Downloaded from RO54xx serie /12
|
|
|
- Θεοφιλά Βικελίδης
- 8 χρόνια πριν
- Προβολές:
Transcript
1 RO54xx serie /12

2 a* b* b a 16b 10a 16* 17a* 17b* 18b 18a 19a 19b 21a 18* 19c 21* 22* 23* 19* 21b 24* 25* 20* 26* 27*

3
4
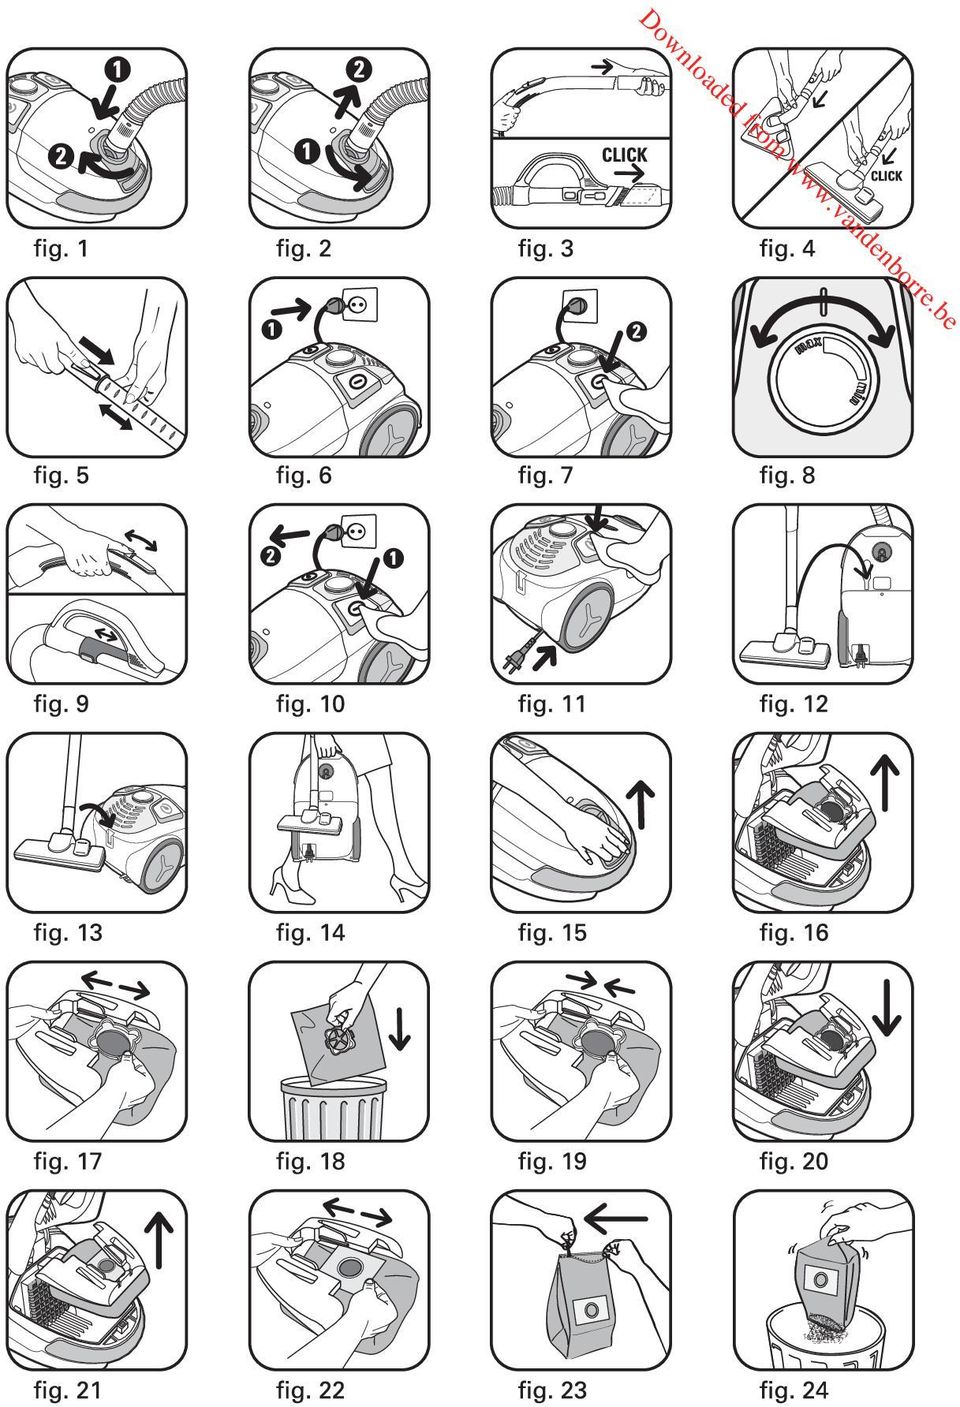
5 CONSEILS DE SÉCURITÉ Pour votre sécurité, cet appareil est conforme aux normes et réglementations applicables (Directives Basse Tension, Compatibilité Electromagnétique, Environnement,...). 1 Conditions d utilisation Votre aspirateur est un appareil électrique : il doit être utilisé dans les conditions normales d utilisation. Utilisez et rangez l appareil hors de portée des enfants. Ne laissez jamais l appareil fonctionner sans surveillance. Ne tenez pas le suceur ou l extrémité du tube à portée des yeux et des oreilles. N aspirez pas de surfaces mouillées à l alcool, de liquides quelle que soit leur nature, de substances chaudes, de substances ultrafines (plâtre, ciment, cendres ), de gros débris tranchants (verre), de produits nocifs (solvants, décapants...), agressifs (acides, nettoyants...), inflammables et explosifs (à base d essence ou d alcool). Ne plongez jamais l appareil dans l eau, ne projetez pas d eau sur l appareil et ne l entreposez pas à l extérieur. N utilisez pas l appareil s il est tombé et présente des détériorations visibles ou des anomalies de fonctionnement. Dans ce cas, n ouvrez pas l appareil, mais envoyez-le au Centre Service Agréé le plus proche ou contactez le service consommateurs Rowenta. Cet appareil n est pas prévu pour être utilisé par des personnes (y compris les enfants) dont les capacités physiques, sensorielles ou mentales sont réduites, ou des personnes dénuées d expérience ou de connaissance, sauf si elles ont pu bénéficier, par l intermédiaire d une personne responsable de leur sécurité, d une surveillance ou d instructions préalables concernant l utilisation de l appareil. Il convient de surveiller les enfants pour s assurer qu ils ne jouent pas avec l appareil. Cet appareil peut être utilisé par des enfants âgés de 8 ans et plus et les personnes manquant d expérience et de connaissances ou dont les capacités physiques, sensorielles ou mentales sont réduites, si elles ont été formées et encadrées quant à l utilisation de manière sûre et connaissent les risques encourus. Les enfants ne doivent pas jouer avec l appareil. Le nettoyage et l entretien par l utilisateur ne doit pas être fait par des enfants à moins qu ils ne soient âgés de 8 et plus et supervisés. Tenir l appareil et son cordon hors de la portée des enfants de moins de 8 ans. 2 Alimentation électrique Vérifiez que la tension d utilisation (voltage) de votre aspirateur corresponde bien à celle de votre installation. Arrêtez et débranchez l appareil en retirant la prise de courant, sans tirer le cordon : - immédiatement après l utilisation, - avant chaque changement d accessoires, - avant chaque nettoyage, entretien ou changement de filtre. N utilisez pas l appareil si le cordon est endommagé. L ensemble enrouleur et cordon de votre aspirateur doit être remplacé impérativement par un Centre Service Agréé Rowenta car des outils spéciaux sont nécessaires pour effectuer toute réparation afin d éviter un danger. 3 Réparations Les réparations ne doivent être effectuées que par des spécialistes avec des pièces détachées d origine. Réparer un appareil soi-même peut constituer un danger pour l utilisateur, la garantie est annulée. FR DESCRIPTION 1 Couvercle 2 Ouverture du couvercle 3 Poignée de transport 4 Pédale enrouleur de cordon 5 Pédale Marche/Arrêt 6 Témoin de changement de sac 7 Ouverture d aspiration 8 Sortie d air 9 Variateur électronique de puissance 10 a - Parking vertical b - Parking horizontal 11 Compartiment sac 12 Support de sac pour sac Wonderbag* ou sac textile* 13 Compartiment cassette filtre (H)EPA* ou cassette Microfiltre* 14 Détecteur de présence de la cassette filtre (H)EPA* ou de la cassette microfiltre* 15 a - Cassette filtre (H)EPA* (réf. ZR004801) adaptée aux sacs Wonderbag* b - Cassette filtre (H)EPA* (réf. RS-RT3734) adaptée aux sacs textile* 16 Cassette Microfiltre* a - Microfiltre (Ref RS-RT3735) b - Mousse de protection du moteur Votre aspirateur est équipé soit d une d une cassette filtre (H)EPA* soit d une cassette microfiltre* 17 a - Sac Wonderbag* UNIVERSAL b - Sac textile* (ref. RS-RT2274) Accessoires 18 Flexible avec crosse standard* a - Crosse standard b - Variateur mécanique de puissance 19 Flexible avec crosse ERGO COMFORT* a - Crosse ergonomique ERGO COMFORT b - Brosse intégrée (EASY BRUSH) c - Variateur mécanique de puissance (POWER CONTROL) 20 Tube télescopique métal standard* * Selon modèles : il s agit d équipements spécifiques à certains modèles ou d accessoires disponibles en option. 1
, de gros débris tranchants (verre),")
6 FR DESCRIPTION 21 Tube télescopique métal ERGO COMFORT* a - Système de verrouillage crosse/tube (LOCK SYSTEM) b - Bouton de réglage du tube 22 Suceur tous sols standard* 23 Suceur tous sols Delta Silence* 24 Suceur fente* 25 Suceur parquet* 26 Turbobrosse* 27 Mini turbobrosse* AVANT LA PREMIÈRE UTILISATION 1 Déballage Déballez et débarrassez votre appareil de toutes les étiquettes éventuelles. Conservez votre bon de garantie et lisez attentivement le mode d emploi avant la première utilisation de votre appareil. 2 Conseils et précautions Avant chaque utilisation, le cordon doit être déroulé complètement. Ne le coincez pas et ne le passez pas sur des arêtes tranchantes. Si vous utilisez une rallonge électrique, assurezvous qu elle est en parfait état et de section adaptée à la puissance de votre aspirateur. Ne débranchez jamais l appareil en tirant sur le cordon. Ne faites jamais fonctionner l aspirateur sans sac et sans système de filtration (cassette). Votre appareil est équipé pour cela d un système de sécurité de présence (14) des cassettes filtre (15a*, 15b*, 16*). Ne déplacez pas l aspirateur en tirant sur le cordon, l appareil doit-être déplacé par sa poignée de transport. N utilisez pas le cordon pour soulever l appareil. Arrêtez et débranchez votre aspirateur après chaque utilisation. Arrêtez et débranchez toujours votre aspirateur avant l entretien ou le nettoyage. N utilisez que des sacs et des filtres d origine Rowenta ou Wonderbag. N utilisez que des accessoires d origine Rowenta. Vérifiez que tous les filtres sont bien en place. En cas de difficultés pour obtenir les accessoires et les filtres pour cet aspirateur, contactez le service consommateurs Rowenta. UTILISATION 1 Assemblage des éléments de l appareil Enfoncez le flexible dans l ouverture d aspiration (fig.1) et tournez jusqu au verrouillage. Pour le retirer, tournez en sens inverse et tirez (Fig 2) Emboîtez le tube télescopique métal (20 ou 21)* à l extrémité de la crosse (18a ou 19a)* (fig.3) (selon modèle) Emboîtez le suceur tous sols (22 ou 23)* (selon modèle) à l extrémité du tube télescopique métal (Fig.4) Réglez le tube télescopique métal à la longueur désirée à l aide du système télescopique (fig.5) Emboîtez l accessoire qui convient à l extrémité du tube télescopique métal ou de la crosse : - Pour les tapis et moquettes : utilisez le suceur tous sols (22 ou23)* en position brosse rentrée ou la Turbobrosse* (fibres et poils d animaux). - Pour les parquets et sols lisses : utilisez le suceur tous sols (22 ou 23)* en position brosse sortie ou, pour un meilleur résultat, utilisez le suceur parquet*. - Pour les recoins et les endroits difficiles : utilisez le suceur fente*. - Pour les meubles et les surfaces fragiles : utilisez la brosse intégrée à la crosse ERGO COMFORT (EASY BRUSH) (selon modèle). IMPORTANT Ne faites jamais fonctionner l aspirateur sans sac et sans système de filtration (cassette). ATTENTION Arrêtez et débranchez toujours votre aspirateur avant de changer d accessoires. 2 Branchement du cordon et mise en marche de l appareil Déroulez complètement le cordon, branchez votre aspirateur (fig.6) et appuyez sur la pédale Marche/Arrêt (fig.7). * Selon modèles : il s agit d équipements spécifiques à certains modèles ou d accessoires disponibles en option. 2

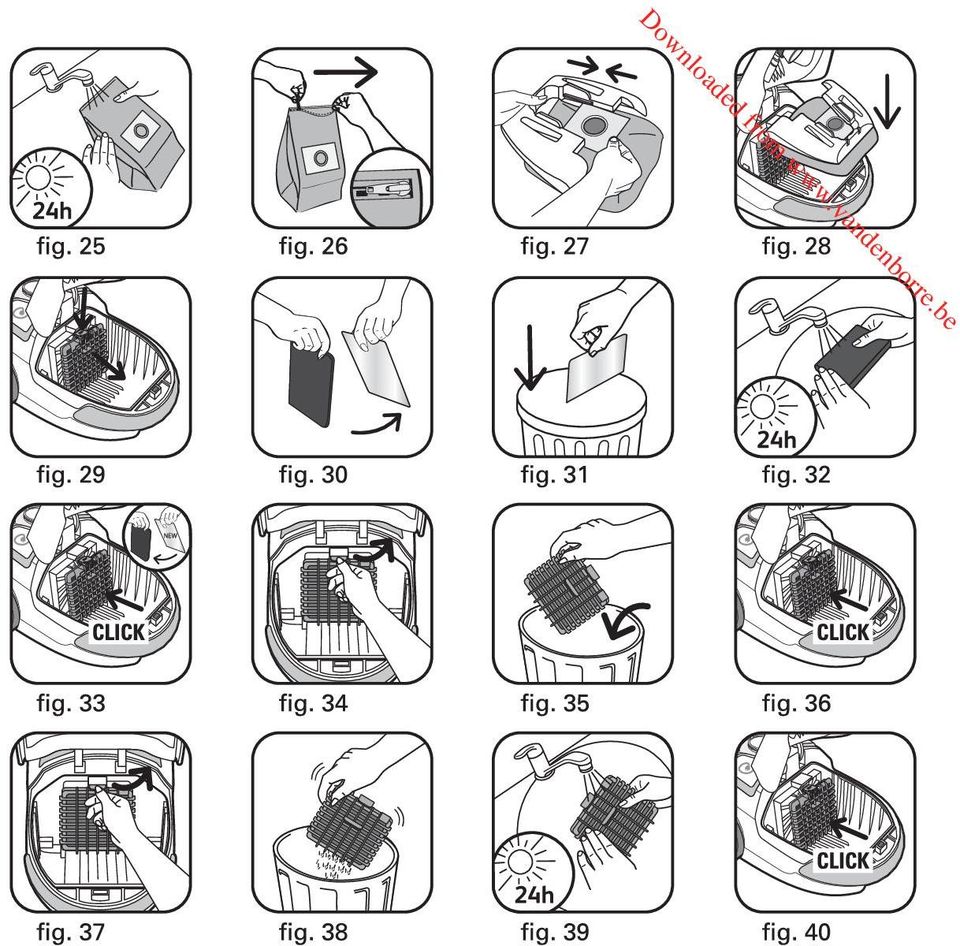
7 UTILISATION Remarque : vous pouvez utiliser votre aspirateur en position horizontale (traîneau) mais également en position verticale, notamment lors de l aspiration des escaliers ou pour dépoussierer les rideaux. Réglez la puissance d aspiration :? avec le variateur électronique de puissance (fig.8)? avec le variateur mécanique de puissance de la crosse : ouvrez le volet du curseur de régulation pour diminuer manuellement la puissance d aspiration et éviter que le suceur ne reste «collé» à la surface aspirée (fig.9) ex : voilages, surfaces fragiles Si votre modèle est équipé de la crosse ERGO COMFORT*, ouvrez le volet du curseur de régulation selon l usage : Position (MIN) pour l aspiration des tissus délicats (voilages, textiles) Position Position (Moyenne) pour l aspiration quotidienne de tous types de sols, en cas de faible salissure (MAX) pour l aspiration des sols durs et des tapis et moquettes en cas de fort encrassement 3 Rangement et transport de l appareil Après utilisation, arrêtez votre aspirateur en appuyant sur la pédale Marche/Arrêt et débranchez-le (fig.10). Rangez le cordon en appuyant sur la pédale enrouleur de cordon (fig.11). En position verticale, placez le suceur dans la position parking (fig.12). En position horizontale, placez le suceur dans la position parking (Fig.13) Vous pourrez ainsi transporter et ranger votre aspirateur en position parking (fig.14). FR NETTOYAGE ET MAINTENANCE L air que nous respirons contient des particules qui peuvent être allergènes : les larves et déjections d acariens, les moisissures, le pollen, les fumées et les résidus animaux (poils, peau, salive, urine). Les particules les plus fines pénètrent profondément dans l appareil respiratoire où elles peuvent provoquer une inflammation et altérer la fonction respiratoire dans son ensemble. Les filtres (H)EPA (High) Efficiency Particulate Air Filter, c est-à-dire filtres de (Haute) Efficacité pour les Particules Aériennes, permettent de retenir les particules les plus fines. Grâce au filtre (H)EPA, l air rejeté dans la pièce est plus sain que l air aspiré. IMPORTANT Arrêtez et débranchez toujours votre aspirateur avant son entretien. 1 Changez de sac Le témoin de changement de sac vous indique que le sac est plein ou saturé. Si vous constatez une diminution de l efficacité de votre appareil, réglez la puissance au maximum et maintenez le suceur levé au-dessus du sol. Si le témoin reste rouge, remplacez le sac. a) Si votre aspirateur est équipé d un sac Wonderbag* (17a) : IMPORTANT Les sacs Wonderbag* UNIVERSAL sont disponibles chez votre revendeur ou dans les Centres Service Agréés. ATTENTION Les sacs Wonderbag* COMPACT ne sont pas utilisables sur cet appareil. Leur utilisation endommagerait l appareil et annulerait la garantie. Retirez le flexible de l ouverture d aspiration (Fig 2) Ouvrez le couvercle de votre aspirateur (fig.15). Retirez le support de sac du compartiment sac (fig.16). Retirez le sac Wonderbag* du support de sac (fig.17). Jetez le sac Wonderbag* dans une poubelle (fig.18). Positionnez un nouveau sac Wonderbag* dans le support sac grâce à sa bague (fig.19). Déployez le sac et placez le support de sac dans le compartiment sac (fig.20). Assurez-vous du bon positionnement du sac et du support de sac avant de refermer le couvercle. IMPORTANT Ne réutilisez pas le sac Wonderbag, il s agit d un sac à usage unique. b) Si votre aspirateur est équipé d un sac textile* (17b) : Les sacs textile* (réf. RS-RT2274) sont disponibles dans les Centres Service Agréés. Retirez le flexible de l ouverture d aspiration (Fig 2) Ouvrez le couvercle de votre aspirateur (fig.15). Retirez le support de sac du compartiment sac (fig.21). Retirez le sac textile* du support de sac (fig.22). Ouvrez le sac textile* à l aide du zip (fig.23) puis videz-le au dessus d une poubelle (fig.24). Nettoyez le sac à l'eau claire et laissez le sécher au moins 24h (Fig 25) (ne replacez le sac que s'il est parfaitement sec) Refermez le sac textile : veillez à ce que le zip soit fermé complètement (fig 26) avant de remettre le sac dans l appareil. Repositionnez le sac textile* sur le support de sac grâce à sa cartonnette (fig.27), déployez le sac et placez le support de sac dans le compartiment sac (fig.28). Assurez-vous du bon positionnement du sac avant de refermer le couvercle. IMPORTANT Ne faites jamais fonctionner l aspirateur sans un sac. * Selon modèles : il s agit d équipements spécifiques à certains modèles ou d accessoires disponibles en option. 3

8 FR NETTOYAGE ET MAINTENANCE 2 Changez le microfiltre* (ref RS-RT3735) IMPORTANT Remplacez le microfiltre tous les 6 changements de sac Le Microfiltre* Ref. RS-RT3735 est disponible chez votre revendeur ou dans les Centres Service Agréés. Ouvrez le couvercle de votre aspirateur (fig.15). Retirez le sac Wonderbag (fig.16), puis retirez la cassette microfiltre* (fig.29) comprenant le microfiltre (16a) et la mousse de protection du moteur (16b). Séparez la mousse (16b) du microfiltre (16a) (fig.30). Jetez le microfiltre dans une poubelle (fig 31) et remplacez le par un nouveau microfiltre. Lavez la mousse de protection du moteur (16b) avec de l eau savoneuse tiède, rincez et laissez sécher au moins 12h avant de la mettre en place (fig 32). Une fois sèche, replacez-la par dessus le microfiltre (16a) puis replacez la cassette microfiltre* (16) dans son compartiment (fig.33). Remettez le sac Wonderbag en place (fig.20). Assurez-vous du bon positionnement de la cassette microfiltre* avant de refermer le couvercle. IMPORTANT Ne faites jamais fonctionner l aspirateur sans une cassette filtre. Votre appareil est équipé pour cela d un système de sécurité de présence de cassette filtre (le couvercle ne pourra pas se fermer si vous n avez pas installé une cassette filtre). 3 Changez la cassette filtre (H)EPA* (réf. ZR )* (pour les appareils équipés d un sac Wonderbag*) IMPORTANT Remplacez le système de filtration une fois par an. La cassette filtre (H)EPA* réf. ZR * est disponible chez votre revendeur ou dans les Centres Service Agréés. Ouvrez le couvercle de votre aspirateur (fig.15). Retirez le support sac du compartiment sac (fig.16), ensuite retirez la cassette filtre (H)EPA* (fig.34) et jetez la cassette dans une poubelle (fig.35). Replacez la nouvelle cassette filtre (H)EPA* (réf. ZR *) dans son compartiment (fig.36). Remettez le support de sac dans le compartiment (fig.20). Assurez-vous du bon positionnement de la cassette filtre (H)EPA* avant de refermer le couvercle. 4 Lavez la cassette filtre HEPA* (réf. RS-RT3734*) (pour les appareils équipés d un sac textile*) ATTENTION! Ce nettoyage est exclusivement réservé à la cassette filtre (H)EPA adaptée aux sacs textile. La cassette filtre (H)EPA* réf. RS-RT3734* est disponible chez votre revendeur ou dans les Centres Service Agréés. Ouvrez le couvercle de votre aspirateur (fig.15). Retirez le support de sac du compartiment (fig 21), puis retirez ensuite la cassette filtre (H)EPA* (fig.37). Tapotez la cassette filtre (H)EPA* au dessus d une poubelle (fig.38). Passez-la ensuite sous l eau claire et laissez sécher au moins 24h. (fig.39) Veillez à ce que la cassette filtre HEPA* (15b) soit bien sèche avant de la remettre en place. Replacez la cassette filtre (H)EPA* dans son compartiment (fig.40). Remettez le support de sac avec le sac textile* dans le compartiment sac (fig 29) Assurez-vous du bon positionnement de la cassette filtre (H)EPA* avant de refermer le couvercle. IMPORTANT Ne faites jamais fonctionner l aspirateur sans une cassette filtre. Votre appareil est équipé pour cela d un système de sécurité de présence de cassette filtre (le couvercle ne pourra pas se fermer si vous n avez pas installé une cassette filtre). 5 Nettoyez votre aspirateur Essuyez le corps et les accessoires de votre appareil avec un chiffon doux. N utilisez pas de produits détergents, agressifs ou abrasifs. * Selon modèles : il s agit d équipements spécifiques à certains modèles ou d accessoires disponibles en option. 4
 et remplacez le par un nouveau microfiltre.")
9 DÉPANNAGE IMPORTANT Dés que votre aspirateur fonctionne moins bien et avant toute vérification, arrêtez-le en appuyant sur la pédale Marche/Arrêt. Si votre aspirateur ne démarre pas L appareil n est pas alimenté. Vérifiez que l appareil est correctement branché. Si votre aspirateur n aspire pas Un accessoire ou le flexible est bouché : débouchez l accessoire ou le flexible. Le couvercle est mal fermé : vérifiez la mise en place du sac, du support de sac et de la cassette filtre et refermez le couvercle. Si votre aspirateur aspire moins bien, fait du bruit, siffle Un accessoire ou le flexible est partiellement bouché : débouchez l accessoire ou le flexible. Le sac est plein ou saturé par des poussières fines : remplacez le sac Wonderbag* (17a) ou videz le sac textile* (17b). Le système de filtration est saturé : - Cassette filtre (H)EPA* : changez la cassette filtre (H)EPA* (réf. ZR004801*) et replacez-la dans son logement ou nettoyez la cassette filtre (H)EPA* (réf. RS-RT3734*) selon la procédure. - Microfiltre* : retirez le microfiltre (16a) et remplacez-le par un nouveau (Ref RS-RT3735). Le variateur mécanique de puissance est ouvert : fermez le variateur mécanique de puissance de la crosse. Si le témoin de changement de sac reste Rouge Le sac est saturé : remplacez le sac Wonderbag* (17a) ou videz le sac textile* (17b). Si le couvercle ne se ferme pas (action du détecteur de présence 14) Vérifiez la présence de la cassette filtre (H)EPA* (15a ou 15b) ou de la cassette microfiltre* (16) et/ou leur bon positionnement. Si le suceur est difficile à déplacer Diminuez la puissance en ouvrant le variateur mécanique de puissance de la crosse (18b ou 19b)* ou en déplaçant le variateur électronique de puissance (9) vers la position MIN. Vérifiez que la position du suceur (22 ou 23)* soit adaptée au sol aspiré : - pour les tapis et moquettes, utilisez le suceur en position brosse rentrée, - pour les parquets et sols lisses, utilisez le suceur en position brosse sortie. Si le cordon ne rentre pas totalement Le cordon est ralenti lors de sa rentrée : ressortez le cordon et appuyez sur la pédale enrouleur de cordon. Si un problème persiste, confiez votre aspirateur au Centre Service Agréé Rowenta le plus proche ou contactez le service consommateur Rowenta. FR GARANTIE Cet appareil est uniquement réservé à un usage ménager et domestique ; en cas d utilisation non appropriée ou non conforme au mode d emploi, aucune responsabilité ne peut engager la marque et la garantie est annulée. Lisez attentivement le mode d emploi avant la première utilisation de votre appareil: une utilisation non conforme au mode d emploi dégagerait Rowenta de toute responsabilité. * Selon modèles : il s agit d équipements spécifiques à certains modèles ou d accessoires disponibles en option. 5

10 FR OÙ ACHETER LES ACCESSOIRES ACCESSOIRES* UTILISATION MISE EN PLACE DE L ACCESSOIRE Sac Wonderbag UNIVERSAL Sac universel Installez la bague sur le support de sac. LIEUX D ACHAT Brosse ameublement Pour nettoyer les meubles. Fixez la brosse ameublement à l extrémité de la crosse. Suceur fente Pour accéder aux recoins et aux endroits difficiles d accès. Emboîter le suceur fente à l extrémité de la crosse ou du tube Suceur parquet Pour les sols fragiles. Emboîtez le suceur parquet à l extrémité du tube. Centres service Agréés Rowenta Mini turbobrosse Pour nettoyer en profondeur les tissus d ameublement. Emboîtez la mini turbobrosse à l extrémité du tube. Turbobrosse Pour enlever les fils et poils d animaux incrustés dans les tapis et moquettes. Emboîtez la turbobrosse à l extrémité du tube. ENVIRONNEMENT Conformément à la réglementation en vigueur, tout appareil hors d usage doit être rendu définitivement inutilisable : débranchez et coupez le cordon avant de jeter l appareil. Participons à la protection de l environnement! Votre appareil contient de nombreux matériaux valorisables ou recyclables. Confiez celui-ci dans un point de collecte pour que son traitement soit effectué. * Selon modèles : il s agit d équipements spécifiques à certains modèles ou d accessoires disponibles en option. 6

11 SAFETY TIPS For your safety, this appliance conforms to all applicable standards and regulations (Low Voltage Directives, Electromagnetic Compatibility, Environment etc.). 1 Conditions of use Your vacuum cleaner is an electrical appliance: It must be used under normal operating conditions. Always use and store the appliance out of the reach of children. Never leave the appliance unattended when switched on. Always keep the nozzle and the end of the hose well away from the eyes and ears. Do not vacuum surfaces that are wet with alcohol, liquids of any sort, or that are covered with hot substances, ultrafine substances (plaster, cement, ashes etc.), large sharp debris (glass), harmful products (solvents, caustic substances etc), aggressive products (acids, cleaners, etc.), inflammable and explosive products (petrol or alcohol based). Never immerse the appliance in water, splash it with water, or store it outside. Do not use the appliance if it has been dropped and shows signs of damage or functions abnormally. In this case, do not open the appliance, but either send it to your nearest Approved Service Centre or contact Rowenta customer services. This appliance is not designed to be used by people (including children) with limited physical, sensory or mental capacities, or by people lacking appropriate knowledge or experience, unless they are supervised by an adult responsible for their safety, or receive instructions concerning safe use of the appliance prior to use. Children must be supervised at all times to ensure that they do not play with the appliance. This appliance may be used by children aged 8 or over, and by persons lacking appropriate knowledge and experience or whose physical, sensory or mental capacities are limited, provided that they are supervised, have received instruction in the safe use of the appliance, and are fully aware of the risks involved. Children must not be allowed to play with the appliance. Home cleaning and maintenance of the appliance must not be carried out by children unless they are aged 8 or over and are supervised. Always keep the appliance and power cord out of reach of children under 8 years. 2 Power supply Check that the voltage of your vacuum cleaner corresponds to the voltage of your home wiring. Switch off and unplug the appliance by removing the plug from the socket, without tugging on the power cord: - immediately after use, - before changing the accessories, - before cleaning, maintenance, or changing the filter. Do not use the appliance if the power cord is damaged. Your vacuum cleaner s power cord and cord rewind system must be replaced by an Approved Rowenta Service Centre since special tools are required in order to ensure that repairs are carried out safely. 3 Repairs Repairs should only be carried out by an Approved Rowenta Service Centre using original replacement parts. Repairing an appliance at home can be dangerous for the user and will invalidate the guarantee. EN DESCRIPTION 1 Cover 2 Cover opening clip 3 Transport handle 4 Power cord rewind pedal 5 On/Off pedal 6 Dust bag full indicator 7 Suction opening 8 Air outlet 9 Electric power regulator 10 a - Vertical parking b - Horizontal parking 11 Dust bag compartment 12 Dust bag support for Wonderbag* or textile bag* 13 Compartment for (H)EPA* filter cartridge or Microfilter* cartridge 14 (H)EPA* filter cartridge or Microfilter cartridge detector 15 a - (H)EPA* filter cartridge (ref. ZR004801) adapted for the Wonderbag* dust bags b - (H)EPA* filter cartridge (ref. RS-RT3734) adapted for textile bags* 16 Microfilter* cartridge a - Microfilter (Ref. RS-RT3735) b - Motor protection foam Your vacuum cleaner is fitted either with a (H)EPA* filter cartridge or a Microfilter* cartridge 17 a - UNIVERSAL Wonderbag* dust bag b - Textile dust bag* (ref. RS-RT2274) Accessories 18 Hose with standard* handle a - Standard handle b - Mechanical power regulator 19 Hose with ERGO COMFORT* handle a - Ergonomic ERGO COMFORT handle b - Built-in brush (EASY BRUSH) c - Mechanical power regulator (POWER CONTROL) 20 Standard* metal telescopic tube *Depending on model: equipment specific to certain models or optional accessories. 7

12 EN DESCRIPTION 21 ERGO COMFORT* metal telescopic tube a - Handle/tube locking system (LOCK SYSTEM) b - Tube adjustment button 22 Standard* all surface floor nozzle 23 Delta Silence* all surface floor nozzle 24 Crevice tool* 25 Parquet floor nozzle* 26 Turbo brush* 27 Mini turbo brush* BEFORE USE 1 Unpacking Unpack your appliance and remove any stickers. Keep your guarantee in a safe place and read the instructions carefully before using your appliance for the first time. 2 Hints and precautions The power cord should be unwound completely before using the appliance. Do not snag or pinch the power cord, and avoid trailing it over sharp edges. If you use an extension cord, ensure that it is in perfect condition and appropriate to the power rating of your vacuum cleaner. Never unplug your appliance by pulling on the power cord. Never use your vacuum cleaner without a dust bag and filtration system (cartridge). To avoid the above, your appliance is equipped with a security system (14) to detect the presence of filter cartridges (15a*, 15b*, 16*). Never move the vacuum cleaner by pulling the power cord, the appliance should always be moved using the transport handle. Do not use the power cord to lift the appliance. Switch off and unplug your vacuum cleaner after use. Always switch off and unplug your vacuum cleaner for maintenance or cleaning. Only use genuine Rowenta or Wonderbag dust bags and filters. Only use genuine Rowenta accessories. Check that all the filters are correctly installed. If you have any difficulty obtaining accessories and filters for this vacuum cleaner, contact Rowenta customer services. VACUUMING 1 Assembling the parts of the appliance Slot the hose into the suction opening (fig.1) and turn until it locks. To remove, turn in the opposite direction and pull (Fig 2) Slide the metal telescopic tube (20 or 21)* onto the end of the handle (18a or 19a)* (fig.3) (depending on model) Fit the floor nozzle (22 or 23)* (depending on model) to the end of the metal telescopic tube (Fig.4) Set the metal telescopic tube to the required length using the telescopic adjustment system (fig.5) Fit the appropriate accessory to the end of the metal telescopic tube or the handle: - For rugs and carpets: use the all surface floor nozzle (22 or 23)* in the brush retracted or Turbo brush* position (fibres and animal hair). - For parquet and smooth flooring: use the all surface floor nozzle (22 or 23)* in brush extended position, or for best results use the parquet floor nozzle*. - For corners and difficult areas: use the crevice tool*. - For furniture and fragile surfaces: use the built-in brush ERGO COMFORT (EASY BRUSH) (depending on model). IMPORTANT: Never use the vacuum cleaner without a dust bag and filter (cartridge) WARNING: Always switch off and unplug your vacuum cleaner before changing the accessories. 2 Plugging in the power cord and switching on the appliance Completely unwind the power cord, plug in your vacuum cleaner (fig.6) and press the On/Off pedal (fig.7). *Depending on model: equipment specific to certain models or optional accessories. 8

13 VACUUMING Note: you can use your vacuum cleaner in a horizontal position or in a vertical position, particularly for vacuuming stairs or curtains. Adjusting suction power:? with the electric power regulator (fig.8)? with the mechanical power regulator on the handle: Slide open the mechanical adjuster to manually reduce suction power and avoid allowing the nozzle to remain stuck to the surface being cleaned (fig.9) eg. net curtains, fragile surfaces etc. If your model is equipped with the ERGO COMFORT* handle, open the regulator as appropriate: Position (MIN) for vacuuming delicate textiles (net curtains, textiles) Position Position (Medium) for the daily cleaning of all lightly soiled floor surfaces (MAX) for vacuuming hard floor surfaces and heavily soiled rugs and carpets 3 Storing and transporting the appliance After use, switch off your vacuum cleaner by pressing the On/Off pedal, and unplug (fig.10). Retract the power cord by pressing the power cord rewind pedal (fig.11). In a vertical position, place the nozzle in the parking position (fig.12). In a horizontal position, place the nozzle in the parking position (Fig.13) You can now transport and store your vacuum cleaner in the parking position (fig.14). EN CLEANING AND MAINTENANCE The air that we breathe contains particles that may be allergenic: the larvae and excrement of dust mites, mould spores, pollen, smoke and animal residues (hair, skin, saliva, urine). The finest particles can penetrate deeply into the respiratory system, where they can lead to inflammation and trigger general deterioration of the entire respiratory system. The (H)EPA (High) Efficiency Particulate Air Filter system effectively traps the very finest of particles. Thanks to the (H)EPA filter, the air returned to the room is healthier than the air initially sucked into the vacuum cleaner. IMPORTANT: Always switch off and unplug your vacuum cleaner for maintenance. 1 Changing the dust bag The dust bag full indicator lets you know that the dust bag is full or saturated. If you observe a reduction in the efficiency of your appliance, set the power to maximum and hold the nozzle above the floor. If the indicator stays red, change the dust bag. a) If your vacuum cleaner is equipped with a Wonderbag* (17a) : IMPORTANT: UNIVERSAL Wonderbag* dust bags are available from your retailer or from Approved Service Centres. CAUTION: COMPACT Wonderbag* dust bags cannot be used in this appliance. Using them will damage the appliance and invalidate the guarantee. Remove the hose from the suction opening (Fig 2) Open the cover of your vacuum cleaner (fig.15). Remove the bag support from the bag compartment (fig.16). Remove the Wonderbag* from the bag support (fig.17). Dispose of the Wonderbag* in a dustbin (fig.18). Position a new Wonderbag* in the bag support using the ring (fig.19). Open out the bag and insert the bag support in the bag compartment (fig.20). Check that both the bag and the bag support are correctly positioned before closing the cover. IMPORTANT: Wonderbags are intended for single use only and should never be reused. b) If your vacuum is equipped with textile bag* (17b): Textile bags* (ref. RS-RT2274) are available from Approved Service Centres. Remove the hose from the suction opening (Fig 2) Open the cover of your vacuum cleaner (fig.15). Remove the bag support from the bag compartment (fig.21). Remove the textile bag* from the bag support (fig.22). Open the textile bag* with the zip (fig.23) then empty it into a dustbin (fig.24). Clean the bag with fresh water and leave it to dry for at least 24 hrs (Fig 25) (do not replace the bag until completely dry) Reseal the textile bag: ensure that the zip is completely closed (fig 26) before returning the bag to the appliance. Reposition the textile bag* on the bag support using the card flap (fig.27), open out the bag and insert the bag support in the bag compartment (fig.28). Check that the bag is correctly positioned before closing the cover. IMPORTANT: Never operate the vacuum cleaner without a bag. *Depending on model: equipment specific to certain models or optional accessories. 9
 eg. net curtains, fragile surfaces etc.")
14 EN CLEANING AND MAINTENANCE 2 Changing the microfilter* (ref RS-RT3735) IMPORTANT: Replace the microfilter every six bag changes. Microfilters* Ref. RS-RT3735 are available from your retailer or from Approved Service Centres. Open the cover of your vacuum cleaner (fig.15). Remove the Wonderbag (fig.16), and then remove the microfilter* cartridge (fig.29) including the microfilter (16a) and the motor protection foam (16b). Separate the foam (16b) from the microfilter (16a) (fig.30). Dispose of the microfilter in a dustbin (fig 31) and replace it with a new microfilter. Wash the motor protection foam (16b) in warm soapy water, rinse it and leave it to dry for at least 12 hrs before returning it to the appliance (fig 32). When dry, reposition it above the microfilter (16a) and then replace the microfilter* cartridge (16) in its compartment (fig.33). Replace the Wonderbag (fig.20). Check that the microfilter* cartridge is correctly positioned before closing the cover. IMPORTANT: never operate the vacuum cleaner without a filter cartridge. To avoid the above, your appliance is equipped with a security system to detect the presence of filter cartridges (the cover cannot be closed unless you have installed a filter cartridge). 3 Changing the (H)EPA* filter cartridge (ref. ZR )* (for appliances fitted with a Wonderbag*) IMPORTANT: Replace the filtration system once a year. (H)EPA* filter cartridges ref. ZR * are available from your retailer or from Approved Service Centres. Open the cover of your vacuum cleaner (fig.15). Remove the bag support from the bag compartment (fig.16), then remove the (H)EPA* filter cartridge (fig.34) and dispose of the cartridge in a dustbin (fig.35). Place the new (H)EPA* filter cartridge (ref. ZR *) in its compartment (fig.36). Return the bag support to the compartment (fig.20). Check that the (H)EPA* filter cartridge is correctly positioned before closing the cover. 4 Cleaning the HEPA* filter cartridge (ref. RS-RT3734*) (for appliances fitted with a textile bag*) CAUTION! This cleaning process is solely for the (H)EPA* filter cartridge adapted for use with the textile bags. (H)EPA* filter cartridges ref. RS-RT3734* are available from your retailer or from Approved Service Centres. Open the cover of your vacuum cleaner (fig.15). Remove the bag support from the compartment (fig 21), then remove the (H)EPA* filter cartridge (fig.37). Tap the (H)EPA* filter cartridge over a dustbin (fig.38). Wash it with fresh water and leave it to dry for at least 24 hrs. (fig.39) Ensure that the (H)EPA* filter cartridge is completely dry before replacing in the appliance. Replace the (H)EPA* filter cartridge in its compartment (fig.40). Replace the bag support with the textile bag* in the bag compartment (fig 29) Check that the (H)EPA* filter cartridge is correctly positioned before closing the cover. IMPORTANT: Never operate the vacuum cleaner without a filter cartridge. To avoid the above, your appliance is equipped with a security system to detect the presence of filter cartridges (the cover cannot be closed unless you have inserted a filter cartridge). 5 Cleaning your vacuum cleaner Wipe the vacuum cleaner and the accessories with a soft cloth. Do not use strong, detergent or abrasive cleaning products. *Depending on model: equipment specific to certain models or optional accessories. 10
 and replace it with a new microfilter.")
15 REPAIRS IMPORTANT: If you observe any reduction in your vacuum s performance, always switch it off using the On/Off pedal before checking. If the dust bag full indicator stays red The bag is saturated: replace the Wonderbag* (17a) or empty the textile bag* (17b). EN If your vacuum cleaner won t start There is no power supply. Check that the appliance is plugged in correctly. If your vacuum cleaner won t suck The hose or an accessory is blocked: unblock the accessory or hose. The cover isn t closed properly: check the positioning of the bag, the bag support and the filter cartridge, and then close the cover again. If your vacuum cleaner loses power, functions noisily, whistles An accessory or the hose is partially blocked: unblock the accessory or hose. The bag is full or saturated with fine dust: replace the Wonderbag* (17a) or empty the textile bag* (17b). The filtration system is saturated: - (H)EPA* filter cartridge: change the (H)EPA* filter cartridge (ref. ZR004801*) and replace in its compartment or clean the (H)EPA* filter cartridge (ref. RS-RT3734*) according to instructions. - Microfilter*: remove the microfilter (16a) and replace it with a new one (Ref RS-RT3735). The mechanical power regulator (19c) vent is open: close the vent. If the cover doesn t close (effect of the detector 14) Check that there is a (H)EPA* filter cartridge (15a or 15b) or a microfilter cartridge* (16) and/or their correct positioning. If the nozzle is difficult to move Reduce the power by opening the mechanical power regulator on the handle (18b or 19b)* or by moving the electric power regulator (9) towards the MIN position. Check that the nozzle position (22 or 23)* is appropriate for the floor surface: - for rugs and carpets, use the nozzle with the brush in the retracted position, - for parquet and smooth flooring, use the nozzle with the brush out. If the power cord will not rewind completely The power cord slowed down as it rewound: pull the cord out again and press the power cord rewind pedal again. If a problem persists, take your vacuum cleaner to your nearest Rowenta Approved Service Centre or contact Rowenta customer services. GUARANTEE This product has been designed for domestic use only. Any commercial use, inappropriate use or failure to comply with the instructions, the manufacturer accepts no responsibility and the guarantee will not apply. Read the instructions carefully before using your appliance for the first time: any use that does not comply with the instructions will release Rowenta from any responsibility. *Depending on model: equipment specific to certain models or optional accessories. 11

16 EN WHERE TO PURCHASE ACCESSORIES ACCESSORIES* USE FITTING THE ACCESSORY UNIVERSAL Wonderbag Universal dust bag. Fit the ring to the bag support WHERE TO BUY Furniture brush For cleaning furniture. Fix the furniture brush to the end of the handle. Crevice tool For cleaning difficult to get to nooks and crannies. Slide the crevice tool onto the end of the handle or the tube. Parquet floor nozzle For fragile flooring. Slide the parquet floor nozzle onto the end of the tube. Approved Rowenta Service Centres Mini Turbo Brush For deep cleaning furniture textiles. Slide the mini turbo brush onto the end of the tube. Turbo Brush For removing threads and animal hairs incrusted in rugs and carpets. Slide the turbo brush onto the end of the tube. ENVIRONMENT In accordance with current regulations, all appliances to be scrapped must be permanently disabled: unplug the appliance and cut off the power cord before disposing of the appliance. Let s work together to protect the environment! Your appliance contains valuable materials which can be recovered or recycled. Leave it at a local civic waste collection point. *Depending on model: equipment specific to certain models or optional accessories. 12

17 SICHERHEITSHINWEISE Um Ihre Sicherheit zu gewährleisten, entspricht dieses Gerät den geltenden Normen und Verordnungen (Niederspannung, elektromagnetische Verträglichkeit, Umweltschutz usw.). 1 Gebrauchsbedingungen Bei Ihrem Staubsauger handelt es sich um ein Elektrogerät, er muss unter normalen Einsatzbedingungen benutzt werden. Dieses Gerät muss außerhalb der Reichweite von Kindern benutzt und aufbewahrt werden. Lassen Sie das Gerät nie unbeaufsichtigt in Betrieb. Achten Sie darauf, dass die Bodendüse, der Schlauch oder das Rohrendstück nicht in die Nähe des Kopfes gelangt. Benutzen Sie den Staubsauger nicht auf nassen Oberflächen mit Alkohol, Flüssigkeiten jeder Art, für warme Substanzen, superfeines Material (Gips, Zement, Asche usw.), scharfe Bruchstücke (Glas), giftige Produkte (Lösungsmittel, Beize usw.), ätzende Substanzen (Säure, Reinigungsmittel usw.), entzündliche oder explosive Substanzen (auf Benzin- oder Alkoholbasis). Tauchen Sie das Gerät nie in Wasser, setzen Sie es keinen Flüssigkeitsspritzern aus und bewahren Sie es nicht im Freien auf. Benutzen Sie das Gerät nicht, wenn es heruntergefallen ist und sichtbare Schäden oder Betriebsstörungen aufweist. Öffnen Sie das Gerät in einem solchen Fall nicht, sondern bringen Sie es zu Ihrem autorisierten Kundendienst oder wenden Sie sich an den Kundenservice von Rowenta. Dieses Gerät ist nicht zur Benutzung durch Personen (einschließlich Kindern) mit eingeschränkten körperlichen, sensorischen oder geistigen Fähigkeiten oder durch Personen ohne entsprechende Erfahrung oder Kenntnisse vorgesehen, es sei denn, sie werden von einer Person, die für ihre Sicherheit verantwortlich ist, beaufsichtigt oder haben von BESCHREIBUNG 1 Deckel 2 Deckelöffnung 3 Transportgriff 4 Schalter Automatische Kabelaufwicklung 5 Ein-/ Aus-Schalter 6 Anzeigelampe für Filterwechsel 7 Saugöffnung 8 Luftauslass 9 Elektronischer Leistungsregler 10 a - Parkstellung vertikal b - Parkstellung horizontal 11 Beutelfach 12 Aufnahme für Wonderbag-Beutel* oder Textilbeutel* 13 Fach für HEPA-Filtereinsatz* oder Mikrofiltereinsatz* 14 Detektor für vorhandenen HEPA-Filtereinsatz* oder Mikrofiltereinsatz* 15 a - HEPA-Filtereinsatz* (Nr. ZR004801) geeignet für Wonderbag-Beutel* dieser zuvor Anweisungen zum Gebrauch des Geräts erhalten. Es muss vermieden werden, dass Kinder mit dem Gerät spielen. Dieses Gerät darf von Kindern in einem Alter ab acht Jahren und von Personen mit verringerten körperlichen, sensoriellen oder mentalen Fähigkeiten benutzt werden, wenn sie Anweisungen in Bezug auf eine absolut sichere Benutzung des Geräts erhalten, wenn wenn sie betreut werden und die Risiken erkennen. Kinder dürfen nicht mit dem Gerät spielen. Die Reinigung und Wartung, die der Benutzer ausführen soll, darf nicht von Kindern ausgeführt werden, es sei denn, sie sind mindestens 8 Jahre alt und werden überwacht. Das Gerät und sein Netzkabel müssen außerhalb der Reichweite von Kindern unter 8 Jahren aufbewahrt werden. 2 Netzanschluss Überprüfen Sie, dass die Netzspannung Ihres Staubsaugers der Spannung Ihres Stromnetzes entspricht. Schalten Sie das Gerät aus, und ziehen Sie den Netzstecker aus der Steckdose (nicht am Kabel ziehen): - sofort nach der Benutzung, - vor einem Wechsel der Zubehörelemente, - vor jeder Reinigung, Wartung oder einem Filterwechsel. Benutzen Sie das Gerät nicht, wenn das Netzkabel beschädigt ist. Die Einheit aus Aufrollautomatik und Netzkabel muss bei einem offiziellen Rowenta-Kundendienst ersetzt werden, weil hierzu Spezialwerkzeug erforderlich ist, um jegliche Gefahren auszuschließen. 3 Reparaturen Reparaturen dürfen nur vom Fachmann mit Original- Ersatzteilen ausgeführt werden. Wenn sie das Gerät selbst reparieren, kann dies eine Gefahr für den Benutzer darstellen, und die Garantie entfällt. b - HEPA-Filtereinsatz* (Nr. RS-RT3734) geeignet für Textilbeutel* 16 Mikrofiltereinsatz* a - Mikrofilter (Nr. RS-RT3735) b - Motorschutz-Schaumstoff Ihr Staubsauger verfügt über einen HEPA-Filtereinsatz* oder über einen Mikrofiltereinsatz* 17 a - Wonderbag-Beutel* UNIVERSAL b - Textilbeutel* (Nr. RS-RT2274) Zubehör: 18 Schauch mit Standardgriff* a - Standardgriff b - Fehlluftregler 19 Schlauch mit ERGO COMFORT GRIFF* a - Ergonomischer ERGO COMFORT GRIFF b - Integrierte Bürste (EASY BRUSH) c - Fehlluftregler (POWER CONTROL) 20 Standard-Teleskoprohr aus Metall* DE * Je nach Modell: Dies sind spezifische Ausstattungen des jeweiligen Modells oder als Option erhältliches Zubehör. 13

18 DE 21 Metall-Teleskoprohr ERGO COMFORT* a - Verriegelungssystem Griff/ Rohr (LOCK SYSTEM) b - Verstelltaste des Rohrs 22 Standard-Bodensaugdüse* 23 Bodensaugdüse Delta Silence* 24 Fugendüse* 25 Parkett-Saugdüse* 26 Maxi-Turbobürste* 27 Mini-Turbobürste* VOR DER ERSTEN BENUTZUNG 1 Auspacken Packen Sie Ihr Gerät aus und entfernen Sie alle Etiketten, die vorhanden sein können. Bewahren Sie Ihren Garantieschein auf, und lesen Sie die Bedienungsanleitung vor der ersten Inbetriebnahme Ihres Geräts aufmerksam durch. 2 Tipps und Vorsichtsmaßnahmen Das Netzkabel muss vor jeder Benutzung vollständig ausgerollt werden. Achten Sie darauf, dass das Kabel nicht eingeklemmt oder über scharfe Kanten geführt wird. Wenn Sie ein Verlängerungskabel verwenden, müssen Sie dessen guten Zustand kontrollieren, und ob es für die Leistung Ihres Staubsaugers geeignet ist. Ziehen Sie zum Trennen des Geräts vom Stromnetz nicht am Kabel. Benutzen Sie den Staubsauger nie ohne Beutel oder ohne Filtersystem (Filtereinsatz). Ihr Gerät verfügt hierzu über einen Sicherheitsdetektor (14), der vorhandene Filtereinsätze (15a*, 15b*, 16*) erkennt. Bewegen Sie den Staubsauger nicht durch Ziehen am Netzkabel. Benutzen Sie dazu den Transportgriff. Heben Sie das Gerät nicht am Netzkabel an. Schalten Sie den Staubsauger nach jeder Benutzung aus, und ziehen Sie den Netzstecker aus der Steckdose, bevor Sie das Gerät reinigen oder warten. Verwenden Sie nur Original- Beutel und Filter von Rowenta oder Wonderbag. Verwenden Sie nur Original-Zubehörteile von Rowenta. Kontrollieren Sie, ob alle Filter richtig angebracht sind. Wenn Sie Probleme mit dem Erwerb von Zubehörteilen oder Filtern für diesen Staubsauger haben, wenden Sie sich bitte an den Rowenta-Kundenservice. BENUTZUNG 1 Zusammensetzen der Teile des Geräts Schließen Sie den Schlauch in der Saugöffnung (Abb. 1) an und drehen Sie den Anschluss, bis er eingerastet ist. Zum Abnehmen des Schlauch drehen Sie den Anschluss in die entgegengesetzte Richtung und ziehen ihn ab (Abb. 2). Schließen Sie das Metall-Teleskoprohr (20 oder 21)* am Ende des Griffs (18a oder 19a)* (Abb.3) (je nach Modell) an. Schließen Sie die Bodendüse (22 oder 23)* (je nach Modell) am Ende des Metall-Teleskoprohrs an (Abb. 4). Stellen Sie das Metall-Teleskoprohr anhand des Teleskopsystems auf die gewünschte Länge ein (Abb. 5). Schließen Sie das jeweils geeignete Zubehör am Ende des Metall-Teleskoprohrs oder des Griffs an: - Für Teppiche und Teppichböden: Verwenden Sie die Bodendüse (22 oder 23)* mit eingezogener Bürste oder die Turbobürste* (Fasern und Tierhaare). - Für Parkett und glatte Böden: Verwenden Sie die Bodendüse (22 oder 23)* mit ausgestellter Bürste oder für ein noch besseres Resultat die Parkett-Saugdüse*. - Für Ecken und schwer zugängliche Stellen: Verwenden Sie die Fugendüse*. - Für Möbel und empfindliche Flächen: Verwenden Sie die integrierte Bürste am ERGO COMFORT GRIFF (EASY BRUSH) (je nach Modell). WICHTIG! Nehmen Sie den Staubsauger nie ohne Beutel und ohne Filtersystem (Einsatz) in Betrieb. ACHTUNG! Schalten Sie den Staubsauger vor einem Wechsel der Zubehörteile immer aus und, ziehen Sie den Stecker aus der Steckdose. 2 Anschließen des Netzkabels und Einschalten des Geräts Rollen Sie das Netzkabel vollständig aus, schließen Sie es an der Steckdose an (Abb.6), und betätigen Sie den Ein-/ Aus- Schalter. (Abb. 7). * Je nach Modell: Dies sind spezifische Ausstattungen des jeweiligen Modells oder als Option erhältliches Zubehör. 14

19 GEBRAUCH Hinweis: Sie können Ihren Staubsauger in horizontaler Stellung (Schlitten), aber auch in vertikaler Stellung benutzen. Dies ist besonders praktisch für die Reinigung von Treppen oder zum Absaugen von Vorhängen. Stellen Sie die Saugleistung ein:? am elektronischen Leistungsregler (Abb. 8)? am den Ein-/ Aus-Schalter. Öffnen Sie die Klappe des Fehlluftreglers, um die Saugleistung manuell zu verringern. Damit kann vermieden werden, dass die Saugdüse sich auf einer Fläche wie z. B. Vorhang, zerbrechliche Flächen usw. ansaugt (Abb. 9). Wenn Ihr Modell mit dem ERGO COMFORT GRIFF* ausgestattet ist, können Sie die Klappe des Fehlluftreglers je nach Gebrauch öffnen: Stellung (MIN) zum Absaugen empfindlicher Gewebe (Vorhänge, Textilien) REINIGUNG UND WARTUNG Die Luft, die wir atmen, kann Partikel enthalten, die Allergien hervorrufen können: Larven und Exkremente von Milben, Schimmel, Pollen, Rauch und Tierreste (Fell, Haut, Speichel, Urin). Die feinsten Partikel dringen tief in den Atemtrakt ein, wo sie Entzündungen verursachen und die Atemfunktion als Ganzes beeinträchtigen können. Die HEPA-Filter (High Efficiency Particular Air Filter) d. h. hochwirksame Filter für Partikel in der Luft, ermöglichen, dass selbst die feinsten Partikel zurückgehalten werden. Dank des HEPA-Filters ist die Abluft des Staubsaugers reiner als die Raumluft vor dem Staubsaugen. WICHTIG! Schalten Sie den Staubsauger vor Wartungsarbeiten immer aus, und ziehen Sie den Netzstecker aus der Steckdose. 1 Beutelwechsel Die Anzeigelampe für Beutelwechsel zeigt Ihnen an, dass der Beutel voll bzw. gesättigt ist. Wenn sie eine Leistungsverringerung Ihres Geräts feststellen, stellen Sie die maximale Leistung ein und heben Sie die Bodendüse vom Boden ab. Leuchtet die Anzeigelampe weiter rot auf, sollten Sie den Beutel wechseln. a) Wenn Ihr Staubsauger mit einem Wonderbag ausgestattet ist* (17a) : WICHTIG! Die Wonderbag-Beutel* UNIVERSAL sind bei Ihrem Händler oder beim offiziellen Kundendienst erhältlich. ACHTUNG! Die Wonderbag-Beutel* COMPACT dürfen mit diesem Gerät nicht verwendet werden. Werden sie verwendet, wird das Gerät beschädigt und die Garantie erlischt. Trennen sie den Schlauch von der Saugöffnung (Abb. 2). Öffnen Sie den Deckel Ihres Staubsaugers (Abb. 15). Nehmen Sie die Beutelhalterung aus dem Beutelfach heraus (Abb. 16). Nehmen Sie den Wonderbag-Beutel* von der Beutelhalterung ab (Abb. 17). * Je nach Modell: Dies sind spezifische Ausstattungen des jeweiligen Modells oder als Option erhältliches Zubehör. 15 Stellung Stellung (Mittel) zum täglichen Absaugen jeder Art von Böden bei geringer Verunreinigung (MAX) zum Absaugen harter Böden und Teppichen und Teppichböden bei starker Verunreinigung 3 Aufbewahren und Transportieren des Geräts Nach der Benutzung schalten Sie Ihren Staubsauger durch Betätigen des Ein-/ Aus-Schalters aus und ziehen den Netzstecker (Abb. 10). Rollen sie das Netzkabel auf, indem sie den Schalter für die Kabelaufwicklung betätigen (Abb. 1). In vertikaler Stellung befestigen Sie die Saugdüse an der Parkstellung (Abb. 12). In horizontaler Stellung befestigen Sie die Saugdüse an der Parkstellung (Abb. 13). Damit können Sie Ihren Staubsauger in Parkstellung transportieren und aufbewahren (Abb. 14). Entsorgen Sie den Wonderbag-Beutel* (Abb. 18). Befestigen Sie den neuen Wonderbag-Beutel* mit dem Ring in der Halterung (Abb. 19). Entfalten Sie den Beutel und setzen Sie die Beutelhalterung in das Beutelfach ein (Abb. 20). Vergewissern Sie sich, dass der Beutel und die Halterung richtig sitzen, bevor Sie den Deckel wieder schließen. WICHTIG! Der Wonderbag-Beutel darf nicht wieder verwendet werden, es handelt sich um einen Einwegbeutel. b) Wenn Ihr Staubsauger mit einem Textilbeutel* (17b) ausgestattet ist: Die Textilbeutel* (Nr. RS-RT2274) sind beim offiziellen Kundendienst erhältlich. Trennen sie den Schlauch von der Saugöffnung (Abb. 2). Öffnen Sie den Deckel Ihres Staubsaugers (Abb. 15). Nehmen Sie die Beutelhalterung aus dem Beutelfach heraus (Abb. 21). Nehmen Sie den Textilbeutel* von der Beutelhalterung ab (Abb. 22). Öffnen Sie den Textilbeutel* am Reißverschluss (Abb. 23) und leeren Sie ihn (Abb. 24). Waschen Sie den Beutel mit klarem Wasser und lassen Sie ihn mindestens 24 Stunden lang trocknen (Abb. 25) (der Beutel darf erst dann wieder eingesetzt werden, wenn er vollständig trocken ist). Den Textilbeutel wieder schließen: Achten Sie darauf, dass der Reißverschluss vollständig geschlossen ist (Abb. 26), bevor Sie den Beutel wieder in das Gerät einsetzen. Befestigen sie den Textilbeutel* mit dem Kartonstreifen an der Halterung (Abb. 27), entfalten Sie den Beutel, und setzen Sie die Beutelhalterung wieder in das Beutelfach ein (Abb. 28). Vergewissern Sie sich, dass der Beutel richtig sitzt, bevor Sie den Deckel wieder schließen. WICHTIG! Nehmen Sie den Staubsauger nie ohne Beutel in Betrieb. DE
.")
20 DE REINIGUNG UND WARTUNG 2 Ersatz des Mikrofilters* (Nr. RS-RT3735) WICHTIG! Der Mikrofilter muss spätestens nach 6 Beutelwechseln ersetzt werden. Der Mikrofilter* Nr. RS-RT3735 ist bei Ihrem Händler oder beim offiziellen Kundendienst erhältlich. Öffnen Sie den Deckel Ihres Staubsaugers (Abb. 15). Nehmen sie den Wonderbag-Beutel (Abb. 16) und danach den Mikrofiltereinsatz* (Abb. 29) zusammen mit dem Mikrofilter (16a) und dem Schaumstoff zum Schutz des Motors (16b) heraus. Trennen Sie den Schaumstoff (16b) vom Mikrofilter (16a) (Abb. 30). Entsorgen Sie den alten Mikrofilter, (Abb. 31) und ersetzen Sie ihn durch einen neuen Mikrofilter. Waschen Sie das Schaumstoffstück zum Schutz des Motors (16b) mit lauwarmer Seifenlauge, drücken sie das Wasser heraus und lassen Sie es mindestens 12 Stunden trocknen, bevor Sie es wieder anbringen (Abb. 32). Nachdem es getrocknet ist, bringen Sie es auf dem Mikrofilter (16a) an und setzen dann den Mikrofiltereinsatz * (16) wieder in sein Fach ein (Abb. 33). Setzen Sie den Wonderbag-Beutel wieder ein (Abb. 20). Vergewissern Sie sich, dass der Mikrofiltereinsatz* richtig sitzt, bevor Sie den Deckel wieder schließen. WICHTIG! Nehmen Sie den Staubsauger nie ohne Filtereinsatz in Betrieb. Ihr Gerät verfügt hierzu über ein Sicherheitssystem, das kontrolliert, ob der Filtereinsatz vorhanden ist (der Deckel lässt sich nicht schließen, wenn kein Filtereinsatz vorhanden ist). 3 Ersatz des HEPA-Filtereinsatzes* (Nr. ZR )* (bei Geräten mit Wonderbag-Beutel*) WICHTIG! Ersetzen Sie das Filtersystem einmal im Jahr. Der HEPA-Filtereinsatz* Nr. ZR * ist bei Ihrem Händler oder beim offiziellen Kundendienst erhältlich. Öffnen Sie den Deckel Ihres Staubsaugers (Abb. 15). Nehmen Sie die Beutelhalterung aus dem Beutelfach (Abb. 16) und danach den HEPA-Filtereinsatz* (Abb. 34) heraus, und entsorgen Sie ihn (Abb. 35). Setzen Sie den neuen HEPA- Filtereinsatz* (Nr. ZR *) im Fach ein (Abb. 36). Setzen Sie die Beutelhalterung wieder in das Fach ein (Abb. 16). Vergewissern Sie sich, dass der HEPA-Filtereinsatz* richtig sitzt, bevor Sie den Deckel wieder schließen. 4 Waschen des HEPA-Filtereinsatzes* (Nr. RS-RT3734*) (bei Geräten mit Textilbeutel*) ACHTUNG! Diese Reinigung ist nur beim HEPA möglich, der für Textilbeutel vorgesehen ist. Der HEPA-Filtereinsatz* Nr. RS-RT3734* ist bei Ihrem Händler oder beim offiziellen Kundendienst erhältlich. Öffnen Sie den Deckel Ihres Staubsaugers (Abb. 15). Nehmen Sie die Beutelhalterung aus dem Beutelfach (Abb. 21) und danach den HEPA-Filtereinsatz* (Abb. 37) heraus. Säubern Sie den HEPA-Filtereinsatz* durch Abklopfen über einem Abfallbehälter (Abb. 38). Spülen Sie ihn danach mit klarem Wasser, und lassen Sie ihn mindestens 24 Stunden trocknen (Abb. 39). Vergewissern Sie sich, dass der HEPA-Filtereinsatz* (15b) richtig trocken ist, bevor Sie ihn wieder einsetzen. Setzen Sie den HEPA-Filtereinsatz* wieder in sein Fach ein (Abb. 40). Setzen Sie die Beutelhalterung mit dem Textilbeutel* wieder in das Beutelfach ein (Abb. 29). Vergewissern Sie sich, dass der HEPA-Filtereinsatz* richtig sitzt, bevor Sie den Deckel wieder schließen. WICHTIG! Nehmen Sie den Staubsauger nie ohne Filtereinsatz in Betrieb. Ihr Gerät verfügt hierzu über ein Sicherheitssystem, das kontrolliert, ob der Filtereinsatz vorhanden ist (der Deckel lässt sich nicht schließen, wenn kein Filtereinsatz vorhanden ist). 5 Reinigung Ihres Staubsaugers Wischen Sie das Gehäuse und das Zubehör mit einem weichen Tuch ab. Verwenden Sie keine ätzenden oder scheuernden Reinigungsmittel. * Je nach Modell: Dies sind spezifische Ausstattungen des jeweiligen Modells oder als Option erhältliches Zubehör. 16
 vom Mikrofilter (16a) (Abb. 30). Entsorgen Sie den alten Mikrofilter, (Abb. 31) und ersetzen Sie ihn durch einen neuen Mikrofilter.")
RO54xx serie
 RO54xx serie www.rowenta.com 760280-13/12 1 2 14 12 7 6 5 4 9 15a* 13 11 15b* 4 9 5 10b 8 6 7 3 16a 16b 10a 16* 17a* 17b* 18b 18a 19a 19b 21a 18* 19c 21* 22* 23* 19* 21b 24* 25* 20* 26* 27* CONSEILS
FR EN DE NL IT ES PT EL AR ROWENTA X-TREM POWER. RO54xx series.
 FR EN DE NL IT ES PT EL AR ROWENTA X-TREM POWER RO54xx series www.rowenta.com 1 2 14 12 7 6 5 4 9 13 8 10b 15a* 11 15b* 4 9 5 6 7 3 16a 16b 10a 16* 17a* 17b* a 19a c b 20 21A* 19 21B* 19b 22* a 18 b 23*
Downloaded from www.vandenborre.be. RO56xx / RO57 series www.rowenta.com 746290-38/12
 RO56xx / RO57 series www.rowenta.com 746290-38/12 1 14 8 4 12 13 5 16 15 11 3 2 7 2 3 7 6 5 4 9 10a 8 10b 8 17a* 20a 20b 21a 25* 17b* 20 20c 21 26* 18a* 22a 21b 19 22 27* 28* 22b 18b* 29* 23* 24* 11 2
902979/02-42/12. Downloaded from www.vandenborre.be
 902979/02-42/12 10 13a 13c 13b 17 8 9 6b 13 7 13d 14 15 11 18a 18* 18b 16 6a 12* 11 14a 1b 14b 3* 2 4 9 1a 5 14a bis 20* 21* 22 24* 26* 25* 27* 23* 19 1 2 1 2 fig. 1 fig. 2 fig. 3a fig. 3b fig. 4 fig.
Περιεχόμενα / Contents
 Aερόθερμo / Fan Heater PTC-906 Περιεχόμενα / Contents GR... Σελίδες 3-8 EN... Pages 9-11 2 GR Ευχαριστούμε που επιλέξατε μια συσκευή της γκάμας θερμαντικών IZZY. Σημαντικές Οδηγίες Ασφαλείας Τα Μέρη της
903110/01-05/12. compacteo ergo cyclonic
 903110/01-05/12 compacteo ergo cyclonic 10 13a 13c 13b 17 8 9 6b 13 7 13d 14 15 11 18a 18* 18b 16 6a 12* 11 14a 1b 14b 3* 2 4 9 1a 5 14a bis 20* 21* 22 24* 26* 25* 27* 23* 19 1 2 1 2 fig. 1 fig. 2 fig.
MARQUE: CALOR REFERENCE: CF 3610CO SO CURLS CODIC:
 MARQUE: CALOR REFERENCE: CF 3610CO SO CURLS CODIC: 4083105 FR EN DE NL IT ES PT EL TR NO SV DA FI AR SO CURLS FA Lire attentivement le mode d emploi ainsi que les consignes de sécurité FR avant toute utilisation.
903110/01-05/12. compacteo ergo cyclonic
 903110/01-05/12 compacteo ergo cyclonic 10 13a 13c 13b 17 8 9 6b 13 7 13d 14 15 11 18a 18* 18b 16 6a 12* 11 14a 1b 14b 3* 2 4 9 1a 5 14a bis 20* 21* 22 24* 26* 25* 27* 23* 19 1 2 1 2 fig. 1 fig. 2 fig.
English PDFsharp is a.net library for creating and processing PDF documents 'on the fly'. The library is completely written in C# and based
 English PDFsharp is a.net library for creating and processing PDF documents 'on the fly'. The library is completely written in C# and based exclusively on safe, managed code. PDFsharp offers two powerful
Downloaded from www.vandenborre.be. RO58xx / RO59xx series www.rowenta.com 732290-38/12
 RO58xx / RO59xx series www.rowenta.com 732290-38/12 4 1 2 14 12 13 8 5 16 15 11 7 2 3 3 7 8 6 10a 5 4 10b 9 8 22a 17a* 20a 20b 21a 22 22b 17b* 20 18a* 20c 21 25* 21b 19 23* 26* 18b* 24* 27* 28* 11 22 CLIC!
RO78xx serie www.rowenta.com
 www.rowenta.com RO78xx serie www.rowenta.com 754280/01-22/12 6 5c 5b 5 2 3 9 8 1 11 12 13 5a 4a 4b 7 15 10 4 14 18a 18b 4c 17a 16a 17 18 17b 16b 19 21a 21b 22a 21 21c 22 26* 27* 23a 20 23 22b 23b 28* 29*
RO78xx serie
 www.rowenta.com RO78xx serie www.rowenta.com 754280/01-22/12 2 6 1 8 3 9 5c 5b 11 12 5 13 5a 7 4a 14 10 18a 4b 4 15 18b 4c 16a 18 17 17a 17b 19 16b 21a 21b 22a 21 21c 22 26* 27* 23a 20 22b 23 23b 24* 25*
Montage - Raccordement Implantation EURO-RELAIS MINI & BOX. Mini & Box
 Montage - Raccordement Implantation EURO-RELAIS MINI & BOX 3 Fiche technique EURO-RELAIS MINI & BOX DESCRIPTIF La borne Euro-Relais MINI est en polyester armé haute résistance totalement neutre à la corrosion
QC5015 A D E 1 2 3 4 F M H 5 6 7 1 B G 2 I 8 9 10 1 J K L 2 C 11 1 12 13 2 14 15 16 17 18
 QC5015 A D E 1 2 3 4 M F H 5 1 6 7 B G 2 I J K L 1 8 9 10 2 C 11 1 12 13 2 14 15 16 17 18 Deutsch Einführung Herzlichen Glückwunsch zu Ihrem Kauf und willkommen bei Philips! Um den Support von Philips
ROWENTA SILENCE FORCE EXTREME
 RO_SFE_8L_EO_736298_736298 15/04/14 14:17 PageC2 FR EN NL DE IT PT ES EL ROWENTA SILENCE FORCE EXTREME RO58xx / RO59xx series www.rowenta.com 24* 25* 26* 27* 1 3 11 14 4 8 10a 2 7 8 6 5 9 10b 3 7 4 16
BFN3000 ΕΠΙΤΡΑΠΕΖΙΟΣ ΑΝΕΜΙΣΤΗΡΑΣ. Owner s manual. Μετάφραση του πρωτοτύπου των οδηγιών χρήσης
 BFN3000 ΕΠΙΤΡΑΠΕΖΙΟΣ ΑΝΕΜΙΣΤΗΡΑΣ Μετάφραση του πρωτοτύπου των οδηγιών χρήσης Owner s manual www.bormanntools.com GR Οδηγίες ασφαλούς λειτουργίας 1. Τα χαρακτηριστικά της παροχής ηλεκτρικού ρεύματος θα
Tipologie installative - Installation types Type d installation - Installationstypen Tipos de instalación - Τυπολογίες εγκατάστασης
 AMPADE MOOCROMATICHE VIMAR DIMMERABII A 0 V~ - VIMAR 0 V~ DIMMABE MOOCHROME AMP AMPE MOOCHROME VIMAR VARIATEUR 0 V~ - DIMMERFÄHIGE MOOCHROMATICHE AMPE VO VIMAR MIT 0 V~ ÁMPARA MOOCROMÁTICA VIMAR REGUABE
RO_COMPACTEO_ERGO_903488-01_903488/01 29/01/14 14:04 Page1
 RO_COMPACTEO_ERGO_903488-01_903488/01 29/01/14 14:04 Page1 903488/01 1/14 RO_COMPACTEO_ERGO_903488-01_903488/01 29/01/14 14:04 Page2 C O M P A C T 11a 11b 3 2 9 10 4 5 7b 8 10 12 7a 1a 1b 6 18a 18b 22
La Déduction naturelle
 La Déduction naturelle Pierre Lescanne 14 février 2007 13 : 54 Qu est-ce que la déduction naturelle? En déduction naturelle, on raisonne avec des hypothèses. Qu est-ce que la déduction naturelle? En déduction
RO_COMPACTEO_ERGO_CYCLONIC_ _903506/01 29/01/14 14:27 Page1
 RO_COMPACTEO_ERGO_CYCLONIC_903506-01_903506/01 29/01/14 14:27 Page1 6 19 903506/01-1/14 RO_COMPACTEO_ERGO_CYCLONIC_903506-01_903506/01 29/01/14 14:27 Page2 10 13a 13c 13b 17 8 9 6b 13 7 13d 14 15 11 18a
User s Manual / Οδηγίες Χρήσης
 User s Manual / Οδηγίες Χρήσης EUROPEAN STANDARDS Your child s safety depends on you. Proper bed rail usage cannot be assured unless you follow these instructions. DO NOT USE YOUR BED RAIL UNTILL YOU READ
Ref
 Ref 902656 www.rowenta.com C O M PA C T 2 3 4 1a 6 5 10 7 1b 12 13 14* 15* 16* 11 9 16a 16b 8 19 17* 20a* 18 21 20b* 22* 24* 25 26* 23* 27* 28* 29* CLIC! 1 2 fig. 1 fig. 2 fig. 3 fig. 4 fig. 5 fig. 6 fig.
The challenges of non-stable predicates
 The challenges of non-stable predicates Consider a non-stable predicate Φ encoding, say, a safety property. We want to determine whether Φ holds for our program. The challenges of non-stable predicates
INSTRUCTIONS MANUAL ΕΓΧΕΙΡΙΔΙΟ ΛΕΙΤΟΥΡΓΙΑΣ
 Model/Μοντέλο: WKH-1132 INSTRUCTIONS MANUAL ΕΓΧΕΙΡΙΔΙΟ ΛΕΙΤΟΥΡΓΙΑΣ ENGLISH General Safety Instructions Before commissioning this kettle, please read the instruction manual carefully. Please keep the instruction
RO58xx / RO59xx series /13
 RO58xx / RO59xx series www.rowenta.com 733280-18/13 4 1 2 14 12 13 8 5 16 15 11 7 2 3 3 8 7 6 10a 10b 5 4 9 8 23* 24* 17a* 22a 20A a 20A b 21a 22 22b 20A 21 18a* 17b* 20A c 25* 19 20B b 21b 20B a 20B c
PLUGIN BASIC TS (en) indication, that electrical appliance is switched on
 indication, that electrical appliance is switched on") PLUGIN BASIC TS (en) indication, that electrical appliance is switched on after pressing the ON button, will be the connected appliance permantely switched on. after pressing the button, will be the connected
PLUGIN BASIC TS (en) indication, that electrical appliance is switched on after pressing the ON button, will be the connected appliance permantely switched on. after pressing the button, will be the connected
Βιομηχανικές απορροφητικές σκούπες
 The is the industrial vacuum cleaner conceived for heavy duty applications in food, pharma, chemical, packaging and OEM industry. Designed into compliance with GMP requirements, it is most powerful vac
Instruction Execution Times
 1 C Execution Times InThisAppendix... Introduction DL330 Execution Times DL330P Execution Times DL340 Execution Times C-2 Execution Times Introduction Data Registers This appendix contains several tables
(Type B) Το προϊόν αυτό δεν είναι κατάλληλο για σκοπούς πρωτογενούς θέρμανσης. ADM AEE
 Το προϊόν αυτό δεν είναι κατάλληλο για σκοπούς πρωτογενούς θέρμανσης. ADM AEE") (Type B) Το προϊόν αυτό δεν είναι κατάλληλο για σκοπούς πρωτογενούς θέρμανσης. ADM AEE 2310 85 30 61 80 00 18 Mklg 01. Rwnc A]SQ,ovb / D OPERATlON FUELING WARNING: uture storage of your heater. Use o NEVE
(Type B) Το προϊόν αυτό δεν είναι κατάλληλο για σκοπούς πρωτογενούς θέρμανσης. ADM AEE 2310 85 30 61 80 00 18 Mklg 01. Rwnc A]SQ,ovb / D OPERATlON FUELING WARNING: uture storage of your heater. Use o NEVE
ΟΔΗΓΙΕΣ ΧΡΗΣΗΣ USE INSTRUCTIONS
 ΟΔΗΓΙΕΣ ΧΡΗΣΗΣ USE INSTRUCTIONS ΗΛΕΚΤΡΙΚΗ ΣΚΟΥΠΑ/ELECTRIC VACUUM CLEANER ΜΟΝΤΕΛΟ/MODEL: YL6228-S 220-240V~50/60HZ 700W ECO Παρακαλούμε διαβάστε προσεκτικά όλες τις οδηγίες χρήσης πριν την χρήση της συσκευής
4K HDMI Splitter 1x4. User s Guide / Bedienungsanleitung / Εγχειρίδιο Χρήστη
 4K HDMI Splitter 1x4 User s Guide / Bedienungsanleitung / Εγχειρίδιο Χρήστη INTRODUCTION The EDISION 4K HDMI Splitter 1x4 uses a single HDMI input source, to distribute it to 4 HDMI outputs. The splitter
Every set of first-order formulas is equivalent to an independent set
 Every set of first-order formulas is equivalent to an independent set May 6, 2008 Abstract A set of first-order formulas, whatever the cardinality of the set of symbols, is equivalent to an independent
11a 11b 21* 18 19* 12* 13* 14a* 14b* 23* 24* 20* 25* 17a* 26* 17b* 17c* Ref: ZR Ref: ZR Ref: WB
 902941/02 16/12 C O M P A C T 11a 11b 3* 2 9 10 4 5 7b 8 10 12 7a 1a 1b 6 22 13* 12* 14a* 14b* 18 19* 21* 23* Ref: ZR0045 01 Ref: ZR0042 01 24* 15 16 20* 25* 17a* 17b* 17c* 26* Ref: WB3051.20-30-40 1 1
VC1225E. Vacuum cleaner Ηλεκτρική σκούπα Прахосмукачка GB GR BG INSTRUCTION MANUAL ΒΙΒΛΙΟ ΟΔΗΓΙΩΝ ИНСТРУКЦИИ ЗА ЕКСПЛОАТАЦИЯ
 VC1225E Vacuum cleaner Ηλεκτρική σκούπα Прахосмукачка GB GR BG INSTRUCTION MANUAL ΒΙΒΛΙΟ ΟΔΗΓΙΩΝ ИНСТРУКЦИИ ЗА ЕКСПЛОАТАЦИЯ GB ENGLISH... 3 GR EΛΛHNIKA... 12 BG БЪЛГАРСКИ... 39 ENGLISH Read this manual
OUR PRODUCT RANGE. www.rakson.gr
 ΤΑ ΑΛΛΑ ΕΙ Η ΠΡΟΪΟΝΤΑ ΜΑΣ ΜΕΤΑΣΧΗΜΑΤΙΣΤΕΣ ΚΟΥ ΟΥΝΙΩΝ ΚΟΥ ΟΥΝΙΑ ΜΠΟΥΤΟΝ ΚΟΥ ΟΥΝΙΩΝ ΑΥΤΟΜΑΤΟΙ ΚΛΙΜΑΚΟΣΤΑΣΙΟΥ ΚΛΕΙ ΑΡΙΕΣ ΑΝΙΧΝΕΥΤΕΣ ΚΙΝΗΣΗΣ ΣΥΣΤΗΜΑΤΑ ΕΠΙΚΟΙΝΩΝΙΑΣ Θυροτηλεοράσεις Θυροτηλέφωνα Ενδοεπικοινωνίες
2 Composition. Invertible Mappings
 Arkansas Tech University MATH 4033: Elementary Modern Algebra Dr. Marcel B. Finan Composition. Invertible Mappings In this section we discuss two procedures for creating new mappings from old ones, namely,
ΓΙΑ ΠΕΡΙΣΣΟΤΕΡΕΣ ΠΛΗΡΟΦΟΡΙΕΣ: Οδηγίες Χρήσης / Instructions Manual Ελληνικά (GR) English (EN) Ηλ. Σκούπα Vacuum Cleaner 4lt K1 Dynamic Force
 English (EN) Ηλ. Σκούπα Vacuum Cleaner 4lt K1 Dynamic Force") ΓΙΑ ΠΕΡΙΣΣΟΤΕΡΕΣ ΠΛΗΡΟΦΟΡΙΕΣ: Χ. ΜΠΕΝΡΟΥΜΠΗ & ΥΙΟΣ Α.Ε. Αγ. Θωμά 27, 15124, Μαρούσι-Αθήνα Τηλ. 210 6156400, Fax: 210 6199316 e-mail: benrubi-sda@benrubi.gr FOR FURTHER INFORMATION: H. BENRUBI & FILS S.A.
ΓΙΑ ΠΕΡΙΣΣΟΤΕΡΕΣ ΠΛΗΡΟΦΟΡΙΕΣ: Χ. ΜΠΕΝΡΟΥΜΠΗ & ΥΙΟΣ Α.Ε. Αγ. Θωμά 27, 15124, Μαρούσι-Αθήνα Τηλ. 210 6156400, Fax: 210 6199316 e-mail: benrubi-sda@benrubi.gr FOR FURTHER INFORMATION: H. BENRUBI & FILS S.A.
 60 61 62 63 64 65 Ο Δ Η Γ Ι Ε Σ Σ Υ Ν Τ Η Ρ Η Σ Η Σ Τ Ω Ν Κ Ο Υ Φ Ω Μ Α Τ Ω Ν Ι Ν S T R U C T I N O N S C O N C E R N I N G Τ Η Ε C A S E M E N T S M A I N T E N A N C E Ο τακτικός καθαρισμός των βαμμένων
Εργαστήριο Ανάπτυξης Εφαρμογών Βάσεων Δεδομένων. Εξάμηνο 7 ο
 Εργαστήριο Ανάπτυξης Εφαρμογών Βάσεων Δεδομένων Εξάμηνο 7 ο Procedures and Functions Stored procedures and functions are named blocks of code that enable you to group and organize a series of SQL and PL/SQL
ΓΙΑ ΠΕΡΙΣΣΟΤΕΡΕΣ ΠΛΗΡΟΦΟΡΙΕΣ: Οδηγίες Χρήσης / Instructions Manual Ελληνικά (GR) English (EN) Ηλ. Σκούπα Vacuum Cleaner Compact Power EV-100
 English (EN) Ηλ. Σκούπα Vacuum Cleaner Compact Power EV-100") ΓΙΑ ΠΕΡΙΣΣΟΤΕΡΕΣ ΠΛΗΡΟΦΟΡΙΕΣ: Χ. ΜΠΕΝΡΟΥΜΠΗ & ΥΙΟΣ Α.Ε. Αγ. Θωμά 27, 15124, Μαρούσι-Αθήνα Τηλ. 210 6156400, Fax: 210 6199316 e-mail: benrubi-sda@benrubi.gr FOR FURTHER INFORMATION: H. BENRUBI & FILS S.A.
ΓΙΑ ΠΕΡΙΣΣΟΤΕΡΕΣ ΠΛΗΡΟΦΟΡΙΕΣ: Χ. ΜΠΕΝΡΟΥΜΠΗ & ΥΙΟΣ Α.Ε. Αγ. Θωμά 27, 15124, Μαρούσι-Αθήνα Τηλ. 210 6156400, Fax: 210 6199316 e-mail: benrubi-sda@benrubi.gr FOR FURTHER INFORMATION: H. BENRUBI & FILS S.A.
SPEEDO AQUABEAT. Specially Designed for Aquatic Athletes and Active People
 SPEEDO AQUABEAT TM Specially Designed for Aquatic Athletes and Active People 1 2 Decrease Volume Increase Volume Reset EarphonesUSBJack Power Off / Rewind Power On / Fast Forward Goggle clip LED Status
ΑΚΑ ΗΜΙΑ ΕΜΠΟΡΙΚΟΥ ΝΑΥΤΙΚΟΥ ΜΑΚΕ ΟΝΙΑΣ ΣΧΟΛΗ ΜΗΧΑΝΙΚΩΝ ΠΤΥΧΙΑΚΗ ΕΡΓΑΣΙΑ ΘΕΜΑ : ΧΗΜΙΚΑ ΠΡΟΣΘΕΤΑ ΠΟΥ ΠΡΟΟΡΙΖΟΝΤΑΙ ΓΙΑ ΤΟ ΝΕΡΟ ΤΟΥ ΑΤΜΟΛΕΒΗΤΑ
 ΑΚΑ ΗΜΙΑ ΕΜΠΟΡΙΚΟΥ ΝΑΥΤΙΚΟΥ ΜΑΚΕ ΟΝΙΑΣ ΣΧΟΛΗ ΜΗΧΑΝΙΚΩΝ ΠΤΥΧΙΑΚΗ ΕΡΓΑΣΙΑ ΘΕΜΑ : ΧΗΜΙΚΑ ΠΡΟΣΘΕΤΑ ΠΟΥ ΠΡΟΟΡΙΖΟΝΤΑΙ ΓΙΑ ΤΟ ΝΕΡΟ ΤΟΥ ΑΤΜΟΛΕΒΗΤΑ ΣΠΟΥ ΑΣΤΗΣ : ΑΓΟΡΑΣΤΟΣ ΧΡΥΣΟΒΑΛΑΝΤΗΣ ΕΠΙΒΛΕΠΟΥΣΑ ΚΑΘΗΓΗΤΡΙΑ :
Technisches Handbuch. Pergola Top Star 120X70. metaform Bescha ungssysteme
 02 Technisches Handbuch Pergola Top Star 120X70 Exklusiv von Metaform ΑVΕΕ entworfen, ist es die Innova on bei der professionellen Bescha ung, denn das wegweisende Hebesystem erlaubt es Ihnen, sie an jeder
Εμπορική αλληλογραφία Ηλεκτρονική Αλληλογραφία
 - Εισαγωγή Sehr geehrter Herr Präsident, Sehr geehrter Herr Präsident, Εξαιρετικά επίσημη επιστολή, ο παραλήπτης έχει ένα ειδικό τίτλο ο οποίος πρέπει να χρησιμοποιηθεί αντί του ονόματος του Sehr geehrter
compacteo ergo 903104/02 16/12
 compacteo ergo 903104/02 16/12 C O M P A C T 11a 11b 3 2 9 10 4 5 7b 8 10 12 7a 1a 1b 6 22 13 12 14a 14b 18 19 21 23 Ref: MT0007 01 Ref: RS-RT900034 01 24 15 16 20 25 17a 17b 17c 26 Ref: WB305120-30-40
Επιτραπέζιος Η/Υ ASUS M12AD and M52AD Εγχειρίδιο χρήστη
 Επιτραπέζιος Η/Υ ASUS M12AD and M52AD Εγχειρίδιο χρήστη M12AD M52AD GK9559 Πρώτη Έκδοση Ιούλιος 2014 Copyright 2014 ASUSTeK Computer Inc. Διατηρούνται όλα τα δικαιώματα. Απαγορεύεται η αναπαραγωγή οποιουδήποτε
Deutsch. English. Ελληνικά
 Deutsch Wir freuen uns, dass Sie sich für den AEG UltraOne- Staubsauger entschieden haben. Diese Bedienungsanleitung gilt für alle UltraOne-Modelle. Das bedeutet, dass Ihr Modell bestimmte Zubehörteile
EE512: Error Control Coding
 EE512: Error Control Coding Solution for Assignment on Finite Fields February 16, 2007 1. (a) Addition and Multiplication tables for GF (5) and GF (7) are shown in Tables 1 and 2. + 0 1 2 3 4 0 0 1 2 3
The Simply Typed Lambda Calculus
 Type Inference Instead of writing type annotations, can we use an algorithm to infer what the type annotations should be? That depends on the type system. For simple type systems the answer is yes, and
ΟΔΗΓΙΕΣ ΣΥΝΑΡΜΟΛΟΓΗΣΗΣ/ ASSEMBLY INSTRUCTION ΤΟΜΜΥ ΚΡΕΒΑΤΙ/BED
 ΟΔΗΓΙΕΣ ΣΥΝΑΡΜΟΛΟΓΗΣΗΣ/ ASSEMBLY INSTRUCTION ΤΟΜΜΥ ΚΡΕΒΑΤΙ/BED 1. Παρακαλώ πολύ διαβάστε προσεκτικά τις οδηγίες πριν την συναρμολόγηση/ Please read the instructions carefully. 2. Παρακαλώ πολύ όπως ελέγξτε
Door Hinge replacement (Rear Left Door)
") Door Hinge replacement (Rear Left Door) We will continue the previous article by replacing the hinges of the rear left hand side door. I will use again the same procedure and means I employed during the
Door Hinge replacement (Rear Left Door) We will continue the previous article by replacing the hinges of the rear left hand side door. I will use again the same procedure and means I employed during the
ΕΡΙΤΟΡΕΣ ΚΑΙ ΑΝΘΩΡΟΙ ΚΛΕΙΔΙΑ ΑΝΑΘΕΣΘ ΑΓΩΝΑ ΓΑΦΕΙΟ ΑΓΩΝΩΝ ΟΓΑΝΩΤΙΚΘ ΕΡΙΤΟΡΘ. ζεκηλαρηο 1 ΡΑΓΚΟΣΜΙΑ ΟΜΟΣΡΟΝΔΙΑ (ISAF) ΕΛΛΘΝΙΚΘ ΟΜΟΣΡΟΝΔΙΑ (Ε.Ι.Ο.
 ΕΛΛΘΝΙΚΘ ΟΜΟΣΡΟΝΔΙΑ (Ε.Ι.Ο.") ΑΝΑΘΕΣΘ ΑΓΩΝΑ ΕΡΙΤΟΡΕΣ ΚΑΙ ΑΝΘΩΡΟΙ ΚΛΕΙΔΙΑ ΡΑΓΚΟΣΜΙΑ ΟΜΟΣΡΟΝΔΙΑ (ISAF) ΕΛΛΘΝΙΚΘ ΟΜΟΣΡΟΝΔΙΑ (Ε.Ι.Ο.) ΚΛΑΣΘ 6/6/2009 1 ΟΡΓΑΝΩΣΙΚΗ ΕΠΙΣΡΟΠΗ ΓΡΑΦΕΙΟ ΑΓΩΝΩΝ ΕΠΙΣΡΟΠΗ ΑΓΩΝΩΝ ΕΠΙΣΡΟΠΗ ΕΝΣΑΕΩΝ ΕΠΙΣΡΟΠΗ ΚΑΣΑΜΕΣΡΗΕΩΝ
ΑΝΑΘΕΣΘ ΑΓΩΝΑ ΕΡΙΤΟΡΕΣ ΚΑΙ ΑΝΘΩΡΟΙ ΚΛΕΙΔΙΑ ΡΑΓΚΟΣΜΙΑ ΟΜΟΣΡΟΝΔΙΑ (ISAF) ΕΛΛΘΝΙΚΘ ΟΜΟΣΡΟΝΔΙΑ (Ε.Ι.Ο.) ΚΛΑΣΘ 6/6/2009 1 ΟΡΓΑΝΩΣΙΚΗ ΕΠΙΣΡΟΠΗ ΓΡΑΦΕΙΟ ΑΓΩΝΩΝ ΕΠΙΣΡΟΠΗ ΑΓΩΝΩΝ ΕΠΙΣΡΟΠΗ ΕΝΣΑΕΩΝ ΕΠΙΣΡΟΠΗ ΚΑΣΑΜΕΣΡΗΕΩΝ
Aufgabe 1 Dreierkette Legt mit den Bild- und Wortkarten eine Dreierkette. Τρεις στη σειρά. Σχηματίστε τριάδες με εικόνες και λέξεις που ταιριάζουν.
 Station Luft Aufgabe 1 Dreierkette Legt mit den Bild- und Wortkarten eine Dreierkette. Τρεις στ σειρά. Σχματίστε τριάδες με εικόνες και λέξεις που ταιριάζουν. der Sturm die Windkraftanlage θύελλα οι ανεμογε
Strain gauge and rosettes
 Strain gauge and rosettes Introduction A strain gauge is a device which is used to measure strain (deformation) on an object subjected to forces. Strain can be measured using various types of devices classified
Η ΕΝΕΡΓΕΙΑΚΗ ΣΗΜΑΝΣΗ ΚΑΙ ERP
 Η ΕΝΕΡΓΕΙΑΚΗ ΣΗΜΑΝΣΗ ΚΑΙ ERP 2 1 ΠΛΑΙΣΙΟ ΓΙΑΤΙ ΕΝΕΡΓΕΙΑΚΗ ΣΗΜΑΝΣΗ ΚΑΙ ErP? Αντιμετωπίζοντας την κλιματική αλλαγή, διασφαλίζοντας την ασφάλεια της παροχής ενέργειας2 και την αύξηση της ανταγωνιστικότητα
ΓΙΑ ΠΕΡΙΣΣΟΤΕΡΕΣ ΠΛΗΡΟΦΟΡΙΕΣ: Οδηγίες Χρήσης / Instructions Manual Ελληνικά (GR) English (EN) Ηλ. Βραστήρας El. Kettle HHB1761
 English (EN) Ηλ. Βραστήρας El. Kettle HHB1761") ΓΙΑ ΠΕΡΙΣΣΟΤΕΡΕΣ ΠΛΗΡΟΦΟΡΙΕΣ: Χ. ΜΠΕΝΡΟΥΜΠΗ & ΥΙΟΣ Α.Ε. Αγ. Θωμά 27, 15124, Μαρούσι-Αθήνα Τηλ. 210 6156400, Fax: 210 6199316 e-mail: benrubi-sda@benrubi.gr FOR FURTHER INFORMATION: H. BENRUBI & FILS S.A.
ΓΙΑ ΠΕΡΙΣΣΟΤΕΡΕΣ ΠΛΗΡΟΦΟΡΙΕΣ: Χ. ΜΠΕΝΡΟΥΜΠΗ & ΥΙΟΣ Α.Ε. Αγ. Θωμά 27, 15124, Μαρούσι-Αθήνα Τηλ. 210 6156400, Fax: 210 6199316 e-mail: benrubi-sda@benrubi.gr FOR FURTHER INFORMATION: H. BENRUBI & FILS S.A.
Ευχαριστούμε που επιλέξατε μια συσκευή της γκάμας IZZY. Thank you for selecting an IZZY product. Συμβουλές Aσφαλείας / Safety Interlocks
 Ευχαριστούμε που επιλέξατε μια συσκευή της γκάμας IZZY. Thank you for selecting an IZZY product. Συμβουλές Aσφαλείας / Safety Interlocks Διαβάστε προσεκτικά τις οδηγίες χρήσης και κρατήστε τις σε ασφαλές
Right Rear Door. Let's now finish the door hinge saga with the right rear door
 Right Rear Door Let's now finish the door hinge saga with the right rear door You may have been already guessed my steps, so there is not much to describe in detail. Old upper one file:///c /Documents
Tipologie installative - Installation types Types d installation - Die einbauanweisungen Tipos de instalación - Τυπολογίες εγκατάστασης
 Types d installation Die einbauanweisungen Tipos de instalación Τυπολογίες εγκατάστασης AMPADE MOOCROMATICHE VIMAR DIMMERABII A 0 V~ MOOCHROME DIMMABE AMP VIMAR 0 V~ AMPE MOOCHROME VIMAR DIMMABE 0 V~ EUCHTE
HQ6990, HQ6970, HQ6950, HQ6920 CHARGE
 HQ6990, HQ6970, HQ6950, HQ6920 1 2 3 4 5 6 7 CHARGE 8 9 10 2 1 11 2 12 13 1 14 15 16 1 2 17 18 19 2 20 21 22 1 ENGLISH Introduction Congratulations on your purchase and welcome to Philips! To fully benefit
Περιεχόμενα / Contents
 ΗΛ. ΕΣΤΙΕΣ 3101 & 3201 Περιεχόμενα / Contents GR... Σελίδες 3-7 EN... Pages 8-11 2 GR ΗΛ. ΕΣΤΙΕΣ 3101 & 3201 Ευχαριστούμε που επιλέξατε μια συσκευή της γκάμας Izzy. Οδηγίες Ασφαλείας Τα μέρη της συσκευής
Επιτραπέζιος Η/Υ K30AM / K30AM-J Εγχειρίδιο χρήστη
 Επιτραπέζιος Η/Υ K30AM / K30AM-J Εγχειρίδιο χρήστη GK9380 Ελληνικα Πρώτη Έκδοση Μάιος 2014 Copyright 2014 ASUSTeK Computer Inc. Διατηρούνται όλα τα δικαιώματα. Απαγορεύεται η αναπαραγωγή οποιουδήποτε τμήματος
derivation of the Laplacian from rectangular to spherical coordinates
 derivation of the Laplacian from rectangular to spherical coordinates swapnizzle 03-03- :5:43 We begin by recognizing the familiar conversion from rectangular to spherical coordinates (note that φ is used
CITRUS JUICER INSTRUCTIONS
 CITRUS JUICER INSTRUCTIONS Model No.: J85SS Safty warning Intended use The citrus juicer is suitable for extracting juice from citrus fruit(lemons,oranges etc).it is designed for juicing domestic portions
L18VFSS10E. Instruction Manual 45.7cm/18 High Power Floor Fan. Εγχειρίδιο Οδηγιών Επιδαπεδιος Ανεμιστηρας 45.7 Εκατοστομετρο
 L18VFSS10E Instruction Manual 45.7cm/18 High Power Floor Fan Εγχειρίδιο Οδηγιών Επιδαπεδιος Ανεμιστηρας 45.7 Εκατοστομετρο GB GR Contents GB Safety Warnings... 2 Unpacking... 5 Getting to Know Your Fan...
Φροντίδα της ουροστομίας μου (urostomy)
") Φροντίδα της ουροστομίας μου (urostomy) Πως θα πρεπει να αλλαζω την σακουλα μου; Εξοπλισμος Για να αλλάξετε την σακούλα σας θα χρειαστείτε τα ακόλουθα πράγματα: Μια λεκάνη με ζεστό νερό. Ένα πετσετάκι
Φροντίδα της ουροστομίας μου (urostomy) Πως θα πρεπει να αλλαζω την σακουλα μου; Εξοπλισμος Για να αλλάξετε την σακούλα σας θα χρειαστείτε τα ακόλουθα πράγματα: Μια λεκάνη με ζεστό νερό. Ένα πετσετάκι
Math 6 SL Probability Distributions Practice Test Mark Scheme
 Math 6 SL Probability Distributions Practice Test Mark Scheme. (a) Note: Award A for vertical line to right of mean, A for shading to right of their vertical line. AA N (b) evidence of recognizing symmetry
SFH-41 Fan Heater Αερόθερμο
 SFH-41 Fan Heater Αερόθερμο GB GR INSTRUCTION MANUAL ΒΙΒΛΙΟ ΟΔΗΓΙΩΝ GB ENGLISH... 3 GR EΛΛHNIKA... 7 ENGLISH PLEASE READ THESE INSTRUCTIONS CAREFULLY AND RETAIN FOR FUTURE REFER- ENCE SAFETY WARNINGS When
Auswandern Studieren Studieren - Universität Griechisch Θα ήθελα να εγγραφώ σε πανεπιστήμιο. Angeben, dass man sich einschreiben will Japanisch Θα ήθε
 - Universität Θα ήθελα να εγγραφώ σε πανεπιστήμιο. Angeben, dass man sich einschreiben will Θα ήθελα να γραφτώ για. Angeben, dass man sich für einen anmelden möchte ένα προπτυχιακό ένα μεταπτυχιακό ένα
Εγκατάσταση λογισμικού και αναβάθμιση συσκευής Device software installation and software upgrade
 Για να ελέγξετε το λογισμικό που έχει τώρα η συσκευή κάντε κλικ Menu > Options > Device > About Device Versions. Στο πιο κάτω παράδειγμα η συσκευή έχει έκδοση λογισμικού 6.0.0.546 με πλατφόρμα 6.6.0.207.
ΟΔΗΓΙΕΣ ΧΡΗΣΗΣ USE INSTRUCTIONS
 ΟΔΗΓΙΕΣ ΧΡΗΣΗΣ USE INSTRUCTIONS ΤΗΛΕΦΩΝΟ ΜΕ ΑΝΑΓΝΩΡΙΣΗ ΚΛΗΣΗΣ /CORDED PHONE WITH CALLER ID ΜΟΝΤΕΛΟ/MODEL: TM09-448 DC48V Παρακαλούμε διαβάστε προσεκτικά όλες τις οδηγίες χρήσης πριν την χρήση της συσκευής
ZLW Series. Single-stage Monoblock Centrifugal Pump ZL PUMP GROUP.,LTD
 ZLW Series Single-stage Monoblock Centrifugal Pump ZL PUMP GROUP.,LTD 1 Application Apply as the transportation of liquids in the fields of air condition, heating, sanitary water, water treatment cooling,
Capacitors - Capacitance, Charge and Potential Difference
 Capacitors - Capacitance, Charge and Potential Difference Capacitors store electric charge. This ability to store electric charge is known as capacitance. A simple capacitor consists of 2 parallel metal
CHAPTER 25 SOLVING EQUATIONS BY ITERATIVE METHODS
 CHAPTER 5 SOLVING EQUATIONS BY ITERATIVE METHODS EXERCISE 104 Page 8 1. Find the positive root of the equation x + 3x 5 = 0, correct to 3 significant figures, using the method of bisection. Let f(x) =
Finite Field Problems: Solutions
 Finite Field Problems: Solutions 1. Let f = x 2 +1 Z 11 [x] and let F = Z 11 [x]/(f), a field. Let Solution: F =11 2 = 121, so F = 121 1 = 120. The possible orders are the divisors of 120. Solution: The
ΕΡΓΑΖΟΜΕΝΩΝ Bildung älterer Arbeitnehmer
 ΚΑΤΑΡΤΙΣΗ ΩΡΙΜΩΝ ΕΡΓΑΖΟΜΕΝΩΝ Bildung älterer Arbeitnehmer Kassandra Teliopoulos IEKEP 06/03/06 ΜΕΡΙΚΑ ΣΗΜΕΙΑ ΚΛΕΙΔΙΑ Einige Gedankenansätze!Στις περισσότερες χώρες μέλη της Ε.Ε. μεγάλης ηλικίας εργαζόμενοι
Οδηγίες Χρήσης / Instructions Manual Ελληνικά (GR) English (EN) Ηλ. Σκούπα Vacuum Cleaner AC-1108
 English (EN) Ηλ. Σκούπα Vacuum Cleaner AC-1108") ΓΙΑ ΠΕΡΙΣΣΟΤΕΡΕΣ ΠΛΗΡΟΦΟΡΙΕΣ: FOR FURTHER INFORMATION: Χ. ΜΠΕΝΡΟΥΜΠΗ & ΥΙΟΣ Α.Ε. H. BENRUBI & FILS S.A. Αγ. Θωμά 27, 15124, Μαρούσι-Αθήνα 27 Aghiou Thoma str. GR 15124, Maroussi-Athens Τηλ. 210 6156400,
ΓΙΑ ΠΕΡΙΣΣΟΤΕΡΕΣ ΠΛΗΡΟΦΟΡΙΕΣ: FOR FURTHER INFORMATION: Χ. ΜΠΕΝΡΟΥΜΠΗ & ΥΙΟΣ Α.Ε. H. BENRUBI & FILS S.A. Αγ. Θωμά 27, 15124, Μαρούσι-Αθήνα 27 Aghiou Thoma str. GR 15124, Maroussi-Athens Τηλ. 210 6156400,
Downloaded from www.vandenborre.be FSMH1621D
 FSMH1621D A B C D E 2 F G H I J 3 K L M N 4 (Original instructions) ENGLISH Intended use Your Black & Decker steam mop has been designed for sanitising and cleaning sealed hardwood, sealed laminate, linoleum,
the total number of electrons passing through the lamp.
 1. A 12 V 36 W lamp is lit to normal brightness using a 12 V car battery of negligible internal resistance. The lamp is switched on for one hour (3600 s). For the time of 1 hour, calculate (i) the energy
Ο ΗΓΙΕΣ ΧΡΗΣΗΣ USE INSTRUCTIONS
 Ο ΗΓΙΕΣ ΧΡΗΣΗΣ USE INSTRUCTIONS ΗΛΕΚΤΡΙΚΟ ΜΠΡΙΚΙ ΚΑΦΕ ELECTRIC COFFEE BOILER (ΓΙΑ ΠΡΟΕΤΟΙΜΑΣΙΑ ΕΛΛΗΝΙΚΟΥ ΚΑΦΕ / FOR BREWING GREEK COFFEE) Μοντέλο / Model : CM4005 AC230V 50Hz - 800W Παρακαλούµε διαβάστε
Code Breaker. TEACHER s NOTES
 TEACHER s NOTES Time: 50 minutes Learning Outcomes: To relate the genetic code to the assembly of proteins To summarize factors that lead to different types of mutations To distinguish among positive,
CYTA Cloud Server Set Up Instructions
 CYTA Cloud Server Set Up Instructions ΕΛΛΗΝΙΚΑ ENGLISH Initial Set-up Cloud Server To proceed with the initial setup of your Cloud Server first login to the Cyta CloudMarketPlace on https://cloudmarketplace.cyta.com.cy
Quick Installation Guide
 A Installation 1 F H B E C D G 2 www.trust.com/17528/faq Quick Installation Guide C C D Freewave Wireless Audio Set 17528/ 17529 D Installation Configuration Windows XP 4 5 8 Windows 7/ Vista 6 7 9 10
 Register your product and get support at www.philips.com/welcome HR1399 1 16 Deutsch Einführung Herzlichen Glückwunsch zu Ihrem Kauf und willkommen bei Philips! Um das Kundendienstangebot von Philips
3 Lösungen zu Kapitel 3
 3 Lösungen zu Kapitel 3 31 Lösungen der Aufgaben zu Abschnitt 31 311 Lösung Die Abbildung D : { R 4 R 4 R 4 R 4 R, a 1, a 2, a 3, a 4 ) D( a 1, a 2, a 3, a 4 ) definiere eine Determinantenform (auf R 4
ANSWERSHEET (TOPIC = DIFFERENTIAL CALCULUS) COLLECTION #2. h 0 h h 0 h h 0 ( ) g k = g 0 + g 1 + g g 2009 =?
 COLLECTION #2. h 0 h h 0 h h 0 ( ) g k = g 0 + g 1 + g g 2009 =?") Teko Classes IITJEE/AIEEE Maths by SUHAAG SIR, Bhopal, Ph (0755) 3 00 000 www.tekoclasses.com ANSWERSHEET (TOPIC DIFFERENTIAL CALCULUS) COLLECTION # Question Type A.Single Correct Type Q. (A) Sol least
Teko Classes IITJEE/AIEEE Maths by SUHAAG SIR, Bhopal, Ph (0755) 3 00 000 www.tekoclasses.com ANSWERSHEET (TOPIC DIFFERENTIAL CALCULUS) COLLECTION # Question Type A.Single Correct Type Q. (A) Sol least
Στο εστιατόριο «ToDokimasesPrinToBgaleisStonKosmo?» έξω από τους δακτυλίους του Κρόνου, οι παραγγελίες γίνονται ηλεκτρονικά.
 Διαστημικό εστιατόριο του (Μ)ΑστροΈκτορα Στο εστιατόριο «ToDokimasesPrinToBgaleisStonKosmo?» έξω από τους δακτυλίους του Κρόνου, οι παραγγελίες γίνονται ηλεκτρονικά. Μόλις μια παρέα πελατών κάτσει σε ένα
DEUTSCHE SCHULE ATHEN ΓΕΡΜΑΝΙΚΗ ΣΧΟΛΗ ΑΘΗΝΩΝ
 Herzlich Willkommen zu unserem Elternabend Übergang aus dem Kindergarten in die Vorschule Καλωσορίσατε στη συνάντηση γονέων με θέμα τη μετάβαση από τον παιδικό σταθμό στο νηπιαγωγείο 1 Übergang vom Kindergarten
Τεστ Κατάταξης 1 Grading Test 1
 HELLENIC CULTURE CENTRE - Education, Language and Culture www.hcc.edu.gr, e-mail: Ifigenia@hcc.edu.gr, Tel.: (+30) 210 5238149, Fax: (+30) 210 8836494 Τεστ Κατάταξης 1 Grading Test 1 Οδηγίες Πρέπει να
Μετανάστευση Στέγαση. Στέγαση - Ενοικίαση. Θα ήθελα να ενοικιάσω ένα. Για να δηλώσετε ότι θέλετε να ενοικιάσετε κάτι.
 - Ενοικίαση γαλλικά Je voudrais louer. Για να δηλώσετε ότι θέλετε να ενοικιάσετε κάτι une chambre un appartement un studio une maison individuelle une maison jumelée une maison mitoyenne Combien coûte
Phys460.nb Solution for the t-dependent Schrodinger s equation How did we find the solution? (not required)
") Phys460.nb 81 ψ n (t) is still the (same) eigenstate of H But for tdependent H. The answer is NO. 5.5.5. Solution for the tdependent Schrodinger s equation If we assume that at time t 0, the electron starts
Phys460.nb 81 ψ n (t) is still the (same) eigenstate of H But for tdependent H. The answer is NO. 5.5.5. Solution for the tdependent Schrodinger s equation If we assume that at time t 0, the electron starts
10a. 10b d 15a. 10c. 15* 15b 9* a. 11b. 8 11a bis 22* 17* 18* 20* 23* 21* 24*
 902892 26/11 10a 14 10b 10 3 2 10c 10d 15a 11 6 15* 15b 9* 12 7 5 13 1b 4 11a 1a 11b 8 11a bis 19 22* 17* 18* 20* 23* 21* 24* 16 1 1 2 2 fig. 1 fig. 2 fig. 3 fig. 4 fig. 5 fig. 6 fig. 7 fig. 8 fig. 9 fig.
NMBTC.COM /
 Common Common Vibration Test:... Conforms to JIS C 60068-2-6, Amplitude: 1.5mm, Frequency 10 to 55 Hz, 1 hour in each of the X, Y and Z directions. Shock Test:...Conforms to JIS C 60068-2-27, Acceleration
UDZ Swirl diffuser. Product facts. Quick-selection. Swirl diffuser UDZ. Product code example:
 UDZ Swirl diffuser Swirl diffuser UDZ, which is intended for installation in a ventilation duct, can be used in premises with a large volume, for example factory premises, storage areas, superstores, halls,
ΘΕΡΜΑΣΤΡΑ ΧΑΛΑΖΙΑ ΟΔΗΓΙΕΣ ΧΡΗΣHΣ
 ΘΕΡΜΑΣΤΡΑ ΧΑΛΑΖΙΑ ΟΔΗΓΙΕΣ ΧΡΗΣHΣ Model No: LQH-01 Ref. No: 891-4147 ΠΡΟΣΟΧΗ! - ΟΔΗΓΙΕΣ ΑΣΦΑΛΕΙΑΣ 1. Αυτή η συσκευή έχει σχεδιαστεί ΜΟΝΟ για οικιακή χρήση. Καμία ευθύνη δεν φέρει ο κατασκευαστής για βλάβη
«ΨΥΧΙΚΗ ΥΓΕΙΑ ΚΑΙ ΣΕΞΟΥΑΛΙΚΗ» ΠΑΝΕΥΡΩΠΑΪΚΗ ΕΡΕΥΝΑ ΤΗΣ GAMIAN- EUROPE
 «ΨΥΧΙΚΗ ΥΓΕΙΑ ΚΑΙ ΣΕΞΟΥΑΛΙΚΗ» ΠΑΝΕΥΡΩΠΑΪΚΗ ΕΡΕΥΝΑ ΤΗΣ GAMIAN- EUROPE We would like to invite you to participate in GAMIAN- Europe research project. You should only participate if you want to and choosing
Wenn ihr nicht werdet wie die Kinder...
 Wenn ihr nicht werdet wie die Kinder... . Der Memoriam-Garten Schön, dass ich mir keine Sorgen machen muss! Mit dem Memoriam-Garten bieten Ihnen Friedhofsgärtner, Steinmetze
ΘΕΡΜΑΣΤΡΑ ΧΑΛΑΖΙΑ 2400W ΟΔΗΓΙΕΣ ΧΡΗΣHΣ. Model No: LX-1502H Ref. No:
 ΘΕΡΜΑΣΤΡΑ ΧΑΛΑΖΙΑ 2400W ΟΔΗΓΙΕΣ ΧΡΗΣHΣ Model No: LX-1502H Ref. No: 891-4144 ΠΡΟΣΟΧΗ! - ΟΔΗΓΙΕΣ ΑΣΦΑΛΕΙΑΣ 1. Αυτή η συσκευή έχει σχεδιαστεί ΜΟΝΟ για οικιακή χρήση. Καμία ευθύνη δεν φέρει ο κατασκευαστής
Mission Berlin. Deutsch lernen und unterrichten Arbeitsmaterialien. Mission Berlin 22 Έλα τώρα, κουνήσου
 22 Έλα τώρα, κουνήσου Η Άννα µεταφέρεται στο Βερολίνο του έτους 1989, όπου κυριαρχεί ο ενθουσιασµός για την πτώση του Τείχους. Πρέπει να περάσει µέσα από το πλήθος και να πάρει τη θήκη. Θα τα καταφέρει;