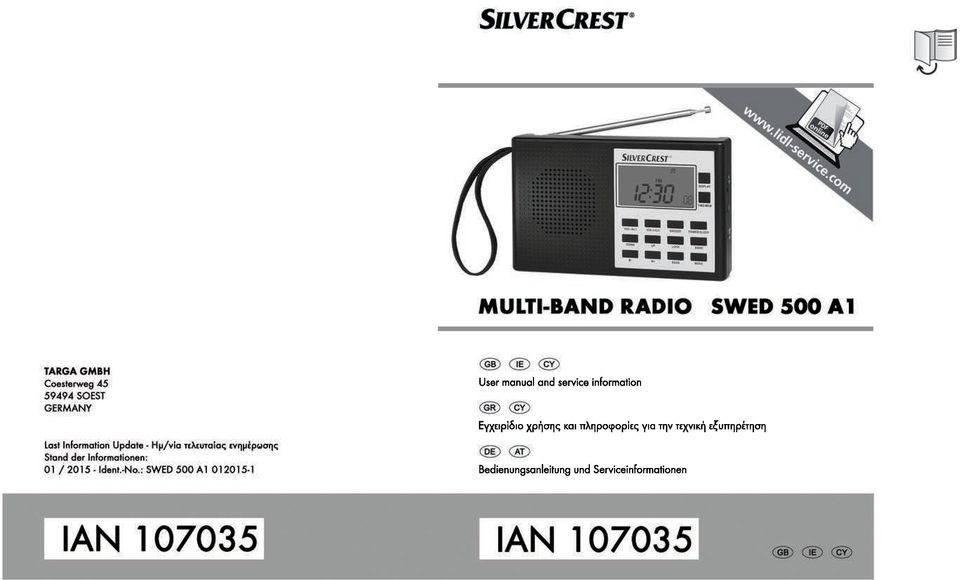
English Ελληνικά Deutsch... 79
|
|
|
- Σωφρόνιος Ευταξίας
- 8 χρόνια πριν
- Προβολές:
Transcript
1
2
3 English... 2 Ελληνικά Deutsch V 1.2

4 Table of contents Introduction... 4 Intended use... 4 Package contents... 5 Specifications... 6 Safety instructions... 7 Copyright Overview of controls and button functions Screendisplay Stand Before start-up Using mains and battery power Inserting the batteries Connecting the mains adapter Initial start-up Light-up screen Switching the device on and off Functions of the 'MODE' button Set the time zone Setting the date / time Display world time SDA Special Date Alarm NAP timer Stopwatch Set the AM reception range Set the volume Set up reception sensitivity Activate bass boost Choose a station Automatic station scanning with auto-store function Manually scanning for stations: Manual tuning control English

5 Fine tuning a station Manually saving stations Go to a saved station Playback in stereo SLEEP timer Set the alarm time Activate the alarm Activate / deactivate the button lock Connecting the earphones Storing the device when not in use Troubleshooting Environmental and waste disposal information Marks of conformity Guarantee and service English - 3

6 Introduction Thank you for choosing a SilverCrest product. The SilverCrest SWED 500 A1 multi-band radio gives you the opportunity to receive stations from VHF MW and LW frequencies, as well as nine different shortwave bands. The device also features a digital clock, which can be set up for use as an alarm clock. Intended use This device is an electric entertainment appliance, designed to receive and play radio stations. The device can also be used as a clock and an alarm clock. It may only be used for private purposes and is not for industrial or commercial use. The device should also not be used in tropical climates. The manufacturer shall not be liable for any damages or faults arising as a result of unauthorised modification of the device. Only use the accessories specified by the manufacturer. Please observe the national regulations and/or laws of the country in which the device is used. Please be aware that national laws in different countries vary regarding which frequency ranges you may legally receive. Information received outside of the allowed frequency ranges may not be utilised and its content or any facts received may not be passed on to third parties. 4 - English

7 Package contents Unpack the device and all accessories. Remove all packaging materials and check all parts for completeness and for signs of damage. If any parts are missing or damaged, please contact the manufacturer. A B C D E Multi-band radio SWED 500 A1 Mains adapter Case SWED 500 A1 earphones These instructions (symbol icon) English - 5

8 Specifications 6 - English These details only describe the technical capabilities of this device. Laws about the frequency ranges that you may legally receive can vary in different countries. Please note that receiving stations outside the scope of these laws is illegal and could result in penalties. Power supply Mains adapter provided: Manufacturer: TAIYTECH Model: TYTM UK 6V, 0.3A Optional batteries 4x AA 1.5V (Mignon, LR6) Polarity of the mains adapter Maximum current consumption 0.3A Power consumption During use as a radio: approximately 0.6 W In standby: < 0.2 W Audio power output 500 mw Frequency bands FM MHz MW KHz Please note, due to production SW MHz tolerances, the upper and lower SW MHz ends of the reception range can SW MHz vary slightly from the values given here. SW MHz SW MHz SW MHz SW MHz SW MHz SW MHz LW KHz

9 Number of memory locations Dimensions Weight Earphones Impedance SilverCrest SWED 500 A1 400 (100 per frequency band) Approximately 11 cm x 17.7 cm x 3.9 cm (H x W x D) Approximately 300 g (without batteries) SWED 500 A1 32 ohm Broadband voltage identification Approximately 90 mv +/-10% Maximum sound pressure with the earphones supplied Maximum output voltage at earphone connector socket Battery life Approximately 90 db(a) Approximately 40 mv Approximately 40 hours Operating temperature 5 C to 35 C Storage conditions -10 C to 50 C Tip: The device should not be stored in hot locations e.g. a car during summer). Operating humidity Maximum 85% relative humidity The specifications and design are subject to change without notice. Safety instructions Before using the device for the first time, please read the following instructions carefully and observe all warnings, even if you are familiar with using electronic devices. Keep this manual in a safe place for future reference. If you give the device away or sell it, please ensure that you also pass on this manual. It is part of the product. English - 7
. Operating humidity Maximum 85% relative humidity The specifications and design are subject to change without notice.")
10 DANGER! This icon, together with the word Danger, indicates an impending dangerous situation which, if not prevented, can lead to serious injuries or even death. WARNING! This icon, together with the word Warning, indicates important information for the safe operation of the device and user safety. This icon indicates impending danger due to an electric shock. This icon indicates further information on the topic. Dangers due to volumelevels being too high Take care when using earphones. Listening at a high volume for prolonged periods can damage the user's hearing. DANGER! 1. Only use the earphones supplied with the device (D) of the following type: SWED 500 A1. Using other earphones can lead to harmful sound pressure levels. 2. Do not use the SWED 500 A1 earphones supplied (D) with other playback devices. Do not use the earphones (D) at a high volume. This would risk damaging your hearing and may disturb those around you. Please note that ambient noises may sound different when using earphones. Although the device is set up so that you can still be aware of ambient noises, set the volume at least low enough so that you can continue to be aware of sounds in your surroundings. In dangerous situations e.g., road use, working with machines or other 8 - English
 of the following type: SWED 500 A1.")
11 situations requiring your full attention, the noise may negatively affect your concentration or decrease your awareness of what is happening around you. In scenarios such as these, do not use the device. Operating environment The device is not designed for operation in rooms with high temperature, humidity (for example, the bathroom) or excessive dust. Operating temperature and operating humidity: 5 C to 35 C; 85% maximum relative humidity. DANGER! Please make sure that: there is always adequate ventilation (do not place the device on a shelf, a carpet, a bed or anywhere where the ventilation slots will be covered; leave a distance of at least 10 cm free on each side) the device is not exposed to direct sources of heat (for example, heaters) the device is not exposed to direct sunlight or strong artificial light contact with splashing and dripping water and aggressive liquids is avoided, and that the device is not operated in the vicinity of water. In particular, the device should never be immersed, nor should any objects filled with liquids, for example vases or drinks, be placed on or near the device. the device is not placed close to magnetic fields (for example, loudspeakers) there are no naked flames (for example, burning candles) placed on or near the device no foreign bodies penetrate into the device the device is not exposed to excessive temperature fluctuations, as otherwise condensation can occur and lead to electrical short circuits. If, however, the device is exposed to large temperature fluctuations, wait for approximately two hours until the device has reached ambient temperature before starting it up. the device is not exposed to excessive shocks and vibrations English - 9

12 the device and the mains adapter are not used during lightning storms. During lightning storms, remove the mains adapter from the plug socket. the mains adapter is always easily accessible whenever it is being used. Always lay the cable in such a way that nobody can trip on it. DANGER! Batteries Always connect the batteries with the correct polarity. To do this, follow the marking in the battery housing. Do not attempt to recharge the batteries and never dispose of batteries in a fire. Do not mix battery types (old and new, alkaline and zinc-carbon etc.). Remove the batteries when not using the device for a prolonged period of time. Improper use can cause explosions and leakages. Batteries must not be opened or deformed because the leaked chemicals can cause injuries. In the case of contact with eyes, rinse eyes immediately with plenty of water and seek medical attention. Children should never play with batteries because batteries can be lethal if swallowed. Always store batteries out of the reach of children. If a battery is swallowed, medical help should be sought immediately. DANGER! Children and people with disabilities Keep electrical equipment out of reach of children. The use of electrical devices by people with reduced physical, sensory or mental capabilities should also be appropriate to their capacity. Ensure that children and people with reduced capabilities never use electrical devices unsupervised, unless they have been properly familiarised with the equipment or are being supervised by a person in charge of their safety. Children should generally be supervised to ensure 10 - English
.")
13 they do not play with this device. Small parts can be lethal if swallowed. If a small part is swallowed, medical help should be sought immediately. Keep the packaging film away from children. There is a risk of suffocation! DANGER! Mains adapter Only plug the mains adapter into a suitable plug socket that is always easily accessible. Never touch the mains adapter with wet hands. There is a risk of electric shock. In the following cases, remove the mains adapter from the mains: If there is a dangerous situation. If unusual sounds or smoke are coming from the mains adapter. Before a storm or thunderstorm where there is a danger of lightning. The mains adapter has been damaged. The mains adapter has been exposed to rain, liquid or extreme humidity. If you wish to clean it. The mains adapter uses electricity even when in standby. To completely remove it from the mains, the mains adapter must be unplugged from the socket. Please observe this advice to avoid the risk of death and of fire! The mains adapter should also never be covered as this is a fire hazard. Never try to open the housing of the mains adapter. There is a risk of death by electric shock. English - 11

14 DANGER! Cables Always take hold of all cables by the plug and do not pull on the cable itself. Do not place any items of furniture or other heavy objects on cables. Make sure that the cables are not bent, particularly at the plug and at the connector sockets. To avoid damaging the cable, do not lay it over hot or sharp locations or corners. Never make a knot in a cable and do not connect it with other cables. All cables should be laid in such a way that no one steps on them or is obstructed by them. DANGER! Screen Do not apply pressure to the screen and keep it away from sharp objects. A broken screen can cause injuries. Wear gloves when collecting broken pieces and, where relevant, contact the manufacturer. Where the screen is scratched or otherwise damaged, make completely sure that no liquid is leaking from it. If any liquid leaks, please observe the following advice: If the liquid comes into contact with skin, wipe it off with a clean cloth and then rinse with plenty of water. It may be necessary to seek medical attention. If the liquid comes into contact with the eyes, rinse with running water for at least 15 minutes. Seek immediate medical attention. If the liquid is swallowed, first rinse the mouth with water and then drink plenty of water. Seek medical attention immediately! 12 - English

15 DANGER! Maintenance / cleaning Repair work is required if the device has been damaged, for example, if the mains adapter or the device housing are damaged, liquids or objects have got inside the device or if the device has been exposed to rain or moisture. Repair work is also required if the device does not work properly or has been dropped. If you notice any smoke, unusual noises or smells, switch off the device immediately, remove the mains adapter from the socket and remove any batteries from the device. In these cases, you must not continue to use the device until it has been checked by a specialist. All repair work should only be carried out by qualified specialists. Never open the housing of the mains adapter or the device. Remove the device from the mains. Clean the multi-band radio using a clean, dry cloth only and never use abrasive liquids. Do not try to open the housing of the device, as this will void your guarantee. In the case of battery leakage, the device must be cleaned by a specialist. Copyright All contents of these operating instructions are subject to copyright law, and are provided to the user solely as a source of information. Any form of copying or reproduction of data and information is prohibited without the express written permission of the author. This also concerns commercial use of the contents and data. The text and illustrations correspond to the technical standards at the time of printing. English - 13

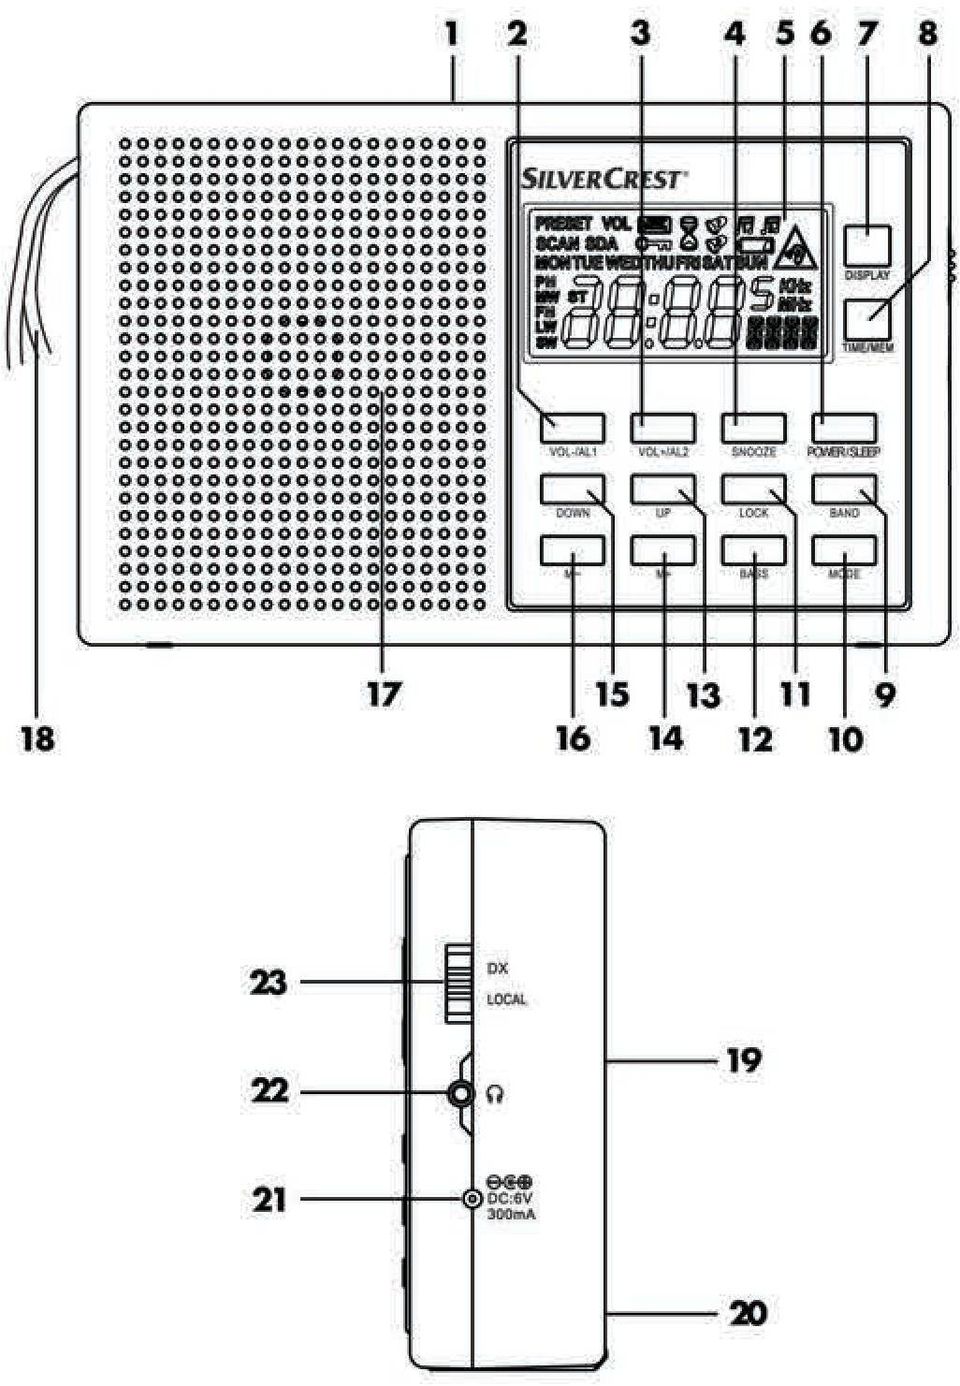
16 Overview of controls and button functions This user manual also contains a cover that can be unfolded. Unfold this cover page so that you can always see the controls English

17 1 Telescopic aerial (on the back) 2 VOL - / AL1 button (reduce volume, Alarm 1) 3 VOL + / AL2 button (increase volume, Alarm 2) 4 SNOOZE button (postpone the alarm for 5 to 120 minutes) 5 Screen 6 POWER/SLEEP button (switch on/off; set sleep timer) 7 Display button (displays time settings) 8 TIME/MEM button (set time, save station) 9 BAND button (choose frequency band) 10 MODE button 11 LOCK button (lock the buttons) 12 BASS button (boosts the bass notes) 13 UP button (station scan up, set minutes +) 14 M+ button (go to next memory location) 15 DOWN button (station scan down, set minutes -) 16 M- button (go to previous memory location) 17 Loudspeaker 18 Carry strap 19 Battery housing (on the back) 20 Stand (on the back) 21 (connector socket for optional mains adapter) 22 (connector socket for earphones) 23 DX/LOCAL button (set up reception sensitivity) English - 15
 16 M- button (go to previous memory location) 17 Loudspeaker 18 Carry strap 19 Battery housing (on the back) 20 Stand (on the back) 21 (connector socket for optional mains adapter) 22 (connector")
18 Screendisplay 24 PRESET (station memory) 25 SDA (special date alarm) 26 VOLUME (volume) 27 LOCK (lock the buttons) 28 SLEEP (snooze function) 29 NAP Timer 30 Alarm 1/2 active (buzzer) 31 Alarm 1/2 active (radio) 32 Low battery 33 Volume level warning icon 34 Frequency unit 35 Other displays: memory location, seconds, volume, alarm, frequency, BASS, city abbreviations etc. 36 Time / frequency display 37 STEREO (only when using earphones) 38 Frequency band 39 PM time display 40 Weekday display 41 SCAN (searching) 16 - English
 38 Frequency band 39 PM time display 40 Weekday display 41 SCAN")
19 Stand On the back of the device there is a stand (20), which can be used to stand the multi-band radio in a tilted position. To do this, pull out the stand (20). Before start-up You can choose whether to run the device using the supplied mains adapter (B) or with four AA batteries (Mignon, LR6). Batteries are not included in the delivery. Using mains and battery power When the multi-band radio (A) is disconnected from the mains, various settings (time and alarm time) are lost. To avoid this, insert batteries before disconnecting from the mains. This will mean that these settings are maintained. English - 17

20 Inserting the batteries Open the battery housing (19) on the back of the device by lifting the battery housing lid down towards you and removing it. Insert the batteries with the correct polarity (see the + and - markings), as shown in the following diagram. The polarity is marked on the batteries and on the battery housing. When inserting the batteries, ensure that the fabric strip is underneath the batteries. This makes it easier to remove the batteries when you need to change them. Now place the two plastic tabs from the battery housing lid into their notches below the battery housing (19) and lift the battery housing lid up and towards the radio until it clicks in. If your screen (5) signals that the battery level is low (32), the batteries have almost run out of charge. Swap them for new batteries of the same type. WARNING! Remove the batteries when not using the device for a prolonged period of time English
 and lift the battery housing lid up and towards the radio until it clicks in.")
21 Connecting the mains adapter SilverCrest SWED 500 A1 Insert the connector from the mains adapter (B) into the connector socket (21) of the multi-band radio (A). Plug the mains adapter (B) into an easily accessible mains plug socket. When the device is plugged into the mains adapter (B), it is powered exclusively by the adapter and not by any batteries that may be inserted. When using the mains adapter (B) to power the radio for prolonged periods of time, you should remove the batteries to prevent them from draining. Initial start-up Light-up screen Every time a button is pressed, the screen lights up for approximately 5 seconds and then the light switches off. Switching the device on and off To switch on the device, briefly press the 'POWER/SLEEP' button (6) once. When switched on, the screen (5) displays the frequency and the frequency band that the radio is tuned to: FM VHF MW Medium wave SW Shortwave LW Longwave To switch off the device, briefly press the 'POWER/SLEEP' button (6) again. When switched off, the screen (5) displays the current time and the weekday. Functions of the 'MODE' button When switched off, you can use the 'MODE' button (10) to access the set up mode for various functions: English - 19
22 Press once Press twice Press three times Press four times Press five times SDA special date alarm NAP timer (timer for short periods) Stopwatch Set the AM reception range (EU/US) Set the time zone When setting up the multi-band radio, the best way to begin is by setting the time zone. To do this, read the following section entitled 'Set the time zone'. When the radio is on, the 'MODE' button has the following functions Press once Press twice Press three times Display 'AL1' setting Display 'AL2' setting Display and change the tuning resolution Set the time zone The following tables provides an overview of the city abbreviations for the various time zones. You can also use the table to see the time differences and any summer time arrangements. Abbreviation Difference Summer City / Country to CET time HNL -10:00 h no Honolulu / USA ANC -9:00 h yes Anchorage / USA YVR -8:00 h yes Vancouver / Canada LAX -8:00 h yes Los Angeles / USA DEN -7:00 h yes Denver / USA CHI -6:00 h yes Chicago / USA MEX -6:00 h yes Mexico City / Mexico NYC -5:00 h yes NewYork / USA YYZ -5:00 h yes Toronto / Canada 20 - English
23 YUL -5:00 h yes Montreal / Canada CCS -4:30 h no Caracas / Venezuela RIO -3:00 h yes Rio de Janeiro / Brazil BUE -3:00 h no Buenos Aires / Argentina UTC* 0:00 h no Universal Time Coordinated LON 0:00 h yes London / Great Britain BER +1:00 h yes Berlin / Germany PAR +1:00 h yes Paris / France ROM +1:00 h yes Rome / Italy CAI +2:00 h yes Cairo / Egypt IST +2:00 h yes Istanbul / Turkey MOW +3:00 h yes Moscow / Russia KWI +3:00 h no Kuwait City / Kuwait DXB +4:00 h no Dubai / Saudi Arabia KHI +5:00 h no Karachi / Pakistan DAC +6:00 h yes Dhaka / Bangladesh BKK +700 h no Bangkok / Thailand SIN +8:00 h no Singapore HKG +8:00 h no Hong Kong PEK +8:00 h no Beijing / China SHA +800 h no Shanghai / China TYO +9:00 h no Tokyo / Japan SYD +10:00 h yes Sydney / Australia NOU +11:00 no Noumea / New Caledonia AKL +12:00 yes Auckland / New Zealand *UTC: Universal Time Coordinated English - 21
24 UTC represents the reference time for the various global time zones. The times of the time zones are derived from this reference time. The differences are presented in the second column. To set the time zone, do the following: When the radio is switched off, press the 'MODE' button (10) five times. The current time will be on the screen and the associated city abbreviation will be displayed in the bottom right-hand corner. The default setting is 'UTC'. By pressing the 'UP' (13) or 'DOWN' (15) buttons, you can now set the city abbreviation that is appropriate to your time zone, e.g., BER for Berlin. You can find the appropriate city abbreviation in the table above. After this, set the correct time, as described below. Setting the date / time First, set the correct time zone. The time can only be altered when the radio is switched off. If it is on, press the 'POWER/SLEEP' button (6) to switch it off. If no buttons are pressed for five seconds during set-up, the settings will be accepted and the set-up mode will be ended. Press the 'TIME/MEM' button (8) once. By pressing the 'UP' (13) or 'DOWN' (15) buttons, you can now set the year. You can also hold down the buttons to move more quickly through the numbers. Confirm your settings by pressing the 'TIME/MEM' button (8). At this stage you can set the day.month by pressing the 'UP' (13) or 'DOWN' (15) buttons. You can also hold down the buttons to move more 22 - English
25 quickly through the numbers. Confirm your settings by pressing the 'TIME/MEM' button (8). In the screen (5) you will also see the weekday (40) that coordinates with the date that you set. Display MON TUE WED THU FRI SAT SUN Weekday Monday Tuesday Wednesday Thursday Friday Saturday Sunday Now you can begin using the 'UP' (13) or 'DOWN' (15) buttons to choose the hours:minutes settings. You can hold down the buttons to move more quickly through the numbers. Confirm your settings by pressing the 'TIME/MEM' button (8). You can use the 'UP' (13) or 'DOWN' (15) buttons to set the time format. The default setting is the 24-hour format. You can choose between the 12- hour or 24-hour format. Confirm your settings by pressing the 'TIME/MEM' button (8). Set-up is now complete. If you have chosen the 12-hour time format, the screen (5) will display the 'PM' icon (39) during the hours after midday. The time must be adapted if you travel to another time zone. English - 23
26 With the 'DISPLAY' button (7), you can access the following information at any time: When the device is off: Press once year Press twice day:month Press three times time zone (hours:minutes and city abbreviation) When the device is on: Press once hours:minutes Press twice year Press three times day:month Press four times time zone (hours:minutes and city abbreviation) Display world time Press the 'DISPLAY' button (7) three times if the device is off or four times if it is being used as a radio. The time for the currently selected time zone will be on the screen (5). The associated city abbreviation will be displayed in the bottom right-hand corner. You can use the 'UP' (13) and 'DOWN' (15) buttons to view the corresponding times in other time zones. Tip: World time will only be displayed briefly for information. The settings will not be saved. SDA Special Date Alarm This functions gives you the option of setting up to ten annual special date alarms. This can be done as follows: When the radio is switched off, press the 'MODE' button (10) once. The number 01 (for SDA 01) will be displayed on the screen (5) and the date associated with it will flash in the day.month format. If the alarm is not activated, the 'SDA' icon will also flash. An activated SDA will be indicated 24 - English
27 by the 'SDA' icon being displayed. In this scenario, the SDA icon will also be displayed when the device is being used as a clock. Use the 'UP' (13) and 'DOWN' (15) buttons to set the date. Hold down the buttons to start automatically scrolling through the numbers. Press the 'BASS' button for about a second in order to activate or deactivate the SDA that has been set up. Each SDA can be activated and deactivated separately. The setting will be saved automatically. Press the 'TIME/MEM' (8) button to set further SDAs. The activated SDAs will now go off every year. If the current date corresponds with the SDA alarm, a buzzer tone will go off every hour between 08:00 and 23:00 for about ten minutes. If in use, the radio function of the multi-band radio will stop. To end this alarm, press any button. NAP timer You have the option of setting a timer for a short period (alarm sound only) for a one-off occurrence. There are five pre-set NAP timers and you can choose between them using the 'TIME/MEM' button (8). The durations of the five preset timers are all different: 10, 15, 20, 25 and 30 minutes. When the radio is switched off, press the 'MODE' button (10) twice. The NAP timer icon (29) will be displayed on the screen (5), along with the number of the timer and the pre-set activation time in minutes. Press the 'TIME/MEM' button (8) repeatedly in order to activate the pre-set NAP timer. You can use the 'UP' (13) and 'DOWN' (15) buttons to adapt these times to your requirements, from 1 minute to 39 minutes. To start the timer, press the 'TIME/MEM' button (8) for about one second. The screen will now display the time counting down. When the timer ends, an alarm will sound until it is switched off. The NAP timer alarm can be switched off by pressing any button. English - 25
28 Stopwatch The stopwatch function can be used as follows: When the device is switched off, press the 'MODE' button (10) three times. The screen will display 0:00 (minutes:seconds) and the bottom right hand of the screen will also show the hundredths of a second. Briefly press the 'TIME/MEM' button (8) to start the stopwatch. Briefly press the 'TIME/MEM' button (8) again to stop the stopwatch. To re-set the timer to 0:00, press the 'TIME/MEM' button (8) for about one second. While the stopwatch is running, the stopwatch time will be displayed on the screen (5). When the stopwatch is stopped, the screen display switches back to the normal time. The time measured by the stopwatch can be recalled by clicking three times on the 'MODE' button (10). Set the AM reception range Due to the various radio transmission systems in different countries, it is best to adapt the channel spacing and/or the reception area: Region Frequency band range Channel spacing Europe 522 khz 1620 khz 9 khz America 520 khz 1710 khz 10 khz This can be done as follows: When the device is switched off, press the 'MODE' button (10) four times. On the screen, either EU or US will be displayed as the currently selected region. You can use the 'UP' (13) and 'DOWN' (15) buttons to change the region English
29 Set the volume By pressing the 'VOL-/AL1' (2) and 'VOL+/AL2' (3) buttons, you can change the volume in accordance with your preferences. The settings range from a minimum volume level of '00' to a maximum volume level of '16'. When being used as a loudspeaker, the device starts at the volume that it was at when last switched off. In order to avoid hearing damage due to excessive volume, the volume settings for use with earphones are regulated as follows: When the volume reaches level '07', the volume warning icon (33) begins to flash. You can now only increase the volume further if you confirm the volume warning by briefly pressing the 'LOCK' button (11). The increased volume level will remain until the device is next switched off. If the volume level during use as a loud speaker was set as higher than level '07' and earphones were then inserted during use as a radio, the volume will jump back to level '07'. By pressing the 'VOL+/AL2' button (3) again, the volume warning icon will begin to flash (33). You can now only increase the volume further if you confirm the volume warning by briefly pressing the 'LOCK' button (11). If the volume level during use as a loud speaker or with earphones was set as higher than level '07' and the device was then switched off, if it is switched on again while earplugs are inserted, the volume will jump back to level '07'. By pressing the 'VOL+/AL2' button (3) again, the volume warning icon will begin to flash (33). You can now only increase the volume further if you confirm the volume warning by briefly pressing the 'LOCK' button (11). Set up reception sensitivity This function only applies for FM and SW. If you wish to use the device in normal mode, slide the 'DX/LOCAL' selection switch (23) to the 'DX' position. If you only wish to receive stations with a high field strength, slide the 'DX/LOCAL' selection switch (23) to the 'LOCAL' position. This is recommended if, for example, you wish to receive a weak local station that stronger national stations are blocking out. English - 27
30 Activate bass boost You have the option of boosting the playback of bass notes. During use as a radio, press the 'BASS' button (12). 'BASS' (35) will be displayed on the screen. Press the 'BASS' button (12) again to switch off the bass boost. 'BASS' (35) will disappear from the screen. Choose a station In order to achieve the best possible signal, pull out the telescopic aerial (1) to its maximum length. The telescopic aerial (1) can be rotated. In this way, the reception can be optimised. Automatic station scanning with auto-store function The most convenient way of searching for and saving stations is the automatic station scanning function with automatic channel saving (auto-store function). Switch the device on. Next, choose the desired frequency band by pressing the 'BAND' button (9). Press the 'TIME/MEM' button (8) for about one second to start automatically scanning for stations. Automatic station scanning always begins with the lowest frequency. 'PRESET' (24) is displayed on the screen. The multi-band radio (A) will now scan the entire frequency range for stations with a strong signal. As soon as a station with a strong signal is found, the memory location (35) that it is stored in will be displayed on the screen. The first 100 stations found will be stored and saved straight to memory locations 001 to 100. When all 100 memory locations are full, the scanning will continue until completion but no further stations will be saved. Please note this will overwrite memory locations that are already in use English
31 Manually scanning for stations: SilverCrest SWED 500 A1 Switch the device on. Next, choose the desired frequency band by pressing the 'BAND' button (9). The shortwave band 'SW; is divided into nine sub-bands, 'SW1' to 'SW9' (see section entitled 'Specifications'). To select individual sub-bands, now press the 'BAND' button (9) and select the 'SW' band. Now press the 'BAND' button (9) for about one second, until the 'SW' icon flashes on the screen. You can now use the 'UP' (13) or 'DOWN' (15) buttons to select the 'SW' sub-bands. When the 'SW' icon (5) is no longer flashing on the screen (5), you can begin searching for stations. To begin the search in the direction of your choice, press the 'UP' (13) or 'DOWN' (15) button for about one second. The search will stop at the next station that is found and the frequency will be displayed on the screen (5). Manual tuning control Instead of using the station search, you also have the option of configuring stations manually. This makes it possible to find weaker stations as well. To do this, proceed as follows: To increase or decrease the frequency by one step, briefly press either the 'UP' (13) or 'DOWN' (15) button respectively. The spacing of the steps varies depending on the frequency band selected. For FM it is 0.1 MHz, 9 khz for 'AM-EU', 10 khz for 'AM-US', 5 khz for 'SW' and 9 khz for 'LW'. Fine tuning a station You have the option of refining the tuning resolution of the tuning controls according to the following table, in the event that a station cannot be exactly located. To configure this, do the following: When the radio is switched on, press 'MODE' three times. The current frequency is displayed on the screen (5) and the current tuning resolution is shown in the bottom right-hand corner. English - 29
32 You can now use the 'UP' (13) or 'DOWN' (15) buttons to select set tuning to normal or fine. The setting will be saved automatically. Frequency range: UKW (FM) MW (AM) EU MW (AM) US SW LW 30 - English Fine / normal tuning resolution 100 khz / 50 khz 9 khz / 1 khz 10 khz / 1 khz 5 khz / 1 khz 9 khz / 1 khz Manually saving stations It is possible to save 100 stations or frequencies per frequency band. To do this, proceed as follows: Find a station that you would like to save. Briefly press the 'TIME/MEM' button (8). The previously chosen memory location (35) is displayed on the screen (5) and 'PRESET' (24) is flashing. Use the 'M-' (16) or 'M+' (14) buttons to choose the memory location in which you wish to store your station. You can also hold down the buttons to move more quickly through the numbers. Press the 'TIME/MEM' button (8) to finish saving. Please note this will overwrite memory locations that are already in use. Go to a saved station To go to a station that you have previously saved, use the 'M-' (16) or 'M+' (14) buttons to choose the memory location in which your chosen station is stored. You can also hold down the buttons to move more quickly through the numbers.
33 Please note: The memory locations are not in use in the default setting. When a memory location not in use is selected, the previously selected station continues to play. If a memory location is in use, the stored frequency is maintained until it is overwritten by saving once again. If the multi-band radio is not supplied with electricity, the time settings are lost but any saved stations will be retained. Playback in stereo Playback can only be in stereo quality when earphones are attached. When this is the case, the 'STEREO' icon (37) appears on the screen (5). SLEEP timer With the SLEEP timer, you can set a time between 10 and 90 minutes, after which your multi-band radio (A) will automatically switch off. This can be set in intervals of ten minutes. Proceed as follows: Switch off the device using the 'POWER/SLEEP' button (6). Press the 'POWER/SLEEP' button (6) for about one second, until the number 90 (for 90 minutes) appears on the screen (5). Now press the 'POWER/SLEEP' button (6) until the desired number of minutes has been reached (e.g., 40). Each time the 'POWER/SLEEP' button (6) is pressed, the duration until the radio switches off is reduced by ten minutes. The multi-band radio (A) will now switch on and will switch off automatically after the number of minutes (e.g., 40) that was selected. The 'SLEEP' icon (28) is visible on the screen (5) when the SLEEP timer is activated. English - 31
34 While the SLEEP timer is activated you can still change the frequency band, begin scanning for stations, access saved stations and set the volume. You can cancel the activated SLEEP timer by switching off the device. Set the alarm time You have the option of setting two alarm times (AL1 and AL2). Ensure that the clock has been set to the correct time. The alarm time can only be altered when the radio is switched off. If it is on, press the 'POWER/SLEEP' button (6) to switch it off. Below is a description of how to set up AL1. AL2 can be set in the same way. If no buttons are pressed for five seconds during set-up, the settings will be accepted and the set-up mode will be ended. Press the 'VOL-/AL1' button (2) for about one second. The time in hours will flash on the screen (5). Now use the 'UP' (13) or 'DOWN' (15) buttons to set the desired time for the alarm. You can also hold down the buttons to move more quickly through the numbers. To accept the settings, briefly press on the 'VOL-/AL1' button (2). Now you can choose which weekdays the alarm time should apply to. You can use the "UP" (13) or "DOWN" buttons to continue choosing the following alternatives. All weekdays Individual weekdays Weekdays from Monday to Friday Weekends Saturday and Sunday To accept the settings, briefly press on the 'VOL-/AL1' button (2). You can now use the 'UP' (13) or 'DOWN' (15) buttons to set the alarm volume. Please note that the alarm volume setting only applies if it is the 32 - English
35 radio that is being used as an alarm. The volume of the buzzer alarm is unaffected by this setting. The alarm time has now been set. Activate the alarm Below is a description of how to set up AL1. The same procedure applies to AL2. When you have set the alarm time, you can activate the alarm function as follows: When the radio is switched off, briefly press the 'VOL-/AL1' button (2) once to activate the radio alarm. The associated icon (31) appears on the screen. Please note that earphones must not be connected when using the radio alarm. Briefly press the 'VOL-/AL1' button (2) for a second time to activate the buzzer alarm. The associated icon (30) appears on the screen. At the time the alarm was set for, the device will switch on automatically, at the same frequency that it was last tuned to and in the same frequency band. However, if you chose the buzzer alarm setting, you will be woken up by this instead. To switch off the alarm sound, press the 'VOL-/AL1' button (2) or press the 'SNOOZE' button (4) to delay the alarm for about five more minutes. The alarm icon (30, 31) will be flashing. Once the five minute snooze period if over, the alarm sound will switch on again. If you press the 'BAND' button (9) during the five minute snooze period, the snooze function will be deactivated but the alarm function will remain activated. The default setting for snooze duration is five minutes. You can increase the snooze time up to 120 minutes, according to your English - 33
36 preference. To do this, hold down the 'SNOOZE' button for about one second when the radio is switched off. The current snooze duration setting will be displayed on the screen (5). You can use the 'UP' (13) or 'DOWN' buttons to change the snooze duration. You can also hold down the buttons to move more quickly through the numbers. Briefly press the 'SNOOZE' button (4) to accept the setting. To deactivate the alarm, keep pressing the 'VOL-/AL1' button (2) until the alarm icon (30, 31) is no longer displayed on the screen. You can still use the device as normal when the alarm function is activated. Please note: Radio alarm: The automatic alarm will turn the radio on at the same frequency that it was last tuned to and in the same frequency band. Buzzer alarm: The automatic alarm will always be at a pre-set volume. This volume cannot be changed. Activate / deactivate the button lock Press the 'LOCK' button (11) for about a second in order to activate the button lock on the multi-band radio. The 'LOCK' icon (27) will now flash on the screen. When the button lock is activated, you can still use the following functions: Stop the alarm Activate the 'SNOOZE' function on the alarm End the 'SNOOZE' function by pressing the 'BAND' button Activate the light-up screen 34 - English
37 Any further actions require the button lock to be deactivated again by pressing and holding the 'LOCK' button (11) again for about one second. The 'LOCK' icon (27) will no longer be flashing on the screen (5). Connecting the earphones DANGER! Do not use any other earphones than the SWED 500 A1 pair supplied. Using other earphones can lead to harmful sound pressure levels. Take care when using earphones. Listening at full volume for prolonged periods can damage the user's hearing. You can connect the SWED 500 A1 earphones supplied (D) to the earphone socket (22). When the earphones are inserted, the loudspeaker (17) is automatically switched off and the volume is automatically reduced. Storing the device when not in use If you will not be using the device for a prolonged period of time, remove any batteries that you may have inserted. Keep the device in a cool, dry place. To protect it from dust, we recommend storing it in the case (C) supplied. Troubleshooting The device will not switch on Check that the mains adapter is connected. If you have inserted batteries, these may be empty; replace with new batteries. Check that the batteries are inserted with the correct polarity. Observe the marking on the battery housing and on the batteries. See also the section entitled 'Inserting the batteries'. English - 35
38 Check whether the button lock is activated. If so, press the 'LOCK' button (11) for about a second in order to deactivate the button lock. No radio reception, poor radio reception Pull out the telescopic aerial (1) as far as it will go and ensure it is correctly oriented. Configure the station correctly. It may be necessary to start a new search. Check that the 'DX/LOCAL' selection switch (23) is in the correct position. See also the section entitled 'Set up reception sensitivity'. No sound despite the device being switched on Check the volume settings. If a set of earphones are connected, the in-built loudspeaker is switched off. I cannot use the controls on the device Check whether the button lock is activated. Environmental and waste disposal information If this icon with a crossed out disposal bin is displayed on a product, this product is governed by the European Directive 2012/19/EU. All electrical and electronic equipment must not be put in the household waste, but must be disposed of via designated public disposal centres. Before disposing of this device, remove the batteries. By properly disposing of the old/defective device, you can avoid environmental damage and hazards to health. Further information regarding disposal of the old/defective device can be obtained from your local authority or the shop where you purchased the product English
39 Disposing of packaging Make sure the packaging is disposed of in an environmentally friendly manner. Cardboard packaging can be put out for waste-paper collection or taken to public collection points for recycling. The plastic packaging used for your device is collected by your local waste management company and disposed of in an environmentally sound manner. Disposing of batteries Consider the environment. Used batteries should not be disposed alongside household waste. They should be brought to a collection point for old batteries. Please note that you should only take discharged batteries to the old battery collection point. As a precaution, use sticky tape to tape up the contacts of batteries that are not completely discharged. Marks of conformity This device conforms to the fundamental requirements and other relevant regulations of the EMC Directive 2004/108/EC, the Low Voltage Directive 2006/95/EC, the ErP Directive 2009/125/EC and the RoHS Directive 2011/65/EU. The corresponding declaration of conformity can be found at the end of this manual. Guarantee and service Warranty of TARGA GmbH This device is sold with three years warranty from the date of purchase. Please keep the original receipt in a safe place as proof of purchase. Before using your product for the first time, please read the enclosed documentation. Should any problems arise which cannot be solved in this way, please call our hotline. Please have the article number and, if available, the serial number to hand for all enquiries. If it is not possible to solve the problem on the phone, our hotline support staff will initiate further servicing procedures depending on the fault. English - 37
40 Within the warranty period the product will be repaired or replaced free of charge as we deem appropriate. No new warranty period commences if the product is repaired or replaced. Consumables such as batteries, rechargeable batteries and lamps are not covered by the warranty. Your statutory rights towards the seller are not affected or restricted by this warranty. Service Phone: Phone: Phone: Phone: IAN: Manufacturer TARGA GmbH Coesterweg SOEST GERMANY 38 - English
41 Περιεχόμενα Εισαγωγή Προβλεπόμενη χρήση Περιεχόμενα συσκευασίας Τεχνικά στοιχεία Υποδείξεις ασφαλείας Δικαιώματα πνευματικής ιδιοκτησίας Επισκόπηση στοιχείων χειρισμού και λειτουργιών πλήκτρων.. 52 Ενδείξεις οθόνης Βάση στήριξης Πριν από τη θέση σε λειτουργία Λειτουργία με ρεύμα και μπαταρίες Τοποθέτηση μπαταριών Σύνδεση του εμβυσματούμενου τροφοδοτικού Θέση σε λειτουργία Φωτισμός οθόνης Ενεργοποίηση και απενεργοποίηση της συσκευής Λειτουργίες του πλήκτρου MODE Ρύθμιση ζώνης ώρας Ρύθμιση ημερομηνίας / ώρας Εμφάνιση παγκόσμιας ώρας SDA (ειδοποίηση σε συγκεκριμένη ημερομηνία) Βραχυπρόθεσμη αφύπνιση (NAP Timer) Χρονόμετρο Ρύθμιση περιοχής λήψης AM Ρύθμιση έντασης ήχου Ρύθμιση της ευαισθησίας λήψης Ενεργοποίηση ενίσχυσης μπάσων Επιλογή σταθμού Αυτόματη αναζήτηση σταθμών με λειτουργία αυτόματης αποθήκευσης Χειροκίνητη αναζήτηση σταθμών Χειροκίνητη ρύθμιση σταθμών Ελληνικά - 39
42 Ακριβής συντονισμός σταθμών Χειροκίνητη αποθήκευση σταθμών Εμφάνιση αποθηκευμένων σταθμών Αναπαραγωγή στερεοφωνικού ήχου Χρονοδιακόπτης αυτόματου τερματισμού (SLEEP Timer) Ρύθμιση ώρας αφύπνισης (ξυπνητήρι) Ενεργοποίηση της λειτουργίας αφύπνισης Ενεργοποίηση / απενεργοποίηση κλειδώματος πλήκτρων Σύνδεση των ακουστικών Αποθήκευση σε περίπτωση μη χρήσης Αντιμετώπιση σφαλμάτων Υποδείξεις σχετικά με το περιβάλλον και πληροφορίες για την απόρριψη Σημειώσεις σχετικά με τη συμμόρφωση Υποδείξεις σχετικά με την εγγύηση και το σέρβις Ελληνικά
43 Εισαγωγή Σας ευχαριστούμε που επιλέξατε ένα προϊόν της SilverCrest. Με το ραδιόφωνο παγκόσμιας λήψης SilverCrest SWED 500 A1 μπορείτε να συντονίζεστε σε σταθμούς της ζώνης UKW, της ζώνης μεσαίων κυμάτων, σε σταθμούς 9 διαφορετικών ζωνών λήψης βραχέων κυμάτων και σε σταθμούς της ζώνης μακρών κυμάτων. Επίσης, η συσκευή διαθέτει ψηφιακό ρολόι το οποίο μπορείτε να προγραμματίζετε ως ξυπνητήρι. Προβλεπόμενη χρήση Αυτό το προϊόν είναι μια ηλεκτρονική συσκευή ευρείας κατανάλωσης και χρησιμεύει στη λήψη και αναπαραγωγή ραδιοφωνικών σταθμών. Η συσκευή μπορεί επίσης να χρησιμοποιηθεί ως ρολόι και ξυπνητήρι. Προορίζεται μόνο για προσωπική χρήση και όχι για βιομηχανικούς ή εμπορικούς σκοπούς. Επίσης, δεν επιτρέπεται η χρήση της συσκευής σε τροπικές κλιματικές περιοχές. Αποκλείεται οποιαδήποτε ευθύνη του κατασκευαστή για ζημιές ή βλάβες που προκύπτουν σε περίπτωση αυθαίρετων μετατροπών της συσκευής. Χρησιμοποιείτε μόνο τα πρόσθετα εξαρτήματα που παρέχονται από τον κατασκευαστή. Λάβετε υπόψη σας τις προδιαγραφές ή/και τους νόμους που ισχύουν στην εκάστοτε χώρα χρήσης του προϊόντος. Λάβετε υπόψη σας ότι στις διάφορες χώρες μπορεί να υπάρχουν διαφορετικές εθνικές ρυθμίσεις που ορίζουν σε ποιες περιοχές συχνοτήτων επιτρέπεται η ελεύθερη λήψη. Οι πληροφορίες που λαμβάνονται εκτός των εκχωρημένων περιοχών συχνοτήτων δεν επιτρέπεται να αξιοποιούνται, ούτε επιτρέπεται να αποκαλύπτεται το περιεχόμενό τους σε τρίτους ή το γεγονός της λήψης τους. Ελληνικά - 41
44 Περιεχόμενα συσκευασίας Βγάλτε τη συσκευή και όλα τα πρόσθετα εξαρτήματα από τη συσκευασία. Αφαιρέστε όλα τα υλικά συσκευασίας και ελέγξτε αν όλα τα εξαρτήματα είναι πλήρη και σε άψογη κατάσταση. Σε περίπτωση που κάποια περιεχόμενα της συσκευασίας λείπουν ή παρουσιάζουν ζημία, απευθυνθείτε στον κατασκευαστή. A B C D E Ραδιόφωνο παγκόσμιας λήψης SWED 500 A1 Εμβυσματούμενο τροφοδοτικό Θήκη Ακουστικά SWED 500 A1 Αυτές οι οδηγίες χρήσης (εικονίδιο) 42 - Ελληνικά
45 Τεχνικά στοιχεία Αυτά τα στοιχεία αφορούν μόνο τις τεχνικές δυνατότητες της συσκευής. Στις διάφορες χώρες μπορεί να εφαρμόζονται διαφορετικές νομικές ρυθμίσεις για την περιοχή συχνοτήτων ελεύθερης λήψης. Λάβετε υπόψη σας ότι η λήψη κατά παράβαση αυτών των ρυθμίσεων μπορεί να θεωρηθεί παράνομη και να επισύρει την επιβολή ποινής. Παροχή ρεύματος Παρεχόμενο εμβυσματούμενο τροφοδοτικό: Κατασκευαστής: TAIYTECH Μοντέλο: TYTM UK 6V, 0,3A 4 προαιρετικές μπαταρίες AA 1,5V (Mignon, LR6) Πολικότητα εμβυσματούμενου τροφοδοτικού Μέγιστη απαίτηση σε ηλεκτρικό ρεύμα 0,3A Κατανάλωση ισχύος σε λειτουργία ραδιοφώνου: περ. 0,6 W σε κατάσταση αναμονής (standby): < 0,2 W Ισχύς εξόδου ήχου 500mW Ζώνες συχνοτήτων FM 87,5-108 MHz Λάβετε υπόψη σας ότι λόγω των ανοχών κατασκευής η διαθέσιμη περιοχή λήψης χαμηλών και υψηλών σημάτων μπορεί να παρουσιάζει μια ελάχιστη απόκλιση. MW SW1 SW2 SW3 SW4 SW KHz 4,75 5,94 MHz 5,95 7,09 MHz 7,10 9,49 MHz 9,50 11,64 MHz 11,65 13,59 MHz Ελληνικά - 43
46 Θέσεις αποθηκευμένων σταθμών SW6 SW7 SW8 SW9 LW 13,60 15,09 MHz 15,10 17,49 MHz 17,50 21,44 MHz 21,45 21,85 MHz KHz 400 (100 σε κάθε ζώνη συχνοτήτων) Διαστάσεις περ. 17,7 x 3,9 x 11 cm (Π x Β x Υ) Βάρος Ακουστικά Αντίσταση περ. 300 g (χωρίς μπαταρίες) SWED 500 A1 32 Ω Χαρακτηριστική τάση ευρείας ζώνης περ. 90mV +/-10% Μέγιστη ηχητική πίεση με τα παρεχόμενα ακουστικά Μέγιστη τάση εξόδου στη σύνδεση των ακουστικών Διάρκεια λειτουργίας μπαταρίας περ. 90 db(a) περ. 40mV περ. 40 ώρες Θερμοκρασία λειτουργίας 5 C έως 35 C Συνθήκες αποθήκευσης -10 C έως 50 C Υπόδειξη: Η συσκευή δεν επιτρέπεται να φυλάσσεται σε χώρους με υψηλή θερμοκρασία, π.χ. το καλοκαίρι μέσα στο αυτοκίνητο. Υγρασία αέρα λειτουργίας Μέγ. σχετική υγρασία 85% Τα τεχνικά στοιχεία, καθώς και ο σχεδιασμός ενδέχεται να αλλάξουν χωρίς προειδοποίηση Ελληνικά
47 Υποδείξεις ασφαλείας Προτού χρησιμοποιήσετε τη συσκευή για πρώτη φορά, διαβάστε προσεκτικά τις παρακάτω οδηγίες και λάβετε υπόψη σας όλες τις προειδοποιητικές υποδείξεις, ακόμα και αν είστε εξοικειωμένοι με τη χρήση ηλεκτρονικών συσκευών. Φυλάξτε αυτές τις οδηγίες προσεκτικά για μελλοντική αναφορά. Αν θέλετε να πουλήσετε ή να δώσετε τη συσκευή σε τρίτους, παραδώστε οπωσδήποτε μαζί και αυτές τις οδηγίες. Αποτελούν αναπόσπαστο μέρος του προϊόντος. ΚΙΝΔΥΝΟΣ! Αυτό το σύμβολο με την προειδοποιητική λέξη «Κίνδυνος», επισημαίνει επικείμενη επικίνδυνη κατάσταση η οποία, αν δεν αποτραπεί, μπορεί προκαλέσει σοβαρούς τραυματισμούς ή ακόμα και θάνατο. ΠΡΟΕΙΔΟΠΟΙΗΣΗ! Αυτό το σύμβολο με την προειδοποιητική λέξη «Προειδοποίηση» επισημαίνει σημαντικές υποδείξεις για την ασφαλή λειτουργία της συσκευής και την προστασία του χρήστη. Αυτό το σύμβολο επισημαίνει επικείμενο κίνδυνο από ηλεκτροπληξία. Αυτό το σύμβολο επισημαίνει περαιτέρω ενημερωτικές υποδείξεις σχετικά με το θέμα. Κίνδυνοι από υπερβολικά υψηλή στάθμη ακουστότητας Προσοχή κατά τη χρήση ακουστικών. Η παρατεταμένη ακρόαση με υψηλή ένταση ήχου μπορεί να προκαλέσει ακουστικές βλάβες στον χρήστη. ΚΙΝΔΥΝΟΣ! 1. Χρησιμοποιείτε μόνο τα ακουστικά (D) που παρέχονται μαζί με τη συσκευή τύπος: SWED 500 A1. Η χρήση διαφορετικών Ελληνικά - 45
the total number of electrons passing through the lamp.
 1. A 12 V 36 W lamp is lit to normal brightness using a 12 V car battery of negligible internal resistance. The lamp is switched on for one hour (3600 s). For the time of 1 hour, calculate (i) the energy
ΟΔΗΓΙΕΣ ΧΡΗΣΗΣ USE INSTRUCTIONS
 ΟΔΗΓΙΕΣ ΧΡΗΣΗΣ USE INSTRUCTIONS ΤΗΛΕΦΩΝΟ ΜΕ ΑΝΑΓΝΩΡΙΣΗ ΚΛΗΣΗΣ /CORDED PHONE WITH CALLER ID ΜΟΝΤΕΛΟ/MODEL: TM09-448 DC48V Παρακαλούμε διαβάστε προσεκτικά όλες τις οδηγίες χρήσης πριν την χρήση της συσκευής
Περιεχόμενα / Contents
 Aερόθερμo / Fan Heater PTC-906 Περιεχόμενα / Contents GR... Σελίδες 3-8 EN... Pages 9-11 2 GR Ευχαριστούμε που επιλέξατε μια συσκευή της γκάμας θερμαντικών IZZY. Σημαντικές Οδηγίες Ασφαλείας Τα Μέρη της
Instruction Execution Times
 1 C Execution Times InThisAppendix... Introduction DL330 Execution Times DL330P Execution Times DL340 Execution Times C-2 Execution Times Introduction Data Registers This appendix contains several tables
Εγκατάσταση λογισμικού και αναβάθμιση συσκευής Device software installation and software upgrade
 Για να ελέγξετε το λογισμικό που έχει τώρα η συσκευή κάντε κλικ Menu > Options > Device > About Device Versions. Στο πιο κάτω παράδειγμα η συσκευή έχει έκδοση λογισμικού 6.0.0.546 με πλατφόρμα 6.6.0.207.
Οδηγίες Αγοράς Ηλεκτρονικού Βιβλίου Instructions for Buying an ebook
 Οδηγίες Αγοράς Ηλεκτρονικού Βιβλίου Instructions for Buying an ebook Βήμα 1: Step 1: Βρείτε το βιβλίο που θα θέλατε να αγοράσετε και πατήστε Add to Cart, για να το προσθέσετε στο καλάθι σας. Αυτόματα θα
BFN3000 ΕΠΙΤΡΑΠΕΖΙΟΣ ΑΝΕΜΙΣΤΗΡΑΣ. Owner s manual. Μετάφραση του πρωτοτύπου των οδηγιών χρήσης
 BFN3000 ΕΠΙΤΡΑΠΕΖΙΟΣ ΑΝΕΜΙΣΤΗΡΑΣ Μετάφραση του πρωτοτύπου των οδηγιών χρήσης Owner s manual www.bormanntools.com GR Οδηγίες ασφαλούς λειτουργίας 1. Τα χαρακτηριστικά της παροχής ηλεκτρικού ρεύματος θα
Right Rear Door. Let's now finish the door hinge saga with the right rear door
 Right Rear Door Let's now finish the door hinge saga with the right rear door You may have been already guessed my steps, so there is not much to describe in detail. Old upper one file:///c /Documents
ΚΥΠΡΙΑΚΗ ΕΤΑΙΡΕΙΑ ΠΛΗΡΟΦΟΡΙΚΗΣ CYPRUS COMPUTER SOCIETY ΠΑΓΚΥΠΡΙΟΣ ΜΑΘΗΤΙΚΟΣ ΔΙΑΓΩΝΙΣΜΟΣ ΠΛΗΡΟΦΟΡΙΚΗΣ 19/5/2007
 Οδηγίες: Να απαντηθούν όλες οι ερωτήσεις. Αν κάπου κάνετε κάποιες υποθέσεις να αναφερθούν στη σχετική ερώτηση. Όλα τα αρχεία που αναφέρονται στα προβλήματα βρίσκονται στον ίδιο φάκελο με το εκτελέσιμο
Modbus basic setup notes for IO-Link AL1xxx Master Block
 n Modbus has four tables/registers where data is stored along with their associated addresses. We will be using the holding registers from address 40001 to 49999 that are R/W 16 bit/word. Two tables that
Potential Dividers. 46 minutes. 46 marks. Page 1 of 11
 Potential Dividers 46 minutes 46 marks Page 1 of 11 Q1. In the circuit shown in the figure below, the battery, of negligible internal resistance, has an emf of 30 V. The pd across the lamp is 6.0 V and
derivation of the Laplacian from rectangular to spherical coordinates
 derivation of the Laplacian from rectangular to spherical coordinates swapnizzle 03-03- :5:43 We begin by recognizing the familiar conversion from rectangular to spherical coordinates (note that φ is used
SPEEDO AQUABEAT. Specially Designed for Aquatic Athletes and Active People
 SPEEDO AQUABEAT TM Specially Designed for Aquatic Athletes and Active People 1 2 Decrease Volume Increase Volume Reset EarphonesUSBJack Power Off / Rewind Power On / Fast Forward Goggle clip LED Status
Bbc7000 ΦΟΡΤΙΣΤΗΣ - ΕΚΚΙΝΗΤΗΣ ΜΠΑΤΑΡΙΑΣ. Art Nr: Owner s manual. Μετάφραση του πρωτοτύπου των οδηγιών χρήσης
 Bbc7000 ΦΟΡΤΙΣΤΗΣ - ΕΚΚΙΝΗΤΗΣ ΜΠΑΤΑΡΙΑΣ Μετάφραση του πρωτοτύπου των οδηγιών χρήσης Art Nr: 022213 Owner s manual Διαβάστε προσεχτικά όλες τις οδηγίες χρήσης και ασφάλειας πριν την λειτουργία του μηχανήματος.
Math 6 SL Probability Distributions Practice Test Mark Scheme
 Math 6 SL Probability Distributions Practice Test Mark Scheme. (a) Note: Award A for vertical line to right of mean, A for shading to right of their vertical line. AA N (b) evidence of recognizing symmetry
[1] P Q. Fig. 3.1
![[1] P Q. Fig. 3.1](/thumbs/79/80362156.jpg "[1] P Q. Fig. 3.1") 1 (a) Define resistance....... [1] (b) The smallest conductor within a computer processing chip can be represented as a rectangular block that is one atom high, four atoms wide and twenty atoms long. One
1 (a) Define resistance....... [1] (b) The smallest conductor within a computer processing chip can be represented as a rectangular block that is one atom high, four atoms wide and twenty atoms long. One
Section 8.3 Trigonometric Equations
 99 Section 8. Trigonometric Equations Objective 1: Solve Equations Involving One Trigonometric Function. In this section and the next, we will exple how to solving equations involving trigonometric functions.
9.09. # 1. Area inside the oval limaçon r = cos θ. To graph, start with θ = 0 so r = 6. Compute dr
 9.9 #. Area inside the oval limaçon r = + cos. To graph, start with = so r =. Compute d = sin. Interesting points are where d vanishes, or at =,,, etc. For these values of we compute r:,,, and the values
Capacitors - Capacitance, Charge and Potential Difference
 Capacitors - Capacitance, Charge and Potential Difference Capacitors store electric charge. This ability to store electric charge is known as capacitance. A simple capacitor consists of 2 parallel metal
2 Composition. Invertible Mappings
 Arkansas Tech University MATH 4033: Elementary Modern Algebra Dr. Marcel B. Finan Composition. Invertible Mappings In this section we discuss two procedures for creating new mappings from old ones, namely,
Code Breaker. TEACHER s NOTES
 TEACHER s NOTES Time: 50 minutes Learning Outcomes: To relate the genetic code to the assembly of proteins To summarize factors that lead to different types of mutations To distinguish among positive,
Section 1: Listening and responding. Presenter: Niki Farfara MGTAV VCE Seminar 7 August 2016
 Section 1: Listening and responding Presenter: Niki Farfara MGTAV VCE Seminar 7 August 2016 Section 1: Listening and responding Section 1: Listening and Responding/ Aκουστική εξέταση Στο πρώτο μέρος της
Quick Installation Guide
 A Installation 1 F H B E C D G 2 www.trust.com/17528/faq Quick Installation Guide C C D Freewave Wireless Audio Set 17528/ 17529 D Installation Configuration Windows XP 4 5 8 Windows 7/ Vista 6 7 9 10
Δημιουργία Λογαριασμού Διαχείρισης Business Telephony Create a Management Account for Business Telephony
 Δημιουργία Λογαριασμού Διαχείρισης Business Telephony Create a Management Account for Business Telephony Ελληνικά Ι English 1/7 Δημιουργία Λογαριασμού Διαχείρισης Επιχειρηματικής Τηλεφωνίας μέσω της ιστοσελίδας
department listing department name αχχουντσ ϕανε βαλικτ δδσϕηασδδη σδηφγ ασκϕηλκ τεχηνιχαλ αλαν ϕουν διξ τεχηνιχαλ ϕοην µαριανι
 She selects the option. Jenny starts with the al listing. This has employees listed within She drills down through the employee. The inferred ER sttricture relates this to the redcords in the databasee
Strain gauge and rosettes
 Strain gauge and rosettes Introduction A strain gauge is a device which is used to measure strain (deformation) on an object subjected to forces. Strain can be measured using various types of devices classified
How to register an account with the Hellenic Community of Sheffield.
 How to register an account with the Hellenic Community of Sheffield. (1) EN: Go to address GR: Πηγαίνετε στη διεύθυνση: http://www.helleniccommunityofsheffield.com (2) EN: At the bottom of the page, click
The challenges of non-stable predicates
 The challenges of non-stable predicates Consider a non-stable predicate Φ encoding, say, a safety property. We want to determine whether Φ holds for our program. The challenges of non-stable predicates
Έλεγχος και Διασφάλιση Ποιότητας
 Έλεγχος και Διασφάλιση Ποιότητας Ενότητα 6: Κουππάρης Μιχαήλ Τμήμα Χημείας Εργαστήριο Αναλυτικής Χημείας General Successfully carry out the Preventive Maintenance Procedure and complete the Maintenance
ΚΥΠΡΙΑΚΟΣ ΣΥΝΔΕΣΜΟΣ ΠΛΗΡΟΦΟΡΙΚΗΣ CYPRUS COMPUTER SOCIETY 21 ος ΠΑΓΚΥΠΡΙΟΣ ΜΑΘΗΤΙΚΟΣ ΔΙΑΓΩΝΙΣΜΟΣ ΠΛΗΡΟΦΟΡΙΚΗΣ Δεύτερος Γύρος - 30 Μαρτίου 2011
 Διάρκεια Διαγωνισμού: 3 ώρες Απαντήστε όλες τις ερωτήσεις Μέγιστο Βάρος (20 Μονάδες) Δίνεται ένα σύνολο από N σφαιρίδια τα οποία δεν έχουν όλα το ίδιο βάρος μεταξύ τους και ένα κουτί που αντέχει μέχρι
3.4 SUM AND DIFFERENCE FORMULAS. NOTE: cos(α+β) cos α + cos β cos(α-β) cos α -cos β
 cos α + cos β cos(α-β) cos α -cos β") 3.4 SUM AND DIFFERENCE FORMULAS Page Theorem cos(αβ cos α cos β -sin α cos(α-β cos α cos β sin α NOTE: cos(αβ cos α cos β cos(α-β cos α -cos β Proof of cos(α-β cos α cos β sin α Let s use a unit circle
3.4 SUM AND DIFFERENCE FORMULAS Page Theorem cos(αβ cos α cos β -sin α cos(α-β cos α cos β sin α NOTE: cos(αβ cos α cos β cos(α-β cos α -cos β Proof of cos(α-β cos α cos β sin α Let s use a unit circle
Εργαστήριο Ανάπτυξης Εφαρμογών Βάσεων Δεδομένων. Εξάμηνο 7 ο
 Εργαστήριο Ανάπτυξης Εφαρμογών Βάσεων Δεδομένων Εξάμηνο 7 ο Procedures and Functions Stored procedures and functions are named blocks of code that enable you to group and organize a series of SQL and PL/SQL
UDZ Swirl diffuser. Product facts. Quick-selection. Swirl diffuser UDZ. Product code example:
 UDZ Swirl diffuser Swirl diffuser UDZ, which is intended for installation in a ventilation duct, can be used in premises with a large volume, for example factory premises, storage areas, superstores, halls,
Συστήματα Διαχείρισης Βάσεων Δεδομένων
 ΕΛΛΗΝΙΚΗ ΔΗΜΟΚΡΑΤΙΑ ΠΑΝΕΠΙΣΤΗΜΙΟ ΚΡΗΤΗΣ Συστήματα Διαχείρισης Βάσεων Δεδομένων Φροντιστήριο 9: Transactions - part 1 Δημήτρης Πλεξουσάκης Τμήμα Επιστήμης Υπολογιστών Tutorial on Undo, Redo and Undo/Redo
(1) Describe the process by which mercury atoms become excited in a fluorescent tube (3)
 Describe the process by which mercury atoms become excited in a fluorescent tube (3)") Q1. (a) A fluorescent tube is filled with mercury vapour at low pressure. In order to emit electromagnetic radiation the mercury atoms must first be excited. (i) What is meant by an excited atom? (1) (ii)
Q1. (a) A fluorescent tube is filled with mercury vapour at low pressure. In order to emit electromagnetic radiation the mercury atoms must first be excited. (i) What is meant by an excited atom? (1) (ii)
PortSip Softphone. Ελληνικά Ι English 1/20
 PortSip Softphone Ελληνικά Ι English 1/20 1. Περιεχόμενα 2. Εγκατάσταση σε Smartphone & Tablet (Android ή ios)... 1 3. Εγκατάσταση σε ηλεκτρονικό υπολογιστή (Windows ή Mac).... 5 4. Installation in Smartphone
Thin Film Chip Resistors
 FEATURES PRECISE TOLERANCE AND TEMPERATURE COEFFICIENT EIA STANDARD CASE SIZES (0201 ~ 2512) LOW NOISE, THIN FILM (NiCr) CONSTRUCTION REFLOW SOLDERABLE (Pb FREE TERMINATION FINISH) Type Size EIA PowerRating
HOMEWORK 4 = G. In order to plot the stress versus the stretch we define a normalized stretch:
 HOMEWORK 4 Problem a For the fast loading case, we want to derive the relationship between P zz and λ z. We know that the nominal stress is expressed as: P zz = ψ λ z where λ z = λ λ z. Therefore, applying
Modern Greek Extension
 Centre Number 2017 HIGHER SCHOOL CERTIFICATE EXAMINATION Student Number Modern Greek Extension Written Examination General Instructions Reading time 10 minutes Working time 1 hour and 50 minutes Write
Advanced Subsidiary Unit 1: Understanding and Written Response
 Write your name here Surname Other names Edexcel GE entre Number andidate Number Greek dvanced Subsidiary Unit 1: Understanding and Written Response Thursday 16 May 2013 Morning Time: 2 hours 45 minutes
The municipality of Apokoronas has created a new app for your smart phone.
 1 The municipality of Apokoronas has created a new app for your smart phone. It is now available from itunes and the Google Play Store For Apple Smart Phones: https://itunes.apple.com/us/app/%ce%b4%ce%ae%ce%bc%ce%bf%cf%82-
Phys460.nb Solution for the t-dependent Schrodinger s equation How did we find the solution? (not required)
") Phys460.nb 81 ψ n (t) is still the (same) eigenstate of H But for tdependent H. The answer is NO. 5.5.5. Solution for the tdependent Schrodinger s equation If we assume that at time t 0, the electron starts
Phys460.nb 81 ψ n (t) is still the (same) eigenstate of H But for tdependent H. The answer is NO. 5.5.5. Solution for the tdependent Schrodinger s equation If we assume that at time t 0, the electron starts
Κωδικός QR ενεργοποίησης
 Εγχειρίδιο χρήσης Το εγχειρίδιο αυτό ισχύει για τα κλιματιστικά MORRIS με λειτουργία WiFi. Παρακαλούμε να διαβάσετε το εγχειρίδιο προσεκτικά πριν την χρήση του κλιματιστικού και να το κρατήσετε για μελλοντική
OUR PRODUCT RANGE. www.rakson.gr
 ΤΑ ΑΛΛΑ ΕΙ Η ΠΡΟΪΟΝΤΑ ΜΑΣ ΜΕΤΑΣΧΗΜΑΤΙΣΤΕΣ ΚΟΥ ΟΥΝΙΩΝ ΚΟΥ ΟΥΝΙΑ ΜΠΟΥΤΟΝ ΚΟΥ ΟΥΝΙΩΝ ΑΥΤΟΜΑΤΟΙ ΚΛΙΜΑΚΟΣΤΑΣΙΟΥ ΚΛΕΙ ΑΡΙΕΣ ΑΝΙΧΝΕΥΤΕΣ ΚΙΝΗΣΗΣ ΣΥΣΤΗΜΑΤΑ ΕΠΙΚΟΙΝΩΝΙΑΣ Θυροτηλεοράσεις Θυροτηλέφωνα Ενδοεπικοινωνίες
Paper Reference. Paper Reference(s) 1776/04 Edexcel GCSE Modern Greek Paper 4 Writing. Thursday 21 May 2009 Afternoon Time: 1 hour 15 minutes
 1776/04 Edexcel GCSE Modern Greek Paper 4 Writing. Thursday 21 May 2009 Afternoon Time: 1 hour 15 minutes") Centre No. Candidate No. Paper Reference(s) 1776/04 Edexcel GCSE Modern Greek Paper 4 Writing Thursday 21 May 2009 Afternoon Time: 1 hour 15 minutes Materials required for examination Nil Paper Reference
Centre No. Candidate No. Paper Reference(s) 1776/04 Edexcel GCSE Modern Greek Paper 4 Writing Thursday 21 May 2009 Afternoon Time: 1 hour 15 minutes Materials required for examination Nil Paper Reference
Physical DB Design. B-Trees Index files can become quite large for large main files Indices on index files are possible.
 B-Trees Index files can become quite large for large main files Indices on index files are possible 3 rd -level index 2 nd -level index 1 st -level index Main file 1 The 1 st -level index consists of pairs
CHAPTER 25 SOLVING EQUATIONS BY ITERATIVE METHODS
 CHAPTER 5 SOLVING EQUATIONS BY ITERATIVE METHODS EXERCISE 104 Page 8 1. Find the positive root of the equation x + 3x 5 = 0, correct to 3 significant figures, using the method of bisection. Let f(x) =
PTC FUNCTION for Delta C2000 and CP2000
 FUNCTION for Delta C2000 and CP2000 CONTENTS: GENERAL... 2. for motor temperature protection... 2.2 Standards... 2.3 Motor layout... 2.4 characteristic... 2.4. Definitions... 3.4.2 curve... 3.4.3 switching
Contents. Scanradio SUSR 17 A1. English - 1
 Scanradio SUSR 17 A1 Contents Package Contents... 2 Overview... 3 Important Safety Notice... 5 Batteries... 5 Children... 7 Operating Environment... 7 Maintenance and Care... 7 Intended Use... 8 Danger
Precision Metal Film Fixed Resistor Axial Leaded
 Features EIA standard colour-coding Non-Flame type available Low noise and voltage coefficient Low temperature coefficient range Wide precision range in small package Too low or too high ohmic value can
ΚΥΠΡΙΑΚΗ ΕΤΑΙΡΕΙΑ ΠΛΗΡΟΦΟΡΙΚΗΣ CYPRUS COMPUTER SOCIETY ΠΑΓΚΥΠΡΙΟΣ ΜΑΘΗΤΙΚΟΣ ΔΙΑΓΩΝΙΣΜΟΣ ΠΛΗΡΟΦΟΡΙΚΗΣ 6/5/2006
 Οδηγίες: Να απαντηθούν όλες οι ερωτήσεις. Ολοι οι αριθμοί που αναφέρονται σε όλα τα ερωτήματα είναι μικρότεροι το 1000 εκτός αν ορίζεται διαφορετικά στη διατύπωση του προβλήματος. Διάρκεια: 3,5 ώρες Καλή
The Nottingham eprints service makes this work by researchers of the University of Nottingham available open access under the following conditions.
 Luevorasirikul, Kanokrat (2007) Body image and weight management: young people, internet advertisements and pharmacists. PhD thesis, University of Nottingham. Access from the University of Nottingham repository:
Στο εστιατόριο «ToDokimasesPrinToBgaleisStonKosmo?» έξω από τους δακτυλίους του Κρόνου, οι παραγγελίες γίνονται ηλεκτρονικά.
 Διαστημικό εστιατόριο του (Μ)ΑστροΈκτορα Στο εστιατόριο «ToDokimasesPrinToBgaleisStonKosmo?» έξω από τους δακτυλίους του Κρόνου, οι παραγγελίες γίνονται ηλεκτρονικά. Μόλις μια παρέα πελατών κάτσει σε ένα
1. Αφετηρία από στάση χωρίς κριτή (self start όπου πινακίδα εκκίνησης) 5 λεπτά µετά την αφετηρία σας από το TC1B KALO LIVADI OUT
 5 λεπτά µετά την αφετηρία σας από το TC1B KALO LIVADI OUT") Date: 21 October 2016 Time: 14:00 hrs Subject: BULLETIN No 3 Document No: 1.3 --------------------------------------------------------------------------------------------------------------------------------------
Date: 21 October 2016 Time: 14:00 hrs Subject: BULLETIN No 3 Document No: 1.3 --------------------------------------------------------------------------------------------------------------------------------------
Concrete Mathematics Exercises from 30 September 2016
 Concrete Mathematics Exercises from 30 September 2016 Silvio Capobianco Exercise 1.7 Let H(n) = J(n + 1) J(n). Equation (1.8) tells us that H(2n) = 2, and H(2n+1) = J(2n+2) J(2n+1) = (2J(n+1) 1) (2J(n)+1)
AKC Spectrum Analyzer User s Manual.
 AKC-1291 Spectrum Analyzer User s Manual u ano un ao Prohibiting to removal the cover e m Keep the power insert clean RF in/output rating oae o n DC Power nt Restore this instrument 1. Introduction 2.
C.S. 430 Assignment 6, Sample Solutions
 C.S. 430 Assignment 6, Sample Solutions Paul Liu November 15, 2007 Note that these are sample solutions only; in many cases there were many acceptable answers. 1 Reynolds Problem 10.1 1.1 Normal-order
Οι αδελφοί Montgolfier: Ψηφιακή αφήγηση The Montgolfier Βrothers Digital Story (προτείνεται να διδαχθεί στο Unit 4, Lesson 3, Αγγλικά Στ Δημοτικού)
") Οι αδελφοί Montgolfier: Ψηφιακή αφήγηση The Montgolfier Βrothers Digital Story (προτείνεται να διδαχθεί στο Unit 4, Lesson 3, Αγγλικά Στ Δημοτικού) Προσδοκώμενα αποτελέσματα Περιεχόμενο Ενδεικτικές δραστηριότητες
Οι αδελφοί Montgolfier: Ψηφιακή αφήγηση The Montgolfier Βrothers Digital Story (προτείνεται να διδαχθεί στο Unit 4, Lesson 3, Αγγλικά Στ Δημοτικού) Προσδοκώμενα αποτελέσματα Περιεχόμενο Ενδεικτικές δραστηριότητες
Example Sheet 3 Solutions
 Example Sheet 3 Solutions. i Regular Sturm-Liouville. ii Singular Sturm-Liouville mixed boundary conditions. iii Not Sturm-Liouville ODE is not in Sturm-Liouville form. iv Regular Sturm-Liouville note
Door Hinge replacement (Rear Left Door)
") Door Hinge replacement (Rear Left Door) We will continue the previous article by replacing the hinges of the rear left hand side door. I will use again the same procedure and means I employed during the
Door Hinge replacement (Rear Left Door) We will continue the previous article by replacing the hinges of the rear left hand side door. I will use again the same procedure and means I employed during the
VENERE. GR. Οδηγός Χρήσης EN. User Guide
 GR. Οδηγός Χρήσης EN. User Guide ΣΗΜΑΝΤΙΚΟ! ΚΡΑΤΗΣΤΕ ΓΙΑ ΜΕΛΛΟΝΤΙΚΗ ΑΝΑΦΟΡΑ: ΔΙΑΒΑΣΤΕ ΠΡΟΣΕΚΤΙΚΑ Κίνδυνος από φωτιά και άλλες πηγές έντονης θερμότητας, όπως ηλεκτρικές αντιστάσεις, υγραέριο, φωτιά κλπ,
Econ 2110: Fall 2008 Suggested Solutions to Problem Set 8 questions or comments to Dan Fetter 1
 Eon : Fall 8 Suggested Solutions to Problem Set 8 Email questions or omments to Dan Fetter Problem. Let X be a salar with density f(x, θ) (θx + θ) [ x ] with θ. (a) Find the most powerful level α test
EE512: Error Control Coding
 EE512: Error Control Coding Solution for Assignment on Finite Fields February 16, 2007 1. (a) Addition and Multiplication tables for GF (5) and GF (7) are shown in Tables 1 and 2. + 0 1 2 3 4 0 0 1 2 3
Approximation of distance between locations on earth given by latitude and longitude
 Approximation of distance between locations on earth given by latitude and longitude Jan Behrens 2012-12-31 In this paper we shall provide a method to approximate distances between two points on earth
TIME SWITCHES AND TWILIGHT SWITCHES
 W ANALOG DIN-RAIL TIME SWITCH QUARTZ, SERIES TEMPUS ANALOG 244 W SCHRACK-INFO Analogue time switch 1 channel Daily program With power reserve (NiMH rechargeable battery) Synchronised with mains Shortest
Οδηγίες χρήσης. Registered. Οδηγίες ένταξης σήματος D-U-N-S Registered στην ιστοσελίδα σας και χρήσης του στην ηλεκτρονική σας επικοινωνία
 Οδηγίες χρήσης υλικού D-U-N-S Registered Οδηγίες ένταξης σήματος D-U-N-S Registered στην ιστοσελίδα σας και χρήσης του στην ηλεκτρονική σας επικοινωνία Οδηγίες χρήσης υλικού D-U-N-S Για οποιαδήποτε ερώτηση
10 MERCHIA. 10. Starting from standing position (where the SIGN START ) without marshal (self start) 5 minutes after TC4 KALO LIVADI OUT
 without marshal (self start) 5 minutes after TC4 KALO LIVADI OUT") Date: 22 October 2016 Time: 09:00 hrs Subject: BULLETIN No 5 Document No: 1.6 --------------------------------------------------------------------------------------------------------------------------------------
Date: 22 October 2016 Time: 09:00 hrs Subject: BULLETIN No 5 Document No: 1.6 --------------------------------------------------------------------------------------------------------------------------------------
User s Manual / Οδηγίες Χρήσης
 User s Manual / Οδηγίες Χρήσης EUROPEAN STANDARDS Your child s safety depends on you. Proper bed rail usage cannot be assured unless you follow these instructions. DO NOT USE YOUR BED RAIL UNTILL YOU READ
5.4 The Poisson Distribution.
 The worst thing you can do about a situation is nothing. Sr. O Shea Jackson 5.4 The Poisson Distribution. Description of the Poisson Distribution Discrete probability distribution. The random variable
Surface Mount Aluminum Electrolytic Capacitors
 FEATURES CYLINDRICAL V-CHIP CONSTRUCTION LOW COST, GENERAL PURPOSE, 2000 HOURS AT 85 O C NEW EXPANDED CV RANGE (up to 6800µF) ANTI-SOLVENT (2 MINUTES) DESIGNED FOR AUTOMATIC MOUNTING AND REFLOW SOLDERING
b. Use the parametrization from (a) to compute the area of S a as S a ds. Be sure to substitute for ds!
 to compute the area of S a as S a ds. Be sure to substitute for ds!") MTH U341 urface Integrals, tokes theorem, the divergence theorem To be turned in Wed., Dec. 1. 1. Let be the sphere of radius a, x 2 + y 2 + z 2 a 2. a. Use spherical coordinates (with ρ a) to parametrize.
MTH U341 urface Integrals, tokes theorem, the divergence theorem To be turned in Wed., Dec. 1. 1. Let be the sphere of radius a, x 2 + y 2 + z 2 a 2. a. Use spherical coordinates (with ρ a) to parametrize.
DESIGN OF MACHINERY SOLUTION MANUAL h in h 4 0.
 DESIGN OF MACHINERY SOLUTION MANUAL -7-1! PROBLEM -7 Statement: Design a double-dwell cam to move a follower from to 25 6, dwell for 12, fall 25 and dwell for the remader The total cycle must take 4 sec
Surface Mount Multilayer Chip Capacitors for Commodity Solutions
 Surface Mount Multilayer Chip Capacitors for Commodity Solutions Below tables are test procedures and requirements unless specified in detail datasheet. 1) Visual and mechanical 2) Capacitance 3) Q/DF
Smaller. 6.3 to 100 After 1 minute's application of rated voltage at 20 C, leakage current is. not more than 0.03CV or 4 (µa), whichever is greater.
, whichever is greater.") Low Impedance, For Switching Power Supplies Low impedance and high reliability withstanding 5000 hours load life at +05 C (3000 / 2000 hours for smaller case sizes as specified below). Capacitance ranges
Low Impedance, For Switching Power Supplies Low impedance and high reliability withstanding 5000 hours load life at +05 C (3000 / 2000 hours for smaller case sizes as specified below). Capacitance ranges
L18VFSS10E. Instruction Manual 45.7cm/18 High Power Floor Fan. Εγχειρίδιο Οδηγιών Επιδαπεδιος Ανεμιστηρας 45.7 Εκατοστομετρο
 L18VFSS10E Instruction Manual 45.7cm/18 High Power Floor Fan Εγχειρίδιο Οδηγιών Επιδαπεδιος Ανεμιστηρας 45.7 Εκατοστομετρο GB GR Contents GB Safety Warnings... 2 Unpacking... 5 Getting to Know Your Fan...
Οδηγίες χρήσης υλικού D U N S Registered
 Οδηγίες χρήσης υλικού D U N S Registered Οδηγίες ένταξης σήματος D U N S Registered στην ιστοσελίδα σας και χρήσης του στην ηλεκτρονική σας επικοινωνία Για οποιαδήποτε ερώτηση, σας παρακαλούμε επικοινωνήστε
CYTA Cloud Server Set Up Instructions
 CYTA Cloud Server Set Up Instructions ΕΛΛΗΝΙΚΑ ENGLISH Initial Set-up Cloud Server To proceed with the initial setup of your Cloud Server first login to the Cyta CloudMarketPlace on https://cloudmarketplace.cyta.com.cy
INSTRUCTIONS MANUAL ΕΓΧΕΙΡΙΔΙΟ ΛΕΙΤΟΥΡΓΙΑΣ
 Model/Μοντέλο: WKH-1132 INSTRUCTIONS MANUAL ΕΓΧΕΙΡΙΔΙΟ ΛΕΙΤΟΥΡΓΙΑΣ ENGLISH General Safety Instructions Before commissioning this kettle, please read the instruction manual carefully. Please keep the instruction
Lecture 2. Soundness and completeness of propositional logic
 Lecture 2 Soundness and completeness of propositional logic February 9, 2004 1 Overview Review of natural deduction. Soundness and completeness. Semantics of propositional formulas. Soundness proof. Completeness
Calculating the propagation delay of coaxial cable
 Your source for quality GNSS Networking Solutions and Design Services! Page 1 of 5 Calculating the propagation delay of coaxial cable The delay of a cable or velocity factor is determined by the dielectric
IAN 94381. Φωτιστικό LED. Operation and Safety Notes. Υποδείξεις χειρισμού και ασφαλείας
 LED Multi-Function Light LED Multi-Function Light Operation and Safety Notes Φωτιστικό LED Υποδείξεις χειρισμού και ασφαλείας IAN 94381 94381_liv_BS_LED_Taschenlampe_cover_GB_CY.indd 4 24.09.13 09:59 GB
The Simply Typed Lambda Calculus
 Type Inference Instead of writing type annotations, can we use an algorithm to infer what the type annotations should be? That depends on the type system. For simple type systems the answer is yes, and
ENGLISH. S-Video. Composite
 CMP-USBVG6 ENGLISH 1.) Hardware Introduction 1. USB 2.0 connector 2. Audio input Left / Right 3. Composite Input 4. S-Video Input VHS Player Camera S-Video DVD Player Multiple devices Set-top Box Game
Newborn Upfront Payment & Newborn Supplement
 GREEK Newborn Upfront Payment & Newborn Supplement Female 1: Το μωρό μου θα ρθει σύντομα, θα πρέπει να κανονίσω τα οικονομικά μου. Άκουσα ότι η κυβέρνηση δεν δίνει πλέον το Baby Bonus. Ξέρεις τίποτα γι
Problem Set 3: Solutions
 CMPSCI 69GG Applied Information Theory Fall 006 Problem Set 3: Solutions. [Cover and Thomas 7.] a Define the following notation, C I p xx; Y max X; Y C I p xx; Ỹ max I X; Ỹ We would like to show that C
Εγγύηση καλής λειτουργίας
 Εγγύηση καλής λειτουργίας Τα Smartphone Bitmore συνοδεύονται από Εγγύηση Καλής Λειτουργίας Δύο (2) Ετών. Please read carefully the Παρακαλούμε διαβάστε προσεκτικά τους όρους εγγύησης που συνοδεύουν το
1 Alumina Substrate 4 Edge Electrode (NiCr) 7 Resistor Layer (NiCr) 2 Bottom Electrode (Ag) 5 Barrier Layer (Ni) 8 Overcoat (Epoxy)
 7 Resistor Layer (NiCr) 2 Bottom Electrode (Ag) 5 Barrier Layer (Ni) 8 Overcoat (Epoxy)") ARN series Thin Film High Precision Chip Resistor Features» Advanced thin film technology» Very tight tolerance down to ±0.01%» Extremely low TCR down to ±5ppm/» Wide resistance range 1ohm-3Mega ohm» Miniature
ARN series Thin Film High Precision Chip Resistor Features» Advanced thin film technology» Very tight tolerance down to ±0.01%» Extremely low TCR down to ±5ppm/» Wide resistance range 1ohm-3Mega ohm» Miniature
ΠΑΝΔΠΗΣΖΜΗΟ ΠΑΣΡΩΝ ΣΜΖΜΑ ΖΛΔΚΣΡΟΛΟΓΩΝ ΜΖΥΑΝΗΚΩΝ ΚΑΗ ΣΔΥΝΟΛΟΓΗΑ ΤΠΟΛΟΓΗΣΩΝ ΣΟΜΔΑ ΤΣΖΜΑΣΩΝ ΖΛΔΚΣΡΗΚΖ ΔΝΔΡΓΔΗΑ
 ΠΑΝΔΠΗΣΖΜΗΟ ΠΑΣΡΩΝ ΣΜΖΜΑ ΖΛΔΚΣΡΟΛΟΓΩΝ ΜΖΥΑΝΗΚΩΝ ΚΑΗ ΣΔΥΝΟΛΟΓΗΑ ΤΠΟΛΟΓΗΣΩΝ ΣΟΜΔΑ ΤΣΖΜΑΣΩΝ ΖΛΔΚΣΡΗΚΖ ΔΝΔΡΓΔΗΑ Γηπισκαηηθή Δξγαζία ηνπ Φνηηεηή ηνπ ηκήκαηνο Ζιεθηξνιόγσλ Μεραληθώλ θαη Σερλνινγίαο Ζιεθηξνληθώλ
ΕΡΙΤΟΡΕΣ ΚΑΙ ΑΝΘΩΡΟΙ ΚΛΕΙΔΙΑ ΑΝΑΘΕΣΘ ΑΓΩΝΑ ΓΑΦΕΙΟ ΑΓΩΝΩΝ ΟΓΑΝΩΤΙΚΘ ΕΡΙΤΟΡΘ. ζεκηλαρηο 1 ΡΑΓΚΟΣΜΙΑ ΟΜΟΣΡΟΝΔΙΑ (ISAF) ΕΛΛΘΝΙΚΘ ΟΜΟΣΡΟΝΔΙΑ (Ε.Ι.Ο.
 ΕΛΛΘΝΙΚΘ ΟΜΟΣΡΟΝΔΙΑ (Ε.Ι.Ο.") ΑΝΑΘΕΣΘ ΑΓΩΝΑ ΕΡΙΤΟΡΕΣ ΚΑΙ ΑΝΘΩΡΟΙ ΚΛΕΙΔΙΑ ΡΑΓΚΟΣΜΙΑ ΟΜΟΣΡΟΝΔΙΑ (ISAF) ΕΛΛΘΝΙΚΘ ΟΜΟΣΡΟΝΔΙΑ (Ε.Ι.Ο.) ΚΛΑΣΘ 6/6/2009 1 ΟΡΓΑΝΩΣΙΚΗ ΕΠΙΣΡΟΠΗ ΓΡΑΦΕΙΟ ΑΓΩΝΩΝ ΕΠΙΣΡΟΠΗ ΑΓΩΝΩΝ ΕΠΙΣΡΟΠΗ ΕΝΣΑΕΩΝ ΕΠΙΣΡΟΠΗ ΚΑΣΑΜΕΣΡΗΕΩΝ
ΑΝΑΘΕΣΘ ΑΓΩΝΑ ΕΡΙΤΟΡΕΣ ΚΑΙ ΑΝΘΩΡΟΙ ΚΛΕΙΔΙΑ ΡΑΓΚΟΣΜΙΑ ΟΜΟΣΡΟΝΔΙΑ (ISAF) ΕΛΛΘΝΙΚΘ ΟΜΟΣΡΟΝΔΙΑ (Ε.Ι.Ο.) ΚΛΑΣΘ 6/6/2009 1 ΟΡΓΑΝΩΣΙΚΗ ΕΠΙΣΡΟΠΗ ΓΡΑΦΕΙΟ ΑΓΩΝΩΝ ΕΠΙΣΡΟΠΗ ΑΓΩΝΩΝ ΕΠΙΣΡΟΠΗ ΕΝΣΑΕΩΝ ΕΠΙΣΡΟΠΗ ΚΑΣΑΜΕΣΡΗΕΩΝ
ΚΥΠΡΙΑΚΗ ΕΤΑΙΡΕΙΑ ΠΛΗΡΟΦΟΡΙΚΗΣ CYPRUS COMPUTER SOCIETY ΠΑΓΚΥΠΡΙΟΣ ΜΑΘΗΤΙΚΟΣ ΔΙΑΓΩΝΙΣΜΟΣ ΠΛΗΡΟΦΟΡΙΚΗΣ 11/3/2006
 ΠΑΓΚΥΠΡΙΟΣ ΜΑΘΗΤΙΚΟΣ ΔΙΑΓΩΝΙΣΜΟΣ ΠΛΗΡΟΦΟΡΙΚΗΣ 11/3/26 Οδηγίες: Να απαντηθούν όλες οι ερωτήσεις. Ολοι οι αριθμοί που αναφέρονται σε όλα τα ερωτήματα μικρότεροι το 1 εκτός αν ορίζεται διαφορετικά στη διατύπωση
VBA ΣΤΟ WORD. 1. Συχνά, όταν ήθελα να δώσω ένα φυλλάδιο εργασίας με ασκήσεις στους μαθητές έκανα το εξής: Version 25-7-2015 ΗΜΙΤΕΛΗΣ!!!!
 VBA ΣΤΟ WORD Version 25-7-2015 ΗΜΙΤΕΛΗΣ!!!! Μου παρουσιάστηκαν δύο θέματα. 1. Συχνά, όταν ήθελα να δώσω ένα φυλλάδιο εργασίας με ασκήσεις στους μαθητές έκανα το εξής: Εγραφα σε ένα αρχείο του Word τις
ΤΕΧΝΟΛΟΓΙΚΟ ΠΑΝΕΠΙΣΤΗΜΙΟ ΚΥΠΡΟΥ ΤΜΗΜΑ ΝΟΣΗΛΕΥΤΙΚΗΣ
 ΤΕΧΝΟΛΟΓΙΚΟ ΠΑΝΕΠΙΣΤΗΜΙΟ ΚΥΠΡΟΥ ΤΜΗΜΑ ΝΟΣΗΛΕΥΤΙΚΗΣ ΠΤΥΧΙΑΚΗ ΕΡΓΑΣΙΑ ΨΥΧΟΛΟΓΙΚΕΣ ΕΠΙΠΤΩΣΕΙΣ ΣΕ ΓΥΝΑΙΚΕΣ ΜΕΤΑ ΑΠΟ ΜΑΣΤΕΚΤΟΜΗ ΓΕΩΡΓΙΑ ΤΡΙΣΟΚΚΑ Λευκωσία 2012 ΤΕΧΝΟΛΟΓΙΚΟ ΠΑΝΕΠΙΣΤΗΜΙΟ ΚΥΠΡΟΥ ΣΧΟΛΗ ΕΠΙΣΤΗΜΩΝ
1000 VDC 1250 VDC 125 VAC 250 VAC J K 125 VAC, 250 VAC
 Metallized Polyester Film Capacitor Type: ECQE(F) Non-inductive construction using metallized Polyester film with flame retardant epoxy resin coating Features Self-healing property Excellent electrical
Areas and Lengths in Polar Coordinates
 Kiryl Tsishchanka Areas and Lengths in Polar Coordinates In this section we develop the formula for the area of a region whose boundary is given by a polar equation. We need to use the formula for the
ΠΑΝΕΠΙΣΤΗΜΙΟ ΠΑΤΡΩΝ ΤΜΗΜΑ ΗΛΕΚΤΡΟΛΟΓΩΝ ΜΗΧΑΝΙΚΩΝ ΚΑΙ ΤΕΧΝΟΛΟΓΙΑΣ ΥΠΟΛΟΓΙΣΤΩΝ ΤΟΜΕΑΣ ΣΥΣΤΗΜΑΤΩΝ ΗΛΕΚΤΡΙΚΗΣ ΕΝΕΡΓΕΙΑΣ ΕΡΓΑΣΤΗΡΙΟ ΥΨΗΛΩΝ ΤΑΣΕΩΝ
 ΠΑΝΕΠΙΣΤΗΜΙΟ ΠΑΤΡΩΝ ΤΜΗΜΑ ΗΛΕΚΤΡΟΛΟΓΩΝ ΜΗΧΑΝΙΚΩΝ ΚΑΙ ΤΕΧΝΟΛΟΓΙΑΣ ΥΠΟΛΟΓΙΣΤΩΝ ΤΟΜΕΑΣ ΣΥΣΤΗΜΑΤΩΝ ΗΛΕΚΤΡΙΚΗΣ ΕΝΕΡΓΕΙΑΣ ΕΡΓΑΣΤΗΡΙΟ ΥΨΗΛΩΝ ΤΑΣΕΩΝ Διπλωµατική Εργασία Της Φοιτήτριας του Τµήµατος Ηλεκτρολόγων
Ala Wai Drogue Survey
 Ala Wai Drogue Survey On the afternoon of March 24, 2006, drogue surveys were initiated in response to the Beachwalk Pump Station, forcemain break. In total, ten surveys were completed from March 24 to
Homework 8 Model Solution Section
 MATH 004 Homework Solution Homework 8 Model Solution Section 14.5 14.6. 14.5. Use the Chain Rule to find dz where z cosx + 4y), x 5t 4, y 1 t. dz dx + dy y sinx + 4y)0t + 4) sinx + 4y) 1t ) 0t + 4t ) sinx
UNIVERSITY OF CAMBRIDGE INTERNATIONAL EXAMINATIONS International General Certificate of Secondary Education
 www.xtremepapers.com UNIVERSITY OF CAMBRIDGE INTERNATIONAL EXAMINATIONS International General Certificate of Secondary Education *6301456813* GREEK 0543/03 Paper 3 Speaking Role Play Card One 1 March 30
Main source: "Discrete-time systems and computer control" by Α. ΣΚΟΔΡΑΣ ΨΗΦΙΑΚΟΣ ΕΛΕΓΧΟΣ ΔΙΑΛΕΞΗ 4 ΔΙΑΦΑΝΕΙΑ 1
 Main source: "Discrete-time systems and computer control" by Α. ΣΚΟΔΡΑΣ ΨΗΦΙΑΚΟΣ ΕΛΕΓΧΟΣ ΔΙΑΛΕΞΗ 4 ΔΙΑΦΑΝΕΙΑ 1 A Brief History of Sampling Research 1915 - Edmund Taylor Whittaker (1873-1956) devised a