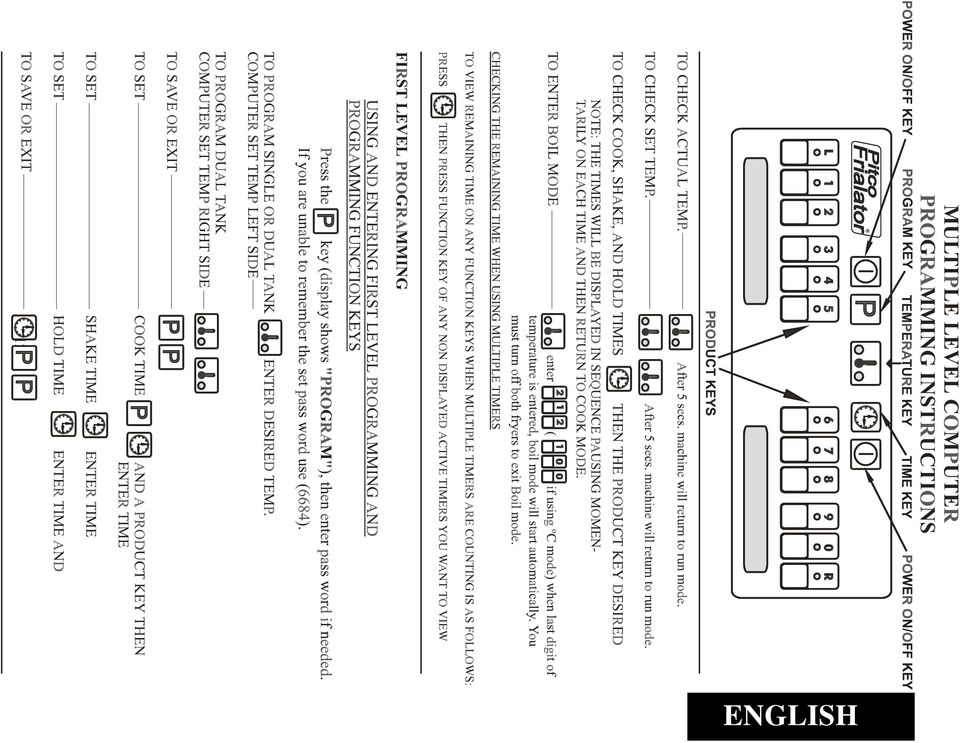
AUSTRALIA. There's Always Something Cooking! ΕΛΛΗΝΙΚΑ
|
|
|
- Οἰδίπους Αγγελίδου
- 8 χρόνια πριν
- Προβολές:
Transcript
1 There's Always Something Cooking! Installation and Operation Manual For Gas Fryers STAND ALONE & ALL OPTIONS Covering Models SG14C, SG14, SG14R, SG14T, & SG18 AUSTRALIA ΕΛΛΗΝΙΚΑ FRANCAIS ITALIANO ENGLISH Pitco Frialator, Inc., P.O. Box 501, Jct I-89 & I-93 Concord, NH Route 3A, Bow, NH (800) (603) FAX (603) The MAYTAG Family of Brands

2 THIS MANUAL MUST BE RETAINED FOR FUTURE REFERENCE FOR YOUR SAFETY DO NOT store or use gasoline or other flammable vapors or liquids in the vicinity of this or any other appliance. WARNING Improper installation, alteration, service or maintenance can cause property damage, injury or death. Read the installation, operating and maintenance instructions thoroughly before installing or servicing this equipment. TO THE PURCHASER Post in a prominent location the instructions to be followed in the event that an operator smells gas. Obtain this information from your local gas supplier. WARNING The fryer is equipped with an oil proof, electrical supply cord without a plug, refer to schematic at rear of manual for power supply connection information. WARNING There is an open flame inside the fryer. The unit may get hot enough to set near by materials on fire. Keep the area around the fryer free from combustibles. WARNING DO NOT supply the fryer with a gas that is not indicated on the data plate. If you need to convert the fryer to another type of fuel, contact your dealer. WARNING DO NOT use an open flame to check for gas leaks! WARNING Never melt blocks of shortening on top of the burner tubes. This will cause a fire, and void your warranty. WARNING Water and shortening DO NOT mix. Keep liquids away from hot shortening. Dropping frozen liquid food into the hot shortening will cause violent boiling. WARNING Ensure that the fryer can get enough air to keep the flame burning correctly. If the flame is starved for air, it can give off a dangerous carbon Monoxide gas. Carbon monoxide is a clear odorless gas that can cause suffocation. WARNING A cooker equipped with casters and a flexible gas line, must be connected to the gas supply with a quick disconnect device. To limit the movement of the cooker without depending on the connector or quick disconnect, a restraining cable must also be installed. WARNING The power supply must be disconnected before servicing or cleaning the appliance WARNING Do not attempt to move the appliance when the unit is at operating temperature. Hot oil will cause serious personal injury if it comes in contact with you skin WARNING Do not attempt to make adjustments to sealed devices, they have been set at the factory and do not require further adjustments. NOTICE Counter top must be constructed of a non-combustible material for SG14C counter top fryer installations.

3 WARNING Installation and all connections must be made according to national and local regulations and codes in force. NOTICE Installation should only be performed by a competent Service Technician. The model & serial number, and gas type & pressure are stamped into the data plate located on the inside panel of the fryer door. NOTICE This appliance is intended for professional commercial use only and, as such, should be operated by fully trained personnel. NOTICE It is recommended that this machine be inspected by a Qualified Technician on a yearly basis. ENGLISH HIGH LIMIT RESET Fryer is equipped with a high temperature safety shut-off switch, which will stop the heating operation if shortening temperature exceeds F (202 0 C ). If fryer does not heat press reset button, if unit still does not heat call authorized service agent. NOTICE Counter top must be constructed of a non-combustible material for SG14C counter top fryer installations. OIL TEMPERATURE Keep the oil temperature in the fryer to a maximum of 190 C. Higher temperatures will cause rapid breakdown of the oil and give you no faster cooking. At 205 C to 210 C the life of the oil is only one third of its life at 190 C. In addition, increased decomposition causes the oil to smoke badly even if the temperature is lowered to 190 C again. High temperatures give you no advantage, cost you money and increase the fire danger. Solstice Series Overall Dimension Models Dimensions (cm) Gas Connection (cm) Height Width Length From Floor From Side SG SG14R SG14T SG

4 INSTALLATION: MILLIVOLT CONTROL FRYERS Installation Clearances The fryer needs clearance around it for proper operation. Adequate clearances allow for servicing and proper burner operation. The clearances shown below are for cooker installation in combustible and noncombustible construction. Combustible Non-Combustible Construction Construction Back 6'' (15.24CM) 0'' (0CM) Sides 6'' (15.24CM) 0'' (0CM) Floor - Combustible 9'' (22.86CM) 9'' (22.86CM) Counter top must be constructed of a non-combustible material for SG14C counter top fryer installations. VENTILATION AND FIRE SAFETY SYSTEMS Your new fryer must have proper ventilation to function safely and properly. Exhaust gas temperatures can reach as high as 1000 F (538 0 C). Therefore, it is very important to install a fire safety system. Your ventilation system should be designed to allow for easy cleaning. Frequent cleaning of the ventilation system and the fryer will reduce the chances of fire. Excessive ventilation causes drafts, which will interfere with the proper operation of the pilot and the burner. Leave at least 18 inches (45.72CM) of open space between the fryer's flue vent opening and the intake of the exhaust hood. CAUTION Ensure that your ventilation system does not cause a down draft at the fryer's flue opening. Down drafts will not allow the fryer to exhaust properly and will cause overheating which may cause permanent damage. Damage caused by down drafts will not be covered under equipment warranty. NEVER allow anything to obstruct the flow of combustibles or ventilation exiting from the fryer flue. DO NOT put anything on top of the flue area. NOTICE NEVER connect the blower directly to the flue openings. The direct flow of air will cause poor temperature recovery, poor ignition, inefficient operation of the fryer, and could extinguish the pilot. GAS CONNECTION: NEVER supply the fryer with a gas that is not indicated on the data plate, located on the inside of the door. To ensure peak performance and correct combustion Pitco Fryers must be supplied with an amount of Fuel Gas sufficient to meet the rating requirements shown on the data plate, found on the inside of the door. All gas connections must be made by a Certified Gas Service Technician. The connection must fulfill local and national requirements. FUEL LINE TESTING: Since the internal gas valve of the Pitco Fryer is rated at 50 mbar maximum pressure, it is imperative that no testinmg be done at a pressure greater than this. If it is necessary to test at a pressure greater than this, the fryer should be isolated from the gas line so that damage to the gas valve does not occur. INITIAL ADJUSTMENTS: Thermocouple: The pilot is set at the factory and requires NO further adjustment. Gas Pressure (Only when Governors are installed.): The gas pressure should be checked to ensure that the manifold pressure reads the same pressure that is indicated on the data plate, located on the inside cover of the door. If not it must be adjusted. 2
.")
5 Regulating Thermostats: These are preset at the factory and DO NOT need further adjustment. Do NOT attempt to make adjustments to this device. Hi Limit Thermostats: These are preset at the factory and DO NOT need further adjustment. Do NOT attempt to make adjustments to this device. INITIAL CLEANING: Before filling any Pitco Frialator with oil, it is advised that it be thoroughly cleaned to remove any foreign particles from the cooking area. The machine should be filled with water to at least the minimum level. Add the sample packet of Fryer Cleaner and set the temperature control between 90º and 100º C. Using the supplied brush and the appropriate protective clothing, brush the inside of the fry tank until clean. When finished, turn the machine OFF and drain, rinse the tank with fresh water and dry carefully. The machine should be filled with oil at this time and all exposed surfaces coated with a small amount of cooking oil to prevent surface rust. OPERATION: CASTERS: On units with casters, move the fryer to the desired location and lock the wheels using the locking devices on the front of the casters. NOTE: Casters must be locked during fryer operation. COVERS: In case of an oil fire in the fryer the cover can be used to place on top of the fryer to extinguish the flames. It should be kept in a nearby location that is uncluttered and easy to reach. FILLING THE FRY TANK WITH SOLID SHORTENING: When using solid shortening, it must be cut into approximately 3 cm cubes and loosely packed around each of the heat tubes. Check that the oil level is at the minimum level once the oil has melted. LIGHTING THE PILOT: Turn the gas valve knob to the PILOT position and press inward. Light the pilot flame. Continue to press the gas valve knob for approximately 60 seconds. The pilot should remain lit when the gas valve knob is released, if NOT, try to reset the Hi-Limit and relight the pilot. USING SOLID SHORTENING AND RUNNING THE FRYER UP TO OPERATING TEMPERATURE: Turn the gas valve knob to the ON position and turn the Thermostat Dail to the desired level. If solid shortenning is being used, manually pulse the heat ON and OFF by turning the thermostat knob from the ON to the OFF position. This should be done so that the burners are ON for about 15 seconds, then OFF for 30 seconds. This procedure should be performed for 10 minutes. At the end of this turn the thermostat knob to the set temperature and the burners will automatically bring the oil up to the cooking temperature. You may now cook with your Pitco fryer. RUNNING THE FRYER UP TO OPERATING TEMPERATURE: Turn the gas valve knob to the ON position and turn the Thermostat Dial to the desired level. The burners will automatically bring the oil up to the cooking temperature. You may now cook with your Pitco fryer. SHUTTING THE FRYERS DOWN FOR A SHORT TIME: Turn the Gas Valve Knob to the PILOT position. This is recommended ONLY for short periods of time. SHUTTING THE FRYERS DOWN FOR AN EXTENDED TIME: Turn the Gas Valve Knob to the OFF position. This is recommended when the machine is to be left unattended for a long time, such as overnight. 3

6 CLEANING / MAINTENANCE: DAILY CLEANING: Using a soft cloth and a mild detergent, wipe all external surfaces until they are free of debris. It is permissible to allow a thin film of cooking oil to remain on all exposed surfaces. Be sure to clean the front panel and behind the door. WARNING The fryer must be properly restrained to prevent movement or tipping. This restraint must prevent the fryer from movements that would splash hot liquids on personnel, which could cause severe burns or injuries. Always wear oil proof gloves when moving or handling equipment or hot liquids. WEEKLY CLEANING: Turn the gas valve knob to the PILOT position. The fryer should be completely drained of shortening. Fill the fry tank with water to above the minimum and below the maximum level lines. (For best results use Pitco Fryer Cleaner Part Number P ) Turn the fryer ON as described in the RUNNING THE FRYER UP TO THE OPERATING TEMPERATURE: section. When the water boils, use a pair of insulated rubber gloves and the supplied cleaning brush to scrub the inside of the fry tank, taking care not to damage the thin capillary tubes inside the tank. When the fryer is clean, shut the fryer down as described in the SHUTTING THE FRYERS DOWN FOR A SHORT PERIOD: section. Drain the water into a container that is capable of withstanding 400 o F (204 0 C) oil. Rinse the inside of the tank with fresh water and dry with a soft cloth until all of the water is gone. This is a good time to perform the DAILY CLEANING. The fryer is now ready to be refilled and used. 4

7 ALL OPTION CONTROL FRYERS CHECKING YOUR NEW FRYER Your new fryer has been carefully packed into one crate. Every effort has been made to ensure that your fryer is delivered to you in perfect condition. As you unpack your new fryer, inspect each of the pieces for damage. If something is damaged, DO NOT sign the bill of lading. Contact the shipper immediately, the shipper is only responsible for 15 days after delivery. Check the packing list enclosed with your fryer to ensure that you have received all of the parts to the fryer. If you are missing any parts, contact the dealer from whom the fryer was purchased. CAUTION To prevent equipment damage, don't tilt the fryer onto any two of it's casters or pull the unit by the flue vents. Locate your Pitco Frialator warranty and fill in the serial number of the fryer and the date received. You will find the serial number on the plate inside the door. Put your warranty card in a safe place for future reference. DO NOT return the card to Pitco Frialator. INSTALLATION Although it is possible for you to install and set up your new fryer, it is STRONGLY recommended that you have it done by qualified professionals. The professionals that install your new fryer will know the local building codes and ensure that your installation is safe. WARNING DO NOT obstruct the flow of combustion/ventilation or air openings around the fryer. Adequate clearance around the fryer is necessary for servicing and proper burner operation. Ensure that you meet the minimum clearances specified in this manual. Installation Clearances The fryer needs clearance around it for proper operation. Adequate clearances allow for servicing and proper burner operation. The clearances shown below are for cooker installation in combustible and noncombustible construction. Combustible Non-Combustible Construction Construction Back 6'' (15.24CM) 0'' (0CM) Sides 6'' (15.24CM) 0'' (0CM) Floor - Combustible 9'' (22.86CM) 9'' (22.86CM) Counter top must be constructed of a non-combustible material for SG14C counter top fryer installations. In addition to the clearances required for proper fryer operation, there must be at least 21 inches (53.34CM) of aisle space in front of the fryer to remove/install the filter pan/module. WARNING The fryer must be properly restrained to prevent movement or tipping. This restraint must prevent the fryer from movements that would splash hot liquids on personnel, which could cause severe burns or injuries. Always wear oil proof gloves when moving or handling equipment or hot liquids. Leveling When you receive your fryer it is completely assembled. The fryer will need to be leveled once it is in place. Leveling the fryer is done with a large pair of water pump pliers. The casters provide the necessary height to meet sanitation requirements and assure adequate air supply to the burner. a. Adjust the height and level the fryer by adjusting the leveling devices on the caster with the water pump pliers. b. Move the fryer to the desired location and lock the wheels using the locking devices on the sides of the casters. 5

8 c. Once the unit is in place, check and readjust the levelness as necessary. GAS CONNECTION Your fryer will give you peak performance when the gas supply line is of sufficient size to provide the correct gas flow. The gas line must be installed to meet the local building codes or National Fuel Gas Codes. Gas line sizing requirements can be determined by your local gas company by referring to National Fuel Gas Codes. The gas line needs to be large enough to supply the necessary amount of fuel to all appliances without losing pressure to any appliance. WARNING NEVER supply the fryer with a gas that is not indicated on the data plate. Using the incorrect gas type will cause improper operation. If you need to convert the fryer to another type of fuel, contact your dealer. ENGLISH Fuel Types - Each fryer is equipped to work with one type of fuel. The type of fuel with which the appliance is intended to operate is stamped on the data plate attached to the inside of the door. NOTICE NEVER use an adaptor to make a smaller gas supply line fit the cooker connection. This may not allow proper gas flow for optimum burner operation, resulting in poor cooker performance. Quick Disconnect Gas Connection Gas fryers equipped with casters must be installed with connectors that comply with the Standard for Connectors for Movable Gas Appliances. This connection should include a quick disconnect device that complies with the Standard for Quick Disconnect Devices for Use With Gas Fuel. When installing a quick disconnect you must also install a means for limiting the movement of the fryer. This device will prevent the gas line or the quick disconnect from being strained. The restraining device should be attached to the cooker on the back panel. Fuel Supply Line Leak and Pressure Testing The fuel supply system must be tested before the fryer is used. If the fuel line is going to be tested at a pressure greater than (>)1/2 PSIG (3.45 kpa), make sure that the fryer is disconnected from the fuel line. If the fuel line is to be tested at a pressure equal to or less than (<) 1/2 PSIG (3.45 kpa), the fryer can be connected but the unit's gas valve must be shut. Test all gas line connections for leaks with a solution of soap and water when pressure is applied. Gas pressure check Gas pressure should be measured at the burner manifold and should match the pressure requirement listed on the data plate mounted on the inside of the fryer door. ELECTRICAL CONNECTION The electrical service used by the fryer must comply with local codes and regulations. The power requirements for the fryer are shown below. North America International Input Voltage 120 VAC, 60Hz 220, 230, (or 240) VAC, 50Hz Current per fryer 0.5 Amps 0.5 Amps Filter System 7.0 Amps 4.0 Amps The fryer must be grounded in accordance with local code and regulations. It is advised that this power supply be plugged into a wall receptacle that is controlled by the ventilation control. This will prevent the fryer from being operated without the ventilator on. 6

9 VENTILATION AND FIRE SAFETY SYSTEMS Your new fryer must have proper ventilation to function safely and properly. Exhaust gas temperatures can reach as high as 1000 F (538 0 C). Therefore, it is very important to install a fire safety system. Your ventilation system should be designed to allow for easy cleaning. Frequent cleaning of the ventilation system and the fryer will reduce the chances of fire. Excessive ventilation causes drafts, which will interfere with the proper operation of the pilot and the burner. Leave at least 18 inches (45.72CM) of open space between the fryer's flue vent opening and the intake of the exhaust hood. CAUTION Ensure that your ventilation system does not cause a down draft at the fryer's flue opening. Down drafts will not allow the fryer to exhaust properly and will cause overheating which may cause permanent damage. Damage caused by down drafts will not be covered under equipment warranty. NEVER allow anything to obstruct the flow of combustibles or ventilation exiting from the fryer flue. DO NOT put anything on top of the flue area. NOTICE NEVER connect the blower directly to the flue openings. The direct flow of air will cause poor temperature recovery, poor ignition, inefficient operation of the fryer, and could extinguish the pilot. LIGHTING INSTRUCTIONS a. Fill kettle before lighting. b. Turn combination gas valve knob to ON position. c. 1. Solid State Thermostat: Switch melt switch to desired position. Turn the Thermostat knob to desired temperature. Turn the power switch to the "ON" position, the fryer is equipped with a matchless ignition system and will automatically light the pilot, and heat up to set temperature. (Note: if using solid shortening, set melt switch to the ON position) 2. Digital Controller: Press the button on the controller panel to turn fryer ON, the fryer is equipped with a matchless ignition system and will automatically light the pilot, and heat up to set temperature. (Note: if using solid shortening, ensure digital controller is programming is set on the solid shortening melt cycle setting, by following digital programming instructions in manual) 3. Computer Controller: Press the button on the controller panel to turn fryer ON, the fryer is equipped with a matchless ignition system and will automatically light the pilot, and heat up to set temperature. (Note: if using solid shortening, ensure computer controller is programming is set on the solid shortening melt cycle setting, by following digital programming instructions in manual) WARNING DO NOT TURN COMBINATION GAS VALVE KNOB TO THE ON POSITION UNTIL VESSEL IS FULL OF WATER OR SHORTENING. TURNING THE KNOB TO ON WITH VESSEL EMPTY WILL DAMAGE THE VESSEL OR COMPONENTS AND VOID WARRANTY. INITIAL CLEANING When the fryer is shipped, many of its parts are covered with a thin coat of oil for protection. Before the fryer is ready for cooking it must be cleaned. This will remove the oil coating and any foreign matter that may have accumulated during storage and shipment. Perform the cleaning as described below. a. Fill the tank with water and add one packet of Pitco fryer cleaner or a mild detergent, and turn gas valve knob to ON position. 7

10 b. 1. Solid State Thermostat: Turn melt switch to the "MELT" position. Turn the Thermostat knob to the lowest temperature setting (250 0 F). Turn the power switch to the "ON" position, the fryer is now in the boil-out mode which will prevent the fryer from boiling over. Note: do not leave the fryer unattended during this operation. Once the fryer has heated up to approximately F (91 0 C), allow it to operate for 15 minutes to allow any build up in the tank to soften. 2. Digital Controller: Press the button on the controller panel to turn fryer ON. The fryer will automatically switch into the boil-out mode which will prevent the fryer from boiling over. Note: do not leave the fryer unattended during this operation. Once the fryer has heated up to approximately F (91 0 C), allow it to operate for 15 minutes to allow any build up in the tank to soften. 3. Computer Controller: Press the button on the controller panel to turn fryer ON. The fryer will automatically switch into the boil-out mode which will prevent the fryer from boiling over. Note: do not leave the fryer unattended during this operation. Once the fryer has heated up to approximately F (91 0 C), allow it to operate for 15 minutes to allow any build up in the tank to soften. NOTE Do not leave the fryer unattended during cleaning. Never let the water level go below the "Min Level" mark on the back of the tank. ENGLISH c. While wearing protective gloves, use the fryer cleaning brush to scrub the inside of the fryer to remove protective coating. d. When cleaning is complete, turn off the fryer main burners and turn gas valve knob to the OFF position. While wearing protective gloves, drain the water into a container suitable for hot water and dispose of it. e. When the tank has cooled, rinse it thoroughly with cool water. Continue to rinse the tank until the cleaner has been rinsed, thoroughly from the tank. f. Using a clean dry cloth, wipe out all of the water. Be very thorough removing the water, because any residual water will cause hot oil to splatter out of the fryer. CAUTION Mild steel tanks must be wiped down/coated with oil to keep the tank from rusting. g. Now that the tank is clean, you are ready to fill and operate the fryer. WARNING Gas units installed with casters must have a restraining device. This device must be connected at all times that the fryer is connected to the gas supply. If it is disconnected for any reason, it must be reconnected. FILLING THE FRYER WITH LIQUID SHORTENING a. Make sure the drain valve is completely closed. b. Fill the fryer with shortening up to the oil level mark indicated on the back splash of the fry tank. c. Once the fryer has been filled with shortening, turn the unit ON and allow to heat up to set temperature. 8

11 FILLING THE FRYER WITH SOLID SHORTENING a. Make sure the drain valve is completely closed. b. Cut the solid shortening into 1" (2.54CM) sqare cubes andcompletely pack fry tank up to oil level mark with cubes making sure there are no air pockets. c. 1. Solid State Thermostat: Switch melt switch to melt position. Turn the Thermostat knob to desired temperature. Turn the power switch to the "ON" position. (Note: if using solid shortening, set melt switch to the ON position) 2. Digital Controller: Press the button on the controller panel to turn fryer ON, (Note: if using solid shortening, ensure digital controller is programming is set on the solid shortening melt cycle setting, by following digital programming instructions in manual) 3. Computer Controller: Press the button on the controller panel to turn fryer ON, (Note: if using solid shortening, ensure computer controller is programming is set on the solid shortening melt cycle setting, by following digital programming instructions in manual) d. Allow unit to heat to operating temperature, unit is now ready for use. THERMOSTAT CALIBRATION a. Set the thermostat dial, computer, or digital controller to 350 o F (177 0 C). b. Remove fryer tube rack and place a thermometer 1" (2.54CM) above fryer temperature probe. c. Compare thermometer reading to thermostat or controller setting, if readings are not close, contact local warranty service agent. d. When the calibration check is complete, remove the thermometer and replace the tube screen. FRYER SHUT-DOWN There are two shutdown modes of fryer operation, STANDBY and COMPLETE. The standby mode removes the ability for the fryer's main burners to cycle. Complete shutdown turns off the gas supply to the fryer. Shut down the fryer by: STANDBY Turn the thermostat or controller OFF. The cooker is now in Standby and can remain this way for only brief periods of time. NEVER leave the cooker in standby overnight. COMPLETE To completely shut down the cooker, push and turn the gas valve to the OFF position. The fryer is now completely shut down and can be cleaned and filtered. SOLID STATE THERMOSTAT 9

12 10 ENGLISH

13 11

14 12 ENGLISH
15 13

16 FILTER PROCEDURES NOTE When working with hot oil ALWAYS wear oil-proof, insulated gloves. WARNING NEVER Run the filter system without a filter bag/paper. NEVER Empty the oil from the fryer before turning OFF the fryer burners. NEVER Store the UFM Filter Unit anywhere other than in the fryer filter cavity. a. Slide the filter pan out. Carefully remove filtered residue off the filter media. Examine the filter media for clogged or torn areas. Refer to filter media replacement instructions following this section. Reinstall the pan. ENGLISH b. Turn the fryer that is to be filtered OFF (See Standby Shutdown). Remove the baskets from the fryer tank(s). Use the clean out brush to lift out the tube screens. If there are excess crumbs in the fryer tank, remove them with the crumb scoop. c. If you have replaced the filter media or remove crumbs and debris, sprinkle Precoat Filter Aid on the filter paper. d. Check the drain spout to ensure that it is in the drain tower and over the filter pan opening. e. Slowly open the green handled drain valve for the tank being filtered. If necessary use the clean-brush to clear the crumbs from the drain. Use the brush to clean the sides of the tank as the oil drains. WARNING This filter pan is only large enough to hold the contents of one (1) tank at once, during the filter process. f. When the tank is empty, close the green handled drain valve. Open the red handled return valve to the tank you are filtering. This will start the pump and return the oil to the bottom of the fry tank. g. When bubbles are seen coming out of the oil return spout, close the red handled valve to turn the pump off. If necessary add more oil to the tank to return the oil level to the fill mark. The fryer is now ready for use. DRAINING A TANK The filter system is also used to drain the fryers. You will need a container capable of holding F (205 0 C) oil and protective gloves. a. Rotate the drain down spout so that it extends in the container that you want to drain the shortening into. b. Open the green handled drain valve for the tank to be drained. The oil will drain into the container you have chosen. When the container is full or the fry tank is empty, close the green handled drain valve. If the container was full repeat this step until fryer tank is empty. c. Once tank is completely empty add new shortening and follow fryer start up procedures. 14
. Remove the baskets from the fryer tank(s). Use the clean out brush to lift out the tube screens.")
17 WARNING The power supply must be disconnected before servicing or cleaning the appliance. FILTER MEDIA REPLACEMENT The filter module stores neatly under the fryer when not in use. The unit is very easy to use and allows for quick installation and filtration, even under the busiest conditions. Follow the procedures below to change the filter media. WARNING At operating temperature, the shortening in the fryer may be hotter than 375 F (190 C). This hot, melted shortening will cause severe burns. Do not let the hot shortening touch your skin or clothing. Always wear insulated oilproof gloves when working on the filter system. It will be easier and safer if the filter assembly has cooled to room temperature before handling any filter parts. a. With the filter pan empty of oil, remove the filter media by grasping the filter pan handle and gently pull the assembly toward the front of the fryer. b. Separate the filter pickup tube from the filter pickup screen assembly by pulling up on the pickup tube just above where it connects to the pickup screen assembly. Lift pickup tube and swing it to the left, until it rests on the left hand side of the filter pan. c. Grab filter screen pickup assembly lift handles and carry it to a trash barrel and shake off heavy discard any debris that may be built upon the top of the assembly. d. Unscrew the filter paper clip bracket from the filter paper support screen and slide the filter paper support screen out of the filter paper clip bracket. e. Remove filter paper support screen from the filter envelope. f. All of the filter pick up assembly parts can be washed in a dish washer or a pot sink. Flush out the suction tube assembly with hot water. After cleaning, it is very important to thoroughly dry the parts before reassembling. Water and oil do not mix. Water in hot oil will cause the oil to splatter. g. Start reassembling the filter pick up assembly by sliding the new filter paper on to the filter paper support rack. Ensure that the hole in the filter paper goes over the pick up tube assembly threaded connector. h. Fold the open end of the bag in two folds. The first fold should be approximately 1 inch from the end and the second should be over the edge of the rack assembly. i. Slide the clip screen over the folded end of the filter paper. Ensure the opening of the clip screen goes over the pick up tube connection. Screw the suction tube connection onto the threaded connection. j. Place the filter pickup assembly into the filter pan and slide the filter pan assembly back into the fryer cabinet. k. Filter unit is now ready for use. 15

18 FRYER CLEANING Daily Your fryer should be clean every day to maintain peak performance and appearance. Perform the procedures below every day. a. Wipe up any shortening that spills onto the exterior of the fryer. This should be done with a clean soft cloth while the oil is still warm. b. Use warm water with a mild detergent to clean surfaces. Be careful not to get water in the shortening and to remove any detergent from the fry tank. c. Use a nonabrasive scouring powder or pad to clean stains if necessary. ENGLISH Weekly (Boil-out) The fryer should be thoroughly cleaned once a week. This cleaning should include a complete draining of the fryer and a boil out. This would also be a good time to check the filter media for damage. CAUTION Completely shut down the fryer when the oil is to be replaced by water, and when the heating portion of the cleaning is complete. This will prevent the heating system from coming on during the oil draining and water filling procedure. a. Drain the oil from the fryer using the fryer drain procedures. When the oil has been pumped into the oil shuttle, disconnect the filter pan and remove from the fryer. WARNING Do not use the filter pan to drain cleaning water into. The only way to remove liquid from the filter pan is via the filter pump. Do not use the filter pump to pump water. Water can remain in the filter lines and mix with hot oil during filter procedures creating a problem. b. Remove tube rack/mesh tube screens and remove any large debris from the bottom of the fry tank. Close the drain valve and fill the fry tank with water and noncaustic detergent. For best results use Pitco Fryer Cleaner part number P c. Place a large pan under the drain. This pan will be used to catch the cleaning water. The pan must be of sufficient size to hold all of the water. d. Restart your fryer. When the water temperature reaches 212 F (100 0 C) the computer will automatically go into Boil mode. To get the fryer out of BOIL mode you must turn the fryer power off. e. After the water has reached a slow boil, turn the fryer off. Allow the fryer to soak for 20 minutes to soften shortening deposits and carbon. Use fryer brush to remove any residue from tank, heating tubes, and side walls. Perform the daily cleaning procedures. f. Drain the water into the pan by slowly opening the green handled drain valve. g. Wipe the tank dry with clean cloth wipes. Close the drain valve and remove the large container. h. Refill the fryer. 16
 The fryer should be thoroughly cleaned once a week. This cleaning should include a complete draining of the fryer and a boil out.")
19 17

20 In the event of problems with or questions about you order, please contact the Pitco Frialator factory, from 8:00 a.m. - 5:00 P.M.., Eastern Standard Time, Monday through Friday, toll-free at: (800) US and Canada only or (603) World Wide In the event of problems with or questions about you equipment, please contact the Pitco Frialator Authorized Service and Parts representative (ASAP) covering you area, through the National Service Network at: (800) US only, 24 hours L revision 0 11/00 18
 covering you area, through the National Service Network at: (800)298-1862 US only, 24 hours L20-224 revision")
21 C è sempre qualcosa da cucinare! Manuale d installazione e funzionamento Per friggitrici a gas NESSUNA OPZIONE & TUTTE LE OPZIONI Modelli SG14C, SG14, SG14R, SG14T e SG18 AUSTRALIA FRANCAIS ITALIANO Pitco Frialator, Inc., P.O. Box 501, Jct I-89 & I-93 Concord, NH Route 3A, Bow, NH (800) (603) FAX (603) La famiglia di prodotti MAYTAG
22 CONSERVARE QUESTO MANUALE PER RIFERIMENTO FUTURO PER LA VOSTRA SICUREZZA NON conservare o usare benzina o altri vapori o liquidi infiammabili nei pressi di questo o di altri apparecchi simili. AVVERTENZA Una installazione, alterazione, riparazione o manutenzione incorretta può causare danni materiali, lesioni o la morte. Leggere attentamente le istruzioni di installazione, funzionamento e manutenzione prima di installare o usare questo apparecchio. AGLI ACQUIRENTI Conservare in un luogo bene in vista le istruzioni da eseguire in caso che l operatore avverte un odore di gas. Queste informazioni sono disponibili presso il locale fornitore di gas. AVVERTENZA Questa friggitrice è dotata di un cavo elettrico resistente all olio senza spina, fare riferimento allo schema sul retro del manuale per informazioni sui collegamenti elettrici. AVVERTENZA Si può sviluppare una fiamma viva all interno della friggitrice. L apparecchio può diventare sufficientemente bollente per incendiare materiali che si trovano in prossimità. Mantenere l area circostante alla friggitrice libera di materiali combustibili. AVVERTENZA NON rifornire la friggitrice con un gas non indicato sulla piastrina dei dati. Se si deve convertire la friggitrice ad un altro tipo di combustibile, rivolgersi al rivenditore. AVVERTENZA NON usare una fiamma viva per cercare le perdite di gas! AVVERTENZA Non fondere il grasso solido sulla parte superiore dei tubi del bruciatore. Questa operazione potrebbe provocare un incendio e rendere nulla la garanzia. AVVERTENZA L acqua e il grasso non si mescolano. Tenere i liquidi distanti dal grasso bollente. Se si immergono cibi congelati nel grasso bollente, si può produrre una violenta ebollizione. AVVERTENZA Assicurarsi che la friggitrice possa ottenere sufficiente aerazione per alimentare la fiamma. Se la fiamma manca di aria, essa può produrre gas pericolosi di anidride carbonica. L anidride carbonica è un gas incolore e inodore che può causare soffocazione. AVVERTENZA Un apparecchio equipaggiato con ruote orientabili e tubazione flessibile per il gas, deve essere collegato alla fonte di alimentazione del gas con un dispositivo di disconnessione rapida. Tale dispositivo deve essere installato conformemente ai requisiti nazionali e locali. Per limitare il movimento dell apparecchio senza dover dipendere dal connettore o disconnettore rapido, installare anche un cavo di trattenuta. AVVERTENZA Scollegare l alimentazione elettrica prima di eseguire la manutenzione o la pulizia dell apparecchio. AVVERTENZA Non cercare di muovere l apparecchio quando l unità è alla temperatura operativa. L olio bollente può causare gravi lesioni se entra in contatto con la pelle. AVVERTENZA Non cercare di eseguire regolazioni ai dispositivi sigillati. Questi sono stati regolati in fabbrica e non richiedono ulteriori regolazioni. 20
23 AVVERTENZA L installazione e tutte le connessioni devono essere eseguite in osservanza dei regolamenti nazionali e locali in vigore. ATTENZIONE L installazione deve essere eseguita da un tecnico competente. Il modello, il numero di serie e il tipo e pressione del gas sono stampati sulla piastrina dei dati, situata sul pannello interno dello sportello. ATTENZIONE L impiego di questo apparecchio è inteso per uso professionale commerciale e deve essere usato come tale da personale addestrato. ATTENZIONE Si raccomanda di fare ispezionare annualmente questo aparecchio da un tecnico qualificato. RIPRISTINO DOPO ARRESTO PER ALTA TEMPERATURA La friggitrice è dotata di un interruttore di arresto per alta temperatura, che disattiva il riscaldamento se la temperatura del grasso supera 425 F (202 C). Se la friggitrice non riscalda premere il pulsante di ripristino; se l unità ancora non riscalda, chiamare un agente di servizio autorizzato. ATTENZIONE La mensola deve essere costruita di materiale non infiammabile, per le installazioni di friggitrici su mensola SG14C. TEMPERATURA DELL OLIO Mantenere la temperatura dell olio nella friggitrice fino a un massimo di 190 C. Temperature maggiori causano un rapido degrado dell olio, senza tuttavia eseguire una cottura più rapida. ITALIANO Da 205 C a 210 C la durata dell olio è inferiore di un terzo rispetto a quella a 190 C. Inoltre, l accresciuta decomposizione comporta una forte emissione di fumo, anche se la temperatura viene riportata di nuovo a 190 C. Le alte temperature non prevedono vantaggi, sono antieconomiche e aumentano il rischio d incendio. Solstice Series Overall Dimension Models Dimensions (cm) Gas Connection (cm) Height Width Length From Floor From Side SG SG14R SG14T SG
24 INSTALLAZIONE: CONTROLLORE DEL MILLIVOLT Distanze di installazione La friggitrice ha bisogno che siano rispettate determinate distanze per il funzionamento. Adeguate distanze sono necessarie per la manutenzione ed il funzionamento corretto del bruciatore. Le distanze mostrate qui di seguito sono per l installazione dell apparecchio in una costruzione combustibile e non combustibile. Costruzione Costruzione combustibile non combustibile Retro 6" (15,24 cm) 0" (0 cm) Lati 6" (15,24 cm) 0" (0 cm) Pavimento combustibile 9" (22,86 cm) 9" (22,86 cm) La mensola deve essere costruita di materiale non infiammabile, per le installazioni di friggitrici su mensola SG14C.La mensola deve essere costruita di materiale non infiammabile, per le installazioni di friggitrici su mensola SG14C. SISTEMI DI VENTILAZIONE E ANTICENDIO: Tutte le friggitrici devono essere poste in un sistema di ventilazione del tipo a cappa. Un adeguata quantità di aria fresca deve essere assicurata nella stanza o nello spazio che racchiude l apparecchio, per assicurare i requisiti di ventilazione e di combustione dell unità. I gas di scarico possono raggiungere temperature di 1000 F (538 C), per cui è importante installare un sistema antincendio. Sia la cappa di ventilazione che il sistema antincendio devono essere installati in osservanza dei regolamenti nazionali e locali. Un eccessiva ventilazione causa correnti d aria discendenti, che possono interferire con il funzionamento corretto del pilota e del bruciatore. Lasciare almeno 45,72 cm di spazio libero tra l apertura della canna fumaria e l entrata della cappa dello scarico. ATTENZIONE Assicurarsi che il sistema di ventilazione non produca una corrente d aria discendente all apertura della canna fumaria. Le correnti d aria discendenti impediscono uno scarico appropriato della friggitrice con conseguente surriscaldamento e danneggiamento dell apparecchio. I danni causati da correnti discendenti non sono coperti da garanzia. NON permettere che si determinino ostruzioni al flusso di combustibile o alla ventilazione di uscita dalla canna fumaria. NON mettere alcun oggetto al di sopra dell area della canna fumaria. AVVISO NON collegare il soffiatore direttamente all apertura della canna fumaria. Il flusso d aria diretto causa un debole recupero della temperatura, una scadente accensione, un inefficace funzionamento della friggitrice e può far spegnere il pilota. CONNESSIONI DEL GAS: NON rifornire mai la friggitrice con un gas non indicato sulla piastrina dei dati, situata all interno dello sportello. Per assicurare le migliori prestazioni ed una corretta combustione, le friggitrici Pitco devono essere alimentate con una quantità di gas combustibile sufficiente per conformarsi ai requisiti di taratura, indicati sulla piastrina dei dati all interno dello sportello. Tutte le connessioni del gas devono essere eseguite da un tecnico di servizio diplomato. Le connessioni devono essere conformi ai requisiti nazionali e locali. PROVA DELLA TUBAZIONE DI COMBUSTIBILE: Dal momento che la valvola interna del gas della friggitrice Pitco è tarata ad una pressione massima di 50mbar, è imperativo che nessuna prova deve essere eseguita ad una pressione superiore. Se è necessario eseguire una prova con una pressione superiore, la friggitrice deve essere isolata dalla tubazione del gas per non danneggiare la valvola del gas. REGOLAZIONI INIZIALI: Termocoppia: Il pilota è regolato in fabbrica e NON richiede ulteriori regolazioni. Pressione del gas (solo se viene installato il regolatore): La pressione del gas deve essere controllata per assicura 1-22
25 re che il collettore legga la stessa pressione che è indicata sulla piastrina dei dati, situata sul pannello interno dello sportello. Nella ipotesi negativa, la pressione deve essere regolata. Termostati di regolazione: Sono preregolati in fabbrica e NON hanno bisogno di ulteriori regolazioni. NON cercare di eseguire regolazioni di questo dispositivo. Termostati di limite alto: Sono preregolati in fabbrica e NON hanno bisogno di ulteriori regolazioni. NON cercare di eseguire regolazioni a questo apparecchio. PULIZIA INIZIALE: Prima di riempire una qualsiasi friggitrice Pitco con olio, si consiglia di pulirla accuratamente per rimuovere ogni particella estranea dall area di cottura. L apparecchio deve essere riempito d acqua fino ad almeno il livello minimo. Aggiungere un pacchetto di detergente per friggitrice e regolare il comando della temperatura tra 90 e 100 C. Usando la spazzola fornita ed il panno protettivo appropriato, spazzolare l interno del serbatoio fino a che sia pulito. Quando terminato, spegnerel apparecchio, sciacquare il serbatoio con acqua fresca e far asciugare accuratamente. A questo punto, riempire l unità di olio e passare un leggero strato di olio di cottura su tutte le superfici esposte, onde evitare la formazione di ruggine. FUNZIONAMENTO: RUOTE ORIENTABILI: Sulle unità con ruote orientabili muovere la friggitrice nel punto desiderato e bloccare le ruote, usando gli appositi dispositivi di bloccaggio, che si trovano sulla parte anteriore delle stesse. NOTA: Le ruote orientabili devono essere bloccate durante il funzionamento dell apparecchio. COPERCHI: In caso di fiamma sulla superficie dell olio nella friggitrice, porre il coperchio sulla parte superiore dell apparecchio per spegnere le fiamme. Il coperchio deve essere tenuto nelle immediate vicinanze in un luogo senza ingombri e facile da raggiungere. RIEMPIMENTO DEL SERBATOIO DELLA FRIGGITRICE CON GRASSO SOLIDO: Quando si usa grasso solido, tagliare cubi di circa 3 cm 3 e raggrupparli senza serrare intorno a ciascun tubo di riscaldamento. Controllare che il livello dell olio sia al livello minimo quando il grasso si è sciolto. ACCENSIONE DEL PILOTA: Girare il pomello della valvola del gas verso la posizione PILOT (pilota) e premere verso l interno. Accendere la fiamma pilota. Continuare a premere il pomello della valvola del gas per circa 60 secondi. Il pilota deve rimanere acceso quando ilpomello della valvola del gas è rilasciato. ALTRIMENTI, cercare di regolare di nuovo il LIMITE ALTO e riaccendere il pilota. USO DI GRASSO SOLIDO E FUNZIONAMENTO DELLA FRIGGITRICE FINO ALLA TEMPERATURA OPERATIVA: Girare il pomello della valvola del gas in posizione ON (acceso) e girare il selettore del termostato alla temperatura desiderata. Se si usa grasso solido, accendere e spegnere il riscaldamento girando il pomello del termostato dalla posizione ON acceso) alla posizione OFF (spento. Questa operazione deve essere eseguita in modo che i bruciatori siano accesi per circa 15 secondi e spenti per 30 secondi. Eseguire questa procedura per 10 minuti. Al termine di questo periodo, girare il pomello del termostato alla temperatura selezionata e i bruciatori porteranno automaticamente l olio alla temperatura di cottura. Si può ora usare la friggitrice Pitco. COME PORTARE L OLIO ALLA TEMPERATURA OPERATIVA: Girare il pomello della valvola del gas in posizione ON e girare il quadrante del termostato al livello desiderato. I bruciatori portano automaticamente l olio alla temperatura operativa. Si può ora cucinare con la friggitrice Pitco. ARRESTO DELLA FRIGGITRICE PER UN BREVE PERIODO: Girare il pomello della valvola del gas in posizione PILOT (pilota). Il ricorso a questa procedura è ARRESTO DELLA FRIGGITRICE PER UN LUNGO PERIODO: Girare l interruttore della corrente (se in dotazione) in posizione OFF (spento) e girare il pomello della valvola del gas in posizione OFF. 23 Il ricorso a questa procedura è consigliato quando la macchina deve essere lasciata incustodita per un lungo periodo, come la durata di
26 ARRESTO DELLA FRIGGITRICE PER UN LUNGO PERIODO: Girare il pomello della valvola del gas in posizione OFF. Il ricorso a questa procedura è consigliato quando la macchina deve essere lasciata incustodita per un lungo periodo, come la durata di una notte. PULIZIA/MANUTENZIONE: PULIZIA GIORNALIERA: Con un panno morbido ed un detergente neutro strofinare le superfici esterne fino a che tutti i detriti siano rimossi. È ammesso lasciare un leggero strato di olio di cottura sulle superfici esposte. Pulire il pannello anteriore e dietro lo portello. AVVERTENZA La friggitrice deve essere bloccata correttamente per impedire movimenti o inclinazioni. Questo bloccaggio deve impedire movimenti della friggitrice tali da spruzzare liquidi bollenti sul personale e causare gravi ustioni o altre lesioni. Indossare sempre guanti protettivi quando si muovono o si maneggiano apparecchiature con liquidi bollenti. PULIZIA GIORNALIERA: Girare il pomello della valvola del gas verso la posizione PILOT. La friggitrice deve essere vuotata completamente dell olio. Riempire il serbatoio con acqua fino a superare il livello minimo, ma sotto il livello massimo. (Per ottenere migliori risultati, usare il detergente per friggitrici Pitco No. di parte P ) Accendere la friggitrice come descritto nella sezione COME PORTARE L OLIO ALLA TEMPERATURA OPERATIVA. Quando l acqua bolle, usare un paio di guanti di gomma isolante e la spazzola in dotazione per fregare energicamente l interno del serbatoio, facendo però attenzione a non danneggiare la rete capillare di tubi sottili all interno del serbatoio. Quando la friggitrice è pulita, spegnerla come descritto nella sezione ARRESTO DELLA FRIGGITRICE PER UN BREVE PERIODO. Scaricare l acqua in un contenitore capace di contenere olio a 400 F (204 C). Sciacquare l interno del serbatoio con acqua fresca ed asciugarlo con un panno soffice fino a che tutta l acqua sia eliminata. Questa è una buona occasione per eseguire la PULIZIA GIORNALIERA. A questo punto, la friggitrice è pronta per essere riempita ed usata. 1-24
27 CONTROLLO DELLA FRIGGITRICE ALLA CONSEGNA La friggitrice è stata imballata con cura. Ogni sforzo è stato compiuto per assicurare la consegna della friggitrice in perfette condizioni. Quando si rimuove la nuova friggitrice dalla confezione, controllare ogni parte per assicurarsi che non sia danneggiata. Se si notano danni, NON firmare la polizza di carico. Contattare immediatamente lo spedizioniere, che è l unico responsabile per i 15 giorni che seguono la consegna. Controllare la lista degli elementi forniti con la friggitrice per assicurarsi di aver ricevuto tutte le parti collegate alla friggitrice. Se mancano delle parti, rivolgersi al rivenditore dal quale la friggitrice è stata acquistata. ATTENZIONE Per impedire danni all apparecchiatura, non inclinare la friggitrice su due delle sue ruote non allontanare l unità dalla canna fumaria. Individuare la garanzia della Pico Frialator ed inscrivere il numero di serie della friggitrice e la data di consegna. Il numero di serie è indicato sulla piastrina dei dati, che si trova all interno dello sportello. Conservare la scheda della garanzia in un posto sicuro. NON ritornare la scheda alla Pitco Frialator. INSTALLAZIONE Sebbene sia possibile per qualunque persona installare e mettere a punto la nuova friggitrice, è FORTEMENTE raccomandato che questo lavoro sia eseguito da professionisti qualificati. Gli installatori professionisti conoscono i regolamenti locali e garantiscono la sicurezza dell installazione. AVVERTENZA NON ostruire il flusso di combustibile o di ventilazione o gli arrivi di aria intorno alla friggitrice. È necessario assicurare uno spazio adeguato intorno all unità per assicurare manutenzione e funzionamento corretti. Rispettare le distanze minime specificate nel manuale. Distanze di installazione La friggitrice ha bisogno che siano rispettate determinate distanze per il funzionamento. Adeguate distanze sono necessarie per la manutenzione ed il funzionamento corretti del bruciatore. Le distanze mostrate qui di seguito sono per l installazione di un unità in una costruzione combustibile o non combustibile. Costruzione Costruzione combustibile non combustibile Retro 6" (15,24 cm) 0" (0 cm) Lati 6" (15,24 cm) 0" (0 cm) Pavimento combustibile 9" (22,86 cm) 9" (22,86 cm) La mensola deve essere costruita di materiale non infiammabile, per le installazioni di friggitrici su mensola SG14C.La mensola deve essere costruita di materiale non infiammabile, per le installazioni di friggitrici su mensola SG14C. Oltre alle distanze richieste per un funzionamento corretto della friggitrice, è necessario lasciare almeno 53 cm di spazio di fronte all apparecchio per essere in grado di rimuovere o installare il modulo/coppa del filtro. Oltre alle distanze richieste per un funzionamento corretto della friggitrice, è necessario lasciare almeno 53,34 cm di spazio di fronte all apparecchio per essere in grado di rimuovere o installare il modulo/coppa del filtro. AVVERTENZA La friggitrice deve essere bloccata correttamente per impedire movimenti o inclinazioni. Questo bloccaggio deve impedire movimenti della friggitrice tali da evitare lo spruzzo di liquidi bollenti sul personale e causare gravi ustioni o altre lesioni. Indossare sempre guanti protettivi quando si muovono o si maneggiano apparecchiature con liquidi bollenti. Livellamento La friggitrice viene consegnata completamente montata. Essa ha bisogno di essere livellata quando è in posizione. Il livellamento della friggitrice è eseguito con un grande paio di pinze della pompa dell acqua. Le ruote orientabili assicurano la necessaria altezza da terra per la conformità con i requisiti sanitari e per assicurare un adeguata 25
Περιεχόμενα / Contents
 Aερόθερμo / Fan Heater PTC-906 Περιεχόμενα / Contents GR... Σελίδες 3-8 EN... Pages 9-11 2 GR Ευχαριστούμε που επιλέξατε μια συσκευή της γκάμας θερμαντικών IZZY. Σημαντικές Οδηγίες Ασφαλείας Τα Μέρη της
Right Rear Door. Let's now finish the door hinge saga with the right rear door
 Right Rear Door Let's now finish the door hinge saga with the right rear door You may have been already guessed my steps, so there is not much to describe in detail. Old upper one file:///c /Documents
(Type B) Το προϊόν αυτό δεν είναι κατάλληλο για σκοπούς πρωτογενούς θέρμανσης. ADM AEE
 Το προϊόν αυτό δεν είναι κατάλληλο για σκοπούς πρωτογενούς θέρμανσης. ADM AEE") (Type B) Το προϊόν αυτό δεν είναι κατάλληλο για σκοπούς πρωτογενούς θέρμανσης. ADM AEE 2310 85 30 61 80 00 18 Mklg 01. Rwnc A]SQ,ovb / D OPERATlON FUELING WARNING: uture storage of your heater. Use o NEVE
(Type B) Το προϊόν αυτό δεν είναι κατάλληλο για σκοπούς πρωτογενούς θέρμανσης. ADM AEE 2310 85 30 61 80 00 18 Mklg 01. Rwnc A]SQ,ovb / D OPERATlON FUELING WARNING: uture storage of your heater. Use o NEVE
Modbus basic setup notes for IO-Link AL1xxx Master Block
 n Modbus has four tables/registers where data is stored along with their associated addresses. We will be using the holding registers from address 40001 to 49999 that are R/W 16 bit/word. Two tables that
EE512: Error Control Coding
 EE512: Error Control Coding Solution for Assignment on Finite Fields February 16, 2007 1. (a) Addition and Multiplication tables for GF (5) and GF (7) are shown in Tables 1 and 2. + 0 1 2 3 4 0 0 1 2 3
the total number of electrons passing through the lamp.
 1. A 12 V 36 W lamp is lit to normal brightness using a 12 V car battery of negligible internal resistance. The lamp is switched on for one hour (3600 s). For the time of 1 hour, calculate (i) the energy
Εγκατάσταση λογισμικού και αναβάθμιση συσκευής Device software installation and software upgrade
 Για να ελέγξετε το λογισμικό που έχει τώρα η συσκευή κάντε κλικ Menu > Options > Device > About Device Versions. Στο πιο κάτω παράδειγμα η συσκευή έχει έκδοση λογισμικού 6.0.0.546 με πλατφόρμα 6.6.0.207.
Advanced Subsidiary Unit 1: Understanding and Written Response
 Write your name here Surname Other names Edexcel GE entre Number andidate Number Greek dvanced Subsidiary Unit 1: Understanding and Written Response Thursday 16 May 2013 Morning Time: 2 hours 45 minutes
Capacitors - Capacitance, Charge and Potential Difference
 Capacitors - Capacitance, Charge and Potential Difference Capacitors store electric charge. This ability to store electric charge is known as capacitance. A simple capacitor consists of 2 parallel metal
Potential Dividers. 46 minutes. 46 marks. Page 1 of 11
 Potential Dividers 46 minutes 46 marks Page 1 of 11 Q1. In the circuit shown in the figure below, the battery, of negligible internal resistance, has an emf of 30 V. The pd across the lamp is 6.0 V and
Door Hinge replacement (Rear Left Door)
") Door Hinge replacement (Rear Left Door) We will continue the previous article by replacing the hinges of the rear left hand side door. I will use again the same procedure and means I employed during the
Door Hinge replacement (Rear Left Door) We will continue the previous article by replacing the hinges of the rear left hand side door. I will use again the same procedure and means I employed during the
 60 61 62 63 64 65 Ο Δ Η Γ Ι Ε Σ Σ Υ Ν Τ Η Ρ Η Σ Η Σ Τ Ω Ν Κ Ο Υ Φ Ω Μ Α Τ Ω Ν Ι Ν S T R U C T I N O N S C O N C E R N I N G Τ Η Ε C A S E M E N T S M A I N T E N A N C E Ο τακτικός καθαρισμός των βαμμένων
Έλεγχος και Διασφάλιση Ποιότητας
 Έλεγχος και Διασφάλιση Ποιότητας Ενότητα 6: Κουππάρης Μιχαήλ Τμήμα Χημείας Εργαστήριο Αναλυτικής Χημείας General Successfully carry out the Preventive Maintenance Procedure and complete the Maintenance
ΑΚΑ ΗΜΙΑ ΕΜΠΟΡΙΚΟΥ ΝΑΥΤΙΚΟΥ ΜΑΚΕ ΟΝΙΑΣ ΣΧΟΛΗ ΜΗΧΑΝΙΚΩΝ ΠΤΥΧΙΑΚΗ ΕΡΓΑΣΙΑ ΘΕΜΑ : ΧΗΜΙΚΑ ΠΡΟΣΘΕΤΑ ΠΟΥ ΠΡΟΟΡΙΖΟΝΤΑΙ ΓΙΑ ΤΟ ΝΕΡΟ ΤΟΥ ΑΤΜΟΛΕΒΗΤΑ
 ΑΚΑ ΗΜΙΑ ΕΜΠΟΡΙΚΟΥ ΝΑΥΤΙΚΟΥ ΜΑΚΕ ΟΝΙΑΣ ΣΧΟΛΗ ΜΗΧΑΝΙΚΩΝ ΠΤΥΧΙΑΚΗ ΕΡΓΑΣΙΑ ΘΕΜΑ : ΧΗΜΙΚΑ ΠΡΟΣΘΕΤΑ ΠΟΥ ΠΡΟΟΡΙΖΟΝΤΑΙ ΓΙΑ ΤΟ ΝΕΡΟ ΤΟΥ ΑΤΜΟΛΕΒΗΤΑ ΣΠΟΥ ΑΣΤΗΣ : ΑΓΟΡΑΣΤΟΣ ΧΡΥΣΟΒΑΛΑΝΤΗΣ ΕΠΙΒΛΕΠΟΥΣΑ ΚΑΘΗΓΗΤΡΙΑ :
Surface Mount Aluminum Electrolytic Capacitors
 FEATURES CYLINDRICAL V-CHIP CONSTRUCTION LOW COST, GENERAL PURPOSE, 2000 HOURS AT 85 O C NEW EXPANDED CV RANGE (up to 6800µF) ANTI-SOLVENT (2 MINUTES) DESIGNED FOR AUTOMATIC MOUNTING AND REFLOW SOLDERING
S /5000 BTU/Hr. 1000/1500 Watt
 763.576.32 SPEC-168 D763.422.2211 COOLING SEALED ENCLOSURE COOLING AIR CONDITIONERS Sealed Enclosure Cooling Air Conditioners SPECTRACOOL SLIM FIT INDOOR S6 1/17 BTU/Hr. 3/5 Watt S1 34/5 BTU/Hr. 1/15 Watt
Math 6 SL Probability Distributions Practice Test Mark Scheme
 Math 6 SL Probability Distributions Practice Test Mark Scheme. (a) Note: Award A for vertical line to right of mean, A for shading to right of their vertical line. AA N (b) evidence of recognizing symmetry
SPARE PARTS LIST. for. Infrared oil heater. Model. Daystar. Type. PH5 for 120V 60Hz. May, 2017
 SPARE PARTS LIST for Infrared oil heater Model Daystar Type PH5 for 120V 60Hz May, 2017 *PRICES AND SPECIFICATIONS ARE SUBJECT TO CHANGE WITHOUT NOTICE..* 2017 J.S.O'will, Inc.. Shizuoka Seiki Co. Ltd.
SPEEDO AQUABEAT. Specially Designed for Aquatic Athletes and Active People
 SPEEDO AQUABEAT TM Specially Designed for Aquatic Athletes and Active People 1 2 Decrease Volume Increase Volume Reset EarphonesUSBJack Power Off / Rewind Power On / Fast Forward Goggle clip LED Status
(REV:01) RYOBI 48 Volt Lawn Mower Model No. RY14110 Replacement Parts List
 RYOBI 48 Volt Lawn Mower Model No. RY14110 Replacement Parts List") 9800-86 2-0-0 (REV:0) RYOBI 48 Volt Lawn Mower Model No. RY0 Replacement Parts List RYOBI RY0 48 volt lawn mower 3 38 39 44 39 36 34 36 42 38 39 3 4 37 34 3 43 2 32 0 8 9 2 4 33 8 7 6 3 6 7 22 8 20 3 30
9800-86 2-0-0 (REV:0) RYOBI 48 Volt Lawn Mower Model No. RY0 Replacement Parts List RYOBI RY0 48 volt lawn mower 3 38 39 44 39 36 34 36 42 38 39 3 4 37 34 3 43 2 32 0 8 9 2 4 33 8 7 6 3 6 7 22 8 20 3 30
Surface Mount Multilayer Chip Capacitors for Commodity Solutions
 Surface Mount Multilayer Chip Capacitors for Commodity Solutions Below tables are test procedures and requirements unless specified in detail datasheet. 1) Visual and mechanical 2) Capacitance 3) Q/DF
Section 8.3 Trigonometric Equations
 99 Section 8. Trigonometric Equations Objective 1: Solve Equations Involving One Trigonometric Function. In this section and the next, we will exple how to solving equations involving trigonometric functions.
(REV:01) RYOBI 48 Volt Lawn Mower Model No. RY14110A Replacement Parts List
 RYOBI 48 Volt Lawn Mower Model No. RY14110A Replacement Parts List") 9000-7 9-- (REV:0) RYOBI 4 Volt Lawn Mower Model No. RY0A Replacement Parts List RYOBI RY0A 4 VOLT LAWN MOWER 3 3 39 44 39 3 34 3 42 3 39 3 4 37 34 3 43 2 0 37 2 33 32 3 9 7 22 30 4 7 3 20 9 3 2 2 27 2
9000-7 9-- (REV:0) RYOBI 4 Volt Lawn Mower Model No. RY0A Replacement Parts List RYOBI RY0A 4 VOLT LAWN MOWER 3 3 39 44 39 3 34 3 42 3 39 3 4 37 34 3 43 2 0 37 2 33 32 3 9 7 22 30 4 7 3 20 9 3 2 2 27 2
ΚΥΠΡΙΑΚΗ ΕΤΑΙΡΕΙΑ ΠΛΗΡΟΦΟΡΙΚΗΣ CYPRUS COMPUTER SOCIETY ΠΑΓΚΥΠΡΙΟΣ ΜΑΘΗΤΙΚΟΣ ΔΙΑΓΩΝΙΣΜΟΣ ΠΛΗΡΟΦΟΡΙΚΗΣ 19/5/2007
 Οδηγίες: Να απαντηθούν όλες οι ερωτήσεις. Αν κάπου κάνετε κάποιες υποθέσεις να αναφερθούν στη σχετική ερώτηση. Όλα τα αρχεία που αναφέρονται στα προβλήματα βρίσκονται στον ίδιο φάκελο με το εκτελέσιμο
HOMEWORK 4 = G. In order to plot the stress versus the stretch we define a normalized stretch:
 HOMEWORK 4 Problem a For the fast loading case, we want to derive the relationship between P zz and λ z. We know that the nominal stress is expressed as: P zz = ψ λ z where λ z = λ λ z. Therefore, applying
Phys460.nb Solution for the t-dependent Schrodinger s equation How did we find the solution? (not required)
") Phys460.nb 81 ψ n (t) is still the (same) eigenstate of H But for tdependent H. The answer is NO. 5.5.5. Solution for the tdependent Schrodinger s equation If we assume that at time t 0, the electron starts
Phys460.nb 81 ψ n (t) is still the (same) eigenstate of H But for tdependent H. The answer is NO. 5.5.5. Solution for the tdependent Schrodinger s equation If we assume that at time t 0, the electron starts
MSN DESK TOP ENCLOSURE WITH STAND / CARRYING HANDLE
 MSN SERIES MSN DESK TOP ENCLOSURE WITH STAND / CARRYING HANDLE W H FEATURE Available in 176 sizes. Stand / carrying handle can be adjusted in 30 degree. Maximum load is kg. There are no ventilation hole
Απόκριση σε Μοναδιαία Ωστική Δύναμη (Unit Impulse) Απόκριση σε Δυνάμεις Αυθαίρετα Μεταβαλλόμενες με το Χρόνο. Απόστολος Σ.
 Απόκριση σε Δυνάμεις Αυθαίρετα Μεταβαλλόμενες με το Χρόνο. Απόστολος Σ.") Απόκριση σε Δυνάμεις Αυθαίρετα Μεταβαλλόμενες με το Χρόνο The time integral of a force is referred to as impulse, is determined by and is obtained from: Newton s 2 nd Law of motion states that the action
Απόκριση σε Δυνάμεις Αυθαίρετα Μεταβαλλόμενες με το Χρόνο The time integral of a force is referred to as impulse, is determined by and is obtained from: Newton s 2 nd Law of motion states that the action
Quick Installation Guide
 A Installation 1 F H B E C D G 2 www.trust.com/17528/faq Quick Installation Guide C C D Freewave Wireless Audio Set 17528/ 17529 D Installation Configuration Windows XP 4 5 8 Windows 7/ Vista 6 7 9 10
ΟΔΗΓΙΕΣ ΧΡΗΣΗΣ USE INSTRUCTIONS
 ΟΔΗΓΙΕΣ ΧΡΗΣΗΣ USE INSTRUCTIONS ΤΗΛΕΦΩΝΟ ΜΕ ΑΝΑΓΝΩΡΙΣΗ ΚΛΗΣΗΣ /CORDED PHONE WITH CALLER ID ΜΟΝΤΕΛΟ/MODEL: TM09-448 DC48V Παρακαλούμε διαβάστε προσεκτικά όλες τις οδηγίες χρήσης πριν την χρήση της συσκευής
CHAPTER 25 SOLVING EQUATIONS BY ITERATIVE METHODS
 CHAPTER 5 SOLVING EQUATIONS BY ITERATIVE METHODS EXERCISE 104 Page 8 1. Find the positive root of the equation x + 3x 5 = 0, correct to 3 significant figures, using the method of bisection. Let f(x) =
MS SERIES MS DESK TOP ENCLOSURE APPLICATION EXAMPLE FEATURE. Measuring instruments. Power supply equipments
 MS SERIES MS DESK TOP ENCLOSURE FEATURE Available in 176 sizes. Screws are not appeared on the surface. Usable as rack mount case with optinal mounting bracket. There are no ventilation hole for cover
Code Breaker. TEACHER s NOTES
 TEACHER s NOTES Time: 50 minutes Learning Outcomes: To relate the genetic code to the assembly of proteins To summarize factors that lead to different types of mutations To distinguish among positive,
Aluminum Electrolytic Capacitors
 Aluminum Electrolytic Capacitors Snap-In, Mini., 105 C, High Ripple APS TS-NH ECE-S (G) Series: TS-NH Features Long life: 105 C 2,000 hours; high ripple current handling ability Wide CV value range (47
2 Composition. Invertible Mappings
 Arkansas Tech University MATH 4033: Elementary Modern Algebra Dr. Marcel B. Finan Composition. Invertible Mappings In this section we discuss two procedures for creating new mappings from old ones, namely,
User s Manual / Οδηγίες Χρήσης
 User s Manual / Οδηγίες Χρήσης EUROPEAN STANDARDS Your child s safety depends on you. Proper bed rail usage cannot be assured unless you follow these instructions. DO NOT USE YOUR BED RAIL UNTILL YOU READ
The challenges of non-stable predicates
 The challenges of non-stable predicates Consider a non-stable predicate Φ encoding, say, a safety property. We want to determine whether Φ holds for our program. The challenges of non-stable predicates
7 Present PERFECT Simple. 8 Present PERFECT Continuous. 9 Past PERFECT Simple. 10 Past PERFECT Continuous. 11 Future PERFECT Simple
 A/ Ονόματα και ένα παράδειγμα 1 Present Simple 7 Present PERFECT Simple 2 Present Continuous 8 Present PERFECT Continuous 3 Past Simple (+ used to) 9 Past PERFECT Simple she eats she is eating she ate
Strain gauge and rosettes
 Strain gauge and rosettes Introduction A strain gauge is a device which is used to measure strain (deformation) on an object subjected to forces. Strain can be measured using various types of devices classified
Instruction Execution Times
 1 C Execution Times InThisAppendix... Introduction DL330 Execution Times DL330P Execution Times DL340 Execution Times C-2 Execution Times Introduction Data Registers This appendix contains several tables
ZLW Series. Single-stage Monoblock Centrifugal Pump ZL PUMP GROUP.,LTD
 ZLW Series Single-stage Monoblock Centrifugal Pump ZL PUMP GROUP.,LTD 1 Application Apply as the transportation of liquids in the fields of air condition, heating, sanitary water, water treatment cooling,
ΟΔΗΓΙΕΣ ΕΓΚΑΤΑΣTΑΣΗΣ ΓΙΑ ΠΑΤΩΜΑ WPC INSTALLATION GUIDE FOR WPC DECKING
 1/12 ΟΔΗΓΙΕΣ ΕΓΚΑΤΑΣTΑΣΗΣ ΓΙΑ ΠΑΤΩΜΑ WPC INSTALLATION GUIDE FOR WPC DECKING Ανοίγουμε τρύπες Ø8 x 80mm στο σημείο κατασκευής, με τρυπάνι. To προτεινόμενο πλάτος και μήκος μεταξύ των 2 οπών να είναι 30-35εκ.,
Aluminum Electrolytic Capacitors (Large Can Type)
") Aluminum Electrolytic Capacitors (Large Can Type) Snap-In, 85 C TS-U ECE-S (U) Series: TS-U Features General purpose Wide CV value range (33 ~ 47,000 µf/16 4V) Various case sizes Top vent construction
Aluminum Electrolytic Capacitors (Large Can Type) Snap-In, 85 C TS-U ECE-S (U) Series: TS-U Features General purpose Wide CV value range (33 ~ 47,000 µf/16 4V) Various case sizes Top vent construction
Assalamu `alaikum wr. wb.
 LUMP SUM Assalamu `alaikum wr. wb. LUMP SUM Wassalamu alaikum wr. wb. Assalamu `alaikum wr. wb. LUMP SUM Wassalamu alaikum wr. wb. LUMP SUM Lump sum lump sum lump sum. lump sum fixed price lump sum lump
Οδηγίες Χρήσης BWR5106
 Οδηγίες Χρήσης BWR5106 Περιγραφή εργαλείου Οι αντλίες χειρός είναι ένα εργαλείο με την ικανότητα, πιέζοντας τον λεβιέ πάνω κάτω να πρεσάρει γράσο σε μεγάλη πίεση και με την βοήθεια αυτής να γρασάρει οπού
b. Use the parametrization from (a) to compute the area of S a as S a ds. Be sure to substitute for ds!
 to compute the area of S a as S a ds. Be sure to substitute for ds!") MTH U341 urface Integrals, tokes theorem, the divergence theorem To be turned in Wed., Dec. 1. 1. Let be the sphere of radius a, x 2 + y 2 + z 2 a 2. a. Use spherical coordinates (with ρ a) to parametrize.
MTH U341 urface Integrals, tokes theorem, the divergence theorem To be turned in Wed., Dec. 1. 1. Let be the sphere of radius a, x 2 + y 2 + z 2 a 2. a. Use spherical coordinates (with ρ a) to parametrize.
[1] P Q. Fig. 3.1
![[1] P Q. Fig. 3.1](/thumbs/79/80362156.jpg "[1] P Q. Fig. 3.1") 1 (a) Define resistance....... [1] (b) The smallest conductor within a computer processing chip can be represented as a rectangular block that is one atom high, four atoms wide and twenty atoms long. One
1 (a) Define resistance....... [1] (b) The smallest conductor within a computer processing chip can be represented as a rectangular block that is one atom high, four atoms wide and twenty atoms long. One
Approximation of distance between locations on earth given by latitude and longitude
 Approximation of distance between locations on earth given by latitude and longitude Jan Behrens 2012-12-31 In this paper we shall provide a method to approximate distances between two points on earth
CYTA Cloud Server Set Up Instructions
 CYTA Cloud Server Set Up Instructions ΕΛΛΗΝΙΚΑ ENGLISH Initial Set-up Cloud Server To proceed with the initial setup of your Cloud Server first login to the Cyta CloudMarketPlace on https://cloudmarketplace.cyta.com.cy
ΚΥΠΡΙΑΚΗ ΕΤΑΙΡΕΙΑ ΠΛΗΡΟΦΟΡΙΚΗΣ CYPRUS COMPUTER SOCIETY ΠΑΓΚΥΠΡΙΟΣ ΜΑΘΗΤΙΚΟΣ ΔΙΑΓΩΝΙΣΜΟΣ ΠΛΗΡΟΦΟΡΙΚΗΣ 6/5/2006
 Οδηγίες: Να απαντηθούν όλες οι ερωτήσεις. Ολοι οι αριθμοί που αναφέρονται σε όλα τα ερωτήματα είναι μικρότεροι το 1000 εκτός αν ορίζεται διαφορετικά στη διατύπωση του προβλήματος. Διάρκεια: 3,5 ώρες Καλή
UK PART-3. ARRANGING FOOD IN THE APPLIANCE Refrigerator Compartment To set the refrigerator compartment to 5 graphic bar will be enough for normal con
 UK PART-3. ARRANGING FOOD IN THE APPLIANCE Refrigerator Compartment To set the refrigerator compartment to 5 graphic bar will be enough for normal conditions. To reduce humidity and consequent increase
Metal Oxide Varistors (MOV) Data Sheet
 Data Sheet") Φ SERIES Metal Oxide Varistors (MOV) Data Sheet Features Wide operating voltage (V ma ) range from 8V to 0V Fast responding to transient over-voltage Large absorbing transient energy capability Low clamping
Φ SERIES Metal Oxide Varistors (MOV) Data Sheet Features Wide operating voltage (V ma ) range from 8V to 0V Fast responding to transient over-voltage Large absorbing transient energy capability Low clamping
Summary of Specifications
 Snap Mount Large High CV High Ripple 85 C Temperature The series capacitors are the standard 85 C, large capacitance, snap-in capacitors from United Chemi-Con. The load life for the series is 2,000 hours
Daewoo Technopark A-403, Dodang-dong, Wonmi-gu, Bucheon-city, Gyeonggido, Korea LM-80 Test Report
 LM-80 Test Report Approved Method: Measuring Lumen Maintenance of LED Light Sources Project Number: KILT1212-U00216 Date: September 17 th, 2013 Requested by: Dongbu LED Co., Ltd 90-1, Bongmyeong-Ri, Namsa-Myeon,
Οδηγίες Αγοράς Ηλεκτρονικού Βιβλίου Instructions for Buying an ebook
 Οδηγίες Αγοράς Ηλεκτρονικού Βιβλίου Instructions for Buying an ebook Βήμα 1: Step 1: Βρείτε το βιβλίο που θα θέλατε να αγοράσετε και πατήστε Add to Cart, για να το προσθέσετε στο καλάθι σας. Αυτόματα θα
DC-DC Constant Current Step-Down LED driver LDD-300L LDD-350L LDD-500L LDD-600L LDD-700L CURRENT RANGE
 SPECIFICATION ORDER NO. LDD-00L LDD-0L LDD-00L LDD-00L LDD-700L CURRENT RANGE 00mA 0mA 00mA VOLTAGE RANGE Note. ~ VDC for LDD-00~700L/LW ; ~ 8VDC for LDD-00~700LS CURRENT ACCURACY (Typ.) ±% at VDC input
OUR PRODUCT RANGE. www.rakson.gr
 ΤΑ ΑΛΛΑ ΕΙ Η ΠΡΟΪΟΝΤΑ ΜΑΣ ΜΕΤΑΣΧΗΜΑΤΙΣΤΕΣ ΚΟΥ ΟΥΝΙΩΝ ΚΟΥ ΟΥΝΙΑ ΜΠΟΥΤΟΝ ΚΟΥ ΟΥΝΙΩΝ ΑΥΤΟΜΑΤΟΙ ΚΛΙΜΑΚΟΣΤΑΣΙΟΥ ΚΛΕΙ ΑΡΙΕΣ ΑΝΙΧΝΕΥΤΕΣ ΚΙΝΗΣΗΣ ΣΥΣΤΗΜΑΤΑ ΕΠΙΚΟΙΝΩΝΙΑΣ Θυροτηλεοράσεις Θυροτηλέφωνα Ενδοεπικοινωνίες
9.09. # 1. Area inside the oval limaçon r = cos θ. To graph, start with θ = 0 so r = 6. Compute dr
 9.9 #. Area inside the oval limaçon r = + cos. To graph, start with = so r =. Compute d = sin. Interesting points are where d vanishes, or at =,,, etc. For these values of we compute r:,,, and the values
Creative TEchnology Provider
 1 Oil pplication Capacitors are intended for the improvement of Power Factor in low voltage power networks. Used advanced technology consists of metallized PP film with extremely low loss factor and dielectric
RSDW08 & RDDW08 series
 /,, MODEL SELECTION TABLE INPUT ORDER NO. INPUT VOLTAGE (RANGE) NO LOAD INPUT CURRENT FULL LOAD VOLTAGE CURRENT EFFICIENCY (Typ.) CAPACITOR LOAD (MAX.) RSDW08F-03 344mA 3.3V 2000mA 80% 2000μF RSDW08F-05
Bbc7000 ΦΟΡΤΙΣΤΗΣ - ΕΚΚΙΝΗΤΗΣ ΜΠΑΤΑΡΙΑΣ. Art Nr: Owner s manual. Μετάφραση του πρωτοτύπου των οδηγιών χρήσης
 Bbc7000 ΦΟΡΤΙΣΤΗΣ - ΕΚΚΙΝΗΤΗΣ ΜΠΑΤΑΡΙΑΣ Μετάφραση του πρωτοτύπου των οδηγιών χρήσης Art Nr: 022213 Owner s manual Διαβάστε προσεχτικά όλες τις οδηγίες χρήσης και ασφάλειας πριν την λειτουργία του μηχανήματος.
ΕΛΛΗΝΙΚΗ ΔΗΜΟΚΡΑΤΙΑ Ανώτατο Εκπαιδευτικό Ίδρυμα Πειραιά Τεχνολογικού Τομέα. Ξενόγλωσση Τεχνική Ορολογία
 ΕΛΛΗΝΙΚΗ ΔΗΜΟΚΡΑΤΙΑ Ανώτατο Εκπαιδευτικό Ίδρυμα Πειραιά Τεχνολογικού Τομέα Ξενόγλωσση Τεχνική Ορολογία Ενότητα: Principles of an Internal Combustion Engine Παναγιώτης Τσατσαρός Τμήμα Μηχανολόγων Μηχανικών
3.4 SUM AND DIFFERENCE FORMULAS. NOTE: cos(α+β) cos α + cos β cos(α-β) cos α -cos β
 cos α + cos β cos(α-β) cos α -cos β") 3.4 SUM AND DIFFERENCE FORMULAS Page Theorem cos(αβ cos α cos β -sin α cos(α-β cos α cos β sin α NOTE: cos(αβ cos α cos β cos(α-β cos α -cos β Proof of cos(α-β cos α cos β sin α Let s use a unit circle
3.4 SUM AND DIFFERENCE FORMULAS Page Theorem cos(αβ cos α cos β -sin α cos(α-β cos α cos β sin α NOTE: cos(αβ cos α cos β cos(α-β cos α -cos β Proof of cos(α-β cos α cos β sin α Let s use a unit circle
Precision Metal Film Fixed Resistor Axial Leaded
 Features EIA standard colour-coding Non-Flame type available Low noise and voltage coefficient Low temperature coefficient range Wide precision range in small package Too low or too high ohmic value can
Συστήματα Διαχείρισης Βάσεων Δεδομένων
 ΕΛΛΗΝΙΚΗ ΔΗΜΟΚΡΑΤΙΑ ΠΑΝΕΠΙΣΤΗΜΙΟ ΚΡΗΤΗΣ Συστήματα Διαχείρισης Βάσεων Δεδομένων Φροντιστήριο 9: Transactions - part 1 Δημήτρης Πλεξουσάκης Τμήμα Επιστήμης Υπολογιστών Tutorial on Undo, Redo and Undo/Redo
Homework 8 Model Solution Section
 MATH 004 Homework Solution Homework 8 Model Solution Section 14.5 14.6. 14.5. Use the Chain Rule to find dz where z cosx + 4y), x 5t 4, y 1 t. dz dx + dy y sinx + 4y)0t + 4) sinx + 4y) 1t ) 0t + 4t ) sinx
(C) 2010 Pearson Education, Inc. All rights reserved.
 2010 Pearson Education, Inc. All rights reserved.") Connectionless transmission with datagrams. Connection-oriented transmission is like the telephone system You dial and are given a connection to the telephone of fthe person with whom you wish to communicate.
Connectionless transmission with datagrams. Connection-oriented transmission is like the telephone system You dial and are given a connection to the telephone of fthe person with whom you wish to communicate.
ΚΥΠΡΙΑΚΗ ΕΤΑΙΡΕΙΑ ΠΛΗΡΟΦΟΡΙΚΗΣ CYPRUS COMPUTER SOCIETY ΠΑΓΚΥΠΡΙΟΣ ΜΑΘΗΤΙΚΟΣ ΔΙΑΓΩΝΙΣΜΟΣ ΠΛΗΡΟΦΟΡΙΚΗΣ 24/3/2007
 Οδηγίες: Να απαντηθούν όλες οι ερωτήσεις. Όλοι οι αριθμοί που αναφέρονται σε όλα τα ερωτήματα μικρότεροι του 10000 εκτός αν ορίζεται διαφορετικά στη διατύπωση του προβλήματος. Αν κάπου κάνετε κάποιες υποθέσεις
VENERE. GR. Οδηγός Χρήσης EN. User Guide
 GR. Οδηγός Χρήσης EN. User Guide ΣΗΜΑΝΤΙΚΟ! ΚΡΑΤΗΣΤΕ ΓΙΑ ΜΕΛΛΟΝΤΙΚΗ ΑΝΑΦΟΡΑ: ΔΙΑΒΑΣΤΕ ΠΡΟΣΕΚΤΙΚΑ Κίνδυνος από φωτιά και άλλες πηγές έντονης θερμότητας, όπως ηλεκτρικές αντιστάσεις, υγραέριο, φωτιά κλπ,
(1) Describe the process by which mercury atoms become excited in a fluorescent tube (3)
 Describe the process by which mercury atoms become excited in a fluorescent tube (3)") Q1. (a) A fluorescent tube is filled with mercury vapour at low pressure. In order to emit electromagnetic radiation the mercury atoms must first be excited. (i) What is meant by an excited atom? (1) (ii)
Q1. (a) A fluorescent tube is filled with mercury vapour at low pressure. In order to emit electromagnetic radiation the mercury atoms must first be excited. (i) What is meant by an excited atom? (1) (ii)
38BXCS STANDARD RACK MODEL. DCS Input/Output Relay Card Series MODEL & SUFFIX CODE SELECTION 38BXCS INSTALLATION ORDERING INFORMATION RELATED PRODUCTS
 DCS Input/Output Relay Card Series STANDARD RACK MODEL 38BXCS MODEL & SUFFIX CODE SELECTION 38BXCS MODEL CONNECTOR Y1 :Yokogawa KS2 cable use Y2 :Yokogawa KS9 cable use Y6 :Yokogawa FA-M3/F3XD32-3N use
Finite Field Problems: Solutions
 Finite Field Problems: Solutions 1. Let f = x 2 +1 Z 11 [x] and let F = Z 11 [x]/(f), a field. Let Solution: F =11 2 = 121, so F = 121 1 = 120. The possible orders are the divisors of 120. Solution: The
Operating Instructions and Parts Manual 14-inch Woodworking Band Saw Models JWBS-14SF and JWBS-14SF-3
 Operating Instructions and Parts Manual 14-inch Woodworking Band Saw Models JWBS-14SF and JWBS-14SF-3 Model #714500 shown JET 427 New Sanford Road LaVergne, Tennessee 37086 Part No. M-714500 Ph.: 800-274-6848
1000 VDC 1250 VDC 125 VAC 250 VAC J K 125 VAC, 250 VAC
 Metallized Polyester Film Capacitor Type: ECQE(F) Non-inductive construction using metallized Polyester film with flame retardant epoxy resin coating Features Self-healing property Excellent electrical
ΠΑΝΕΠΙΣΤΗΜΙΟ ΠΑΤΡΩΝ ΤΜΗΜΑ ΗΛΕΚΤΡΟΛΟΓΩΝ ΜΗΧΑΝΙΚΩΝ ΚΑΙ ΤΕΧΝΟΛΟΓΙΑΣ ΥΠΟΛΟΓΙΣΤΩΝ ΤΟΜΕΑΣ ΣΥΣΤΗΜΑΤΩΝ ΗΛΕΚΤΡΙΚΗΣ ΕΝΕΡΓΕΙΑΣ
 ΠΑΝΕΠΙΣΤΗΜΙΟ ΠΑΤΡΩΝ ΤΜΗΜΑ ΗΛΕΚΤΡΟΛΟΓΩΝ ΜΗΧΑΝΙΚΩΝ ΚΑΙ ΤΕΧΝΟΛΟΓΙΑΣ ΥΠΟΛΟΓΙΣΤΩΝ ΤΟΜΕΑΣ ΣΥΣΤΗΜΑΤΩΝ ΗΛΕΚΤΡΙΚΗΣ ΕΝΕΡΓΕΙΑΣ ιπλωµατική Εργασία του φοιτητή του τµήµατος Ηλεκτρολόγων Μηχανικών και Τεχνολογίας Ηλεκτρονικών
Thin Film Chip Resistors
 FEATURES PRECISE TOLERANCE AND TEMPERATURE COEFFICIENT EIA STANDARD CASE SIZES (0201 ~ 2512) LOW NOISE, THIN FILM (NiCr) CONSTRUCTION REFLOW SOLDERABLE (Pb FREE TERMINATION FINISH) Type Size EIA PowerRating
The Simply Typed Lambda Calculus
 Type Inference Instead of writing type annotations, can we use an algorithm to infer what the type annotations should be? That depends on the type system. For simple type systems the answer is yes, and
Physical DB Design. B-Trees Index files can become quite large for large main files Indices on index files are possible.
 B-Trees Index files can become quite large for large main files Indices on index files are possible 3 rd -level index 2 nd -level index 1 st -level index Main file 1 The 1 st -level index consists of pairs
derivation of the Laplacian from rectangular to spherical coordinates
 derivation of the Laplacian from rectangular to spherical coordinates swapnizzle 03-03- :5:43 We begin by recognizing the familiar conversion from rectangular to spherical coordinates (note that φ is used
Smaller. 6.3 to 100 After 1 minute's application of rated voltage at 20 C, leakage current is. not more than 0.03CV or 4 (µa), whichever is greater.
, whichever is greater.") Low Impedance, For Switching Power Supplies Low impedance and high reliability withstanding 5000 hours load life at +05 C (3000 / 2000 hours for smaller case sizes as specified below). Capacitance ranges
Low Impedance, For Switching Power Supplies Low impedance and high reliability withstanding 5000 hours load life at +05 C (3000 / 2000 hours for smaller case sizes as specified below). Capacitance ranges
Οι αδελφοί Montgolfier: Ψηφιακή αφήγηση The Montgolfier Βrothers Digital Story (προτείνεται να διδαχθεί στο Unit 4, Lesson 3, Αγγλικά Στ Δημοτικού)
") Οι αδελφοί Montgolfier: Ψηφιακή αφήγηση The Montgolfier Βrothers Digital Story (προτείνεται να διδαχθεί στο Unit 4, Lesson 3, Αγγλικά Στ Δημοτικού) Προσδοκώμενα αποτελέσματα Περιεχόμενο Ενδεικτικές δραστηριότητες
Οι αδελφοί Montgolfier: Ψηφιακή αφήγηση The Montgolfier Βrothers Digital Story (προτείνεται να διδαχθεί στο Unit 4, Lesson 3, Αγγλικά Στ Δημοτικού) Προσδοκώμενα αποτελέσματα Περιεχόμενο Ενδεικτικές δραστηριότητες
MS20 High-Efficiency Mini-Split System
 MS20 High-Efficiency Mini-Split System Up to 20 SEER Performance Product Features R-410A chlorine-free refrigerant High-efficiency performance up to 20 SEER DC Inverter technology compressor Indoor antibacterial
safty reasons. Disregarding could result in serious injury. Disregarding could result in injury or product damage. Forbidden.
 The following safety precautions are given throughout this manual. They must be strictly followed to protect those who install, use or maintain this product as well as to protect players, visitors and
ΕΛΛΗΝΙΚΗ ΔΗΜΟΚΡΑΤΙΑ Ανώτατο Εκπαιδευτικό Ίδρυμα Πειραιά Τεχνολογικού Τομέα. Ξένη Ορολογία. Ενότητα 6: Working Capital
 ΕΛΛΗΝΙΚΗ ΔΗΜΟΚΡΑΤΙΑ Ανώτατο Εκπαιδευτικό Ίδρυμα Πειραιά Τεχνολογικού Τομέα Ξένη Ορολογία Ενότητα 6: Working Capital Ευαγγελία Κουτσογιάννη Τμήμα Λογιστικής & Χρηματοοικονομικής Άδειες Χρήσης Το παρόν εκπαιδευτικό
For safty reasons. Disregarding could result in serious injury. Disregarding could result in injury or product damage. Forbidden.
 The following safety precautions are given throughout this manual. They must be strictly followed to protect those who install, use or maintain this product as well as to protect players, visitors and
DC-DC Constant Current Step-Down LED driver LDD-300L LDD-350L LDD-500L LDD-600L LDD-700L CURRENT RANGE
 SPECIFICATION ORDER NO. LDD-00L LDD-0L LDD-00L LDD-00L LDD-700L CURRENT RANGE 00mA 0mA 00mA 00mA VOLTAGE RANGE Note. ~ VDC for LDD-00~700L/LW ; ~ 8VDC for LDD-00~700LS CURRENT ACCURACY (Typ.) ±% at VDC
2013 REV 01 ELECTRONICS CAPACITORS. DC Applications Metallized Polypropylene Film Self Healing
 2013 REV 01 POWER EECTRONICS CAPACITORS C Applications Metallized Polypropylene Film Healing OUR MISSION: POWER EECTRONICS AN SPECIA CAPACITORS M.V. PFC CAPACITORS AN BANKS IGHTING CAPACITORS MOTOR RUN
Φροντίδα της ουροστομίας μου (urostomy)
") Φροντίδα της ουροστομίας μου (urostomy) Πως θα πρεπει να αλλαζω την σακουλα μου; Εξοπλισμος Για να αλλάξετε την σακούλα σας θα χρειαστείτε τα ακόλουθα πράγματα: Μια λεκάνη με ζεστό νερό. Ένα πετσετάκι
Φροντίδα της ουροστομίας μου (urostomy) Πως θα πρεπει να αλλαζω την σακουλα μου; Εξοπλισμος Για να αλλάξετε την σακούλα σας θα χρειαστείτε τα ακόλουθα πράγματα: Μια λεκάνη με ζεστό νερό. Ένα πετσετάκι
Volume of a Cuboid. Volume = length x breadth x height. V = l x b x h. The formula for the volume of a cuboid is
 Volume of a Cuboid The formula for the volume of a cuboid is Volume = length x breadth x height V = l x b x h Example Work out the volume of this cuboid 10 cm 15 cm V = l x b x h V = 15 x 6 x 10 V = 900cm³
CSR series. Thick Film Chip Resistor Current Sensing Type FEATURE PART NUMBERING SYSTEM ELECTRICAL CHARACTERISTICS
 FEATURE Operating Temperature: -55 ~ +155 C 3 Watts power rating in 1 Watt size, 1225 package High purity alumina substrate for high power dissipation Long side terminations with higher power rating PART
Glass Door Freezers Service Manual
 Turbo Air Speed up the Pace of Innovation CAUTION! PLEASE KEEP POWER SWITCH ON BEFORE OPERATING THIS EQUIPMENT Glass Door Freezers Service Manual Please read this manual completely before attempting to
LR Series Metal Alloy Low-Resistance Resistor
 Tel : 881745 Fax : 881749 LR Series Metal Alloy LowResistance Resistor This specification is applicable to lead free, halogen free of RoHS directive for metal alloy lowresistance resistor. The product
ΚΥΠΡΙΑΚΟΣ ΣΥΝΔΕΣΜΟΣ ΠΛΗΡΟΦΟΡΙΚΗΣ CYPRUS COMPUTER SOCIETY 21 ος ΠΑΓΚΥΠΡΙΟΣ ΜΑΘΗΤΙΚΟΣ ΔΙΑΓΩΝΙΣΜΟΣ ΠΛΗΡΟΦΟΡΙΚΗΣ Δεύτερος Γύρος - 30 Μαρτίου 2011
 Διάρκεια Διαγωνισμού: 3 ώρες Απαντήστε όλες τις ερωτήσεις Μέγιστο Βάρος (20 Μονάδες) Δίνεται ένα σύνολο από N σφαιρίδια τα οποία δεν έχουν όλα το ίδιο βάρος μεταξύ τους και ένα κουτί που αντέχει μέχρι
Section 7.6 Double and Half Angle Formulas
 09 Section 7. Double and Half Angle Fmulas To derive the double-angles fmulas, we will use the sum of two angles fmulas that we developed in the last section. We will let α θ and β θ: cos(θ) cos(θ + θ)
Econ 2110: Fall 2008 Suggested Solutions to Problem Set 8 questions or comments to Dan Fetter 1
 Eon : Fall 8 Suggested Solutions to Problem Set 8 Email questions or omments to Dan Fetter Problem. Let X be a salar with density f(x, θ) (θx + θ) [ x ] with θ. (a) Find the most powerful level α test
For safty reasons. Disregarding could result in serious injury. Disregarding could result in injury or product damage. Forbidden.
 The following safety precautions are given throughout this manual. They must be strictly followed to protect those who install, use or maintain this product as well as to protect players, visitors and
ΟΔΗΓΙΕΣ ΣΥΝΑΡΜΟΛΟΓΗΣΗΣ/ ASSEMBLY INSTRUCTION ΤΟΜΜΥ ΚΡΕΒΑΤΙ/BED
 ΟΔΗΓΙΕΣ ΣΥΝΑΡΜΟΛΟΓΗΣΗΣ/ ASSEMBLY INSTRUCTION ΤΟΜΜΥ ΚΡΕΒΑΤΙ/BED 1. Παρακαλώ πολύ διαβάστε προσεκτικά τις οδηγίες πριν την συναρμολόγηση/ Please read the instructions carefully. 2. Παρακαλώ πολύ όπως ελέγξτε
Γιπλυμαηική Δπγαζία. «Ανθπυποκενηπικόρ ζσεδιαζμόρ γέθςπαρ πλοίος» Φοςζιάνηρ Αθανάζιορ. Δπιβλέπυν Καθηγηηήρ: Νηθφιανο Π. Βεληίθνο
 ΔΘΝΙΚΟ ΜΔΣΟΒΙΟ ΠΟΛΤΣΔΥΝΔΙΟ ΥΟΛΗ ΝΑΤΠΗΓΩΝ ΜΗΥΑΝΟΛΟΓΩΝ ΜΗΥΑΝΙΚΩΝ Γιπλυμαηική Δπγαζία «Ανθπυποκενηπικόρ ζσεδιαζμόρ γέθςπαρ πλοίος» Φοςζιάνηρ Αθανάζιορ Δπιβλέπυν Καθηγηηήρ: Νηθφιανο Π. Βεληίθνο Σπιμελήρ Δξεηαζηική
Digital Inverter Generator Item No. PSi2100G Mfg. No Replacement Parts List
 Digital Inverter Generator Item No. PSi100G Mfg. No. 09093030 Replacement Parts List 99100076 1-3-1 (Rev:01) OWT INDUSTRIES, INC. P.O. Box 3, Highway Pickens, SC 9671 USA 1-77-617-301 01 00 3 11 11 DIGITAL
SPBW06 & DPBW06 series
 /,, MODEL SELECTION TABLE INPUT ORDER NO. INPUT VOLTAGE (RANGE) NO LOAD INPUT CURRENT FULL LOAD VOLTAGE CURRENT EFFICIENCY (TYP.) CAPACITOR LOAD (MAX.) SPBW06F-03 310mA 3.3V 0 ~ 1500mA 81% 4700μF SPBW06F-05