controlled comfort TPC-300 Quick installation guide Schnellinstallationshandbuch Guía de instalación rápida Manual de instalação rápida
|
|
|
- Κῆρες Διαμαντόπουλος
- 8 χρόνια πριν
- Προβολές:
Transcript
1 v1.0 Quick installation guide EN Quick installation guide DE Schnellinstallationshandbuch ES Guía de instalación rápida PT Manual de instalação rápida EL Οδηγός γρήγορης εγκατάστασης TPC-300 controlled comfort

2

3

4 EN Congratulations on purchasing this COCO product! To get the most out of your purchase, please take some time to register this product at: You will also find more information, updates and online support on our website. DE Herzlichen Glückwunsch zum Kauf dieses COCO-Produkts! Um dieses Produkt optimal benutzen zu können, sollten Sie es unter folgender Adresse registrieren: Auf unserer Website finden Sie weitere Informationen, Updates und Online-Support. ES Enhorabuena por comprar este producto COCO! Para sacar el máximo partido a su compra, por favor registre el producto en: También puede encontrar más información, actualizaciones y apoyo en nuestra página web. PT Parabéns por ter adquirido este produto COCO! Para tirar o máximo partido da sua compra, reserve algum tempo para registar este produto no site: Também encontrará mais informações, actualizações, e assistência online no nosso website. EL Συγχαρητήρια για την αγορά αυτού του προϊόντος COCO! Για να αξιοποιήσετε στο έπακρο την αγορά σας, αφιερώστε λίγο χρόνο προκειμένου να καταχωρίσετε αυτό το προϊόν στη διεύθυνση: Στην ιστοσελίδα μας θα βρείτε επίσης περισσότερες πληροφορίες, ενημερώσεις και διαδικτυακή υποστήριξη. 4

5 EN A D B C E Receivers not included A: LED indicator B: USB-B connection C: USB A-B cable D: Battey compartment E: USB stick 5

6 EN General information The TPC-300 is a computer controlled transmitter with built-in timer with the following capabilities: A programmable timer for automatically activating or deactivating COCO receivers. The timer can be synchronized with sunset and sunrise time settings for numerous cities in various countries. Automatic transition from standard time to daylight saving time. COCO receivers can also be controlled manually, as long as the TPC-300 is programmed and connected to a PC with software. Getting ready 1. Insert the USB stick into a USB port of your computer. Run the installer, Setup.exe, that is stored on the USB stick. Follow the instructions to finish installation. 2. Open the battery compartment of the TPC-300 and place two AA batteries in the holder. Please keep in mind the correct polarity. 3. Connect the TPC-300 to the USB-connection of a computer. If you are running Windows XP or higher, the TPC-300 will automatically be recognized and after a few seconds the notification New hardware is ready to use will appear. 6

7 EN INFORMATION COMPATIBILITY This transmitter works with all COCO receivers. FUNCTIONALITY On/off, dim function (only if the receiver is a dimmer), and timer function. TECHNICAL SPECIFICATIONS Batteries 2x 1,5 Volt AA alkaline RF frequency MHz RF range Up to 30 m indoor/70 m outdoor (optimal conditions) Timer function yes WIRELESS RADIO SIGNAL The MHz radio signal passes through walls, windows and doors. Indoor range: up to 30 m. Outdoor range: up to 70 m. (optimal conditions) The range is strongly dependent on local conditions, such as the presence of metals. For example, the thin metal coating in Low-emissivity (Low-E) glass has a negative impact on the range of radio signals. There may be restrictions on the use of this device outside the EU. If applicable, check whether this device complies with local directives. 7
 The range is strongly dependent on local conditions, such as the presence of metals.")
8 EN SAFETY Read these simple guidelines. Not following them may be dangerous and faulty installation will invalidate any warranty that may apply to this product. BATTERIES Remove the batteries if the product will not be used for an extended period. Extreme temperatures reduce the capacity and lifetime of the battery. Replace the 1,5 Volt AA alkaline batteries when the transmit indicator no longer lights when sending an ON or OFF signal. Do not crush, burn or shred batteries. Dispose of batteries according to local regulations. Please recycle when possible. Do not dispose as household waste. LIFE-SUPPORT Never use COCO products for life-support systems or other applications in which equipment malfunctions can have life-threatening consequences. INTERFERENCE All wireless devices may be subject to interference, which could affect performance. The minimum distance between 2 receivers should be at least 50 cm. REPAIRING Do not attempt to repair this product. There are no user-serviceable parts inside. WATER-RESISTANCE This product is not water-resistant. Keep it dry. Moisture will corrode the inner electronics. CLEANING Use a dry cloth to clean this product. Do not use harsh chemicals, cleaning solvents, or strong detergents. HANDLING Do not drop, knock, or shake the device. Rough handling can break internal circuit boards and fine mechanics. ENVIRONMENT Do not expose the product to excessive heat or cold, as it can damage or shorten the life of electronic circuit boards and batteries. 8

9 EN Main menu The main screen appears when you run the TPC-300 software. If you use the software for the first time, there will be no rooms or devices visible yet. Add rooms Use this menu to add a room to your setup. You can add a maximum of 16 rooms. Add devices Use this menu to add devices to your setup. It is possible to program up to 16 different devices (each with their own receiver) per room. 9

10 EN Extra Use this menu to configure some basic settings of your TPC-300. For example, you can set your location, send your settings to the TPC-300, save your settings on your PC or open/switch to previously saved settings on your PC. If you use receivers with code wheels, you can activate code wheel support here. Scenes Combine different commands for different receivers in one scene. For example Watch a movie, in which the lights will dim and the sunblinds will automatically close. Timer Program different timer settings to automatically activate or deactivate devices or scenes. It is also possible to program sunset and sunrise time settings for your place of residence (or a nearby city) Main menu controls Manually control your COCO receivers when the TPC-300 is connected to a PC. 10

11 EN 11

12 EN Add a room Before you can program receivers/devices, you need to add a room. Double-click on the black box in the rooms section of the main menu to add a room. You can create 16 different rooms. You can browse through all available images by clicking on the small tiles in the top left corner. By double-clicking a black box, you have entered the submenu rooms. Here you will see 32 example images of various rooms. Single-click on one of the available images to select it, or double-click on an image to replace it by your own photo (for example a photo of your own living room). Then, add a room description and press OK to save the room, or press cancel to return to the main menu without saving any modifications. If you want to delete the selected room, press delete. 12
.")
13 EN 13

14 EN Add devices After you have added a room, you can add devices to that room. Double-click on the black box of devices in the main menu, to add a device. A maximum of 16 different devices can be programmed, per room. You can browse through all available images by clicking on the small tiles in the top left corner. Single-click on one of the available images to select that image, or double-click an image to replace it by your own photo. Then, select whether the receiver a dimmer (yes or no) and add a device description. When you press the cancel button, you will return to the main menu without saving any modifications. Depending on the type of receiver, there are now 2 necessary procedures to choose from: 1. Automatic code system receiver Press learn code. The TPC-300 will start sending signals. Then, activate the learn-mode of a receiver (see manual of the receiver). The receiver will now automatically receive and store the TPC-300 tranmission code. Press learn off to stop sending transmission signals. Finally, press OK. 2. Codeswitch receiver Click cancel to return to the main menu. From the main menu, choose extra, select yes for code wheels and press OK. Then, add a device, select yes for codeswitch receiver and program the matching code (e.g. A-3). Finally, press OK. 14
 and add a device description. When you press the cancel button, you will return to the main menu without saving any modifications.")
15 EN 15
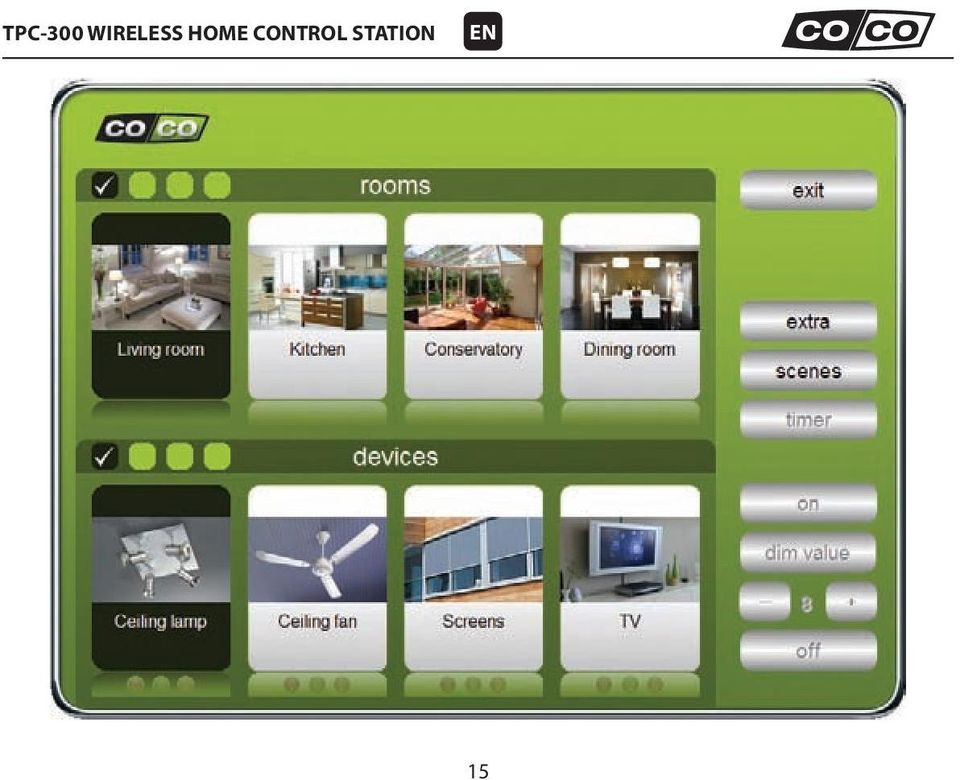
16 EN Main menu: controls The main screen now shows all the rooms and devices you have added. Control devices directly with your computer If you have programmed the receiver(s) correctly (see p. 11), you can select and control each receiver directly from the main screen: The dim value and +/- buttons can only be used for dimmer receivers. The dim value button allows you to send a preset light level (1 to 16) to a dimmer receiver, which enables you to adjust the brightness of a lamp. For regular receivers, you can use on and off to switch a device on or off. Use timer settings to carry out commands There are 2 ways to program commands with a timer: 1. Use the timer menu to add a timer to a single device. 2. Create a scene (= several devices, each with their own command: on/off/dim value) and add a timer to that scene. Both options will be explained later on in this manual. 16

17 EN 17
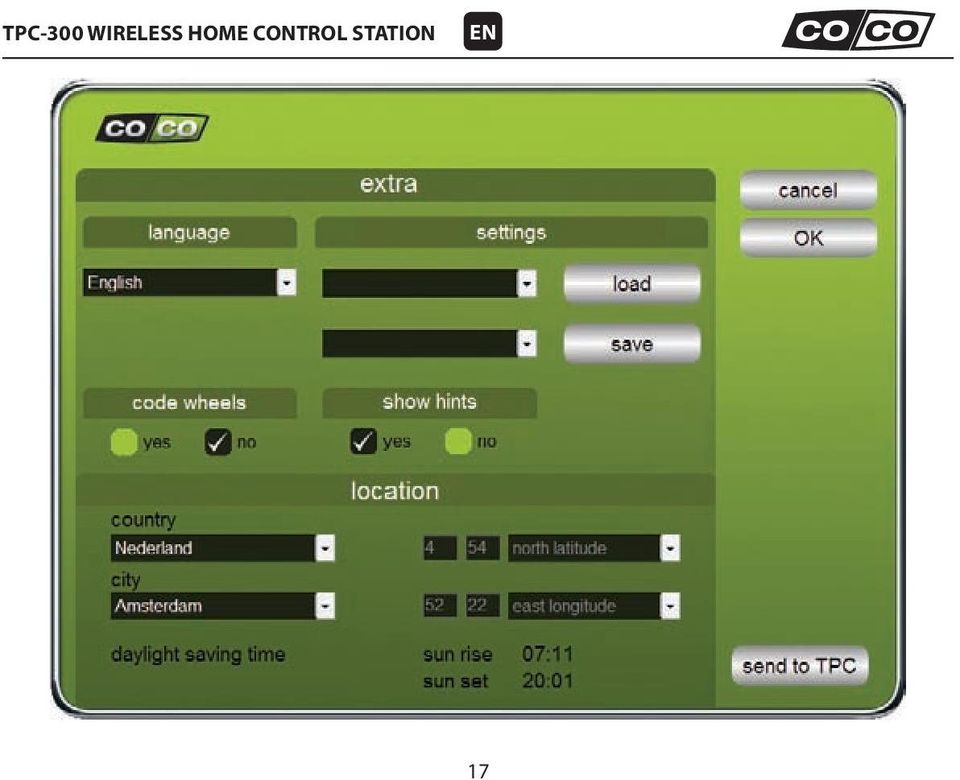
18 EN Extra From the main menu, choose extra to change the following settings of the TPC-300: Language Change the language of the software. Settings Click save to save the current settings to the harddisk of your computer. Click load to open previously saved settings. Code wheels Do you have one or more classic receivers with code wheels? Check yes, so you can set the matching code when adding a device to your configuration. If you only work with automatic receivers, keep the box no checked. Show hints If yes is checked, short instruction hints will appear when you hover over an item, button or image. Location To use the timer function with sunrise/sunset settings for your geographic location, select the appropriate country and city. Send to TPC Transfer the current settings to the internal memory of the TPC-300, by pressing the button send to TPC. By sending the settings to the TPC-300, the TPC-300 will carry out all timer programs, even when the device is disconnected from a PC. 18

19 EN 19
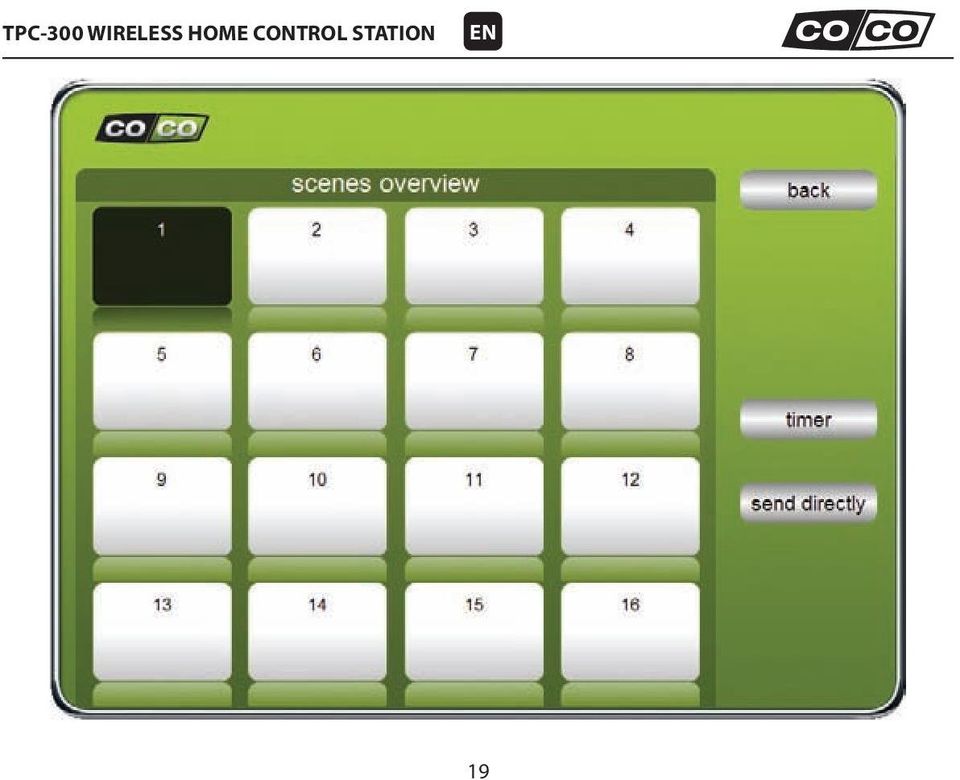
20 EN Scenes You can combine several devices from various rooms in one scene. A scene, such as Watch a movie, can contain different commands for different devices, that can be executed simultaneously. For example: close the sunblinds + switch off a ceiling fan + dim the lights. By double-clicking on the black box in the scenes overview, you will open the menu for scene 1, as displayed below. You can now add a scene description. By double-clicking on the black box again, you will enter a menu in which you can select all previously added rooms and devices. As mentioned earlier, you can combine multiple devices from multiple rooms into one scene. You can program up to 16 different scenes. 20

21 EN 21
22 EN Click on the desired room, the desired device, and the desired command (on/dim-value/off). Command Color Function On Green TPC-300 sends an on-signal Dim value Orange TPC-300 dims lighting to a preselected level (1-16) Off Red TPC-300 sends an off-signal Press OK to add the device with a specific command to a scene. Repeat this procedure to add various receivers with specific commands to the same scene. You can also cancel or delete the device from the scene. Timer Add a timer to the scene, so the entire scene can be activated automatically (even if the TPC-300 is not connected to a PC). Send directly The TPC-300 directly activates a scene. This command only works if the TPC-300 is connected via USB to a PC. 22
23 EN 23
24 EN Timer Devices and scenes can be activated/deactivated automatically with the timer option. To create a timer program for a single device: select that device in the main menu and press the timer button. To create a timer program for a scene: press the scenes button in the main menu, select the scene and then press the timer button. <month> <day/date> Double-click to Double-click to select select the month the day(s) on which the in which the timer timer should be active, should be active. or select a specific date. <time> Double-click to select a fixed or variable time (random) or sunrise/ sunset moment to activate the timer program. <command> For single devices: double-click to select a command (on, off or a certain dim value). For scenes: the command for each device (on, off or a certain dim value) is already set in the scene itself. Adding/duplicating/removing/saving timer programs Press add to insert a new row for a new timer program. Press copy to duplicate an existing row. Press delete to remove a timer program. Press OK to save the timer programs (or press back to return to the main menu without saving any changes). 24
25 DE A D B C E Empfänger nicht enthalten A: LED-Kontrollleuchte B: USB-B-Anschluss C: USB-A-B-Kabel D: Batteriefach E: USB-Stick 25
26 DE Allgemeine Hinweise TPC-300 ist ein computergesteuerter Sender mit eingebauter Schaltuhr und folgenden Fähigkeiten: Einer programmierbaren Schaltuhr zum automatischen Aktivieren oder Deaktivieren von COCO-Empfängern. Die Schaltuhr kann mit den Sonnenuntergangsund Sonnenaufgangszeiten für viele Orte in verschiedenen Ländern synchronisiert werden. Automatische Umstellung auf Winter- bzw. Sommerzeit. COCO-Empfänger können auch manuell gesteuert werden, sofern TPC-300 programmiert und mit einem PC mit Software verbunden ist. Vorbereiten 1. Schließen Sie den USB-Stick an einen USB-Port am Computer an. Führen Sie das Installationsprogramm Setup.exe auf dem USB-Stick aus. Folgen Sie den Anweisungen zum Ausführen der Installation. 2. Öffnen Sie das Batteriefach von TPC-300 und legen Sie zwei AA-Batterien in den Halter ein. Achten Sie bitte auf die richtige Polung. 3. Verbinden Sie TPC-300 mit dem USB-Anschluss eines Computers. Wenn Sie Windows XP (oder höher) verwenden, wird TPC-300 automatisch erkannt. Nach wenigen Sekunden wird die Meldung Die neue Hardware kann jetzt verwendet werden angezeigt. 26
27 DE INFORMATIONEN KOMPATIBILITÄT Dieser Sender funktioniert mit allen COCO- Empfängern. FUNKTIONEN Ein/Aus, Dimm-Funktion (nur wenn der Empfänger ein Dimmer ist) und Schaltuhrfunktion. TECHNISCHE DATEN Batterien Funkfrequenz Reichweite Schaltuhrfunktion 2x 1,5 Volt AA Alkali 433,92 MHz Bis 30 m in Innenräumen/70 m im Freien (optimale Bedingungen) Ja FUNKSIGNAL Das Funksignal (433,92 MHz) durchdringt Wände, Fenster und Türen. Reichweite in Innenräumen: bis 30 m. Reichweite im Freien: bis 70 m. (optimale Bedingungen) Die Reichweite hängt stark von den örtlichen Bedingungen (wie dem Vorhandensein von Metallen) ab. So kann z. B. die dünne Metallbeschichtung von Isolierglas die Reichweite von Funksignalen beeinträchtigen. Der Einsatz dieses Geräts außerhalb der EU kann Einschränkungen unterliegen. Kontrollieren Sie ggf., ob das Gerät den Bestimmungen am Einsatzort entspricht. 27
28 DE SICHERHEIT Lesen Sie diese einfachen Hinweise. Die Nichtbeachtung dieser Hinweise kann gefährlich sein, und bei einer fehlerhaften Installation erlischt jede Garantie für dieses Produkt. BATTERIEN Nehmen Sie die Batterien aus dem Gerät, wenn Sie es längere Zeit nicht verwenden. Extreme Temperaturen verringern die Kapazität und Lebensdauer der Batterie. REPARATUR Versuchen Sie nicht, dieses Produkt zu reparieren. Im Gerät befinden sich keine Teile, die der Benutzer selbst warten kann. Ersetzen Sie die 1,5-Volt-AA-Alkali-Batterien, wenn die Sendekontrollleuchte beim Senden eines ON- oder OFF-Signals nicht mehr aufleuchtet. Zerbrechen, verbrennen oder zerkleinern Sie Batterien nicht. Entsorgen Sie Batterien nach den örtlichen Vorschriften. Führen Sie Batterien nach Möglichkeit dem Recycling zu. Nicht als Hausmüll entsorgen. LEBENSERHALTENDE SYSTEME In keinem Fall dürfen COCO-Produkte für lebenserhaltende Systeme oder andere Zwecke, in denen Fehlfunktionen zu lebensgefährlichen Situationen führen können, verwendet werden. STÖRUNGEN Die Funktion aller drahtlosen Systeme kann durch Störungen beeinträchtigt werden. Der Abstand zwischen zwei Empfängern sollte mindestens 50 cm betragen. 28 WASSERDICHTIGKEIT Dieses Produkt ist nicht wasserdicht. Halten Sie es trocken. Feuchtigkeit führt zu Korrosion an elektronischen Bauteilen im Gerät. REINIGUNG Reinigen Sie dieses Produkt mit einem trockenen Tuch. Verwenden Sie keine aggressiven Chemikalien, Lösungsmittel oder scharfen Reinigungsmittel. BEHANDLUNG Lassen Sie das Gerät nicht fallen, schlagen Sie nicht gegen das Gerät und schütteln Sie es nicht. Grobe Behandlung kann die Leiterplatten und Feinmechanik im Gerät beschädigen. UMGEBUNG Setzen Sie das Gerät nicht starker Wärme oder Kälte aus. Dies kann die elektronischen Leiterplatten und Batterien beschädigen sowie ihre Lebensdauer verkürzen.
29 DE Hauptmenü Der Hauptbildschirm wird angezeigt, wenn Sie die TPC-300- Software ausführen. Wenn Sie die Software zum ersten Mal verwenden, sind noch keine Räume oder Geräte zu sehen. Räume hinzufügen In diesem Menü fügen Sie einen Raum zu Ihrer Konfiguration hinzu. Sie können maximal 16 Räume hinzufügen. Geräte hinzufügen In diesem Menü fügen Sie Geräte zu Ihrer Konfiguration hinzu. Pro Raum können bis zu 16 verschiedene Geräte (jeweils mit eigenem Empfänger) programmiert werden. 29
30 DE Extra In diesem Menü konfigurieren Sie grundlegende Einstellungen Ihres TPC-300. Beispielsweise können Sie Ihren Ort einstellen, Ihre Einstellungen an TPC-300 übertragen, Ihre Einstellungen auf dem PC speichern oder zuvor gespeicherte Einstellungen auf dem PC öffnen und zu diesen Einstellungen wechseln. Wenn Sie Empfänger mit Coderädern verwenden, können Sie die Unterstützung für Coderäder hier aktivieren. Szenen Verschiedene Befehle für verschiedene Empfänger lassen sich zu einer Szene kombinieren. Zum Beispiel Einen Film sehen, wobei die Lampen gedimmt und die Jalousien automatisch geschlossen werden. Schaltuhr Programmieren verschiedener Schaltuhr-Einstellungen zum automatischen Aktivieren oder Deaktivieren von Geräten oder Szenen. Es können auch die Sonnenuntergangs- und Sonnenaufgangszeiten für Ihren Wohnort (oder eine Stadt in der Nähe programmiert werden) Bedienelemente im Hauptmenü Manuelles Steuern Ihrer COCO-Empfänger, wenn TPC-300 mit einem PC verbunden ist. 30
31 DE 31
32 DE Einen Raum hinzufügen Bevor Sie Empfänger bzw. Geräte programmieren können, müssen Sie einen Raum hinzufügen. Doppelklicken Sie auf das schwarze Feld im Abschnitt Räume des Hauptmenüs, um einen Raum hinzuzufügen. Sie können 16 verschiedene Räume anlegen. Durch Anklicken der kleinen Kacheln oben links im Bildschirm können Sie alle vorhandenen Bilder durchsuchen. Mit einem Doppelklick auf ein schwarzes Feld haben Sie das Untermenü Räume aufgerufen. Hier sehen Sie 32 Beispielbilder für verschiedene Räume. Mit einem einfachen Klick wählen Sie eines der vorhandenen Bilder aus, mit einem Doppelklick auf ein Bild können Sie es durch Ihr eigenes Foto ersetzen (zum Beispiel ein Foto Ihres eigenen Wohnzimmers). Fügen Sie dann eine Raumbeschreibung hinzu, und klicken Sie auf OK, um den Raum zu speichern, oder drücken Sie auf Abbrechen, um wieder zurück zum Hauptmenü zu gehen, ohne Änderungen zu speichern. Wenn Sie den ausgewählten Raum löschen wollen, drücken Sie auf löschen. 32
33 DE 33
34 Geräte hinzufügen Nachdem Sie einen Raum hinzugefügt haben, können Sie Geräte zum Raum hinzufügen. Zum Hinzufügen eines Geräts doppelklicken Sie auf das schwarze Feld Geräte im Hauptmenü. Pro Raum können maximal 16 verschiedene Geräte programmiert werden. DE Durch Anklicken der kleinen Kacheln oben links im Bildschirm können Sie alle vorhandenen Bilder durchsuchen. Mit einem einfachen Klick wählen Sie eines der vorhandenen Bilder aus, und mit einem Doppelklick auf ein Bild können Sie es durch Ihr eigenes Foto ersetzen. Wählen Sie dann, ob der Empfänger ein Dimmer ist (Ja oder Nein), und fügen Sie eine Gerätebeschreibung hinzu. Wenn Sie auf abbrechen drücken, gehen Sie zurück zum Hauptmenü, ohne Änderungen zu speichern. Je nach Empfängertyp stehen jetzt zwei Verfahren zur Auswahl: 1. Empfänger mit automatischem Codesystem Drücken Sie auf Code lernen. TPC-300 startet mit dem Senden von Signalen. Aktivieren Sie dann den Lernmodus eines Empfängers (siehe die Anleitung des Empfängers). Der Empfänger empfängt jetzt automatisch den von TPC-300 gesendeten Code und speichert ihn. Drücken Sie auf lernen aus, um das Senden von Signalen zu beenden. Drücken Sie zum Abschluss auf OK. 2. Empfänger mit Coderädern Klicken Sie auf abbrechen, um zurück zum Hauptmenü zu gehen. Wählen Sie im Hauptmenü extra, wählen Sie Ja für Coderäder, und drücken Sie auf OK. Fügen Sie dann ein Gerät hinzu. Wählen Sie Ja für Empfänger mit Coderädern und programmieren Sie den entsprechenden Code (z. B. A-3). Drücken Sie zum Abschluss auf OK. 34
35 DE 35
36 DE Hauptmenü: Bedienelemente Der Hauptbildschirm zeigt jetzt alle Räume und Geräte an, die Sie hinzugefügt haben. Geräte direkt vom Computer aus steuern Wenn Sie den/die Empfänger korrekt programmiert haben (siehe S. 11), können Sie jeden Empfänger direkt im Hauptbildschirm auswählen und steuern: Die Tasten Dimmwert und +/- können nur für Dimmer-Empfänger verwendet werden. Mit der Taste Dimmwert können Sie eine voreingestellte Dimmstufe (1 bis 16) an einen Dimmer-Empfänger senden und damit die Helligkeit einer Lampe einstellen. Für normale Empfänger können Sie mit ein und aus ein Gerät ein- bzw. ausschalten. Mit Schaltuhr-Einstellungen Befehle ausführen Zum Programmieren von Befehlen mit einer Schaltuhr gibt es zwei Möglichkeiten: 1. Mit dem Menü Schaltuhr eine Schaltuhr einem einzelnen Gerät zuweisen. 2. Eine Szene (= mehrere Geräte, jedes mit einem eigenen Befehl: ein/aus/dimmwert) erstellen, und zu dieser Szene eine Schaltuhr hinzufügen. Beide Optionen werden im weiteren Verlauf dieser Anleitung erläutert. 36
37 DE 37
38 Extra Wählen Sie im Hauptmenü Extra, um die folgenden Einstellungen von TPC-300 zu ändern: Sprache Die Sprache der Software ändern. DE Einstellungen Klicken Sie auf Speichern, um die aktuellen Einstellungen auf der Festplatte des Computers zu speichern. Klicken Sie auf Laden, um die zuvor gespeicherten Einstellungen zu öffnen. Coderäder Haben Sie einen oder mehrere klassische Empfänger mit Coderädern? Durch Aktivieren von Ja können Sie den entsprechenden Code einstellen, wenn Sie ein Gerät zu Ihrer Konfiguration hinzufügen. Wenn Sie nur mit automatischen Empfängern arbeiten, lassen Sie das Kästchen nein aktiviert. Hinweise anzeigen Wenn Ja aktiviert ist, werden kurze Hinweise angezeigt, wenn Sie die Maus über ein Element, eine Schaltfläche oder ein Bild bewegen. Ort Um die Schaltuhr-Funktion mit den Einstellungen für Sonnenaufgang/Sonnenuntergang für ihre geografische Position zu verwenden, wählen Sie das Land und den Ort. An TPC senden Zum Übertragen der momentanen Einstellungen in den internen Speicher von TPC-300 drücken Sie die Schaltfläche An TPC senden. Wenn Sie die Einstellungen an TPC-300 übertragen, führt TPC-300 alle Schaltuhr- Programme aus, auch wenn das Gerät nicht mit einem PC verbunden ist. 38
39 DE 39
40 DE Szenen Mehrere Geräte in verschiedenen Räumen lassen sich zu einer Szene kombinieren. Eine Szene z. B. Einen Film ansehen kann aus verschiedenen Befehlen für verschiedene Geräte bestehen, die zeitgleich ausgeführt werden. Beispiel: Die Jalousien schließen + einen Deckenventilator ausschalten + das Licht dimmen. Mit einem Doppeltklick auf das schwarze Feld in der Szenenübersicht öffnen Sie das Menü für Szene 1 wie unten abgebildet. Jetzt können Sie eine Szenen-Beschreibung hinzufügen. Mit einem weiteren Doppelklick auf das schwarze Feld rufen Sie ein Menü auf, in dem Sie alle zuvor hinzugefügten Räume und Geräte auswählen können. Wie bereits erwähnt können Sie mehrere Geräte in mehreren Räumen zu einer Szene kombinieren. Sie können bis zu 16 verschiedene Szenen programmieren. 40
41 DE 41
42 DE Klicken Sie auf den gewünschten Raum, das gewünschte Gerät und den gewünschten Befehl (ein/dimmwert/aus). Befehl Farbe Funktion Ein Grün TPC-300 sendet ein Ein-Signal Dimmwert Orange TPC-300 dimmt die Beleuchtung auf eine vorgegebene Dimmstufe (1 16) Aus Rot TPC-300 sendet ein Aus-Signal Drücken Sie auf OK, um das Gerät mit einem bestimmten Befehl zu einer Szene hinzuzufügen. Wiederholen Sie diese Schritte, um weitere Empfänger mit spezifischen Befehlen zu derselben Szene hinzuzufügen. Sie können auch abbrechen oder das Gerät aus der Szene löschen. Schaltuhr Fügen Sie eine Schaltuhr zur Szene hinzu, damit die gesamte Szene automatisch aktiviert werden kann (auch wenn TPC-300 nicht mit einem PC verbunden ist). Direkt senden TPC-300 aktiviert eine Szene direkt. Dieser Befehl funktioniert nur, wenn TPC-300 über USB mit einem PC verbunden ist. 42
43 DE 43
44 Schaltuhr Mit der Schaltuhr-Option können Geräte und Szenen automatisch aktiviert bzw. deaktiviert werden. Zum Erstellen eines Schaltuhr-Programms für ein einzelnes Gerät: Wählen Sie das Gerät im Hauptmenü aus und drücken Sie auf die Schaltfläche Schaltuhr. Zum Erstellen eines Schaltuhr-Programms für eine Szene: Drücken Sie auf die Schaltfläche Szenen im Hauptmenü, wählen Sie die Szene aus, und drücken Sie auf die Schaltfläche Schaltuhr. <Monat> Wählen Sie mit einem Doppelklick den Monat, in dem die Schaltuhr aktiv sein soll. <Tag/Datum> Wählen Sie mit einem Doppelklick den bzw. die Tag(e), an dem/denen die Schaltuhr aktiv sein soll, oder wählen Sie ein bestimmtes Datum. DE <Zeit> Wählen Sie mit einem Doppelklick eine feste oder variable (zufällige) Zeit, oder die Sonnenaufgangs-/ Sonnenuntergangszeit zum Aktivieren des Schaltuhrprogramms. <Befehl> Für einzelne Geräte: Wählen Sie einen Befehl (ein, aus oder einen bestimmten Dimmwert) mit einem Doppelklick aus. Für Szenen: Der Befehl für jedes Gerät (ein, aus oder ein bestimmter Dimmwert) ist bereits in der Szene selbst festgelegt. Hinzufügen, Kopieren, Löschen und Speichern von Schaltuhr-Programmen Drücken Sie auf hinzufügen, um eine neue Zeile für ein neues Schaltuhr Programm hinzuzufügen. Drücken Sie auf kopieren, um eine vorhandene Zeile zu kopieren. Drücken Sie auf löschen, um ein Schaltuhr-Programm zu löschen. Drücken Sie auf OK, um die Schaltuhr-Programme zu speichern (oder drücken Sie auf Zurück, um zum Hauptmenü zurückzugehen, ohne Änderungen zu speichern). 44
45 ES A D B C E Receptores no incluidos A: indicador LED B: conexión USB-B C: cable USB A-B D: Compartimiento para pilas E: memoria USB 45
46 ES Información general El TPC-300 es un transmisor controlado por ordenador con temporizador integrado que cuenta con las siguientes capacidades: Un temporizador programable para activar o desactivar de forma automática los receptores COCO. El programador se puede sincronizar con la hora del amanecer y el atardecer para muchas ciudades en varios países. Transición automática de la hora estándar a la hora de verano. Los receptores COCO también se podrán controlar manualmente siempre que el TPC- 300 se programe y conecte al PC mediante el software. Preparación 1. Inserte la memoria USB en un puerto USB de su ordenador. Ejecute el programa de instalación 'Setup.exe' de la memoria USB. Siga las instrucciones para finalizar la instalación. 2. Abra el compartimiento de las pilas del TPC-300 y coloque dos pilas AA en el soporte. Tenga en cuenta seguir la correcta polaridad. 3. Conecte el TPC-300 a un puerto USB de un ordenador. Si utiliza Windows XP o superior, el TPC-300 será automáticamente reconocido y después de unos segundos aparecerá la notificación "El nuevo hardware está listo para usarse". 46
47 ES INFORMACIÓN COMPATIBILIDAD Este transmisor funciona con todos los receptores COCO. FUNCIONES Encendido/apagado, función de atenuación (sólo si el receptor es un atenuador) y función de temporizador. ESPECIFICACIONES TÉCNICAS Pilas 2 pilas alcalinas AA de 1,5 voltios Frecuencia RF 433,92 MHz Rango de RF Hasta 30 m en interiores / 70 m en exteriores (en condiciones óptimas) Función de temporizador sí SEÑAL DE RADIO INALÁMBRICA La señal de radio de 433,92 MHz pasa a través de paredes, ventanas y puertas. Alcance en interiores: hasta 30 m. Alcance en exteriores: hasta 70 m. (condiciones óptimas) El alcance depende en gran medida de las condiciones locales, tales como la presencia de metales. Por ejemplo, la fina capa de metal del vidrio de baja emisividad (Low-E) tiene un impacto negativo en el alcance de las señales de radio. Puede haber restricciones sobre el uso de este dispositivo fuera de la UE. En caso aplicable, compruebe si este dispositivo cumple las directivas locales. 47
48 ES SEGURIDAD Lea estas sencillas instrucciones. El incumplimiento de las instrucciones puede ser peligroso y la instalación defectuosa invalidará cualquier garantía aplicable a este producto. PILAS Retire las pilas si el producto no se va a utilizar durante un período prolongado. Las temperaturas extremas reducen la capacidad y la duración de las pilas. Sustituya las pilas alcalinas de 1,5 voltios AA cuando el indicador de transmisión ya no se encienda al enviar una señal de encendido o apagado. No aplaste, queme ni destruya las pilas. Elimine las pilas conforme a las normativas locales. Por favor, recíclelas cuando sea posible. No las tire a la basura doméstica. EQUIPOS DE MANTENIMIENTO DE VIDA Nunca use productos COCO para sistemas de mantenimiento de vida u otras aplicaciones en las que un fallo del equipo pueda poner en peligro la vida. INTERFERENCIAS Todos los dispositivos inalámbricos pueden sufrir interferencias que podrían afectar su rendimiento. La distancia mínima entre dos receptores debe ser por lo menos de 50 cm. REPARACIÓN No intente reparar este producto. No hay piezas que pueda reparar el usuario. RESISTENCIA AL AGUA Este producto no es resistente al agua. Manténgalo seco. La humedad puede corroer los circuitos internos. LIMPIEZA Utilice un paño seco para limpiar este producto. No utilice productos químicos, disolventes ni detergentes fuertes. MANIPULACIÓN No deje caer ni golpee o mueva bruscamente el dispositivo. Un manejo brusco puede romper las placas de circuitos internos y las piezas mecánicas más sensibles. MEDIO AMBIENTE No exponga el producto a un calor o frío excesivos, ya que puede dañar o acortar la vida útil de las placas de circuitos electrónicos y de las pilas. 48
49 ES Menú principal Cuando ejecute el software del TPC-300 aparecerá la pantalla principal. Si utiliza el software por primera vez, no habrá habitaciones ni dispositivos visibles. Añadir habitaciones Utilice este menú para añadir una habitación a su configuración. Puede añadir un máximo de 16 habitaciones. Añadir dispositivos Utilice este menú para añadir dispositivos a su configuración. Podrá programar hasta 16 dispositivos distintos (cada uno con su propio receptor) por habitación. 49
50 ES Extra Utilice este menú para configurar algunos de los parámetros básicos de su TPC-300. Por ejemplo, podrá ajustar su localización, enviar sus ajustes al TPC-300 o guardarlos en su PC, así como abrir/volver a ajustes anteriores en su PC. Si utiliza receptores con rueda de código de dígitos, puede activar aquí la ayuda para la rueda de códigos de dígitos. Escenarios Combine diferentes acciones de distintos receptores en un escenario. Por ejemplo "Ver una película", para atenuar las luces y cerrar automáticamente las persianas. Temporizador Programe diferentes ajustes de temporizador para activar o desactivar automáticamente dispositivos o escenarios. También podrá programar ajustes de hora de atardecer y amanecer para su lugar de residencia (o una ciudad cercana) Controles del menú principal Podrá controlar sus receptores COCO cuando el TPC-300 esté conectado a un PC. 50
51 ES 51
52 ES Añadir una habitación Antes de poder programar receptores o dispositivos, debe añadir una habitación. Haga doble clic en el cuadro negro en la sección "habitaciones" para añadir una habitación. Puede crear 16 habitaciones diferentes. Puede explorar todas las imágenes disponibles haciendo clic en las viñetas pequeñas de la esquina superior izquierda. Si hace doble clic en el cuadro negro entrará en el submenú "habitaciones". Ahí podrá ver 32 ejemplos de imágenes de distintas habitaciones. Haga un solo clic en una de las imágenes disponibles para seleccionarla, o doble clic en una imagen para reemplazarla por una imagen propia (por ejemplo una imagen de su salón). Después, añada una descripción de la habitación y pulse aceptar para guardar la habitación o cancelar para volver al menú principal sin guardar ningún cambio. Si desea eliminar la habitación seleccionada, pulse eliminar. 52
53 ES 53
54 ES Añadir dispositivos Después de añadir una habitación, puede añadir dispositivos a dicha habitación. Haga doble clic en el cuadro negro de "dispositivos" para añadir una habitación. Se puede programar un máximo de 16 dispositivos diferentes por habitación. Puede explorar todas las imágenes disponibles haciendo clic en las viñetas pequeñas de la esquina superior izquierda. Haga un solo clic en una de las imágenes disponibles para seleccionar la imagen, o doble clic en una imagen para sustituirla por una propia. A continuación, seleccione si el receptor es atenuador (sí o no) y añada una descripción de dispositivo. Si pulsa el botón cancelar, volverá al menú principal sin guardar ningún cambio. En función del tipo de receptor, tiene que elegir ahora uno de los 2 procedimientos necesarios: 1. Receptor de sistemas de código automático Pulse aprender cód. El TPC-300 empezará a enviar señales. A continuación, active el modo aprendizaje del receptor (véase el manual del receptor). El receptor recibirá y guardará automáticamente el código de transmisión del TPC-300. Pulse parar para dejar de enviar señales de transmisión. Por último, pulse aceptar. 2. Receptor de rueda de código de dígitos Haga clic en cancelar para volver al menú principal. Desde el menú principal, elija opciones, seleccione sí para la rueda de códigos de dígitos y pulse aceptar. A continuación, añada un dispositivo, seleccione sí para receptor de rueda de código de dígitos y programe el código correspondiente (p. ej., A-3). Por último, pulse aceptar. 54
55 ES 55
56 ES Menú principal: controles La pantalla principal muestra todas las habitaciones y dispositivos añadidos. Control directo de los dispositivos con su ordenador Si ha programado el/los receptor(es) correctamente (véase p. 11), podrá seleccionar y controlar cada receptor directamente desde la pantalla principal: La atenuación y los botones +/- tan sólo pueden utilizarse para los receptores atenuadores. Con la atenuación podrá enviar un nivel pre-establecido de intensidad lumínica (1 a 16) a un receptor atenuador, lo que le permitirá ajustar la intensidad de la lámpara. Para los receptores regulares, podrá usar los botones encender y apagar para encender o apagar el dispositivo. Ajuste del temporizador para la ejecución de comandos Hay dos maneras de programar los comandos con un temporizador: 1. Utilice el menú 'temporizador' para añadir un temporizador a un único dispositivo. 2. Cree una escena (= distintos dispositivos, cada cual con su propio comando: encender/apagar/atenuación) y añada un temporizador a dicha escena. Ambas opciones se explican más adelante en este manual. 56
57 ES 57
58 ES Opciones Desde el menú principal, elija opciones para cambiar los siguientes ajustes del TPC-300: Idioma Cambie el idioma del software. Ajustes Haga clic en guardar para guardar los ajustes actuales en el disco duro de su ordenador. Haga clic en cargar para abrir los ajustes guardados previamente. Rueda de códigos de dígitos Tiene uno o más receptores clásicos con la rueda de códigos de dígitos? Marque sí, para que pueda establecer el código correspondiente cuando añada un dispositivo a su configuración. Si sólo trabaja con receptores automáticos, deje marcada la casilla no. Mostrar consejos Si estuviera marcado sí, aparecerán pequeños consejos cuando pase por encima de un elemento, botón o imagen. Ubicación Para utilizar la función de temporizador con los ajustes de atardecer y amanecer de su ubicación geográfica, seleccione el país y la ciudad correspondientes. Enviar a TPC Transfiera los ajustes actuales a la memoria interna del TPC-300 pulsando el botón enviar a TPC. Enviando los ajustes al TPC-300, el dispositivo ejecutará todos los programas de temporizador, aunque el dispositivo no esté conectado a un ordenador. 58
59 ES 59
60 ES Escenarios Puede combinar varios dispositivos de varias habitaciones en un solo escenario. Un escenario, como "Ver una película", puede contener diferentes acciones para diferentes dispositivos que se pueden ejecutar simultáneamente. Por ejemplo: cerrar las persianas + apagar un ventilador de techo + atenuar las luces. Al hacer doble clic en el cuadro negro en la vista general de escenarios, abrirá el menú del escenario 1, como se muestra a continuación. Ya puede añadir una descripción de escenario. Si hace doble clic en el cuadro negro de nuevo, entrará en un menú en el que podrá seleccionar todas las habitaciones y dispositivos añadidos previamente. Como se ha mencionado arriba, podrá combinar varios dispositivos de varias habitaciones en un único escenario. Podrá combinar hasta 16 escenas diferentes. 60
61 ES 61
62 ES Haga clic en la habitación deseada, el dispositivo deseado, y la acción deseada (encendido/valor de atenuación/ apagado). Acción Color Función Encendido Verde El TPC-300 envía una señal de encendido Atenuación Naranja El TPC-300 atenúa la luz al nivel preseleccionado (1-16). Apagado Rojo El TPC-300 envía una señal de apagado. Pulse aceptar para añadir el dispositivo con una acción específica a un escenario. Repita este procedimiento para añadir varios receptores con acciones específicas al mismo escenario. También puede cancelar o eliminar el dispositivo del escenario. Temporizador Añada un temporizador a un escenario para que pueda activarse un escenario completo de manera automática (aunque el TPC-300 no esté conectado a un ordenador). Enviar directamente El TPC-300 activa directamente un escenario. Este comando sólo funciona si el TPC-300 se conecta vía USB a un PC. 62
63 ES 63
64 ES Temporizador Los dispositivos y escenas se pueden activar/desactivar de manera automática con la opción temporizador. Para crear un programa de temporizador para un único dispositivo: seleccione ese dispositivo en el menú principal y pulse el botón temporizador. Para crear un programa de temporizador para un escenario: pulse el botón escenarios en el menú principal, seleccione el escenario y después pulse el botón temporizador. <mes> Haga doble clic para seleccionar el mes en el que deberá activarse el temporizador. <día/fecha> Haga doble clic para seleccionar el/los día(s) en los que debe activarse el temporizador, o seleccione una fecha específica. <time> Haga doble clic para seleccionar una hora fija o variable (aleatoria) o el momento del atardecer o amanecer para activar el programa temporizador. <acción> Para dispositivos únicos: haga doble clic para seleccionar una acción (encendido, apagado o una atenuación determinada). Para escenarios: la acción para cada dispositivo (encendido, apagado o una atenuación determinada) ya está establecida en el propio escenario. Añadir / duplicar / eliminar / guardar programas de temporizador Pulse añadir para insertar una nueva fila para un programa temporizador. Pulse copiar para duplicar una fila existente. Pulse eliminar para eliminar un programa temporizador. Pulse aceptar para guardar los programas temporizadores (o pulse atrás para retroceder al menú principal sin guardar los cambios). 64
65 PT A D B C E Receptores não incluídos A: indicador LED B: ligação USB-B C: cabo USB A-B D: compartimento das pilhas E: chave USB 65
66 PT Informações gerais O TPC-300 é um transmissor controlado por computador com temporizador incorporado com as seguintes capacidades: Um temporizador programável para activar ou desactivar automaticamente receptores COCO. Possibilidade de sincronizar o temporizador com as definições horárias de nascer e pôr-do-sol de várias cidades de vários países. A transição automática da hora padrão para a hora de Verão. Os receptores COCO também podem ser controlados de forma manual, desde que o TPC-300 esteja programado e ligado a um PC com software. Como começar 1. Insira a chave USB numa porta USB do seu computador. Execute o programa de instalação, Setup.exe, armazenado na chave USB. Siga as instruções para concluir a instalação. 2. Abra o compartimento das pilhas do TPC-300 e insira duas pilhas AA. Respeite as polaridades. 3. Ligue o TPC-300 à entrada USB de um computador. Se estiver a executar o Windows XP ou posterior, o TPC-300 será automaticamente reconhecido e, após alguns segundos, surgirá a notificação O novo hardware está pronto a utilizar. 66
67 PT INFORMAÇÕES COMPATIBILIDADE Este transmissor funciona com todos os receptores COCO. CARACTERÍSTICAS TÉCNICAS Pilhas Frequência de radiofrequência Alcance da radiofrequência Função de temporizador FUNCIONALIDADE Ligar/desligar, função de regulação de intensidade (apenas se o receptor for um regulador de intensidade), e função de temporizador. 2x alcalina AA 1,5 Volts 433,92 MHz Até 30 m em espaços fechados/70 m ao ar livre (condições ideais) sim SINAL DE RÁDIO SEM FIOS O sinal de rádio de 433,92 MHz atravessa paredes, janelas e portas. Alcance em espaços fechados: até 30 m. Alcance ao ar livre: até 70 m. (condições ideais) O alcance varia muito consoante as condições locais, tal como a presença de metais. Por exemplo, a fina camada de revestimento metálico em vidros de baixa emissividade tem um impacto negativo no alcance de sinais de rádio. Poderá haver restrições à utilização deste equipamento fora da UE. Se aplicável, verifique se o equipamento está em conformidade com as directivas locais. 67
68 PT SEGURANÇA Leia estas instruções simples. O não cumprimento das mesmas pode ser perigoso, e uma instalação incorrecta irá invalidar totalmente a garantia que se possa aplicar a este produto. PILHAS Retire as pilhas se o produto não for utilizado durante um longo período de tempo. Temperaturas extremas reduzem a capacidade e a vida útil da pilha. REPARAÇÃO Não tente reparar este produto. Não existem peças dentro do produto que possam ser reparadas pelo utilizador. Substitua as pilhas alcalinas AA de 1,5 Volts quando o indicador de transmissão deixar de acender ao enviar um sinal ON (ligar) ou OFF (desligar). Não esmague, não queime, nem triture pilhas. Elimine as pilhas de acordo com os regulamentos locais. Recicle sempre que possível. Não elimine juntamente com o lixo doméstico. SUPORTE DE VIDA Nunca utilize produtos COCO para sistemas de suporte de vida ou outras aplicações cuja avaria possa ter consequências potencialmente fatais. INTERFERÊNCIA Todos os equipamentos sem fios podem estar sujeitos a interferência, o que pode afectar o desempenho. A distância mínima entre 2 receptores deve ser, no mínimo, 50 cm. 68 RESISTÊNCIA À ÁGUA Este produto não é à prova de água. Mantenha-o seco. A humidade provocará a corrosão do sistema electrónico interior. LIMPEZA Utilize um pano seco para limpar este produto. Não utilize químicos fortes, solventes de limpeza ou detergentes fortes. MANUSEAMENTO Não deixe cair, não derrube, nem abane o equipamento. Um manuseamento inadequado pode quebrar as placas de circuito interno e os mecanismos mais frágeis. AMBIENTE Não exponha o produto a calor ou frio excessivo, pois poderá danificar ou reduzir a vida das placas de circuito electrónico e das pilhas.
69 PT Menu principal O ecrã principal aparece quando executar o software TPC-300. Se estiver a utilizar o software pela primeira vez, não haverá salas ou equipamentos visíveis neste momento. Adicionar salas Utilize este menu para adicionar uma sala à sua configuração. Pode adicionar 16 salas no máximo. Adicionar equipamentos Utilize este menu para adicionar equipamentos à sua configuração. É possível programar até 16 equipamentos diferentes (cada um com o seu próprio receptor) por sala. 69
70 PT Outros Utilize este menu para configurar algumas definições básicas do seu TPC-300. Por exemplo, pode definir a sua localização, enviar as suas definições para o TPC-300, guardar as suas definições no seu PC, ou abrir/mudar para as definições que guardou anteriormente no seu PC. Se utilizar receptores com rodas de código, poderá activar o suporte para a roda de código aqui. Cenas Combine diferentes acções para diferentes receptores numa única cena. Por exemplo "Ver um filme", em que as luzes escurecem e os estores fecham automaticamente. Temporizador Programe diferentes definições do temporizador para activar ou desactivar automaticamente equipamentos ou cenas. Também é possível programar definições horárias de nascer do Sol e pôrdo-sol para o local onde vive (ou uma cidade próxima) Controlos do menu principal Controle os seus receptores COCO de forma manual quando o TPC-300 estiver ligado a um PC. 70
71 PT 71
72 PT Adicionar uma sala Antes de poder programar receptores/equipamentos, terá de adicionar uma sala. Clique duas vezes na caixa preta na secção "salas" do menu principal para adicionar uma sala. Pode criar 16 salas diferentes. Pode percorrer todas as imagens disponíveis clicando nos pequenos blocos no canto superior esquerdo. Se clicar duas vezes numa caixa preta, entrará no submenu "salas". Aqui verá 32 imagens de exemplo de várias salas. Clique numa das imagens disponíveis para seleccionar, ou clique duas vezes numa imagem para substituí-la pela sua própria fotografia (por exemplo, uma fotografia da sua própria sala de estar). Em seguida, adicione uma descrição da sala e carregue em OK para guardar a sala, ou carregue em cancelar para voltar ao menu principal sem guardar qualquer modificação. Se pretender eliminar a sala seleccionada, carregue em eliminar. 72
73 PT 73
74 Adicionar equipamentos Após adicionar uma sala, pode adicionar equipamentos para aquela sala. Clique duas vezes na caixa preta de "equipamentos" no menu principal para adicionar um equipamento. É possível programar 16 equipamentos diferentes, no máximo, por sala. PT Pode percorrer todas as imagens disponíveis clicando nos pequenos blocos no canto superior esquerdo. Clique numa das imagens disponíveis para seleccionar, ou clique duas vezes numa imagem para substituí-la pela sua própria fotografia. Em seguida, seleccione se o receptor tem regulador de intensidade (sim ou não), e adicione uma descrição do equipamento. Se carregar no botão cancelar, voltará ao menu principal sem guardar qualquer modificação. Consoante o tipo de receptor, neste momento poderá optar por um de dois procedimentos necessários: 1. Receptor automático do sistema de código Carregue em obter código. O TPC-300 começa a enviar sinais. Em seguida, active o modo de obtenção de um receptor (consulte o manual do receptor). O receptor irá receber e guardar automaticamente o código de transmissão do TPC-300. Carregue em parar obtenção para interromper o envio de sinais de transmissão. Por fim, carregue em OK. 2. Receptor de rodas de código Clique em cancelar para voltar ao menu principal. A partir do menu principal, seleccione outros, seleccione sim em rodas de código e carregue em OK. Em seguida, adicione um equipamento, seleccione sim em receptor de rodas de código e programe o código correspondente (ex. A-3). Por fim, carregue em OK. 74
75 PT 75
76 PT Menu principal: controlos O menu principal agora apresenta todas as salas e equipamentos que adicionou. Controlar equipamentos directamente com o computador Se tiver programado o(s) receptor(es) correctamente (consulte a p.11), pode seleccionar e controlar cada receptor directamente a partir do ecrã principal: Os botões valor dim e +/- apenas podem ser utilizados para receptores com regulador de intensidade. O botão valor dim permite-lhe enviar um nível de luz predefinido (1 a 16) para um receptor com regulador de intensidade, o que lhe permite ajustar a luminosidade de uma lâmpada. No caso dos receptores normais, pode utilizar as opções ligado e desligado para ligar ou desligar um equipamento. Utilizar definições do temporizador para executar acções Existem 2 formas de programar acções com um temporizador: 1. Utilize o menu "temporizador" para adicionar um temporizador a um equipamento. 2. Crie uma cena (= vários equipamentos, cada um com a sua própria acção: ligar/desligar/valor de diminuição) e adicione um temporizador a essa cena. Ambas as opções serão explicadas mais adiante neste manual. 76
77 PT 77
78 PT Outros A partir do menu principal, seleccione outros para alterar as seguintes definições do TPC-300: Idioma Altere o idioma do software. Definições Clique em guardar para guardar as definições actuais no disco rígido do seu computador. Clique em carregar para abrir as definições que guardou anteriormente. Rodas de código Tem um ou mais receptores clássicos com rodas de código? Assinale sim, para que possa definir o código correspondente ao adicionar um equipamento à sua configuração. Se apenas trabalhar com receptores automáticos, mantenha a caixa não assinalada. Mostrar sugestões Se a opção sim estiver assinalada, sempre que passar por cima de um item, botão ou imagem aparecerão breves sugestões com instruções. Localização Para utilizar a função de temporizador com definições de nascer do Sol/pôr-do-sol do seu local geográfico, seleccione o país e a cidade adequados. Enviar para o TPC Transfira as definições actuais para a memória interna do TPC-300, carregando no botão Enviar p/ TPC. Se enviar as definições para o TPC-300, este executará todos os programas do temporizador, mesmo que o equipamento não esteja ligado a um PC. 78
79 PT 79
80 PT Cenas Pode combinar vários equipamentos de várias salas numa única cena. Uma cena, como "Ver um filme", pode conter diferentes acções para diferentes equipamentos, que podem ser executadas em simultâneo. Por exemplo: fechar os estores + desligar a ventoinha do tecto + escurecer a luz. Se clicar duas vezes na caixa preta da visão geral das cenas, abrirá o menu da cena 1, tal como poderá ver abaixo. Neste momento, pode adicionar uma descrição da cena. Se clicar duas vezes na caixa preta novamente, entrará num menu onde poderá seleccionar todas as salas e os equipamentos que adicionou anteriormente. Tal como já foi referido, pode combinar vários equipamentos de várias salas numa única cena. Pode programar até 16 cenas diferentes. 80
SPEEDO AQUABEAT. Specially Designed for Aquatic Athletes and Active People
 SPEEDO AQUABEAT TM Specially Designed for Aquatic Athletes and Active People 1 2 Decrease Volume Increase Volume Reset EarphonesUSBJack Power Off / Rewind Power On / Fast Forward Goggle clip LED Status
Instruction Execution Times
 1 C Execution Times InThisAppendix... Introduction DL330 Execution Times DL330P Execution Times DL340 Execution Times C-2 Execution Times Introduction Data Registers This appendix contains several tables
Tipologie installative - Installation types Types d installation - Die einbauanweisungen Tipos de instalación - Τυπολογίες εγκατάστασης
 Types d installation Die einbauanweisungen Tipos de instalación Τυπολογίες εγκατάστασης AMPADE MOOCROMATICHE VIMAR DIMMERABII A 0 V~ MOOCHROME DIMMABE AMP VIMAR 0 V~ AMPE MOOCHROME VIMAR DIMMABE 0 V~ EUCHTE
Tipologie installative - Installation types Type d installation - Installationstypen Tipos de instalación - Τυπολογίες εγκατάστασης
 AMPADE MOOCROMATICHE VIMAR DIMMERABII A 0 V~ - VIMAR 0 V~ DIMMABE MOOCHROME AMP AMPE MOOCHROME VIMAR VARIATEUR 0 V~ - DIMMERFÄHIGE MOOCHROMATICHE AMPE VO VIMAR MIT 0 V~ ÁMPARA MOOCROMÁTICA VIMAR REGUABE
English PDFsharp is a.net library for creating and processing PDF documents 'on the fly'. The library is completely written in C# and based
 English PDFsharp is a.net library for creating and processing PDF documents 'on the fly'. The library is completely written in C# and based exclusively on safe, managed code. PDFsharp offers two powerful
Εγκατάσταση λογισμικού και αναβάθμιση συσκευής Device software installation and software upgrade
 Για να ελέγξετε το λογισμικό που έχει τώρα η συσκευή κάντε κλικ Menu > Options > Device > About Device Versions. Στο πιο κάτω παράδειγμα η συσκευή έχει έκδοση λογισμικού 6.0.0.546 με πλατφόρμα 6.6.0.207.
English PDFsharp is a.net library for creating and processing PDF documents 'on the fly'. The library is completely written in C# and based
 English PDFsharp is a.net library for creating and processing PDF documents 'on the fly'. The library is completely written in C# and based exclusively on safe, managed code. PDFsharp offers two powerful
Δημιουργία Λογαριασμού Διαχείρισης Business Telephony Create a Management Account for Business Telephony
 Δημιουργία Λογαριασμού Διαχείρισης Business Telephony Create a Management Account for Business Telephony Ελληνικά Ι English 1/7 Δημιουργία Λογαριασμού Διαχείρισης Επιχειρηματικής Τηλεφωνίας μέσω της ιστοσελίδας
Quick Installation Guide
 A Installation 1 F H B E C D G 2 www.trust.com/17528/faq Quick Installation Guide C C D Freewave Wireless Audio Set 17528/ 17529 D Installation Configuration Windows XP 4 5 8 Windows 7/ Vista 6 7 9 10
Οδηγίες Αγοράς Ηλεκτρονικού Βιβλίου Instructions for Buying an ebook
 Οδηγίες Αγοράς Ηλεκτρονικού Βιβλίου Instructions for Buying an ebook Βήμα 1: Step 1: Βρείτε το βιβλίο που θα θέλατε να αγοράσετε και πατήστε Add to Cart, για να το προσθέσετε στο καλάθι σας. Αυτόματα θα
FILTRO DE RED METÁLICA
 FILTRO DE RED METÁLICA Estas instrucciones forman parte integrante del manual que acompaña el aparato en el cual está instalado el accesorio. Este manual se refiere a ADVERTENCIAS GENERALES y a REGLAS
PortSip Softphone. Ελληνικά Ι English 1/20
 PortSip Softphone Ελληνικά Ι English 1/20 1. Περιεχόμενα 2. Εγκατάσταση σε Smartphone & Tablet (Android ή ios)... 1 3. Εγκατάσταση σε ηλεκτρονικό υπολογιστή (Windows ή Mac).... 5 4. Installation in Smartphone
Εργαστήριο Ανάπτυξης Εφαρμογών Βάσεων Δεδομένων. Εξάμηνο 7 ο
 Εργαστήριο Ανάπτυξης Εφαρμογών Βάσεων Δεδομένων Εξάμηνο 7 ο Procedures and Functions Stored procedures and functions are named blocks of code that enable you to group and organize a series of SQL and PL/SQL
KIT DE DRENAJE DE CONDENSADOS
 KIT DE DRENAJE DE CONDENSADOS Estas instrucciones forman parte integrante del manual que acompaña el aparato en el cual está instalado este Kit. Este manual se refiere a ADVERTENCIAS GENERALES y REGLAS
How to register an account with the Hellenic Community of Sheffield.
 How to register an account with the Hellenic Community of Sheffield. (1) EN: Go to address GR: Πηγαίνετε στη διεύθυνση: http://www.helleniccommunityofsheffield.com (2) EN: At the bottom of the page, click
3 Lösungen zu Kapitel 3
 3 Lösungen zu Kapitel 3 31 Lösungen der Aufgaben zu Abschnitt 31 311 Lösung Die Abbildung D : { R 4 R 4 R 4 R 4 R, a 1, a 2, a 3, a 4 ) D( a 1, a 2, a 3, a 4 ) definiere eine Determinantenform (auf R 4
4K HDMI Splitter 1x4. User s Guide / Bedienungsanleitung / Εγχειρίδιο Χρήστη
 4K HDMI Splitter 1x4 User s Guide / Bedienungsanleitung / Εγχειρίδιο Χρήστη INTRODUCTION The EDISION 4K HDMI Splitter 1x4 uses a single HDMI input source, to distribute it to 4 HDMI outputs. The splitter
MATERIALIEN ZUR VORBEREITUNG AUF DIE KLAUSUR INFORMATIK II FÜR VERKEHRSINGENIEURWESEN ANTEIL VON PROF. VOGLER IM WINTERSEMESTER 2011/12
 Fakultät Informatik Institut für Angewandte Informatik, Professur Technische Informationssysteme MATERIALIEN ZUR VORBEREITUNG AUF DIE KLAUSUR INFORMATIK II FÜR VERKEHRSINGENIEURWESEN ANTEIL VON PROF. VOGLER
3.4 SUM AND DIFFERENCE FORMULAS. NOTE: cos(α+β) cos α + cos β cos(α-β) cos α -cos β
 cos α + cos β cos(α-β) cos α -cos β") 3.4 SUM AND DIFFERENCE FORMULAS Page Theorem cos(αβ cos α cos β -sin α cos(α-β cos α cos β sin α NOTE: cos(αβ cos α cos β cos(α-β cos α -cos β Proof of cos(α-β cos α cos β sin α Let s use a unit circle
3.4 SUM AND DIFFERENCE FORMULAS Page Theorem cos(αβ cos α cos β -sin α cos(α-β cos α cos β sin α NOTE: cos(αβ cos α cos β cos(α-β cos α -cos β Proof of cos(α-β cos α cos β sin α Let s use a unit circle
VBA ΣΤΟ WORD. 1. Συχνά, όταν ήθελα να δώσω ένα φυλλάδιο εργασίας με ασκήσεις στους μαθητές έκανα το εξής: Version 25-7-2015 ΗΜΙΤΕΛΗΣ!!!!
 VBA ΣΤΟ WORD Version 25-7-2015 ΗΜΙΤΕΛΗΣ!!!! Μου παρουσιάστηκαν δύο θέματα. 1. Συχνά, όταν ήθελα να δώσω ένα φυλλάδιο εργασίας με ασκήσεις στους μαθητές έκανα το εξής: Εγραφα σε ένα αρχείο του Word τις
Always there to help you Register your product and get support at HTB5260G. Question? Contact Philips.
 Always there to help you Register your product and get support at www.philips.com/support Question? Contact Philips HTB5260G Quick start guide EN Before using your product, read all accompanying safety
the total number of electrons passing through the lamp.
 1. A 12 V 36 W lamp is lit to normal brightness using a 12 V car battery of negligible internal resistance. The lamp is switched on for one hour (3600 s). For the time of 1 hour, calculate (i) the energy
Galatia SIL Keyboard Information
 Galatia SIL Keyboard Information Keyboard ssignments The main purpose of the keyboards is to provide a wide range of keying options, so many characters can be entered in multiple ways. If you are typing
Capacitors - Capacitance, Charge and Potential Difference
 Capacitors - Capacitance, Charge and Potential Difference Capacitors store electric charge. This ability to store electric charge is known as capacitance. A simple capacitor consists of 2 parallel metal
ΚΥΠΡΙΑΚΗ ΕΤΑΙΡΕΙΑ ΠΛΗΡΟΦΟΡΙΚΗΣ CYPRUS COMPUTER SOCIETY ΠΑΓΚΥΠΡΙΟΣ ΜΑΘΗΤΙΚΟΣ ΔΙΑΓΩΝΙΣΜΟΣ ΠΛΗΡΟΦΟΡΙΚΗΣ 6/5/2006
 Οδηγίες: Να απαντηθούν όλες οι ερωτήσεις. Ολοι οι αριθμοί που αναφέρονται σε όλα τα ερωτήματα είναι μικρότεροι το 1000 εκτός αν ορίζεται διαφορετικά στη διατύπωση του προβλήματος. Διάρκεια: 3,5 ώρες Καλή
2 Composition. Invertible Mappings
 Arkansas Tech University MATH 4033: Elementary Modern Algebra Dr. Marcel B. Finan Composition. Invertible Mappings In this section we discuss two procedures for creating new mappings from old ones, namely,
Exercises 10. Find a fundamental matrix of the given system of equations. Also find the fundamental matrix Φ(t) satisfying Φ(0) = I. 1.
 satisfying Φ(0) = I. 1.") Exercises 0 More exercises are available in Elementary Differential Equations. If you have a problem to solve any of them, feel free to come to office hour. Problem Find a fundamental matrix of the given
Exercises 0 More exercises are available in Elementary Differential Equations. If you have a problem to solve any of them, feel free to come to office hour. Problem Find a fundamental matrix of the given
Section 8.3 Trigonometric Equations
 99 Section 8. Trigonometric Equations Objective 1: Solve Equations Involving One Trigonometric Function. In this section and the next, we will exple how to solving equations involving trigonometric functions.
The municipality of Apokoronas has created a new app for your smart phone.
 1 The municipality of Apokoronas has created a new app for your smart phone. It is now available from itunes and the Google Play Store For Apple Smart Phones: https://itunes.apple.com/us/app/%ce%b4%ce%ae%ce%bc%ce%bf%cf%82-
The Simply Typed Lambda Calculus
 Type Inference Instead of writing type annotations, can we use an algorithm to infer what the type annotations should be? That depends on the type system. For simple type systems the answer is yes, and
Οδηγίες χρήσης. Registered. Οδηγίες ένταξης σήματος D-U-N-S Registered στην ιστοσελίδα σας και χρήσης του στην ηλεκτρονική σας επικοινωνία
 Οδηγίες χρήσης υλικού D-U-N-S Registered Οδηγίες ένταξης σήματος D-U-N-S Registered στην ιστοσελίδα σας και χρήσης του στην ηλεκτρονική σας επικοινωνία Οδηγίες χρήσης υλικού D-U-N-S Για οποιαδήποτε ερώτηση
Section 7.6 Double and Half Angle Formulas
 09 Section 7. Double and Half Angle Fmulas To derive the double-angles fmulas, we will use the sum of two angles fmulas that we developed in the last section. We will let α θ and β θ: cos(θ) cos(θ + θ)
Advanced Subsidiary Unit 1: Understanding and Written Response
 Write your name here Surname Other names Edexcel GE entre Number andidate Number Greek dvanced Subsidiary Unit 1: Understanding and Written Response Thursday 16 May 2013 Morning Time: 2 hours 45 minutes
Panel lateral/de esquina de la Synergy. Synergy πλαϊνή σταθερή πλευρά τετράγωνης καμπίνας. Rohová/boční zástěna Synergy
 Instrucciones de instalación Suministrar al usuario ADVERTENCIA! Este producto pesa más de 19 kg, puede necesitarse ayuda para levantarlo Lea con atención las instrucciones antes de empezar la instalación.
Puerta corredera de la Synergy Synergy Συρόμενη πόρτα Posuvné dveře Synergy Porta de correr da Synergy
 Instrucciones de instalación Suministrar al usuario ADVERTENCIA! Este producto pesa más de 19 kg, puede necesitarse ayuda para levantarlo Lea con atención las instrucciones antes de empezar la instalación.
Modbus basic setup notes for IO-Link AL1xxx Master Block
 n Modbus has four tables/registers where data is stored along with their associated addresses. We will be using the holding registers from address 40001 to 49999 that are R/W 16 bit/word. Two tables that
ΚΥΠΡΙΑΚΗ ΕΤΑΙΡΕΙΑ ΠΛΗΡΟΦΟΡΙΚΗΣ CYPRUS COMPUTER SOCIETY ΠΑΓΚΥΠΡΙΟΣ ΜΑΘΗΤΙΚΟΣ ΔΙΑΓΩΝΙΣΜΟΣ ΠΛΗΡΟΦΟΡΙΚΗΣ 19/5/2007
 Οδηγίες: Να απαντηθούν όλες οι ερωτήσεις. Αν κάπου κάνετε κάποιες υποθέσεις να αναφερθούν στη σχετική ερώτηση. Όλα τα αρχεία που αναφέρονται στα προβλήματα βρίσκονται στον ίδιο φάκελο με το εκτελέσιμο
Potential Dividers. 46 minutes. 46 marks. Page 1 of 11
 Potential Dividers 46 minutes 46 marks Page 1 of 11 Q1. In the circuit shown in the figure below, the battery, of negligible internal resistance, has an emf of 30 V. The pd across the lamp is 6.0 V and
ΕΡΙΤΟΡΕΣ ΚΑΙ ΑΝΘΩΡΟΙ ΚΛΕΙΔΙΑ ΑΝΑΘΕΣΘ ΑΓΩΝΑ ΓΑΦΕΙΟ ΑΓΩΝΩΝ ΟΓΑΝΩΤΙΚΘ ΕΡΙΤΟΡΘ. ζεκηλαρηο 1 ΡΑΓΚΟΣΜΙΑ ΟΜΟΣΡΟΝΔΙΑ (ISAF) ΕΛΛΘΝΙΚΘ ΟΜΟΣΡΟΝΔΙΑ (Ε.Ι.Ο.
 ΕΛΛΘΝΙΚΘ ΟΜΟΣΡΟΝΔΙΑ (Ε.Ι.Ο.") ΑΝΑΘΕΣΘ ΑΓΩΝΑ ΕΡΙΤΟΡΕΣ ΚΑΙ ΑΝΘΩΡΟΙ ΚΛΕΙΔΙΑ ΡΑΓΚΟΣΜΙΑ ΟΜΟΣΡΟΝΔΙΑ (ISAF) ΕΛΛΘΝΙΚΘ ΟΜΟΣΡΟΝΔΙΑ (Ε.Ι.Ο.) ΚΛΑΣΘ 6/6/2009 1 ΟΡΓΑΝΩΣΙΚΗ ΕΠΙΣΡΟΠΗ ΓΡΑΦΕΙΟ ΑΓΩΝΩΝ ΕΠΙΣΡΟΠΗ ΑΓΩΝΩΝ ΕΠΙΣΡΟΠΗ ΕΝΣΑΕΩΝ ΕΠΙΣΡΟΠΗ ΚΑΣΑΜΕΣΡΗΕΩΝ
ΑΝΑΘΕΣΘ ΑΓΩΝΑ ΕΡΙΤΟΡΕΣ ΚΑΙ ΑΝΘΩΡΟΙ ΚΛΕΙΔΙΑ ΡΑΓΚΟΣΜΙΑ ΟΜΟΣΡΟΝΔΙΑ (ISAF) ΕΛΛΘΝΙΚΘ ΟΜΟΣΡΟΝΔΙΑ (Ε.Ι.Ο.) ΚΛΑΣΘ 6/6/2009 1 ΟΡΓΑΝΩΣΙΚΗ ΕΠΙΣΡΟΠΗ ΓΡΑΦΕΙΟ ΑΓΩΝΩΝ ΕΠΙΣΡΟΠΗ ΑΓΩΝΩΝ ΕΠΙΣΡΟΠΗ ΕΝΣΑΕΩΝ ΕΠΙΣΡΟΠΗ ΚΑΣΑΜΕΣΡΗΕΩΝ
Approximation of distance between locations on earth given by latitude and longitude
 Approximation of distance between locations on earth given by latitude and longitude Jan Behrens 2012-12-31 In this paper we shall provide a method to approximate distances between two points on earth
Preisliste AB JUNI 2019
 Preisliste AB JUNI 2019 LOVE STORIES Pakete (3H) STATT 690 JETZT 650 - Einmalige Aufnahmepauschale - Brautpaar Shooting inkl. 10 bearbeiteten Bildern digital & mit Abzug bis 15x20cm - Reportage der Trauung
Lógica Proposicional
 Proposicional educción Natural Proposicional - 1 Justificación de la validez del razonamiento os maneras diferentes de justificar Justificar que la veracidad de las hipótesis implica la veracidad de la
Lógica Proposicional. Justificación de la validez del razonamiento?
 Proposicional educción Natural Proposicional - 1 Justificación de la validez del razonamiento? os maneras diferentes de justificar Justificar que la veracidad de las hipótesis implica la veracidad de la
Solar Laptop Charger with 2.5w/12000mah
 WWW..GR ΕΤΑΙΡΙΑ: ΟΙ. ΦΟΡΤΙΣΤΕΣ ΜΑΣ ΓΙΑ ΟΛΑ ΚΑΙ ΟΛΟΥΣ Solar Laptop Charger with 2.5w/12000mah Specification Battery Type: Lithium-ion polymer battery; Battery capacity: 12000mAh/3.7V 3000mAh lithium polymer
[1] P Q. Fig. 3.1
![[1] P Q. Fig. 3.1](/thumbs/79/80362156.jpg "[1] P Q. Fig. 3.1") 1 (a) Define resistance....... [1] (b) The smallest conductor within a computer processing chip can be represented as a rectangular block that is one atom high, four atoms wide and twenty atoms long. One
1 (a) Define resistance....... [1] (b) The smallest conductor within a computer processing chip can be represented as a rectangular block that is one atom high, four atoms wide and twenty atoms long. One
ENGLISH. S-Video. Composite
 CMP-USBVG6 ENGLISH 1.) Hardware Introduction 1. USB 2.0 connector 2. Audio input Left / Right 3. Composite Input 4. S-Video Input VHS Player Camera S-Video DVD Player Multiple devices Set-top Box Game
Phys460.nb Solution for the t-dependent Schrodinger s equation How did we find the solution? (not required)
") Phys460.nb 81 ψ n (t) is still the (same) eigenstate of H But for tdependent H. The answer is NO. 5.5.5. Solution for the tdependent Schrodinger s equation If we assume that at time t 0, the electron starts
Phys460.nb 81 ψ n (t) is still the (same) eigenstate of H But for tdependent H. The answer is NO. 5.5.5. Solution for the tdependent Schrodinger s equation If we assume that at time t 0, the electron starts
την..., επειδή... Se usa cuando se cree que el punto de vista del otro es válido, pero no se concuerda completamente
 - Concordar En términos generales, coincido con X por Se usa cuando se concuerda con el punto de vista de otro Uno tiende a concordar con X ya Se usa cuando se concuerda con el punto de vista de otro Comprendo
ΑΛΛΗΛΕΠΙΔΡΑΣΗ ΑΝΘΡΩΠΟΥ - ΥΠΟΛΟΓΙΣΤΗ. Διδάσκων: Κωνσταντίνος Στεφανίδης
 ΠΑΝΕΠΙΣΤΗΜΙΟ ΚΡΗΤΗΣ ΣΧΟΛΗ ΘΕΤΙΚΩΝ ΕΠΙΣΤΗΜΩΝ ΤΜΗΜΑ ΕΠΙΣΤΗΜΗΣ ΥΠΟΛΟΓΙΣΤΩΝ ΜΑΘΗΜΑ ΕΠΙΛΟΓΗΣ ΗΥ-464 ΑΛΛΗΛΕΠΙΔΡΑΣΗ ΑΝΘΡΩΠΟΥ - ΥΠΟΛΟΓΙΣΤΗ Διδάσκων: Κωνσταντίνος Στεφανίδης Adobe XD is an all-in-one cross-platform
Inmigración Estudiar. Estudiar - Universidad. Indicar que quieres matricularte. Indicar que quieres matricularte en una asignatura.
 - Universidad Me gustaría matricularme en la universidad. Indicar que quieres matricularte Me quiero matricular. Indicar que quieres matricularte en una asignatura en un grado en un posgrado en un doctorado
PARTIAL NOTES for 6.1 Trigonometric Identities
 PARTIAL NOTES for 6.1 Trigonometric Identities tanθ = sinθ cosθ cotθ = cosθ sinθ BASIC IDENTITIES cscθ = 1 sinθ secθ = 1 cosθ cotθ = 1 tanθ PYTHAGOREAN IDENTITIES sin θ + cos θ =1 tan θ +1= sec θ 1 + cot
Bring Your Own Device (BYOD) Legal Challenges of the new Business Trend MINA ZOULOVITS LAWYER, PARNTER FILOTHEIDIS & PARTNERS LAW FIRM
 Legal Challenges of the new Business Trend MINA ZOULOVITS LAWYER, PARNTER FILOTHEIDIS & PARTNERS LAW FIRM") Bring Your Own Device (BYOD) Legal Challenges of the new Business Trend MINA ZOULOVITS LAWYER, PARNTER FILOTHEIDIS & PARTNERS LAW FIRM minazoulovits@phrlaw.gr What is BYOD? Information Commissioner's Office
Bring Your Own Device (BYOD) Legal Challenges of the new Business Trend MINA ZOULOVITS LAWYER, PARNTER FILOTHEIDIS & PARTNERS LAW FIRM minazoulovits@phrlaw.gr What is BYOD? Information Commissioner's Office
ΟΔΗΓΙΕΣ ΧΡΗΣΗΣ USE INSTRUCTIONS
 ΟΔΗΓΙΕΣ ΧΡΗΣΗΣ USE INSTRUCTIONS ΤΗΛΕΦΩΝΟ ΜΕ ΑΝΑΓΝΩΡΙΣΗ ΚΛΗΣΗΣ /CORDED PHONE WITH CALLER ID ΜΟΝΤΕΛΟ/MODEL: TM09-448 DC48V Παρακαλούμε διαβάστε προσεκτικά όλες τις οδηγίες χρήσης πριν την χρήση της συσκευής
LR Series Metal Alloy Low-Resistance Resistor
 Tel : 881745 Fax : 881749 LR Series Metal Alloy LowResistance Resistor This specification is applicable to lead free, halogen free of RoHS directive for metal alloy lowresistance resistor. The product
Ρ Η Μ Α Τ Ι Κ Η Δ Ι Α Κ Ο Ι Ν Ω Σ Η
 Αρ. Φακέλου.: Ku 622.00/3 (Παρακαλούμε να αναφέρεται στην απάντηση) Αριθμός Ρημ. Διακ: 22/14 2 αντίγραφα Συνημμένα: -2- ΑΝΤΙΓΡΑΦΟ Ρ Η Μ Α Τ Ι Κ Η Δ Ι Α Κ Ο Ι Ν Ω Σ Η Η Πρεσβεία της Ομοσπονδιακής Δημοκρατίας
DEUTSCHE SCHULE ATHEN ΓΕΡΜΑΝΙΚΗ ΣΧΟΛΗ ΑΘΗΝΩΝ
 Herzlich Willkommen zu unserem Elternabend Übergang aus dem Kindergarten in die Vorschule Καλωσορίσατε στη συνάντηση γονέων με θέμα τη μετάβαση από τον παιδικό σταθμό στο νηπιαγωγείο 1 Übergang vom Kindergarten
Οδηγίες χρήσης υλικού D U N S Registered
 Οδηγίες χρήσης υλικού D U N S Registered Οδηγίες ένταξης σήματος D U N S Registered στην ιστοσελίδα σας και χρήσης του στην ηλεκτρονική σας επικοινωνία Για οποιαδήποτε ερώτηση, σας παρακαλούμε επικοινωνήστε
CYTA Cloud Server Set Up Instructions
 CYTA Cloud Server Set Up Instructions ΕΛΛΗΝΙΚΑ ENGLISH Initial Set-up Cloud Server To proceed with the initial setup of your Cloud Server first login to the Cyta CloudMarketPlace on https://cloudmarketplace.cyta.com.cy
Εμπορική αλληλογραφία Ηλεκτρονική Αλληλογραφία
 - Εισαγωγή Sehr geehrter Herr Präsident, Sehr geehrter Herr Präsident, Εξαιρετικά επίσημη επιστολή, ο παραλήπτης έχει ένα ειδικό τίτλο ο οποίος πρέπει να χρησιμοποιηθεί αντί του ονόματος του Sehr geehrter
ULX Wireless System USER GUIDE SUPPLEMENT RENSEIGNEMENT SUPPLÉMENTAIRES INFORMACION ADICIONAL. M1 ( MHz)
") ULX Wireless System USER GUIDE SUPPLEMENT RENSEIGNEMENT SUPPLÉMENTAIRES INFORMACION ADICIONAL M1 (662 698 MHz) 2003, Shure Incorporated 27B8733A (Rev. 4) Printed in U.S.A. SPECIFICATIONS ULX1 Transmitter
ULX Wireless System USER GUIDE SUPPLEMENT RENSEIGNEMENT SUPPLÉMENTAIRES INFORMACION ADICIONAL M1 (662 698 MHz) 2003, Shure Incorporated 27B8733A (Rev. 4) Printed in U.S.A. SPECIFICATIONS ULX1 Transmitter
SOAP API. https://bulksmsn.gr. Table of Contents
 SOAP API https://bulksmsn.gr Table of Contents Send SMS...2 Query SMS...3 Multiple Query SMS...4 Credits...5 Save Contact...5 Delete Contact...7 Delete Message...8 Email: sales@bulksmsn.gr, Τηλ: 211 850
Auswandern Studieren Studieren - Universität Griechisch Θα ήθελα να εγγραφώ σε πανεπιστήμιο. Angeben, dass man sich einschreiben will Japanisch Θα ήθε
 - Universität Θα ήθελα να εγγραφώ σε πανεπιστήμιο. Angeben, dass man sich einschreiben will Θα ήθελα να γραφτώ για. Angeben, dass man sich für einen anmelden möchte ένα προπτυχιακό ένα μεταπτυχιακό ένα
Ρύθμιση e-mail σε whitelist
 Ρύθμιση e-mail σε whitelist «Δουλεύω Ηλεκτρονικά, Δουλεύω Γρήγορα και με Ασφάλεια - by e-base.gr» Web : www.e-base.gr E-mail : support@e-base.gr Facebook : Like Twitter : @ebasegr Πολλές φορές αντιμετωπίζετε
OUR PRODUCT RANGE. www.rakson.gr
 ΤΑ ΑΛΛΑ ΕΙ Η ΠΡΟΪΟΝΤΑ ΜΑΣ ΜΕΤΑΣΧΗΜΑΤΙΣΤΕΣ ΚΟΥ ΟΥΝΙΩΝ ΚΟΥ ΟΥΝΙΑ ΜΠΟΥΤΟΝ ΚΟΥ ΟΥΝΙΩΝ ΑΥΤΟΜΑΤΟΙ ΚΛΙΜΑΚΟΣΤΑΣΙΟΥ ΚΛΕΙ ΑΡΙΕΣ ΑΝΙΧΝΕΥΤΕΣ ΚΙΝΗΣΗΣ ΣΥΣΤΗΜΑΤΑ ΕΠΙΚΟΙΝΩΝΙΑΣ Θυροτηλεοράσεις Θυροτηλέφωνα Ενδοεπικοινωνίες
Math 6 SL Probability Distributions Practice Test Mark Scheme
 Math 6 SL Probability Distributions Practice Test Mark Scheme. (a) Note: Award A for vertical line to right of mean, A for shading to right of their vertical line. AA N (b) evidence of recognizing symmetry
Other Test Constructions: Likelihood Ratio & Bayes Tests
 Other Test Constructions: Likelihood Ratio & Bayes Tests Side-Note: So far we have seen a few approaches for creating tests such as Neyman-Pearson Lemma ( most powerful tests of H 0 : θ = θ 0 vs H 1 :
Example Sheet 3 Solutions
 Example Sheet 3 Solutions. i Regular Sturm-Liouville. ii Singular Sturm-Liouville mixed boundary conditions. iii Not Sturm-Liouville ODE is not in Sturm-Liouville form. iv Regular Sturm-Liouville note
UNIVERSITY OF CALIFORNIA. EECS 150 Fall ) You are implementing an 4:1 Multiplexer that has the following specifications:
 You are implementing an 4:1 Multiplexer that has the following specifications:") UNIVERSITY OF CALIFORNIA Department of Electrical Engineering and Computer Sciences EECS 150 Fall 2001 Prof. Subramanian Midterm II 1) You are implementing an 4:1 Multiplexer that has the following specifications:
UNIVERSITY OF CALIFORNIA Department of Electrical Engineering and Computer Sciences EECS 150 Fall 2001 Prof. Subramanian Midterm II 1) You are implementing an 4:1 Multiplexer that has the following specifications:
HOMEWORK 4 = G. In order to plot the stress versus the stretch we define a normalized stretch:
 HOMEWORK 4 Problem a For the fast loading case, we want to derive the relationship between P zz and λ z. We know that the nominal stress is expressed as: P zz = ψ λ z where λ z = λ λ z. Therefore, applying
6.003: Signals and Systems. Modulation
 6.003: Signals and Systems Modulation May 6, 200 Communications Systems Signals are not always well matched to the media through which we wish to transmit them. signal audio video internet applications
AMORTIGUADORES DE VIBRACIÓN
 AMORTIGUADORES DE VIBRACIÓN Estas instrucciones forman parte integrante del manual que acompaña el aparato en el cual se va a instalar este accesorio. Este manual se refiere a ADVERTENCIAS GENERALES y
Partial Trace and Partial Transpose
 Partial Trace and Partial Transpose by José Luis Gómez-Muñoz http://homepage.cem.itesm.mx/lgomez/quantum/ jose.luis.gomez@itesm.mx This document is based on suggestions by Anirban Das Introduction This
DCR-SX30E/SX31E/SX40E/SX41E/SX50E/SX60E
 4-132-765-32(1) DCR-SX30E/SX31E/SX40E/SX41E/SX50E/SX60E ES/PT/GR/TR Digital Video Camera Recorder Manual de instrucciones Manual de instruções Οδηγός Χρήσης Kullanma Kılavuzu ES PT GR TR http://www.sony.net/
Section 9.2 Polar Equations and Graphs
 180 Section 9. Polar Equations and Graphs In this section, we will be graphing polar equations on a polar grid. In the first few examples, we will write the polar equation in rectangular form to help identify
Όλγα Κασσώτη
 Όλγα Κασσώτη okassoti@gmail.com Τι είναι οι καυτές πατάτες? Αρχίζοντας Βασικά εργαλεία Σύντομος οδηγός / Διαμόρφωση JCloze JMatch JQuiz JCross JMix The Masher Χρήσιμες συμβουλές Εισαγωγή εικόνων Το Hot
CHAPTER 25 SOLVING EQUATIONS BY ITERATIVE METHODS
 CHAPTER 5 SOLVING EQUATIONS BY ITERATIVE METHODS EXERCISE 104 Page 8 1. Find the positive root of the equation x + 3x 5 = 0, correct to 3 significant figures, using the method of bisection. Let f(x) =
Το σύστημα των αξιών της ελληνικής κοινωνίας μέσα στα σχολικά εγχειρίδια της Λογοτεχνίας του Δημοτικού Σχολείου
 ΔΗΜΟΚΡΙΤΕΙΟ ΠΑΝΕΠΙΣΤΗΜΙΟ ΘΡΑΚΗΣ ΠΑΙΔΑΓΩΓΙΚΟ ΤΜΗΜΑ ΔΗΜΟΤΙΚΗΣ ΕΚΠ/ΣΗΣ ΔΙΔΑΣΚΑΛΕΙΟ «ΘΕΟΔΩΡΟΣ ΚΑΣΤΑΝΟΣ» Το σύστημα των αξιών της ελληνικής κοινωνίας μέσα στα σχολικά εγχειρίδια της Λογοτεχνίας του Δημοτικού
Mission Berlin. Deutsch lernen und unterrichten Arbeitsmaterialien. Mission Berlin 22 Έλα τώρα, κουνήσου
 22 Έλα τώρα, κουνήσου Η Άννα µεταφέρεται στο Βερολίνο του έτους 1989, όπου κυριαρχεί ο ενθουσιασµός για την πτώση του Τείχους. Πρέπει να περάσει µέσα από το πλήθος και να πάρει τη θήκη. Θα τα καταφέρει;
ΕΡΓΑΖΟΜΕΝΩΝ Bildung älterer Arbeitnehmer
 ΚΑΤΑΡΤΙΣΗ ΩΡΙΜΩΝ ΕΡΓΑΖΟΜΕΝΩΝ Bildung älterer Arbeitnehmer Kassandra Teliopoulos IEKEP 06/03/06 ΜΕΡΙΚΑ ΣΗΜΕΙΑ ΚΛΕΙΔΙΑ Einige Gedankenansätze!Στις περισσότερες χώρες μέλη της Ε.Ε. μεγάλης ηλικίας εργαζόμενοι
Right Rear Door. Let's now finish the door hinge saga with the right rear door
 Right Rear Door Let's now finish the door hinge saga with the right rear door You may have been already guessed my steps, so there is not much to describe in detail. Old upper one file:///c /Documents
Wenn ihr nicht werdet wie die Kinder...
 Wenn ihr nicht werdet wie die Kinder... . Der Memoriam-Garten Schön, dass ich mir keine Sorgen machen muss! Mit dem Memoriam-Garten bieten Ihnen Friedhofsgärtner, Steinmetze
Fragen, ob Gebühren anfallen, wenn man in einem bestimmten Land Geld abhebt
 - Allgemeines Μπορώ να κάνω ανάληψη στην [χώρα] χωρίς να πληρώσω προμήθεια; Kann ich in [Land] gebührenfrei Geld abheben? Fragen, ob Gebühren anfallen, wenn man in einem bestimmten Land Geld abhebt Πόσα
TRIGONOMETRIA. hipotenusa L 2. hipotenusa
 TRIGONOMETRIA. Calcular las razones trigonométricas de 0º, º y 60º. Para calcular las razones trigonométricas de º, nos ayudamos de un triángulo rectángulo isósceles como el de la figura. cateto opuesto
Οδηγός εκκαθάρισης ιστορικού cookies περιηγητή
 Οδηγός εκκαθάρισης ιστορικού cookies περιηγητή «Δουλεύω Ηλεκτρονικά, Δουλεύω Γρήγορα και με Ασφάλεια - by e-base.gr» Web : www.e-base.gr E-mail : support@e-base.gr Facebook : Like Παρακάτω μπορείτε να
Εργαστήριο 9. Styling with Javascript
 Εργαστήριο 9 Styling with Javascript Pimp my Text with Javascript Today you'll write a page where the user can type text into a box, and by clicking on UI controls, the user can "pimp out" the text by
9.09. # 1. Area inside the oval limaçon r = cos θ. To graph, start with θ = 0 so r = 6. Compute dr
 9.9 #. Area inside the oval limaçon r = + cos. To graph, start with = so r =. Compute d = sin. Interesting points are where d vanishes, or at =,,, etc. For these values of we compute r:,,, and the values
Strain gauge and rosettes
 Strain gauge and rosettes Introduction A strain gauge is a device which is used to measure strain (deformation) on an object subjected to forces. Strain can be measured using various types of devices classified
Dynamic types, Lambda calculus machines Section and Practice Problems Apr 21 22, 2016
 Harvard School of Engineering and Applied Sciences CS 152: Programming Languages Dynamic types, Lambda calculus machines Apr 21 22, 2016 1 Dynamic types and contracts (a) To make sure you understand the
PASSANT A: Ja, guten Tag. Ich suche den Alexanderplatz. Können Sie mir helfen?
 03 Για την οδό Kantstraße Η Άννα ξεκινά για την Kantstraße, αλλά καθυστερεί, επειδή πρέπει να ρωτήσει πώς πάνε µέχρι εκεί. Χάνει κι άλλο χρόνο, όταν εµφανίζονται πάλι οι µοτοσικλετιστές µε τα µαύρα κράνη
ΟΔΗΓΙΕΣ ΕΓΚΑΤΑΣTΑΣΗΣ ΓΙΑ ΠΑΤΩΜΑ WPC INSTALLATION GUIDE FOR WPC DECKING
 1/12 ΟΔΗΓΙΕΣ ΕΓΚΑΤΑΣTΑΣΗΣ ΓΙΑ ΠΑΤΩΜΑ WPC INSTALLATION GUIDE FOR WPC DECKING Ανοίγουμε τρύπες Ø8 x 80mm στο σημείο κατασκευής, με τρυπάνι. To προτεινόμενο πλάτος και μήκος μεταξύ των 2 οπών να είναι 30-35εκ.,
Calculating the propagation delay of coaxial cable
 Your source for quality GNSS Networking Solutions and Design Services! Page 1 of 5 Calculating the propagation delay of coaxial cable The delay of a cable or velocity factor is determined by the dielectric
RM Pro. Universal Wi-Fi Remote Control Wi-Fi Κέντρο Ελέγχου Συσκευών. Setup Guide Οδηγός Εγκατάστασης
 RM Pro Universal Wi-Fi Remote Control Wi-Fi Κέντρο Ελέγχου Συσκευών Setup Guide Οδηγός Εγκατάστασης Package Content Περιεχόμενα Συσκευασίας RM Pro RM Pro AC/DC Adapter Τροφοδοτικό AC/DC Yellow LED Κίτρινο
LR Series Metal Alloy Low-Resistance Resistor
 LR Series Metal Alloy LowResistance Resistor This specification is applicable to lead free, halogen free of RoHS directive for metal alloy lowresistance resistor. The product is for general purpose. The
Στο εστιατόριο «ToDokimasesPrinToBgaleisStonKosmo?» έξω από τους δακτυλίους του Κρόνου, οι παραγγελίες γίνονται ηλεκτρονικά.
 Διαστημικό εστιατόριο του (Μ)ΑστροΈκτορα Στο εστιατόριο «ToDokimasesPrinToBgaleisStonKosmo?» έξω από τους δακτυλίους του Κρόνου, οι παραγγελίες γίνονται ηλεκτρονικά. Μόλις μια παρέα πελατών κάτσει σε ένα
Econ 2110: Fall 2008 Suggested Solutions to Problem Set 8 questions or comments to Dan Fetter 1
 Eon : Fall 8 Suggested Solutions to Problem Set 8 Email questions or omments to Dan Fetter Problem. Let X be a salar with density f(x, θ) (θx + θ) [ x ] with θ. (a) Find the most powerful level α test
ΚΥΠΡΙΑΚΟΣ ΣΥΝΔΕΣΜΟΣ ΠΛΗΡΟΦΟΡΙΚΗΣ CYPRUS COMPUTER SOCIETY 21 ος ΠΑΓΚΥΠΡΙΟΣ ΜΑΘΗΤΙΚΟΣ ΔΙΑΓΩΝΙΣΜΟΣ ΠΛΗΡΟΦΟΡΙΚΗΣ Δεύτερος Γύρος - 30 Μαρτίου 2011
 Διάρκεια Διαγωνισμού: 3 ώρες Απαντήστε όλες τις ερωτήσεις Μέγιστο Βάρος (20 Μονάδες) Δίνεται ένα σύνολο από N σφαιρίδια τα οποία δεν έχουν όλα το ίδιο βάρος μεταξύ τους και ένα κουτί που αντέχει μέχρι
derivation of the Laplacian from rectangular to spherical coordinates
 derivation of the Laplacian from rectangular to spherical coordinates swapnizzle 03-03- :5:43 We begin by recognizing the familiar conversion from rectangular to spherical coordinates (note that φ is used
Matrices and Determinants
 Matrices and Determinants SUBJECTIVE PROBLEMS: Q 1. For what value of k do the following system of equations possess a non-trivial (i.e., not all zero) solution over the set of rationals Q? x + ky + 3z
Griechisches Staatszertifikat - Deutsch
 ΥΠΟΥΡΓΕΙΟ ΕΘΝΙΚΗΣ ΠΑΙ ΕΙΑΣ ΚΑΙ ΘΡΗΣΚΕΥΜΑΤΩΝ ΚΡΑΤΙΚΟ ΠΙΣΤΟΠΟΙΗΤΙΚΟ ΓΛΩΣΣΟΜΑΘΕΙΑΣ Griechisches Ministerium für Bildung und Religion Griechisches Staatszertifikat - Deutsch Niveau A1 & A2 Entspricht dem Gemeinsamen