0504_ELRO_KT100 thermostat_ch_130x73_2.indd :31
|
|
|
- Ê Ιωαννίδης
- 8 χρόνια πριν
- Προβολές:
Transcript
1 0504_ELRO_KT100 thermostat_ch_130x73_2.indd :31
2 AM PM C CL HT DLY 1 2 PROG CL HT DLY AM PM A B PROG C _ELRO_KT100 thermostat_ch_130x73_2.indd :31

3 NO COM NC A B C _ELRO_KT100 thermostat_ch_130x73_2.indd :32
4 GB Table of contents Introduction 4 I Description of the product 4 II Used symbols 5 1 Precautions and safety instructions 5 2 Composition of the product Main components Overview display 6 3 Assembly and installation 6 4 Operation of the thermostat Setting the time Setting the temperature Choosing programs Modifying programs Temporarily deviating from a program Other settings 8 5 Malfunctions 9 6 Technical specifications General specifications Environmental conditions 10 Introduction I Description of the product Intended and unintended use The Elro programmable room thermostat KT100 is a fully automatic thermostat with a total of 20 programs. The thermostat is intended for controlling a heating or cooling system suitable to be switched. Any other use than the intended use described above is considered unintended use. Elro cannot be held liable for any damage caused by improper, incorrect or unwise use. Operation The thermostat operates on the basis of a comfort, economical and frost protection temperature. You can set the temperatures manually use preset programs. The thermostat ensures a comfortable temperature and can be adjusted to your needs. By using the economical temperature, your heating is automatically set to a lower setting at desired times to save energy. The thermostat is only suitable for indoor use. The thermostat should be connected to a suitable heating or cooling system. The proper operation of the thermostat and control of the temperature depends on the correct functioning of the connected heating or cooling system. This manual is intended for the user of the thermostat. Read the manual carefully and keep it for later reference. II Use W (sever ously indica user o user d carefu A inform to aler T and a easier 1 Prec W power _ELRO_KT100 thermostat_ch_130x73_2.indd :32

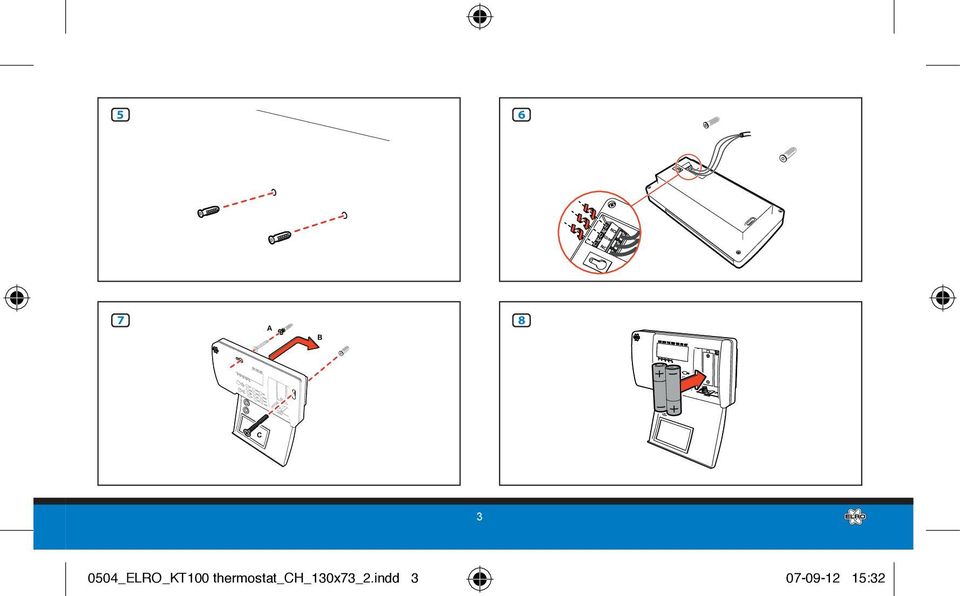
5 is roe a e e ng g at here. d em. stat nds - r of re- II Used symbols Warning! The user may cause (severe) injury to himself or seriously damage the product. A warning indicates the possibility of injury to the user or damage to the product, if the user does not perform the procedures carefully. Attention! A note with additional information for the user. A note intended to alert the user of possible problems. Tip! Gives the user suggestions and advice to perform certain tasks easier or more convenient. 1 Precautions and safety instructions Warning! Always disconnect the power from the device to which the thermostat will be connected during installation and disassembly. This prevents an electric shock and damage to the equipment. Warning! Ensure that there are no water/gas pipes or electrical wires in the wall at the spot where you mount the thermostat. When in doubt, use a pipe detector to make sure you are not drilling in a pipe. Warning! The thermostat is for indoor use. The thermostat may not become wet. Warning! Do not use a pencil for resetting the thermostat with the reset function. The graphite in the pencil can cause a short circuit and consequently cause damage to the thermostat. Attention! When using the reset function all settings are returned to the original factory settings. This means that you will lose your manually set programs and presets. You cannot retrieve it. 2 Composition of the product 2.1 Main components 1 1 Display 2 Battery Holder 3 Comfort temperature 4 Economic temperature 5 (day) Setting the day 6 (hour) Setting the time, hour 7 (min) Setting the time, minutes 8 (temp) Setting the temperature 9 (prog) Choice of day (for setting the program) 10 (prog #) Choice/ setting program 11 (1c/2c) Adjust fluctuation of the temperature limits 12 (DLY) Allow the mode to start heating/cooling delayed 13 (CL/HT) Choice controlling heating/ _ELRO_KT100 thermostat_ch_130x73_2.indd :32

6 cooling system 14 (OK) Save settings/return 15 (MODE) Changing of (1c/2c), (DLY), (CL/HT). 16 (reset) Reset/Return to factory settings 2.2 Overview display LD 2 17 Day of the week 18 Time 19 Indicator for output signal from thermostat to heating and cooling system 20 Ambient temperature/set temperature 21 Selected program number 22 Program profile, distribution of comfort and economic temperature throughout the day. 23 Status indicators: Low battery Comfort temperature Economic temperature Frost protection mode Manual mode (CL) Controller for cooling system (HT) Controller for heating system (DLY) Delayed start heating/ cooling (1 ) Allowable temperature fluctuation 1 C (2 ) Allowable temperature fluctuation 2 C 3 Assembly and installation To assemble and install the thermostat, follow the steps below: Hold the template against the spot where you want to install the thermostat. Use the cross marks on the template to drill two holes in the wall. Use a drill of 6 mm 4 Insert the plugs into the holes 5. Lead the two wire cable (these come from the device to be connected) with the green terminal block at the back of the thermostat 6. In most cases these are the connections NO and COM. Refer to the manual of the heating or cooling system to be connected. Insert a screw into the left plug. Make sure it protrudes approximately 5 mm. Place the thermostat on the screw and slide it to the right. Insert the other screw into the right plug through the battery holder 7. Place the batteries 8. 4 Operation of the thermostat 4.1 Setting the time Choose the day of the week with day (5). Choose the time in hours with hour (6) and the time in minutes with min (7). Tip! Press and hold any key for more time r desire 4.2 Se The th three : Co tempe sonal : Ec tempe gy, for home : Fr tempe chang You ca nomic as des then m progra Set th _ELRO_KT100 thermostat_ch_130x73_2.indd :32
 Controller for cooling system (HT) Controller for heating system (DLY) Delayed start")
7 e st NO of e ake mm. ough ay ith r more than 2 seconds to change the time rapidly. Release the key when the desired time is reached. 4.2 Setting the temperature The thermostat works on the basis of three temperature settings: : Comfort temperature. This is the temperature that you use for your personal comfort. : Economic temperature. This is the temperature that you use to save energy, for example, when you are not at home or when you are sleeping. : Frost Protection Temperature. This temperature is 7 C and you cannot change it. You can adjust the comfort and economic temperature from 5 thru 30 C as desired. The set temperature is then maintained within the selected programs. Set the temperature as follows: Press temp (8) and then press (3) or (4) (depending on whether you want to change the comfort or economic temperature). Each time you press or, the temperature increases by 0.5 C. Store the values with ok (14). If you want to select a temperature lower than the set temperature: keep pressing or. Once the setting exceeds 30 C, it return to 5 C. Tip! Press and hold any key for more than 2 seconds to change the chosen temperature rapidly. Release the key when the desired temperature is reached. 4.3 Choosing programs 3 The set comfort and economic temperature are implemented by the thermostat on the basis of a program. You can choose from 10 preset programs (0 thru 9) and 10 programs that you can modify to your preference (10 thru 19). You can set a program per day of the week. Press prog (9) in order to view the selected program per day. A program consists of a program profile with 24 blocks of one hour. Per hour, either the comfort temperature is enabled (dash) (B) or the economic enabled (no dash) (A). To choose a program for a day of the week, take the steps below: Press prog (9) Then repeatedly press prog (9) until you are on the day of the week for which you want to choose the program. Then repeatedly press prog # (10) until you have reached the desired program. Exit with ok (14). The thermostat is set to program 1 by default. In this program the comfort temperature is maintained from 06: _ELRO_KT100 thermostat_ch_130x73_2.indd :32

8 until 23:00. The economic temperature is maintained between 23:00 and 06:00. Program 0 is the frost protection program. Here, the entire day and night the frost protection temperature is maintained. 4.4 Modifying programs To modify a program, follow the steps below: Press prog (9) Then repeatedly press prog (9) until you are on the day of the week for which you want to choose the program (modification is only possible of program 10 thru 19). Run through the program profile (21) of that day of the week (starting at 00: 00 hours) in order to modify the program. If you want comfort temperature on a block of time, press (3). If you want economic temperature on a block of time, press (4). After the choice between comfort and economic temperature you automatically continue to the next block of time. Once you are satisfied with the program profile of the day, exit with ok (14). 4.5 Temporarily deviating from a program You can deviate from a program by selecting the opposite mode. For example: The program has set the thermostat to economic temperature. But you temporarily want a higher temperature. Press (3). The thermostat temporarily switches to comfort temperature. The thermostat returns to the programmed setting by pressing ok (14), or when a new hour begins. To deviate from a program for more than an hour, press and hold (3) for 2 seconds. Press again to change the time of the deviation. Up to 24 hours may be deviated from the program. The thermostat then automatically switches back in the programmed temperature. To deviate from the comfort temperature follow the same actions, but instead press. 4.6 Other settings The function CL/HT The thermostat can be connected to a heating system or a cooling system. The thermostat should be set on HT for a heating system and on CL for a cooling system. If necessary, adjust the setting by pressing mode (15). Then press CL/HT (13) until the desired mode appears. Exit with ok (14). The function DLY The thermostat optionally can start your heating system delayed (for a cooling system, this is set by default). The thermostat only starts your system after it has been switched off for 5 minutes. Press the de DLY with o low th sure t play. The fu You ca fluctua mines ture m the th with a peratu may d (for a 20.5 C therm first pr 1C/2C span i _ELRO_KT100 thermostat_ch_130x73_2.indd :32
. If you want economic temperature on a block of time, press (4).")
9 rmok in villow. o m. T r a the en your g herit. Press on mode (15) first to enable the delay. Then press DLY (12) until DLY appears on the display and exit with ok (14). To turn off the delay, follow the same procedure but make sure that DLY is not shown in the display. The function 1C/2C You can set the permissible temperature fluctuation or span. The span determines how much the ambient temperature may increase or decrease before the thermostat responds. For example: with a span of 1 C and a comfort temperature set to 20 C, the temperature may decrease to a maximum of 19.5 C (for a heating system) or increase to 20.5 C (for a cooling system) before the thermostat responds. To set the span, first press mode (15) and then press 1C/2C (11) until you see the desired span in the display. Exit with ok (14). 5 Malfunctions Malfunction Cause Solution Information on the - Batteries are empty - Replace display is not visible - Batteries placed wrong Strange characters on display Temperature is not well regulated 6 Technical specifications 6.1 General specifications Product description Name: Programmable room thermostat Model/Type: KT100 Technical product specifications Batteries: 2 penlight alkaline type - Failure in software - Press the reset key - Thermostat is too close to a heat source, exposed to the sun or draught - The span is set too wide - Set the span to 1 C - Move the thermostat AA/ LR6 Switching Voltage: 24V AC and 230V AC Switching Current: max. 6 Amp Measuring Range: C Adjustable Range: C Measuring Accuracy: +/- 0.5 C Temperature span: 1 C or 2 C adjustable Programs: 10 presets, 10 to be modified _ELRO_KT100 thermostat_ch_130x73_2.indd :32
 or increase to 20.")
10 by the user Control mode: Heating or cooling system Accuracy clock: +/- 70 seconds per month Size: LxWxH 155x80x30mm Environmental Conditions Ambient Temperature: C Storage Temperature: C Humidity: % relative Other: Use only indoors ROOS Electronics BV Broekakkerweg BD GILZE Netherlands Tel: +31 (0) Website: info@elro.eu 6.2 Environmental conditions For a proper operation, the thermostat must be mounted at the correct spot. Use the thermostat only indoors and do not install it in a magnetic field. This can cause damage to the internal components. Do not install the thermostat near a heat source (radiator, TV, fridge), in the sun or in the draft. It is also not recommended to mount the thermostat on an outside wall or near a window. This affects the measurement of the temperature. Mount the thermostat at a height of approx meter. NL Inhoudsopgave Inleiding 11 I Beschrijving van het product 11 II Gebruikte symbolen 11 1 Voorzorgsmaatregelen en veiligheidsinstructies 12 2 Samenstelling van het product Belangrijkste onderdelen Overzicht display 12 3 Montage en installatie 13 4 Bediening van de thermostaat Instellen van de tijd Instellen van temperatuur Kiezen van programma s Aanpassen van programma s Tijdelijk afwijken van een programma Stor 6 Tech Inleid I Besc Bedo De Elr mosta vol aut totaal is bed daarto warmi gebru bedoe doeld delijk _ELRO_KT100 thermostat_ch_130x73_2.indd :32
, in the sun or in the draft.")
11 Overige instellingen 15 5 Storingen 16 6 Technische specificaties Algemene specificaties Omgevingsinvloeden 17 Inleiding I Beschrijving van het product Bedoeld en onbedoeld gebruik De Elro Programmeerbare kamerthermostaat KT100 (thermostaat) is een vol auto matische thermostaat met in totaal 20 programma s. De thermostaat is bedoeld voor het aansturen van een daartoe geschikte schakelende verwarmings- of koelinstallatie. Elk ander gebruik dan het hierboven beschreven bedoeld gebruik wordt gezien als onbedoeld gebruik. Elro kan niet verantwoordelijk worden gesteld voor eventuele schade veroorzaakt door oneigenlijk, verkeerd of onverstandig gebruik. Werking De thermostaat werkt op basis van een comfort-, economische- en vorstbeveiligingstemperatuur. Deze temperaturen kunt u handmatig instellen of laten uitvoeren door middel van de voorkeuzeprogramma s. De thermostaat zorgt voor een voor u comfortabele temperatuur welke aanpasbaar is aan uw wensen. Door gebruik van de economische temperatuur wordt uw verwarming automatisch op gewenste tijden lager gezet om energie te besparen. De thermostaat is alleen geschikt voor gebruik binnenshuis. De thermostaat dient aange sloten te worden op een geschikte verwarmingsof koel installatie. De goede werking van de thermostaat en controle van de temperatuur is afhankelijk van correcte werking van de aangesloten verwarmings- of koelinstallatie. Deze gebruiksaanwijzing is bedoeld voor de eindgebruiker van de thermostaat. Lees de handleiding aandachtig door en bewaar deze voor latere referentie. II Gebruikte symbolen Waarschuwing! De gebruiker kan zichzelf (ernstig) verwonden of het product ernstig beschadigen. Een waarschuwing duidt op de kans op schade aan de gebruiker of aan het product, als de gebruiker de procedures niet zorgvuldig uitvoert. Let op! Een opmerking met aanvullende informatie voor de gebruiker. Een opmer king maakt de gebruiker attent op mogelijke problemen _ELRO_KT100 thermostat_ch_130x73_2.indd :32

12 Tip! Geeft de gebruiker suggesties en adviezen om bepaalde taken gemakkelijker of handiger uit te voeren. 1 Voorzorgsmaatregelen en veiligheidsinstructies Waarschuwing! Haal bij installatie en demontage altijd de stroom af van het apparaat waar de thermostaat op aangesloten wordt. Hiermee voorkomt u een elektrische schok en schade aan de apparatuur. Waarschuwing! Verzeker uzelf er van dat er geen water-/ gasleiding of electriciteitsdraden in de muur lopen op de plek waar u de thermostaat bevestigt. Gebruik bij twijfel een leidingdetector om zeker te zijn dat u niet in een leiding boort. Waarschuwing! De thermostaat is voor gebruik binnenshuis. De thermostraat mag niet nat worden. Waarschuwing! Gebruik voor het resetten van de thermostaat via de functie reset geen potlood. Het grafiet in het potlood kan kortsluiting en daardoor schade aan de thermostaat veroorzaken. Let op! Bij gebruik van functie reset worden alle instellingen vervangen door de oorspronkelijke fabrieksinstellingen. Dit betekent dat u uw handmatig ingestelde programma s en voorkeuzes kwijt bent. U kunt deze niet terughalen. 2 Samenstelling van het product 2.1 Belangrijkste onderdelen 1 1 Display 2 Batterijhouder 3 Comforttemperatuur 4 Economische temperatuur 5 (day) Instellen van dag 6 (hour) Instellen van tijd, uur 7 (min) Instellen van tijd, minuten 8 (temp) Instellen van temperatuur 9 (prog) Keuze van dag (voor instellen programma) 10 (prog#) Keuze/ instellen programma 11 (1c/2c) Temperatuur- grenzen schommeling aanpassen 12 (DLY) Modus vertraagd aan laten slaan verwarming/ koeling 13 (CL/HT) Keuze aansturen verwarmings-/ koelingssysteem 14 (OK) Instellingen vastleggen/ terug 15 (MODE) Wijzigen van (1c/2c), (DLY), (CL/HT). 16 (reset) Reset/ terug naar fabrieksinstellingen 2.2 Overzicht display 2 17 Dag van de week 18 Tijd 19 Indicator voor output (CL (HT (DL ( _ELRO_KT100 thermostat_ch_130x73_2.indd :32

13 en ur stelmma n ten ling r- m / LY), signaal van thermostaat aan verwarmings- en koelingsinstallatie 20 Omgevings temperatuur/ ingestelde temperatuur 21 Gekozen programmanummer 22 Programma- profiel, verdeling van comfort- en economische temperatuur over de dag. 23 Status indicators: Batterij bijna leeg Comforttemperatuur Economische temperatuur Vorstbeveiliging Handmatige modus (CL) Besturing voor koelingssysteem (HT) Besturing voor verwarmingssysteem (DLY) Vertraagd aanslaan verwarming/ koeling (1 ) Toelaatbare (2 ) temperatuur schommeling 1 C Toelaatbare temperatuurschommeling 2 C 3 Montage en installatie Om de thermostaat te monteren en te installeren dient u de volgende stappen te volgen: Houd het sjabloon tegen de plaats waar u de thermostaat wilt plaatsen. Gebruik de kruisjes op het sjabloon om twee gaten in de muur te boren. Gebruik hiervoor een boor van 6 mm 4 Stop de pluggen in de gaten 5. Voer de twee aderige kabel (deze komt vanaf het aan te sluiten toestel) met het groene blokje aan de achterzijde van de thermostaat 6. In de meeste gevallen zijn dit de aansluitingen NO en COM. Raadpleeg de handleiding van de aan te sluiten verwarmings- of koelinstallatie. Draai een schroef in de linker plug. Zorg dat deze ongeveer 5mm blijft uitsteken. Plaats de thermostaat over de schroef en schuif deze naar rechts. Draai de andere schroef in de rechterplug via de batterijhouder 7. Plaats de batterijen 8. 4 Bediening van de thermostaat 4.1 Instellen van de tijd Kies de dag van de week met day (5). Kies de tijd in uren met hour (6) en de tijd in minuten met min (7). Tip! Houd een toets langer dan 2 seconden ingedrukt om de tijd snel te wijzigen. Laat de toets los zodra de gewenste tijd wordt bereikt. 4.2 Instellen van temperatuur De thermostaat werkt op basis van drie temperatuurinstellingen: _ELRO_KT100 thermostat_ch_130x73_2.indd :32
 Toelaatbare (2 ) temperatuur schommeling 1 C Toelaatbare temperatuurschommeling 2 C 3 Montage en installatie Om de thermostaat te monteren en te")
14 : Comforttemperatuur. Dit is de temperatuur die u gebruikt voor een aangenaam verblijf. : Economische temperatuur. Dit is de temperatuur die u gebruik om energie te besparen, bijvoorbeeld wanneer u niet thuis bent of wanneer u slaapt. : Vorstbeveiligings temperatuur. Deze temperatuur is 7 C en kunt u niet wijzigen. U kunt de comfort- en economische temperatuur naar wens aanpassen van 5 tot en met 30 C. De ingestelde temperatuur wordt dan aangehouden binnen de door u gekozen programma s. De temperatuur stelt u als volgt in: Druk op temp (8) en vervolgens op (3) of (4) (al naargelang u de comfort- of economische temperatuur wilt wijzigen). Elke keer dat u of indrukt gaat de temperatuur met 0,5 C omhoog. Leg de waarden vast met (ok) (14). Als u een temperatuur wilt selecteren die lager ligt dan de ingestelde temperatuur: blijf of indrukken. Zodra de instelling boven 30 C komt springt deze terug naar 5 C. Tip! Houd een toets langer dan 2 seconden ingedrukt om de gekozen temperatuur snel te wijzigen. Laat de toets los zodra de gewenste temperatuur wordt bereikt. 4.3 Kiezen van programma s 3 De ingestelde comfort- en economische temperatuur worden door de thermostaat uitgevoerd op basis van een programma. U heeft de keuze uit 10 voorkeuzeprogramma s (0 t/m 9) en 10 programma s die u naar wens kunt aanpassen (10 t/m 19). U kunt per dag van de week een programma instellen. Druk op prog (9) om het gekozen programma per dag te bekijken. Een programma bestaat uit een programmaprofiel met 24 blokken van een uur. Per uur is óf comforttemperatuur ingeschakeld (streepje) (B) óf economische temperatuur ingeschakeld (geen streepje) (A). Om een programma te kiezen voor een dag van de week dient u de volgende stappen te volgen: Druk op prog (9) Druk vervolgens net zo vaak op prog (9) totdat u op de dag van de week bent waar u het programma voor wilt kiezen. Druk vervolgens net zolang op prog# (10) totdat u het gewenste programma hebt bereikt. Sluit af met ok (14). De thermostaat staat standaard ingesteld op programma 1. Bij dit programma wordt van 06u tot 23u de comforttemperatuur aangehouden. De econo gehou gramm gramm nacht aange 4.4 Aa Om ee u de v Druk o Dru pro wee voo alle t/m Loo die bij 0 te p tuur u op tem _ELRO_KT100 thermostat_ch_130x73_2.indd :32

15 et era- A). een de e e- et De economische temperatuur wordt aangehouden tussen 23u en 06u. Programma 0 is het vorstbeveiligingsprogramma. Hierbij wordt de gehele dag en nacht de vorstbeveiligingstemperatuur aangehouden. 4.4 Aanpassen van programma s Om een programma aan te passen dient u de volgende stappen te volgen: Druk op prog (9) Druk vervolgens net zo vaak op prog (9) totdat u op de dag van de week bent waar u het programma voor wilt aanpassen (aanpassen is alleen mogelijk bij programma 10 t/m 19). Loop het programmaprofiel (21) van die dag van de week door (beginnend bij 00:00 uur) om het programma aan te passen. Indien u comforttemperatuur wenst op een tijdsblok drukt u op (3). Indien u economische temperatuur wenst op een tijdsblok drukt u op (4). Na de keuze tussen comfort- en economische temperatuur gaat u automatisch naar het volgende tijdsblok. Zodra u tevreden bent met het programmaprofiel van de dag sluit u af met (ok)(14). 4.5 Tijdelijk afwijken van een programma U kunt afwijken van een programma door de tegengestelde modus te selecteren. Bijvoorbeeld: De thermostaat verkeert volgens het programma op economische temperatuur. U wilt tijdelijk een hogere temperatuur. Druk op (3). De thermostaat schakelt tijdelijk over op comfort temperatuur. De thermostaat keert terug naar de geprogrammeerde instelling door op ok (14) te drukken, óf wanneer een nieuw uur aanbreekt. U kunt het afwijken van een programma langer dan een uur laten duren door (3) 2 seconden ingedrukt te houden. Druk nogmaals op zon om de afwijkingstijd te veranderen. Er kan maximaal 24 uur van het programma afgeweken worden. De thermostaat springt daarna vanzelf weer terug in de geprogrammeerde temperatuur. Voor het afwijken van comforttemperatuur volgt u dezelfde handelingen, maar drukt u op. 4.6 Overige instellingen De functie CL/HT De thermostaat kan aangesloten worden op een verwarmingssysteem óf een koelingssysteem. De thermostaat dient op HT te staan bij een verwarmingssysteem en op CL bij een koelingssysteem. Pas zo nodig de instelling aan door eerst op mode (15) te drukken. Druk vervolgens op CL/HT (13) tot de gewenste modus verschijnt. Sluit af met ok (14) _ELRO_KT100 thermostat_ch_130x73_2.indd :32
.")
16 De functie DLY De thermostaat kan uw verwarmingssysteem desgewenst vertraagd aan laten slaan (bij een koelingssysteem is dit standaard ingesteld). De thermostaat laat uw systeem alleen aanslaan als deze 5 minuten uit is geweest. Druk om de vertraging in te schakelen eerst op mode (15). Druk vervolgens op DLY (12) totdat DLY op het display verschijnt en sluit af met ok (14). Om de vertraging uit te zetten volgt u dezelfde procedure maar zorgt u dat DLY niet in het display staat. De functie 1C/ 2C U kunt de toelaatbare tempera tuurschommeling ofwel span instellen. De span bepaalt hoeveel de omgevingstemperatuur kan stijgen of dalen voordat de thermostaat reageert. Bijvoorbeeld: bij een span van 1 C en een ingestelde comforttemperatuur van 20 C kan de temperatuur maximaal zakken tot 19,5 C (bij een verwarmingssysteem) of stijgen tot 20,5 C (bij een koelingssysteem) voordat de thermostaat reageert.om de span in te stellen drukt u eerst op mode (15) en vervolgens op 1C/2C (11) totdat u de gewenste span in het display ziet. Sluit af met ok (14). 5 Storingen Storing Oorzaak Oplossing Informatie op display - Batterijen leeg - Vervang niet zichtbaar - Batterijen verkeerd om geplaatst Vreemde tekens op display Temperatuur wordt niet goed geregeld - Storing in software - Druk op de reset toets - Thermostaat is te dicht bij een warmtebron, in de zon of in de tocht geplaatst - De span is te ruim ingesteld - Verplaatst de thermostaat - Stel de span in op 1 C 6 Tech 6.1 Al Produ Naam therm Mode Techn Batter LR6 Schak Schak Meetb Instelb Meetn Tempe Progra 10 aa Contro koelin Nauw per m _ELRO_KT100 thermostat_ch_130x73_2.indd :32

17 6 Technische specificaties 6.1 Algemene specificaties Productbeschrijving Naam: Programmeerbare kamer thermostaat Model/Type: KT100 Technische producspecificaties Batterijen: 2 penlight alkaline type AA/ LR6 Schakelspanning: 24V AC en 230V AC Schakelstroom: max. 6 Ampère Meetbereik: C Instelbereik: C Meetnauwkeurigheid: +/- 0,5 C Temperatuur span: 1 C of 2 C instelbaar Programma s:10 voorinstellingen, 10 aan te passen door de gebruiker Controle modus:verwarmings- of koelingssysteem Nauwkeurigheid klok: +/- 70 seconden per maand Afmeting: LxBxH 155x80x30mm Omgevingscondities Omgevingstemperatuur: C Opslagtemperatuur: C Luchtvochtigheid: % relatief Overig: Gebruik uitsluitend binnen ROOS Electronics BV Broekakkerweg BD GILZE Nederland Tel: +31 (0) Website: info@elro.eu 6.2 Omgevingsinvloeden Voor een goede werking moet de thermo staat op de juiste plek worden aangebracht. Gebruik de thermostaat alleen binnenshuis en hang deze niet in een magnetisch veld. Dit kan schade veroorzaken aan de interne componenten. Hang de thermostaat niet in de buurt van een warmtebron (radiator, TV, koelkast), in de zon of in de tocht. Het is tevens af te raden de thermostaat op een buitenmuur of vlakbij een raam te bevestigen. Dit beinvloedt het meten van de temperatuur. Hang de thermostaat op een hoogte van ca. 1,65 meter _ELRO_KT100 thermostat_ch_130x73_2.indd :32

18 D Inhaltsverzeichnis Einleitung 18 I Produktbeschreibung 18 II Verwendete Symbole 19 1 Vorsichtsmaßnahmen und Sicherheitshinweise 19 2 Zusammensetzung des Produktes Hauptbestandteile Überblick Display 20 3 Montage und Installation 20 4 Betrieb des Thermostats Zeit einstellen Temperatur einstellen Programme wählen Programme ändern Zeitweise vom Programm abweichen Weitere Einstellungen 23 5 Funktionsstörungen 24 6 Technische Daten Allgemeine technische Daten Umweltbedingungen 25 Einleitung I Produktbeschreibung Bestimmungsgemäßer und nicht bestimmungsgemäßer Gebrauch Der programmierbare Raumthermostat KT 100 von Elro ist ein vollautomatischer Thermostat mit insgesamt 20 Programmen. Der Thermostat ist für die Steuerung eines schaltbaren Heiz- oder Kühlsystems bestimmt. Jeder andere als der oben beschriebene bestimmungsgemäße Gebrauch wird als nicht bestimmungsgemäßer Gebrauch angesehen. Elro kann nicht für Schäden aufgrund von missbräuchlichem, falschem oder unklugem Gebrauch haftbar gemacht werden. Betrieb Der Thermostat arbeitet auf der Basis einer Wohlfühl-, Energiespar- oder Frostschutz-Temperatur. Sie können die Temperaturen manuell unter Verwendung der voreingestellten Programme festlegen. Der Thermostat garantiert eine angenehme Temperatur und kann ganz nach Ihren Bedürfnissen eingestellt werden. Wenn Sie die Energiespartemperatur verwenden wird Ihre Heizung zu ausgewählten Zeiten automatisch niedriger eingestellt, um Energie zu sparen. Der Thermostat darf nur in Innenräumen verwendet werden. Der Thermostat sollte an ein geeignet Heiz- oder Kühlsystem angeschlossen werde des Th steuer ten Fu nen H Diese des Th das H Sie es zu kön II Verw W (ernst schwe zeigt d des N Produ Arbeit A lichen _ELRO_KT100 thermostat_ch_130x73_2.indd :32

19 gel- ftbar is n die n- e t ann e- - e toernur et en werden. Der ordnungsgemäße Betrieb des Thermostats und die Temperatursteuerung sind abhängig von der korrekten Funktionsweise des angeschlossenen Heiz- oder Kühlsystems. Dieses Handbuch ist für den Nutzer des Thermostats bestimmt. Lesen Sie das Handbuch sorgfältig und bewahren Sie es auf, um später darin nachlesen zu können. II Verwendete Symbole Warnung! Der Nutzer kann sich (ernsthaft) verletzen oder das Produkt schwer beschädigen. Eine Warnung zeigt die Möglichkeit einer Verletzung des Nutzers oder Beschädigung des Produktes an, wenn der Nutzer die Arbeitsschritte nicht sorgfältig ausführt. Achtung! Ein Hinweis mit zusätzlichen Informationen für den Nutzer. Ein Hinweis, um den Nutzer auf mögliche Probleme aufmerksam zu machen. Tipp! Bietet dem Nutzer Vorschläge oder Ratschläge, um Aufgaben leichter oder bequemer auszuführen. 1 Vorsichtsmaßnahmen und Sicherheitshinweise Warnung! Trennen Sie das Gerät, an das der Thermostat angeschlossen wird während Installation und Abbau immer von der Stromquelle. Dies verhindert Stromschläge und Schäden an den Geräten. Warnung! Vergewissern Sie sich, dass sich keine Wasser- oder Gasleitungen oder Elektrokabel in der Wand an dem Punkt befinden, an dem Sie den Thermostat aufhängen. Verwenden Sie im Zweifelsfall ein Prüfgerät, um sicherzugehen, dass Sie nicht in eine Leitung oder ein Kabel bohren. Warnung! Der Thermostat ist für den Gebrauch in Innenräumen bestimmt. Der Thermostat darf nicht nass werden. Warnung! Verwenden Sie keinen Bleistift, um den Thermostat mit der Reset -Funktion zurückzusetzen. Der Grafit im Bleistift kann einen Kurzschluss verursachen und in Folge den Thermostat beschädigen. Achtung! Wenn Sie die Reset - Funktion vewenden, werden alle Einstellungen auf die ursprünglichen Werkseinstellungen zurückgesetzt. Das bedeutet, dass Sie Ihre manuell eingestellten Programme und Presets verlieren werden. Sie können sie nicht wiedererlangen _ELRO_KT100 thermostat_ch_130x73_2.indd :32
 verletzen oder das Produkt schwer beschädigen.")
20 2 Zusammensetzung des Produktes 2.1 Hauptbestandteile 1 1 Display 2 Batteriefach 3 Wohlfühltemperatur 4 Sparmodus 5 (Tag) Datumseinstellung 6 (Stunde) Einstellung der Zeit, Stunde 7 (Min) Einstellung der Zeit, Minuten 8 (Temp) Einstellung der Temperatur 9 (Prog) Auswahl des Tages (für die Programmeinstellung) 10 (Prog #) Auswahl/ Programmeinstellung 11 (1c/2c) Einstellung der Grenzen der Temperaturschwankung 12 (DLY) Das Heizen/Kühlen verzögert starten 13 (CL/HT) Wahl zwischen Regelung für Heiz- oder Kühlsystem 14 (OK) Einstellungen speichern/ Zurück 15 (MODE) Änderung von (1c/2c), (DLY), (CL/HT). 16 (Reset) Reset/Zurückstellen auf Werkeinstellungen 2.2 Überblick Display LD 2 17 Wochentag 18 Zeit 19 Anzeige für das Ausgangssignal vom Thermostat zum Heiz- und Kühlsystem 20 Umgebungstemperatur/ eingestellte Temperatur 21 Gewählte Programmnummer 22 Programmprofil, Verteilung von Wohlfühl- und Spartemperatur während des Tages 23 Statusanzeigen: Batterie schwach Wohlfühltemperatur Spartemperatur Frostschutzmodus Manueller Modus (CL) Regelung für ein Kühlsystem (HT) Regelung für ein Heizsystem (DLY) Verzögerter Start des Heizens/Kühlens (1 ) Erlaubte Temperaturschwankung 1 C (2 ) Erlaubte Temperaturschwankung 2 C 3 Montage und Installation Führen Sie zur Montage und Installation des Thermostats folgende Schritte aus: Halten Sie die Schablone gegen den Punkt, an dem Sie den Thermostat installieren möchten. Verwenden Sie die Kreuzpunkte auf der Schablone, um zwei Löcher in die Wand zu bohren. Verwenden Sie einen 6 mm Bohrer 4 Stecken Sie die Dübel in die Löcher 5. Füh (das kom auf 6. die Les des Küh Stec linke sie Sie und Stec durc Düb Setz 4 Betr 4.1 Ze Wähle (5). W _ELRO_KT100 thermostat_ch_130x73_2.indd :32
 Wahl zwischen Regelung für Heiz- oder Kühlsystem 14 (OK) Einstellungen speichern/ Zurück 15 (MODE) Änderung von (1c/2c), (DLY), (CL/HT).")
21 ation aus: den at Sie ne, m er Führen Sie das zweiadrige Kabel (das vom anzuschließenden Gerät kommt) zum grünen Anschlussblock auf der Rückseite des Thermostats 6. In den meisten Fällen sind dies die Anschlüsse NO und COM. Lesen Sie in der Bedienungsanleitung des anzuschließenden Heiz- oder Kühlsystems nach. Stecken Sie eine Schraube in den linken Dübel. Sorgen Sie dafür, dass sie etwa 5 mm heraussteht. Setzen Sie den Thermostat auf die Schraube und schieben Sie ihn nach rechts. Stecken Sie die andere Schraube durch das Batteriefach in den rechten Dübel 7. Setzen Sie die Batterien ein 8. 4 Betrieb des Thermostats 4.1 Zeit einstellen Wählen Sie den Wochentag mit Tag (5). Wählen Sie die Zeit in Stunden mit Stunde (6) und die Zeit in Minuten mit Min (7). Tipp! Halten Sie eine beliebige Taste länger als 2 Sekunden gedrückt, um die Zeit schnell zu ändern. Lassen Sie die Taste los, wenn Sie die gewünschte Zeit erreicht haben. 4.2 Temperatur einstellen Der Thermostat arbeitet auf der Basis von drei Temperatureinstellungen: Wohlfühltemperatur. Dies ist die Temperatur, bei der Sie persönlich sich wohlfühlen. Spartemperatur. Dies ist die Temperatur, die sie zum Energiesparen nutzen, z.b. wenn Sie nicht zu Hause sind oder wenn Sie schlafen. Frostschutztemperatur. Diese Temperatur beträgt 7 C und kann nicht verändert werden. Sie können die Wohlfühl- und die Energiespartemperatur ganz nach Wunsch von 5 bis 30 C einstellen. Die eingestellte Temperatur wird dann innerhalb der gewählten Programme aufrecht erhalten. Die Temperatur stellen Sie folgendermaßen ein: Drücken Sie temp (8) und danach (3) oder (4) (je nachdem, ob Sie die Wohlfühl- oder die Energiespartemperatur ändern wollen). Jedes Mal, wenn Sie oder drücken, steigt die Temperatur um 0,5 C. Speichern Sie die Werte mit ok (14). Wenn Sie eine niedrigere Temperatur als die eingestellte Temperatur wünschen, drücken Sie weiter oder. Nachdem die Einstellung 30 C erreicht hat, fängt sie wieder bei 5 C an. Tipp! Halten Sie eine beliebige Taste länger als 2 Sekunden gedrückt, um die gewählte Temperatur schnell zu _ELRO_KT100 thermostat_ch_130x73_2.indd :32
22 ändern. Lassen Sie die Taste los, wenn Sie die gewünschte Temperatur erreicht haben. 4.3 Programme wählen 3 Die eingestellte Wohlfühl- und Energiespartemperatur wird vom Thermostat auf der Basis eines Programms umgesetzt. Sie können aus 10 voreingestellten Programmen wählen (von 0 bis 9) und aus 10 Programmen, die Sie nach eigenen Wünschen modifizieren können (10 bis 19). Sie können ein Programm für jeden Tag der Woche einstellen. Drücken Sie prog (9), um das gewählte Programm für den Tag anzusehen. Ein Programm besteht aus einem Programmprofil mit 24 Blöcken von einer Stunde. Jede Stunde kann entweder die Wohlfühltemperatur aktiviert sein (Strich) (B) oder die Energiespartemperatur (kein Strich) (A). Um ein Programm für einen Wochentag auszuwählen, führen Sie folgende Schritte aus: Drücken Sie prog (9) Drücken Sie dann immer wieder prog (9), bis Sie an dem Wochentag angelangt sind, für den Sie das Programm auswählen möchten. Drücken Sie dann immer wieder prog # (10), bis Sie das gewünschte Programm erreicht haben. Beenden Sie mit ok (14). Der Thermostat ist standardmäßig auf Programm 1 eingestellt. In diesem Programm wird die Wohlfühltemperatur von 06:00 bis 23:00 Uhr aufrecht erhalten. Die Energiespartemperatur wird zwischen 23:00 und 06:00 Uhr aufrecht erhalten. Programm 0 ist das Frostschutzprogramm. Dabei wird Tag und Nacht die Frostschutztemperatur aufrecht erhalten. 4.4 Programme ändern Um ein Programm zu verändern, führen Sie folgende Schritte aus: Drücken Sie prog (9) Drücken Sie dann immer wieder prog (9), bis Sie an dem Wochentag angelangt sind, für den Sie das Programm auswählen möchten (nur die Programme 10 bis 19 können verändert werden). Gehen Sie das Programmprofil (21) für diesen Wochentag durch (beginnend mit 00:00 Uhr), um das Programm zu verändern. Wenn Sie die Wohlfühltemperatur für einen Zeitblock wünschen, drücken Sie (3). Wenn Sie die Energiespartemperatur für einen Zeitblock wünschen, drücken Sie (4). Nachdem Sie sich zwischen Wohlfühl- und Energiespartemperatur entschieden haben, gelangen Sie automatisch zum nächsten Block. Wenn Sie mit dem Programmprofil des Tages zufrieden sind, beenden Sie mit ok (14). 4.5 Ze ab Sie kö abwei setzte Das P auf En Sie m höher (3) berge Therm Einste drücke beginn Um lä gramm 2 Sek um die stellen Progra der Th progra _ELRO_KT100 thermostat_ch_130x73_2.indd :32
23 ntag r ur en ratur. fil n 4.5 Zeitweise vom Programm abweichen Sie können von einem Programm abweichen, indem Sie den entgegengesetzten Modus wählen. Zum Beispiel: Das Programm hat den Thermostat auf Energiespartemperatur eingestellt. Sie möchten aber vorübergehend eine höhere Temperatur haben. Drücken Sie (3). Der Thermostat schaltet vorübergehend auf Wohlfühltemperatur. Der Thermostat kehrt zur programierten Einstellung zurück, wenn Sie ok (14) drücken oder wenn eine neue Stunde beginnt. Um länger als eine Stunde vom Programm abzuweichen, drücken Sie (3) 2 Sekunden lang. Drücken Sie erneut, um die Dauer der Abweichung einzustellen. Bis zu 24 Stunden können vom Programm abweichen. Danach schaltet der Thermostat automatisch zurück zur programmierten Temperatur. Um von der Wohlfühltemperatur abzuweichen, führen Sie die selben Schritte aus, allerdings mit. 4.6 Weitere Einstellungen Die Funktion CL/HT Der Thermostat kann an ein Heiz- oder ein Kühlsystem angeschlossen werden. Der Thermostat sollte bei einem Heizsystem auf HT und bei einem Kühlsystem auf CL eingestellt werden. Falls notwendig, passen Sie die Einstellung durch Drücken von mode (15) an. Drücken Sie dann CL/HT (13) bis der gewünschte Modus erscheint. Beenden Sie mit ok (14). Die Funktion DLY Der Thermostat kann Ihr Heizsystem optional verzögert starten (für Kühlsysteme ist dies die Standardeinstellung). Der Thermostat startet Ihr System erst, wenn es 5 Minuten lang ausgeschaltet war. Drücken Sie zuerst auf mode (15), um die Verzögerung zu aktivieren. Drücken Sie dann DLY (12), bis DLY auf dem Display angezeigt wird und beenden Sie mit ok (14). Um die Verzögerung zu deaktivieren, führen Sie bitte die gleichen Schritte durch, aber vergewissern Sie sich, dass DLY nicht auf dem Display angezeigt wird. Die Funktion 1C/2C Sie können die erlaubt Temperaturschwankung oder Spanne einstellen. Die Spanne legt fest, wie sehr die Umgebungstemperatur zu- oder abnehmen kann bevor der Thermostat anspricht. Beispiel: bei einer Spanne von 1 C und einer Wohlfühltemperatur, die auf 20 C eingestellt ist, kann die Temperatur bis 19,5 C fallen (bei einem Heizsystem) oder auf 20,5 C steigen (bei einem Kühlsystem), bevor der Thermostat anspricht. Um die Spanne _ELRO_KT100 thermostat_ch_130x73_2.indd :32
24 einzustellen, drücken Sie zuerst mode (15) und dann 1C/2C (11), bis Sie die gewünschte Spanne im Display sehen. Beenden Sie mit ok (14). 5 Funktionsstörungen Funktionsstörung Ursache Lösung Information auf dem Display - Batterien sind leer - Ersetzen ist nicht sichtbar - Batterien sind falsch eingelegt Seltsame Zeichen auf dem Display Die Temperaturregelung funktioniert nicht richtig - Softwarefehler - Drücken Sie die Reset-Taste - Der Thermostat befindet sich zu nah an einer Wärmequelle oder ist der Sonne oder Zugluft ausgesetzt - Die Spanne ist zu breit eingestellt - Bewegen Sie den Thermostat - Stellen Sie die Spanne auf 1 C ein 6 Technische Daten 6.1 Allgemeine technische Daten Produktbeschreibung Name: programmierbarer Raumthermostat Model/Typ: KT100 Technische Produktdaten Batterien: 2 Alkali-Batterien Typ AA/ LR6 Schaltspannung: 24V AC und 230V AC Schaltstrom: max. 6 Amp Messbereich: C Einstellbarer Bereich: C Messgenauigkeit: +/- 0,5 C Temperaturspanne: 1 C oder 2 C einstellbar Programme: 10 voreingestellt, 10 vom Nutzer änderbar Regelung: Heiz- oder Kühlsystem Genauigkeit der Uhr: +/- 70 Sekunden im Monat Größe: LxBxH 155x80x30mm Umwe Umge Lager Feuch Feuch Ander verwe ROOS Broek 5126 Niede Tel: +3 Webs E-mai 6.2 Um Um or muss montie mosta lieren Dadur digt w _ELRO_KT100 thermostat_ch_130x73_2.indd :32
25 / LR6 AC om en Umweltbedingungen Umgebungstemperatur: C Lagertemperatur: C Feuchtigkeit: % relative Feuchtigkeit Anderes: Nur in Innenräumen verwenden ROOS Electronics BV Broekakkerweg BD GILZE Niederlande Tel: +31 (0) Website: info@elro.eu 6.2 Umweltbedingungen Um ordnungsgemäß zu funktionieren, muss der Thermostat am richtigen Ort montiert sein. Verwenden Sie den Thermostat nur in Innenräumen und installieren Sie ihn nicht in einem Magnetfeld. Dadurch könnten die Bauteile beschädigt werden. Installieren Sie den Thermostat nicht neben einer Wärmequelle (Heizkörper, Fernseher, Kühlschrank), in der Sonne oder in Zugluft. Es ist auch nicht empfehlenswert, den Thermostat an einer Außenwand oder neben einem Fenster zu montieren. Dies beeinflusst die Temperaturmessung. Montieren Sie den Thermostat auf einer Höhe von etwa 1,65 Meter. F Sommaire Introduction 26 I Description du produit 26 II Symboles utilisés 26 1 Précautions et mesures de sécurité 27 2 Composition du produit Composants principaux Aperçu de l écran 28 3 Montage et installation 28 4 Fonctionnement du thermostat Réglage de l heure Réglage de la température Choix des programmes Modification des programmes _ELRO_KT100 thermostat_ch_130x73_2.indd :32
26 4.5 Écart temporaire d un programme Autres réglages 31 5 Dysfonctionnements 32 6 Caractéristiques techniques Caractéristiques générales Conditions environnementales 32 Introduction I Description du produit Utilisation prévue et non prévue Le thermostat KT100 programmable d ambiance d Elro est entièrement automatique avec un total de 20 programmes. Ce thermostat sert à réguler un système de chauffage ou de climatisation commutable. Toute autre utilisation que celle décrite ci-dessus est considérée comme une utilisation non prévue. Elro ne saurait être tenu responsable de dégâts occasionnés par une utilisation inappropriée, incorrecte ou abusive. Fonctionnement Le thermostat fonctionne sur la base du confort, de l économie et d une température de protection contre le froid. Vous pouvez régler la température manuellement ou utiliser les programmes préréglés. Ce thermostat assure une température confortable que vous pouvez régler en fonction de vos besoins. En sélectionnant une température économique, votre chauffage se règle automatiquement à une température de consigne inférieure aux moments voulus afin d économiser de l énergie. Ce thermostat doit être utilisé uniquement en intérieur. Le thermostat doit être raccordé à un système de chauffage ou de climatisation adéquat. Le bon fonctionnement du thermostat et la régulation de la température dépendent du bon fonctionnement du système de chauffage ou de climatisation auquel il est raccordé. Ce mode d emploi est destiné à l utilisateur du thermostat. Lisez-le attentivement et conservez-le pour le consulter par la suite. II Symboles utilisés Avertissement! L utilisateur risque de se blesser (gravement) ou d endommager gravement le produit. Un avertissement indique la possibilité de blessure à l utilisateur ou de dégâts au produit si l utilisateur ne suit pas scrupuleusement les procédures. Attention! Une remarque accompagnée d informations pour l utilisateur. Une remarque servant à alerter l utilisateur d éventuels problèmes. C à l util certain et plus 1 Préc A toujou auque penda Cela p électri A a aucu électri monte utilise vous a condu A est de _ELRO_KT100 thermostat_ch_130x73_2.indd :32
27 pé- - e it. ilité âts ilitivelter utierter Conseil! Donne des suggestions à l utilisateur et un conseil pour effectuer certaines tâches de manière plus facile et plus pratique. 1 Précautions et mesures de sécurité Avertissement! Débranchez toujours l alimentation de l appareil auquel vous raccorderez le thermostat pendant l installation et le démontage. Cela permet d éviter une décharge électrique et des dégâts matériels. Avertissement! Vérifiez qu il n y a aucun conduit d eau/de gaz ni de fils électriques dans le mur où vous allez monter le thermostat. En cas de doute, utilisez un détecteur de conduits pour vous assurer de ne pas percer dans un conduit. Avertissement! Ce thermostat est destiné à un usage en intérieur. Il n est pas conçu pour être mouillé. Avertissement! N utilisez pas de crayon pour réinitialiser le thermostat avec la fonction «Réinitialisation». Le graphite d un crayon pourrait causer un court-circuit et donc endommager le thermostat. Attention! Lorsque vous utilisez la fonction «Réinitialisation», tous les réglages sont réinitialisés aux paramètres d usine. Cela signifie que vous perdrez tous vos programmes manuellement réglés et les préréglages. Vous ne pourrez pas les récupérer. 2 Composition du produit 2.1 Composants principaux 1 1 Écran 2 Support de pile 3 Température de confort 4 Température économique 5 (jour) Réglage du jour 6 (heure) Réglage des heures 7 (min) Réglage des minutes 8 (temp) Réglage de la température 9 (prog) Choix du jour (pour régler le programme) 10 (n prog) Choix/réglage du programme 11 (1c/2c) Pour définir la plage de température 12 (DLY) Pour activer le mode de démarrage différé de chauffage/ climatisation 13 (CL/HT) Choix du système de chauffage/climatisation de régulation 14 (OK) Sauvegarde des réglages/retour 15 (MODE) Pour basculer entre _ELRO_KT100 thermostat_ch_130x73_2.indd :32
28 (1c/2c), (DLY) et (CL/HT). 16 (réinitialisation) Réinitialisation/ rétablissement des paramètres d usine 2.2 Aperçu de l écran 2 17 Jour de la semaine 18 Heure 19 Indicateur du signal de sortie du thermostat vers le système de chauffe et de climatisation 20 Température ambiante/température de consigne 21 Numéro du programme sélectionné 22 Profil du programme, périodes de température de confort et économique tout au long de la journée. 23 Indicateurs d état : Pile faible Température de confort Température économique Mode de protection antigel Mode manuel (CL) Régulateur pour le système de climatisation (HT) Régulateur pour le système de chauffage (DLY) Démarrage différé du chauffage/ climatisation (1 ) Plage de température de 1 C (2 ) Plage de température de 2 C 3 Montage et installation Voici la procédure de montage et d installation du thermostat : Tenez le gabarit contre le mur là où vous souhaitez installer le thermostat. Utilisez les croix du gabarit pour percer deux trous dans le mur. Utilisez un foret de 6 mm 4 Insérez les chevilles dans les trous 5. Branchez les deux fils (venant de l appareil à raccorder) avec le bornier vert à l arrière du thermostat 6. Généralement, ce sont des connexions «NO» et «COM». Consultez le mode d emploi du système de chauffage ou de climatisation à raccorder. Insérez une vis dans la cheville de gauche. Laissez-la dépasser d environ 5 mm. Placez le thermostat sur la vis et faites-le glisser vers la droite. Insérez l autre vis dans la cheville de d pile Inst 4 Fon 4.1 Ré Chois «jour «heu min» C n impo 2 seco l heure l heure 4.2 Ré Le the trois ré Tem tempé confor _ELRO_KT100 thermostat_ch_130x73_2.indd :32
29 insù stat. ilisez s tat s- ation e viur la e. de droite au travers du support de pile 7. Installez les piles 8. 4 Fonctionnement du thermostat 4.1 Réglage de l heure Choisissez le jour de la semaine avec «jour» (5). Choisissez les heures avec «heures» (6) et les minutes avec «min» (7). Conseil! Maintenez enfoncée n importe quelle touche pendant plus de 2 secondes pour changer rapidement l heure. Relâchez la touche lorsque l heure souhaitée est atteinte. 4.2 Réglage de la température Le thermostat fonctionne sur la base de trois réglages de température : Température de confort. Il s agit de la température que vous utilisez pour votre confort personnel. : Température économique. Il s agit de la température que vous utilisez pour économiser de l énergie, par exemple quand vous n êtes pas chez vous ou quand vous dormez. : Température de protection antigel. Cette température est de 7 C et vous ne pouvez pas la modifier. Vous pouvez régler la température de confort et la température économique entre 5 et 30 C à votre convenance. La température de consigne est ensuite maintenue dans les programmes sélectionnés. Procédure de réglage de la température : Appuyez sr «temp» (8) puis sur (3) ou (4) (selon que vous souhaitiez changer la température de confort ou la température économique). À chaque fois que vous appuyez sur ou, la température augmentera de 0,5 C. Sauvegardez les valeurs avec «ok» (14). Pour sélectionner une température inférieure à la température de consigne : maintenez enfoncée la touche ou Lorsque la température dépasse 30 C, elle revient à 5 C. Conseil! Maintenez enfoncée n importe quelle touche pendant plus de 2 secondes pour changer rapidement la température choisie. Relâchez la touche lorsque la température souhaitée est atteinte. 4.3 Choix des programmes 3 Les températures de consigne de confort et économique sont appliquées par le thermostat qui se base sur un programme. Vous pouvez choisir parmi 10 programmes préréglés (0 à 9) et 10 programmes personnalisables (10 à 19). Vous pouvez régler un programme par jour de la semaine. Appuyez sur « _ELRO_KT100 thermostat_ch_130x73_2.indd :32
PLUGIN BASIC TS (en) indication, that electrical appliance is switched on
 indication, that electrical appliance is switched on") PLUGIN BASIC TS (en) indication, that electrical appliance is switched on after pressing the ON button, will be the connected appliance permantely switched on. after pressing the button, will be the connected
PLUGIN BASIC TS (en) indication, that electrical appliance is switched on after pressing the ON button, will be the connected appliance permantely switched on. after pressing the button, will be the connected
Εγκατάσταση λογισμικού και αναβάθμιση συσκευής Device software installation and software upgrade
 Για να ελέγξετε το λογισμικό που έχει τώρα η συσκευή κάντε κλικ Menu > Options > Device > About Device Versions. Στο πιο κάτω παράδειγμα η συσκευή έχει έκδοση λογισμικού 6.0.0.546 με πλατφόρμα 6.6.0.207.
De eerste stappen Πρώτα Βήματα First Steps
 Camera - Κάμερα elements camera De eerste stappen Πρώτα Βήματα First Steps Issued by: Gigaset elements GmbH Hansaallee 299, D-40549 Düsseldorf Gigaset elements GmbH 2015 All rights reserved. Subject to
4K HDMI Splitter 1x4. User s Guide / Bedienungsanleitung / Εγχειρίδιο Χρήστη
 4K HDMI Splitter 1x4 User s Guide / Bedienungsanleitung / Εγχειρίδιο Χρήστη INTRODUCTION The EDISION 4K HDMI Splitter 1x4 uses a single HDMI input source, to distribute it to 4 HDMI outputs. The splitter
the total number of electrons passing through the lamp.
 1. A 12 V 36 W lamp is lit to normal brightness using a 12 V car battery of negligible internal resistance. The lamp is switched on for one hour (3600 s). For the time of 1 hour, calculate (i) the energy
Instruction Execution Times
 1 C Execution Times InThisAppendix... Introduction DL330 Execution Times DL330P Execution Times DL340 Execution Times C-2 Execution Times Introduction Data Registers This appendix contains several tables
English PDFsharp is a.net library for creating and processing PDF documents 'on the fly'. The library is completely written in C# and based
 English PDFsharp is a.net library for creating and processing PDF documents 'on the fly'. The library is completely written in C# and based exclusively on safe, managed code. PDFsharp offers two powerful
ΟΔΗΓΙΕΣ ΧΡΗΣΗΣ USE INSTRUCTIONS
 ΟΔΗΓΙΕΣ ΧΡΗΣΗΣ USE INSTRUCTIONS ΤΗΛΕΦΩΝΟ ΜΕ ΑΝΑΓΝΩΡΙΣΗ ΚΛΗΣΗΣ /CORDED PHONE WITH CALLER ID ΜΟΝΤΕΛΟ/MODEL: TM09-448 DC48V Παρακαλούμε διαβάστε προσεκτικά όλες τις οδηγίες χρήσης πριν την χρήση της συσκευής
[1] P Q. Fig. 3.1
![[1] P Q. Fig. 3.1](/thumbs/79/80362156.jpg "[1] P Q. Fig. 3.1") 1 (a) Define resistance....... [1] (b) The smallest conductor within a computer processing chip can be represented as a rectangular block that is one atom high, four atoms wide and twenty atoms long. One
1 (a) Define resistance....... [1] (b) The smallest conductor within a computer processing chip can be represented as a rectangular block that is one atom high, four atoms wide and twenty atoms long. One
Advanced Subsidiary Unit 1: Understanding and Written Response
 Write your name here Surname Other names Edexcel GE entre Number andidate Number Greek dvanced Subsidiary Unit 1: Understanding and Written Response Thursday 16 May 2013 Morning Time: 2 hours 45 minutes
SPEEDO AQUABEAT. Specially Designed for Aquatic Athletes and Active People
 SPEEDO AQUABEAT TM Specially Designed for Aquatic Athletes and Active People 1 2 Decrease Volume Increase Volume Reset EarphonesUSBJack Power Off / Rewind Power On / Fast Forward Goggle clip LED Status
Daewoo Technopark A-403, Dodang-dong, Wonmi-gu, Bucheon-city, Gyeonggido, Korea LM-80 Test Report
 LM-80 Test Report Approved Method: Measuring Lumen Maintenance of LED Light Sources Project Number: KILT1212-U00216 Date: September 17 th, 2013 Requested by: Dongbu LED Co., Ltd 90-1, Bongmyeong-Ri, Namsa-Myeon,
 OST-7080HD Διασυνδέσεις Sleep ΠΛΗΚΤΡΟ ΜΑΘΗΣΗΣ: Το τηλεχειριστήριο του ψηφιακού δέκτη έχει 6 πλήκτρα μάθησης. Κάθε πλήκτρο μπορεί να είναι αντίγραφο κάθε πλήκτρου λειτουργίας του τηλεχειριστηρίου. Οδηγίες
Tipologie installative - Installation types Type d installation - Installationstypen Tipos de instalación - Τυπολογίες εγκατάστασης
 AMPADE MOOCROMATICHE VIMAR DIMMERABII A 0 V~ - VIMAR 0 V~ DIMMABE MOOCHROME AMP AMPE MOOCHROME VIMAR VARIATEUR 0 V~ - DIMMERFÄHIGE MOOCHROMATICHE AMPE VO VIMAR MIT 0 V~ ÁMPARA MOOCROMÁTICA VIMAR REGUABE
PTC FUNCTION for Delta C2000 and CP2000
 FUNCTION for Delta C2000 and CP2000 CONTENTS: GENERAL... 2. for motor temperature protection... 2.2 Standards... 2.3 Motor layout... 2.4 characteristic... 2.4. Definitions... 3.4.2 curve... 3.4.3 switching
Potential Dividers. 46 minutes. 46 marks. Page 1 of 11
 Potential Dividers 46 minutes 46 marks Page 1 of 11 Q1. In the circuit shown in the figure below, the battery, of negligible internal resistance, has an emf of 30 V. The pd across the lamp is 6.0 V and
CHAPTER 25 SOLVING EQUATIONS BY ITERATIVE METHODS
 CHAPTER 5 SOLVING EQUATIONS BY ITERATIVE METHODS EXERCISE 104 Page 8 1. Find the positive root of the equation x + 3x 5 = 0, correct to 3 significant figures, using the method of bisection. Let f(x) =
PortSip Softphone. Ελληνικά Ι English 1/20
 PortSip Softphone Ελληνικά Ι English 1/20 1. Περιεχόμενα 2. Εγκατάσταση σε Smartphone & Tablet (Android ή ios)... 1 3. Εγκατάσταση σε ηλεκτρονικό υπολογιστή (Windows ή Mac).... 5 4. Installation in Smartphone
Metal Oxide Varistors (MOV) Data Sheet
 Data Sheet") Φ SERIES Metal Oxide Varistors (MOV) Data Sheet Features Wide operating voltage (V ma ) range from 8V to 0V Fast responding to transient over-voltage Large absorbing transient energy capability Low clamping
Φ SERIES Metal Oxide Varistors (MOV) Data Sheet Features Wide operating voltage (V ma ) range from 8V to 0V Fast responding to transient over-voltage Large absorbing transient energy capability Low clamping
ΚΥΠΡΙΑΚΗ ΕΤΑΙΡΕΙΑ ΠΛΗΡΟΦΟΡΙΚΗΣ CYPRUS COMPUTER SOCIETY ΠΑΓΚΥΠΡΙΟΣ ΜΑΘΗΤΙΚΟΣ ΔΙΑΓΩΝΙΣΜΟΣ ΠΛΗΡΟΦΟΡΙΚΗΣ 6/5/2006
 Οδηγίες: Να απαντηθούν όλες οι ερωτήσεις. Ολοι οι αριθμοί που αναφέρονται σε όλα τα ερωτήματα είναι μικρότεροι το 1000 εκτός αν ορίζεται διαφορετικά στη διατύπωση του προβλήματος. Διάρκεια: 3,5 ώρες Καλή
Surface Mount Aluminum Electrolytic Capacitors
 FEATURES CYLINDRICAL V-CHIP CONSTRUCTION LOW COST, GENERAL PURPOSE, 2000 HOURS AT 85 O C NEW EXPANDED CV RANGE (up to 6800µF) ANTI-SOLVENT (2 MINUTES) DESIGNED FOR AUTOMATIC MOUNTING AND REFLOW SOLDERING
Phys460.nb Solution for the t-dependent Schrodinger s equation How did we find the solution? (not required)
") Phys460.nb 81 ψ n (t) is still the (same) eigenstate of H But for tdependent H. The answer is NO. 5.5.5. Solution for the tdependent Schrodinger s equation If we assume that at time t 0, the electron starts
Phys460.nb 81 ψ n (t) is still the (same) eigenstate of H But for tdependent H. The answer is NO. 5.5.5. Solution for the tdependent Schrodinger s equation If we assume that at time t 0, the electron starts
UDZ Swirl diffuser. Product facts. Quick-selection. Swirl diffuser UDZ. Product code example:
 UDZ Swirl diffuser Swirl diffuser UDZ, which is intended for installation in a ventilation duct, can be used in premises with a large volume, for example factory premises, storage areas, superstores, halls,
Modbus basic setup notes for IO-Link AL1xxx Master Block
 n Modbus has four tables/registers where data is stored along with their associated addresses. We will be using the holding registers from address 40001 to 49999 that are R/W 16 bit/word. Two tables that
Εργαστήριο Ανάπτυξης Εφαρμογών Βάσεων Δεδομένων. Εξάμηνο 7 ο
 Εργαστήριο Ανάπτυξης Εφαρμογών Βάσεων Δεδομένων Εξάμηνο 7 ο Procedures and Functions Stored procedures and functions are named blocks of code that enable you to group and organize a series of SQL and PL/SQL
65W PWM Output LED Driver. IDLV-65 series. File Name:IDLV-65-SPEC
 ~ A File Name:IDLV65SPEC 07050 SPECIFICATION MODEL OUTPUT OTHERS NOTE DC VOLTAGE RATED CURRENT RATED POWER DIMMING RANGE VOLTAGE TOLERANCE PWM FREQUENCY (Typ.) SETUP TIME Note. AUXILIARY DC OUTPUT Note.
3 Lösungen zu Kapitel 3
 3 Lösungen zu Kapitel 3 31 Lösungen der Aufgaben zu Abschnitt 31 311 Lösung Die Abbildung D : { R 4 R 4 R 4 R 4 R, a 1, a 2, a 3, a 4 ) D( a 1, a 2, a 3, a 4 ) definiere eine Determinantenform (auf R 4
Περιεχόμενα / Contents
 Aερόθερμo / Fan Heater PTC-906 Περιεχόμενα / Contents GR... Σελίδες 3-8 EN... Pages 9-11 2 GR Ευχαριστούμε που επιλέξατε μια συσκευή της γκάμας θερμαντικών IZZY. Σημαντικές Οδηγίες Ασφαλείας Τα Μέρη της
CYTA Cloud Server Set Up Instructions
 CYTA Cloud Server Set Up Instructions ΕΛΛΗΝΙΚΑ ENGLISH Initial Set-up Cloud Server To proceed with the initial setup of your Cloud Server first login to the Cyta CloudMarketPlace on https://cloudmarketplace.cyta.com.cy
Capacitors - Capacitance, Charge and Potential Difference
 Capacitors - Capacitance, Charge and Potential Difference Capacitors store electric charge. This ability to store electric charge is known as capacitance. A simple capacitor consists of 2 parallel metal
MATERIALIEN ZUR VORBEREITUNG AUF DIE KLAUSUR INFORMATIK II FÜR VERKEHRSINGENIEURWESEN ANTEIL VON PROF. VOGLER IM WINTERSEMESTER 2011/12
 Fakultät Informatik Institut für Angewandte Informatik, Professur Technische Informationssysteme MATERIALIEN ZUR VORBEREITUNG AUF DIE KLAUSUR INFORMATIK II FÜR VERKEHRSINGENIEURWESEN ANTEIL VON PROF. VOGLER
The Simply Typed Lambda Calculus
 Type Inference Instead of writing type annotations, can we use an algorithm to infer what the type annotations should be? That depends on the type system. For simple type systems the answer is yes, and
HOMEWORK 4 = G. In order to plot the stress versus the stretch we define a normalized stretch:
 HOMEWORK 4 Problem a For the fast loading case, we want to derive the relationship between P zz and λ z. We know that the nominal stress is expressed as: P zz = ψ λ z where λ z = λ λ z. Therefore, applying
Εμπορική αλληλογραφία Ηλεκτρονική Αλληλογραφία
 - Εισαγωγή Sehr geehrter Herr Präsident, Sehr geehrter Herr Präsident, Εξαιρετικά επίσημη επιστολή, ο παραλήπτης έχει ένα ειδικό τίτλο ο οποίος πρέπει να χρησιμοποιηθεί αντί του ονόματος του Sehr geehrter
Wenn ihr nicht werdet wie die Kinder...
 Wenn ihr nicht werdet wie die Kinder... . Der Memoriam-Garten Schön, dass ich mir keine Sorgen machen muss! Mit dem Memoriam-Garten bieten Ihnen Friedhofsgärtner, Steinmetze
RSDW08 & RDDW08 series
 /,, MODEL SELECTION TABLE INPUT ORDER NO. INPUT VOLTAGE (RANGE) NO LOAD INPUT CURRENT FULL LOAD VOLTAGE CURRENT EFFICIENCY (Typ.) CAPACITOR LOAD (MAX.) RSDW08F-03 344mA 3.3V 2000mA 80% 2000μF RSDW08F-05
Surface Mount Multilayer Chip Capacitors for Commodity Solutions
 Surface Mount Multilayer Chip Capacitors for Commodity Solutions Below tables are test procedures and requirements unless specified in detail datasheet. 1) Visual and mechanical 2) Capacitance 3) Q/DF
Aluminum Electrolytic Capacitors
 Aluminum Electrolytic Capacitors Snap-In, Mini., 105 C, High Ripple APS TS-NH ECE-S (G) Series: TS-NH Features Long life: 105 C 2,000 hours; high ripple current handling ability Wide CV value range (47
DESIGN OF MACHINERY SOLUTION MANUAL h in h 4 0.
 DESIGN OF MACHINERY SOLUTION MANUAL -7-1! PROBLEM -7 Statement: Design a double-dwell cam to move a follower from to 25 6, dwell for 12, fall 25 and dwell for the remader The total cycle must take 4 sec
Bbc7000 ΦΟΡΤΙΣΤΗΣ - ΕΚΚΙΝΗΤΗΣ ΜΠΑΤΑΡΙΑΣ. Art Nr: Owner s manual. Μετάφραση του πρωτοτύπου των οδηγιών χρήσης
 Bbc7000 ΦΟΡΤΙΣΤΗΣ - ΕΚΚΙΝΗΤΗΣ ΜΠΑΤΑΡΙΑΣ Μετάφραση του πρωτοτύπου των οδηγιών χρήσης Art Nr: 022213 Owner s manual Διαβάστε προσεχτικά όλες τις οδηγίες χρήσης και ασφάλειας πριν την λειτουργία του μηχανήματος.
Aluminum Electrolytic Capacitors (Large Can Type)
") Aluminum Electrolytic Capacitors (Large Can Type) Snap-In, 85 C TS-U ECE-S (U) Series: TS-U Features General purpose Wide CV value range (33 ~ 47,000 µf/16 4V) Various case sizes Top vent construction
Aluminum Electrolytic Capacitors (Large Can Type) Snap-In, 85 C TS-U ECE-S (U) Series: TS-U Features General purpose Wide CV value range (33 ~ 47,000 µf/16 4V) Various case sizes Top vent construction
Technisches Handbuch. Pergola Top Star 120X70. metaform Bescha ungssysteme
 02 Technisches Handbuch Pergola Top Star 120X70 Exklusiv von Metaform ΑVΕΕ entworfen, ist es die Innova on bei der professionellen Bescha ung, denn das wegweisende Hebesystem erlaubt es Ihnen, sie an jeder
9.09. # 1. Area inside the oval limaçon r = cos θ. To graph, start with θ = 0 so r = 6. Compute dr
 9.9 #. Area inside the oval limaçon r = + cos. To graph, start with = so r =. Compute d = sin. Interesting points are where d vanishes, or at =,,, etc. For these values of we compute r:,,, and the values
EE512: Error Control Coding
 EE512: Error Control Coding Solution for Assignment on Finite Fields February 16, 2007 1. (a) Addition and Multiplication tables for GF (5) and GF (7) are shown in Tables 1 and 2. + 0 1 2 3 4 0 0 1 2 3
Section 8.3 Trigonometric Equations
 99 Section 8. Trigonometric Equations Objective 1: Solve Equations Involving One Trigonometric Function. In this section and the next, we will exple how to solving equations involving trigonometric functions.
TMA4115 Matematikk 3
 TMA4115 Matematikk 3 Andrew Stacey Norges Teknisk-Naturvitenskapelige Universitet Trondheim Spring 2010 Lecture 12: Mathematics Marvellous Matrices Andrew Stacey Norges Teknisk-Naturvitenskapelige Universitet
VBA ΣΤΟ WORD. 1. Συχνά, όταν ήθελα να δώσω ένα φυλλάδιο εργασίας με ασκήσεις στους μαθητές έκανα το εξής: Version 25-7-2015 ΗΜΙΤΕΛΗΣ!!!!
 VBA ΣΤΟ WORD Version 25-7-2015 ΗΜΙΤΕΛΗΣ!!!! Μου παρουσιάστηκαν δύο θέματα. 1. Συχνά, όταν ήθελα να δώσω ένα φυλλάδιο εργασίας με ασκήσεις στους μαθητές έκανα το εξής: Εγραφα σε ένα αρχείο του Word τις
OUR PRODUCT RANGE. www.rakson.gr
 ΤΑ ΑΛΛΑ ΕΙ Η ΠΡΟΪΟΝΤΑ ΜΑΣ ΜΕΤΑΣΧΗΜΑΤΙΣΤΕΣ ΚΟΥ ΟΥΝΙΩΝ ΚΟΥ ΟΥΝΙΑ ΜΠΟΥΤΟΝ ΚΟΥ ΟΥΝΙΩΝ ΑΥΤΟΜΑΤΟΙ ΚΛΙΜΑΚΟΣΤΑΣΙΟΥ ΚΛΕΙ ΑΡΙΕΣ ΑΝΙΧΝΕΥΤΕΣ ΚΙΝΗΣΗΣ ΣΥΣΤΗΜΑΤΑ ΕΠΙΚΟΙΝΩΝΙΑΣ Θυροτηλεοράσεις Θυροτηλέφωνα Ενδοεπικοινωνίες
2 Composition. Invertible Mappings
 Arkansas Tech University MATH 4033: Elementary Modern Algebra Dr. Marcel B. Finan Composition. Invertible Mappings In this section we discuss two procedures for creating new mappings from old ones, namely,
Creative TEchnology Provider
 1 Oil pplication Capacitors are intended for the improvement of Power Factor in low voltage power networks. Used advanced technology consists of metallized PP film with extremely low loss factor and dielectric
Οδηγίες Αγοράς Ηλεκτρονικού Βιβλίου Instructions for Buying an ebook
 Οδηγίες Αγοράς Ηλεκτρονικού Βιβλίου Instructions for Buying an ebook Βήμα 1: Step 1: Βρείτε το βιβλίο που θα θέλατε να αγοράσετε και πατήστε Add to Cart, για να το προσθέσετε στο καλάθι σας. Αυτόματα θα
The challenges of non-stable predicates
 The challenges of non-stable predicates Consider a non-stable predicate Φ encoding, say, a safety property. We want to determine whether Φ holds for our program. The challenges of non-stable predicates
k A = [k, k]( )[a 1, a 2 ] = [ka 1,ka 2 ] 4For the division of two intervals of confidence in R +
[a 1, a 2 ] = [ka 1,ka 2 ] 4For the division of two intervals of confidence in R +](/thumbs/73/69566903.jpg "k A = [k, k]( )[a 1, a 2 ] = [ka 1,ka 2 ] 4For the division of two intervals of confidence in R +") Chapter 3. Fuzzy Arithmetic 3- Fuzzy arithmetic: ~Addition(+) and subtraction (-): Let A = [a and B = [b, b in R If x [a and y [b, b than x+y [a +b +b Symbolically,we write A(+)B = [a (+)[b, b = [a +b
Chapter 3. Fuzzy Arithmetic 3- Fuzzy arithmetic: ~Addition(+) and subtraction (-): Let A = [a and B = [b, b in R If x [a and y [b, b than x+y [a +b +b Symbolically,we write A(+)B = [a (+)[b, b = [a +b
Approximation of distance between locations on earth given by latitude and longitude
 Approximation of distance between locations on earth given by latitude and longitude Jan Behrens 2012-12-31 In this paper we shall provide a method to approximate distances between two points on earth
Digital motor protection relays
 Digital motor protection relays Specification DMP -S & DMP -Sa DMP -T & DMP -Ta Model No. DMP06-S/Sa DMP60-S/Sa DMP06-T/Ta DMP60-T/Ta Wiring Screw type Tunnel type Panel mount Unit or Extension Note1)
LR Series Metal Alloy Low-Resistance Resistor
 Tel : 881745 Fax : 881749 LR Series Metal Alloy LowResistance Resistor This specification is applicable to lead free, halogen free of RoHS directive for metal alloy lowresistance resistor. The product
Bulletin 1489 UL489 Circuit Breakers
 Bulletin 489 UL489 Circuit Breakers Tech Data 489-A Standard AC Circuit Breaker 489-D DC Circuit Breaker 489-A, AC Circuit Breakers 489-D, DC Circuit Breakers Bulletin 489-A Industrial Circuit Breaker
Griechisches Staatszertifikat - Deutsch
 ΥΠΟΥΡΓΕΙΟ ΕΘΝΙΚΗΣ ΠΑΙ ΕΙΑΣ ΚΑΙ ΘΡΗΣΚΕΥΜΑΤΩΝ ΚΡΑΤΙΚΟ ΠΙΣΤΟΠΟΙΗΤΙΚΟ ΓΛΩΣΣΟΜΑΘΕΙΑΣ Griechisches Ministerium für Bildung und Religion Griechisches Staatszertifikat - Deutsch Niveau A1 & A2 Entspricht dem Gemeinsamen
ΟΔΗΓΙΕΣ ΣΥΝΑΡΜΟΛΟΓΗΣΗΣ/ ASSEMBLY INSTRUCTION ΤΟΜΜΥ ΚΡΕΒΑΤΙ/BED
 ΟΔΗΓΙΕΣ ΣΥΝΑΡΜΟΛΟΓΗΣΗΣ/ ASSEMBLY INSTRUCTION ΤΟΜΜΥ ΚΡΕΒΑΤΙ/BED 1. Παρακαλώ πολύ διαβάστε προσεκτικά τις οδηγίες πριν την συναρμολόγηση/ Please read the instructions carefully. 2. Παρακαλώ πολύ όπως ελέγξτε
65W PWM Output LED Driver. IDPV-65 series. File Name:IDPV-65-SPEC
 IDPV65 series ~ A File Name:IDPV65SPEC 07060 IDPV65 series SPECIFICATION MODEL OUTPUT OTHERS NOTE DC VOLTAGE RATED CURRENT RATED POWER DIMMING RANGE VOLTAGE TOLERANCE PWM FREQUENCY (Typ.) SETUP TIME Note.
Matrices and Determinants
 Matrices and Determinants SUBJECTIVE PROBLEMS: Q 1. For what value of k do the following system of equations possess a non-trivial (i.e., not all zero) solution over the set of rationals Q? x + ky + 3z
IDPV-45 series. 45W PWM Output LED Driver. File Name:IDPV-45-SPEC S&E
 IDPV5 series S&E ~ A File Name:IDPV5SPEC 0805 IDPV5 series SPECIFICATION MODEL OUTPUT INPUT OTHERS NOTE DC VOLTAGE RATED CURRENT RATED POWER DIMMING RANGE VOLTAGE TOLERANCE PWM FREQUENCY (Typ.) SETUP TIME
Finite Field Problems: Solutions
 Finite Field Problems: Solutions 1. Let f = x 2 +1 Z 11 [x] and let F = Z 11 [x]/(f), a field. Let Solution: F =11 2 = 121, so F = 121 1 = 120. The possible orders are the divisors of 120. Solution: The
DEUTSCHE SCHULE ATHEN ΓΕΡΜΑΝΙΚΗ ΣΧΟΛΗ ΑΘΗΝΩΝ
 Herzlich Willkommen zu unserem Elternabend Übergang aus dem Elternhaus in den Kindergarten Καλωσορίσατε στη συνάντηση γονέων με θέμα τη μετάβαση από το οικογενειακό περιβάλλον στο προνηπιακό τμήμα 1 Überblick
ΕΙΣΑΓΩΓΗ ΣΤΗ ΣΤΑΤΙΣΤΙΚΗ ΑΝΑΛΥΣΗ
 ΕΙΣΑΓΩΓΗ ΣΤΗ ΣΤΑΤΙΣΤΙΚΗ ΑΝΑΛΥΣΗ ΕΛΕΝΑ ΦΛΟΚΑ Επίκουρος Καθηγήτρια Τµήµα Φυσικής, Τοµέας Φυσικής Περιβάλλοντος- Μετεωρολογίας ΓΕΝΙΚΟΙ ΟΡΙΣΜΟΙ Πληθυσµός Σύνολο ατόµων ή αντικειµένων στα οποία αναφέρονται
La Déduction naturelle
 La Déduction naturelle Pierre Lescanne 14 février 2007 13 : 54 Qu est-ce que la déduction naturelle? En déduction naturelle, on raisonne avec des hypothèses. Qu est-ce que la déduction naturelle? En déduction
QUICKTRONIC PROFESSIONAL QTP5
 osram.com QUICKTRONIC PROFESSIONA QTP5 ECG for T5/ 16mm, T8/ 26mm, DUUX fluorescent lamps QTP5 i.e. UMIUX T5 HO ES 01 Product Features: Up to 100.000 hours lifetime 1 amp start with optimized filament
Physical DB Design. B-Trees Index files can become quite large for large main files Indices on index files are possible.
 B-Trees Index files can become quite large for large main files Indices on index files are possible 3 rd -level index 2 nd -level index 1 st -level index Main file 1 The 1 st -level index consists of pairs
ANSWERSHEET (TOPIC = DIFFERENTIAL CALCULUS) COLLECTION #2. h 0 h h 0 h h 0 ( ) g k = g 0 + g 1 + g g 2009 =?
 COLLECTION #2. h 0 h h 0 h h 0 ( ) g k = g 0 + g 1 + g g 2009 =?") Teko Classes IITJEE/AIEEE Maths by SUHAAG SIR, Bhopal, Ph (0755) 3 00 000 www.tekoclasses.com ANSWERSHEET (TOPIC DIFFERENTIAL CALCULUS) COLLECTION # Question Type A.Single Correct Type Q. (A) Sol least
Teko Classes IITJEE/AIEEE Maths by SUHAAG SIR, Bhopal, Ph (0755) 3 00 000 www.tekoclasses.com ANSWERSHEET (TOPIC DIFFERENTIAL CALCULUS) COLLECTION # Question Type A.Single Correct Type Q. (A) Sol least
15W DIN Rail Type DC-DC Converter. DDR-15 s e r i e s. File Name:DDR-15-SPEC
 DIN Rail Type DC-DC Converter ± : DIN Rail Type DC-DC Converter SPECIFICATION MODEL OUTPUT INPUT PROTECTION ENVIRONMENT SAFETY & EMC (Note 5) OTHERS NOTE DC VOLTAGE RATED CURRENT CURRENT RANGE RATED POWER
Programmeerbare thermostaat ÚÔÁÚ ÌÌ ÙÈ fiìâóô. ıâúìôûù ÙË
 Sagane TM Thermostat programmable Programmable thermostat Programmeerbare thermostaat ÚÔÁÚ ÌÌ ÙÈ fiìâóô 846 37/87 ıâúìôûù ÙË Caractéristiques Karakteristieken Technical data Ã Ú ÎÙËÚÈÛÙÈÎ Alimentation
Paper Reference. Paper Reference(s) 1776/04 Edexcel GCSE Modern Greek Paper 4 Writing. Thursday 21 May 2009 Afternoon Time: 1 hour 15 minutes
 1776/04 Edexcel GCSE Modern Greek Paper 4 Writing. Thursday 21 May 2009 Afternoon Time: 1 hour 15 minutes") Centre No. Candidate No. Paper Reference(s) 1776/04 Edexcel GCSE Modern Greek Paper 4 Writing Thursday 21 May 2009 Afternoon Time: 1 hour 15 minutes Materials required for examination Nil Paper Reference
Centre No. Candidate No. Paper Reference(s) 1776/04 Edexcel GCSE Modern Greek Paper 4 Writing Thursday 21 May 2009 Afternoon Time: 1 hour 15 minutes Materials required for examination Nil Paper Reference
TRC ELECTRONICS, INC LED Driver Constant Voltage 45W MEAN WELL IDLV-45 Series
 LED Driver Constant Voltage 5W MEAN WELL IDLV5 Series ~ A File Name:IDLV5SPEC 0707 TRC ELECTRONICS, INC..888.6.95 LED Driver Constant Voltage 5W MEAN WELL IDLV5 Series TRC ELECTRONICS, INC. SPECIFICATION
NEDERLANDS 4 ΕΛΛΗΝΙΚΑ 27
 ISANDE NL GR NEDERLANDS 4 ΕΛΛΗΝΙΚΑ 27 NEDERLANDS 4 Inhoudsopgave Veiligheidsinformatie 4 Veiligheidsvoorschriften 5 Montage 7 Beschrijving van het product 8 Bediening 9 Het eerste gebruik 13 Dagelijks
ΚΥΠΡΙΑΚΗ ΕΤΑΙΡΕΙΑ ΠΛΗΡΟΦΟΡΙΚΗΣ CYPRUS COMPUTER SOCIETY ΠΑΓΚΥΠΡΙΟΣ ΜΑΘΗΤΙΚΟΣ ΔΙΑΓΩΝΙΣΜΟΣ ΠΛΗΡΟΦΟΡΙΚΗΣ 19/5/2007
 Οδηγίες: Να απαντηθούν όλες οι ερωτήσεις. Αν κάπου κάνετε κάποιες υποθέσεις να αναφερθούν στη σχετική ερώτηση. Όλα τα αρχεία που αναφέρονται στα προβλήματα βρίσκονται στον ίδιο φάκελο με το εκτελέσιμο
Other Test Constructions: Likelihood Ratio & Bayes Tests
 Other Test Constructions: Likelihood Ratio & Bayes Tests Side-Note: So far we have seen a few approaches for creating tests such as Neyman-Pearson Lemma ( most powerful tests of H 0 : θ = θ 0 vs H 1 :
(1) Describe the process by which mercury atoms become excited in a fluorescent tube (3)
 Describe the process by which mercury atoms become excited in a fluorescent tube (3)") Q1. (a) A fluorescent tube is filled with mercury vapour at low pressure. In order to emit electromagnetic radiation the mercury atoms must first be excited. (i) What is meant by an excited atom? (1) (ii)
Q1. (a) A fluorescent tube is filled with mercury vapour at low pressure. In order to emit electromagnetic radiation the mercury atoms must first be excited. (i) What is meant by an excited atom? (1) (ii)
Smaller. 6.3 to 100 After 1 minute's application of rated voltage at 20 C, leakage current is. not more than 0.03CV or 4 (µa), whichever is greater.
, whichever is greater.") Low Impedance, For Switching Power Supplies Low impedance and high reliability withstanding 5000 hours load life at +05 C (3000 / 2000 hours for smaller case sizes as specified below). Capacitance ranges
Low Impedance, For Switching Power Supplies Low impedance and high reliability withstanding 5000 hours load life at +05 C (3000 / 2000 hours for smaller case sizes as specified below). Capacitance ranges
3.4 SUM AND DIFFERENCE FORMULAS. NOTE: cos(α+β) cos α + cos β cos(α-β) cos α -cos β
 cos α + cos β cos(α-β) cos α -cos β") 3.4 SUM AND DIFFERENCE FORMULAS Page Theorem cos(αβ cos α cos β -sin α cos(α-β cos α cos β sin α NOTE: cos(αβ cos α cos β cos(α-β cos α -cos β Proof of cos(α-β cos α cos β sin α Let s use a unit circle
3.4 SUM AND DIFFERENCE FORMULAS Page Theorem cos(αβ cos α cos β -sin α cos(α-β cos α cos β sin α NOTE: cos(αβ cos α cos β cos(α-β cos α -cos β Proof of cos(α-β cos α cos β sin α Let s use a unit circle
DEUTSCHE SCHULE ATHEN ΓΕΡΜΑΝΙΚΗ ΣΧΟΛΗ ΑΘΗΝΩΝ
 Herzlich Willkommen zu unserem Elternabend Übergang aus dem Kindergarten in die Vorschule Καλωσορίσατε στη συνάντηση γονέων με θέμα τη μετάβαση από τον παιδικό σταθμό στο νηπιαγωγείο 1 Übergang vom Kindergarten
2013 REV 01 ELECTRONICS CAPACITORS. DC Applications Metallized Polypropylene Film Self Healing
 2013 REV 01 POWER EECTRONICS CAPACITORS C Applications Metallized Polypropylene Film Healing OUR MISSION: POWER EECTRONICS AN SPECIA CAPACITORS M.V. PFC CAPACITORS AN BANKS IGHTING CAPACITORS MOTOR RUN
15W DIN Rail Type DC-DC Converter. DDR-15 series. File Name:DDR-15-SPEC
 DIN Rail Type DC-DC Converter ± : DIN Rail Type DC-DC Converter SPECIFICATION MODEL OUTPUT INPUT PROTECTION ENVIRONMENT SAFETY & EMC (Note 5) OTHERS DC VOLTAGE RATED CURRENT CURRENT RANGE RATED POWER RIPPLE
Thin Film Chip Resistors
 FEATURES PRECISE TOLERANCE AND TEMPERATURE COEFFICIENT EIA STANDARD CASE SIZES (0201 ~ 2512) LOW NOISE, THIN FILM (NiCr) CONSTRUCTION REFLOW SOLDERABLE (Pb FREE TERMINATION FINISH) Type Size EIA PowerRating
Galatia SIL Keyboard Information
 Galatia SIL Keyboard Information Keyboard ssignments The main purpose of the keyboards is to provide a wide range of keying options, so many characters can be entered in multiple ways. If you are typing
Quick Guide. Controls. Microwave/Quick Start mode
 Quick Guide This quick guide gives you a brief overview of the most important controls and functions of the microwave. Keep the quick guide to hand near the microwave. It provides quick assistance if you
Code Breaker. TEACHER s NOTES
 TEACHER s NOTES Time: 50 minutes Learning Outcomes: To relate the genetic code to the assembly of proteins To summarize factors that lead to different types of mutations To distinguish among positive,
Αναερόβια Φυσική Κατάσταση
 Αναερόβια Φυσική Κατάσταση Γιάννης Κουτεντάκης, BSc, MA. PhD Αναπληρωτής Καθηγητής ΤΕΦΑΑ, Πανεπιστήµιο Θεσσαλίας Περιεχόµενο Μαθήµατος Ορισµός της αναερόβιας φυσικής κατάστασης Σχέσης µε µηχανισµούς παραγωγής
department listing department name αχχουντσ ϕανε βαλικτ δδσϕηασδδη σδηφγ ασκϕηλκ τεχηνιχαλ αλαν ϕουν διξ τεχηνιχαλ ϕοην µαριανι
 She selects the option. Jenny starts with the al listing. This has employees listed within She drills down through the employee. The inferred ER sttricture relates this to the redcords in the databasee
Δημιουργία Λογαριασμού Διαχείρισης Business Telephony Create a Management Account for Business Telephony
 Δημιουργία Λογαριασμού Διαχείρισης Business Telephony Create a Management Account for Business Telephony Ελληνικά Ι English 1/7 Δημιουργία Λογαριασμού Διαχείρισης Επιχειρηματικής Τηλεφωνίας μέσω της ιστοσελίδας
Econ 2110: Fall 2008 Suggested Solutions to Problem Set 8 questions or comments to Dan Fetter 1
 Eon : Fall 8 Suggested Solutions to Problem Set 8 Email questions or omments to Dan Fetter Problem. Let X be a salar with density f(x, θ) (θx + θ) [ x ] with θ. (a) Find the most powerful level α test
5.4 The Poisson Distribution.
 The worst thing you can do about a situation is nothing. Sr. O Shea Jackson 5.4 The Poisson Distribution. Description of the Poisson Distribution Discrete probability distribution. The random variable
Homework 8 Model Solution Section
 MATH 004 Homework Solution Homework 8 Model Solution Section 14.5 14.6. 14.5. Use the Chain Rule to find dz where z cosx + 4y), x 5t 4, y 1 t. dz dx + dy y sinx + 4y)0t + 4) sinx + 4y) 1t ) 0t + 4t ) sinx
Inverse trigonometric functions & General Solution of Trigonometric Equations. ------------------ ----------------------------- -----------------
 Inverse trigonometric functions & General Solution of Trigonometric Equations. 1. Sin ( ) = a) b) c) d) Ans b. Solution : Method 1. Ans a: 17 > 1 a) is rejected. w.k.t Sin ( sin ) = d is rejected. If sin
Right Rear Door. Let's now finish the door hinge saga with the right rear door
 Right Rear Door Let's now finish the door hinge saga with the right rear door You may have been already guessed my steps, so there is not much to describe in detail. Old upper one file:///c /Documents
ΚΡΑΤΙΚΟ ΠΙΣΤΟΠΟΙΗΤΙΚΟ ΓΛΩΣΣΟΜΑΘΕΙΑΣ HÖRVERSTEHEN. Mai 2012
 ΥΠΟΥΡΓΕΙΟ ΠΑΙΔΕΙΑΣ ΔΙΑ ΒΙΟΥ ΜΑΘΗΣΗΣ ΚΑΙ ΘΡΗΣΚΕΥΜΑΤΩΝ ΚΡΑΤΙΚΟ ΠΙΣΤΟΠΟΙΗΤΙΚΟ ΓΛΩΣΣΟΜΑΘΕΙΑΣ Griechisches Ministerium für Bildung, Lebenslanges Lernen und Religionsangelegenheiten Griechisches Staatszertifikat
ΟΔΗΓΙΕΣ ΕΓΚΑΤΑΣTΑΣΗΣ ΓΙΑ ΠΑΤΩΜΑ WPC INSTALLATION GUIDE FOR WPC DECKING
 1/12 ΟΔΗΓΙΕΣ ΕΓΚΑΤΑΣTΑΣΗΣ ΓΙΑ ΠΑΤΩΜΑ WPC INSTALLATION GUIDE FOR WPC DECKING Ανοίγουμε τρύπες Ø8 x 80mm στο σημείο κατασκευής, με τρυπάνι. To προτεινόμενο πλάτος και μήκος μεταξύ των 2 οπών να είναι 30-35εκ.,
Multilayer Chip Inductor / CL TYPE
 Multilayer Chip Inductor / CL TYPE.Features: 1.Closed magnetic circuit avoids crosstalk. 2.S.M.T. type. 3.Excellent solderability and heat resistance. 4.High realiability. 5.The products contain no lead
Assalamu `alaikum wr. wb.
 LUMP SUM Assalamu `alaikum wr. wb. LUMP SUM Wassalamu alaikum wr. wb. Assalamu `alaikum wr. wb. LUMP SUM Wassalamu alaikum wr. wb. LUMP SUM Lump sum lump sum lump sum. lump sum fixed price lump sum lump