SLIDING CROSS CUT MITRE SAW PKS 1700 B2
|
|
|
- Δάμαλις Τρικούπης
- 6 χρόνια πριν
- Προβολές:
Transcript

1 SLIDING CROSS CUT MITRE SAW PKS 1700 B2 K O E SLIDING CROSS CUT MITRE SAW Operation and Safety Notes Original operating instructions L E ΦΑΛΤΣΟΠΡΙΟΝΟ Υποδείξεις χειρισμού και ασφαλείας Πρωτότυπες Οδηγίες χρήσης F A C ZUG-, KAPP- UND GEHRUNGSSÄGE Bedienungs- und Sicherheitshinweise Originalbetriebsanleitung IAN K O E Anl_ indb :38
2 K O E Before reading, unfold the page containing the illustrations and familiarise yourself with all functions of the device. L E Πριν ξεκινήσετε την ανάγνωση, ανοίξτε τη σελίδα με τις εικόνες και εξοικειωθείτε με όλες τις λειτουργίες της συσκευής. F A C Klappen Sie vor dem Lesen die Seite mit den Abbildungen aus und machen Sie sich anschließend mit allen Funktionen des Gerätes vertraut. GB/IE/CY Operation and Safety Notes Page 8 GR/CY Υποδείξεις χειρισμού και ασφαλείας Σελίδα 23 DE/AT/CH Bedienungs- und Sicherheitshinweise Seite Anl_ indb :38


3 1 18 c Anl_ indb :38


4 d z 29 d Anl_ indb :38


5 y Anl_ indb :39


6 c Anl_ indb :39


7 Anl_ indb :39
8 Table of contents GB/IE/CY 1. Introduction Safety regulations Layout and items supplied Intended use Technical data Before starting the equipment Operation Replacing the power cable Cleaning, maintenance and ordering of spare parts Storage Disposal and recycling Declaration of conformity Warranty certifi cate...22 The reprinting or reproduction by any other means, in whole or in part, of documentation and papers accompanying products is permitted only with the express consent of the isc GmbH. Subject to technical changes Anl_ indb :39
9 GB/IE/CY Caution - Read the operating instructions to reduce the risk of inquiry Wear ear-muffs. The impact of noise can cause damage to hearing. Wear a breathing mask. Dust which is injurious to health can be generated when working on wood and other materials. Never use the device to work on any materials containing asbestos! Wear safety goggles. Sparks generated during working or splinters, chips and dust emitted by the device can cause loss of sight. Important. Risk of injury. Never reach into the running saw blade Anl_ indb :39
10 GB/IE/CY 1. Introduction Congratulations on your new purchase. You have decided in favor of a high-quality product. The operating instructions are a part of this product. They contain information of importance for your safety, for the use of the product and for its disposal. Before you use the product, acquaint yourself with all the information concerning its operation and safety. Use the product only as described and only for the listed areas of application. If you hand on the product to other people, give them all the documentation as well. 2. Safety regulations Caution! Read all safety regulations and instructions. Any errors made in following the safety regulations and instructions may result in an electric shock, fi re and/or serious injury. Keep all safety regulations and instructions in a safe place for future use. 2.1 General safety information on electric power tools Warning! When using electric tools, basic safety precautions should always be followed to reduce the risk of fire, electric shock and personal injury, including the following. Read all these instructions before attempting to operate this product and safe these instructions. Keep work area clean Cluttered areas and benches invite injuries. Consider work area environment Don t expose power tools to rain. Don t use power tools in damp or wet locations. Keep work area well lit. Don t use power tools in presence of flammable liquids or gases. Guard against electric shock Prevent body contact with grounded surfaces (e.g. pipes, radiators, ranges refrigeratiors). Keep children away Do not let visitors contact tool or extension cord. All visitors should be kept away from work area. Store idle tools When not is use, tools should be stored in dry, high, or locked-up place, out of the reach of children. Don t force tool It will do the job better and safer at the rate for which it was intended. Use right tool Don t force small tools or attachments to do the job of heavy duty tool. Don t use tools for purposes not intended: for example, don t use circular saw for cutt- ing tree limbs or logs. Dress properly Do not wear loose clothing or jewelry. They can be caught in moving parts. Nonskid footwear is recommended when working outdoors. Wear protective hair covering to contain long hair. Use safety glasses Also use face or dust mask if cutting operation is dusty. Don t abuse cord Never carry tool by cord or yank it to disconnect it from receptacle. Keep cord from heat, oil and sharp edges. Secure work Use clamps or a vise to hold work. It s safer than using your hand and it frees both hands to operate tool. Don t overreach Keep proper footing and balance at all times. Maintain tools with care Keep tools sharp and clean for better and safer performance. Follow instructions for lubricating and changing accessories. Inspect tool cords periodically and, if damaged, have repaired by authorized service facility. Inspect extension cords periodically and replace if damaged. Keep handles dry, clean and free from oil and grease. Disconnect tools When not in use, before servicing, and Anl_ indb :39
11 GB/IE/CY when changing accessories such as blades, bits and cutters. Remove adjusting keys and wrenches Form the habit of checking to see that keys and adjusting wrenches are removed from tool before turning it on. Avoid unintentional starting Don t carry plugged-in tool with finger on switch. Be sure switch is off when plugging in. Outdoor use extension cords When tool is used outdoors, use only extension cords intended for use outdoors and so marked. Stay alert Watch what you are doing. Use common sense. Do not operate tool when you are tired. Check damaged parts Before further use of the tool, a guard or other part that is damaged should be carefully checked to determine that it will operate properly and perform its intended function. Check for alignment of moving parts, binding of moving parts, breakage of parts, mounting, and any other conditions that may affect its operation. A guard or other part that is damaged should be properly repaired or replaced by an authorized service center unless otherwise indicated elsewhere in this instructions manual. Have defective switches replaced by an authorized service center. Do not use tool if switch does not turn it on and off. Warning The use of any other accessory or attachment other than recommended it this operating instruction or the Einhell catalog may present a risk of personal injury. Have your tool repared by an expert This electric appliance is in accordance with the relevant safety rules repairing of electric appliances may be carried out only by experts otherwise it may cause considerable danger for the user. Connect the dust extraction device Wherever there are facilities for fitting a dust extraction system, make sure it is connected and used. 2.2 Special safety information on the equipment 1. Safety precautions Change a worn out table insert. Use only blades which are recommended by the manufacturer and comply with EN If necessary, wear suitable personal protection equipment. This could consist of: - Ear plugs to prevent the risk of damaging your hearing - A breathing mask to avoid the risk of inhaling hazardous dust - Always wear gloves when handling saw blades and rough materials. Whenever practicable, saw blades must be carried in a container. The following can have an influence on dust development: - Worn, damaged or cracked saw blades - Recommended capacity of the vacuum extraction system: 20 m/s - Proper guidance of the workpiece Blades made of high-alloy high-speed steel (HSS) must not be used. 2. Safety information on the laser Important: Laser radiation Do not look into the beam Laser class 2 Protect yourself and your environment from accidents by taking the appropriate precautionary measures. Do not look directly into the laser beam with the naked eye. Never look directly into the laser path. Never direct the laser beam at reflecting sur Anl_ indb :39
12 GB/IE/CY faces, persons or animals. Even a low output laser beam can inflict injury on the eye. Caution: It is vital to follow the work procedures described in these instructions. Using the equipment in any other way may result in hazardous exposure to laser radiation. Never open laser module. When the laser is not going to be used for an extended period of time, the batteries should be removed. Never use an optical instrument (for example magnifying glass) to view the laser beam. Check the laser for damage on a regular basis and always before use. To protect yourself against injury, never use the equipment if it is damaged. Defective lasers have to be repaired by a customer service workshop. 3. Safety information on the batteries Never recharge the batteries. Danger of explosion. Keep batteries out of the reach of children. Do not throw batteries into the fire, short-circuit or take them apart. If necessary clean the contacts on the batteries and equipment before inserting the batteries. Remove flat batteries immediately from the equipment. Risk of leakage! Always replace all batteries in one go. Only use new batteries of the same make. Avoid contact with skin, eyes and mucous membranes. If you come into contact with battery acid, rinse the affected pars at once with plenty of clear water and seek immediate medical assistance. Do not expose batteries to extreme conditions, e.g. do not place on heaters or in direct sunshine. Increased risk of leakage. 4. Maintenance and service The following conditions can have an influence on noise impact on the operator: - Type of saw blade (e.g. saw blades designed to reduce noise development) - Material of the workpiece - The force with which the workpiece is pushed against the saw blade Faults on the machine or its guards, safety devices and blade must be reported to the person in charge as soon as they are discovered. 5. Safe operation Use a suitable blade for the material you wish to saw. Never use the drag, crosscut and miter saw to cut any materials other than those specified by the manufacturer. Use only the transport devices to move the equipment. Never use the guards for handling or moving the equipment. Use the saw only if it is in perfect condition and properly maintained and only if the guards are correctly positioned. When cutting miters, make sure that the device for swiveling the arm is fastened securely. The floor around the machine must be level, clean and free of loose particles, such as chips and cutting residues. The operator must receive proper training in the use, adjustment and operation of the machine. Only use properly sharpened saw blades. Do not exceed the maximum speed specified on the blade. Be sure to only use spacers and spindle rings specified by the manufacturer as suitable for the intended purpose. If the machine is equipped with a laser, this laser may not be replaced by a different type of laser. Repairs may only be carried out by the manufacturer of the laser or one of his authorized agents. Do not remove any cutting residues or other parts of workpieces from the cutting zone while the machine is running and the saw unit is not at rest. Make sure that the machine is always secured Anl_ indb :39
13 GB/IE/CY on a workbench or a table if at all possible. Support long workpieces (e.g. with a roller table) to prevent them sagging at the end of a cut. 6. Additional safety information on crosscut saws Give these safety instructions to all persons who work on the machine. Do not use this saw to cut fire wood. Caution! Hands and fingers may be injured on the rotating saw blade. Before you use the machine for the first time, check that the voltage marked on the rating plate is the same as your mains voltage. If you need to use an extension cable, make sure its conductor cross-section is big enough for the saw s power consumption. Minimum cross-section: 1.5 mm 2. If you use a cable reel, the complete cable must be pulled off the reel. Persons working on the machine should not be distracted. Note the direction of rotation of the motor and saw blade. After you have switched off the motor, never slow down the saw blade by applying pressure to its side. Only fit blades which are well sharpened and have no cracks or deformations. Faulty saw blades must be replaced immediately. Never use saw blades which do not comply with the data specified in this manual. It is imperative to make sure that the arrow on the saw blade conforms with the arrow on the machine. Pull out the power plug and twist the blade with your hand into the 45 and 90 positions in order to make sure that the blade does not touch the turntable in any position. If necessary, readjust the saw head. It is imperative to make sure that all devices which cover the saw blade are in good working order. Never wedge the hinged saw blade guard in open position. Never dismantle the machine s safety devices or render them inoperative. Damaged or faulty safety devices have to be replaced immediately. Never cut workpieces which are too small to hold securely in your hand. Avoid placing your hands in hazardous positions in which, one or both hands could touch the saw blade if they slip suddenly. The saw must not to be used for cutting round workpieces. There must be no nails or other foreign bodies in the part of the workpiece that you wish to saw. Always stand to the side of the saw blade when working with the saw. Never load the machine so much that it cuts out. Always press the workpiece firmly against the workbench and the stop rail to prevent the workpiece wobbling or twisting. Ensure that the off-cuts can be removed to the side of the saw blade. Otherwise it is possible that they will be caught by the saw blade and catapulted out of the machine. Never saw more than one workpiece at any one time. Never remove loose splinters, chips or jammed pieces of wood when the saw blade is running. To rectify faults or remove jammed pieces of wood, always switch off the machine first. - Pull out the power plug- Refit all guards and safety devices immediately after you have completed any repairs or maintenance work. Be sure to observe the safety information and operating and maintenance instructions issued by the manufacturer, as well as the dimensions listed in the Technical Data. It is imperative to observe the accident prevention regulations in force in your area as well as all other generally recognized rules of safety. Operation in enclosed areas is permitted only with a suitable vacuum extraction system. The crosscut saw has to be connected to a 230 V socket-outlet with minimum fusing of 10 A Anl_ indb :39
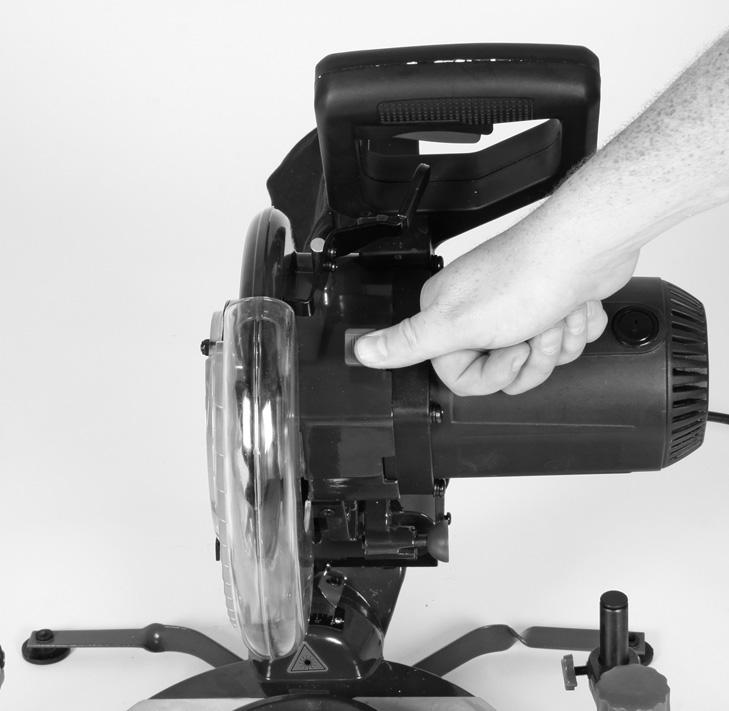
14 GB/IE/CY Do not use any low-powered machines for heavy duty work. Be careful when working in vertical mode. Caution: Take extra care when making double miter cuts! Do not lose these safety instructions 3. Layout and items supplied 3.1 Layout 1. Handle 2. ON/OFF switch 3. Release lever 4. Saw shaft lock 5. Machine head 6. Movable blade guard 7. Saw blade 8. Clamping device 9. Workpiece support 10. Locking screw for workpiece support 11. Table insert 12. Latched position lever 13. Locking grip 14. Pointer 15. Scale 16. Turntable 17. Fixed saw table 18. Additional stability bar 19. Stop rail 20. Scale 21. Pointer 22. Sawdust bag 23. Locking screw 24. Locking screw for drag guide 25. Fastening bolt 26. Drag guide 27. Knurled screw for cutting depth limiter 28. Stop for cutting depth limiter 29. Adjustment screw (90 ) 30. Adjustment screw (45 ) 31. Flange bolt 32. Outer fl ange 33. Laser 34. ON/OFF switch for laser 35. Battery compartment 36. Battery compartment cover 37. Screw 38. Inner fl ange c) Allen key, 6 mm d) Counternut y) 45 stop angle (not supplied) z) 90 stop angle (not supplied) 3.2 Items supplied Open the packaging and take out the equipment with care. Remove the packaging material and any packaging and/or transportation braces (if available). Check to see if all items are supplied. Inspect the equipment and accessories for transport damage. If possible, please keep the packaging until the end of the guarantee period. Important! The equipment and packaging material are not toys. Do not let children play with plastic bags, foils or small parts. There is a danger of swallowing or suffocating! Drag, crosscut and miter Saw 2 x Clamping device (8) 2 x Workpiece support (9) Sawdust bag (22) Allen key, 5 mm Allen key, 6 mm (c) Additional stability bar (18) 2 x Battery (1.5 V LR03) Anl_ indb :39
15 GB/IE/CY 4. Intended use The drag, crosscut and miter saw is designed to crosscut wood and plastic respective of the machine s size. The saw is not designed for cutting fi rewood. The equipment is to be used only for its prescribed purpose. Any other use is deemed to be a case of misuse. The user / operator and not the manufacturer will be liable for any damage or injuries of any kind caused as a result of this. Please note that our equipment has not been designed for use in commercial, trade or industrial applications. Our warranty will be voided if the equipment is used in commercial, trade or industrial businesses or for equivalent purposes. The equipment is to be operated only with suitable saw blades. It is prohibited to use any type of cutting-off wheel. To use the equipment properly you must also observe the safety information, the assembly instructions and the operating instructions to be found in this manual. All persons who use and service the equipment have to be acquainted with this manual and must be informed about the equipment s potential hazards. It is also imperative to observe the accident prevention regulations in force in your area. The same applies for the general rules of health and safety at work. The manufacturer will not be liable for any changes made to the equipment nor for any damage resulting from such changes. Even when the equipment is used as prescribed it is still impossible to eliminate certain residual risk factors. The following hazards may arise in connection with the machine s construction and design: Contact with the saw blade in the uncovered saw zone. Reaching into the running saw blade (cut injuries). Kick-back of workpieces and parts of workpieces. Saw blade fracturing. Catapulting of faulty carbide tips from the saw blade. Damage to hearing if ear-muffs are not used as necessary. Harmful emissions of wood dust when used in closed rooms. The product meets the requirements of EN and is subject to special connection conditions. This means that use of the product at any freely selectable connection point is not allowed. Given unfavorable conditions in the power supply the product can cause the voltage to fluctuate temporarily. The product is exclusively intended for use at connection points that have a continuous current-carrying capacity of at least 100 A per phase. As the user, you are required to ensure, in consultation with your electric power company if necessary, that the connection point at which you wish to operate the product meets the specified requirements. 5. Technical data AC motor:...230v ~ 50Hz Power: W Operating mode:...s1 Idle speed n 0 :... 4,800 min -1 Carbide saw blade:...ø 210 x ø 30 x 2.8 mm Number of teeth:...24 Swiveling range: / 0 / +45 Miter cut:... 0 to 45 to the left Saw width at 90 : x 65 mm Saw width at 45 : x 65 mm Saw width at 2 x 45 (double miter cut): x 40 mm Protection class:...ii / Weight:...approx. 15 kg Laser class:... 2 Wavelength of laser: nm Laser output:... 1mW Laser module power supply:... 2 x 1.5 V Micro (AAA) Anl_ indb :39
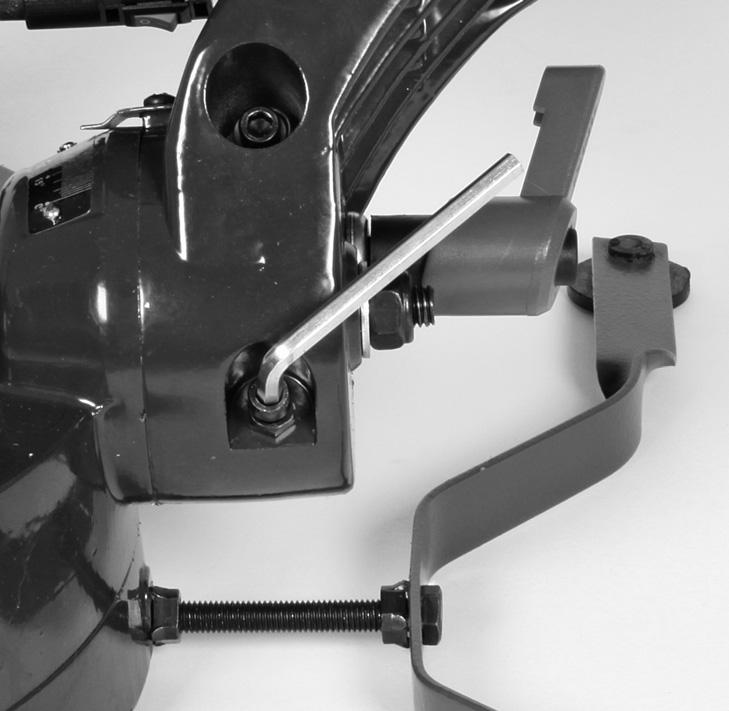
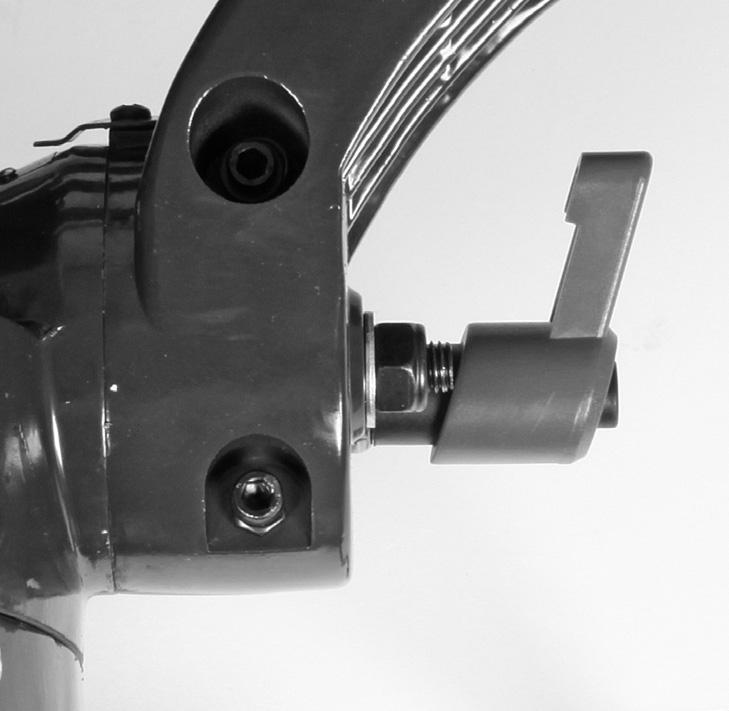
16 GB/IE/CY Noise emission values The saw s noise is measured in accordance with EN Idle speed L pa sound pressure level... 88,6 db(a) K pa uncertainty...3 db L WA sound power level...101,6 db(a) K WA uncertainty...3 db Total vibration values (vector sum of three directions) determined in accordance with EN Vibration emission value a h < 2.5 m/s 2 K uncertainty = 1.5 m/s 2 Warning! The specifi ed vibration value was established in accordance with a standardized testing method. It may change according to how the electric equipment is used and may exceed the specifi ed value in exceptional circumstances. The specifi ed vibration value can be used to compare the equipment with other electric power tools. The specifi ed vibration value can be used for initial assessment of a harmful effect. Keep the noise emissions and vibrations to a minimum. Only use appliances which are in perfect working order. Service and clean the appliance regularly. Adapt your working style to suit the appliance. Do not overload the appliance. Have the appliance serviced whenever necessary. Switch the appliance off when it is not in use. 6. Before starting the equipment 6.1 General information The equipment must be set up where it can stand securely, i.e. it should be bolted to a workbench, a universal base frame or similar. All covers and safety devices have to be properly fitted before the equipment is switched on. It must be possible for the blade to run freely. When working with wood that has been processed before, watch out for foreign bodies such as nails or screws, etc. Before you press the ON/OFF switch check that the saw blade is fitted correctly. Moving parts must run smoothly. Before you connect the equipment to the power supply make sure the data on the rating plate are identical to the mains data. 6.2 Assembling the saw (Fig. 1-2, 4-6) To adjust the turntable (16), loosen the locking grip (13) by approx. 2 turns and press the latched position lever (12) to disengage the turntable (16) (Figure 4). To release the saw from its bottom position, apply light downward pressure to the machine head (5). At the same time pull the safety pin (25) out of the motor mount. Turn the safety pin (25) through 90 so that the saw remains unlocked (Fig. 1-2). Swing the machine head (5) up until the release lever (3) latches into place (Fig. 1). Fit the clamping devices (8) on the left and/or right side of the fixed saw table (17) (Fig. 1). Undo the locking screws for the workpiece support (10) (Fig. 5). Mount the workpiece support (9) on the fixed saw table (17) and tighten the appropriate locking screw (10) (Fig. 5). Mount the second workpiece support (9) on the opposite side of the saw and secure with the appropriate locking screw (10). When the locking screw (23) is loosened, you can tilt the machine head (5) to the left by up to 45 (Fig. 1-2). Screw the additional stability bar (18) to the Anl_ indb :39
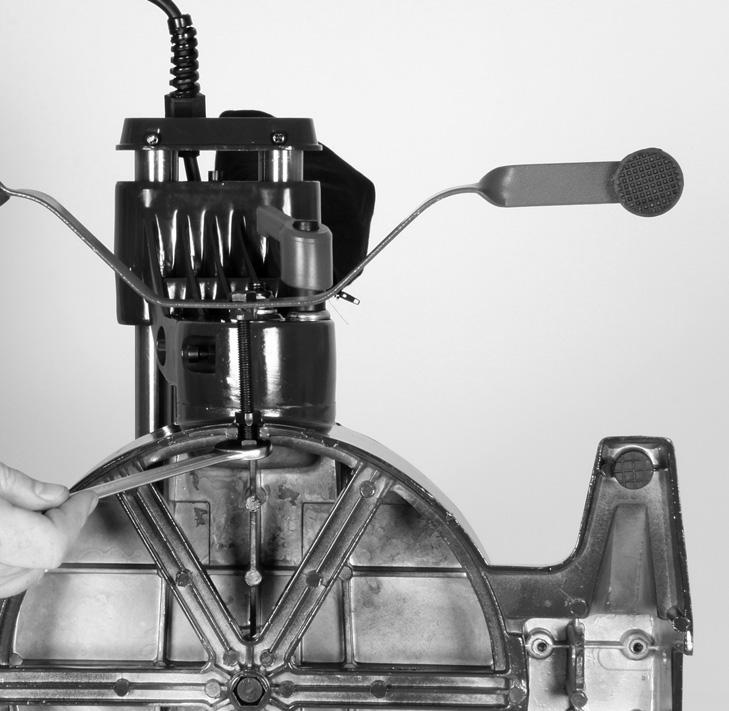
17 GB/IE/CY back of the equipment (Fig. 6). 6.3 Precision adjustment of the stop for crosscut 90 (Fig. 7-8) No stop angle included. Fasten the turntable (16) in 0 position. Undo the locking screw (23) and move the machine head (5) all the way to the right using the handle (1). Place the 90 angular stop (z) between the blade (7) and the turntable (16). Slacken the counternut (d). Adjust the adjustment screw (90 ) (29) until the angle between the blade (7) and the turntable (16) equals 90. Retighten the counternut (d) to secure this setting. Check the position of the pointer (21) on the scale (20). If necessary, release the pointer (21) with a crosstip screwdriver, move to the 0 position of the scale (20) and retighten. 6.4 Precision adjustment of the stop for miter cut 45 (Fig. 1, 7, 10-11) No stop angle included. Fasten the turntable (16) in 0 position. Undo the locking screw (23) and move the machine head (5) all the way to the left using the handle, until it coincides at 45. Place the 45 stop angle (y) between the blade (7) and the turntable (16). Adjust the adjustment screw (30) so that the angle between the blade (7) and the turntable (16) equals exactly Operation 7.1 Cross cut 90 and turntable 0 (Fig. 1-3, 12) Important! The integral resetting springs will automatically lift the machine head. Do not simply let go of the handle (1) after cutting, but allow the machine head (5) to rise slowly, applying slight counter pressure as it does so. For cutting widths up to approx. 100 mm it is possible to fi x the saw s drag function with the locking screw for drag guide (24) in rear position. If the cutting width exceeds 100 mm you must ensure that the locking screw for drag guide (24) is slackened and that the machine head (5) can be moved. Move the machine head (5) to its upper position. Use the handle (1) to push back the machine head (5) and fix it in this position if required (dependent on the cutting width). Place the piece of wood to be cut at the stop rail (19) and on the turntable (16). Lock the material with the clamping device (8) on the fixed saw table (17) to prevent the material from moving during the cutting operation. Push down the release lever (3) to release the machine head (5). Press the ON/OFF switch (2) to start the motor. With the drag guide (26) fixed in place: use the handle (1) to move the machine head (5) steadily and with light pressure downwards until the saw blade (7) has completely cut through the workpiece. With the drag guide (26) not fixed in place: pull the machine head (5) all the way to the front. Lower the handle (1) to the very bottom by applying steady and light downward pressure. Now push the machine head (5) slowly and steadily to the very back until the saw blade (7) has completely cut through the workpiece. When the cutting operation is completed, move the machine head (5) back to its upper (home) position and release the ON/OFF Anl_ indb :39
18 GB/IE/CY button (2). 7.2 Cross cut 90 and turntable 0-45 (Fig. 1-3, 13) The crosscut saw can be used to make crosscuts of 0-45 to the left and 0-45 to the right in relation to the stop rail. Release the turntable (16) by slackening the locking grip (13). Press the latched position lever (12). Turn the turntable (16) and scale pointer (14) to the desired angular setting on the scales (15) and lock into place with the locking grip (13). The saw has locking positions at angles of - 45, -30, -22.5, -15, 0, 15, 22.5, 30 and 45, at which you can engage latched position lever (12). Cut as described under section Miter cut 0-45 and turntable 0 (Fig. 1-3, 14) The crosscut saw can be used to make miter cuts of 0-45 in relation to the work face. If required, dismantle the clamping device (8) or mount on the opposite side of the fixed saw table (17). Move the machine head (5) to its upper position. Fasten the turntable (16) in 0 position. Undo the locking screw (23). Use the handle (1) to tilt the machine head (5) to the left until the pointer (21) points to the required angle on the scale (20). Re-tighten the fixing screw (23). Cut as described in section Miter cut 0-45 and turntable 0-45 (Fig. 1-3, 15) The crosscut saw can be used to make miter cuts to the left of 0-45 in relation to the work face and, at the same time, 0-45 to the left or 0-45 to the right in relation to the stop rail (double miter cut). If required, dismantle the clamping device (8) or mount on the opposite side of the fixed saw table (17). Move the machine head (5) to its upper position. Release the turntable (16) by slackening the locking grip (13). Press the latched position lever (12). Turn the turntable (16) and scale pointer (14) to the desired angular setting on the scales (15) and lock into place with the locking grip (13). Undo the locking screw (23) and use the handle (1) to tilt the machine head (5) to the left until it coincides with the required angle value (in this connection see also section 7.3). Re-tighten the fixing screw (23). Cut as described under section Limiting the cutting depth (Fig. 16) The cutting depth can be infinitely adjusted using the screw (27). To do this loosen the knurled nut on the screw (27). Move the stop for the cutting depth limiter (28) to the outside. Turn the screw (27) in or out to set the required cutting depth. Then re-tighten the knurled nut on the screw (27). Check the setting by completing a test cut. 7.6 Sawdust bag (Fig. 2) The saw is equipped with a debris bag (22) for sawdust and chips. The debris bag (22) can be emptied by means of a zipper at the bottom. 7.7 Changing the saw blade (Fig. 1, 17-20) Remove the power plug! Important. Wear safety gloves when changing the saw blade. Risk of injury. Swing up the machine head (5). Use the safety pin (25) to lock the machine head in this position. Press the release lever (3). Swing up the saw blade guard (6) to the point where the recess in the saw blade guard (6) is above the flange bolt (31). Press the saw shaft lock (4) with one hand. With the other hand insert the Allen key (c) in the flange bolt (31). Firmly press the saw shaft lock (4) and slowly rotate the flange bolt (31) in clockwise direction. The saw shaft lock (4) engages after no Anl_ indb :39
19 GB/IE/CY more than one rotation. Now, using a little more force, slacken the flange bolt (31) in the clockwise direction. Turn the flange screw (31) right out and remove the external flange (32). Take the blade (7) off the inner flange (38) and pull out downwards. Carefully clean the flange screw (31), outer flange (32) and inner flange (38). Fit and fasten the new saw blade (7) in reverse order. Important! The cutting angle of the teeth, in other words the direction of rotation of the saw blade (7) must coincide with the direction of the arrow on the housing. Before continuing your work make sure that all safety devices are in good working condition. Important! Every time that you change the saw blade (7), check to see that it spins freely in the table insert (11) in both perpendicular and 45 angle settings. Important! The work to change and align the saw blade (7) must be carried out correctly. 7.8 Transport (Fig. 1-3) Retighten the locking grip (13) to secure the turntable (16) in place. Activate the release lever (3), press the machine head (5) downwards and secure with the safety pin (25). The saw is now locked in its bottom position. Fix the saw s drag function with the locking screw for drag guide (24) in rear position. Carry the equipment by the fixed saw table (17). When reassembling the equipment proceed as described under section Using the laser (Fig /Item 33) To switch on: Move the ON/OFF switch of the laser (34) to the 1 position. A laser line is projected onto the material you wish to process, providing an exact guide for the cut. To switch off: Move the ON/OFF switch of the laser (34) to the 0 position. Setting the laser: The laser is adjusted with the screw (37) and glued in place ex-works. Further adjustment of the laser during operation is not required. Important. Do not look into the laser beam. Replacing the battery: Switch off the laser (33). Remove the battery compartment cover (36). Remove the batteries and replace with new batteries (2 x 1.5 Volt Type R03, LR 03 Micro, AAA) Check that the battery terminals are positioned correctly when inserting new batteries. Close the battery compartment (35) again. 8. Replacing the power cable If the power cable for this equipment is damaged, it must be replaced by the manufacturer or its after-sales service or similarly trained personnel to avoid danger. 9. Cleaning, maintenance and ordering of spare parts Always pull out the mains power plug before starting any cleaning work. 9.1 Cleaning Keep all safety devices, air vents and the motor housing free of dirt and dust as far as possible. Wipe the equipment with a clean cloth or blow it with compressed air at low pressure. We recommend that you clean the device immediately each time you have finished using it. Clean the equipment regularly with a moist cloth and some soft soap. Do not use cleaning agents or solvents; these could attack the plastic parts of the equipment. Ensure that no water can seep into the device Anl_ indb :39
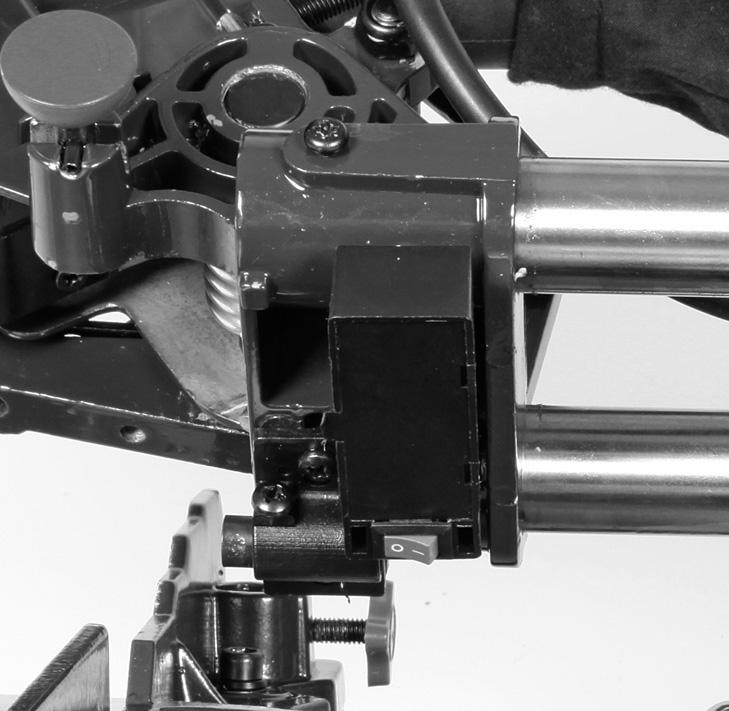
20 GB/IE/CY 9.2 Carbon brushes In case of excessive sparking, have the carbon brushes checked only by a qualifi ed electrician. Important! The carbon brushes should not be rep laced by anyone but a qualifi ed electrician. equipment will be correctly disposed of by the manufacturer. 9.3 Maintenance There are no parts inside the equipment which require additional maintenance. 9.4 Ordering replacement parts: Please quote the following data when ordering replacement parts: Type of machine Article number of the machine Identification number of the machine For our latest prices and information please go to Storage Store the equipment and accessories out of children s reach in a dark and dry place at above freezing temperature. The ideal storage temperature is between 5 and 30 C. Store the electric tool in its original packaging. 11. Disposal and recycling The unit is supplied in packaging to prevent its being damaged in transit. This packaging is raw material and can therefore be reused or can be returned to the raw material system. The unit and its accessories are made of various types of material, such as metal and plastic. Defective components must be disposed of as special waste. Ask your dealer or your local council. Disposing of batteries: Batteries contain materials that are potentially harmful to the environment. Never place batteries in your household refuse, in fi re or in water. Batteries should be collected, recycled or disposed of by environment-friendly means. Send your old batteries to isc GmbH, Eschenstrasse 6 in D Landau. You can then be sure that the For EU countries only Never place any electric power tools in your household refuse. To comply with European Directive 2002/96/EC concerning old electric and electronic equipment and its implementation in national laws, old electric power tools have to be separated from other waste and disposed of in an environment-friendly fashion, e.g. by taking to a recycling depot. Recycling alternative to the return request: As an alternative to returning the equipment to the manufacturer, the owner of the electrical equipment must make sure that the equipment is properly disposed of if he no longer wants to keep the equipment. The old equipment can be returned to a suitable collection point that will dispose of the equipment in accordance with the national recycling and waste disposal regulations. This does not apply to any accessories or aids without electrical components supplied with the old equipment Anl_ indb :39
21 GB/IE/CY 12. Declaration of conformity Einhell Germany AG Wiesenweg 22 D Landau/Isar Konformitätserklärung D erklärt folgende Konformität gemäß EU-Richtlinie und Normen für Artikel GB explains the following conformity according to EU directives and norms for the following product F déclare la conformité suivante selon la directive CE et les normes concernant l article I dichiara la seguente conformità secondo la direttiva UE e le norme per l articolo NL verklaart de volgende overeenstemming conform EU richtlijn en normen voor het product E declara la siguiente conformidad a tenor de la directiva y normas de la UE para el artículo P declara a seguinte conformidade, de acordo com a directiva CE e normas para o artigo DK attesterer følgende overensstemmelse i medfør af EU-direktiv samt standarder for artikel S förklarar följande överensstämmelse enl. EU-direktiv och standarder för artikeln FIN vakuuttaa, että tuote täyttää EU-direktiivin ja standardien vaatimukset EE tõendab toote vastavust EL direktiivile ja standarditele CZ vydává následující prohlášení o shodě podle směrnice EU a norem pro výrobek SLO potrjuje sledečo skladnost s smernico EU in standardi za izdelek SK vydáva nasledujúce prehlásenie o zhode podľa smernice EÚ a noriem pre výrobok H a cikkekhez az EU-irányvonal és Normák szerint a következő konformitást jelenti ki PL deklaruje zgodność wymienionego poniżej artykułu z następującymi normami na podstawie dyrektywy WE. BG декларира съответното съответствие съгласно Директива на ЕС и норми за артикул LV paskaidro šādu atbilstību ES direktīvai un standartiem LT apibūdina šį atitikimą EU reikalavimams ir prekės normoms RO declară următoarea conformitate conform directivei UE şi normelor pentru articolul GR δηλώνει την ακόλουθη συμμόρφωση σύμφωνα με την Οδηγία ΕΚ και τα πρότ υπα για το προϊόν HR potvrđuje sljedeću usklađenost prema smjernicama EU i normama za artikl Izjava o sukladnosti za ovaj proizvod dostupna je na internet stranici BIH potvrđuje sljedeću usklađenost prema smjernicama EU i normama za artikl RS potvrđuje sledeću usklađenost prema smernicama EZ i normama za artikal RUS следующим удостоверяется, что следующие продукты соответствуют директивам и нормам ЕС UKR проголошує про зазначену нижче відповідність виробу директивам та стандартам ЄС на виріб MK ја изјавува следната сообрзност согласно ЕУ-директивата и нормите за артикли TR Ürünü ile ilgili AB direktifl eri ve normları gereğince aşağıda açıklanan uygunluğu belirtir N erklærer følgende samsvar i henhold til EU-direktivet og standarder for artikkel IS Lýsir uppfyllingu EU-reglna og annarra staðla vöru Zug-, Kapp- und Gehrungssäge PKS 1700 B2 (Parkside) 87/404/EC_2009/105/EC 2005/32/EC_2009/125/EC 2006/95/EC 2006/28/EC X 2004/108/EC 2004/22/EC 1999/5/EC 97/23/EC 90/396/EC_2009/142/EC 89/686/EC_96/58/EC X 2011/65/EC X 2006/42/EC Annex IV Notifi ed Body: Notifi ed Body No.: Reg. No.: 2000/14/EC_2005/88/EC Annex V Annex VI Noise measured: LWA = db (A); guaranteed LWA = db (A) P = KW; L/Ø = cm Notifi ed Body: 2006/28/EC Emission No.: Standard references: EN ; EN ; EN ; EN ; EN ; EN ; EN Landau/Isar, den Weichselgartner/General-Manager Wentao/Product-Management First CE: 11 Archive-File/Record: NAPR Art.-No.: I.-No.: Documents registrar: Siegfried Roider Subject to change without notice Wiesenweg 22, D Landau/Isar Anl_ indb :39
22 GB/IE/CY 13. Warranty certificate Dear Customer, All of our products undergo strict quality checks to ensure that they reach you in perfect condition. In the unlikely event that your device develops a fault, please contact our service department at the address shown on this guarantee card. Of course, if you would prefer to call us then we are also happy to offer our assistance under the service number printed below. Please note the following terms under which guarantee claims can be made: 1. These guarantee terms cover additional guarantee rights and do not affect your statutory warranty rights. We do not charge you for this guarantee. 2. Our guarantee only covers problems caused by material or manufacturing defects, and it is restricted to the rectifi cation of these defects or replacement of the device. Please note that our devices have not been designed for use in commercial, trade or industrial applications. Consequently, the guarantee is invalidated if the equipment is used in commercial, trade or industrial applications or for other equivalent activities. The following are also excluded from our guarantee: compensation for transport damage, damage caused by failure to comply with the installation/assembly instructions or damage caused by unprofessional installation, failure to comply with the operating instructions (e.g. connection to the wrong mains voltage or current type), misuse or inappropriate use (such as overloading of the device or use of non-approved tools or accessories), failure to comply with the maintenance and safety regulations, ingress of foreign bodies into the device (e.g. sand, stones or dust), effects of force or external infl uences (e.g. damage caused by the device being dropped) and normal wear resulting from proper operation of the device. This applies in particular to rechargeable batteries for which we nevertheless issue a guarantee period of 12 months. The guarantee is rendered null and void if any attempt is made to tamper with the device. 3. The guarantee is valid for a period of 3 years starting from the purchase date of the device. Guarantee claims should be submitted before the end of the guarantee period within two weeks of the defect being noticed. No guarantee claims will be accepted after the end of the guarantee period. The original guarantee period remains applicable to the device even if repairs are carried out or parts are replaced. In such cases, the work performed or parts fi tted will not result in an extension of the guarantee period, and no new guarantee will become active for the work performed or parts fi tted. This also applies when an on-site service is used. 4. In order to assert your guarantee claim, please send your defective device postage-free to the address shown below. Please enclose either the original or a copy of your sales receipt or another dated proof of purchase. Please keep your sales receipt in a safe place, as it is your proof of purchase. It would help us if you could describe the nature of the problem in as much detail as possible. If the defect is covered by our guarantee then your device will either be repaired immediately and returned to you, or we will send you a new device. Of course, we are also happy offer a chargeable repair service for any defects which are not covered by the scope of this guarantee or for units which are no longer covered. To take advantage of this service, please send the device to our service address. Einhell UK Ltd Morpeth Wharf Twelve Quays Birkenhead, Wirral CH41 1LF Tel , Fax IAN Anl_ indb :39
23 Περιεχόμενα GR/CY 1. Eισαγωγή Υποδείξεις ασφαλείας Περιγραφή της συσκευής και συμπαραδιδόμενα Ενδεδειγμένη χρήση Τεχνικά χαρακτηριστικά Πριν τη θέση σε λειτουργία Λειτουργία Αντικατάσταση του αγωγού σύνδεσης με το δίκτυο Καθαρισμός, συντήρηση και παραγγελία ανταλλακτικών Φύλαξη Διάθεση στα απορρίμματα και επαναχρησιμοποίηση Δήλωση Συμμόρφωσης Εγγύηση Η ανατύπωση ή οποιασδήποτε άλλης μορφής αναπαραγωγή της τεκμηρίωσης ή άλλων δικαιολογητικών που αναφέρονται στα προϊόντα, ακόμη και αποσπασματικά, επιτρέπεται μόνο με ρητή συγκατάθεση της isc GmbH. Mε επιφύλαξη τεχνικών τροποποιήσεων Anl_ indb :39
24 GR/CY Προειδοποίηση Για τη μείωση του κινδύνου τραυματισμού διαβάστε την Οδηγία χρήσης Να χρησιμοποιείτε ωτοασπίδες. Η επίδραση του θορύβου μπορεί να προκαλέσει την απώλεια της ακοής. Να χρησιμοποιείτε μάσκα προστασίας από σκόνη. Κατά την επεξεργασία ξύλου και άλλων υλικών δεν αποκλείεται η δημιουργία επιβλαβούς για την υγεία σκόνης. Δεν επιτρέπεται η επεξεργασία υλικών που περιέχουν αμίαντο! Να φοράτε οπωσδήποτε προστατευτικά γυαλιά. Οι σπινθήρες που δημιουργούνται κατά την εργασία ή τα εκσφενδονιζόμενα κομμάτια, ροκανίδια και σκόνες μπορούν να προκαλέσουν απώλεια της όρασης. Προσοχή! Κίνδυνος τραυματισμού! Μην βάζετε τα χέρια σας σε περιστρεφόμενο πριονοδίσκο! Anl_ indb :39
25 GR/CY 1. Eισαγωγή Συγχαρητήρια για την αγορά της νέας συσκευής σας. Προτιμήσατε να αγοράσετε ένα προϊόν ανώτερης ποιότητας. Οι οδηγίες χρήσης αποτελούν αναπόσπαστο μέρος αυτού του προϊόντος. Περιέχουν σημαντικές υποδείξεις για την ασφάλεια, τη χρήση και διάθεση της συσκευής. Πριν τη χρήση του προϊόντος να εξοικειωθείτε με όλες τις οδηγίες χειρισμούς και τις υποδείξεις ασφαλείας. Να χρησιμοποιείτε το προϊόν μόνο όπως περιγράφεται και μόνο για τον αναφερόμενο σκοπό. Να παραδώσετε όλες τις οδηγίες και υποδείξεις μαζί με το προϊόν εάν το δώσετε σε τρίτα πρόσωπα. 2. Υποδείξεις ασφαλείας Προσοχή! Διαβάστε όλες τις Υποδείξεις ασφαλείας και τις Οδηγίες. Εάν δεν ακολουθήσετε τις Υποδείξεις ασφαλεία και τις Οδηγίες δεν αποκλείονται ηλεκτροπληξία, πυρκαγιά και/ή σοβαροί τραυματισμοί. Φυλάξτε προσεκτικά όλες τις Υποδείξεις ασφαλεάις και τις Οδηγίες για το μέλλον. 2.1 Γενικές Υποδείξεις ασφαλείας για ηλεκτρικές συσκευές Προσοχή! Κατά την χρήση ηλεκτρικών συσκευών πρέπει για την προστασία σας από ηλεκτροπληξία, τραυματισμό και πυρκαγιά να προσέξετε τις ακόλουθες Υποδείξεις ασφαλείας. Παρακαλούμε να διαβάσετε και να προσέξετε τις υποδείξεις πριν χρησιμοποιήσετε τη συσκευή. Να κρατάτε τη θέση εργασίας πάντα τακτική. - Μία όχι τακτική θέση εργασία προακελί κινδύνους ατυχημάτων. Να λάβετε υπόψη τις επιδράσεις του περιβάλλοντος - Μην εκθέτετε ηλεκτρικές συσκευές σε βροχή. Ποτέ μη χρησιμοποιείτε τα ηλεκτρικά εργαλεία σε υγρό περιβάλλον. Φροντίστε για καλό φωτισμό. Μη χρησιμοποιείτε τα ηλεκτρικά εργαλεία κοντά σε εύφλεκτα υγρά ή αέρια. Προστατέψτε τον εαυτό σας από ηλεκτροπληξία - Να αποφεύγετε κάθε επαφή του σώματος με γειωμένα εξαρτήματα, για παράδειγμα με σωλήνες, καλοριφέρ, εστίες, ψυγεία. Να κρατάτε μακριά τα παιδιά! - Μην αφήνετε άλλα άτομα να έρχονται σε επαφή με το εργαλείο ή το καλώδιο, κρατάτε τα μακριά από την περιοχή εργασίας. Nα φυλάγετε τα εργαλεία σας σε ασφαλές μέρος - Όταν δεν χρησιμοποιείτε τα εργαλεία, να τα φυλάγετε σε στεγνό χώρο που κλειδώνεται, μακριά από παιδιά. Μην υπερφορτώνετε τα εργαλεία σας - Εργάζεστε καλύτερα και ασφαλέστερα στο αναφερόμενο πεδίο ισχύος. Να χρησιμοποιείτε το σωστό εργαλείο - Μη χρησιμοποιείτε αδύναμες μηχανές ή συσκευές για βαριές εργασίες. Μη χρησιμοποιείτε τα εργαλεία για σκοπούς και εργασίες για τους οποίους δεν προορίζονται, π.χ. μη χρησιμοποιείτε ένα δισκοπρίονο χεριού για να κόψετε δέντρα ή χοντρά κλαδιά. Να φοράτε πάντα τον κατάλληλο ρουχισμό εργασίας. - Μη φοράτε φαρδιά ρούχα ή κοσμήματα. Θα μπορούσαν να πιαστούν από κινούμενα τμήματα. Σε εργασίες στο ύπαιθρο συνιστώνται λαστιχένια γάντια και αντιολισθητικά παπούτσια. Εάν έχετε μακριά μαλλιά, να φοράτε ένα δίχτυ. Να χρησιμοποιείτε προστατευτικά Anl_ indb :39
26 GR/CY γυαλιά. - Σε περίπτωση εργασιών με σκόνη, να χρησιμοποιείτε μάσκα για προστασία της αναπνοής. Μην χρησιμοποιείτε το καλώδιο για άλλο σκοπό - Μη μεταφέρετε το καλώδιο κρατώντας από αυτό τη συσκευή, και μη το χρησιμοποιείτε για να τραβήξετε το βύσμα από την πρίζα. Να προστατεύετε το καλώδιο από ψηλές θερμοκρασίες, λάδι και αιχμηρά αντικείμενα. Να ασφαλίζετε το εργαλείο - Να χρησιμοποιείτε συστήματα συγκράτησης ή μία μέγγενη για τη συγκράτηση του κατεργαστέου αντικειμένου. Έτσι συγκρατιέται ασφαλέστερα παρά με το χέρι σας και σας επιτρέπεται ο χειρισμός της μηχανής με δύο χέρια. Προσέχετε την ευστάθειά σας - Να αποφεύγετε τη μη φυσιολογική στάση του σώματος. Φροντίστε να στέκεστε σταθερά και να κρατάτε πάντα την ισορροπία σας. Να περιποιήστε τα εργαλεία σας - Να διατηρείτε τα εργαλεία σας ακονισμένα και καθαρά για να μπορείτε να εργάζεστε καλύτερα και ασφαλέστερα. Να ακολουθείτε τις προδιαγραφές συντήρησης και τις υποδείξεις για αλλαγή του εργαλείου. Να ελέγχετε τακτικά το βύσμα και το καλώδιο και σε περίπτωση ελαττωμάτων να αντικαθίστανται από αναγνωρισμένο και ειδικευμένο τεχνίτη. Να ελέγχετε τακτικά το καλώδιο επέκτασης (μπαλαντέζα) που να αντικαθίσταται εάν είναι ελαττωματικό. Να διατηρείτε τις χειρολαβές στεγνές και ελεύθερες από λάδια και λίπη. Βγάλτε το βύσμα από την πρίζα - Όταν δεν χρησιμοποιείτε τη συσκευή, σε εργασίες συντήρησης και κατά την αλλαγή εργαλείων, όπως για παράδειγμα πριονοδίσκος, τρυπάνι ή εργαλεία παντός είδους. Μην αφήνετε επάνω στη συσκευή κλειδιά εργαλείων - Πριν την ενεργοποίηση να ελέγχετε, εάν έχουν απομακρυνθεί τα κλειδιά και εργαλεία ρύθμισης. Να αποφεύγετε αθέλητη ενεργοποίηση - Μην μεταφέρετε συσκευές που είναι συνδεδεμένες με το ρεύμα κρατώντας τις με το χέρι στο διακόπτη. Σιγουρευτείτε πως ο διακόπτης είναι απενεργοποιημένος κατά τη σύνδεση με το ρεύμα δικτύου. Μπαλαντέζα στο ύπαιθρο - Στο ύπαιθρο να χρησιμοποιείτε μόνο τα για το σκοπό αυτό εγκεκριμένα καλώδια επέκτασης (μπαλαντέζες) με την ανάλογη σήμανση. Να είστε πάντα προσεκτικοί - Να παρακολουθείτε την εργασία σας. Να εργάζεστε συνετά. Μη χρησιμοποιείτε τα εργαλεία όταν δεν είστε συγκεντρωμένοι. Να ελέγχετε τη συσκευή σας για ενδεχόμενες βλάβες - Πριν από περαιτέρω χρήση του εργαλείου να ελέγχονται προσεκτικά τα συστήματα ασφαλείας ή ελαφρά ελαττωματικά τμήματα για την άψογη λειτουργία τους σύμφωνα με το σκοπό για τον οποίο προορίζονται. Ελέγξτε εάν λειτουργούν άψογα και δεν μπλοκάρουν όλα τα κινούμενα τμήματα ή εάν ορισμένα τμήματα έχουν ζημιές. Όλα τα τμήματα πρέπει να είναι σωστά τοποθετημένα ώστε να εξασφαλίζεται η ασφάλεια της συσκευής. Τα ελαττωματικά συστήματα ασφαλείας και τα ελαττωματικά εξαρτήματα πρέπει να επισκευάζονται ή να αντικαθίστανται σωστά από αναγνωρισμένο εξειδικευμένο συνεργείο εάν δεν αναφέρεται κάτι διαφορετικό στις Οδηγίες χρήσης. Οι ελαττωματικοί διακόπτες να αντικαθίστανται σε συμβεβλημένο συνεργείο. Μη Anl_ indb :39
27 GR/CY χρησιμοποιείτε εργαλεία, στα οποία ο διακόπτης δεν ενεργοποιείται και δεν απενεργοποιείται. Προσοχή! - Για τη δική σας ασφάλεια να χρησιμοποιείτε μόνο εξαρτήματα και πρόσθετες συσκευές που αναφέρονται στις Οδηγίες χρήσης ή που συνιστώνται ή αναφέρονται από τον κατασκευαστή. Η χρήση άλλων εργαλείων ή εξαρτημάτων από αυτών που αναφέρονται στις Οδηγίες χρήσης ή στον κατάλογο μπορούν να αποτελέσουν κίνδυνο για τη σωματική σας ακεραιότητα. Επισκευές μόνο από ηλεκτρολόγο Αυτό το εργαλείο ανταποκρίνεται στις σχετικές διατάξεις ασφαλείας. Οι επισκευές επιτρέπεται να εκτελούνται μόνο από ειδικευμένους ηλεκτρολόγους, διαφορετικά δεν αποκλείονται τραυματισμοί του χειριστή. Συνδέστε το σύστημα αναρρόφησης σκόνης - Εάν υπάρχουν συστήματα για τη σύνδεση συσκευών αναρρόφησης της σκόνης, σιγουρευτείτε πως είναι συνδεδεμένα και χρησιμοποιούνται. - Αναπνευστική προστασία για μείωση του κινδύνου εισπνοής επικίνδυνης σκόνης - Όταν πιάνετε με πριονολάμες και με όχι λεία υλικά να φοράτε γάντια. Εάν γίνεται να μεταφέρεται τις πριονολάμες σε περιέκτη. Οι ακόλουθοι παράγοντες μπορεί να επιδράσουν στην δημιουργία σκόνης: - Φθαρμένες, ελαττωματικές λάμες ή λάμες με ρωγμές - Συνιστώμενη ισχύς αναρρόφησης των συστημάτων αναρρόφησης 20 m/s - Το κατεργαζόμενο αντικείμενο να οδηγείται σωστά Δεν επιτρέπεται η χρήση λαμών από ατσάλι HSS. 2. Υποδείξεις ασφαλείας για το σύστημα λεϊζερ Προσοχή : Ακτινοβολία λέιζερ Μη κοιτάζετε στην ακτίνα Κατηγορία λέιζερ Ειδικές υποδείξεις ασφαλείας για τη συσκευή: 1. Μέτρα ασφαλείας Να αντικαθίσταται το ενδεχομένως φθαρμένο στήριγμα της συσκευής στον πάγκο εργασίας. Nα χρησιμοποιείτε μόνο τις πριονολάμες που συνιστά ο κατασκευαστής και που ανταποκρίνονται στο πρότυπο ΕΝ Εάν απαιτείται να χρησιμοποιείτε τα κα ταλληλα μέτρα ατομικής προστασίας. Αυτά αποτελούνται κατά περίπτωση από: - Ωτοασπίδες για μείωση του κινδύνου απώλειας της ακοής Προστατέψτε τον εαυτό σας και το περιβάλλον με κατάλληλα μέτρα προστασίας από κινδύνους ατυχημάτων. Μη κοιτάζετε χωρίς προστασία ματιών απευθείας στην ακτίνα λαίζηερ. Μη κοιτάζετε άμεσα στην διαδρομή της ακτίνας. Μη τείνετε την ακτίνα λαίηζερ ποτέ σε αντανακλούσες επιφάνειες, σε πρόσωπα ή ζώα. Ακόμη και ακτίνα λέιζερ χαμηλής ισχύος μπρορεί να προκαλέσει βλάβες στα μάτια. Προσοχή - εάν εκτελούνται άλλες από Anl_ indb :39
Περιεχόμενα / Contents
 Aερόθερμo / Fan Heater PTC-906 Περιεχόμενα / Contents GR... Σελίδες 3-8 EN... Pages 9-11 2 GR Ευχαριστούμε που επιλέξατε μια συσκευή της γκάμας θερμαντικών IZZY. Σημαντικές Οδηγίες Ασφαλείας Τα Μέρη της
Door Hinge replacement (Rear Left Door)
") Door Hinge replacement (Rear Left Door) We will continue the previous article by replacing the hinges of the rear left hand side door. I will use again the same procedure and means I employed during the
Door Hinge replacement (Rear Left Door) We will continue the previous article by replacing the hinges of the rear left hand side door. I will use again the same procedure and means I employed during the
ΟΔΗΓΙΕΣ ΕΓΚΑΤΑΣTΑΣΗΣ ΓΙΑ ΠΑΤΩΜΑ WPC INSTALLATION GUIDE FOR WPC DECKING
 1/12 ΟΔΗΓΙΕΣ ΕΓΚΑΤΑΣTΑΣΗΣ ΓΙΑ ΠΑΤΩΜΑ WPC INSTALLATION GUIDE FOR WPC DECKING Ανοίγουμε τρύπες Ø8 x 80mm στο σημείο κατασκευής, με τρυπάνι. To προτεινόμενο πλάτος και μήκος μεταξύ των 2 οπών να είναι 30-35εκ.,
Instruction Execution Times
 1 C Execution Times InThisAppendix... Introduction DL330 Execution Times DL330P Execution Times DL340 Execution Times C-2 Execution Times Introduction Data Registers This appendix contains several tables
the total number of electrons passing through the lamp.
 1. A 12 V 36 W lamp is lit to normal brightness using a 12 V car battery of negligible internal resistance. The lamp is switched on for one hour (3600 s). For the time of 1 hour, calculate (i) the energy
Right Rear Door. Let's now finish the door hinge saga with the right rear door
 Right Rear Door Let's now finish the door hinge saga with the right rear door You may have been already guessed my steps, so there is not much to describe in detail. Old upper one file:///c /Documents
ΟΔΗΓΙΕΣ ΣΥΝΑΡΜΟΛΟΓΗΣΗΣ/ ASSEMBLY INSTRUCTION ΤΟΜΜΥ ΚΡΕΒΑΤΙ/BED
 ΟΔΗΓΙΕΣ ΣΥΝΑΡΜΟΛΟΓΗΣΗΣ/ ASSEMBLY INSTRUCTION ΤΟΜΜΥ ΚΡΕΒΑΤΙ/BED 1. Παρακαλώ πολύ διαβάστε προσεκτικά τις οδηγίες πριν την συναρμολόγηση/ Please read the instructions carefully. 2. Παρακαλώ πολύ όπως ελέγξτε
BFN3000 ΕΠΙΤΡΑΠΕΖΙΟΣ ΑΝΕΜΙΣΤΗΡΑΣ. Owner s manual. Μετάφραση του πρωτοτύπου των οδηγιών χρήσης
 BFN3000 ΕΠΙΤΡΑΠΕΖΙΟΣ ΑΝΕΜΙΣΤΗΡΑΣ Μετάφραση του πρωτοτύπου των οδηγιών χρήσης Owner s manual www.bormanntools.com GR Οδηγίες ασφαλούς λειτουργίας 1. Τα χαρακτηριστικά της παροχής ηλεκτρικού ρεύματος θα
Operating Instructions and Parts Manual 14-inch Woodworking Band Saw Models JWBS-14SF and JWBS-14SF-3
 Operating Instructions and Parts Manual 14-inch Woodworking Band Saw Models JWBS-14SF and JWBS-14SF-3 Model #714500 shown JET 427 New Sanford Road LaVergne, Tennessee 37086 Part No. M-714500 Ph.: 800-274-6848
PKS 1700 B2. SLIDING CROSS CUT MITRE SAW Operation and Safety Notes Original operating instructions
 Anleitung_4300684_GB_IE_:_ 27.10.2011 10:33 Uhr Seite 1 PKS 1700 B2 SLIDING CROSS CUT MITRE SAW Operation and Safety Notes Original operating instructions ΦΑΛΤΣΟΠΡΙΟΝΟ Υποδείξεις χειρισμού και ασφαλείας
[1] P Q. Fig. 3.1
![[1] P Q. Fig. 3.1](/thumbs/79/80362156.jpg "[1] P Q. Fig. 3.1") 1 (a) Define resistance....... [1] (b) The smallest conductor within a computer processing chip can be represented as a rectangular block that is one atom high, four atoms wide and twenty atoms long. One
1 (a) Define resistance....... [1] (b) The smallest conductor within a computer processing chip can be represented as a rectangular block that is one atom high, four atoms wide and twenty atoms long. One
Capacitors - Capacitance, Charge and Potential Difference
 Capacitors - Capacitance, Charge and Potential Difference Capacitors store electric charge. This ability to store electric charge is known as capacitance. A simple capacitor consists of 2 parallel metal
Potential Dividers. 46 minutes. 46 marks. Page 1 of 11
 Potential Dividers 46 minutes 46 marks Page 1 of 11 Q1. In the circuit shown in the figure below, the battery, of negligible internal resistance, has an emf of 30 V. The pd across the lamp is 6.0 V and
ΚΥΠΡΙΑΚΗ ΕΤΑΙΡΕΙΑ ΠΛΗΡΟΦΟΡΙΚΗΣ CYPRUS COMPUTER SOCIETY ΠΑΓΚΥΠΡΙΟΣ ΜΑΘΗΤΙΚΟΣ ΔΙΑΓΩΝΙΣΜΟΣ ΠΛΗΡΟΦΟΡΙΚΗΣ 19/5/2007
 Οδηγίες: Να απαντηθούν όλες οι ερωτήσεις. Αν κάπου κάνετε κάποιες υποθέσεις να αναφερθούν στη σχετική ερώτηση. Όλα τα αρχεία που αναφέρονται στα προβλήματα βρίσκονται στον ίδιο φάκελο με το εκτελέσιμο
Math 6 SL Probability Distributions Practice Test Mark Scheme
 Math 6 SL Probability Distributions Practice Test Mark Scheme. (a) Note: Award A for vertical line to right of mean, A for shading to right of their vertical line. AA N (b) evidence of recognizing symmetry
2 Composition. Invertible Mappings
 Arkansas Tech University MATH 4033: Elementary Modern Algebra Dr. Marcel B. Finan Composition. Invertible Mappings In this section we discuss two procedures for creating new mappings from old ones, namely,
Operating Instructions and Parts Manual 14-inch Woodworking Band Saw Models JWBS-14SF and JWBS-14SF-3
 Operating Instructions and Parts Manual 14-inch Woodworking Band Saw Models JWBS-14SF and JWBS-14SF-3 Model #714500 shown JET 427 New Sanford Road LaVergne, Tennessee 37086 Part No. M-714500 Ph.: 800-274-6848
MS SERIES MS DESK TOP ENCLOSURE APPLICATION EXAMPLE FEATURE. Measuring instruments. Power supply equipments
 MS SERIES MS DESK TOP ENCLOSURE FEATURE Available in 176 sizes. Screws are not appeared on the surface. Usable as rack mount case with optinal mounting bracket. There are no ventilation hole for cover
NMBTC.COM /
 Common Common Vibration Test:... Conforms to JIS C 60068-2-6, Amplitude: 1.5mm, Frequency 10 to 55 Hz, 1 hour in each of the X, Y and Z directions. Shock Test:...Conforms to JIS C 60068-2-27, Acceleration
(REV:01) RYOBI 48 Volt Lawn Mower Model No. RY14110 Replacement Parts List
 RYOBI 48 Volt Lawn Mower Model No. RY14110 Replacement Parts List") 9800-86 2-0-0 (REV:0) RYOBI 48 Volt Lawn Mower Model No. RY0 Replacement Parts List RYOBI RY0 48 volt lawn mower 3 38 39 44 39 36 34 36 42 38 39 3 4 37 34 3 43 2 32 0 8 9 2 4 33 8 7 6 3 6 7 22 8 20 3 30
9800-86 2-0-0 (REV:0) RYOBI 48 Volt Lawn Mower Model No. RY0 Replacement Parts List RYOBI RY0 48 volt lawn mower 3 38 39 44 39 36 34 36 42 38 39 3 4 37 34 3 43 2 32 0 8 9 2 4 33 8 7 6 3 6 7 22 8 20 3 30
Modbus basic setup notes for IO-Link AL1xxx Master Block
 n Modbus has four tables/registers where data is stored along with their associated addresses. We will be using the holding registers from address 40001 to 49999 that are R/W 16 bit/word. Two tables that
Thin Film Chip Resistors
 FEATURES PRECISE TOLERANCE AND TEMPERATURE COEFFICIENT EIA STANDARD CASE SIZES (0201 ~ 2512) LOW NOISE, THIN FILM (NiCr) CONSTRUCTION REFLOW SOLDERABLE (Pb FREE TERMINATION FINISH) Type Size EIA PowerRating
(REV:01) RYOBI 48 Volt Lawn Mower Model No. RY14110A Replacement Parts List
 RYOBI 48 Volt Lawn Mower Model No. RY14110A Replacement Parts List") 9000-7 9-- (REV:0) RYOBI 4 Volt Lawn Mower Model No. RY0A Replacement Parts List RYOBI RY0A 4 VOLT LAWN MOWER 3 3 39 44 39 3 34 3 42 3 39 3 4 37 34 3 43 2 0 37 2 33 32 3 9 7 22 30 4 7 3 20 9 3 2 2 27 2
9000-7 9-- (REV:0) RYOBI 4 Volt Lawn Mower Model No. RY0A Replacement Parts List RYOBI RY0A 4 VOLT LAWN MOWER 3 3 39 44 39 3 34 3 42 3 39 3 4 37 34 3 43 2 0 37 2 33 32 3 9 7 22 30 4 7 3 20 9 3 2 2 27 2
Surface Mount Multilayer Chip Capacitors for Commodity Solutions
 Surface Mount Multilayer Chip Capacitors for Commodity Solutions Below tables are test procedures and requirements unless specified in detail datasheet. 1) Visual and mechanical 2) Capacitance 3) Q/DF
ZLW Series. Single-stage Monoblock Centrifugal Pump ZL PUMP GROUP.,LTD
 ZLW Series Single-stage Monoblock Centrifugal Pump ZL PUMP GROUP.,LTD 1 Application Apply as the transportation of liquids in the fields of air condition, heating, sanitary water, water treatment cooling,
Code Breaker. TEACHER s NOTES
 TEACHER s NOTES Time: 50 minutes Learning Outcomes: To relate the genetic code to the assembly of proteins To summarize factors that lead to different types of mutations To distinguish among positive,
Οδηγίες Λειτουργίας. Assembly Operating instructions. Montageanleitung. Απογυμνωτές PV-AZM...3. Stripping pliers PV-AZM...3.
 MA000 MA267 (de_en) (gr_en) Montageanleitung Οδηγίες Λειτουργίας Απογυμνωτής PV-AZM... για MC3, MC4 MA000 MA267 (de_en) (gr_en) Assembly Operating instructions Stripping pliers PV-AZM... for MC3 and MC4
MSN DESK TOP ENCLOSURE WITH STAND / CARRYING HANDLE
 MSN SERIES MSN DESK TOP ENCLOSURE WITH STAND / CARRYING HANDLE W H FEATURE Available in 176 sizes. Stand / carrying handle can be adjusted in 30 degree. Maximum load is kg. There are no ventilation hole
 60 61 62 63 64 65 Ο Δ Η Γ Ι Ε Σ Σ Υ Ν Τ Η Ρ Η Σ Η Σ Τ Ω Ν Κ Ο Υ Φ Ω Μ Α Τ Ω Ν Ι Ν S T R U C T I N O N S C O N C E R N I N G Τ Η Ε C A S E M E N T S M A I N T E N A N C E Ο τακτικός καθαρισμός των βαμμένων
Εγκατάσταση λογισμικού και αναβάθμιση συσκευής Device software installation and software upgrade
 Για να ελέγξετε το λογισμικό που έχει τώρα η συσκευή κάντε κλικ Menu > Options > Device > About Device Versions. Στο πιο κάτω παράδειγμα η συσκευή έχει έκδοση λογισμικού 6.0.0.546 με πλατφόρμα 6.6.0.207.
Phys460.nb Solution for the t-dependent Schrodinger s equation How did we find the solution? (not required)
") Phys460.nb 81 ψ n (t) is still the (same) eigenstate of H But for tdependent H. The answer is NO. 5.5.5. Solution for the tdependent Schrodinger s equation If we assume that at time t 0, the electron starts
Phys460.nb 81 ψ n (t) is still the (same) eigenstate of H But for tdependent H. The answer is NO. 5.5.5. Solution for the tdependent Schrodinger s equation If we assume that at time t 0, the electron starts
Precision Metal Film Fixed Resistor Axial Leaded
 Features EIA standard colour-coding Non-Flame type available Low noise and voltage coefficient Low temperature coefficient range Wide precision range in small package Too low or too high ohmic value can
Οδηγίες Αγοράς Ηλεκτρονικού Βιβλίου Instructions for Buying an ebook
 Οδηγίες Αγοράς Ηλεκτρονικού Βιβλίου Instructions for Buying an ebook Βήμα 1: Step 1: Βρείτε το βιβλίο που θα θέλατε να αγοράσετε και πατήστε Add to Cart, για να το προσθέσετε στο καλάθι σας. Αυτόματα θα
Έλεγχος και Διασφάλιση Ποιότητας
 Έλεγχος και Διασφάλιση Ποιότητας Ενότητα 6: Κουππάρης Μιχαήλ Τμήμα Χημείας Εργαστήριο Αναλυτικής Χημείας General Successfully carry out the Preventive Maintenance Procedure and complete the Maintenance
HOMEWORK 4 = G. In order to plot the stress versus the stretch we define a normalized stretch:
 HOMEWORK 4 Problem a For the fast loading case, we want to derive the relationship between P zz and λ z. We know that the nominal stress is expressed as: P zz = ψ λ z where λ z = λ λ z. Therefore, applying
User s Manual / Οδηγίες Χρήσης
 User s Manual / Οδηγίες Χρήσης EUROPEAN STANDARDS Your child s safety depends on you. Proper bed rail usage cannot be assured unless you follow these instructions. DO NOT USE YOUR BED RAIL UNTILL YOU READ
VENERE. GR. Οδηγός Χρήσης EN. User Guide
 GR. Οδηγός Χρήσης EN. User Guide ΣΗΜΑΝΤΙΚΟ! ΚΡΑΤΗΣΤΕ ΓΙΑ ΜΕΛΛΟΝΤΙΚΗ ΑΝΑΦΟΡΑ: ΔΙΑΒΑΣΤΕ ΠΡΟΣΕΚΤΙΚΑ Κίνδυνος από φωτιά και άλλες πηγές έντονης θερμότητας, όπως ηλεκτρικές αντιστάσεις, υγραέριο, φωτιά κλπ,
ΟΔΗΓΙΕΣ ΧΡΗΣΗΣ USE INSTRUCTIONS
 ΟΔΗΓΙΕΣ ΧΡΗΣΗΣ USE INSTRUCTIONS ΤΗΛΕΦΩΝΟ ΜΕ ΑΝΑΓΝΩΡΙΣΗ ΚΛΗΣΗΣ /CORDED PHONE WITH CALLER ID ΜΟΝΤΕΛΟ/MODEL: TM09-448 DC48V Παρακαλούμε διαβάστε προσεκτικά όλες τις οδηγίες χρήσης πριν την χρήση της συσκευής
First Sensor Quad APD Data Sheet Part Description QA TO Order #
 Responsivity (/W) First Sensor Quad PD Data Sheet Features Description pplication Pulsed 16 nm laser detection RoHS 211/65/EU Light source positioning Laser alignment ø mm total active area Segmented in
3.4 SUM AND DIFFERENCE FORMULAS. NOTE: cos(α+β) cos α + cos β cos(α-β) cos α -cos β
 cos α + cos β cos(α-β) cos α -cos β") 3.4 SUM AND DIFFERENCE FORMULAS Page Theorem cos(αβ cos α cos β -sin α cos(α-β cos α cos β sin α NOTE: cos(αβ cos α cos β cos(α-β cos α -cos β Proof of cos(α-β cos α cos β sin α Let s use a unit circle
3.4 SUM AND DIFFERENCE FORMULAS Page Theorem cos(αβ cos α cos β -sin α cos(α-β cos α cos β sin α NOTE: cos(αβ cos α cos β cos(α-β cos α -cos β Proof of cos(α-β cos α cos β sin α Let s use a unit circle
Strain gauge and rosettes
 Strain gauge and rosettes Introduction A strain gauge is a device which is used to measure strain (deformation) on an object subjected to forces. Strain can be measured using various types of devices classified
EE512: Error Control Coding
 EE512: Error Control Coding Solution for Assignment on Finite Fields February 16, 2007 1. (a) Addition and Multiplication tables for GF (5) and GF (7) are shown in Tables 1 and 2. + 0 1 2 3 4 0 0 1 2 3
IAN 46876 SLIDING CROSS CUT MITRE SAW PZKS 1500 A1
 SLIDING CROSS CUT MITRE SAW PZKS 1500 A1 GB CY GR CY SLIDING CROSS CUT MITRE SAW PZKS 1500 A1 Operating and Safety Instructions Translation of Original Operating Manual ΦΑΛΤΣΟΠΡΙΟΝΟ ΚΑΙ ΠΡΙΟΝΙ ΚΑΘΕΤΗΣ
Εγγύηση καλής λειτουργίας
 Εγγύηση καλής λειτουργίας Τα Smartphone Bitmore συνοδεύονται από Εγγύηση Καλής Λειτουργίας Δύο (2) Ετών. Please read carefully the Παρακαλούμε διαβάστε προσεκτικά τους όρους εγγύησης που συνοδεύουν το
Surface Mount Aluminum Electrolytic Capacitors
 FEATURES CYLINDRICAL V-CHIP CONSTRUCTION LOW COST, GENERAL PURPOSE, 2000 HOURS AT 85 O C NEW EXPANDED CV RANGE (up to 6800µF) ANTI-SOLVENT (2 MINUTES) DESIGNED FOR AUTOMATIC MOUNTING AND REFLOW SOLDERING
9.09. # 1. Area inside the oval limaçon r = cos θ. To graph, start with θ = 0 so r = 6. Compute dr
 9.9 #. Area inside the oval limaçon r = + cos. To graph, start with = so r =. Compute d = sin. Interesting points are where d vanishes, or at =,,, etc. For these values of we compute r:,,, and the values
Bbc7000 ΦΟΡΤΙΣΤΗΣ - ΕΚΚΙΝΗΤΗΣ ΜΠΑΤΑΡΙΑΣ. Art Nr: Owner s manual. Μετάφραση του πρωτοτύπου των οδηγιών χρήσης
 Bbc7000 ΦΟΡΤΙΣΤΗΣ - ΕΚΚΙΝΗΤΗΣ ΜΠΑΤΑΡΙΑΣ Μετάφραση του πρωτοτύπου των οδηγιών χρήσης Art Nr: 022213 Owner s manual Διαβάστε προσεχτικά όλες τις οδηγίες χρήσης και ασφάλειας πριν την λειτουργία του μηχανήματος.
derivation of the Laplacian from rectangular to spherical coordinates
 derivation of the Laplacian from rectangular to spherical coordinates swapnizzle 03-03- :5:43 We begin by recognizing the familiar conversion from rectangular to spherical coordinates (note that φ is used
Section 8.3 Trigonometric Equations
 99 Section 8. Trigonometric Equations Objective 1: Solve Equations Involving One Trigonometric Function. In this section and the next, we will exple how to solving equations involving trigonometric functions.
Aluminum Electrolytic Capacitors (Large Can Type)
") Aluminum Electrolytic Capacitors (Large Can Type) Snap-In, 85 C TS-U ECE-S (U) Series: TS-U Features General purpose Wide CV value range (33 ~ 47,000 µf/16 4V) Various case sizes Top vent construction
Aluminum Electrolytic Capacitors (Large Can Type) Snap-In, 85 C TS-U ECE-S (U) Series: TS-U Features General purpose Wide CV value range (33 ~ 47,000 µf/16 4V) Various case sizes Top vent construction
RSDW08 & RDDW08 series
 /,, MODEL SELECTION TABLE INPUT ORDER NO. INPUT VOLTAGE (RANGE) NO LOAD INPUT CURRENT FULL LOAD VOLTAGE CURRENT EFFICIENCY (Typ.) CAPACITOR LOAD (MAX.) RSDW08F-03 344mA 3.3V 2000mA 80% 2000μF RSDW08F-05
Digital motor protection relays
 Digital motor protection relays Specification DMP -S & DMP -Sa DMP -T & DMP -Ta Model No. DMP06-S/Sa DMP60-S/Sa DMP06-T/Ta DMP60-T/Ta Wiring Screw type Tunnel type Panel mount Unit or Extension Note1)
Presenter SNP6000. Register your product and get support at Εγχειρίδιο χρήσης
 Register your product and get support at www.philips.com/welcome Presenter SNP6000 EL Εγχειρίδιο χρήσης 1 a b c d e 2 3 4 Federal Communication Commission Interference Statement This equipment has been
DOUBLE STAGE SCISSORS CAR LIFT TYPE:
 DOUBLE STAGE TYPE: DP-X1 Version: Page: 1.0 1/10 Date: 18.07.08 Range of Application Page: 2/10 Contents 3D LAYOUT... 3 TECHNICAL SPECIFICATION... 5 THROUGH CAR... 6 Plan view... 6 SINGLE ENTRANCE CAR...
CHAPTER 25 SOLVING EQUATIONS BY ITERATIVE METHODS
 CHAPTER 5 SOLVING EQUATIONS BY ITERATIVE METHODS EXERCISE 104 Page 8 1. Find the positive root of the equation x + 3x 5 = 0, correct to 3 significant figures, using the method of bisection. Let f(x) =
Linear diffuser. Dimensions. Description
 Dimensions -- + D -- Description is a rectangular linear diffuser in aluminium. is suitable for both supply and exhaust air. is equipped with air guide baffles, making it possible to use for horizontal
Bulletin 1489 UL489 Circuit Breakers
 Bulletin 489 UL489 Circuit Breakers Tech Data 489-A Standard AC Circuit Breaker 489-D DC Circuit Breaker 489-A, AC Circuit Breakers 489-D, DC Circuit Breakers Bulletin 489-A Industrial Circuit Breaker
1000 VDC 1250 VDC 125 VAC 250 VAC J K 125 VAC, 250 VAC
 Metallized Polyester Film Capacitor Type: ECQE(F) Non-inductive construction using metallized Polyester film with flame retardant epoxy resin coating Features Self-healing property Excellent electrical
Assalamu `alaikum wr. wb.
 LUMP SUM Assalamu `alaikum wr. wb. LUMP SUM Wassalamu alaikum wr. wb. Assalamu `alaikum wr. wb. LUMP SUM Wassalamu alaikum wr. wb. LUMP SUM Lump sum lump sum lump sum. lump sum fixed price lump sum lump
C.S. 430 Assignment 6, Sample Solutions
 C.S. 430 Assignment 6, Sample Solutions Paul Liu November 15, 2007 Note that these are sample solutions only; in many cases there were many acceptable answers. 1 Reynolds Problem 10.1 1.1 Normal-order
UDZ Swirl diffuser. Product facts. Quick-selection. Swirl diffuser UDZ. Product code example:
 UDZ Swirl diffuser Swirl diffuser UDZ, which is intended for installation in a ventilation duct, can be used in premises with a large volume, for example factory premises, storage areas, superstores, halls,
2013 REV 01 ELECTRONICS CAPACITORS. DC Applications Metallized Polypropylene Film Self Healing
 2013 REV 01 POWER EECTRONICS CAPACITORS C Applications Metallized Polypropylene Film Healing OUR MISSION: POWER EECTRONICS AN SPECIA CAPACITORS M.V. PFC CAPACITORS AN BANKS IGHTING CAPACITORS MOTOR RUN
Parts catalogue LAWN MOWER
 OREC ISSUED NO. GR535PRO-1 Parts catalogue LAWN MOWER (EXPORT MODEL) GR535PRO(2Action) MODEL GR535PRO CODE 0278- CONTENTS Fig.1 GEAR CASE------------------------------------------------------------ 1 Fig.2
Quick Installation Guide
 A Installation 1 F H B E C D G 2 www.trust.com/17528/faq Quick Installation Guide C C D Freewave Wireless Audio Set 17528/ 17529 D Installation Configuration Windows XP 4 5 8 Windows 7/ Vista 6 7 9 10
INSTRUCTIONS MANUAL ΕΓΧΕΙΡΙΔΙΟ ΛΕΙΤΟΥΡΓΙΑΣ
 Model/Μοντέλο: WKH-1132 INSTRUCTIONS MANUAL ΕΓΧΕΙΡΙΔΙΟ ΛΕΙΤΟΥΡΓΙΑΣ ENGLISH General Safety Instructions Before commissioning this kettle, please read the instruction manual carefully. Please keep the instruction
Econ 2110: Fall 2008 Suggested Solutions to Problem Set 8 questions or comments to Dan Fetter 1
 Eon : Fall 8 Suggested Solutions to Problem Set 8 Email questions or omments to Dan Fetter Problem. Let X be a salar with density f(x, θ) (θx + θ) [ x ] with θ. (a) Find the most powerful level α test
Συστήματα Διαχείρισης Βάσεων Δεδομένων
 ΕΛΛΗΝΙΚΗ ΔΗΜΟΚΡΑΤΙΑ ΠΑΝΕΠΙΣΤΗΜΙΟ ΚΡΗΤΗΣ Συστήματα Διαχείρισης Βάσεων Δεδομένων Φροντιστήριο 9: Transactions - part 1 Δημήτρης Πλεξουσάκης Τμήμα Επιστήμης Υπολογιστών Tutorial on Undo, Redo and Undo/Redo
Section 7.6 Double and Half Angle Formulas
 09 Section 7. Double and Half Angle Fmulas To derive the double-angles fmulas, we will use the sum of two angles fmulas that we developed in the last section. We will let α θ and β θ: cos(θ) cos(θ + θ)
W-898 Tire Changer Parts
 W-898 Tire Changer Parts 19 30 53 37 32 27 40 54 43 47 44 48 49 45 46 10 8 7 6 5 4 42 51 52 16 17 18 14 24 15 22 21 20 39 43 23 13 12 26 25 3 30 33 31 37 32 29 28 36 38 35 34 11 50 9 1 2 41 32 321 REVISION
Aluminum Electrolytic Capacitors
 Aluminum Electrolytic Capacitors Snap-In, Mini., 105 C, High Ripple APS TS-NH ECE-S (G) Series: TS-NH Features Long life: 105 C 2,000 hours; high ripple current handling ability Wide CV value range (47
Homework 8 Model Solution Section
 MATH 004 Homework Solution Homework 8 Model Solution Section 14.5 14.6. 14.5. Use the Chain Rule to find dz where z cosx + 4y), x 5t 4, y 1 t. dz dx + dy y sinx + 4y)0t + 4) sinx + 4y) 1t ) 0t + 4t ) sinx
DESIGN OF MACHINERY SOLUTION MANUAL h in h 4 0.
 DESIGN OF MACHINERY SOLUTION MANUAL -7-1! PROBLEM -7 Statement: Design a double-dwell cam to move a follower from to 25 6, dwell for 12, fall 25 and dwell for the remader The total cycle must take 4 sec
MRL HYDRAULIC LIFTS TYPE:
 DRO MRL MRL HYDRAULIC LIFTS TYPE: HYD Version: 1.1 Date: 26/04/2012 Page: 1/17 Range of Application 1 Version: 1.1 Date: 26/04/2012 Page: 2/17 Contents 3D LAYOUT... 3 TECHNICAL SPECIFICATION... 4 ACTING
ΕΡΙΤΟΡΕΣ ΚΑΙ ΑΝΘΩΡΟΙ ΚΛΕΙΔΙΑ ΑΝΑΘΕΣΘ ΑΓΩΝΑ ΓΑΦΕΙΟ ΑΓΩΝΩΝ ΟΓΑΝΩΤΙΚΘ ΕΡΙΤΟΡΘ. ζεκηλαρηο 1 ΡΑΓΚΟΣΜΙΑ ΟΜΟΣΡΟΝΔΙΑ (ISAF) ΕΛΛΘΝΙΚΘ ΟΜΟΣΡΟΝΔΙΑ (Ε.Ι.Ο.
 ΕΛΛΘΝΙΚΘ ΟΜΟΣΡΟΝΔΙΑ (Ε.Ι.Ο.") ΑΝΑΘΕΣΘ ΑΓΩΝΑ ΕΡΙΤΟΡΕΣ ΚΑΙ ΑΝΘΩΡΟΙ ΚΛΕΙΔΙΑ ΡΑΓΚΟΣΜΙΑ ΟΜΟΣΡΟΝΔΙΑ (ISAF) ΕΛΛΘΝΙΚΘ ΟΜΟΣΡΟΝΔΙΑ (Ε.Ι.Ο.) ΚΛΑΣΘ 6/6/2009 1 ΟΡΓΑΝΩΣΙΚΗ ΕΠΙΣΡΟΠΗ ΓΡΑΦΕΙΟ ΑΓΩΝΩΝ ΕΠΙΣΡΟΠΗ ΑΓΩΝΩΝ ΕΠΙΣΡΟΠΗ ΕΝΣΑΕΩΝ ΕΠΙΣΡΟΠΗ ΚΑΣΑΜΕΣΡΗΕΩΝ
ΑΝΑΘΕΣΘ ΑΓΩΝΑ ΕΡΙΤΟΡΕΣ ΚΑΙ ΑΝΘΩΡΟΙ ΚΛΕΙΔΙΑ ΡΑΓΚΟΣΜΙΑ ΟΜΟΣΡΟΝΔΙΑ (ISAF) ΕΛΛΘΝΙΚΘ ΟΜΟΣΡΟΝΔΙΑ (Ε.Ι.Ο.) ΚΛΑΣΘ 6/6/2009 1 ΟΡΓΑΝΩΣΙΚΗ ΕΠΙΣΡΟΠΗ ΓΡΑΦΕΙΟ ΑΓΩΝΩΝ ΕΠΙΣΡΟΠΗ ΑΓΩΝΩΝ ΕΠΙΣΡΟΠΗ ΕΝΣΑΕΩΝ ΕΠΙΣΡΟΠΗ ΚΑΣΑΜΕΣΡΗΕΩΝ
The Simply Typed Lambda Calculus
 Type Inference Instead of writing type annotations, can we use an algorithm to infer what the type annotations should be? That depends on the type system. For simple type systems the answer is yes, and
Srednicki Chapter 55
 Srednicki Chapter 55 QFT Problems & Solutions A. George August 3, 03 Srednicki 55.. Use equations 55.3-55.0 and A i, A j ] = Π i, Π j ] = 0 (at equal times) to verify equations 55.-55.3. This is our third
Thermistor (NTC /PTC)
") ISO/TS16949 ISO 9001 ISO14001 2015 Thermistor (NTC /PTC) GNTC (Chip in Glass Thermistor) SMD NTC Thermistor SMD PTC Thermistor Radial type Thermistor Bare Chip Thermistor (Gold & silver Electrode) 9B-51L,
ISO/TS16949 ISO 9001 ISO14001 2015 Thermistor (NTC /PTC) GNTC (Chip in Glass Thermistor) SMD NTC Thermistor SMD PTC Thermistor Radial type Thermistor Bare Chip Thermistor (Gold & silver Electrode) 9B-51L,
LR Series Metal Alloy Low-Resistance Resistor
 Tel : 881745 Fax : 881749 LR Series Metal Alloy LowResistance Resistor This specification is applicable to lead free, halogen free of RoHS directive for metal alloy lowresistance resistor. The product
OPERATING INSTRUCTIONS ΟΔΗΓΙΕΣ ΧΡΗΣΗΣ
 OPERATING INSTRUCTIONS ΟΔΗΓΙΕΣ ΧΡΗΣΗΣ Model No.: WLSF-4050 ΠΑΡΑΚΑΛΩ ΔΙΑΒΑΣΤΕ ΚΑΙ ΦΥΛΑΤΕ ΤΙΣ ΟΔΗΓΙΕΣ ΠΡΟΣΕΧΤΙΚΑ ΠΡΙΝ ΧΡΗΣΙΜΟΠΟΙΗΣΕΤΕ ΤΟΝ ΑΝΕΜΙΣΤΗΡΑ 1 ΕΞΑΡΤΗΜΑΤΑ (Σχήμα 1) 1 Εξώφυλλο μπροστινού προστατευτικό
PTK 1700 A1. TABLE SAW Operation and Safety Notes Original operating instructions
 Anleitung_4340686:_ 07.06.2010 15:59 Uhr Seite 1 PTK 1700 A1 TABLE SAW Operation and Safety Notes Original operating instructions ΕΠΙΤΡΑΠΕΖΙΟ ΔΙΣΚΟΠΡΙΟΝΟ Υποδείξεις χειρισμού και ασφαλείας Πρωτότυπες Οδηγίες
Version: 1.0 Page: 1/15 TYPE: HYDRO SUPERIOR MRL HYDRAULIC LIFTS. Date: Range of Application
 Page: 1/15 Range of Application Page: 2/15 Contents 3D LAYOUT... 3 TECHNICAL SPECIFICATION... 4 HYDRO SUPERIOR - LAYOUT ARRANGEMENT:... 5 SINGLE ENTRANCE GUIDE RAILS AT THE SIDE... 5... 5 SINGLE ENTRANCE
RANGE OF APPLICATION HYDRO DL. ver sion 1.1 / web:
 RANGE OF APPLICATION HYDRO DL ver sion 1.1 / 26-04-2012 Factory Head Office Polykastro Industrial Park 61200 Polykastro, Greece Tel.: +30 23430 20140, 20150 Fax: +30 23430 23701 Athens Office-Showroom
A, B. Before installation of the foam parts (A,B,C,D) into the chambers we put silicone around. We insert the foam parts in depth shown on diagram.
 into the chambers we put silicone around. We insert the foam parts in depth shown on diagram.") Corner Joints Machining, Frame edge sealing. Page ID: frame01 D D C A, B A C B C A 20 60 Before installation of the foam parts (A,B,C,D) into the chambers we put silicone around. We insert the foam parts
Corner Joints Machining, Frame edge sealing. Page ID: frame01 D D C A, B A C B C A 20 60 Before installation of the foam parts (A,B,C,D) into the chambers we put silicone around. We insert the foam parts
(1) Describe the process by which mercury atoms become excited in a fluorescent tube (3)
 Describe the process by which mercury atoms become excited in a fluorescent tube (3)") Q1. (a) A fluorescent tube is filled with mercury vapour at low pressure. In order to emit electromagnetic radiation the mercury atoms must first be excited. (i) What is meant by an excited atom? (1) (ii)
Q1. (a) A fluorescent tube is filled with mercury vapour at low pressure. In order to emit electromagnetic radiation the mercury atoms must first be excited. (i) What is meant by an excited atom? (1) (ii)
Terminal Contact UL Insulation Designation (provided with) style form system approval Flux tight
 style form system approval Flux tight") eatures A miniature PCB Power Relay. form A contact configuration with quick terminal type. 5KV dielectric strength, K surge voltage between coils to contact. Ideal for high rating Home Appliances of heating
eatures A miniature PCB Power Relay. form A contact configuration with quick terminal type. 5KV dielectric strength, K surge voltage between coils to contact. Ideal for high rating Home Appliances of heating
1 Alumina Substrate 4 Edge Electrode (NiCr) 7 Resistor Layer (NiCr) 2 Bottom Electrode (Ag) 5 Barrier Layer (Ni) 8 Overcoat (Epoxy)
 7 Resistor Layer (NiCr) 2 Bottom Electrode (Ag) 5 Barrier Layer (Ni) 8 Overcoat (Epoxy)") ARN series Thin Film High Precision Chip Resistor Features» Advanced thin film technology» Very tight tolerance down to ±0.01%» Extremely low TCR down to ±5ppm/» Wide resistance range 1ohm-3Mega ohm» Miniature
ARN series Thin Film High Precision Chip Resistor Features» Advanced thin film technology» Very tight tolerance down to ±0.01%» Extremely low TCR down to ±5ppm/» Wide resistance range 1ohm-3Mega ohm» Miniature
Model: RT33D6AAE. Compact Double Door Refrigerator. Owner s manual
 Model: RT33D6AAE Compact Double Door Refrigerator Owner s manual COPYRIGHT STATEMENT 2015 Hisense Company Ltd. All Rights Reserved. All material in this Owner's Manual is the property of Hisense Company
Parts catalogue LAWN MOWER
 OREC ISSUED NO. GRH535PRO-3 Parts catalogue LAWN MOWER (EXPORT MODEL) GRH535PRO(2Action) MODEL GRH535PRO CODE 0276- CONTENTS Fig. 1 GEAR CASE -------------------------------------- 1 Fig. 2 GEAR CASE INSIDE,
Block Ciphers Modes. Ramki Thurimella
 Block Ciphers Modes Ramki Thurimella Only Encryption I.e. messages could be modified Should not assume that nonsensical messages do no harm Always must be combined with authentication 2 Padding Must be
SPEEDO AQUABEAT. Specially Designed for Aquatic Athletes and Active People
 SPEEDO AQUABEAT TM Specially Designed for Aquatic Athletes and Active People 1 2 Decrease Volume Increase Volume Reset EarphonesUSBJack Power Off / Rewind Power On / Fast Forward Goggle clip LED Status
1. Πως μειώνεται η ταχύτητα των καυσαερίων από το σημείο εξόδου τους στο ακροφύσιο εξόδου του κινητήρα? 2. Με ποιους τρόπους γίνεται η σήμανση της
 1. Πως μειώνεται η ταχύτητα των καυσαερίων από το σημείο εξόδου τους στο ακροφύσιο εξόδου του κινητήρα? 2. Με ποιους τρόπους γίνεται η σήμανση της επικίνδυνης περιοχής μπροστά από το κινητήρα? 3. Ποιοιείναιοικύκλοιασφαλείαςγύρωαπότοαεροσκάφοςκαιτιαντιπροσωπεύουν?
Οδηγίες Χρήσης BWR5106
 Οδηγίες Χρήσης BWR5106 Περιγραφή εργαλείου Οι αντλίες χειρός είναι ένα εργαλείο με την ικανότητα, πιέζοντας τον λεβιέ πάνω κάτω να πρεσάρει γράσο σε μεγάλη πίεση και με την βοήθεια αυτής να γρασάρει οπού
TIME SWITCHES AND TWILIGHT SWITCHES
 W ANALOG DIN-RAIL TIME SWITCH QUARTZ, SERIES TEMPUS ANALOG 244 W SCHRACK-INFO Analogue time switch 1 channel Daily program With power reserve (NiMH rechargeable battery) Synchronised with mains Shortest
MRL HYDRAULIC LIFTS TYPE:
 Page: 1/18 Range of Application Page: 2/18 Contents 3D LAYOUT... 3 TECHNICAL SPECIFICATION... 4 ACTING 2:1... 4 LAYOUT ARRANGEMENT: ACTING 2:1... 5 SINGLE ENTRANCE GUIDE RAILS AT THE SIDE... 5 Plan view...
BFN6000 ΑΝΕΜΙΣΤΗΡΑΣ ΟΡΘΟΣΤΑΤΗΣ. Owner s manual. Μετάφραση του πρωτοτύπου των οδηγιών χρήσης
 BFN6000 ΑΝΕΜΙΣΤΗΡΑΣ ΟΡΘΟΣΤΑΤΗΣ Μετάφραση του πρωτοτύπου των οδηγιών χρήσης Owner s manual GR Εικ.1 1 Κέντρο προφυλακτήρα 9 Κεντρικός άξονας 16 Εσωτερικό τμήμα στύλου 2 Εμπρόσθιο τμήμα προφυλακτήρα 10 Περίβλημα
Section 1: Listening and responding. Presenter: Niki Farfara MGTAV VCE Seminar 7 August 2016
 Section 1: Listening and responding Presenter: Niki Farfara MGTAV VCE Seminar 7 August 2016 Section 1: Listening and responding Section 1: Listening and Responding/ Aκουστική εξέταση Στο πρώτο μέρος της
ΟΔΗΓΙΕΣ ΧΡΗΣΗΣ ΒΡΕΦΙΚΟΥ ΑΝΑΠΗΡΙΚΟΥ ΑΜΑΞΙΔΙΟΥ / Baby s Wheelchairs User Manual
 ΟΔΗΓΙΕΣ ΧΡΗΣΗΣ ΒΡΕΦΙΚΟΥ ΑΝΑΠΗΡΙΚΟΥ ΑΜΑΞΙΔΙΟΥ / Baby s Wheelchairs User Manual 0808818 ΟΔΗΓΙΕΣ ΕΓΚΑΤΑΣΤΑΣΗΣ/SETUP INSTRUCTIONS Ανοίξτε το αμαξίδιο, τραβώντας τις λαβές, δώστε πλήρη έκταση στο αμαξίδιο τραβώντας
aluset sliding system for doors and windows
 aluset sliding system for doors and windows ÐÉÓÔÏÐÏÉÇÔÉÊÁ - CERTIFICATES 4 aluset ÔÅ ÍÉÊÁ ÁÑÁÊÔÇÑÉÓÔÉÊÁ ÓÕÓÔÇÌÁÔÏÓ - SYSTEM TECHNICAL FEATURES aluset 5 ÔÅ ÍÉÊH ÐÅÑÉÃÑÁÖÇ - TECHNICAL DESCRIPTION TEXNIKH
Advanced Subsidiary Unit 1: Understanding and Written Response
 Write your name here Surname Other names Edexcel GE entre Number andidate Number Greek dvanced Subsidiary Unit 1: Understanding and Written Response Thursday 16 May 2013 Morning Time: 2 hours 45 minutes