FOOD PROCESSOR SKM 550 B1 FOOD PROCESSOR ΚΟΥΖΙΝΟΜΗΧΑΝΗ. Οδηүίες χρήσης. Operating instructions KÜCHENMASCHINE. Bedienungsanleitung IAN
|
|
|
- Ξένη Δασκαλόπουλος
- 5 χρόνια πριν
- Προβολές:
Transcript


1 FOOD PROCESSOR SKM 550 B1 FOOD PROCESSOR Operating instructions ΚΟΥΖΙΝΟΜΗΧΑΝΗ Οδηүίες χρήσης KÜCHENMASCHINE Bedienungsanleitung IAN
2 Before reading, unfold both pages containing illustrations and familiarise yourself with all functions of the device. Πριν ξεκινήσετε την ανάγνωση, ανοίξτε τις δυο σελίδες με τις εικόνες και εξοικειωθείτε με όλες τις λειτουργίες της συσκευής. Klappen Sie vor dem Lesen die beiden Seiten mit den Abbildungen aus und machen Sie sich anschließend mit allen Funktionen des Gerätes vertraut. GB / IE / CY Operating instructions Page 1 GR / CY Οδηүίες χρήσης Σελίδα 15 DE / AT / CH Bedienungsanleitung Seite 29


3 A B C D E
4 F G H I
5 Contents Introduction....2 Proper use....2 Package contents....2 Appliance description...2 Safety instructions....3 First use...6 Operating positions....6 Working with the kneading hook, beater and whisk...7 Refilling with ingredients...7 After you have finished using your appliance...8 Working with the continuous shredder...8 After using your appliance...9 Working with the blender...9 Adding more ingredients...9 After you have finished using your appliance...10 Cleaning and care...10 Cleaning the appliance...10 Cleaning the mixing bowl with lid, continuous shredder, lid with pusher, blender lid and all accessories...10 Cleaning the blender...11 Storage...11 Troubleshooting Technical data...11 Warranty and service Disposal Importer...12 Recommended filling quantities SKM 550 B1 GB IE CY 1
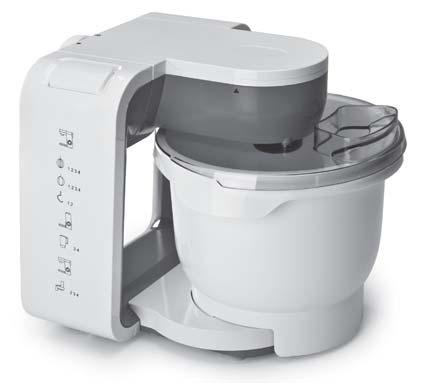
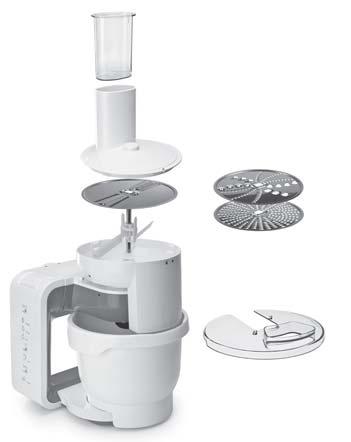
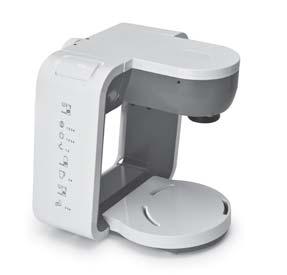
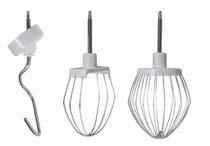
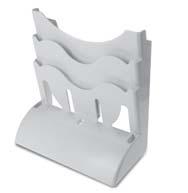
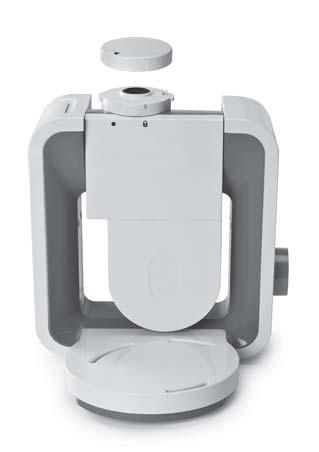
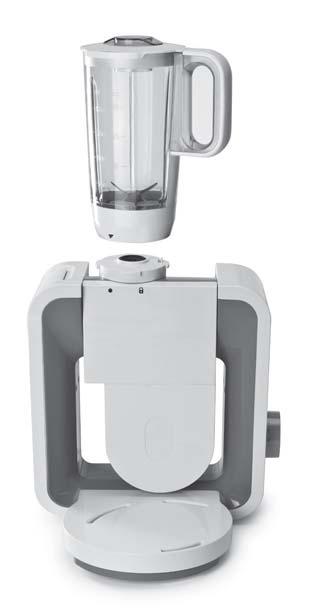
6 Introduction Congratulations on the purchase of your new appliance. You have selected a high-quality product. The operating instructions are part of this product. They contain important information on safety, use and disposal. Before using the product, familiarise yourself with all handling and safety guidelines. Use this product only as described and only for the specified areas of application. Please also pass these operating instructions on to any future owner(s). Proper use This appliance is intended exclusively for processing foodstuffs in normal household quantities. This appliance is intended solely for use in private homes. It is not suitable for commercial use! This appliance is intended only for private use in enclosed, dry spaces. It must not be used outdoors. The appliance may only be used with original accessories. Package contents Food processor Mixing bowl with lid Blender with lid and measuring jug Continuous shredder with pusher Rotary cutting disc (thick and thin) Rotary shredding disc (coarse and medium-fine) Grating disc (fine) Kneading hooks with dough deflector Beater Whisk Accessories holder 2 screws (3.5 x 22 mm) 2 wall plugs (6 mm) Operating instructions NOTE One of the discs for the continuous shredder is pre-fitted inside the shredder on purchase! Check contents for completeness and damage immediately after unpacking. Contact Customer Services if necessary. Appliance description Fold out the flaps on the front and rear covers of this operating manual. Image E: Kneading hook with dough deflector Whisk Beater Blender with lid and measuring jug Accessories holder Mixing bowl with lid Continuous shredder Shredding disc Grating disc Drive shaft for continuous shredder Rotary cutting disc Lid with pusher for the continuous shredder Image H: Release button Rotary switch Pivoting arm Drive unit Recesses for the mixing bowl Cable storage compartment 2 GB IE CY SKM 550 B1
7 Safety instructions DANGER ELECTRIC SHOCK! The appliance must only be connected to a correctly installed and earthed mains power socket. Ensure that the rating for your local power supply corresponds with the details on the rating plate of the appliance. Ensure that the power cable does not become wet or moist during use. Route the cable in such a way that it cannot be crushed or damaged. Keep the power cable away from hot surfaces. Do not perform any repairs on the appliance. All repairs must be performed by our Customer Service Unit or by a qualified specialist technician. Remove the plug from the mains power socket when the appliance is being cleaned or in the event of a fault. It is not sufficient to switch off the appliance, as the appliance is subject to mains voltage for as long as the plug is connected to the mains power socket. Always remove the plug from the mains power socket when the appliance is not in use. To avoid risks, have defective plugs and/or power cables replaced immediately by a qualified specialist technician or our Customer Service Department. The appliance and its connecting cable must be kept away from children. Never submerge the appliance in water or other liquids. SKM 550 B1 GB IE CY 3
8 WARNING! RISK OF INJURY! Always disconnect the appliance from the mains power supply when fitting or removing accessories. This will prevent unintentional activation of the appliance. The appliance will begin running again after any power outage is over! The appliance should always be disconnected from the mains when unattended and before assembly, disassembly or cleaning. This appliance should not be used by children. Use only the original accessory parts for this appliance. Accessory parts from other manufacturers may not be suitable, and this may lead to risks! This appliance can be used by persons with reduced physical, sensory or mental capabilities or lack of experience and knowledge if they have been given supervision or instruction concerning safe use of the appliance, and if they are aware of the potential risks. Children must not use the appliance as a plaything. The grating, cutting and shredding discs and the blender blades are very sharp! Take care when inserting and removing the grating, cutting and shredding discs, as well as during cleaning! 4 GB IE CY SKM 550 B1
9 WARNING! RISK OF INJURY! Warning the cutting blade is very sharp! For this reason, take great care when removing the blender jug. Never use the appliance for purposes other than those described in these instructions. Otherwise there is a risk of serious injury! Do not change accessories unless the drive unit is entirely at a standstill and the blender is unplugged from the power supply! The appliance will run on for a short time after being switched off! Never leave the appliance unattended! Before changing any accessories or additional parts that move during operation, the appliance must be switched off and disconnected from mains power. While the appliance is in operation, do not put anything other than the ingredients to be processed into the mixing bowl, continuous shredder or blender. Do not put hands and foreign objects into the filling shaft or the blender to avoid the risk of injury or damage to the appliance. ATTENTION! PROPERTY DAMAGE! Do not operate the appliance without ingredients. Risk of overheating! Never fill the appliance with hot ingredients! SKM 550 B1 GB IE CY 5
10 First use 1) Take all the parts out of the box and remove the packaging material and any protective wrapping or stickers. 2) Clean all components as described in the section Cleaning and Care. Ensure that all parts are completely dry. 3) Place the appliance on a clean and level surface. 4) Secure the appliance to the surface using its four suction discs. 5) Pull the power cord out of the cable storage compartment. 6) Insert the plug into the mains power socket. NOTE You can store the kneading hook, the whisk, the beater and the shredding disc, the grating disc and the rotary cutter disc in the accessories holder. Operating positions ATTENTION! DAMAGE TO PROPERTY! Only operate the appliance with the accessories correctly inserted and in the operating positions shown in this table. NEVER operate the appliance without ingredients. 1 2 Position Accessories DANGER ELECTRIC SHOCK! If you want to attach the accessories holder to the wall using the mounting materials provided, you should make sure before you start drilling that there are no electric cables, wires or pipes running behind the wall surface where you want to drill! 7) Mark the drill holes on the wall using the accessories holder. 8) Use a 6 mm bit to drill holes at the pre-marked positions on the wall. 9) Push a wall plug into each hole. 10) Screw the screws into the wall plugs so that they stand proud of the wall just enough to allow you to hang the accessories holder on them. 11) Place the accessories holder over the screws and push it downwards so that the accessories holder fits firmly on the screws Positioning the mixing bowl Using the kneading hook, beater and whisk Insertion of large quantities of foodstuffs for processing 6 GB IE CY SKM 550 B1
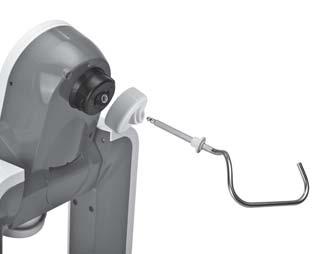
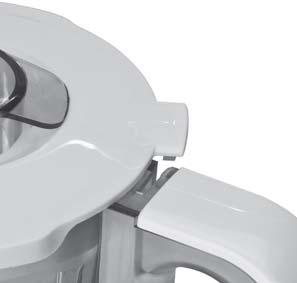
11 Working with the kneading hook, beater and whisk WARNING! RISK OF INJURY! Under no circumstances should you place your hands or fingers in the mixing bowl during operation! Danger of injury due to rotating parts! Switch from one accessory to another only when the drive unit is at a complete standstill! After being switched off, the drive unit will continue to run for a short time. In cases of malfunction, switch the appliance off and remove the plug from the wall socket. This will prevent the appliance from becoming switched on again unintentionally. NOTE The appliance may only be used when the drive hubs not being used are fitted with their protective covers. Proceed as follows to prepare the appliance for operation using the kneading hook, beater and whisk : 1) Press down the release button and move the pivoting arm into operating position 4 (see the section Operating positions ) (Image A). 2) Set the mixing bowl into place. Check that the base of the mixing bowl is inserted fully into the recesses provided for it on the blender. 3) Press down the release button and move the pivoting arm into operating position 1 (Image A). 4) Set the rotary switch to P and hold it in this position until the drive unit settles in its Park position (Image B). If the drive unit doesn t move, it is already in its park position (Fig. 2). 5) Press down the release button and move the pivoting arm into operating position 4 (Image A). 6) If you want to use the kneading hook, insert the dough deflector into the drive unit (Image D). Ensure that the hole through which the kneading hook is inserted is lying over the mounting hole on the drive unit. 7) Depending on the task to be performed, insert the kneading hook, beater or whisk so that they firmly click firmly into the drive unit. 8) Add the ingredients you wish to process into the mixing bowl. NOTE While kneading and/or mixing, please note that the dough in the mixing bowl will increase in volume or will be pressed upwards by the tool. Take note of the table in the section "Recommended filling quantities". 9) Press down the release button and move the pivoting arm down into operating position 1 (Image A). 10) Slide the lid onto the mixing bowl so that the catches on the pivoting arm click into place. 11) Turn the rotary switch to the required setting. Refilling with ingredients Add the ingredients through the hole in the lid during operation. Or: 1) Switch the appliance off using the rotary switch. 2) Set the rotary switch to P and hold it in this position until the drive unit comes to a standstill (Image B). 3) Remove the lid. 4) Press down the release button and move the pivoting arm into operating position 5. 5) Add the ingredients. SKM 550 B1 GB IE CY 7
12 After you have finished using your appliance 1) Switch the appliance off using the rotary switch. 2) Set the rotary switch to P and hold it in this position until the drive unit comes to a standstill (Image B). 3) Remove the lid. 4) Press down the release button and move the pivot arm into operating position 4. 5) Remove the attachment you have been using from the drive unit. 6) Remove the mixing bowl. 7) Clean the appliance (see section Cleaning and care ). Working with the continuous shredder WARNING! RISK OF INJURY! To avoid personal injury and damage to the appliance, never insert or place your hands or any foreign objects into the feed tube. Always use the pusher and no other implement or body part to push ingredients into the appliance. Danger of injury due to rotating parts! Switch from one accessory to another only when the drive unit is at a complete standstill! After being switched off, the drive unit will continue to run for a short time. In cases of malfunction, switch the appliance off and remove the plug from the wall socket. This will prevent the appliance from becoming switched on again unintentionally. NOTE The appliance may only be used when the drive hubs not being utilised are fitted with their protective covers. Make sure that neither the kneading hooks, the whisk, or the beater are attached to the pivot arm. Proceed as follows to prepare the appliance for operation using the continuous shredder : 1) Press down the release button and move the pivot arm into operating position 4 (see the section Operating positions ). 2) Set the mixing bowl into place. The base of the mixing bowl must click into the recesses on the appliance. 3) Press down the release button and move the pivot arm into operating position 2. 4) Remove the protective cover from the drive for the continuous shredder (Image C). 5) Insert the continuous shredder into the hub socket (aligning the marking on the continuous shredder with the marking on the pivoting arm ). Turn it in an anti-clockwise direction until the continuous shredder clicks firmly in place (and the marking on the continuous shredder is aligned with the marking on the pivoting arm ). 6) Set the drive shaft into place. 7) Depending on the task you want to perform, place the cutting, shredding or grating disc onto the drive shaft of the continous shredder. 8) Place the lid with the pusher onto the continuous shredder (so that the marking on the lid is lined up with the marking on the continuous shredder ) and lock the lid in (marking on the lid is lined up with the marking on the continuous shredder ). 9) Turn the rotary switch to the required setting. NOTE Do not press too much food into the continuous shredder. Take note of the table in the section "Recommended filling levels". 10) Add the ingredients through the opening in the lid with the help of the pusher. 8 GB IE CY SKM 550 B1
13 After using your appliance 1) Switch the appliance off using the rotary switch. 2) Turn the continuous shredder anti-clockwise and remove it. 3) Disassemble the continuous shredder and clean all parts as shown in the section Cleaning and care. Working with the blender WARNING! RISK OF INJURY! Allow hot fluids to cool to a lukewarm temperature (approx C) before pouring them into the blender. WARNING! RISK OF INJURY FROM SHARP KNIFE/ROTATING DRIVE! Never put your hand into the attached blender while it is running! Remove the blade from the blender only when it is at a complete standstill. Only use the blender with the lid firmly in position. In cases of malfunction, switch the appliance off and remove the plug from the wall socket. This will prevent the appliance from becoming switched on again unintentionally. Proceed as follows to prepare the appliance for operation using the blender : 1) Press down the release button and move the pivot arm into operating position 3 (see the section Operating positions ). 2) Remove the protective cover for the blender drive hub (turn so that the marking on the protective cover for the blender drive hub is in line with the marking on the appliance itself) (Image F). 3) Position the blender on top of the appliance (so that the marking on the blender lines up with the marking on the appliance). Turn the blender anti-clockwise until the stop (so that the marking on the blender lines up with the marking on the appliance itself) (Image G). 4) Add the ingredients. Maximum fill quantity: approx. 1 litre; Foaming liquids, maximum 0.5 litre; Ideal processing quantity for solids: g. NOTE Take note of the table in the section "Recommended filling quantities". 5) Place the lid onto the measuring jug slightly offset and then turn it until the lid clicks into place (Image I). 6) Turn the rotary switch to the required setting. Adding more ingredients 1) Switch the appliance off using the rotary switch. 2) Rotate the lid of the blender a little (Image I), remove the lid and add the ingredients you want to mix or 3) Rotate the measuring jug, which is placed in the lid of the blender, by 90 and remove it. Then gradually add the solid ingredients using the opening provided for this purpose. SKM 550 B1 GB IE CY 9
14 After you have finished using your appliance 1) Switch the appliance off using the rotary switch. 2) Turn the blender clockwise and remove it. NOTE Ideally, you should clean the blender immediately after use (see the section "Cleaning and care"). This makes food residues easier to remove. Cleaning and care DANGER ELECTRIC SHOCK! Before cleaning the appliance, disconnect the plug from the mains power socket! Risk of electric shock! NEVER immerse the appliance in water or any other liquid! ATTENTION! DAMAGE TO PROPERTY! Do not use abrasive or aggressive cleaning materials. These may damage the surfaces of your appliance. TIPS It is best to clean the appliance directly after use. This makes food residues easier to remove. Processing foodstuffs containing strong pigments, such as carrots, may cause staining of the plastic parts. Such stains can be removed using a little cooking oil. Cleaning the appliance Wipe the appliance with a damp cloth. For stubborn soiling use a mild detergent on the cloth. Wipe off any detergent residue using a cloth moistened with clean water. Then carefully dry the appliance. Cleaning the mixing bowl with lid, continuous shredder, lid with pusher, blender lid and all accessories Clean all accessories, the mixing bowl with its lid, the blender lid and measuring jug, the protective cover for the drive hub, the continuous shredder and its lid with the pusher as well as the shredding disc, grating disc and the rotary cutting disc in warm water with a little detergent. Any residues can be removed with a washing-up brush. Rinse all parts with warm clean water and make sure that all parts are dry before re-using them. NOTE The accessories, the mixing bowl with its lid, the blender lid and measuring jug, the protective cover for the drive hub, the continuous shredder and its lid with the pusher as well as the shredding disc, grating disc and the rotary cutting disc are also suitable for cleaning in the dishwasher. If you clean them in the dishwasher, please ensure that no plastic parts become trapped under pressure between other objects. This may cause them to become deformed. Wherever possible, place all plastic parts in the top basket of the dishwasher. 10 GB IE CY SKM 550 B1
15 Cleaning the blender WARNING! RISK OF INJURY! Do not handle the blender knife with your bare hands. ATTENTION! DAMAGE TO PROPERTY! The blender is not suitable for cleaning in a dishwasher. Cleaning it in a dishwasher will cause irreparable damage to the blender. Clean the blender in warm water with a little mild detergent. Afterwards, rinse all parts with clean water so that no detergent residues remain. Troubleshooting If the appliance suddenly stops working: The appliance has overheated and triggered the automatic safety cut-out. Turn the rotary switch to 0. Remove the plug from the wall socket. Allow the appliance to cool for 15 minutes. If the appliance has not yet cooled off completely after 15 minutes, it will not start. Wait a further 15 minutes and try switching on again. In most cases, you an also achieve sufficiently hygienic cleaning directly after use in the following way: 1) Put some water containing a little detergent into the fully assembled blender. 2) Place the lid onto the measuring jug slightly offset and then turn it until the lid clicks into place (Image I). 3) Switch on the blender for a few seconds. 4) Pour out the washing water. Any residues can be removed with a washing-up brush. 5) Afterwards, rinse out the blender with plenty of clean water, so that all detergent residues are removed. Storage Place the mains cable in the cable storage compartment when storing the appliance. Store the cleaned appliance in a clean, dust-free and dry location. If the appliance does not switch itself on: Check that the plug is correctly connected to a wall socket. Check to make sure the protective cover for the drive hub for the blender and for the continuous shredder and the mixing bowl are all positioned correctly and clicked into place. Check to see if the pivoting arm is in the required position (see section Operating positions ). If the steps described above do not solve the problem, then the appliance is defective. Arrange for it to be repaired by a qualified specialist technician or by the Customer Service Department. Technical data Input voltage: Power consumption: Max. capacity Mixing bowl: Blender: V ~/50 Hz 550 W approx. 3.8 l approx. 1 l Protection class: II / All of the parts of this appliance that come into contact with food are food-safe. SKM 550 B1 GB IE CY 11
16 Warranty and service You are provided a 3-year warranty on this appliance, valid from the date of purchase. This appliance has been manufactured with care and inspected meticulously prior to delivery. Please retain your receipt as proof of purchase. In the event of a warranty claim, please call your local Customer Service centre. This is the only way to guarantee free return of your goods. The warranty only covers claims for material and manufacturing defects, not for transport damage, parts subject to wear and tear or for damage to fragile components such as switches or batteries. This appliance is intended solely for private use and not for commercial purposes. The warranty shall be deemed void if this product has been subjected to misuse or improper handling, use of force or any interventions not carried out by one of our authorised service centres. Your statutory rights are not restricted by this warranty. The warranty period is not prolonged by repairs effected under the warranty. This also applies to replaced and repaired components. Any damage and defects present at the time of purchase must be reported immediately after unpacking, but no later than two days after the date of purchase. Repairs effected after expiry of the warranty period shall be subject to charge. Service Great Britain Tel.: ( 0.10/Min.) kompernass@lidl.co.uk IAN Service Ireland Tel.: (0,08 EUR/Min., (peak)) (0,06 EUR/Min., (off peak)) kompernass@lidl.ie IAN CY Service Cyprus Tel.: kompernass@lidl.com.cy IAN Disposal Under no circumstance should the appliance be disposed of as standard domestic waste. This product is subject to the provisions of European Directive 2012/19/EU. Dispose of the appliance via an approved waste disposal company or your municipal waste disposal facility. Please observe applicable regulations. Please contact your waste disposal centre if you are in any doubt. The packaging for this product is made from environmentally friendly material and can be disposed of at your local recycling plant. Importer KOMPERNASS HANDELS GMBH BURGSTRASSE BOCHUM GERMANY 12 GB IE CY SKM 550 B1
17 Recommended filling quantities Attachment Accessories Food Amount Time Level Blender Continuous shredder Mixing bowl - Juice 400 g ingredients ml water 30 sec. 3, 4 - Nuts, almonds 100 g 20 sec. 3, 4 - Ice cubes 110 g 10 sec. 3, 4 - Liquids 1000 ml 10 sec. 3, 4 carrots, potatoes, cucumber carrots, potatoes, cucumber carrots, potatoes, cucumber carrots, potatoes, cucumber carrots, potatoes, cucumber Yeast dough Spritz cookie pastry 500 g *1 25 sec. 500 g *2 50 sec. 500 g 25 sec. 500 g *1 25 sec. 500 g *2 40 sec. 500 g flour, 1 egg, 80 g oil (at room temperature), 80 g sugar, ml warm milk, 25 g fresh yeast or 1 sachet of dry yeast, 1 pinch of salt *3 125 g butter (at room temperature), g sugar, 1 egg, 1 pinch salt, 250 g flour *4 1st mixing process: 2 min. 2nd mixing process: 10 min. 1st mixing process: 30 sec. 2nd mixing process: 6 min. Meringue 8 egg whites 2-3 min. 4 Double cream (30% fat content) 600 ml approx. 3 min. 4 *1: Use the coarse side of the rotary shredder disc or rotary cutting disc. *2: Use the fine side of the rotary shredder disc or rotary cutting disc. *3: The maximum volume for yeast dough is about one and a half times the quantities given in the recipe. *4: The maximum volume for spritz cookie pastry amounts to about one and a half times to twice the quantities given in the recipe. 2, 3, 4 2, 3, 4 2, 3, 4 2, 3, 4 2, 3, , 3, 4 SKM 550 B1 GB IE CY 13
18 14 GB IE CY SKM 550 B1
19 Περιεχόμενα Εισαγωγή Προβλεπόμενη χρήση Παραδοτέος εξοπλισμός Περιγραφή συσκευής Υποδείξεις ασφαλείας Πρώτη θέση σε λειτουργία Θέσεις λειτουργίας Εργασία με άγκιστρο ζυμώματος, χτυπητήρι και αναδευτήρα...21 Προσθήκη υλικών...21 Μετά την εργασία...22 Εργασία με το εξάρτημα τοποθέτησης Μετά την εργασία...23 Εργασία με το μίξερ...23 Προσθήκη υλικών...23 Μετά την εργασία...24 Καθαρισμός και φροντίδα...24 Καθαρισμός συσκευής...24 Καθαρισμός μπολ ανάμειξης με καπάκι, εξαρτήματος τοποθέτησης, καπακιού με εξάρτημα ώθησης, καπακιού του μίξερ και αξεσουάρ...24 Καθαρισμός μίξερ...25 Αποθήκευση Διόρθωση σφαλμάτων Τεχνικά χαρακτηριστικά Εγγύηση και σέρβις Απόρριψη Εισαγωγέας Προτεινόμενες ποσότητες πλήρωσης SKM 550 B1 GR CY 15
20 Εισαγωγή Συγχαρητήρια για την αγορά της νέας σας συσκευής. Αποφασίσατε έτσι για την απόκτηση ενός προϊόντος υψηλής ποιότητας. Οι οδηγίες χρήσης είναι τμήμα αυτού του προϊόντος. Περιέχουν σημαντικές υποδείξεις για την ασφάλεια, τη χρήση και την απόρριψη. Πριν από τη χρήση του προϊόντος, εξοικειωθείτε με όλες τις υποδείξεις χειρισμού και ασφάλειας. Χρησιμοποιείτε το προϊόν μόνο όπως περιγράφεται και για τους αναφερόμενους τομείς χρήσης. Παραδώστε όλα τα έγγραφα σε περίπτωση παράδοσης του προϊόντος σε τρίτους. Προβλεπόμενη χρήση Αυτή η συσκευή προορίζεται αποκλειστικά για την επεξεργασία τροφίμων σε συνηθισμένες ποσότητες. Αυτή η συσκευή προορίζεται αποκλειστικά για χρήση σε νοικοκυριά. Μην τη χρησιμοποιείτε για επαγγελματικό σκοπό! Αυτή η συσκευή ενδείκνυται μόνο για ιδιωτική χρήση σε κλειστούς και προστατευμένους από τη βροχή χώρους. Μην τη χρησιμοποιείτε σε εξωτερικούς χώρους! Η συσκευή επιτρέπεται να χρησιμοποιείται μόνο με γνήσια εξαρτήματα. Παραδοτέος εξοπλισμός Κούζίνομηχανη Μπολ ανάμειξης με καπάκι Μίξερ με καπάκι και δοχείο μέτρησης Εξάρτημα τοποθέτησης με εξάρτημα ώθησης Περιστρεφόμενος δίσκος κοπής (χοντρά και λεπτά) Περιστρεφόμενος δίσκος κοπής σε φέτες (χοντρά και μέτρια) Δίσκος για τρίψιμο (λεπτά) Άγκιστρο ζυμώματος με εξάρτημα απομάκρυνσης ζύμης Χτυπητήρι Αναδευτήρας Βάση αξεσουάρ 2 βίδες (3,5 x 22χιλ.) 2 ούπα (6χιλ.) Οδηγίες χρήσης ΥΠΟΔΕΙΞΗ Ένας εκ των δίσκων κοπής για το εξάρτημα τοποθέτησης είναι ήδη προεγκατεστημένος με την παράδοση στο εξάρτημα τοποθέτησης! Ελέγξτε τον παραδοτέο εξοπλισμό ως προς την πληρότητα και για ζημιές, απευθείας μετά την αποσυσκευασία. Απευθυνθείτε, εάν απαιτείται, στο τμήμα σέρβις. Περιγραφή συσκευής Ξεδιπλώστε τις αναδιπλούμενες σελίδες στο μπροστινό και πίσω κάλυμμα αυτών των οδηγιών χρήσης: Εικόνα Ε: Άγκιστρο ζυμώματος με εξάρτημα απομάκρυνσης ζύμης Αναδευτήρας Χτυπητήρι Μίξερ με καπάκι και δοχείο μέτρησης Βάση αξεσουάρ Μπολ ανάμειξης με καπάκι Εξάρτημα τοποθέτησης Δίσκος για τρίψιμο Περιστρεφόμενος δίσκος κοπής σε φέτες Άξονας μετάδοσης κίνησης εξαρτήματος τοποθέτησης Περιστρεφόμενος δίσκος κοπής Καπάκι με εξάρτημα ώθησης για το εξάρτημα τοποθέτησης Εικόνα H: Πλήκτρο απασφάλισης Περιστρεφόμενος διακόπτης Περιστρεφόμενος βραχίονας Σύστημα μετάδοσης κίνησης Εγκοπές για το μπολ ανάμειξης Θήκη φύλαξης καλωδίου 16 GR CY SKM 550 B1
21 Υποδείξεις ασφαλείας ΚΙΝΔΥΝΟΣ ΗΛΕΚΤΡΟΠΛΗΞΙΑΣ! Συνδέετε τη συσκευή μόνο σε μια σύμφωνα με τις προδιαγραφές εγκατεστημένη και γειωμένη πρίζα. Η τάση δικτύου πρέπει να συμφωνεί με τα στοιχεία στην πινακίδα τύπου της συσκευής. Προσέχετε ώστε κατά τη λειτουργία το καλώδιο να μη βρέχεται ή υγραίνεται. Περνάτε το κατά τέτοιο τρόπο, ώστε να μην πιάνεται ή φθείρεται. Κρατάτε το καλώδιο μακριά από καυτές επιφάνειες. Μη διεξάγετε εργασίες επισκευών στη συσκευή. Οποιεσδήποτε επισκευές πρέπει να διεξάγονται μέσω του τμήματος εξυπηρέτησης πελατών ή από ειδικό προσωπικό. Τραβάτε το βύσμα από την πρίζα, όταν καθαρίζετε τη συσκευή ή σε περίπτωση βλάβης. Η απενεργοποίηση από μόνη της δεν αρκεί, διότι υπάρχει ακόμα τάση στη συσκευή, όσο το βύσμα βρίσκεται στην πρίζα. Αποσυνδέετε το βύσμα από την πρίζα, εάν η συσκευή δεν χρησιμοποιείται. Τα βύσματα ή τα καλώδια που έχουν υποστεί βλάβη πρέπει να αντικαθίστανται αμέσως από εξουσιοδοτημένο εξειδικευμένο προσωπικό ή από το τμήμα εξυπηρέτησης πελατών, ώστε να αποφεύγονται κίνδυνοι. Η συσκευή και το καλώδιο σύνδεσής της πρέπει να φυλάσσονται μακριά από τα παιδιά. Δεν επιτρέπεται σε καμία περίπτωση να βυθίσετε τη συσκευή σε νερό ή άλλα υγρά. SKM 550 B1 GR CY 17
22 ΠΡΟΕΙΔΟΠΟΙΗΣΗ! ΚΙΝΔΥΝΟΣ ΤΡΑΥΜΑΤΙΣΜΟΥ! Αποσυνδέετε τη συσκευή από την παροχή ρεύματος όταν τοποθετείτε ή απομακρύνετε εξαρτήματα. Έτσι αποφεύγεται μια μη ηθελημένη ενεργοποίηση της συσκευής. Μετά από μια διακοπή ρεύματος η συσκευή ενεργοποιείται πάλι! Η συσκευή πρέπει να αποσυνδέεται πάντα από το δίκτυο όταν δεν επιτηρείται και πριν από τη συναρμολόγηση, την αποσυναρμολόγηση ή τον καθαρισμό. Η συσκευή αυτή δεν επιτρέπεται να χρησιμοποιείται από παιδιά. Χρησιμοποιείτε μόνο τα γνήσια αξεσουάρ για αυτή τη συσκευή. Αξεσουάρ άλλων κατασκευαστών πιθανώς να μην ενδείκνυνται και μπορεί να οδηγήσουν σε κινδύνους! Μπορεί να γίνεται χρήση αυτής της συσκευής από άτομα με μειωμένες φυσικές, αισθητηριακές ή νοητικές ικανότητες ή με έλλειψη εμπειρίας και/ή γνώσεων, εφόσον επιτηρούνται ή έχουν εκπαιδευτεί αναφορικά με την ασφαλή χρήση της συσκευής και έχουν κατανοήσει τους επακόλουθους κινδύνους. Τα παιδιά δεν επιτρέπεται να παίζουν με τη συσκευή. Προσοχή: οι δίσκοι κοπής και κοπής σε φέτες, καθώς και η λεπίδα του μίξερ είναι πολύ αιχμηρά! Να είστε προσεκτικοί κατά την τοποθέτηση και απομάκρυνση, καθώς και κατά τον καθαρισμό των δίσκων κοπής και κοπής σε φέτες και της λεπίδας μίξερ! 18 GR CY SKM 550 B1
23 ΠΡΟΕΙΔΟΠΟΙΗΣΗ! ΚΙΝΔΥΝΟΣ ΤΡΑΥΜΑΤΙΣΜΟΥ! Προσοχή: η λεπίδα είναι πολύ κοφτερή! Γι αυτό να είστε προσεκτικοί κατά την αφαίρεση του μπολ. Μη χρησιμοποιείτε τη συσκευή για άλλους σκοπούς από τους περιγραφόμενους στις παρούσες οδηγίες. Σε αντίθετη περίπτωση υπάρχει κίνδυνος τραυματισμού! Αλλάζετε τα αξεσουάρ μόνο όταν η μετάδοση κίνησης είναι ακινητοποιημένη και το βύσμα έχει αποσυνδεθεί! Η συσκευή συνεχίζει να λειτουργεί για λίγο μετά την απενεργοποίηση! Ποτέ μην αφήνετε τη συσκευή χωρίς επιτήρηση. Πριν από την αντικατάσταση αξεσουάρ ή επιπρόσθετων εξαρτημάτων, τα οποία κινούνται κατά τη λειτουργία, η συσκευή πρέπει να απενεργοποιηθεί και να αποσυνδεθεί από το δίκτυο. Όσο η συσκευή λειτουργεί, βάζετε αποκλειστικά τα προς επεξεργασία συστατικά στο μπολ ανάμειξης, στο εξάρτημα τοποθέτησης ή στο μίξερ. Ποτέ μην βάζετε τα χέρια ή ξένα αντικείμενα στο χωνί πλήρωσης ή στο μίξερ, ώστε να αποφεύγετε τραυματισμούς και βλάβες της συσκευής. ΠΡΟΣΟΧΗ! ΥΛΙΚΕΣ ΖΗΜΙΕΣ! Ποτέ μην λειτουργείτε τη συσκευή χωρίς υλικά! Κίνδυνος υπερθέρμανσης! Μη γεμίζετε με καυτά υλικά τη συσκευή! SKM 550 B1 GR CY 19
24 Πρώτη θέση σε λειτουργία 1) Απομακρύνετε όλα τα εξαρτήματα από το χαρτοκιβώτιο και αφαιρέστε το υλικό συσκευασίας, καθώς και ενδεχόμενες προστατευτικές μεμβράνες και αυτοκόλλητα. 2) Καθαρίστε όλα τα εξαρτήματα, όπως περιγράφεται στο Κεφάλαιο Καθαρισμός και φροντίδα. Βεβαιωθείτε ότι όλα τα εξαρτήματα είναι εντελώς στεγνά. 3) Τοποθετήστε τη συσκευή επάνω σε μία λεία και καθαρή επιφάνεια. 4) Σταθεροποιήστε τη συσκευή με τις τέσσερις βεντούζες στην επιφάνεια. 5) Τραβήξτε έξω το καλώδιο από τη θήκη φύλαξης καλωδίου. 6) Εισάγετε το βύσμα στην πρίζα. ΥΠΟΔΕΙΞΗ Μπορείτε να φυλάξετε το άγκιστρο ζυμώματος, τον αναδευτήρα, το χτυπητήρι, καθώς και το δίσκο για τρίψιμο, τον περιστρεφόμενο δίσκο κοπής σε φέτες και τον περιστρεφόμενο δίσκο κοπής στη βάση αξεσουάρ. Θέσεις λειτουργίας ΠΡΟΣΟΧΗ! ΥΛΙΚΕΣ ΖΗΜΙΕΣ! Λειτουργείτε τη συσκευή μόνο όταν τα αξεσουάρ έχουν τοποθετηθεί σύμφωνα με αυτόν τον πίνακα και είναι έτοιμα για λειτουργία. Ποτέ μην τη λειτουργείτε χωρίς υλικά Θέση Εξαρτήματα ΚΙΝΔΥΝΟΣ ΗΛΕΚΤΡΟΠΛΗΞΙΑΣ! Εάν θέλετε να στερεώσετε τη βάση αξεσουάρ μαζί με το παραδοτέο υλικό συναρμολόγησης στον τοίχο, βεβαιωθείτε πριν τη διάτρηση ότι από το συγκεκριμένο σημείο του τοίχου δεν περνούν ρευματοφόροι αγωγοί, καλώδια ή σωλήνες! 7) Σημειώστε τις οπές διάτρησης στον τοίχο με τη βοήθεια της βάσης αξεσουάρ. 8) Κάνετε οπές στο επισημασμένο σημείο στον τοίχο με ένα τρυπάνι 6χιλ. 9) Σπρώξτε μέσα τα ούπα. 10) Γυρίστε τις βίδες στα ούπα, ώστε να απομένει χώρος ανάμεσα στον τοίχο και την κεφαλή της βίδας, αρκετός ώστε να μπορείτε να τοποθετήσετε επάνω τη βάση αξεσουάρ. 11) Τοποθετήστε τη βάση αξεσουάρ στις βίδες και πιέστε τη προς τα κάτω, ώστε η βάση αξεσουάρ να κάτσει καλά επάνω στις βίδες. 20 GR CY 4 5 Τοποθέτηση του μπολ ανάμειξης Εφαρμογή του άγκιστρου ζυμώματος, του χτυπητηριού και του αναδευτήρα Προσθήκη μεγάλων ποσοτήτων επεξεργασίας SKM 550 B1
25 Εργασία με άγκιστρο ζυμώματος, χτυπητήρι και αναδευτήρα ΠΡΟΕΙΔΟΠΟΙΗΣΗ! ΚΙΝΔΥΝΟΣ ΤΡΑΥΜΑΤΙΣΜΟΥ! Ποτέ μην αγγίζετε μέσα στο μπολ ανάμειξης κατά τη διάρκεια λειτουργίας! Κίνδυνος τραυματισμού λόγω περιστρεφόμενων εξαρτημάτων! Αλλάζετε τα εξαρτήματα μόνο όταν η μετάδοση κίνησης είναι σταματημένη! Μετά την απενεργοποίηση η μετάδοση κίνησης συνεχίζει να λειτουργεί για λίγο. Σε περίπτωση σφάλματος απενεργοποιήστε τη συσκευή και αποσυνδέστε το βύσμα, ώστε να αποφύγετε μη ηθελημένη ενεργοποίηση της συσκευής. ΥΠΟΔΕΙΞΗ Η συσκευή επιτρέπεται να χρησιμοποιείται μόνο όταν έχουν ασφαλιστεί τα μη χρησιμοποιούμενα ανοίγματα μετάδοσης κίνησης με τα καπάκια προστασίας. Για να προετοιμάσετε τη συσκευή για τη λειτουργία με τα άγκιστρα ζυμώματος, το χτυπητήρι και τον αναδευτήρα ακολουθήστε την εξής διαδικασία: 1) Πιέστε το πλήκτρο απασφάλισης προς τα κάτω και φέρτε τον περιστρεφόμενο βραχίονα στη θέση λειτουργίας 4 (βλ. Κεφάλαιο "Θέσεις λειτουργίας") (Εικ. A). 2) Τοποθετήστε το μπολ ανάμειξης. Φροντίστε ώστε η υποδοχή του μπολ ανάμειξης να περνάει στις εγκοπές της συσκευής. 3) Πιέστε το πλήκτρο απασφάλισης προς τα κάτω και φέρτε τον περιστρεφόμενο βραχίονα στη θέση λειτουργίας 1 (Εικ. A). 4) Θέστε τον περιστρεφόμενο διακόπτη στη θέση P και κρατήστε τον σε αυτή τη θέση, μέχρι η μετάδοση κίνησης να σταματήσει στη θέση ακινητοποίησης (Εικ. B). Εάν η μετάδοση κίνησης δεν κινείται, έχει ήδη επιτευχθεί η θέση ακινητοποίησης. 5) Πιέστε το πλήκτρο απασφάλισης προς τα κάτω και φέρτε τον περιστρεφόμενο βραχίονα στη θέση λειτουργίας 4 (Εικ. A). SKM 550 B1 6) Εάν θέλετε να χρησιμοποιήσετε το άγκιστρο ζυμώματος περάστε το εξάρτημα απομάκρυνσης ζύμης στη μετάδοση κίνησης (Εικ. D). Προσέξτε εδώ ότι η οπή, μέσα από την οποία οδηγείται το άγκιστρο ζυμώματος, βρίσκεται πάνω από το άνοιγμα υποδοχής στο σύστημα μετάδοσης κίνησης. 7) Αναλόγως της εργασίας τοποθετήστε το άγκιστρο ζυμώματος, το χτυπητήρι ή τον αναδευτήρα μέχρι να ασφαλίσουν στη μετάδοση κίνησης. 8) Γεμίστε το μπολ ανάμειξης με τα προς επεξεργασία υλικά. ΥΠΟΔΕΙΞΗ Προσέχετε διότι κατά τη διαδικασία ζυμώματος ή ανάμειξης η ζύμη φουσκώνει μέσα στο μπολ ανάμειξης ή μέσω της κίνησης πιέζεται λίγο προς τα επάνω. Προσοχή στον πίνακα του Κεφαλαίου "Προτεινόμενες ποσότητες πλήρωσης". 9) Πιέστε το πλήκτρο απασφάλισης προς τα κάτω και φέρτε τον περιστρεφόμενο βραχίονα στη θέση λειτουργίας 1 (Εικ. A). 10) Σπρώξτε το καπάκι στο μπολ ανάμειξης, ώστε οι ασφάλειες στον περιστρεφόμενο βραχίονα να ασφαλίσουν. 11) Θέστε τον περιστρεφόμενο διακόπτη στην επιθυμητή βαθμίδα. Προσθήκη υλικών Προσθέστε τα υλικά κατά τη λειτουργία μέσα από το άνοιγμα στο καπάκι. Ή: 1) Απενεργοποιήστε τη συσκευή από τον περιστρεφόμενο διακόπτη. 2) Θέστε τον περιστρεφόμενο διακόπτη στη θέση P και κρατήστε τον σε αυτή τη θέση, μέχρι η μετάδοση κίνησης να σταματήσει (Εικ. B). 3) Αφαιρέστε το καπάκι. 4) Πιέστε το πλήκτρο απασφάλισης προς τα κάτω και φέρτε τον περιστρεφόμενο βραχίονα στη θέση λειτουργίας 5. 5) Προσθέστε τα υλικά. GR CY 21
26 Μετά την εργασία 1) Απενεργοποιήστε τη συσκευή από τον περιστρεφόμενο διακόπτη. 2) Θέστε τον περιστρεφόμενο διακόπτη στη θέση P και κρατήστε τον σε αυτή τη θέση, μέχρι η μετάδοση κίνησης να σταματήσει (Εικ. B). 3) Αφαιρέστε το καπάκι. 4) Πιέστε το πλήκτρο απασφάλισης προς τα κάτω και φέρτε τον περιστρεφόμενο βραχίονα στη θέση λειτουργίας 4. 5) Αφαιρέστε τα αξεσουάρ από τη μετάδοση κίνησης. 6) Αφαιρέστε το μπολ ανάμειξης. 7) Καθαρίστε όλα τα μέρη (βλ. Κεφάλαιο "Καθαρισμός και φροντίδα"). Εργασία με το εξάρτημα τοποθέτησης ΠΡΟΕΙΔΟΠΟΙΗΣΗ! ΚΙΝΔΥΝΟΣ ΤΡΑΥΜΑΤΙΣΜΟΥ! Ποτέ μη βάζετε τα χέρια ή ξένα αντικείμενα στο χωνί πλήρωσης, ώστε να αποφεύγετε τραυματισμούς και φθορές στη συσκευή. Πιέζετε τα υλικά μόνο με το εξάρτημα ώθησης. Κίνδυνος τραυματισμού λόγω περιστρεφόμενων εξαρτημάτων! Αλλάζετε τα εξαρτήματα μόνο όταν η μετάδοση κίνησης είναι σταματημένη! Μετά την απενεργοποίηση η μετάδοση κίνησης συνεχίζει να λειτουργεί για λίγο. Σε περίπτωση σφάλματος απενεργοποιήστε τη συσκευή και αποσυνδέστε το βύσμα, ώστε να αποφύγετε μη ηθελημένη ενεργοποίηση της συσκευής. ΥΠΟΔΕΙΞΗ Η συσκευή επιτρέπεται να χρησιμοποιείται μόνο όταν έχουν ασφαλιστεί τα μη χρησιμοποιούμενα ανοίγματα μετάδοσης κίνησης με τα καπάκια προστασίας. Βεβαιωθείτε ότι στον περιστρεφόμενο βραχίονα δεν υπάρχει ούτε άγκιστρο ζυμώματος, ούτε χτυπητήρι ή αναδευτήρας. 22 GR CY Για να προετοιμάσετε τη συσκευή για τη λειτουργία με εξάρτημα τοποθέτησης, ακολουθήστε την εξής διαδικασία: 1) Πιέστε το πλήκτρο απασφάλισης προς τα κάτω και φέρτε τον περιστρεφόμενο βραχίονα στη θέση λειτουργίας 4 (βλ. Κεφάλαιο "Θέσεις λειτουργίας"). 2) Τοποθετήστε το μπολ ανάμειξης. Η υποδοχή του μπολ ανάμειξης πρέπει να έχει μπει στις εγκοπές της συσκευής. 3) Πιέστε το πλήκτρο απασφάλισης προς τα κάτω και φέρτε τον περιστρεφόμενο βραχίονα στη θέση λειτουργίας 2. 4) Απομακρύνετε το καπάκι προστασίας για το εξάρτημα τοποθέτησης (Εικ. C). 5) Εισάγετε το εξάρτημα τοποθέτησης στο άνοιγμα μετάδοσης κίνησης (σήμανση στο εξάρτημα τοποθέτησης στη σήμανση στον περιστρεφόμενο βραχίονα ). Περιστρέψτε το προς τα δεξιά, έως ότου το εξάρτημα τοποθέτησης ασφαλίσει αισθητά (σήμανση στο εξάρτημα τοποθέτησης στη σήμανση στον περιστρεφόμενο βραχίονα ). 6) Τοποθετήστε τον άξονα μετάδοσης κίνησης. 7) Αναλόγως της εργασίας, τοποθετήστε το δίσκο κοπής, το δίσκο κοπής σε φέτες ή το δίσκο για τρίψιμο στον άξονα μετάδοσης κίνησης του εξαρτήματος τοποθέτησης. 8) Τοποθετήστε το καπάκι με εξάρτημα ώθησης στο εξάρτημα τοποθέτησης (σήμανση στο καπάκι στη σήμανση στο εξάρτημα τοποθέτησης ) και ασφαλίστε το καπάκι (σήμανση στο καπάκι στη σήμανση στο εξάρτημα τοποθέτησης ). 9) Θέστε τον περιστρεφόμενο διακόπτη στην επιθυμητή βαθμίδα. ΥΠΟΔΕΙΞΗ Μην πιέζετε πολλά υλικά στο εξάρτημα τοποθέτησης. Προσοχή στον πίνακα του Κεφαλαίου "Προτεινόμενες ποσότητες πλήρωσης". 10) Προσθέστε τα υλικά μέσα από το χωνί πλήρωσης με τη βοήθεια του εξαρτήματος ώθησης. SKM 550 B1
27 Μετά την εργασία 1) Απενεργοποιήστε τη συσκευή από τον περιστρεφόμενο διακόπτη. 2) Περιστρέψτε το εξάρτημα τοποθέτησης προς τα αριστερά και αφαιρέστε το. 3) Αποσυναρμολογήστε το εξάρτημα τοποθέτησης και καθαρίστε όλα τα μέρη όπως περιγράφεται στο Κεφάλαιο "Καθαρισμός και φροντίδα". Εργασία με το μίξερ ΠΡΟΕΙΔΟΠΟΙΗΣΗ! ΚΙΝΔΥΝΟΣ ΤΡΑΥΜΑΤΙΣΜΟΥ! Αφήνετε τα καυτά υγρά να κρυώσουν έως ότου φτάσουν σε μια θερμοκρασία σώματος (περ C), πριν αυτά τοποθετηθούν στο μίξερ. ΠΡΟΕΙΔΟΠΟΙΗΣΗ! ΚΙΝΔΥΝΟΣ ΤΡΑΥΜΑΤΙΣΜΟΥ ΛΟΓΩ ΑΙΧΜΗΡΗΣ ΛΕΠΙΔΑΣ/ΠΕΡΙΣΤΡΕΦΟΜΕΝΗΣ ΜΕΤΑΔΟΣΗΣ ΚΙΝΗΣΗΣ! Μην πιάνετε ποτέ την τοποθετημένη λεπίδα! Βγάζετε το μίξερ μόνο αφού έχει ακινητοποιηθεί η λεπίδα. Λειτουργείτε το μίξερ μόνο με τοποθετημένο καπάκι. Σε περίπτωση σφάλματος απενεργοποιήστε τη συσκευή και αποσυνδέστε το βύσμα, ώστε να αποφύγετε μη ηθελημένη ενεργοποίηση της συσκευής. Για να προετοιμάσετε τη συσκευή για τη λειτουργία με το μίξερ ακολουθήστε την εξής διαδικασία: 1) Πιέστε το πλήκτρο απασφάλισης προς τα κάτω και φέρτε τον περιστρεφόμενο βραχίονα στη θέση λειτουργίας 3 (βλ. Κεφάλαιο "Θέσεις λειτουργίας"). 2) Αφαιρέστε το καπάκι προστασίας της μετάδοσης κίνησης του μίξερ (γυρίστε τη σήμανση στο καπάκι προστασίας της μετάδοσης κίνησης του μίξερ στη σήμανση της κύριας συσκευής) (Εικ. F). 3) Τοποθετήστε το μίξερ (σήμανση στο μίξερ στη σήμανση της κύριας συσκευής). Στρέψτε τέρμα αριστερά το μίξερ (σήμανση στο μίξερ στη σήμανση της κύριας συσκευής) (Εικ. G). 4) Προσθέστε τα υλικά: Μέγιστη ποσότητα: περ. 1 λίτρο Αφρίζοντα υγρά μέγιστο 0,5 λίτρα Βέλτιστη ποσότητα επεξεργασίας, στέρεα: γρ. ΥΠΟΔΕΙΞΗ Προσοχή στον πίνακα του Κεφαλαίου "Προτεινόμενες ποσότητες πλήρωσης". 5) Τοποθετήστε το καπάκι με το δοχείο μέτρησης ελαφρώς μετατοπισμένο και περιστρέψτε το, ώστε το καπάκι να ασφαλίσει (Εικ. I). 6) Θέστε τον περιστρεφόμενο διακόπτη στην επιθυμητή βαθμίδα. Προσθήκη υλικών 1) Απενεργοποιήστε τη συσκευή από τον περιστρεφόμενο διακόπτη. 2) Περιστρέψτε ελαφρώς το καπάκι του μίξερ (Εικ. I), βγάλτε το καπάκι και προσθέστε τα υλικά ή 3) Περιστρέψτε το δοχείο μέτρησης κατά 90 και βγάλτε το. Προσθέστε λίγο-λίγο στέρεα υλικά μέσα από το άνοιγμα πλήρωσης. SKM 550 B1 GR CY 23
28 Μετά την εργασία 1) Απενεργοποιήστε τη συσκευή από τον περιστρεφόμενο διακόπτη. 2) Περιστρέψτε το μίξερ προς τα δεξιά και αφαιρέστε το. ΥΠΟΔΕΙΞΗ Καθαρίζετε το μίξερ κατά προτίμηση αμέσως μετά τη χρήση (βλ. Κεφάλαιο "Καθαρισμός και φροντίδα"). Έτσι, υπολείμματα τροφίμων απομακρύνονται ευκολότερα. Καθαρισμός και φροντίδα ΚΙΝΔΥΝΟΣ ΗΛΕΚΤΡΟΠΛΗΞΙΑΣ! Πριν από κάθε καθαρισμό αποσυνδέετε το βύσμα από την πρίζα! Υπάρχει κίνδυνος ηλεκτροπληξίας! Ποτέ μη βυθίζετε τη συσκευή σε νερό ή σε άλλα υγρά! ΠΡΟΣΟΧΗ! ΥΛΙΚΕΣ ΖΗΜΙΕΣ! Μη χρησιμοποιείτε τριβικά ή επιθετικά απορρυπαντικά. Αυτά μπορεί να φθείρουν τις επιφάνειες. ΥΠΟΔΕΙΞΕΙΣ Κατά προτίμηση καθαρίζετε τη συσκευή αμέσως μετά τη χρήση. Έτσι, υπολείμματα τροφίμων απομακρύνονται ευκολότερα. Κατά την επεξεργασία τροφίμων πλούσιων σε χρωστικές, όπως παραδείγματος χάριν καρότων, τα πλαστικά μέρη μπορεί να αλλάξουν χρώμα. Αυτοί οι αποχρωματισμοί μπορούν να αφαιρεθούν με λίγο λάδι μαγειρικής. Καθαρισμός συσκευής Σκουπίζετε τη συσκευή με ένα νωπό πανί. Σε επίμονες βρομιές προσθέτετε στο πανί ένα ήπιο απορρυπαντικό. Σκουπίζετε τα υπολείμματα του απορρυπαντικού με ένα πανί εμποτισμένο με καθαρό νερό. Στη συνέχεια στεγνώνετε καλά τη συσκευή. Καθαρισμός μπολ ανάμειξης με καπάκι, εξαρτήματος τοποθέτησης, καπακιού με εξάρτημα ώθησης, καπακιού του μίξερ και αξεσουάρ Καθαρίζετε όλα τα αξεσουάρ, το μπολ ανάμειξης με καπάκι, το καπάκι του μίξερ με το δοχείο μέτρησης, το καπάκι προστασίας μετάδοσης κίνησης, το εξάρτημα τοποθέτησης και το σχετικό καπάκι με εξάρτημα ώθησης σε ζεστό νερό με λίγο απορρυπαντικό. Απομακρύνετε τυχόν υπολείμματα με μια βούρτσα καθαρισμού. Ξεπλένετε όλα τα μέρη με καθαρό, ζεστό νερό και βεβαιωθείτε ότι όλα τα μέρη είναι στεγνά προτού χρησιμοποιηθούν ξανά. ΥΠΟΔΕΙΞΗ Τα αξεσουάρ, το μπολ ανάμειξης με καπάκι, το καπάκι του μίξερ με το δοχείο μέτρησης, το καπάκι προστασίας μετάδοσης κίνησης, το εξάρτημα τοποθέτησης και το σχετικό καπάκι με εξάρτημα ώθησης είναι κατάλληλα και για καθαρισμό στο πλυντήριο πιάτων. Κατά τον καθαρισμό στο πλυντήριο πιάτων προσέχετε ώστε τα πλαστικά μέρη να μην μαγκώσουν. Ειδάλλως μπορεί να παραμορφωθούν! Αν είναι δυνατό, τοποθετήστε τα πλαστικά μέρη στο επάνω καλάθι του πλυντηρίου πιάτων. 24 GR CY SKM 550 B1
29 Καθαρισμός μίξερ ΠΡΟΕΙΔΟΠΟΙΗΣΗ! ΚΙΝΔΥΝΟΣ ΤΡΑΥΜΑΤΙΣΜΟΥ! Μην αγγίζετε τη λεπίδα μίξερ με γυμνά χέρια. ΠΡΟΣΟΧΗ! ΥΛΙΚΕΣ ΖΗΜΙΕΣ! Το μίξερ δεν ενδείκνυται για καθαρισμό στο πλυντήριο πιάτων. Ο καθαρισμός στο πλυντήριο πιάτων οδηγεί σε ανεπανόρθωτες ζημιές στο μίξερ. Καθαρίζετε το μίξερ σε ζεστό νερό, προσθέτοντας ένα ήπιο απορρυπαντικό. Στη συνέχεια ξεπλύνετέ το με καθαρό νερό, έτσι ώστε να μην παραμένουν υπολείμματα απορρυπαντικού. Στις περισσότερες περιπτώσεις ένας επαρκής υγιεινός καθαρισμός μπορεί να επιτευχθεί αμέσως μετά τη χρήση με την εξής εναλλακτική: 1) Για τον καθαρισμό, βάλτε νερό με λίγο απορρυπαντικό στο τοποθετημένο μίξερ. 2) Τοποθετήστε το καπάκι με το δοχείο μέτρησης ελαφρώς μετατοπισμένο και περιστρέψτε το, ώστε το καπάκι να ασφαλίσει (Εικ. I). 3) Ενεργοποιήστε το μίξερ για μερικά δευτερόλεπτα. 4) Αδειάστε το νερό πλύσης. Απομακρύνετε τυχόν υπολείμματα με μια βούρτσα καθαρισμού. 5) Στη συνέχεια ξεπλύνετε το μίξερ με πολύ καθαρό νερό, έτσι ώστε να απομακρυνθούν όλα τα υπολείμματα απορρυπαντικού. Αποθήκευση Για την αποθήκευση φυλάξτε το καλώδιο στη θήκη φύλαξης καλωδίου. Φυλάξτε την καθαρή συσκευή σε έναν καθαρό και στεγνό χώρο χωρίς σκόνη. Διόρθωση σφαλμάτων Όταν ξαφνικά η συσκευή σταματά: Η συσκευή έχει υπερθερμανθεί και η αυτόματη απενεργοποίηση ασφαλείας έχει ενεργοποιηθεί. Θέστε τον περιστρεφόμενο διακόπτη στο 0. Τραβήξτε το βύσμα από την πρίζα. Αφήστε τη συσκευή να κρυώσει για 15 λεπτά. Εάν η συσκευή δεν έχει κρυώσει εντελώς μετά από 15 λεπτά, δεν θα ενεργοποιηθεί. Περιμένετε άλλα 15 λεπτά και ενεργοποιήστε εκ νέου. Όταν η συσκευή δεν μπορεί να ενεργοποιηθεί: Ελέγξτε εάν το βύσμα βρίσκεται στην πρίζα. Ελέγξτε εάν το καπάκι προστασίας μετάδοσης κίνησης για το μίξερ και το εξάρτημα τοποθέτησης και το μπολ ανάμειξης έχουν τοποθετηθεί σωστά και ασφαλίσει. Ελέγξτε εάν ο περιστρεφόμενος βραχίονας βρίσκεται στην εκάστοτε απαιτούμενη θέση λειτουργίας (βλ. Κεφάλαιο Θέσεις λειτουργίας ). Εάν τα περιγραφόμενα μέτρα δεν προσφέρουν βοήθεια, η συσκευή είναι ελαττωματική. Παραδώστε τη συσκευή για επισκευή σε ένα εξειδικευμένο συνεργείο ή στο τμήμα εξυπηρέτησης πελατών. Τεχνικά χαρακτηριστικά Τάση δικτύου: V ~/ 50 Hz Απορρόφηση ισχύος: 550 W Μέγ. χωρητικότητα Μπολ ανάμειξης: περ. 3,8 λ. Μίξερ: περ. 1 λ. Κατηγορία προστασίας: II / Όλα τα εξαρτήματα αυτής της συσκευής που έρχονται σε επαφή με τρόφιμα μπορούν να χρησιμοποιούνται με ασφάλεια στα τρόφιμα. SKM 550 B1 GR CY 25
30 Εγγύηση και σέρβις Η παρούσα συσκευή διαθέτει 3 χρόνια εγγύηση από την ημερομηνία αγοράς. Η συσκευή κατασκευάστηκε και ελέγχθηκε προσεκτικά πριν από την αποστολή. Παρακαλούμε φυλάξτε την απόδειξη ταμείου ως απόδειξη για την αγορά. Σε περίπτωση απαίτησης εγγύησης επικοινωνήστε τηλεφωνικώς με το τμήμα σέρβις. Μόνο έτσι μπορεί να εξασφαλιστεί δωρεάν αποστολή του εμπορεύματός σας. Η απόδοση εγγύησης ισχύει μόνο για σφάλματα υλικού ή κατασκευής, όχι όμως για ζημιές από τη μεταφορά, για εξαρτήματα φθοράς ή για βλάβες σε εύθραυστα εξαρτήματα, π.χ. διακόπτες ή συσσωρευτές. Το προϊόν προορίζεται μόνο για ιδιωτική και όχι για επαγγελματική χρήση. Σε περίπτωση κακής μεταχείρισης και ακατάλληλης χρήσης, χρήσης βίας και παρεμβάσεων, οι οποίες δεν διεξήχθησαν από το εξουσιοδοτημένο μας τμήμα σέρβις, η εγγύηση παύει να ισχύει. Τα νομικά σας δικαιώματα δεν περιορίζονται μέσω αυτής της εγγύησης. Ο χρόνος εγγύησης δεν επιμηκύνεται μέσω της εγγύησης. Αυτό ισχύει και για εξαρτήματα, τα οποία έχουν αντικατασταθεί και επισκευαστεί. Ενδεχόμενες ήδη υπάρχουσες ζημιές και ελλείψεις κατά την αγορά πρέπει να γνωστοποιηθούν αμέσως μετά το άνοιγμα της συσκευασίας, το αργότερο ωστόσο δύο ημέρες μετά την ημερομηνία αγοράς. Μετά τη λήξη του χρόνου εγγύησης, τυχόν εμφανιζόμενες επισκευές χρεώνονται. Απόρριψη Σε καμία περίπτωση μην απορρίπτετε τη συσκευή στα οικιακά απορρίμματα. Αυτό το προϊόν υπόκειται στην Ευρωπαϊκή Οδηγία 2012/19/ΕU. Απορρίπτετε τη συσκευή μέσω μιας εγκεκριμένης επιχείρησης απόρριψης ή μέσω της κοινοτικής επιχείρησης απόρριψης. Τηρείτε τους ισχύοντες κανονισμούς. Σε περίπτωση αμφιβολιών επικοινωνείτε με την αρμόδια επιχείρηση απόρριψης. Η συσκευασία αποτελείται από φιλικά προς το περιβάλλον υλικά, τα οποία μπορείτε να απορρίψετε μέσω των τοπικών σημείων ανακύκλωσης. Εισαγωγέας KOMPERNASS HANDELS GMBH BURGSTRASSE BOCHUM GERMANY Σέρβις Ελλάδα Tel.: (0,03 EUR/Min.) kompernass@lidl.gr IAN CY Σέρβις Κύπρος Tel.: kompernass@lidl.com.cy IAN GR CY SKM 550 B1
31 Προτεινόμενες ποσότητες πλήρωσης Εξάρτημα Αξεσουάρ Τρόφιμα Ποσότητα Χρόνος Μίξερ - Χυμός 400 γρ. συστατικά ml νερό Βαθμίδα 30 δευτ. 3, 4 - Καρύδια, αμύγδαλα 100 γρ. 20 δευτ. 3, 4 - Παγάκια 110 γρ. 10 δευτ. 3, 4 - Υγρά 1000 ml 10 δευτ. 3, 4 Εξάρτημα τοποθέτησης Καρότο, πατάτα, αγγούρι Καρότο, πατάτα, αγγούρι Καρότο, πατάτα, αγγούρι Καρότο, πατάτα, αγγούρι Καρότο, πατάτα, αγγούρι Ζύμη μαγιάς 500 γρ. *1 25 δευτ. 2, 3, γρ. *2 50 δευτ. 2, 3, γρ. 25 δευτ. 2, 3, γρ. *1 25 δευτ. 2, 3, γρ. *2 40 δευτ. 2, 3, γρ. αλεύρι, 1 αυγό, 80 γρ. λάδι (θερμοκρασία δωματίου), 80 γρ. ζάχαρη, ml ζεστό γάλα, 25 γρ. φρέσκια μαγιά ή 1 πακέτο στεγνή μαγιά, 1 πρέζα αλάτι *3 1. Διαδικασία ανάμειξης: 2 λεπτά 2. Διαδικασία ανάμειξης: 10 λεπτά 1 2 Μπολ ανάμειξης Ζύμη για κουλουράκια 125 γρ. βούτυρο (θερμοκρασία δωματίου), γρ. ζάχαρη, 1 αυγό, 1 πρέζα αλάτι, 250 γρ. αλεύρι *4 1. Διαδικασία ανάμειξης: 30 δευτ. 2. Διαδικασία ανάμειξης: 6 λεπτά 1 2, 3, 4 Χτυπημένα 8 ασπράδια 2-3 λεπτά 4 ασπράδια Κρέμα σαντιγί 600 ml Περ. 3 λεπτά 4 (30% λιπαρά) *1: Χρησιμοποιήστε τη χονδρή πλευρά του περιστρεφόμενου δίσκου κοπής σε φέτες ή κοπής. *2: Χρησιμοποιήστε τη λεπτή πλευρά του περιστρεφόμενου δίσκου κοπής σε φέτες ή κοπής. *3: Η ανώτερη ποσότητα για ζύμη μαγιάς είναι 1,5 φορές περισσότερη από ότι στη δοθείσα συνταγή. *4: Η ανώτερη ποσότητα για ζύμη για κουλουράκια είναι 1,5 ή 2 φορές περισσότερη από ότι στη δοθείσα συνταγή. SKM 550 B1 GR CY 27
32 28 GR CY SKM 550 B1
33 Inhaltsverzeichnis Einleitung Bestimmungsgemäßer Gebrauch Lieferumfang Gerätebeschreibung...30 Sicherheitshinweise Erste Inbetriebnahme Betriebspositionen...34 Arbeiten mit Knethaken, Schlag- und Rührbesen...35 Zutaten nachfüllen...35 Nach der Arbeit...36 Arbeiten mit dem Durchlaufschnitzler...36 Nach der Arbeit...37 Arbeiten mit dem Mixer...37 Zutaten nachfüllen...37 Nach der Arbeit...38 Reinigen und Pflegen...38 Gerät reinigen...38 Rührschüssel mit Deckel, Durchlaufschnitzler, Deckel mit Stopfer, Deckel des Mixers und Zubehörteile reinigen...38 Mixer reinigen...39 Aufbewahrung...39 Fehler beheben Technische Daten...39 Garantie und Service Entsorgung Importeur...40 Empfohlene Füllmengen SKM 550 B1 DE AT CH 29
34 Einleitung Herzlichen Glückwunsch zum Kauf Ihres neuen Gerätes. Sie haben sich damit für ein hochwertiges Produkt entschieden. Die Bedienungsanleitung ist Bestandteil dieses Produkts. Sie enthält wichtige Hinweise für Sicherheit, Gebrauch und Entsorgung. Machen Sie sich vor der Benutzung des Produkts mit allen Bedien- und Sicherheitshinweisen vertraut. Benutzen Sie das Produkt nur wie beschrieben und für die angegebenen Einsatzbereiche. Händigen Sie alle Unterlagen bei Weitergabe des Produkts an Dritte mit aus. Bestimmungsgemäßer Gebrauch Dieses Gerät dient ausschließlich dem Verarbeiten von Lebensmitteln in haushaltsüblichen Mengen. Dieses Gerät ist ausschließlich für die Benutzung in privaten Haushalten bestimmt. Benutzen Sie es nicht gewerblich! Dieses Gerät ist nur für den privaten Gebrauch in geschlossenen, regengeschützten Räumen vorgesehen. Benutzen Sie es nicht im Freien! Das Gerät darf nur mit Originalzubehör benutzt werden. Lieferumfang Küchenmaschine Rührschüssel mit Deckel Mixer mit Deckel und Messbecher Durchlaufschnitzler mit Stopfer Schneid-Wendescheibe (dick und dünn) Raspel-Wendescheibe (grob und mittelfein) Reibscheibe (fein) Knethaken mit Teigabweiser Schlagbesen Rührbesen Zubehörhalter 2 Schrauben (3,5 x 22mm) 2 Dübel (6mm) Bedienungsanleitung 30 DE AT CH HINWEIS Eine der Schneidscheiben für den Durchlaufschnitzler ist bei der Lieferung bereits im Durchlaufschnitzler vormontiert! Kontrollieren Sie den Lieferumfang direkt nach dem Auspacken auf Vollständigkeit und Beschädigungen. Wenden Sie sich, wenn nötig, an den Service. Gerätebeschreibung Klappen Sie die Ausklappseiten im vorderen und hinteren Umschlag dieser Bedienungsanleitung aus: Bild E: Knethaken mit Teigabweiser Rührbesen Schlagbesen Mixer mit Deckel und Messbecher Zubehörhalter Rührschüssel mit Deckel Durchlaufschnitzler Reibscheibe Raspel-Wendescheibe Antriebswelle Durchlaufschnitzler Schneid-Wendescheibe Deckel mit Stopfer für den Durchlaufschnitzler Bild H: Entriegelungstaste Drehschalter Schwenkarm Antrieb Aussparungen für die Rührschüssel Kabelstaufach SKM 550 B1
35 Sicherheitshinweise GEFAHR - ELEKTRISCHER SCHLAG! Schließen Sie das Gerät nur an eine vorschriftsmäßig installierte und geerdete Netzsteckdose an. Die Netzspannung muss mit den Angaben auf dem Typenschild des Gerätes übereinstimmen. Achten Sie darauf, dass im Betrieb das Netzkabel nicht nass oder feucht wird. Führen Sie es so, dass es nicht eingeklemmt oder beschädigt werden kann. Halten Sie das Netzkabel von heißen Oberflächen fern. Führen Sie keine Reparaturarbeiten am Gerät durch. Jegliche Reparaturen müssen durch den Kundendienst oder von qualifiziertem Fachpersonal durchgeführt werden. Ziehen Sie den Netzstecker aus der Netzsteckdose, wenn das Gerät gereinigt wird oder im Fehlerfall. Ausschalten alleine genügt nicht, weil noch immer Netzspannung im Gerät anliegt, solange der Netzstecker in der Netzsteckdose steckt. Ziehen Sie den Netzstecker aus der Netzsteckdose, wenn das Gerät nicht benutzt wird! Lassen Sie beschädigte Netzstecker oder Netzkabel sofort von autorisiertem Fachpersonal oder dem Kundenservice austauschen, um Gefährdungen zu vermeiden. Das Gerät und seine Anschlussleitung sind von Kindern fernzuhalten. Sie dürfen das Gerät keinesfalls in Wasser oder andere Flüssigkeiten tauchen. SKM 550 B1 DE AT CH 31
36 WARNUNG! VERLETZUNGSGEFAHR! Trennen Sie das Gerät grundsätzlich vom Stromnetz, wenn Sie Zubehörteile abnehmen oder anbringen. Ein unbeabsichtigtes Einschalten des Gerätes wird so vermieden. Nach Stromunterbrechung läuft das Gerät wieder an! Das Gerät ist bei nicht vorhandener Aufsicht und vor dem Zusammenbau, dem Auseinandernehmen oder Reinigen stets vom Netz zu trennen. Dieses Gerät darf nicht von Kindern benutzt werden. Verwenden Sie nur die Original-Zubehörteile zu diesem Gerät. Zubehörteile anderer Hersteller sind dafür möglicherweise nicht geeignet und führen zu Gefährdungen! Dieses Gerät kann von Personen mit reduzierten physischen, sensorischen oder mentalen Fähigkeiten oder Mangel an Erfahrung und/ oder Wissen benutzt werden, wenn sie beaufsichtigt oder bezüglich des sicheren Gebrauchs des Gerätes unterwiesen wurden und die daraus resultierenden Gefahren verstanden haben. Kinder dürfen nicht mit dem Gerät spielen. Vorsicht: die Reib-, Schneid- bzw. Raspelscheiben sowie das Mixermesser sind sehr scharf! Seien Sie vorsichtig beim Einsetzen und Herausnehmen sowie bei der Reinigung der Reib-, Schneid- bzw. Raspelscheiben und Mixermesser! 32 DE AT CH SKM 550 B1
37 WARNUNG! VERLETZUNGSGEFAHR! Vorsicht: das Mixermesser ist sehr scharf! Gehen Sie daher vorsichtig beim Abnehmen des Mixbehälters vor. Missbrauchen Sie das Gerät nicht für andere Zwecke, als in dieser Bedienungsanleitung beschrieben. Ansonsten besteht Verletzungsgefahr! Wechseln Sie das Zubehör nur bei Stillstand des Antriebs und bei gezogenem Netzstecker! Das Gerät läuft nach dem Ausschalten noch kurze Zeit nach! Lassen Sie das Gerät niemals unbeaufsichtigt. Vor dem Auswechseln von Zubehör oder Zusatzteilen, die im Betrieb bewegt werden, muss das Gerät ausgeschaltet und vom Netz getrennt werden. Geben Sie während das Gerät läuft, ausschließlich die zu verarbeitenden Zutaten in die Rührschüssel, Durchlaufschnitzler oder in den Mixer. Stecken Sie niemals Hände oder Fremdgegenstände in den Einfüllschacht oder in den Mixer, um Verletzungen und Beschädigungen des Gerätes zu vermeiden. ACHTUNG! SACHSCHÄDEN! Betreiben Sie das Gerät nie ohne Zutaten! Überhitzungsgefahr! Füllen Sie niemals heiße Zutaten in das Gerät! SKM 550 B1 DE AT CH 33
38 Erste Inbetriebnahme 1) Entnehmen Sie alle Teile aus dem Karton und entfernen Sie das Verpackungsmaterial und eventuelle Schutzfolien und Aufkleber. 2) Reinigen Sie alle Teile, wie im Kapitel Reinigen und Pflegen beschrieben. Stellen Sie sicher, dass alle Teile vollständig getrocknet sind. 3) Stellen Sie das Gerät auf einen glatten und sauberen Untergrund. 4) Befestigen Sie das Gerät mit den vier Saugnäpfen am Untergrund. 5) Ziehen Sie das Netzkabel aus dem Kabelstaufach heraus. 6) Stecken Sie den Netzstecker in die Steckdose. HINWEIS Sie können den Knethaken, den Rührbesen, den Schlagbesen sowie die Reibscheibe, die Raspel-Wendescheibe und die Schneid-Wendescheibe im Zubehörhalter aufbewahren. Betriebspositionen ACHTUNG! SACHSCHADEN! Das Gerät nur betreiben, wenn das Zubehör nach dieser Tabelle angebracht und in Betriebsposition ist. Nie ohne Zutaten betreiben Position Zubehör GEFAHR - ELEKTRISCHER SCHLAG! Wenn Sie den Zubehörhalter mit dem mitgeliefertem Montagematerial an der Wand befestigen wollen, vergewissern Sie sich vor dem Bohren, dass keine stromführenden Leitungen, Kabel oder Rohre an der gewünschten Stelle durch die Wand führen! 7) Markieren Sie die Bohrlöcher mit Hilfe des Zubehörhalters an der Wand. 8) Bohren Sie mit einem 6mm-Bohrer Löcher an den zuvor markierten Stellen in die Wand. 9) Schieben Sie die Dübel hinein. 10) Drehen Sie die Schrauben in die Dübel ein, so dass noch so viel Platz zwischen Wand und Schraubenkopf bleibt, dass Sie den Zubehörhalter darauf stecken können. 11) Setzen Sie den Zubehörhalter auf die Schrauben und drücken Sie ihn nach unten, so dass der Zubehörhalter fest auf den Schrauben sitzt. 4 5 Platzieren der Rührschüssel Einsetzen von Knethaken, Schlag- und Rührbesen Zugeben von großen Verarbeitungsmengen 34 DE AT CH SKM 550 B1
39 Arbeiten mit Knethaken, Schlag- und Rührbesen WARNUNG! VERLETZUNGSGEFAHR! Greifen Sie während des Betriebes niemals in die Rührschüssel! Verletzungsgefahr durch rotierende Teile! Wechseln Sie Zubehör nur bei Stillstand des Antriebs! Nach dem Ausschalten läuft der Antrieb kurze Zeit nach. Schalten Sie im Fehlerfall das Gerät aus und ziehen Sie den Netzstecker, um ein unbeabsichtigtes Einschalten des Gerätes zu vermeiden. HINWEIS Das Gerät darf nur genutzt werden, wenn die nicht genutzten Antriebsöffnungen mit den Antriebsschutzdeckeln gesichert sind. Um das Gerät für den Betrieb mit Knethaken, Schlag- und Rührbesen vorzubereiten, gehen Sie wie folgt vor: 1) Drücken Sie die Entriegelungstaste herunter und bringen Sie den Schwenkarm in die Betriebsposition 4 (siehe Kapitel Betriebspositionen ) (Bild A). 2) Setzen Sie die Rührschüssel ein. Achten Sie darauf, dass der Sockel der Rührschüssel in den Aussparungen am Gerät steckt. 3) Drücken Sie die Entriegelungstaste herunter und bringen Sie den Schwenkarm in die Betriebsposition 1 (Bild A). 4) Stellen Sie den Drehschalter auf P und halten Sie diesen in dieser Position fest, bis der Antrieb in der Parkposition stehen bleibt (Bild B). Bewegt sich der Antrieb nicht, ist die Parkposition bereits erreicht. 5) Drücken Sie die Entriegelungstaste herunter und bringen Sie den Schwenkarm in die Betriebsposition 4 (Bild A). 6) Stecken Sie, wenn Sie den Knethaken benutzen wollen, den Teigabweiser auf den Antrieb (Bild D). Achten Sie dabei darauf, dass das Loch, durch den der Knethaken geführt wird, über der Aufnahmeöffnung am Antrieb liegt. 7) Stecken Sie je nach Aufgabe Knethaken, Schlag- oder Rührbesen bis zum Einrasten in den Antrieb ein. 8) Füllen Sie die zu verarbeitenden Zutaten in die Rührschüssel. HINWEIS Beachten Sie, dass während des Knet-, bzw. Rührvorgangs der Teig in der Rührschüssel an Volumen zunimmt oder durch die Bewegung etwas nach oben gedrückt wird. Beachten Sie daher die Tabelle im Kapitel Empfohlene Füllmengen. 9) Drücken Sie die Entriegelungstaste herunter und bringen Sie den Schwenkarm in die Betriebsposition 1 (Bild A). 10) Schieben Sie den Deckel auf die Rührschüssel, so dass die Arretierungen am Schwenkarm einrasten. 11) Stellen Sie den Drehschalter auf die gewünschte Stufe. Zutaten nachfüllen Füllen Sie die Zutaten während des Beriebs durch die Öffnung im Deckel ein. Oder: 1) Schalten Sie das Gerät am Drehschalter aus. 2) Stellen Sie den Drehschalter auf P und halten Sie ihn in dieser Position fest, bis der Antrieb stehen bleibt (Bild B). 3) Ziehen Sie den Deckel ab. 4) Drücken Sie die Entriegelungstaste herunter und bringen Sie den Schwenkarm in Betriebsposition 5. 5) Füllen Sie die Zutaten ein. SKM 550 B1 DE AT CH 35
40 Nach der Arbeit 1) Schalten Sie das Gerät am Drehschalter aus. 2) Stellen Sie den Drehschalter auf P und halten Sie ihn in dieser Position fest, bis der Antrieb stehen bleibt (Bild B). 3) Ziehen Sie den Deckel ab. 4) Drücken Sie die Entriegelungstaste herunter und bringen Sie den Schwenkarm in Betriebsposition 4. 5) Nehmen Sie das Zubehör aus dem Antrieb. 6) Entnehmen Sie die Rührschüssel. 7) Reinigen Sie alle Teile (siehe Kapitel Reinigen und Pflegen ). Arbeiten mit dem Durchlaufschnitzler WARNUNG! VERLETZUNGSGEFAHR! Stecken Sie niemals Hände oder Fremdgegenstände in den Einfüllschacht, um Verletzungen und Beschädigungen des Gerätes zu vermeiden. Drücken Sie Zutaten nur mit dem Stopfer nach. Verletzungsgefahr durch rotierende Teile! Wechseln Sie Zubehör nur bei Stillstand des Antriebs! Nach dem Ausschalten läuft der Antrieb kurze Zeit nach. Schalten Sie im Fehlerfall das Gerät aus und ziehen Sie den Netzstecker, um ein unbeabsichtigtes Einschalten des Gerätes zu vermeiden. HINWEIS Das Gerät darf nur genutzt werden, wenn die nicht genutzten Antriebsöffnungen mit den Antriebsschutzdeckeln gesichert sind. Stellen Sie sicher, dass sich am Schwenkarm weder Knethaken, Schlag- oder Rührbesen befinden. Um das Gerät für den Betrieb mit Durchlaufschnitzler vorzubereiten, gehen Sie wie folgt vor: 1) Drücken Sie die Entriegelungstaste herunter und bringen Sie den Schwenkarm in Betriebsposition 4 (siehe Kapitel Betriebspositionen ). 2) Setzen Sie die Rührschüssel ein. Der Sockel der Rührschüssel muss in den Aussparungen am Gerät stecken. 3) Drücken Sie die Entriegelungstaste herunter und bringen Sie den Schwenkarm in Betriebsposition 2. 4) Entfernen Sie den Antriebsschutzdeckel für den Durchlaufschnitzler (Bild C). 5) Stecken Sie den Durchlaufschnitzler in die Antriebsöffnung ein (Markierung am Durchlaufschnitzler auf Markierung am Schwenkarm ). Drehen Sie ihn im Uhrzeigersinn, bis der Durchlaufschnitzler fühlbar einrastet (Markierung am Durchlaufschnitzler auf Markierung am Schwenkarm ). 6) Setzen Sie die Antriebswelle ein. 7) Setzen Sie, je nach Aufgabe, Schneid-, Raspel- oder Reibscheibe auf die Antriebswelle des Durchlaufschnitzlers auf. 8) Setzen Sie Deckel mit Stopfer auf den Durchlaufschnitzler auf (Markierung am Deckel auf Markierung am Durchlaufschnitzler ) und verriegeln Sie den Deckel (Markierung am Deckel auf Markierung am Durchlaufschnitzler ). 9) Stellen Sie den Drehschalter auf die gewünschte Stufe. HINWEIS Drücken Sie nicht zu viele Zutaten in den Durchlaufschnitzler. Beachten Sie die Tabelle im Kapitel Empfohlene Füllmengen. 10) Füllen Sie die Zutaten durch den Einfüllschacht mit Hilfe des Stopfers ein. 36 DE AT CH SKM 550 B1
41 Nach der Arbeit 1) Schalten Sie das Gerät am Drehschalter aus. 2) Drehen Sie den Durchlaufschnitzler gegen den Uhrzeigersinn und nehmen Sie ihn ab. 3) Demontieren Sie den Durchlaufschnitzler und reinigen Sie alle Teile wie im Kapitel Reinigen und Pflegen beschrieben. Arbeiten mit dem Mixer WARNUNG! VERLETZUNGSGEFAHR! Lassen Sie heiße Flüssigkeiten immer auf eine handwarme Temperatur (ca C) abkühlen, bevor Sie diese in den Mixer einfüllen. WARNUNG! VERLETZUNGSGEFAHR DURCH SCHARFE MESSER/ROTIEREN- DEN ANTRIEB! Greifen Sie niemals in den aufgesetzten Mixer! Nehmen Sie den Mixer nur bei Stillstand der Messer ab. Betreiben Sie den Mixer nur mit aufgesetztem Deckel. Schalten Sie im Fehlerfall das Gerät aus und ziehen Sie den Netzstecker, um ein unbeabsichtigtes Einschalten des Gerätes zu vermeiden. Um das Gerät für den Betrieb mit Mixer vorzubereiten, gehen Sie wie folgt vor: 1) Drücken Sie die Entriegelungstaste herunter und bringen Sie den Schwenkarm in Betriebsposition 3 (siehe Kapitel Betriebspositionen ). 2) Nehmen Sie den Mixerantriebsschutzdeckel ab (Markierung am Mixerantriebsschutzdeckel auf Markierung am Grundgerät drehen) (Bild F). 3) Setzen Sie den Mixer auf (Markierung am Mixer auf Markierung am Grundgerät). Drehen Sie den Mixer bis zum Anschlag gegen den Uhrzeigersinn (Markierung am Mixer auf Markierung am Grundgerät) (Bild G). 4) Füllen Sie die Zutaten ein: Maximalmenge: ca. 1 Liter; schäumende Flüssigkeiten maximal 0,5 Liter; optimale Verarbeitungsmenge fest: g. HINWEIS Beachten Sie die Tabelle im Kapitel Empfohlene Füllmengen. 5) Setzen Sie den Deckel mit Messbecher ein wenig versetzt auf und drehen Sie ihn, so dass der Deckel einrastet (Bild I). 6) Stellen Sie den Drehschalter auf gewünschte Stufe. Zutaten nachfüllen 1) Schalten Sie das Gerät am Drehschalter aus. 2) Drehen Sie den Deckel des Mixers ein wenig (Bild I), nehmen Sie den Deckel ab und füllen Sie die Zutaten ein oder 3) Drehen Sie den Messbecher, der sich im Deckel des Mixers befindet, um 90 und nehmen Sie ihn heraus. Füllen Sie feste Zutaten nach und nach durch die Nachfüllöffnung ein. SKM 550 B1 DE AT CH 37
42 Nach der Arbeit 1) Schalten Sie das Gerät am Drehschalter aus. 2) Drehen Sie den Mixer im Uhrzeigersinn und nehmen Sie ihn ab. HINWEIS Reinigen Sie den Mixer am besten sofort nach dem Gebrauch (siehe Kapitel Reinigen und Pflegen ). So lassen sich Lebensmittelreste leichter entfernen. Reinigen und Pflegen GEFAHR - ELEKTRISCHER SCHLAG! Ziehen Sie vor jeder Reinigung den Netzstecker aus der Netzsteckdose! Es besteht die Gefahr eines elektrischen Schlages! Tauchen Sie das Gerät niemals in Wasser oder andere Flüssigkeiten! ACHTUNG! SACHSCHADEN! Verwenden Sie keine scheuernden oder aggressiven Reinigungsmittel. Diese können die Oberflächen beschädigen! HINWEISE Reinigen Sie das Gerät am besten sofort nach der Benutzung. Dann lassen sich Lebensmittelreste leichter entfernen. Bei der Verarbeitung von farbstoffreichen Lebensmitteln, wie zum Beispiel Karotten, können sich die Kunststoffteile verfärben. Diese Verfärbungen können Sie mit ein wenig Speiseöl entfernen. Gerät reinigen Wischen Sie das Gerät mit einem feuchten Tuch ab. Bei hartnäckigeren Verschmutzungen geben Sie ein mildes Spülmittel auf das Tuch. Wischen Sie Spülmittelreste mit einem mit klarem Wasser befeuchteten Tuch ab. Trocknen Sie das Gerät danach gut ab. Rührschüssel mit Deckel, Durchlaufschnitzler, Deckel mit Stopfer, Deckel des Mixers und Zubehörteile reinigen Reinigen Sie alle Zubehörteile, die Rührschüssel mit Deckel, den Deckel des Mixers mit Messbecher, die Antriebsschutzdeckel, den Durchlaufschnitzler, den dazugehörigen Deckel mit Stopfer und die Reibscheibe, die Raspel-Wendescheibe und die Schneid- Wendescheibe im warmen Wasser mit etwas Spülmittel. Entfernen Sie eventuelle Rückstände mit einer Spülbürste. Spülen Sie alle Teile mit klarem, warmem Wasser ab und stellen Sie sicher, dass alle Teile vor einer erneuten Benutzung trocken sind. HINWEIS Die Zubehörteile, die Rührschüssel mit Deckel, der Deckel des Mixers mit Messbecher, der Antriebsschutzdeckel, der Durchlaufschnitzler, der dazugehörigen Deckel mit Stopfer und die Reibscheibe, die Raspel-Wendescheibe und die Schneid-Wendescheibe sind auch für die Reinigung in der Spülmaschine geeignet. Achten Sie bei der Reinigung in der Spülmaschine darauf, dass die Kunststoffteile nicht eingeklemmt werden. Ansonsten können sich diese verformen! Legen Sie die Kunststoffteile, wenn möglich, in den oberen Korb der Spülmaschine. 38 DE AT CH SKM 550 B1
43 Mixer reinigen WARNUNG! VERLETZUNGSGEFAHR! Mixermesser nicht mit bloßen Händen berühren. ACHTUNG! SACHSCHADEN! Der Mixer ist nicht zur Reinigung in der Spülmaschine geeignet. Das Reinigen in der Spülmaschine führt zu irreparablen Schäden am Mixer. Reinigen Sie den Mixer in warmem Wasser und geben Sie ein mildes Spülmittel hinzu. Spülen Sie ihn danach mit klarem Wasser ab, so dass keine Spülmittelreste mehr daran haften. In den meisten Fällen kann eine ausreichend hygienische Reingung direkt nach der Benutzung durch folgende Alternative erreicht werden: 1) Geben Sie Wasser mit etwas Spülmittel in den aufgesetzten Mixer. 2) Setzen Sie den Deckel mit Messbecher ein wenig versetzt auf und drehen Sie ihn, so dass der Deckel einrastet (Bild I). 3) Schalten Sie den Mixer für einige Sekunden ein. 4) Schütten Sie das Spülwasser aus. Entfernen Sie eventuelle Rückstände mit einer Spülbürste. 5) Spülen Sie danach den Mixer mit viel klarem Wasser ab, so dass alle Spülmittelreste beseitigt sind. Aufbewahrung Verstauen Sie zur Aufbewahrung das Netzkabel im Kabelstaufach. Bewahren Sie das gereinigte Gerät an einem sauberen, staubfreien und trockenen Ort auf. Fehler beheben Wenn das Gerät plötzlich stehen bleibt: Das Gerät ist überhitzt und die automatische Sicherheitsabschaltung ist aktiviert. Drehschalter auf 0 stellen. Netzstecker aus der Steckdose ziehen. Das Gerät 15 Minuten abkühlen lassen. Ist das Gerät nach den 15 Minuten noch nicht vollständig abgekühlt, wird es nicht angehen. Weitere 15 Minuten warten und erneut einschalten. Wenn das Gerät sich nicht einschalten lässt: Überprüfen Sie, ob sich der Netzstecker in der Steckdose befindet. Überprüfen Sie, ob die Antriebsschutzdeckel für Mixer und Durchlaufschnitzler und die Rührschüssel richtig eingesetzt und eingerastet sind. Überprüfen Sie, ob sich der Schwenkarm in der jeweils erforderlichen Betriebsposition befindet (siehe Kapitel Betriebspositionen ). Sollten die beschriebenen Maßnahmen keine Abhilfe schaffen, ist das Gerät defekt. Lassen Sie das Gerät von einer qualifizierten Fachwerkstatt oder dem Kundenservice reparieren. Technische Daten Netzspannung: V ~/ 50 Hz Leistungsaufnahme: 550 W max. Fassungsvermögen Rührschüssel: ca. 3,8 l Mixer: ca. 1l Schutzklasse: II / Alle Teile dieses Gerätes, die mit Lebensmitteln in Berührung kommen, sind lebensmittelecht. SKM 550 B1 DE AT CH 39
44 Garantie und Service Sie erhalten auf dieses Gerät 3 Jahre Garantie ab Kaufdatum. Das Gerät wurde sorgfältig produziert und vor Anlieferung gewissenhaft geprüft. Bitte bewahren Sie den Kassenbon als Nachweis für den Kauf auf. Bitte setzen Sie sich im Garantiefall mit Ihrer Servicestelle telefonisch in Verbindung. Nur so kann eine kostenlose Einsendung Ihrer Ware gewährleistet werden. Die Garantieleistung gilt nur für Material- oder Fabrikationsfehler, nicht aber für Transportschäden, Verschleißteile oder für Beschädigungen an zerbrechlichen Teilen, z. B. Schalter oder Akkus. Das Produkt ist lediglich für den privaten und nicht für den gewerblichen Gebrauch bestimmt. Bei missbräuchlicher und unsachgemäßer Behandlung, Gewaltanwendung und bei Eingriffen, die nicht von unserer autorisierten Service-Niederlassung vorgenommen wurden, erlischt die Garantie. Ihre gesetzlichen Rechte werden durch diese Garantie nicht eingeschränkt. Die Garantiezeit wird durch die Gewährleistung nicht verlängert. Dies gilt auch für ersetzte und reparierte Teile. Eventuell schon beim Kauf vorhandene Schäden und Mängel müssen sofort nach dem Auspacken gemeldet werden, spätestens aber zwei Tage nach Kaufdatum. Nach Ablauf der Garantiezeit anfallende Reparaturen sind kostenpflichtig. Entsorgung Werfen Sie das Gerät keinesfalls in den normalen Hausmüll. Dieses Produkt unterliegt der europäischen Richtlinie 2012/19/EU. Entsorgen Sie das Gerät über einen zugelassenen Entsorgungsbetrieb oder über Ihre kommunale Entsorgungseinrichtung. Beachten Sie die aktuell geltenden Vorschriften. Setzen Sie sich im Zweifelsfall mit Ihrer Entsorgungseinrichtung in Verbindung. Die Verpackung besteht aus umweltfreundlichen Materialien, die Sie über die örtlichen Recyclingstellen entsorgen können. Importeur KOMPERNASS HANDELS GMBH BURGSTRASSE BOCHUM GERMANY Service Deutschland Tel.: kompernass@lidl.de IAN Service Österreich Tel.: (0,15 EUR/Min.) kompernass@lidl.at IAN Service Schweiz Tel.: (0,08 CHF/Min., Mobilfunk max. 0,40 CHF/Min.) kompernass@lidl.ch IAN DE AT CH SKM 550 B1
45 Empfohlene Füllmengen Aufsatz Zubehör Lebensmittel Menge Zeit Stufe Mixer - Saft 400 g Zutaten ml Wasser 30 Sek. 3, 4 - Nüsse, Mandeln 100 g 20 Sek. 3, 4 - Eiswürfel 110 g 10 Sek. 3, 4 - Flüssigkeiten 1000 ml 10 Sek. 3, 4 Karotte, Kartoffel, Salatgurke 500 g *1 25 Sek. 2, 3, 4 Karotte, Kartoffel, Salatgurke 500 g *2 50 Sek. 2, 3, 4 Durchlaufschnitzler Karotte, Kartoffel, Salatgurke 500 g 25 Sek. 2, 3, 4 Karotte, Kartoffel, Salatgurke 500 g *1 25 Sek. 2, 3, 4 Karotte, Kartoffel, Salatgurke 500 g *2 40 Sek. 2, 3, 4 Hefeteig 500 g Mehl, 1 Ei, 80 g Öl (Raumtemperatur), 80 g Zucker, ml warme Milch, 25 g Frischhefe oder 1 Paket Trockenhefe, 1 Prise Salz *3 1. Rührvorgang: 2 Min. 2. Rührvorgang: 10 Min. 1 2 Rührschüssel Spritzgebäckteig 125 g Butter (Raumtemperatur), g Zucker, 1 Ei, 1 Prise Salz, 250 g Mehl *4 1. Rührvorgang: 30 Sek. 2. Rührvorgang: 6 Min. 1 2, 3, 4 Eischnee 8 Eiweiße 2-3 Min. 4 Schlagsahne (30% Fettgehalt) 600 ml ca. 3 Min. 4 *1: Verwenden Sie die grobe Seite der Raspel- bzw. Schneid-Wendescheibe. *2: Verwenden Sie die feine Seite der Raspel- bzw. Schneid-Wendescheibe. *3: Die Höchstmenge für Hefeteig beträgt das 1,5-fache des angegebenen Rezeptes. *4: Die Höchstmenge für Spritzgebäckteig beträgt das 1,5- bis 2-fache des angegebenen Rezeptes. SKM 550 B1 DE AT CH 41
46 KOMPERNASS HANDELS GMBH BURGSTRASSE BOCHUM DEUTSCHLAND / GERMANY Last Information Update Έκδοση των πληροφοριών Stand der Informationen: 04 / 2016 Ident.-No.: SKM550B IAN

47 KITCHEN TOOLS Recipe Book SKM 550 B1 Recipe Book Βιβλιαράκι συνταγών Rezeptheft
48 RECIPE BOOK PAGE Tasty recipes for your Food Processor 2 Potato soup with vegetables...2 Danish Remoulade...4 Carrot soup...6 Soufflé with Crabmeat...6 Salad plate...8 Filled Chickenbreast with Curry Sauce...9 Tomato sauce...10 Tuna spread...12 Red wine-red cabbage...12 Potato rosti...14 Traditional Pancake...15 Hazelnut biscuits...16 Sponge pastry...17 Shortcrust pastry...18 Batter...20 Marble cake...21 Yeast dough...22 Poppy seed cake...23 Orange drink...24 Use only cookware suitable for microwaves when you want to cook food in the microwave oven. Pay heed to the instructions in the operating manual for your microwave oven
49 Tasty recipes for your Food Processor Potato soup with vegetables Ingredients: 125 g Carrots 50 g Celeriac 250 g Potatoes 1000 ml Meat broth (Instant) 1 Onion 20 g Butter 1 Beaker Créme fraîche or Cream 1/2 tbsp scharp Mustard Salt Pepper 1 stick Leek 1 tbsp chopped Herbs (in season) Stove: Heating: Cooking time: Microwave: Power level: Cooking time: Hotplate 10 Minutes 600 Watt 5-7 minutes Preparation: Wash, peel and dice the carrots, celeriac and potatoes. Clean and then cut the leek into thin strips with the shredder disc in the food processor. Pour 1/3 of the meat broth into the mixer and then start the mixer at the highest level with the lid closed. Now add the shredded vegetables through the lid opening in the mixer. Puree it until the desired consistency is reached. Pour the remaining meat broth into a large pot and then add the finely pureed vegetables. Let the whole cook for 10 minutes covered. (Alternatively, you can also cook the closed vegetable broth for 5-7 minutes at 600 watts in the microwave.) Meanwhile, saute the onions in butter until they are golden brown and then add them into the soup. Now, flavour it to your taste with cream fraiche, mustard, salt and pepper. Blend in the chopped herbs before serving. Now fill the soup into pre-warmed plates and sprinkle it with the leek strips
50 Potato soup with vegetables - 3 -
51 Danish Remoulade Ingredients: 4 tbsp Mayonnaise 1 tbsp Capers in brine 1 tsp Sweet Mustard 1 Shallot 2 tbsp Chives 1/2 sweet Gherkin 1/2 tsp Curry 1 pinch Ginger 1 tbsp Apricot jam 1 tbsp Yoghurt 1/2 Anchovy fillets (or 3 cm Anchovy paste) Lemon juice Preparation: Place all ingredients in the mixer and stir them at level 2 until they are well blended., Danish Remoulade - 4 -
52 - 5 - Carrot soup
53 Carrot soup Ingredients: 500 g Carrots 250 ml Water 500 ml Meat stock (glass) 125 ml Cream 125 ml White wine Salt Pepper 50 g cold Butter Fresh Chervil Soufflé with Crabmeat Ingredients: 40 g Butter 20 g Flour 250 ml Milk 1 pinch Sugar 150 g Gouda cheese 200 g Crabmeat 4 Egg yolks 4 Egg whites Butter for the mould Stove: Heating: Cooking time: Microwave: Power level: Cooking time: Hotplate Carrots approx. 20 minutes 600 Watt Carrots approx. 10 minutes Preparation: Wash and peel the carrots. Cut them small enough to fit into the mixer. Put the 250 ml of water into a saucepan and cook the carrots in it for 20 minutes. Then puree all of it in a mixer until no large pieces are left over. Afterwards, put the pureed carrots back into the pot. Now add in the meat stock, cream and white wine. Heat the soup up and flavour it to taste. Blend the butter into the soup in small pieces and then serve it with the chervil. Oven: Shelf height: 2 Heating: E: Top and bottom heat at 200 C (preheated) G: Mark 3 Baking time: minutes Microwave: Power level: Baking time: 360 Watt minutes Preparation: Heat the butter and flour and then add the milk and sugar by stirring. Bring the whole to the boil. Shred the cheese in the food processor with the grating disc and then stir it into the sauce. Now fold in the crab meat. Whisk the egg yolks and fold them in. Beat the egg whites until stiff and fold them in. Grease a baking mould or several small serving moulds and fill them with the mixture. Bake the soufflés immediately and serve them straight away
54 - 7 - Soufflé with Crabmeat
55 Salad plate Salad plate Ingredients: 1 fresh Cucumber 1/4 head White cabbage 2 Paprikas 1 Onion For the marinade: 3-4 tsp Wine vinegar 2 tbsp Cooking oil Salt Sugar Freshly ground pepper 1 tbsp chopped herbs Preparation: Peel the cucumber and divide the cabbage into pieces such that they fit into the filler tube of the food processor. Now slice the cucumber, cabbage, prepared peppers and onions with the food processor at the highest level using the cutting disk. Stir the ingredients for the marinade in a mixer. Combine the vegetables with the marinade and flavour to taste. Preparation time: 15 minutes - 8 -
56 Filled Chickenbreast with Curry Sauce Ingredients: 4 chicken breasts, each approx. 150 g Salt Freshly ground pepper For the filling: 150 g minced pork (raw) 1 Onion, diced China Spices 1 pinch of Ginger powder for the Sauce: 250 ml White wine 2-4 tbsp Cream Sal, 1 tbsp Curry powder Possibly some gravy thickener Stove: Heating: Total cooking time: Hotplate minutes Preparation: Salt and pepper the chicken breasts and then cut them up using a sharp kitchen knife. Process all of the ingredients for the filling into a paste, using the dough hook in the mixing bowl, and flavour to taste. Now fill the chicken breasts with the filling and sew them to. (Alternatively, you can also use wooden pins.) Heat the fat and fry all the chicken breasts in it. Pour in the wine and then let the chicken breasts braise for minutes. Remove the chicken breasts from the pan and place them where they can stay warm. Flavour the sauce with cream, salt and curry powder and thicken the sauce as desired with gravy thickener. Now serve the chicken breasts with the sauce on, for example, rice. Filled Chickenbreast with Curry Sauce - 9 -
57 Tomato sauce Ingredients: 5 tbsp Cooking oil 1 large Onion 1 large tin (800 g ) peeled tomatoes Salt, Pepper, 1 pinch Sugar Pr, 1 pinch Thyme, 1 Pinch Chili powder 1/2 bunch Parsley, chopped 1 bunch Basil, finely chopped 40 g cold Butter or 100 ml sweet Cream Stove: Heating: Cooking time: Hotplate minutes Preparation: Peel the onions and roughly dice them. Heat the oil and fry the onions in it or use the microwave for 2-3 minutes at 600 watts. Add the tomatoes with the juice and stir in all of the spices. Let the sauce simmer covered for 20 minutes or gently cook it all in the microwave. Allow the tomato sauce to cool (to lukewarm) and then puree it in a mixer. Then pour the sauce back into a pot and cook it until it has reduced a little. Now stir in the butter or cream. Sprinkle on the herbs and flavour it to taste. Microwave: Power level: Cooking time: 600 Watt for 5 minutes 180 Watt for 5 minutes approx. 10 minutes As a side dish with noodles and all kinds of grated cheese. Tomato sauce
58 Tuna spread
59 Tuna spread Ingredients: 1 can of Tuna in sauce with vegetables 3 tbsp Yoghurt 1 tsp Lemon juice, freshly pressed 1 Pinch Salt Freshly ground pepper 2 hard-boiled Eggs, diced To serve: Whole wheat bread in slices Butter for smearing 1 hard boiled Egg, diced Chives, sliced Preparation: Blend all ingredients in the mixer at the highest level until the desired consistency is reached (approx. 15 seconds) and then flavour to taste. Spread the bread with butter and tuna cream and sprinkle the whole with chopped egg and chives. Red wine-red cabbage Ingredients: 1 Red cabbage, approx. 1 kg 60 g pork or goose fat 1 large Onion 3 Apples 2 tbsp Sherry vinegar 2 tbsp. Lemon juice 250 ml Red wine 2 tbsp Red currant jelly Salt 1 tbsp. Sugar 2 Bay leaves 1 Clove 1 Tbsp Flour 2 Tbsp Water Stove: Heating: Cooking time: Hotplate minutes Preparation: Peel the onions, cut them into quarters and then chop them using the cutting disc in the food processor. Remove the outer leaves and quarter the red cabbage. Chop the red cabbage in the food processor with the fine shredder disc. Peel, core and dice the apples. Put the fat into a pot and let it melt. Saute the chopped onion in it until it is glassy and then add the red cabbage, apples and all other ingredients except the flour and water. Stir it and bring it to the boil. Then let the red cabbage simmer covered for 60 minutes
60 Should there still be too much fluid in the cabbage afterwards, mix the flour with the water and then add it to the red cabbage to bind the liquid. Flavour to taste with salt, sugar and vinegar. Suitable as an accompaniment to meat, poultry and game. Tip: You can also prepare the cabbage a day before cooking and marinate it in wine and vinegar. Red wine-red cabbage
61 Potato rosti Potato rosti Ingredients: 4 potatoes, large, floury cooking Salt Pepper Nutmeg, ground 80 g Butter or Margarine Stove: Heating: Total roasting time: Hotplate minutes Preparation: Wash and peel the potatoes and cut them into strips with the shredder disc. Wrap the potato mass in a cloth and squeeze the liquid out. Sprinkle the spices on the potato mass and mix everything together. Using a small ladle, put some of the potato mass into the hot fat and press it flat with a spatula. Now fry the rostis on both sides until they are crispy. Suitable as an accompaniment to meat and game dishes
62 Traditional Pancake Ingredients: 2-3 Eggs 375 ml Milk 1 Pinch Salt 250 g Flour Fat for frying Preparation: Mix the eggs, milk and salt with the beater. Sift the flour through and then add it to the mixture. Mix everything together with the beater until you have a smooth batter. Allow the batter to swell for 20 minutes. Heat the fat and, with a small ladle, place some batter in the pan. (Only as much as is needed to thinly cover the pan bottom.) Fry the pancakes until golden brown on both sides and serve hot. Traditional Pancake
63 Hazelnut biscuits Ingredients: 300 g Hazelnuts 90 g Cane sugar 2 Egg whites 2 2 tsp Honey Approx. 75 g of Plum or Rose hip jam 50 g each of Semisweet and Milk chocolate Couverture Oven: Shelf height: 2 Heating: E: Circulation 200 C (preheated for 5 minutes) G: Mark 1-2 Baking time: 6-8 minutes Preparation: Grind the nuts medium fine with the grating disk in the food processor and set four tablespoons of it aside. Process the remaining nuts, sugar, egg white and honey with the beater to a firm pastry. Sprinkle the remaining nuts onto a work surface and roll the pastry out to about a quarter inch thick. Now cut out the biscuits and place them on a baking tray lined with baking paper. Join the cooled biscuits together in pairs with the rose hip or plum jam and then coat them with some milk chocolate and semisweet chocolate. Melt for both types separately. Dip the biscuits up to half way in and let them dry on a kitchen grid. Hazelnut biscuits
64 Sponge pastry Sponge pastry Ingredients: 3 Eggs 3-4 tbsp Water, hot 150 g Sugar 1 pkt of Vanilla sugar 100 g Flour of type g Corn starch 2-3 levelled tsp of Baking powder Oven: Shelf height: 2 Heating: E: Upper and lower heat C G: Mark 2-3 (preheat for 5 minutes) Baking time: minutes Preparation: Line the bottom of a springform pan (diameter: 28 cm) with baking paper. Do not grease the edge, as the surface will then not be evenly smooth and browned.. Whisk the whole eggs in the mixing bowl and add the hot water. Then beat the mixture at the highest level with the whisk for about 1 minute until fluffy. Stir in the sugar and vanilla sugar and beat the mixture for a further two minutes at the highest level. Mix the flour, cornstarch and baking powder together and sift half of it onto the creamed eggs, then briefly stir everything at Level 1. Then stir in the remaining flour in the same way and fill the pastry into the prepared springform. Bake it at once
65 Shortcrust pastry Ingredients: 250 g Wheat flour 1/2 levelled tsp of Baking powder g Sugar 1 Packet of Vanilla sugar 1 pinch Salt 1 Egg 125 g Butter Oven: Shelf height: 3 Heating: E: Upper and lower heat C (preheat for 5 minutes) G: Mark 3-4 Baking time: minutes Preparation: Mix the flour and baking powder in the mixing bowl and then add all of the other ingredients. Knead everything with the kneading hook first for about 1 minute at level 1, then for about 3 minutes at level 2-3. Do not knead the pastry for too long, the pastry could otherwise be too soft. Let the pastry rest in the refrigerator for half an hour and then process it into a pie crust or small pastries. For a pie shell, roll out 2/3 of the pastry and place it in a greased springform. Roll the remaining pastry into a roll. Place this roll as a boundary on the pastry and press it with two fingers on the edge so that an about 3 cm edge is created. Pierce the pie crust several times with a fork and then place it in the oven
66 Shortcrust pastry
67 Batter Batter Ingredients: 250 g soft Butter or Margarine 250 g Sugar 1 pkt of Vanilla sugar 1 Pinch Salt 4 Eggs 500 g Wheat flour 1 pkt Baking powder Approx. 125 ml Milk Oven: Shelf height: 2 Heating: E: Upper and lower heat C G: Mark 2-3 Baking time: minutes Preparation: Put all ingredients into the mixing bowl and stir everything with the beater for 1/2 a minute at level 1, then for 30 seconds at level 2 and then for about 5 minutes at level 4. Grease a baking mould or line it with baking paper. Fill the baking mould and bake the pastry. Before you take the cake from the oven, you should make a readiness test: Insert a pointed wooden stick into the middle of the cake. If no pastry is sticking to it, the cake is baked. Then tip the cake onto a wire rack and allow it to cool
68 Marble cake Ingredients: 125 g soft Butter or Margarine 125 g Sugar 3 eggs 1/2 Packet of Vanilla sugar 1 pinch Salt 250 g Wheat flour 1/2 pkt Baking powder 75 ml Milk 20 g Baking cocoa 50 g Plain chocolate couverture Butter for the mould Oven: Shelf height: 1 Heating: E: Circulation C G: Mark 2 Baking time: minutes Preparation: Put all ingredients except the chocolate and baking cocoa into the mixing bowl and mix everything with the whisk for 1/2 a minute at level 1, then for 30 seconds at level 2 and then for about 5 minutes on level 4. Break the chocolate into chunks and grind it with the coarse grating disc in food processor. Grease a Bundt cake-shape (diameter: 20-22cm) or a loaf pan (30cm long). Fill half of the pastry into the mould and then stir the cocoa and grated chocolate into the remaining pastry. Now place the dark pastry on the light pastry and fold the pastry in with a fork in a spiral form. Tip: If you wish, you can also cover the cake with 100 g of semi-sweet chocolate and then decorate it with cream dabs and chocolate biscuits. Marble cake
69 Yeast dough Ingredients: 500 g Wheat flour 25 g Fresh yeast or 1 pack Dry yeast approx. 1/4 liter lukewarm Milk 80 g Butter or Margarine (room temperature) 80 g Sugar 1 egg Preparation: Place the flour, dry yeast or crumbled yeast and all other ingredients (not directly on the yeast) into the mixing bowl. Slowly mix everything, starting with the dough hook at level 1, then for 3-4 minutes on level 2. Cover the bowl with a dish towel, place it in a warm place and let the dough rise until it has visibly increased its size. Then knead the dough through once again. After that, the dough is finished and you can process it further. Yeast dough
70 Poppy seed cake Poppy seed cake Ingredients: For the dough: 100 g Buckwheat flour 200 g Wheat flour 100 g Hazelnuts, ground 1 cube of Yeast (40 g) or 1 pack Dry yeast Approx. 125 ml Milk 1 pinch Salt 75 g Sugar 1 Egg 150 g Soft butter 1 btl. Citro-bake 1 btl. Rum-bake 100 g Orange peel, diced 50 g Lemon peel, diced For the filling: 1 btl. (200 g ) Poppy-bake For the coating: 100 g Butter for spreading Powder sugar for dusting. Oven: Shelf height: 1 Heating: E: Upper and lower heat C (preheat for 5 minutes) G: Mark 2-3 Baking time: minutes Preparation: Make from the specified ingredients, except the orange peel and lemon peel, a yeast dough (see "Yeast Dough"). Knead the orange and lemon peel in at the end. Roll the dough out (about 20 x 25 cm) and spread the poppy mix on to it. Then fold and beat the dough together into a stollen shape. Grease a stollen mould and place the stollen inside for baking. Spread the remaining butter onto the still hot stollen and sprinkle it with the powdered sugar
71 Orange drink Orange drink Ingredients: 500 ml Orange juice 2-4 tbsp. Lemon juice 300 g tinned Apricots Ice cubes, crushed 4 tsp Sugar or Honey Preparation: Put the juice, the apricots and the ice cubes in the mixer and mix everything for about 20 seconds at the highest level. Now add the sugar or honey to taste and serve the juice ice cold. Tip: The apricot juice can be frozen in ice cube trays and used later as ice cubes. Enjoy your meal! These recipes are provided without guarantee. All ingredients and preparation information are guiding values. Expand these recipe suggestions based on your personal experiences. We hope you enjoy the recipes and wish you "bon appetit"
72 Βιβλιαράκι συνταγών Σελίδα Νόστιμες συνταγές για τη μηχανή κουζίνας 26 Σούπα πατάτας με λαχανικά...26 Δανέζικη σάλτσα σαλάτας...28 Σούπα καρότων...30 Σουφλέ με καβούρια...30 Πιατέλα με σαλατικά...32 Γεμιστό στήθος κοτόπουλου με σάλτσα κάρυ...33 Σάλτσα τομάτας...34 Επάλειμμα τόνου...36 Κόκκινο λάχανο με κόκκινο κρασί...36 Ρόστι πατάτας...38 Παραδοσιακή ομελέτα...39 Μπισκότα με φουντούκια...40 Ζύμη μπισκότων...41 Ζύμη εύθρυπτης κόρας...42 Μίγμα κέικ...44 Κέικ ανάμεικτο...45 Ζύμη μαγιάς...46 Στόλεν...47 Ποτό από πορτοκάλια...48 Χρησιμοποιείτε συσκευές που ενδείκνυνται αποκλειστικά για συσκευές μικροκυμάτων, εάν θέλετε να μαγειρέψετε τα φαγητά στη συσκευή μικροκυμάτων. Προσέχετε τις υποδείξεις στις οδηγίες χειρισμού της συσκευής σας μικροκυμάτων
73 Νόστιμες συνταγές για τη μηχανή κουζίνας Σούπα πατάτας με λαχανικά Υλικά: 125 γρ. καρότα 50 γρ. σέλινο 250 g πατάτες 1000 ml ζωμός κρέατος (στιγμιαίος) 1 κρεμμύδι 20 γρ. βούτυρο 1 κούπα κρέμα γάλακτος ή σαντιγί 1/2 ΚΣ πικάντικη μουστάρδα Αλάτι πιπέρι 1 μπαστούνι πράσο 1 ΚΣ ψιλοκομμένα βότανα (της εποχής) Κουζίνα: Ζέσταμα: Χρόνος μαγειρέματος: Συσκευή μικροκυμάτων: Απόδοση: Χρόνος μαγειρέματος: Μάτι κουζίνας 10 λεπτά 600 Watt 5-7 λεπτά Ετοιμασία: Πλένετε, καθαρίζετε και τεμαχίζετε τα καρότα, το σέλινο και τις πατάτες. Στη συνέχεια καθαρίζετε και κόβετε το πράσο στο εξάρτημα κοπής με το δίσκο τριψίματος, σε λεπτές λωρίδες. Ρίξτε το 1/3 του ζωμού κρέατος στο μίξερ και εκκινήστε το με κλειστό καπάκι στην ανώτερη βαθμίδα. Βάλτε τώρα τα ψιλοκομμένα λαχανικά μέσα από το άνοιγμα του καπακιού στο μίξερ. Πολτοποιήστε τόσο έως ότου επιτευχθεί η επιθυμητή πυκνότητα. Ρίξτε τον υπόλοιπο ζωμό κρέατος σε μια μεγάλη κατσαρόλα και στη συνέχεια προσθέστε τα λεπτοκομμένα λαχανικά. Αφήστε το μίγμα τώρα να βράσει σκεπασμένο για 10 λεπτά. (Εναλλακτικά μπορείτε να αφήσετε το ζωμό λαχανικών να μαγειρευτεί σε κλειστό δοχείο στα 600 Watt για 5-7 λεπτά στη συσκευή μικροκυμάτων.) Κατά τη διάρκεια αυτής της διαδικασίας ροδίζετε τα κρεμμύδια σε βούτυρο έως ότου αποκτήσουν χρυσοκίτρινο χρώμα και τα προσθέτετε τέλος μέσα στη σούπα. Σύμφωνα με το γούστο σας βάζετε τώρα κρέμα γάλακτος, μουστάρδα, αλάτι και πιπέρι. Πριν από το σερβίρισμα ανακατεύετε τα ψιλοκομμένα βότανα από κάτω. Σερβίρετε τη σούπα τώρα σε προζεσταμένα πιάτα και την πασπαλίζετε με τις λωρίδες πράσου
74 Σούπα πατάτας με λαχανικά
75 Δανέζικη σάλτσα σαλάτας Υλικά: 4 ΚΣ μαγιονέζα 1 ΚΣ κάππαρη σε άλμη 1 κγ γλυκιά μουστάρδα 1 ασκαλώνιο (κρεμμύδι) 2 ΚΣ πρασουλίδα 1/2 γλυκό αγγούρι 1/2 κγ κάρυ 1 πρέζα πιπερόριζα 1 ΚΣ μαρμελάδα βερίκοκο 1 ΚΣ γιαούρτι 1/2 φιλέτο σαρδέλα (ή 3 cm πάστα αντζούγιας) Χυμός λεμονιού Ετοιμασία: Προσθέτετε όλα τα uλικά στο μίξερ και τα ανακατεύετε τόσο στη βαθμίδα 2, έως ότου αναμειχθούν καλά., Δανέζικη σάλτσα σαλάτας
76 Σούπα καρότων
77 Σούπα καρότων Υλικά: 500 γρ. καρότα 250 ml νερό 500 ml ζωμός κρέατος (γυάλινη συσκευασία) 125 ml κρέμα 125 ml λευκό κρασί Αλάτι πιπέρι 50 γρ. κρύο βούτυρο Φρέσκος φραγκομαϊντανός Σουφλέ με καβούρια Υλικά: 40 g βούτυρο 20 γρ. αλεύρι 250 ml γάλα 1 πρέζα ζάχαρη 150 g τυρί γκούντα 200 g κρέας από καβούρια 4 κρόκοι 4 ασπράδια Βούτυρο για το ταψί Κουζίνα: Ζέσταμα: Χρόνος μαγειρέματος: Συσκευή μικροκυμάτων: Απόδοση: Χρόνος μαγειρέματος: Μάτι κουζίνας Καρότα περ. 20 λεπτά 600 Watt Καρότα περ. 10 λεπτά Κουζίνα: Ύψος εισαγωγής: 2 Ζέσταμα: H: Άνω και κάτω θερμοκρασία 200 C (προθέρμανση) Γκ: Βαθμίδα 3 Χρόνος ψησίματος: λεπτά Ετοιμασία: Πλένετε και καθαρίζετε τα καρότα. Τα κόβετε τόσο μικρά, ώστε να χωράνε καλά στο μίξερ. Βάζετε 250 ml νερό σε μια κατσαρόλα και μαγειρεύετε τα καρότα για 20 λεπτά εκεί μέσα. Στη συνέχεια πολτοποιείτε τα υλικά αυτά στο μίξερ, έως ότου να μην υπάρχουν πλέον χοντρά κομμάτια. Στη συνέχεια βάζετε τα πολτοποιημένα καρότα πάλι στην κατσαρόλα. Τώρα προσθέτετε το ζωμό κρέατος, την κρέμα γάλακτος και το λευκό κρασί. Ζεσταίνετε τη σούπα και καρυκεύετε κατόπιν επιθυμίας. Ανακατεύετε το βούτυρο σε μικρά κομμάτια από κάτω στη σούπα και στη συνέχεια σερβίρετε με το φραγκομαϊντανό. Συσκευή μικροκυμάτων: Απόδοση: 360 Watt Χρόνος ψησίματος: λεπτά Ετοιμασία: Ζεσταίνετε το βούτυρο και το αλεύρι και προσθέτετε στη συνέχεια ανακατεύοντας γάλα και ζάχαρη. Αφήστε αυτό το μίγμα να πάρει βράση μια φορά. Ψιλοκόβετε το τυρί στο εξάρτημα κοπής με το δίσκο τριψίματος και το ανακατεύετε στη σάλτσα από κάτω. Αναγυρίστε τώρα το κρέας των καβουριών. Χτυπήστε τον κρόκο και αναγυρίστε τον και αυτόν. Χτυπήστε το ασπράδι καλά και αναγυρίστε και αυτό. Τώρα επαλείψτε ένα πυρέξ ή μικρά πυρέξ μερίδων με λίπος και γεμίστε τα με τη μάζα που δημιουργήσατε. Ψήστε τα σουφλέ αμέσως και σερβίρετέ τα επίσης αμέσως
78 Σουφλέ με καβούρια
79 Πιατέλα με σαλατικά Πιατέλα με σαλατικά Υλικά: 1 φρέσκο αγγούρι 1/4 κεφάλι άσπρο λάχανο 2 Πιπεριές 1 κρεμμύδι Για τη σάλτσα μαρινάτου: 3-4 ΚΣ Ξίδι κρασιού 2 ΚΣ λάδι μαγειρικής Αλάτι Ζάχαρη Φρεσκοτριμμένο πιπέρι 1 ΚΣ ψιλοκομμένα βότανα Ετοιμασία: Καθαρίστε το αγγούρι και κόψτε έτσι το λάχανο ώστε τα κομμάτια να χωράνε στην υποδοχή πλήρωσης του εξαρτήματος κοπής. Ψιλοκόψτε τώρα αγγούρι, λάχανο, την προετοιμασμένη πιπεριά και κρεμμύδια στην ανώτερη ταχύτητα στο εξάρτημα κοπής με το δίσκο λεπτής κοπής. Ανακατέψτε τα συστατικά για τη σάλτσα μαρινάτου με το μίξερ. Αναμείξτε τη σάλτσα μαρινάτου με τα λαχανικά και καρυκεύστε κατόπιν επιθυμίας. Χρόνος προετοιμασίας: 15 λεπτά
80 Γεμιστό στήθος κοτόπουλου με σάλτσα κάρυ Υλικά: 4 τεμάχια στήθος κοτόπουλου έκαστο 150 g Αλάτι Φρεσκοτριμμένο πιπέρι Για τη γέμιση: 150 g χοιρινός κιμάς 1 κρεμμύδι, ψιλοκομμένο Μείγμα Κινέζικων καρυκευμάτων Σκόνη πιπερόριζας στη μύτη του μαχαιριού Για τη σάλτσα: 250 ml λευκό κρασί 2-4 ΚΣ κρέμα γάλακτος Αλάτι, 1 κγ κάρυ Ενδεχομένως λίγο κόρν-φλάουερ Κουζίνα: Ζέσταμα: Συνολικός χρόνος μαγειρέματος: Μάτι κουζίνας λεπτά Ετοιμασία: Αλατίστε και πιπερώστε το στήθος κοτόπουλου και κόψτε τα κομμάτια στη συνέχεια με ένα κοφτερό μαχαίρι κουζίνας. Επεξεργαστείτε όλα τα υλικά για τη γέμιση στο μπολ ανάμειξης με το εξάρτημα ζυμώματος έως ότου γίνει μια ζύμη και καρυκεύστε κατόπιν επιθυμίας. Γεμίστε τώρα τα κομμάτια στήθος κοτόπουλου με τη γέμιση και ράψτε τα. (Εναλλακτικά μπορείτε να χρησιμοποιήσετε και μικρά ξυλάκια.) Ζεσταίνετε τώρα το λίπος και τηγανίζετε εκεί τα κομμάτια στήθους κοτόπουλου. Περιχύστε το κρασί εκεί και αφήστε στη συνέχεια τα κομμάτια κοτόπουλο να σιγοψηθούν για λεπτά. Απομακρύνετε τα κομμάτια στήθους κοτόπουλου από το τηγάνι και τα αφήνετε κάπου ώστε να μην κρυώσουν. Καρυκεύστε τη σάλτσα με κρέμα γάλακτος, αλάτι και κάρυ και προσθέστε της κόρν-φλάουρ κατόπιν επιθυμίας. Σερβίρετε τώρα το κομμάτια κοτόπουλου για παράδειγμα με σάλτσα επάνω σε ρύζι. Γεμιστό στήθος κοτόπουλου με σάλτσα κάρυ
81 Σάλτσα τομάτας Υλικά: 5 ΚΣ λάδι μαγειρικής 1 μεγάλο κρεμμύδι 1 μεγάλη κονσέρβα (800 g) ψιλοκομμένες τομάτες Αλάτι, πιπέρι, 1 πρ. ζάχαρη, 1 πρ. θυμάρι, 1 πρ. σκόνη τσίλι 1/2 μάτσο μαϊντανό, ψιλοκομμένο 1 μάτσο βασιλικό, λεπτοκομμένο 40 g κρύο βούτυρο ή 100 ml γλυκιά κρέμα γάλακτος Κουζίνα: Ζέσταμα: Χρόνος μαγειρέματος: Συσκευή μικροκυμάτων: Απόδοση: Χρόνος μαγειρέματος: Μάτι κουζίνας λεπτά 600 Watt 5 λεπτά 180 Watt 5 λεπτά περίπου 10 λεπτά Ετοιμασία: Καθαρίστε τα κρεμμύδια και κόψτε τα σε χοντρά κομμάτια. Ζεσταίνετε το λάδι και τηγανίζετε τα κρεμμύδια ή χρησιμοποιείτε τη συσκευή μικροκυμάτων για 2-3 λεπτά στα 600 Watt. Προσθέτετε τις τομάτες με το χυμό και ανακατεύετε από κάτω όλα τα καρυκεύματα. Αφήστε τη σάλτσα να βράσει σε χαμηλή θερμοκρασία για 20 λεπτά ή μαγειρέψτε την στη συσκευή μικροκυμάτων. Αφήστε τη σάλτσα τομάτας να κρυώσει (να γίνει χλιαρή) και πολτοποιήστε την στο μίξερ. Ρίξτε τη σάλτσα στη συνέχεια πάλι στην κατσαρόλα και βράστε την ενδεχομένως για άλλο λίγο χρόνο. Ανακατέψτε τώρα το βούτυρο ή την κρέμα γάλακτος. Πασπαλίστε τα βότανα και καρυκεύστε κατόπιν επιθυμίας. Ως συνοδευτικό για ζυμαρικά κάθε είδους με τριμμένο τυρί. Σάλτσα τομάτας
82 Επάλειμμα τόνου
83 Επάλειμμα τόνου Υλικά: 1 κονσέρβα τόνος σε σάλτσα με λαχανικά 3 ΚΣ γιαούρτι 1 κγ χυμός λεμονιού φρεσκοστυμμένος 1 πρ. αλάτι Φρεσκοτριμμένο πιπέρι 2 σκφιχτά αυγά, κομμένα σε κύβους Για το σερβίρισμα: Ψωμί ολικής άλεσης σε φέτες Βούτυρο για επάλειψη 1 σκφιχτό αυγό, κομμένο σε κύβους Πρασουλίδα, κομμένη Ετοιμασία: Αναμειγνύετε όλα τα υλικά στην ανώτερη βαθμίδα στο μίξερ έως ότου επιτευχθεί η επιθυμητή πυκνότητα (περ. 15 δευτερόλεπτα) και καρυκεύετε κατόπιν επιθυμίας. Επαλείφετε το ψωμί με βούτυρο και κρέμα τόνου και πασπαλίζετε με το κομμένο αυγό και την πρασουλίδα. Κόκκινο λάχανο με κόκκινο κρασί Υλικά: 1 Κόκκινο λάχανο περ. 1 kg 60 g χοιρινό λίπος ή λίπος χήνας 1 μεγάλο κρεμμύδι 3 μήλα 2 ΚΣ ξίδι από τσέρι 2 κουταλιές σούπας χυμό λεμονιού 250 ml κόκκινο κρασί 2 ΚΣ ζελέ ξανθής σταφίδας Αλάτι 1 ΚΣ ζάχαρη 2 φύλλα δάφνης 1 γαρίφαλο 1 ΚΣ αλεύρι 2 ΚΣ νερό Κουζίνα: Ζέσταμα: Χρόνος μαγειρέματος: Μάτι κουζίνας λεπτά Ετοιμασία: Καθαρίζετε τα κρεμμύδια, τα κόβετε στα τέσσερα και τα ψιλοκόβετε με τη βοήθεια του εξαρτήματος κοπής με το δίσκο κοπής. Απομακρύνετε τα εξωτερικά φύλλα και κόβετε στα τέσσερα το λάχανο. Ψιλοκόβετε το λάχανο στο εξάρτημα κοπής με τo δίσκο λεπτού τριψίματος. Καθαρίζετε, βγάζετε τα κουκούτσια και κόβετε σε κύβους τα μήλα. Βάζετε το λίπος σε μια κατσαρόλα και το αφήνετε να υγροποιηθεί. Τσιγαρίζετε εκεί τα ψιλοκομμένα κρεμμύδια και στη συνέχεια προσθέτετε το κόκκινο λάχανο, τα μήλα και τα υπόλοιπα υλικά εκτός του αλευριού και του νερού. Ανακατεύετε και το αφήνετε βράσει. Στη συνέχεια αφήνετε το κόκκινο λάχανο σκεπασμένο να μαγειρευτεί στον αχνό
84 Εάν στη συνέχεια υπάρχει πολύ υγρό στο κόκκινο λάχανο, ανακατεύετε το αλεύρι με το νερό και το βάζετε στο κόκκινο λάχανο για να δέσετε το υγρό. Καρυκεύετε κατόπιν επιθυμίας με αλάτι, ζάχαρη και ξίδι. Ενδείκνυται ως συνοδευτικό στο κρέας, το κοτόπουλο και σε συνταγές με κυνήγι. Υπόδειξη: Μπορείτε επίσης να ψιλοκόψετε το λάχανο μια ημέρα πριν από την προετοιμασία και να το μαρινάρετε με κρασί και ξίδι. Κόκκινο λάχανο με κόκκινο κρασί
85 Ρόστι πατάτας Ρόστι πατάτας Υλικά: 4 πατάτες, μεγάλες, καλά βρασμένες Αλάτι πιπέρι μοσχοκάρυδο, τριμμένο 80 g βούτυρο ή μαργαρίνη Κουζίνα: Ζέσταμα: Συνολικός χρόνος τηγανίσματος: Μάτι κουζίνας λεπτά Ετοιμασία: Πλένετε και καθαρίζετε τις πατάτες και τις κόβετε με το δίσκο τριψίματος σε λωρίδες. Βάζετε τη μάζα πατάτας σε ένα πανί και το πιέζετε ώστε να βγει όλο το υγρό. Πασπαλίζετε τα καρυκεύματα στη μάζα πατάτας και τα ανακατεύετε όλα. Τώρα προσθέτετε με μια μικρή σέσουλα λίγο από τη μάζα πατάτας στο καυτό λίπος και την πιέζετε με τη σπάτουλα γυρίσματος έως ότου γίνει επίπεδη. Τηγανίστε τα ρόστι τώρα και από τις δύο πλευρές έως ότου γίνουν τραγανά. Ενδείκνυται ως συνοδευτικό στο κρέας και σε συνταγές με κυνήγι
86 Παραδοσιακή ομελέτα Υλικά: 2-3 αυγά 375 ml γάλα 1 πρ. αλάτι 250 γρ. αλεύρι Λίπος για το τηγάνισμα Ετοιμασία: Αναμείξτε τα αυγά, το γάλα και το αλάτι με το χτυπητήρι. Κοσκινίστε το αλεύρι και προσθέστε το. Αναμείξτε τα όλα με το χτυπητήρι έως ότου δημιουργηθεί μια λεία ζύμη. Αφήστε τη ζύμη να φουσκώσει για περ. 20 λεπτά. Ζεσταίνετε το λίπος και βάζετε με μια μικρή σέσουλα ζύμη. (Πάντα τόσο πολύ, ώστε το κάτω μέρος του τηγανιού να έχει μια λεπτή στρώση.) Τηγανίστε την ομελέτα και από τις δύο πλευρές έως ότου ροδίσει και σερβίρετε την καυτή. Παραδοσιακή ομελέτα
87 Μπισκότα με φουντούκια Υλικά: 300 g φουντούκια 90 γρ. ακατέργαστη ζάχαρη 2 ασπράδια 2 κγ μέλι Περ. 75 g πολτός δαμάσκηνου ή αγριοτριαντάφυλλου Από 50 g ημίγλυκη κουβερτούρα και κουβερτούρα πλήρους γάλακτος Κουζίνα: Ύψος εισαγωγής: 2 Ζέσταμα: H: Αέρας κυκλοφορίας 200 C (5 λεπτά προθέρμανση) Γκ: Βαθμίδα 1-2 Χρόνος ψησίματος: 6-8 λεπτά Ετοιμασία: Τρίβετε τα φουντούκια με το δίσκο τριψίματος στο εξάρτημα κοπής σε μεσαία λεπτότητα και βάζετε στην άκρη τέσσερα κουτάλια της σούπας. Ανακατέψτε τα υπόλοιπα φουντούκια, τη ζάχαρη, το ασπράδι και το μέλι με το χτυπητήρι έως ότου γίνει μια σφιχτή ζύμη. Πασπαλίστε την επιφάνεια εργασίας με τα υπόλοιπα φουντούκια και τυλίξτε τη ζύμη σε πάχος μισού εκατοστού. Τρυπήστε τώρα τα μπισκότα και τοποθετήστε τα στο καλυμμένο με χαρτί ψησίματος, ταψί. Τοποθετήστε τα μπισκότα όταν έχουν κρυώσει ανά ζεύγη μαζί με τον πολτό δαμάσκηνου ή αγριοτριαντάφυλλου και καλύψτε τα εν μέρει με κουβερτούρα πλήρους γάλακτος και εν μέρει με ημίγλυκη κουβερτούρα. Για αυτό λιώστε ξεχωριστά και τα δύο είδη κουβερτούρας. Βυθίστε τα μπισκότα έως το ήμισυ και αφήστε τα να στεγνώσουν σε ειδικές σχάρες. Μπισκότα με φουντούκια
88 Ζύμη μπισκότων Ζύμη μπισκότων Υλικά: 3 αυγά 3-4 ΚΣ νερό, καυτό 150 γρ. ζάχαρη 1 πακετάκι βανίλια 100 g αλεύρι, τύπος γρ. κόρν-φλάουρ 2-3 κοφτή ΚΣ μπέϊκιν πάουντερ Κουζίνα: Ύψος εισαγωγής: 2 Ζέσταμα: H: Άνω και κάτω θερμοκρασία C Γκ: Βαθμίδα 2-3 (5 λεπτά προθέρμανση) Χρόνος ψησίματος: λεπτά Ετοιμασία: Τοποθετήστε χαρτί ψησίματος σε ένα ειδικό ταψί με κλιπ (Διάμετρος: 28 εκ.). Μη βάζετε λίπος στα άκρα, διότι αλλιώς η επιφάνεια δεν θα γίνει ομοιόμορφα λεία και ροδισμένη. Χτυπήστε τα αυγά σε ένα μπολ ανάμειξης και προσθέστε καυτό νερό. Χτυπήστε τα για περ. 1 λεπτό στην ανώτερη βαθμίδα με το χτυπητήρι, έως ότου γίνει αφρός. Ανακατέψτε ζάχαρη και ζάχαρη βανίλιας από κάτω και χτυπήστε τα όλα για 2 λεπτά στην ανώτερη βαθμίδα. Αναμείξτε αλεύρι, κορν-φλάουρ και μπέϊκιν πάουντερ και κοσκινίστε το μισό στην κρέμα από τα αυγά και ανακατέψτε τα όλα για λίγο στη βαθμίδα 1. Στη συνέχεια αναμείξτε το υπόλοιπο αλεύρι με τον ίδιο τρόπο από κάτω και γεμίστε με τη ζύμη στο προετοιμασμένο ταψί με κλιπ. Ψήστε το αμέσως
89 Ζύμη εύθρυπτης κόρας Υλικά: 250 g αλεύρι σιταριού 1/2 κοφτή ΚΣ μπέϊκιν πάουντερ g ζάχαρη 1 πακετάκι βανίλια 1 πρέζα αλάτι 1 Αυγό 125 γρ. βούτυρο Κουζίνα: Ύψος εισαγωγής: 3 Ζέσταμα: H: Άνω και κάτω θερμοκρασία C (5 λεπτά προθέρμανση) Γκ: Βαθμίδα 3-4 Χρόνος ψησίματος: λεπτά Ετοιμασία: Αναμείξτε το αλεύρι και το μπέϊκιν πάουντερ στο δοχείο ανάμειξης και στη συνέχεια προσθέστε όλα τα υπόλοιπα υλικά. Ζυμώστε τα όλα με το εξάρτημα ζυμώματος πρώτα για περ. 1 λεπτό στη βαθμίδα 1 και στη συνέχεια για περ. 3 λεπτά στη βαθμίδα 2-3. Μη ζυμώσετε τη ζύμη για πολύ, γιατί αλλιώς μπορεί να γίνει πολύ μαλακή. Αφήστε τη ζύμη στο ψυγείο για 1/2 ώρα να καθήσει και στη συνέχεια απλώστε την σε ένα ταψί για τάρτες ή όημιοupγήστε μικρά γλυκάκια. Για ένα ταψί τάρτας ξετυλίξτε τα 2/3 της ζύμης και τοποθετήστε την σε ένα ταψί το οποίο θα έχετε λαδώσει. Την υπόλοιπη ζύμη την κάνετε ρολό. Τοποθετήστε αυτό το ρολό στα άκρα της ζύμης και πιέστε το με τα δύο δάχτυλα έτσι στα άκρα ώστε να δημιουργείται ένα περίγραμμα περ 3 εκ. Τρυπήστε το κάτω μέρος της τάρτας με ένα πιρούνι πολλές φορές και τοποθετήστε στη συνέχεια στο φούρνο
90 Ζύμη εύθρυπτης κόρας
91 Μίγμα κέικ Μίγμα κέικ Υλικά: 250 g μαλακό βούτυρο ή μαργαρίνη 250 γρ. ζάχαρη 1 πακετάκι βανίλια 1 πρ. αλάτι 4 αυγά 500 g αλεύρι σιταριού 1 πακέτο μπέϊκιν πάουντερ Περ. 125 ml γάλα Κουζίνα: Ύψος εισαγωγής: 2 Ζέσταμα: H: Άνω και κάτω θερμοκρασία C Γκ: Βαθμίδα 2-3 Χρόνος ψησίματος: λεπτά Ετοιμασία: Βάλτε όλα τα υλικά στο δοχείο ανάμειξης και ανακατέψτε τα με το χτυπητήρι για 1/2 λεπτό στη βαθμίδα 1, στη συνέχεια για 30 δευτερόλεπτα στη βαθμίδα 2 και μετά για περ. 5 λεπτά στη βαθμίδα 4. Λαδώνετε τη φόρμα ή τοποθετείτε εκεί χαρτί ψησίματος. Γεμίζετε το ταψί και ψήνετε τη ζύμη. Προτού πάρετε το γλυκό από το φούρνο, πρέπει να κάνετε μια δοκιμή με ένα μυτερό αντικείμενο για να δείτε εάν έχει ψηθεί: Για αυτό τρυπήστε με το μυτερό αντικείμενο στο κέντρο του γλυκού. Εάν δεν μένει ζύμη στο μυτερό αντικείμενο, είναι το γλυκό ψημένο. Γυρίστε στη συνέχεια το γλυκό σε μια ειδική σχάρα και αφήστε το να κρυώσει
92 Κέικ ανάμεικτο Υλικά: 125 g μαλακό βούτυρο ή μαργαρίνη 125 γρ. ζάχαρη 3 αυγά 1/2 πακετάκι βανίλια 1 πρέζα αλάτι 250 g αλεύρι σιταριού 1/2 πακέτο μπέϊκιν πάουντερ 75 ml γάλα 20 g κακάο για κέϊκ 50 g ημίγλυκη κουβερτούρα Βούτυρο για το ταψί Κουζίνα: Ύψος εισαγωγής: 1 Ζέσταμα: H: Αέρας κυκλοφορίας C Γκ: Βαθμίδα 2 Χρόνος ψησίματος: λεπτά Ετοιμασία: Βάλτε όλα τα υλικά, εκτός της κουβερτούρας και του κακάου, στο δοχείο ανάμειξης και χτυπήστε τα όλα με το χτυπητήρι για 1/2 λεπτό στη βαθμίδα 1, στη συνέχεία για 30 δευτερόλεπτα στη βαθμίδα 2 και στη συνέχεια για περ. 5 λεπτά στη βαθμίδα 4. Σπάστε την κουβερτούρα σε μεγάλα κομμάτια και τρίψτε την με το δίσκο χοντρού τριψίματος στο εξάρτημα κοπής. Βάλτε μαργαρίνη σε ένα στρογγυλό ταψί (Διάμετρος: εκ.) ή σε ένα τετράγωνο ταψί (μήκος 30 εκ.). Γεμίστε τη μισή ζύμη στο ταψί και ανακατέψτε στη συνέχεια το κακάο και την τριμμένη κουβερτούρα στην υπόλοιπη ζύμη. Βάλτε τώρα τη σκουρόχρωμη επάνω στην ανοιχτόχρωμη ζύμη και ανακατεύετε τη ζύμη σε σπειροειδή κίνηση με ένα πιρούνι. Υπόδειξη: Εάν θέλετε μπορείτε να σκεπάσετε το γλυκό και με 100 g ημίγλυκη κουβερτούρα και στη συνέχεια να το διακοσμήσετε με στίγματα σαντιγί και με σοκολατένια μπισκότα. Κέικ ανάμεικτο
93 Ζύμη μαγιάς Υλικά: 500 γρ. αλεύρι σίτου 25 γρ. φρέσκια μαγιά ή 1 πακετάκι στεγνή μαγιά Περ. 1/4 λ. χλιαρό γάλα 80 γρ. βούτυρο ή μαργαρίνη (θερμοκρασία δωματίου) 80 γρ. ζάχαρη 1 αυγό Ετοιμασία: Προσθέστε αλεύρι, στεγνή μαγιά ή μαγιά σε ψίχα και όλα τα άλλα υλικά (όχι απευθείας στη μαγιά) στο δοχείο ανάμειξης. Ανακατέψτε τα όλα αργά με το εξάρτημα ζυμώματος στη βαθμίδα 1, στη συνέχεια για 3-4 λεπτά στη βαθμίδα 2. Καλύψτε το δοχείο με μια πετσέτα κουζίνας, τοποθετήστε το σε ένα ζεστό σημείο και αφήστε τη ζύμη να φουσκώσει έως ότου μεγαλώσει ορατά. Ζυμώστε τη ζύμη στη συνέχεια άλλη μια φορά. Στη συνέχεια είναι έτοιμη η ζύμη και μπορείτε να διεξάγετε περαιτέρω επεξεργασία. Ζύμη μαγιάς
94 Στόλεν Στόλεν Υλικά: Για τη ζύμη: 100 g Φαγόπυρο 200 g αλεύρι σιταριού 100 g φουντούκια, αλεσμένα 1 κύβος μαγιά (40 g) ή 1 πακέτο στεγνή μαγιά Περ. 125 ml γάλα 1 πρ. αλάτι 75 γρ. ζάχαρη 1 Αυγό 150 γρ. μαλακό βούτυρο 1 σακουλάκι γευστική ύλη λεμονιού (Citro-back) 1 σακουλάκι γευστική ύλη από ρούμι (Rum-back) 100 g σακχαρόπηκτη φλούδα πορτοκαλιού, σε κύβους 50 g σακχαρόπηκτη φλούδα λεμονιού, σε κύβους Για τη γέμιση: 1 σακουλάκι (200 g ) μάζα σπόρων παπαρούνας Για την επίστρωση: 100 g βούτυρο επάλειψης Ζάχαρη άχνη για το πασπάλισμ Κουζίνα: Ύψος εισαγωγής: 1 Ζέσταμα: H: Άνω και κάτω θερμοκρασία C (5 λεπτά προθέρμανση) Γκ: Βαθμίδα 2-3 Χρόνος ψησίματος: λεπτά Ετοιμασία: Δημιουργείτε από τα δοθέντα υλικά εκτός των σακχαρόπηκτων φλούδων πορτοκαλιού και λεμονιού, μια ζύμη μαγιάς (δείτε Ζύμη μαγιάς ). Ζυμώνετε από κάτω τη σακχαρόπηκτη φλούδα πορτοκαλιού και λεμονιού στο τέλος. Ξετυλίγετε τη ζύμη (περ. 20 x 25 εκ.) και επιστρώνετε εκεί πάνω τη μάζα σπόρων παπαρούνας. Στη συνέχεια τυλίγετε τη ζύμη σε ένα σχήμα φραντζόλας. Βάζετε μαργαρίνη σε μια φόρμα για στόλεν και τοποθετείτε τη δημιουργημένη φραντζόλα για ψήσιμο. Πασπαλίζετε το ακόμα καυτό στόλεν με βούτυρο και επιστρώνετε με ζάχαρη άχνη
95 Ποτό από πορτοκάλια Ποτό από πορτοκάλια Υλικά: 500 ml χυμός πορτοκαλιού 2-4 ΚΣ χυμό λεμονιού 300 g βερίκοκα από την κονσέρβα παγάκια, θρυμματισμένα 4 ΚΣ ζάχαρη ή μέλι Ετοιμασία: Βάζετε το χυμό, τα βερίκοκα και τα παγάκια στο μίξερ και τα αναμειγνύετε όλα για περ. 20 δευτερόλεπτα στην ανώτερη βαθμίδα. Προσθέτετε τώρα ζάχαρη ή μέλι και σερβίρετε το χυμό παγωμένο. Υπόδειξη: Μπορείτε να παγώσετε το χυμό βερίκοκων στο δοχείο για παγάκια και να τον χρησιμοποιήσετε αργότερα σαν παγάκια. Καλή όρεξη! Συνταγές χωρίς εγγύηση. Όλα τα υλικά και τα στοιχεία ετοιμασίας είναι τιμές βάσης. Διορθώστε αυτές τις προτάσεις συνταγών σύμφωνα με τις ατομικές σας εμπειρίες. Σας ευχόμαστε σε κάθε περίπτωση καλή επιτυχία και καλή όρεξη
96 REZEPTHEFT SEITE Leckere Rezepte für Ihre Küchenmaschine 50 Kartoffelsuppe mit Gemüse...50 Dänische Remoulade...52 Möhrensuppe...54 Soufflé mit Krabben...54 Salatplatte...56 Gefüllte Hähnchenbrust mit Curry-Sauce...57 Tomatensauce...58 Thunfisch-Aufstrich...60 Rotwein-Rotkohl...60 Kartoffelröstis...62 Traditionelle Pfannkuchen...63 Haselnuss-Kekse...64 Biskuitteig...65 Mürbeteig...66 Rührteig...68 Marmorkuchen...69 Hefeteig...70 Mohnstollen...71 Orangen-Getränk...72 Verwenden Sie ausschließlich für Mikrowellen geeignetes Geschirr, wenn Sie die Speisen in der Mikrowelle zubereiten wollen. Achten Sie auf die Hinweise in der Bedienungsanleitung Ihrer Mikrowelle
97 Leckere Rezepte für Ihre Küchenmaschine Kartoffelsuppe mit Gemüse Zutaten: 125 g Möhren 50 g Sellerie 250 g Kartoffeln 1000 ml Fleischbrühe (Instant) 1 Zwiebel 20 g Butter 1 Becher Créme fraîche oder Sahne 1/2 EL scharfer Senf Salz Pfeffer 1 Stange Lauch 1 EL gehackte Kräuter (nach Saison) Herd: Beheizung: Garzeit: Mikrowelle: Leistung: Garzeit: Kochplatte 10 Minuten 600 Watt 5-7 Minuten Zubereitung: Waschen, schälen und würfeln Sie die Möhren, Sellerie und Kartoffeln. Putzen und schneiden Sie die Lauchstange anschließend im Durchlaufschnitzler mit der Raspelscheibe in feine Streifen. Gießen Sie 1/3 der Fleischbrühe in den Mixer und starten Sie den Mixer mit geschlossenem Deckel auf höchster Stufe. Geben Sie nun das zerkleinerte Gemüse durch die Deckelöffnung in den Mixer. Pürieren Sie es solange, bis die gewünschte Konsistenz erreicht ist. Gießen Sie die restliche Fleischbrühe in einen großen Topf und geben Sie anschließend das fein pürierte Gemüse dazu. Lassen Sie das Ganze nun 10 Minuten zugedeckt aufkochen. (Alternativ können Sie die Gemüsebrühe auch bei 600 Watt 5-7 Minuten in der Mikrowelle geschlossen garen lassen.) Braten Sie währenddessen die Zwiebeln in Butter bis sie goldbraun sind und geben Sie sie anschließend in die Suppe. Schmecken Sie nun nach Ihrem Geschmack mit Créme fraîche, Senf, Salz und Pfeffer ab. Rühren Sie vor dem Anrichten die gehackten Kräuter unter. Füllen Sie die Suppe nun in vorgewärmte Teller und bestreuen Sie sie mit den Lauchstreifen

98 Kartoffelsuppe mit Gemüse
 Zitronensaft Zubereitung: Geben Sie alle Zutaten in den Mixer und verrühren Sie sie solange auf Stufe 2, bis sich alle Zutaten gut vermischt haben.")
99 Dänische Remoulade Zutaten: 4 EL Mayonnaise 1 EL Kapern in Lake 1 TL süßen Senf 1 Schalotte 2 EL Schnittlauch 1/2 süße Gurke 1/2 TL Curry 1 Prise Ingwer 1 EL Aprikosenkonfitüre 1 EL Joghurt 1/2 Sardellenfilet (oder 3 cm Sardellenpaste) Zitronensaft Zubereitung: Geben Sie alle Zutaten in den Mixer und verrühren Sie sie solange auf Stufe 2, bis sich alle Zutaten gut vermischt haben., Dänische Remoulade

100 Möhrensuppe
101 Möhrensuppe Zutaten: 500 g Karotten 250 ml Wasser 500 ml Fleischfond (Glas) 125 ml Sahne 125 ml Weißwein Salz Pfeffer 50 g kalte Butter Frischer Kerbel Soufflé mit Krabben Zutaten: 40 g Butter 20 g Mehl 250 ml Milch 1 Prise Zucker 150 g Gouda-Käse 200 g Krabbenfleisch 4 Eigelb 4 Eiweiß Butter für die Form Herd: Beheizung: Garzeit: Mikrowelle: Leistung: Garzeit: Kochplatte Möhren ca. 20 Minuten 600 Watt Möhren ca. 10 Minuten Zubereitung: Waschen und schälen Sie die Möhren. Schneiden Sie sie so klein, dass Sie gut in den Mixer passen. Geben Sie 250 ml Wasser in einen Topf und kochen Sie die Möhren für 20 Minuten darin. Anschließend pürieren Sie das Ganze im Mixer, bis keine größeren Stücke mehr übrig sind. Geben Sie die pürierten Möhren danach zurück in den Topf. Gießen Sie nun Fleischfond, Sahne und Weißwein hinzu. Erhitzen Sie die Suppe und schmecken Sie sie ab. Rühren Sie die Butter in kleinen Stückchen unter die Suppe und richten Sie danach mit dem Kerbel an. Herd: Einschubhöhe: 2 Beheizung: E: Ober- und Unterhitze 200 C (vorgeheizt) G: Stufe 3 Backzeit: Minuten Mikrowelle: Leistung: Backzeit: 360 Watt Minuten Zubereitung: Erhitzen Sie die Butter und das Mehl und geben Sie anschließend unter Rühren Milch und Zucker dazu. Lassen Sie das Ganze einmal aufkochen. Zerkleinern Sie den Käse im Durchlaufschnitzler mit der Reibscheibe und rühren Sie ihn unter die Sauce. Heben Sie nun das Krabbenfleisch unter. Verquirlen Sie das Eigelb und heben Sie es unter. Schlagen Sie das Eiweiß steif und heben Sie es unter. Fetten Sie nun eine Auflaufform oder kleine Portionsförmchen und befüllen Sie diese mit der Masse. Backen Sie die Soufflés sofort und servieren Sie sie gleich

102 Soufflé mit Krabben

103 Salatplatte Salatplatte Zutaten: 1 frische Gurke 1/4 Kopf Weißkohl 2 Paprikaschoten 1 Zwiebel Für die Marinade: 3-4 EL Weinessig 2 EL Speiseöl Salz Zucker Pfeffer aus der Mühle 1 EL gehackte Kräuter Zubereitung: Schälen Sie die Gurke und teilen Sie den Kohl so, dass die Stücke in den Einfüllstutzen des Durchlaufschnitzlers passen. Hobeln Sie nun Gurke, Kohl, vorbereitete Paprika und Zwiebel auf höchster Stufe im Durchlaufschnitzler mit der feinen Schneidescheibe. Verrühren Sie die Zutaten für die Marinade mit dem Mixer. Mischen Sie die Marinade mit dem Gemüse und schmecken Sie ab. Zubereitungszeit: 15 Minuten

104 Gefüllte Hähnchenbrust mit Curry-Sauce Zutaten: 4 Hähnchenbrüste zu je 150 g Salz Pfeffer aus der Mühle Für die Füllung: 150 g Schweinehack (Mett) 1 Zwiebel, gewürfelt Chinagewürz 1 Msp. Ingwerpulver Für die Sauce: 250 ml Weißwein 2-4 EL Sahne Salz, 1 TL Curry Evtl. etwas Saucenbinder Herd: Beheizung: Garzeit gesamt: Kochplatte Minuten Zubereitung: Salzen und pfeffern Sie die Hähnchenbrüste und schneiden Sie sie anschließend mit einem scharfen Küchenmesser ein. Verarbeiten Sie alle Zutaten für die Füllung in der Rührschüssel mit dem Knethaken zu einem Teig und schmecken Sie ab. Füllen Sie nun die Hähnchenbrüste mit der Füllung und nähen Sie sie zu. (Alternativ können Sie auch Holzstäbchen benutzen.) Erhitzen Sie nun das Fett und braten alle Hähnchenbrüste darin an. Gießen Sie den Wein dazu und lassen Sie anschließen die Hähnchenbrüste Minuten garschmoren. Nehmen Sie die Hähnchenbrüste aus der Pfanne und stellen Sie sie warm. Schmecken Sie die Sauce mit Sahne, Salz und Curry ab und binden Sie die Sauce nach Belieben mit Saucenbinder. Richten Sie nun die Hähnchenbrüste mit Sauce zum Beispiel auf Reis an. Gefüllte Hähnchenbrust mit Curry-Sauce

105 Tomatensauce Zutaten: 5 EL Speiseöl 1 große Zwiebel 1 große Dose (800 g) geschälte Tomaten Salz, Pfeffer, 1 Prise Zucker, 1 Prise Thymian, 1 Prise Chilipulver 1/2 Bund Petersilie, gehackt 1 Bund Basilikum, fein geschnitten 40 g kalte Butter oder 100 ml süße Sahne Herd: Beheizung: Garzeit: Mikrowelle: Leistung: Garzeit: Kochplatte Minuten 600 Watt 5 Minuten 180 Watt 5 Minuten ca. 10 Minuten Zubereitung: Schälen Sie die Zwiebeln und zerkleinern Sie sie grob. Erhitzen Sie das Öl und braten Sie die Zwiebeln darin an oder benutzen Sie die Mikrowelle für 2-3 Minuten bei 600 Watt. Geben Sie die Tomaten mit dem Saft dazu und rühren Sie alle Gewürze unter. Lassen Sie die Sauce zugedeckt 20 Minuten sanft köcheln oder garen Sie das Ganze mit der Mikrowelle. Lassen Sie die Tomatensauce abkühlen (lauwarm) und pürieren Sie sie im Mixer. Gießen Sie die Sauce anschließend wieder in den Topf und kochen Sie sie evtl. etwas ein. Rühren Sie nun die Butter oder Sahne ein. Streuen Sie die Kräuter dazu und schmecken Sie sie ab. Als Beilage zu Nudeln aller Art mit geriebenem Käse. Tomatensauce

106 Thunfisch-Aufstrich
107 Thunfisch-Aufstrich Zutaten: 1 Dose Thunfisch in Sauce mit Gemüseeinlage 3 EL Joghurt 1 TL Zitronensaft, frisch gepresst 1 Prise Salz Pfeffer aus der Mühle 2 hartgekochte Eier, gewürfelt Zum Anrichten: Vollkornbrot in Scheiben Butter zum Bestreichen 1 hartgekochtes Ei, gewürfelt Schnittlauch, geschnitten Zubereitung: Mischen Sie alle Zutaten auf höchster Stufe im Mixer bis die gewünschte Konsistenz erreicht ist (ca. 15 Sekunden) und schmecken Sie danach ab. Bestreichen Sie das Brot mit Butter und Thunfisch- Creme und bestreuen Sie das Ganze mit dem gehackten Ei und dem Schnittlauch. Rotwein-Rotkohl Zutaten: 1 Rotkohl, ca. 1 kg 60 g Schweine- oder Gänseschmalz 1 große Zwiebel 3 Äpfel 2 EL Sherry-Essig 2 EL Zitronensaft 250 ml Rotwein 2 EL Johannisbeergelee Salz 1 EL Zucker 2 Lorbeerblätter 1 Nelke 1 EL Mehl 2 EL Wasser Herd: Beheizung: Garzeit: Kochplatte Minuten Zubereitung: Schälen Sie die Zwiebeln, vierteln Sie sie und zerkleinern Sie sie mit Hilfe des Durchlaufschnitzlers mit der Schneidscheibe. Entfernen Sie die Außenblätter und vierteln Sie den Kohl. Zerkleinern Sie den Kohl im Durchlaufschnitzler mit der feinen Raspelscheibe. Schälen, entkernen und würfeln Sie die Äpfel. Geben Sie den Schmalz in einen Topf und lassen Sie ihn zergehen. Dünsten Sie die zerkleinerten Zwiebeln darin glasig und geben Sie anschließend den Rotkohl, die Äpfel und die übrigen Zutaten, bis auf das Mehl und das Wasser, dazu. Rühren Sie um und lassen Sie das Ganze aufkochen. Dann lassen Sie den Rotkohl zugedeckt für 60 Minuten dünsten

108 Falls sich danach noch zuviel Flüssigkeit im Rotkohl befindet, rühren Sie das Mehl mit dem Wasser an und geben Sie es zum Rotkohl, um die Flüssigkeit zu binden. Schmecken Sie alles mit Salz, Zucker und Essig ab. Geeignet als Beilage zu Fleisch, Geflügel und Wildgerichten. Tipp: Sie können den Kohl auch einen Tag vor der Zubereitung zerkleinern und mit Wein und Essig marinieren. Rotwein-Rotkohl

109 Kartoffelröstis Kartoffelröstis Zutaten: 4 Kartoffeln, groß, mehlig kochend Salz Pfeffer Muskat, gemahlen 80 g Butter oder Margarine Herd: Beheizung: Bratzeit gesamt: Kochplatte Minuten Zubereitung: Waschen und schälen Sie die Kartoffeln und schneiden Sie sie mit der Raspelscheibe in Streifen. Geben Sie die Kartoffel-Masse in ein Tuch und drücken Sie die Flüssigkeit heraus. Streuen Sie die Gewürze auf die Kartoffel- Masse und vermischen Sie alles. Geben Sie nun mit einer kleinen Kelle etwas von der Kartoffel-Masse in das heiße Fett und drücken Sie es mit dem Bratenwender flach. Braten Sie die Röstis nun von beiden Seiten kross an. Geeignet als Beilage zu Fleisch und Wildgerichten

110 Traditionelle Pfannkuchen Zutaten: 2-3 Eier 375 ml Milch 1 Prise Salz 250 g Mehl Fett zum Backen Zubereitung: Mischen Sie die Eier, die Milch und das Salz mit dem Schlagbesen. Sieben Sie das Mehl durch und geben Sie es dazu. Mischen Sie alles mit dem Schlagbesen, bis ein glatter Teig entsteht. Lassen Sie den Teig für ca. 20 Minuten quellen. Erhitzen Sie das Fett und geben Sie mit einer kleinen Kelle Teig hinein. (Immer nur so viel, dass der Pfannenboden dünn bedeckt ist.) Backen Sie die Pfannkuchen von beiden Seiten goldbraun und servieren Sie sie heiß. Traditionelle Pfannkuchen
 G: Stufe 1-2 Backzeit: 6-8 Minuten Zubereitung:")
111 Haselnuss-Kekse Zutaten: 300 g Haselnusskerne 90 g Rohrzucker 2 Eiweiß 2 TL Honig Ca. 75 g Pflaumen- oder Hagebuttenmus Je 50 g Halbbitter- und Vollmilch-Kuvertüre Herd: Einschubhöhe: 2 Beheizung: E: Umluft 200 C (5 Minuten vorgeheizt) G: Stufe 1-2 Backzeit: 6-8 Minuten Zubereitung: Reiben Sie die Nüsse mit der Reibscheibe im Durchlaufschnitzler mittelfein und stellen Sie davon vier Esslöffel beiseite. Verarbeiten Sie die restlichen Nüsse, den Zucker, das Eiweiß und den Honig mit dem Schlagbesen zu einem festen Teig. Bestreuen Sie die Arbeitsfläche mit den übrig gebliebenen Nüssen und rollen Sie den Teig halbzentimeterdick aus. Stechen Sie nun die Plätzchen aus und setzen Sie sie auf das mit Backpapier belegte Blech. Setzen Sie die abgekühlten Plätzchen jeweils paarweise mit dem Hagebutten- oder Pflaumenmus zusammen und überziehen Sie sie teils mit Vollmilch- und Halbbitter-Kuvertüre. Schmelzen Sie dafür beide Sorten getrennt. Tauchen Sie die Plätzchen bis zur Hälfte ein und lassen Sie sie auf Kuchengittern trocknen. Haselnuss-Kekse
 Backzeit: 20-30 Minuten Zubereitung: Legen Sie den Boden einer Springform")
112 Biskuitteig Biskuitteig Zutaten: 3 Eier 3-4 EL Wasser, heiß 150 g Zucker 1 Päckchen Vanillinzucker 100 g Mehl, Typ g Speisestärke 2-3 gestr. TL Backpulver Herd: Einschubhöhe: 2 Beheizung: E: Ober- und Unterhitze C G: Stufe 2-3 (5 Minuten vorheizen) Backzeit: Minuten Zubereitung: Legen Sie den Boden einer Springform (Durchmesser: 28 cm) mit Backpapier aus. Fetten Sie nicht den Rand, da sonst die Oberfläche nicht gleichmäßig glatt und gebräunt wird. Schlagen Sie die ganzen Eier in der Rührschüssel und geben Sie heißes Wasser dazu. Schlagen Sie das Ganze dann für ca. 1 Minute auf höchster Stufe mit dem Rührbesen schaumig. Rühren Sie Zucker und Vanillinzucker unter und schlagen Sie alles für 2 Minuten auf höchster Stufe weiter. Mischen Sie Mehl, Speisestärke und Backpulver und sieben Sie die Hälfte davon auf die Eiercreme und rühren Sie alles kurz auf Stufe 1 unter. Rühren Sie dann das restliche Mehl auf dieselbe Weise unter und füllen Sie den Teig in die vorbereitete Springform. Backen Sie das Ganze sofort
113 Mürbeteig Zutaten: 250 g Weizenmehl 1/2 gestr. TL Backpulver g Zucker 1 Päckchen Vanillinzucker 1 Prise Salz 1 Ei 125 g Butter Herd: Einschubhöhe: 3 Beheizung: E: Ober- und Unterhitze C (5 Minuten vorgeheizt) G: Stufe 3-4 Backzeit: Minuten Zubereitung: Mischen Sie Mehl und Backpulver in der Rührschüssel und geben Sie anschließend alle übrigen Zutaten hinzu. Kneten Sie alles mit dem Knethaken zuerst für ca. 1 Minute auf Stufe 1, dann für ca. 3 Minuten auf Stufe 2-3. Kneten Sie den Teig nicht zu lange, der Teig könnte sonst zu weich werden. Lassen Sie den Teig im Kühlschrank für 1/2 Stunde ruhen und verarbeiten Sie ihn danach zu einem Tortenboden oder zu Kleingebäck. Für einen Tortenboden rollen Sie 2/3 des Teiges aus und legen ihn in eine gefettete Springform. Rollen Sie den restlichen Teig zu einer Rolle. Legen Sie diese Rolle als Rand auf den Teig und drücken Sie ihn mit zwei Fingern so an den Rand, dass ein ca. 3 cm hoher Rand entsteht. Stechen Sie den Tortenboden mit einer Gabel mehrfach ein und platzieren Sie ihn anschließend im Backofen

114 Mürbeteig

115 Rührteig Rührteig Zutaten: 250 g weiche Butter oder Margarine 250 g Zucker 1 Päckchen Vanillinzucker 1 Prise Salz 4 Eier 500 g Weizenmehl 1 Päckchen Backpulver Ca. 125 ml Milch Herd: Einschubhöhe: 2 Beheizung: E: Ober- und Unterhitze C G: Stufe 2-3 Backzeit: Minuten Zubereitung: Geben Sie alle Zutaten in die Rührschüssel und rühren Sie alles mit dem Schlagbesen für 1/2 Minute auf Stufe 1, dann für 30 Sekunden auf Stufe 2 und danach für ca. 5 Minuten auf Stufe 4. Fetten Sie die Backform oder legen Sie sie mit Backpapier aus. Befüllen Sie die Backform und backen Sie den Teig. Bevor Sie den Kuchen aus dem Ofen nehmen sollten Sie eine Garprobe machen: Stechen Sie dazu mit einem spitzen Holzstäbchen in die Mitte des Kuchens. Wenn kein Teig dran hängen bleibt, ist der Kuchen gar. Stürzen Sie dann den Kuchen auf einen Kuchenrost und lassen Sie ihn abkühlen

116 Marmorkuchen Zutaten: 125 g weiche Butter oder Margarine 125 g Zucker 3 Eier 1/2 Päckchen Vanillinzucker 1 Prise Salz 250 g Weizenmehl 1/2 Päckchen Backpulver 75 ml Milch 20 g Back-Kakao 50 g Halbbitter-Kuvertüre Fett für die Form Herd: Einschubhöhe: 1 Beheizung: E: Umluft C G: Stufe 2 Backzeit: Minuten Zubereitung: Geben Sie alle Zutaten außer der Kuvertüre und des Back-Kakaos in die Rührschüssel und vermengen Sie alles mit dem Schlagbesen für 1/2 Minute auf Stufe 1, dann für 30 Sekunden auf Stufe 2 und danach für ca. 5 Minuten auf Stufe 4. Brechen Sie die Kuvertüre in große Stücke und reiben Sie sie mit der groben Reibescheibe im Durchlaufschnitzler. Fetten Sie eine Gugelhupf-Form (Durchmesser: 20-22cm) oder eine Kastenform (30cm lang). Füllen Sie die Hälfte des Teiges in die Form und rühren Sie dann den Kakao und die geriebene Kuvertüre in den restlichen Teig. Geben Sie nun den dunklen auf den hellen Teig und ziehen Sie den Teig mit einer Gabel spiralförmig unter. Tipp: Wenn Sie möchten, können Sie den Kuchen noch mit 100 g Halbbitter-Kuvertüre überziehen und ihn anschließend mit Sahnetupfern und Schokoladenplätzchen dekorieren. Marmorkuchen
 80 g Zucker 1 Ei Zubereitung: Geben Sie Mehl, Trockenhefe oder zerbröselte Hefe und alle anderen Zutaten (nicht direkt auf die Hefe)")
117 Hefeteig Zutaten: 500 g Weizenmehl 25 g frische Hefe oder 1 Pck. Trockenhefe ca. 1/4 l lauwarme Milch 80 g Butter oder Margarine (Raumtemperatur) 80 g Zucker 1 Ei Zubereitung: Geben Sie Mehl, Trockenhefe oder zerbröselte Hefe und alle anderen Zutaten (nicht direkt auf die Hefe) in die Rührschüssel. Vermengen Sie alles langsam mit dem Knethaken auf Stufe 1, danach für 3-4 Minuten auf Stufe 2. Decken Sie die Schüssel mit einem Geschirrtuch ab, stellen Sie sie an einen warmen Ort und lassen Sie den Teig gehen, bis er sich sichtbar vergrößert hat. Kneten Sie den Teig dann noch einmal durch. Danach ist der Teig fertig und Sie können ihn weiterverarbeiten. Hefeteig

118 Mohnstollen Mohnstollen Zutaten: Für den Teig: 100 g Buchweizenmehl 200 g Weizenmehl 100 g Haselnüsse, gemahlen 1 Würfel Hefe (40 g) oder 1 Pck. Trockenhefe Knapp 125 ml Milch 1 Prise Salz 75 g Zucker 1 Ei 150 g weiche Butter 1 Beutel Citro Back 1 Beutel Rum Back 100 g Orangeat, gewürfelt 50 g Zitronat, gewürfelt Für die Füllung: 1 Beutel (200 g ) Mohn Back Für den Überzug: 100 g Butter zum Bestreichen Puderzucker zum Bestäuben Herd: Einschubhöhe: 1 Beheizung: E: Ober- und Unterhitze C (5 Minuten vorgeheizt) G: Stufe 2-3 Backzeit: Minuten Zubereitung: Erstellen Sie aus den angegebenen Zutaten außer Orangeat und Zitronat einen Hefeteig (siehe Hefeteig ). Kneten Sie Orangeat und Zitronat zum Schluss unter. Rollen Sie den Teig aus (ca. 20 x 25 cm) und streichen Sie die Mohnmasse darauf. Anschließend schlagen Sie den Teig zu einem Stollen zusammen. Fetten Sie eine Stollenform und legen Sie den Stollen zum Backen hinein. Bestreichen Sie den noch heißen Stollen mit Butter und bestäuben Sie ihn mit dem Puderzucker

119 Orangen-Getränk Orangen-Getränk Zutaten: 500 ml Orangensaft 2-4 EL Zitronensaft 300 g Aprikosen aus der Dose Eiswürfel, zerstoßen 4 TL Zucker oder Honig Zubereitung: Geben Sie den Saft, die Aprikosen und die Eiswürfel in den Mixer und mischen Sie alles für ca. 20 Sekunden auf höchster Stufe. Schmecken Sie jetzt noch mit Zucker oder Honig ab und servieren Sie den Saft eiskalt. Tipp: Den Aprikosensaft können Sie im Eiswürfelbehälter einfrieren und später als Eiswürfel verwenden. Guten Appetit! Rezepte ohne Gewähr. Alle Zutaten- und Zubereitungsangaben sind Anhaltswerte. Ergänzen Sie diese Rezeptvorschläge um Ihre persönlichen Erfahrungswerte. Wir wünschen Ihnen auf jeden Fall gutes Gelingen und guten Appetit
Food Processor SKM 550 A1
 KITCHEN TOOLS Food Processor SKM 550 A1 Food Processor Operating instructions Κουζινομηχανή Οδηγίες χρήσης KOMPERNASS GMBH BURGSTRASSE 21 D-44867 BOCHUM www.kompernass.com ID-Nr.: SKM 550 A1-06/11-V1 IAN:68611
Grater attachment Operating instructions. Εξάρτημα τριψίματος Οδηүίες χρήσης. For food processor Κουζινομηχανή SKV 1200 A1 IAN A
 Grater attachment Operating instructions Εξάρτημα τριψίματος Οδηүίες χρήσης For food processor Κουζινομηχανή SKV 1200 A1 IAN 281064 - A Before reading, unfold the page containing the illustrations and
BFN3000 ΕΠΙΤΡΑΠΕΖΙΟΣ ΑΝΕΜΙΣΤΗΡΑΣ. Owner s manual. Μετάφραση του πρωτοτύπου των οδηγιών χρήσης
 BFN3000 ΕΠΙΤΡΑΠΕΖΙΟΣ ΑΝΕΜΙΣΤΗΡΑΣ Μετάφραση του πρωτοτύπου των οδηγιών χρήσης Owner s manual www.bormanntools.com GR Οδηγίες ασφαλούς λειτουργίας 1. Τα χαρακτηριστικά της παροχής ηλεκτρικού ρεύματος θα
Περιεχόμενα / Contents
 Aερόθερμo / Fan Heater PTC-906 Περιεχόμενα / Contents GR... Σελίδες 3-8 EN... Pages 9-11 2 GR Ευχαριστούμε που επιλέξατε μια συσκευή της γκάμας θερμαντικών IZZY. Σημαντικές Οδηγίες Ασφαλείας Τα Μέρη της
INSTRUCTIONS MANUAL ΕΓΧΕΙΡΙΔΙΟ ΛΕΙΤΟΥΡΓΙΑΣ
 Model/Μοντέλο: WKH-1132 INSTRUCTIONS MANUAL ΕΓΧΕΙΡΙΔΙΟ ΛΕΙΤΟΥΡΓΙΑΣ ENGLISH General Safety Instructions Before commissioning this kettle, please read the instruction manual carefully. Please keep the instruction
Personal Sports Blender D1202
 Personal Sports Blender D1202 ΟΔΗΓΙΕΣ ΧΡΗΣΗΣ Παρακαλούμε διαβάστε προσεκτικά αυτές τις οδηγίες πριν χρησιμοποιήσετε το προϊόν. Φυλάξτε τες για πιθανή μελλοντική χρήση. ΣΗΜΑΝΤΙΚΕΣ ΠΡΟΕΙΔΟΠΟΙΗΣΕΙΣ 1. Αυτή
Nuvelle Ηλεκτρικός Βραστήρας KP 1419S ΟΔΗΓΙΕΣ ΧΡΗΣΗΣ
 Nuvelle Ηλεκτρικός Βραστήρας KP 1419S ΟΔΗΓΙΕΣ ΧΡΗΣΗΣ Διαβάστε προσεκτικά αυτές τις οδηγίες πριν χρησιμοποιήσετε τη συσκευή και φυλάξτε τες για πιθανή μελλοντική ανάγνωση 1 ΣΗΜΑΝΤΙΚΕΣ ΟΔΗΓΙΕΣ ΑΣΦΑΛΕΙΑΣ
Pasta attachment Operating instructions. Εξάρτημα ζυμαρικών Οδηүίες χρήσης. For food processor IAN B
 Pasta attachment Operating instructions Εξάρτημα ζυμαρικών Οδηүίες χρήσης For food processor Professional Food Processor SKV 1200 A1 IAN 281064 - B Before reading, unfold the page containing the illustrations
Εγκατάσταση λογισμικού και αναβάθμιση συσκευής Device software installation and software upgrade
 Για να ελέγξετε το λογισμικό που έχει τώρα η συσκευή κάντε κλικ Menu > Options > Device > About Device Versions. Στο πιο κάτω παράδειγμα η συσκευή έχει έκδοση λογισμικού 6.0.0.546 με πλατφόρμα 6.6.0.207.
Popcorn Maker SPCM 1200 A1
 KITCHEN TOOLS Popcorn Maker SPCM 1200 A1 Popcorn Maker Operating instructions Συσκευή παρασκευής ποπ κορν Οδηγίες χρήσης KOMPERNASS GMBH BURGSTRASSE 21 D-44867 BOCHUM www.kompernass.com ID-Nr.: SPCM 1200
RL-PKM SLV Επιτραπέζιο Μίξερ 1900W max Royalty Line
 RL-PKM1900-7-SLV Επιτραπέζιο Μίξερ 1900W max Royalty Line ΠΕΡΙΓΡΑΦΗ ΤΗΣ ΣΥΣΚΕΥΗΣ 1.Βραχίονας 2.Κουμπί απελευθέρωσης βραχίονα 3.Διακόπτης ελέγχου ταχύτητας 4.Περίβλημα μοτέρ 5.Πόδια 6.Μύτη μοτέρ 7.Καπάκι
ΠΑΝΤΟΚΟΠΤΗΣ ΣΗΜΑΝΤΙΚΕΣ ΟΔΗΓΙΕΣ ΑΣΦΑΛΕΙΑΣ. R V~ 50Hz, 550W Nom / 650W Max
 ΣΗΜΑΝΤΙΚΕΣ ΟΔΗΓΙΕΣ ΑΣΦΑΛΕΙΑΣ ΠΑΝΤΟΚΟΠΤΗΣ R-516 220-240V~ 50Hz, 550W Nom / 650W Max ΔΙΑΒΑΣΤΕ ΑΥΤΕΣ ΤΙΣ ΟΔΗΓΙΕΣ ΠΡΙΝ ΤΗ ΧΡΗΣΗ Κατά τη χρήση ηλεκτρικών συσκευών, τηρείτε πάντα τις βασικές προφυλάξεις ασφαλείας
ΜΟΝΤΕΛΟ: S1255BL Διαβάστε προσεκτικά τις οδηγίες και κρατήστε τις για μελλοντική αναφορά
 ΕΓΧΕΙΡΙΔΙΟ ΧΡΗΣΗΣ ΜΟΝΤΕΛΟ: S1255BL Διαβάστε προσεκτικά τις οδηγίες και κρατήστε τις για μελλοντική αναφορά ΣΗΜΑΝΣΕΙΣ ΑΣΦΑΛΕΙΑΣ Για να χρησιμοποιήσετε αυτή τη συσκευή πρέπει να τηρείτε βασικούς κανόνες
 Ο ΗΓΙΕΣ ΧΡΗΣΗΣ Μίξερ µε κάδο Μοντέλο:R-557 8 7 6 5 9 4 Περιγραφή συσκευής: 10 3 1. ΒΑΣΗ ΤΟΥ ΚΑ ΟΥ 2. ΙΑΚΟΠΤΗΣ ΑΣΦΑΛΕΙΑΣ 3. ΒΡΑΧΙΟΝΑΣ ΣΤΗΡΙΞΗΣ 4. ΚΟΥΜΠΙ ΒΡΑΧΙΟΝΑ ΣΤΗΡΙΞΗΣ 5. ΚΑΛΥΜΜΑ 6. ΙΑΚΟΠΤΗΣ TURBO 7.
Hand Mixer SHM 300 A1
 KITCHEN TOOLS Hand Mixer SHM 300 A1 Hand Mixer Operating instructions Μίξερ χειρός Οδηγίες χρήσης KOMPERNASS GMBH BURGSTRASSE 21 D-44867 BOCHUM www.kompernass.com ID-Nr.: SHM 300 A1-06/11-V1 IAN: 68612
ΟΔΗΓΙΕΣ ΧΡΗΣΗΣ USE INSTRUCTIONS
 ΟΔΗΓΙΕΣ ΧΡΗΣΗΣ USE INSTRUCTIONS ΤΗΛΕΦΩΝΟ ΜΕ ΑΝΑΓΝΩΡΙΣΗ ΚΛΗΣΗΣ /CORDED PHONE WITH CALLER ID ΜΟΝΤΕΛΟ/MODEL: TM09-448 DC48V Παρακαλούμε διαβάστε προσεκτικά όλες τις οδηγίες χρήσης πριν την χρήση της συσκευής
D 3101 ΟΔΗΓΙΕΣ ΧΡΗΣΗΣ
 Βραστήρας D 3101 ΟΔΗΓΙΕΣ ΧΡΗΣΗΣ Προσοχή: Πριν εγκαταστήσετε και χρησιμοποιήσετε τη συσκευή σας, θα πρέπει να διαβάσετε αυτές τις οδηγίες εγκατάστασης και χρήσης, οι οποίες θα σας επιτρέψουν να εξοικειωθείτε
User s Manual / Οδηγίες Χρήσης
 User s Manual / Οδηγίες Χρήσης EUROPEAN STANDARDS Your child s safety depends on you. Proper bed rail usage cannot be assured unless you follow these instructions. DO NOT USE YOUR BED RAIL UNTILL YOU READ
V 50/60Hz W 1.7L
 ΟΔΗΓΙΕΣ ΧΡΗΣΗΣ Ηλεκτρικός Βραστήρας Μοντέλο: R-778 220-240V 50/60Hz 1850--2200W 1.7L ΒΑΣΙΚΕΣ ΠΡΟΦΥΛΑΞΕΙΣ Όταν χρησιμοποιείτε ηλεκτρικές συσκευές, πρέπει να τηρείτε τις βασικές προφυλάξεις ασφαλείας, συμπεριλαμβανομένων
ΛΕΜΟΝΟΣΤΥΦΤΗΣ ΟΔΗΓΙΕΣ ΧΡΗΣHΣ
 ΛΕΜΟΝΟΣΤΥΦΤΗΣ ΟΔΗΓΙΕΣ ΧΡΗΣHΣ Model No: JE-601A Ref. No: 859-71121 Συγχαρητήρια για την επιλογή σας να προμηθευτείτε ένα προϊόν. Η ποιότητα κατασκευής είναι εγγυημένη και οι προδιαγραφές σύμφωνες με τα
Διαβάστε προσεκτικά τις οδηγίες και κρατήστε τις για μελλοντική αναφορά
 ΦΡΑΠΙΕΡΑ Με ρυθμιζόμενο ύψος Μοντέλο: CM-6058 Διαβάστε προσεκτικά τις οδηγίες και κρατήστε τις για μελλοντική αναφορά Σημαντικές ειδοποιήσεις ΟΔΗΓΙΕΣ 1. Για να αποφύγετε τραυματισμό από κακή χρήση, διαβάστε
ΜΙΞΕΡ ΧΕΙΡΟΣ ΜΟΝΤΕΛΟ HM 135
 ΜΙΞΕΡ ΧΕΙΡΟΣ ΜΟΝΤΕΛΟ HM 135 Μίξερ χειρός AC220-240V 50Hz 350W MAX Γενικές προφυλάξεις ασφαλείας 1. Σας ευχαριστούμε για την αγορά αυτής της συσκευής. Διαβάστε προσεκτικά όλες τις οδηγίες. Φυλάξτε αυτό
Bfn8000 ΑΝΕΜΙΣΤΗΡΑΣ 3 ΣΕ 1. Owner s manual. Μετάφραση του πρωτοτύπου των οδηγιών χρήσης
 Bfn8000 ΑΝΕΜΙΣΤΗΡΑΣ 3 ΣΕ 1 Μετάφραση του πρωτοτύπου των οδηγιών χρήσης Owner s manual GR Οδηγίες ασφαλείας Για την ορθή χρήση του ανεμιστήρα, την μείωση των πιθανοτήτων εκδήλωσης πυρκαγιάς, ηλεκτροπληξίας
ΡΑΒΔΟ-ΜΠΛΕΝΤΕΡ ΜΟΝΤΕΛΟ: R-578 ΟΔΗΓΙΕΣ ΧΡΗΣΗΣ
 ΡΑΒΔΟ-ΜΠΛΕΝΤΕΡ ΜΟΝΤΕΛΟ: R-578 ΟΔΗΓΙΕΣ ΧΡΗΣΗΣ Πριν χρησιμοποιήσετε τη συσκευή, διαβάστε αυτές τις οδηγίες χρήσης προσεκτικά και κρατήστε τες για μελλοντική αναφορά. ΠΕΡΙΓΡΑΦΗ ΠΡΟΙΟΝΤΟΣ A. Διακόπτης ρύθμισης
HP8180
 Register your product and get support at www.philips.com/welcome HP8180 EL Εγχειρίδιο χρήσης Ελληνικά Συγχαρητήρια για την αγορά σας και καλωσορίσατε στη Philips! Για να επωφεληθείτε πλήρως από την υποστήριξη
IAN PROFESSIONAL FOOD PROCESSOR SKV 1200 A1 PROFESSIONAL FOOD PROCESSOR ΚΟΥΖΙΝΟΜΗΧΑΝΗ PROFI-KÜCHENMASCHINE. Οδηүίες χρήσης
 PROFESSIONAL FOOD PROCESSOR PROFESSIONAL FOOD PROCESSOR Operating instructions ΚΟΥΖΙΝΟΜΗΧΑΝΗ Οδηүίες χρήσης PROFI-KÜCHENMASCHINE Bedienungsanleitung IAN 281064 Before reading, unfold the page containing
ΟΔΗΓΙΕΣ ΣΥΝΑΡΜΟΛΟΓΗΣΗΣ/ ASSEMBLY INSTRUCTION ΤΟΜΜΥ ΚΡΕΒΑΤΙ/BED
 ΟΔΗΓΙΕΣ ΣΥΝΑΡΜΟΛΟΓΗΣΗΣ/ ASSEMBLY INSTRUCTION ΤΟΜΜΥ ΚΡΕΒΑΤΙ/BED 1. Παρακαλώ πολύ διαβάστε προσεκτικά τις οδηγίες πριν την συναρμολόγηση/ Please read the instructions carefully. 2. Παρακαλώ πολύ όπως ελέγξτε
Styler. Register your product and get support at HP4681/00. Εγχειρίδιο χρήσης
 Register your product and get support at www.philips.com/welcome Styler HP4681/00 EL Εγχειρίδιο χρήσης a h g b c f e d Ελληνικά Συγχαρητήρια για την αγορά σας και καλωσορίσατε στη Philips! Για να επωφεληθείτε
Bedienungsanleitung Elektrischer Kamin KH 1117 Οδηγίες χρήσης Ηλεκτρικό τσάκι KH 1117 Käyttöohje Sähkötakka KH 1117 Bruksanvisning Elektrisk kamin KH
 D S Bedienungsanleitung Elektrischer Kamin KH 1117 Οδηγίες χρήσης Ηλεκτρικό τσάκι KH 1117 Käyttöohje Sähkötakka KH 1117 Bruksanvisning Elektrisk kamin KH 1117 ➂ ➁ ➀ ➃ ➄ Υποδείξεις ασφαλείας Κίνδυνος ηλεκτροπληξίας!
Μοντέλο R-539 Διαβάστε προσεκτικά τις οδηγίες χρήσης πριν χρησιμοποιήσετε την συσκευή και αποθηκεύστε για μελλοντική χρήση
 BLENDER Οδηγίες χρήσης Μοντέλο R-539 Διαβάστε προσεκτικά τις οδηγίες χρήσης πριν χρησιμοποιήσετε την συσκευή και αποθηκεύστε για μελλοντική χρήση Σημαντικές οδηγίες προφύλαξης Όταν χρησιμοποιείτε την ηλεκτρική
Cross Cut Shredder UAV 380 A1
 Cross Cut Shredder UAV 380 A1 Cross Cut Shredder Operating instructions Καταστροφέας εγγράφων Οδηγίες χρήσης KOMPERNASS GMBH BURGSTRASSE 21 D-44867 BOCHUM www.kompernass.com ID-Nr.: UAV 380 A1-10/11-V2
Bfn7000 ΑΝΕΜΙΣΤΗΡΑΣ ΟΡΘΟΣΤΑΤΗΣ. Owner s manual. Μετάφραση του πρωτοτύπου των οδηγιών χρήσης
 Bfn7000 ΑΝΕΜΙΣΤΗΡΑΣ ΟΡΘΟΣΤΑΤΗΣ Μετάφραση του πρωτοτύπου των οδηγιών χρήσης Owner s manual GR Οδηγίες ασφαλείας Για την ορθή χρήση του ανεμιστήρα, την μείωση των πιθανοτήτων εκδήλωσης πυρκαγιάς, ηλεκτροπληξίας
ΟΔΗΓΙΕΣ ΧΡΗΣΗΣ 16 ΕΠΙΔΑΠΕΔΙΟΣ ΑΝΕΜΙΣΤΗΡΑΣ ΜΕ ΤΗΛΕΧΕΙΡΙΣΤΗΡΙΟ R-845
 ΟΔΗΓΙΕΣ ΧΡΗΣΗΣ 16 ΕΠΙΔΑΠΕΔΙΟΣ ΑΝΕΜΙΣΤΗΡΑΣ ΜΕ ΤΗΛΕΧΕΙΡΙΣΤΗΡΙΟ R-845 Ευχαριστούμε για την αγορά του ανεμιστήρα. Παρακαλούμε διαβάστε προσεκτικά τις οδηγίες χρήσης πριν θέσετε σε λειτουργία τη συσκευή. Αγαπητέ
CITRUS JUICER CJ 7280 ΕΛΛΗΝΙΚΑ
 CITRUS JUICER CJ 7280 ΕΛΛΗΝΙΚΑ EL H A G B F E C D 3 ΑΣΦΑΛΕΙΑ ΚΑΙ ΕΓΚΑΤΑΣΤΑΣΗ Διαβάστε προσεκτικά όλο το παρόν εγχειρίδιο οδηγιών πριν χρησιμοποιήσετε αυτή τη συσκευή! Ακολουθήστε όλες τις οδηγίες ασφαλείας
Bfn2000 ΕΠΙΤΡΑΠΕΖΙΟΣ ΑΝΕΜΙΣΤΗΡΑΣ. Owner s manual. Μετάφραση του πρωτοτύπου των οδηγιών χρήσης
 Bfn2000 ΕΠΙΤΡΑΠΕΖΙΟΣ ΑΝΕΜΙΣΤΗΡΑΣ Μετάφραση του πρωτοτύπου των οδηγιών χρήσης Owner s manual Οδηγίες ασφαλείας Για την ορθή χρήση του ανεμιστήρα, την μείωση των πιθανοτήτων εκδήλωσης πυρκαγιάς, ηλεκτροπληξίας
Εγχειρίδιο χρήσης 2 σε 1 σκουπάκι χειρός
 Εγχειρίδιο χρήσης 2 σε 1 σκουπάκι χειρός Μοντέλο: VC-1156 Διαβάστε προσεκτικά τις οδηγίες χρήσης και κρατήστε τις για μελλοντική αναφορά ΠΡΙΝ ΧΡΗΣΙΜΟΠΟΙΗΣΕΤΕ ΤΗ ΣΥΣΚΕΥΗ, ΔΙΑΒΑΣΤΕ ΠΡΟΣΕΚΤΙΚΑ ΤΙΣ ΟΔΗΓΙΕΣ
D Automassagematte KH 4061 Bedienungsanleitung Ψάθα αυτοκινήτου για µασάζ KH 4061 Οδηγίες χρήσης Hierontamatto autoon KH 4061 Käyttöohje S Elektrisk
 D Automassagematte KH 4061 Bedienungsanleitung Ψάθα αυτοκινήτου για µασάζ KH 4061 Οδηγίες χρήσης Hierontamatto autoon KH 4061 Käyttöohje S Elektrisk massagedyna KH 4061 Bruksanvisning N Bilmassasjematte
 60 61 62 63 64 65 Ο Δ Η Γ Ι Ε Σ Σ Υ Ν Τ Η Ρ Η Σ Η Σ Τ Ω Ν Κ Ο Υ Φ Ω Μ Α Τ Ω Ν Ι Ν S T R U C T I N O N S C O N C E R N I N G Τ Η Ε C A S E M E N T S M A I N T E N A N C E Ο τακτικός καθαρισμός των βαμμένων
ΜΙΞΕΡ ΕΓΧΕΙΡΙΔΙΟ ΟΔΗΓΙΩΝ ΜΟΝΤΕΛΟ: HM888. Διαβάστε αυτό το εγχειρίδιο εξολοκλήρου πριν τη χρήση. και φυλάξτε το για μελλοντική αναφορά.
 ΜΙΞΕΡ ΕΓΧΕΙΡΙΔΙΟ ΟΔΗΓΙΩΝ ΜΟΝΤΕΛΟ: HM888 Διαβάστε αυτό το εγχειρίδιο εξολοκλήρου πριν τη χρήση και φυλάξτε το για μελλοντική αναφορά. ΣΗΜΑΝΤΙΚΗ ΠΡΟΣΤΑΣΙΑ Πριν χρησιμοποιήσετε την ηλεκτρική συσκευή, πρέπει
Hairdryer. Register your product and get support at HP4867/00. Εγχειρίδιο χρήσης
 Register your product and get support at www.philips.com/welcome Hairdryer HP4867/00 EL Εγχειρίδιο χρήσης b c d e i h g f a Ελληνικά Συγχαρητήρια για την αγορά σας και καλωσορίσατε στη Philips! Για να
ΜΠΛΕΝΤΕΡ ΧΕΙΡΟΣ ΕΓΧΕΙΡΙΔΙΟ ΟΔΗΓΙΩΝ. Μοντέλο: HB989. Διαβάστε αυτό το εγχειρίδιο εξολοκλήρου πριν τη χρήση και φυλάξτε το για μελλοντική αναφορά.
 ΜΠΛΕΝΤΕΡ ΧΕΙΡΟΣ ΕΓΧΕΙΡΙΔΙΟ ΟΔΗΓΙΩΝ Μοντέλο: HB989 Διαβάστε αυτό το εγχειρίδιο εξολοκλήρου πριν τη χρήση και φυλάξτε το για μελλοντική αναφορά. 1 ΣΗΜΑΝΤΙΚΗ ΠΡΟΣΤΑΣΙΑ Πριν τη χρήση ηλεκτρικής συσκευής, πρέπει
ΜΙΞΕΡ ΧΕΙΡΟΣ ΟΔΗΓΙΕΣ ΧΡΗΣHΣ
 ΜΙΞΕΡ ΧΕΙΡΟΣ ΟΔΗΓΙΕΣ ΧΡΗΣHΣ Model No: HM703A Ref. No: 865-4417 ΟΔΗΓΙΕΣ ΑΣΦΑΛΕΙΑΣ 1. Αυτή η συσκευή έχει σχεδιαστεί ΜΟΝΟ για οικιακή χρήση. Καμία ευθύνη δεν φέρει ο κατασκευαστής για βλάβη που προκλήθηκε
Advanced Subsidiary Unit 1: Understanding and Written Response
 Write your name here Surname Other names Edexcel GE entre Number andidate Number Greek dvanced Subsidiary Unit 1: Understanding and Written Response Thursday 16 May 2013 Morning Time: 2 hours 45 minutes
ΟΔΗΓΙΕΣ ΕΓΚΑΤΑΣTΑΣΗΣ ΓΙΑ ΠΑΤΩΜΑ WPC INSTALLATION GUIDE FOR WPC DECKING
 1/12 ΟΔΗΓΙΕΣ ΕΓΚΑΤΑΣTΑΣΗΣ ΓΙΑ ΠΑΤΩΜΑ WPC INSTALLATION GUIDE FOR WPC DECKING Ανοίγουμε τρύπες Ø8 x 80mm στο σημείο κατασκευής, με τρυπάνι. To προτεινόμενο πλάτος και μήκος μεταξύ των 2 οπών να είναι 30-35εκ.,
ΚΑΦΕΤΙΕΡΑ ΜΟΝΤΕΛΟ: R-920
 ΚΑΦΕΤΙΕΡΑ ΜΟΝΤΕΛΟ: R-920 ΟΔΗΓΙΕΣ ΧΡΗΣΗΣ Διαβάστε προσεκτικά τις οδηγίες χρήσης πριν λειτουργήσετε τη συσκευή και φυλάξτε τις για μελλοντική αναφορά. Η συσκευή αυτή προορίζεται για χρήση σε οικιακές και
ΕΓΧΕΙΡΙΔΙΟ ΧΡΗΣΗΣ ΒΡΑΣΤΗΡΑΣ ΜΟΝΤΕΛΟ: XB6008H. Παρακαλούμε, διαβάστε το παρόν εγχειρίδιο πριν από τη χρήση και φυλάξτε το για μελλοντική αναφορά
 ΒΡΑΣΤΗΡΑΣ ΕΓΧΕΙΡΙΔΙΟ ΧΡΗΣΗΣ ΜΟΝΤΕΛΟ: XB6008H Παρακαλούμε, διαβάστε το παρόν εγχειρίδιο πριν από τη χρήση και φυλάξτε το για μελλοντική αναφορά Κίνα Baumarkt KIG GmbH Wandsbeker Zollstraße 91 D-22041 Hamburg
Μπλέντερ Οδηγίες χρήσης R-533
 Μπλέντερ Οδηγίες χρήσης R-533-1 - ΣΗΜΑΝΤΙΚΕΣ ΟΔΗΓΙΕΣ ΑΣΦΑΛΕΙΑΣ Πριν χρησιμοποιήσετε αυτό το προϊόν, παρακαλούμε διαβάστε όλες τις οδηγίες χρήσης και κρατήστε τες για μελλοντική αναφορά. 1. Αυτό το προϊόν
Hairdryer. Register your product and get support at HP4829/00. Εγχειρίδιο χρήσης
 Register your product and get support at www.philips.com/welcome Hairdryer HP4829/00 EL Εγχειρίδιο χρήσης c d b e g a f Ελληνικά Συγχαρητήρια για την αγορά σας και καλωσορίσατε στη Philips! Για να επωφεληθείτε
ΗΛΕΚΤΡΙΚΗ ΕΣΤΙΑ ΜΟΝΤΕΛΟ: V~ 50/60Hz W
 ΗΛΕΚΤΡΙΚΗ ΕΣΤΙΑ ΜΟΝΤΕΛΟ: CP3639 220-240V~ 50/60Hz 1900-2250W ΣΗΜΑΝΤΙΚΕΣ ΟΔΗΓΙΕΣ ΑΣΦΑΛΕΙΑΣ Διαβάστε τις παρακάτω οδηγίες προσεχτικά πριν κάνετε χρήση της συσκευής. Βεβαιωθείτε ότι η τάση του ρεύματος της
Hair Styler HP8650 HP8651. Register your product and get support at Εγχειρίδιο χρήσης
 Register your product and get support at www.philips.com/welcome Hair Styler HP8650 HP8651 EL Εγχειρίδιο χρήσης Ελληνικά Συγχαρητήρια για την αγορά σας και καλωσορίσατε στη Philips! Για να επωφεληθείτε
Ο ΗΓΙΕΣ ΧΡΗΣΗΣ USE INSTRUCTIONS
 Ο ΗΓΙΕΣ ΧΡΗΣΗΣ USE INSTRUCTIONS ΗΛΕΚΤΡΙΚΗ ΡΑΒ ΟΣ ΜΠΛΕΝΤΕΡ ΜΕ ΕΞΑΡΤΗΜΑΤΑ ELECTRIC STICK BLENDER WITH ACCESSORIES Μοντέλο / Model : HB989W AC230V 50Hz - 400W Παρακαλούµε διαβάστε προσεκτικά όλες τις οδηγίες
L18VFSS10E. Instruction Manual 45.7cm/18 High Power Floor Fan. Εγχειρίδιο Οδηγιών Επιδαπεδιος Ανεμιστηρας 45.7 Εκατοστομετρο
 L18VFSS10E Instruction Manual 45.7cm/18 High Power Floor Fan Εγχειρίδιο Οδηγιών Επιδαπεδιος Ανεμιστηρας 45.7 Εκατοστομετρο GB GR Contents GB Safety Warnings... 2 Unpacking... 5 Getting to Know Your Fan...
Οδηγίες Χρήσης R-826/R-827/R-828
 Οδηγίες Χρήσης R-826/R-827/R-828 Περιγραφή Συσκευών R-826/R-827/R-828 1. ΦΤΕΡΩΤΗ 2. ΠΛΑΣΤΙΚΟ ΜΕΡΟΣ ΜΠΡΟΣΤΙΝΟΥ ΠΡΟΣΤΑΤΕΥΤΙΚΟΥ ΚΑΛΥΜΜΑΤΟΣ 3. ΚΛΙΠ ΠΡΟΣΤΑΤΕΥΤΙΚΟΥ ΚΑΛΥΜΜΑΤΟΣ 4. ΒΑΣΗ 5. ΠΙΣΩ ΠΡΟΣΤΑΤΕΥΤΙΚΟ ΚΑΛΥΜΜΑ
Mini Chopper SMZ 260 B1
 KITCHEN TOOLS Mini Chopper SMZ 260 B1 Mini Chopper Operating instructions Μπλέντερ Οδηγίες χρήσης KOMPERNASS GMBH BURGSTRASSE 21 D-44867 BOCHUM www.kompernass.com ID-Nr.: SMZ 260 B1-06/11-V1 IAN: 69293
Θερμά συγχαρητήρια! Περιγραφή (εικ. A) Αρχική χρήση
 Αρχική χρήση") Θερμά συγχαρητήρια! Έχετε αγοράσει μια συσκευή της Nova. Στόχος μας είναι να σας παρέχουμε ποιοτικά προϊόντα με ωραίο σχεδιασμό σε οικονομικές τιμές. Ελπίζουμε να απολαύσετε τη χρήση αυτής της συσκευής
Θερμά συγχαρητήρια! Έχετε αγοράσει μια συσκευή της Nova. Στόχος μας είναι να σας παρέχουμε ποιοτικά προϊόντα με ωραίο σχεδιασμό σε οικονομικές τιμές. Ελπίζουμε να απολαύσετε τη χρήση αυτής της συσκευής
Straightener HP8330. Register your product and get support at Εγχειρίδιο χρήσης
 Register your product and get support at www.philips.com/welcome Straightener HP8330 EL Εγχειρίδιο χρήσης Ελληνικά Συγχαρητήρια για την αγορά σας και καλωσορίσατε στη Philips! Για να επωφεληθείτε πλήρως
ΔΙΑΒΑΣΤΕ ΠΡΟΣΕΚΤΙΚΑ ΚΑΙ ΚΡΑΤΗΣΤΕ ΑΥΤΕΣ ΤΙΣ ΟΔΗΓΙΕΣ
 ΚΑΛΟΡΙΦΕΡ ΛΑΔΙΟΥ ΜΟΝΤΕΛΟ: UHR-864 ΕΓΧΕΙΡΙΔΙΟ ΧΡΗΣΗΣ ΔΙΑΒΑΣΤΕ ΠΡΟΣΕΚΤΙΚΑ ΚΑΙ ΚΡΑΤΗΣΤΕ ΑΥΤΕΣ ΤΙΣ ΟΔΗΓΙΕΣ Πληροφορίες για την ασφάλεια σας ΔΙΑΒΑΣΤΕ ΠΡΟΣΕΚΤΙΚΑ ΤΙΣ ΠΑΡΑΚΑΤΩ ΟΔΗΓΙΕΣ ΠΡΙΝ ΧΡΗΣΙΜΟΠΟΙΗΣΕΤΕ ΤΗ
Hairdryer HP4963 HP4962 HP4961 HP4960. Register your product and get support at Εγχειρίδιο χρήσης
 Register your product and get support at www.philips.com/welcome Hairdryer HP4963 HP4962 HP4961 HP4960 EL Εγχειρίδιο χρήσης Ελληνικά Συγχαρητήρια για την αγορά σας και καλωσορίσατε στη Philips! Για να
SSV 230WH. GR Ηλεκτρικός κόφτης κοπής λαχανικών σε σπείρες. Copyright 2017, Fast ČR, a.s.
 SSV 230WH GR Ηλεκτρικός κόφτης κοπής λαχανικών σε σπείρες - 1 - GR Ηλεκτρικός κόφτης κοπής λαχανικών σε σπείρες Σημαντικές οδηγίες ασφάλειας ΔΙΑΒΑΣΤΕ ΠΡΟΣΕΚΤΙΚΑ ΚΑΙ ΦΥΛΑΞΤΕ ΓΙΑ ΜΕΛΛΟΝΤΙΚΗ ΧΡΗΣΗ. Η παρούσα
Οδηγίες χρήσης. Μοντέλο: VC1153. Ευχαριστούμε για την αγορά των προϊόντων μας. Διαβάστε προσεκτικά τις οδηγίες πριν χρησιμοποιήσετε τη συσκευή.
 Οδηγίες χρήσης Μοντέλο: VC1153 Ευχαριστούμε για την αγορά των προϊόντων μας. Διαβάστε προσεκτικά τις οδηγίες πριν χρησιμοποιήσετε τη συσκευή. Σελ. 1 από 7 ΠΡΟΕΙΔΟΠΟΙΗΣΗ: Για να μειώσετε τον κίνδυνο πυρκαγιάς,
Οδηγίες Αγοράς Ηλεκτρονικού Βιβλίου Instructions for Buying an ebook
 Οδηγίες Αγοράς Ηλεκτρονικού Βιβλίου Instructions for Buying an ebook Βήμα 1: Step 1: Βρείτε το βιβλίο που θα θέλατε να αγοράσετε και πατήστε Add to Cart, για να το προσθέσετε στο καλάθι σας. Αυτόματα θα
Hairdryer. Register your product and get support at HP4935/00. Εγχειρίδιο χρήσης
 Register your product and get support at www.philips.com/welcome Hairdryer HP4935/00 EL Εγχειρίδιο χρήσης Ελληνικά Συγχαρητήρια για την αγορά σας και καλωσορίσατε στη Philips! Για να επωφεληθείτε πλήρως
GR Ηλεκτρικός κόφτης κοπής λαχανικών σε σπείρες
 SSV 330WH GR Ηλεκτρικός κόφτης κοπής λαχανικών σε σπείρες - 1 - GR Ηλεκτρικός κόφτης κοπής λαχανικών σε σπείρες Σημαντικές οδηγίες ασφάλειας ΔΙΑΒΑΣΤΕ ΠΡΟΣΕΚΤΙΚΑ ΚΑΙ ΦΥΛΑΞΤΕ ΓΙΑ ΜΕΛΛΟΝΤΙΚΗ ΧΡΗΣΗ. Η παρούσα
Oδηγίες χρήσεως. Σεσουάρ μαλλιών
 Oδηγίες χρήσεως Σεσουάρ μαλλιών GR 8 1 7 6 2 3 4 5 2 GR Σεσουάρ μαλλιών Σύνδεση με την παροχή ηλεκτρικού ρεύματος Η συσκευή αυτή πρέπει να συνδέεται μόνο με γειωμένη πρίζα, εγκατεστημένη σύμφωνα με τις
ΟΔΗΓΙΕΣ ΧΡΗΣΕΩΣ ΕΠΑΓΓΕΛΜΑΤΙΚΗΣ ΦΡΑΠΙΕΡΑΣ
 www.colorato.net ΟΔΗΓΙΕΣ ΧΡΗΣΕΩΣ ΕΠΑΓΓΕΛΜΑΤΙΚΗΣ ΦΡΑΠΙΕΡΑΣ ΜΟΝΤΕΛΟ: CLDM-400A Διαβάστε προσεκτικά αυτές τις οδηγίες πριν τη χρήση της συσκευής και διατηρήστε τις για μελλοντική χρήση H COLORATO συνιστά
ΚΑΤΑΣΚΕΥΑΣΤΗΣ: Εταιρεία VALEO Formosa Office Building 4F 3, 161, Sung The Road Taipei, Taiwan, R.O.C.
 ΚΑΤΑΣΚΕΥΑΣΤΗΣ: Εταιρεία VALEO Formosa Office Building 4F 3, 161, Sung The Road Taipei, Taiwan, R.O.C. P/N: 700351626(09.03) ΔΙΑΒΑΣΤΕ ΠΡΙΝ ΤΗ ΧΡΗΣΗ: Διαβάστε τις οδηγίες προσεκτικά και απευθυνθείτε στις
ΟΔΗΓΙΕΣ ΧΡΗΣΗΣ ΣΟΜΠΑ ΜΕ ΛΑΜΠΕΣ ΑΝΘΡΑΚΑ AR4B01
 ΟΔΗΓΙΕΣ ΧΡΗΣΗΣ ΣΟΜΠΑ ΜΕ ΛΑΜΠΕΣ ΑΝΘΡΑΚΑ AR4B01 ΠΡΟΕΙΔΟΠΟΙΗΣΕΙΣ ΠΡΟΣΟΧΗ: Διαβάστε προσεκτικά αυτό το εγχειρίδιο περιέχει σημαντικές οδηγίες για την ασφαλή τοποθέτηση, χρήση και συντήρηση. Σημαντικές οδηγίες
ΒΡΑΣΤΗΡΑΣ ΟΔΗΓΙΕΣ ΧΡΗΣHΣ
 ΒΡΑΣΤΗΡΑΣ ΟΔΗΓΙΕΣ ΧΡΗΣHΣ Model No: AS8622 Ref. No: 857-8622 ΟΔΗΓΙΕΣ ΑΣΦΑΛΕΙΑΣ 1. Αυτή η συσκευή έχει σχεδιαστεί ΜΟΝΟ για οικιακή χρήση. Καμία ευθύνη δεν φέρει ο κατασκευαστής για βλάβη που προκλήθηκε από
ΑΝΕΜΙΣΤΗΡΑΣ BOX FAN ΟΔΗΓΙΕΣ ΧΡΗΣHΣ
 ΑΝΕΜΙΣΤΗΡΑΣ BOX FAN ΟΔΗΓΙΕΣ ΧΡΗΣHΣ Model No: KYT-30D Ref. No: 862-8137 ΠΡΟΣΟΧΗ! - ΟΔΗΓΙΕΣ ΑΣΦΑΛΕΙΑΣ 1. Αυτή η συσκευή έχει σχεδιαστεί ΜΟΝΟ για οικιακή χρήση. Καμία ευθύνη δεν φέρει ο κατασκευαστής για
Οδηγίες χρήσης για σκούπα στάχτης 20Lt BAC2000
 Οδηγίες χρήσης για σκούπα στάχτης 20Lt BAC2000 Διαβάστε τις οδηγίες χρήσης πριν την λειτουργία. Δίνει σημαντικές πληροφορίες για την ασφάλεια, την χρήση και την συντήρηση του μηχανήματος. Εάν υπάρχουν
Ατμοκαθαριστής FA Εγχειρίδιο χρήσης [1]
![Ατμοκαθαριστής FA Εγχειρίδιο χρήσης [1]](/thumbs/56/39604852.jpg "Ατμοκαθαριστής FA Εγχειρίδιο χρήσης [1]") Ατμοκαθαριστής FA-5141-1 Εγχειρίδιο χρήσης [1] ΣΗΜΑΝΤΙΚΕΣ ΟΔΗΓΙΕΣ ΑΣΦΑΛΕΙΑΣ Όταν χρησιμοποιείτε τη συσκευή σας πρέπει να τηρούνται βασικές προφυλάξεις, συμπεριλαμβανομένου των παρακάτω: Διαβάστε όλες τις
Ατμοκαθαριστής FA-5141-1 Εγχειρίδιο χρήσης [1] ΣΗΜΑΝΤΙΚΕΣ ΟΔΗΓΙΕΣ ΑΣΦΑΛΕΙΑΣ Όταν χρησιμοποιείτε τη συσκευή σας πρέπει να τηρούνται βασικές προφυλάξεις, συμπεριλαμβανομένου των παρακάτω: Διαβάστε όλες τις
66546_mel_LED-Lichtervorhang_Content_LB6+GR.indd :56
 1 2 3 4 3 66546_mel_LED-Lichtervorhang_Content_LB6+GR.indd 3 29.04.11 13:56 Table of contents Introduction Intended Use... Page 5 Description of parts... Page 5 Delivery scope... Page 6 Technical information...
Hairdryer. Register your product and get support at HP4962/22 HP4961/22. Εγχειρίδιο χρήσης
 Register your product and get support at www.philips.com/welcome Hairdryer HP4962/22 HP4961/22 EL Εγχειρίδιο χρήσης Ελληνικά Συγχαρητήρια για την αγορά σας και καλωσορίσατε στη Philips! Για να επωφεληθείτε
Right Rear Door. Let's now finish the door hinge saga with the right rear door
 Right Rear Door Let's now finish the door hinge saga with the right rear door You may have been already guessed my steps, so there is not much to describe in detail. Old upper one file:///c /Documents
MEAT MINCING ATTACHMENT. Operating instructions ΠΡΟΣΑΡΜΟΓΕΑΣ ΚΡΕΑΤΟΜΗΧΑΝΗΣ. Οδηүίες χρήσης FOR FOOD PROCESSOR ΚΟΥΖΙΝΟΜΗΧΑΝΗ SKV 1200 A1 IAN C
 MEAT MINCING ATTACHMENT Operating instructions ΠΡΟΣΑΡΜΟΓΕΑΣ ΚΡΕΑΤΟΜΗΧΑΝΗΣ Οδηүίες χρήσης FOR FOOD PROCESSOR ΚΟΥΖΙΝΟΜΗΧΑΝΗ SKV 1200 A1 IAN 281064 - C Before reading, unfold the page containing the illustrations
Curler. Register your product and get support at HP8600/00. Εγχειρίδιο χρήσης
 Register your product and get support at www.philips.com/welcome Curler HP8600/00 EL Εγχειρίδιο χρήσης a b c d e f g h i j Ελληνικά Συγχαρητήρια για την αγορά σας και καλωσορίσατε στη Philips! Για να επωφεληθείτε
Cookies γεμιστά με κρέμα πανακότα Chocolate Chip Cookie Cupsilled with Panna Cotta Cream by Gabriel Nikolaides and the Cool Artisan!
 Cookies γεμιστά με κρέμα πανακότα Chocolate Chip Cookie Cupsilled with Panna Cotta Cream by Gabriel Nikolaides and the Cool Artisan! Η πρώτη φορά που δοκίμασα αυτή τη συνταγή κατάλαβα ότι δεν υπάρχει κανένας
Καλοριφέρ Λαδιού ΟΔΗΓΙΕΣ ΧΡΗΣΗΣ
 Καλοριφέρ Λαδιού ΟΔΗΓΙΕΣ ΧΡΗΣΗΣ Μοντέλο UHR-835 ΜΗΝ ΑΝΑΠΟΔΟΓΥΡΙΖΕΤΕ ΤΗ ΣΥΣΚΕΥΗ ΚΑΤΑ ΤΗ ΛΕΙΤΟΥΡΓΙΑ ΤΗΣ. ΣΥΝΑΡΜΟΛΟΓΗΣΗ Αφαιρέστε το καλοριφέρ και όλα τα παρελκόμενα από τη συσκευασία. 1. Γυρίστε το καλοριφέρ
Ποτέ μη χρησιμοποιείτε οινόπνευμα ή άλλους διαλύτες για να καθαρίσετε οποιοδήποτε μέρος του ηχείου!
 BeoLab 7 1 Οδηγός Καθημερινή χρήση 3 Όταν ολοκληρώσετε την εγκατάσταση του ηχείου όπως περιγράφεται στις παρακάτω σελίδες, συνδέστε ολόκληρο το σύστημα στο ρεύμα. Προστασία ηχείου Το ηχείο διαθέτει ένα
Staightener. Register your product and get support at HP8309/00 HP8310/00. Εγχειρίδιο χρήσης
 Register your product and get support at www.philips.com/welcome Staightener HP8309/00 HP8310/00 EL Εγχειρίδιο χρήσης d e c b a Ελληνικά Συγχαρητήρια για την αγορά σας και καλωσορίσατε στη Philips! Για
Vegan μπισκοτάκια σαν oreo- Vegan oreo cookies by Demetra and the Veggiesisters!
 Vegan μπισκοτάκια σαν oreo- Vegan oreo cookies by Demetra and the Veggiesisters! Σήμερα φτιάχνουμε μπισκοτάκια, διαφορετικά από τα άλλα! Είναι νόστιμα, χωρίς ζωικά παράγωγα, δεν χρειάζονται ψήσιμο και
Straightener. Register your product and get support at HP8355. Εγχειρίδιο χρήσης
 Register your product and get support at www.philips.com/welcome Straightener HP8355 EL Εγχειρίδιο χρήσης SONIC SONIC Ελληνικά Συγχαρητήρια για την αγορά σας και καλωσορίσατε στη Philips! Για να επωφεληθείτε
ΕΓΧΕΙΡΙΔΙΟ ΧΡΗΣΗΣ ΘΕΡΜΑΝΤΙΚΟ MICA UHM-782
 ΕΓΧΕΙΡΙΔΙΟ ΧΡΗΣΗΣ ΘΕΡΜΑΝΤΙΚΟ MICA UHM-782 Ευχαριστούμε που χρησιμοποιείτε τα προιόντα μας. Σας παρακαλούμε να διαβάσετε προσεκτικά τις οδηγίες χρήσης πριν χρησιμοποιήσετε τη συσκευή! Ⅰ. Παρουσίαση συσκευής
Οδηγίες χρήσης. Μοντέλο: VC1154. Ευχαριστούμε για την αγορά των προϊόντων μας. Διαβάστε προσεκτικά τις οδηγίες πριν χρησιμοποιήσετε τη συσκευή.
 Οδηγίες χρήσης Μοντέλο: VC1154 Ευχαριστούμε για την αγορά των προϊόντων μας. Διαβάστε προσεκτικά τις οδηγίες πριν χρησιμοποιήσετε τη συσκευή. Σελ. 1 από 7 ΠΡΟΕΙΔΟΠΟΙΗΣΗ: Για να μειώσετε τον κίνδυνο πυρκαγιάς,
Hairdryer. Register your product and get support at HP4996/22. Εγχειρίδιο χρήσης
 Register your product and get support at www.philips.com/welcome Hairdryer HP4996/22 EL Εγχειρίδιο χρήσης d c b e f g h a i Ελληνικά Συγχαρητήρια για την αγορά σας και καλωσορίσατε στη Philips! Για να
ΜΠΛΕΝΤΕΡ ΜΕ ΑΠΟΣΠΩΜΕΝΟ ΔΟΧΕΙΟ ΓΙΑ ΜΕΤΑΦΟΡΑ ΡΟΦΗΜΑΤΩΝ ΕΓΧΕΙΡΙΔΙΟ ΧΡΗΣΗΣ ΜΟΝΤΕΛΟ: SB8151
 ΜΠΛΕΝΤΕΡ ΜΕ ΑΠΟΣΠΩΜΕΝΟ ΔΟΧΕΙΟ ΓΙΑ ΜΕΤΑΦΟΡΑ ΡΟΦΗΜΑΤΩΝ ΕΓΧΕΙΡΙΔΙΟ ΧΡΗΣΗΣ ΜΟΝΤΕΛΟ: SB8151 Διαβάστε τις οδηγίες χρήσης και φυλάξτε τις για μελλοντική αναφορά ΣΗΜΑΝΤΙΚΕΣ ΠΡΟΦΥΛΑΞΕΙΣ Πριν χρησιμοποιήσετε αυτή
ΚΡΕΑΤΟΜΗΧΑΝΗ ΜΟΝΤΕΛΟ: R-542
 ΚΡΕΑΤΟΜΗΧΑΝΗ ΜΟΝΤΕΛΟ: R-542 ΟΔΗΓΙΕΣ ΧΡΗΣΗΣ - 1 - Παρακαλούμε διαβάστε προσεκτικά και φυλάξτε τις οδηγίες για μελλοντική αναφορά ΠΕΡΙΓΡΑΦΗ 1 Διακόπτης λειτουργίας ΟN/O/αντίστροφης κίνησης 8 Στρόφιγγα 2
FM1100 FM2000 FM3000 Μύλος Ζωοτροφών
 FM1100 FM2000 FM3000 Μύλος Ζωοτροφών Μετάφραση του πρωτοτύπου των οδηγιών χρήσης Owner s manual Οδηγίες χρήσης για μύλο ζωοτροφών Διαβάστε προσεχτικά τις οδηγίες χρήσης. Η μη τήρηση των οδηγιών μπορεί
Hairdryer HP4993 HP4992 HP4991 HP4990. Register your product and get support at Εγχειρίδιο χρήσης
 Register your product and get support at www.philips.com/welcome Hairdryer HP4993 HP4992 HP4991 HP4990 Εγχειρίδιο χρήσης e f g d h b a c i j k Ελληνικά Συγχαρητήρια για την αγορά σας και καλωσορίσατε στη
ΜΟΝΤΕΛΟ: UTF-673 ΑΝΕΜΙΣΤΗΡΑΣ ΣΤΗΛΗ
 ΕΓΧΕΙΡΙΔΙΟ ΧΡΗΣΗΣ ΜΟΝΤΕΛΟ: UTF-673 ΑΝΕΜΙΣΤΗΡΑΣ ΣΤΗΛΗ Σας ευχαριστούμε για την προτίμηση σας στο προϊόν μας. Παρακαλούμε διαβάστε προσεκτικά τις οδηγίες αυτές και φυλάξτε τις για μελλοντική χρήση. Παρακαλούμε
Αποχυμωτής R-434 Rohnson. Οδηγίες χρήσης. Παρακαλώ διαβάστε προσεκτικά τις οδηγίες χρήσης πριν λειτουργήσετε τη συσκευή.
 Αποχυμωτής R-434 Rohnson Οδηγίες χρήσης Παρακαλώ διαβάστε προσεκτικά τις οδηγίες χρήσης πριν λειτουργήσετε τη συσκευή. Περιγραφή Συσκευής 1. Πιεστήρας 2.Διαφανές κάλυμμα 3. Φίλτρο αποχύμωσης 4. Βάση φίλτρου
Hairdryer HP4997/00. Register your product and get support at Εγχειρίδιο χρήσης
 Register your product and get support at www.philips.com/welcome Hairdryer HP4997/00 EL Εγχειρίδιο χρήσης h i a b g c f d e Ελληνικά Συγχαρητήρια για την αγορά σας και καλωσορίσατε στη Philips! Για να
ΘΕΡΜΑΝΤΙΚΟ MICA ΕΓΧΕΙΡΙΔΙΟ ΧΡΗΣΗΣ Μοντέλο: UHM V 50Hz 2200W
 ΘΕΡΜΑΝΤΙΚΟ MICA ΕΓΧΕΙΡΙΔΙΟ ΧΡΗΣΗΣ Μοντέλο: UHM-786 230V 50Hz 2200W Σημάνσεις Ασφαλείας Προκειμένου να μειώσετε τον κίνδυνο τραυματισμού ή ζημιάς σε ιδιοκτησία, βασικές οδηγίες ασφαλείας θα πρέπει να τηρούνται
rainbowsystem.com Rexair LLC Troy, Michigan 2011 Rexair LLC R14388n-0 Printed in U.S.A.
 rainbowsystem.com Rexair LLC Troy, Michigan 2011 Rexair LLC R14388n-0 Printed in U.S.A. αριθμός εξυπηρέτησης πελατών Κάθε συσκευή Rainbow AquaMate διαθέτει ένα σειριακό αριθμό εξυπηρέτησης πελατών μόνο
Hairdryer. Register your product and get support at HP8183 HP8182 HP8181 HP8180. Εγχειρίδιο χρήσης
 Register your product and get support at www.philips.com/welcome Hairdryer HP8183 HP8182 HP8181 HP8180 EL Εγχειρίδιο χρήσης Ελληνικά Συγχαρητήρια για την αγορά σας και καλωσορίσατε στη Philips! Για να
HP8180
 Register your product and get support at www.philips.com/welcome HP8180 EL Εγχειρίδιο χρήσης Ελληνικά Συγχαρητήρια για την αγορά σας και καλωσορίσατε στη Philips! Για να επωφεληθείτε πλήρως από την υποστήριξη
Instruction Execution Times
 1 C Execution Times InThisAppendix... Introduction DL330 Execution Times DL330P Execution Times DL340 Execution Times C-2 Execution Times Introduction Data Registers This appendix contains several tables
HAND MIXER HM 6280 HM 6280 W
 EL HAND MIXER HM 6280 HM 6280 W A B C D E F G 3 ΑΣΦΑΛΕΙΑ ΚΑΙ ΕΓΚΑΤΑΣΤΑΣΗ Διαβάστε προσεκτικά όλο το παρόν εγχειρίδιο οδηγιών πριν χρησιμοποιήσετε αυτή τη συσκευή! Ακολουθήστε όλες τις οδηγίες ασφαλείας
MILK FROTHER MF 5260 ΕΛΛΗΝΙΚΑ
 MILK FROTHER MF 5260 ΕΛΛΗΝΙΚΑ EL A B C D E F G H 3 ΑΣΦΑΛΕΙΑ ΚΑΙ ΕΓΚΑΤΑΣΤΑΣΗ Διαβάστε προσεκτικά όλο το παρόν εγχειρίδιο οδηγιών πριν χρησιμοποιήσετε αυτή τη συσκευή! Ακολουθήστε όλες τις οδηγίες ασφαλείας
Οδηγίες χρήσης για το πολυμίξερ
 Οδηγίες χρήσης για το πολυμίξερ Περιεχόμενα Ασφάλεια του πολυμίξερ Σημαντικά μέτρα ασφάλειας 6 Ηλεκτρικές απαιτήσεις 8 Απόρριψη χρησιμοποιημένου ηλεκτρικού εξοπλισμού 8 ΜΈΡΗ ΚΑΙ ΧΑΡΑΚΤΗΡΙΣΤΙΚΆ Μέρη και