MOD COD REV. 3 del 23/10/2006
|
|
|
- Ἐμμανουήλ Ἀβιούδ Ρόκας
- 8 χρόνια πριν
- Προβολές:
Transcript


1 MOD COD REV. 3 del 23/10/2006 Via Toscana, 57 a-b - Località Macrolotto Prato PO - Italy info@ariete.net Internet:


2 I G B C H F D L E A Fig. 8 Fig. 9 Fig. 10 U V W T M M/a N O P Q R S Fig. 11 Fig. 12 Fig MAX 1,5 lt Fig. 1 8 F Fig. 14 Fig. 15 Fig. 2 Fig. 3 Fig. 4 D B Fig. 5 Fig. 6 Fig. 7
3 AVVERTENZE IMPORTANTI Leggere attentamente le istruzioni prima dell uso. Si consiglia di conservare gli imballi originali, poiché l assistenza gratuita non è prevista per i guasti causati da imballo non adeguato del prodotto al momento della spedizione ad un Centro di Assistenza autorizzato. Prima di collegare l apparecchio alla rete di alimentazione controllare che la tensione indicata sulla targhetta posta al di sotto della macchina corrisponda a quella della rete locale. Non sollevare l apparecchio afferrandolo per la vaschetta dell acqua ma utilizzare le apposite cavità della base di appoggio della macchina. L uso di prolunghe elettriche non autorizzate dal fabbricante dell apparecchio può provocare danni e incidenti. Evitare di immettere nel serbatoio una quantità eccessiva di acqua. Non utilizzare acqua gassata (addizionata di anidride carbonica). Non usare la macchina senza acqua, poiché in tale caso la pompa si brucerebbe. Il cavo non deve toccare le parti calde della macchina. Togliere la spina dalla presa prima di ogni intervento di pulizia o di manutenzione. Non lasciare la macchina a temperatura ambiente inferiore a 0 C, in quanto il residuo d acqua nella caldaia potrebbe ghiacciare e provocare dei danni. Prima di procedere all operazione di riempimento del serbatoio dell acqua, scollegare l apparecchio dalla presa di corrente. L apparecchio è destinato solo ad uso domestico, e non deve essere adibito ad uso commerciale o industriale. Non lasciare mai la macchina in funzione alla portata dei bambini o incapaci. Non regolate mai il macinacaffè durante il suo funzionamento, non introducete assolutamente caffè macinato nel macinacaffè, ma esclusivamente caffè in grani. Se il cavo di alimentazione è danneggiato, esso deve essere sostituito dal costruttore o dal suo servizio Assistenza Tecnica o comunque da una persona con qualifica similare, in modo da prevenire ogni rischio. Le parti metalliche esterne dell apparecchio non devono essere toccate, con l apparecchio in funzione, in quanto potrebbero causare delle scottature. Non riempire mai il serbatoio dell acqua con acqua calda o bollente. Dopo aver staccato la spina di alimentazione e dopo che le parti calde si saranno freddate, l apparecchio dovrà essere pulito esclusivamente con un panno non abrasivo appena inumidito aggiungendo poche gocce di detergenti neutri non aggressivi (non usare mai solventi che danneggiano la plastica) NON IMMERGERE L APPARECCHIO IN ACQUA O ALTRI LIQUIDI. Non mettere mai le parti sotto tensione a contatto con l acqua: può generarsi un cortocircuito! Non dirigere mai il getto di vapore o acqua calda verso parti del corpo; manipolare con precauzione il tubo vapore/acqua calda: pericolo ustioni! Collocare la macchina su un piano stabile dove non possa essere rovesciata. Non usare l apparecchio all aperto. Non posizionare la macchina su superfici molto calde o nelle vicinanze di fiamme libere per evitare che la carrozzeria possa essere danneggiata. Scegliere un ambiente sufficientemente illuminato, pulito e con la presa di corrente facilmente accessibile. In caso di guasti, difetti o sospetto difetto dopo una caduta, staccare subito la spina dalla presa di corrente. Non mettere mai in funzione l apparecchio difettoso. LE RIPARAZIONI POSSONO ESSERE EFFETTUATE ESCLUSIVAMENTE DAI CENTRI DI ASSISTENZA AUTORIZZATI. Si declina ogni responsabilità per eventuali danni provocati da interventi di riparazione eseguiti in modo non corretto. Allorché si decida di smaltire come rifiuto questo apparecchio, si raccomanda di renderlo inoperante tagliandone il cavo di alimentazione. Si raccomanda inoltre di rendere innocue quelle parti dell apparecchio suscettibili di costituire un pericolo, specialmente per i bambini che potrebbero servirsi dell apparecchio per i propri giochi. Gli elementi dell imballaggio non devono essere lasciati alla portata dei bambini in quanto potenziali fonti di pericolo. Non lasciare l apparecchio esposto ad agenti atmosferici (pioggia, sole, ecc...). Questo apparecchio è conforme alla direttiva 89/336 CEE relativa alla compatibilità elettromagnetica. Il livello massimo di rumorosità della macchina in funzione è di 86 db(a). CONSERVARE SEMPRE QUESTE ISTRUZIONI. IT
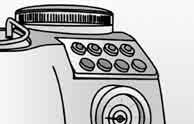
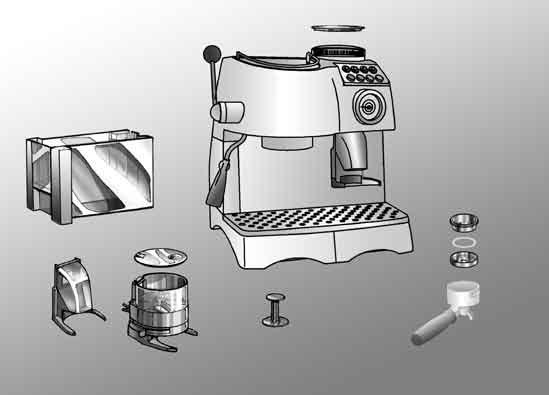
4 IT Le macchine da caffè ARIETE sono ideali per chi sa gustarsi i piaceri della vita, a cominciare da un buon caffè. Grazie al dispositivo Thermocream si può sempre ottenere a casa un caffè caldo e cremoso come quello del bar. Infatti, il dispositivo Thermocream è dotato di un filtro che assicura l erogazione del caffè a pressione costante. In questo modo si può gustare un caffè con molta crema, dall aroma intenso e dal gusto pieno e corposo, senza la necessità di pressare energicamente ed utilizzando qualsiasi tipo di miscela purché non troppo fine. Le macchine da caffè Ariete soddisfano anche gli amanti del cappuccino perché grazie al dispositivo MAXI CAPPUCCINO si può ottenere, in pochi secondi, una schiuma ricca e densa. Inoltre caffè subito pronto con le macchine Ariete perché dotate del sistema auto-innesco che consente di fare subito il caffè anche in caso di lungo inutilizzo delle macchine o dopo il riempimento del serbatoio dell acqua. Buon caffè a tutti con Café Roma Deluxe di Ariete! DESCRIZIONE DEI COMPONENTI A - Corpo macchina B - Pulsante di fermo del regolatore macinatura caffè C - Coperchio contenitore caffè D - Contenitore caffè in grani, regolatore macinatura E - Termometro temperatura caldaia ( C e F) F - Leva acqua/vapore G - Vano porta accessori H - Serbatoio acqua (capacità lt. 1,5 livello MAX) I - Sportellino riempimento serbatoio L - Pannello comandi M - Dispositivo flusso continuo caffè macinato N - Dispositivo Dispenser con dosatore caffè macinato O - Dispositivo MAXI CAPPUCCINO e stilo acqua/vapore P - Pressino Q - Cassetto recupero acqua R - Cassetto recupero polvere caffè S - Griglia appoggiatazze T - Portafiltro professionale U - Filtro Thermocream V - Anello in silicone W - Disco Thermocream DESCRIZIONE DEI COMANDI 1 Spia accensione 2 Spia temperatura caffè 3 Spia temperatura vapore 4 Spia riempimento Dispenser 5 Tasto accensione 6 Interruttore erogazione caffè 7 Interruttore vapore 8 Tasto riempimento dispositivo Dispenser MESSA IN FUNZIONE - Togliere il serbatoio acqua (H) dal vano della macchina, riempirlo di acqua naturale fresca fino a livello Max. (lt. 1,5), e reinserirlo nel vano del corpo macchina. Per assicurare il corretto funzionamento della macchina premere bene a fondo il serbatoio, Fig. 5. Il serbatoio può essere riempito anche dall alto, versando l acqua nell apposito vano dopo aver sollevato lo sportellino (I) Fig. 4.
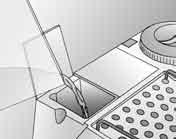
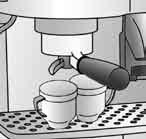
5 - Inserire la spina nella presa di corrente. - Premere l interruttore generale (5) Fig. 2; si accenderà fissa la spia accensione (1) e la spia (2) inizierà a lampeggiare fino al raggiungimento della giusta temperatura dopodiché rimarrà accesa fissa. Abbassare la leva acqua/vapore (Fig. 3 - F), e contemporaneamente premere l interruttore di erogazione caffè (6) facendo uscire l eventuale aria o acqua contenuta nel circuito. Riempire almeno una tazza con quest acqua. Rialzare la leva acqua/vapore (F) e spegnere l erogazione caffè premendo il tasto (6). IMPORTANTE: si consiglia di ripetere questa operazione ogni volta che la macchina viene riaccesa dopo diversi giorni di non utilizzo. Per il normale riempimento del serbatoio alzare lo sportellino (I) e versare acqua naturale fresca nell apposito vano (Fig. 4). - Introdurre del caffè in grani nel contenitore (D) Max. 230 gr. Fig. 6. Il caffè può essere macinato più o meno finemente a seconda del grado di macinatura desiderato. Per variare il grado di macinatura, premere il pulsante di fermo (B) e ruotare il macinacaffè a destra o sinistra secondo la scala numerata Fig. 7. L OPERAZIONE DEVE ESSERE ESEGUITA ASSOLUTAMENTE CON IL MACINA- CAFFÈ SPENTO. SCELTA DEL TIPO DI DISPOSITIVO EROGATORE DEL CAFFÈ MACINATO La macchina è corredata di due dispositivi intercambiabili: 1) Dispositivo a Flusso Continuo (M), Fig. 1 permette la macinatura istantanea del caffè. Premere il pulsante (M/a) posto sotto l uscita del caffè macinato con il portafiltro inserito nell apposita forcella Fig. 8. 2) Dispositivo Dispenser /Dosatore (N) Fig. 9. Per riempire il Dispenser di caffè macinato, premere l interruttore (8) Fig. 2 fino al riempimento; azionare la levetta del Dosatore una o due volte quante sono le tazzine di caffè desiderate tenendo il portafiltro inserito nella forcella. Per il disinserimento, tirare verso di Voi i dispositivi (M) o (N). COME FARE IL CAFFÈ Controllare il livello dell acqua nel serbatoio (H). Verificare che il serbatoio sia inserito correttamente nella sua sede. Dosare il caffè nel portafiltro Fig. 8 con il dispositivo di erogazione che avete scelto e pressatelo leggermente con il pressino Fig. 10. Serrare bene il portafiltro assicurandosi di averlo ben agganciato alla flangia Fig. 14. Se viene inserita una quantità eccessiva di polvere di caffè all interno del filtro, la rotazione del portafiltro può risultare difficoltosa e/o durante l erogazione del caffè si possono avere perdite dal portafiltro. La macchina sarà pronta all uso, quando la spia (2) Fig. 2 da lampeggiante diventa fissa. Premere quindi l interruttore erogazione caffè (6). Per cessare l erogazione ripremere l interruttore (6). La dose massima per un caffè è di 50 ml. N.B. Come per le macchine da caffè professionali non togliere il portafiltro quando l interruttore erogazione (6) è inserito. Dopo aver fatto il caffè, allentate gradualmente il portafiltro ruotandolo in senso orario. Il sistema Thermocream di ARIETE è stato studiato appositamente per soddisfare al meglio tutte le esigenze del consumatore, e si compone di due elementi: il filtro Thermocream (U) dotato di un solo foro di uscita caffè (Fig. 13) che favorisce la formazione della crema, ed il disco Thermocream in plastica (W) insieme all anello in silicone (V). Una costante pulizia del filtro (U) ne favorisce un perfetto mantenimento nel tempo. COME FARE UN CAPPUCCINO Attenzione prima di usare MAXI CAPPUCCINO assicuratevi di aver disinnestato il portafiltro dalla sua sede. Per fare un cappuccino, un cioccolato caldo, o solo riscaldare qualsiasi altra bevanda, premere l interruttore produzione vapore (7) Fig. 2. La spia luminosa (2) si spegnerà e la spia luminosa (3) del pulsante vapore inizierà IT
6 IT a lampeggiare; quando la spia (3) da lampeggiante diventerà fissa, la macchina sarà pronta per erogare vapore. Abbassare la leva acqua/vapore (F) Fig.3, dopo aver posizionato un bicchiere sotto lo stilo Maxi Cappuccino (O) Fig. 12. Uscirà per prima una piccola quantità di acqua e subito dopo un forte getto di vapore. Interrompere quindi l erogazione del vapore e rialzando la leva (F) Fig. 3, disporre sotto lo stilo il bricco del latte da montare, riaprire il flusso di vapore abbassando la leva gradualmente e immergere a fondo lo stilo nel latte: in pochi attimi vedrete salire una schiuma densa e cremosa, Fig. 15. Terminata l operazione disattivare la funzione vapore premendo nuovamente il tasto vapore (7). La spia vapore (3) si spegnerà. COME FARE TÈ O INFUSI Dopo aver effettuato le operazioni descritte nel capitolo FASI PRELIMINARI PER L USO, posizionare una tazza sotto lo stilo Maxi Cappuccino (O); abbassare la leva acqua/vapore (F) e premere contemporaneamente gli interruttori (6) di erogazione caffè e del vapore (7). La spia (2) si spegnerà e la spia (3) inizierà a lampeggiare. L acqua inizierà a fuoriuscire dallo stilo Maxi Cappuccino (O). Per interrompere l erogazione premere l interruttore caffè (6): la spia (3) si spegnerà e la spia (2) si accenderà fissa. Rialzare la leva vapore; la macchina è nuovamente pronta per l uso. RIUTILIZZO PER CAFFÈ. Per passare dalla produzione di vapore a quella di caffè occorre raffreddare la macchina: premere l interruttore erogazione caffè (6) e fare uscire almeno una tazza di acqua dalla sede di aggancio del portafiltro. Attendere che la spia luminosa (2) si spenga di nuovo prima di fare il caffè. CONSIGLI UTILI PER OTTENERE UN BUON ESPRESSO ALL ITALIANA Il caffè macinato nel portafiltro dovrà essere pressato leggermente. Un caffè più forte o meno forte dipende dal grado di macinatura del caffè e dalla quantità di esso immessa nel portafiltro. Pochi secondi sono il tempo sufficiente perché il caffè scenda nelle tazzine. Se il tempo di erogazione è superiore significa che la macinatura è troppo fine o che la polvere immessa nel portafiltro è stata pressata eccessivamente. PULIZIE PERIODICHE ATTENZIONE: tutte le operazioni di pulizia sotto indicate devono essere effettuate a macchina spenta. Pulizia del filtro contenente il macinato. Verificare che i forellini interni non si otturino e nel caso ripulirli con uno spazzolino. Verificare che il foro sottostante non si otturi e nel caso ripulirlo con uno spillo (Fig. 13) e far erogare acqua bollente dal portafiltro con il filtro inserito senza la polvere, per sciogliere o rimuovere eventuali residui di caffè o impurità. Si consiglia di pulire accuratamente il filtro (U) ogni circa 3 mesi, utilizzando le pastiglie detergenti COFFEE CLEAN di ARIETE reperibili presso i punti vendita ed i Centri Assistenza Autorizzati seguendo le istruzioni contenute nella confezione. Pulizia della sede del portafiltro. Con l uso si può verificare, nella sede di aggancio del portafiltro, una sedimentazione di fondi di caffè, che possono essere rimossi con uno stuzzicadenti, con una spugnetta, oppure lasciando scorrere acqua senza portafiltro inserito. Pulizia del dispositivo MAXI CAPPUCCINO. Eseguire l operazione quando il tubo cromato è freddo per evitare scottature. Svitare il dispositivo (O) dal tubetto, e lavarlo con acqua corrente. Il tubetto può essere pulito con un panno non abrasivo. Riavvitare il cappuccinatore fino alla fine della corsa. Se necessario ripulire con uno spillo il forellino di uscita del vapore. Dopo ogni utilizzo erogare il vapore per alcuni secondi per liberare il foro da eventuali residui. Pulizia del serbatoio. Si consiglia di pulire periodicamente l interno del serbatoio con una spugna o un panno umido. DECALCIFICAZIONE In base alla nostra esperienza e grazie alle tecniche di costruzione della macchina da caffè, non si formano depositi calcarei nell apparecchio. Se nonostante ciò, dopo qualche tempo, la funzione dell apparecchio
7 dovesse essere compromessa, in seguito all uso frequente di acqua dura e molto calcarea, si può procedere alla decalcificazione della macchina per eliminare il malfunzionamento. Utilizzate per questo scopo esclusivamente il prodotto decalcificante dell Ariete a base di acido citrico (NOCAL). Questo prodotto si può ordinare facilmente rivolgendosi all indirizzo dell assistenza tecnica indicata. Prodotti decalcificanti di altri produttori anche se sono a base di acido citrico possono contenere additivi chimici, che potrebbero causare danni ai componenti interni della macchina da caffè, per i quali Ariete non si assume nessuna responsabilità. In caso di necessità di una decalcificazione, osservate le indicazioni sul foglio di istruzioni del prodotto decalcificante. COME RIMEDIARE AI SEGUENTI INCONVENIENTI PROBLEMI CAUSE RIMEDI La macchina non eroga acqua bollente per infusi. La macchina non eroga vapore. Fuoriuscita di caffè dai bordi del portafiltro. L erogazione del caffè non avviene od avviene troppo lentamente. Il caffè è troppo acquoso e freddo. Probabilmente è entrata aria nel circuito e ciò ha disinnescato la pompa. C è poca acqua e la pompa non aspira. Foro di uscita vapore dello stilo erogatore ostruito. Probabilmente nel portafiltro è stata immessa una quantità eccessiva di caffè macinato che ha impedito di stringere a fondo il portafiltro nella sua sede. Il filtro contenente macinato ha il forellino di uscita ostruito. È possibile che la scarsa erogazione del caffè dipenda anche dalla insufficiente fuoriuscita dell acqua dal disco forato a doccia nella sede del portafiltro. È possibile infatti che, dopo alcuni mesi di uso, i residui di grasso o calcare possano ostruire i fori del disco forato a doccia. Il serbatoio non è ben inserito. Inserire bene il serbatoio spingendolo a fondo. C è poca acqua e la pompa non aspira. Riempire il serbatoio. La miscela di caffè è macinata troppo fine o troppo pressata. La miscela è stata macinata troppo grossa. IT Verificare che il serbatoio sia ben inserito ed il livello non sia sceso sotto il minimo indicato dall apposito riferimento in rilievo sullo stesso. Ripetere le operazioni descritte nel paragrafo Fasi preliminari per l uso. Stasare con uno spillo eventuali incrostazioni formatesi nel foro dello stilo erogatore. Controllare che il livello dell acqua nel serbatoio sia regolare. Ripetere l operazione, immettendo nel filtro la giusta quantità di caffè. Sulla guarnizione della sede del portafiltro sono rimasti residui di caffè macinato. Provvedere a ripulire la guarnizione con uno stuzzicadenti o con una spugnetta. Detergere il portafiltro utilizzando le pastiglie COFFEE CLEAN di Ariete. Se nonostante l esecuzione delle operazioni sopra suggerite il problema permane, rivolgersi ad un Centro Assistenza Autorizzato. Ripulire con uno spillo il forellino otturato del filtro. Controllare il filtro contenente il macinato. Se i forellini sono otturati, vanno ripuliti con uno spazzolino, oppure mediante l uso di un attrezzo. Far erogare acqua bollente dal portafiltro con il filtro inserito senza la polvere, per sciogliere o rimuovere eventuali residui di caffè o impurità. Per una pulizia più accurata utilizzare le pastiglie detergenti COFFEE CLEAN seguendo le istruzioni riportate nella confezione. Azionare la macchina senza portafiltro facendo defluire l acqua. Se l acqua continua a non uscire uniformemente da tutti i fori recarsi al più vicino Centro di Assistenza Autorizzato per far eseguire la pulizia. Provare ad utilizzare miscele di caffè a grana più grossa. Pressare il caffè nel filtro con minor pressione. Per ottenere un caffè più concentrato e più caldo, si deve usare una miscela più finemente macinata. In ogni caso questo problema si elimina grazie al sistema Thermocream, che assicura sempre un caffè bollente ed una ricca crema, anche con caffè macinato grosso.
8 EN IMPORTANT INFORMATION Read the instructions carefully before use. We suggest you keep the original box, as our free-of-charge service does not cover transportation damage due to inadequate packaging of the product when sent to an Authorised Service Centre. Before connecting the appliance to the power supply, make sure that the voltage indicated on the plate on the bottom of the machine corresponds to the local network voltage. Do not lift the appliance from the water tank; instead use the cavities found at the base of the machine. The use of extension leads, which have not been authorized by the appliance manufacturer, may cause damage and accidents. Avoid putting excessive quantities of water into the tank. Do not use sparkling water (with added carbon dioxide). Never use the machine without water because the pump will burn out. The cable must not touch any hot parts of the machine. Unplug before any cleaning or maintenance operations. Do not leave the machine at a room temperature below 0 C because the water remaining in the boiler could freeze and cause damage. Before filling the tank with water, remember to always disconnect the appliance at the socket. This appliance is for domestic use only and must not be used for commercial or industrial purposes. Keep the machine out of reach of children when in use. Do not adjust the coffee grinder when it is functioning. Never introduce ground coffee in the coffee grinder, only coffee beans must be used. If the electric cable is damaged it must be replaced by the manufacturer or its Technical Assistance Service, or in any case by a person with similar qualifications. The appliance s external metallic parts must not be touched when the machine is functioning as it could cause burns. Never fill the water reservoir with hot or boiling water. Before cleaning the appliance always unplug if and allow it cool down. Clean exclusively with a non-abrasive cloth that has been slightly dampened with water, adding a few drops of mild, non-aggressive detergent (never use solvents that damage plastic) DO NOT IMMERSE THE APPLIANCE IN WATER OR OTHER LIQUIDS. Never let the live parts come into contact with water: this may cause a short circuit! Never direct the steam or hot water jet towards parts of the body; handle the steam/hot water spout with care: risk of scalding! Place the machine on a stable surface where it cannot be knocked over. Never use the appliance outdoors. Do not place the machine on very hot surfaces or near naked flames in order to prevent damage to the body. Choose a sufficiently well lit and clean environment, with an easily accessible electric socket. Unplug the appliance from the electricity supply immediately in the case of faults, defects or suspected defects after dropping. Never operate the appliance if defective. REPAIRS MAY ONLY BE CARRIED OUT BY AU- THORIZED ASSISTENCE SERVICE CENTRES. The manufacturer disclaims all responsibility for any damage caused by incorrect repair work. In the event that this appliance is to be disposed of it is suggested that the power chord is cut. It is also recommended that all potentially dangerous components are rendered harmless to prevent children hurting themselves when playing wit the apparatus. Do not leave the packing components near children because they are potentially dangerous. Do not expose the appliance to the atmospherical agents (rain, sun ). This appliance complies with the European community directive 89/336 CEE concerning electromagnetic compatibility. The maximum operating noise level for this appliance is 86 db(a). KEEP THESE INSTRUCTIONS IN A SAFE PLACE.
9 EN ARIETE coffee makers are for those who know how to enjoy the pleasures of life, beginning with a good cup of coffee. The innovative Thermocream device gives you hot and rich coffee shop espresso, right at home. In fact, Thermocream is designed with a filter that ensures coffee brewing at constant pressure. In this manner it is possible to enjoy very creamy coffee with an intense aroma and full-bodied flavour, without the necessity of pressing energetically, and by using whatever type of blend as long as it is not too fine. Ariete coffee makers also satisfy cappuccino lovers as they have a MAXI CAPPUCCINO attachment that allows you to obtain, in a few seconds, a rich and dense froth in less than ten seconds. Furthermore, the coffee is ready instantly with Ariete makers as they have an auto-priming system which allows a cup of coffee to be made immediately, even if the maker has not been used for a long time or after filling the water tank. Enjoy your coffee with Café Roma Deluxe Ariete! DESCRIPTION OF COMPONENTS A - Machine body B - Lock button of the coffee grinding regulator C - Tank cover D - Coffee beans tank, grinding regulator E - Boiler temperature gauge ( C and F) F - Water/steam lever G - Accessories box H - Water tank (capacity 1,5 lt MAX level) I - Tank filler flap L - Control panel M - Continuous flow device of ground coffee N - Dispenser with ground coffee measure O - MAXI-CAPPUCCINO attachment and stylus for water and steam supply P - Press Q - Water collection tray R - Coffee powder collection tray S - Cup grille T - Professional filter holder U - Thermocream Filter V - Silicon Ring W - Thermocream Disc CONTROLS DESCRIPTION 1 On/off light 2 Coffee temperature light 3 Steam temperature light 4 Dispenser filler light 5 On/off button 6 Coffee brewing button 7 Steam button 8 Dispenser filler device button SET UP - Remove the water tank (H) from the opening on the machine, fill with fresh natural water up to the Max mark (1.5 lt.), and refit it into its housing onto the body. In order to guarantee the correct operation of the appliance, push the tank down as far as it will go, Fig. 5. The tank may also be filled from the top, by pouring water through
10 EN the opening and after lifting the filler cap (I), Fig Plug the appliance into the mains. - Press the main switch (5) Fig. 2; the power light (1) will light up and light (2) will start blinking until the operating temperature has been reached. Lower the water/steam lever (Fig. 3 - F), and, at the same time, press the coffee brewing button (6) thus bleeding any air or water out of the circuit. Fill up at least a cupful of water. Lift the water/steam lever (F) back up and stop the brewing cycle by pressing the coffee button (6). IMPORTANT!: it is recommended that this operation be carried out every time the machine is started after a few days it has not been used. For the daily refilling of the water tank, lift the filler flap (I) and pour in fresh natural water through the opening (Fig. 4). - Introduce the coffee into the coffee beans tank (D) Max 230 gr. Fig. 6. Coffee may be ground coarse or fine, as per your personal preferences. To change the grinding level, press the stop button (B) and turn the coffee grinder clock or anticlockwise, following the graded scale, Fig. 7. THIS OPERATION MUST ONLY BE PER- FORMED WITH THE GRINDER OFF. CHOICE OF THE GROUND COFFEE SUPPLY DEVICE The appliance is provided with two interchangeable devices: 1) Continuous flow device (M) Fig. 1 for the coffee instantaneous grinding. Press the push button (M/a) situated under the ground coffee outlet with the filter ring inserted into the provided fork Fig. 8. 2) Dispenser/Measuring Device (N) Fig. 9. Keep the switch (8) Fig. 2 pressed until the ground coffee Dispenser is full: operate the Measuring Device lever once or twice, according to how many cups of coffee you wish to prepare, and keep the filter ring inserted into the fork. To release, pull the devices (M) or (N) in your direction. HOW TO BREW COFFEE Check the water level in the tank (H). Make sure that the water tank is correctly placed into its position. Measure the coffee in the filter ring Fig. 8 with the supply device that you have chosen and slightly press it Fig. 10. Tighten the filter holder firmly by ensuring it is securely fitted against the flange Fig. 14. If an excessive amount of ground coffee is placed into the filter, turning the filter holder may become difficult, and/or coffee may leak from the filter holder when drawn. The appliance will be ready for use, as soon as light (2) Fig. 2 stops blinking and stays lit. Then press the switch for the outflow of the coffee (6). Press it again (6) to stop the coffee outflow. The maximum dose for one coffee is 50 ml. Note: as with professional coffee machines, do not remove the filter ring when the supply switch is turned on; after having made the coffee gradually loosen the filter ring by turning it in a clockwise direction. The ARIETE Thermocream system was specially designed to best meet all of the consumer s needs, and is made up of two components: the Thermocream filter (U), fitted with a single drawing spout (Fig. 13), which helps the formation of cream, and the Thermocream plastic disc (W) with the silicon ring (V). Cleaning the filter (U) often, will help guaranteeing its preservation in time. HOW TO MAKE A CAPPUCCINO Note: before using MAXI CAPPUCCINO, make sure you detached the filter holder from its housing. To brew a cappuccino, or a hot chocolate, or to simply heat up any drink, press the steam button (7), Fig. 2. Light (2) will go off and light (3), on the steam button, will start blinking; as soon as light (3) stops blinking and stays lit, the appliance is ready to produce steam. Lower the water/steam lever (F), Fig.3, after placing a glass underneath the Maxi Cappuccino stylus (O), Fig. 12. A small amount of water from the nozzle will be immediately followed 10
11 11 EN by strong jet of steam. Stop the steam delivery by lifting the lever (F) back up, Fig. 3, position a jug containing whipping milk underneath the stylus, reopen the steam flux by slowly lowering the lever and immerse the stylus deep into the milk: in a few seconds you will notice a thick, creamy foam rising up the jug, Fig. 15. Once the operation is completed, deactivate the steam function by pressing the steam button a second time (7). The steam light (3) will go off. HOW TO MAKE TEA OR TISANES After performing the operations described in the PRELIMINARY STEPS FOR USE chapter, place a cup underneath the Maxi Cappuccino tube (O); lower the water/steam lever (F) and press the coffee (6) and steam (7) buttons at the same time. Light (2) will go off and light (3) will start blinking. Water will start flowing out of the Maxi Cappuccino tube (O). To stop the flow, press the coffee button (6): light (3) will go off and light (2) will remain lit. Lift the steam lever; the machine is now ready for use again. REUTILIZATION FOR COFFEE To switch from steam to coffee, you must let the appliance cool down: press the coffee brewing button (6) and let at least one cupful of water out of the filter holder attachment. Wait for the temperature light (2) to go off again, before brewing coffee. USEFUL TIPS FOR OBTAINING A GOOD ITALIAN ESPRESSO The ground coffee in the filter holder has to be pressed lightly. Whether the coffee is stronger or weaker depends on the degree the coffee is ground, the quantity put into the filter holder and the pressing. Just a few seconds are needed for the coffee to flow down into the cups. If the dispensing time is longer, this means that the coffee is ground too fine or that the coffee put into the filter holder has been pressed too much. REGULAR CLEANING CAUTION: all cleaning operations described below must be performed with the machine turned off. Cleaning the filter containing the grounds. Check that the internal holes are not clogged and if so, clean them with a small brush. Check that the hole underneath is not clogged and if so, clean it with a pin (Fig. 13) and let boiling water run through the filter holder, by placing the filter in position without any coffee or impurity. We suggest you clean the filter (U) carefully every 3 months using ARIETE COFFEE CLEAN pads, available from your nearest dealer or Authorised Service Centre, and following the instructions given in the package. Cleaning the filter holder seat. With time, coffee residues may accumulate on the filter holder seat; these may be removed with a toothpick, a sponge, or by letting water run through without fitting the filter holder. Cleaning the MAXI CAPPUCCINO device. Perform this operation when the chrome-plated pipe is cold so as to prevent burns. Unscrew the device (O) from the small pipe and wash it with running water. The small pipe can be cleaned with a non-abrasive cloth. Screw the cappuccino maker back on as far as it will go. If necessary, clean the small steam outlet hole again with a pin. After use, always let the steam nozzle run for a few seconds so to free the outlet from any possible residue. Cleaning the tank. Periodically clean the inside of the tank with a sponge or damp cloth. DECALCIFICATION Our experience and the special design of your appliance are such that no limescale or calcium compound will form. However, should your coffee machine fail to work properly as a result of the frequent use of hard, highcalcium, water, you may perform a decalcification process to restore its operational efficiency. For this purpose you must use exclusively Ariete s, citric acid-based decalcifying products (NOCAL). This product may be easily ordered through the customer service address provided. Other decalcifying products although citric acid-based may contain chemical additives which may damage the internal parts of your coffee machine; Ariete declines
12 EN any responsibility over damages caused by the use of such products. Should you need to decalcify your appliance, please follow the instructions which come with the decalcifying product. TROUBLESHOOTING PROBLEMS CAUSE SOLUTIONS The coffee maker does not Air has probably entered the Make sure the tank is properly inserted and supply boiling water for tisanes circuit and deactivated the pump. that the water is not below the minimum level. Repeat the operations described in the Preliminary phases for use paragraph. The coffee maker does not supply steam. Coffee overflowing from the edges of the filter ring The coffee is not supplied or flows too slowly. The coffee is too watery and cold. There is little water and the pump does not suck it up. The steam exit hole on the dispenser wand is clogged. Probably an excess amount of ground coffee has been placed in the filter ring preventing the filter ring from being correctly tightened into its housing. The outlet hole of the filter containing the grounds is obstructed. It is possible that the scarce outflow of coffee also depends on the insufficient emission of water from the perforated showerhead type disc in the filter ring housing. In fact it is possible that after a few months of use, fat or lime residues can obstruct the disc. The tanks is not inserted well. Fit the tank securely by pushing it as far as it will go. There is little water and the pump does not suck it up. Fill the tank. The coffee blend is ground too fine, or excessively tampered. The blend has been ground too coarsely. Use a pin to unclog the wand. Make sure the water level in the tank is normal. Repeat the operation placing the correct quantity of coffee in the filter. Residues of coffee grounds have remained on the seal. Clean the seal with a toothpick or a sponge. Clean the filter holder by using Ariete s COFFEE CLEAN pads. If the problem persists after carrying out the above operations, go to an Authorized Assistance Center. Clean the obstructed hole of the filter with a pin. Check the filter containing the ground coffee. If the holes are blocked they should be cleaned using a small brush or using a suitable tool. Let boiling water run through the filter holder to dissolve or remove any possible residue of coffee or impurity. For best results, use COFFEE CLEAN pads following the instructions given inside the package. Operate the machine without the filter ring, allowing the water to flow. If water is still not flowing uniformly through each hole, please contact your nearest Authorised Service Centre to have your appliance cleaned. Try using coarser coffee blends. Tamper coffee inside the filter using less pressure. A more finely ground blend must be used to obtain a more concentrated and hotter coffee. Anyhow, this problem is easily solved thanks to the Thermocream system, which always guarantees hot coffee accompanied by a reach cream, even with coarsely ground beans. 12
13 REMARQUES IMPORTANTES Lire attentivement les instructions avant l utilisation. Il est conseillé de conserver l emballage d origine vu que l assistance gratuite ne joue pas pour les dommages causés par un emballage du produit non adéquat lors de l expédition à un service après-vente agréé. Avant de brancher l appareil au réseau d alimentation, contrôler que la tension indiquée sur la plaquette placée sous la machine corrisponde bien à celle du réseau local. Ne pas soulever l appareil en le prenant par le bac à eau mais utiliser les creux de la base d appui de la machine prévus à cet effet. L utilisation de rallonges électriques non autorisées par le fabricant de l appareil peut causer des dommages et provoquer également des accidents. Eviter de verser dans le réservoir une quantità excessive d eau. Ne pas utiliser d eau gazeuse Ne pas utiliser la machine sans eau pour ne pas griller la pompe. Le cordon ne doit pas toucher les parties chaudes de la machine. Débrancher la prise de courant avant chaque intervention de nettoyage ou d entretien. Ne pas stocker la machine à une température inférieure à 0 C, car l eau restante dans la chaudière pourrait geler et provoquer des dégâts. Avant d effectuer l opération de remplissage du réservoir d eau, débrancher l appareil de la prise de courant. L appareil est destiné seulement à une utilisation domestique et ne doit en aucun cas être servir à des fins commerciales ou industrielles. Ne jamais laisser la machine en marche à la portée des enfants ou des personnes ne possédant pas les capacités requises. Ne jamais régler le moulin à café pendant son fonctionnement. Ne jamais introduire de café moulu dans le moulin, mais exclusivement du café en grains. Le cordon d alimentation endommagé doit être remplacé par le constructeur ou par son service Après-vente ou dans tous les cas par une personne ayant une qualification équivalente, de manière à éviter tout risque. Les parties métalliques extérieures de l appareil ne doivent pas être touchées, avec l appareil en fonction sous peine de brûlures. Ne jamais remplir le réservoir d eau à l eau chaude ou bouillante. Après avoir débranché la prise d alimentation et lorsque les parties chaudes ont refroidi, l appareil doit être nettoyé exclusivement avec un linge non abrasif à peine humide et seulement quelques gouttes de détergents neutres non agressifs (ne pas utiliser de solvants qui détériorent le plastique). NE JAMAIS TREMPER L AP- PAREIL DANS L EAU NI DANS TOUT AUTRE LIQUIDE. Ne jamais mettre les parties sous tension en contact avec l eau: cela pourrait engendrer un court-circuit! Ne jamais diriger le jet de vapeur ou d eau chaude vers les parties du corps; manipuler avec précaution le tube vapeur/eau; il y a risque de brûlures! Placer la machine sur un plan stable où il n y a pas risque de la renverser. Ne pas utiliser l appareil en plein air. Ne pas positionner la machine sur des superficies très chaudes ou près de flammes libres pour éviter ainsi que la carrosserie puisse être endommagée. Choisir un endroit assez éclairé, propre et avec une prise de courant facilement accessible. En cas de pannes, défauts ou défaut suspect après une chute, débrancher immédiatement la prise de l appareil défectueux. Ne jamais mettre en marche l appareil défectueux. LES REPARATIONS PEUVENT ÊTRE EFFEC- TUEES EXCLUSIVEMENT PAR LES CENTRES D ASSISTANCE AGREES. On décline toute responsabilité pour les éventuels dégâts provoqués par des interventions de réparation effectuées de manière erronée. Lorsqu on décidera de jeter cet appareil, il est recommandé de le mettre hors d usage en coupant le câble d alimentation. Il est également recommandé de protéger les parties susceptibles de constituer un danger spécialement pour les enfants qui pourraient se servir de l appareil pour jouer. Les éléments de l emballage ne doivent pas être laissés à la portée des enfants car représentent une source de danger. Ne pas laisser l appareil exposé aux agents atmosphériques (pluie, soleil ect..) Cet appareil est conforme à la directive 89/336 CEE concernant la compatibilité électromagnétique. 13 FR
14 FR L émission de bruit de la machine par rapport au poste de travail est de 86 db(a). TOUJOURS CONSERVER CES INSTRUCTIONS Cet appareil est conforme à la directive 89/336 CEE concernant la compatibilité électromagnétique. Les machines à café ARIETE sont idéales pour tous ceux qui savent apprécier les plaisirs de la vie, à commencer par un bon petit café. Grâce au dispositif Thermocream, on peut toujours obtenir, chez soi, un bon café chaud et crémeux comme au bar. En effet, le dispositif Thermocream est muni d un filtre qui assure le débit du café à une pression constante. De cette manière, on peut déguster un café très crémeux, d un arôme très intense et d une saveur pleine et forte, sans pour cela avoir besoin d exercer de pression énergique et seulement en utilisant n importe quel mélange de café pas trop fin. Les machines à café Ariete sont en mesure de satisfaire également les amateurs de cappuccino car grâce à son dispositif MAXI CAPPUCCINO, il est possible d obtenir, en quelques secondes, une crème riche et dense. En outre, le café est toujours prêt avec les machines Ariete car elles sont équipées d un système d auto-amorçage permettant de préparer tout de suite le café même en cas de longue inactivité de la machine et seulement après avoir rempli le réservoir d eau. Bon café à tous avec Café Roma Deluxe ARIETE. DESCRIPTION DES COMPOSANTS A - Corps machine B - Poussoir de blocage du régulateur de la mouture C - Couvercle récipient à café D - Récipient café en grains, régulateur de mouture E - Thermomètre température chaudière ( C e F) F - Levier eau/vapeur G - Compartiment des accessoires H - Réservoir d eau (capacité lt. 1,5 niveau MAX.) I - Volet de remplissage du réservoir L - Panneau des commandes M - Dispositif débit continu café moulu N - Dispositif Dispenser avec doseur café moulu O - Dispositif MAXI CAPPUCCINO et distributeur eau-vapeur P - Doseur Q - Tiroir de récupération de l eau R - Tiroir de récupération de la poudre de café S - Grille d appui des tasses T - Porte filtre professionnel U - Filtre Thermocream V - Bague en silicone W - Disque Thermocream DESCRIPTION DES COMMANDES 1 Voyant allumage 2 Voyant température du café 3 Voyant température de la vapeur 4 Voyant remplissage Dispenser 5 Touche de mise en marche 6 Interrupteur débit du café 7 Interrupteur vapeur 8 Touche remplissage dispositif Dispenser 14
15 FR MISE EN MARCHE - Enlever le réservoir à eau (H) du compartiment de la machine, le remplir avec de l eau naturelle froide jusqu au niveau Max. (lt. 1,5), et le remettre dans le compartiment du corps de machine. Pour assurer un fonctionnement correct de la machine, bien appuyer à fond sur le réservoir, Fig. 5. Le réservoir peut également être rempli par le haut, en versant l eau dans le conteneur prévu à cet effet, après avoir soulevé le volet (I) Fig Introduire la fiche dans la prise de courant. - Appuyer sur l interrupteur général (5) Fig. 2; le voyant marche reste allumé (1) et le voyant (2) commence à clignoter jusqu à ce que la bonne température soit atteinte; après quoi, la lumière reste fixe. Baisser le levier eau/vapeur (Fig. 3 - F), et dans le même temps, appuyer sur l interrupteur de débit du café (6) en faisant sortir l air ou l eau contenue dans le circuit. Remplir au moins une tasse de cette eau. Relever le levier eau/vapeur (F) et arrêter le débit de café en appuyant sur la touche (6). IMPORTANT!: Il est conseillé de répéter cette opération toutes les fois que la machine est rallumée après plusieurs jours d inactivité. Pour un remplissage normal du réservoir lever le volet (I) et verser de l eau naturelle froide dans le conteneur prévu à cet effet. (Fig. 4). - Introduire du café en grains dans le récipient (D) Max. 230 gr. Fig. 6. Le café peut être moulu plus ou moins finement en fonction du degré de mouture désiré. Pour changer le degré de mouture, appuyer sur le bouton de blocage (B) et tourner le moulin à café vers la droite ou la gauche en fonction de l échelle numérotée Fig. 7. L OPÉRATION DOIT ABSOLUMENT ETRE EFFECTUEE AVEC LE MOULIN A CAFE ETEINT. CHOIX DU TYPE DE DISPOSITIF DE DISTRIBUTION DU CAFÉ MOULU La machine est munie de deux dispositifs interchangeables: 1) Dispositif à «Débit Continu» (M) Fig. 1, permet la mouture instantanée du café. Appuyer sur le bouton (M/a) placé sous la sortie du café moulu avec le porte-filtre engagé dans la fourche Fig. 8. 2) Dispositif «Dispenser/Doseur» (N) Fig. 9. Pour remplir le Dispenser de café moulu, appuyer sur l interrupteur (8) Fig. 2 jusqu au remplissage; actionner le levier du Doseur une ou deux fois selon le nombre de tasses voulues en tenant le porte-filtre engagé dans la fourche. Pour le retrait, tirer le dispositif vers soi (M) ou (N). COMMENT FAIRE LE CAFE Contrôler le niveau de l eau dans le réservoir (H). Vérifier que le réservoir soit mis en place correctement dans son siège. Doser le café dans le porte-filtre Fig. 8 avec le dispositif de débit choisi et le tasser légèrement à l aide du presseur Fig. 10. Bien serrer le porte-filtre en vérifiant de l avoir correctement accroché à la bride Fig. 14. Si on a mis une quantité excessive de poudre de café à l intérieur du filtre, la rotation du porte-filtre peut se montrer difficile et /ou des fuites provenant du porte-filtre peuvent apparaître durant la distribution du café. La machine est prête à l emploi lorsque le voyant (2) Fig. 2 cesse de clignoter et que la lumière reste fixe. Appuyer ensuite sur l interrupteur de débit du café (6). Pour arrêter la distribution, appuyer à nouveau sur l interrupteur (6). La dose maximum pour un café est de 50ml. N.B.: comme pour les machines à café professionnelles, ne pas ôter le portefiltre quand l interrupteur de distribution (6) est enclenché; une fois le café fait, dévisser progressivement le porte-filtre en le tournant dans le sens des aiguilles d une montre. Le système Thermocream d ARIETE a été spécialement étudié pour satisfaire au mieux les exigences du consommateur. Il est composé de deux éléments: le filtre Thermocream (U) muni d un seul bec de sortie du café (Fig. 13) ce qui favorise la formation de la crème, et le disque en plastique Thermocream (W) avec la bague en silicone (V). Un nettoyage constant du filtre (U) favorise son maintient parfait au cours du temps. 15
16 FR COMMENT FAIRE UN CAPPUCCINO Attention! Avant d utiliser MAXI CAPPUCCINO assurez-vous d avoir décroché le porte-filtre de son siège. Pour faire un cappucino, un chocolat chaud ou simplement réchauffer une autre boisson, appuyer sur l interrupteur de production de vapeur (7) Fig. 2. Le voyant (2) s éteint et le témoin lumineux (3) du bouton vapeur commence à clignoter ; lorsque le voyant (3) cesse de clignoter pour devenir fixe, la machine est prête à émettre la vapeur. Baisser le levier eau/vapeur (F) Fig. 3, après avoir placé un verre sous le tuyau Maxi Cappuccino (O) Fig. 12. Il sort d abord une petite quantité d eau puis juste après, une gros jet de vapeur. Interrompre alors la sortie de vapeur et, en relevant le levier (F) Fig. 3, mettre le récipient avec le lait à monter sous le tuyau et rouvrir le flux de vapeur en baissant progressivement le levier. Plonger complètement le tuyau dans le lait : en peu de temps, on peut voir la formation d une mousse dense et crémeuse Fig. 15. Une fois l opération termine, désactiver la fonction vapeur en réappuyant sur la touche vapeur (7). Le témoin vapeur (3) s éteint. COMMENT FAIRE LE THÉ OU LES INFUSIONS Après avoir suivi les opérations décrites au chapitre PHASES PRÉLIMINAIRES À L EMPLOI, placer une tasse sous le bec Maxi Cappuccino (O); baisser le levier eau/vapeur (F) et en même temps, appuyer sur les interrupteurs (6) de débit café et vapeur (7). Le voyant (2) s éteint et le témoin (3) commence à clignoter. L eau commence à sortir du bec Maxi Cappuccino (O). Pour interrompre le débit, appuyer sur l interrupteur du café (6): le témoin (3) séteint et le voyant (2) s allume fixement. Relever le levier vapeur; la machine est à nouveau prête à l emploi. RETOUR A L EMPLOI CAFÉ Pour passer de la production de vapeur à celle du café, il faut laisser refroidir la machine : appuyer sur l interrupteur du café (6) et faire sortir au moins une tasse d eau du siège d accrochage du porte-filtre. Attendre que le voyant lumineux (2) s éteigne avant de faire un café. CONSEILS UTILES POUR OBTENIR UN BON CAFE ESPRESSO A L ITALIENNE Le café moulu du porte-filtre doit être légèrement pressé. Un café plus ou moins fort dépend du degré de mouture, de la quantité mise dans le porte-filtre et de la façon dont il a été pressé. Il suffit de quelques secondes pour que le café descende dans les tasses. Si le temps est supérieur cela signifie que la mouture est trop fine ou que le café moulu a été pressé de façon excessive. NETTOYAGES PERIODIQUES ATTENTION: toutes les opérations de nettoyage indiquées ci-dessous doivent être effectuées à machine éteinte. Nettoyage du filtre contenant la mouture. Vérifier que les perforations internes ne sont pas bouchées et dans le cas contraire, les nettoyer avec une brosse. Vérifier que le trou situé en dessous n est pas bouché et dans le cas contraire le nettoyer avec une aiguille (Fig. 13). Faire couler de l eau bouillante par le porte-filtre avec le filtre inséré sans poudre, afin de dissoudre et nettoyer les éventuels résidus de café ou impuretés. Il est conseillé de nettoyer soigneusement le filtre (U) environ tous les 3 mois avec les pastilles détergentes COFFEE CLEAN d ARIETE que l on trouve dans les points de vente et Service Après-Vente Agréés. Suivre les instructions reportées sur le paquet. Nettoyage du siège du porte-filtre. Après diverses utilisations, on pourrait voir apparaître la sédimentation de marc de café dans le siège d accrochage du porte-filtre. On peut l enlever à l aide d un cure-dent, d une petite éponge ou en laissant couler l eau sans avoir introduit le porte-filtre. Nettoyage du dispositif MAXI CAPPUCCINO. Effectuer l opération lorsque le tube chrômé est froid pour éviter les brûlures. Dévisser le dispositif (O) du tube et le laver à l eau courante. Le tube peut être nettoyé avec un linge non abrasif. Revisser l appareil à cappucino jusqu au bout. Nettoyer si nécessaire le trou de sortie de la vapeur avec une aiguille. Après chaque utilisation, laisser évacuer de la vapeur pendant quelques secondes afin de 16
17 libérer le trou d éventuels résidus. Nettoyage du réservoir. Il est conseillé de nettoyer périodiquement l intérieur du réservoir à l aide d une éponge ou d un linge humide. DÉCALCIFICATION Grâce à notre expérience et aux techniques de construction de la machine à café, aucun dépôt de calcaire ne se forme dans l appareil. Si, malgré tout, après un certain temps, le fonctionnement de l appareil devait être compromis suite à l utilisation fréquente d eau dure et très calcaire, on peut procéder à la décalcification de la machine pour résorber le disfonctionnement. Pour cela, n utiliser que le produit décalcifiant Ariete à base d acide cytrique (NOCAL). Ce produit peut facilement être commandé auprès des services après-vente indiqués. Les produits décalcifiants d une autre production (même à base d acide cytrique) peuvent contenir des additifs chimiques pouvant causer une détérioration des composants internes de la machine à café. Dans ce cas, Ariete n assume aucune responsabilité. En cas de besoin de décalcification, observer les indications de la feuille d instructions du produit décalcifiant. FR 17
18 FR La machine ne débite pas d eau bouillante pour les infusions. La machine ne débite pas de vapeur. COMMENT REMEDIER AUX INCONVENIENTS SUIVANTS PROBLEMES CAUSES SOLUTIONS Il est probable que de l air soit entré dans le circuit et cela ait pu désamorcer la pompe. Ecoulement de café des bords du porte-filtre. La distribution du café n a pas lieu ou a lieu trop lentement. Le café est trop aqueux et froid. Il y a peu d eau et la pompe n aspire pas. Trou de sortie de la vapeur du tuyau bouché. Il est probable que l on ait versé une quantité excessive de café moulu dans le portefiltre, ce qui a empêché de serrer à fond le porte-filtre dans son siège. Le filtre contenant la mouture a l orifice de sortie bouché. Il est possible que le mauvais débit du café dépende également de l écoulement insuffisant d eau du disque troué à douche dans le porte-filtre. Il est possible, en effet, qu après quelques mois d utilisation, les restes de graisse ou de calcaire puissent boucher les orifices du disque troué à douche. Le réservoir n est pas bien inséré. Le réservoir n est pas bien inséré. Introduire convenablement le réservoir en le poussant à fond. Il y a peu d eau et la pompe n aspire pas. Remplir le réservoir. Le mélange de café a été trop finement moulu ou trop pressé. Le grain de la mouture est trop gros. Vérifier que le réservoir est bien introduit et que le niveau ne soit pas descendu sous le niveau minimum indiqué par la référence appropriée en relief. Déboucher à l aide d une épingle les incrustations éventuelles qui se sont formées dans le trou de la petite tige. Répéter l opération, en versant dans le filtre la quantité correcte de café. Sur le joint du siège du porte-filtre, il y a des restes de café moulu. Nettoyer le joint avec un cure-dent ou une petite éponge. Nettoyer le porte-filtre avec les pastilles COFFEE CLEAN d Ariete. Si malgré l exécution des opérations suggérées cidessus, le problème persiste, s adresser à un Centre d Assistance Agrée. Nettoyer à l aide d une aiguille l orifice bouché du filtre. Contrôler le filtre contenant le café moulu. Si les trous sont colmatés, il faut les nettoyer avec une brosse ou, à l aide d un outil. Faire couler de l eau bouillante par le porte-filtre avec le filtre inséré sans poudre, afin de dissoudre et nettoyer les éventuels résidus de café ou impuretés. Pour plus de propreté, utiliser les pastilles détergentes COFFEE CLEAN en suivant les instructions reportées sur le paquet. Actionner la machine sans le porte-filtre en laissant l eau s écouler. Si l eau continue à ne pas sortir des trous de façon uniforme, se rendre dans le service après-vente agréé le plus proche pour faire effectuer un nettoyage. Essayer d utiliser un café à plus gros grains. Presser le café dans le filtre en exerçant une pression plus faible. Pour obtenir un café plus concentré et plus chaud, utiliser un mélange de grain fin. Ce problème est de toute façon éliminé grâce au système Thermocream, qui assure un café toujours bouillant et crémeux, même avec un café à grain moulu trop gros. 18
19 WICHTIGE HINWEISE Die Bedienungsanleitung vor Gebrauch aufmerksam lesen. Wir empfehlen die Originalverpackungen aufzubewahren, da ein Gratis-Kundendienst nicht für Schäden vorgesehen ist, die durch falsche Verpackung bei der Spedition zum Kundendienst entstehen. Bevor das Gerät an das Stromnetz angeschlossen wird, muss kontrolliert werden, ob die Netzspannung den Angaben auf dem Typenschild des Geräts entspricht. Das Gerät nicht am Wasserbehälter hochheben sondern die entsprechenden Griffmulden am Geräte-Untersatz benutzen. Der Einsatz von nicht vom Hersteller zugelassenen Verlängerungskabeln kann Schäden und Unfälle verursachen. Niemals zuviel Wasser in den Wasserbehälter füllen. Kein Sprudelwasser verwenden (mit hinzugefügtem Kohlendioxyd). Die Maschine nie ohne Wasser verwenden, da sonst die Pumpe durchbrennen könnte. Das Elektrokabel darf nicht mit heißen Flächen der Maschine in Berührung kommen. Vor Reinigungs- oder Wartungsarbeiten stets den Stecker aus der Steckdose ziehen. Nie die Maschine in Räumen mit Temperaturen unter 0 C aufstellen. Das Restwasser im Heizsystem könnte gefrieren und Schäden verursachen. Bevor der Wasserbehälter gefüllt wird, stets den Stecker aus der Steckdose ziehen. Das Gerät ist nur für den Hausgebrauch vorgesehen und darf nicht für gewerbliche oder industrielle Zwecke verwendet werden. Das eingeschaltete Gerät von Kindern oder Behinderten fernhalten. Die Kaffeemühle nie während des Betriebs einstellen. Es darf auf keinen Fall Kaffeepulver in die Kaffeemühle gegeben werden. Nur Kaffeebohnen verwenden. Ist das Stromkabel beschädigt, muss es ausgetauscht werden. Um jedes Risiko zu vermeiden, bringen Sie in diesem Fall das Gerät zum Hersteller, zum Kundendienst oder zu einem Fachelektriker. Bei eingeschalteter Maschine nie die äußeren Metallteile berühren. Verbrennungsgefahr. Den Wasserbehälter nie mit heißem oder kochendem Wasser auffüllen. Nachdem der Stecker aus der Steckdose gezogen worden ist und die heißen Teile abgekühlt sind, kann die Maschine mit einem weichen, nicht kratzenden und leicht feuchtem Tuch gereinigt werden. Es können einige Tropfen mildes Spülmittel verwendet werden (nie Lösungsmittel benutzen, die Plastikteile beschädigen können). DIE MASCHINE NIE IN WASSER ODER ANDERE FLÜSSIGKEITEN TAUCHEN. Die unter Spannung stehenden Geräteteile dürfen nicht in Kontakt mit Wasser kommen: es besteht Kurzschlussgefahr! Den Dampfstrahl oder das heiße Wasser nie auf Körperteile richten; Vorsicht beim Umgang mit dem Dampfröhrchen/ Heißwasserröhrchen: Verbrühungsgefahr! Das Gerät auf einer festen Unterlage aufstellen, wo es nicht kippen kann. Das Gerät darf nicht im Freien benutzt werden. Um zu vermeiden, dass das Gehäuse beschädigt wird, das Gerät nie auf heiße Flächen oder in der Nähe von offenen Flammen aufstellen. Zum Aufstellen einen ausreichend beleuchteten und sauberen Platz mit einer leicht zugänglichen Steckdose wählen. Bei Störungen, Defekten oder Verdacht auf Defekte nach Herunterfallen des Geräts sofort den Stecker aus der Steckdose ziehen. Defekte Geräte nie in Betrieb nehmen. Reparaturen dürfen nur von autorisierten Kundendienststellen vorgenommen werden. Für falsch ausgeführte Reparaturen wird keine Haftung übernommen. Soll das Gerät als Abfall entsorgt werden, empfehlen wir es durch Abschneiden des Anschlusskabels unbrauchbar zu machen. Wir empfehlen außerdem die Geräteteile unschädlich zu machen, die besonders für Kinder beim Spielen mit dem Gerät gefährlich sein könnten. Die Verpackungsteile von Kindern fernhalten, da diese eine mögliche Gefahrenquelle bilden. Das Gerät nicht Witterungseinflüssen ausgesetzt lassen (Regen, Sonne usw...). Dieses Gerät entspricht der EWG-Richtlinie 89/336 (elektromagnetischer Verträglichkeit). Die arbeitsplatzbezogene Geräuschemission des Gerätes beträgt 86 db (A). 19 DE
20 DE GEBRAUCHSANLEITUNG GUT AUFHEBEN Die Kaffeemaschinen von ARIETE sind für Genießer gemacht, die das Leben schon ab einer guten Tasse Kaffee genießen können. Dank der Thermocream Scheibe machen Sie sich Zuhause eine Tasse heißen und cremigen Kaffee, wie Sie ihn sonst nur aus der Bar kennen. Die Thermocream Scheibe ist mit einem Filter ausgestattet, der den Kaffee mit gleichbleibendem Druck abgibt. Auf diese Weise kann man einen sehr cremigen Kaffee, mit kräftigem Aroma und vollem Geschmack genießen, ohne dass das Kaffeepulver stark gepresst werden muss. Es können alle nicht zu fein gemahlenen Kaffeemischungen benutzt werden. Die Kaffeemaschinen von Ariete sind mit der MAXI-CAPPUCCINO Vorrichtung ausgestattet und stellen so auch die Cappuccino-Liebhaber zufrieden, weil sie in wenigen Sekunden reichlich und festen Schaum herstellen können. Mit den Kaffeemaschinen von ARIETE ist der Kaffee sofort fertig, weil diese mit einem automatischen Ventil ausgestattet sind, das eine schnelle Kaffeezubereitung auch nach längerer Abschaltzeit oder nach dem Auffüllen des Wasserbehälters ermöglicht. Ein guter Kaffee für alle mit Café Roma Deluxe Ariete! BESCHREIBUNG DER BAUTEILE A - Gehäuse der Kaffeemaschine B - Blockierung Einstellung Kaffeemühle C - Deckel Kaffeebehälter D - Behälter Kaffeebohnen, Einstellung Kaffeemühle E - Heizkessel-Thermometer ( C und F) F - Wasser-/ Dampfhebel G - Zubehörfach H - Wasserbehälter (Inhalt max. 1,5l) I - Klappe zum Füllen des Behälters L - Schalttafel M - Zuführung von Kaffeepulver N - Vorratsbehälter mit Dosiervorrichtung O - MAXI CAPPUCCINO und Wasser- und Dampfröhrchen P - Drücker Q - Wasser-Auffangbehälter R - Kaffeesatz-Auffangbehälter S - Abstellgrill für Tassen T - Professioneller Filterhalter U - Thermocream Filter V - Silikonring W - Thermocream Scheibe BESCHREIBUNG DER SCHALTER 1 Einschalt-Kontrolllampe 2 Kontrolllampe Kaffeetemperatur 3 Kontrolllampe Dampftemperatur 4 Kontrolllampe Dispenser-Füllstand 5 Ein-Ausschalter 6 Schalter Kaffeeausgabe 7 Dampf-Schalter 8 Taste zum Füllen des Dispensers 20
21 INBETRIEBNAHME - Den Wasserbehälter (H) aus dem Fach am Gerät herausnehmen, mit kaltem Leitungswasser bis zum Höchstfüllstand (Max.) (1,5 Liter) füllen und dann wieder in das Fach am Gerätegehäuse einsetzen. Damit das Gerät richtig funktioniert, muss der Behälter fest bis zum Anschlag mit Druck eingesetzt werden (Fig. 5). Der Behälter kann auch von oben gefüllt werden. Dazu zuerst die Klappe (I) (Fig. 4) anheben und dann das Wasser in das Fach gießen. - Den Stecker in die Steckdose stecken. - Hauptschalter (5) Fig. 2 abdrücken: Einschaltkontrollampe (1) leuchtet dauernd, und Lampe (2) blinkt bis zum Erreichen der korrekten Temperatur. Danach leuchtet sie dauernd. Den Wasser-/ Dampfhebel (Fig. 3 F) runterdrücken und gleichzeitig den Schalter Kaffeeausgabe (6) drücken, so dass eventuell im Kreislauf befindliche Luft oder Wasser austritt. Mindestens eine Tasse mit diesem Wasser füllen. Den Wasser-/ Dampfhebel (F) wieder hochstellen und durch erneutes Drücken der Taste (6) die Kaffeeausgabe unterbrechen. WICHTIG! Wiederholen Sie diesen Vorgang jedesmal dann, wenn die Kaffeemaschine mehrere Tage nicht benutzt wurde. Zum normalen Auffüllen des Wasserbehälters die Klappe (I) anheben und kaltes Leitungswasser in das entsprechende Fach (Fig. 4) gießen. - Kaffeebohnen in den Behälter (D) max. 230 g einfüllen (Fig. 6). Entsprechend dem gewünschten Mahlgrad können die Kaffeebohnen mehr oder weniger fein gemahlen werden. Zum Einstellen des Mahlgrades die Sperrtaste (B) drücken und das Mahlwerk entsprechend der nummerierten Skala nach rechts oder links drehen (Fig. 7). DIE EINSTELLUNG DARF AUSSCHLIESSLICH BEI AUSGESCHALTETEM MAHLWERK VORGENOMMEN WERDEN. AUSWAHL DES TYPS DER AUSGABEVORRICHTUNG FÜR DAS KAFFEEPULVER Das Gerät ist mit zwei untereinander austauschbaren Vorrichtungen ausgestattet. 1) Vorrichtung mit kontinuierlicher Zuführung (M), Fig. 1 die Kaffeepulver zuführt, das jedes Mal direkt gemahlen wird. Den Schalter (M/a) drücken, der sich unter dem Auslass für das Kaffeepulver befindet. Der Filterhalter muss sich dabei in der Gabel Fig. 8 befinden. 2) Vorratsbehälter/ Dosiervorrichtung (N) Fig. 9. Zum Auffüllen des Vorratsbehälters den Schalter (8) Fig. 2 solange drücken, bis der Behälter gefüllt ist. Den Hebel der Dosiervorrichtung einmal oder zweimal (je nach Anzahl der Tassen Kaffe, die sie zubereiten wollen) betätigen. Der Filterhalter muss sich dabei in der Gabel befinden. Zum Austausch müssen Sie die Vorrichtung (M) oder (N) nach vorne ziehen. EINEN KAFFEE ZUBEREITEN Den Wasserstand im Wasserbehälter überprüfen (H). Kontrollieren ob der Wasserbehälter richtig angebracht ist. Kaffeepulver mit der Ausgabevorrichtung in den Filterhalter Fig. 8 füllen, den Sie ausgewählt haben. Das Kaffeepulver leicht mit dem Drücker Fig. 10 andrücken. Sicherstellen, dass der Filterhalter gut in die Flansch eingehakt ist und dann richtig festziehen (Fig. 14). Wird zuviel Kaffeepulver in der Filter eingefüllt, kann es sein, dass sich der Filterhalter nur schwer drehen lässt bzw. bei der Kaffeeabgabe Kaffee aus dem Filterhalter austritt. Sobald die Kontrollampe (2) Fig. 2 von Blink- auf Dauerlicht wechselt, ist die Maschine betriebsbereit. Anschließend kann der Schalter zur Kaffeeausgabe (6) gedrückt werden. Zur Beendigung der Kaffeeausgabe (6) den Schalter erneut abdrücken. Höchstmenge für einen Kaffee: 50 ml. ANMERKUNG: Wie bei professionellen Kaffeemaschinen den Filterhalter nie abnehmen, wenn der Schalter zur Kaffeeausgabe (6) eingeschaltet ist. Nach der Kaffeezubereitung den Filterhalter langsam durch Drehen in Uhrzeigersinn lösen. Das Thermocream System von ARIETE ist so entwickelt worden, dass die Ansprü- 21 DE
22 DE che der Kunden am besten befriedigt werden können. Das System besteht aus zwei Elementen: der Filter Thermocream (U), der nur mit einer einzigen Kaffee-Austrittsöffnung ausgestattet ist (Fig. 13), die die Cremebildung unterstützt und die Thermocream Plastikscheibe (W) zusammen mit dem Silikonring (V). Die regelmäßige Reinigung des Filters (U) sorgt für eine lange und perfekte Haltbarkeit. EINEN CAPPUCCINO ZUBEREITEN Achtung, vor Verwendung des MAXI CAPPUCCINO sicherstellen, dass der Filterhalter aus seinem Sitz gelöst ist. Für die Zubereitung eines Cappuccino, einer heißen Schokolade oder zum Aufwärmen eines beliebigen Getränkes muss der Schalter Dampferzeugung (7) Fig. 2 gedrückt werden. Die Kontrolllampe (2) erlischt und die Kontrolllampe (3) des Dampf-Schalters beginnt zu blinken. Sobald die Kontrolllampe (3) von Blink- auf Dauerlicht wechselt, kann die Maschine Dampf abgeben. Zunächst ein Glas unter das Maxi Cappuccino Röhrchen (O) (Fig. 12) aufstellen und dann den Wasser-/ Dampfhebel (F) (Fig.3) runterdrücken. Zuerst tritt etwas Wasser aus, anschließend erhalten Sie sofort einen starken Dampfstrahl. Anschließend durch Anheben des Hebels (F) (Fig.3) die Dampfabgabe unterbrechen. Eine kleine Kanne mit der zu schäumenden Milch unter das Röhrchen stellen, den Dampffluss durch langsames Runterdrücken des Hebels wieder einschalten und das Röhrchen bis zum Boden in die kleine Kanne tauchen: innerhalb kürzester Zeit bildet sich ein dichter und cremiger Schaum (Fig. 15). Anschließend die Dampf-Funktion abstellen. Dazu erneut auf die Taste Dampf (7) drücken: die Dampf-Kontrolllampe (3) erlischt. TEE ODER AUFGÜSSE ZUBEREITEN Nach Durchführung der Operationen lt. Kapitel INBETRIEBNAHME eine Tasse unter das Röhrchen von MAXI CAPPUCCINO (O) aufstellen, den Wasser-/Dampfhebel (F) herunterdrücken und zugleich die Schalter (6) Kaffee- und Dampfausgabe (7) abdrücken. Die Lampe (2) erlischt und die Lampe (3) beginnt zu blinken. Das Wasser beginnt nun aus dem Röhrchen von MAXI CAPPUCCINO (O) auszutreten. Die Ausgabe kann gestoppt werden durch Abdrücken des Kaffee-Schalters (6): Kontrollampe (3) erlischt und Lampe (2) leuchtet jetzt dauerhaft. Dampf-Hebel erneut hochziehen: Maschine betriebsbereit! WIEDEREINSTELLEN AUF KAFFEEZUBEREITUNG Um von Dampferzeugung auf Kaffeezubereitung umzustellen, muss das Gerät abkühlen: Den Schalter Kaffeeausgabe (6) drücken und mindestens eine Tasse Wasser aus dem Sitz des Filterhalter ausfließen lassen. Vor der Kaffeezubereitung abwarten bis sich die Kontrolllampe (2) wieder ausschaltet. WIE SIE EINEN GUTEN ITALIENISCHEN ESPRESSO ZUBEREITEN Das Kaffeepulver leicht im Filterhalter andrücken. Ob der Kaffee stark oder weniger stark wird, hängt von der Feinheit des Kaffeepulvers, von der Kaffeemenge im Filter und von der Stärke des Zusammendrückens ab. Nach wenigen Sekunden fließt der Kaffee bereits in die Tasse. Wenn es länger dauert, ist das Kaffeepulver zu fein gemahlen oder im Filterhalter zu stark angedrückt. REGELMÄßIGE PFLEGE ACHTUNG: Alle nachstehend aufgeführten Reinigungs- und Pflegearbeiten müssen bei ausgeschaltetem Gerät vorgenommen werden. Reinigung des Filters vom Kaffeepulver. Prüfen, dass die kleinen Löcher nicht verstopft sind und gegebenenfalls mit einer kleinen Bürste reinigen. Prüfen, dass das darunter liegende Loch nicht verstopft ist. Gegebe- 22
23 nenfalls mit einer Nadel reinigen (Fig. 13) und kochendes Wasser durch den Filterhalter mit eingesetztem Filter aber ohne Kaffeepulver leiten, so dass Kaffeereste oder Verunreinigungen aufgelöst und beseitigt werden. Wir empfehlen den Filter (U) alle 3 Monate gründlich zu reinigen. Für die Filterreinigung sollten Reinigungstabletten COFFEE CLEAN der Firma ARIETE benutzt werden, die in allen Verkaufsstellen und beim Kundendienst erhältlich sind. Bei der Reinigung die Anweisungen aus der Packung beachten. Reinigung der Fassung des Kaffeefilters. Wenn das Gerät längere Zeit benutzt worden ist, kann sich Kaffeesatz auf der Fassung des Filterhalters absetzen. Der Kaffeesatz kann mit einem Zahnstocher, einem kleinen Schwamm oder durch Durchlaufen von Wasser, ohne den Filterhalter in die Fassung einzusetzen, entfernt werden. Reinigung der MAXI CAPPUCCINO Vorrichtung. Um Verbrennungen zu vermeiden, muss das verchromte Rohr bei der Reinigung kalt sein. Die Vorrichtung (O) vom Röhrchen abschrauben und mit fließendem Wasser spülen. Das Röhrchen kann mit einem nicht scheuernden Lappen gereinigt werden. Das Cappuccino-Schaumröhrchen wieder bis zum Anschlag festschrauben. Gegebenenfalls die Dampf-Austrittsöffnung mit einer Nadel reinigen. Nach jedem Gebrauch für einige Sekunden Dampf austreten lassen, so dass eventuelle Reste aus der Austrittsöffnung beseitigt werden. Reinigung des Wasserbehälters. Es wird angeraten das Innere des Behälters regelmäßig mit einem Schwamm oder einem feuchten Tuch zu reinigen. ENTKALKUNG Durch die technische Konstruktion der Espressomaschine bilden sich nach unserer Erfahrung kaum Kalkablagerungen im Inneren der Maschine. Falls die Funktion des Gerätes bei häufigem Gebrauch und der Verwendung von hartem, sehr kalkhaltigem Wasser nach einiger Zeit dennoch beeinträchtigt ist, kann die Espressomaschine entkalkt werden, um die Beeinträchtigungen zu beseitigen. Verwenden Sie dazu ausschließlich das auf Zitronensäuere basierende Entkalkungsmittel (NOCAL) der Firma Ariete, das Sie problemlos und einfach unter der angegebenen Serviceadresse bestellen können. Entkalkungsmittel anderer Hersteller - auch wenn sie auf Zitronensäure basieren - können chemische Zusätze enthalten, die im Inneren der Espressomaschine Schaden anrichten können, für die keine Haftung übernommen werden kann. Befolgen Sie bei einer notwendigen Entkalkung die Anweisungen auf dem Beipackzettel des Entkalkungsmittels. DE 23
24 DE WAS TUN, WENN ES PROBLEME GIBT PROBLEME URSACHEN ABHILFE Die Maschine gibt kein heißes Wasser für Tee. Wahrscheinlich befindet sich Luft im Kreislauf und die Pumpe hat sich deshalb abgeschaltet. Prüfen, dass der Wasserbehälter richtig eingesetzt ist, und dass der Wasserstand nicht unter die Minimum-Markierung am Behälter abgefallen ist. Siehe Anweisungen im Abschnitt Vor Inbetriebnahme. Es kommt kein Dampf. Zu wenig Wasser im Behälter und diepumpe kann nicht ansaugen. Eventuell ist das Loch vom Dampfröhrchen verstopft. Eventuelle Verkrustungen mit einer Nadel entfernen. Die Dampf-Austrittsöffnung am Prüfen ob noch Wasser im Behälter ist. Dampfröhrchen ist verstopft. Es tritt Wasser an der Seite des Filterhalters aus. Der Kaffee kommt zu langsam oder kommt überhaupt nicht. Der Kaffee ist nicht stark genug und kalt. Wahrscheinlich ist zuviel Kaffeepulver im Filter und deswegen konnte der Filter in der Fassung nicht richtig festgedreht werden. Die Öffnungen am Auslass des Kaffeepulversiebs sind verstopft. 24 Nochmals mit der richtigen Kaffeemenge versuchen. Es befindet sich Kaffeesatz auf der Dichtung des Kaffeefilters. Die Dichtung mit einem Zahnstocher oder einem kleinen Schwamm reinigen. Den Filterhalter mit den Tabletten COFFEE CLEAN von Ariete reinigen. Falls diese Hinweise keine Abhilfe schaffen, wenden Sie sich an den technischen Kundendienst. Gegebenenfalls die verstopfte Filter-Austrittsöffnung mit einer Nadel reinigen. Es kann auch sein, dass Den Filter für das Kaffeepulver überprüfen. Sind kein Kaffee kommt, weil nicht die kleinen Löcher verstopft, müssen sei mit einer genügend Wasser aus der kleinen Bürste oder einem anderen Werkzeug Siebscheibe an der Fassung gereinigt werden. Kochendes Wasser durch den für den Filterhalter austritt. Filterhalter mit eingesetztem Filter aber ohne Nach einigen Monaten können Kaffeepulver leiten, so dass eventuelle Kaffeereste die Löcher der Siebscheibe oder Verunreinigungen aufgelöst und beseitigt durch Fettreste oder werden Für eine gründlichere Filterreinigung Kalkablagerungen verstopft sollten Reinigungstabletten COFFEE CLEAN sein. benutzt werden. Bei der Reinigung die Der Wasserbehälter ist Anweisungen aus der Packung beachten nicht richtig eingesetzt. Den Lassen Sie Wasser aus der Maschine fließen, Wasserbehälter richtig bis zum ohne dabei den Filterhalter einzusetzen. Tritt das Anschlag einsetzen. Wasser weiterhin nicht gleichmäßig aus allen Zu wenig Wasser im kleinen Löchern aus, wenden Sie sich für eine Behälter und die Pumpe Reinigung bitte an den nächsten Kundendienst. kann nicht ansaugen. Den Mit einer grobkörnigeren Kaffeemischung Wasserbehälter auffüllen. versuchen. Den Kaffee mit weniger Druck in den Die Kaffeemischung ist zu Filter drücken. fein gemahlen oder zu stark gepresst worden. Das Kaffeepulver ist zu grob gemahlen. Um einen stärkeren und heißeren Kaffee zuzubereiten, sollte ein feineres Kaffeepulver benutzt werden. Dieses Problem wird auf jeden Fall durch die Verwendung des Thermocream Systems beseitigt, das auch bei grob gemahlenem Kaffee stets für einen heißen und cremigen Kaffee sorgt.
25 ADVERTENCIAS IMPORTANTES Leer atentamente las instrucciones antes del uso. Se recomienda guardar el embalaje original, puesto que no está prevista la asistencia gratuita por daños provocados por un embalaje no adecuado del producto en el momento del envío del mismo a un Centro de Asistencia autorizado. Antes de conectar el aparato a la red de alimentación verificar que la tensión indicada en la etiqueta ubicada debajo de la máquina corresponda a la de la red local. No levantar la tapa cogiéndola por la cubeta del agua sino por las cavidades que se encuentran en la base de apoyo de la máquina. Usar cables de alargue no autorizados por el fabricante puede provocar daños y accidentes. Evitar colocar en el deposito una cantidad excesiva de agua. No utilizar agua con gas (con anhídrido carbónico). No usar la máquina sin agua ya que en tal caso la bomba se quemaría. El cable no debe tocar las partes calientes de la máquina. Desenchufar la máquina antes de efectuar la limpieza o el mantenimiento. No dejar la máquina a una temperatura ambiente inferior a 0 C puesto que el residuo de agua en la caldera podría helarse y provocar daños. Antes de efectuar la operación de llenado del depósito de agua, desconectar el aparato de la toma de corriente. El aparato debe tener únicamente un uso particular, no es para uso comercial o industrial. No dejar nunca la máquina funcionando al alcance de los niños o discapacitados. No regular nunca el molinillo de café mientras funciona, no introducir café molido en el molinillo de café sino únicamente café en grano. Si el cable de alimentación está dañado deberá ser sustituido por el fabricante o por su servicio Asistencia Técnica o en todo caso por personal calificado para prevenir riesgos. Las partes metálicas externas del aparato no se deben tocar con el aparato en funcionamiento ya que podrían causar quemaduras. No llenar nunca el deposito del agua con agua caliente o hirviendo. Después de haber desconectado el enchufe de alimentación y una vez que las partes calientes se habrán enfriado, el aparato se podrá limpiar únicamente con un paño no abrasivo humedecido en agua añadiendo pocas gotas de detergentes neutros no agresivos (no utilizar nunca disolventes que dañan el plástico) NO SUMERGIR EL APARATO EN EL AGUA U OTROS LÍQUIDOS. No colocar nunca las partes bajo tensión a contacto con el agua: puede provocar corto circuito! No dirigir nunca un chorro de vapor o agua caliente hacia partes del cuerpo; manipular con precaución el tubo vapor/agua caliente: peligro de quemaduras! Colocar la máquina en un plano estable donde no sea posible volcarla. No usar el aparato fuera de la habitación. No colocar la máquina en superficies demasiado calientes o cerca de llamas libres para evitar que la carrocería se pueda dañar. Elegir un ambiente con suficiente iluminación, limpio y con la toma de corriente accesible con facilidad. En el caso de avería, defectos o probables defectos después de una caída, desenchufar inmediatamente la máquina. No hacer funcionar nunca el aparato defectuoso. LAS REPARACIONES SE PUEDEN REALIZAR EXCLUSIVAMENTE EN LOS CENTROS DE ASISTENCIA AUTORIZADOS. Se rechaza cualquier responsabilidad por eventuales daños provocados por intervenciones de reparación no realizadas correctamente. En el momento que decida no utilizar mas el aparato y quiera arrojarlo a la basura, se recomienda quitar el cable de alimentación para evitar que el mismo se pueda reactivar. Se recomienda además eliminar las partes del aparato que puedan originar peligro especialmente para los niños, los cuales podrían utilizarlo para sus juegos. No deje los elementos del embalaje al alcance de niños ya que podrían originar peligros. No exponga el aparato a los agentes atmosféricos (lluvia, sol ). Este aparato es conforme a la directiva 89/336 CEE relativa a la compatibilidad electromagnética. El nivel máximo de rumorosidad de la máquina en función es de 86 db(a). 25 ES
26 ES CONSERVAR SIEMPRE ESTAS INSTRUCCIONES Las máquinas para la preparación del café ARIETE son ideales para el que sabe satisfacer los placeres de la vida, empezando por un buen café. Gracias al dispositivo Thermocream se puede obtener en la propia casa un café caliente y cremoso como el del bar. En efecto, el dispositivo Thermocream está equipado con un filtro que garantiza la suministración del café a una presión constante. De esta manera se puede saborear un café con mucha crema, de aroma intenso y del gusto pleno y consistente, sin la necesidad de presionar enérgicamente y utilizando cualquier tipo de café con tal que no sea demasiado fino. La máquina para la preparación del café Ariete satisfacen también a quienes adoran el cappuccino puesto que gracias al dispositivo MAXI CAPPUCCINO se puede obtener, dentro de pocos segundos, una espuma rica y densa. Además con las máquinas Ariete café inmediatamente disponible puesto que está equipada con el sistema de auto conexión el cual permite preparar inmediatamente un café aún en el caso de larga tiempo sin utilizar las máquinas o después del llenado del deposito del agua. Buen café a todos con Café Roma Deluxe Ariete! DESCRIPCIÓN DE LOS COMPONENTES A - Cuerpo máquina B - Pulsador de paro del regulador molienda café C - Tapa recipiente café D - Recipiente café en grano, regulador molienda E - Termómetro temperatura caldera ( C y F) F - Palanca agua/vapor G - Hueco alojamiento accesorios H - Depósito agua (capacidad 1,5 litros nivel MAX) I - Puerta para llenar deposito L - Panel mandos M - Dispositivo flujo continuo café molido N - Dispositivo Dispenser con dosificador café molido O - Dispositivo MAXI CAPPUCCINO y brazo distribuidor agua - vapor P - Prensador Q - Caja para recuperación del agua R - Caja recolección polvo de café S - Rejilla para apoyar tazas T - Porta-filtro profesional U - Filtro Thermocream V - Anillo de silicona W - Disco Thermocream DESCRIPCIÓN DE LOS MANDOS 1 Luz testigo encendido 2 Luz testigo temperatura café 3 Luz testigo temperatura vapor 4 Luz testigo llenado Dispenser 5 Botón de encendido 6 Interruptor suministro café 7 Interruptor vapor 8 Botón llenado dispositivo Dispenser 26
27 ES PUESTA EN FUNCIÓN - Quitar el deposito del agua (H) del hueco de la máquina, llenarlo de agua natural fresca hasta el nivel Max. (litros 1,5), y volver a colocarlo en el hueco del cuerpo de la máquina. Para garantizar el correcto funcionamiento de la máquina empujar bien hasta el fondo el deposito, Fig. 5. El deposito se puede llenar también desde arriba, vertiéndo el agua en el hueco correspondiente después de haber levantado la puerta (I) Fig Introducir el enchufe en la toma de corriente. - Apretar en el interruptor general (5) Fig. 2; se encenderá y quedará prendida la luz testigo del encendido (1) y la luz testigo (2) se encenderá de forma intermitente hasta alcanzar la correcta temperatura y luego quedará prendida en forma fija. Bajar la palanca del agua/vapor (Fig. 3 - F), y contemporáneamente apretar el interruptor para el suministro del café (6) dejando salir eventual aire o agua contenida en el circuito. Llenar por lo menos una taza con ésta agua. Levantar nuevamente la palanca agua/vapor (F) y detener el suministro del café apretando el botón (6). IMPORTANTE: se aconseja repetir esta operación cada vez que se enciende la máquina después de varios días sin ser utilizada. Para el llenado normal del deposito levantar la puerta (I) y echar agua natural fresca en el hueco correspondiente (Fig. 4). - Introducir café en grano en el recipiente (D) Max. 230 gr. Fig. 6. El café se puede moler más o menos fino según el grado de molienda deseado. Para variar el grado de molienda, apretar el botón de stop (B) y girar el moledor de café hacia la derecha o hacia la izquierda de acuerdo a la escala numerada Fig. 7. LA OPERACIÓN SE DEBE REALIZAR ABSOLUTAMENTE CON EL MOLEDOR DE CAFÉ APAGADO. ELECCIÓN DEL TIPO DE DISPOSITIVO DISTRIBUIDOR DEL CAFÉ MOLIDO La máquina está equipada con dos dispositivos intercambiables: 1) Dispositivo de Flujo Continuo (M) Fig. 1 permite moler instantáneamente el café. Presionar el botón (M/a) colocado debajo de la salida del café molido con el porta-filtro introducido en la horquilla Fig. 8. 2) Dispositivo Dispenser/Dosificador (N) Fig. 9. Para llenar el Dispenser con café molido, presionar el interruptor (8) Fig. 2 hasta su llenado; accionar la palanca del Dosificador una o dos veces según la cantidad de tazas de café deseadas teniendo el porta-filtro introducido en la horquilla. Para extraerlo, tirar hacia afuera los dispositivos (M) o (N). COMO HACER EL CAFÉ Controlar el nivel del agua en el depósito (H). Verificar que el depósito esté introducido correctamente en su asiento. Dosificar el café en el portafiltro Fig. 8 con el dispositivo de erogación elegido previamente y prensarlo ligeramente con el prensador Fig. 10. Apretar bien el portafiltro después de haber verificado que el mismo se encuentra bien enganchado en el soporte Fig. 14. Si se coloca una cantidad excesiva de café molido en el interior del filtro, la rotación del portafiltro puede resultar dificultosa y/o durante el suministro de café producirse pérdidas por el portafiltro. La máquina estará lista para el uso cuando la indicación (2) Fig. 2 de intermitente pasará a la condición de prendida fija. Presionar el interruptor de erogación café (6). Para cesar la erogación presionar de nuevo el interruptor (6). La dosis máxima para un café es de 50 ml. N.B.: como en las máquinas de café profesionales, no quitar el portafiltro cuando el interruptor de erogación (6) está introducido; Después de haber preparado el café, aflojar el portafiltro girándolo en el sentido de las agujas del reloj. El sistema Thermocream de ARIETE ha sido proyectado para satisfacer al máximo todas las necesidades del consumidor, y está formado por dos elementos: el filtro Thermocream (U) con un solo orificio para la salida del café (Fig. 13) que favorece la formación de la crema, y el disco Thermocream de plástico (W) con el anillo de silicona (V). 27
28 ES Una limpieza constante del filtro (U) garantiza un perfecto mantenimiento en el tiempo. COMO PREPARAR UN CAPPUCCINO Atención antes de usar MAXI CAPPUCCINO cerciorarse que el portafiltro no se encuentre en su alojamiento. Para preparar un cappuccino, un chocolate caliente, o solamente calentar cualquier otra bebida, apretar el botón producción vapor (7) Fig. 2. La luz testigo luminosa (2) se apagará y la luz testigo luminosa (3) del botón del vapor comenzará a destellar; cuando la luz testigo (3) pasará de la condición de intermitente a fija, la máquina estará lista para el suministro de vapor. Bajar la palanca agua/vapor (F) Fig.3, después de haber colocado un vaso debajo de la boquilla Maxi Cappuccino (O) Fig. 12. Saldrá primero una cantidad pequeña de agua y enseguida un fuerte chorro de vapor. Interrumpir entonces el suministro de vapor y levantando la palanca (F) Fig. 3, colocar debajo de la boquilla la cafetera con la leche que se debe batir, abrir nuevamente el flujo de vapor bajando un poco por vez la palanca y sumergir a fondo la boquilla en la leche: en pocos instantes podrán ver subir una espuma densa y cremosa, Fig. 15. Terminada la operación desactiva la función vapor apretando nuevamente el botón vapor (7). La luz testigo vapor (3) se apagará. COMO PREPARAR TÉ O INFUSOS Después de haber realizado las operaciones descritas en el capítulo FASES PRELIMINARES AL USO, colocar una taza debajo de la boquilla del Maxi Cappuccino (O); bajar la palanca agua/vapor (F) y apretar contemporáneamente los interruptores (6) para el suministro de café y del vapor (7). La luz testigo (2) se apagará y la luz testigo (3) se volverá intermitente. El agua comenzará a salir por la boquilla Maxi Cappuccino (O). Para interrumpir el suministro apretar el botón café (6): la luz testigo (3) se apagará y la luz testigo (2) se encenderá de forma continua. Levantar nuevamente la palanca del vapor; la máquina está lista nuevamente para el uso. NUEVO USO PARA EL CAFÉ Para pasar de la producción de vapor a la del café es necesario dejar enfriar la máquina: apretar el interruptor suministro café (6) y dejar que salga por lo menos una taza de agua por el alojamiento y enganche del portafiltro. Esperar que la luz testigo luminosa (2) se apague nuevamente antes de preparar el café. CONSEJOS ÚTILES PARA OBTENER UN BUEN CAFÉ EXPRÉS A LA ITALIANA El café molido se debe prensar en forma ligera en el porta filtro. Un café mas o menos fuerte depende del grado de moledura del mismo café, de la cantidad que se coloca en el porta filtro y del prensado. Unos pocos segundos son suficientes para que el café caiga en las tacitas. Si el tiempo de suministro es superior esto quiere decir que la moledura es demasiado fina o que el polvo colocado en el porta filtro ha sido prensado demasiado. LIMPIEZA PERIÓDICA ATENCION: todas las operaciones de limpieza indicadas abajo se deben realizar con la máquina apagada. Limpieza del filtro que contiene el café molido. Comprobar que los orificios internos no se tapen y si fuese necesario limpiarlos con un cepillo. Comprobar que el orificio que se encuentra debajo no se tape y si fuese necesario limpiarlo con una aguja (Fig. 13) y dejar salir agua hirviendo a través del portafiltro con el filtro montado sin el café molido, para disolver y eliminar eventuales restos de café o impurezas. Se recomienda realizar una cuidadosa limpieza del filtro (U) cada 3 meses aproximadamente, utilizando las pastillas de detergente COFFEE CLEAN de ARIETE que se pueden adquirir en los puntos de venta y los Centros de Asistencia Autorizados siguiendo las instrucciones contenidas en el envase. Limpieza del alojamiento del porta filtro. Con el uso se puede verificar, en el alojamiento de enganche del portafiltro, una sedimentación de restos de café, que se puede eliminar con un palillo escarbadientes, con una 28
29 esponja, o dejando escurrir agua sin el portafiltro montado. Limpieza del dispositivo MAXI CAPPUCCINO. Realizar la operación cuando el tubo cromado se encuentre frío para evitar quemaduras. Desenroscar el dispositivo (O) del tubo, y lavarlo con agua corriente. El tubo se puede limpiar con un paño no abrasivo. Volver a enroscar el preparador de capuchino hasta el final del recorrido. Si fuese necesario limpiar con una aguja el orificio de salida del vapor. Cada vez que se usa dejar funcionar el suministrador de vapor por algunos segundos para liberar el orificio de eventuales residuos. Limpieza del deposito. Se recomienda limpiar periódicamente el interior del deposito con una esponja o con un paño húmedo. DESCALCIFICACIÓN En base a nuestra experiencia y gracias a las técnicas de construcción de la máquina de café, no se forman depósitos calcáreos en el aparato. Si a pesar de eso, después de algún tempo, la función del aparato tuviera se viese comprometida, en consecuencia del empleo frecuente de agua dura y muy calcárea, se puede proceder a la descalcificación de la máquina para eliminar el funcionamiento defectuoso. Utilice exclusivamente para este fin el produco decalcificante ARIETE a base de ácido citrico (NOCAL). Este produco se puede ordenar fácilmente Questo prodotto si può ordinare facilmente dirigiendose a la dirección de la asistencia técnica indica. Los Productos descalcificantes de otros fabricantes por más que sean a base de ácido cítrico- pueden contener aditivos quimicos, que podrian causar daños a los componentes internos de la máquina de café, por los cuales Ariete no asume ninguna responsabilidad. En caso e necesidad de una descalcificación, miren las indicaciones en el manual de instrucciones del producto decalcificante. ES 29
30 ES La máquina no suministra agua hirviendo para infusos. COMO SOLUCIONAR LOS SIGUIENTES INCONVENIENTES PROBLEMAS CAUSA REMEDIOS Probablemente ha entrado aire en el circuito y esto ha desconectado la bomba. La máquina no suministra vapor. Salida de café por los bordes del porta-filtro. La erogación del café no se produce o se produce demasiado lentamente. El café contiene mucha agua y está frío. Hay poca agua y la bomba no aspira. Orificio de salida del vapor de la boquilla de suministro obstruido. Probablemente se haya colocado en el porta-filtro una cantidad excesiva de café molido lo cual ha impedido de ajustar hasta el tope el porta-filtro en su alojamiento. El orificio de salida del filtro que contiene el molido está obstruido. Es posible que el escaso suministro del café depende también de la salida insuficiente de agua por el disco agujereado en el alojamiento del porta-filtro. Es posible que después de algunos meses de uso, residuos de grasa o calcáreos puedan obstruir los agujeros del disco. El deposito no está bien montado. Introducir el deposito empujándolo hasta el fondo. Hay poca agua y la bomba no aspira. Llenar el deposito. La mezcla de café tiene una moledura demasiado fina o demasiado prensada. El café ha sido molido demasiado grueso. Comprobar que el deposito esté bien colocado y que el nivel no esté por debajo del mínimo indicado por la referencia en relieve en el mismo deposito. Repetir las operaciones descritas en el párrafo Fases preliminares al uso. Quitar con una aguja eventuales incrustaciones que se puedan haber formado en el orificio del tubo de suministro. Comprobar que el nivel del agua en el deposito sea normal. Repetir la operación, colocando en el filtro la correcta cantidad de café. En la junta del asiento del porta-filtro han quedado residuos de café molido. Limpiar la junta con un escarbadientes o con una esponja. Limpiar el porta-filtro utilizando las pastillas COFFEE CLEAN de Ariete. Si no obstante las operaciones sugeridas no eliminamos el problema, dirigirse a un Centro de Asistencia Autorizado. Limpiar el orificio obstruido del filtro con un cepillo. Controlar el filtro que contiene el café molido. Si los agujeritos están obstruidos, limpiarlos con un cepillo o bien, con la ayuda de una herramienta. Dejar salir agua hirviendo a través del porta-filtro con el filtro montado sin el café molido, para disolver o eliminar eventuales restos de café o impurezas. Para una limpieza más cuidadosa utilizar pastillas detergentes COFFEE CLEAN siguiendo las instrucciones indicadas en el envase. Accionar la máquina sin portafiltro haciendo fluir el agua. Si el agua sigue saliendo solo por algunos orificios dirigirse al más cercano centro de Asistencia Autorizado para realizar la limpieza. Probar a utilizar mezcla de café con una moledura más gruesa. Prensar el café en el filtro con menos presión. Para obtener un café más concentrado y más caliente, se debe usar una mezcla de café molido más fino. De todas maneras este problema se soluciona gracias al sistema Thermocream, el cual garantiza siempre un café muy caliente y una crema exquisita, también con el café molido grueso. 30
31 ADVERTÊNCIAS IMPORTANTES Ler atentamente as instruções antes de usar a máquina. Aconselhamos conservar as embalagens originais pois a assistência gratuita não é feita em casos de avarias causadas por embalagens não apropriadas do produto no momento da expedição à um Centro de Assistência autorizado. Antes de ligar o aparelho à rede de alimentação certificar-se que a tensão indicada na placa de características colocada na parte inferior da máquina corresponda àquela da rede local. Não levantar o aparelho segurando-o pelo reservatório da água mas utilizar as aberturas específicas da base de apoio da máquina. Uso de extensões eléctricas não autorizadas pelo fabricante do aparelho pode provocar danos e acidentes. Evitar a introdução de uma quantidade excessiva de água no reservatório. Não utilizar água com gás (com adição de anidrido carbónico). Não utilize a máquina sem água porque a bomba pode queimar. O cabo de alimentação não deve tocar as partes quentes da máquina. Antes de efectuar qualquer intervenção de limpeza ou manutenção da máquina, desligue sempre a ficha da tomada. Não deixe a máquina em locais com temperatura ambiente inferior a 0º porque a água da caldeira poderia gelar e provocar danos na máquina. Antes de proceder ao enchimento do depósito de água, desligue o aparelho da tomada. O aparelho é destinado somente para o uso doméstico e não deve ser designado para utilização comercial ou industrial. Nunca deixar a máquina em funcionamento ao alcance de crianças ou pessoas que não sejam capazes de utilizá-la. Nunca faça a regulação do moinho do café durante o seu funcionamento. Não introduza café moído no moinho do café. Utilize sempre café em grão. Se o cabo de alimentação se estragar, deverá ser substituído pelo serviço de Assistência Técnica Autorizada. As partes metálicas no exterior do aparelho não devem ser tocadas durante o funcionamento da máquina na medida em que poderiam provocar queimaduras. Nunca encher o reservatório de água com água quente ou fervente. Depois de ter desligado a ficha da tomada de corrente eléctrica e depois das partes quentes da máquina terem arrefecido, o aparelho deverá ser limpo, única e exclusivamente, com um pano não abrasivo, ligeiramente humedecido com água adicionada com algumas gotas de detergente neutro não agressivo (nunca utilize solventes, pois eles estragam o plástico). NÃO MERGULHE O APARELHO EM ÁGUA NEM EM NENHUM OUTRO LÍQUIDO. Nunca colocar as partes sob tensão em contacto com a água: isto pode provocar um curto-circuito! Nunca direccionar o jacto de vapor ou de água quente para as partes do corpo; manipular o tubo de vapor/ água quente com muito cuidado: perigo de queimaduras! Colocar a máquina sobre um plano estável onde não possa ser tombada. Não utilizar o aparelho a céu aberto. Não posicionar a máquina sobre superfícies muito quentes ou nas proximidades de chamas livres para evitar que a estrutura possa sofrer danos. Escolher um ambiente bem iluminado, limpo e com a tomada de corrente facilmente acessível. Em caso de avarias, defeitos ou suspeitas de defeito após uma queda, retirar logo a ficha da tomada de corrente. Nunca ligar o aparelho com defeito. AS REPARAÇÕES PODEM SER EFECTUADAS EXCLUSIVA- MENTE PELOS CENTROS DE ASSISTÊNCIA AUTORIZADOS. Declinamos qualquer responsabilidade por possíveis danos provocados nas operações de reparação efectuadas de modo incorrecto. Quando decidir eliminar este aparelho, recomendamos que seja inutilizado cortando seu cabo de alimentação. Recomendamos também tornar inócuas as partes que possam ser causa de perigo principalmente para as crianças que poderiam utilizá-lo como brinquedo. Os elementos da embalagem não devem ser deixados ao alcance de crianças pois constituem potenciais fontes de perigo. 31 PT
32 PT Não deixar o aparelho exposto a agentes atmosféricos.(chuva, sol etc...). Este aparelho está em conformidade com a directiva 89/336 CEE relativa à compatibilidade electromagnética. O nível máximo de ruído da máquina em funcionamento é de 86 db(a). CONSERVAR SEMPRE ESTAS INSTRUÇÕES As máquinas de café ARIETE são ideais para quem sabe apreciar os prazeres da vida, iniciando com um bom café. Graças ao dispositivo Thermocream pode-se sempre obter, em casa, um café quente e cremoso como aquele que se toma ao bar. O dispositivo Thermocream é dotado de um filtro que garante a preparação do café a uma pressão constante. Deste modo, pode-se apreciar um café com muito creme, com aroma intenso, aromático e denso, sem a necessidade de comprimir energicamente e utilizando qualquer tipo de mistura de café, com a condição que não seja de moagem muito fina. As máquinas de café Ariete satisfazem também os amantes do cappuccino pois graças ao dispositivo MAXI CAPPUCCINO pode-se obter, em poucos segundos, um creme rico e denso. Além disso, o café estará logo pronto com as máquinas Ariete pois estas são dotadas de sistema de auto-activação que permite tirar o café imediatamente mesmo em caso de longa utilização das máquinas ou após o enchimento do reservatório de água. Desejamos um bom café a todos com Café Roma Deluxe Ariete! DESCRIÇÃO DOS COMPONENTES A - Corpo da máquina B - Botão para impedir o funcionamento do regulador de moagem do café C - Tampa do depósito de café D - Depósito do café em grão, regulador de moagem E - Termômetro de temperatura da caldeira ( C e F) F - Alavanca água/vapor G - Compartimento porta-acessórios H - Depósito de água (capacidade volumétrica 1,5 l MÁX) I - Portinhola para enchimento do reservatório L - Painel de comandos M - Dispositivo para accionar o fluxo contínuo do café moído N - Dispositivo Dispenser com acessório para dosagem do café moído O - Dispositivo MAXI CAPUCCINO e Bico emissor de água e vapor P - Acessório para prensar o café Q - Bandeja de recolha da água R - Bandeja de recolha de resíduos de café S - Plano para chávenas T - Porta-filtro co-profissional U - Filtro Thermocream V - Anel de silicone W - Disco Thermocream DESCRIÇÃO DOS COMANDOS 1 Sinalizador de accionamento 2 Sinalizador de temperatura do café 3 Sinalizador temperatura vapor 4 Sinalizador de enchimento Dispenser 5 Tecla de accionamento 6 Interruptor de saída do café 32
33 7 Interruptor do vapor 8 Tecla de enchimento do dispositivo Dispenser PT ACCIONAMENTO - Retirar o reservatório da água (H) da abertura existente na máquina, enche-lo com água natural fresca até o nível Max. (lt. 1,5), e inseri-lo novamente na abertura do corpo da máquina. Para garantir o funcionamento correcto da máquina deve-se pressionar bem a fundo o reservatório, Fig. 5. O reservatório pode também ser enchido por cima, deitando água na devida abertura, após ter levantado a portinhola específica (I) Fig Inserir a ficha na tomada de corrente. - Carregar sobre o interruptor geral (5) Fig. 2; acender-se-á de modo fixo o sinalizador de ligação (1) e o sinalizador (2) iniciará a piscar até que se atinja a temperatura certa depois disso ficará sempre acesa. Abaixar a alavanca da água/vapor (Fig. 3 - F), e, ao mesmo tempo, pressionar o interruptor de saída do café (6) fazendo com que o ar ou a água contida no circuito seja eliminada. Encher pelo menos uma chávena com esta água. Levantar novamente a alavanca água/vapor (F) e desligar a saída do café pressionado a tecla (6). IMPORTANTE!: Aconselha-se fazer esta operação sempre que se ligar a máquina após um período de vários dias de inactividade. Para o enchimento normal do reservatório deve-se levantar a portinhola (I) e deitar água natural fresca na relativa abertura (Fig. 4). - Introduza o café em grão no respectivo depósito (D) Máx. 230 g, Fig. 6. O café pode ser moído mais ou menos fino consoante o grau de moagem desejado. Para variar o grau de moagem, pressionar o botão de bloqueio (B) e girar o moedor de café para a direita ou esquerda conforme a escala numerada Fig. 7. A OPERAÇÃO DEVE SER EFECTUADA EXPRESSAMENTE COM O MOEDOR DE CAFÉ DESLIGADO. SELECÇÃO DO TIPO DE DISPOSITIVO PARA A SAÍDA DO CAFÉ MOÍDO A máquina é dotada de dois dispositivos intercambiáveis: 1) O dispositivo Fluxo Contínuo (M) Fig. 1 que permite a moagem instantânea do café. Pressione o botão (M/a), situado por baixo da saída do café moído, com o porta-filtro inserido no encaixe específico Fig. 8. 2) Dispositivo Dispenser/Dosatore (N) Fig. 9. Para encher o Dispenser com o café moído pressione o interruptor (8) Fig. 2; accione a alavanca do Dosador tantas vezes (uma ou duas) quantas forem as chávenas de café que desejar fazer, mantendo o porta-filtro inserido no respectivo encaixe. Para o tirar puxe para si os dispositivos (M) ou (N). COMO PREPARAR O CAFÉ Controle o nível de água no depósito (H). Verifique se o depósito está bem inserido na sua posição. Doseie o café no porta-filtro Fig. 8 mediante utilização do dispositivo para saída de café seleccionado e pressione- o ligeiramente com o acessório específico Fig. 10. Apertar bem o porta-filtro certificando-se que o mesmo esteja bem encaixado à flange Fig. 14. Se for inserida uma quantidade excessiva de café moído no interior do filtro, a rotação do porta-filtro pode tornar-se difícil e/ou durante a saída do café, podem ocorrer perdas de café pelo porta-filtro. A máquina estará pronta para ser usada quando o sinalizador (2) Fig. 2 que está a piscar ficará fixo. Pressione então o interruptor do café (6). Para interromper a saída do café carregue outra vez no mesmo interruptor (6). A máxima para uma máquina café é de 50 ml. N.B.: Como para as máquinas de café profissionais, não retirar o porta-filtro quando o interruptor de saída de café (6) estiver pressionado; Após ter preparado o café, desapertar gradualmente o porta-filtro girando-o no sentido dos ponteiros do relógio. O sistema Thermocream de ARIETE foi estudado especificamente para satisfazer 33
34 PT do melhor modo todas as exigências do consumidor. Este sistema é composto por dois elementos: o filtro Thermocream (U) possui somente um furo de saída do café (Fig. 13) que favorece a formação do creme, e o disco Thermocream de plástico (W) junto ao anel de silicone (V). Uma limpeza constante do filtro (U) favorece a perfeita manutenção do mesmo. COMO FAZER UM CAPUCCINO Prestar atenção antes de usar o MAXI CAPPUCCINO, certificar-se que o porta-filtro foi desencaixado de sua sede. Para preparar um cappuccino, um chocolate quente, ou simplesmente aquecer qualquer outra bebida, pressionar o interruptor de produção de vapor (7) Fig. 2. O sinalizador luminoso (2) se apagará e o sinalizador luminoso (3) do botão do vapor começará a piscar; quando o sinalizador (3) que está a piscar ficará fixo, a máquina estará pronta para distribuir vapor. Abaixar a alavanca água/vapor (F) Fig.3 após ter posicionado um copo abaixo do dispositivo Maxi Cappuccino (O) Fig. 12. Primeiramente haverá saída de uma pequena quantidade de água e, logo em seguida, um forte jacto de vapor. Deve-se interromper a saída do vapor, levantar a alavanca (F) Fig. 3 e dispor, abaixo do dispositivo Maxi Cappuccino, o recipiente com leite, abrir novamente o fluxo de vapor abaixando gradualmente a alavanca e mergulhar a fundo o dispositivo no leite: em poucos segudos surgirá uma espuma densa e cremosa, Fig. 15. Depois que tiver terminado a operação, desactivar a função do vapor carregando novamente sobre a tecla do vapor (7). O sinalizador do vapor (3) se apagará. COMO PREPARAR CHÁ OU INFUSOS Depois de ter realizado as operações descritas no capítulo FASES PRELIMINARES PARA O USO, posicionar uma chávena debaixo do dispositivo Maxi Cappuccino (O); abaixar a alavanca da água/vapor (F) e pressionar contemporaneamente os interruptores (6) de distribuição do café e do vapor (7). O sinalizador (2) se apagará e o sinalizador (3) começará a piscar. A água iniciará a sair do dispositivo Maxi Cappuccino (O). Para interromper o fornecimento pressionar o interruptor de café (6): o sinalizador (3) se apagará e o sinalizador (2) se acenderá de maneira fixa. Levantar a alavanca do vapor: a máquina fica pronta para ser usada de novo. REUTILIZAÇÃO DA MÁQUINA PARA FAZER O CAFÉ Para passar da produção de vapor para a produção de café deve-se arrefecer a máquina: pressionar o interruptor de saída do café (6) e fazer com que pelo menos uma chávena de água saia pela sede de enchaixe do porta-filtro. Aguardar que o sinalizador luminoso (2) esteja apagado novamente antes de preparar o café. CONSELHOS ÚTEIS PARA OBTER UM BOM EXPRESSO À ITALIANA O café moído colocado no porta-filtro deverá ser comprimido levemente. Um café mais forte ou menos forte depende do grau de moagem do café, da quantidade deste colocada no porta-filtro e da compressão. Poucos segundos é o tempo suficiente para tirar o café. Se o tempo de saída do café for maior do que o indicado significa que o grau de moagem é muito fino ou que o café em pó colocado no porta-filtro foi comprimido excessivamente. LIMPEZAS PERIÓDICAS ATENÇÃO: todas as operações de limpeza indicadas abaixo devem ser efectuadas com a máquina desligada. Limpeza do filtro que contém o café moído. Certifique-se que os furos internos não estejam obstruídos e, se 34
35 isto ocorrer, limpe-os com uma pequena escova. Certifique-se que o furo inferior não esteja obstruído e, se isto ocorrer, limpe-o com um alfinete (Fig. 13) e faça com que a água fervente saia do porta-filtro com o filtro inserido, sem o café moído, para dissolver ou remover possíveis resíduos de café ou impurezas. Aconselhamos a limpeza meticulosa do filtro (U) a cada 3 meses aproxi-madamente, utilizando as pastilhas detergentes COFFEE CLEAN da ARIETE que se encontram nos pontos de venda e nos Centros de Assistência Autorizados seguindo as instruções contidas na confecção. Limpeza do alojamento do porta-filtro. Com o uso, poderá ocorrer, na sede de encaixe do porta-filtro, uma sedimentação de resíduos de café que podem ser removidos com um palito, com uma esponja ou deixando passar água sem o porta-filtro inserido. Limpeza do dispositivo MAXI CAPPUCCINO. Efectue esta operação quando o tubo cromado estiver frio, para evitar quei-maduras. Desaperte o dispositivo (O) do pequeno tubo e lave-o com água corrente. A limpeza deste tubo pode ser feita com um pano não abrasivo. Aperte novamente o dispositivo para cappuccino até o fim de curso. Se necessário, limpe com um alfinete o furo de saída do vapor. Após cada utilização, deve-se deixar que o vapor saia por alguns segundos para liberar o furo e eliminar possíveis resíduos. Limpeza do reservatório. Aconselhamos a limpeza periódica da parte interna do reservatório com uma esponja ou um pano húmido. DESCALCIFICAÇÃO Com base na nossa experiência e graças às técnicas de fabricação da máquina de café, não ocorre a formação de depósitos de calcário no aparelho. Se, mesmo assim, após algum tempo, a função do aparelho estiver comprometida devido ao uso frequente de água dura e muito calcária, pode-se efectuar a descalcificação da máquina para eliminar o problema de funcionamento. Utilizar, a este fim, exclusivamente o produto para descalcificação da Ariete, a base de ácido cítrico (NOCAL). Este produto pode ser encomendado facilmente contactando o endereço da assistência técnica indicada. Produtos para descalcificação de outros produtores mesmo se forem a base de ácido cítrico podem conter aditivos químicos, que poderiam causar danos aos componentes internos da máquina para café, em relação aos quais a Ariete não assume nenhuma responsabilidade. Em caso de necessidade de uma descalcificação, deve-se observar as indicações da folha de instruções do produto de descalcificação. PT 35
36 PT COMO REMEDIAR OS SEGUINTES INCONVENIENTES PROBLEMAS CAUSAS SOLUÇÕES Não ocorre a saída de água quente para chá. Provavelmente houve entrada de ar no circuito e isto desactivou a bomba. Certificar-se que o reservatório esteja bem encaixado e que o nível não seja inferior ao mínimo nível indicado em relevo no mesmo. Repetir as operações descritas no parágrafo Preparação da máquina. Não ocorre saída de vapor. Ocorre saída de café pelas bordas do porta-filtro. A saída do café não ocorreu ou ocorre muito lentamente. O café está aguado e frio. Há pouca água e a bomba não aspira. Furo de saída do vapor do bico emissor obstruído. Provavelmente foi colocada uma quantidade excessiva de café moído no porta-filtro o que impediu que este último tenha sido apertado até o fundo em seu encaixe. O filtro que contém café moído está com o furo de saída obstruído. É possível que a saída de pouco café dependa também da saída insuficiente de água do disco para duche no alojamento do porta-filtro. Pode acontecer que, após alguns meses de utilização, os resíduos de gordura ou calcário obstruam os furos do disco. O reservatório não está bem colocado. Encaixar bem o reservatório empurrando-o até o fundo. Há pouca água e a bomba não aspira. Encher o reservatório. A mistura de café moído muito fino ou muito comprimida. O grau de moagem da mistura de café é muito grosso. Desobstruir com um alfinete as possíveis incrustações formadas no furo do injector de vapor. Certificar-se que o nível de água do reservatório seja regular. Repetir a operação colocando a quantidade adequada de café no filtro. Encontram-se resíduos de café moído na vedação do alojamento do porta-filtro Deve-se limpar a vedação com um palito ou uma esponja. Lavar o porta-filtro utilizando as pastilhas COFFEE CLEAN de Ariete. Se, mesmo assim, o problema persistir, contactar um Centro de Assistência Autorizado. Limpar novamente, com um alfinete, o furo obstruído do filtro. Verifique o filtro que contém o café moído. Certifiquese que o furo inferior não esteja obstruído, se estiver, é necessário limpá-lo com um alfinete. Faça com que saia água fervente do porta-filtro com o filtro inserido, sem o café moído, para dissolver ou remover possíveis resíduos de café ou impurezas. Para uma limpeza mais meticulosa utilize as pastilhas detergentes COFFEE CLEAN seguindo as instruções apresentadas na confecção. Accionar a máquina sem o porta-filtro fazendo com que a água saia. Se a água continuar a não sair uniformemente por todos os furos, deve-se contactar o Centro de Assistência Autorizado mais próximo para que este efectue a limpeza. Tente utilizar misturas de café moído mais grosso. Comprimir o café no filtro com uma pressão menor. Para obter um café mais concentrado e mais quente, deve-se usar uma mistura com grau de moagem mais fino. Em todos os casos este problema é eliminado graças ao sistema Thermocream, que garante sempre um café quentíssimo e um creme rico, mesmo com o café moído grosso. 36
37 BELANGRIJKE AANWIJZINGEN Lees zorgvuldig de instructies voor gebruik. Het wordt aangeraden de originele verpakking te bewaren, aangezien geen gratis assistentie wordt verleend als het product defect raakt bij het versturen naar een erkend Assistentiecentrum doordat het niet goed is verpakt. Voordat het apparaat op het elektriciteitsnet wordt aangesloten moet u controleren of de spanning, die staat aangegeven op het plaatje onder het apparaat, gelijk is met die van het lokale net. Til het apparaat niet op door het aan het waterreservoir vast te pakken, maar gebruik de speciale uitsparingen op de steunbasis van de machine. Het gebruik van niet door de fabrikant van het apparaat goedgekeurde verlengsnoeren, kan schade en ongelukken veroorzaken. Giet niet te veel water in het reservoir. Gebruik geen koolzuurhoudend water (toevoeging van kooldioxide). Gebruik het apparaat niet zonder water, aangezien de pomp in dit geval zou kunnen doorbranden. Het snoer mag niet in contact komen met de warme delen van het apparaat. Verwijder de stekker uit het stopcontact alvorens het apparaat te reinigen of onderhoudswerkzaamheden uit te voeren. Stel het apparaat niet bloot aan temperaturen onder de 0 C; het in het apparaat gebleven water zou kunnen bevriezen en schade veroorzaken. Alvorens het waterreservoir te vullen het apparaat loskoppelen van het elektriciteitsnet. Het apparaat is alleen geschikt voor huishoudelijk gebruik, en mag niet gebruikt worden voor commerciële of industriële doeleinden. Laat het apparaat nooit aan staan in de aanwezigheid van kinderen of ondeskundige personen. Stel de koffiemolen nooit af als deze in functie is en gooi nooit gemalen koffie in de koffiemolen, maar uitsluitend koffiebonen. In geval de toevoerkabel is beschadigd, dient deze te worden vervangen door de fabrikant of door de Technische Dienst of door een persoon die hiertoe is bevoegd, om ieder risico te vermijden. De externe metalen delen van het apparaat mogen niet worden aangeraakt wanneer het apparaat in werking is, vanwege het gevaar voor brandwonden. Vul het waterreservoir nooit met heet of kokend water. Na de stekker uit het stopcontact te hebben getrokken en nadat het apparaat is afgekoeld, dient deze uitsluitend te worden gereinigd met een vochtige doek die geen krassen achterlaat en met een zachte zeepoplossing (gebruik nooit reinigingsmiddelen die de plastic delen kunnen beschadigen). DOMPEL HET APPARAAT NIET ONDER IN WATER OF ANDERE VLOEISTOFFEN. Zorg dat de delen onder spanning nooit in contact komen met water: er kan kortsluiting ontstaan! Richt het stoom- of heetwaterpijpje nooit op lichaamsdelen; wees altijd voorzichtig wanneer u het stoom-/heetwaterpijpje gebruikt: gevaar voor verbrandingen! Zet het apparaat op een stabiel vlak waar deze niet kan omvallen. Gebruik het apparaat niet in de open lucht. Zet het apparaat niet op erg warme oppervlakten of vlakbij open vlammen om te voorkomen dat de behuizing beschadigd raakt. Kies een ruimte die goed verlicht en schoon is met een makkelijk te bereiken stopcontact. Haal, in het geval van storingen, gebreken of een mogelijk defect na een val, onmiddellijk de stekker uit het stopcontact. Stel nooit een defect apparaat in werking. REPARATIES MOGELIJK UITSLUITEND WORDEN UITGEVOERD DOOR GEAUTORISEERDE ASSISTENTIECENTRA. Alle aansprakelijkheid voor eventuele schade die het gevolg is van reparaties die op de verkeerde wijze zijn uitgevoerd, wordt afgewezen. Mocht u dit apparaat willen weggooien, dan bevelen wij aan om het onbruikbaar te maken door de stroomkabel door te snijden. Verder bevelen wij aan om de delen van het apparaat die gevaar kunnen opleveren, speciaal voor kinderen die het apparaat kunnen gebruiken om ermee te spelen, onschadelijk te maken. Stel het apparaat niet bloot aan weersinvloeden (regen, zon enz...). Houd de verpakkingsmaterialen buiten het bereik van kinderen, aangezien deze een bron van gevaar kunnen vormen. 37 NL
38 NL Dit apparaat is conform aan de EEG richtlijn 89/336 m.b.t. de elektromagnetische compatibiliteit. Het geluidsniveau van de machine als hij in werking is, is maximaal 86 db(a). BEWAAR DEZE INSTRUCTIES ALTIJD De ARIETE koffiezetapparaten zijn ideaal voor diegenen die weten wat lekker is, te beginnen bij een goed kopje koffie. Dankzij het Thermocream apparaat heeft u altijd een warm en smeuïg kopje koffie als die uit de bar. Het Thermocream apparaat is namelijk uitgerust met een filter die een constante druk van de koffie-uitloop garandeert. Zo kunt u van een kopje koffie genieten met veel crème, met een intens aroma en volle smaak, zonder dat de koffie hard hoeft te worden aangedrukt, en waarbij iedere maling kan worden gebruikt, als deze maar niet te fijn is. De ARIETE koffiezetapparaten komen ook aan de wensen van cappuccinodrinkers tegemoet, want dankzij het MAXI CAPPUCCINO apparaat kunt u in enkele seconden een stevige dikke schuimlaag maken. De koffie is ook meteen klaar met de ARIETE machines want deze zijn uitgerust met een automatische inschakeling die het mogelijk maakt om meteen koffie te zetten, ook als de machine lange tijd iet is gebruikt of nadat het waterreservoir is gevuld. Een lekker kopje koffie toegewenst met Café Roma Deluxe Ariete!. BESCHRIJVING VAN DE ONDERDELEN A - Basis van het apparaat B - Stopknop van de regelaar voor het malen van de koffie C - Deksel houder koffie D - Houder koffiebonen, regelaar voor het malen E - Thermometer temperatuur in de ketel ( C en F) F - Water/stoomhendel G - Accessoireruimte H - Waterreservoir (inhoud 1,5 l MAX peil) I - Deurtje voor het vullen van het reservoir L - Bedieningspaneel M - Inrichting voor continue koffietoevoer N - Dispenser met doseerinrichting voor de gemalen koffie O - MAXI CAPPUCCINO en buisje water/stoom P - Aandrukker Q - Wateropvanglade R - Koffiepoederopvanglade S - Rooster om de kopjes op te zetten T - Professionele filterhouder U - Thermocream filter V - Siliconenring W - Schijf Thermocream BESCHRIJVING VAN DE BEDIENING 1 Controlelampje inschakeling 2 Controlelampje koffietemperatuur 3 Controlelampje stoomtemperatuur 4 Controlelampje vullen dispenser 5 Toets inschakeling 6 Schakelaar koffie zetten 7 Stoomschakelaar 8 Toets vullen dispenser 38
39 INBEDRIJFSTELLING - Neem het waterreservoir (H) uit de machine, vul het met vers water tot aan het Max. peil (1,5 l) en zet het weer op zijn plaats in de machine terug. Om de goede werking van de machine te garanderen, drukt u het reservoir stevig aan, Fig. 5. Het reservoir kan ook van boven worden gevuld, door water in de speciale ruimte te doen na het deurtje (I) te hebben opgetild, Fig Steek de stekker in het stopcontact. - Druk op de inschakeltoets (5) Fig. 2; het controlelampje voor de inschakeling (1) gaat branden en het controlelampje (2) begint te knipperen tot de juiste temperatuur is bereikt, waarna hij blijft branden. Druk de water/ stoomhendel omlaag (Fig. 3 - F), druk tegelijkertijd op de schakelaar voor het koffie zetten (6) en laat eventuele lucht of water uit het circuit. Vul minstens een kopje met dit water. Zet de water/stoomhendel (F) weer omhoog en stop met koffie zetten door op toets (6) te drukken. BELANGRIJK!: Het wordt aangeraden deze handeling uit te voeren iedere keer dat de machine wordt aangezet nadat deze enige dagen niet is gebruikt. Om het reservoir normaal te vullen tilt u het deurtje (I) op en doet u vers water in de hiervoor bestemde ruimte (Fig. 4). - Gooi de koffiebonen in de houder (D) Max. 230 gr Fig. 6. De koffie kan meer of minder fijn worden gemalen, afhankelijk van uw wensen. Om de maalfijnheid te veranderen, drukt u op de stopknop (B) en draait u de koffiemaler afhankelijk van de genummerde schaal naar rechts of naar links, Fig. 7. DEZE HANDELING DIENT ALTIJD TE WORDEN VERRICHT ALS DE KOFFIEMALER IS UITGESCHAKELD. KEUS VAN HET TYPE APPARAAT DAT DE KOFFIE MAALT De machine is voorzien van twee onderling uitwisselbare mechanismen: 1) Continue koffietoevoer (M) Fig. 1 dat de mogelijkheid geeft de koffie onmiddellijk te malen. Druk op de knop (M/a) die zich onder de uitlaat van de gemalen koffie bevindt met de filterhouder aangebracht in de speciale houder Fig. 8. 2) Dispenser / doseerinrichting (N) Fig. 9. Vul de dispenser met gemalen koffie door op de schakelaar (8) te drukken Fig. 2 tot deze geheel is gevuld; beweeg het doseerhendeltje een of twee keer, afhankelijk van hoeveel kopjes koffie u wilt, met de filterhouder in de houder. Om het element uit te zetten moet u hem naar u toe trekken (M) of (N). HOE MAAK JE KOFFIE Controleer het waterpeil in het reservoir (H). Ga na of het reservoir op correcte wijze is aangebracht in de houder. Doseer de koffie in de filterhouder Fig. 8 met de koffiezetinrichting van uw keus en druk de koffie zachtjes aan met de drukker Fig. 10. Zet de filterhouder goed vast en controleer of de flens goed vast is gezet Fig. 14. Als er te veel koffiepoeder in het filter wordt gedaan, kan het zijn dat het vastdraaien van de filterhouder moeizaam gaat en/of de filterhouder tijdens het koffiezetten lekt. De machine is klaar voor gebruik wanneer het controlelampje (2) Fig. 2 stopt met knipperen en blijft branden. Druk vervolgens de schakelaar voor het koffiezetten in (6). Het koffiezetten kan worden onderbroken door de schakelaar (6) opnieuw in te drukken. De maximum dosis voor een kopje koffie is 50 ml. N.B. Net als bij de professionele koffiezetapparaten, mag de filterhouder niet worden verwijderd wanneer het hoofdschakelaar (6) is ingeschakeld; Draai, nadat koffie is gezet, de filterhouder geleidelijk losser door hem met de wijzers van de klok mee te draaien. Het Thermocream systeem van ARIETE is speciaal ontwikkeld om zo goed mogelijk in de behoeften van de consument te voorzien, en bestaat uit twee delen: het Thermocream -filter (U) met slechts één opening waar de koffie uit komt (Fig. 13), waardoor er meer crème wordt gemaakt, en de kunststof Thermocream -schijf (W) 39 NL
40 NL samen met de siliconenring (V). Een continue reiniging van het filter (U) zorgt ervoor dat hij lange tijd in goede staat blijft. HOE MAAK JE CAPPUCCINO Let goed op voordat u MAXI CAPPUCCINO gebruikt: verzeker u ervan dat de filterhouder van zijn plaats is genomen. Voor een cappuccino, warme chocomel, of om alleen maar een drankje op te warmen, drukt u op de schakelaar voor de stoomproductie (7) Fig. 2. Het controlelampje (2) zal doven en het controlelampje (3) van de stoomschakelaar zal beginnen te knipperen; wanneer het controlelampje (3) stopt met knipperen en blijft branden, zal de machine klaar zijn om stoom af te geven. Druk de water/stoomhendel (F) Fig.3 omlaag, na een glas onder het Maxi Cappuccino pijpje (O) Fig. 12 te hebben gezet. Er zal eerst een kleine hoeveelheid water uitkomen en meteen daarna een harde straal stoom. Stop vervolgens de stoomafgifte en haal de hendel (F) Fig. 3 omhoog. Zet de melkkan met de op te schuimen melk onder het stoompijpje, open de stoomafgifte weer door de hendel geleidelijk neer te laten en dompel het pijpje diep in de melk: binnen enkele ogenblikken ziet u dik en smeuïg schuim ontstaan Fig. 15. Zet wanneer u klaar bent met deze handeling de stoomfunctie uit door opnieuw de stoomschakelaar (7) in te drukken. Het controlelampje voor de stoom (3) zal doven. HOE MAAK JE THEE EN DERGELIJKE Zet, na de handelingen beschreven in het hoofdstuk VOORAFGAANDE FASES AAN HET GEBRUIK te hebben uitgevoerd, een kopje onder het pijpje van de Maxi Cappuccino (O); duw de water-stoomhendel (F) naar beneden en druk tegelijkertijd op de schakelaar (6) van de koffietoevoer en de stoomschakelaar (7). Het controlelampje (2) zal doven en het controlelampje (3) begint te knipperen. Er begint water uit het pijpje van de Maxi Cappuccino (O) te komen. Druk op de schakelaar van de koffietoevoer (6) om de koffietoevoer te onderbreken: het controlelampje (3) zal doven en het controlelampje (2) zal blijven branden. Duw de stoomhendel weer omhoog, de machine is weer klaar voor gebruik. HET OPNIEUW GEBRUIKEN VOOR HET KOFFIEZETTEN Om van de stoomafgifte op koffie zetten over te gaan, moet de machine worden afgekoeld: druk op de schakelaar voor het koffie zetten (6) en laat minstens één kopje water uit uitgang komen waar het filterhouder wordt vastgezet. Wacht tot het controlelampje (2) weer uitgaat, voordat u koffie zet. NUTTIGE INFORMATIE VOOR HET MAKEN VAN EEN GOEDE ESPRESSO De gemalen koffie in de filterhouder moet zachtjes worden aangedrukt. Of de koffie sterk of minder sterk is hangt af van de maalfijnheid van de koffie, van de hoeveelheid koffie die in de filterhouder wordt gedaan, en van hoe stevig de koffie wordt aangedrukt. Na enkele seconden begint de koffie in de kopjes te druppelen. Als daar meer tijd nodig is, dan betekent dit dat de koffie te fijn is gemalen of te stevig is aangedrukt. REGELMATIGE SCHOONMAAK LET OP: alle schoonmaakhandelingen die hieronder staat beschreven moeten uitgevoerd worden terwijl de machine uitstaat. Schoonmaak van het filter waarin de maling zit. Controleer of de interne gaatjes niet verstopt raken; als dat wel het geval is, maak het filter dan met een borsteltje schoon. Kijk of het gat aan de onderkant niet verstopt is geraakt, en als dat wel het geval is, maak hem dan schoon met een speld (Fig. 13) en laat kokend water door de filterhouder met het filter maar zonder gemalen koffie lopen, om eventuele koffieresten of verontreinigingen op te lossen of te verwijderen. Het wordt aangeraden het filter (U) ongeveer iedere 3 maanden goed schoon te maken met gebruikmaking van de schoonmaakpads COFFEE CLEAN van ARIETE, die bij ieder verkooppunt en bij de Erkende Service Centra verkrijgbaar zijn; volg daarbij de instructies op de verpakking. 40
41 Schoonmaak van de plek waar de filterhouder zit. Door het gebruik kan, op de plaats waar de filterhouder wordt vastgezet, aanslag van koffiedik ontstaan, die kan worden verwijderd met een tandenstoker of met een sponsje, of door water door te laten lopen zonder filterhouder. Schoonmaak van het MAXI CAPPUCCINO apparaat. Voer de handeling uit als de chromen buis koud is, om verbranding te voorkomen. Draai het apparaat (O) van het buisje en was deze onder de kraan. Het buisje mag met een niet schurende doek worden schoongemaakt. Draai de cappuccinoinrichting er weer helemaal op. Maak, indien nodig, de uitgang van het stoombuisje schoon met een speld. Laat het stoom er na ieder gebruik enkele seconden doorheen stromen om eventuele resten te verwijderen. Schoonmaak reservoir. Het wordt aangeraden om de binnenkant van het reservoir regelmatig met een spons of een vochtige doek schoon te maken. ONTKALKEN Gezien onze ervaring en dankzij de technieken die bij het fabriceren van het koffiezetapparaat worden gebruikt, vormt zich geen kalkaanslag in het apparaat. Als het apparaat echter na verloop van tijd minder goed blijkt te werken doordat er vaak hard en kalkrijk water wordt gebruikt, moet de machine worden ontkalkt om de gebreken te verhelpen. Gebruik hiervoor uitsluitend het ontkalkingsmiddel van Ariete op basis van citroenzuur (NOCAL). Dit product kan eenvoudig worden besteld bij het adres dat is aangegeven voor technische assistentie. Ontkalkingsproducten van andere fabrikanten, ook als ze op basis van citroenzuur zijn, kunnen chemische toevoegingsmiddelen bevatten, die schade aan de interne onderdelen van het koffiezetapparaat kunnen veroorzaken, waarvoor Ariete iedere aansprakelijkheid afwijst. Als ontkalking noodzakelijk is, volg dan de aanwijzingen op de gebruiksaanwijzing van het ontkalkingsproduct. NL 41
42 NL HOE KUNNEN DE VOLGENDE PROBLEMEN WORDEN OPGELOST PROBLEMEN OORZAKEN OPLOSSINGEN Er komt geen kokend water voor thee uit de machine. Waarschijnlijk is er lucht in het circuit gekomen die de pomp buiten werking heeft gesteld. Kijk of het reservoir er goed inzit en of het niveau niet onder het minimum, dat in relief aangegeven, is gedaald. Herhaal de handelingen uit de paragraaf VOORAFGAANDE FASES AAN HET GEBRUIK. De machine produceert geen stoom. Koffie die uit de bovenkant van de filterhouder komt. Er komt geen koffie uit het apparaat, of de koffie loopt te langzaam door. De koffie is te waterig en koud. Er is weinig water en de pomp zuigt niet aan. Uitgang van het stoombuisje verstopt. Waarschijnlijk zit er te veel gemalen koffie in de filterhouder waardoor deze niet goed op zijn plek gedrukt kan worden. De uitgang van het filter met de gemalen koffie is verstopt. Het is mogelijk dat de slechte doorloop van de koffie ook komt door het water dat niet goed door de gaatjes van de schijf, die op de plek waar de filterhouder zit, kan lopen. Het is namelijk mogelijk dat na enkele maanden gebruik, vet- of kalkresten de gaatjes van de schijf blokkeren. Het reservoir zit er verkeerd in. Zet deze er goed in door het reservoir helemaal aan te drukken. Er is weinig water en de pomp zuigt niet aan. Vul het reservoir. Het koffiemelange is te fijn gemalen of de stevig aangedrukt. De maling is te grof. 42 Haal eventueel afgezet materiaal uit het stoombuisje. Controleer of er genoeg water in het reservoir zit. Herhaal de handeling, maar nu met een juiste hoeveelheid koffie in de filter. Op het leertje van de plek waar de filterhouder inzit, zijn resten van gemalen koffie blijven zitten. Maak het leertje met een tandenstoker of een sponsje schoon. Reinig de filterhouder met de COFFEE CLEAN tabletten van Ariete. Als het probleem zich na de hierboven beschreven handelingen blijft voordoen, ga dan naar een erkend Servicecentrum. Maak het verstopte gaatje van het filter schoon met een naald. Kijk het filter na waar de gemalen koffie in zit. Als de gaatjes verstopt zijn, moeten ze worden schoongemaakt met een borsteltje, of met behulp van gereedschap. Laat kokend water door de filterhouder lopen met daarin het filter zonder koffie, om de eventuele koffieresten of verontreinigingen op te lossen of te verwijderen. Reinig de filterhouder met de COFFEE CLEAN tabletten van Ariete. Schakel de machine in zonder filterhouder en laat het water stromen. Als er nog steeds geen water uit alle gaatjes komt, wend u dan tot het dichtstbijzijnde Erkende Servicecentrum om het apparaat schoon te laten maken. Probeer koffiemelanges met een grovere maling te gebruiken. Druk de koffie in het filter minder hard aan. Voor sterkere en warmere koffie, moet een fijnere maling worden gebruikt. Dit probleem wordt in ieder geval opgelost dankzij het Thermocream systeem, dat een altijd hete koffie met veel schuim garandeert, ook bij grof gemalen koffie.
43 ΣΗΜΑΝΤΙΚΕΣ ΠΡΟΕΙΔΟΠΟΙΗΣΕΙΣ Διαβάστε προσεκτικά τις οδηγίες, πριν χρησιμοποιήσετε τη συσκευή. Συνιστούμε να φυλάσσετε τα υλικά συσκευασίας του εργοστασίου, δεδομένου ότι δεν προβλέπεται δωρεάν τεχνική υποστήριξη για τις ζημιές που προκλήθηκαν από ακατάλληλη συσκευασία του προϊόντος κατά την αποστολή από ένα εξουσιοδοτημένο Κέντρο Τεχνικής Υποστήριξης. Πριν συνδέσετε τη συσκευή στο ηλεκτρικό δίκτυο, βεβαιωθείτε πως η τάση που αναφέρεται στην πινακίδα κάτω από τη συσκευή, αντιστοιχεί με την τάση του δικτύου της περιοχής σας. Μην ανασηκώνετε τη συσκευή κρατώντας την από το δοχείο νερού, αλλά χρησιμοποιείτε τις ειδικές εσοχές στη βάση της. Μην θέτετε ποτέ σε λειτουργία τη συσκευή χωρίς νερό ή χωρίς σπόρους καφέ. Αποφύγετε να βάλετε στο δοχείο υπερβολική ποσότητα νερού. Μην χρησιμοποιείτε αεριούχο νερό. Μην χρησιμοποιείτε τη συσκευή χωρίς νερό, γιατί θα καεί η αντλία. Το καλώδιο ηλεκτροδότησης δεν πρέπει να ακουμπάει σε ζεστές επιφάνειες. Να βγάζετε το φις από την πρίζα πριν από οποιαδήποτε επέμβαση καθαρισμού ή συντήρησης. Μην αφήνετε τη συσκευή σε θερμοκρασία περιβάλλοντος χαμηλότερη από 0 C, δεδομένου ότι μπορεί να παγώσει το νερό στο λέβητα και να επακολουθήσει ζημιά. Πριν γεμίσετε το δοχείο με νερό, βγάλτε το φις από την πρίζα. Η συσκευή προορίζεται αποκλειστικά για οικιακή χρήση και δεν πρέπει να χρησιμοποιείται για εμπορικούς ή βιομηχανικούς σκοπούς. Μην επιτρέπετε σε μικρά παιδιά ή άτομα με ειδικές ανάγκες να πλησιάζουν στη συσκευή όταν είναι αναμμένη. Μην ρυθμίζετε ποτέ το μύλο άλεσης όταν λειτουργεί. Μην βάζετε ποτέ μέσα αλεσμένο καφέ σε σκόνη, αλλά αποκλειστικά καφέ σε σπόρους. Αν είναι χαλασμένο το καλώδιο ηλεκτροδότησης, πρέπει να αντικατασταθεί από τον κατασκευαστικό οίκο ή από ένα εξουσιοδοτημένο Κέντρο Τεχνικής Υποστήριξης (Σέρβις) ή από κάποιο άτομο που έχει την απαιτούμενη τεχνική κατάρτιση, ώστε να αποφύγετε κάθε κίνδυνο. Μην αγγίζετε ποτέ τις μεταλλικές εξωτερικές επιφάνειες όταν λειτουργεί η συσκευή, γιατί μπορεί να πάθετε εγκαύματα. Μην γεμίζετε ποτέ το δοχείο του νερού με ζεστό ή καυτό νερό. Αφού βγάλετε το φις από την πρίζα και αφού κρυώσουν τα ζεστά εξαρτήματα, η συσκευή πρέπει να καθαριστεί αποκλειστικά με ένα μαλακό πανί, μόλις βουτηγμένο στο νερό με λίγες σταγόνες ουδέτερου απορρυπαντικού κουζίνας (μην χρησιμοποιείτε ποτέ διαλύτες που μπορεί να κάνουν ζημιά στα πλαστικά). ΜΗΝ ΒΥΘΊΖΕΤΕ ΤΗ ΣΥΣΚΕΥΉ ΣΕ ΝΕΡΌ Ή ΆΛΛΑ ΥΓΡΆ. Μην βρέχετε ποτέ τα ηλεκτρικά εξαρτήματα για να μην δημιουργηθεί βραχυκύκλωμα. Μην κατευθύνετε ποτέ το ζεστό νερό ή τον ατμό πάνω σας. Να πιάνετε και να μετακινείτε προσεκτικά το σωληνάκι ατμού/ζεστού νερού: κίνδυνος εγκαυμάτων. Τοποθετήστε τη συσκευή σε ένα σταθερό επίπεδο, όπου δεν υπάρχει κίνδυνος να αναποδογυρίσει. Μην τοποθετείτε τη συσκευή πάνώ σε ζεστές επιφάνειες ή κοντά σε γυμνές φλόγες για να μην γίνει ζημιά στο περίβλημά της. Μην χρησιμοποιείτε τη συσκευή σε υπαίθριο χώρο. Επιλέξτε ένα χώρο με επαρκή φωτισμό και αερισμό και με μια πρίζα εύκολα προσπελάσιμη. Σε περίπτωση ζημιών, ελαττωμάτων ή υποψίας προβλήματος μετά από μια πτώση της συσκευής, βγάλτε αμέσως το φις από την πρίζα. Μην θέτετε σε λειτουργία τη συσκευή αν είναι ελαττωματική. ΟΙ ΕΠΙΣΚΕΥΕΣ ΠΡΕΠΕΙ ΝΑ ΕΚΤΕΛΟΥΝΤΑΙ ΑΠΟΚΛΕΙΣΤΙΚΑ ΣΕ ΕΞΟΥΣΙΟΔΟΤΗΜΕΝΑ ΚΕΝΤΡΑ ΤΕΧΝΙΚΗΣ ΥΠΟΣΤΗΡΙ- ΞΗΣ (ΣΕΡΒΙΣ). Ο κατασκευαστικός οίκος απαλλάσσεται από κάθε ευθύνη για τυχόν βλάβες που οφείλονται σε λανθασμένες επισκευές. Αν αποφασίσετε να πετάξετε τη συσκευή, πρέπει να την αχρηστεύσετε κόβοντας το καλώδιο τροφοδοσίας. Συνιστάται επίσης να καταστήσετε ακίνδυνα τα μέρη της συσκευής που μπορεί να αποτελέσουν πηγή κινδύνου, ιδιαίτερα για μικρά παιδιά που μπορεί να παίξουν με τη συσκευή. Τα υλικά συσκευασίας δεν πρέπει να εγκαταλείπονται στη διάθεση μικρών παιδιών, δεδομένου ότι αποτελούν πηγή κινδύνου. Μην αφήνετε τη συσκευή εκτεθειμένη στους ατμοσφαιρικούς παράγοντες (βροχή, ήλιο, κλπ...). 43 EL
44 EL Η συσκευή ανταποκρίνεται στις προδιαγραφές της οδηγίας 89/336/ΕΟΚ περί ηλεκτρομαγνητικής συμβατότητας. Η εκπομπή θορύβου της συσκευής στη θέση εργασίας είναι 86 db(a). ΦΥΛΑΞΤΕ ΤΙΣ ΟΔΗΓΙΕΣ ΑΥΤΕΣ Οι μηχανές καφέ της ARIETE προορίζονται γι αυτούς που απολαμβάνουν τη ζωή, αρχίζοντας από έναν καλό καφέ. Το ειδικό πιατάκι Thermocream, που καλύπτεται από δίπλωμα ευρεσιτεχνίας, δίνει τη δυνατότητα να φτιάξετε στο σπίτι ένα ζεστό καφέ με καϊμάκι, όπως ο καφές του μπαρ. Το πιατάκι Thermocream είναι εξοπλισμένο με ένα φίλτρο που εξασφαλίζει την παροχή του καφέ σε σταθερή πίεση. Μ αυτό τον τρόπο μπορείτε να απολαύσετε έναν καφέ με πολύ καϊμάκι, έντονο άρωμα και χυμώδη γεύση, χωρίς να πρέπει να τον συμπιέσετε υπερβολικά και χρησιμοποιώντας οποιοδήποτε χαρμάνι, αρκεί να μην είναι πολύ ψιλοκομμένο. Οι μηχανές καφέ της Ariete ικανοποιούν και όσους προτιμούν τον καπουτσίνο δεδομένου ότι με το εξάρτημα MAXI CAPPUCCINO παρασκευάζεται σε λίγα δευτερόλεπτα, ένας πλούσιος και πυκνός αφρός. Επιπλέον οι μηχανές καφέ της Ariete, έχουν μια αυτόματη βαλβίδα που δίνει τη δυνατότητα να φτιάξετε αμέσως έναν καφέ, ακόμα και μετά από μακροχρόνια μη χρήση της συσκευής ή αμέσως μετά από το γέμισμα του δοχείου με νερό. Ευχόμαστε σε όλους να απολαύσουν έναν καλό καφέ με την Café Roma Deluxe της Ariete. ΠΕΡΙΓΡΑΦΗ ΤΩΝ ΕΞΑΡΤΗΜΑΤΩΝ Α - Σώμα συσκευής Β - Κουμπί στάσης του ρυθμιστή άλεσης καφέ C - Καπάκι δοχείου καφέ D - Δοχείο καφέ σε σπόρους, ρυθμιστής άλεσης Ε - Θερμόμετρο θερμοκρασίας λέβητα ( C και F) F - Μοχλός νερού/ατμού G - Διαμέρισμα εξαρτημάτων Η - Δοχείο νερού (χωρητικότητα 1,5 λίτρο, μέγιστη στάθμη) Ι - Πορτάκι πλήρωσης δοχείου L - Πίνακας ελέγχου Μ - Διάταξη συνεχούς ροής αλεσμένου καφέ Ν - Διάταξη δοσομέτρησης αλεσμένου καφέ Ο - Εξάρτημα MAXI CAΡPUCCINO και σωληνάκι νερού/ατμού P - Πιεστηράκι Q - Σκαφάκι συλλογής νερού R - Σκαφάκι συλλογής σκόνης καφέ S - Σχάρα για τα φλιτζάνια T - Επαγγελματική υποδοχή φίλτρου U - Πιατάκι Thermocream V - Δαχτύλιος σιλικόνης W - Πιατάκι Thermocream ΠΕΡΙΓΡΑΦΗ ΕΞΑΡΤΗΜΑΤΩΝ ΧΕΙΡΙΣΜΟΥ 1 Ενδεικτικό λαμπάκι λειτουργίας 2 Ενδεικτικό λαμπάκι θερμοκρασίας καφέ 3 Ενδεικτικό λαμπάκι ατμού 4 Ενδεικτικό λαμπάκι πλήρωσης δοσομετρητή 5 Κουμπί που ανάβει τη συσκευή 6 Διακόπτης παροχής καφέ 7 Διακόπτης ατμού 8 Κουμπί πλήρωσης διάταξης δοσομέτρησης 44
 Εικ. 4.")
45 EL ΘΕΣΗ ΣΕ ΛΕΙΤΟΥΡΓΙΑ - Αφαιρέστε το δοχείο νερού (Η) από τη συσκευή, γεμίστε το με το καθαρό φυσικό νερό μέχρι τη μέγιστη στάθμη (1,5 λίτρο) και ξαναβάλτε το στη συσκευή. Για να εξασφαλίσετε τη σωστή λειτουργία της συσκευής, πιέστε τέρμα το δοχείο, Εικ. 5. Το δοχείο μπορεί να γεμίσει και από πάνω, χύνοντας το νερό, αφού ανασηκώσετε το πορτάκι (1) Εικ Βάλτε το φις στην πρίζα. - Πατήστε τον γενικό διακόπτη (5) Εικ. 2: θα ανάψει σταθερά η λυχνία λειτουργίας (1) και η λυχνία (2) θα αρχίσει να αναβοσβήνει ωσότου η συσκευή φτάσει στην σωστή θερμοκρασία, στην συνέχεια θα παραμείνει σταθερά αναμμένη. Kατεβάστε το μοχλό νερού/ατμού (Εικ. 3 F) και ταυτόχρονα πιέστε το διακόπτη παροχής καφέ (6), αφήνοντας να βγει ο τυχόν αέρας ή το νερό που περιέχεται στο κύκλωμα. Γεμίστε τουλάχιστον ένα φλιτζάνι με το νερό αυτό. Ανεβάστε το μοχλό νερού/ατμού (F) και διακόψτε την παροχή καφέ, πατώντας το κουμπί (6). ΣΗΜΑΝΤΙΚΟ: Συνιστάται να επαναλάβετε τη διαδικασία αυτή κάθε φορά που ανάβετε τη συσκευή ή μετά από μερικές μέρες που έμεινε αχρησιμοποίητη. Για να γεμίσετε κανονικά το δοχείο, ανασηκώστε το πορτάκι (Ι) και χύστε στο ειδικό διαμέρισμα φρέσκο φυσικό νερό (Εικ. 4). - Βάλτε στο δοχείο (D), τον καφέ σε σπόρους, μέγιστη ποσότητα 230 γρ. Εικ. 6. Η άλεση του καφέ μπορεί να είναι περισσότερο ή λιγότερο λεπτή, ανάλογα με τον επιθυμητό βαθμό άλεσης. Για να αλλάξετε το βαθμό άλεσης, πατήστε το κουμπί στάσης (Β) και γυρίστε το μύλο του καφέ προς τα αριστερά ή προς τα δεξιά, ανάλογα με τη βαθμονομημένη κλίμακα Εικ. 7. Η ΕΡΓΑΣΙΑ ΑΥΤΗ ΠΡΕΠΕΙ ΝΑ ΓΙΝΕΙ ΟΠΩΣΔΗΠΟΤΕ ΜΕ ΣΒΗΣΤΟ ΜΥΛΟ ΑΛΕΣΗΣ. ΕΠΙΛΟΓΗ ΕΞΑΡΤΗΜΑΤΟΣ ΠΑΡΟΧΗΣ ΑΛΕΣΜΕΝΟΥ ΚΑΦΕ Η συσκευή είναι εφοδιασμένη με δύο ανταλλάξιμα εξαρτήματα: 1) Εξάρτημα «Συνεχούς Ροής» (Μ) Εικ. 1 που αλέθει αμέσως τον καφέ. Πατήστε το κουμπί (Μ/a) που βρίσκεται κάτω από την έξοδο του αλεσμένου καφέ, έχοντας περάσει την υποδοχή του φίλτρου στο ειδικό δίχαλο Εικ. 8. 2) Εξάρτημα «Δοσομέτρησης» (Ν) Εικ. 9. Για να γεμίσετε το Δοσομετρητή του αλεσμένου καφέ, πατήστε το διακόπτη (8) Εικ. 2, μέχρι να γεμίσει. Μετατοπίστε το μοχλό του Δοσομετρητή μία ή δύο φορές, ανάλογα με το πόσα είναι τα φλιτζάνια καφέ που θέλετε να φτιάξετε, έχοντας περάσει την υποδοχή του φίλτρου στο δίχαλο. Για να αφαιρέσετε τα εξαρτήματα, τραβήξτε τα προς το μέρος σας (Μ) ή (Ν). ΠΩΣ ΝΑ ΦΤΙΑΞΕΤΕ ΚΑΦΕ Ελέγξτε τη στάθμη του νερού στο δοχείο (Η). Βεβαιωθείτε πως το δοχείο είναι σωστά τοποθετημένο στην έδρα του. Δοσομετρήστε τον καφέ στην υποδοχή φίλτρου Εικ. 8 με το εξάρτημα παροχής που επιλέξατε και πιέστε τον ελαφρά με το πιεστηράκι Εικ. 10. Συσφίξτε καλά την υποδοχή του φίλτρου και βεβαιωθείτε πως είναι καλά περασμένη στη φλάντζα Εικ. 14. Αν έχετε βάλει υπερβολική ποσότητα καφέ στο φίλτρο, μπορεί να είναι δύσκολη η περιστροφή της υποδοχής του φίλτρου ή/και να παρουσιάζονται διαρροές όταν αρχίσει να ρέει ο καφές στο φλιτζάνι. Η συσκευή θα είναι έτοιμη για χρήση, όταν η λυχνία (2) Εικ. 2 σταματήσει να αναβοσβήνει. Πατήστε στη συνέχεια το διακόπτη παροχής καφέ (6). Για να διακόψετε την παροχή, ξαναπατήστε το διακόπτη (6). Η μέγιστη δόση για έναν καφέ είναι 50 ml. Σημαντικό: Όπως και στις επαγγελματικές μηχανές καφέ, δεν πρέπει να αφαιρείτε την υποδοχή του φίλτρου, όσο είναι ενεργοποιημένος ο διακόπτης. Αφού φτιάξετε τον καφέ, χαλαρώστε σταδιακά την υποδοχή του φίλτρου περιστρέφοντάς την προς τα δεξιά. Το σύστημα Thermocream της ARIETE είναι μελετημένο ειδικά για να ικανοποιεί με τον καλύτερο τρόπο όλες τις απαιτήσεις του καταναλωτή και αποτελείται από δύο στοιχεία: το φίλτρο Thermocream (U) διαθέτει μονάχα μια οπή για την εκροή του καφέ (Εικ. 13) που ευνοεί να γίνει το καϊμάκι και το πλαστικό πιατάκι Thermocream 45
Περιεχόμενα / Contents
 Aερόθερμo / Fan Heater PTC-906 Περιεχόμενα / Contents GR... Σελίδες 3-8 EN... Pages 9-11 2 GR Ευχαριστούμε που επιλέξατε μια συσκευή της γκάμας θερμαντικών IZZY. Σημαντικές Οδηγίες Ασφαλείας Τα Μέρη της
 60 61 62 63 64 65 Ο Δ Η Γ Ι Ε Σ Σ Υ Ν Τ Η Ρ Η Σ Η Σ Τ Ω Ν Κ Ο Υ Φ Ω Μ Α Τ Ω Ν Ι Ν S T R U C T I N O N S C O N C E R N I N G Τ Η Ε C A S E M E N T S M A I N T E N A N C E Ο τακτικός καθαρισμός των βαμμένων
the total number of electrons passing through the lamp.
 1. A 12 V 36 W lamp is lit to normal brightness using a 12 V car battery of negligible internal resistance. The lamp is switched on for one hour (3600 s). For the time of 1 hour, calculate (i) the energy
La Déduction naturelle
 La Déduction naturelle Pierre Lescanne 14 février 2007 13 : 54 Qu est-ce que la déduction naturelle? En déduction naturelle, on raisonne avec des hypothèses. Qu est-ce que la déduction naturelle? En déduction
Tipologie installative - Installation types Type d installation - Installationstypen Tipos de instalación - Τυπολογίες εγκατάστασης
 AMPADE MOOCROMATICHE VIMAR DIMMERABII A 0 V~ - VIMAR 0 V~ DIMMABE MOOCHROME AMP AMPE MOOCHROME VIMAR VARIATEUR 0 V~ - DIMMERFÄHIGE MOOCHROMATICHE AMPE VO VIMAR MIT 0 V~ ÁMPARA MOOCROMÁTICA VIMAR REGUABE
!Stato di tensione triassiale!stato di tensione piano!cerchio di Mohr
 !Stato di tensione triassiale!stato di tensione piano!cerchio di Mohr Stato di tensione F A = F / A F Traione pura stato di tensione monoassiale F M A M Traione e torsione stato di tensione piano = F /
CHAPTER 25 SOLVING EQUATIONS BY ITERATIVE METHODS
 CHAPTER 5 SOLVING EQUATIONS BY ITERATIVE METHODS EXERCISE 104 Page 8 1. Find the positive root of the equation x + 3x 5 = 0, correct to 3 significant figures, using the method of bisection. Let f(x) =
Montage - Raccordement Implantation EURO-RELAIS MINI & BOX. Mini & Box
 Montage - Raccordement Implantation EURO-RELAIS MINI & BOX 3 Fiche technique EURO-RELAIS MINI & BOX DESCRIPTIF La borne Euro-Relais MINI est en polyester armé haute résistance totalement neutre à la corrosion
Right Rear Door. Let's now finish the door hinge saga with the right rear door
 Right Rear Door Let's now finish the door hinge saga with the right rear door You may have been already guessed my steps, so there is not much to describe in detail. Old upper one file:///c /Documents
[1] P Q. Fig. 3.1
![[1] P Q. Fig. 3.1](/thumbs/79/80362156.jpg "[1] P Q. Fig. 3.1") 1 (a) Define resistance....... [1] (b) The smallest conductor within a computer processing chip can be represented as a rectangular block that is one atom high, four atoms wide and twenty atoms long. One
1 (a) Define resistance....... [1] (b) The smallest conductor within a computer processing chip can be represented as a rectangular block that is one atom high, four atoms wide and twenty atoms long. One
Οδηγίες Χρήσης BWR5106
 Οδηγίες Χρήσης BWR5106 Περιγραφή εργαλείου Οι αντλίες χειρός είναι ένα εργαλείο με την ικανότητα, πιέζοντας τον λεβιέ πάνω κάτω να πρεσάρει γράσο σε μεγάλη πίεση και με την βοήθεια αυτής να γρασάρει οπού
Capacitors - Capacitance, Charge and Potential Difference
 Capacitors - Capacitance, Charge and Potential Difference Capacitors store electric charge. This ability to store electric charge is known as capacitance. A simple capacitor consists of 2 parallel metal
HOMEWORK 4 = G. In order to plot the stress versus the stretch we define a normalized stretch:
 HOMEWORK 4 Problem a For the fast loading case, we want to derive the relationship between P zz and λ z. We know that the nominal stress is expressed as: P zz = ψ λ z where λ z = λ λ z. Therefore, applying
ΑΚΑ ΗΜΙΑ ΕΜΠΟΡΙΚΟΥ ΝΑΥΤΙΚΟΥ ΜΑΚΕ ΟΝΙΑΣ ΣΧΟΛΗ ΜΗΧΑΝΙΚΩΝ ΠΤΥΧΙΑΚΗ ΕΡΓΑΣΙΑ ΘΕΜΑ : ΧΗΜΙΚΑ ΠΡΟΣΘΕΤΑ ΠΟΥ ΠΡΟΟΡΙΖΟΝΤΑΙ ΓΙΑ ΤΟ ΝΕΡΟ ΤΟΥ ΑΤΜΟΛΕΒΗΤΑ
 ΑΚΑ ΗΜΙΑ ΕΜΠΟΡΙΚΟΥ ΝΑΥΤΙΚΟΥ ΜΑΚΕ ΟΝΙΑΣ ΣΧΟΛΗ ΜΗΧΑΝΙΚΩΝ ΠΤΥΧΙΑΚΗ ΕΡΓΑΣΙΑ ΘΕΜΑ : ΧΗΜΙΚΑ ΠΡΟΣΘΕΤΑ ΠΟΥ ΠΡΟΟΡΙΖΟΝΤΑΙ ΓΙΑ ΤΟ ΝΕΡΟ ΤΟΥ ΑΤΜΟΛΕΒΗΤΑ ΣΠΟΥ ΑΣΤΗΣ : ΑΓΟΡΑΣΤΟΣ ΧΡΥΣΟΒΑΛΑΝΤΗΣ ΕΠΙΒΛΕΠΟΥΣΑ ΚΑΘΗΓΗΤΡΙΑ :
Instruction Execution Times
 1 C Execution Times InThisAppendix... Introduction DL330 Execution Times DL330P Execution Times DL340 Execution Times C-2 Execution Times Introduction Data Registers This appendix contains several tables
ΚΥΠΡΙΑΚΗ ΕΤΑΙΡΕΙΑ ΠΛΗΡΟΦΟΡΙΚΗΣ CYPRUS COMPUTER SOCIETY ΠΑΓΚΥΠΡΙΟΣ ΜΑΘΗΤΙΚΟΣ ΔΙΑΓΩΝΙΣΜΟΣ ΠΛΗΡΟΦΟΡΙΚΗΣ 19/5/2007
 Οδηγίες: Να απαντηθούν όλες οι ερωτήσεις. Αν κάπου κάνετε κάποιες υποθέσεις να αναφερθούν στη σχετική ερώτηση. Όλα τα αρχεία που αναφέρονται στα προβλήματα βρίσκονται στον ίδιο φάκελο με το εκτελέσιμο
derivation of the Laplacian from rectangular to spherical coordinates
 derivation of the Laplacian from rectangular to spherical coordinates swapnizzle 03-03- :5:43 We begin by recognizing the familiar conversion from rectangular to spherical coordinates (note that φ is used
2 Composition. Invertible Mappings
 Arkansas Tech University MATH 4033: Elementary Modern Algebra Dr. Marcel B. Finan Composition. Invertible Mappings In this section we discuss two procedures for creating new mappings from old ones, namely,
Stucco Natural / Stucco Mítiko. Στόκος με βάση τον ασβέστη.
 Stucco Natural / Stucco Mítiko Στόκος με βάση τον ασβέστη. 5Kg Stucco Mítiko + 480ml Esencia 05 Stuco Natural / Stucco Mítiko Στόκος, για εσωτερική χρήση που χαρίζει ένα πολυτελές παλαιωμένο αποτέλεσμα,
Assalamu `alaikum wr. wb.
 LUMP SUM Assalamu `alaikum wr. wb. LUMP SUM Wassalamu alaikum wr. wb. Assalamu `alaikum wr. wb. LUMP SUM Wassalamu alaikum wr. wb. LUMP SUM Lump sum lump sum lump sum. lump sum fixed price lump sum lump
The challenges of non-stable predicates
 The challenges of non-stable predicates Consider a non-stable predicate Φ encoding, say, a safety property. We want to determine whether Φ holds for our program. The challenges of non-stable predicates
Ο ΗΓΙΕΣ ΧΡΗΣΗΣ USE INSTRUCTIONS
 Ο ΗΓΙΕΣ ΧΡΗΣΗΣ USE INSTRUCTIONS ΗΛΕΚΤΡΙΚΟ ΜΠΡΙΚΙ ΚΑΦΕ ELECTRIC COFFEE BOILER (ΓΙΑ ΠΡΟΕΤΟΙΜΑΣΙΑ ΕΛΛΗΝΙΚΟΥ ΚΑΦΕ / FOR BREWING GREEK COFFEE) Μοντέλο / Model : CM4005 AC230V 50Hz - 800W Παρακαλούµε διαβάστε
(1) Describe the process by which mercury atoms become excited in a fluorescent tube (3)
 Describe the process by which mercury atoms become excited in a fluorescent tube (3)") Q1. (a) A fluorescent tube is filled with mercury vapour at low pressure. In order to emit electromagnetic radiation the mercury atoms must first be excited. (i) What is meant by an excited atom? (1) (ii)
Q1. (a) A fluorescent tube is filled with mercury vapour at low pressure. In order to emit electromagnetic radiation the mercury atoms must first be excited. (i) What is meant by an excited atom? (1) (ii)
Strain gauge and rosettes
 Strain gauge and rosettes Introduction A strain gauge is a device which is used to measure strain (deformation) on an object subjected to forces. Strain can be measured using various types of devices classified
EE512: Error Control Coding
 EE512: Error Control Coding Solution for Assignment on Finite Fields February 16, 2007 1. (a) Addition and Multiplication tables for GF (5) and GF (7) are shown in Tables 1 and 2. + 0 1 2 3 4 0 0 1 2 3
The Simply Typed Lambda Calculus
 Type Inference Instead of writing type annotations, can we use an algorithm to infer what the type annotations should be? That depends on the type system. For simple type systems the answer is yes, and
ΟΔΗΓΙΕΣ ΕΓΚΑΤΑΣTΑΣΗΣ ΓΙΑ ΠΑΤΩΜΑ WPC INSTALLATION GUIDE FOR WPC DECKING
 1/12 ΟΔΗΓΙΕΣ ΕΓΚΑΤΑΣTΑΣΗΣ ΓΙΑ ΠΑΤΩΜΑ WPC INSTALLATION GUIDE FOR WPC DECKING Ανοίγουμε τρύπες Ø8 x 80mm στο σημείο κατασκευής, με τρυπάνι. To προτεινόμενο πλάτος και μήκος μεταξύ των 2 οπών να είναι 30-35εκ.,
How to register an account with the Hellenic Community of Sheffield.
 How to register an account with the Hellenic Community of Sheffield. (1) EN: Go to address GR: Πηγαίνετε στη διεύθυνση: http://www.helleniccommunityofsheffield.com (2) EN: At the bottom of the page, click
Phys460.nb Solution for the t-dependent Schrodinger s equation How did we find the solution? (not required)
") Phys460.nb 81 ψ n (t) is still the (same) eigenstate of H But for tdependent H. The answer is NO. 5.5.5. Solution for the tdependent Schrodinger s equation If we assume that at time t 0, the electron starts
Phys460.nb 81 ψ n (t) is still the (same) eigenstate of H But for tdependent H. The answer is NO. 5.5.5. Solution for the tdependent Schrodinger s equation If we assume that at time t 0, the electron starts
Finite Field Problems: Solutions
 Finite Field Problems: Solutions 1. Let f = x 2 +1 Z 11 [x] and let F = Z 11 [x]/(f), a field. Let Solution: F =11 2 = 121, so F = 121 1 = 120. The possible orders are the divisors of 120. Solution: The
Ευχαριστούμε που επιλέξατε μια συσκευή της γκάμας IZZY. Thank you for selecting an IZZY product. Συμβουλές Aσφαλείας / Safety Interlocks
 Ευχαριστούμε που επιλέξατε μια συσκευή της γκάμας IZZY. Thank you for selecting an IZZY product. Συμβουλές Aσφαλείας / Safety Interlocks Διαβάστε προσεκτικά τις οδηγίες χρήσης και κρατήστε τις σε ασφαλές
Stato di tensione triassiale Stato di tensione piano Cerchio di Mohr
 Stato di tensione triassiale Stato di tensione iano Cerchio di Mohr Stato di tensione F A = F / A F Traione ura stato di tensione monoassiale F M A M Traione e torsione stato di tensione iano = F / A =
C.S. 430 Assignment 6, Sample Solutions
 C.S. 430 Assignment 6, Sample Solutions Paul Liu November 15, 2007 Note that these are sample solutions only; in many cases there were many acceptable answers. 1 Reynolds Problem 10.1 1.1 Normal-order
Advanced Subsidiary Unit 1: Understanding and Written Response
 Write your name here Surname Other names Edexcel GE entre Number andidate Number Greek dvanced Subsidiary Unit 1: Understanding and Written Response Thursday 16 May 2013 Morning Time: 2 hours 45 minutes
9.09. # 1. Area inside the oval limaçon r = cos θ. To graph, start with θ = 0 so r = 6. Compute dr
 9.9 #. Area inside the oval limaçon r = + cos. To graph, start with = so r =. Compute d = sin. Interesting points are where d vanishes, or at =,,, etc. For these values of we compute r:,,, and the values
3.4 SUM AND DIFFERENCE FORMULAS. NOTE: cos(α+β) cos α + cos β cos(α-β) cos α -cos β
 cos α + cos β cos(α-β) cos α -cos β") 3.4 SUM AND DIFFERENCE FORMULAS Page Theorem cos(αβ cos α cos β -sin α cos(α-β cos α cos β sin α NOTE: cos(αβ cos α cos β cos(α-β cos α -cos β Proof of cos(α-β cos α cos β sin α Let s use a unit circle
3.4 SUM AND DIFFERENCE FORMULAS Page Theorem cos(αβ cos α cos β -sin α cos(α-β cos α cos β sin α NOTE: cos(αβ cos α cos β cos(α-β cos α -cos β Proof of cos(α-β cos α cos β sin α Let s use a unit circle
Main source: "Discrete-time systems and computer control" by Α. ΣΚΟΔΡΑΣ ΨΗΦΙΑΚΟΣ ΕΛΕΓΧΟΣ ΔΙΑΛΕΞΗ 4 ΔΙΑΦΑΝΕΙΑ 1
 Main source: "Discrete-time systems and computer control" by Α. ΣΚΟΔΡΑΣ ΨΗΦΙΑΚΟΣ ΕΛΕΓΧΟΣ ΔΙΑΛΕΞΗ 4 ΔΙΑΦΑΝΕΙΑ 1 A Brief History of Sampling Research 1915 - Edmund Taylor Whittaker (1873-1956) devised a
Potential Dividers. 46 minutes. 46 marks. Page 1 of 11
 Potential Dividers 46 minutes 46 marks Page 1 of 11 Q1. In the circuit shown in the figure below, the battery, of negligible internal resistance, has an emf of 30 V. The pd across the lamp is 6.0 V and
Εγκατάσταση λογισμικού και αναβάθμιση συσκευής Device software installation and software upgrade
 Για να ελέγξετε το λογισμικό που έχει τώρα η συσκευή κάντε κλικ Menu > Options > Device > About Device Versions. Στο πιο κάτω παράδειγμα η συσκευή έχει έκδοση λογισμικού 6.0.0.546 με πλατφόρμα 6.6.0.207.
Homework 8 Model Solution Section
 MATH 004 Homework Solution Homework 8 Model Solution Section 14.5 14.6. 14.5. Use the Chain Rule to find dz where z cosx + 4y), x 5t 4, y 1 t. dz dx + dy y sinx + 4y)0t + 4) sinx + 4y) 1t ) 0t + 4t ) sinx
Econ 2110: Fall 2008 Suggested Solutions to Problem Set 8 questions or comments to Dan Fetter 1
 Eon : Fall 8 Suggested Solutions to Problem Set 8 Email questions or omments to Dan Fetter Problem. Let X be a salar with density f(x, θ) (θx + θ) [ x ] with θ. (a) Find the most powerful level α test
ΑΚΑ ΗΜΙΑ ΕΜΠΟΡΙΚΟΥ ΝΑΥΤΙΚΟΥ ΜΑΚΕ ΟΝΙΑΣ ΣΧΟΛΗ ΜΗΧΑΝΙΚΩΝ ΠΤΥΧΙΑΚΗ ΕΡΓΑΣΙΑ
 ΑΚΑ ΗΜΙΑ ΕΜΠΟΡΙΚΟΥ ΝΑΥΤΙΚΟΥ ΜΑΚΕ ΟΝΙΑΣ ΣΧΟΛΗ ΜΗΧΑΝΙΚΩΝ ΠΤΥΧΙΑΚΗ ΕΡΓΑΣΙΑ ΘΕΜΑ :ΤΥΠΟΙ ΑΕΡΟΣΥΜΠΙΕΣΤΩΝ ΚΑΙ ΤΡΟΠΟΙ ΛΕΙΤΟΥΡΓΙΑΣ ΣΠΟΥ ΑΣΤΡΙΑ: ΕΥΘΥΜΙΑ ΟΥ ΣΩΣΑΝΝΑ ΕΠΙΒΛΕΠΩΝ ΚΑΘΗΓΗΤΗΣ : ΓΟΥΛΟΠΟΥΛΟΣ ΑΘΑΝΑΣΙΟΣ 1 ΑΚΑ
Fractional Colorings and Zykov Products of graphs
 Fractional Colorings and Zykov Products of graphs Who? Nichole Schimanski When? July 27, 2011 Graphs A graph, G, consists of a vertex set, V (G), and an edge set, E(G). V (G) is any finite set E(G) is
Quick Installation Guide
 A Installation 1 F H B E C D G 2 www.trust.com/17528/faq Quick Installation Guide C C D Freewave Wireless Audio Set 17528/ 17529 D Installation Configuration Windows XP 4 5 8 Windows 7/ Vista 6 7 9 10
ΕΦΑΡΜΟΓΗ APPLICAZIONE APPLICATION APPLICATION. Sublime Colours 2,5L (10-12m2/L) Esencia 25 ml 100 ml. Damasco 2,5L (6-8m2/L)
 Esencia 25 ml 100 ml. Damasco 2,5L (6-8m2/L)") DAMASCO Διακριτική και κομψή διακόσμηση εμπνευσμένη από τα πολυτελή υφάσματα της αρχαιότητας, για όσους επιθυμούν οι τοίχοι να είναι επενδεδυμένοι με ένα προϊόν που παρέχει μεταξένια και βελούδινη αντανάκλαση.
DAMASCO Διακριτική και κομψή διακόσμηση εμπνευσμένη από τα πολυτελή υφάσματα της αρχαιότητας, για όσους επιθυμούν οι τοίχοι να είναι επενδεδυμένοι με ένα προϊόν που παρέχει μεταξένια και βελούδινη αντανάκλαση.
SPEEDO AQUABEAT. Specially Designed for Aquatic Athletes and Active People
 SPEEDO AQUABEAT TM Specially Designed for Aquatic Athletes and Active People 1 2 Decrease Volume Increase Volume Reset EarphonesUSBJack Power Off / Rewind Power On / Fast Forward Goggle clip LED Status
ANSWERSHEET (TOPIC = DIFFERENTIAL CALCULUS) COLLECTION #2. h 0 h h 0 h h 0 ( ) g k = g 0 + g 1 + g g 2009 =?
 COLLECTION #2. h 0 h h 0 h h 0 ( ) g k = g 0 + g 1 + g g 2009 =?") Teko Classes IITJEE/AIEEE Maths by SUHAAG SIR, Bhopal, Ph (0755) 3 00 000 www.tekoclasses.com ANSWERSHEET (TOPIC DIFFERENTIAL CALCULUS) COLLECTION # Question Type A.Single Correct Type Q. (A) Sol least
Teko Classes IITJEE/AIEEE Maths by SUHAAG SIR, Bhopal, Ph (0755) 3 00 000 www.tekoclasses.com ANSWERSHEET (TOPIC DIFFERENTIAL CALCULUS) COLLECTION # Question Type A.Single Correct Type Q. (A) Sol least
Section 8.3 Trigonometric Equations
 99 Section 8. Trigonometric Equations Objective 1: Solve Equations Involving One Trigonometric Function. In this section and the next, we will exple how to solving equations involving trigonometric functions.
ZLW Series. Single-stage Monoblock Centrifugal Pump ZL PUMP GROUP.,LTD
 ZLW Series Single-stage Monoblock Centrifugal Pump ZL PUMP GROUP.,LTD 1 Application Apply as the transportation of liquids in the fields of air condition, heating, sanitary water, water treatment cooling,
CONFIGURAZIONE DELLA CASELLA DI POSTA ELETTRONICA CERTIFICATA (P.E.C.)
") CONFIGURAZIONE DELLA CASELLA DI POSTA ELETTRONICA CERTIFICATA (P.E.C.) Consigliamo di configurare ed utilizzare la casella di posta elettronica certificata tramite il webmail dedicato fornito dal gestore
CONFIGURAZIONE DELLA CASELLA DI POSTA ELETTRONICA CERTIFICATA (P.E.C.) Consigliamo di configurare ed utilizzare la casella di posta elettronica certificata tramite il webmail dedicato fornito dal gestore
Δημιουργία Λογαριασμού Διαχείρισης Business Telephony Create a Management Account for Business Telephony
 Δημιουργία Λογαριασμού Διαχείρισης Business Telephony Create a Management Account for Business Telephony Ελληνικά Ι English 1/7 Δημιουργία Λογαριασμού Διαχείρισης Επιχειρηματικής Τηλεφωνίας μέσω της ιστοσελίδας
Approximation of distance between locations on earth given by latitude and longitude
 Approximation of distance between locations on earth given by latitude and longitude Jan Behrens 2012-12-31 In this paper we shall provide a method to approximate distances between two points on earth
OUR PRODUCT RANGE. www.rakson.gr
 ΤΑ ΑΛΛΑ ΕΙ Η ΠΡΟΪΟΝΤΑ ΜΑΣ ΜΕΤΑΣΧΗΜΑΤΙΣΤΕΣ ΚΟΥ ΟΥΝΙΩΝ ΚΟΥ ΟΥΝΙΑ ΜΠΟΥΤΟΝ ΚΟΥ ΟΥΝΙΩΝ ΑΥΤΟΜΑΤΟΙ ΚΛΙΜΑΚΟΣΤΑΣΙΟΥ ΚΛΕΙ ΑΡΙΕΣ ΑΝΙΧΝΕΥΤΕΣ ΚΙΝΗΣΗΣ ΣΥΣΤΗΜΑΤΑ ΕΠΙΚΟΙΝΩΝΙΑΣ Θυροτηλεοράσεις Θυροτηλέφωνα Ενδοεπικοινωνίες
User s Manual / Οδηγίες Χρήσης
 User s Manual / Οδηγίες Χρήσης EUROPEAN STANDARDS Your child s safety depends on you. Proper bed rail usage cannot be assured unless you follow these instructions. DO NOT USE YOUR BED RAIL UNTILL YOU READ
Istruzioni per l uso Οδηγίες χρήσης ΑΤΜΟΣΥΣΤΗΜΑ
 Istruzioni per l uso Οδηγίες χρήσης Sistema stirante ΑΤΜΟΣΥΣΤΗΜΑ Indice - Περιεχόμενα IT Descrizione... 4 Descrizione... 4 Pannello comandi... 4 Ferro di tipo professionale... 4 Ferro di tipo domestico...
VBA ΣΤΟ WORD. 1. Συχνά, όταν ήθελα να δώσω ένα φυλλάδιο εργασίας με ασκήσεις στους μαθητές έκανα το εξής: Version 25-7-2015 ΗΜΙΤΕΛΗΣ!!!!
 VBA ΣΤΟ WORD Version 25-7-2015 ΗΜΙΤΕΛΗΣ!!!! Μου παρουσιάστηκαν δύο θέματα. 1. Συχνά, όταν ήθελα να δώσω ένα φυλλάδιο εργασίας με ασκήσεις στους μαθητές έκανα το εξής: Εγραφα σε ένα αρχείο του Word τις
ΟΔΗΓΙΕΣ ΧΡΗΣΗΣ USE INSTRUCTIONS
 ΟΔΗΓΙΕΣ ΧΡΗΣΗΣ USE INSTRUCTIONS ΤΗΛΕΦΩΝΟ ΜΕ ΑΝΑΓΝΩΡΙΣΗ ΚΛΗΣΗΣ /CORDED PHONE WITH CALLER ID ΜΟΝΤΕΛΟ/MODEL: TM09-448 DC48V Παρακαλούμε διαβάστε προσεκτικά όλες τις οδηγίες χρήσης πριν την χρήση της συσκευής
Statistical Inference I Locally most powerful tests
 Statistical Inference I Locally most powerful tests Shirsendu Mukherjee Department of Statistics, Asutosh College, Kolkata, India. shirsendu st@yahoo.co.in So far we have treated the testing of one-sided
(Type B) Το προϊόν αυτό δεν είναι κατάλληλο για σκοπούς πρωτογενούς θέρμανσης. ADM AEE
 Το προϊόν αυτό δεν είναι κατάλληλο για σκοπούς πρωτογενούς θέρμανσης. ADM AEE") (Type B) Το προϊόν αυτό δεν είναι κατάλληλο για σκοπούς πρωτογενούς θέρμανσης. ADM AEE 2310 85 30 61 80 00 18 Mklg 01. Rwnc A]SQ,ovb / D OPERATlON FUELING WARNING: uture storage of your heater. Use o NEVE
(Type B) Το προϊόν αυτό δεν είναι κατάλληλο για σκοπούς πρωτογενούς θέρμανσης. ADM AEE 2310 85 30 61 80 00 18 Mklg 01. Rwnc A]SQ,ovb / D OPERATlON FUELING WARNING: uture storage of your heater. Use o NEVE
Math221: HW# 1 solutions
 Math: HW# solutions Andy Royston October, 5 7.5.7, 3 rd Ed. We have a n = b n = a = fxdx = xdx =, x cos nxdx = x sin nx n sin nxdx n = cos nx n = n n, x sin nxdx = x cos nx n + cos nxdx n cos n = + sin
ITALIANO. pag. 3 ENGLISH. pag. 13 FRANÇAIS. pag. 22 DEUTSCH. pag. 33 ESPAÑOL. pag. 40 ΕΛΛΗΝΙΚΗ. pag. 48
 FERRO DA STIRO - MANUALE DI ISTRUZIONI STEAM IRON - USE INSTRUCTIONS FER A REPASSER VAPEUR - MANUEL D INSTRUCTIONS BÜGELEISEN - BETRIEBSANLEITUNG PLANCHA DE VAPOR - MANUAL DE INSTRUCCIONES ΑΤΜΟΣΙΔΕΡΟ -
Session novembre 2009
 ΥΠΟΥΡΓΕΙΟ ΕΘΝΙΚΗΣ ΠΑΙΔΕΙΑΣ ΚΑΙ ΘΡΗΣΚΕΥΜΑΤΩΝ ΚΡΑΤΙΚΟ ΠΙΣΤΟΠΟΙΗΤΙΚΟ ΓΛΩΣΣΟΜΑΘΕΙΑΣ MINISTÈRE GREC DE L ÉDUCATION NATIONALE ET DES CULTES CERTIFICATION EN LANGUE FRANÇAISE NIVEAU ÉPREUVE B1 sur l échelle proposée
INSTRUCTIONS MANUAL ΕΓΧΕΙΡΙΔΙΟ ΛΕΙΤΟΥΡΓΙΑΣ
 Model/Μοντέλο: WKH-1132 INSTRUCTIONS MANUAL ΕΓΧΕΙΡΙΔΙΟ ΛΕΙΤΟΥΡΓΙΑΣ ENGLISH General Safety Instructions Before commissioning this kettle, please read the instruction manual carefully. Please keep the instruction
ΤΑ ΝΕΑ ΜΑΣ!!!! Ο Αγιασμός στην Αδαμάντιο Σχολή. Επίσκεψη των προνηπίων στο Κτήμα Γεροβασιλείου
 ΣΕΠΤΕΜΒΡΙΟΣ 2013 Ο Αγιασμός στην Αδαμάντιο Σχολή Οι μικροί μαθητές κάτω από την Ευλογία και τη Χάρη της εκκλησίας στον Αγιασμό για την έναρξη της νέας σχολικής χρονιάς 2013 2014. Όμορφα πρόσωπα, χαρούμενα,
ΚΥΠΡΙΑΚΗ ΕΤΑΙΡΕΙΑ ΠΛΗΡΟΦΟΡΙΚΗΣ CYPRUS COMPUTER SOCIETY ΠΑΓΚΥΠΡΙΟΣ ΜΑΘΗΤΙΚΟΣ ΔΙΑΓΩΝΙΣΜΟΣ ΠΛΗΡΟΦΟΡΙΚΗΣ 6/5/2006
 Οδηγίες: Να απαντηθούν όλες οι ερωτήσεις. Ολοι οι αριθμοί που αναφέρονται σε όλα τα ερωτήματα είναι μικρότεροι το 1000 εκτός αν ορίζεται διαφορετικά στη διατύπωση του προβλήματος. Διάρκεια: 3,5 ώρες Καλή
Η ΕΝΕΡΓΕΙΑΚΗ ΣΗΜΑΝΣΗ ΚΑΙ ERP
 Η ΕΝΕΡΓΕΙΑΚΗ ΣΗΜΑΝΣΗ ΚΑΙ ERP 2 1 ΠΛΑΙΣΙΟ ΓΙΑΤΙ ΕΝΕΡΓΕΙΑΚΗ ΣΗΜΑΝΣΗ ΚΑΙ ErP? Αντιμετωπίζοντας την κλιματική αλλαγή, διασφαλίζοντας την ασφάλεια της παροχής ενέργειας2 και την αύξηση της ανταγωνιστικότητα
1) Formulation of the Problem as a Linear Programming Model
 Formulation of the Problem as a Linear Programming Model") 1) Formulation of the Problem as a Linear Programming Model Let xi = the amount of money invested in each of the potential investments in, where (i=1,2, ) x1 = the amount of money invested in Savings Account
1) Formulation of the Problem as a Linear Programming Model Let xi = the amount of money invested in each of the potential investments in, where (i=1,2, ) x1 = the amount of money invested in Savings Account
BFN3000 ΕΠΙΤΡΑΠΕΖΙΟΣ ΑΝΕΜΙΣΤΗΡΑΣ. Owner s manual. Μετάφραση του πρωτοτύπου των οδηγιών χρήσης
 BFN3000 ΕΠΙΤΡΑΠΕΖΙΟΣ ΑΝΕΜΙΣΤΗΡΑΣ Μετάφραση του πρωτοτύπου των οδηγιών χρήσης Owner s manual www.bormanntools.com GR Οδηγίες ασφαλούς λειτουργίας 1. Τα χαρακτηριστικά της παροχής ηλεκτρικού ρεύματος θα
Votre système de traite vous parle, écoutez-le!
 Le jeudi 28 octobre 2010 Best Western Hôtel Universel, Drummondville Votre système de traite vous parle, écoutez-le! Bruno GARON Conférence préparée avec la collaboration de : Martine LABONTÉ Note : Cette
Οδηγίες Αγοράς Ηλεκτρονικού Βιβλίου Instructions for Buying an ebook
 Οδηγίες Αγοράς Ηλεκτρονικού Βιβλίου Instructions for Buying an ebook Βήμα 1: Step 1: Βρείτε το βιβλίο που θα θέλατε να αγοράσετε και πατήστε Add to Cart, για να το προσθέσετε στο καλάθι σας. Αυτόματα θα
Lecture 2: Dirac notation and a review of linear algebra Read Sakurai chapter 1, Baym chatper 3
 Lecture 2: Dirac notation and a review of linear algebra Read Sakurai chapter 1, Baym chatper 3 1 State vector space and the dual space Space of wavefunctions The space of wavefunctions is the set of all
Τεστ Κατάταξης 1 Grading Test 1
 HELLENIC CULTURE CENTRE - Education, Language and Culture www.hcc.edu.gr, e-mail: Ifigenia@hcc.edu.gr, Tel.: (+30) 210 5238149, Fax: (+30) 210 8836494 Τεστ Κατάταξης 1 Grading Test 1 Οδηγίες Πρέπει να
Calculating the propagation delay of coaxial cable
 Your source for quality GNSS Networking Solutions and Design Services! Page 1 of 5 Calculating the propagation delay of coaxial cable The delay of a cable or velocity factor is determined by the dielectric
ΓΙΑ ΠΕΡΙΣΣΟΤΕΡΕΣ ΠΛΗΡΟΦΟΡΙΕΣ: Οδηγίες Χρήσης / Instructions Manual Ελληνικά (GR) English (EN) Ηλ. Βραστήρας El. Kettle HHB1761
 English (EN) Ηλ. Βραστήρας El. Kettle HHB1761") ΓΙΑ ΠΕΡΙΣΣΟΤΕΡΕΣ ΠΛΗΡΟΦΟΡΙΕΣ: Χ. ΜΠΕΝΡΟΥΜΠΗ & ΥΙΟΣ Α.Ε. Αγ. Θωμά 27, 15124, Μαρούσι-Αθήνα Τηλ. 210 6156400, Fax: 210 6199316 e-mail: benrubi-sda@benrubi.gr FOR FURTHER INFORMATION: H. BENRUBI & FILS S.A.
ΓΙΑ ΠΕΡΙΣΣΟΤΕΡΕΣ ΠΛΗΡΟΦΟΡΙΕΣ: Χ. ΜΠΕΝΡΟΥΜΠΗ & ΥΙΟΣ Α.Ε. Αγ. Θωμά 27, 15124, Μαρούσι-Αθήνα Τηλ. 210 6156400, Fax: 210 6199316 e-mail: benrubi-sda@benrubi.gr FOR FURTHER INFORMATION: H. BENRUBI & FILS S.A.
Example Sheet 3 Solutions
 Example Sheet 3 Solutions. i Regular Sturm-Liouville. ii Singular Sturm-Liouville mixed boundary conditions. iii Not Sturm-Liouville ODE is not in Sturm-Liouville form. iv Regular Sturm-Liouville note
Door Hinge replacement (Rear Left Door)
") Door Hinge replacement (Rear Left Door) We will continue the previous article by replacing the hinges of the rear left hand side door. I will use again the same procedure and means I employed during the
Door Hinge replacement (Rear Left Door) We will continue the previous article by replacing the hinges of the rear left hand side door. I will use again the same procedure and means I employed during the
b. Use the parametrization from (a) to compute the area of S a as S a ds. Be sure to substitute for ds!
 to compute the area of S a as S a ds. Be sure to substitute for ds!") MTH U341 urface Integrals, tokes theorem, the divergence theorem To be turned in Wed., Dec. 1. 1. Let be the sphere of radius a, x 2 + y 2 + z 2 a 2. a. Use spherical coordinates (with ρ a) to parametrize.
MTH U341 urface Integrals, tokes theorem, the divergence theorem To be turned in Wed., Dec. 1. 1. Let be the sphere of radius a, x 2 + y 2 + z 2 a 2. a. Use spherical coordinates (with ρ a) to parametrize.
Tipologie installative - Installation types Types d installation - Die einbauanweisungen Tipos de instalación - Τυπολογίες εγκατάστασης
 Types d installation Die einbauanweisungen Tipos de instalación Τυπολογίες εγκατάστασης AMPADE MOOCROMATICHE VIMAR DIMMERABII A 0 V~ MOOCHROME DIMMABE AMP VIMAR 0 V~ AMPE MOOCHROME VIMAR DIMMABE 0 V~ EUCHTE
Other Test Constructions: Likelihood Ratio & Bayes Tests
 Other Test Constructions: Likelihood Ratio & Bayes Tests Side-Note: So far we have seen a few approaches for creating tests such as Neyman-Pearson Lemma ( most powerful tests of H 0 : θ = θ 0 vs H 1 :
LESSON 14 (ΜΑΘΗΜΑ ΔΕΚΑΤΕΣΣΕΡΑ) REF : 202/057/34-ADV. 18 February 2014
 REF : 202/057/34-ADV. 18 February 2014") LESSON 14 (ΜΑΘΗΜΑ ΔΕΚΑΤΕΣΣΕΡΑ) REF : 202/057/34-ADV 18 February 2014 Slowly/quietly Clear/clearly Clean Quickly/quick/fast Hurry (in a hurry) Driver Attention/caution/notice/care Dance Σιγά Καθαρά Καθαρός/η/ο
LESSON 14 (ΜΑΘΗΜΑ ΔΕΚΑΤΕΣΣΕΡΑ) REF : 202/057/34-ADV 18 February 2014 Slowly/quietly Clear/clearly Clean Quickly/quick/fast Hurry (in a hurry) Driver Attention/caution/notice/care Dance Σιγά Καθαρά Καθαρός/η/ο
X815 X715. www.blackanddecker.co.uk
 www.blackanddecker.co.uk X815 X715 English 1. Spray button 2. Steam control dial 3. Steam burst button 4. Temperature control dial 5. Heating light 6. Heel rest 7. Self-clean button 8. Cord storage 9.
forms This gives Remark 1. How to remember the above formulas: Substituting these into the equation we obtain with
 Week 03: C lassification of S econd- Order L inear Equations In last week s lectures we have illustrated how to obtain the general solutions of first order PDEs using the method of characteristics. We
Concrete Mathematics Exercises from 30 September 2016
 Concrete Mathematics Exercises from 30 September 2016 Silvio Capobianco Exercise 1.7 Let H(n) = J(n + 1) J(n). Equation (1.8) tells us that H(2n) = 2, and H(2n+1) = J(2n+2) J(2n+1) = (2J(n+1) 1) (2J(n)+1)
Physical DB Design. B-Trees Index files can become quite large for large main files Indices on index files are possible.
 B-Trees Index files can become quite large for large main files Indices on index files are possible 3 rd -level index 2 nd -level index 1 st -level index Main file 1 The 1 st -level index consists of pairs
Exercises 10. Find a fundamental matrix of the given system of equations. Also find the fundamental matrix Φ(t) satisfying Φ(0) = I. 1.
 satisfying Φ(0) = I. 1.") Exercises 0 More exercises are available in Elementary Differential Equations. If you have a problem to solve any of them, feel free to come to office hour. Problem Find a fundamental matrix of the given
Exercises 0 More exercises are available in Elementary Differential Equations. If you have a problem to solve any of them, feel free to come to office hour. Problem Find a fundamental matrix of the given
pag. 3 ITALIANO pag. 14 ENGLISH pag. 24 FRANÇAIS pag. 35 DEUTSCH pag. 46 ESPAÑOL pag. 56 ΕΛΛΗΝΙΚΗ
 MACCHINA CAFFÈ - MANUALE DI ISTRUZIONI ESPRESSO MACHINE - USE INSTRUCTIONS MACHINE POUR ESPRESSO - MANUEL D INSTRUCTIONS ESPRESSO KAFFEMACHINE - BETRIEBSANLEITUNG MAQUINA PARA ESPRESSO - MANUAL DE INSTRUCCIONES
Galatia SIL Keyboard Information
 Galatia SIL Keyboard Information Keyboard ssignments The main purpose of the keyboards is to provide a wide range of keying options, so many characters can be entered in multiple ways. If you are typing
ΕΛΛΗΝΙΚΗ ΔΗΜΟΚΡΑΤΙΑ Ανώτατο Εκπαιδευτικό Ίδρυμα Πειραιά Τεχνολογικού Τομέα. Ξένη Ορολογία. Ενότητα 6: Working Capital
 ΕΛΛΗΝΙΚΗ ΔΗΜΟΚΡΑΤΙΑ Ανώτατο Εκπαιδευτικό Ίδρυμα Πειραιά Τεχνολογικού Τομέα Ξένη Ορολογία Ενότητα 6: Working Capital Ευαγγελία Κουτσογιάννη Τμήμα Λογιστικής & Χρηματοοικονομικής Άδειες Χρήσης Το παρόν εκπαιδευτικό
A Συνέχεια πίσω A-26-2
 A-26-1 Συνέχεια πίσω A-26-2 A-26-2 Συνέχεια πίσω A-26-1 Για τον εγκαταστάτη: FΙJI 5050 Οι ένθετοι νεροχύτες FΙJI διατίθενται με προχαραγμένες οπές. Συνιστούμε την χρήση τους ως εξής. FΙJI 5075 A-35 μπαταρία
ΤΕΧΝΟΛΟΓΙΚΟ ΠΑΝΕΠΙΣΤΗΜΙΟ ΚΥΠΡΟΥ ΤΜΗΜΑ ΝΟΣΗΛΕΥΤΙΚΗΣ
 ΤΕΧΝΟΛΟΓΙΚΟ ΠΑΝΕΠΙΣΤΗΜΙΟ ΚΥΠΡΟΥ ΤΜΗΜΑ ΝΟΣΗΛΕΥΤΙΚΗΣ ΠΤΥΧΙΑΚΗ ΕΡΓΑΣΙΑ ΨΥΧΟΛΟΓΙΚΕΣ ΕΠΙΠΤΩΣΕΙΣ ΣΕ ΓΥΝΑΙΚΕΣ ΜΕΤΑ ΑΠΟ ΜΑΣΤΕΚΤΟΜΗ ΓΕΩΡΓΙΑ ΤΡΙΣΟΚΚΑ Λευκωσία 2012 ΤΕΧΝΟΛΟΓΙΚΟ ΠΑΝΕΠΙΣΤΗΜΙΟ ΚΥΠΡΟΥ ΣΧΟΛΗ ΕΠΙΣΤΗΜΩΝ
Modbus basic setup notes for IO-Link AL1xxx Master Block
 n Modbus has four tables/registers where data is stored along with their associated addresses. We will be using the holding registers from address 40001 to 49999 that are R/W 16 bit/word. Two tables that
Srednicki Chapter 55
 Srednicki Chapter 55 QFT Problems & Solutions A. George August 3, 03 Srednicki 55.. Use equations 55.3-55.0 and A i, A j ] = Π i, Π j ] = 0 (at equal times) to verify equations 55.-55.3. This is our third
Σχετικά με την τεχνολογία του fin
 Innovation by GR ΕΝ Σχετικά με την τεχνολογία του fin Η τεχνολογία του fin συλλέγει τις ποσότητες του καθαρού νερού που σπαταλούνται όταν η βρύση παραμένει ανοικτή στα ενδιάμεσα διαστήματα των χρήσεων
Nowhere-zero flows Let be a digraph, Abelian group. A Γ-circulation in is a mapping : such that, where, and : tail in X, head in
 Nowhere-zero flows Let be a digraph, Abelian group. A Γ-circulation in is a mapping : such that, where, and : tail in X, head in : tail in X, head in A nowhere-zero Γ-flow is a Γ-circulation such that
Συστήματα Διαχείρισης Βάσεων Δεδομένων
 ΕΛΛΗΝΙΚΗ ΔΗΜΟΚΡΑΤΙΑ ΠΑΝΕΠΙΣΤΗΜΙΟ ΚΡΗΤΗΣ Συστήματα Διαχείρισης Βάσεων Δεδομένων Φροντιστήριο 9: Transactions - part 1 Δημήτρης Πλεξουσάκης Τμήμα Επιστήμης Υπολογιστών Tutorial on Undo, Redo and Undo/Redo
Every set of first-order formulas is equivalent to an independent set
 Every set of first-order formulas is equivalent to an independent set May 6, 2008 Abstract A set of first-order formulas, whatever the cardinality of the set of symbols, is equivalent to an independent
ΑΓΓΛΙΚΗ ΓΛΩΣΣΑ ΣΕ ΕΙΔΙΚΑ ΘΕΜΑΤΑ ΔΙΕΘΝΩΝ ΣΧΕΣΕΩΝ & ΟΙΚΟΝΟΜΙΑΣ
 ΑΓΓΛΙΚΗ ΓΛΩΣΣΑ ΣΕ ΕΙΔΙΚΑ ΘΕΜΑΤΑ ΔΙΕΘΝΩΝ ΣΧΕΣΕΩΝ & ΟΙΚΟΝΟΜΙΑΣ Ενότητα 1β: Principles of PS Ιφιγένεια Μαχίλη Τμήμα Οικονομικών Επιστημών Άδειες Χρήσης Το παρόν εκπαιδευτικό υλικό υπόκειται σε άδειες χρήσης
COURBES EN POLAIRE. I - Définition
 Y I - Définition COURBES EN POLAIRE On dit qu une courbe Γ admet l équation polaire ρ=f (θ), si et seulement si Γ est l ensemble des points M du plan tels que : OM= ρ u = f(θ) u(θ) Γ peut être considérée
ST5224: Advanced Statistical Theory II
 ST5224: Advanced Statistical Theory II 2014/2015: Semester II Tutorial 7 1. Let X be a sample from a population P and consider testing hypotheses H 0 : P = P 0 versus H 1 : P = P 1, where P j is a known