ITALIANO. pag. 4 ENGLISH. pag. 10 FRANÇAIS. pag. 16 DEUTSCH. pag. 23 ESPAÑOL. pag. 30 ΕΛΛΗΝΙΚΗ. pag. 37. Fig. 1
|
|
|
- Ἀγαυή Μπλέτσας
- 7 χρόνια πριν
- Προβολές:
Transcript


1 VENTILATORE A PIANTANA - MANUALE DI ISTRUZIONI STAND FAN - USE INSTRUCTIONS VENTILATEUR À PIED - MANUEL D INSTRUCTIONS TURMVENTILATOR - BETRIEBSANLEITUNG VENTILADOR DE PIE - MANUAL DE INSTRUCCIONES ΑΝΕΜΙΣΤΗΡΑΣ ΟΡΘΟΣΤΑΤΗΣ - ΕΓΧΕΙΡΊΔΙΟ ΟΔΗΓΙΏΝ Cod.: VE.112
2 ITALIANO ENGLISH FRANÇAIS DEUTSCH ESPAÑOL ΕΛΛΗΝΙΚΗ pag. 4 pag. 10 pag. 16 pag. 23 pag. 30 pag. 37 For further information and/or for instructions for use in other languages, please visit: beper.com Fig. 1

3 Fig. 2 3
4 Ventilatore a piantana Manuale di istruzioni AVVERTENZE GENERALI LEGGERE QUESTE ISTRUZIONI PRIMA DI USARE L APPAREC- CHIO. Prima e durante l uso dell apparecchio è necessario seguire alcune precauzioni elementari. Dopo aver tolto l imballaggio assicurarsi dell integrità dell apparecchio. In caso di dubbio non utiliz zare l apparecchio e rivolgersi a personale professionalmente qualificato. Gli elementi dell imbal laggio (sacchetti di plastica, polistirolo, ecc.) non devono essere lasciati alla portata dei bambini, in quanto potenziali fonti di pericolo. Assicurarsi sempre che la tensione di rete elettrica sia uguale a quella indicata nell etichetta dati tecnici e che l impianto sia compatibile con la potenza dell apparecchio. Non tirare mai il cavo per scollegarlo dalla presa di corrente elettrica. Assicurarsi che il cavo non sia in contatto con superfici calde o taglienti. Non utilizzare l apparecchio con il cavo danneggiato. Se il cavo di alimentazione è danneggiato, esso deve essere sostituito dal Costruttore o dal suo Servizio Assistenza Tecnica o comunque da una persona con qualifica similare, in modo da pre venire ogni rischio. Collegare l apparecchio esclusivamente ad una presa di corrente elettrica alternata. In generale è sconsigliabile l uso di adattatori, prese multiple e/o prolunghe. Qualora il loro uso si rendesse indispensabile è necessario utilizzare solamente adattatori e prolunghe conformi alle vigenti norme di sicurezza. Questo apparecchio dovrà essere destinato solo all uso per il quale è stato espressamente con cepito. Ogni altro uso è da considerarsi improprio e quindi pericoloso, nonché far decadere la garanzia. Il costruttore non può essere considerato responsabile per eventuali danni derivati da usi impropri, erronei ed irragionevoli. Per evitare surriscaldamenti pericolosi si raccomanda di svolgere in tutta la sua lunghezza il cavo di alimentazione. Prima di effettuare qualsiasi operazione di cambio degli accessori o di pulizia disinserire l apparec chio dalla rete di alimentazione elettrica. Non lasciare esposto l apparecchio ad agenti atmosferici (pioggia, sole, etc.). 4
5 Ventilatore a piantana Manuale di istruzioni IT Non tenere l apparecchio vicino a fonti di calore (es. termosifone). Questo apparecchio non deve essere utilizzato da persone (compresi i bambini) con capacità fisiche, sensoriali o mentali ridotte; da persone che manchino di esperienza e conoscenza del l apparecchio, a meno che siano attentamente sorvegliate o ben istruite relativamente all utilizzo dell apparecchio stesso da parte di una persona responsabile della loro sicurezza. Assicurarsi che i bambini non giochino con l apparecchio. Allorché si decida di smaltire come rifiuto questo apparecchio, si raccomanda di renderlo inoperan te. SI RACCOMANDA INOLTRE DI RENDERE INNOCUE QUELLE PARTI DELL APPARECCHIO SUSCETTIBI- LI DI COSTITUIRE UN PERICOLO, SPECIALMEN- TE PER I BAMBINI CHE POTREBBERO SERVIRSI DELL APPARECCHIO PER I PROPRI GIOCHI. ISTRUZIONI DI ASSEMBLAGGIO: Svitare la vite a L alla fine del tubo principale e rimuoverla assieme alla rondella di bloccaggio. Allentare il regolatore di altezza ed estrarre l estensione del tubo fino all altezza desiderata, quindi girare il regolatore di altezza in senso orario per bloccarla. Inserire il tubo principale nella base attraverso l apposito foro, ruotarlo e fissarlo usando la vite a L e la rondella di bloccaggio. Stringere adeguatamente. Posizionare la base su una superficie piana. Allentare leggermente la vite di fermo e fissare il corpo del ventilatore alla parte superiore del palo di estensione, quindi stringere nuovamente la vite di fermo. L albero motore è fissato con il cappuccio blocca pale e il dado di protezione. Rimuovere il cappuccio blocca pale girandolo in senso orario e il dado di protezione girandolo in senso antiorario. Posizionare la griglia posteriore davanti all alloggiamento del motore, allineandola correttamente nella posizione indicate dai due fori della griglia stessa. Asicurarsi che la maniglia sia posizionata verso l alto. Una volta che la griglia posteriore è ben posizionata, bloccarla con il dado di protezione avvitandolo in senso orario. Rimuovere l eventuale protezione dall albero motore e posizionare sopra di esso le pale del ventilator, assicurandosi di posizionarle correttamente abbinando le sporgenze dell albero motore agli appositi spazi nelle pale. Fissare la posizione delle pale avvitando il cappuccino blocca pale in senso antiorario. Testare la posizione delle pale provando a farle girare con le mani e assicurandosi che non siano in contatto con il dado di protezione. Le pale del ventilatore devono girare liberamente. Posizionare infine la griglia anteriore sopra a quella posteriore e fissarla attraverso gli appositi ganci di chiusura delle griglie. 5
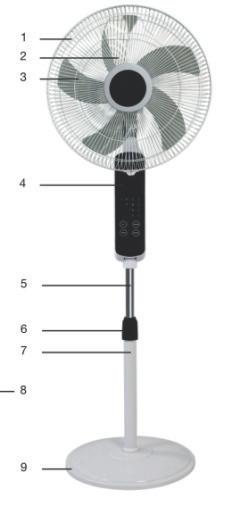
6 Ventilatore a piantana Manuale di istruzioni PRODOTTO E ACCESSORI Fig.1 1. Griglia anteriore 2. Cappuccio blocca pale 3. Pale 4. Dado di protezine 5. Griglia posteriore 6. Alloggiamento del motore 7. Corpo del ventilatore 8. Vite di fermo 9. Regolatore di altezza 10. Tubo principale 11. Base 12. Rondella di bloccaggio 13. Vite a L ISTRUZIONI D USO: Questo ventilatore può funzionare a tre velocità diverse, tre modalità diverse e può essere impostato fino a 7,5 ore di funzionamento. È inoltre equipaggiato di un telecomando e di un pannello di controllo dai quali è possibile impostare la modalità di funzionamento desiderata. Posizionare il ventilatore su una superficie asciutta e livellata e attaccarlo a una presa elettrica. Sul pannello di controllo si vedranno tutte le impostazioni lampeggiare. Assicurarsi che il telecomando contenga 2 pile AAA (non fornite dal produttore). Telecomando ON/SPEED Premere il tasto ON/SPEED (da telecomando o pannello di controllo) per accendere il ventilatore. Il ventilatore inizierà a funzionare a media velocità e nei seguenti utilizzi si accenderà funzionando nell ultima modalità impostata prima di spegnerlo. Premere ancora il tasto ON/SPEED per selezionare le modalità HIGH (alta velocità) o LOW (bassa velocità) OFF Premere il tasto OFF per spegnere il ventilatore MODE Premere il tasto MODE sul telecomando per cambiare la modalità di ventilazione: - Normal: il ventilatore funzionerà a velocità costante; l indicatore MODE sarà rosso. - Nature: in questa modalità il ventilatore simula la naturale brezza che si avverte all aria aperta, funzionando quindi a velocità diverse; l indicatore MODE sarà vered. - Sleep: in questa modalità il ventilatore simula una leggea e piacevole brezza adatta all uso notturno. L indicatore MODE sarà spento. SWING Premere il tasto SWING per attivare la funzione oscillazione per una distribuzione omogenea della brezza prodotta dal ventilatore. Premere nuovamente il tasto SWING per fermare l oscillazione. 6
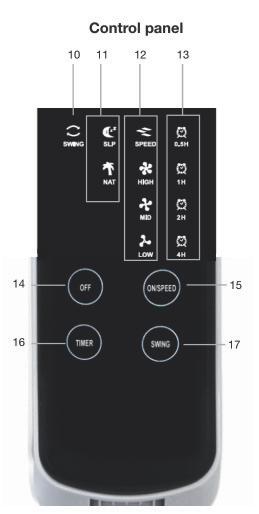
7 Ventilatore a piantana Manuale di istruzioni IT TIMER Premere il tasto TIMER (quando il ventilatore è in funzionamento) per impostare il timer di spegnimento (si illuminano i led in corrispondenza del tempo impostato). Il tempo impostabile è di 7,5 ore massimo; premendo il tasto TIMER viene impostato il tempo con una progressione di mezz ora ogni volta che viene premuto e si accendono i led rossi in corrispondenza del tempo selezionato Inclinare il ventilatore La testa del ventilatore può essere inclinata così da indirizzare la brezza verso un angolo preciso. - Per inclinare la testa del ventilatore, assicurarsi che esso non sia collegato alla corrente elettrica. - Tenere fermo l alloggiamento del motore con una mano e la testa del ventilatore con l altra. Con attenzione inclinare il ventilatore fino all angolazione desiderata. ATTENZIONE: Non sforzare la testa del ventilatore per inclinarla più di quanto possibile per non danneggiare il prodotto. Componenti: Fig.2 1. Griglie anteriore e posteriore 2. Motore 3. Pale 4. Panello di controllo 5. Palo di estensione 6. Regolatore di altezza 7. Tubo principale 8. Telecomando 9. Base Pannello di controllo: 10. indicatore SWING (oscillazione) 11. indicatore MODE (modalità): Sleep, Nature, Normal 12. indicatori di velocità: High (alta), Mid (media), Low (bassa) 13. Indicatori TIMER: 0.5H, 1H, 2H, 4H,7.5H 14. tasto OFF 15. tasto ON/SPEED 16. indicatore TIMER 17. indicatore SWING Telecomando: 18. tasto MODE 19. tatso TIMER 20. tasto ON/SPEED 21. tasto OFF 22. tasto SWING 23. tasto LAMP 7
8 Ventilatore a piantana Manuale di istruzioni PULIZIA Prima di effettuare qualsiasi operazione di pulizia spegnere il ventilatore e scollegare la spina dalla presa di corrente. Per pulire il ventilatore utilizzare un panno morbido, eventualmente inumidito con acqua. Non utilizzare alcool o agenti chimici come diluenti, prodotti abrasivi in genere. Non spruzzare acqua e liquidi sul ventilatore, previo infiltrazioni dannose. Asciugare bene tutte le parti interessate dalla pulizia prima di accendere il ventilatore. Quando non si usa il ventilatore durante la stagione invernale conservarlo in un luogo asciutto pulito. DATI TECNICI Potenza: 55W Alimentazione: 230V ~ 50/60Hz In un ottica di miglioramento continuo Beper si riserva la facoltà di apportare modifiche e migliorie al prodotto in oggetto senza previo preavviso. Il simbolo del cestino barrato riportato sull apparecchio indica che il prodotto, alla fine della propria vita utile, dovendo essere trattato separatamente dai rifiuti domestici, deve essere conferito in un centro di raccolta differenziata per apparecchiature elettriche ed elettroniche oppure riconsegnato al rivenditore al momento dell acquisto di una nuova apparecchiatura equivalente. L adeguata raccolta differenziata per l avvio successivo dell apparecchio al riciclaggio, al trattamento e allo smaltimento ambientalmente compatibile contribuisce ad evitare possibili effetti negativi sull ambiente e sulla salute e favorisce il recupero dei materiali di cui è composto. L utente è responsabile del conferimento dell apparecchio a fine vita alle appropriate strutture di raccolta. Per informazioni più dettagliate inerenti i sistemi di raccolta disponibili, rivolgersi al servizio locale di smaltimento rifiuti, o al negozio dove è stato effettuato l acquisto. Chiunque abbandona o cestina questo apparecchio e non lo riporta in un centro di raccolta differenziata per rifiuti elettrici-elettronici è punito con la sanzione amministrativa pecuniaria prevista dalla normativa vigente in materia di smaltimento abusivo di rifiuti 8
9 Ventilatore a piantana Manuale di istruzioni IT CERTIFICATO DI GARANZIA La garanzia di applicazione è valida 24 mesi dalla data di acquisto per difetti di materiale o di fabbricazione. La garanzia è valida unicamente presentando il certificato di garanzia e il documento di acquisto (scontrino fiscale) che certifichi la data di acquisto e il nome del modello dell apparecchio acquistato. Se l apparecchio dovesse richiedere assistenza tecnica rivolgersi al venditore o presso la nostra sede. Questo per conservare inalterata l efficienza del vostro apparecchio e per NON invalidare la garanzia. Eventuali manomissioni dell apparecchio da parte di personale non autorizzato invalideranno automaticamente la garanzia. Condizioni di garanzia Se ci sono guasti a causa di difetti di materiale e/o fabbricazione durante il periodo di garanzia, garantiamo la riparazione del prodotto gratuitamente. Non sono coperte dalla garanzia tutte le parti che dovessero risultare difettose a causa di: a. Danni da trasporto o da cadute accidentali, b. Errata installazione o inadeguatezza impianto elettrico, c. Riparazioni o modifiche operate da personale non autorizzato, d. Mancata o non corretta manutenzione e pulizia, e. Prodotto e/o parti di prodotto soggette a usura e/o consumabili (es.: lampade, batterie, lame) f. Mancata osservanza delle istruzioni per il funzionamento dell apparecchio, negligenza o trascuratezza nell uso. L elenco di cui sopra è a titolo meramente esemplificativo e non esaustivo, in quanto la presente garanzia è comunque esclusa per tutte quelle circostanze che non possono farsi risalire a difetti di fabbricazione dell apparecchio. La garanzia è inoltre esclusa in tutti i casi di uso improprio dell apparecchio ed in caso di uso professionale. Beper Srl declina ogni responsabilità per eventuali danni che possano direttamente o indirettamente derivare a persone, cose ed animali domestici in conseguenza della mancata osservanza di tutte le prescrizioni indicate nell apposito Libretto Istruzioni ed avvertenze in tema di installazione, uso e manutenzione dell apparecchio. Assistenza tecnica Per l assistenza tecnica e/o riparazioni fuori dal periodo di garanzia ci si può rivolgere direttamente all indirizzo sottostante. BEPER SRL Via Salieri, Vallese di Oppeano - Verona Tel. 045/ Fax 045/ assistenza@beper.com 9
10 Stand Fan Use instructions GENERAL SAFETY ADVICE READ THE OPERATING INSTRUCTIONS CAREFULLY BEFORE FIRST USE OF THE APPLIANCE. Read the following instructions carefully, since they give you useful safety information about installation, use and maintenance and help you avoid mishaps and possible accidents. Remove the packing and make sure that the appliance is intact, with special attention to the supply cable. The elements of the packing (plastic bags, polystyrene, etc) do not have to be accessible to the children, in order to preserve them from danger sources. It is recommended not to throw these packing material in the domestic waste, but to deliver them to the appropriate station of collection or destruction refusals, asking eventually information to the manager of the Sanitation Department of your own municipality. Before connecting the appliance make sure that the mains voltage corresponds to the data specified on the label. If the plug does not suit the socket, let it be replaced with another suitable plug by qualified personnel only, which shall also ensure that the section of the socket cables is suitable for your appliance power absorption. Never pull the supply cord to unplug the appliance. Make sure that the supply cord never comes into contact with hot or cutting surfaces Do not use this appliance if the supply cord is damaged. In case of damage, it must be replaced by the manufacturer, its service agent or similarly qualified persons in order to avoid a hazard. Only connect this appliance on alternating current Generally, the use adaptors multiple plugs and/or extensions is not recommended; should they be necessary, please use only simple or multiple adaptors and extensions in compliance with the safety rules in force, making sure that the capacity absorption limit marked on the simple adaptors and the extensions and the maximum power limit marked on the multiple adaptor are not exceeded. This appliance is to be destined to its special purpose only. Any other use is to be considered as improper and thus dangerous. The manufacturer cannot be responsible for any damages deriving from improper, wrong or incautious use. To avoid any heating risk, it is recommended to unroll completely the supply cord and to unplug the appliance, when not used. 10
11 Stand Fan Use instructions EN Before cleaning, always unplug the appliance. To protect against electric shock, do not immerse cord, plug or any parts of the appliance into water or other fluids. Do not hold the appliance with wet hands or feet. Do not hold the appliance with naked feet. Do not expose the appliance to atmospheric agents such as rain, wind, snow, hail. Do not use the appliance near explosives, highly flammable materials, gases, burning flames, heaters. Do not allow children, disabled people or every people without experience or technical ability to use the appliance if they are not properly watched over. Close supervision is necessary when any appliance used by or near children. Make sure that children do not play with this appliance. If you decide not to use the appliance any longer, make it unserviceable by simply cutting the supply cable after disconnecting the plug from the socket. ALSO MAKE ANY DANGEROUS PARTS UNSERVICE- ABLE, ESPECIALLY FOR CHILDREN WHO COULD PLAY WITH THE APPLIANCE. ASSEMBLY INSTRUCTIONS: Unscrew the L-shaped screw and remove it and the clamping washer from the end of the base tube. Loosen the height adjustment ring at the top of the base tube and pull out the extension pole to the desired height, or all the way to the top for maximum height (you may have to push it up from the bottom if it is tight or stuck). At the desired height, turn the height adjustment ring clockwise to tighten securely. Insert the base tube into the hole on the base, turn over the base and affix the tube using the L- shaped screw and the clamping washer. Tighten the screw firmly but do not overtighten. Set the base on a level, dry surface. Lightly loosen the set screw, attach the fan body to the top of the extension pole. Push the body down as far as possible and then tighten securely with the set screw. The motor shaft has the blade cap and guard nut attached. Remove the cap by turning it clockwise and the nut by turning it anticlockwise. Place the rear guard on the front of the motor housing, lining up the two positioning knobs on the front of the motor housing with the two holes in the rear guard. Make sure that the handle is up the top. Push the guard in firmly until the three knobs protrude through the holes. Secure the rear guard by reattaching the guard nut and turning it clockwise to tighten. If the motor shaft is covered with a protected sleeve, remove the sleeve. Slide the blade onto the motor shaft, making sure to match the protrusions on the shaft with the slots in the blade. Tighten the blade with the blade cap, turning it anticlockwise to tighten it securely. 11
12 Stand Fan Use instructions Test the fan by rotating the blade with your hands, making sure that there is no contact with the nut. The fan blade should rotate freely. The front and rear guard are held together with a guard ring, which has two grooves, one for each of the guards. Slightly loosen the large screw at the bottom of the ring and ensure the edge of the guard sits in the appropriate groove, all around the rear guard. Then fit the front guard against the rear guard and ensure that the edge sits properly in the other groove. Retighten the screw to secure the guards together. Your new Pedestal Fan is now fully assembled. PRODUCT AND ACCESSORIES Fig.1 1. Front guard 2. Blade cap 3. Fan blade 4. Guard nut 5. Rear guard 6. Motor housing 7. Fan body 8. Set screw 9. Height adjustment ring 10. Base tube 11. Base 12. Clamping washer 13. L-shaped screw OPERATION: Place the fan on a dry, level surface, plug it into a V 50Hz electrical outlet and switch on power to the outlet. All available settings options will start flashing on the control panel. Ensure the remote controls contains two AAA size batteries (not supplied). Remote control operation This fan is equipped with 3 speeds, 3 breeze modes, a 7.5hr timer and a remote control for convenient operation. (You can also use the control panel to switch the fan on and off, select a speed, set the timer and oscillation.) ON/SPEED Press the ON/SPEED button (on the remote control or on the control panel) to switch on the fan. At first operation it will start at medium speed. On subsequent operations the fan will start at the last selected settings. Press the ON/SPEED button again to select HIGH or LOW speed. OFF Press the OFF button to switch off the fan. MODE Press the MODE button (on the remote control) to change the fan mode through different breeze modes. Normal: In this mode the fan operates at a constant speed. The mode indicator is red. Nature: In this mode the fan simulates a natural breeze mode by cycling on and off, as in nature. 12
13 Stand Fan Use instructions EN The mode indicator is green. Sleep: In this mode the fan simulates a soft, natural breeze suitable for night-time use. The indicator is off. WING Press the SWING button (on the remote control or on the control panel) to activate the oscillation function for widespread breeze distribution. Press the button again to stop oscillation when the fan head is in the desired position. TIMER Push the timer button (when the fan is working) to set the timer for the fan s shut off: the led light corresponding to the time set will appear. You can set the fan timer to a maximum of 7,5 hours. You can set the time half hour by half hour by pushing the Timer button on the remote control or on the control panel. Tilting the fan head: The fan head can be tilted so that the breeze is targeted at an angle. To tilt the fan head, make sure the fan is disconnected from the power supply. Steady the motor housing of the fan with one hand, grip the fan head with the other and carefully tilt the fan head until it reaches the desired angle. CAUTION: Do not tilt back the fan head further than it is intended to go. Doing so will damage the unit. Components: Fig.2 1. Front and rear grilles 2. Motor 3. Fan blade 4. Control panel 5. Extension pole 6. Height adjustment ring 7. Base tube 8. Remote control 9. Base Control panel: 10 Swing indicator 11 Mode indicators: Sleep, Nature, Normal (default, no indicator) 12 Fan speed indicators: High, Mid, Low 13 Timer indicators: 0.5H, 1H, 2H, 4H,7.5H 14 OFF button 15 ON/SPEED button 16 TIMER button 17 SWING button Remote control buttons: 18 MODE button 19 TIMER button 20 ON/SPEED button 21 OFF button 22 SWING button 23 LAMP button 13
14 Stand Fan Use instructions CLEANING Before cleaning, switch off and unplug the fan. For cleaning use a soft cloth, that may be softly wet. Do not use alcohol or chemical substances, or any detergent that could damaged this appliance. Do not spray water or other liquids on the fan in order to protect it. After cleaning, dry every parts before using the appliance. During the winter and when not used, keep this appliance in a dry and clean place. TECHNICAL DATA Power : 55W Power supply : 230V ~ 50/60Hz For any improvement reasons, Beper reserves the right to modify or improve the product without any notice. The European directive 2011/65/EU on Waste Electrical and Electronic Equipment (WEEE), requires that old household electrical appliances must not be disposed of in the normal unsorted municipal waste stream. Old appliances must be collected separately in order to optimize the recovery and recycling of the materials they contain, and reduce the impact on human health and the environment. The crossed out wheeled bin symbol on the product reminds you of your obligation, that when you dispose of the appliance, it must be separately collected. 14
15 Stand Fan Use instructions EN GUARANTEE CERTIFICATE This appliance has been checked in the factory. From the date of original purchase a 24 month guarantee applies to material and production defects. The purchase receipt and the guarantee certificate must be submitted together in case of claim to guarantee. The guarantee is valid only with a guaranty certificate and proof of purchase (fiscal receipt) indicating the date of purchase and the model of the appliance For any technical assistance, please contact directly the seller or our head office in order to preserve the appliance s efficiency and NOT TO void the guarantee. Any intervention on this appliance by non-authorized persons will automatically void the guarantee. GUARANTEE CONDITIONS If the appliance shows defects as a result of faulty material and/or production during the period of guarantee, we guarantee repair free of charge on condition that: - The appliance has been used properly and for the purpose for which it has been intended. - The appliance has not been tampered with, otherwise it is not maintainable. - The purchase receipt shall be presented. - The appliance showing a fair wear and tear shall not be covered by this guarantee. Therefore, any part that could be accidentally broken or having visible signs of use in consumable products (such as lamps, batteries, heating elements ) the aesthetic parts are excluded from the guarantee, and any defect whatsoever resulting from non-respect of the rules for use, negligence in usage and/or maintenance of the appliance, carelessness, wrong or improper installation, damage during transport and any other damage not attributable the supplier. For every defect that could not be repaired within the guarantee period, the appliance will be replaced free of charge. In any case, if the part to be replaced for defect, breakage or malfunction is an accessory and/or a detachable part of the product, Beper reserves the right to replace only the very part in question and not the entire product TECHNICAL ASSISTANCE Even after the guarantee period we will always pay attention to repairs for defected appliances. For technical assistance and/or repairs after the guarantee period you can directly contact the below address: CONTACT YOUR DISTRIBUTOR IN YOUR COUNTRY OR ATER SALES DEPARTMENT BEPER. assistenza@beper.com WHICH WILL FORWARD YOUR ENQUIRIES TO YOUR DISTRI- BUTOR. 15
16 Ventilateur à pied Manuel d instructions PRECAUTIONS GENERALES LIRE ATTENTIVEMENT LES INSTRUCTIONS SUIVANTES AVANT LA PREMIERE UTILISATION DE L APPAREIL. Avant et durant l utilisation de cet appareil il est nécessaire de suivre précautions élémentaires suivantes. Après avoir enlever l emballage, s assurer de l intégrité de l appareil. En cas de doute ne pas utiliser l appareil et s adresser à un professionnel qualifié. Les éléments d emballage (sachets plastique, polystyrène, etc.) ne doivent pas être laissés à la portée des enfants, car potentiellement dangereux. Il est recommandé de ne pas jeter les éléments d emballage dans les déchets ménagers, mais de les déposer dans les centres de traitement des déchets appropriés, en demandant éventuellement conseil au gérant du centre de sa commune de résidence. Toujours s assurer que la tension électrique soit la même que celle indiquée sur l étiquette des données techniques et que le réseau électrique soit compatible avec la puissance de l appareil. En cas d incompatibilité entre la prise électrique murale et celle de l appareil faire changer la prise de l appareil par un professionnel qualifié. Ce dernier devra s assurer que la section des câbles de la prise soit adaptée à la puissance absorbée par l appareil. Ne jamais tirer sur le câble d alimentation pour débrancher la prise électrique. S assurer que le câble n entre pas en contact avec des superficies chaudes ou coupantes. Ne pas utiliser l appareil si le câble d alimentation est abîmé. Si le câble d alimentation est endommagé, pour éviter tout risque, il devra être substitué par le constructeur, par son service d assistance technique ou toute autre personne de même qualification. Brancher l appareil exclusivement sur une prise de courant alterné. Il est en général déconseiller d utiliser des adaptateurs, prises multiples et/ou rallonges. En cas de nécessité, utiliser seulement des adaptateurs ou rallonges conformes aux normes de sécurité en vigueur. Cet appareil ne devra être utilisé que pour l usage pour lequel il a été conçu. Tout autre usage sera considéré comme inapproprié et donc dangereux, et engendrera l annulation de la garantie. 16
17 Ventilateur à pied Manuel d instructions ES FR Le constructeur ne peut être tenu pour responsable en cas de dommages causés par une utilisation incorrecte, inappropriée et déraisonnable. Pour éviter tout risque d échauffement il est recommandé de dérouler entièrement le câble d alimentation et de débrancher l appareil de la prise de courant en cas d inutilisation. Avant d effectuer toute opération de nettoyage ou entretien, débrancher l appareil de la prise de courant électrique. Ne jamais immerger l appareil dans l eau ou d autres liquides. Ne pas toucher l appareil avec les mains et pieds mouillés ou humides. Ne pas utiliser l appareil si vous êtes pieds nus. Ne pas laisser l appareil exposé aux agents atmosphériques comme la pluie, le soleil Ne pas laisser l appareil près d une source de chaleur (ex. Radiateur) Ne pas laisser les enfants, les personnes avec des capacités physiques, sensorielles ou mentales réduites, ou manquant d expérience ou de connaissance technique, utiliser cet appareil sans surveillance S assurer que les enfants ne jouent pas avec cet appareil. DÈS LORS QUE L APPAREIL DOIT ÊTRE DÉTRUIT, IL EST RECOMMANDÉ DE COUPER LE CÂBLE D ALI- MENTATION, ET DE RETIRER TOUTES LES PARTIES SUSCEPTIBLES DE PRÉSENTER UN QUELCONQUE DANGER, EN PARTICULIER POUR LES ENFANTS QUI POURRAIENT UTILISER CET APPAREIL COMME UN JEU. 17
18 Ventilateur à pied Manuel d instructions INSTRUCTIONS D ASSEMBLAGE : Dévisser la vis à L à la fin du tube principal et l enlever avec la rondelle de blocage. Desserrer le régulateur de la hauteur et extraire l extension du tube jusqu à la hauteur désirée, donc tourner le régulateur de la hauteur dans le sens horaire des aiguilles d une montre pour le bloquer. Insérer le tube principal dans la base à travers le trou approprié, le tourner et le fixer en utilisant la vis à L et la rondelle de blocage. Serrer adéquatement. Positionner la base sur une superficie plate. Desserrer légèrement la vis d arrêt et fixer le corps du ventilateur à la partie supérieure de la tige d extension, donc serrer de nouveau les vis d arrêt. L arbre de transmission est fixé avec le capuchon bloc pales et l écrou de protection. Enlever le capuchon bloc pales en le tournant dans le sens horaire des aiguilles d une montre et l écrou de protection en le tournant dans le sens contraire des aiguilles d une montre. Positionner la grille postérieure devant l emplacement du moteur, en l alignant correctement dans la position indiquée par les deux trous de la même grille. S assurer que la poignée soit positionnée vers le haut. Une fois que la grille postérieure soit bien positionnée, la bloquer avec l écrou de protection en le vissant dans le sens horaire des aiguilles d une montre. Enlever l éventuelle protection de l arbre de transmission et positionner au-dessus de lui les pales du ventilateur, en s assurant de les positionner correctement en associant les saillantes de l arbre de transmission aux espaces appropriés dans les pales. Fixer la position des pales en vissant le capuchon bloc pales dans le sens contraire des aiguilles d une montre. Tester la position des pales en essayant de les faire tourner avec les mains et en s assurant qu elles ne soient pas au contact avec l écrou de protection. Les pales du ventilateur doivent tourner librement. Positionner enfin la grille antérieure au-dessus de celle postérieure et la fixer à PRODUIT ET ACCESSOIRES Fig.1 1. Grille antérieure 2. Capuchon bloc des pales 3. Pales 4. Écrou de protection 5. Grille postérieure 6. Boitier du moteur 7. Corps du ventilateur 8. Vis d arrêt 9. Régleur de la hauteur 10. Tube principal 11. Base 12. Rondelle de blocage 13. Vis à L 18
19 Ventilateur à pied Manuel d instructions ES FR INSTRUCTIONS D UTILISATION : Ce ventilateur peut fonctionner à trois différentes vitesses, trois différentes modalités et peut être imposé jusqu à 7,5 heures de fonctionnement. En outre il est équipé d une télécommande et d un panneau de contrôle pour lesquels il est possible d imposer la modalité de fonctionnement désirée. Positionner le ventilateur sur une superficie sèche et à niveau et le brancher à une prise électrique. Sur un panneau de contrôle vous verrez toutes les configurations clignoter. S assurer que le télécommande contienne 2 piles AAA (non fournies par le producteur). Télécommande ON/SPEED Appuyer sur le pulsant ON/SPEED (du télécommande ou du panneau de contrôle) pour allumer le ventilateur. Le ventilateur commencera à fonctionner à une vitesse moyenne et dans les utilisations suivantes il s allumera en fonctionnant dans la dernière modalité imposée avant de l éteindre. Appuyer encore sur le pulsant ON/SPEED pour sélectionner les modalités HIGH (haute vitesse) ou LOW (basse vitesse) OFF Appuyer sur le pulsant OFF pour éteindre le ventilateur. MODE Appuyer sur le pulsant MODE sur le télécommande pour changer la modalité de ventilation : - Normal : le ventilateur fonctionnera à vitesse constante, l indicateur MODE sera rouge. - Nature : dans cette modalité le ventilateur simule le souffle naturel qui se note en plein air, en fonctionnant donc à différentes vitesses ; l indicateur MODE sera vered. - Sleep : Dans cette modalité le ventilateur simule un léger et agréable souffle adapté à l usage nocturne. L indicateur MODE sera éteint. SWING Appuyer sur le pulsant SWING pour activer la fonction d oscillation pour une distribution homogène du souffle produit par le ventilateur. Appuyer de nouveau sur le pulsant SWING pour arrêter l oscillation. TIMER Appuyer sur le pulsant TIMER (quand le ventilateur est en fonctionnement) pour imposer la minuterie d éteignement (les led s illuminent en correspondance du temps imposé). Le temps imposable est de 7,5 heures maximum ; en appuyant sur le pulsant TIMER il est imposé le temps avec une progression d une demi-heure à chaque fois qu il est appuyé et les led rouges s allument en correspondance du temps sélectionné. Incliner le ventilateur La tête du ventilateur peut être inclinée en dirigeant le souffle vers un angle précis. - Pour incliner la tête du ventilateur, s assurer qu il ne soit pas branché à l électricité courante. - Maintenir le boitier du moteur avec une main et la tête du ventilateur avec l autre. Avec attention incliner le ventilateur jusqu à l angle désiré. ATTENTION : Ne pas forcer la tête du ventilateur pour l incliner le plus possible pour ne pas endommager le produit. 19
20 Ventilateur à pied Manuel d instructions Composants : Fig.2 1. Grilles antérieure et postérieure 2. Moteur 3. Pales 4. Panneau de contrôle 5. tige d extension 6. Régulateur de la hauteur 7. Tube principal 8. Télécommande 9. Base Panneau de contrôle : 10. indicateur SWING (oscillation) 11. indicateur MODE (modalité) : Sleep, Nature, Normal 12. indicateurs de vitesse : High (haute), Mid (moyenne), Low (basse) 13. Indicateurs TIMER : 0.5H, 1H, 2H, 4H, 7.5H 14. pulsant OFF 15. pulsant ON/SPEED 16. indicateur TIMER 17. indicateur SWING Télécommande : 18. pulsant MODE 19. pulsant TIMER 20. pulsant ON/SPEED 21. pulsant OFF 22. pulsant SWING 23. pulsant LAMP NETTOYAGE Avant d effectuer toute opération de nettoyage éteindre le ventilateur et le de la prise de courant. Pour nettoyer le ventilateur utiliser un chiffon humide, éventuellement légèrement humidifié. Ne pas utiliser d alcool ou agents chimiques comme des diluants, ou produits abrasifs en général. Non spruzzare acqua e liquidi sul ventilatore, previo infiltrazioni dannose. Bien sécher toutes les parties nettoyées avant d utiliser le ventilateur. En cas de non utilisation pendant la période hivernale conserver l appareil dans un endroit sec. 20
21 Ventilateur à pied Manuel d instructions ES FR DONNEES TECHNIQUES Puissance : 55W Alimentation : 230V ~ 50/60Hz Dans une optique d amélioration constante Beper se réserve le droit de modifier ou améliorer cet appareil sans préavis. Le produit en fin de vie doit être détruit selon les normes en vigueur relatives à l élimination des déchets et ne peut être traité comme simple déchet ménagé. Le produit doit être détruit dans un centre d élimination des déchets adapté ou être restitué au revendeur dans le cas d une substitution avec un autre produit équivalent neuf. Le fabricant prendra à sa charge les frais occasionnés pour la destruction du produit selon les termes de la loi en vigeur. Le produit est composé de pièces non biodégradables et substances qui peuvent polluer l environnement si détruites de façon inapropriée. Par ailleurs, certaines parties de ces matières peuvent être recyclées évitant ainsi toute pollution pour l environnement. Il est de votre et notre devoir de préserver la santé de l environnement. Le symbole indique que le produit répond aux normes requises par les nouvelles directives introduites en faveur de l environnement (2011/65/EU) et que le produit doit être détruit de façon appropriée au terme du cycle de vie. Si besoin, informez-vous auprès des autorités locales compétentes en matière d élimination des déchets de votre commune. Toute personne qui ne tiendra pas compte de ces règles d élimination des déchets indiquées dans ce paragraphe en répondra selon la loi en vigueur. 21
22 Ventilateur à pied Manuel d instructions CERTIFICAT DE GARANTIE La garantie d application est valable pour 24 mois à partir de la date d achat pour des défauts de matériel ou de fabrication. La garantie est valable uniquement en présentant le certificat de garantie et le document d achat (ticket de caisse) qui certifie la date d achat et le nom du modèle de l appareil acheté Si l appareil devrait demander l assistance technique s adresser au vendeur ou auprès de notre siège. Ceci pour conserver inaltérée l efficacité de votre appareil et pour NON invalider la garantie. Des éventuelles manipulations de l appareil de la part du personnel non autorisé invalident automatiquement a garantie. CONDITIONS DE GARANTIE S il y a des pannes à cause des défauts de matériel et/ou de fabrication pendant la période de garantie, nous garantissons la réparation du produit gratuitement. Elles ne sont pas couvertes de la garantie toutes les parties qui devraient résulter défectueuses à cause de : a. Dommages de transport ou de chutes accidentelles, b. Installation erronée ou inadaptation de l installation électrique, c. Réparations ou modifications effectuées par un personnel non autorisé, d. Manque ou incorrect entretien et nettoyage, e. Produit et/ou parties du produit relevant de l usure et/ou consommables (ex : lampes piles, lames) f. Manque d observation des instructions pour le fonctionnement de l appareil, négligence dans l utilisation La liste indiquée ci-dessus est à titre purement exemplaire et non exhaustif, car la présente garantie est donc exclue pour toutes les circonstances qui ne peuvent pas dériver des défauts de fabrication de l appareil. En outre la garantie est exclue dans tous les cas d usage impropre de l appareil et en cas d usage professionnel. Beper S.R.L. décline chaque responsabilité pour des éventuels dommages qui peuvent directement ou indirectement dériver à des personnes, des choses et des animaux domestiques, en conséquence au non-respect de toutes les prescriptions indiquées dans le «livret des instructions et des précautions» approprié, en thème d installation, d utilisation et d entretien de l appareil. ASSISTANCE TECHNIQUE Pour l assistance technique et/ou des réparations en dehors de la période de garantie, vous pouvez vous adresser directement à l adresse indiquée ci-dessous: LE SERVICE APRÈS-VENTE EST EFFECTUÉ PAR VOTRE REVENDEUR OU PAR L IMPORTATEUR/DISTRIBUTEUR DES PRODUITS BEPER. ÉCRIVEZ UN AU assistenza@beper.com POUR CONNAITRE LE CENTRE SERVICE AGRÉE BEPER LE PLUS PROCHE DE CHEZ VOUS. 22
23 Turmventilator Betriebsanleitung DE ES ALLGEMEINE ANLElTUNGEN 1. Diese Anleitungen aufmerksam lesen, denn sie geben wichtige Hinweise zu Ihrer eigenen Sicherheit bei Installation, Benutzung und Service. Sie können dadurch Störungen und Unfalle vermeiden, die u.u. Ihre Sicherheit beeintrachtigen können. 2. Beim Auspacken überprüfen, ob das Gerät unversehrt ist, insbesondere Anschlußkabel. 3. Im Falls der Kabel ist zerstört, die Reparierung oder die Ersetzung dürfen nur von Fachkräfter durchgeführt warden oder sie können erhbeliche Gefahren für den Benutzer entstehen. 4. Vor Geräteanschluß überprüfen, ob der Netzstrom und die Schildwerte übereinstimmen. Das Gerät kann Schäden erleiden, wenn einer nicht geeigneten Spannung unterliegt. 5. Bei Nichtubereinstimmung von Gerätestecker und Steckdose lassen Sie die Steckdose durch einen geeigneten Typ von qualifiziertem Fachpersonal ersetzen, das auch überprüfen soll, ob der Durchschnitt der Steckerkabel der vom Gerät aufgenommenen Leistung entspricht. 6. Die Benutzung von Paßstücken, Vielfrachsteckdosen und/oder Verlangerungskabel ist in der Regel nicht ratsam, insbesondere in Badezimmer oder Duschraum. Müssen diese Teile unbedingt verwendet werden, so benutzen Sie nur Einfach-oder Vielfrachpaßstücke bzw. Verlangerungskabel, die den geltenden Sicherheitsvorschriften entsprechen. Darauf achten, daß die auf dem Einfachpaß stuck bzw. Verlangerungskabel angegebene Stromleistungsgrenze und die auf dem Vielfachpaßstück angegebene Hochstleistungsgrenze nicht uberschritten werden. 7. Gerät bei beschädigtem Anschlußkabel oder Stecker nicht benutzen. 8. Bei Störung und/oder Fehlbetrieb Gerät ausschalten und nicht eingreifen. Zur eventuellen Reparatur das Gerät nur zu einer Beper Vertragsservicestelle bringen und nur den Einsatz von Originalersatzteiler, verlangen. Die Nichtbeachtung dieser Anleitungen kann die Sicherheit des Gerätes beeintrachtigen. 9. Gerät nur für der vorgesehenen Zweck, einsetzen. Jede andersartige Benutzung ist ungeeignet und deswegen gefährlich. Für Schaden, die durch unsachgemäße und unvernunftige Handhabung verursacht werden, wird nicht gehaftet. 23
24 Turmventilator Betriebsanleitung 10. Gerät keinesfalls ins Wasser bzw. in andere Flüssigkeiten tauchen. 11. Gerät nicht in der Nähe von Sprengstoffen, stark brennbaren Materialien, Gasen oder Flammen bedienen. 12. Gerät nicht von Kindern oder Ungeschickten unbewacht bedienen lassen. 13. Gerät nicht mit nassen oder feuchten Händen und Füßen berühren. 14. Für absolute Betriebssicherheit nur vorgesehene Zubehörteile verwenden Gerät nicht im Duschraum und bei Badewanne oder beim Waschbecken benutzen: die Anwesenheit von Wasser könnte lebensgefährlich sein. 16. Stecker niemals an der Leitung bzw. an dem Gerät aus der Steckdose ziehen. 17. Das Kabel nicht herabhängen lassen. 18. Gerät nicht den Witterungseinflüssen (Regen, Wind, Schnee, Hagen usw.) aussetzen. 19. Bei Nicht benutzen bzw. Reinigen den Gerätestecker aus der Steckdose ziehen. 20. Falls Sie entscheiden, das Gerät nicht mehr zu verwenden, dann ist es empfehlenswert, das Gerät durch Abschneiden des Anschlußkabel außer Betrieb zu setzen, nachdem der Stecker aus der Steckdose gezogen wurde. Es wird ferner empfohlen, die Geräteteile, die lebensgefährlich sein können, außer Betrieb zu setzen, besonders für die Kinder, die mit dem Gerät außer Gebrauch spielen können. 21. Beim Nichtgebrauch, vor dem Einfügen oder Entnehmen seiner Bestandteile und vor dem Durchführung von Reinigungsarbeiten muß das Gerät vom Strom abgeschaltet werden. 22. Es wird empfohlen das Gerät sauber zu halten um die o.g. Funktionsstörungen und Feuer -Gefahr zu vermeiden. 23. Achten Sie darauf, dass alle die das Gerät benutzen, diese Anleitungen lesen. 24. Diese Anleitungen aufbewahren. 24
25 Turmventilator Betriebsanleitung DE ES MONTAGEANLEITUNG: Lösen Sie die L-Schraube am Ende des Hauptrohres und entfernen Sie sie zusammen mit der Sicherungsscheibe. Lösen Sie den Höhenverstellungsregler und ziehen Sie das Verlängerungsrohr bis zur gewünschten Höhe, dann den Höhenverstellungsregler im Uhrzeigersinn drehen, um ihn zu blockieren. Stecken Sie das Hauptrohr in das sich in der Basis befindlichen Loch, drehen und sichern Sie ihn mittels der L- Schraube und der Sicherungsscheibe. Schraube richtig fest anziehen. Stellen Sie die Basis auf eine ebene Fläche. Lockern Sie leicht die Fixierschraube und befestigen Sie das Gebläse-Gehäuse an der Spitze der Verlängerungsstange. Danach die Fixierschraube wieder anziehen. Die Motorwelle ist an der Kappe zur Blockierung der Drehflügel und der Sicherheitsmutter befestigt. Entfernen Sie die Drehflügel-Blockierungskappe in dem Sie sie im Uhrzeigersinn drehen und die Sicherheitsmutter, indem Sie sie gegen den Uhrzeigersinn drehen. Platzieren Sie das hintere Gitter vor dem Motorgehäuse und richten Sie es nach den beiden Löcher des Gitters selbst aus. Vergewissern Sie sich dass der Griff nach oben positioniert ist. Sobald das hintere Gitter richtig ausgerichtet ist, verriegeln Sie ihn mit der Sicherheitsmutter in dem Sie sie im Uhrzeigersinn zuschrauben. Entfernen Sie den eventuellen Schutz von der Motorwelle und positionieren Sie die Drehflügel über sie. Stellen Sie sicher dass sie richtig positioniert sind, indem Sie die Vorsprünge der Kurbelwelle nach den dazugehörigen Räumen in den Drehflügel ausrichten. Fixieren Sie die Position der Drehflügeln durch das anschrauben der Drehflügel-Blockierungskappe gegen den Uhrzeigersinn. Prüfen Sie die Position der Drehflügeln in dem Sie versuchen, sie mit den Händen drehen zu lassen so, dass sie keinen Kontakt mit der Sicherheitsmutter haben. Die Drehflügel sollten frei drehen können. Platzieren Sie dann das vordere Gitter über das Hintere und befestigen Sie sie durch die entsprechenden Gitterschließhaken. PRODUKT UND ZUBEHÖR Fig.1 1. Vordergitter 2. Drehflügel-Blockierungskappe 3. Drehflügel 4. Sicherheitsmutter 5. Hinteres Gitter 6. Motorgehäuse 7. Ventilatorgehäuse 8. Schraube 9. Höhenversteller 10. Hauptrohr 11. Basis 12. Sicherungsscheibe 13. L- Schraube GEBRAUCHSANWEISUNGEN: Dieser Lüfter kann in drei verschiedenen Geschwindigkeiten, drei verschiedenen Modi arbeiten und kann bis zu 7,5 Betriebsstunden eingestellt werden. Er ist auch mit einer Fernbedienung und einem Bedienfeld ausgestattet womit es möglich ist, die gewünschte Betriebsart einzustellen. Platzieren Sie den Lüfter auf einer trockenen ebenen Fläche und schließen Sie ihn an eine Steckdose an. Auf dem Bedienfeld werden Sie alle Einstellungen leuchten sehen. Stellen Sie sicher, dass die Fernbedienung 2 AAA-Batterien enthält (nicht vom Hersteller mitgeliefert). 25
26 Turmventilator Betriebsanleitung Fernsteuerung ON / SPEED Drücken Sie die ON / SPEED-Taste (auf der Fernbedienung oder über das Bedienfeld) um den Lüfter einzuschalten. Der Lüfter wird beginnen bei mittlerer Geschwindigkeit zu funktionieren und, bei den darauf folgenden Anwendungen, wird er sich auf dem letzten Arbeitsmodus vor dem Ausschalten einstellen. Drücken Sie die ON / SPEED-Taste um das HIGH-Modus (hohe Geschwindigkeit) oder LOW- Modus (niedrige Geschwindigkeit) zu wählen AUS Drücken Sie die OFF-Taste um den Ventilator auszuschalten MODE Drücken Sie die MODE-Taste auf der Fernbedienung, um den Ventilator Modus zu ändern: - Normal: der Lüfter wird mit konstanter Drehzahl laufen; die MODE-Anzeige wird rot leuchten. - Nature: in diesem Modus wird der Lüfter die natürliche Brise die man in der frische Luft spürt simulieren, d.h. mit unterschiedlichen Geschwindigkeiten laufen; die MODE-Anzeige wird grün leuchten. - Sleep: In diesem Modus wird der Lüfter eine leichte und angenehme Brise simulieren und das ist für die Verwendung in der Nacht geeignet. Die MODE-Anzeige wird ausgeschaltet sein. SWING die SWING-Taste drücken um die Schwenkfunktion für eine homogene Verteilung der vom Ventilator erzeugte Brise zu gewährleisten. Drücken Sie erneut die Taste SWING um die Schwenkung zu stoppen. TIMER Drücken Sie TIMER (bei eingeschaltetem Ventilator), um den Ausschaltungs-Timer einzustellen (LEDs leuchten bei der eingestellten Zeit). Die einstellbare Zeit beträgt maximal 7,5 Stunden; in dem Sie die Taste TIMER drücken, wird jedes Mal wenn Sie darauf drücken die Zeit mit einer halben Stunde Progression eingestellt, und die roten LEDs werden bei der entsprechenden eingestellten Zeit leuchten Ventilator kippen Der Gebläse-Kopf kann gekippt werden, um die Brise in einen bestimmten Winkel zu lenken. - Bevor Sie den Kopf des Lüfters kippen, stellen Sie sicher, dass er nicht an Strom angeschlossen ist. Halten Sie das Motorgehäuse mit einer Hand und den Kopf des Lüfters mit der anderen. Kippen Sie vorsichtig den Ventilator-Kopf bis zur Erreichung des gewünschten Winkels. ACHTUNG: Forcieren Sie den Ventilator-Kopf nicht in dem Sie ihn mehr zu kippen versuchen als möglich, um das Produkt nicht zu beschädigen 26
27 Turmventilator Betriebsanleitung DE ES Komponenten: Fig.2 1. Vorderes und hinteres Gitter 2. Motor 3. Drehflügel 4. Bedienfeld 5. Verlängerungsrohr 6. Höhenversteller 7. Hauptrohr 8. Fernbedienung 9. Basis Bedienungsfeld: 10. SWING-Anzeige (Schwenkung) 11. MODE-Anzeige (Modus): Sleep, Nature, Normal 12. Geschwindigkeitsanzeigen: High (hoch), Mid (mittlere), Low (niedrig) 13. Timer-Anzeigen: 0,5H, 1H, 2H, 4H, 7.5H 14. OFF-Taste 15. ON / SPEED-Taste 16. TIMER-Anzeige 17. SWING-Anzeige Fernbedienung: 18. MODE-Taste 19. TIMER-Taste 20. ON / SPEED-Taste 21. OFF-Taste 22. SWING-Taste 23. LAMP-Taste REINIGUNG Vor der Reinigung Standventilator ausschalten und Stecker aus der Steckdose ziehen. Für die Reinigung benutzen Sie ein weiches angefeuchtetes Tuch. Niemals Alkohol, Verdünnungsmittel, Schleifmittel, usw. für die Reinigung benutzen. Kein Wasser oder andere Flüssigkeiten auf dem Gerät sprühen. Sie können es beschädigen. Vor dem folgendem Gebrauch trocknen Sie alle Teile komplett ab. 6. Feststellschraube (13) komplett einschrauben, bis das Schaltbrett (14) ganz fest an dem Rohr ist. 7. Befestigen Sie das hintere Schutzgitter (6) am Motorgehäuse (9). Achten Sie darauf, dass die Zentrierstifte des Motorgehäuses in die entsprechenden Passlöcher am hinteren Schutzgitter einrasten. 8. Drehen Sie die Befestigungsschraube (5) wieder auf das Motorgehäuse auf und ziehen Sie die Befestigungsschraube kräftig mit der Hand fest. 9. Setzen Sie die Rotorblätter (4) auf die Motorspindel auf und drehen Sie die Befestigungsmutter (3) gegen den Uhrzeigesinn, um sie an dem Motorgehäuse festzumachen. Drehen Sie mit der Hand kräftig auf die Motorspindel auf. 27
28 Turmventilator Betriebsanleitung TECHNISCHE DATEN Leistung: 55W Betriebsspannung: 230V ~ 50/60Hz In Hinblick auf eine Verbesserungsperspektive behält sich Beper das Recht vor, das betreffende Produkt ohne Voranmeldung zu ändern bzw. umzubauen. Die WEEE-Richtlinie (von engl.: Waste Electrical and Electronic Equipment; deutsch: (Elektro- und Elektronikgeräte-Abfall) ist die EG-Richtlinie 2011/65/EU zur Reduktion der zunehmenden Menge an Elektronikschrott aus nicht mehr benutzten Elektro- und Elektronikgeräten. Ziel ist das Vermeiden, Verringern sowie umweltverträgliche Entsorgen der zunehmenden Mengen an Elektronikschrott durch eine erweiterte Herstellerverantwortung. Ihr Gerät enthält wertvolle Rohstoffe, die wieder verwertet werden können. Bringen Sie das Gerät zur Entsorgung zu einer Sammelstelle Ihrer Stadt oder Gemeinde. Elektro- und Elektronikgeräte mit folgender Kennzeichnung versehen und dürfen nicht mehr über Restmüll, sondern nur noch über die öffentlichen Entsorgungsträger und anschließende Rückgabe an die Hersteller und Importeure entsorgt werden. 28
Περιεχόμενα / Contents
 Aερόθερμo / Fan Heater PTC-906 Περιεχόμενα / Contents GR... Σελίδες 3-8 EN... Pages 9-11 2 GR Ευχαριστούμε που επιλέξατε μια συσκευή της γκάμας θερμαντικών IZZY. Σημαντικές Οδηγίες Ασφαλείας Τα Μέρη της
Tipologie installative - Installation types Type d installation - Installationstypen Tipos de instalación - Τυπολογίες εγκατάστασης
 AMPADE MOOCROMATICHE VIMAR DIMMERABII A 0 V~ - VIMAR 0 V~ DIMMABE MOOCHROME AMP AMPE MOOCHROME VIMAR VARIATEUR 0 V~ - DIMMERFÄHIGE MOOCHROMATICHE AMPE VO VIMAR MIT 0 V~ ÁMPARA MOOCROMÁTICA VIMAR REGUABE
Tipologie installative - Installation types Types d installation - Die einbauanweisungen Tipos de instalación - Τυπολογίες εγκατάστασης
 Types d installation Die einbauanweisungen Tipos de instalación Τυπολογίες εγκατάστασης AMPADE MOOCROMATICHE VIMAR DIMMERABII A 0 V~ MOOCHROME DIMMABE AMP VIMAR 0 V~ AMPE MOOCHROME VIMAR DIMMABE 0 V~ EUCHTE
the total number of electrons passing through the lamp.
 1. A 12 V 36 W lamp is lit to normal brightness using a 12 V car battery of negligible internal resistance. The lamp is switched on for one hour (3600 s). For the time of 1 hour, calculate (i) the energy
Operating-instruction Manual ΟΔΗΓΙΕΣ ΧΡΗΣΕΩΣ
 Operating-instruction Manual ΟΔΗΓΙΕΣ ΧΡΗΣΕΩΣ 16 3 SPEED PEDESTAL FAN 16 ΑΝΕΜΙΣΤΗΡΑΣ ΟΡΘΟΣΤΑΤΗΣ 3 ΤΑΧΥΤΗΤΩΝ PLEASE READ ALL INSTRUCTIONS CAREFULLYAND KEEP FOR FUTURE USE ΠΑΡΑΚΑΛΩ ΔΙΑΒΑΣΤΕ ΤΙΣ ΟΔΗΓΙΕΣ ΧΡΗΣΗΣ
BFN3000 ΕΠΙΤΡΑΠΕΖΙΟΣ ΑΝΕΜΙΣΤΗΡΑΣ. Owner s manual. Μετάφραση του πρωτοτύπου των οδηγιών χρήσης
 BFN3000 ΕΠΙΤΡΑΠΕΖΙΟΣ ΑΝΕΜΙΣΤΗΡΑΣ Μετάφραση του πρωτοτύπου των οδηγιών χρήσης Owner s manual www.bormanntools.com GR Οδηγίες ασφαλούς λειτουργίας 1. Τα χαρακτηριστικά της παροχής ηλεκτρικού ρεύματος θα
ITALIANO. pag. 5 ENGLISH. pag. 9 FRANÇAIS. pag. 14 DEUTSCH. pag. 19 ESPAÑOL. pag. 24 ΕΛΛΗΝΙΚΗ. pag. 29. Fig. 1
 VENTILATORE A PIANTANA - MANUALE DI ISTRUZIONI STAND FAN - USE INSTRUCTIONS VENTILATEUR À PIED - MANUEL D INSTRUCTIONS TURMVENTILATOR - BETRIEBSANLEITUNG VENTILADOR DE PIE - MANUAL DE INSTRUCCIONES ΑΝΕΜΙΣΤΗΡΑΣ
Capacitors - Capacitance, Charge and Potential Difference
 Capacitors - Capacitance, Charge and Potential Difference Capacitors store electric charge. This ability to store electric charge is known as capacitance. A simple capacitor consists of 2 parallel metal
La Déduction naturelle
 La Déduction naturelle Pierre Lescanne 14 février 2007 13 : 54 Qu est-ce que la déduction naturelle? En déduction naturelle, on raisonne avec des hypothèses. Qu est-ce que la déduction naturelle? En déduction
Instruction Execution Times
 1 C Execution Times InThisAppendix... Introduction DL330 Execution Times DL330P Execution Times DL340 Execution Times C-2 Execution Times Introduction Data Registers This appendix contains several tables
derivation of the Laplacian from rectangular to spherical coordinates
 derivation of the Laplacian from rectangular to spherical coordinates swapnizzle 03-03- :5:43 We begin by recognizing the familiar conversion from rectangular to spherical coordinates (note that φ is used
Εγκατάσταση λογισμικού και αναβάθμιση συσκευής Device software installation and software upgrade
 Για να ελέγξετε το λογισμικό που έχει τώρα η συσκευή κάντε κλικ Menu > Options > Device > About Device Versions. Στο πιο κάτω παράδειγμα η συσκευή έχει έκδοση λογισμικού 6.0.0.546 με πλατφόρμα 6.6.0.207.
ITALIANO. pag. 5 ENGLISH. pag. 11 FRANÇAIS. pag. 16 DEUTSCH. pag. 21 ESPAÑOL. pag. 27 ΕΛΛΗΝΙΚΗ. pag. 33. Fig. 1
 VENTILATORE A PIANTANA - MANUALE DI ISTRUZIONI STAND FAN - USE INSTRUCTIONS VENTILATEUR À PIED - MANUEL D INSTRUCTIONS TURMVENTILATOR - BETRIEBSANLEITUNG VENTILADOR DE PIE - MANUAL DE INSTRUCCIONES ΑΝΕΜΙΣΤΗΡΑΣ
EE512: Error Control Coding
 EE512: Error Control Coding Solution for Assignment on Finite Fields February 16, 2007 1. (a) Addition and Multiplication tables for GF (5) and GF (7) are shown in Tables 1 and 2. + 0 1 2 3 4 0 0 1 2 3
ΑΚΑ ΗΜΙΑ ΕΜΠΟΡΙΚΟΥ ΝΑΥΤΙΚΟΥ ΜΑΚΕ ΟΝΙΑΣ ΣΧΟΛΗ ΜΗΧΑΝΙΚΩΝ ΠΤΥΧΙΑΚΗ ΕΡΓΑΣΙΑ ΘΕΜΑ : ΧΗΜΙΚΑ ΠΡΟΣΘΕΤΑ ΠΟΥ ΠΡΟΟΡΙΖΟΝΤΑΙ ΓΙΑ ΤΟ ΝΕΡΟ ΤΟΥ ΑΤΜΟΛΕΒΗΤΑ
 ΑΚΑ ΗΜΙΑ ΕΜΠΟΡΙΚΟΥ ΝΑΥΤΙΚΟΥ ΜΑΚΕ ΟΝΙΑΣ ΣΧΟΛΗ ΜΗΧΑΝΙΚΩΝ ΠΤΥΧΙΑΚΗ ΕΡΓΑΣΙΑ ΘΕΜΑ : ΧΗΜΙΚΑ ΠΡΟΣΘΕΤΑ ΠΟΥ ΠΡΟΟΡΙΖΟΝΤΑΙ ΓΙΑ ΤΟ ΝΕΡΟ ΤΟΥ ΑΤΜΟΛΕΒΗΤΑ ΣΠΟΥ ΑΣΤΗΣ : ΑΓΟΡΑΣΤΟΣ ΧΡΥΣΟΒΑΛΑΝΤΗΣ ΕΠΙΒΛΕΠΟΥΣΑ ΚΑΘΗΓΗΤΡΙΑ :
MS SERIES MS DESK TOP ENCLOSURE APPLICATION EXAMPLE FEATURE. Measuring instruments. Power supply equipments
 MS SERIES MS DESK TOP ENCLOSURE FEATURE Available in 176 sizes. Screws are not appeared on the surface. Usable as rack mount case with optinal mounting bracket. There are no ventilation hole for cover
Stucco Natural / Stucco Mítiko. Στόκος με βάση τον ασβέστη.
 Stucco Natural / Stucco Mítiko Στόκος με βάση τον ασβέστη. 5Kg Stucco Mítiko + 480ml Esencia 05 Stuco Natural / Stucco Mítiko Στόκος, για εσωτερική χρήση που χαρίζει ένα πολυτελές παλαιωμένο αποτέλεσμα,
English PDFsharp is a.net library for creating and processing PDF documents 'on the fly'. The library is completely written in C# and based
 English PDFsharp is a.net library for creating and processing PDF documents 'on the fly'. The library is completely written in C# and based exclusively on safe, managed code. PDFsharp offers two powerful
ΟΔΗΓΙΕΣ ΧΡΗΣΗΣ USE INSTRUCTIONS
 ΟΔΗΓΙΕΣ ΧΡΗΣΗΣ USE INSTRUCTIONS ΤΗΛΕΦΩΝΟ ΜΕ ΑΝΑΓΝΩΡΙΣΗ ΚΛΗΣΗΣ /CORDED PHONE WITH CALLER ID ΜΟΝΤΕΛΟ/MODEL: TM09-448 DC48V Παρακαλούμε διαβάστε προσεκτικά όλες τις οδηγίες χρήσης πριν την χρήση της συσκευής
The Simply Typed Lambda Calculus
 Type Inference Instead of writing type annotations, can we use an algorithm to infer what the type annotations should be? That depends on the type system. For simple type systems the answer is yes, and
ITALIANO. pag. 3 ENGLISH. pag. 7 FRANÇAIS. pag. 11 DEUTSCH. pag. 15 ESPAÑOL. pag. 20 ΕΛΛΗΝΙΚΗ. pag. 24. Fig. 1
 VENTILATORE - MANUALE DI ISTRUZIONI FAN - USE INSTRUCTIONS VENTILATEUR - MANUEL D INSTRUCTIONS VENTILATOR - BETRIEBSANLEITUNG VENTILADOR - MANUAL DE INSTRUCCIONES ΑΝΕΜΙΣΤΗΡΑΣ ΟΡΘΟΣΤΑΤΗΣ - ΕΓΧΕΙΡΊΔΙΟ ΟΔΗΓΙΏΝ
ITALIANO. pag. 3 ENGLISH. pag. 8 FRANÇAIS. pag. 13 DEUTSCH. pag. 19 ESPAÑOL. pag. 25 ΕΛΛΗΝΙΚΗ. pag. 30. Fig. 1
 VENTILATORE DA TAVOLO - MANUALE DI ISTRUZIONI TABLE FAN - USE INSTRUCTIONS VENTILATEUR DE TABLE - MANUEL D INSTRUCTIONS TISCHVENTILATOR - BETRIEBSANLEITUNG VENTILADOR DE MESA - MANUAL DE INSTRUCCIONES
!Stato di tensione triassiale!stato di tensione piano!cerchio di Mohr
 !Stato di tensione triassiale!stato di tensione piano!cerchio di Mohr Stato di tensione F A = F / A F Traione pura stato di tensione monoassiale F M A M Traione e torsione stato di tensione piano = F /
C.S. 430 Assignment 6, Sample Solutions
 C.S. 430 Assignment 6, Sample Solutions Paul Liu November 15, 2007 Note that these are sample solutions only; in many cases there were many acceptable answers. 1 Reynolds Problem 10.1 1.1 Normal-order
OPERATING INSTRUCTIONS ΟΔΗΓΙΕΣ ΧΡΗΣΗΣ
 OPERATING INSTRUCTIONS ΟΔΗΓΙΕΣ ΧΡΗΣΗΣ Model No.: WLSF-4050 ΠΑΡΑΚΑΛΩ ΔΙΑΒΑΣΤΕ ΚΑΙ ΦΥΛΑΤΕ ΤΙΣ ΟΔΗΓΙΕΣ ΠΡΟΣΕΧΤΙΚΑ ΠΡΙΝ ΧΡΗΣΙΜΟΠΟΙΗΣΕΤΕ ΤΟΝ ΑΝΕΜΙΣΤΗΡΑ 1 ΕΞΑΡΤΗΜΑΤΑ (Σχήμα 1) 1 Εξώφυλλο μπροστινού προστατευτικό
Strain gauge and rosettes
 Strain gauge and rosettes Introduction A strain gauge is a device which is used to measure strain (deformation) on an object subjected to forces. Strain can be measured using various types of devices classified
Τεστ Κατάταξης 1 Grading Test 1
 HELLENIC CULTURE CENTRE - Education, Language and Culture www.hcc.edu.gr, e-mail: Ifigenia@hcc.edu.gr, Tel.: (+30) 210 5238149, Fax: (+30) 210 8836494 Τεστ Κατάταξης 1 Grading Test 1 Οδηγίες Πρέπει να
Right Rear Door. Let's now finish the door hinge saga with the right rear door
 Right Rear Door Let's now finish the door hinge saga with the right rear door You may have been already guessed my steps, so there is not much to describe in detail. Old upper one file:///c /Documents
Cod.: VE.401BL. Cod.: VE.401G
 VENTILATORE USB - MANUALE DI ISTRUZIONI USB FAN - USE INSTRUCTIONS VENTILATEUR USB - MANUEL D INSTRUCTIONS USB-VENTILATOR - BETRIEBSANLEITUNG VENTILADOR USB - MANUAL DE INSTRUCCIONES ΑΝΕΜΙΣΤΗΡΑΣ USB -
MSN DESK TOP ENCLOSURE WITH STAND / CARRYING HANDLE
 MSN SERIES MSN DESK TOP ENCLOSURE WITH STAND / CARRYING HANDLE W H FEATURE Available in 176 sizes. Stand / carrying handle can be adjusted in 30 degree. Maximum load is kg. There are no ventilation hole
BFN6000 ΑΝΕΜΙΣΤΗΡΑΣ ΟΡΘΟΣΤΑΤΗΣ. Owner s manual. Μετάφραση του πρωτοτύπου των οδηγιών χρήσης
 BFN6000 ΑΝΕΜΙΣΤΗΡΑΣ ΟΡΘΟΣΤΑΤΗΣ Μετάφραση του πρωτοτύπου των οδηγιών χρήσης Owner s manual GR Εικ.1 1 Κέντρο προφυλακτήρα 9 Κεντρικός άξονας 16 Εσωτερικό τμήμα στύλου 2 Εμπρόσθιο τμήμα προφυλακτήρα 10 Περίβλημα
ΟΔΗΓΙΕΣ ΧΡΗΣΗΣ ΕΠΙΤΡΑΠΕΖΙΟΣ ΑΝΕΜΙΣΤΗΡΑΣ
 ΟΔΗΓΙΕΣ ΧΡΗΣΗΣ ΕΠΙΤΡΑΠΕΖΙΟΣ ΑΝΕΜΙΣΤΗΡΑΣ ΜΟΝΤΕΛΟ: UDF-769 ΣΗΜΕΙΩΣΗ: Παρακαλούμε διαβάστε το εγχειρίδιο χρήσης, πριν χρησιμοποιήσετε τη συσκευή. ΣΗΜΑΝΤΙΚΑ ΜΕΤΡΑ ΠΡΟΣΤΑΣΙΑΣ Όταν χρησιμοποιείτε ηλεκτρικές
Advanced Subsidiary Unit 1: Understanding and Written Response
 Write your name here Surname Other names Edexcel GE entre Number andidate Number Greek dvanced Subsidiary Unit 1: Understanding and Written Response Thursday 16 May 2013 Morning Time: 2 hours 45 minutes
Finite Field Problems: Solutions
 Finite Field Problems: Solutions 1. Let f = x 2 +1 Z 11 [x] and let F = Z 11 [x]/(f), a field. Let Solution: F =11 2 = 121, so F = 121 1 = 120. The possible orders are the divisors of 120. Solution: The
[1] P Q. Fig. 3.1
![[1] P Q. Fig. 3.1](/thumbs/79/80362156.jpg "[1] P Q. Fig. 3.1") 1 (a) Define resistance....... [1] (b) The smallest conductor within a computer processing chip can be represented as a rectangular block that is one atom high, four atoms wide and twenty atoms long. One
1 (a) Define resistance....... [1] (b) The smallest conductor within a computer processing chip can be represented as a rectangular block that is one atom high, four atoms wide and twenty atoms long. One
ΕΦΑΡΜΟΓΗ APPLICAZIONE APPLICATION APPLICATION. Sublime Colours 2,5L (10-12m2/L) Esencia 25 ml 100 ml. Damasco 2,5L (6-8m2/L)
 Esencia 25 ml 100 ml. Damasco 2,5L (6-8m2/L)") DAMASCO Διακριτική και κομψή διακόσμηση εμπνευσμένη από τα πολυτελή υφάσματα της αρχαιότητας, για όσους επιθυμούν οι τοίχοι να είναι επενδεδυμένοι με ένα προϊόν που παρέχει μεταξένια και βελούδινη αντανάκλαση.
DAMASCO Διακριτική και κομψή διακόσμηση εμπνευσμένη από τα πολυτελή υφάσματα της αρχαιότητας, για όσους επιθυμούν οι τοίχοι να είναι επενδεδυμένοι με ένα προϊόν που παρέχει μεταξένια και βελούδινη αντανάκλαση.
INSTRUCTIONS MANUAL ΕΓΧΕΙΡΙΔΙΟ ΛΕΙΤΟΥΡΓΙΑΣ
 Model/Μοντέλο: WKH-1132 INSTRUCTIONS MANUAL ΕΓΧΕΙΡΙΔΙΟ ΛΕΙΤΟΥΡΓΙΑΣ ENGLISH General Safety Instructions Before commissioning this kettle, please read the instruction manual carefully. Please keep the instruction
ITALIANO. pag. 3 ENGLISH. pag. 7 FRANÇAIS. pag. 11 DEUTSCH. pag. 15 ESPAÑOL. pag. 19 ΕΛΛΗΝΙΚΗ. pag. 23
 SCALDAMANI MANOLO - MANUALE DI ISTRUZIONI HAND WARMER MANOLO - USE INSTRUCTIONS CHAUFFE-MAINS MANOLO - MANUEL D INSTRUCTIONS HANDWÄRMER MANOLO - BETRIEBSANLEITUNG CALENTADOR PARA LAS MANOS MANOLO MANUAL
L18VFSS10E. Instruction Manual 45.7cm/18 High Power Floor Fan. Εγχειρίδιο Οδηγιών Επιδαπεδιος Ανεμιστηρας 45.7 Εκατοστομετρο
 L18VFSS10E Instruction Manual 45.7cm/18 High Power Floor Fan Εγχειρίδιο Οδηγιών Επιδαπεδιος Ανεμιστηρας 45.7 Εκατοστομετρο GB GR Contents GB Safety Warnings... 2 Unpacking... 5 Getting to Know Your Fan...
Operating Instructions and Parts Manual 14-inch Woodworking Band Saw Models JWBS-14SF and JWBS-14SF-3
 Operating Instructions and Parts Manual 14-inch Woodworking Band Saw Models JWBS-14SF and JWBS-14SF-3 Model #714500 shown JET 427 New Sanford Road LaVergne, Tennessee 37086 Part No. M-714500 Ph.: 800-274-6848
ITALIANO. pag. 3 ENGLISH. pag. 7 FRANÇAIS. pag. 11 DEUTSCH. pag. 15 ESPAÑOL. pag. 19 ΕΛΛΗΝΙΚΗ. pag. 23
 SCALDAPIEDI - MANUALE DI ISTRUZIONI FOOT WARMER - USE INSTRUCTIONS RÉCHAUFFE PIEDS - MANUEL D INSTRUCTIONS FUSSWÄRMER - BETRIEBSANLEITUNG CALENTADOR PARA LOS PIES MANUAL DE INSTRUCCIONES ΘΕΡΜΑΝΤΙΚΟ ΓΙΑ
Section 8.3 Trigonometric Equations
 99 Section 8. Trigonometric Equations Objective 1: Solve Equations Involving One Trigonometric Function. In this section and the next, we will exple how to solving equations involving trigonometric functions.
ITALIANO. pag. 3 ENGLISH. pag. 7 FRANÇAIS. pag. 11 DEUTSCH. pag. 15 ESPAÑOL. pag. 19 ΕΛΛΗΝΙΚΗ. pag. 23
 SCALDA SPALLE - MANUALE DI ISTRUZIONI SHOULDER WARMER - USE INSTRUCTIONS RÉCHAUFFE ÉPAULES - MANUEL D INSTRUCTIONS SCHULTERWÄRMER - BETRIEBSANLEITUNG CALENTADOR PARA LOS HOMBROS MANUAL DE INSTRUCCIONES
ITALIANO. pag. 3 ENGLISH. pag. 7 FRANÇAIS. pag. 11 DEUTSCH. pag. 15 ESPAÑOL. pag. 19 ΕΛΛΗΝΙΚΗ. pag. 23
 SCALDA SCHIENA - MANUALE DI ISTRUZIONI WAIST WARMER - USE INSTRUCTIONS RÉCHAUFFE DOS - MANUEL D INSTRUCTIONS RÜCKENWÄRMER - BETRIEBSANLEITUNG CALENTADOR PARA LA ESPALDA MANUAL DE INSTRUCCIONES ΘΕΡΜΑΝΤΙΚΟ
SCALDA E ASCIUGA SCARPE
 SCALDA E ASCIUGA SCARPE MANUALE DI ISTRUZIONI (pag. 2) SHOES DRYER - USE INSTRUCTIONS (pag. 8) CHAUFFE ET SÈCHE CHAUSSURES MANUEL D INSTRUCTIONS (pag. 13) SCHUHWÄRMER BETRIEBSANLEITUNG ( PAG. 19) SECADOR
4K HDMI Splitter 1x4. User s Guide / Bedienungsanleitung / Εγχειρίδιο Χρήστη
 4K HDMI Splitter 1x4 User s Guide / Bedienungsanleitung / Εγχειρίδιο Χρήστη INTRODUCTION The EDISION 4K HDMI Splitter 1x4 uses a single HDMI input source, to distribute it to 4 HDMI outputs. The splitter
Stato di tensione triassiale Stato di tensione piano Cerchio di Mohr
 Stato di tensione triassiale Stato di tensione iano Cerchio di Mohr Stato di tensione F A = F / A F Traione ura stato di tensione monoassiale F M A M Traione e torsione stato di tensione iano = F / A =
CHAPTER 25 SOLVING EQUATIONS BY ITERATIVE METHODS
 CHAPTER 5 SOLVING EQUATIONS BY ITERATIVE METHODS EXERCISE 104 Page 8 1. Find the positive root of the equation x + 3x 5 = 0, correct to 3 significant figures, using the method of bisection. Let f(x) =
Every set of first-order formulas is equivalent to an independent set
 Every set of first-order formulas is equivalent to an independent set May 6, 2008 Abstract A set of first-order formulas, whatever the cardinality of the set of symbols, is equivalent to an independent
DC-DC Constant Current Step-Down LED driver LDD-300L LDD-350L LDD-500L LDD-600L LDD-700L CURRENT RANGE
 SPECIFICATION ORDER NO. LDD-00L LDD-0L LDD-00L LDD-00L LDD-700L CURRENT RANGE 00mA 0mA 00mA VOLTAGE RANGE Note. ~ VDC for LDD-00~700L/LW ; ~ 8VDC for LDD-00~700LS CURRENT ACCURACY (Typ.) ±% at VDC input
ΟΔΗΓΙΕΣ ΣΥΝΑΡΜΟΛΟΓΗΣΗΣ/ ASSEMBLY INSTRUCTION ΤΟΜΜΥ ΚΡΕΒΑΤΙ/BED
 ΟΔΗΓΙΕΣ ΣΥΝΑΡΜΟΛΟΓΗΣΗΣ/ ASSEMBLY INSTRUCTION ΤΟΜΜΥ ΚΡΕΒΑΤΙ/BED 1. Παρακαλώ πολύ διαβάστε προσεκτικά τις οδηγίες πριν την συναρμολόγηση/ Please read the instructions carefully. 2. Παρακαλώ πολύ όπως ελέγξτε
ITALIANO. pag. 3 ENGLISH. pag. 9 FRANÇAIS. pag. 15 DEUTSCH. pag. 21 ESPAÑOL. pag. 27 ΕΛΛΗΝΙΚΗ. pag. 34
 FORNO - MANUALE DI ISTRUZIONI TOASTER OVEN - USE INSTRUCTIONS FOUR - MANUEL D INSTRUCTIONS BACKOFEN - BETRIEBSANLEITUNG HORNO - MANUAL DE INSTRUCCIONES ΗΛΕΚΤΡΙΚΌΣ ΦΟΎΡΝΟΣ - ΕΓΧΕΙΡΊΔΙΟ ΟΔΗΓΙΏΝ Cod.: 90.885
How to register an account with the Hellenic Community of Sheffield.
 How to register an account with the Hellenic Community of Sheffield. (1) EN: Go to address GR: Πηγαίνετε στη διεύθυνση: http://www.helleniccommunityofsheffield.com (2) EN: At the bottom of the page, click
Door Hinge replacement (Rear Left Door)
") Door Hinge replacement (Rear Left Door) We will continue the previous article by replacing the hinges of the rear left hand side door. I will use again the same procedure and means I employed during the
Door Hinge replacement (Rear Left Door) We will continue the previous article by replacing the hinges of the rear left hand side door. I will use again the same procedure and means I employed during the
Μοντέλα/Models: MFT-16227, MFT-16228
 Εγχειρίδιο χρήσης για επιτραπέζιο ανεμιστήρα Instructions Manual for table fan Μοντέλα/Models: MFT-16227, MFT-16228 Διαβάστε προσεκτικά τις οδηγίες χρήσης και κρατήστε τις για μελλοντική αναφορά Read carefully
Οδηγίες Αγοράς Ηλεκτρονικού Βιβλίου Instructions for Buying an ebook
 Οδηγίες Αγοράς Ηλεκτρονικού Βιβλίου Instructions for Buying an ebook Βήμα 1: Step 1: Βρείτε το βιβλίο που θα θέλατε να αγοράσετε και πατήστε Add to Cart, για να το προσθέσετε στο καλάθι σας. Αυτόματα θα
MOTORI PER VENTILATORI MOTORS FOR BLOWERS
 MOTORI PER VENTILATORI MOTORS FOR BLOWERS LR 91167 FLANGIA TIPO A FLANGE TYPE A TIPO / TYPE A B C D E F G H I* L M N O P Q BM.80.A2.1000 315 250 290 20 225 φ 7 155 33 19 h7 114 84 6 21.5 M 8 3/8 BM.80.A2.1001
Math 6 SL Probability Distributions Practice Test Mark Scheme
 Math 6 SL Probability Distributions Practice Test Mark Scheme. (a) Note: Award A for vertical line to right of mean, A for shading to right of their vertical line. AA N (b) evidence of recognizing symmetry
Quick Installation Guide
 A Installation 1 F H B E C D G 2 www.trust.com/17528/faq Quick Installation Guide C C D Freewave Wireless Audio Set 17528/ 17529 D Installation Configuration Windows XP 4 5 8 Windows 7/ Vista 6 7 9 10
Operating Instructions and Parts Manual 14-inch Woodworking Band Saw Models JWBS-14SF and JWBS-14SF-3
 Operating Instructions and Parts Manual 14-inch Woodworking Band Saw Models JWBS-14SF and JWBS-14SF-3 Model #714500 shown JET 427 New Sanford Road LaVergne, Tennessee 37086 Part No. M-714500 Ph.: 800-274-6848
Table Electric Fan 16 Επιτραπέζιος Ηλεκτρικός Ανεμιστήρας 16
 Table Electric Fan 16 Επιτραπέζιος Ηλεκτρικός Ανεμιστήρας 16 Model / Μοντέλο: FSTC-40 GB GR OWNER S MANUAL ΕΓΧΕΙΡΙΔΙΟ ΧΡΗΣΗΣ READ AND SAVE THESE INSTRUCTIONS ΔΙΑΒΑΣΤΕ ΠΡΟΣΕΚΤΙΚΑ ΑΥΤΕΣ ΤΙΣ ΟΔΗΓΙΕΣ ΠΡΙΝ
2 Composition. Invertible Mappings
 Arkansas Tech University MATH 4033: Elementary Modern Algebra Dr. Marcel B. Finan Composition. Invertible Mappings In this section we discuss two procedures for creating new mappings from old ones, namely,
Οι αδελφοί Montgolfier: Ψηφιακή αφήγηση The Montgolfier Βrothers Digital Story (προτείνεται να διδαχθεί στο Unit 4, Lesson 3, Αγγλικά Στ Δημοτικού)
") Οι αδελφοί Montgolfier: Ψηφιακή αφήγηση The Montgolfier Βrothers Digital Story (προτείνεται να διδαχθεί στο Unit 4, Lesson 3, Αγγλικά Στ Δημοτικού) Προσδοκώμενα αποτελέσματα Περιεχόμενο Ενδεικτικές δραστηριότητες
Οι αδελφοί Montgolfier: Ψηφιακή αφήγηση The Montgolfier Βrothers Digital Story (προτείνεται να διδαχθεί στο Unit 4, Lesson 3, Αγγλικά Στ Δημοτικού) Προσδοκώμενα αποτελέσματα Περιεχόμενο Ενδεικτικές δραστηριότητες
Περιεχόμενα / Contents. GR...Σελίδες 2-10 EN...Pages 11-19
 1 Περιεχόμενα / Contents GR...Σελίδες 2-10 EN...Pages 11-19 Ευχαριστούμε που επιλέξατε μια συσκευή της γκάμας IZZY. 2 Συμβουλές Aσφαλείας Διαβάστε προσεκτικά τις οδηγίες χρήσης και κρατήστε τις σε ασφαλές
User s Manual / Οδηγίες Χρήσης
 User s Manual / Οδηγίες Χρήσης EUROPEAN STANDARDS Your child s safety depends on you. Proper bed rail usage cannot be assured unless you follow these instructions. DO NOT USE YOUR BED RAIL UNTILL YOU READ
ITALIANO. pag. 4 ENGLISH. pag. 9 FRANÇAIS. pag. 14 DEUTSCH. pag. 20 ESPAÑOL. pag. 26 ΕΛΛΗΝΙΚΗ. pag. 32. Fig. 1
 MASSAGGIATORE A INFRAROSSI - MANUALE DI ISTRUZIONI BODY INFRARED MASSAGER - USE INSTRUCTIONS MASSEUR Á INFRAROUGES - MANUEL D INSTRUCTIONS INFRAROT MASSAGE-GERÄT - BETRIEBSANLEITUNG MASAJEADOR CON INFRARROJOS
department listing department name αχχουντσ ϕανε βαλικτ δδσϕηασδδη σδηφγ ασκϕηλκ τεχηνιχαλ αλαν ϕουν διξ τεχηνιχαλ ϕοην µαριανι
 She selects the option. Jenny starts with the al listing. This has employees listed within She drills down through the employee. The inferred ER sttricture relates this to the redcords in the databasee
ΚΥΠΡΙΑΚΗ ΕΤΑΙΡΕΙΑ ΠΛΗΡΟΦΟΡΙΚΗΣ CYPRUS COMPUTER SOCIETY ΠΑΓΚΥΠΡΙΟΣ ΜΑΘΗΤΙΚΟΣ ΔΙΑΓΩΝΙΣΜΟΣ ΠΛΗΡΟΦΟΡΙΚΗΣ 6/5/2006
 Οδηγίες: Να απαντηθούν όλες οι ερωτήσεις. Ολοι οι αριθμοί που αναφέρονται σε όλα τα ερωτήματα είναι μικρότεροι το 1000 εκτός αν ορίζεται διαφορετικά στη διατύπωση του προβλήματος. Διάρκεια: 3,5 ώρες Καλή
90ΚΥΡΙΟΣ ΟΔΗΓΟΣ ΠΕΡΙΕΧΟΜΕΝΑ
 90ΚΥΡΙΟΣΟΔΗΓΟΣ ΤοRazerNagaείναιτοαπόλυτοποντίκιγιαMassivelyMultiplayerOnlineGamingτοοποίομετατοπίζει τηνισορροπίαμεταξύτουπληκτρολογίουκαιτουποντικιούτοποθετώνταςένανπρωτόγνωροαριθμό εσωτερικώνεντολώντουπαιχνιδιούσεμιαθέση.έναπλέγμααντίχειραπολλαπλώνκουμπιώνμε
3.4 SUM AND DIFFERENCE FORMULAS. NOTE: cos(α+β) cos α + cos β cos(α-β) cos α -cos β
 cos α + cos β cos(α-β) cos α -cos β") 3.4 SUM AND DIFFERENCE FORMULAS Page Theorem cos(αβ cos α cos β -sin α cos(α-β cos α cos β sin α NOTE: cos(αβ cos α cos β cos(α-β cos α -cos β Proof of cos(α-β cos α cos β sin α Let s use a unit circle
3.4 SUM AND DIFFERENCE FORMULAS Page Theorem cos(αβ cos α cos β -sin α cos(α-β cos α cos β sin α NOTE: cos(αβ cos α cos β cos(α-β cos α -cos β Proof of cos(α-β cos α cos β sin α Let s use a unit circle
ITALIANO. pag. 3 ENGLISH. pag. 7 FRANÇAIS. pag. 11 DEUTSCH. pag. 15 ESPAÑOL. pag. 19 ΕΛΛΗΝΙΚΗ. pag. 24
 STUFA AL CARBONIO - MANUALE DI ISTRUZIONI CARBON HEATER - USE INSTRUCTIONS RADIATEUR AU CARBONE - MANUEL D INSTRUCTIONS KOHLENSTOFFOFEN - BETRIEBSANLEITUNG ESTUFA DE CARBONO - MANUAL DE INSTRUCCIONES ΘΕΡΜΑΝΤΙΚΟ
OUR PRODUCT RANGE. www.rakson.gr
 ΤΑ ΑΛΛΑ ΕΙ Η ΠΡΟΪΟΝΤΑ ΜΑΣ ΜΕΤΑΣΧΗΜΑΤΙΣΤΕΣ ΚΟΥ ΟΥΝΙΩΝ ΚΟΥ ΟΥΝΙΑ ΜΠΟΥΤΟΝ ΚΟΥ ΟΥΝΙΩΝ ΑΥΤΟΜΑΤΟΙ ΚΛΙΜΑΚΟΣΤΑΣΙΟΥ ΚΛΕΙ ΑΡΙΕΣ ΑΝΙΧΝΕΥΤΕΣ ΚΙΝΗΣΗΣ ΣΥΣΤΗΜΑΤΑ ΕΠΙΚΟΙΝΩΝΙΑΣ Θυροτηλεοράσεις Θυροτηλέφωνα Ενδοεπικοινωνίες
VBA ΣΤΟ WORD. 1. Συχνά, όταν ήθελα να δώσω ένα φυλλάδιο εργασίας με ασκήσεις στους μαθητές έκανα το εξής: Version 25-7-2015 ΗΜΙΤΕΛΗΣ!!!!
 VBA ΣΤΟ WORD Version 25-7-2015 ΗΜΙΤΕΛΗΣ!!!! Μου παρουσιάστηκαν δύο θέματα. 1. Συχνά, όταν ήθελα να δώσω ένα φυλλάδιο εργασίας με ασκήσεις στους μαθητές έκανα το εξής: Εγραφα σε ένα αρχείο του Word τις
AMENDMENTS XM United in diversity XM. European Parliament Draft opinion Giovanni La Via (PE v01-00)
") European Parliament 2014-2019 Committee on the Environment, Public Health and Food Safety 14.12.2016 2016/2166(DEC) AMENDMENTS 1-11 Giovanni La Via (PE592.294v01-00) Discharge 2015: European Environment
European Parliament 2014-2019 Committee on the Environment, Public Health and Food Safety 14.12.2016 2016/2166(DEC) AMENDMENTS 1-11 Giovanni La Via (PE592.294v01-00) Discharge 2015: European Environment
NMBTC.COM /
 Common Common Vibration Test:... Conforms to JIS C 60068-2-6, Amplitude: 1.5mm, Frequency 10 to 55 Hz, 1 hour in each of the X, Y and Z directions. Shock Test:...Conforms to JIS C 60068-2-27, Acceleration
MARQUE: CALOR REFERENCE: CF 3610CO SO CURLS CODIC:
 MARQUE: CALOR REFERENCE: CF 3610CO SO CURLS CODIC: 4083105 FR EN DE NL IT ES PT EL TR NO SV DA FI AR SO CURLS FA Lire attentivement le mode d emploi ainsi que les consignes de sécurité FR avant toute utilisation.
SPAZZOLA IONICA LISCIANTE MANUALE DI ISTRUZIONI HOT IONIC BRUSH - USE INSTRUCTIONS BROSSE IONIQUE LISSANTE MANUEL D INSTRUCTIONS
 SPAZZOLA IONICA LISCIANTE MANUALE DI ISTRUZIONI HOT IONIC BRUSH - USE INSTRUCTIONS BROSSE IONIQUE LISSANTE MANUEL D INSTRUCTIONS IONBÜRSTE-GLÄTTEISEN - BETRIEBSANLEITUNG CEPILLO IÓNICO ALISADOR MANUAL
Η ΕΝΕΡΓΕΙΑΚΗ ΣΗΜΑΝΣΗ ΚΑΙ ERP
 Η ΕΝΕΡΓΕΙΑΚΗ ΣΗΜΑΝΣΗ ΚΑΙ ERP 2 1 ΠΛΑΙΣΙΟ ΓΙΑΤΙ ΕΝΕΡΓΕΙΑΚΗ ΣΗΜΑΝΣΗ ΚΑΙ ErP? Αντιμετωπίζοντας την κλιματική αλλαγή, διασφαλίζοντας την ασφάλεια της παροχής ενέργειας2 και την αύξηση της ανταγωνιστικότητα
SPEEDO AQUABEAT. Specially Designed for Aquatic Athletes and Active People
 SPEEDO AQUABEAT TM Specially Designed for Aquatic Athletes and Active People 1 2 Decrease Volume Increase Volume Reset EarphonesUSBJack Power Off / Rewind Power On / Fast Forward Goggle clip LED Status
SFH-41 Fan Heater Αερόθερμο
 SFH-41 Fan Heater Αερόθερμο GB GR INSTRUCTION MANUAL ΒΙΒΛΙΟ ΟΔΗΓΙΩΝ GB ENGLISH... 3 GR EΛΛHNIKA... 7 ENGLISH PLEASE READ THESE INSTRUCTIONS CAREFULLY AND RETAIN FOR FUTURE REFER- ENCE SAFETY WARNINGS When
(1) Describe the process by which mercury atoms become excited in a fluorescent tube (3)
 Describe the process by which mercury atoms become excited in a fluorescent tube (3)") Q1. (a) A fluorescent tube is filled with mercury vapour at low pressure. In order to emit electromagnetic radiation the mercury atoms must first be excited. (i) What is meant by an excited atom? (1) (ii)
Q1. (a) A fluorescent tube is filled with mercury vapour at low pressure. In order to emit electromagnetic radiation the mercury atoms must first be excited. (i) What is meant by an excited atom? (1) (ii)
Montage - Raccordement Implantation EURO-RELAIS MINI & BOX. Mini & Box
 Montage - Raccordement Implantation EURO-RELAIS MINI & BOX 3 Fiche technique EURO-RELAIS MINI & BOX DESCRIPTIF La borne Euro-Relais MINI est en polyester armé haute résistance totalement neutre à la corrosion
ΕΡΙΤΟΡΕΣ ΚΑΙ ΑΝΘΩΡΟΙ ΚΛΕΙΔΙΑ ΑΝΑΘΕΣΘ ΑΓΩΝΑ ΓΑΦΕΙΟ ΑΓΩΝΩΝ ΟΓΑΝΩΤΙΚΘ ΕΡΙΤΟΡΘ. ζεκηλαρηο 1 ΡΑΓΚΟΣΜΙΑ ΟΜΟΣΡΟΝΔΙΑ (ISAF) ΕΛΛΘΝΙΚΘ ΟΜΟΣΡΟΝΔΙΑ (Ε.Ι.Ο.
 ΕΛΛΘΝΙΚΘ ΟΜΟΣΡΟΝΔΙΑ (Ε.Ι.Ο.") ΑΝΑΘΕΣΘ ΑΓΩΝΑ ΕΡΙΤΟΡΕΣ ΚΑΙ ΑΝΘΩΡΟΙ ΚΛΕΙΔΙΑ ΡΑΓΚΟΣΜΙΑ ΟΜΟΣΡΟΝΔΙΑ (ISAF) ΕΛΛΘΝΙΚΘ ΟΜΟΣΡΟΝΔΙΑ (Ε.Ι.Ο.) ΚΛΑΣΘ 6/6/2009 1 ΟΡΓΑΝΩΣΙΚΗ ΕΠΙΣΡΟΠΗ ΓΡΑΦΕΙΟ ΑΓΩΝΩΝ ΕΠΙΣΡΟΠΗ ΑΓΩΝΩΝ ΕΠΙΣΡΟΠΗ ΕΝΣΑΕΩΝ ΕΠΙΣΡΟΠΗ ΚΑΣΑΜΕΣΡΗΕΩΝ
ΑΝΑΘΕΣΘ ΑΓΩΝΑ ΕΡΙΤΟΡΕΣ ΚΑΙ ΑΝΘΩΡΟΙ ΚΛΕΙΔΙΑ ΡΑΓΚΟΣΜΙΑ ΟΜΟΣΡΟΝΔΙΑ (ISAF) ΕΛΛΘΝΙΚΘ ΟΜΟΣΡΟΝΔΙΑ (Ε.Ι.Ο.) ΚΛΑΣΘ 6/6/2009 1 ΟΡΓΑΝΩΣΙΚΗ ΕΠΙΣΡΟΠΗ ΓΡΑΦΕΙΟ ΑΓΩΝΩΝ ΕΠΙΣΡΟΠΗ ΑΓΩΝΩΝ ΕΠΙΣΡΟΠΗ ΕΝΣΑΕΩΝ ΕΠΙΣΡΟΠΗ ΚΑΣΑΜΕΣΡΗΕΩΝ
BILANCIA PESAPERSONE MECCANICA
 BILANCIA PESAPERSONE MECCANICA MANUALE DI ISTRUZIONI BODY SCALE - USE INSTRUCTIONS PESE-PERSONNE - MANUEL D INSTRUCTIONS PERSONENWAAGE - BETRIEBSANLEITUNG BASCULA DE BANO - MANUAL DE INSTRUCCIONES ΜΗΧΑΝΙΚΗ
ITALIANO. pag. 3 ENGLISH. pag. 7 FRANÇAIS. pag. 11 DEUTSCH. pag. 15 ESPAÑOL. pag. 19 ΕΛΛΗΝΙΚΗ. pag. 24
 STUFA AL CARBONIO - MANUALE DI ISTRUZIONI CARBON HEATER - USE INSTRUCTIONS RADIATEUR AU CARBONE - MANUEL D INSTRUCTIONS KOHLENSTOFFOFEN - BETRIEBSANLEITUNG ESTUFA DE CARBONO - MANUAL DE INSTRUCCIONES ΘΕΡΜΑΝΤΙΚΟ
ITALIANO. pag. 3 ENGLISH. pag. 9 FRANÇAIS. pag. 14 DEUTSCH. pag. 20 ESPAÑOL. pag. 26 ΕΛΛΗΝΙΚΗ. pag. 32
 CENTRIFUGA XXL - MANUALE DI ISTRUZIONI XXL JUICE EXTRACTOR - USE INSTRUCTIONS CENTRIFUGEUSE XXL - MANUEL D INSTRUCTIONS ENTSAFTER XXL - BETRIEBSANLEITUNG LICUADORA XXL - MANUAL DE INSTRUCCIONES XXL ΑΠΟΧΥΜΩΤΗΣ
Model: RT33D6AAE. Compact Double Door Refrigerator. Owner s manual
 Model: RT33D6AAE Compact Double Door Refrigerator Owner s manual COPYRIGHT STATEMENT 2015 Hisense Company Ltd. All Rights Reserved. All material in this Owner's Manual is the property of Hisense Company
VENERE. GR. Οδηγός Χρήσης EN. User Guide
 GR. Οδηγός Χρήσης EN. User Guide ΣΗΜΑΝΤΙΚΟ! ΚΡΑΤΗΣΤΕ ΓΙΑ ΜΕΛΛΟΝΤΙΚΗ ΑΝΑΦΟΡΑ: ΔΙΑΒΑΣΤΕ ΠΡΟΣΕΚΤΙΚΑ Κίνδυνος από φωτιά και άλλες πηγές έντονης θερμότητας, όπως ηλεκτρικές αντιστάσεις, υγραέριο, φωτιά κλπ,
Section 7.6 Double and Half Angle Formulas
 09 Section 7. Double and Half Angle Fmulas To derive the double-angles fmulas, we will use the sum of two angles fmulas that we developed in the last section. We will let α θ and β θ: cos(θ) cos(θ + θ)
Homework 8 Model Solution Section
 MATH 004 Homework Solution Homework 8 Model Solution Section 14.5 14.6. 14.5. Use the Chain Rule to find dz where z cosx + 4y), x 5t 4, y 1 t. dz dx + dy y sinx + 4y)0t + 4) sinx + 4y) 1t ) 0t + 4t ) sinx
ΟΔΗΓΙΕΣ ΕΓΚΑΤΑΣTΑΣΗΣ ΓΙΑ ΠΑΤΩΜΑ WPC INSTALLATION GUIDE FOR WPC DECKING
 1/12 ΟΔΗΓΙΕΣ ΕΓΚΑΤΑΣTΑΣΗΣ ΓΙΑ ΠΑΤΩΜΑ WPC INSTALLATION GUIDE FOR WPC DECKING Ανοίγουμε τρύπες Ø8 x 80mm στο σημείο κατασκευής, με τρυπάνι. To προτεινόμενο πλάτος και μήκος μεταξύ των 2 οπών να είναι 30-35εκ.,
Efecto Perlado. Colores. Efectos. by Osaka
 Efecto Perlado Colores & Efectos by Osaka 2 EFECTO PERLADO Τεχνοτροπία με βάση την άμμο με χρυσή και ασημή πέρλα. Πολύ γρήγορη εφαρμογή, με μια στρώση χρώματος. Έτοιμο να χρησιμοποιηθεί η χρωματίζεται
Session novembre 2009
 ΥΠΟΥΡΓΕΙΟ ΕΘΝΙΚΗΣ ΠΑΙΔΕΙΑΣ ΚΑΙ ΘΡΗΣΚΕΥΜΑΤΩΝ ΚΡΑΤΙΚΟ ΠΙΣΤΟΠΟΙΗΤΙΚΟ ΓΛΩΣΣΟΜΑΘΕΙΑΣ MINISTÈRE GREC DE L ÉDUCATION NATIONALE ET DES CULTES CERTIFICATION EN LANGUE FRANÇAISE NIVEAU ÉPREUVE B1 sur l échelle proposée
ITALIANO. pag. 3 ENGLISH. pag. 10 FRANÇAIS. pag. 17 DEUTSCH. pag. 24 ESPAÑOL. pag. 31 ΕΛΛΗΝΙΚΗ. pag. 38
 LEVIGATRICE PEDICURE - MANUALE DI ISTRUZIONI CALLUS REMOVER - USE INSTRUCTIONS PONCEUSE POUR PIEDS - MANUEL D INSTRUCTIONS SCHLEIF FUSS - BETRIEBSANLEITUNG REMOVEDOR DE KALLOS - MANUAL DE INSTRUCCIONES
CMP-EHUB25 5 ETHERNET-SWITCH MIT 8 ANSCHLÜSSEN ETHERNET 8 PORT SWITCH 8 COMMUTATEUR ETHERNET 8 PORTS 11 8 POORTEN ETHERNET SWITCH
 CMP-EHUB25 ETHERNET 8 PORT SWITCH 8 COMMUTATEUR ETHERNET 8 PORTS 5 ETHERNET-SWITCH MIT 8 ANSCHLÜSSEN 11 8 POORTEN ETHERNET SWITCH 14 COMMUTATORE ETHERNET A 8 PORTE 20 8-PORTOS ETHERNET-KAPCSOLÓ 17 CONMUTADOR
ITALIANO. pag. 3 ENGLISH. pag. 8 FRANÇAIS. pag. 13 DEUTSCH. pag. 18 ESPAÑOL. pag. 23 ΕΛΛΗΝΙΚΗ. pag. 28
 STUFA A TORRETTA - MANUALE DI ISTRUZIONI TOWER HEATER - USE INSTRUCTIONS RADIATEUR À TOURELLE - MANUEL D INSTRUCTIONS TURMOFEN - BETRIEBSANLEITUNG ESTUFA DE TORRE - MANUAL DE INSTRUCCIONES ΑΕΡΟΘΕΡΜΟ ΠΥΡΓΟΣ
DC-DC Constant Current Step-Down LED driver LDD-300L LDD-350L LDD-500L LDD-600L LDD-700L CURRENT RANGE
 SPECIFICATION ORDER NO. LDD-00L LDD-0L LDD-00L LDD-00L LDD-700L CURRENT RANGE 00mA 0mA 00mA 00mA VOLTAGE RANGE Note. ~ VDC for LDD-00~700L/LW ; ~ 8VDC for LDD-00~700LS CURRENT ACCURACY (Typ.) ±% at VDC
STUFA ALOGENA - MANUALE DI ISTRUZIONI HALOGEN HEATER - USE INSTRUCTIONS RADIATEUR ALLOGÈNE - MANUEL D INSTRUCTIONS HALOGENOFEN - BETRIEBSANLEITUNG
 STUFA ALOGENA - MANUALE DI ISTRUZIONI HALOGEN HEATER - USE INSTRUCTIONS RADIATEUR ALLOGÈNE - MANUEL D INSTRUCTIONS HALOGENOFEN - BETRIEBSANLEITUNG ESTUFA HALÓGENA - MANUAL DE INSTRUCCIONES ΘΕΡΜΑΝΤΙΚΟ ΑΛΟΓΟΝΟΥ