CLIMARADIO
|
|
|
- Τηθύς Παπαφιλίππου
- 10 χρόνια πριν
- Προβολές:
Transcript
1 Cronotermostato elettronico da parete - Istruzioni Surface electronic chronothermostat - Instruction handbook Chronothermostat électronique en saillie - Notice technique Elektronisches Chronothermostat zur Wandinstallation - Montageanweisungen Cronotermostato electrónico de superficie - Manual de Instrucciones Ηλεκτρονικός επίτοιχος χρονοθερμοστάτης - Οδηγίες χρήσης CLIMARADIO

2

3 ITALIANO Cronotermostato elettronico da parete ENGLISH Surface-mounted electronic chronothermostat FRANÇAIS Chronothermostat électronique en saillie DEUTSCH Elektronisches Chronothermostat zur Wandinstallation ESPAÑOL Cronotermostato electrónico de superficie ΕΛΛΗΝΙΚΑ Ηλεκτρονικός επίτοιχος χρονοθερμοστάτης... 91

4 ATTENZIONE! Quando il simbolo lampeggia, le batterie di alimentazione si stanno esaurendo. SOSTITUITELE QUANTO PRIMA! Quando il simbolo è acceso, il relè di uscita passa automaticamente allo stato di OFF. SOSTITUITE LE BATTERIE! Le batterie scariche e la relativa sostituzione non cancellano programmi e impostazioni. Dopo aver sostituito le batterie, dovranno essere reimpostate l ora e il giorno della settimana.

5 INDICE. 1. Descrizione Campo di applicazione Installazione Vista frontale, comandi e display Collegamenti Pompe di circolazione, bruciatori, elettrovalvole Valvole motorizzate... 5 Comando tramite combinatore telefonico... 6 Inserimento/sostituzione batterie di alimentazione Funzioni dei tasti Programmazione Funzionamento Principali caratteristiche Regole di installazione Conformità normativa ITALIANO

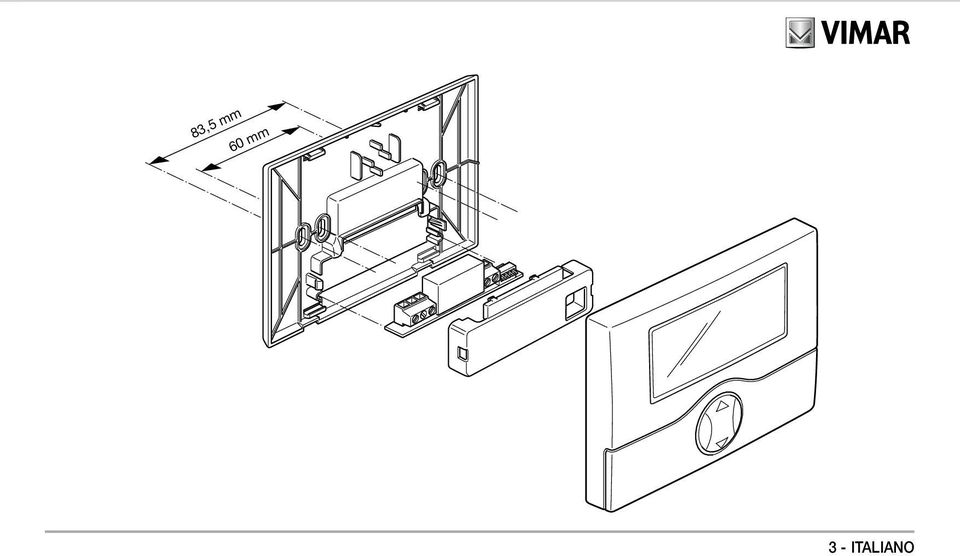
6 1. DESCRIZIONE. Cronotermostato elettronico da parete per controllo temperatura ambiente (riscaldamento e condizionamento), programmazione giornaliera/settimanale, alimentazione mediante due batterie stilo AA LR6 1,5 V (non fornite), uscita a relè in scambio 5(2) A 250 V~ 2. CAMPO DI APPLICAZIONE. L apparecchio è adatto a controllare la temperatura ambiente agendo sul circuito di comando del bruciatore o della pompa di circolazione (riscaldamento) o sul circuito di comando del condizionatore (condizionamento), garantendo una situazione di temperatura ideale, ogni giorno, nell arco dell intera settimana. L ampio display visualizza la temperatura ambiente, il giorno, l ora, lo stato di funzionamento dell impianto e il profilo di temperatura giornaliero impostato per il programma in esecuzione. 3. INSTALLAZIONE. L apparecchio deve essere installato a parete a un altezza di 1,5 m dal piano di calpestio, in una posizione idonea alla corretta rilevazione della temperatura ambiente, evitando l installazione in nicchie, dietro porte e tende o zone influenzate da fonti di calore o fattori atmosferici. La base dell apparecchio è predisposta con 4 asole per il fissaggio diretto alla parete con viti e tasselli ø 6 mm (non forniti), oppure per l installazione su scatole da incasso con fissaggio a viti con interasse 60 mm o 83,5 mm (scatole rettangolari unificate 3 moduli). Va utilizzato in luoghi asciutti e non polverosi a temperatura compresa tra 0 C e +40 C. 2 - ITALIANO
 o sul circuito di comando del condizionatore")
7 83,5 mm 60 mm 3 - ITALIANO
8 4. VISTA FRONTALE, COMANDI E DISPLAY Giorni della settimana. 2. Display. 3. Ora corrente. 4. Temperatura ambiente. 5. Andamento giornaliero del programma in esecuzione. 6. Tasto mouse per il comando delle funzioni base. 7. Tasti per la programmazione delle funzioni. 8. Coperchio frontale ribaltabile. 4 - ITALIANO

9 5. COLLEGAMENTI. Pompe di circolazione, bruciatori, elettrovalvole. Valvole motorizzate. L N L N CHIUDE U1 APRE U1 5 - ITALIANO

10 Comando tramite combinatore telefonico. Mediante un combinatore telefonico collegato ai morsetti dedicati è possibile comandare il cronotermostato a distanza. Chiudendo il contatto il funzionamento del cronotermostato viene forzato in modalità manuale e i tasti vengono bloccati. Aprendo il contatto il cronotermostato viene forzato: In modalità antigelo se sta funzionando il riscaldamento. In modalità OFF (spegnimento) se sta funzionando il condizionamento. In questa fase i tasti del cronotermostato non sono bloccati ed è possibile effettuare qualsiasi operazione sul dispositivo. Collegamento con attuatore telefonico con contatto pulito 6 - ITALIANO
 se sta funzionando il condizionamento.")
11 Inserimento/Sostituzione batterie di alimentazione AA LR6 1,5 V ATTENZIONE! In caso di sostituzione, smaltire le batterie negli appositi cassonetti per la raccolta differenziata. 7 - ITALIANO

12 6. FUNZIONI DEI TASTI. Tasti. Consentono di entrare nella funzione Programmazione e di selezionare il giorno da programmare e di eseguire la copia del programma. Tasti. Consentono di entrare nella funzione Programmazione e di selezionare l ora da programmare. Tasto. Modifica dei parametri selezionati (es. incremento/decremento della temperatura). Tasto. Conferma delle impostazioni. Tasto. Cancellazione o ritorno alla videata precedente. Tasto. A cronotermostato acceso, consente di selezionare il funzionamento manuale o automatico. A cronotermostato spento, premendo una volta, consente di accenderlo in modalità manuale, premendo due volte, di accenderlo in modalità automatico. Tasto. Premuto in sequenza, imposta le funzioni di: Spento, Spento a tempo, Antigelo (impostabile solo in riscaldamento). - SPENTO. Consente di spegnere il cronotermostato. Il display visualizza ora e temperatura e il relè di uscita rimane nello stato di OFF. - ANTIGELO. Impostabile solo in riscaldamento, consente di impostare un livello minimo di temperatura tale da evitare il danneggiamento delle condutture o per non far scendere la temperatura al di sotto di un livello di sicurezza. - SPENTO A TEMPO. Consente di spegnere il cronotermostato per un periodo a piacere, impostabile fino a 99 ore. 8 - ITALIANO
. - SPENTO. Consente di spegnere il cronotermostato.")
13 Tasto. Mantenendo premuto a lungo il pulsante, consente di selezionare la modalità di funzionamento del cronotermostato, scegliendo tra Riscaldamento o Condizionamento. Tasto. Premuto in sequenza, consente di impostare i valori della Temperatura di antigelo, dei Livelli di temperatura T1-T2- T3, del Differenziale termico, e della Scala di temperatura. - LIVELLI DI TEMPERATURA. Consente di visualizzare e/o modificare il valore dei livelli di temperatura T1-T2-T3 sia per il programma di riscaldamento che di condizionamento. - DIFFERENZIALE TERMICO. Consente di impostare il valore del differenziale termico. Per differenziale termico si intende la differenza tra il valore di temperatura impostato e l effettiva temperatura di accensione o di spegnimento dell impianto. Adeguando il differenziale termico al tipo di impianto se ne evitano continue accensioni e spegnimenti; impianti ad alta inerzia (ad esempio impianti con radiatori in ghisa) necessitano di un valore basso di differenziale termico, mentre impianti a bassa inerzia (ad esempio ventil-convettori) necessitano di un valore più alto. Esempio. Impostando la temperatura ambiente a 20 C e il differenziale termico a 0,3 C, l impianto si accenderà quando la temperatura ambiente scenderà a 19,7 C e si spegnerà quando raggiungerà i 20,3 C. - SCALA DI TEMPERATURA. Consente di impostare l unità di misura della temperatura, scegliendo tra gradi Celsius e gradi Fahrenheit. Tasto. Consente di regolare il giorno della settimana e l ora corrente. In programmazione consente di selezionare l orario a passi di 15 minuti. Tasto. Premuto a lungo, tutti i parametri impostati si portano nelle condizioni di prima accensione (azzeramento dell orologio, cancellazione dei programmi utente, ritorno ai valori di default per i 3 livelli di temperatura). 9 - ITALIANO

14 7. PROGRAMMAZIONE Effettuare i collegamenti elettrici, installare l apparecchio e infine inserire le batterie. Impostazione di data e ora Prima di iniziare la programmazione del cronotermostato, è consigliabile effettuare l impostazione del giorno e dell ora corrente. - Premere il tasto ; il display del dispositivo visualizzerà solamente la freccia situata in alto che indica il giorno e l ora da impostare. - Attraverso il tasto spostare la freccia in corrispondenza del giorno corrente. - Premere il tasto per confermare e passare all impostazione dell orario; le due cifre che indicano l ora iniziano a lampeggiare. - Attraverso il tasto impostare l ora corrente. - Premere il tasto per confermare e passare all impostazione dei minuti; le due cifre che indicano i minuti iniziano a lampeggiare. - Attraverso il tasto impostare i minuti correnti. - Premere il tasto per confermare e uscire. Impostazione dei livelli di temperatura I livelli di temperatura rappresentano quei valori di temperatura che saranno successivamente inseriti nel programma automatico che si andrà a creare. Il cronotermostato dispone di 3 livelli di temperatura T1, T2 e T3 oltre alla T antigelo. - Premere il tasto ; il display del dispositivo visualizzerà solamente T * (antigelo) con il valore di riferimento che lampeggia. - Attraverso il tasto impostare il valore di temperatura antigelo desiderato. - Premere il tasto per confermare e passare all impostazione della temperatura T1; il display visualizzerà il valore di riferimento che lampeggia ITALIANO

15 - Attraverso il tasto impostare il valore di temperatura T1 desiderato. - Premere il tasto per confermare e passare all impostazione della temperatura T2; il display visualizzerà il valore di riferimento che lampeggia. - Attraverso il tasto impostare il valore di temperatura T2 desiderato. - Premere il tasto per confermare e passare all impostazione della temperatura T3; il display visualizzerà il valore di riferimento che lampeggia. - Attraverso il tasto impostare il valore di temperatura T3 desiderato. - Premere il tasto per confermare; il display visualizzerà l icona diff e il relativo differenziale termico che lampeggia a 00.2 C. - Attraverso il tasto impostare il valore del differenziale termico desiderato. - Premere il tasto per confermare e passare all impostazione della scala di temperatura; il display visualizzerà la temperatura corrente con l unità di misura che lampeggia ( C Celsius o F Fahreneit). - Attraverso il tasto impostare l unità di misura desiderata (in Italia si utilizza C). - Premere il tasto per confermare e uscire. Creazione del programma automatico Attraverso questa procedura è possibile creare il programma orario che, per ogni giorno della settimana, regola la temperatura ambiente (riscaldamento e condizionamento) secondo i valori T1, T2 e T3 impostati. - Premere il tasto o il tasto per entrare nel menù di creazione del programma; il display visualizzerà una freccia lampeggiante in corrispondenza del giorno della settimana ITALIANO

16 - Attraverso il tasto selezionare il giorno desiderato. Nella creazione del programma si consiglia di iniziare sempre dal giorno lunedì. - Attraverso il tasto selezionare l ora; il display visualizzerà l indicazione 00:00 e a fianco il valore del livello di temperatura T1 o T2 o T3 impostato. - Attraverso il tasto impostare il valore del livello di temperatura desiderato; sul display si potrà notare il cambiamento dell istogramma grafico in funzione del valore impostato. - Attraverso il tasto selezionare le ore seguenti (da a 23:00) e con il tasto impostare il valore del livello di temperatura desiderato per ognuna di esse. Il display visualizzerà l istogramma grafico che riproduce l andamento selezionato. - Dopo aver impostato il valore di temperatura per l ora 23:00, premere il tasto per confermare; la creazione del programma per il lunedì è quindi terminata. - Attraverso il tasto selezionare il giorno martedì; il display visualizzerà la freccia in corrispondenza di mar e l icona lampeggiante COPY. - Se si desidera che il programma del martedì sia uguale a quello del lunedì premere il tasto ; il programma di lunedì sarà copiato in martedì. - Se invece si desidera impostare il programma diversamente, premere il tasto e procedere impostando, per ogni ora, il livello di temperatura desiderato. La procedura di creazione del programma automatico va quindi ripetuta con le stesse modalità per tutti i giorni della settimana ITALIANO
 e con il tasto impostare il valore del livello di temperatura desiderato per ognuna di esse.")
17 8. FUNZIONAMENTO Una volta che il cronotermostato è stato programmato, può essere messo in funzione. Se il relè è attivato, il display visualizza il simbolo in inverno (riscaldamento) oppure il simbolo in estate (condizionamento). Il simbolo indica la presenza del modulo radio TX o la mancanza del modulo relè; attendere 2 minuti al massimo per il riconoscimento automatico oppure effettuare l operazione di reset. Impostazione funzionamento manuale - Se il cronotermostato sta funzionando in automatico premere il tasto per passare in manuale; il display visualizzerà il simbolo. - Attraverso il tasto selezionare il valore di temperatura desiderato quindi premere il tasto per confermare. Impostazione funzionamento automatico - Se il cronotermostato sta funzionando in manuale premere il tasto per passare in automatico; il display visualizzerà l istogramma grafico relativo all andamento giornaliero del programma. In questo caso è possibile passare temporaneamente in modalità manuale, ad esempio nel caso in cui la temperatura desiderata sia diversa da quella programmata, selezionando il valore da impostare attraverso il tasto e attendendo circa 5 secondi affinché l operazione sia confermata. La nuova impostazione resterà attiva fino al successivo cambio di livello di temperatura programmato, dopo di che sarà ripristinato il programma memorizzato. Per tornare immediatamente nella modalità di funzionamento automatico, premere il tasto. Eventualmente attendere circa 5 secondi perché l operazione venga confermata ITALIANO

18 Spegnimento - Premere il tasto ; il display visualizzerà, a fianco del valore di temperatura, il simbolo OFF lampeggiante. Il cronotermostato rimarrà quindi spento per il periodo di tempo impostato al termine del quale si attiverà tornando alla precedente modalità di funzionamento (manuale o automatico). - Premere il tasto per confermare. Per riaccendere il cronotermostato premere il tasto. Spegnimento a tempo - Premere il tasto ; il display visualizzerà, a fianco del valore di temperatura, il simbolo OFF lampeggiante. - Premere nuovamente il tasto ; il display visualizzerà due cifre lampeggianti che indicano il numero di ore (h) da impostare. - Attraverso il tasto selezionare il numero di ore desiderato (da 1 a 99) e premere il tasto per confermare. Antigelo - Premere il tasto ; il display visualizzerà, a fianco del valore di temperatura, il simbolo OFF lampeggiante. - Premere nuovamente il tasto ; il display visualizzerà le due cifre lampeggianti da impostare se si desidera effettuare lo spegnimento temporizzato del dispositivo. - Premere una terza volta il tasto ; il display visualizzerà 3 cifre lampeggianti che indicano il valore della temperatura di antigelo da impostare (da 04.0 C a 15 C). - Attraverso il tasto selezionare il valore desiderato e premere il tasto per confermare ITALIANO

19 Il display visualizzerà, a impianto di riscaldamento spento, il simbolo di antigelo a fianco del valore di temperatura misurato. Selezione estate/inverno Questo tipo di funzione viene utilizzata solamente nel caso in cui, oltre all impianto di riscaldamento, debba essere gestito anche quello di condizionamento tramite il cronotermostato. - Premere e mantenere premuto il tasto ; il display visualizzerà il simbolo oppure il simbolo. - Attraverso il tasto selezionare il simbolo per la stagione invernale o il simbolo per quella estiva e premere il tasto per confermare. Nel funzionamento in condizionamento (estate), gli interventi effettuati sul cronotermostato, sono invertiti rispetto a quelli nel funzionamento in riscaldamento (inverno) ITALIANO

20 9. PRINCIPALI CARATTERISTICHE Alimentazione: 3 V d.c. mediante 2 batterie stilo AA LR6 1,5 V (non fornite) Durata della batteria: superiore ad un anno Uscita: a relè con contatto pulito in scambio 5(2) A 250 V~ Tipo di regolazione: ON/OFF Possibilità di collegamento in radiofrequenza ad attuatori e previa sostituzione del modulo relè con il modulo trasmettitore Aggiornamento della temperatura visualizzata: ogni 20 s Visualizzazione temperatura ambiente: 0 C +40 C Risoluzione della lettura: 0,1 C Risoluzione delle impostazioni: 0,1 C Precisione della lettura: - ±0,5 C tra +15 C e +30 C - ±0,8 C agli estremi Differenziale termico: regolabile da 0,1 C a 1 C Campo di regolazione: - +4 C C in antigelo - +5 C C in riscaldamento o condizionamento Errore orologio: ±1 s al giorno Funzioni principali: - impostazione oraria della temperatura con passi da 15 minuti - 3 livelli di temperatura programmabili per riscaldamento + 3 livelli di temperatura per condizionamento + 1 livello antigelo - programmazione settimanale - 1 programma automatico impostabile dall utente (sia per riscaldamento che per condizionamento) - possibilità di forzare il programma variando manualmente la temperatura - regolazione per riscaldamento e condizionamento - funzione antigelo - possibilità di spegnimento temporizzato - possibilità di attivazione e disattivazione tramite attuatore telefonico - possibilità di visualizzazione in gradi Celsius o Fahrenheit - reset del dispositivo Grado di protezione: IP30 Apparecchio di classe II: Numero di cicli manuali: Numero di cicli automatici: Tipo di apertura dei contatti: microinterruzione Tipo di azione: 1CU 16 - ITALIANO

21 Indice di tracking: PTI175 Situazione di polluzione: 2 (normale) Tensione impulsiva nominale: 4000 V Temperatura ambiente durante il trasporto: -25 C +60 C Temperatura di funzionamento: T40 (0 C +40 C) Classe del software: A 10. REGOLE DI INSTALLAZIONE. L installazione deve essere effettuata con l osservanza delle disposizioni regolanti l installazione del materiale elettrico in vigore nel paese dove i prodotti sono installati. 11. CONFORMITÀ NORMATIVA. Direttiva BT Direttiva EMC Norme EN , EN , EN ITALIANO
22 CAUTION! When the symbol flashes, the batteries are dying. REPLACE THEM AS SOON AS POSSIBLE! When the symbol is lit, the output relay automatically switches OFF. REPLACE THE BATTERIES! Programs and settings are not erased when the batteries are low or when changing them. After replacing the batteries, the time and day of the week must be reset.
23 CONTENTS. 1. Description Scope Installation Front view and view of controls Connections Circulation pumps, burners, solenoid valves Motor-operated valves Phone dialler control Fitting/Replacing power batteries Functions of the buttons Programming Operation Characteristics Installation rules Conformity to standards ENGLISH
24 1. DESCRIPTION. Surface-mounted electronic chronothermostat to control ambient temperature (heating and air-conditioning), daily/weekly programming, powered by two AA batteries LR6 1.5 V (not included), exchange relay output 5(2) A 250 V~ 2. SCOPE. The chronothermostat is suitable for ambient temperature control by regulating the supply circuit of the burner or heat pump (heating), or the supply circuit of the air conditioner (air conditioning), to maintain ideal temperature conditions seven days a week. The large display shows the ambient temperature, day, time, the operating status of the system and the daily temperature profile set for the current program. 3. INSTALLATION. The device must be surface-mounted at a height of 1.5 m from floor level, in a position suitable for correctly measuring the ambient temperature. Do not install in niches, behind doors and curtains, or in areas affected by heat sources or outdoor weather. The base of the device has 4 slots for fastening directly to the wall with ø 6 mm screws and studs (not included), or for installation in inset boxes with screws placed 60 mm or 83.5 mm apart (standard 3-module rectangular boxes). Use in dry, non-dusty environments at a temperature between 0 C and +40 C ENGLISH
25 83,5 mm 60 mm 21 - ENGLISH
26 4. FRONT VIEW AND VIEW OF CONTROLS Days of the week: - lun = Monday - mar = Tuesday - mer = Wednesday - gio = Thursday - ven = Friday - sab = Saturday - dom = Sunday 2. Display. 3. Current time. 4. Ambient temperature. 5. Daily profile for the currently active program. 6. Mouse button to control the basic functions. 7. Function setting buttons. 8. Flipping front cover ENGLISH
27 5. CONNECTIONS. Circulation pumps, burners, solenoid valves. Motor-operated valves. L N L N CLOSE U1 OPEN U ENGLISH
28 Phone dialler control. It is possible to control the timer-thermostat remotely with a phone dialler connected to the terminals. By closing the contact, the timer-thermostat is forced onto manual operation and the keys are locked. On opening the contact the timer-thermostat is forced onto: Antifreeze mode if heating is on. OFF if air-conditioning is on. In this phase the keys of the timer-thermostat are not locked and it is possible to operate the device. Connection to a telephone actuator with clean contact 24 - ENGLISH
29 Fitting/Replacing power batteries AA LR6 1,5 V ATTENTION! After replacing the battery, dispose of the old battery in the appropriate sorted refuse bins ENGLISH
30 6. FUNCTIONS OF THE BUTTONS. Buttons. Make it possible to enter the Programming function and select the day to be programmed, and to copy the program. Buttons. Make it possible to enter the Programming function and select the time to be programmed. Button. Edit the selected parameters (i.e. temperature increase/decrease) Button. Confirm the settings. Button. Delete or return to the previous screen. Button. When the chronothermostat is on, selects manual or automatic mode. When the chronothermostat is off, pressing once turns it on in manual mode, pressing twice turns it on in automatic mode. Button. Pressed in sequence, sets the functions: Off, Off on timer, Antifreeze (available only in heating). - OFF. Makes it possible to shut off the chronothermostat.the display shows time and temperature and the output relay remains OFF. - ANTIFREEZE. Available only in heating, sets a minimum temperature level to avoid damaging the wires, or to prevent the temperature from falling below a given safety level. - OFF ON TIMER. Makes it possible to shut off the chronothermostat for a desired time period, up to 99 hours. Button. Holding down this button makes it possible to select the operating mode of the chronothermostat, choosing between Heating or Air-conditioning ENGLISH
31 Button. Pressed in sequence, makes it possible to set the values for the Antifreeze temperature, of the Temperature levels T1-T2- T3, the Hysteresis, and Temperature scale. - TEMPERATURE LEVELS. Displays and/or modifies the values of the temperature setpoints T1, T2, T3 for both heating and cooling programs. - HYSTERESIS. Adjusts the value of the temperature hysteresis parameter. Hysteresis is the amount by which the ambient temperature can deviate from the set-point before the system is switched on and off. By adapting the hysteresis parameter to the type of system, it is possible to prevent repeated switch-on and switch-off around the set-point value; systems with high inertia (for example with cast iron radiators) require a low hysteresis value, whereas systems with low inertia (for example fan-convectors) require a higher value. Example. With a temperature set-point of 20 C and a hysteresis of 0.3 C, the system will switch on when the ambient temperature drops below 19.7 C, and will switch off when the ambient temperature reaches 20.3 C. - TEMPERATURE SCALE. Used for setting the units of measurement for temperature, choosing between degrees Celsius and degrees Fahrenheit. Button. Sets the current day of the week and time. In programming, it is used to set the time in 15-minute increments. Button. When this button is held down, all parameters set return to their original default status (clock reset, user programs deleted, return to default values for the 3 temperature levels) ENGLISH
32 7. PROGRAMMING Make the electrical connections, install the appliance and lastly insert the batteries. - Set the current minutes with the button. - Press the button to confirm and quit. Setting date and time Before starting to program the timer-thermostat, it is advisable to set the current date and time. - Press the button; the device s display will show only the arrow at the top indicating the date and time to set. - Using the button, move the arrow onto the current date. - Press the button to confirm and pass on to set the time; the two digits indicating the hour will start blinking. - Set the current hour with the button. - Press the button to confirm and pass on to set the minutes; the two digits indicating the minutes will start blinking. Setting the temperature levels The temperature levels are the temperatures that will later be entered in the automatic program that will be created. The timer-thermostat has 3 temperature levels T1, T2 and T3 as well as T antifreeze. - Press the button; the device s display will show only T * (antifreeze) with the reference value blinking. - Using the button, set the desired antifreeze temperature. - Press the button to confirm and pass on to set the temperature T1; the display will show the reference value blinking. - Using the button, set the desired temperature T ENGLISH
33 - Press the button to confirm and pass on to set the temperature T2; the display will show the reference value blinking - Using the button, set the desired temperature T2. - Press the utton to confirm and pass on to set the temperature T3; the display will show the reference value blinking. - Using the button, set the desired temperature T3. - Press the button to confirm; the display will show the icon diff and the related hysteresis that blinks on 00.2 C. - Using the button, set the desired hysteresis. - Press the button to confirm and pass on to set the temperature scale; the display will show the current temperature with the unit of measurement blinking ( C Celsius or F Fahrenheit). - Using the button, set the desired unit of measurement (in Italy they use C). - Press the button to confirm and quit. Creating the automatic program With this procedure you can create the time program that, for each day of the week, controls the room temperature (heating and airconditioning) according to the settings T1, T2 and T3. - Press the button or the button to enter the program creation menu; the display will show a blinking arrow on the day of the week. - Select the desired day with the button. When creating the program you are always recommended to start from Monday. - Using the button, select the time; the display will show 00:00 and alongside the set temperature level T1 or T2 or T ENGLISH
34 - Using the button, set the desired temperature level; the display will show the histogram changing according to the setting. The procedure for creating the automatic program must then be repeated in the same way for all the other days of the week. - Using the button, select the following hours (from to 23:00) and with the button, set the desired temperature level for each one of them. The display will show the histogram for the selection. - After setting the temperature for 23:00, press the button to confirm; program creation for Monday is then concluded. - Press the button to select Tuesday; the display will show the arrow on mar and the COPY icon blinking. - If you want Tuesday s program to be the same as Monday s, press the button; Monday s program will be copied onto Tuesday - Whereas, if you want to set the program differently, press the button and proceed by setting the desired temperature level for each hour ENGLISH
35 8. OPERATION When the timer-thermostat has been programmed it can be set in operation. If the relay is on, the display will show the symbol in the winter (heating) or the symbol in the summer (air-conditioning). The symbol indicates there is a TX radio module or no relay module; wait for at most 2 minutes for automatic recognition or do a reset. Setting manual operation - If the timer-thermostat is working in automatic mode, press the button to pass onto manual mode; the display will show the. - Using the button, select the desired temperature then press the button to confirm. Setting automatic operation - If the timer-thermostat is working in manual mode, press the button to pass onto automatic mode; the display will show the histogram for the program s day selection. In this case it is possible to pass onto manual mode temporarily, for example when the desired temperature is not the programmed temperature, by selecting the setting with the button and waiting approximately 5 seconds for the operation to be confirmed. The new setting will remain active until the next programmed temperature level change, after which the saved program will be restored. To go back onto automatic operating mode immediately, press the button. If necessary, wait approximately 5 seconds for the operation to be confirmed ENGLISH
36 Switch-off - Press the button; the display will show the OFF symbol blinking alongside the temperature. which it will switch on going into the prior operating mode (manual or automatic). - Press the button to confirm. To switch the timer-thermostat back on, press the button. Antifreeze - Press the button; the display will show the OFF symbol blinking alongside the temperature. Timed switch-off - Press the button; the display will show the OFF symbol blinking alongside the temperature. - Press the button again; the display will show two blinking digits indicating the number of hours (h) to set. - Using the button, select the desired number of hours (from 1 to 99) and then press the button to confirm. The timer-thermostat will then stay off for the set period of time after - Press the button again; the display will show two blinking digits to set if you want timed switch-off for the device. - Press the button a third time; the display will show 3 blinking digits indicating the antifreeze temperature to set (from 04.0 C to 15 C). - Using the button, select the desired temperature and then press the button to confirm. With the heating system off, the display will show the antifreeze symbol next to the measured temperature ENGLISH
CLIMARADIO
 01910-01910.14-01910.20 Cronotermostato elettronico da parete - Istruzioni Surface electronic chronothermostat - Instruction handbook Chronothermostat électronique en saillie - Notice technique Elektronisches
Electronic chronothermostat - Instruction handbook. Chronothermostat électronique - Notice technique
 Eikon Arké 20446 19446 Plana 14446 Cronotermostato elettronico - Istruzioni Electronic chronothermostat - Instruction handbook Chronothermostat électronique - Notice technique Elektronisches Chronothermostat
Electronic chronothermostat - Instruction handbook. Chronothermostat électronique - Notice technique
 Idea 16575-16576 Cronotermostato elettronico - Istruzioni Electronic chronothermostat - Instruction handbook Chronothermostat électronique - Notice technique Elektronisches Chronothermostat - Montageanweisungen
GUIDA RAPIDA INSTALLATORE/UTENTE. Antigelo
 GUIDA RAPIDA INSTALLATORE/UTENTE Cronotermostato elettronico da parete per controllo temperatura ambiente (riscaldamento e condizionamento), programmazione giornaliera/settimanale, alimentazione mediante
Tipologie installative - Installation types Type d installation - Installationstypen Tipos de instalación - Τυπολογίες εγκατάστασης
 AMPADE MOOCROMATICHE VIMAR DIMMERABII A 0 V~ - VIMAR 0 V~ DIMMABE MOOCHROME AMP AMPE MOOCHROME VIMAR VARIATEUR 0 V~ - DIMMERFÄHIGE MOOCHROMATICHE AMPE VO VIMAR MIT 0 V~ ÁMPARA MOOCROMÁTICA VIMAR REGUABE
PLUGIN BASIC TS (en) indication, that electrical appliance is switched on
 indication, that electrical appliance is switched on") PLUGIN BASIC TS (en) indication, that electrical appliance is switched on after pressing the ON button, will be the connected appliance permantely switched on. after pressing the button, will be the connected
PLUGIN BASIC TS (en) indication, that electrical appliance is switched on after pressing the ON button, will be the connected appliance permantely switched on. after pressing the button, will be the connected
Manuale installatore - Installer manual - Manuel pour l installateur Installationshandbuch - Manual del instalador - Εγχειρίδιο οδηγιών
 Manuale installatore - Installer manual - Manuel pour l installateur Installationshandbuch - Manual del instalador - Εγχειρίδιο οδηγιών Eikon 20445 Plana 14445 Cronotermostato elettronico Electronic chronothermostat
Eikon. Termostato elettronico - Istruzioni. Electronic thermostat - Instruction handbook. Thermostat électronique - Notice technique
 20441 Termostato elettronico - Istruzioni Electronic thermostat - Instruction handbook Thermostat électronique - Notice technique Elektronischer Thermostat - Montageanweisungen Termostato electrónico -
GUIDA RAPIDA INSTALLATORE/UTENTE
 GUIDA RAPIDA INSTALLATORE/UTENTE Cronotermostato elettronico per controllo ON/OFF della temperatura ambiente (riscaldamento e condizionamento), programmazione giornaliera/settimanale, dispositivo di controllo
TIME SWITCHES AND TWILIGHT SWITCHES
 W ANALOG DIN-RAIL TIME SWITCH QUARTZ, SERIES TEMPUS ANALOG 244 W SCHRACK-INFO Analogue time switch 1 channel Daily program With power reserve (NiMH rechargeable battery) Synchronised with mains Shortest
Tipologie installative - Installation types Types d installation - Die einbauanweisungen Tipos de instalación - Τυπολογίες εγκατάστασης
 Types d installation Die einbauanweisungen Tipos de instalación Τυπολογίες εγκατάστασης AMPADE MOOCROMATICHE VIMAR DIMMERABII A 0 V~ MOOCHROME DIMMABE AMP VIMAR 0 V~ AMPE MOOCHROME VIMAR DIMMABE 0 V~ EUCHTE
Εγκατάσταση λογισμικού και αναβάθμιση συσκευής Device software installation and software upgrade
 Για να ελέγξετε το λογισμικό που έχει τώρα η συσκευή κάντε κλικ Menu > Options > Device > About Device Versions. Στο πιο κάτω παράδειγμα η συσκευή έχει έκδοση λογισμικού 6.0.0.546 με πλατφόρμα 6.6.0.207.
!Stato di tensione triassiale!stato di tensione piano!cerchio di Mohr
 !Stato di tensione triassiale!stato di tensione piano!cerchio di Mohr Stato di tensione F A = F / A F Traione pura stato di tensione monoassiale F M A M Traione e torsione stato di tensione piano = F /
Instruction Execution Times
 1 C Execution Times InThisAppendix... Introduction DL330 Execution Times DL330P Execution Times DL340 Execution Times C-2 Execution Times Introduction Data Registers This appendix contains several tables
ΟΔΗΓΙΕΣ ΧΡΗΣΗΣ USE INSTRUCTIONS
 ΟΔΗΓΙΕΣ ΧΡΗΣΗΣ USE INSTRUCTIONS ΤΗΛΕΦΩΝΟ ΜΕ ΑΝΑΓΝΩΡΙΣΗ ΚΛΗΣΗΣ /CORDED PHONE WITH CALLER ID ΜΟΝΤΕΛΟ/MODEL: TM09-448 DC48V Παρακαλούμε διαβάστε προσεκτικά όλες τις οδηγίες χρήσης πριν την χρήση της συσκευής
UDZ Swirl diffuser. Product facts. Quick-selection. Swirl diffuser UDZ. Product code example:
 UDZ Swirl diffuser Swirl diffuser UDZ, which is intended for installation in a ventilation duct, can be used in premises with a large volume, for example factory premises, storage areas, superstores, halls,
Modbus basic setup notes for IO-Link AL1xxx Master Block
 n Modbus has four tables/registers where data is stored along with their associated addresses. We will be using the holding registers from address 40001 to 49999 that are R/W 16 bit/word. Two tables that
Quick Installation Guide
 A Installation 1 F H B E C D G 2 www.trust.com/17528/faq Quick Installation Guide C C D Freewave Wireless Audio Set 17528/ 17529 D Installation Configuration Windows XP 4 5 8 Windows 7/ Vista 6 7 9 10
4 Way Reversing Valve
 STANDARD 4 Way Reversing Valve SHF series four-way reversing valves are applicable for heat pump systems such as central, unitary and room air conditioners to realize switching between cooling mode and
C4C-C4H-C4G-C4M MKP Series AXIAL CAPACITORS PCB APPLICATIONS
 C4C-C4H-C4G-C4M AXIAL CAPACITORS PCB APPLICATIONS General characteristics - Self-Healing - Low losses - High ripple current - High contact reliability - Suitable for high frequency applications 40 ±5 L
LR Series Metal Alloy Low-Resistance Resistor
 Tel : 881745 Fax : 881749 LR Series Metal Alloy LowResistance Resistor This specification is applicable to lead free, halogen free of RoHS directive for metal alloy lowresistance resistor. The product
Montage - Raccordement Implantation EURO-RELAIS MINI & BOX. Mini & Box
 Montage - Raccordement Implantation EURO-RELAIS MINI & BOX 3 Fiche technique EURO-RELAIS MINI & BOX DESCRIPTIF La borne Euro-Relais MINI est en polyester armé haute résistance totalement neutre à la corrosion
CHAPTER 25 SOLVING EQUATIONS BY ITERATIVE METHODS
 CHAPTER 5 SOLVING EQUATIONS BY ITERATIVE METHODS EXERCISE 104 Page 8 1. Find the positive root of the equation x + 3x 5 = 0, correct to 3 significant figures, using the method of bisection. Let f(x) =
the total number of electrons passing through the lamp.
 1. A 12 V 36 W lamp is lit to normal brightness using a 12 V car battery of negligible internal resistance. The lamp is switched on for one hour (3600 s). For the time of 1 hour, calculate (i) the energy
2 Composition. Invertible Mappings
 Arkansas Tech University MATH 4033: Elementary Modern Algebra Dr. Marcel B. Finan Composition. Invertible Mappings In this section we discuss two procedures for creating new mappings from old ones, namely,
Capacitors - Capacitance, Charge and Potential Difference
 Capacitors - Capacitance, Charge and Potential Difference Capacitors store electric charge. This ability to store electric charge is known as capacitance. A simple capacitor consists of 2 parallel metal
Η ΕΝΕΡΓΕΙΑΚΗ ΣΗΜΑΝΣΗ ΚΑΙ ERP
 Η ΕΝΕΡΓΕΙΑΚΗ ΣΗΜΑΝΣΗ ΚΑΙ ERP 2 1 ΠΛΑΙΣΙΟ ΓΙΑΤΙ ΕΝΕΡΓΕΙΑΚΗ ΣΗΜΑΝΣΗ ΚΑΙ ErP? Αντιμετωπίζοντας την κλιματική αλλαγή, διασφαλίζοντας την ασφάλεια της παροχής ενέργειας2 και την αύξηση της ανταγωνιστικότητα
Alféa Extensa + and Extensa Duo +
 Alféa Extensa + and Extensa Duo + FR Document n 1592-2~ 12/07/2013 EN Heat pumps air/water split 1 service and 2 services Technical manual Intended for professionals Completed by the installation and operating
Bulletin 1489 UL489 Circuit Breakers
 Bulletin 489 UL489 Circuit Breakers Tech Data 489-A Standard AC Circuit Breaker 489-D DC Circuit Breaker 489-A, AC Circuit Breakers 489-D, DC Circuit Breakers Bulletin 489-A Industrial Circuit Breaker
GUIDA RAPIDA INSTALLATORE/UTENTE. PRINCIPALI CARATTERISTICHE. PRINCIPALI IMPOSTAZIONI. PER L INSTALLATORE. REGOLE DI INSTALLAZIONE.
 GUIDA RAPIDA INSTALLATORE/UTENTE Cronotermostato elettronico a cursori per controllo temperatura ambiente (riscaldamento e condizionamento), uscita a relè in scambio 5(2) A 250 V~, alimentazione a batterie
Surface Mount Aluminum Electrolytic Capacitors
 FEATURES CYLINDRICAL V-CHIP CONSTRUCTION LOW COST, GENERAL PURPOSE, 2000 HOURS AT 85 O C NEW EXPANDED CV RANGE (up to 6800µF) ANTI-SOLVENT (2 MINUTES) DESIGNED FOR AUTOMATIC MOUNTING AND REFLOW SOLDERING
LR Series Metal Alloy Low-Resistance Resistor
 LR Series Metal Alloy LowResistance Resistor This specification is applicable to lead free, halogen free of RoHS directive for metal alloy lowresistance resistor. The product is for general purpose. The
4 Way Reversing Valve
 STANDARD 4 Way Reversing Valve SHF series four-way reversing valves are applicable for heat pump systems such as central, unitary and room air conditioners to realize switching between cooling mode and
SPEEDO AQUABEAT. Specially Designed for Aquatic Athletes and Active People
 SPEEDO AQUABEAT TM Specially Designed for Aquatic Athletes and Active People 1 2 Decrease Volume Increase Volume Reset EarphonesUSBJack Power Off / Rewind Power On / Fast Forward Goggle clip LED Status
Metal Oxide Varistors (MOV) Data Sheet
 Data Sheet") Φ SERIES Metal Oxide Varistors (MOV) Data Sheet Features Wide operating voltage (V ma ) range from 8V to 0V Fast responding to transient over-voltage Large absorbing transient energy capability Low clamping
Φ SERIES Metal Oxide Varistors (MOV) Data Sheet Features Wide operating voltage (V ma ) range from 8V to 0V Fast responding to transient over-voltage Large absorbing transient energy capability Low clamping
PortSip Softphone. Ελληνικά Ι English 1/20
 PortSip Softphone Ελληνικά Ι English 1/20 1. Περιεχόμενα 2. Εγκατάσταση σε Smartphone & Tablet (Android ή ios)... 1 3. Εγκατάσταση σε ηλεκτρονικό υπολογιστή (Windows ή Mac).... 5 4. Installation in Smartphone
SPBW06 & DPBW06 series
 /,, MODEL SELECTION TABLE INPUT ORDER NO. INPUT VOLTAGE (RANGE) NO LOAD INPUT CURRENT FULL LOAD VOLTAGE CURRENT EFFICIENCY (TYP.) CAPACITOR LOAD (MAX.) SPBW06F-03 310mA 3.3V 0 ~ 1500mA 81% 4700μF SPBW06F-05
CONFIGURAZIONE DELLA CASELLA DI POSTA ELETTRONICA CERTIFICATA (P.E.C.)
") CONFIGURAZIONE DELLA CASELLA DI POSTA ELETTRONICA CERTIFICATA (P.E.C.) Consigliamo di configurare ed utilizzare la casella di posta elettronica certificata tramite il webmail dedicato fornito dal gestore
CONFIGURAZIONE DELLA CASELLA DI POSTA ELETTRONICA CERTIFICATA (P.E.C.) Consigliamo di configurare ed utilizzare la casella di posta elettronica certificata tramite il webmail dedicato fornito dal gestore
ELECTRONIC DIGITAL METERED DISPENSER
 Οδηγίες Χρήσης Operating Instructions ELECTRONIC DIGITAL METERED DISPENSER Manufactured by: SPRING AIR LTD 2 DELIGIORGI & IONIAS STR., 174 56 ALIMOS - ATHENS - GREECE PHONE NUM.: +30210 9734805 FAX: +30210
ΚΥΠΡΙΑΚΟΣ ΣΥΝΔΕΣΜΟΣ ΠΛΗΡΟΦΟΡΙΚΗΣ CYPRUS COMPUTER SOCIETY 21 ος ΠΑΓΚΥΠΡΙΟΣ ΜΑΘΗΤΙΚΟΣ ΔΙΑΓΩΝΙΣΜΟΣ ΠΛΗΡΟΦΟΡΙΚΗΣ Δεύτερος Γύρος - 30 Μαρτίου 2011
 Διάρκεια Διαγωνισμού: 3 ώρες Απαντήστε όλες τις ερωτήσεις Μέγιστο Βάρος (20 Μονάδες) Δίνεται ένα σύνολο από N σφαιρίδια τα οποία δεν έχουν όλα το ίδιο βάρος μεταξύ τους και ένα κουτί που αντέχει μέχρι
RSDW08 & RDDW08 series
 /,, MODEL SELECTION TABLE INPUT ORDER NO. INPUT VOLTAGE (RANGE) NO LOAD INPUT CURRENT FULL LOAD VOLTAGE CURRENT EFFICIENCY (Typ.) CAPACITOR LOAD (MAX.) RSDW08F-03 344mA 3.3V 2000mA 80% 2000μF RSDW08F-05
ULX Wireless System USER GUIDE SUPPLEMENT RENSEIGNEMENT SUPPLÉMENTAIRES INFORMACION ADICIONAL. M1 ( MHz)
") ULX Wireless System USER GUIDE SUPPLEMENT RENSEIGNEMENT SUPPLÉMENTAIRES INFORMACION ADICIONAL M1 (662 698 MHz) 2003, Shure Incorporated 27B8733A (Rev. 4) Printed in U.S.A. SPECIFICATIONS ULX1 Transmitter
ULX Wireless System USER GUIDE SUPPLEMENT RENSEIGNEMENT SUPPLÉMENTAIRES INFORMACION ADICIONAL M1 (662 698 MHz) 2003, Shure Incorporated 27B8733A (Rev. 4) Printed in U.S.A. SPECIFICATIONS ULX1 Transmitter
English PDFsharp is a.net library for creating and processing PDF documents 'on the fly'. The library is completely written in C# and based
 English PDFsharp is a.net library for creating and processing PDF documents 'on the fly'. The library is completely written in C# and based exclusively on safe, managed code. PDFsharp offers two powerful
Aluminum Electrolytic Capacitors (Large Can Type)
") Aluminum Electrolytic Capacitors (Large Can Type) Snap-In, 85 C TS-U ECE-S (U) Series: TS-U Features General purpose Wide CV value range (33 ~ 47,000 µf/16 4V) Various case sizes Top vent construction
Aluminum Electrolytic Capacitors (Large Can Type) Snap-In, 85 C TS-U ECE-S (U) Series: TS-U Features General purpose Wide CV value range (33 ~ 47,000 µf/16 4V) Various case sizes Top vent construction
Εργαστήριο Ανάπτυξης Εφαρμογών Βάσεων Δεδομένων. Εξάμηνο 7 ο
 Εργαστήριο Ανάπτυξης Εφαρμογών Βάσεων Δεδομένων Εξάμηνο 7 ο Procedures and Functions Stored procedures and functions are named blocks of code that enable you to group and organize a series of SQL and PL/SQL
HOMEWORK 4 = G. In order to plot the stress versus the stretch we define a normalized stretch:
 HOMEWORK 4 Problem a For the fast loading case, we want to derive the relationship between P zz and λ z. We know that the nominal stress is expressed as: P zz = ψ λ z where λ z = λ λ z. Therefore, applying
PTC FUNCTION for Delta C2000 and CP2000
 FUNCTION for Delta C2000 and CP2000 CONTENTS: GENERAL... 2. for motor temperature protection... 2.2 Standards... 2.3 Motor layout... 2.4 characteristic... 2.4. Definitions... 3.4.2 curve... 3.4.3 switching
CYTA Cloud Server Set Up Instructions
 CYTA Cloud Server Set Up Instructions ΕΛΛΗΝΙΚΑ ENGLISH Initial Set-up Cloud Server To proceed with the initial setup of your Cloud Server first login to the Cyta CloudMarketPlace on https://cloudmarketplace.cyta.com.cy
[1] P Q. Fig. 3.1
![[1] P Q. Fig. 3.1](/thumbs/79/80362156.jpg "[1] P Q. Fig. 3.1") 1 (a) Define resistance....... [1] (b) The smallest conductor within a computer processing chip can be represented as a rectangular block that is one atom high, four atoms wide and twenty atoms long. One
1 (a) Define resistance....... [1] (b) The smallest conductor within a computer processing chip can be represented as a rectangular block that is one atom high, four atoms wide and twenty atoms long. One
La Déduction naturelle
 La Déduction naturelle Pierre Lescanne 14 février 2007 13 : 54 Qu est-ce que la déduction naturelle? En déduction naturelle, on raisonne avec des hypothèses. Qu est-ce que la déduction naturelle? En déduction
QUICKTRONIC PROFESSIONAL QTP5
 osram.com QUICKTRONIC PROFESSIONA QTP5 ECG for T5/ 16mm, T8/ 26mm, DUUX fluorescent lamps QTP5 i.e. UMIUX T5 HO ES 01 Product Features: Up to 100.000 hours lifetime 1 amp start with optimized filament
LR(-A) Series Metal Alloy Low-Resistance Resistor
 Series Metal Alloy Low-Resistance Resistor") LR(A) Series Metal Alloy LowResistance Resistor This specification is applicable to lead free, halogen free of RoHS directive for metal alloy lowresistance resistor. The product is for general purpose.
LR(A) Series Metal Alloy LowResistance Resistor This specification is applicable to lead free, halogen free of RoHS directive for metal alloy lowresistance resistor. The product is for general purpose.
DATA SHEET Surface mount NTC thermistors. BCcomponents
 DATA SHEET 2322 615 1... Surface mount N thermistors Supersedes data of 17th May 1999 File under BCcomponents, BC02 2001 Mar 27 FEATURES High sensitivity High accuracy over a wide temperature range Taped
Stato di tensione triassiale Stato di tensione piano Cerchio di Mohr
 Stato di tensione triassiale Stato di tensione iano Cerchio di Mohr Stato di tensione F A = F / A F Traione ura stato di tensione monoassiale F M A M Traione e torsione stato di tensione iano = F / A =
NIAGARA C 25 CF - 25 FF - 30 FF. NIAGARA C Green 25-35. Manuale d'uso per l'utente. Βιβλίο χρήσης για το χρήστη
 Manuale d'uso per l'utente Βιβλίο χρήσης για το χρήστη IT GR CALDAIA MURALE A GAS CON ACCUMULO ΕΠΙΤΟΙΧΟΣ ΛΕΒΗΤΑΣ ΣΥΜΠΥΚΝΩΣΗΣ CALDAIA MURALE A GAS A CONDENSAZIONE CON ACCUMULO ΕΠΙΤΟΙΧΟΣ ΛΕΒΗΤΑΣ ΑΕΡΙΟΥ ΣΥΜΠΥΚΝΩΣΗΣ
Surface Mount Multilayer Chip Capacitors for Commodity Solutions
 Surface Mount Multilayer Chip Capacitors for Commodity Solutions Below tables are test procedures and requirements unless specified in detail datasheet. 1) Visual and mechanical 2) Capacitance 3) Q/DF
VBA ΣΤΟ WORD. 1. Συχνά, όταν ήθελα να δώσω ένα φυλλάδιο εργασίας με ασκήσεις στους μαθητές έκανα το εξής: Version 25-7-2015 ΗΜΙΤΕΛΗΣ!!!!
 VBA ΣΤΟ WORD Version 25-7-2015 ΗΜΙΤΕΛΗΣ!!!! Μου παρουσιάστηκαν δύο θέματα. 1. Συχνά, όταν ήθελα να δώσω ένα φυλλάδιο εργασίας με ασκήσεις στους μαθητές έκανα το εξής: Εγραφα σε ένα αρχείο του Word τις
65W PWM Output LED Driver. IDLV-65 series. File Name:IDLV-65-SPEC
 ~ A File Name:IDLV65SPEC 07050 SPECIFICATION MODEL OUTPUT OTHERS NOTE DC VOLTAGE RATED CURRENT RATED POWER DIMMING RANGE VOLTAGE TOLERANCE PWM FREQUENCY (Typ.) SETUP TIME Note. AUXILIARY DC OUTPUT Note.
Section 8.3 Trigonometric Equations
 99 Section 8. Trigonometric Equations Objective 1: Solve Equations Involving One Trigonometric Function. In this section and the next, we will exple how to solving equations involving trigonometric functions.
ΚΥΠΡΙΑΚΗ ΕΤΑΙΡΕΙΑ ΠΛΗΡΟΦΟΡΙΚΗΣ CYPRUS COMPUTER SOCIETY ΠΑΓΚΥΠΡΙΟΣ ΜΑΘΗΤΙΚΟΣ ΔΙΑΓΩΝΙΣΜΟΣ ΠΛΗΡΟΦΟΡΙΚΗΣ 19/5/2007
 Οδηγίες: Να απαντηθούν όλες οι ερωτήσεις. Αν κάπου κάνετε κάποιες υποθέσεις να αναφερθούν στη σχετική ερώτηση. Όλα τα αρχεία που αναφέρονται στα προβλήματα βρίσκονται στον ίδιο φάκελο με το εκτελέσιμο
 1. Important Safety Instructions Before using the system, be sure to read these Important Safety Instructions. After reading this manual, save it in a convenient place. Warning Installation Precautions
Οδηγίες Αγοράς Ηλεκτρονικού Βιβλίου Instructions for Buying an ebook
 Οδηγίες Αγοράς Ηλεκτρονικού Βιβλίου Instructions for Buying an ebook Βήμα 1: Step 1: Βρείτε το βιβλίο που θα θέλατε να αγοράσετε και πατήστε Add to Cart, για να το προσθέσετε στο καλάθι σας. Αυτόματα θα
Esercizi sui circoli di Mohr
 Esercizi sui circoli di Mohr ESERCIZIO A Sia assegnato lo stato tensionale piano nel punto : = -30 N/mm² = 30 N/mm² x = - N/mm² 1. Determinare le tensioni principali attraverso il metodo analitico e mediante
Επιτραπέζιος Η/Υ K30AM / K30AM-J Εγχειρίδιο χρήστη
 Επιτραπέζιος Η/Υ K30AM / K30AM-J Εγχειρίδιο χρήστη GK9380 Ελληνικα Πρώτη Έκδοση Μάιος 2014 Copyright 2014 ASUSTeK Computer Inc. Διατηρούνται όλα τα δικαιώματα. Απαγορεύεται η αναπαραγωγή οποιουδήποτε τμήματος
TRIGONOMETRIA: ANGOLI ASSOCIATI
 FACOLTÀ DI INGEGNERIA CORSO DI AZZERAMENTO - MATEMATICA ANNO ACCADEMICO 010-011 ESERCIZI DI TRIGONOMETRIA: ANGOLI ASSOCIATI Esercizio 1: Fissata in un piano cartesiano ortogonale xoy una circonferenza
Aluminum Electrolytic Capacitors
 Aluminum Electrolytic Capacitors Snap-In, Mini., 105 C, High Ripple APS TS-NH ECE-S (G) Series: TS-NH Features Long life: 105 C 2,000 hours; high ripple current handling ability Wide CV value range (47
SOAP API. https://bulksmsn.gr. Table of Contents
 SOAP API https://bulksmsn.gr Table of Contents Send SMS...2 Query SMS...3 Multiple Query SMS...4 Credits...5 Save Contact...5 Delete Contact...7 Delete Message...8 Email: sales@bulksmsn.gr, Τηλ: 211 850
SEN TRONIC AG 3-2 7 0 0 7 A 3 57 3 3 AB 93 :, C,! D 0 7 % 0 7 3 3 93 : 3 A 5 93 :
 # 3-270 07A35733 AB93:,C,!D 07% 0733 93: 3A593:!"#$%% &%&''()*%'+,-. &%&''(/*%'+0. 1*23 '4# 54/%6%7%53 *323 %7 77# %%3#% 8908/"/*55 :1$;/ = 7?@ > 7= 7 %! "$!"#$%&#%'(%%)*#$%&#%'(%#++#,-."/-0-1222"/-0-1
SPECIFICATIONS... Pag. 2. WIRE SOLDER... Pag. 3. PCB SOLDER... Pag HIGH VOLTAGE PCB SOLDER... Pag. 6. RIGHT ANGLE PCB... Pag.
 DIN 41618 & 41622 INDEX DIN 41618 SPECIFICATIONS.......................................................... Pag. 2 WIRE SOLDER............................................................ Pag. 3 PCB SOLDER.............................................................
Potential Dividers. 46 minutes. 46 marks. Page 1 of 11
 Potential Dividers 46 minutes 46 marks Page 1 of 11 Q1. In the circuit shown in the figure below, the battery, of negligible internal resistance, has an emf of 30 V. The pd across the lamp is 6.0 V and
If error is detected the display will show the message "E" followed by the relative error code.
 INPUT MENU Select input type by pressing key and then F-button at the same time. The display will show: In1 = TC type J -100 ~ 1000 ºC In2 = TC type K -100 ~ 1300 ºC In3 = RTD Pt-100-100 ~ 600 ºC In4 =
DC-DC Constant Current Step-Down LED driver LDD-300L LDD-350L LDD-500L LDD-600L LDD-700L CURRENT RANGE
 SPECIFICATION ORDER NO. LDD-00L LDD-0L LDD-00L LDD-00L LDD-700L CURRENT RANGE 00mA 0mA 00mA VOLTAGE RANGE Note. ~ VDC for LDD-00~700L/LW ; ~ 8VDC for LDD-00~700LS CURRENT ACCURACY (Typ.) ±% at VDC input
NMBTC.COM /
 Common Common Vibration Test:... Conforms to JIS C 60068-2-6, Amplitude: 1.5mm, Frequency 10 to 55 Hz, 1 hour in each of the X, Y and Z directions. Shock Test:...Conforms to JIS C 60068-2-27, Acceleration
COURBES EN POLAIRE. I - Définition
 Y I - Définition COURBES EN POLAIRE On dit qu une courbe Γ admet l équation polaire ρ=f (θ), si et seulement si Γ est l ensemble des points M du plan tels que : OM= ρ u = f(θ) u(θ) Γ peut être considérée
3.4 SUM AND DIFFERENCE FORMULAS. NOTE: cos(α+β) cos α + cos β cos(α-β) cos α -cos β
 cos α + cos β cos(α-β) cos α -cos β") 3.4 SUM AND DIFFERENCE FORMULAS Page Theorem cos(αβ cos α cos β -sin α cos(α-β cos α cos β sin α NOTE: cos(αβ cos α cos β cos(α-β cos α -cos β Proof of cos(α-β cos α cos β sin α Let s use a unit circle
3.4 SUM AND DIFFERENCE FORMULAS Page Theorem cos(αβ cos α cos β -sin α cos(α-β cos α cos β sin α NOTE: cos(αβ cos α cos β cos(α-β cos α -cos β Proof of cos(α-β cos α cos β sin α Let s use a unit circle
Επιτραπέζιος Η/Υ ASUS M12AD and M52AD Εγχειρίδιο χρήστη
 Επιτραπέζιος Η/Υ ASUS M12AD and M52AD Εγχειρίδιο χρήστη M12AD M52AD GK9559 Πρώτη Έκδοση Ιούλιος 2014 Copyright 2014 ASUSTeK Computer Inc. Διατηρούνται όλα τα δικαιώματα. Απαγορεύεται η αναπαραγωγή οποιουδήποτε
The challenges of non-stable predicates
 The challenges of non-stable predicates Consider a non-stable predicate Φ encoding, say, a safety property. We want to determine whether Φ holds for our program. The challenges of non-stable predicates
Περιεχόμενα / Contents
 Aερόθερμo / Fan Heater PTC-906 Περιεχόμενα / Contents GR... Σελίδες 3-8 EN... Pages 9-11 2 GR Ευχαριστούμε που επιλέξατε μια συσκευή της γκάμας θερμαντικών IZZY. Σημαντικές Οδηγίες Ασφαλείας Τα Μέρη της
USO DEL TERMOSTATO ELECTRÓNICO. Ajuste el funcionamiento deseado mediante el conmutador
 ESPAÑO Hoja de instalación DESCRIPCIÓ. Cronotermostato electrónico, ideado para controlar la temperatura ambiente (calefacción y acondicionamiento), función Ahorro Energético, salida por relé de intercambio
Digital motor protection relays
 Digital motor protection relays Specification DMP -S & DMP -Sa DMP -T & DMP -Ta Model No. DMP06-S/Sa DMP60-S/Sa DMP06-T/Ta DMP60-T/Ta Wiring Screw type Tunnel type Panel mount Unit or Extension Note1)
Guida utente - User Guide - Guide utilisateur Benutzerhandbuch - Guía de usuario - Οδηγός χρήστη
 Guida utente - User Guide - Guide utilisateur Benutzerhandbuch - Guía de usuario - Οδηγός χρήστη Sistema domotico By-me By-me home automation system Système domotique By-me Hausautomationssystem By-me
Thin Film Chip Resistors
 FEATURES PRECISE TOLERANCE AND TEMPERATURE COEFFICIENT EIA STANDARD CASE SIZES (0201 ~ 2512) LOW NOISE, THIN FILM (NiCr) CONSTRUCTION REFLOW SOLDERABLE (Pb FREE TERMINATION FINISH) Type Size EIA PowerRating
NTC Thermistor:TTC3 Series
 Features. RoHS compliant 2. Halogen-Free(HF) series are available 3. Body size: Ф3mm 4. Radial lead resin coated 5. Operating temperature range: -40 ~+25 6. Wide resistance range 7. Cost effective 8. Agency
Physical DB Design. B-Trees Index files can become quite large for large main files Indices on index files are possible.
 B-Trees Index files can become quite large for large main files Indices on index files are possible 3 rd -level index 2 nd -level index 1 st -level index Main file 1 The 1 st -level index consists of pairs
S /5000 BTU/Hr. 1000/1500 Watt
 763.576.32 SPEC-168 D763.422.2211 COOLING SEALED ENCLOSURE COOLING AIR CONDITIONERS Sealed Enclosure Cooling Air Conditioners SPECTRACOOL SLIM FIT INDOOR S6 1/17 BTU/Hr. 3/5 Watt S1 34/5 BTU/Hr. 1/15 Watt
NPI Unshielded Power Inductors
 FEATURES NON-SHIELDED MAGNETIC CIRCUIT DESIGN SMALL SIZE WITH CURRENT RATINGS TO 16.5 AMPS SURFACE MOUNTABLE CONSTRUCTION TAKES UP LESS PCB REAL ESTATE AND SAVES MORE POWER TAPED AND REELED FOR AUTOMATIC
Βασιλική Σαμπάνη 2013. Μαντάμ Μποβαρύ: Αναπαραστάσεις φύλου και σεξουαλικότητας
 Βασιλική Σαμπάνη 2013 Μαντάμ Μποβαρύ: Αναπαραστάσεις φύλου και σεξουαλικότητας 200 Διαγλωσσικές Θεωρήσεις μεταφρασεολογικός η-τόμος Interlingual Perspectives translation e-volume ΜΑΝΤΑΜ ΜΠΟΒΑΡΥ: ΑΝΑΠΑΡΑΣΤΑΣΕΙΣ
ZLW Series. Single-stage Monoblock Centrifugal Pump ZL PUMP GROUP.,LTD
 ZLW Series Single-stage Monoblock Centrifugal Pump ZL PUMP GROUP.,LTD 1 Application Apply as the transportation of liquids in the fields of air condition, heating, sanitary water, water treatment cooling,
derivation of the Laplacian from rectangular to spherical coordinates
 derivation of the Laplacian from rectangular to spherical coordinates swapnizzle 03-03- :5:43 We begin by recognizing the familiar conversion from rectangular to spherical coordinates (note that φ is used
2R2. 2 (L W H) [mm] Wire Wound SMD Power Inductor. Nominal Inductance Packing Tape & Reel. Design Code M ±20%
![2R2. 2 (L W H) [mm] Wire Wound SMD Power Inductor. Nominal Inductance Packing Tape & Reel. Design Code M ±20%](/thumbs/78/78109689.jpg "2R2. 2 (L W H) [mm] Wire Wound SMD Power Inductor. Nominal Inductance Packing Tape & Reel. Design Code M ±20%") Wire Wound SMD Power Inductors WPN Series Operating temperature range : -40 ~+125 (Including self-heating) FEATURES Fe base metal material core provides large saturation current Metallization on ferrite
Wire Wound SMD Power Inductors WPN Series Operating temperature range : -40 ~+125 (Including self-heating) FEATURES Fe base metal material core provides large saturation current Metallization on ferrite
Math 6 SL Probability Distributions Practice Test Mark Scheme
 Math 6 SL Probability Distributions Practice Test Mark Scheme. (a) Note: Award A for vertical line to right of mean, A for shading to right of their vertical line. AA N (b) evidence of recognizing symmetry
Δημιουργία Λογαριασμού Διαχείρισης Business Telephony Create a Management Account for Business Telephony
 Δημιουργία Λογαριασμού Διαχείρισης Business Telephony Create a Management Account for Business Telephony Ελληνικά Ι English 1/7 Δημιουργία Λογαριασμού Διαχείρισης Επιχειρηματικής Τηλεφωνίας μέσω της ιστοσελίδας
Summary of Specifications
 Snap Mount Large High CV High Ripple 85 C Temperature The series capacitors are the standard 85 C, large capacitance, snap-in capacitors from United Chemi-Con. The load life for the series is 2,000 hours
Κωδικός QR ενεργοποίησης
 Εγχειρίδιο χρήσης Το εγχειρίδιο αυτό ισχύει για τα κλιματιστικά MORRIS με λειτουργία WiFi. Παρακαλούμε να διαβάσετε το εγχειρίδιο προσεκτικά πριν την χρήση του κλιματιστικού και να το κρατήσετε για μελλοντική
Heat exchanger. Type WT. For the reheating of airflows in rectangular ducting PD WT 1. 03/2017 DE/en
 X X testregistrierung Heat exchanger Type For the reheating of airflows in rectangular ducting Rectangular hot water heat exchanger for the reheating of airflows, suitable for VAV terminal units Type TVR,
AKC Spectrum Analyzer User s Manual.
 AKC-1291 Spectrum Analyzer User s Manual u ano un ao Prohibiting to removal the cover e m Keep the power insert clean RF in/output rating oae o n DC Power nt Restore this instrument 1. Introduction 2.
Στο εστιατόριο «ToDokimasesPrinToBgaleisStonKosmo?» έξω από τους δακτυλίους του Κρόνου, οι παραγγελίες γίνονται ηλεκτρονικά.
 Διαστημικό εστιατόριο του (Μ)ΑστροΈκτορα Στο εστιατόριο «ToDokimasesPrinToBgaleisStonKosmo?» έξω από τους δακτυλίους του Κρόνου, οι παραγγελίες γίνονται ηλεκτρονικά. Μόλις μια παρέα πελατών κάτσει σε ένα
DC-DC Constant Current Step-Down LED driver LDD-300L LDD-350L LDD-500L LDD-600L LDD-700L CURRENT RANGE
 SPECIFICATION ORDER NO. LDD-00L LDD-0L LDD-00L LDD-00L LDD-700L CURRENT RANGE 00mA 0mA 00mA 00mA VOLTAGE RANGE Note. ~ VDC for LDD-00~700L/LW ; ~ 8VDC for LDD-00~700LS CURRENT ACCURACY (Typ.) ±% at VDC
Overview: Relay Modules
 20 Overview: Relay Modules 859 Series 857 Series 788 Series 858 Series 288 and 287 Series 286 Series 789 Series Relays with Changeover Contacts 1 changeover contact Item No. Page Item No. Page Item No.