DD-REC 1. Printed: Doc-Nr: PUB / / 000 / 01
|
|
|
- Ῥαάβ Βασιλειάδης
- 9 χρόνια πριν
- Προβολές:
Transcript
1 DD-REC 1 Bedienungsanleitung Operating instructions Mode d emploi Istruzioni d uso Gebruiksaanwijzing Manual de instruções Manual de instrucciones Οδηγιες χρησεως de en fr it nl pt es el

2 DD EC-1 0/1 1 0/1 0/1
3 DD EC-1 0/1 0/ / /1 6 max 7 min 8 9

4 /1 0/1
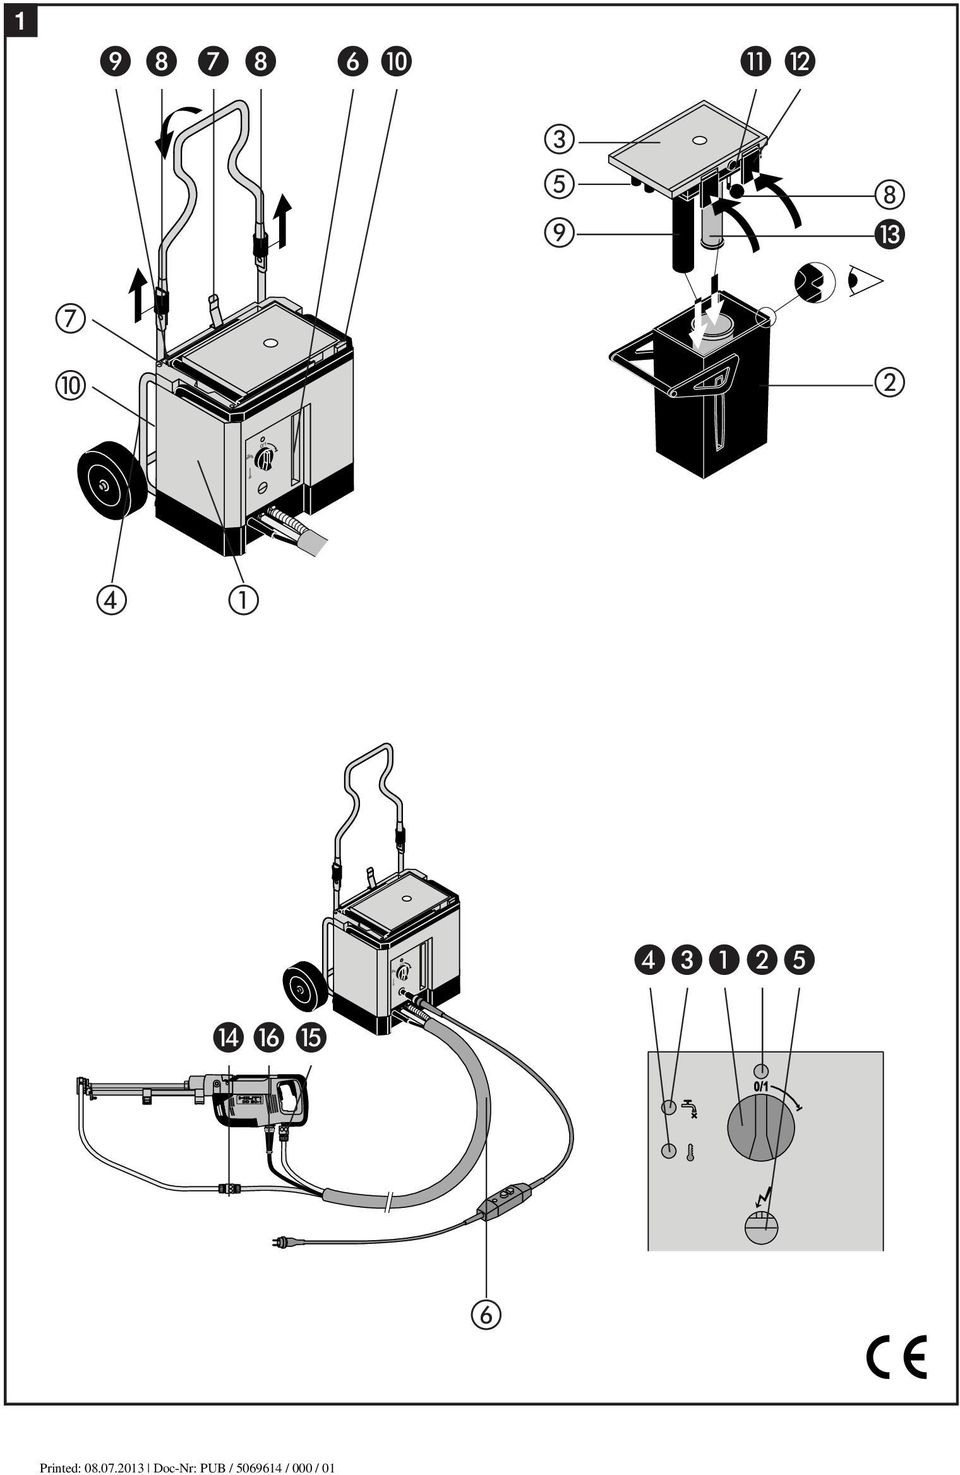
5 DD-REC1 Wasserrecyclingsystem Lesen Sie die Bedienungs anleitung vor Inbetriebnahme unbedingt durch. Bewahren Sie diese Bedienungsanleitung immer beim Gerät auf. Geben Sie das Gerät nur mit Bedienungsanleitung an andere Personen weiter. Bedienungselemente Ein-/Ausschalter Betriebsleuchte Warnleuchte Wasser Warnleuchte Temperatur Codierte Elektrokabel-Steckverbindung (Steckdose für Netzkabel) Schauglas Wasserstand/Schlammmenge Fahrwerksbügel-Verriegelung Fahrwerks-Verriegelung Behältergriff Gehäusegriff Entlüftungsventil Behälter-Verriegelung Hauptfilter Kupplungsstück Absaugschlauch Kupplungsstück Wasserversorgungsschlauch Codierte Elektrokabel-Steckverbindung (Stecker zum Bohrgerät) Allgemeine Hinweise Dieses Symbol kennzeichnet besonders wichtige Sicherheitshinweise in dieser Bedienungsanleitung. Befolgen Sie diese immer, andernfalls können schwere Verletzungen die Folge sein. Warnung vor gefährlicher elektrischer Spannung. Die Zahlen verweisen jeweils auf Abbildungen auf den aufklappbaren Umschlagseiten (vorn und hinten). / Die Zahlen verweisen jeweils auf Bedienungselemente / Gerätebauteile. Im Text dieser Bedienungsanleitung bezeichnet «das Gerät» immer dieses Elektrowerkzeug, das Gegenstand dieser Bedienungsanleitung ist. Gerätebauteile Gehäuse Behälter Deckel Fahrwerk Nippel Schlauchpaket Tasche für Gerätedokumente Schwimmer Sedimentationsrohr Typenschild Inhalt Seite Allgemeine Hinweise 1 Beschreibung 1 Technische Daten 2 Zubehör 3 Sicherheitshinweise 3 Inbetriebnahme 4 Bedienung 4 Pflege und Instandhaltung 7 Herstellergewährleistung Geräte 7 Entsorgung 8 Fehlersuche 9 EG-Konformitätserklärung (Original) 10 Beschreibung Das DD-REC1 ist ein elektrisch betriebenes Wasserrecyclingsystem für den Einsatz mit dem Diamantkernbohrgerät DD EC-1. Lieferumfang: Zum Lieferumfang gehören: Gerät, Fahrwerk, Bedienungsanleitung, Reinigungs-Pad Beim Betrieb des Gerätes sind folgende Bedingungen immer einzuhalten: am elektrischen Wechselspannungsnetz gemäss Typenschildangabe betreiben nur zusammen mit dem Netzkabel des Diamantkernbohrgeräts DD EC-1 verwenden nicht in explosionsgefährdeter Umgebung einsetzen 1

6 Technische Daten Nennleistungsaufnahme: 300 W Nennspannung: 100 V 110 V 120 V 220 V 230 V 240 V Netzfrequenz: Hz Gerätegewicht (ohne Wasser): 25 kg Wasserfüllmenge: 4 13 l Max. Bohrungsanzahl je Füllung: ca. 50 Abmessungen (ohne Fahrwerk): mm Max. Wasserdruck: 6 bar Zul. Temperaturbereich Betrieb: + 3 bis +50 C Zul. Temperaturbereich Lagerung / Transport: 15 bis +50 C (ohne Wasser, Filter entnehmen) Das Gerät wird in verschiedenen Nennspannungen angeboten. Die Nennspannung und Nennstromaufnahme Ihres Gerätes entnehmen Sie bitte dem Typenschild Bezogen auf 20 mm und 125 mm Bohrtiefe; abhängig von Untergrund, Bohrrichtung und Bohrungsart (Durchgangsbohrung, Sackloch) Geräuschinformation (gemäss EN 61029): Typischer A-bewerteter Emissions-Schalldruckpegel (LpA): 76 db (A) 80 db (A Wesentliche Gerätemerkmale Elektrische Schutzklasse I Absaugung von Bohrschlamm Wasser-Rückgewinnung aus dem Bohrschlamm (Recycling) Wasser- und Stromversorgung für das Diamantkernbohrgerät DD EC-1 Integriertes Schlauchpaket für Ver- und Entsorgungsleitungen zum Diamantkernbohrgerät DD EC-1 Automatische Filterrückspülung Regenerierbarer Filter Stand-By-Betrieb Warnanzeigen für zu geringen Wasserfluss zu hohe Temperatur Selbstcheck der Elektronik bei jedem Einschalten Entnehmbarer Behälter für Wasser und Bohrschlamm Abkoppelbares Fahrwerk, Ablagemöglichkeit für Transportkoffer des Diamantkernbohrgeräts Technische Änderungen vorbehalten 2

7 Bestimmungsgemässer Gebrauch Das Gerät ist für folgenden Gebrauch bestimmt: Bohrschlammabsaugung, Wasser- und Stromversorgung für das Diamantkernbohrgerät DD EC-1 bei der Bearbeitung von mineralischen Untergründen (armierter Beton, Mauerwerk, Naturstein). Das Gerät darf nur auf waagerechtem Untergrund stehend betrieben werden. Als Kühl- und Spülmedium ist sauberes Wasser zu verwenden. Zubehör Ersatz-Hauptfilter, Art. Nr (Verschleissteil) Das vom Gerät bereitgestellte Wasser ist nahezu partikelfrei, kann aber aus dem Bohruntergrund gelöste Inhaltsstoffe enthalten. Es ist daher keinesfalls als Trinkwasser geeignet. Verwenden Sie dieses Produkt in keinem Fall anders, als es in dieser Bedienungsanleitung beschrieben ist. Benutzen Sie Schutzausrüstung Bedienungsanleitung lesen Sicherheitshinweise Augenschutz benutzen Schutzandschuhe benutzen Beim Gebrauch des Geräts sind zum Schutz gegen elektrischen Schlag sowie gegen Verletzungs-und Brandgefahr grundsätzliche Sicherheitsmassnahmen zu beachten. Lesen und befolgen Sie die untenstehenden Hinweise, bevor Sie das Gerät benutzen. Tragen Sie geeignete Arbeitskleidung Tragen Sie rutschfestes Schuhwerk. Richten Sie das Arbeitsumfeld sicher ein Halten Sie das Arbeitsumfeld frei von Gegenständen, an denen Sie sich verletzen könnten. Sorgen Sie für eine gute Beleuchtung. Halten Sie beim Arbeiten andere Personen, vor allem Kinder, vom Gerät fern. Berücksichtigen Sie Umgebungseinflüsse Setzen Sie das Gerät nicht Niederschlägen aus, benützen Sie es nicht in feuchter oder nasser Umgebung sowie in der Nähe von brennbaren Flüssigkeiten und Gasen. Prüfen Sie das Gerät vor jeder Inbetriebnahme Prüfen Sie zuerst das eingesetzte Netzkabel mit Bohrschlamm sowie recyceltes Bohrwasser können Reizungen verursachen. Bei Berührung mit der Haut sofort mit Wasser abspülen. Bei Berührung mit den Augen sofort mit viel Wasser nachspülen und den Arzt aufsuchen. Nach längerem Einsatz können Wasser, Behälter und Schläuche sehr heiss sein. Es besteht Verbrühungs - gefahr. Fehlerstromschutzschalter PRCD (im Lieferumfang des Diamantkernbohrgeräts DD EC-1 enthalten, ausser für die GB-Version), anschließend das Gerät inkl. Netzkabel und Stecker (im Schlauchpaket integriert) auf ordnungsgemässen Zustand. Betreiben Sie das Gerät nicht, wenn Beschädigungen vorliegen, das Gerät nicht komplett ist oder Bedienungselemente sich nicht einwandfrei betätigen lassen. Verwenden Sie das richtige Zubehör Benutzen Sie nur empfohlenes original Hilti Zubehör. Verwenden Sie das Gerät nur für jene Zwecke, für die es bestimmt ist Praktizieren Sie eine sichere Arbeitsweise Sorgen Sie jederzeit für sicheren Stand von Bediener und Gerät. Auf Gerüsten oder Ähnlichem ist das Gerät ohne Fahrwerk zu verwenden. Stellen Sie sich niemals auf das Gerät. Fahrwerks-, Gehäuse- und Behältergriffe dürfen niemals als Aufnahme für einen Kranhaken oder ähnliches verwendet werden. Für den Krantransport sind die einschlägigen Sicherheitsbestimmungen zu befolgen. 3

8 Sorgen Sie für eine hindernisfreie Lage von Gerät, Netzkabel und Schlauchpaket. Führen Sie beim Arbeiten das Schlauchpaket immer nach hinten vom Diamantkernbohrgerät weg. Tragen oder ziehen Sie das Gerät niemals am Netzkabel oder Schlauchpaket. Fahren Sie niemals über Schläuche oder Kabel. Ziehen Sie den Stecker nicht am Kabel aus der Steckdose. Schützen Sie Schlauchpaket und Kabel vor Hitze, Öl und scharfen Kanten. Wird bei der Arbeit das Gerät bzw. das Netzkabel beschädigt, Gerät und Kabel nicht berühren. Ziehen Sie sofort den Netzstecker und lassen Sie das Gerät bzw. Netzkabel vom Hilti Service reparieren. Setzen Sie die Gerätesteckvorrichtung niemals dem Wasser aus. Eine naß gewordene Steckebene nur nach Ziehen des Netzsteckers anfassen und abwischen. Kontakte des Steckers und Gerätekabel nur im sauberen und trockenen Zustand verbinden. Vor der Reinigung der Kontakte Netzstecker ziehen. Vermeiden Sie unbeabsichtigten Anlauf Vor jeder Behälterentnahme, bei Nichtgebrauch des Gerätes (z.b. während einer Arbeitspause), vor Pflege und Instandhaltung immer das Gerät ausschalten und den Stecker des Netzkabels aus der Steckdose ziehen. Halten Sie das Gerät in einwandfreiem Zustand Befolgen Sie die Hinweise für Pflege und Instandhaltung. Reparaturen am Gerät dürfen nur von einer autorisierten Elektrofachkraft unter Verwendung von original Hilti Ersatzteilen ausgeführt werden, andernfalls besteht die Gefahr von Beschädigungen bzw. Unfällen. Lassen Sie deshalb Reparaturen nur vom Hilti Service oder in von Hilti autorisierten Werkstätten durchführen. Die Sicherheitsfunktion des Schutzleiters bedarf gemäß den nationalen Sicherheitsbestimmungen einer regelmäßigen Überprüfung. Inbetriebnahme Lesen und befolgen Sie unbedingt die Sicherheitshinweise in dieser Bedienungsanleitung. Lesen und befolgen Sie auch die Bedienungs- und Sicherheitshinweise in der Bedienungsanleitung des Diamantkernbohrgeräts DD EC-1. Verwenden Sie das Wasserrecyclingsystem DD-REC1 ausschliesslich zusammen mit dem Diamantkernbohrgerät DD EC-1 und dem zugehörigen Netzkabel mit integriertem Fehlerstromschutzschalter PRCD (im Lieferumfang des Diamantkernbohrgeräts DD EC-1 enthalten). In GB sind die 110 V-Geräte an einem Trenntrafo zu betreiben. Die Netzspannung muss mit der Angabe auf dem Typenschild übereinstimmen. Bei Einsatz von Verlängerungskabeln: Nur für den Einsatzbereich zugelassene Verlängerungskabel mit ausreichendem Querschnitt verwenden. Ansonsten kann es zu Leistungsverlusten bei den Geräten und Überhitzung des Kabels kommen. Ersetzen Sie beschädigte Verlängerungskabel. Empfohlene Mindestquerschnitte und max. Kabellängen: Leiterquerschnitt Netzspannung 1,5 mm 2 2,0 mm 2 2,5 mm 2 3,5 mm V 20 m 40 m 110 V 20 m 40 m V 50 m 80 m Bedienung Schlauchpaket mit dem Bohrgerät verbinden Codierten Elektrokabel-Stecker des Schlauchpakets in die Gerätesteckdose an der Unterseite des Bohrgeräts einstecken. Dazu Markierungen von Stecker und Steckdose in Überdeckung bringen und den Stecker bis auf Anschlag in das Gerät einführen. Stecker unter leichtem Anpressen im Uhrzeigersinn verdrehen, bis der Arretierring hörbar einrastet. Das dünne Schlauchende des Schlauchpakets mit dem Bohrgerät verbinden, das dicke Schlauchende mit dem Schlauchstück des Wasserfangrings verbinden. Die Kupplungen müssen beim Aufstecken hörbar einrasten. Behälter entnehmen und öffnen Behälter niemals bei eingeschaltetem Gerät entnehmen. Gerät ggf. durch Drehung des Ein-/Ausschalters im Uhrzeigersinn ausschalten und Netzstecker ziehen. Schutzhandschuhe und Schutzbrille benutzen. Behälterinhalt kann Reizungen verursachen. Nach längerem Einsatz können Behälter und Behälterinhalt heiss sein. Sicherheitshinweise beachten. Achten Sie beim Hantieren mit dem Behälter darauf, dass Sie sich nicht an Gehäusekanten, Griffen und Verschlüssen quetschen. Behältergriff um etwa 45 anheben und solange in dieser Stellung lassen, bis der Druckausgleich (ca. 2 Sekunden) hörbar abgeschlossen ist. Andernfalls besteht die Gefahr, dass der Behälterinhalt an den Nippeln in grösserer Menge austritt. Behältergriff senkrecht stellen und Behälter nach oben aus dem Gehäuse ziehen. Behälter stets aufrecht transportieren oder auf waagrechter Fläche abstellen. Auf sicheren Stand achten. Die vier Behälter-Verriegelungen öffnen. Deckel vom Behälter abheben und dabei darauf achten, dass die Schwimmerkugel nicht eingeklemmt wird. Deckel vorsichtig ablegen. 4

9 Behälter befüllen, schliessen und einsetzen Inneren Behälter bis zum Rand mit sauberem Wasser füllen. Äusseren Behälter bis zur gewünschten Menge zwischen Min.- und Max.-Markierung auffüllen. Innere und äussere Deckeldichtung auf Schäden überprüfen. Verunreinigungen der Dichtflächen sorgfältig beseitigen. Auf festen Sitz des Hauptfilters achten. Entlüftungsventil auf Leichtgängigkeit prüfen. Deckel auf Behälter aufsetzen. Dabei auf seitenrichtige Lage achten: (Die Stege an den beiden Ecken des Behälterdeckels in die entsprechenden Aussparungen des Behälters positionieren ( und ). Die Nippelleiste am Deckel befindet sich dann auf der gleichen Seite wie das Behälterschauglas). Beim Aufsetzen darauf achten, dass die Behälter-Verriegelungen und der Schwimmerschlauch nicht zwischen Behälter und Deckel eingeklemmt werden. Darauf achten, dass Ansaugschlauch im Wasser hängt und Schwimmerkugel frei schwimmt. Behälter-Verriegelungen schliessen. Dazu zuerst in die Halterungen am Behälter einsetzen. Anschliessend Behälter-Verriegelungen an den Deckel an drücken. Die Behälter-Verriegelungen müssen dabei spürbar einrasten. Evtl. den Deckel dabei leicht an drücken. Stets alle vier Behälter-Verriegelungen verwenden. Niemals beschädigte Behälter-Verriegelungen verwenden. Behälter am Behältergriff nehmen und seitenrichtig in das Gehäuse einführen. Dabei müssen die Führungsrippen am Behälter sorgfältig in die entsprechenden Aussparungen im Gehäuse eingeführt werden. Behälter nicht ins Gehäuse fallen lassen. Behältergriff zur Nippelseite hin umlegen, bis er bündig mit der Gehäuseoberfläche abschliesst. Evtl. den Deckel dabei leicht andrücken. Befüllen Sie das Gerät niemals über die Schläuche, sondern ausschließlich wie oben beschrieben. Betrieb Am Schauglas kontrollieren, ob ausreichend Wasser im Behälter vorhanden ist. Gerät mit dem Stromnetz verbinden. Dazu Netzkabel mit integriertem Fehlerstromschutzschalter PRCD (im Lieferumfang des Diamantkernbohrgeräts) verwenden. Codierten Stecker wie oben beschrieben in die Steckdose stecken. Netzstecker in Netzsteck dose stecken. Fehlerstromschutzschalter durch Drücken der grünen Taste einschalten. Dadurch wird die Selbstkontrollfunktion des Geräts aktiviert. Dabei leuchten kurz alle Warnlampen auf und ein akustisches Signal ertönt. Funktionstest Fehlerstromschutzschalter durchführen. Dazu schwarze Test-Taste drücken. Die Betriebskontrollanzeige am Gerät muss dabei verlöschen. Anschliessend wieder mit der grünen Taste einschalten. Gerät durch Drehung des Ein-/Ausschalters im Uhrzeigersinn bis zum Anschlag einschalten. Anschlies- send läuft etwa 20 Sekunden lang die Befüllung der geräteinternen Systeme. Während dieser Zeit ist die Wasserversorgung nicht sichergestellt. Danach zeigt die grüne Betriebsleuchte die Betriebsbereitschaft an. Wasserversorgung durch Betätigen des Schalters des Diamantkernbohrgeräts DD EC-1 starten. Gewünschte Wassermenge am Regler des Diamantkernbohrgeräts einstellen und Bohrvorgang starten (s. Bedienungsanleitung zum Diamantkernbohrgerät DD EC-1). Wird der Schalter am Diamantkernbohrgerät DD EC-1 einige Sekunden nicht betätigt, wird der automatische Filterrückspülvorgang gestartet, der etwa 15 bis 20 Sekunden dauert. Während dieser Zeit ist die Wasserversorgung nicht gewährleistet. Nach Abschluss des Filterrückspülvorgangs befindet sich das Gerät wieder im Bereitschafts-Modus und der nächste Bohrvorgang kann gestartet werden. Stand-By-Modus: Wird der Schalter des Diamantkernbohrgeräts länger als 15 Minuten nicht betätigt, führt das Gerät selbsttätig eine Druckentlastung durch und geht in den Stand-By-Modus. Vor dem Starten des nächsten Bohrvorgangs muss in diesem Fall der Schalter des Diamantkernbohrgeräts kurz betätigt werden, um den internen Druckaufbau erneut zu starten (s.o.). Nach wenigen Sekunden ist die Wasserversorgung sichergestellt. Warnanzeigen: Akustisches Warnsignal (ohne Warnleuchte): Zeigt zu geringen Wasserdurchfluss an. Hinweis auf falsch eingestelltes Regulierventil im Manuellbetrieb oder andere Störungen (Abhilfe s. Fehlersuche). Warnleuchte Wasser (gleichzeitig akustisches Warnsignal): Zeigt zu geringen Wasserdruck an. Hinweis auf leeren Behälter, verstopften Filter oder andere Störungen (Abhilfe s. Fehlersuche). Warnleuchte Temperatur (gleichzeitig akustisches Warnsignal): Zeigt zu hohe Wassertemperatur an. Betrieb sofort einstellen (Abhilfe s. Fehlersuche). Schauglas Wasserstand/Schlammmenge : Zeigt das Bohrschlammniveau und die Restwassermenge im Behälter an. Gibt Hinweis für Fehlerursache bei Störungen bzw. ermöglicht die Abschätzung der verbleibenden Anzahl von Bohrungen. Eine genaue Angabe ist wegen der sehr unterschiedlichen Bedingungen (Durchmesser, Tiefe, usw) nicht möglich. Behälter reinigen In folgenden Fällen ist der Behälter zu entleeren und zu reinigen. Grundsätzlich wird die gleichzeitige Reinigung des Hauptfilters (s.u.) empfohlen: Störungen, die auf ein zu hohes Schlammniveau oder zu niedrigen Wasserstand zurückzuführen sind (siehe Fehlerursachen) Ausserbetriebsetzung des Geräts (z.b. nach Beendigung des Arbeitstages). Behälter wie oben beschrieben aus dem Gehäuse entnehmen und öffnen. Dabei Sicherheitshinweise beachten. 5
.")
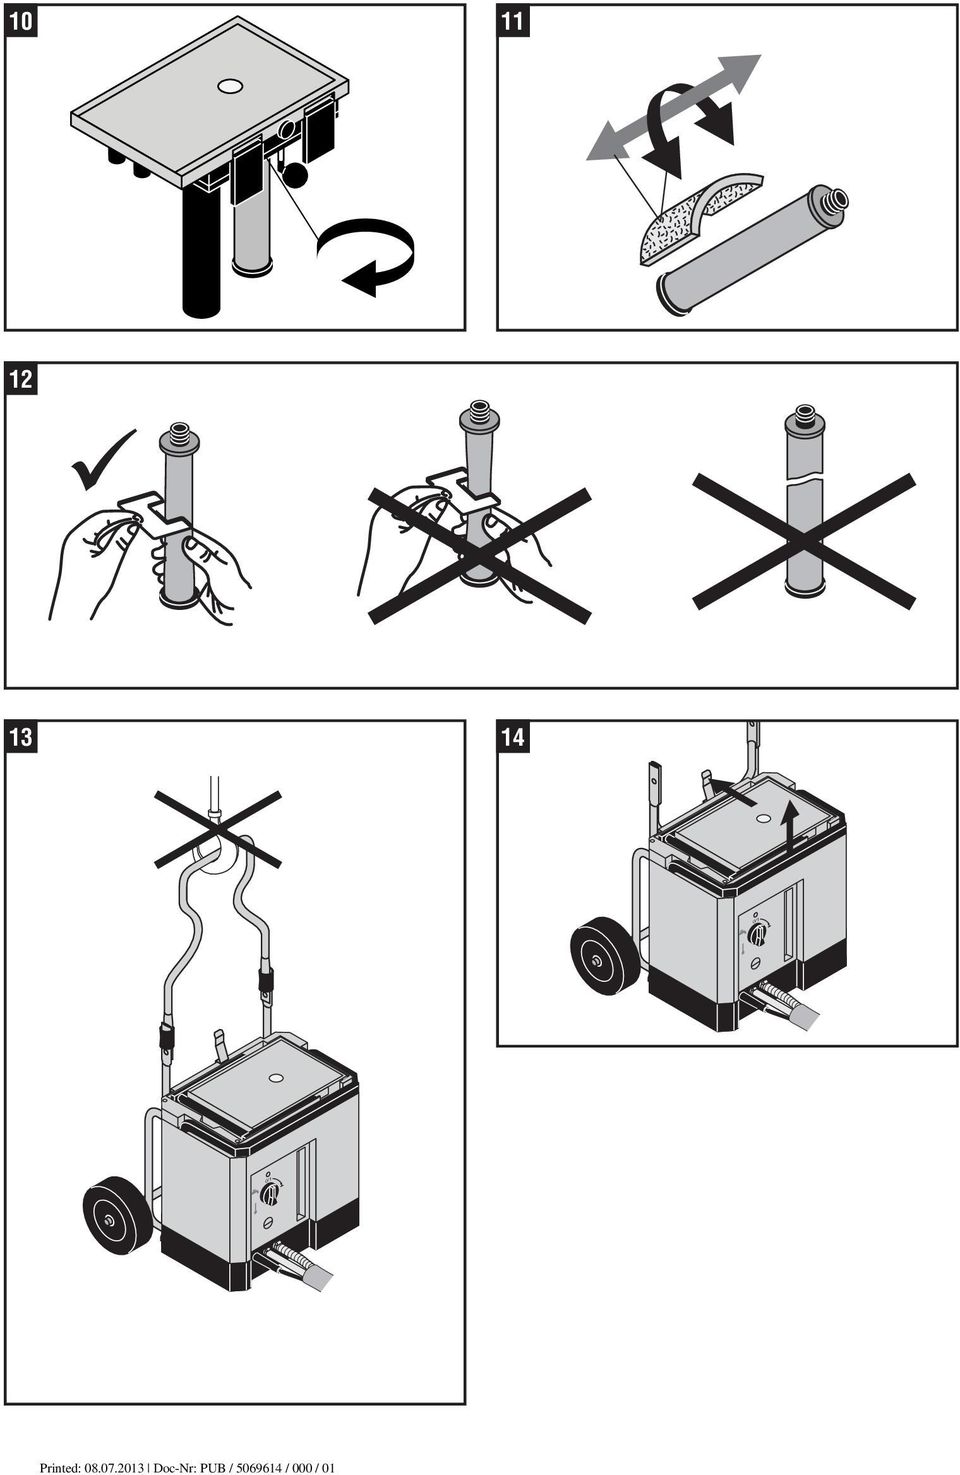
10 Behälterinhalt entsprechend den Hinweisen im Kapitel «Entsorgung» unter Beachtung der örtlichen Vorschriften sachgerecht entsorgen. Restschlamm ausspülen, ggf. angetrocknete Rückstände entfernen. Schauglas von innen mit einem weichen Tuch abwischen. Dichtflächen am Behälter sorgfältig reinigen. Behälter unter fliessendem Wasser ausspülen. Verwenden Sie dazu kein Hochdruckreinigungsgerät. Hauptfilterreinigung durchführen (s.u.). Behälter wie oben beschrieben befüllen, schliessen und ins Gehäuse einsetzen. Hauptfilter regenerieren In folgenden Fällen wird die Regeneration des Hauptfilters empfohlen: Störungen, die auf Verstopfungen des Hauptfilters zurückzuführen sind Bei jeder Neubefüllung des Behälters Behälter wie oben beschrieben aus dem Gehäuse entnehmen und öffnen. Dabei Sicherheitshinweise beachten. Hauptfilter vom Deckel losschrauben. Dabei den Filter nicht am Keramikkörper festhalten, sondern nur im Griffbereich auf der Unterseite des Hauptfilters (dadurch Verringerung des Bruchrisikos). Hauptfilter unter Verwendung des mitgelieferten Schleif papiers unter laufendem Wasser reinigen, indem man ihn in Längsrichtung auf allen Seiten abreibt, bis die helle Tönung des Keramikkörpers wieder erscheint. Dabei wird die oberste Schicht des Keramikkörpers abgetragen. Dieser Regenerationsvorgang lässt sich bis zu 20 mal wiederholen, bevor die minimale Wandstärke des Keramikkörpers erreicht ist. Wanddicke des Keramikkörpers überprüfen. Der Hauptfilter ist dann unverzüglich zu ersetzen, sobald der Minimaldurchmesser des Keramikkörpers auf 42 mm oder weniger abgesunken ist. Bei Nichtbeachtung dieses Punktes könnten am Keramikkörper Risse oder Bruchbeschädigungen auftreten. Hauptfilter prüfen. Bei Rissbildung oder Bruch sofort ersetzen. Ein defekter Hauptfilter kann zu Schäden am Gerät und am Diamantkernbohrgerät führen. Hauptfilter in Deckel einschrauben, bis ein deutlicher Widerstand zu spüren ist. Hauptfilter um maximal 45 weiterdrehen. Weiteres Eindrehen verbessert die Wirkung der Filterdichtung nicht und kann zur Zerstörung des Filters oder von Deckelbauteilen führen. Behälter wie oben beschrieben befüllen, schliessen und ins Gehäuse einsetzen. Hauptfilter trocknen In seltenen Fällen reicht die Regeneration des Hauptfilters nicht aus, um eine Verstopfung zu beseitigen. In diesen Fällen ist der Hauptfilter in trockener und warmer Umgebung, mit Gewinde nach oben stehend, mindestens 24 Stunden lang zu trocknen, bevor er wieder zum Einsatz kommt. Ersatz-Hauptfilter Der Hauptfilter ist ein Verschleissteil mit beschränkter Lebensdauer. Es wird empfohlen, stets einen Ersatz- Hauptfilter mitzuführen. Im Gehäuse besteht die Möglichkeit, den Ersatz-Hauptfilter unterzubringen. Dazu Behälter entnehmen. Zum Einsetzen Griffbereich des Hauptfilters in die Aufnahme im Gehäuseboden schräg einsetzen und Hauptfilter senkrecht in Kunststofflasche einrasten lassen. Zum Entnehmen des Hauptfilters Kunststofflasche leicht anheben und Hauptfilter seitlich herausnehmen. Ausserbetriebsetzung Vor jeder längeren Arbeitspause (z.b. nach Beendigung des Arbeitstages) Gerät wie folgt ausserbetriebsetzen: 1. Netzstecker ziehen. 2. Schlauchverbindungen zum Diamantkernbohrgerät lösen. Schlauchkupplungen von Absaugschlauch und Wasserversorgungsschlauch ineinanderstecken. 3. Codierten Stecker vom Diamantkernbohrgerät lösen. Dazu Ring ziehen und Stecker bis zum Anschlag gegen den Uhrzeigersinn drehen und abziehen. Gehen Sie wie folgt vor, um Fehlfunktionen zufolge von Schmutzablagerungen zu vermeiden: 1. Tankbehälter und Hauptfilter reinigen. 2. Mit Frischwasser wieder auffüllen. 3. Netzstecker in die Netzsteckdose stecken. 4. Fehlerstromschutzschalter durch Drücken der grünen Taste einschalten. 5. Gerät durch drehen des Ein-/Ausschalters im Uhrzeigersinn bis zum Anschlag einschalten. 6. Recycling-Einheit während 10 Minuten laufen lassen. Diese Einheit während dieser Zeit mit dem Hauptschalter viermal ein- und ausschalten. Dadurch werden die Innenrohre und die Ventile der Recycling-Einheit durchgespült. 7. Netzstecker ziehen. Behälter reinigen und Hauptfilter regenerieren Transport ohne Fahrwerk Für den Transport von Hand ist der Gehäusegriff, der sich leicht ausklappen lässt, vorgesehen. Für das beidhändige Anheben des Geräts sind die seitlichen Grifftaschen vorgesehen. Achten Sie darauf, dass Sie sich nicht an Griffelementen quetschen. Zum Krantransport des Geräts nur geeignete Hilfsmittel (Netz, Band) verwenden. Fahrwerks-, Gehäuse- und Behältergriffe dürfen niemals als Aufnahme für einen Kranhaken oder ähnliches verwendet werden. Für den Krantransport sind die einschlägigen Sicherheitsbestimmungen zu befolgen. Transport mit Fahrwerk Fahrwerk ankoppeln: Gerät an die Führungsrohre des Fahrwerks anlegen und hinuntergleiten lassen, bis die Fahrwerks-Verriegelung selbsttätig einrastet. Darauf achten, dass die Füsse des Geräts in die entsprechen den Aufnahmen am Fahrwerk eingeführt sind. 6

11 Zum Transport mit dem Fahrwerk Schlauchpaket um den Fahrwerksgriff wickeln. Ggf. vorher den Koffer des Diamantkernbohrgeräts DD EC-1 auf dem Gerät ablegen. Fahrwerk abkoppeln: Fahrwerksverriegelung betätigen und gleichzeitig Gerät anheben. Bei Verwendung des Fahrwerks ist auf sicheren Stand von Fahrwerk und Gerät zu achten. Auf Gerüsten oder Ähnlichem ist das Gerät aus Sicherheitsgründen ohne Fahrwerk zu verwenden. Pflege und Instandhaltung Pflege Gehäuse, Behälter und Deckel sind aus schlagfestem Kunststoff gefertigt. Kabeltülle und Schläuche bestehen aus Elastomer-Werkstoff. Die Schlauchpaket-Ummantelung besteht aus strapazierfähigem Kunststoffgewebe. Reinigen Sie verschmutzte Gerätebauteile regelmässig mit einem feuchten Tuch. Verwenden Sie kein Sprühgerät, Dampfstrahlgerät oder fliessendes Wasser zur Reinigung! Die elektrische Sicherheit des Gerätes kann dadurch gefährdet werden. Halten Sie die Griffpartien am Gerät immer frei von Öl und Fett. Verwenden Sie keine silikonhaltigen Pflegemittel. Lassen Sie keine Fremdkörper in das Innere des Gerätes eindringen. Führen Sie regelmässig die Hauptfilterregeneration und die Behälterreinigung durch, insbesondere vor jeder grösseren Arbeitspause (z.b. nach Beendigung des Arbeitstages). Prüfen Sie vor jeder Inbetriebnahme das gesamte Diamantbohrsystem auf Dichtheit. Prüfen und reinigen Sie regelmässig die Dichtungen. Lassen Sie Bohrschlamm oder Wasser niemals über längere Zeit im Behälter. Herstellergewährleistung Geräte Hilti gewährleistet, dass das gelieferte Gerät frei von Material- und Fertigungsfehler ist. Diese Gewährleis - tung gilt unter der Voraussetzung, dass das Gerät in Übereinstimmung mit der Hilti Bedienungsanleitung richtig eingesetzt und gehandhabt, gepflegt und ge - reinigt wird, und dass die technische Einheit gewahrt wird, d.h. dass nur Original Hilti Verbrauchsmaterial, Zubehör und Ersatzteile mit dem Gerät verwendet werden. Diese Gewährleistung umfasst die kostenlose Reparatur oder den kostenlosen Ersatz der defekten Teile während der gesamten Lebensdauer des Gerätes. Teile, die dem normalen Verschleiss unterliegen, fallen nicht unter diese Gewährleistung. Weitergehende Ansprüche sind ausgeschlossen, soweit nicht zwingende nationale Vorschriften entgegenstehen. Insbesondere haftet Hilti nicht für unmittelbare oder mittelbare Mangel- oder Man gelfolgeschäden, Verluste oder Kosten im Zusam menhang mit der Verwendung oder wegen der Un möglichkeit der Verwendung des Gerätes für ir gendeinen Zweck. Stillschweigende Zusicherungen für Verwendung oder Eignung für einen bestimmten Zweck werden ausdrücklich ausgeschlossen. Für Reparatur oder Ersatz sind Gerät oder betroffene Teile unverzüglich nach Feststellung des Mangels an die zuständige Hilti Marktorganisation zu senden. Die vorliegende Gewährleistung umfasst sämtliche Gewährleistungsverpflichtungen seitens Hilti und er - setzt alle früheren oder gleichzeitigen Erklärungen, schriftlichen oder mündlichen Verabredungen betreffend Gewährleistung. Instandhaltung Prüfen Sie regelmässig alle Funktionsbauteile und Bedienungselemente des Geräts auf Beschädigung und einwandfreie Funktion. Betreiben Sie das Gerät nicht, wenn Teile beschädigt sind oder Bedienungselemente nicht einwandfrei funktionieren. Lassen Sie das Gerät vom Hilti Service reparieren. Siehe: Regenerierungsfilter Ausschalten nach Gebrauch 7

12 Entsorgung Abfälle der Wiederverwertung zuführen Hilti-Geräte sind zu einem hohen Anteil aus wieder verwendbaren Materialien hergestellt. Voraussetzung für eine Wiederverwendung ist eine sachgemässe Stofftren nung. In vielen Ländern ist Hilti bereits eingerichtet, Ihr Altgerät zur Verwertung zurückzunehmen. Fragen Sie den Hilti Kundenservice oder Ihren Verkaufsberater. Nur für EU-Länder Werfen Sie Elektrowerkzeuge nicht in den Hausmüll! Gemäss Europäischer Richtlinie über Elektro- und Elektronik-Altgeräte und Umsetzung in nationales Recht müssen verbrauchte Elektrowerkzeuge getrennt gesammelt und einer umwelt gerechten Wiederverwertung zugeführt werden. Umgang mit Bohrschlamm Bei der Bearbeitung von mineralischen Untergründen (z.b Beton) mit dem Diamantborhrgerät DD-EC1 fällt Bohrschlamm an. Ähnlich wie bei frischem Mörtel können bei Haut- und Augenkontakt Reizungen auftreten. Tragen Sie Arbeitsschutzkleidung, Schutzhandschuhe und eine Schutzbrille. Unter Umweltgesichtspunkten ist das Einleiten dieses Bohrschlamms in Gewässer oder in die Kanalisation ohne geeignete Vorbehandlung problematisch. Vorgehensweise zur Entsorgung Bei der Entsorgung des Bohrschlamms sind zusätzlich zur nachstehenden empfohlenen Vorbehandlung die jeweiligen nationalen Bestimmungen zu beachten. Erkundigen Sie sich bei den lokalen Behörden. Empfohlene Behandlung: Das Wasser des Bohrschlamms ist zu neutralisieren, bevor es in die Kanalisation eingeleitet werden kann (z.b. durch Zugabe von viel Wasser oder anderen Neutralisationsmitteln). Der feste Anteil des Bohrschlamms ist auf einer Bauschuttdeponie zu entsorgen. 8

13 Fehlersuche Fehler Mögliche Ursache Behebung Gerät läuft nicht an Netzstromversorgung Anderes Elektrogerät einstecken, unterbrochen Funktion prüfen Netzkabel oder Stecker defekt Von Elektrofachkraft prüfen und gegebenenfalls ersetzen lassen Gerät defekt Von Hilti Service reparieren lassen Akustisches Warnsignal Bohrkrone oder Diamantkern- Durchgängigkeit prüfen und Verstopfung (ohne Warnleuchte) bohrgerät verstopft beheben Regulierventil am Diamantkern- Regulierventil am Diamantkernbohrgerät bohrgerät in Manuellbetrieb zu weiter öffnen niedrig eingestellt Wasserversorgungsschlauch am Wasserversorgungsschlauch am Diamantkernbohrgerät nicht Diamantkernbohrgerät anschliessen angeschlossen Warnleuchte Wasser leuchtet; Zu wenig Wasser bzw. zu viel Behälter reinigen und neu befüllen akustisches Warnsignal Schlamm im Behälter Innerer Behälter nicht vollständig Inneren Behälter vollständig mit Wasser mit Wasser gefüllt füllen Hauptfilter verstopft Hauptfilter regenerieren. Regulierventil am ausgeschalteten Regulierventil am Diamantkernbohrgerät Diamantkernbohrgerät im schliessen Manuellbetrieb geöffnet Dichtungen defekt Dichtungen im Deckel und in den Nippeln auf Beschädigungen prüfen und gegebenenfalls durch Hilti Service ersetzen lassen Behälter nicht korrekt in Gerät Korrekte Lage des Behälters im Gehäuse eingeführt prüfen; Behältergriff sorgfältig schliessen Entlüftungsventil klemmt Entlüftungsventil gängig machen; gegebenenfalls Reparatur durch Hilti Service Druckpumpe defekt Von Hilti Service reparieren lassen Warnleuchte Temperatur leuchtet; Wassertemperatur zu hoch Behälter abkühlen lassen oder reinigen akustisches Warnsignal und neu befüllen. Achtung: Verbrühungsgefahr! Saugleistung zu gering Grobfilter im Wasserfangring Grobpartikel entfernen (Wasserfangring am Diamant- des Diamantkernbohrgeräts kernbohrgerät leckt) verstopft Saugpumpe defekt Von Hilti Service reparieren lassen Die Dichtungen des Wassertanks Überprüfen Sie, ob die Oberfläche und die dichten nicht vollständig. Dichtungen des Wassertank-Deckels sauber sind. 9

14 EG-Konformitätserklärung (Original) Bezeichnung: Wasser-Recycling-Gerät Typenbezeichnung: DD-REC1 Konstruktionsjahr: 2000 Wir erklären in alleiniger Verantwortung, dass dieses Produkt mit den folgenden Richtlinien und Normen über - einstimmt: EN , EN ISO 12100, 2011/65/EU, 2006/95/EG, 2004/108/EG. Hilti Aktiengesellschaft, Feldkircherstrasse 100, FL-9494 Schaan Paolo Luccini Johannes W. Huber Head of BA Quality and Process Management Senior Vice President BA Electric Tools & Accessories Business Unit Diamond 01/ /2012 Technische Dokumentation bei: Hilti Entwicklungsgesellschaft mbh Zulassung Elektrowerkzeuge Hiltistrasse Kaufering Deutschland 10

15 DD-REC1 water recycling system It is essential that the operating instructions are read before the unit is used for the first time. Always keep these operating instructions together with the unit. Ensure that the operating instructions are with the unit when it is given to other persons. Operating controls ON / OFF switch ON indicator lamp Water warning lamp Temperature warning lamp Keyed plug connection for electric cable (supply cord socket) Water level / slurry volume sight glass Trolley release lever Trolley handle lock Container grip Housing grip Air release valve Container cover latch Main filter Extraction hose coupling Water supply hose coupling Keyed plug connection for electric cable (Plug for drilling machine) Contents Page General information 11 Description 11 Technical data 12 Accessories 13 Safety precautions 13 Before use 14 Operation 14 Care and maintenance 17 Manufacturer's warranty tools 17 Disposal 18 Troubleshooting 19 Declaration of conformity (original) 20 General information In these operating instructions, this symbol indicates points of particular importance to safety. The instructions at these points must always be observed in order to avoid a risk of serious injury. Caution: High voltage The numbers refer to the illustrations on the fold-out cover pages (front and rear cover). / The numbers refer to the operating controls / component parts of the unit. In these operating instructions, the electric appliance to which these operating instructions apply is referred to as the unit. Component parts Housing Container Cover Wheel assembly / Trolley Nipple Hose set Pocket for documents about the unit Float Sedimentation tube Type plate Description The DD-REC1 is an electrically powered water recycling unit for use with the DD EC-1 diamond core drilling machine. Items supplied: recycling unit, wheel assembly, operating instructions, cleaning pad The following conditions must always be observed when the unit is in use: The unit must be connected to an alternating current electric mains supply in compliance with the information given on the type plate. The unit may be used only with the supply cord for the DD EC-1 diamond drilling machine. The unit must not be operated in areas where there is a risk of explosion. 11

16 Technical data Nominal power input: 300 W Nominal voltage: 100 V 110 V 120 V 220 V 230 V 240 V Mains frequency: Hz Weight of unit (without water): 25 kg Water volume: 4 13 l Max. number of holes per filling: Approx. 50 Dimensions (without wheels): mm Max. water pressure: 6 bar Permissible operating temperature range: C Permissible storage or transport temperature range: C (without water, remove the filter) The unit is offered in different versions for various mains voltages. Please refer to the information on the type plate for the nominal voltage and nominal current input of your unit. Measured at 20 mm dia. and 125 mm drilling depth; depends on base material, drilling direction and type of hole drilled (through hole, blind hole) Noise information (in accordance with EN 61029) Typical A-weighted emission sound pressure level (LpA): 76 db (A) 80 db (A Main features of the unit Class I electrical protection Extraction of drilling slurry Water is retrieved from the drilling slurry (recycling) Supplies water and power for the DD EC-1 diamond core drilling machine Integrated supply and return hose set for connecting the DD EC-1 diamond core drilling machine Automatic filter flushing Filter can be regenerated - Stand-by operation Warning indicators for: inadequate water flow overheating Self-check of the electronics carried out each time the unit is switched on Removable container for water and drilling slurry Removable wheel assembly, also provides suitable surface for laying down the toolbox for the diamond core drilling machine Right of technical changes reserved 12

17 Intended uses The unit is intended for the following uses Extraction of drilling slurry and supplying water and power to the DD EC-1 diamond core drilling machine for drilling in mineral materials (reinforced concrete, masonry and natural stone) The unit may be operated only when standing on a horizontal surface and in an upright position. Clean water should be used as the cooling and flushing medium. Accessories Replacement main filter, item number (wearing part) The water recycled by the unit is almost entirely free of particles but may contain substances released by the material in which the hole is drilled. Under no circumstances should this water be considered suitable for use as drinking water. Do not, under any circumstances, use this product in any way other than as described in these operating instructions. Use protective equipment. Read the operating instructions Safety precautions Eye protection must be worn. Protective gloves must be worn. When using the unit, the following fundamental safety precautions must always be observed in order to avoid the risk of injury, electric shock and fire hazards. Please read and observe the instructions before using the unit. Wear suitable working clothing. Wear shoes with non-slip soles. Make the working area safe. Objects which could cause injury should be removed from the working area. Ensure that the area is well lit. When working, keep other persons, children in particular, away from the unit. Take the influences of the surrounding area into account. Do not expose the unit to rain or snow and do not operate it in damp or wet environments or in the vicinity of flammable liquids or gases. Check the unit each time before use. First check the condition of the supply cord with PRCD/GFCI residual current device (supplied with the DD EC-1 diamond core drilling machine) and then check Drilling slurry and recycled drilling water may irritate the skin and eyes. Rinse with water immediately after skin contact. If allowed to come into contact with the eyes, rinse with plenty of water and consult a doctor. The water, container and hoses may become very hot after long periods of use and present a risk of burning or scalding. the condition of the unit, including the supply cord and the plug (an integral part of the hose set, except for the GB version). Do not operate the unit if any parts of it are found to be damaged, if the unit is not complete or when the operating controls cannot be operated faultlessly. Use the correct accessories. Use only the recommended original Hilti accessories. Use the unit only for the purposes for which it is intended. Apply a safe working method. Always ensure that you have a safe stance and that the unit is standing securely. On scaffolding or similar platforms, the unit should be used without the wheel assembly. Never stand on the unit. The wheel assembly, housing and container grips should never be used as attachment points for lifting by a crane hook or similar means. If the unit is to be transported by crane, the applicable safety regulations must be observed. Ensure that the unit, supply cord and hose set are positioned where they are free of obstructions. When working, always guide the hose set away from the diamond 13
 The water recycled by the unit is almost entirely free of particles but may contain substances released by the material in which")
18 core drilling machine to the rear. Never carry the unit by the supply cord or hose set and never pull on these parts. Never drive over the hoses or supply cord. Don t unplug the unit by pulling on the supply cord. Don t expose the hoses or supply cord to heat, oil or sharp edges. If the supply cord becomes damaged while working, don t touch it unplug the mains plug immediately and have the unit or supply cord repaired at a Hilti service centre. Never expose the plug connections for the unit to water. If a plug interface has become wet, always disconnect the supply cord plug from the mains socket before touching it and wiping it dry. Check that the pins of the plug and the supply cord are clean and dry before they are connected. Unplug the supply cord from the mains socket before cleaning. Avoid unintentional starting. Always switch off the unit and unplug the supply cord from the mains socket before removing the container, when the unit is not in use (e.g. during pauses between work), before cleaning and before carrying out any maintenance. Keep the unit in good condition. Follow the instructions on care and maintenance. Repairs to the unit may be carried out only by an authorised electrical specialist using original Hilti spare parts. Failure to observe this point may result in damage to the unit or present a risk of accident. Accordingly, if necessary, have the unit repaired at a Hilti service centre or authorised Hilti repair workshop. In accordance with national safety regulations, the safety function of the earth / ground conductor must be checked at regular intervals. Before use It is essential that the safety precautions printed in these operating instructions are read and observed. Also read and observe the instructions and safety precautions listed in the operating instructions for the DD EC-1 diamond core drilling machine. The DD-REC1 water recycling system should be used exclusively with the DD EC-1 diamond core drilling machine and the corresponding supply cord with built-in PRCD residual current device (supplied with the DD EC-1 diamond core drilling machine). In Great Britain, the 110 V units must be connected to an isolating transformer. The mains voltage must comply with the information on the type plate. If extension cables are used: only extension cables of a type approved for the intended use and of adequate cross section may be used. Failure to observe this point may result in reduced performance and could cause the cable to overheat. Damaged extension cables must be replaced. The recommended cable cross sections and maximum lengths are as follows: Mains Conductor cross section voltage 1.5 mm mm mm mm V 20 m 40 m 110 V 20 m 40 m V 50 m 80 m Operation Connecting the hose set to the drilling machine Connect the keyed electric supply cord plug from the hose set to the socket on the underside of the drilling machine. To do this, bring the marks on the plug and the socket into alignment and then push the plug into the socket on the machine as far as it will go. While maintaining slight pressure on the plug, rotate it in a clockwise direction until it is heard to engage. Connect the thin end of the hose from the hose set to the drilling machine and the thick end of the hose to the water collector hose connector. The couplings must be heard to engage when connected. Removing and opening the container Never remove the container while the unit is switched on. Switch the unit off by turning the on / off switch in a clockwise direction and disconnect the mains plug. Wear protective gloves and protective goggles. The contents of the container may irritate the skin and eyes. The container and its contents may be hot after long periods of use. Observe the safety precautions. When handling the container, take care to avoid pinching your fingers at the edges of the housing, grips and latches. Lift the container grip approx. 45 and hold it in this position until pressure compensation is heard to be complete (approx. 2 seconds). Failure to observe this point may cause a large quantity of the container contents to escape at the nipples. Lift the container grip to the vertical position and pull the container upwards out of the housing. Always transport the container in an upright position or place it on a horizontal surface. Ensure that it stands securely. Open the four container cover latches. Lift the cover off the container, taking care to ensure that the float ball doesn t get stuck. Lay the cover down carefully. Filling, closing and inserting the container Fill the inner container up to the top edge with clean water. Fill the outer container to the desired level between the min. and max. marks. 14

19 Check the inner and outer cover seals for damage. Carefully remove dirt from the surfaces of the seals. Ensure that the main filter is seated securely. Check that the air release valve moves easily. Place the cover on the container. Take care to ensure that it is positioned correctly, the right way round (the lugs at both corners of the cover located in the corresponding recesses in the container and ). The nipple block is then positioned at the same side as the container water level sight glass. When the cover is placed in position, take care to ensure that the container latches and the float hose are not pinched between the container and the cover. Care must also be taken to ensure that the suction hose hangs down into the water and that the float ball is free to float. Close the container latches. To do this, first engage the latches on the container and then press the latches towards the cover. The container latches must be heard to engage. It may be necessary to press the cover down slightly. Always use all four container latches. Never use the unit when the container latches are damaged. Lift the container by its handle and insert it carefully, the right way round, in the housing. When doing so, the guide ribs on the container must be carefully inserted into the corresponding openings in the housing. Do not allow the container to drop into the housing. Fold the container handle down to the nipples side until it is flush with the top surface of the housing. It may be necessary to press the cover down slightly. Never attempt to fill the unit through the hoses. It must always be filled as described above. Operation Check the sight glass to ensure that sufficient water is in the container. Connect the unit to the mains supply. Use the supply cord with the built-in PRCD residual current device (supplied with the diamond core drilling machine). Insert the keyed plug in the socket as described above. Insert the mains plug in the mains socket. Switch on the residual current device by pressing the green button. The self-test function of the unit is then activated. All warning lamps light briefly and an acoustic signal is emitted. Test the residual current device for correct functionality. To do this, press the black test button. The ON indicator on the unit must extinguish. After testing, switch on again by pressing the green button. Switch on the unit by turning the ON / OFF switch in a clockwise direction as far as it will go. It then takes about 20 seconds for the internal parts of the system to fill with water. During this time, the water supply system is not fully operational. Subsequently, the green ON indicator lights to show that the unit is ready for use. Start the water supply system by operating the switch on the DD EC-1 diamond core drilling machine. Adjust the water volume as desired by turning the regulator on the diamond core drilling machine and begin drilling (please refer to the operating instructions for the DD EC-1 diamond core drilling machine). Automatic filter flushing begins (takes about 15 to 20 seconds) when the switch on the DD EC-1 diamond core drilling machine is not operated for several seconds. The unit supplies no water during this time. After completion of the filter flushing procedure, the unit is again ready for use and the next drilling operation can be started (ready mode). Stand-by mode: If the switch on the diamond core drilling machine is not pressed for a period of more than 15 minutes, the unit automatically releases pressure and enters stand-by mode. In this case, before beginning the next drilling operation, the switch on the diamond core drilling machine must be pressed briefly in order to re-pressurise the unit. After a few seconds, the unit is again ready to supply water. Warning indicators Acoustic warning signal (without warning lamp): This indicates inadequate water flow which could be caused by incorrect adjustment of the regulator valve in manual operation or other malfunctions (please refer to the Troubleshooting section). Water warning lamp (simultaneous acoustic warning signal): This indicates inadequate water pressure. Could be caused by the container being empty, blocked filter or other malfunctions (see Troubleshooting section). Temperature warning lamp (simultaneous acoustic warning signal): This indicates excessively high water temperature. Stop using the system immediately (see Troubleshooting section). Water level / slurry volume sight glass : This indicates the drilling slurry level and the remaining quantity of water in the container. It provides useful faultfinding information in case of malfunctions and makes it possible to estimate the number of holes which can be drilled before emptying and refilling. Due to widely varying conditions (diameter, depth, etc.), it is not possible to give an exact indication of the number of holes which can be drilled. Cleaning the container The container should be emptied and cleaned in the following cases (it is generally recommended that the main filter is cleaned at the same time): Malfunctions caused by the slurry level being too high or the water level being too low (see Troubleshooting section). Unit is switched off permanently (e.g. at the end of the working day). Remove the container from the housing and open it as described above. Observe the safety precautions. Dispose of the container contents in accordance with the information in the Disposal section and under observance of local regulations. 15

20 Rinse out the remaining slurry and, if necessary, remove dried-on remains. Wipe the inside of the sight glass with a soft cloth. Clean the surfaces of the seals on the container carefully. Rinse out the con tainer under running water. Do not use a high-pressure cleaning system. Clean the main filter (see below). Fill the container as described above, close it and then insert it in the housing. Regenerating the main filter Regeneration of the main filter is recommended in the following situations: When malfunctions caused by blockage of the main filter are experienced Each time the container is refilled Remove the container from the housing as described above and open it. Observe the safety precautions. Unscrew the main filter from the cover. When doing so, do not hold the filter by the ceramic body. Instead, grip it only by the grip section on the underside of the main filter (reduces risk of breakage). Clean the main filter under running water, using the sandpaper supplied, by rubbing it in a longitudinal direction on all sides until the light colour of the ceramic body reappears. During this process, the outermost surface of the ceramic body is rubbed off. This regeneration procedure can be repeated up to about 20 times until the mini mum wall thickness of the ceramic body is reached. Check the wall thickness of the ceramic body. The main filter must be replaced as soon as the diameter of the ceramic body reaches a minimum of 42 mm. Failure to observe this point could result in cracking or breakage of the ceramic body. Check the main filter. Replace it immediately if cracked or broken. A defective main filter may cause damage to the recycling unit and to the diamond core drilling machine. Screw the main filter into the cover until resistance is clearly felt. Then continue to turn the filter a further 45 (maximum). Screwing the filter in beyond this point does not improve the efficiency of the filter seal and may result in permanent damage to the filter or cover parts. Fill the container as described above, close it and then insert it in the housing. Drying the main filter In rare cases, regeneration of the main filter may not be sufficient to clear a blockage. Should this be experienced, allow the main filter to dry for at least 24 hours, standing upright with the thread at the top, in a warm, dry place before it is reused. Replacement main filter The main filter is a wearing part with a limited life expectancy. The housing has provision for storing a spare main filter (not supplied). A spare filter is recomended. The container must be removed on order to access the storage location and insert a spare filter. Insert the grip section of the spare main filter in the holder in the base of the housing at an angle and then bring the filter into a vertical position until it engages with the plastic tab. To remove the spare main filter, lift the plastic tab slightly and pull the filter out of the holder to the side. Switching off after use Before each long break between periods of use (e.g. after finishing work for the day). The recycling unit must be switched off as follows: 1. Disconnect the mains plug. 2. Release the hose connectors to the diamond core drilling machine. Connect the extraction hose and water supply hose connectors together. 3. Release the keyed plug from the diamond core drilling machine. To do this, pull on the ring and turn the plug in a counterclockwise direction, as far as it will go, and then pull it out. Proceed as follows in order to avoid malfunctions caused by dirt deposits: 1. Clean the container tank and main filter. 2. Refill with fresh water. 3. Plug the supply cord into the mains socket. 4. Switch on the PRCD by pressing the green button. 5. Switch on the unit by turning the ON/OFF switch in a clockwise direction, as far as it will go. 6. Run the recycling unit for 10 minutes. Switch the recyc ling unit on/off at the main switch four times during these 10 minutes. This will flush out the internal tubing and valves of the recycling unit. 7. Disconnect the mains plug. Clean the container and regenerate the main filter. Transport without wheel assembly A handle, which can be folded out easily, is provided for transporting the unit by hand. Grip sections are provided at the sides for lifting the unit with both hands. Take care to avoid pinching your fingers at the grips. A suitable means (net or straps) must be used when the unit is lifted by a crane. The wheel assembly, housing or container grip must never be used as a lifting point for a crane hook or other similar lifting tackle. When transporting the unit by crane, the applicable safety regulations must be observed. Transport with wheel assembly Attaching the wheel assembly: Hold the unit against the guide tubes on the wheel assembly and allow it to slide down until the catch engages automatically. Take care to ensure that the feet of the unit are located in the corresponding sockets in the wheel assembly. Wind the hose set around the wheel assembly handle for transport. If desired, the toolbox for the DD EC-1 diamond core drilling machine can be placed on the unit first. 16

Περιεχόμενα / Contents
 Aερόθερμo / Fan Heater PTC-906 Περιεχόμενα / Contents GR... Σελίδες 3-8 EN... Pages 9-11 2 GR Ευχαριστούμε που επιλέξατε μια συσκευή της γκάμας θερμαντικών IZZY. Σημαντικές Οδηγίες Ασφαλείας Τα Μέρη της
the total number of electrons passing through the lamp.
 1. A 12 V 36 W lamp is lit to normal brightness using a 12 V car battery of negligible internal resistance. The lamp is switched on for one hour (3600 s). For the time of 1 hour, calculate (i) the energy
Capacitors - Capacitance, Charge and Potential Difference
 Capacitors - Capacitance, Charge and Potential Difference Capacitors store electric charge. This ability to store electric charge is known as capacitance. A simple capacitor consists of 2 parallel metal
[1] P Q. Fig. 3.1
![[1] P Q. Fig. 3.1](/thumbs/79/80362156.jpg "[1] P Q. Fig. 3.1") 1 (a) Define resistance....... [1] (b) The smallest conductor within a computer processing chip can be represented as a rectangular block that is one atom high, four atoms wide and twenty atoms long. One
1 (a) Define resistance....... [1] (b) The smallest conductor within a computer processing chip can be represented as a rectangular block that is one atom high, four atoms wide and twenty atoms long. One
UDZ Swirl diffuser. Product facts. Quick-selection. Swirl diffuser UDZ. Product code example:
 UDZ Swirl diffuser Swirl diffuser UDZ, which is intended for installation in a ventilation duct, can be used in premises with a large volume, for example factory premises, storage areas, superstores, halls,
4K HDMI Splitter 1x4. User s Guide / Bedienungsanleitung / Εγχειρίδιο Χρήστη
 4K HDMI Splitter 1x4 User s Guide / Bedienungsanleitung / Εγχειρίδιο Χρήστη INTRODUCTION The EDISION 4K HDMI Splitter 1x4 uses a single HDMI input source, to distribute it to 4 HDMI outputs. The splitter
English PDFsharp is a.net library for creating and processing PDF documents 'on the fly'. The library is completely written in C# and based
 English PDFsharp is a.net library for creating and processing PDF documents 'on the fly'. The library is completely written in C# and based exclusively on safe, managed code. PDFsharp offers two powerful
Advanced Subsidiary Unit 1: Understanding and Written Response
 Write your name here Surname Other names Edexcel GE entre Number andidate Number Greek dvanced Subsidiary Unit 1: Understanding and Written Response Thursday 16 May 2013 Morning Time: 2 hours 45 minutes
MSN DESK TOP ENCLOSURE WITH STAND / CARRYING HANDLE
 MSN SERIES MSN DESK TOP ENCLOSURE WITH STAND / CARRYING HANDLE W H FEATURE Available in 176 sizes. Stand / carrying handle can be adjusted in 30 degree. Maximum load is kg. There are no ventilation hole
MS SERIES MS DESK TOP ENCLOSURE APPLICATION EXAMPLE FEATURE. Measuring instruments. Power supply equipments
 MS SERIES MS DESK TOP ENCLOSURE FEATURE Available in 176 sizes. Screws are not appeared on the surface. Usable as rack mount case with optinal mounting bracket. There are no ventilation hole for cover
Creative TEchnology Provider
 1 Oil pplication Capacitors are intended for the improvement of Power Factor in low voltage power networks. Used advanced technology consists of metallized PP film with extremely low loss factor and dielectric
Quick Installation Guide
 A Installation 1 F H B E C D G 2 www.trust.com/17528/faq Quick Installation Guide C C D Freewave Wireless Audio Set 17528/ 17529 D Installation Configuration Windows XP 4 5 8 Windows 7/ Vista 6 7 9 10
3 Lösungen zu Kapitel 3
 3 Lösungen zu Kapitel 3 31 Lösungen der Aufgaben zu Abschnitt 31 311 Lösung Die Abbildung D : { R 4 R 4 R 4 R 4 R, a 1, a 2, a 3, a 4 ) D( a 1, a 2, a 3, a 4 ) definiere eine Determinantenform (auf R 4
Right Rear Door. Let's now finish the door hinge saga with the right rear door
 Right Rear Door Let's now finish the door hinge saga with the right rear door You may have been already guessed my steps, so there is not much to describe in detail. Old upper one file:///c /Documents
Instruction Execution Times
 1 C Execution Times InThisAppendix... Introduction DL330 Execution Times DL330P Execution Times DL340 Execution Times C-2 Execution Times Introduction Data Registers This appendix contains several tables
ΟΔΗΓΙΕΣ ΕΓΚΑΤΑΣTΑΣΗΣ ΓΙΑ ΠΑΤΩΜΑ WPC INSTALLATION GUIDE FOR WPC DECKING
 1/12 ΟΔΗΓΙΕΣ ΕΓΚΑΤΑΣTΑΣΗΣ ΓΙΑ ΠΑΤΩΜΑ WPC INSTALLATION GUIDE FOR WPC DECKING Ανοίγουμε τρύπες Ø8 x 80mm στο σημείο κατασκευής, με τρυπάνι. To προτεινόμενο πλάτος και μήκος μεταξύ των 2 οπών να είναι 30-35εκ.,
Potential Dividers. 46 minutes. 46 marks. Page 1 of 11
 Potential Dividers 46 minutes 46 marks Page 1 of 11 Q1. In the circuit shown in the figure below, the battery, of negligible internal resistance, has an emf of 30 V. The pd across the lamp is 6.0 V and
Εγκατάσταση λογισμικού και αναβάθμιση συσκευής Device software installation and software upgrade
 Για να ελέγξετε το λογισμικό που έχει τώρα η συσκευή κάντε κλικ Menu > Options > Device > About Device Versions. Στο πιο κάτω παράδειγμα η συσκευή έχει έκδοση λογισμικού 6.0.0.546 με πλατφόρμα 6.6.0.207.
65W PWM Output LED Driver. IDLV-65 series. File Name:IDLV-65-SPEC
 ~ A File Name:IDLV65SPEC 07050 SPECIFICATION MODEL OUTPUT OTHERS NOTE DC VOLTAGE RATED CURRENT RATED POWER DIMMING RANGE VOLTAGE TOLERANCE PWM FREQUENCY (Typ.) SETUP TIME Note. AUXILIARY DC OUTPUT Note.
(1) Describe the process by which mercury atoms become excited in a fluorescent tube (3)
 Describe the process by which mercury atoms become excited in a fluorescent tube (3)") Q1. (a) A fluorescent tube is filled with mercury vapour at low pressure. In order to emit electromagnetic radiation the mercury atoms must first be excited. (i) What is meant by an excited atom? (1) (ii)
Q1. (a) A fluorescent tube is filled with mercury vapour at low pressure. In order to emit electromagnetic radiation the mercury atoms must first be excited. (i) What is meant by an excited atom? (1) (ii)
(Type B) Το προϊόν αυτό δεν είναι κατάλληλο για σκοπούς πρωτογενούς θέρμανσης. ADM AEE
 Το προϊόν αυτό δεν είναι κατάλληλο για σκοπούς πρωτογενούς θέρμανσης. ADM AEE") (Type B) Το προϊόν αυτό δεν είναι κατάλληλο για σκοπούς πρωτογενούς θέρμανσης. ADM AEE 2310 85 30 61 80 00 18 Mklg 01. Rwnc A]SQ,ovb / D OPERATlON FUELING WARNING: uture storage of your heater. Use o NEVE
(Type B) Το προϊόν αυτό δεν είναι κατάλληλο για σκοπούς πρωτογενούς θέρμανσης. ADM AEE 2310 85 30 61 80 00 18 Mklg 01. Rwnc A]SQ,ovb / D OPERATlON FUELING WARNING: uture storage of your heater. Use o NEVE
Door Hinge replacement (Rear Left Door)
") Door Hinge replacement (Rear Left Door) We will continue the previous article by replacing the hinges of the rear left hand side door. I will use again the same procedure and means I employed during the
Door Hinge replacement (Rear Left Door) We will continue the previous article by replacing the hinges of the rear left hand side door. I will use again the same procedure and means I employed during the
2013 REV 01 ELECTRONICS CAPACITORS. DC Applications Metallized Polypropylene Film Self Healing
 2013 REV 01 POWER EECTRONICS CAPACITORS C Applications Metallized Polypropylene Film Healing OUR MISSION: POWER EECTRONICS AN SPECIA CAPACITORS M.V. PFC CAPACITORS AN BANKS IGHTING CAPACITORS MOTOR RUN
ZLW Series. Single-stage Monoblock Centrifugal Pump ZL PUMP GROUP.,LTD
 ZLW Series Single-stage Monoblock Centrifugal Pump ZL PUMP GROUP.,LTD 1 Application Apply as the transportation of liquids in the fields of air condition, heating, sanitary water, water treatment cooling,
Hauptseminar Mathematische Logik Pcf Theorie (S2A2) Das Galvin-Hajnal Theorem
 Das Galvin-Hajnal Theorem") Hauptseminar Mathematische Logik Pcf Theorie (S2A2) Das Galvin-Hajnal Theorem Jonas Fiege 21 Juli 2009 1 Theorem 1 (Galvin-Hajnal [1975]) Sei ℵ α eine singuläre, starke Limes-Kardinalzahl mit überabzählbarer
Hauptseminar Mathematische Logik Pcf Theorie (S2A2) Das Galvin-Hajnal Theorem Jonas Fiege 21 Juli 2009 1 Theorem 1 (Galvin-Hajnal [1975]) Sei ℵ α eine singuläre, starke Limes-Kardinalzahl mit überabzählbarer
RSDW08 & RDDW08 series
 /,, MODEL SELECTION TABLE INPUT ORDER NO. INPUT VOLTAGE (RANGE) NO LOAD INPUT CURRENT FULL LOAD VOLTAGE CURRENT EFFICIENCY (Typ.) CAPACITOR LOAD (MAX.) RSDW08F-03 344mA 3.3V 2000mA 80% 2000μF RSDW08F-05
INSTRUCTIONS MANUAL ΕΓΧΕΙΡΙΔΙΟ ΛΕΙΤΟΥΡΓΙΑΣ
 Model/Μοντέλο: WKH-1132 INSTRUCTIONS MANUAL ΕΓΧΕΙΡΙΔΙΟ ΛΕΙΤΟΥΡΓΙΑΣ ENGLISH General Safety Instructions Before commissioning this kettle, please read the instruction manual carefully. Please keep the instruction
Aluminum Electrolytic Capacitors
 Aluminum Electrolytic Capacitors Snap-In, Mini., 105 C, High Ripple APS TS-NH ECE-S (G) Series: TS-NH Features Long life: 105 C 2,000 hours; high ripple current handling ability Wide CV value range (47
BFN3000 ΕΠΙΤΡΑΠΕΖΙΟΣ ΑΝΕΜΙΣΤΗΡΑΣ. Owner s manual. Μετάφραση του πρωτοτύπου των οδηγιών χρήσης
 BFN3000 ΕΠΙΤΡΑΠΕΖΙΟΣ ΑΝΕΜΙΣΤΗΡΑΣ Μετάφραση του πρωτοτύπου των οδηγιών χρήσης Owner s manual www.bormanntools.com GR Οδηγίες ασφαλούς λειτουργίας 1. Τα χαρακτηριστικά της παροχής ηλεκτρικού ρεύματος θα
ΟΔΗΓΙΕΣ ΧΡΗΣΗΣ USE INSTRUCTIONS
 ΟΔΗΓΙΕΣ ΧΡΗΣΗΣ USE INSTRUCTIONS ΤΗΛΕΦΩΝΟ ΜΕ ΑΝΑΓΝΩΡΙΣΗ ΚΛΗΣΗΣ /CORDED PHONE WITH CALLER ID ΜΟΝΤΕΛΟ/MODEL: TM09-448 DC48V Παρακαλούμε διαβάστε προσεκτικά όλες τις οδηγίες χρήσης πριν την χρήση της συσκευής
QUICKTRONIC PROFESSIONAL QTP5
 osram.com QUICKTRONIC PROFESSIONA QTP5 ECG for T5/ 16mm, T8/ 26mm, DUUX fluorescent lamps QTP5 i.e. UMIUX T5 HO ES 01 Product Features: Up to 100.000 hours lifetime 1 amp start with optimized filament
Bbc7000 ΦΟΡΤΙΣΤΗΣ - ΕΚΚΙΝΗΤΗΣ ΜΠΑΤΑΡΙΑΣ. Art Nr: Owner s manual. Μετάφραση του πρωτοτύπου των οδηγιών χρήσης
 Bbc7000 ΦΟΡΤΙΣΤΗΣ - ΕΚΚΙΝΗΤΗΣ ΜΠΑΤΑΡΙΑΣ Μετάφραση του πρωτοτύπου των οδηγιών χρήσης Art Nr: 022213 Owner s manual Διαβάστε προσεχτικά όλες τις οδηγίες χρήσης και ασφάλειας πριν την λειτουργία του μηχανήματος.
HOMEWORK 4 = G. In order to plot the stress versus the stretch we define a normalized stretch:
 HOMEWORK 4 Problem a For the fast loading case, we want to derive the relationship between P zz and λ z. We know that the nominal stress is expressed as: P zz = ψ λ z where λ z = λ λ z. Therefore, applying
Οδηγίες Λειτουργίας. Assembly Operating instructions. Montageanleitung. Απογυμνωτές PV-AZM...3. Stripping pliers PV-AZM...3.
 MA000 MA267 (de_en) (gr_en) Montageanleitung Οδηγίες Λειτουργίας Απογυμνωτής PV-AZM... για MC3, MC4 MA000 MA267 (de_en) (gr_en) Assembly Operating instructions Stripping pliers PV-AZM... for MC3 and MC4
Thin Film Chip Resistors
 FEATURES PRECISE TOLERANCE AND TEMPERATURE COEFFICIENT EIA STANDARD CASE SIZES (0201 ~ 2512) LOW NOISE, THIN FILM (NiCr) CONSTRUCTION REFLOW SOLDERABLE (Pb FREE TERMINATION FINISH) Type Size EIA PowerRating
SPARE PARTS LIST. for. Infrared oil heater. Model. Daystar. Type. PH5 for 120V 60Hz. May, 2017
 SPARE PARTS LIST for Infrared oil heater Model Daystar Type PH5 for 120V 60Hz May, 2017 *PRICES AND SPECIFICATIONS ARE SUBJECT TO CHANGE WITHOUT NOTICE..* 2017 J.S.O'will, Inc.. Shizuoka Seiki Co. Ltd.
Surface Mount Aluminum Electrolytic Capacitors
 FEATURES CYLINDRICAL V-CHIP CONSTRUCTION LOW COST, GENERAL PURPOSE, 2000 HOURS AT 85 O C NEW EXPANDED CV RANGE (up to 6800µF) ANTI-SOLVENT (2 MINUTES) DESIGNED FOR AUTOMATIC MOUNTING AND REFLOW SOLDERING
ΚΥΠΡΙΑΚΗ ΕΤΑΙΡΕΙΑ ΠΛΗΡΟΦΟΡΙΚΗΣ CYPRUS COMPUTER SOCIETY ΠΑΓΚΥΠΡΙΟΣ ΜΑΘΗΤΙΚΟΣ ΔΙΑΓΩΝΙΣΜΟΣ ΠΛΗΡΟΦΟΡΙΚΗΣ 19/5/2007
 Οδηγίες: Να απαντηθούν όλες οι ερωτήσεις. Αν κάπου κάνετε κάποιες υποθέσεις να αναφερθούν στη σχετική ερώτηση. Όλα τα αρχεία που αναφέρονται στα προβλήματα βρίσκονται στον ίδιο φάκελο με το εκτελέσιμο
Aluminum Electrolytic Capacitors (Large Can Type)
") Aluminum Electrolytic Capacitors (Large Can Type) Snap-In, 85 C TS-U ECE-S (U) Series: TS-U Features General purpose Wide CV value range (33 ~ 47,000 µf/16 4V) Various case sizes Top vent construction
Aluminum Electrolytic Capacitors (Large Can Type) Snap-In, 85 C TS-U ECE-S (U) Series: TS-U Features General purpose Wide CV value range (33 ~ 47,000 µf/16 4V) Various case sizes Top vent construction
4 Way Reversing Valve
 STANDARD 4 Way Reversing Valve SHF series four-way reversing valves are applicable for heat pump systems such as central, unitary and room air conditioners to realize switching between cooling mode and
Multilayer Ceramic Chip Capacitors
 FEATURES X7R, X6S, X5R AND Y5V DIELECTRICS HIGH CAPACITANCE DENSITY ULTRA LOW ESR & ESL EXCELLENT MECHANICAL STRENGTH NICKEL BARRIER TERMINATIONS RoHS COMPLIANT SAC SOLDER COMPATIBLE* Temperature Coefficient
Heat exchanger. Type WT. For the reheating of airflows in rectangular ducting PD WT 1. 03/2017 DE/en
 X X testregistrierung Heat exchanger Type For the reheating of airflows in rectangular ducting Rectangular hot water heat exchanger for the reheating of airflows, suitable for VAV terminal units Type TVR,
First Sensor Quad APD Data Sheet Part Description QA TO Order #
 Responsivity (/W) First Sensor Quad PD Data Sheet Features Description pplication Pulsed 16 nm laser detection RoHS 211/65/EU Light source positioning Laser alignment ø mm total active area Segmented in
65W PWM Output LED Driver. IDPV-65 series. File Name:IDPV-65-SPEC
 IDPV65 series ~ A File Name:IDPV65SPEC 07060 IDPV65 series SPECIFICATION MODEL OUTPUT OTHERS NOTE DC VOLTAGE RATED CURRENT RATED POWER DIMMING RANGE VOLTAGE TOLERANCE PWM FREQUENCY (Typ.) SETUP TIME Note.
DC-DC Constant Current Step-Down LED driver LDD-300L LDD-350L LDD-500L LDD-600L LDD-700L CURRENT RANGE
 SPECIFICATION ORDER NO. LDD-00L LDD-0L LDD-00L LDD-00L LDD-700L CURRENT RANGE 00mA 0mA 00mA VOLTAGE RANGE Note. ~ VDC for LDD-00~700L/LW ; ~ 8VDC for LDD-00~700LS CURRENT ACCURACY (Typ.) ±% at VDC input
Multilayer Ceramic Chip Capacitors
 FEATURES X7R, X6S, X5R AND Y5V DIELECTRICS HIGH CAPACITANCE DENSITY ULTRA LOW ESR & ESL EXCELLENT MECHANICAL STRENGTH NICKEL BARRIER TERMINATIONS RoHS COMPLIANT SAC SOLDER COMPATIBLE* PART NUMBER SYSTEM
D36-42 D46-42 D50-42 MODEL DIESEL PILE HAMMER SPARE PARTS BOOK
 MODEL D36-42 D46-42 D50-42 DIESEL PILE HAMMER SPARE PARTS BOOK Corporate Office 7032 S. 196th Street Kent, WA, USA 98032 Tel: 1-800-248-8498 Tel: 1-253-872-0141 Fax: 1-253-872-8710 2 No. Parts-No. Description
MATERIALIEN ZUR VORBEREITUNG AUF DIE KLAUSUR INFORMATIK II FÜR VERKEHRSINGENIEURWESEN ANTEIL VON PROF. VOGLER IM WINTERSEMESTER 2011/12
 Fakultät Informatik Institut für Angewandte Informatik, Professur Technische Informationssysteme MATERIALIEN ZUR VORBEREITUNG AUF DIE KLAUSUR INFORMATIK II FÜR VERKEHRSINGENIEURWESEN ANTEIL VON PROF. VOGLER
TIME SWITCHES AND TWILIGHT SWITCHES
 W ANALOG DIN-RAIL TIME SWITCH QUARTZ, SERIES TEMPUS ANALOG 244 W SCHRACK-INFO Analogue time switch 1 channel Daily program With power reserve (NiMH rechargeable battery) Synchronised with mains Shortest
QC5015 A D E 1 2 3 4 F M H 5 6 7 1 B G 2 I 8 9 10 1 J K L 2 C 11 1 12 13 2 14 15 16 17 18
 QC5015 A D E 1 2 3 4 M F H 5 1 6 7 B G 2 I J K L 1 8 9 10 2 C 11 1 12 13 2 14 15 16 17 18 Deutsch Einführung Herzlichen Glückwunsch zu Ihrem Kauf und willkommen bei Philips! Um den Support von Philips
Οδηγίες Χρήσης BWR5106
 Οδηγίες Χρήσης BWR5106 Περιγραφή εργαλείου Οι αντλίες χειρός είναι ένα εργαλείο με την ικανότητα, πιέζοντας τον λεβιέ πάνω κάτω να πρεσάρει γράσο σε μεγάλη πίεση και με την βοήθεια αυτής να γρασάρει οπού
MODEL D25-42 D30-42 DIESEL PILE HAMMER SPARE PARTS BOOK
 MODEL D25-42 D30-42 DIESEL PILE HAMMER SPARE PARTS BOOK Corporate Office 7032 S. 196th Street Kent, WA, USA 98032 Tel: 1-800-248-8498 Tel: 1-253-872-0141 Fax: 1-253-872-8710 2 No. Parts-No. Description
Smaller. 6.3 to 100 After 1 minute's application of rated voltage at 20 C, leakage current is. not more than 0.03CV or 4 (µa), whichever is greater.
, whichever is greater.") Low Impedance, For Switching Power Supplies Low impedance and high reliability withstanding 5000 hours load life at +05 C (3000 / 2000 hours for smaller case sizes as specified below). Capacitance ranges
Low Impedance, For Switching Power Supplies Low impedance and high reliability withstanding 5000 hours load life at +05 C (3000 / 2000 hours for smaller case sizes as specified below). Capacitance ranges
IDPV-45 series. 45W PWM Output LED Driver. File Name:IDPV-45-SPEC S&E
 IDPV5 series S&E ~ A File Name:IDPV5SPEC 0805 IDPV5 series SPECIFICATION MODEL OUTPUT INPUT OTHERS NOTE DC VOLTAGE RATED CURRENT RATED POWER DIMMING RANGE VOLTAGE TOLERANCE PWM FREQUENCY (Typ.) SETUP TIME
ΚΥΠΡΙΑΚΗ ΕΤΑΙΡΕΙΑ ΠΛΗΡΟΦΟΡΙΚΗΣ CYPRUS COMPUTER SOCIETY ΠΑΓΚΥΠΡΙΟΣ ΜΑΘΗΤΙΚΟΣ ΔΙΑΓΩΝΙΣΜΟΣ ΠΛΗΡΟΦΟΡΙΚΗΣ 6/5/2006
 Οδηγίες: Να απαντηθούν όλες οι ερωτήσεις. Ολοι οι αριθμοί που αναφέρονται σε όλα τα ερωτήματα είναι μικρότεροι το 1000 εκτός αν ορίζεται διαφορετικά στη διατύπωση του προβλήματος. Διάρκεια: 3,5 ώρες Καλή
PTC FUNCTION for Delta C2000 and CP2000
 FUNCTION for Delta C2000 and CP2000 CONTENTS: GENERAL... 2. for motor temperature protection... 2.2 Standards... 2.3 Motor layout... 2.4 characteristic... 2.4. Definitions... 3.4.2 curve... 3.4.3 switching
TRC ELECTRONICS, INC LED Driver Constant Voltage 45W MEAN WELL IDLV-45 Series
 LED Driver Constant Voltage 5W MEAN WELL IDLV5 Series ~ A File Name:IDLV5SPEC 0707 TRC ELECTRONICS, INC..888.6.95 LED Driver Constant Voltage 5W MEAN WELL IDLV5 Series TRC ELECTRONICS, INC. SPECIFICATION
MODEL D62-42 D70-42 DIESEL PILE HAMMER SPARE PARTS BOOK
 MODEL D62-42 D70-42 DIESEL PILE HAMMER SPARE PARTS BOOK Corporate Office 7032 S. 196th Street Kent, WA, USA 98032 Tel: 1-800-248-8498 Tel: 1-253-872-0141 Fax: 1-253-872-8710 2 No. Parts-No. Description
Surface Mount Multilayer Chip Capacitors for Commodity Solutions
 Surface Mount Multilayer Chip Capacitors for Commodity Solutions Below tables are test procedures and requirements unless specified in detail datasheet. 1) Visual and mechanical 2) Capacitance 3) Q/DF
SPBW06 & DPBW06 series
 /,, MODEL SELECTION TABLE INPUT ORDER NO. INPUT VOLTAGE (RANGE) NO LOAD INPUT CURRENT FULL LOAD VOLTAGE CURRENT EFFICIENCY (TYP.) CAPACITOR LOAD (MAX.) SPBW06F-03 310mA 3.3V 0 ~ 1500mA 81% 4700μF SPBW06F-05
(REV:01) RYOBI 48 Volt Lawn Mower Model No. RY14110 Replacement Parts List
 RYOBI 48 Volt Lawn Mower Model No. RY14110 Replacement Parts List") 9800-86 2-0-0 (REV:0) RYOBI 48 Volt Lawn Mower Model No. RY0 Replacement Parts List RYOBI RY0 48 volt lawn mower 3 38 39 44 39 36 34 36 42 38 39 3 4 37 34 3 43 2 32 0 8 9 2 4 33 8 7 6 3 6 7 22 8 20 3 30
9800-86 2-0-0 (REV:0) RYOBI 48 Volt Lawn Mower Model No. RY0 Replacement Parts List RYOBI RY0 48 volt lawn mower 3 38 39 44 39 36 34 36 42 38 39 3 4 37 34 3 43 2 32 0 8 9 2 4 33 8 7 6 3 6 7 22 8 20 3 30
ΚΥΠΡΙΑΚΟΣ ΣΥΝΔΕΣΜΟΣ ΠΛΗΡΟΦΟΡΙΚΗΣ CYPRUS COMPUTER SOCIETY 21 ος ΠΑΓΚΥΠΡΙΟΣ ΜΑΘΗΤΙΚΟΣ ΔΙΑΓΩΝΙΣΜΟΣ ΠΛΗΡΟΦΟΡΙΚΗΣ Δεύτερος Γύρος - 30 Μαρτίου 2011
 Διάρκεια Διαγωνισμού: 3 ώρες Απαντήστε όλες τις ερωτήσεις Μέγιστο Βάρος (20 Μονάδες) Δίνεται ένα σύνολο από N σφαιρίδια τα οποία δεν έχουν όλα το ίδιο βάρος μεταξύ τους και ένα κουτί που αντέχει μέχρι
ΟΔΗΓΙΕΣ ΣΥΝΑΡΜΟΛΟΓΗΣΗΣ/ ASSEMBLY INSTRUCTION ΤΟΜΜΥ ΚΡΕΒΑΤΙ/BED
 ΟΔΗΓΙΕΣ ΣΥΝΑΡΜΟΛΟΓΗΣΗΣ/ ASSEMBLY INSTRUCTION ΤΟΜΜΥ ΚΡΕΒΑΤΙ/BED 1. Παρακαλώ πολύ διαβάστε προσεκτικά τις οδηγίες πριν την συναρμολόγηση/ Please read the instructions carefully. 2. Παρακαλώ πολύ όπως ελέγξτε
, / 230 4,6 / 2, , / 230 5,4 / 2,7
 Einstufige Kompressoren mit Einphasen-Wechselstrom Motor; Volumenstrom bis zu 335 m 3 /h Single stage compressors with single phase AC motor; volume flow up to 335 m 3 /h Bestell-Nr. Motor (IP55, Wärmeklasse
(REV:01) RYOBI 48 Volt Lawn Mower Model No. RY14110A Replacement Parts List
 RYOBI 48 Volt Lawn Mower Model No. RY14110A Replacement Parts List") 9000-7 9-- (REV:0) RYOBI 4 Volt Lawn Mower Model No. RY0A Replacement Parts List RYOBI RY0A 4 VOLT LAWN MOWER 3 3 39 44 39 3 34 3 42 3 39 3 4 37 34 3 43 2 0 37 2 33 32 3 9 7 22 30 4 7 3 20 9 3 2 2 27 2
9000-7 9-- (REV:0) RYOBI 4 Volt Lawn Mower Model No. RY0A Replacement Parts List RYOBI RY0A 4 VOLT LAWN MOWER 3 3 39 44 39 3 34 3 42 3 39 3 4 37 34 3 43 2 0 37 2 33 32 3 9 7 22 30 4 7 3 20 9 3 2 2 27 2
NMBTC.COM /
 Common Common Vibration Test:... Conforms to JIS C 60068-2-6, Amplitude: 1.5mm, Frequency 10 to 55 Hz, 1 hour in each of the X, Y and Z directions. Shock Test:...Conforms to JIS C 60068-2-27, Acceleration
User s Manual / Οδηγίες Χρήσης
 User s Manual / Οδηγίες Χρήσης EUROPEAN STANDARDS Your child s safety depends on you. Proper bed rail usage cannot be assured unless you follow these instructions. DO NOT USE YOUR BED RAIL UNTILL YOU READ
DC-DC Constant Current Step-Down LED driver LDD-300L LDD-350L LDD-500L LDD-600L LDD-700L CURRENT RANGE
 SPECIFICATION ORDER NO. LDD-00L LDD-0L LDD-00L LDD-00L LDD-700L CURRENT RANGE 00mA 0mA 00mA 00mA VOLTAGE RANGE Note. ~ VDC for LDD-00~700L/LW ; ~ 8VDC for LDD-00~700LS CURRENT ACCURACY (Typ.) ±% at VDC
Safety Barriers. 6 Safety Barriers KP00 III en Preferred products in stock or available at short notice
 5-- KP III en Contents Single-Channel INTRINSPAK 9 8 Dual-Channel INTRINSPAK 9 with Electronic Current Limitation INTRINSPAK 94 You will find further information on the Internet www.stahl.de General Information
The Simply Typed Lambda Calculus
 Type Inference Instead of writing type annotations, can we use an algorithm to infer what the type annotations should be? That depends on the type system. For simple type systems the answer is yes, and
9.09. # 1. Area inside the oval limaçon r = cos θ. To graph, start with θ = 0 so r = 6. Compute dr
 9.9 #. Area inside the oval limaçon r = + cos. To graph, start with = so r =. Compute d = sin. Interesting points are where d vanishes, or at =,,, etc. For these values of we compute r:,,, and the values
safty reasons. Disregarding could result in serious injury. Disregarding could result in injury or product damage. Forbidden.
 The following safety precautions are given throughout this manual. They must be strictly followed to protect those who install, use or maintain this product as well as to protect players, visitors and
Lowara SPECIFICATIONS
 SH Series Centrifugal pumps entirely made of AISI 36 stainless steel according to EN 733 (ex DIN 24255). Designed to pump hot, cold and moderately aggressive liquids. Available versions: SHE Close-coupled
Linear diffuser. Dimensions. Description
 Dimensions -- + D -- Description is a rectangular linear diffuser in aluminium. is suitable for both supply and exhaust air. is equipped with air guide baffles, making it possible to use for horizontal
For safty reasons. Disregarding could result in serious injury. Disregarding could result in injury or product damage. Forbidden.
 The following safety precautions are given throughout this manual. They must be strictly followed to protect those who install, use or maintain this product as well as to protect players, visitors and
Return Line Filters Type RTF10/25
 Technical Data Type RTF1/25 Product Description Technical Data Construction Materials Filter head: Sealings: Aluminum NR (una-n ) Other sealing materials on request Options and Accessories Valve Clogging
derivation of the Laplacian from rectangular to spherical coordinates
 derivation of the Laplacian from rectangular to spherical coordinates swapnizzle 03-03- :5:43 We begin by recognizing the familiar conversion from rectangular to spherical coordinates (note that φ is used
Strain gauge and rosettes
 Strain gauge and rosettes Introduction A strain gauge is a device which is used to measure strain (deformation) on an object subjected to forces. Strain can be measured using various types of devices classified
Paper Reference. Paper Reference(s) 1776/04 Edexcel GCSE Modern Greek Paper 4 Writing. Thursday 21 May 2009 Afternoon Time: 1 hour 15 minutes
 1776/04 Edexcel GCSE Modern Greek Paper 4 Writing. Thursday 21 May 2009 Afternoon Time: 1 hour 15 minutes") Centre No. Candidate No. Paper Reference(s) 1776/04 Edexcel GCSE Modern Greek Paper 4 Writing Thursday 21 May 2009 Afternoon Time: 1 hour 15 minutes Materials required for examination Nil Paper Reference
Centre No. Candidate No. Paper Reference(s) 1776/04 Edexcel GCSE Modern Greek Paper 4 Writing Thursday 21 May 2009 Afternoon Time: 1 hour 15 minutes Materials required for examination Nil Paper Reference
Modbus basic setup notes for IO-Link AL1xxx Master Block
 n Modbus has four tables/registers where data is stored along with their associated addresses. We will be using the holding registers from address 40001 to 49999 that are R/W 16 bit/word. Two tables that
The Nottingham eprints service makes this work by researchers of the University of Nottingham available open access under the following conditions.
 Luevorasirikul, Kanokrat (2007) Body image and weight management: young people, internet advertisements and pharmacists. PhD thesis, University of Nottingham. Access from the University of Nottingham repository:
Lowara APPLICATIONS MATERIALS. General Catalogue
 FH Series Centrifugal electric pumps according to EN 733 (ex DIN 24255). Electric pumps with pump casing in cast iron and impeller in AISI 36* stainless steel, designed to pump hot, cold and moderately
Section 8.3 Trigonometric Equations
 99 Section 8. Trigonometric Equations Objective 1: Solve Equations Involving One Trigonometric Function. In this section and the next, we will exple how to solving equations involving trigonometric functions.
L18VFSS10E. Instruction Manual 45.7cm/18 High Power Floor Fan. Εγχειρίδιο Οδηγιών Επιδαπεδιος Ανεμιστηρας 45.7 Εκατοστομετρο
 L18VFSS10E Instruction Manual 45.7cm/18 High Power Floor Fan Εγχειρίδιο Οδηγιών Επιδαπεδιος Ανεμιστηρας 45.7 Εκατοστομετρο GB GR Contents GB Safety Warnings... 2 Unpacking... 5 Getting to Know Your Fan...
Assalamu `alaikum wr. wb.
 LUMP SUM Assalamu `alaikum wr. wb. LUMP SUM Wassalamu alaikum wr. wb. Assalamu `alaikum wr. wb. LUMP SUM Wassalamu alaikum wr. wb. LUMP SUM Lump sum lump sum lump sum. lump sum fixed price lump sum lump
Applications Water distribution
 1 FH Series Centrifugal electric pumps according to EN 733 (ex DIN 24255). Electric pumps with pump casing in cast iron designed to pump clean, chemically non-aggressive water and liquids. Available versions:
Math 6 SL Probability Distributions Practice Test Mark Scheme
 Math 6 SL Probability Distributions Practice Test Mark Scheme. (a) Note: Award A for vertical line to right of mean, A for shading to right of their vertical line. AA N (b) evidence of recognizing symmetry
Approximation of distance between locations on earth given by latitude and longitude
 Approximation of distance between locations on earth given by latitude and longitude Jan Behrens 2012-12-31 In this paper we shall provide a method to approximate distances between two points on earth
1. Αφετηρία από στάση χωρίς κριτή (self start όπου πινακίδα εκκίνησης) 5 λεπτά µετά την αφετηρία σας από το TC1B KALO LIVADI OUT
 5 λεπτά µετά την αφετηρία σας από το TC1B KALO LIVADI OUT") Date: 21 October 2016 Time: 14:00 hrs Subject: BULLETIN No 3 Document No: 1.3 --------------------------------------------------------------------------------------------------------------------------------------
Date: 21 October 2016 Time: 14:00 hrs Subject: BULLETIN No 3 Document No: 1.3 --------------------------------------------------------------------------------------------------------------------------------------
 60 61 62 63 64 65 Ο Δ Η Γ Ι Ε Σ Σ Υ Ν Τ Η Ρ Η Σ Η Σ Τ Ω Ν Κ Ο Υ Φ Ω Μ Α Τ Ω Ν Ι Ν S T R U C T I N O N S C O N C E R N I N G Τ Η Ε C A S E M E N T S M A I N T E N A N C E Ο τακτικός καθαρισμός των βαμμένων
ΑΚΑ ΗΜΙΑ ΕΜΠΟΡΙΚΟΥ ΝΑΥΤΙΚΟΥ ΜΑΚΕ ΟΝΙΑΣ ΣΧΟΛΗ ΜΗΧΑΝΙΚΩΝ ΠΤΥΧΙΑΚΗ ΕΡΓΑΣΙΑ ΘΕΜΑ : ΧΗΜΙΚΑ ΠΡΟΣΘΕΤΑ ΠΟΥ ΠΡΟΟΡΙΖΟΝΤΑΙ ΓΙΑ ΤΟ ΝΕΡΟ ΤΟΥ ΑΤΜΟΛΕΒΗΤΑ
 ΑΚΑ ΗΜΙΑ ΕΜΠΟΡΙΚΟΥ ΝΑΥΤΙΚΟΥ ΜΑΚΕ ΟΝΙΑΣ ΣΧΟΛΗ ΜΗΧΑΝΙΚΩΝ ΠΤΥΧΙΑΚΗ ΕΡΓΑΣΙΑ ΘΕΜΑ : ΧΗΜΙΚΑ ΠΡΟΣΘΕΤΑ ΠΟΥ ΠΡΟΟΡΙΖΟΝΤΑΙ ΓΙΑ ΤΟ ΝΕΡΟ ΤΟΥ ΑΤΜΟΛΕΒΗΤΑ ΣΠΟΥ ΑΣΤΗΣ : ΑΓΟΡΑΣΤΟΣ ΧΡΥΣΟΒΑΛΑΝΤΗΣ ΕΠΙΒΛΕΠΟΥΣΑ ΚΑΘΗΓΗΤΡΙΑ :
Multilayer Chip Inductor
 Features -Monolithic structure for high reliability -High self-resonant frequency -Excellent solderability and high heat resistance Construction Applications -RF circuit in telecommunication and other
SMC SERIES Subminiature Coaxial Connectors
 SERIES Subminiature Coaxial Connectors FEATURES Subminiature coaxial connectors with 50 Ω impedance for applications up to 10 GHz. (screw on mechanism)fulfills the subminiature coaxial connector requirement
1000 VDC 1250 VDC 125 VAC 250 VAC J K 125 VAC, 250 VAC
 Metallized Polyester Film Capacitor Type: ECQE(F) Non-inductive construction using metallized Polyester film with flame retardant epoxy resin coating Features Self-healing property Excellent electrical
FAVORIT 55402 I DE GESCHIRRSPÜLER BENUTZERINFORMATION 2 EL ΠΛΥΝΤΉΡΙΟ ΠΙΆΤΩΝ ΟΔΗΓΊΕΣ ΧΡΉΣΗΣ 24
 FAVORIT 55402 I DE GESCHIRRSPÜLER BENUTZERINFORMATION 2 EL ΠΛΥΝΤΉΡΙΟ ΠΙΆΤΩΝ ΟΔΗΓΊΕΣ ΧΡΉΣΗΣ 24 2 FÜR PERFEKTE ERGEBNISSE Danke, dass Sie sich für dieses AEG Produkt entschieden haben. Wir haben es geschaffen,
Έλεγχος και Διασφάλιση Ποιότητας
 Έλεγχος και Διασφάλιση Ποιότητας Ενότητα 6: Κουππάρης Μιχαήλ Τμήμα Χημείας Εργαστήριο Αναλυτικής Χημείας General Successfully carry out the Preventive Maintenance Procedure and complete the Maintenance
Technisches Handbuch. Pergola Top Star 120X70. metaform Bescha ungssysteme
 02 Technisches Handbuch Pergola Top Star 120X70 Exklusiv von Metaform ΑVΕΕ entworfen, ist es die Innova on bei der professionellen Bescha ung, denn das wegweisende Hebesystem erlaubt es Ihnen, sie an jeder
0.635mm Pitch Board to Board Docking Connector. Lead-Free Compliance
 .635mm Pitch Board to Board Docking Connector Lead-Free Compliance MINIDOCK SERIES MINIDOCK SERIES Features Specifications Application.635mm Pitch Connector protected by Diecasted Zinc Alloy Metal Shell