GE-PW 45. Art.-Nr.: I.-Nr.: Originalbetriebsanleitung Benzin-Wasserpumpe. Original operating instructions Petrol water pump
|
|
|
- Ἔβέρ Δοξαράς
- 9 χρόνια πριν
- Προβολές:
Transcript
1 GE-PW 45 D GB F I E P GR Originalbetriebsanleitung Benzin-Wasserpumpe Original operating instructions Petrol water pump Mode d emploi d origine Pompe a eau a essence Istruzioni per l uso originali Pompa dell acqua a benzina Manual de instrucciones original Bomba de agua con motor de gasolina Manual de instruções original Bomba de água a gasolina Πρωτότυπες Οδηγίες χρήσης Βενζινοκινητη αντλια νερου 7 Art.-Nr.: I.-Nr.: Anl_GE_PW_45_SPK7.indb :02

2 Anl_GE_PW_45_SPK7.indb :57

3 a 5b H L A B 6a 6b Anl_GE_PW_45_SPK7.indb :57

4 Anl_GE_PW_45_SPK7.indb :57
5 Inhaltsverzeichnis 1. Sicherheitshinweise 2. Gerätebeschreibung und Lieferumfang 3. Bestimmungsgemäße Verwendung 4. Technische Daten 5. Vor Inbetriebnahme 6. Bedienung 7. Reinigung, Wartung, Lagerung und Ersatzteilbestellung 8. Entsorgung und Wiederverwertung 9. Fehlersuchplan D Anl_GE_PW_45_SPK7.indb :57

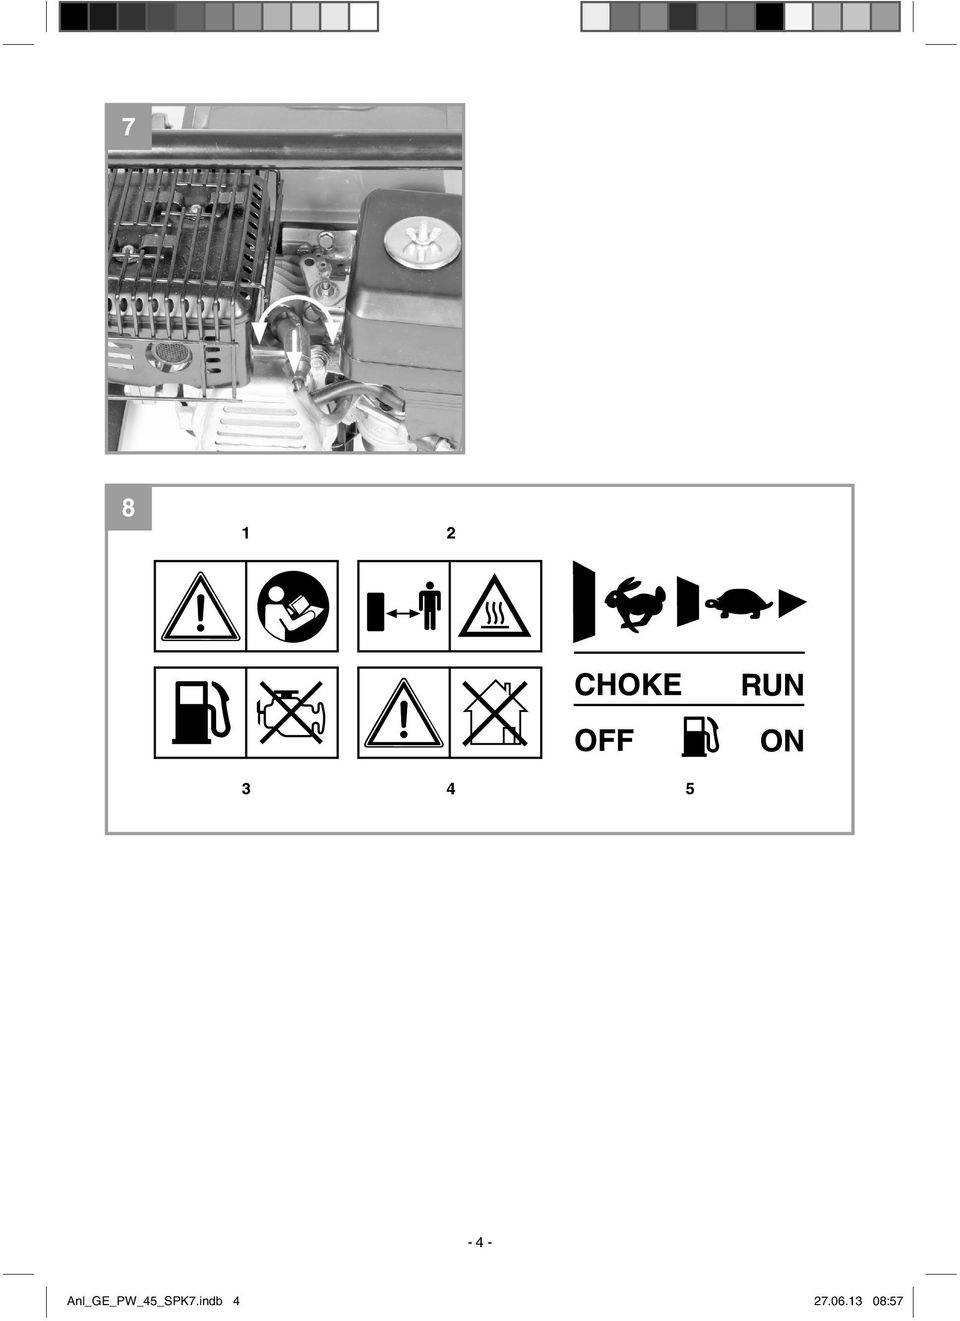
6 D Achtung! Beim Benutzen von Geräten müssen einige Sicherheitsvorkehrungen eingehalten werden, um Verletzungen und Schäden zu verhindern. Lesen Sie diese Bedienungsanleitung / Sicherheitshinweise deshalb sorgfältig durch. Bewahren Sie diese gut auf, damit Ihnen die Informationen jederzeit zur Verfügung stehen. Falls Sie das Gerät an andere Personen übergeben sollten, händigen Sie diese Bedienungsanleitung / Sicherheitshinweise bitte mit aus. Wir übernehmen keine Haftung für Unfälle oder Schäden, die durch Nichtbeachten dieser Anleitung und den Sicherheitshinweisen entstehen. 1. Sicherheitshinweise Die entsprechenden Sicherheitshinweise fi nden Sie im beiliegenden Heftchen! Warnung Lesen Sie alle Sicherheitshinweise und Anweisungen. Versäumnisse bei der Einhaltung der Sicherheitshinweise und Anweisungen können elektrischen Schlag, Brand und/oder schwere Verletzungen verursachen. Bewahren Sie alle Sicherheitshinweise und Anweisungen für die Zukunft auf. Erklärung der Hinweisschilder auf dem Gerät (Bild 8) 1. Achtung! Bedienungsanleitung lesen. 2. Achtung! Heisse Teile. Abstand halten. 3. Achtung! Während des Tankens Motor abstellen. 4. Achtung! Nicht in unbelüfteten Räumen betreiben Drehzahleinstellung - Chokehebel - Benzinhahn 2. Gerätebeschreibung und Lieferumfang 2.1 Gerätebeschreibung (Bild 1-4) 1. Tankdeckel 2. Füllstutzen mit Schraube 3. Druckanschluß 4. Öleinfüllschraube 5. Ölablaßschraube 6. Ein-/Ausschalter 7. Reversierstarter 8. Benzinhahn 9. Chokehebel 10. Gashebel 11. Sauganschluß 12. Wasserentleerungsschraube 13. 2x Gewindeanschlussstück 1 AG 14. 2x Gewindeanschlussstück 1,25 AG 15. 2x Schlauchanschlussstück x Schlauchklemme 17. 2x Dichtung 18. 2x Überwurfmutter 19. Saugkorb 20. Zündkerzenschlüssel 21. Öleinfülltrichter Positionen werden verwendet um die Pumpe an eine Saug- und Druckleitung (nicht im Lieferumfang enthalten) anzuschließen. 2.2 Lieferumfang Bitte überprüfen Sie die Vollständigkeit des Artikels anhand des beschriebenen Lieferumfangs. Bei Fehlteilen wenden Sie sich bitte spätestens innerhalb von 5 Arbeitstagen nach Kauf des Artikels unter Vorlage eines gültigen Kaufbeleges an unser Service Center oder an den nächstgelegenen zuständigen Baumarkt. Bitte beachten Sie hierzu die Gewährleistungstabelle in den Garantiebestimmungen am Ende der Anleitung. Öffnen Sie die Verpackung und nehmen Sie das Gerät vorsichtig aus der Verpackung. Entfernen Sie das Verpackungsmaterial sowie Verpackungs-/ und Transportsicherungen (falls vorhanden). Überprüfen Sie, ob der Lieferumfang vollständig ist. Kontrollieren Sie das Gerät und die Zubehörteile auf Transportschäden. Bewahren Sie die Verpackung nach Möglichkeit bis zum Ablauf der Garantiezeit auf Anl_GE_PW_45_SPK7.indb :57

7 Achtung! Gerät und Verpackungsmaterial sind kein Kinderspielzeug! Kinder dürfen nicht mit Kunststoffbeuteln, Folien und Kleinteilen spielen! Es besteht Verschluckungs- und Erstickungsgefahr! Originalbetriebsanleitung Sicherheitshinweise 3. Bestimmungsgemäße Verwendung Das Gerät ist geeignet zum Bewässern und Gießen von Grünanlagen, Gemüsebeeten und Gärten sowie zum Betrieb von Rasensprengern. Mit Vorfi lter kann die Wasserentnahme aus Teichen, Bächen, Regentonnen, Regenwasserzisternen und Brunnen erfolgen. Die maximale Temperatur der Förderfl üssigkeit darf im Dauerbetrieb +35 C nicht überschreiten. Als Fördermedien eignen sich klares Wasser (Süßwasser), Regenwasser und leichte Waschlauge. Es dürfen keine brennbare, gasende, explosive und aggressive Flüssigkeiten (z.b. Benzin, Säuren, Laugen, Silosickersaft, ) sowie Flüssigkeiten mit abrasiven Stoffen (z.b Sand) gefördert werden. Das Gerät darf nur nach seiner Bestimmung verwendet werden. Jede weitere darüber hinausgehende Verwendung ist nicht bestimmungsgemäß. Für daraus hervorgerufene Schäden oder Verletzungen aller Art haftet der Benutzer/Bediener und nicht der Hersteller. Bitte beachten Sie, dass unsere Geräte bestimmungsgemäß nicht für den gewerblichen, handwerklichen oder industriellen Einsatz konstruiert wurden. Wir übernehmen keine Gewährleistung, wenn das Gerät in Gewerbe-, Handwerks- oder Industriebetrieben sowie bei gleichzusetzenden Tätigkeiten eingesetzt wird. D Technische Daten Motortyp:... 4-Takt-Motor; Luftgekühlt Motorleistung max:...4,8 kw/ 6,5 PS Hubraum: cm 3 Nenndrehzahl Motor: min -1 Treibstoff:...Benzin bleifrei Tankinhalt:...3,6 l Ölmenge / Typ: ml / 10W40 Zündkerze:... LG F6RTC Saughöhe max.:... 6,5 m Fördermenge max.: l/h Förderhöhe max.: m Druck max.:... 2,6 bar Gewicht (leerer Tank):...22,5 kg Saug-/Druckanschluss:...2 Schlauchanschluss 2 /1,25 /1 Gewindeanschluss Schallleistungspegel L WA : db Schalldruckpegel L pa :...85 db/k: 2,89 db 5. Vor Inbetriebnahme Grundsätzlich empfehlen wir die Verwendung eines Vorfi lters und einer Sauggarnitur mit Saugschlauch, Saugkorb und Rückschlagventil, um lange Wiederansaugzeiten und eine unnötige Beschädigung der Pumpe durch Steine und feste Fremdkörper zu verhindern. 5.1 Vorbereiten des Gerätes Motor mit Motoröl befüllen (siehe auch Punkt Ölwechsel). Tank mit Benzin füllen. Gerät auf ebenem und festem Standort aufstellen. 5.2 Anschluss und Verlegung von Saug- und Druckleitung Schließen Sie die Saugleitung am Sauganschluss (Bild 3/Pos. 11) und die Druckleitung am Druckanschluss (Bild 3/ Pos. 3) an. Die Saugleitung von der Wasserentnahme zur Pumpe steigend verlegen. Vermeiden Sie unbedingt die Verlegung der Saugleitung über die Pumpenhöhe. Luftblasen in der Saugleitung verzögern und verhindern den Ansaugvorgang. Saug- und Druckleitung sind so anzubringen, dass diese keinen mechanischen Druck auf die Pumpe ausüben. Das Saugventil sollte genügend tief im Anl_GE_PW_45_SPK7.indb :57

8 D Wasser liegen, so dass durch Absinken des Wasserstandes ein Trockenlauf der Pumpe vermieden wird. Eine undichte Saugleitung verhindert durch Luftansaugen das Ansaugen des Wassers. Vermeiden Sie das Ansaugen von Fremdkörpern (Sand usw.) Falls notwendig ist ein Vorfilter anzubringen. 6. Bedienung Vor dem Starten des Motors muss die Pumpe am Füllstutzen (Bild 3/ Pos. 2) mit Förderfl üssigkeit aufgefüllt werden. Hinweis: Es ist ratsam, in der Saugleitung ein Rückschlagventil zu montieren und diese vor dem ersten Betrieb zusätzlich mit Wasser zu befüllen. 6.1 Anlassen des Motors: 1. Ein-/Ausschalter (Bild 1/Pos. 6) auf ON stellen. 2. Benzinhahn (Bild 4/ Pos. 8) auf ON stellen. 3. Bei Kaltstart den Chokehebel (Bild 4/ Pos. 9) auf Choke stellen. 4. Gashebel (Bild 4/ Pos. 10) in die Mitte stellen. 5. Kräftig am Startseilzug (Bild 4/ Pos. 7) ziehen bis der Motor startet. 6. Nach ca. 30sek. Laufzeit den Chokehebel auf Run stellen. Bei warmen Motor den Chokehebel beim Starten in Stellung Run belassen. Erklärung der Positionen des Gashebels (Bild 4/ Pos.10): Schildkröte : Motor in Leerlauf Hase : Maximale Förderleistung 6.2 Ansaugvorgang: Während des Ansaugvorgangs sind die in der Druckleitung vorhandenen Absperrorgane (Spritzdüsen, Ventile etc. ) voll zu öffnen, damit die in der Saugleitung vorhandene Luft frei entweichen kann. Je nach Saughöhe und Luftmenge in der Saugleitung kann der erste Ansaugvorgang ca. 0,5 min.- 5 min. betragen. Bei längeren Ansaugzeiten sollte erneut Wasser aufgefüllt werden. Wird die Pumpe nach dem Einsatz wieder entfernt, so muß bei erneutem Anschluß und Inbetriebnahme unbedingt wieder Wasser aufgefüllt werden. 6.3 Abstellen des Motors: Ein-/ Ausschalter auf Stellung OFF stellen. Benzinhahn schließen. Einlaufzeit: In den ersten 20 Betriebsstunden darf der Motor nicht zu lange mit Vollgas betrieben werden. Fehlzündungen, Anlaßschwierigkeiten: Überprüfen, ob Kraftstoff in den Vergaser fließt; Kraftstoffilter sauber ist; die Vergaserluftklappe offen ist; der Luftfilter sauber ist; die Zündkerze sauber ist und der Elektrodenabstand zwischen 0,6 und 0,7mm liegt. 7. Reinigung, Wartung, Lagerung und Ersatzteilbestellung Ziehen Sie vor allen Reinigungs- und Wartungsarbeiten den Zündkerzenstecker. 7.1 Reinigung Halten Sie Schutzvorrichtungen, Luftschlitze und Motorengehäuse so staub- und schmutzfrei wie möglich. Reiben Sie das Gerät mit einem sauberen Tuch ab oder blasen Sie es mit Druckluft bei niedrigem Druck aus. Wir empfehlen, dass Sie das Gerät direkt nach jeder Benutzung reinigen. Reinigen Sie das Gerät regelmäßig mit einem feuchten Tuch und etwas Schmierseife. Verwenden Sie keine Reinigungs- oder Lösungsmittel; diese könnten die Kunststoffteile des Gerätes angreifen. Achten Sie darauf, dass kein Wasser in das Geräteinnere gelangen kann. 7.2 Wartung Beachten Sie hierzu auch die beiliegenden Service- Informationen Anl_GE_PW_45_SPK7.indb :57
 auf ON stellen. 2. Benzinhahn (Bild 4/ Pos. 8) auf ON stellen. 3. Bei Kaltstart den Chokehebel (Bild 4/ Pos. 9) auf Choke stellen. 4. Gashebel (Bild 4/ Pos.")
9 D Ölwechsel Der Motorölwechsel sollte bei betriebswarmen Motor durchgeführt werden. Nur Motorenöl (10W40) verwenden. Gerät auf geeigneter Unterlage leicht schräg gegen die Ölablasschraube (Bild 5a/Pos. A) abstellen. Öleinfüllschraube (Bild5a/ Pos. B) öffnen. Ölablassschraube entfernen und warmes Motoröl in geeigneten Behälter ablassen. Nach vollständigem Entleeren Ölablassschraube einschrauben und Gerät eben aufstellen. Neues Motoröl bis zur oberen Markierung des Öleinfüllstabes einfüllen (Bild 5b/Pos. H). Achtung! Ölmessstab zum Prüfen des Ölstandes nur einstecken. Nicht einschrauben! Während des Betriebes muss sich der Ölstand zwischen den beiden Markierungen L und H (Bild 5b) befi nden. Das Altöl muss ordnungsgemäß entsorgt werden Luftfilter Den Luftfi lter regelmäßig reinigen, wenn nötig ersetzen. Verschraubung der Luftfilterabdeckung entfernen (Bild 6a) und Luftfilterabdeckung abnehmen. Verschraubung des Luftfilterelements entfernen (Bild 6b) und Luftfilterelement entnehmen. Luftfilter durch Ausklopfen oder Ausblasen mit Druckluft reinigen. Der Zusammenbau erfolgt in umgekehrter Reihenfolge Zündkerze Zündkerze regelmäßig reinigen, wenn nötig ersetzen. Elektrodenabstand auf 0,6 mm einstellen. Zündkerzenstecker mit einer Drehbewegung abziehen (Bild 7) Zündkerze mit Zündkerzenschlüssel entfernen. Zündkerze mit Kupferdrahtbürste reinigen bzw. neue verwenden. Der Zusammenbau erfolgt in umgekehrter Reihenfolge. 7.3 Lagerung Vor längerem Nichtgebrauch oder Überwinterung die Pumpe gründlich mit Wasser durchspülen. Benzinhahn schließen und Motor laufen lassen bis dieser stoppt, um den Vergaser zu entleeren. Tank vollständig Füllen um Rostbildung zu verhindern. Entleerungsschraube (Bild 3/Pos. 12) entfernen und das Pumpengehäuse vollständig entleeren. Das Gerät an einem trocken Ort außerhalb der Reichweite von Kindern lagern. 7.4 Ersatzteilbestellung: Bei der Ersatzteilbestellung sollten folgende Angaben gemacht werden; Typ des Gerätes Artikelnummer des Gerätes Ident-Nummer des Gerätes Ersatzteilnummer des erforderlichen Ersatzteils Aktuelle Preise und Infos fi nden Sie unter 8. Entsorgung und Wiederverwertung Das Gerät befi ndet sich in einer Verpackung um Transportschäden zu verhindern. Diese Verpackung ist Rohstoff und ist somit wieder verwendbar oder kann dem Rohstoffkreislauf zurückgeführt werden. Das Gerät und dessen Zubehör bestehen aus verschiedenen Materialien, wie z.b. Metall und Kunststoffe. Defekte Geräte gehören nicht in den Hausmüll. Zur fachgerechten Entsorgung sollte das Gerät an einer geeigneten Sammelstellen abgegeben werden. Wenn Ihnen keine Sammelstelle bekannt ist, sollten Sie bei der Gemeindeverwaltung nachfragen Anl_GE_PW_45_SPK7.indb :57
. Achtung! Ölmessstab zum Prüfen des Ölstandes nur einstecken. Nicht einschrauben!")
10 D 9. Fehlersuchplan Störung Mögliche Ursache Behebung Motor kann nicht gestartet werden Pumpe saugt nicht an Fördermenge ungenügend - Zündkerze verrußt - Luftfi lter verschmutzt - Keine Kraftstoff im Tank - Ölabschaltautomatik spricht an - Saugventil nicht im Wasser - Pumpenraum ohne Wasser - Luft in der Saugleitung - Saugkorb (Saugventil) verstopft - Max. Saughöhe überschritten - Saughöhe zu hoch - Saugkorb verschmutzt - Wasserspiegel sinkt rasch und Saugleitung ragt aus Wasser - Pumpenleistung verringert durch Ablagerungen Achtung! Die Pumpe darf nicht trocken laufen. - Zündkerze reinigen und ersetzen - Luftfi lter reinigen - Kraftstoff einfüllen - Ölstand prüfen, Motoröl auffüllen - Saugventil in Wasser legen - Pumpenraum durch Füllstutzen mit Wasser füllen - Saugkorb reinigen - Saughöhe überprüfen, ggf. verringern - Saughöhe überprüfen, ggf. verringern - Saugkorb reinigen - Saugleitung tiefer legen - Pumpe reinigen Anl_GE_PW_45_SPK7.indb :57

11 Der Nachdruck oder sonstige Vervielfältigung von Dokumentation und Begleitpapieren der Produkte, auch auszugsweise, ist nur mit ausdrücklicher Zustimmung der isc GmbH zulässig. Technische Änderungen vorbehalten D Anl_GE_PW_45_SPK7.indb :57

12 D Garantiebestimmungen Die Fa. isc GmbH bzw. der zuständige Baumarkt garantiert die Behebung von Mängeln bzw. den Geräteaustausch entsprechend der unten stehenden Übersicht, wobei die gesetzlichen Gewährleistungsansprüche unberührt bleiben. Kategorie Beispiel Garantieleistung Mängel an Material oder Konstruktion 24 Monate Verschleißteile* Zündkerze, Luftfi lter, Kraftstofffi lter 6 Monate Verbrauchsmaterial/ Verbrauchsteile* Fehlteile 5 Arbeitstage * nicht zwingend im Lieferumfang enthalten! Garantie nur bei Sofortdefekt (24h nach Kauf / Kaufbelegdatum) Bezüglich Verschleißteilen, Verbrauchsmaterial und Fehlteilen garantiert die Fa. isc GmbH bzw. der zuständige Baumarkt eine Mängelbehebung bzw. eine Nachlieferung nur, wenn der Mangel innerhalb von 24h (Verbrauchsmaterial), 5 Arbeitstagen (Fehlteilen) oder 6 Monaten (Verschleißteile) nach Kauf angezeigt und das Kaufdatum durch Kaufbeleg nachgewiesen wird. Bei Mängeln an Material oder Konstruktion, bitten wir Sie im Garantiefall das Gerät zusammen mit beiliegender Gerätekarte einzureichen und diese vollständig auszufüllen. Wichtig ist hierbei eine genaue Fehlerbeschreibung anzugeben. Beantworten Sie hierfür folgende Fragen: Hat das Gerät bereits einmal funktioniert oder war es von Anfang an defekt? Ist Ihnen vor dem Auftreten des Defektes etwas aufgefallen (Symptom vor Defekt)? Welche Fehlfunktion weist das Gerät Ihrer Meinung nach auf (Hauptsymptom)? Beschreiben Sie diese Fehlfunktion Anl_GE_PW_45_SPK7.indb :57
 Bezüglich Verschleißteilen, Verbrauchsmaterial und Fehlteilen garantiert die Fa.")
13 D Garantieurkunde Sehr geehrte Kundin, sehr geehrter Kunde, unsere Produkte unterliegen einer strengen Qualitätskontrolle. Sollte dieses Gerät dennoch einmal nicht einwandfrei funktionieren, bedauern wir dies sehr und bitten Sie, sich an unseren Servicedienst unter der auf dieser Garantiekarte angegebenen Adresse zu wenden. Gern stehen wir Ihnen auch telefonisch über die untenangegebene Servicerufnummer zur Verfügung. Für die Geltendmachung von Garantieansprüchen gilt folgendes: 1. Diese Garantiebedingungen regeln zusätzliche Garantieleistungen. Ihre gesetzlichen Gewährleistungsansprüche werden von dieser Garantie nicht berührt. Unsere Garantieleistung ist für Sie kostenlos. 2. Die Garantieleistung erstreckt sich ausschließlich auf Mängel, die auf Material- oder Herstellungsfehler zurückzuführen sind und ist auf die Behebung dieser Mängel bzw. den Austausch des Gerätes beschränkt. Bitte beachten Sie, dass unsere Geräte bestimmungsgemäß nicht für den gewerblichen, handwerklichen oder industriellen Einsatz konstruiert wurden. Ein Garantievertrag kommt daher nicht zustande, wenn das Gerät in Gewerbe-, Handwerks- oder Industriebetrieben sowie bei gleichzusetzenden Tätigkeiten eingesetzt wird. Von unserer Garantie sind ferner Ersatzleistungen für Transportschäden, Schäden durch Nichtbeachtung der Montageanleitung oder aufgrund nicht fachgerechter Installation, Nichtbeachtung der Gebrauchsanleitung (wie durch z.b. Anschluss an eine falsche Netzspannung oder Stromart), missbräuchliche oder unsachgemäße Anwendungen (wie z.b. Überlastung des Gerätes oder Verwendung von nicht zugelassenen Einsatzwerkzeugen oder Zubehör), Nichtbeachtung der Wartungsund Sicherheitsbestimmungen, Eindringen von Fremdkörpern in das Gerät (wie z.b. Sand, Steine oder Staub), Gewaltanwendung oder Fremdeinwirkungen (wie z. B. Schäden durch Herunterfallen) sowie durch verwendungsgemäßen, üblichen Verschleiß ausgeschlossen. Dies gilt insbesondere für Akkus, auf die wir dennoch eine Garantiezeit von 12 Monaten gewähren. Der Garantieanspruch erlischt, wenn an dem Gerät bereits Eingriffe vorgenommen wurden. 3. Die Garantiezeit beträgt 2 Jahre und beginnt mit dem Kaufdatum des Gerätes. Garantieansprüche sind vor Ablauf der Garantiezeit innerhalb von zwei Wochen, nachdem Sie den Defekt erkannt haben, geltend zu machen. Die Geltendmachung von Garantieansprüchen nach Ablauf der Garantiezeit ist ausgeschlossen. Die Reparatur oder der Austausch des Gerätes führt weder zu einer Verlängerung der Garantiezeit noch wird eine neue Garantiezeit durch diese Leistung für das Gerät oder für etwaige eingebaute Ersatzteile in Gang gesetzt. Dies gilt auch bei Einsatz eines Vor-Ort- Services. 4. Für die Geltendmachung Ihres Garantieanspruches übersenden Sie bitte das defekte Gerät portofrei an die unten angegebene Adresse. Fügen Sie den Verkaufsbeleg im Original oder einen sonstigen datierten Kaufnachweis bei. Bitte bewahren Sie deshalb den Kassenbon als Nachweis gut auf! Beschreiben Sie uns bitte den Reklamationsgrund möglichst genau. Ist der Defekt des Gerätes von unserer Garantieleistung erfasst, erhalten Sie umgehend ein repariertes oder neues Gerät zurück. Selbstverständlich beheben wir gegen Erstattung der Kosten auch gerne Defekte am Gerät, die vom Garantieumfang nicht oder nicht mehr erfasst sind. Dazu senden Sie das Gerät bitte an unsere Serviceadresse. Für Verschleiß-/Verbrauchs- und Fehlteile verweisen wir auf die Einschränkungen dieser Garantie gemäß den Garantiebestimmungen dieser Bedienungsanleitung. isc GmbH Eschenstraße Landau/Isar (Deutschland) Telefon: +49 [0] Telefax +49 [0] (Festnetzpreis: 14 ct/min, Mobilfunkpreise maximal: 42 ct/min) Außerhalb Deutschlands fallen stattdessen Gebühren für ein reguläres Gespräch ins dt. Festnetz an. info@isc-gmbh.info Internet: Anl_GE_PW_45_SPK7.indb :57

14 D 1 Service Hotline: Mo-Fr 8:00-18:00 Uhr (Festnetzpreis: 14 ct/min, Mobilfunkpreise maximal: 42 ct/min; Außerhalb Deutschlands fallen stattdessen Gebühren für ein reguläres Gespräch ins dt. Festnetz an.) 2 Name: Retouren-Nr. isc: Straße / Nr.: Telefon: PLZ: Ort: Mobil: 3 Welcher Fehler ist aufgetreten (genaue Angabe): Art.-Nr.: I.-Nr.: Sehr geehrte Kundin, sehr geehrter Kunde, bitte beschreiben Sie uns die von Ihnen festgestellte Fehlfunktion Ihres Gerätes als Grund Ihrer Beanstandung möglichst genau. Dadurch können wir für Sie Ihre Reklamation schneller bearbeiten und Ihnen schneller helfen. Eine zu ungenaue Beschreibung mit Begriffen wie Gerät funktioniert nicht oder Gerät defekt verzögert hingegen die Bearbeitung erheblich. 4 Garantie JA NEIN Kaufbeleg-Nr. / Datum: 1 Service Hotline kontaktieren oder bei isc-webadresse anmelden - es wird Ihnen eine Retourennummer zugeteilt l 2 Ihre Anschrift eintragen 3 Fehlerbeschreibung und Art.-Nr. und I.-Nr. angeben l 4 Garantiefall JA/NEIN ankreuzen sowie Kaufbeleg-Nr. und Datum angeben und eine Kopie des Kaufbeleges beilegen Anl_GE_PW_45_SPK7.indb :57

15 Table of contents GB 1. Safety regulations 2. Layout and items supplied 3. Proper use 4. Technical data 5. Before starting the equipment 6. Operation 7. Cleaning, maintenance, storage and ordering of spare parts 8. Disposal and recycling 9. Troubleshooting Anl_GE_PW_45_SPK7.indb :57

16 GB Important! When using the equipment, a few safety precautions must be observed to avoid injuries and damage. Please read the complete operating instructions and safety regulations with due care. Keep this manual in a safe place, so that the information is available at all times. If you give the equipment to any other person, hand over these operating instructions and safety regulations as well. We cannot accept any liability for damage or accidents which arise due to a failure to follow these instructions and the safety instructions. 1. Safety regulations The corresponding safety information can be found in the enclosed booklet. Caution! Read all safety regulations and instructions. Any errors made in following the safety regulations and instructions may result in an electric shock, fi re and/or serious injury. Keep all safety regulations and instructions in a safe place for future use. Explanation of the warning signs on the equipment (Fig. 8) 1. Important! Read the operating instructions. 2. Important! Hot parts. Keep your distance. 3. Important! Switch off the engine before refueling. 4. Important! Never operate in non-ventilated rooms Speed setting - Choke lever - Petrol cock 2. Layout and items supplied 2.1 Layout (Fig. 1-4) 1. Tank cover 2. Refi lling nozzle with screw 3. Pressure connection 4. Oil fi ller plug 5. Oil drain plug 6. ON/OFF switch 7. Reversing starter 8. Petrol cock 9. Choke lever 10. Throttle control 11. Suction connection 12. Water emptying plug 13. 2x Threaded connector 1 external thread 14. 2x Threaded connector 1.25 external thread 15. 2x Hose connector x Hose clip 17. 2x Seal 18. 2x Union nut 19. Intake cage 20. Spark plug wrench 21. Oil fi ller funnel Items are used for connecting the pump to an intake and discharge line (not included in delivery). 2.2 Items supplied Please check that the article is complete as specifi ed in the scope of delivery. If parts are missing, please contact our service center or the nearest branch of the DIY store where you made your purchase at the latest within 5 work days after purchasing the article and upon presentation of a valid bill of purchase. Also, refer to the warranty table in the warranty provisions at the end of the operating instructions. Open the packaging and take out the equipment with care. Remove the packaging material and any packaging and/or transportation braces (if available). Check to see if all items are supplied. Inspect the equipment and accessories for transport damage. If possible, please keep the packaging until the end of the guarantee period. Important! The equipment and packaging material are not toys. Do not let children play with plastic bags, foils or small parts. There is a danger of swallowing or suffocating! Original operating instructions Safety instructions Anl_GE_PW_45_SPK7.indb :57

17 GB 3. Proper use The machine is suitable for irrigating and watering landscaped areas, vegetable beds and gardens and for operating lawn sprinklers. The water can be taken from ponds, streams, rainwater butts, rainwater cisterns and springs if an initial fi lter is fi tted. The maximum temperature of the fl uid must not exceed +35 C if the machine is operated permanently. Clean water (sweet water), rainwater and low concentrations of washing lye can be used as the transport medium. The machine must not be used to transport infl ammable, gassing, explosive and aggressive fl uids (such as petrol, acids, lyes, silo percolating juice, etc.) and fl uids that contain abrasive substances (such as sand). The equipment is to be used only for its prescribed purpose. Any other use is deemed to be a case of misuse. The user / operator and not the manufacturer will be liable for any damage or injuries of any kind caused as a result of this. Please note that our equipment has not been designed for use in commercial, trade or industrial applications. Our warranty will be voided if the machine is used in commercial, trade or industrial businesses or for equivalent purposes. 4. Technical data Engine type:... 4-stroke engine; air-cooled Max. engine output: kw / 6.5 bhp Displacement: cc Motor rated speed:...3,600 min -1 Fuel:... Regular unleaded petrol Tank capacity: l Oil volume / type: ml / 10W40 Spark plug:... LG F6RTC Max. intake head: m Max. pumping rate: l/h Max. delivery head: m Max. pressure: bar Weight (with empty tank): kg Intake/Discharge connector:. 2 hose connection...2 / 1.25 / 1 thread connector L WA sound power level: db L pa sound pressure level: db/k2.89 db 5. Before starting the equipment As a basic principle, we recommend the use of a preliminary fi lter and a suction set with suction hose, suction strainer and non-return valve, in order to prevent long priming periods and unnecessary damage to the pump as a result of stones and solid foreign bodies. 5.1 Preparing the machine Fill the engine with engine oil (see also point Oil change). Fill the tank with petrol. Place the machine on a flat, firm surface. 5.2 Connecting and routing the intake and discharge lines Connect the intake line to the intake connection (Figure 3 / Item 11) and the discharge line to the discharge connection (Figure 3 / Item 3). Position the intake line so that it rises from the water withdrawal point to the pump. It is essential that you do not route the intake line above the height of the pump. Air bubbles in the intake line will slow down and prevent the intake process. Install the intake and discharge lines in such a way that they do not exert any mechanical pressure on the pump. The intake valve should be low enough in the water to ensure that if the water level falls, the pump will not run dry. A leaking intake line will draw in air and therefore not draw in any water. Do not draw in any foreign bodies (sand, etc.). If necessary install an initial filter Anl_GE_PW_45_SPK7.indb :57
, rainwater and low concentrations of washing lye can be used as the transport medium.")
18 GB 6. Operation The pump must be fi lled with the transport fl uid at the fi ller neck (Figure 3 / Item 2) before the engine is started. Note: We advise that you install a non-return valve in the intake line and fi ll it with water before you start the machine for the fi rst time. 6.1 Starting the engine 1. Set the On/Off switch (Figure 1 / Item 6) to ON. 2. Set the petrol cock (Figure 4 / Item 8) to the ON position. 3. If the engine is cold, set the choke lever (Figure 4 / Item 9) to Choke. 4. Move the throttle lever (Figure 4 / Item 10) to the center position. 5. Pull the starter cord (Figure 4 / Item 7) until the engine starts. 6. When the engine has been running for approx. 30 seconds, move the choke lever to Run. If the engine is warm, leave the choke lever in the Run position when starting. Explanation of the positions of the throttle lever (Figure 4 / Item 10): Tortoise : Engine in idling Hare : Maximum delivery rate 6.2 Intake process During the priming process, the shut-off devices present in the pressure pipe (spray nozzles, valves etc.) must be completely open so that the air in the suction pipe can escape freely. Depending on the suction height and the air quantity in the suction pipe, the initial priming process can last for approx. 0.5 min. 5 min. In the case of longer priming periods, top up again with water. If the pump is removed after use, it is essential that it is filled with water again the next time it is connected and started. 6.3 Stopping the engine Set the On/Off switch to OFF. Close the petrol cock. Running-in period: For the fi rst 20 hours of operation, the motor must not be operated at full throttle for too long. Misfires, start-up difficulties: Check whether fuel is flowing into the carburetor; the fuel filter is clean; the carburetor air valve is open; the air filter is clean; the spark plug is clean and the electrode gap is between 0.6 and 0.7mm. 7. Cleaning, maintenance, storage and ordering of spare parts Disconnect the spark plug boot before doing any cleaning and maintenance work! 7.1 Cleaning Keep all safety devices, air vents and the motor housing free of dirt and dust as far as possible. Wipe the equipment with a clean cloth or blow it with compressed air at low pressure. We recommend that you clean the device immediately each time you have finished using it. Clean the equipment regularly with a moist cloth and some soft soap. Do not use cleaning agents or solvents; these could attack the plastic parts of the equipment. Ensure that no water can seep into the device. 7.2 Maintenance In this connection, please also read the attached service information Changing the oil The engine oil is best changed when the engine is at working temperature Use only engine oil (10W40). Place the machine on a slightly inclined surface so that the oil drain plug is at the lower end (Figure 5a / Item A). Remove the oil filler screw (Figure 5a / Item B). Remove the oil drain plug and drain the warm engine oil into a suitable container Anl_GE_PW_45_SPK7.indb :57
 until the engine starts. 6. When the engine has been running for approx. 30 seconds, move the choke lever to Run.")
19 GB After all the oil has drained, screw in the oil drain plug and place the machine on a flat surface. Insert fresh engine oil up to the top mark on the oil dipstick (Figure 5b / Item H). Important. Only inset the oil dipstick to check the oil level. Do not screw it in. While the machine is working, the oil level must be between the two marks L and H (Figure 5b). Dispose of the waste oil properly Air filter Clean the air fi lter at regular intervals, and replace it if necessary. Remove the screw connection of the air filter cover (Fig. 6a) and take off the air filter cover. Remove the screw connection of the air filter element (Fig. 6b) and take off the air filter element. Clean the air filter by tapping it or blowing it with compressed air. Assemble in reverse order Spark plug Clean the spark plug at regular intervals, and replace it if necessary. Set the electrode gap to 0.6 mm. Remove the spark plug boot by twisting it (Figure 7) Remove the spark plug using a spark plug wrench Clean the spark plug with a copper wire brush or fit a new one. Assemble in reverse order. 7.4 Ordering replacement parts: Please quote the following data when ordering replacement parts: Type of machine Article number of the machine Identification number of the machine Replacement part number of the part required For our latest prices and information please go to 8. Disposal and recycling The equipment is supplied in packaging to prevent it from being damaged in transit. The raw materials in this packaging can be reused or recycled. The equipment and its accessories are made of various types of material, such as metal and plastic. Never place defective equipment in your household refuse. The equipment should be taken to a suitable collection center for proper disposal. If you do not know the whereabouts of such a collection point, you should ask in your local council offices. 7.3 Storage Rinse the pump thoroughly with water before lengthy periods of inactivity or winter storage. Close the petrol cock and allow the engine to run until it stops to empty the carburetor. Fill the tank fully to prevent rust formation. Remove the drain plug (Figure 3 / Item 12) and fully drain the pump housing. Store the machine in a dry place out of the reach of children Anl_GE_PW_45_SPK7.indb :57
 and take off the air filter cover. Remove the screw connection of the air filter element (Fig. 6b) and take off the air filter element.")
20 GB 9. Troubleshooting Fault Cause Remedy Engine does not start Pump fails to prime Insufficient pumping rate - Spark plug fouled - Air fi lter dirty - No fuel in the tank - Automatic oil cut-out has not responded - Intake valve not in the water - No water in the pump chamber - Air in the intake line - Intake cage (intake valve) blocked - Max. intake head exceeded - Intake head too high Important. The pump must not run dry. - Intake cage soiled - Water level falling rapidly and intake line is out of the water- - Pump performance reduced by deposits - Clean or replace the spark plug - Clean the air fi lter. - Top up fuel. - Check oil level, top up engine oil - Place the intake valve in the water - Fill the pump chamber with water through the fi ller neck - Check the intake line for leaks and seal it if necessary. - Clean intake cage - Check intake head and reduce it if necessary - Check intake head and reduce it if necessary - Clean intake cage - Place the intake line at a deeper level - Clean pump Anl_GE_PW_45_SPK7.indb :57

21 The reprinting or reproduction by any other means, in whole or in part, of documentation and papers accompanying products is permitted only with the express consent of the isc GmbH. Subject to technical changes GB Anl_GE_PW_45_SPK7.indb :57
22 GB Warranty provisions isc GmbH or the DIY store where you made you purchase guarantees the repair of defects or replacement of the equipment in accordance with the overview below. Statutory guarantee claims are unaffected. Category Example Warranty Defect with regard to material or 24 months construction Wear parts* Spark plug, air fi lter, fuel fi lter 6 months Consumables* Warranty only in case of an immediate defect (24 hours after purchase / date on the bill) Missing parts 5 work days * Not necessarily included in the scope of delivery! For consumables, wear parts and missing parts isc GmbH guarantees the correction of defects or a new delivery only if the defect is reported within 24 hours (consumables), 5 work days (missing parts) or 6 months (wear parts) after purchase and the purchase date is verifi ed with the bill. In case of defects concerning the material or construction, we kindly request you to submit the equipment together with the fully completed warranty card supplied with the equipment. It is important that you enter an exact description of the defect. To do so, answer the following questions: Did the equipment work at all or was it defective from the beginning? Did you notice anything (symptom or defect) prior to the failure? What malfunction does the equipment have in your opinion (main symptom)? Describe this malfunction Anl_GE_PW_45_SPK7.indb :57
23 GB Warranty certificate Dear Customer, All of our products undergo strict quality checks to ensure that they reach you in perfect condition. In the unlikely event that your device develops a fault, please contact our service department at the address shown on this guarantee card. Of course, if you would prefer to call us then we are also happy to offer our assistance under the service number printed below. Please note the following terms under which guarantee claims can be made: 1. These guarantee terms cover additional guarantee rights and do not affect your statutory warranty rights. We do not charge you for this guarantee. 2. Our guarantee only covers problems caused by material or manufacturing defects, and it is restricted to the rectifi cation of these defects or replacement of the device. Please note that our devices have not been designed for use in commercial, trade or industrial applications. Consequently, the guarantee is invalidated if the equipment is used in commercial, trade or industrial applications or for other equivalent activities. The following are also excluded from our guarantee: compensation for transport damage, damage caused by failure to comply with the installation/assembly instructions or damage caused by unprofessional installation, failure to comply with the operating instructions (e.g. connection to the wrong mains voltage or current type), misuse or inappropriate use (such as overloading of the device or use of non-approved tools or accessories), failure to comply with the maintenance and safety regulations, ingress of foreign bodies into the device (e.g. sand, stones or dust), effects of force or external infl uences (e.g. damage caused by the device being dropped) and normal wear resulting from proper operation of the device. This applies in particular to rechargeable batteries for which we nevertheless issue a guarantee period of 12 months. The guarantee is rendered null and void if any attempt is made to tamper with the device. 3. The guarantee is valid for a period of 2 years starting from the purchase date of the device. Guarantee claims should be submitted before the end of the guarantee period within two weeks of the defect being noticed. No guarantee claims will be accepted after the end of the guarantee period. The original guarantee period remains applicable to the device even if repairs are carried out or parts are replaced. In such cases, the work performed or parts fi tted will not result in an extension of the guarantee period, and no new guarantee will become active for the work performed or parts fi tted. This also applies when an on-site service is used. 4. In order to assert your guarantee claim, please send your defective device postage-free to the address shown below. Please enclose either the original or a copy of your sales receipt or another dated proof of purchase. Please keep your sales receipt in a safe place, as it is your proof of purchase. It would help us if you could describe the nature of the problem in as much detail as possible. If the defect is covered by our guarantee then your device will either be repaired immediately and returned to you, or we will send you a new device. Of course, we are also happy offer a chargeable repair service for any defects which are not covered by the scope of this guarantee or for units which are no longer covered. To take advantage of this service, please send the device to our service address. Also refer to the restrictions of this warranty concerning wear parts/consumables and missing parts as set forth in the warranty conditions in these operating instructions Anl_GE_PW_45_SPK7.indb :57
24 Sommaire 1. Consignes de sécurité 2. Description de l appareil et volume de livraison 3. Utilisation conforme à l affectation 4. Données techniques 5. Avant la mise en service 6. Commande 7. Nettoyage, maintenance, stockage et commande de pièces de rechange 8. Mise au rebut et recyclage 9. Elimination des erreurs F Anl_GE_PW_45_SPK7.indb :57
25 F Attention! Lors de l utilisation d appareils, il faut respecter certaines mesures de sécurité afi n d éviter des blessures et dommages. Veuillez donc lire attentivement ce mode d emploi/ces consignes de sécurité. Veillez à le conserver en bon état pour pouvoir accéder aux informations à tout moment. Si l appareil doit être remis à d autres personnes, veillez à leur remettre aussi ce mode d emploi/ ces consignes de sécurité. Nous déclinons toute responsabilité pour les accidents et dommages dus au non-respect de ce mode d emploi et des consignes de sécurité. 1. Consignes de sécurité Vous trouverez les consignes de sécurité correspondantes dans le cahier en annexe. Avertissement! Veuillez lire toutes les consignes de sécurité et instructions. Tout non-respect des consignes de sécurité et instructions peut provoquer une décharge électrique, un incendie et/ou des blessures graves. Conservez toutes les consignes de sécurité et instructions pour une consultation ultérieure. Explication des plaques signalétiques situées sur l appareil (fig. 8) 1. Attention! Lisez le mode d emploi. 2. Attention! Parties brûlantes. Gardez vos distances. 3. Attention! Éteignez le moteur pendant que vous mettez de l essence. 4. Attention! Ne pas exploiter dans les pièces non aérées Réglage de la vitesse de rotation - Levier étrangleur - Robinet d essence 2. Description de l appareil et volume de livraison 2.1 Description de l appareil (figure 1-4) 1. Couvercle du réservoir 2. Tubulure de remplissage avec vis 3. Raccord de pression 4. Vis de remplissage d huile 5. Vis de vidange d huile 6. Interrupteur Marche / Arrêt 7. Starter réversible 8. Robinet d essence 9. Levier étrangleur 10. Accélérateur 11. Raccord d aspiration 12. Vis de vidange d eau 13. 2x raccords de fi let 1 fi let ext x raccords de fi let 1,25 fi let ext x raccords de tuyau x pinces pour fl exible 17. 2x joints 18. 2x écrous-raccords 19. Panier d aspiration 20. Clé à bougie 21. Entonnoir de remplissage d huile Les positions 13 à 19 sont utilisées pour brancher la pompe sur une conduite d aspiration et de pression (non comprise dans la livraison). 2.2 Volume de livraison Veuillez contrôler si l article est complet à l aide de la description du volume de livraison. S il manque des pièces, il faut vous adresser dans un délai de 5 jours ouvrables maximum après votre achat à notre service après-vente ou au magasin de bricolage compétent le plus proche muni d une preuve d achat valable. Veuillez consulter pour cela le tableau des garanties dans les conditions de garantie à la fi n du mode d emploi. Ouvrez l emballage et prenez l appareil en le sortant avec précaution de l emballage. Retirez le matériel d emballage tout comme les sécurités d emballage et de transport (s il y en a). Vérifiez si la livraison est bien complète. Contrôlez si l appareil et ses accessoires ne sont pas endommagés par le transport. Conservez l emballage autant que possible jusqu à la fin de la période de garantie Anl_GE_PW_45_SPK7.indb :57
26 F Attention! L appareil et le matériel d emballage ne sont pas des jouets! Il est interdit de laisser des enfants jouer avec des sacs et des films en plastique et avec des pièces de petite taille. Ils risquent de les avaler et de s étouffer! Mode d emploi d origine Consignes de sécurité 3. Utilisation conforme à l affectation L appareil convient à arroser et à irriguer les espaces verts, les plates-bandes de légumes et les jardins tout comme à l exploitation d arroseurs automatiques. Lorsque l on emploie un fi ltre préalable, il est possible de prendre l eau à partir de pièces d eau, de ruisseaux, de fûts d eau de pluie, de citernes d eau de pluie de puits. Ne pas dépasser la température maximale (+35 C) du liquide refoulé en fonctionnement continu. Conviennent comme fl uide refoulé l eau claire (eau douce), l eau de pluie et les lessives légères. Il est interdit de refouler des liquides infl ammables, générant du gaz, explosifs ni agressifs (p. ex. de l essence, des acides, des solutions alcalines, la sève d écoulement de silos,...) tout comme les liquides contenant des substances abrasives (p. ex. du sable). La machine doit exclusivement être employée conformément à son affectation. Chaque utilisation allant au-delà de cette affectation est considérée comme non conforme. Pour les dommages en résultant ou les blessures de tout genre, le producteur décline toute responsabilité et l opérateur/l exploitant est responsable. Veillez au fait que nos appareils, conformément à leur affectation, n ont pas été construits, pour être utilisés dans un environnement professionnel, industriel ou artisanal. Nous déclinons toute responsabilité si l appareil est utilisé professionnellement, artisanalement ou dans des sociétés industrielles, tout comme pour toute activité équivalente. 4. Données techniques Type de moteur: Moteur quatre temps ; refroidi par air Puissance du moteur maxi. :...4,8 kw / 6,5 CV Cylindrée : cm 3 Vitesse nominale moteur : tr/min Carburant :...Essence normale sans plomb Contenance du réservoir :...3,6 l Quantité d huile / type : ml / 10W40 Bougie d allumage :... LG F6RTC Hauteur d aspiration maxi. :... 6,5 m Refoulement maxi. : l/h Hauteur manométrique maxi. : m Pression maxi. :... 2,6 bars Poids (réservoir vide) :...22,5 kg Raccord d aspiration / de pression : Raccord de tuyau flexible 2... Raccord fi leté 2 /1,25 /1 Niveau acoustique L WA : db Niveau de pression acoustique L pa :...85 db/k: 2,89 db 5. Avant la mise en service Nous préconisons fondamentalement l utilisation d un préfi ltre et d une garniture d aspiration comprenant une tête aspirante, un panier d aspiration et une soupape de retenue qui permettra d éviter de longs temps de réaspiration et un endommagement inutile de la pompe par des pierres et des corps étrangers solides. 5.1 Préparation de l appareil Remplir le moteur d huile pour moteur (voir également le repère Vidange d huile). Remplir le réservoir d essence. Placez l appareil dans un endroit plan et fixe. 5.2 Raccordement et pose de conduites d aspiration et de pression Raccordez la conduite d aspiration au raccord d aspiration (figure 3/pos. 11) et la conduite de pression au raccord de pression (figure 3/pos. 3). Poser la conduite d aspiration en la faisant monter de la prise d eau jusqu à la pompe. Evitez absolument de poser la conduite d aspiration au-dessus de la hauteur de la pompe. Les bulles d air dans la conduite d aspiration ralentissent et empêchent Anl_GE_PW_45_SPK7.indb :57
27 F l aspiration. La conduite d aspiration et celle de pression doivent être posées de telle manière qu elles ne puissent exercer aucune pression mécanique sur la pompe. La soupape d aspiration doit se trouver à une profondeur suffisante dans l eau pour que, lorsque le niveau d eau baisse, on puisse empêcher que la pompe ne marche à sec. Une conduite d aspiration non étanche empêche d aspirer l eau en raison de l air aspiré. Evitez d aspirer des corps étrangers (sable etc.) Utilisez un filtre préalable si nécessaire. 6. Commande Avant de faire démarrer le moteur, il faut remplir la pompe sur la tubulure de remplissage (fi gure 3/ pos. 2) de liquide de refoulement. Remarque : Il est conseillé de monter une soupape anti-retour dans la conduite d aspiration et de la remplir en sus d eau avant le premier service. 6.1 Démarrer le moteur : 1. Mettre l interrupteur Marche / Arrêt (fi gure 1/ pos. 6) sur «ON». 2. Mettre le robinet d essence (fi gure 4/pos. 8) sur «ON». 3. En démarrage à froid, mettre le levier excentrique (fi gure 4/ pos. 9) sur étrangleur. 4. Mettre le levier de l accélérateur (fi gure 4/ pos. 10) en position centrale. 5. Tirer vigoureusement la corde de lancement (fi gure 4/ pos. 7) pour faire démarrer le moteur. 6. Après un certain temps de service, mettre le levier excentrique sur Run. Lorsque le moteur est chaud, on peut laisser le levier étrangleur en position Run pendant le démarrage. 6.2 Aspiration : Pendant l aspiration, il faut ouvrir complètement les organes d arrêt présents dans la conduite de refoulement (gicleurs, soupapes, etc.) afin que l air se trouvant dans la conduite d aspiration puisse s échapper. En fonction de la hauteur d aspiration et de la quantité d air dans la conduite d aspiration, la première aspiration peut durer env. 0,5 min.- 5 min. Si les temps d aspiration sont longs, il faut remplir encore d eau. Si la pompe est à nouveau retirée après emploi, il faut alors absolument la remplir à nouveau d eau à son prochain branchement et à sa prochaine mise en service. 6.3 Eteindre le moteur : Mettre l interrupteur Marche/Arrêt en position OFF. Fermer le robinet d essence. Temps de rodage : pendant les 20 premières heures de service, il ne faut pas faire marcher le moteur à fond. Mauvais allumages, difficultés de démarrage: contrôler si le carburant s écoule dans le carburateur ; le filtre de carburant est propre ; le clapet d air du carburateur est ouvert ; le filtre à air est propre ; la bougie d allumage est propre et l écart entre les électrodes se trouve entre 0,6 et 0,7 mm. Explication des positions du levier de l accélérateur (fig. 4/pos. 10) : tortue : Moteur en marche à vide lièvre : Volume de refoulement maximum Anl_GE_PW_45_SPK7.indb :57
28 F 7. Nettoyage, maintenance, stockage et commande de pièces de rechange Retirez la cosse de bougie d allumage pour chaque travail de réglage et de maintenance. 7.1 Nettoyage Maintenez les dispositifs de protection, les fentes à air et le carter de moteur aussi propres (sans poussière) que possible. Frottez l appareil avec un chiffon propre ou soufflez dessus avec de l air comprimé à basse pression. Nous recommandons de nettoyer l appareil directement après chaque utilisation. Nettoyez l appareil régulièrement à l aide d un chiffon humide et un peu de savon. N utilisez aucun produit de nettoyage ni détergeant ; ils pourraient endommager les pièces en matières plastiques de l appareil. Veillez à ce qu aucune eau n entre à l intérieur de l appareil. 7.2 Maintenance Veuillez également respecter à ce propos les informations du service après-vente ci-jointes Vidange d huile Le changement d huile du moteur doit se faire lorsque le moteur est à température de service N utilisez que des huiles moteur (10W40). Déposez l appareil sur un support adéquat, en position légèrement inclinée contre le bouchon de vidange d huile (figure 5a/pos. A). Ouvrir le bouchon de remplissage d huile (figure 5a/ pos. B). Retirer le bouchon de vidange d huile et vider l huile pour moteur dans un récipient adéquat. Une fois qu il est complètement vidé, revissez le bouchon de vidange d huile et mettez l appareil à l horizontale. Remplissez de nouvelle huile pour moteur jusqu à la marque supérieure de la jauge de remplissage d huile (figure 5b/pos. H). Attention! Enfi chez simplement la jauge de niveau d huile pour le contrôle du niveau d huile. Ne la vissez pas! Pendant le fonctionnement, le niveau d huile doit se trouver entre les deux repères L et H (fi gure 5b). Mettez l huile usée au rebut conformément aux spécifi cations Filtre à air Nettoyez le fi ltre à air régulièrement et si nécessaire remplacez-le. Enlevez le raccord vissé du recouvrement du filtre à air (figure 6a) et retirez le recouvrement du filtre à air. Enlevez le raccord vissé de l élément du filtre (figure 6b) et retirez l élément du filtre à air. Nettoyez le filtre à air en le tapotant ou en le soufflant avec de l air comprimé. Le montage s effectue dans l ordre inverse des étapes Bougie d allumage Nettoyez régulièrement la bougie d allumage, remplacez-les au besoin. Régler la distance entre électrodes sur 0,6 mm. Retirez la cosse de bougie d allumage d un mouvement rotatif (figure 7) Retirez la bougie d allumage avec la clé à bougie Nettoyez la bougie d allumage avec la brosse à fils de cuivre ou encore en employer une nouvelle. Le montage est effectué dans l ordre inverse des étapes. 7.3 Stockage Lorsque vous ne vous servez pas de la pompe pendant une période prolongée ou que vous la rangez pour l hiver, rincez-la minutieusement à l eau. Fermez le robinet d essence et faites fonctionner le moteur jusqu à ce que celui-ci s arrête pour vidanger le carburateur. Remplissez le bac complètement pour éviter la rouille. Retirez le bouchon fileté de vidange (figure 3/ pos. 12) et vidanger le carter de pompe complètement. Stockez l appareil dans un endroit sec hors de portée des enfants Anl_GE_PW_45_SPK7.indb :57
TE-ID 500 E. Art.-Nr.: 42.596.10 I.-Nr.: 11012. Originalbetriebsanleitung Schlagbohrmaschine. Πρωτότυπες Οδηγίες χρήσης Κρουστικο δράπανο
 TE-ID 500 E D GR TR Originalbetriebsanleitung Schlagbohrmaschine Πρωτότυπες Οδηγίες χρήσης Κρουστικο δράπανο Orijinal Kullanma Talimatı Darbeli Matkap 5 Art.-Nr.: 42.596.10 I.-Nr.: 11012 Anleitung_TE_ID_500_E_SPK5.indb
GE-PW 45. Art.-Nr.: I.-Nr.: Originalbetriebsanleitung Benzin-Wasserpumpe. Original operating instructions Petrol water pump
 GE-PW 45 D GB F I E P GR Originalbetriebsanleitung Benzin-Wasserpumpe Original operating instructions Petrol water pump Mode d emploi d origine Pompe a eau a essence Istruzioni per l uso originali Pompa
the total number of electrons passing through the lamp.
 1. A 12 V 36 W lamp is lit to normal brightness using a 12 V car battery of negligible internal resistance. The lamp is switched on for one hour (3600 s). For the time of 1 hour, calculate (i) the energy
Εμπορική αλληλογραφία Ηλεκτρονική Αλληλογραφία
 - Εισαγωγή Sehr geehrter Herr Präsident, Sehr geehrter Herr Präsident, Εξαιρετικά επίσημη επιστολή, ο παραλήπτης έχει ένα ειδικό τίτλο ο οποίος πρέπει να χρησιμοποιηθεί αντί του ονόματος του Sehr geehrter
, / 230 4,6 / 2, , / 230 5,4 / 2,7
 Einstufige Kompressoren mit Einphasen-Wechselstrom Motor; Volumenstrom bis zu 335 m 3 /h Single stage compressors with single phase AC motor; volume flow up to 335 m 3 /h Bestell-Nr. Motor (IP55, Wärmeklasse
Instruction Execution Times
 1 C Execution Times InThisAppendix... Introduction DL330 Execution Times DL330P Execution Times DL340 Execution Times C-2 Execution Times Introduction Data Registers This appendix contains several tables
Περιεχόμενα / Contents
 Aερόθερμo / Fan Heater PTC-906 Περιεχόμενα / Contents GR... Σελίδες 3-8 EN... Pages 9-11 2 GR Ευχαριστούμε που επιλέξατε μια συσκευή της γκάμας θερμαντικών IZZY. Σημαντικές Οδηγίες Ασφαλείας Τα Μέρη της
English PDFsharp is a.net library for creating and processing PDF documents 'on the fly'. The library is completely written in C# and based
 English PDFsharp is a.net library for creating and processing PDF documents 'on the fly'. The library is completely written in C# and based exclusively on safe, managed code. PDFsharp offers two powerful
Wenn ihr nicht werdet wie die Kinder...
 Wenn ihr nicht werdet wie die Kinder... . Der Memoriam-Garten Schön, dass ich mir keine Sorgen machen muss! Mit dem Memoriam-Garten bieten Ihnen Friedhofsgärtner, Steinmetze
ZLW Series. Single-stage Monoblock Centrifugal Pump ZL PUMP GROUP.,LTD
 ZLW Series Single-stage Monoblock Centrifugal Pump ZL PUMP GROUP.,LTD 1 Application Apply as the transportation of liquids in the fields of air condition, heating, sanitary water, water treatment cooling,
Εγκατάσταση λογισμικού και αναβάθμιση συσκευής Device software installation and software upgrade
 Για να ελέγξετε το λογισμικό που έχει τώρα η συσκευή κάντε κλικ Menu > Options > Device > About Device Versions. Στο πιο κάτω παράδειγμα η συσκευή έχει έκδοση λογισμικού 6.0.0.546 με πλατφόρμα 6.6.0.207.
Capacitors - Capacitance, Charge and Potential Difference
 Capacitors - Capacitance, Charge and Potential Difference Capacitors store electric charge. This ability to store electric charge is known as capacitance. A simple capacitor consists of 2 parallel metal
Math 6 SL Probability Distributions Practice Test Mark Scheme
 Math 6 SL Probability Distributions Practice Test Mark Scheme. (a) Note: Award A for vertical line to right of mean, A for shading to right of their vertical line. AA N (b) evidence of recognizing symmetry
EE512: Error Control Coding
 EE512: Error Control Coding Solution for Assignment on Finite Fields February 16, 2007 1. (a) Addition and Multiplication tables for GF (5) and GF (7) are shown in Tables 1 and 2. + 0 1 2 3 4 0 0 1 2 3
The Simply Typed Lambda Calculus
 Type Inference Instead of writing type annotations, can we use an algorithm to infer what the type annotations should be? That depends on the type system. For simple type systems the answer is yes, and
Strain gauge and rosettes
 Strain gauge and rosettes Introduction A strain gauge is a device which is used to measure strain (deformation) on an object subjected to forces. Strain can be measured using various types of devices classified
ΑΚΑ ΗΜΙΑ ΕΜΠΟΡΙΚΟΥ ΝΑΥΤΙΚΟΥ ΜΑΚΕ ΟΝΙΑΣ ΣΧΟΛΗ ΜΗΧΑΝΙΚΩΝ ΠΤΥΧΙΑΚΗ ΕΡΓΑΣΙΑ ΘΕΜΑ : ΧΗΜΙΚΑ ΠΡΟΣΘΕΤΑ ΠΟΥ ΠΡΟΟΡΙΖΟΝΤΑΙ ΓΙΑ ΤΟ ΝΕΡΟ ΤΟΥ ΑΤΜΟΛΕΒΗΤΑ
 ΑΚΑ ΗΜΙΑ ΕΜΠΟΡΙΚΟΥ ΝΑΥΤΙΚΟΥ ΜΑΚΕ ΟΝΙΑΣ ΣΧΟΛΗ ΜΗΧΑΝΙΚΩΝ ΠΤΥΧΙΑΚΗ ΕΡΓΑΣΙΑ ΘΕΜΑ : ΧΗΜΙΚΑ ΠΡΟΣΘΕΤΑ ΠΟΥ ΠΡΟΟΡΙΖΟΝΤΑΙ ΓΙΑ ΤΟ ΝΕΡΟ ΤΟΥ ΑΤΜΟΛΕΒΗΤΑ ΣΠΟΥ ΑΣΤΗΣ : ΑΓΟΡΑΣΤΟΣ ΧΡΥΣΟΒΑΛΑΝΤΗΣ ΕΠΙΒΛΕΠΟΥΣΑ ΚΑΘΗΓΗΤΡΙΑ :
4K HDMI Splitter 1x4. User s Guide / Bedienungsanleitung / Εγχειρίδιο Χρήστη
 4K HDMI Splitter 1x4 User s Guide / Bedienungsanleitung / Εγχειρίδιο Χρήστη INTRODUCTION The EDISION 4K HDMI Splitter 1x4 uses a single HDMI input source, to distribute it to 4 HDMI outputs. The splitter
Potential Dividers. 46 minutes. 46 marks. Page 1 of 11
 Potential Dividers 46 minutes 46 marks Page 1 of 11 Q1. In the circuit shown in the figure below, the battery, of negligible internal resistance, has an emf of 30 V. The pd across the lamp is 6.0 V and
Modbus basic setup notes for IO-Link AL1xxx Master Block
 n Modbus has four tables/registers where data is stored along with their associated addresses. We will be using the holding registers from address 40001 to 49999 that are R/W 16 bit/word. Two tables that
(1) Describe the process by which mercury atoms become excited in a fluorescent tube (3)
 Describe the process by which mercury atoms become excited in a fluorescent tube (3)") Q1. (a) A fluorescent tube is filled with mercury vapour at low pressure. In order to emit electromagnetic radiation the mercury atoms must first be excited. (i) What is meant by an excited atom? (1) (ii)
Q1. (a) A fluorescent tube is filled with mercury vapour at low pressure. In order to emit electromagnetic radiation the mercury atoms must first be excited. (i) What is meant by an excited atom? (1) (ii)
[1] P Q. Fig. 3.1
![[1] P Q. Fig. 3.1](/thumbs/79/80362156.jpg "[1] P Q. Fig. 3.1") 1 (a) Define resistance....... [1] (b) The smallest conductor within a computer processing chip can be represented as a rectangular block that is one atom high, four atoms wide and twenty atoms long. One
1 (a) Define resistance....... [1] (b) The smallest conductor within a computer processing chip can be represented as a rectangular block that is one atom high, four atoms wide and twenty atoms long. One
Right Rear Door. Let's now finish the door hinge saga with the right rear door
 Right Rear Door Let's now finish the door hinge saga with the right rear door You may have been already guessed my steps, so there is not much to describe in detail. Old upper one file:///c /Documents
Εγγύηση καλής λειτουργίας
 Εγγύηση καλής λειτουργίας Τα Smartphone Bitmore συνοδεύονται από Εγγύηση Καλής Λειτουργίας Δύο (2) Ετών. Please read carefully the Παρακαλούμε διαβάστε προσεκτικά τους όρους εγγύησης που συνοδεύουν το
Advanced Subsidiary Unit 1: Understanding and Written Response
 Write your name here Surname Other names Edexcel GE entre Number andidate Number Greek dvanced Subsidiary Unit 1: Understanding and Written Response Thursday 16 May 2013 Morning Time: 2 hours 45 minutes
Εμπορική αλληλογραφία Ηλεκτρονική Αλληλογραφία
 - Εισαγωγή ελληνικά Αξιότιμε κύριε Πρόεδρε, γερμανικά Sehr geehrter Herr Präsident, Εξαιρετικά επίσημη επιστολή, ο παραλήπτης έχει ένα ειδικό τίτλο ο οποίος πρέπει να χρησιμοποιηθεί αντί του ονόματος του
Lowara SPECIFICATIONS
 SH Series Centrifugal pumps entirely made of AISI 36 stainless steel according to EN 733 (ex DIN 24255). Designed to pump hot, cold and moderately aggressive liquids. Available versions: SHE Close-coupled
Precision Metal Film Fixed Resistor Axial Leaded
 Features EIA standard colour-coding Non-Flame type available Low noise and voltage coefficient Low temperature coefficient range Wide precision range in small package Too low or too high ohmic value can
Assalamu `alaikum wr. wb.
 LUMP SUM Assalamu `alaikum wr. wb. LUMP SUM Wassalamu alaikum wr. wb. Assalamu `alaikum wr. wb. LUMP SUM Wassalamu alaikum wr. wb. LUMP SUM Lump sum lump sum lump sum. lump sum fixed price lump sum lump
Digital Inverter Generator Item No. PSi2100G Mfg. No Replacement Parts List
 Digital Inverter Generator Item No. PSi100G Mfg. No. 09093030 Replacement Parts List 99100076 1-3-1 (Rev:01) OWT INDUSTRIES, INC. P.O. Box 3, Highway Pickens, SC 9671 USA 1-77-617-301 01 00 3 11 11 DIGITAL
SPARE PARTS LIST. for. Infrared oil heater. Model. Daystar. Type. PH5 for 120V 60Hz. May, 2017
 SPARE PARTS LIST for Infrared oil heater Model Daystar Type PH5 for 120V 60Hz May, 2017 *PRICES AND SPECIFICATIONS ARE SUBJECT TO CHANGE WITHOUT NOTICE..* 2017 J.S.O'will, Inc.. Shizuoka Seiki Co. Ltd.
DC-DC Constant Current Step-Down LED driver LDD-300L LDD-350L LDD-500L LDD-600L LDD-700L CURRENT RANGE
 SPECIFICATION ORDER NO. LDD-00L LDD-0L LDD-00L LDD-00L LDD-700L CURRENT RANGE 00mA 0mA 00mA VOLTAGE RANGE Note. ~ VDC for LDD-00~700L/LW ; ~ 8VDC for LDD-00~700LS CURRENT ACCURACY (Typ.) ±% at VDC input
ΚΥΠΡΙΑΚΗ ΕΤΑΙΡΕΙΑ ΠΛΗΡΟΦΟΡΙΚΗΣ CYPRUS COMPUTER SOCIETY ΠΑΓΚΥΠΡΙΟΣ ΜΑΘΗΤΙΚΟΣ ΔΙΑΓΩΝΙΣΜΟΣ ΠΛΗΡΟΦΟΡΙΚΗΣ 6/5/2006
 Οδηγίες: Να απαντηθούν όλες οι ερωτήσεις. Ολοι οι αριθμοί που αναφέρονται σε όλα τα ερωτήματα είναι μικρότεροι το 1000 εκτός αν ορίζεται διαφορετικά στη διατύπωση του προβλήματος. Διάρκεια: 3,5 ώρες Καλή
Technisches Handbuch. Pergola Top Star 120X70. metaform Bescha ungssysteme
 02 Technisches Handbuch Pergola Top Star 120X70 Exklusiv von Metaform ΑVΕΕ entworfen, ist es die Innova on bei der professionellen Bescha ung, denn das wegweisende Hebesystem erlaubt es Ihnen, sie an jeder
Phys460.nb Solution for the t-dependent Schrodinger s equation How did we find the solution? (not required)
") Phys460.nb 81 ψ n (t) is still the (same) eigenstate of H But for tdependent H. The answer is NO. 5.5.5. Solution for the tdependent Schrodinger s equation If we assume that at time t 0, the electron starts
Phys460.nb 81 ψ n (t) is still the (same) eigenstate of H But for tdependent H. The answer is NO. 5.5.5. Solution for the tdependent Schrodinger s equation If we assume that at time t 0, the electron starts
 60 61 62 63 64 65 Ο Δ Η Γ Ι Ε Σ Σ Υ Ν Τ Η Ρ Η Σ Η Σ Τ Ω Ν Κ Ο Υ Φ Ω Μ Α Τ Ω Ν Ι Ν S T R U C T I N O N S C O N C E R N I N G Τ Η Ε C A S E M E N T S M A I N T E N A N C E Ο τακτικός καθαρισμός των βαμμένων
BFN3000 ΕΠΙΤΡΑΠΕΖΙΟΣ ΑΝΕΜΙΣΤΗΡΑΣ. Owner s manual. Μετάφραση του πρωτοτύπου των οδηγιών χρήσης
 BFN3000 ΕΠΙΤΡΑΠΕΖΙΟΣ ΑΝΕΜΙΣΤΗΡΑΣ Μετάφραση του πρωτοτύπου των οδηγιών χρήσης Owner s manual www.bormanntools.com GR Οδηγίες ασφαλούς λειτουργίας 1. Τα χαρακτηριστικά της παροχής ηλεκτρικού ρεύματος θα
ΞΕΝΟΔΟΧΕΙΟ ΝΕΟΝ ΑΣΤΡΟΝ
 ΞΕΝΟΔΟΧΕΙΟ ΠΛ. ΛΑΟΥ 5 ΤΗΛ 22310 26245 - Wifi: hot3l1234 ΠΛΗΡΟΦΟΡΙΕΣ ΠΡΟΣ ΤΟΥ ΠΕΛΑΤΕΣ Μετασχηματιστές και καλώδια προέκτασης είναι διαθέσιμα στην Ρεσεψιόν. Στην Ελλάδα η τάση είναι 220v. Ψύκτης με φιλτραρισμένο
Στο εστιατόριο «ToDokimasesPrinToBgaleisStonKosmo?» έξω από τους δακτυλίους του Κρόνου, οι παραγγελίες γίνονται ηλεκτρονικά.
 Διαστημικό εστιατόριο του (Μ)ΑστροΈκτορα Στο εστιατόριο «ToDokimasesPrinToBgaleisStonKosmo?» έξω από τους δακτυλίους του Κρόνου, οι παραγγελίες γίνονται ηλεκτρονικά. Μόλις μια παρέα πελατών κάτσει σε ένα
La Déduction naturelle
 La Déduction naturelle Pierre Lescanne 14 février 2007 13 : 54 Qu est-ce que la déduction naturelle? En déduction naturelle, on raisonne avec des hypothèses. Qu est-ce que la déduction naturelle? En déduction
ΚΥΠΡΙΑΚΗ ΕΤΑΙΡΕΙΑ ΠΛΗΡΟΦΟΡΙΚΗΣ CYPRUS COMPUTER SOCIETY ΠΑΓΚΥΠΡΙΟΣ ΜΑΘΗΤΙΚΟΣ ΔΙΑΓΩΝΙΣΜΟΣ ΠΛΗΡΟΦΟΡΙΚΗΣ 19/5/2007
 Οδηγίες: Να απαντηθούν όλες οι ερωτήσεις. Αν κάπου κάνετε κάποιες υποθέσεις να αναφερθούν στη σχετική ερώτηση. Όλα τα αρχεία που αναφέρονται στα προβλήματα βρίσκονται στον ίδιο φάκελο με το εκτελέσιμο
Heat exchanger. Type WT. For the reheating of airflows in rectangular ducting PD WT 1. 03/2017 DE/en
 X X testregistrierung Heat exchanger Type For the reheating of airflows in rectangular ducting Rectangular hot water heat exchanger for the reheating of airflows, suitable for VAV terminal units Type TVR,
ΟΔΗΓΙΕΣ ΕΓΚΑΤΑΣTΑΣΗΣ ΓΙΑ ΠΑΤΩΜΑ WPC INSTALLATION GUIDE FOR WPC DECKING
 1/12 ΟΔΗΓΙΕΣ ΕΓΚΑΤΑΣTΑΣΗΣ ΓΙΑ ΠΑΤΩΜΑ WPC INSTALLATION GUIDE FOR WPC DECKING Ανοίγουμε τρύπες Ø8 x 80mm στο σημείο κατασκευής, με τρυπάνι. To προτεινόμενο πλάτος και μήκος μεταξύ των 2 οπών να είναι 30-35εκ.,
derivation of the Laplacian from rectangular to spherical coordinates
 derivation of the Laplacian from rectangular to spherical coordinates swapnizzle 03-03- :5:43 We begin by recognizing the familiar conversion from rectangular to spherical coordinates (note that φ is used
UDZ Swirl diffuser. Product facts. Quick-selection. Swirl diffuser UDZ. Product code example:
 UDZ Swirl diffuser Swirl diffuser UDZ, which is intended for installation in a ventilation duct, can be used in premises with a large volume, for example factory premises, storage areas, superstores, halls,
ΟΔΗΓΙΕΣ ΣΥΝΑΡΜΟΛΟΓΗΣΗΣ/ ASSEMBLY INSTRUCTION ΤΟΜΜΥ ΚΡΕΒΑΤΙ/BED
 ΟΔΗΓΙΕΣ ΣΥΝΑΡΜΟΛΟΓΗΣΗΣ/ ASSEMBLY INSTRUCTION ΤΟΜΜΥ ΚΡΕΒΑΤΙ/BED 1. Παρακαλώ πολύ διαβάστε προσεκτικά τις οδηγίες πριν την συναρμολόγηση/ Please read the instructions carefully. 2. Παρακαλώ πολύ όπως ελέγξτε
HOMEWORK 4 = G. In order to plot the stress versus the stretch we define a normalized stretch:
 HOMEWORK 4 Problem a For the fast loading case, we want to derive the relationship between P zz and λ z. We know that the nominal stress is expressed as: P zz = ψ λ z where λ z = λ λ z. Therefore, applying
Section 8.3 Trigonometric Equations
 99 Section 8. Trigonometric Equations Objective 1: Solve Equations Involving One Trigonometric Function. In this section and the next, we will exple how to solving equations involving trigonometric functions.
DC-DC Constant Current Step-Down LED driver LDD-300L LDD-350L LDD-500L LDD-600L LDD-700L CURRENT RANGE
 SPECIFICATION ORDER NO. LDD-00L LDD-0L LDD-00L LDD-00L LDD-700L CURRENT RANGE 00mA 0mA 00mA 00mA VOLTAGE RANGE Note. ~ VDC for LDD-00~700L/LW ; ~ 8VDC for LDD-00~700LS CURRENT ACCURACY (Typ.) ±% at VDC
VENERE. GR. Οδηγός Χρήσης EN. User Guide
 GR. Οδηγός Χρήσης EN. User Guide ΣΗΜΑΝΤΙΚΟ! ΚΡΑΤΗΣΤΕ ΓΙΑ ΜΕΛΛΟΝΤΙΚΗ ΑΝΑΦΟΡΑ: ΔΙΑΒΑΣΤΕ ΠΡΟΣΕΚΤΙΚΑ Κίνδυνος από φωτιά και άλλες πηγές έντονης θερμότητας, όπως ηλεκτρικές αντιστάσεις, υγραέριο, φωτιά κλπ,
SPEEDO AQUABEAT. Specially Designed for Aquatic Athletes and Active People
 SPEEDO AQUABEAT TM Specially Designed for Aquatic Athletes and Active People 1 2 Decrease Volume Increase Volume Reset EarphonesUSBJack Power Off / Rewind Power On / Fast Forward Goggle clip LED Status
Lowara APPLICATIONS MATERIALS. General Catalogue
 FH Series Centrifugal electric pumps according to EN 733 (ex DIN 24255). Electric pumps with pump casing in cast iron and impeller in AISI 36* stainless steel, designed to pump hot, cold and moderately
Approximation of distance between locations on earth given by latitude and longitude
 Approximation of distance between locations on earth given by latitude and longitude Jan Behrens 2012-12-31 In this paper we shall provide a method to approximate distances between two points on earth
RSDW08 & RDDW08 series
 /,, MODEL SELECTION TABLE INPUT ORDER NO. INPUT VOLTAGE (RANGE) NO LOAD INPUT CURRENT FULL LOAD VOLTAGE CURRENT EFFICIENCY (Typ.) CAPACITOR LOAD (MAX.) RSDW08F-03 344mA 3.3V 2000mA 80% 2000μF RSDW08F-05
Hauptseminar Mathematische Logik Pcf Theorie (S2A2) Das Galvin-Hajnal Theorem
 Das Galvin-Hajnal Theorem") Hauptseminar Mathematische Logik Pcf Theorie (S2A2) Das Galvin-Hajnal Theorem Jonas Fiege 21 Juli 2009 1 Theorem 1 (Galvin-Hajnal [1975]) Sei ℵ α eine singuläre, starke Limes-Kardinalzahl mit überabzählbarer
Hauptseminar Mathematische Logik Pcf Theorie (S2A2) Das Galvin-Hajnal Theorem Jonas Fiege 21 Juli 2009 1 Theorem 1 (Galvin-Hajnal [1975]) Sei ℵ α eine singuläre, starke Limes-Kardinalzahl mit überabzählbarer
Econ 2110: Fall 2008 Suggested Solutions to Problem Set 8 questions or comments to Dan Fetter 1
 Eon : Fall 8 Suggested Solutions to Problem Set 8 Email questions or omments to Dan Fetter Problem. Let X be a salar with density f(x, θ) (θx + θ) [ x ] with θ. (a) Find the most powerful level α test
1. Πως μειώνεται η ταχύτητα των καυσαερίων από το σημείο εξόδου τους στο ακροφύσιο εξόδου του κινητήρα? 2. Με ποιους τρόπους γίνεται η σήμανση της
 1. Πως μειώνεται η ταχύτητα των καυσαερίων από το σημείο εξόδου τους στο ακροφύσιο εξόδου του κινητήρα? 2. Με ποιους τρόπους γίνεται η σήμανση της επικίνδυνης περιοχής μπροστά από το κινητήρα? 3. Ποιοιείναιοικύκλοιασφαλείαςγύρωαπότοαεροσκάφοςκαιτιαντιπροσωπεύουν?
3 Lösungen zu Kapitel 3
 3 Lösungen zu Kapitel 3 31 Lösungen der Aufgaben zu Abschnitt 31 311 Lösung Die Abbildung D : { R 4 R 4 R 4 R 4 R, a 1, a 2, a 3, a 4 ) D( a 1, a 2, a 3, a 4 ) definiere eine Determinantenform (auf R 4
2 Composition. Invertible Mappings
 Arkansas Tech University MATH 4033: Elementary Modern Algebra Dr. Marcel B. Finan Composition. Invertible Mappings In this section we discuss two procedures for creating new mappings from old ones, namely,
ΕΛΛΗΝΙΚΗ ΔΗΜΟΚΡΑΤΙΑ Ανώτατο Εκπαιδευτικό Ίδρυμα Πειραιά Τεχνολογικού Τομέα. Ξενόγλωσση Τεχνική Ορολογία
 ΕΛΛΗΝΙΚΗ ΔΗΜΟΚΡΑΤΙΑ Ανώτατο Εκπαιδευτικό Ίδρυμα Πειραιά Τεχνολογικού Τομέα Ξενόγλωσση Τεχνική Ορολογία Ενότητα: Principles of an Internal Combustion Engine Παναγιώτης Τσατσαρός Τμήμα Μηχανολόγων Μηχανικών
Code Breaker. TEACHER s NOTES
 TEACHER s NOTES Time: 50 minutes Learning Outcomes: To relate the genetic code to the assembly of proteins To summarize factors that lead to different types of mutations To distinguish among positive,
The Nottingham eprints service makes this work by researchers of the University of Nottingham available open access under the following conditions.
 Luevorasirikul, Kanokrat (2007) Body image and weight management: young people, internet advertisements and pharmacists. PhD thesis, University of Nottingham. Access from the University of Nottingham repository:
Οδηγίες Χρήσης BWR5106
 Οδηγίες Χρήσης BWR5106 Περιγραφή εργαλείου Οι αντλίες χειρός είναι ένα εργαλείο με την ικανότητα, πιέζοντας τον λεβιέ πάνω κάτω να πρεσάρει γράσο σε μεγάλη πίεση και με την βοήθεια αυτής να γρασάρει οπού
Safety Barriers. 6 Safety Barriers KP00 III en Preferred products in stock or available at short notice
 5-- KP III en Contents Single-Channel INTRINSPAK 9 8 Dual-Channel INTRINSPAK 9 with Electronic Current Limitation INTRINSPAK 94 You will find further information on the Internet www.stahl.de General Information
Paper Reference. Paper Reference(s) 1776/04 Edexcel GCSE Modern Greek Paper 4 Writing. Thursday 21 May 2009 Afternoon Time: 1 hour 15 minutes
 1776/04 Edexcel GCSE Modern Greek Paper 4 Writing. Thursday 21 May 2009 Afternoon Time: 1 hour 15 minutes") Centre No. Candidate No. Paper Reference(s) 1776/04 Edexcel GCSE Modern Greek Paper 4 Writing Thursday 21 May 2009 Afternoon Time: 1 hour 15 minutes Materials required for examination Nil Paper Reference
Centre No. Candidate No. Paper Reference(s) 1776/04 Edexcel GCSE Modern Greek Paper 4 Writing Thursday 21 May 2009 Afternoon Time: 1 hour 15 minutes Materials required for examination Nil Paper Reference
Illustrated Parts List 10A900
 FORM MS 0669 07/10/2008 REPLACES FORM MS 0669 05/19/2008 FILE IN SECT. 2 OF SERVICE MANUAL 10A900 Illustrated Parts List Model Series 10A900 TYPE NUMBERS 0015 through 2299. TABLE OF CONTENTS Air Cleaner.........................
Üzleti élet Rendelés. Rendelés - Megrendelés. Rendelés - Visszaigazolás. Hivatalos, kísérleti
 - Megrendelés Εξετάζουμε την αγορά... Hivatalos, kísérleti Είμαστε στην ευχάριστη θέση να δώσουμε την παραγγελία μας στην εταιρεία σας για... Θα θέλαμε να κάνουμε μια παραγγελία. Επισυνάπτεται η παραγγελία
Bbc7000 ΦΟΡΤΙΣΤΗΣ - ΕΚΚΙΝΗΤΗΣ ΜΠΑΤΑΡΙΑΣ. Art Nr: Owner s manual. Μετάφραση του πρωτοτύπου των οδηγιών χρήσης
 Bbc7000 ΦΟΡΤΙΣΤΗΣ - ΕΚΚΙΝΗΤΗΣ ΜΠΑΤΑΡΙΑΣ Μετάφραση του πρωτοτύπου των οδηγιών χρήσης Art Nr: 022213 Owner s manual Διαβάστε προσεχτικά όλες τις οδηγίες χρήσης και ασφάλειας πριν την λειτουργία του μηχανήματος.
ΑΙΤΗΣΗ ΓΙΑ ΑΔΕΙΟΔΟΤΗΣΗ ΣΕ ΛΙΜΕΝΙΚΗ ΠΕΡΙΟΧΗ PERMIT APPLICATION WITHIN PORT AREA 1. ΣΤΟΙΧΕΙΑ ΕΤΑΙΡΕΙΑΣ COMPANY DETAILS
 ΑΙΤΗΣΗ ΓΙΑ ΑΔΕΙΟΔΟΤΗΣΗ ΣΕ ΛΙΜΕΝΙΚΗ ΠΕΡΙΟΧΗ 1. ΣΤΟΙΧΕΙΑ ΕΤΑΙΡΕΙΑΣ COMPANY DETAILS Ονομα εταιρείας / Company name Περίοδος άδειας: Start End Τίτλος έργου / Project title Permit duration Αριθμός εγγραφής
38BXCS STANDARD RACK MODEL. DCS Input/Output Relay Card Series MODEL & SUFFIX CODE SELECTION 38BXCS INSTALLATION ORDERING INFORMATION RELATED PRODUCTS
 DCS Input/Output Relay Card Series STANDARD RACK MODEL 38BXCS MODEL & SUFFIX CODE SELECTION 38BXCS MODEL CONNECTOR Y1 :Yokogawa KS2 cable use Y2 :Yokogawa KS9 cable use Y6 :Yokogawa FA-M3/F3XD32-3N use
ΚΥΠΡΙΑΚΟΣ ΣΥΝΔΕΣΜΟΣ ΠΛΗΡΟΦΟΡΙΚΗΣ CYPRUS COMPUTER SOCIETY 21 ος ΠΑΓΚΥΠΡΙΟΣ ΜΑΘΗΤΙΚΟΣ ΔΙΑΓΩΝΙΣΜΟΣ ΠΛΗΡΟΦΟΡΙΚΗΣ Δεύτερος Γύρος - 30 Μαρτίου 2011
 Διάρκεια Διαγωνισμού: 3 ώρες Απαντήστε όλες τις ερωτήσεις Μέγιστο Βάρος (20 Μονάδες) Δίνεται ένα σύνολο από N σφαιρίδια τα οποία δεν έχουν όλα το ίδιο βάρος μεταξύ τους και ένα κουτί που αντέχει μέχρι
IHS 1500 W. Art.-Nr.: I.-Nr.: Originalbetriebsanleitung Halogenheizer. Original operating instructions Halogen Heater
 IHS 1500 W D GB F NL GR Originalbetriebsanleitung Halogenheizer Original operating instructions Halogen Heater Instructions d origine Chauffage halogène Originele handleiding Halogeenverwarmer Πρωτότυπες
Οδηγίες Χρήσης / Instructions Manual Ελληνικά (GR) English (EN) Αντικολλητική Γάστρα Non-Stick Roaster
 English (EN) Αντικολλητική Γάστρα Non-Stick Roaster") ΓΙΑ ΠΕΡΙΣΣΟΤΕΡΕΣ ΠΛΗΡΟΦΟΡΙΕΣ: FOR FURTHER INFORMATION: Χ. ΜΠΕΝΡΟΥΜΠΗ & ΥΙΟΣ Α.Ε. H. BENRUBI & FILS S.A. Αγ. Θωμά 27, 15124, Μαρούσι-Αθήνα 27 Aghiou Thoma str. GR 15124, Maroussi-Athens Τηλ. 210 6156400,
ΓΙΑ ΠΕΡΙΣΣΟΤΕΡΕΣ ΠΛΗΡΟΦΟΡΙΕΣ: FOR FURTHER INFORMATION: Χ. ΜΠΕΝΡΟΥΜΠΗ & ΥΙΟΣ Α.Ε. H. BENRUBI & FILS S.A. Αγ. Θωμά 27, 15124, Μαρούσι-Αθήνα 27 Aghiou Thoma str. GR 15124, Maroussi-Athens Τηλ. 210 6156400,
Quick Installation Guide
 A Installation 1 F H B E C D G 2 www.trust.com/17528/faq Quick Installation Guide C C D Freewave Wireless Audio Set 17528/ 17529 D Installation Configuration Windows XP 4 5 8 Windows 7/ Vista 6 7 9 10
Στοιχεία του/της συζύγου ή του/ της συντρόφου του προσώπου που υποβάλλει την αίτηση
 Επώνυμο και όνομα του προσώπου που υποβάλλει την αίτηση Name und der antragstellenden Person Αριθμός επιδόματος τέκνων Kindergeld-Nr. F K KG 51R Παράρτημα Εξωτερικό (Ausland) της αίτησης για γερμανικό
DESIGN OF MACHINERY SOLUTION MANUAL h in h 4 0.
 DESIGN OF MACHINERY SOLUTION MANUAL -7-1! PROBLEM -7 Statement: Design a double-dwell cam to move a follower from to 25 6, dwell for 12, fall 25 and dwell for the remader The total cycle must take 4 sec
Aluminum Electrolytic Capacitors (Large Can Type)
") Aluminum Electrolytic Capacitors (Large Can Type) Snap-In, 85 C TS-U ECE-S (U) Series: TS-U Features General purpose Wide CV value range (33 ~ 47,000 µf/16 4V) Various case sizes Top vent construction
Aluminum Electrolytic Capacitors (Large Can Type) Snap-In, 85 C TS-U ECE-S (U) Series: TS-U Features General purpose Wide CV value range (33 ~ 47,000 µf/16 4V) Various case sizes Top vent construction
Informative Leaflet on the Deposit Guarantee Scheme. Ενημερωτικό Δελτίο για το Σύστημα Εγγύησης των Καταθέσεων
 Informative Leaflet on the Deposit Guarantee Scheme Ενημερωτικό Δελτίο για το Σύστημα Εγγύησης των Καταθέσεων Deposit Guarantee Scheme Basic information about the protection of deposits EN Deposits in
Test Data Management in Practice
 Problems, Concepts, and the Swisscom Test Data Organizer Do you have issues with your legal and compliance department because test environments contain sensitive data outsourcing partners must not see?
QUICKTRONIC PROFESSIONAL QTP5
 osram.com QUICKTRONIC PROFESSIONA QTP5 ECG for T5/ 16mm, T8/ 26mm, DUUX fluorescent lamps QTP5 i.e. UMIUX T5 HO ES 01 Product Features: Up to 100.000 hours lifetime 1 amp start with optimized filament
The challenges of non-stable predicates
 The challenges of non-stable predicates Consider a non-stable predicate Φ encoding, say, a safety property. We want to determine whether Φ holds for our program. The challenges of non-stable predicates
Example Sheet 3 Solutions
 Example Sheet 3 Solutions. i Regular Sturm-Liouville. ii Singular Sturm-Liouville mixed boundary conditions. iii Not Sturm-Liouville ODE is not in Sturm-Liouville form. iv Regular Sturm-Liouville note
Οδηγίες Αγοράς Ηλεκτρονικού Βιβλίου Instructions for Buying an ebook
 Οδηγίες Αγοράς Ηλεκτρονικού Βιβλίου Instructions for Buying an ebook Βήμα 1: Step 1: Βρείτε το βιβλίο που θα θέλατε να αγοράσετε και πατήστε Add to Cart, για να το προσθέσετε στο καλάθι σας. Αυτόματα θα
Multilayer Chip Inductor
 Features -Monolithic structure for high reliability -High self-resonant frequency -Excellent solderability and high heat resistance Construction Applications -RF circuit in telecommunication and other
Εμπορική αλληλογραφία Επιστολή
 - Διεύθυνση Mr. J. Rhodes Rhodes & Rhodes Corp. 212 Silverback Drive California Springs CA 92926 Mr. J. Rhodes Rhodes & Rhodes Corp. 212 Silverback Drive California Springs CA 92926 Αμερικανική γραφή διεύθυνσης:
ANSWERSHEET (TOPIC = DIFFERENTIAL CALCULUS) COLLECTION #2. h 0 h h 0 h h 0 ( ) g k = g 0 + g 1 + g g 2009 =?
 COLLECTION #2. h 0 h h 0 h h 0 ( ) g k = g 0 + g 1 + g g 2009 =?") Teko Classes IITJEE/AIEEE Maths by SUHAAG SIR, Bhopal, Ph (0755) 3 00 000 www.tekoclasses.com ANSWERSHEET (TOPIC DIFFERENTIAL CALCULUS) COLLECTION # Question Type A.Single Correct Type Q. (A) Sol least
Teko Classes IITJEE/AIEEE Maths by SUHAAG SIR, Bhopal, Ph (0755) 3 00 000 www.tekoclasses.com ANSWERSHEET (TOPIC DIFFERENTIAL CALCULUS) COLLECTION # Question Type A.Single Correct Type Q. (A) Sol least
2013 REV 01 ELECTRONICS CAPACITORS. DC Applications Metallized Polypropylene Film Self Healing
 2013 REV 01 POWER EECTRONICS CAPACITORS C Applications Metallized Polypropylene Film Healing OUR MISSION: POWER EECTRONICS AN SPECIA CAPACITORS M.V. PFC CAPACITORS AN BANKS IGHTING CAPACITORS MOTOR RUN
High pressure centrifugal pumps
 High pressure centrifugal pumps Wilo-Multivert MVI (North America) Series description H [ft] 3 1 MVI 1 1 1 MVI 1 MVI 3 MVI MVI 1 1 Q [m³/h] Wilo-Multivert-MVI Hz - North America Q [US gpm] H [m] 1 1 1
Tipologie installative - Installation types Type d installation - Installationstypen Tipos de instalación - Τυπολογίες εγκατάστασης
 AMPADE MOOCROMATICHE VIMAR DIMMERABII A 0 V~ - VIMAR 0 V~ DIMMABE MOOCHROME AMP AMPE MOOCHROME VIMAR VARIATEUR 0 V~ - DIMMERFÄHIGE MOOCHROMATICHE AMPE VO VIMAR MIT 0 V~ ÁMPARA MOOCROMÁTICA VIMAR REGUABE
Cambridge International Examinations Cambridge International General Certificate of Secondary Education
 Cambridge International Examinations Cambridge International General Certificate of Secondary Education *4358398658* GREEK 0543/04 Paper 4 Writing May/June 2015 1 hour Candidates answer on the Question
Fractional Colorings and Zykov Products of graphs
 Fractional Colorings and Zykov Products of graphs Who? Nichole Schimanski When? July 27, 2011 Graphs A graph, G, consists of a vertex set, V (G), and an edge set, E(G). V (G) is any finite set E(G) is
ΑΚΑ ΗΜΙΑ ΕΜΠΟΡΙΚΟΥ ΝΑΥΤΙΚΟΥ ΜΑΚΕ ΟΝΙΑΣ ΣΧΟΛΗ ΜΗΧΑΝΙΚΩΝ ΠΤΥΧΙΑΚΗ ΕΡΓΑΣΙΑ
 ΑΚΑ ΗΜΙΑ ΕΜΠΟΡΙΚΟΥ ΝΑΥΤΙΚΟΥ ΜΑΚΕ ΟΝΙΑΣ ΣΧΟΛΗ ΜΗΧΑΝΙΚΩΝ ΠΤΥΧΙΑΚΗ ΕΡΓΑΣΙΑ ΘΕΜΑ :ΤΥΠΟΙ ΑΕΡΟΣΥΜΠΙΕΣΤΩΝ ΚΑΙ ΤΡΟΠΟΙ ΛΕΙΤΟΥΡΓΙΑΣ ΣΠΟΥ ΑΣΤΡΙΑ: ΕΥΘΥΜΙΑ ΟΥ ΣΩΣΑΝΝΑ ΕΠΙΒΛΕΠΩΝ ΚΑΘΗΓΗΤΗΣ : ΓΟΥΛΟΠΟΥΛΟΣ ΑΘΑΝΑΣΙΟΣ 1 ΑΚΑ
NMBTC.COM /
 Common Common Vibration Test:... Conforms to JIS C 60068-2-6, Amplitude: 1.5mm, Frequency 10 to 55 Hz, 1 hour in each of the X, Y and Z directions. Shock Test:...Conforms to JIS C 60068-2-27, Acceleration
Finite Field Problems: Solutions
 Finite Field Problems: Solutions 1. Let f = x 2 +1 Z 11 [x] and let F = Z 11 [x]/(f), a field. Let Solution: F =11 2 = 121, so F = 121 1 = 120. The possible orders are the divisors of 120. Solution: The
Specification. code ±1.0 ±1.0 ±1.0 ±1.0 ±0.5 approx (g)
") High CV-value Long Life > 10 years at 50 C Low ESR and ESL High stability, 10 years shelf life Optimized designs available on request RoHS Compliant application Basic design Smoothing, energy storage,
High CV-value Long Life > 10 years at 50 C Low ESR and ESL High stability, 10 years shelf life Optimized designs available on request RoHS Compliant application Basic design Smoothing, energy storage,
MODEL D62-42 D70-42 DIESEL PILE HAMMER SPARE PARTS BOOK
 MODEL D62-42 D70-42 DIESEL PILE HAMMER SPARE PARTS BOOK Corporate Office 7032 S. 196th Street Kent, WA, USA 98032 Tel: 1-800-248-8498 Tel: 1-253-872-0141 Fax: 1-253-872-8710 2 No. Parts-No. Description
ΚΥΠΡΙΑΚΗ ΕΤΑΙΡΕΙΑ ΠΛΗΡΟΦΟΡΙΚΗΣ CYPRUS COMPUTER SOCIETY ΠΑΓΚΥΠΡΙΟΣ ΜΑΘΗΤΙΚΟΣ ΔΙΑΓΩΝΙΣΜΟΣ ΠΛΗΡΟΦΟΡΙΚΗΣ 24/3/2007
 Οδηγίες: Να απαντηθούν όλες οι ερωτήσεις. Όλοι οι αριθμοί που αναφέρονται σε όλα τα ερωτήματα μικρότεροι του 10000 εκτός αν ορίζεται διαφορετικά στη διατύπωση του προβλήματος. Αν κάπου κάνετε κάποιες υποθέσεις
Modern Greek Extension
 Centre Number 2017 HIGHER SCHOOL CERTIFICATE EXAMINATION Student Number Modern Greek Extension Written Examination General Instructions Reading time 10 minutes Working time 1 hour and 50 minutes Write