IAN IN-1 CORDLESS COMBINATION TOOL PKGA 16 A1. ΠΟΛΥΜΗΧΑΝΗΜΑ ΜΠΑΤΑΡΙΑΣ 4 ΣΕ 1 Μετάφραση των αυθεντικών οδηγιών λειτουργίας
|
|
|
- Σωφρονία Κοσμόπουλος
- 6 χρόνια πριν
- Προβολές:
Transcript

1 4-IN-1 CORDLESS COMBINATION TOOL PKGA 16 A1 4-IN-1 CORDLESS COMBINATION TOOL Translation of the original instructions ΠΟΛΥΜΗΧΑΝΗΜΑ ΜΠΑΤΑΡΙΑΣ 4 ΣΕ 1 Μετάφραση των αυθεντικών οδηγιών λειτουργίας 4-IN-1-AKKU-KOMBIGERÄT Originalbetriebsanleitung IAN
2 Before reading, unfold the page containing the illustrations and familiarise yourself with all functions of the device. Πριν ξεκινήσετε την ανάγνωση, ανοίξτε τη σελίδα με τις εικόνες και εξοικειωθείτε με όλες τις λειτουργίες της συσκευής. Klappen Sie vor dem Lesen die Seite mit den Abbildungen aus und machen Sie sich anschließend mit allen Funktionen des Gerätes vertraut. GB / IE / NI / Translation of the original instructions Page 4 GR / Μετάφραση των αυθεντικών οδηγιών λειτουργίας Σελίδα 24 DE / AT / CH Originalbetriebsanleitung Seite 46


3
4 GB I E N I Content Introduction... 4 Intended Use... 4 General Description... 5 Scope of delivery...5 Overview...5 Technical Data... 6 Notes on Safety... 7 Symbols...7 General safety instructions for power tools.. 8 Additional safety instructions...10 Correct handling of the Battery charger...12 Charging the battery Remove/insert rechargeable battery...13 Recharging the battery...13 Used batteries...14 Checking the charge status of the rechargeable battery...14 Operation Replacing the appliance attachment...14 Switching on/off...15 Motor unit with drill attachment PKGA1..15 Motor unit with multi-sander attachment PKGA Motor unit with sabre saw attachment PKGA Motor unit with multifunction tool PKGA Practical tips Sawing...18 Sanding...18 Scraping...18 Cleaning/Maintenance Cleaning...19 Maintenance...19 Storage Waste Disposal/ Environmental Protection Guarantee Repair Service Service-Center Importer Spare Parts/Accessories Trouble Shooting Translation of the original EC declaration of conformity Exploded Diagrams Introduction Congratulations on the purchase of your new device. With it, you have chosen a high quality product. During production, this equipment has been checked for quality and subjected to a final inspection. The functionality of your equipment is therefore guaranteed. The operating instructions constitute part of this product. They contain important information on safety, use and disposal. Before using the product, familiarise yourself with all of the operating and safety instructions. Use the product only as described and for the applications specified. Keep this manual safely and in the event that the product is passed on, hand over all documents to the third party. Intended Use The appliance is intended for screwing screws in and out and for drilling holes in wood, metal or plastic. The add-on tools are intended for grinding, sawing and scraping. The device is not suitable for commercial use. Any other use that is not explicitly approved in these instructions may result in damage to the equipment and represent a serious danger to the user. The equipment is designed for use by adults. Adolescents over the age of 16 may use the device only under supervision. The manufacturer is not liable for damages caused by unspecified use or incorrect operation. 4
5 GB I E N I General Description The illustration of the principal functioning parts can be found on the front and back foldout pages. Scope of delivery Carefully unpack the trimmer and check that it is complete. Dispose of the packaging material correctly. Motor unit with rechargeable battery and drill attachment Sabre saw attachment Multi-sander attachment Multifunction tool Accessories for drill attachment - 6 drill bits (1,5/2/3/4/5/6) - 6 screwdriver bits, 50 mm - Bit holder Accessories for sabre saw attachment - Wood sawblade - Metal sawblade Accessories for multi-sander attachment - 5 sanding sheets (2 x P 60, 2 x P 120, 1 x P 240) Accessories for multifunction tool - Plunge sawblade - Scraper blade - Delta sanding plate with 3 sanding sheets (1 x P 60, 1 x P 80, 1 x P 120) Charger Storage case Instruction Manual Overview 1 Keyless chuck 2 Torque adjustment ring 3 Gear selection switch 4 Drill attachment PKGA1 5 Unlocking lever for appliance attachment 6 Motor unit 7 Direction switch 8 Handle 9 Rechargeable battery 10 Unlock button - rechargeable battery 11 On/off switch 12 Bit holder 13 Screwdriver bits, 50 mm, 6 no. 14 Drill bits 6 no. 15 Charger 16 Storage case 17 Sabre saw attachment PKGA3 18 Footplate 19 Lever for unlocking sawblade 20 Metal sawblade 21 Wood sawblade 22 Sanding plate 23 Multi-sander attachment PKGA sanding sheets 25 Dust extraction adaptor 26 Multifunction tool PKGA4 27 Lever for unlocking tool 28 Arbor 29 Tool holder 30 Delta sanding plate 31 3 sanding sheets 32 Scraper blade 33 Plunge sawblade 5
6 GB I E N I Technical Data 4-in-1 Cordless combination tool... PKGA 16 A1 Motor voltage V Idling speed (n 0 ) min -1 Sound pressure level (L pa ) db(a), K= 3 db Sound power level (L WA ) db(a) K= 3 db Motor unit with drill attachment...pkga1 Idling speed (n 0 ) / min -1 Torque...max. 25 Nm Spread drill chuck mm Drill diameter for wood... max. 25 mm for steel... max. 8 mm Weight (without charger) kg Vibration (a h ) drilling in metal m/s 2, K= 1.5 m/s 2 drilling in wood m/s 2, K= 1.5 m/s 2 Motor unit with multisander attachment..pkga2 Oscillation rate (n 0 ) min -1 Sanding sheet size x 97 mm Weight (without charger) kg Vibration (a h ) m/s 2, K= 1.5 m/s 2 Motor unit with sabre saw attachment...pkga3 Stroke rate (n 0 ) min -1 Stroke length mm Weight (without charger) kg Vibration (a h ) Sawing boards m/s 2 Sawing wood beams m/s 2 K= 1.5 m/s 2 Battery (Li-Ion)... PAP16 Nominal voltage V Capacity Ah Charging time... approx. 1 h Recharger...PLCP-016A Nominal consumption...55 W Voltage input V~, 50 Hz Voltage output V 2.4 A Protection class... II Protection category...ipx0 The stated vibration emission value was measured in accordance with a standard testing procedure and may be used to compare one power tool to another. The stated vibration emission value may also be used for a preliminary exposure assessment. Warning: The vibration emission value may differ during actual use of the power tool from the stated value depending on the manner in which the power tool is used. Safety precautions aimed at protecting the user should be based on estimated exposure under actual usage conditions (all parts of the operating cycle are to be considered, including, for example, times during which the power tool is turned off and times when the tool is turned on but is running idle). Motor unit with multifunction tool...pkga4 Oscillation rate (n 0 ) min -1 Oscillation angle Weight (without charger) kg 6
7 GB I E N I Notes on Safety This section details the basic safety instructions for working with the appliance. Symbols Symbols in the manual Warning symbols with information on damage and injury prevention. Hazard symbol with information on the prevention of personal injury caused by electric shock. Instruction symbols (the instruction is explained at the place of the exclamation mark) with information on preventing damage. Help symbols with information on improving tool handling. Symbols on the Equipment Read through the instruction manual carefully. Electrical appliances must not be disposed of with the domestic waste. Stop appliance before changing gear. Injury hazard caused by rotating tool! Keep hands away. Symbols on the battery Do not dispose of batteries in household waste, fire or water. Do not subject the battery to strong sunlight over long periods and do not leave it on a heater (max. 45 C). Take batteries to an old battery collection point where they will be recycled in an environmentally friendly manner. Read through the instruction manual carefully. Symbols on the recharger Caution! Read the operating instructions before charging. The recharger is for indoor use only. Miniature fuse Protection class II (Double insulation) Electrical appliances must not be disposed of with the domestic waste. LED display while charging. Wear eye protection. 7
8 GB I E N I General safety instructions for power tools WARNING! Read all safety directions and instructions. Omissions in the compliance with safety directions and instructions can cause electrical shock, fire and/or severe injuries. Retain all safety directions and instructions for future use. The term power tool in the warnings refers to your mains-operated (corded) power tool or battery-operated (cordless) power tool. 1) WORK AREA SAFETY Keep work area clean and well lit. Cluttered or dark areas invite accidents. Do not operate power tools in explosive atmospheres, such as in the presence of flammable Iiquids, gases or dust. Power tools create sparks which may ignite the dust or fumes. Keep children and bystanders away while operating a power tool. Distractions can cause you to lose control. 2) ELECTRICAL SAFETY Power tool plugs must match the outlet. Never modify the plug in any way. Do not use any adapter plugs with earthed (grounded) power tools. Unmodified plugs and matching outlets will reduce risk of electric shock. Avoid body contact with earthed or grounded surfaces, such as pipes, radiators, ranges and refrigerators. There is an increased risk of electric shock if your body is earthed or grounded. Do not expose power tools to rain or wet conditions. Water entering a power tool will increase the risk of electric shock. Do not abuse the cord. Never use the cord for carrying, pulling or unplugging the power tool. Keep cord away from heat, oil, sharp edges or moving parts. Damaged or entangled cords increase the risk of electric shock. When operating a power tool outdoors, use an extension cord suitable for outdoor use. Use of a cord suitable for outdoor use reduces the risk of electric shock. If operating a power tool in a damp location is unavoidable, use a residual current device (RCD) protected supply. Use of an RCD reduces the risk of electric shock. 3) PERSONAL SAFETY Stay alert, watch what you are doing and use common sense when operating a power tool. Do not use a power tool while you are tired or under the influence of drugs, alcohol or medication. A moment of inattention white operating power tools may result in serious personal injury. Use personal protective equipment. Always wear eye protection. Protective equipment such as dust mask, non-skid safety shoes, hard hat, or hearing protection used for appropriate conditions will reduce personal injuries. Prevent unintentional starting. Ensure the switch is in the off-position before connecting to power 8
9 GB I E N I source and/or battery pack, picking up or carrying the tool. Carrying power tools with your finger on the switch or energising power tools that have the switch on invites accidents. Remove any adjusting key or wrench before turning the power tool on. A wrench or a key left attached to a rotating part of the power tool may result in personal injury. Do not overreach. Keep proper footing and balance at all times. This enables better control of the power tool in unexpected situations. Dress properly. Do not wear loose clothing or jewellery. Keep your hair, clothing and gloves away from moving parts. Loose clothes, jewellery or long hair can be caught in moving parts. If devices are provided for the connection of dust extraction and collection facilities, ensure these are connected and properly used. Use of dust collection can reduce dustrelated hazards. 4) POWER TOOL USE AND CARE Do not force the power tool. Use the correct power tool for your application. The correct power tool will do the job better and safer at the rate for which it was designed. Do not use the power tool if the switch does not turn it on and off. Any power tool that cannot be controlled with the switch is dangerous and must be repaired. Disconnect the plug from the power source and/or the battery pack from the power tool before making any adjust -ments, changing accessories, or storing power tools. Such preventive safety measures reduce the risk of starting the power tool accidentaily. Store idle power tools out of the reach of children and do not allow persons unfamiliar with the power tool or these instructions to operate the power tool. Power tools are dangerous in the hands of untrained users. Maintain power tools. Check for misalignment or binding of moving parts, breakage of parts and any other condition that may affect the power tool s operation. If damaged, have the power tool repaired before use. Many accidents are caused by poorly maintained power tools. Keep cutting tools sharp and clean. Properly maintained cutting tools with sharp cutting edges are less Iikely to bind and are easier to control. Use the power tool, accessories and tool bits etc. in accordance with these instructions, taking into account the working conditions and the work to be performed. Use of the power tool for operations different from those intended could result in a hazardous situation. Hold the device by the insulated gripping surfaces when performing work in which the cutting tool may come into contact with hidden wiring or its own cord. Contact with a live wire can also cause a charge in metal parts of the device and result in an electric shock. 5) CAREFUL HANDLING AND USE OF BATTERY DEVICES Charge the batteries only in chargers that are recommended by the manufacturer. Risk of fire if a 9
10 GB I E N I charger that is suitable for a specific type of battery is used with other batteries. In the power tools, use only the batteries designed for the purpose. The use of other batteries may result in injuries and risk of fire. Keep the unused battery away from paper clips, coins, keys, nails, screws and other small metal objects, which could cause bridging of the contacts. A short circuit between the battery contacts may cause burns or fire. If used incorrectly, liquid may leak from the battery. Avoid contact with this. In the event of accidental contact, rinse off with water. If the liquid gets into eyes, seek medical assistance. Leaking battery fluid may cause skin irritations or burns. 6) SERVICE Have your power tool serviced by a qualified repair person using only identical replacement parts. This will ensure that the safety of the power tool is maintained. 7) SPECIAL SAFETY DIRECTIONS FOR BATTERY-OPERATED TOOLS Ensure that the device is switched off before inserting the battery. Inserting a battery into a power tool that is switched on may result in accidents. Recharge the batteries indoors only because the battery charger is designed for indoor use only. Risk of electric shock. To reduce the electric shock hazard, unplug the battery charger from the mains before cleaning the charger. Do not subject the battery to strong sunlight over long periods and do not leave it on a heater. Heat damages the battery and there is a risk of explosion. Allow a hot battery to cool before charging. Do not open up the battery and avoid mechanical damage to the battery. Risk of short circuit and fumes may be emitted that irritate the respiratory tract. Ensure fresh air and seek medical assistance in the event of discomfort. After eye/skin contact, rinse the affected areas with water or a neutraliser and consult a doctor. Do not use non-rechargeable batteries. This could damage the appliance. Additional safety instructions Warning! Sawing or sanding can result in the formation of hazardous dusts (e.g. arising from materials with paints containing lead, materials containing asbestos, metals or some wood types) which can present a hazard to the operator or persons in the vicinity. Make sure that the workplace is well ventilated. Always wear safety goggles, safety gloves and respiratory protection. Attach a dust extraction system. 1) SPECIAL SAFETY INFORMATION FOR THE CORDLESS COMBINATION TOOL Use the additional handles delivered with the appliance. The loss of control can result in injuries. Hold the electric tool by the insu- 1 0
11 GB I E N I lated handle surfaces when performing work where the cutting tool or screw may come into contact with hidden wiring. Contact with a live wire can also cause a charge in metal parts of the appliance and result in an electric shock. Use suitable detectors in order to find hidden supply lines or ask the local utility company. Contact with electrical cables can lead to electric shock and fire, contact with a gas pipe can result in an explosion. Damage to a water pipe can lead to property damaged and electric shock. Secure the workpiece. A workpiece that is retained with clamping appliances or a vice is held more securely than with your hand. Be very careful when handling tools such as saws, scraper blades and drills. These are sharp and present an injury hazard. Wear safety gloves when changing attachments. This enables you to avoid injuries if the appliance attachment has heated up after use. 2) SPECIFIC SAFETY INSTRUCTIONS WHEN SAWING Keep hands away from the sawing area. Do not reach underneath the workpiece. Always stand to the side of the saw when working. Upon contact with the blade there is a risk of injury. Only when the electric tool is turned on should the sawing blade be moved against the workpiece. There is a risk of kickback if the tool insert jams in the workpiece. Make sure that the footplate is securely placed against the workpiece during sawing. The sawblade can tilt and lead to loss of control over the power tool. After you have finished work, turn the power tool off and do not pull the sawblade out of the cut until it has come to a standstill. In this way you will avoid any kickback and can safely put down the power tool. Use only undamaged sawblades in perfect condition. Bent or blunt blades can break, adversely affect the cut or cause kickback. Do not brake the sawblade after switching the appliance off by applying side pressure. The sawblade may be damaged, break or cause a kickback. Tighten the material firmly. Do not support the workpiece by hand or foot. Do not touch any objects or the ground with the saw running. There is a risk of kickback. Hold the power tool tightly with both hands while working and ensure a secure footing. The power tool is guided more securely with both hands. Wait until the power tool has stopped before placing it down. The tool insert can tilt and lead to loss of control over the power tool. Switch the appliance off immediately if the sawing blade jams. Spread the saw cut out and pull the blade out carefully. This can lead to loss of control over the power tool. 3) SPECIAL SAFETY INFORMATION DURING SANDING AND SCRAPING Only use the power tool for dry sanding. Do not scrape moist ma- 1 1
12 GB I E N I terials. Penetration of water into the power tool increases the risk of electric shock. Avoid overheating the sanded object and the sander itself. Possible fire hazard. The workpiece gets hot during grinding. Do not touch the machined area, allow it to cool down. There is a risk of burning. Do not use coolants or the like. Always empty the dust container before work breaks. Sanding dust in the dust sack, micro filter, paper sack (or in the filter sack or extraction system filter) can self-ignite under unfavourable conditions such as flying sparks caused by grinding metals. Particular hazards are caused if the sanding dust is mixed with paint, polyurethane residues or other chemical substances, or if the sanded object is hot after long working periods. 4) RESIDUAL RISKS Even if properly operating and handling this electric tool, some residual risks will remain. Due to its construction and build, this electric tool may present the following hazards: a) Lung damage, if suitable respiratory protection is not worn; b) Cuts c) Ear damage if working without ear protection. d) Eye damage if suitable eye protection is not worn. e) Damage to your health caused by swinging your hands and arms when operating the appliance for longer periods of time or if the unit is not held or maintained properly. Warning! During operation, this electric tool generates an electromagnetic field which, under certain circumstances, may impair the functionality of active or passive medical implants. To reduce the risk of serious or lethal injuries, we recommend that persons with medical implants consult their doctor and the manufacturer of their medical implant before operating the machine. Correct handling of the Battery charger This appliance can be used by children aged from 8 years and above and persons with reduced physical, sensory or mental capabilities or lack of experience and knowledge if they have been given supervision or instruction concerning use of the appliance in a safe way and understand the hazards involved. Children shall not play with the appliance. Cleaning and user maintenance shall not be made by children without supervision. To charge the battery, use only the charger supplied. Risk of fire and explosion. This ensures that the safety of the device is maintained. Before each use, check the charger, cable and plug and have them repaired by qualified professionals and only with original parts. Do not use a defective charger and do not open it up yourself. This ensures that the safety of the device is maintained. 1 2
13 GB I E N I Connect the charger only to a socket with an earth. Ensure that the mains voltage matches the specifications on the charger rating plate. Risk of electric shock. Disconnect the charger from the mains before closing or opening connection to the battery/power tool/device. This ensures that the battery and charger are not damaged. Keep the charger clean and away from wet and rain. Do not use the charger outdoors. Dirt and the entry of water increase the risk of electric shock. Operate the charger only with the appropriate original batteries. Charging other batteries may result in injuries and risk of fire. Avoid mechanical damage to the charger. This can result in internal short circuits. Do not operate the charger on a combustible surface (e.g. paper, textiles). Risk of fire due to heating during charging. If the power cable for this equipment is damaged, it must be replaced by the manufacturer, a customer service agent of the same or a similarly qualified person in order to prevent hazards. Do not charge non-rechargeable batteries in the charger. This could damage the appliance. Charging the battery Charge the battery in a dry room only. Prior to attaching the charger, check that the battery s outer surface is clean and dry. There is a risk of injury due to electric shock. Charge the battery before the first time of use. Only use the charger from the package to charge the battery. If a fully recharged battery lasts for considerably shorter operating times, the battery is used up and needs to be replaced. Only use an OEM spare battery available from our Customer Service. Always take heed of the applicable safety instructions as well as the environmental protection regulations and information. The warranty excludes all defects caused by improper handling. Remove/insert rechargeable battery 1. To remove the battery (9) from the appliance, press the release button (10) on the battery and pull the battery out. 2. To insert the battery (9) push the battery along the guide rail into the appliance. It locks into place audibly. Recharging the battery Charging time is approx. 1 hour. 1 3
14 GB I E N I 1. Remove the battery (9) from the appliance. 2. Slide the rechargeable battery (9) onto the charger (15). It locks into place audibly. 3. Plug the charger (15) into an electrical outlet. 4. After the charging process, disconnect the charger (15) from the mains supply. 5. Pull the rechargeable battery (9) out of the charger (15). Overview of the LED indicators (15a) on the charger (15): green LED flashes: Charger is connected to the mains without a battery. red LED lights up: Battery charging. green LED lights up: Battery is charged. Used batteries If a fully recharged battery lasts for considerably shorter operating times, the battery is used up and needs to be replaced. Only use an OEM battery pack replacement available from our Customer Service. Always take heed of the applicable safety instructions as well as the environmental protection regulations and information (see Waste Disposal/ Environmental Protection ). Checking the charge status of the rechargeable battery The battery charge status indicator (9a) signalises the state of charge of the battery (9). Press the button (9b) on the battery (9). The state of charge of the battery is displayed by illuminating the 3-colour LED lights of the state of charge display (9a). All LEDs are on: Battery is fully charged. Red and yellow LEDs are on: Battery has a residual charge (< 90 %). Red LED lights up: Battery is empty, please charge. Operation Replacing the appliance attachment Secure the appliance against switching on (see Switching on/off ) or remove the rechargeable battery from the appliance. There is an injury hazard if the device is switched on accidentally. Wear safety gloves. The appliance attachment might have heated up after use. Removing appliance attachment 1. Push the unlocking lever (5) into position as far as the stop and then hold it in this position. 2. Pull the unlocked appliance attachment off (4/17/23/26). 3. Allow the unlocking lever er (5) to slide back into position. 1 4
15 GB I E N I Fitting appliance attachment 4. Push the appliance attachment (4/17/23/26) along the guide rail into the motor unit (6). It locks into place audibly. 5. Allow the unlocking lever (5) to slide back into position. 6. Check that the appliance attachment is secure by pulling on it. Switching on/off 1. Switching on: Press the on/off switch ( 11). By using the on/off switch ( 11) you can progressively control the speed. Gentle pressure: low speed Increase pressure: higher speed. 2. Switching off: Release the on/off switch ( 11). If you place the direction switch ( 7) in the middle position, the device is secured against being switched on. Motor unit with drill attachment PKGA1 Changing the tool Secure the appliance against switching on (see Switching on/off ). If the appliance is switched on accidentally, there is a danger of injury. 1. Rotate the keyless chuck (1) counter-clockwise, until the drill chuck aperture is large enough to accommodate the tool. 2. Insert the tool as far as possible into the keyless chuck (1). 3. Rotate the keyless chuck (1) clockwise in order to clamp the tool. 4. To remove the tool again, rotate the keyless chuck (1) and pull out the tool. Choice of gear Stop appliance before changing gear. 1. Wait for the appliance to come to a standstill. 2 Slide the gear selector ( 3) into the required position: 1: low speed preselection. 2: high speed preselection. Set the direction of rotation The appliance s direction of rotation can be changed with the rotational direction switch. 1. Wait for the appliance to come to a standstill. 2. Push the rotational direction speed ( 7) into the desired position: Clockwise rotation: to drill and screw in screws. Anticlockwise rotation: to unscrew screws. 3. If you place the direction switch ( 7) in the middle position, the device is secured against being switched on. The direction change may only be actuated when at a standstill! Torque adjustment You can preselect the maximum torque. The torque settings are labelled Wait for the appliance to come to a standstill. 1 5
16 GB I E N I 2. Turn the torque adjusting ring (2) to select the desired torque: Screws: Steps 1-19 Drilling: Step 3. Start with a lower torque step and increase as required. The direction change may only be actuated when the appliance is at a standstill! The necessary torque is dependent on: - the type and hardness of the material to be treated; - the type and length of the screws used. Motor unit with multi-sander attachment PKGA2 Secure the appliance against switching on (see Switching on/off ). If the appliance is switched on accidentally, there is a danger of injury. Attaching/removing sanding sheet The sanding plate ( 22) is fitted with Velcro for rapid attachment of the sanding sheet. Attaching sanding sheet 1. Press the sanding sheet (24) evenly onto the sanding plate (22). Ensure that the holes in the sanding sheet are placed above the openings in the sanding plate. Removing sanding sheet 2. Simply pull the sanding sheet (24) off the sanding plate (22). Connecting dust extraction You can reduce dust production during sanding by attaching a dust extraction system. 1. Push the adaptor (25) into the opening on the multi-sander attachment (23) as far as the stop. 2. Connect a dust extractor suction hose to the adaptor (25). Motor unit with sabre saw attachment PKGA3 Installing/changing the blade Secure the appliance against switching on (see Switching on/off ). If the appliance is switched on accidentally, there is a danger of injury. Wear gloves when handling the sawblade. In this way, you avoid injury from cuts. Caution, risk of Injury! - Do not use any blunt or bent blades or blades which are damaged in any other way. - Always insert a suitable sawblade. An overview of appropriate blades can be found in Spare Parts/Accessories. Installing the blade: 1. Push the lever (19) for sawblade unlocking upwards as far as the stop. Push the sawblade shaft (20/21) into the sawblade mounting slot. 2. To unlock, release the lever (19), 1 6
17 GB I E N I it will return to the initial position. 3. Check that the sawblade is secure by pulling on it. Removing the sawblade: 4. Press the lever (19) for sawblade unlocking upwards as far as the stop and then pull the sawblade out of the sawblade mounting. For certain work, the sawblade can also be inserted after turning through 180. Operating the sabre saw 1. Before switching the appliance on, ensure it is not in contact with the workpiece. 2. Turn the appliance on. By using the on/off switch ( 11) you can progressively control the stroke rate. Gentle pressure: low stroke rate. Greater pressure: higher stroke rate. The on/off switch cannot be locked. 3. Place the footplate ( 18) on the workpiece. 4. Cut with a uniform forward motion. 5. After completion of the work, first remove the blade from the saw cut and then switch the appliance off. Motor unit with multifunction tool PKGA4 Changing the tool Secure the appliance against switching on (see Switching on/off ). If the appliance is switched on accidentally, there is a danger of injury. 1. Push the lever (27) for tool unlocking upwards as far as the stop. 2. Pull the unlocked tool holder (29) off forwards. 3. Place the required tool (30/32/33) on the arbor (28). 12 different positions are possible. 4. Press the tool holder (29) back into the central mounting. 5. Push the lever (27) for tool unlocking forwards again. The tool holder is fixed to the tool. Attaching/removing sanding sheet The delta sanding plate (30) is fitted with Velcro for rapid attachment of the sanding sheet. Attaching sanding sheet 1. Press the sanding sheet (31) evenly onto the delta sanding plate (30). Ensure that the holes in the sanding sheet are placed above the openings in the sanding plate. Removing sanding sheet 2. Simply pull the sanding sheet (31) off the delta sanding plate (30). Practical tips When working with the appliance, always wear suitable clothing and appropriate protective equipment. Prior to each use it must be ensured that the appliance is working correctly. Personal protective equipment and a fully functional appliance reduce the risk of injuries and accidents. 1 7
18 GB I E N I Sawing Wear ear protection. Wear eye protection. Use only undamaged sawblades in perfect condition. Only use metal sawblades for metalworking. Ensure your stance is stable and hold the appliance tightly with both hands and away from your body. Before sawing the workpiece, check for hidden foreign objects such as nails, screws. These must be removed. Plunge cuts may only be made in soft material such as wood or plasterboard. Selection of sawblade Wood sawblade Metal sawblade Plunge sawblade Sanding for wood, plastic, plasterboard for metal sheets, profiles and tubes for soft materials like wood or plasterboard Use a dust extraction system when sanding with the multi-sander attachment. Move the appliance against the workpiece once it is switched on. Clean the sanding plate before you attach a sanding sheet. Only work with sanding sheets in perfect condition to achieve good sanding results. Work using low and even pressure. This protects the appliance and the sanding sheet. Do not use the same sanding sheet to sand different materials (e.g. metal and then wood). Selection of sanding sheet Grain size P Application 60 for pre-sanding rough wood surfaces 80 / 120 for plain sanding 240 for fine sanding of primed and painted surfaces Scraping Use a high oscillation rate when scraping. Work using low pressure and at a low angle in order not to damage the substrate material. Cleaning/Maintenance Repair and servicing work not described in this manual should always be carried by our Service Centre. Use only original parts. Switch off the device and remove the battery from the device before working with or transporting it. The following cleaning and servicing should be done regularly. This will ensure a long and reliable service life. 1 8
19 GB I E N I Cleaning Do not spray the appliance with water and do not immerse it in water. Electric shock hazard! Keep clean the ventilation slots, motor housing and handles of the appliance. Use a damp cloth or a brush. Do not use cleaning agents or solvents. You may otherwise irreparably damage the appliance. Maintenance The equipment is maintenance free. Storage Store the device in a dry place well out of reach of children. Remove the battery before storing the unit for longer periods of time (e.g. hibernation). Store the battery only in a partially charged state. The state of charge should be % over a longer storage period (two LED lights of the charge status indicator ( 9a) light up). During a longer storage period, check the state of charge of the battery and recharge if necessary roughly every 3 months. In order to keep the battery well charged, avoid exposing the appliance to extreme heat or cold in storage. Store the equipment between 10 C and 25 C. During storage, avoid extreme cold or heat so the battery does not lose power. Waste Disposal/ Environmental Protection Remove the battery from the device and take the device, battery, accessories and packaging for environmentally friendly recycling. Electric units do not belong with domestic waste. Do not dispose of batteries in household waste, fire (risk of explosion) or water. Damaged batteries may damage the environment and your health if toxic fumes or liquids leak out. Return the unit and the recharger to a recycling centre. The plastic and metal parts employed can be separated out and thus recycled use can be implemented. Ask our Service-Center for details. Dispose of batteries in discharged condition. We recommend covering the pole with adhesive tape to prevent a short circuit. Do not open up the battery. Dispose of batteries in accordance with the local regulations. Take batteries to an old battery collection point where they will be recycled in an environmentally friendly manner. For information about this, ask your local waste management company or our service centre. Defective units returned to us will be disposed of for free. 1 9
20 GB I E N I Guarantee Dear Customer, This equipment is provided with a 3-year guarantee from the date of purchase. In case of defects, you have statutory rights against the seller of the product. These statutory rights are not restricted by our guarantee presented below. Terms of Guarantee The term of the guarantee begins on the date of purchase. Please retain the original receipt. This document is required as proof of purchase. If a material or manufacturing defect occurs within three years of the date of purchase of this product, we will repair or replace at our choice the product for you free of charge. This guarantee requires the defective equipment and proof of purchase to be presented within the three-year period with a brief written description of what constitutes the defect and when it occurred. If the defect is covered by our guarantee, you will receive either the repaired product or a new product. No new guarantee period begins on repair or replacement of the product. Guarantee Period and Statutory Claims for Defects The guarantee period is not extended by the guarantee service. This also applies for replaced or repaired parts. Any damages and defects already present at the time of purchase must be reported immediately after unpacking. Repairs arising after expiry of the guarantee period are chargeable. Guarantee Cover The equipment has been carefully produced in accordance with strict quality guidelines and conscientiously checked prior to delivery. The guarantee applies for all material and manufacturing defects. This guarantee does not extend to cover product parts that are subject to normal wear and may therefore be considered as wearing parts (e.g. tools, battery) or to cover damage to breakable parts (e.g. switches). This guarantee shall be invalid if the product has been damaged, used incorrectly or not maintained. Precise adherence to all of the instructions specified in the operating manual is required for proper use of the product. Intended uses and actions against which the operating manual advises or warns must be categorically avoided. The product is designed only for private and not commercial use. The guarantee will be invalidated in case of misuse or improper handling, use of force, or interventions not undertaken by our authorised service branch. Processing in Case of Guarantee To ensure quick handling of you issue, please follow the following directions: Please have the receipt and identification number (IAN ) ready as proof of purchase for all enquiries. Please find the item number on the rating plate. Should functional errors or other defects occur, please initially contact the service department specified below by telephone or by . You will then receive further information on the processing of your complaint. After consultation with our customer service, a product recorded as defective can be sent postage paid to the service address communicated to you, with the proof of purchase (receipt) and specification of what constitutes the defect and when it occurred. In order to avoid acceptance problems and additional 2 0
21 GB I E N I costs, please be sure to use only the address communicated to you. Ensure that the consignment is not sent carriage forward or by bulky goods, express or other special freight. Please send the equipment inc. all accessories supplied at the time of purchase and ensure adequate, safe transport packaging. Repair Service For a charge, repairs not covered by the guarantee can be carried out by our service branch, which will be happy to issue a cost estimate for you. We can handle only equipment that has been sent with adequate packaging and postage. Attention: Please send your equipment to our service branch in clean condition and with an indication of the defect. Equipment sent carriage forward or by bulky goods, express or other special freight will not be accepted. We will dispose of your defective devices free of charge when you send them to us. Service-Center GB I E N I Service Great Britain Tel.: ( 0.10/Min.) grizzly@lidl.co.uk IAN Service Ireland Service Northern Ireland Tel.: (0,08 EUR/Min., (peak)) (0,06 EUR/Min., (off peak)) grizzly@lidl.ie IAN Service Cyprus Tel.: grizzly@lidl.com.cy IAN Importer Please note that the following address is not a service address. Please initially contact the service centre specified above. Grizzly Tools GmbH & Co. KG Stockstädter Straße 20 DE Großostheim GERMANY 2 1
22 GB I E N I Spare Parts/Accessories Spare parts and accessories can be obtained at If you do not have internet access, please contact the Service Centre via telephone (see Service-Center Page 21). Please have the order number mentioned below ready. Position Position Description Order No. instruction exploded manual drawing 4 PKGA1 Drill attachment Battery Charger UK PKGA3 Sabre saw attachment PKGA3-1 Metal sawblade (HSS 150 mm/18 TPI*) Wood sawblade (HCS 150 mm/6 TPI*) PKGA2 Multi-sander attachment PKGA2-7 Sanding sheets for multi-sander attachment (2 x P 60, 2 x P 120, 1 x P 240**) PKGA2-9 Dust extraction adaptor PKGA4 Multifunction tool Sanding sheets for delta sanding plate (1 x P 60, 1 x P 80, 1 x P 120**) Scraper blade Plunge sawblade * HSS = High Speed Steel * HCS = High Carbon Steel, steel with high carbon content TPI = Teeth per inch **P = Grain size Further accessories are available from the trade for every possible application purpose. 2 2
23 GB I E N I Trouble Shooting Problem Possible Cause Error correction Appliance doesn t start Appliance works with interruptions Tool does not move although the motor is running Rechargeable battery ( 9) discharged Rechargeable battery ( 9) not inserted On/off switch ( 11) is broken Internal lose contact On/off switch ( 11) is broken Appliance attachment or tool not correctly mounted Tool unsuitable for the workpiece to be worked on Charge rechargeable battery (see Charging process ) Insert rechargeable battery (see Charging process ) Repair by Service Centre Repair by Service Centre Fit the appliance attachment or tool correctly (see Operation ) Insert a suitable tool Low appliance power Tool blunt or worn down Incorrect speed Insert a new tool Adjust speed Low battery power Charge battery ( process ) 9) (see Charging Tool wears down quickly Tool unsuitable for the workpiece to be worked on Too much pressure applied Speed too high Insert a suitable tool (see Operation ) Reduce the pressure Reduced speed 2 3
24 GR Περιεχόμενα Εισαγωγή Σκοπός χρήσης Συγχαρητήρια για 2 4 την αγορά της νέας συσκευής σας Προτιμήσατε 2 5 να αγοράσετε Γενική περιγραφή Παραδοτέα υλικά...25 ένα προϊόν ανώτερης ποιότητας. Επισκόπηση...25 Η ποιότητα αυτής της συσκευής ελέγχθηκε... κατά.... τη... διάρκεια της παραγωγής, αλλά Τεχνικά στοιχεία Υποδείξεις ασφάλειας και σε τελικό έλεγχο. Με τον τρόπο αυτό Σύμβολα και εικονοσύμβολα...27 Γενικές υποδείξεις ασφαλείας για ηλεκτρικά εργαλεία...28 σκευής σας. εξασφαλίστηκε η λειτουργικότητα της συ- Περαιτέρω υποδείξεις ασφάλειας...31 Σώστoσ χειρισμoσ τoy φoρτιστήώ Οι οδηγίες χρήσης αποτελούν μλαταριν...33 αναπόσπαστο τμήμα αυτού του Φόρτιση Απομάκρυνση/Τοποθέτηση συσσωρευτή...34 Φόρτιση συσσωρευτή...35 Χρησιμοποιημένοι συσσωρευτές...35 Έλεγχος κατάστασης φόρτισης του συσσωρευτή...35 Χρήση Αλλαγή προσαρτημάτων συσκευής...35 Ενεργοποίηση/Απενεργοποίηση...36 Μονάδα μοτέρ με εξαρτήματα δραπανοκατσάβιδου PKGA Μονάδα μοτέρ με πολυλειαντήρα PKGA Μονάδα μοτέρ με σπαθοσέγα PKGA Μονάδα μοτέρ με εργαλείο πολλαπλών λειτουργιών PKGA Υποδείξεις εργασίας Πριόνισμα...39 Λείανση...40 Ξύσιμο...40 Καθαρισμός και συντήρηση Εισαγωγή προϊόντος. Περιέχουν σημαντικές υποδείξεις για την ασφάλεια, τη χρήση και διάθεση της συσκευής. Πριν τη χρήση του προϊόντος να εξοικειωθείτε με όλες τις οδηγίες χειρισμούς και τις υποδείξεις ασφαλείας. Να χρησιμοποιείτε το προϊόν μόνο όπως περιγράφεται και μόνο για τον αναφερόμενο σκοπό. Να φυλάξετε καλά τις οδηγίες και να τις παραδώσετε σε τρίτους μαζί με το προϊόν. Σκοπός χρήσης Η συσκευή προορίζεται για το βίδωμα και το λύσιμο βιδών, καθώς και για διάτρηση ξύλου, μετάλλου ή πλαστικού. Τα εργαλεία προσάρτησης προβλέπονται Καθαρισμός...40 για λείανση, πριόνισμα και ξύσιμο. Συντήρησης...41 Αποθήκευση Αυτή..... η. συσκευή δεν 4 1 είναι κατάλληλη για Απόσυρση/προστασία του επαγγελματική χρήση. περιβάλλοντος Οποιαδήποτε άλλη. 4 1 χρήση, η οποία δεν Εγγύηση εγκρίνεται ρητά.... μέσα..... από 4 2 τις οδηγίες αυτές,.... μπορεί να. 4προκαλέσει 3 ζημιές στη συ- Σέρβις επισκευής S e r v i c e - Ce n t e r σκευή..... και.... να.. αποτελέσει σοβαρό κίνδυνο Εισαγωγέας Ανταλλακτικά / Αξεσουάρ για... το.. χρήστη. 4 4 Ανίχνευση βλαβών Η.. χρήση της.. 4συσκευής 5 απευθύνεται Μετάφραση της πρωτότυπης σε ενήλικες. Νέοι κάτω των 16 ετών Δήλωσης συμμόρφωσης CE επιτρέπεται να χρησιμοποιούν τη συσκευή Επί μέρoυς σχεδιαγράμματα
25 GR μόνο υπό την επίβλεψη ενηλίκων. Ο κατασκευαστής δεν ευθύνεται για ζημιές που προκλήθηκαν λόγω μη ενδεδειγμένης χρήσης ή λόγω εσφαλμένου χειρισμού. Γενική περιγραφή Θα βρείτε τις απεικονίσεις στην μπροστινή και πίσω αναδιπλωνόμενη σελίδα. Παραδοτέα υλικά Βγάλτε τη συσκευή από τη συσκευασία και ελέγξτε, αν είναι πλήρης. Διαθέστε τα υλικά συσκευασίας σύμφωνα με τους κανονισμούς. Μονάδα μοτέρ με συσσωρευτή και εξαρτήματα δραπανοκατσάβιδου Σπαθοσέγα Πολυλειαντήρας Πολυεργαλείο Αξεσουάρ Εξαρτήματα δραπανοκατσάβιδου - 6 Bit διάτρησης (1,5/2/3/4/5/6) - 6 Bit βιδώματος, 50 mm - Συγκράτηση μυτών Αξεσουάρ Σπαθοσέγα - Πριονολάμα για ξύλο - Πριονολάμα για μέταλλο Αξεσουάρ Πολυλειαντήρας - 5 Φύλλα λείανσης (2 x 60, 2 x 120, 1 x 240) Αξεσουάρ Πολυεργαλείο - Βυθιζόμενη πριονολάμα - Ξύστρα - Πλάκα λείανσης τριβείου-δέλτα (1 x 60, 1 x 80, 1 x 120) Φορτιστής Βαλιτσάκι Οδηγιών χρήσης Επισκόπηση 1 Ταχυτσόκ 2 Δακτύλιος ρύθμισης ροπής στρέψης 3 Διακόπτης επιλογής ταχυτήτων 4 Εξαρτήματα δραπανοκατσάβιδου PKGA1 5 Μοχλός απασφάλισης για το προσάρτημα συσκευής 6 Μονάδα μοτέρ 7 Διακόπτης κατεύθυνσης περιστροφής 8 Λαβή 9 Συσσωρευτής 10 Πλήκτρο απασφάλισης συσσωρευτή 11 Διακόπτης ενεργο-/απενεργοποίησης 12 Συγκράτηση μυτών 13 Bit βιδώματος, 50 mm, 6 τεμάχια 14 Bit διάτρησης, 6 τεμάχια 15 Φορτιστής 16 Βαλιτσάκι 17 Σπαθοσέγα PKGA3 18 Πλάκα πέδιλου 19 Μοχλός για απασφάλιση της πριονολάμας 20 Πριονολάμα για μέταλλο 21 Πριονολάμα για ξύλο 22 Πλάκα τροχίσματος 23 Πολυλειαντήρας PKGA Φύλλα λείανσης 25 Αντάπτορας για την διάταξη αναρρόφησης σκόνης 26 Πολυεργαλείο PKGA4 27 Μοχλός για την απασφάλιση εργαλείου 28 Άξονες υποδοχής 29 Στήριγμα εργαλείου 30 Πλάκα λείανσης τριβείου-δέλτα 31 3 Φύλλα λείανσης 32 Ξύστρα 33 Βυθιζόμενη πριονολάμα 2 5
26 GR Τεχνικά στοιχεία Μονάδα μοτέρ + πολυεργαλείο PKGA4 Αριθμός ταλαντώσεων (n 0 ) min -1 Πολυμηχάνημα μπαταρίας Γωνία ταλάντωσης... 3,0 4 σε P. K. GA A1... Βάρος... (χωρίς φορτιστή)...1,3 kg Τάση κινητήρα V Αριθμός στροφών ρελαντί (n 0 ) min -1 Μπλοκ συσσωρευτή (Li-Ion) P AP 1 6 Στάθμη ηχητικής πίεσης Ονομαστική τάση V (L pa )...86,7 db(a), K= 3 db Χωρητικότητα...2,0 Ah Επιτρεπόμενη στάθμη θορύβου Διάρκεια φόρτισης...περ. 1 h (L WA )...97,7 db(a), K= 3 db Μονάδα μοτέρ + εξαρτήματα δραπανοκατσάβιδου PKGA1 Αριθμός στροφών ρελαντί (n 0 ) / min -1 Ροπή στρέψης...μέγ. 25 Nm Διάσταση τσοκ...1,0-10 mm Διάμετρος διάτρησης για ξύλο... μέγ. 25 mm για χάλυβα... μέγ. 8 mm Βάρος (χωρίς φορτιστή)... 1,4 kg Δόνηση (a h ) Διάτρηση σε μέταλλο...1,615 m/s 2 Διάτρηση σε ξύλο..1,475 m/s 2, K= 1,5 m/s 2 Φορτιστής PLCP-016A Απόδοση W Τάση εισόδου/input V~, 50 Hz Τάση εξόδου/output... 16,8 V ; 2,4 A Κλάση προστασίας... II Είδος προστασίας... IPX0 H αφερόμενη τιμή μετάδοσης δόνησης μετρήθηκε βάσει τυποποιημένης μεθόδου δοκιμής και μπορεί να χρησιμοποιηθεί για τη σύγκριση μίας ηλεκτρικής συσκευής με μία άλλη. Η αναφερόμενη τιμή μετάδοσης δόνησης μπορεί επίσης να χρησιμοποιηθεί και για αρχική εκτίμηση της έκθεσης. Μονάδα μοτέρ + πολυλειαντήρας P K GA2 Αριθμός στροφών ρελαντί (n 0 ) min -1 Γυαλόχαρτο x 97 mm Βάρος (χωρίς φορτιστή)...1,3 kg Δόνηση (a h )... 4,383 m/s 2, K= 1,5 m/s 2 Μονάδα μοτέρ + σπαθοσέγα PKGA3 Αριθμός στροφών ρελαντί (n 0 ) min -1 Μήκος ταλάντωσης...22 mm Βάρος (χωρίς φορτιστή)...1,7 kg Δόνηση (a h ) Κοπή σανίδων... 11,926 m/s 2 Κοπή ξύλινων δοκών...12,392 m/s 2 K= 1,5 m/s 2 Προειδοποίηση: Η τιμή μετάδοσης της δόνησης μπορεί να διαφέρει κατά την πραγματική χρήση της ηλεκτρικής συσκευής από την αναφερόμενη τιμή, ανάλογα με τον τρόπο χρήσης της. Πρέπει να οριοσθούν μέτρα ασφαλεάις για την προστασία του χειριστή βασιζόμενα σε εκτίμηση της έκθεσης κατά τη διάρκεια των πραγματικών συνθηκών χρήσης (εδώ να ληφθούν υπόψη τα ποσοστά του κύκλου λειτουργίας, για παράδειγμα οι χρόνοι κατά τους οποίους είναι απενεργοποιημένη η συσκευή και οι χρόνοι κατά τους οποίους είναι μεν ενεργοποιημένη η συσκευή αλλά λειτουργεί χωρίς φορτίο). 2 6
27 GR Υποδείξεις ασφάλειας Στο κεφάλαιο αυτό θα βρείτε τις βασικές προδιαγραφές ασφαλείας που αφορούν την εργασία με τη συσκευή. Σύμβολα και εικονοσύμβολα Σύμβολα στις οδηγίες Σύμβολα κινδύνου με στοιχεία για την πρόληψη προσωπικών και υλικών ζημιών. Σύμβολο υποχρέωσης (στη θέση του συμβόλου έκτακτης ανάγκης επεξηγείται η αντίστοιχη υποχρέωση) με στοιχεία για την πρόληψη ζημιών. Σύμβολο υπόδειξης με πληροφορίες για τον καλύτερο χειρισμό της συσκευής. Σήματα εικόνες στη συσκευή: Διαβάστε προσεκτικά ολόκληρη την οδηγία χειρισμού. Οι συσκευές δεν επιτρέπεται να καταλήγουν στα οικιακά απορρίμματα. Σταματήστε τη συσκευή πριν από την αλλαγή ταχύτητας. Κίνδυνος τραυματισμού από το περιστρεφόμενο εργαλείο! Κρατάτε τα χέρια σας μακριά. Φοράτε προστατευτικά γυαλιά. Σήματα εικόνες στο συσσωρευτή Μη πετάτε τις μπαταρίες στα οικιακά απορρίμματα, στη φωτιά ή στο νερό. Μην εκθέτετε τη μπαταρία/τη συσκευή για μεγάλο χρονικό διάστημα σε εντατική ηλιακή ακτινοβολία και μη την ακουμπάτε πάνω σε σώματα καλοριφέρ (μέγ. 45 C). Παραδίδετε τις μπαταρίες σε κέντρο συλλογής μεταχειρισμένων μπαταριών, όπου θα μεριμνηθεί η ανακύκλωσή τους με τρόπο φιλικό για το περιβάλλον. Διαβάστε προσεκτικά ολόκληρη την οδηγία χειρισμού. Σήματα εικόνες στη συσκευή φόρτισης Προσοχή! Πριν την φόρτιση, πρέπει να διαβάσετε τις οδηγίες λειτουργίας. Η συσκευή φόρτισης είναι κατάλληλη μόνο για χρήση σε κλειστούς χώρους. Ασφάλεια συσκευής Κατηγορία προστασίας II (Διπλή μόνωση) Οι συσκευές δεν επιτρέπεται να καταλήγουν στα οικιακά απορρίμματα. Ένδειξη LED κατά τη διάρκεια της διαδικασίας φόρτισης. 2 7
28 GR Γενικές υποδείξεις ασφαλείας για ηλεκτρικά εργαλεία ΠΡΟΕΙΔΟΠΟΙΗΣΗ! Διαβάστε όλες τις υποδείξεις ασφαλείας και τις οδηγίες. Παραλείψεις στην τήρηση των υποδείξεων ασφαλείας και των οδηγιών μπορούν να οδηγήσουν σε ηλεκτροπληξία, πυρκαγιά και/ή βαρείς τραυματισμούς. Διατηρείτε όλες τις υποδείξεις ασφαλείας και τις οδηγίες για μελλοντική αναφορά. Η έννοια ηλεκτρικά εργαλεία, που χρησιμοποιείται στις υποδείξεις ασφαλείας, αναφέρεται σε ηλεκτρικά εργαλεία που λειτουργούνται με το ηλεκτρικό δίκτυο (με καλώδιο ρεύματος) και σε ηλεκτρικά εργαλεία που λειτουργούνται με συσσωρευτή (δίχως καλώδιο ρεύματος). 1) AΣΦΑΛΕΙΑ ΣΤΗ ΘΕΣΗ ΕΡΓΑΣΙΑΣ: Να διατηρείτε τη θέση εργασίας σας καθαρή και καλά φωτισμένη. Σε όχι τακτικούς ή όχι καλά φωτισμένους χώρους εργασίας δημιουργούνται ατυχήματα. Μην εργάζεστε με το ηλεκτρικό εργαλείο σε εκρηκτικό περιβάλλον, στο οποίο βρίσκονται εύφλεκτα υγρά, αέρια ή σκόνες. Τα ηλεκτρικά εργαλεία παράγουν σπινθήρες που μπορούν να αναφλέξουν τη σκόνη και τους ατμούς. Να κρατάτε μακριά τα παιδιά κατά τη διάρκεια χρήσης του ηλεκτρικού εραλείουαλυσοπρίονου. Εάν δεν είστε καλά συγκεντρωμένοι, δεν αποκλείεται να χάσετε τον έλεγχο επί της συσκευής. 2) ΗΛΕΚΤΡΙΚΗ ΑΣΦΑΛΕΙΑ: Το βύσμα του ηλεκτρικού εργαλείου πρέπει να ταιριάζει στην πρίζα. Δεν επιτρέπεται καμία τροποποίηση του βύσματος. Μη χρησιμοποιείτε προσαρμογές βυσμάτων μαζί με γειωμένες ηλεκτρικές συσκευές. Όταν δεν έχουν αλλαχτεί τα βύσματα και όταν χρησιμοποιείτε κατάλληλες πρίζες, μειώνεται ο κίνδυνος ηλεκτροπληξίας. Να αποφεύγετε την σωματική επαφή με γειωμένες επιφάνειες όπως τις γειωμένες επιφάνειες σωλήνων, θερμάνσεων, εστιών και ψυγείων. Υπάρχει ιδιαίτερος κίνδυνος ηλεκτροπληξίας, όταν το ωμα σας είναι γειωμένο. Μην εκθέτετε το ηλεκτρικό εργαλείο σε βροχή ή υγρασία. Η διείσδυση νερού σε ηλεκτρική συσκευή αυξάνει τον κίνδυνο ηλεκτροπληξίας. Μη μεταφέρετε το ηλεκτρικό εργαλείο κρατώντας το από το καλώδιο, μη κρεμάτε τη συσκευή από το καλώδιο και μη χρησιμοποιείτε το καλώδιο για να τραβήξετε το βύσμα από την πρίζα. Να προστατεύετε το καλώδιο από ψηλές θερμοκρασίες, λάδι, αιχμηρές άκρες και κινούμενα τμήματα της συσκευής. Τα ελαττωματικά ή μπερδεμένα καλώδια αυξάνουν τον κίνδυνο ηλεκτροπληξίας. Εάν εργάζεστε με το ηλεκτρικό εργαλείο στο ύπαιθρο, να χρησιμοποιείτε μόνο μπαλαντέζες που είναι κατάλληλες για το ύπαιθρο. Η χρήση μίας μπαλαντέζας κατάλληλης για το ύπαιθρο μειώνει τον κίνδυνο ηλεκτροπληξίας. Εάν δεν μπορείτε να αποφύγετε τη λειτουργία του ηλεκτρικού εργαλείου σε υγρό περιβάλλον, να χρησιμοποιείτε διακόπτη ασφαλείας. Η χρήση ενός διακόπτη ασφαλείας μειώνει τον κίνδυνο ηλεκτροπληξίας. 3) ΑΣΦΑΛΕΙΑ ΑΤΟΜΩΝ Να είστε προσεκτικοί, να προσέχετε τί κανετε, και να εργάζεστε συνετά με 2 8
29 GR το ηλεκτρικό εργαλείο. Μη χρησιμοποιείτε το ηλεκτρικό εργαλείο όταν είστε κουρασμένοι ή υπό την επήρεια ναρκωτικών, οινοπνευματωδών ποτών ή φαρμάκων. Μόνο μία στιγμή απροσεξίας κατά τη χρήση του ηλεκτρικού εργαλείου μπορεί να προκαλέσει σοβαρούς τραυματισμούς. Να χρησιμοποιείοτε τα μέσα ατομικής προστασίας και πάντα προστατευτικά γυαλιά. Η χρήση των μέσων ατομικής προστασίας όπως αντιολισθητικά υποδήματα, προστατευτικό κράνος και ωτοπροστασία, μειώνει τον κίνδυνο τραυματισμών. Να αποφεύγετε την αθέλητη θέση σε λειτουργία. Σιγουρευτείτε πως το ηλεκτρικό εργαλείο είναι απενεργοποιημένο πριν το συνδέσετε με την παροχή ρεύματος, πριν το σηκώσετε και πριν το μεταφέρετε. Εάν κατά την μεταφορά του ηλεκτρικού αλυσοπρίονου έχετε το χέρι σας στον διακόπτη ή η συσκευή είναι ενεργοποιημένη όταν τη συνδέσετε με την παροχή ρεύματος, δεν αποκλείονται ατυχήματα. Πριν ενεργοποιήσετε το ηλεκτρικό εργαλείο να αφαιρέστε ενδεχόμενα εργαλεία ρύθμισης ή κλειδιά. Ένα εργαλείο ρύθμισης ή κλειδί που βρίσκεται στο περιστρεφόμενο τμήμα της συσκευής, μπορεί να οδηγήσει σε τραυματισμούς. Να αποφεύγετε τη μη φυσιολογική στάση του σώματος. Φροντίστε να στέκεστε σταθερά και να κρατάτε πάντα την ισορροπία σας. Έτσι μπορείτε να ελέγχετε το ηλεκτρικό εργαλείο ακόμη και σε απρόοπτες περιστάσεις. Να φοράτε πάντα τον κατάλληλο ρουχισμό εργασίας. Μη φοράτε φαρδιά ρούχα ή κοσμήματα. Να κρατάτε τα μαλλιά, τα ρούχα και τα γάντια μακριά από κινούμενα εξαρτήματα. Τα φαρδιά ρούχα, τα κοσμήματα ή τα μακριά μαλλιά θα μπορούσαν να πιαστούν από τα κινούμενα εξαρτήματα. Εάν είναι δυνατή η συναρμολόγηση εξαρτημάτων απορρόφησης σκόνης, ή σκούπας σιγουρευτείτε ότι είναι συναρμολογημένα και λειτουργούν σωστά. Η χρήση απορροφητή σκόνης μπορεί να μειώσει τους κινδύνους που προκαλεί η σκόνη. 4) ΧΡΗΣΗ ΚΑΙ ΦΡΟΝΤΙΔΑ ΤΟΥ ΗΛΕ- ΚΤΡΙΚΟΥ ΕΡΓΑΛΕΙΟΥ Προσέξτε να μην υπερφορτώνετε τη συσκευή. Να χρησιμοποείτε τα ηλεκτρικά εργαλεία που είναι κατάλληλα για την εργασία σας. Με το κατάλληλο ηλεκτρικό εργαλείο εργάζεστε καλύτερα και ασφαλέστερα στο αναφερόμενο πεδίο ισχύος. Μη χρησιμοποιείτε ηλεκτρικά εργαλεία, ο διακόπτης των οποίων είναι ελαττωματικός. Ένα ηλεκτρικ οεργαλείο που δεν μπορεί να ενεργοποιηθεί ή να απενεργοποιηθεί είναι επικίνδυνο και πρέπει να επισκευαστεί. Βγάλτε το βύσμα από την πρίζα και/ή αφαιρέστε το συσσωρευτή προτού κάνετε τις ρυθμίσεις στη συσκευή, πριν αλλάξετε εξαρτήματα ή πριν ακουμπήσετε κάπου τη συσκευή. Με τον τρόπο αυτό δεν είναι δυνατή η αθέλητη ενεργοποίηση του ηλεκτρικού εργαλείου. Να φυλάγετε το ηλεκτρικό εργαλείο, όταν δεν το χρησιμοποιείτε, μακριά από παιδιά. Μην αφήνετε να χρησιμοποιούν τη συσκευή άτομα που δεν είναι εξοικειωμένα μαζί της ή που δεν διάβασαν αυτές τις οδηγίες. Τα ηλεκτρικά εργαλεία είναι επικίνδυνα, όταν χρησιμοποιούνται από άτομα χωρίς πείρα. Να περιποιείτε προσεκτικά το ηλεκτρικό σας εργαλείο. Ελέγξτε εάν λειτουργούν άψογα και δεν μπλοκάρουν όλα 2 9
30 GR τα κινούμενα τμήματα ή εάν έχουν σπάσει εξαρτήματα ή ορισμένα τμήματα έχουν ζημιές που εμποδίζουν την άψογη λειτουργία του ηλεκτρικού εργαλείου. Δώστε να επισκευαστούν τα ελαττωματικά εξαρτήματα πριν χρησιμοποιήσετε τη συσκευή. Πολλά ατυχήματα οφείλονται σε ηλεκτρικά εργαλεία που δεν έχουν συντηρηθεί σωστά. Τα κοπτικά εξαρτήματα να διατηρούνται πάντα ακονισμένα και καθαρά. Τα προσεγμένα κοπτικά εξαρτήματα με ακονισμένες λάμες δεν μπλοκάρουν εύκολα και κινούνται καλύτερα. Να χρησιμοποιείτε το ηλεκτρικό εργαλείο, τα εξαρτήματά του, τα πρόσθετα εργαλεία κλπ. μόνο σύμφωνα με αυτές τις οδηγίες. Nα λάβετε υπόψη σας τις συνθήκες εργασίας και το είδος της εργασίας σας. Η χρήση του ηλεκτρικού εργαλείου για άλλες εργασίες εκτός αυτών για τις οποίες προορίζεται, μπορεί να προκαλέσει επικίνδυνες περιστάσεις. Κρατάτε τη συσκευή από τις μονωμένες επιφάνειες λαβών όταν διεξάγετε εργασίες κατά τις οποίες το εργαλείο χρήσης μπορεί να συναντήσει κρυμμένους αγωγούς ρεύματος ή το ίδιο του το καλώδιο δικτύου. Η επαφή με έναν αγωγό υπό τάση μπορεί να θέσει υπό τάση και τα μεταλλικά τμήματα της συσκευής και να προκαλέσει ηλεκτροπληξία. 5) ΠΡΟΣΕΚΤΙΚΟΣ ΧΕΙΡΙΣΜΟΣ ΚΑΙ ΧΡΗΣΗ ΜΠΑΤΑΡΙΩΝ Να φορτίζετε τις μπαταρίες μόνο με φορτιστές που συνιστώνται από τον κατασκευαστή. Για ένα φορτιστή που προορίζεται μόνο για ένα είδος μπαταριών, υφίσταται κίνδυνος πυρκαγιάς όταν χρησιμοποιηθεί με άλλες μπαταρίες. Να χρησιμοποιείτε μόνο τις κατάλληλες μπαταρίες στα ηλεκτρικά εργαλεία. Η χρήση άλλων μπαταριών μπορεί να προκαλέσει τραυματισμούς και κίνδυνο πυρκαγιάς. Η μπαταρία που δεν χρησιμοποιείται να βρίσκεται μακριά από συνδετήρες, κέρματα, κλειδιά, καρφιά, βίδες ή άλλα μεταλλικά μικροαντικείμενα που θα μπορούσαν να προκαλέσουν γεφύρωση των επαφών. Ένα ενδεχόμενο βραχυκύκλωμα μεταξύ των επαφών της μπαταρίας μπορεί να έχει σαν συνέπεια εγκαύματα ή φωτιά. Σε περίπτωση εσφαλμένης χρήσης μπορεί να εξέλθει υγρό από τη μπαταρία. Να αποφεύγετε την επαφή με το υγρό αυτό. Σε περίπτωση αθέλητης επαφής, ξεπλύντε με νερό. Εάν το υγρό πάει στα μάτια, συμβουλευθείτε και ένα γιατρό. Το εξερχόμενο υγρό από μπαταρία μπορεί να προκαλέσει δερματικούς ερεθισμούς ή και εγκαύματα. 6) ΣΕΡΒΙΣ Η επισκευή του ηλεκτρικού σας εργαλείου να εκτελείται μόνο από εξειδικευμένο προσωπικό και να χρησιμοποιούνται μόνο γνήσια ανταλλακτικά. Έτσι εξασφαλίζεται η ασφάλεια του ηλεκτρικού σας εργαλείου. 7) ΕΙΔΙΚΕΣ ΥΠΟΔΕΙΞΕΙΣ ΑΣΦΑΛΕΙΑΣ ΓΙΑ ΜΗΧΑΝΗΜΑΤΑ ΜΕ ΣΥΣΣΩΡΕΥΤΗ Σιγουρευτείτε πως η συσκευή είναι απενεργοποιημένη πριν τοποθετήσετε μέσα τη μπαταρία. Η τοποθέτηση μπαταρίας σε ενεργοποιημένη συσκευή μπορεί να προκαλέσει ατυχήματα. Να φορτίζεται τις μπαταρίες σας πάντα σε κλειστούς χώρους, διότι ο φορτιστής προορίζεται μόνο για τον σκοπό 3 0
31 GR αυτό. Για μείωση του κινδύνου της ηλεκτροπληξίας, πριν τον καθαρισμό του φορτιστή να βγάζετε το φις από την πρίζα. Μην εκθέτετε τη μπαταρία/το ηλεκτρικό εργαλείο/τη συσκευή για μεγάλο χρονικό διάστημα σε εντατική ηλιακή ακτινοβολία και μη την ακουμπάτε πάνω σε σώματα καλοριφέρ. Η ψηλές θερμοκρασίες βλάπτουν τη μπαταρία και υφίσταται κίνδυνος έκρηξης. Πριν τη φόρτιση αφήστε τη ζεστή να κρυώσει. Μην ανοίγετε τη μπαταρία και αποφεύγετε τη μηχανική της βλάβη. Υφίσταται κίνδυνος βραχυκυκλώματος και ενδεχομένως εξόδου ατμών που ερεθίζουν τις αναπνευστικές οδούς. Φροντίστε για καθαρό αέρα και σε περίπτωση ενοχλήσεων συμβουλευθείτε ένα γιατρό. Σε περίπτωση επαφής με τα μάτια ή το δέρμα να πλύνετε τα σημεία επαφής με νερό ή με ουδετεροποιητή και να συμβουλευθείτε έναν γιατρό. Μη χρησιμοποιείτε μη επαναφορτιζόμενες μπαταρίες! Περαιτέρω υποδείξεις ασφάλειας Προειδοποίηση! Κατά το πριόνισμα ή την λείανση ενδέχεται να προκληθούν επιβλαβείς για την υγεία σκόνες (π.χ. από υλικά όπως χρώματα που περιέχουν μόλυβδο, υλικά με αμίαντο, μέταλλα ή ορισμένα είδη ξύλου), οι οποίες μπορεί να αποτελούν κίνδυνο για τον χειριστή ή όσους βρίσκονται κοντά. Φροντίζετε για καλό αερισμό του χώρου εργασίας. Φοράτε πάντα γυαλιά προστασίας, προστατευτικά γάντια και προστασία για την αναπνοή. Συνδέετε μια διάταξη αναρρόφησης σκόνης. 1) ΕΙΔΙΚΕΣ ΥΠΟΔΕΙΞΕΙΣ ΑΣΦΑΛΕΙΑΣ ΓΙΑ ΤΟ ΠΟΛΥΜΗΧΑΝΗΜΑ ΜΠΑΤΑΡΙΑΣ Χρησιμοποιείτε με τη συσκευή τις απεσταλμένες επιπρόσθετες χειρολαβές. Η απώλεια ελέγχου μπορεί να οδηγήσει σε τραυματισμούς. Πιάνετε το ηλεκτρικό εργαλείο από τις μονωμένες λαβές όταν εκτελείτε εργασίες κατά τις οποίες το εργαλείο ή η βίδα μπορεί να πετύχει κρυμμένους αγωγούς ρεύματος. Η επαφή με έναν αγωγό υπό τάση μπορεί να θέσει υπό τάση και τα μεταλλικά τμήματα της συσκευής και να προκαλέσει ηλεκτροπληξία. Χρησιμοποιείτε κατάλληλες συσκευές αναζήτησης για τον εντοπισμό κρυμμένων αγωγών τροφοδοσίας ή ενημερωθείτε στην τοπική επιχείρηση παροχής. Μια επαφή με αγωγούς ηλεκτρικού μπορεί να οδηγήσει σε ηλεκτροπληξία και πυρκαγιά, η επαφή με αγωγό αερίου μπορεί να οδηγήσει σε έκρηξη. Η ζημιά σε αγωγό νερού μπορεί να οδηγήσει σε υλική ζημιά και ηλεκτροπληξία. Ασφαλίζετε το τεμάχιο επεξεργασίας. Ένα τεμάχιο επεξεργασίας που συγκρατείται από διατάξεις σύσφιξης ή μέγγενη συγκρατείται με μεγαλύτερη ασφάλεια από ότι με το χέρι σας. Κατά τον χειρισμό των εργαλείων όπως πριόνι, ξύστρα και τρυπάνι να είστε προσεκτικοί. Αυτά είναι αιχμηρά και υπάρχει κίνδυνος τραυματισμού. Κατά την αλλαγή προσαρτημάτων, φοράτε προστατευτικά γάντια. Έτσι αποφεύγετε τραυματισμούς, εάν το προσάρτημα συσκευής θερμανθεί μετά τη χρήση. 3 1
32 GR 2) ΕΙΔΙΚΕΣ ΥΠΟΔΕΙΞΕΙΣ ΑΣΦΑΛΕΙΑΣ ΚΑΤΑ ΤΟ ΠΡΙΟΝΙΣΜΑ Κρατάτε τα χέρια μακριά από τον τομέα λεπίδας. Μην πιάνετε κάτω από το τεμάχιο επεξεργασίας. Κατά την εργασία να στέκεστε πάντα στα πλάγια της σέγας. Κατά την επαφή με την λεπίδα, υπάρχει κίνδυνος τραυματισμού. Οδηγείτε το εργαλείο χρήσης μόνο ενεργοποιημένο προς το τεμάχιο επεξεργασίας. Υπάρχει κίνδυνος αντεπιστροφής όταν το εργαλείο μαγκώσει στο τεμάχιο επεξεργασίας. Προσέξτε ότι η πλάκα πέδιλου θα βρίσκεται πάντα στο τεμάχιο επεξεργασίας κατά την κοπή. Η λεπίδα μπορεί να μαγκώσει και να οδηγήσει σε απώλεια ελέγχου του ηλεκτρικού εργαλείου. Μετά την ολοκλήρωση της διαδικασίας εργασίας απενεργοποιήστε το ηλεκτρικό εργαλείο και τραβήξτε την λεπίδα από το σημείο κοπής μόνο όταν αυτή έχει σταματήσει εντελώς. Έτσι αποφεύγετε αντεπιστροφή και μπορείτε να αποθέσετε με ασφάλεια το ηλεκτρικό εργαλείο. Χρησιμοποιείτε μόνο μη φθαρμένες λεπίδες σε άψογη κατάσταση. Λυγισμένες ή στομωμένες λεπίδες μπορεί να σπάσουν, να επηρεάσουν αρνητικά την κοπή ή να προκαλέσουν αντεπιστροφή. Μην φρενάρετε την λεπίδα μετά την απενεργοποίηση μέσω πλευρικής αντιπίεσης. Η λεπίδα μπορεί να πάθει ζημιά, να σπάσει ή να προκαλέσει αντεπιστροφή. Σφίξτε καλά το υλικό. Μην στηρίζετε το τεμάχιο επεξεργασίας με το χέρι ή το πόδι. Μην αγγίζετε αντικείμενα ή το δάπεδο με λεπίδα σε λειτουργία. Υπάρχει κίνδυνος αντεπιστροφής. Κρατάτε το ηλεκτρικό εργαλείο σφιχτά κατά την εργασία με τα δύο χέρια και φροντίζετε να στέκεστε καλά. Το ηλεκτρικό εργαλείο οδηγείται με μεγαλύτερη ασφάλεια με τα δύο χέρια. Περιμένετε έως ότου το ηλεκτρικό εργαλείο ακινητοποιηθεί, προτού το αποθέσετε. Το εργαλείο μπορεί να μαγκώσει και να οδηγήσει σε απώλεια ελέγχου του ηλεκτρικού εργαλείου. Απενεργοποιήστε αμέσως τη συσκευή, εάν έχει μπλοκάρει η λεπίδα. Ανοίξτε την κοπή και τραβήξτε έξω προσεκτικά την λεπίδα. Μπορεί να οδηγήσει σε απώλεια ελέγχου του ηλεκτρικού εργαλείου. 3) ΕΙΔΙΚΕΣ ΥΠΟΔΕΙΞΕΙΣ ΑΣΦΑΛΕΙΑΣ ΚΑΤΑ ΤΗ ΛΕΙΑΝΣΗ ΚΑΙ ΤΟ ΞΥΣΙΜΟ Χρησιμοποιείτε το ηλεκτρικό εργαλείο μόνο για στεγνή λείανση. Μην ξύνετε νωπά υλικά. Η είσοδος νερού στην ηλεκτρική συσκευή, αυξάνει τον κίνδυνο ηλεκτροπληξίας. Αποφεύγετε υπερθέρμανση του είδους λείανσης και του λειαντικού. Υπάρχει κίνδυνος πυρκαγιάς. Το τεμάχιο επεξεργασίας αποκτά υψηλή θερμοκρασία κατά τη λείανση. Μην πιάνετε στο σημείο επεξεργασίας, επιτρέψτε να κρυώσει. Υπάρχει κίνδυνος εγκαύματος. Μη χρησιμοποιείτε ψυκτικά μέσα ή παρόμοια. Πριν από διαλείμματα εργασίας αδειάζετε πάντα το δοχείο σκόνης. Υπό δυσμενείς συνθήκες όπως σε σπινθηρισμό κατά την λείανση μετάλλων ενδέχεται η σκόνη λείανσης στον σάκο σκόνης, στο μικροφίλτρο, στον χάρτινο σάκο (ή στον σάκο φίλτρου ή στο φίλτρο της διάταξης αναρρόφησης σκόνης) να αναφλεχθεί από μόνη της. Υπάρχει ιδιαίτερος κίνδυνος όταν η σκόνη λείανσης 3 2
33 GR αναμειχθεί με υπολείμματα χρωμάτων, πολυουρεθάνης ή άλλων χημικών ουσιών και το είδος λείανσης είναι καυτό λόγω εργασίας μεγάλης διάρκειας. 4) ΥΠΟΛΕΙΠΟΜΕΝΟΙ ΚΙΝΔΥΝΟΙ Aκόμη και σε περίπτωση σωστής και κανονικής χρήσης αυτού του ηλεκτρικού εργαλείου, υφίστανται πάντα υπόλειπόμενοι κίνδυνοι. Oι ακόλουθοι κίνδυνοι μπορούν να παρουσιαστούν ανάλογα με το είδος κατασκευής και το μο ντέλο αυτού του ηλεκτρικού εργαλείου: a) Βλάβες στους πνεύμονες, στην περίπτωση που δεν χρησιμοποιείται προστασία για την αναπνοή. b) Τέμνοντα τραύματα c) Bλάβες της ακοής, εάν δεν χρησιμοποιθεί κατάλληλη ηχοπροστασίας. d) Βλάβες στα μάτια, στην περίπτωση που δεν χρησιμοποιείται προστασία για τα μάτια. e) Βλάβες της υγείας που προκαλούνται από δονήσεις χεριού-βραχίονα, εάν η συσκευή χρησιμοποιηθεί για μεγαλύτερο χρονικό διάστημα ή δεν τηρείται και δεν συντηρείται σωστά. Προσοχή! Αυτό το ηλεκτρικό εργαλείο δημιουργεί κατά τη λειτουργία ένα ηλεκτρομαγνητικό πεδίο. Αυτό το πεδίο δεν αποκλείεται υπό ορισμένες συνθήκες να εηρεάσει τη λειτουργία, ενεργητικά ή παθηιτκά ιατρικά εμφυτεύματα. Προς αποφυγή του κινδύνου σοβαρών ή και θανατηφόρων τραυματισμών, συνιστούμε σε άτομα με ιατρικά εμφυτεύματα να συμβουλευθούν τον γιατρό τους και τον κατασκευαστή του ιατρικού εμφυτεύματος, πριν χειριστούν τη μηχανή. Σώστoσ χειρισμoσ τoy φoρτιστήώ μλαταριν Αυτή η συσκευή μπορεί να χρησιμοποιηθεί από παιδιά άνω των 8 ετών καθώς και από άτομα με περιορισμένες σωματικές, αισθητικές ή πνευματικές ικανότητες ή με έλλειψη πείρας και γνώσεων, εφόσον επιτηρούνται από άτομο αρμόδιο για την ασφάλεια ή εάν έλαβαν οδηγίες για την ασφαλή χρήση της συσκευής. Τα παιδιά δεν επιτρέπεται να παίζουν με τη συσκευή. Καθαρισμός και συντήρηση εκ μέρους του χρήστη δεν επιτρέπεται να εκτελούνται από μη επιτηρούμενα παιδιά. Για τη φόρτιση της μπαταρίας να χρησιμοποιείτε μόνο τον συμπαραδιδόμενο φορτιστή. Υφίσταται κίνδυνος πυρκαγιάς και έκρηξης. Πριν από κάθε χρήση να ελέγχετε το φορτιστή, το καλώδιο και το βύσμα και να το δίνετε για επισκευή μόνο σε εξειδικευμένο προσωπικό που θα χρησιμοποιήσει γνήσια ανταλλακτικά. Μη χρησιμοποιείτε ελαττωματικές συσκευές και μη τις ανοίγετε μόνοι σας. Έτσι εξασφαλίζεται η ασφάλεια του ηλεκτρικού σας εργαλείου. Προσέχετε να συμφωνεί η τάση δικτύου με τα στοιχεία στην πινακίδα του φορτιστή. Υφίσταται κίνδυνος ηλεκτροπληξίας. 3 3
34 GR Διακόψτε την παροχή ρεύματος προς το φορτιστή προτού κλειστεί ή ανοχιτεί η σύνδεση προς τη μπαταρία ή το ηλεκτρικό εργαλείο/συσκευή. Να διατηρείτε το φορτιστή καθαρό και να μην τον εκθέτετε σε υγρασία και βροχή. Ποτέ μη χρησιμοποιείτε το φορτιστή στο ύπαιθρο. Οι ρύποι και η είσοδος νερού αυξάνουν τον κίνδυνο ηλεκτροπληξίας. Ο φορτιστής επιτρέπεται να λειτουργεί μόνο με τις γνήσιες μπαταρίες που του ανήκουν. Η φόρτιση άλλων μπαταριών μπορεί να προκαλέσει τραυματισμούς και κίνδυνο πυρκαγιάς. Να αποφεύγετε την μηχανική βλάβη του φορτιστή. Μπορεί να προκαλέσει βραχυκύκλωμα. Ο φορτιστής δεν επιτρέπεται να λειτουργεί πάνω σε εύφλεκτη επιφάνεια (π.χ. χαρτί, ύφασμα). Υφίσταται κίνδυνος πυρκαγιάς λόγω της δημιουργούμενης θερμότητας κατά τη φόρτιση. Σε περίπτωση βλάβης του καλωδίου αυτής της συσκευής, πρέπει, προς αποφυγή κινδύνου, να αντικατασταθεί από τον κατασκευαστή, το τμήμα του εξυπηρέτησης πελατών, ή παρόμοια εξειδικευμένο πρόσωπο. Μη φορτίζετε με το φορτιστή μη επαναφορτιζόμενες μπαταρίες. Φόρτιση Να φορτίζετε τη μπαταρία μόνο σε στεγνούς χώρους. Η εξωτερική πλευρά της μπαταρίας πρέπει να είναι καθαρή και στεγνή πριν την συνδέσετε με τον φορτιστή. Υφίσταται κίνδυνος τραυματισμών από ηλεκτροπληξία. Πριν την πρώτη χρήση φορτίστε τη μπαταρία. Να φορτίζετε μόνο με τον συμπαραδιδόμενο αυθεντικό φορτιστή Μία σημαντικά ελαττωμένη διάρκεια λειτουργίας αποτελεί ένδειξη για απαραίτητη αντικατάσταση της μπαταρίας λόγω γήρανσης. Να χρησιμοποιείτε μόνο γνήσιες μπαταρίες αντικατάστασης που θα βρείτε στο κέντρο εξυπηρέτησης πελατών. Προσέξτε οπωσδήποτε τις ισχύουσες υποδείξεις ασφαλείας καθώς και τους όρους και τις υποδείξεις για την προστασία του περιβάλλοντος. Ελαττώματα που οφείλονται σε εσφαλμένο χειρισμό, δεν περιλαμβάνονται στην εγγύηση. Απομάκρυνση/Τοποθέτηση συσσωρευτή 1. Για την εξαγωγή του συσσωρευτή (9) από τη συσκευή, πατήστε το πλήκτρο απασφάλισης (10) στο συσσωρευτή και τραβήξτε έξω το συσσωρευτή. 2. Για την τοποθέτηση του συσσωρευτή (9), ωθήστε το συσσωρευτή κατά μήκος της ράγας οδήγησης μέσα στη συσκευή. Ασφαλίζει με το χαρακτηριστικό ήχο. 3 4
35 GR Φόρτιση συσσωρευτή Ο χρόνος φόρτισης είναι περίπου 1 ώρα. 1. Απομακρύνετε το συσσωρευτή (9) από τη συσκευή. 2. Ωθήστε το συσσωρευτή (9) στη συσκευή φόρτισης (15). Ασφαλίζει με το χαρακτηριστικό ήχο. 3. Συνδέστε τη συσκευή φόρτισης (15) σε μια πρίζα. 4. Μετά από επιτυχή διαδικασία φόρτισης, αποσυνδέστε τη συσκευή φόρτισης (15) από το δίκτυο. 5. Τραβήξτε το συσσωρευτή (9) από τη συσκευή φόρτισης (15). Επισκόπηση των ενδείξεων ελέγχου LED (15a) στην συσκευή φόρτισης (15): Η πράσινη LED αναβοσβήνει: Η συσκευή φόρτισης έχει συνδεθεί στο δίκτυο χωρίς συσσωρευτή. Η κόκκινη LED ανάβει: ο συσσωρευτής φορτίζεται. Η πράσινη LED ανάβει: ο συσσωρευτής έχει φορτιστεί. Χρησιμοποιημένοι συσσωρευτές Μία σημαντικά ελαττωμένη διάρκεια λειτουργίας αποτελεί ένδειξη για απαραίτητη αντικατάσταση της μπαταρίας λόγω γήρανσης. Να χρησιμοποιείτε πάντα μόνο γνήσια ανταλλακτική μπαταρία που θα βρείτε στο τμήμα εξυπηρέτησης πελατών. Προσέξτε οπωσδήποτε τις ισχύουσες υποδείξεις ασφαλείας καθώς και τους όρους και τις υποδείξεις για την προστασάι του περιβάλλοντος (δείτε «Απόσυρση/προστασία του περιβάλλοντος». Έλεγχος κατάστασης φόρτισης του συσσωρευτή Η ένδειξη κατάστασης φόρτισης (9a) σηματοδοτεί την κατάσταση φόρτισης του συσσωρευτή (9). Χρήση Πατήστε το πλήκτρο (9b) στο συσσωρευτή (9). Η κατάσταση φόρτισης του συσσωρευτή φαίνεται καθώς ανάβουν οι λυχνίες LED τριών χρωμάτων της ένδειξης κατάστασης φόρτισης (9a): Όλες οι LED ανάβουν: ο συσσωρευτής έχει φορτιστεί πλήρως. Οι LED κόκκινου και κίτρινου χρώματος ανάβουν: ο συσσωρευτής διαθέτει υπολειπόμενη φόρτιση (< 90 %). Η κόκκινη LED ανάβει: ο συσσωρευτής είναι άδειος, φορτίστε τον. Αλλαγή προσαρτημάτων συσκευής Ασφαλίστε τη συσκευή έναντι ενεργοποίησης (δείτε «Ενεργοποίηση/Απενεργοποίηση») ή αφαιρέστε τον συσσωρευτή από τη συσκευή. Σε μη ηθελημένη ενεργοποίηση, υπάρχει κίνδυνος τραυματισμού. Φοράτε γάντια προστασίας. Μετά τη χρήση μπορεί να έχει θερμανθεί το προσάρτημα συσκευής. 3 5
36 GR Αφαίρεση του προσαρτήματος συσκευής 1. Ωθήστε τον μοχλό απασφάλισης (5) έως τον αναστολέα και κρατήστε τον σε αυτή τη θέση. 2. Αφαιρέστε το απασφαλισμένο προσάρτημα συσκευής (4/17/23/26). 3. Επιτρέψτε ο μοχλός απασφάλι- σης (5) να γλιστρήσει στην θέση του. Τοποθέτηση προσαρτήματος συσκευής 4. Ωθήστε το προσάρτημα συσκευής (4/17/23/26) κατά μήκος της ράγας οδήγησης στην μονάδα μοτέρ (6). Ασφαλίζει με το χαρακτηριστικό ήχο. 5. Επιτρέψτε ο μοχλός απασφάλι- σης (5) να γλιστρήσει στην θέση του. 6. Ελέγξτε την σταθερή έδραση τραβώντας στο προσάρτημα συσκευής. Ενεργοποίηση/Απενεργοποίηση 1. Ενεργοποίηση: Πατήστε το διακόπτη on/off ( 11). Με το διακόπτη ενεργοποίησης/απενεργοποίησης ( 11) μπορείτε να ρυθμίζετε αδιαβάθμητα τις στροφές. Ελαφριά πίεση: χαμηλός αριθμός στροφών Μεγαλύτερη πίεση: υψηλότερος αριθμός στροφών. 2. Απενεργοποίηση: Αφήστε το διακόπτη on/off ( 11). Εάν θέσετε τον διακόπτη κατεύθυνσης περιστροφής ( 7) στη μεσαία θέση, η συσκευή είναι ασφαλισμένη από ενεργοποίηση. Μονάδα μοτέρ με εξαρτήματα δραπανοκατσάβιδου PKGA1 Αλλαγή εργαλείου Ασφαλίστε τη συσκευή έναντι ενεργοποίησης (δείτε «Ενεργοποίηση/Απενεργοποίηση»). Σε μη ηθελημένη ενεργοποίηση της συσκευής, υπάρχει κίνδυνος τραυματισμού. 1. Περιστρέψτε το ταχυτσόκ (1) αριστερόστροφα, μέχρι το άνοιγμα του τσοκ να είναι αρκετά μεγάλο για να τοποθετηθεί το εργαλείο. 2. Ωθήστε το εργαλείο όσο γίνεται μέσα στο ταχυτσόκ (1). 3. Κλείστε περιστρέφοντας το ταχυτσόκ (1) δεξιόστροφα, για να σφίξετε καλά το εργαλείο. 4. Για να βγάλετε ξανά το εργαλείο, ξεβιδώστε το ταχυτσόκ (1) και τραβήξτε το εργαλείο προς τα έξω. Επιλογή ταχύτητας Σταματήστε τη συσκευή πριν από την αλλαγή ταχύτητας. 1. Περιμένετε έως ότου ακινητοποιηθεί η συσκευή. 2. Σύρετε το διακόπτη επιλογής ταχυτήτων ( 3) στην επιθυμητή θέση: 1: χαμηλή προεπιλογή αριθμού στροφών. 2: υψηλή προεπιλογή αριθμού στροφών. 3 6
37 GR Ρύθμιση κατεύθυνσης περιστροφής Με τον διακόπτη κατεύθυνσης περιστροφής μπορείτε να αλλάξετε την κατεύθυνση περιστροφής της συσκευής. 1. Περιμένετε έως ότου ακινητοποιηθεί η συσκευή. 2. Ωθήστε τον διακόπτη κατεύθυνσης περιστροφής ( 7) στην επιθυμητή θέση: Δεξιόστροφη κίνηση : για την διάτρηση και το βίδωμα βιδών. Αριστερόστροφη κίνηση : για το λασκάρισμα βιδών. 3. Εάν θέσετε τον διακόπτη κατεύθυνσης περιστροφής ( 7) στη μεσαία θέση, η συσκευή είναι ασφαλισμένη από ενεργοποίηση. Ο διακόπτης κατεύθυνσης περιστροφής επιτρέπεται να ενεργοποιείται μόνο σε κατάσταση ακινησίας! Ρύθμιση ροπής στρέψης Μπορείτε να προρυθμίσετε την μέγιστη ροπή στρέψης. Οι βαθμίδες ροπής στρέψης έχουν χαρακτηρισμό Περιμένετε έως ότου ακινητοποιηθεί η συσκευή. 2. Επιλέξτε την επιθυμητή ροπή στρέψης μέσω περιστροφής στον δακτύλιο ρύθμισης ροπής στρέψης (2). Βίδωμα: Βαθμίδα 1-19 Διάτρηση: Βαθμίδα 3. Ξεκινήστε από μια μικρότερη βαθμίδα ροπής στρέψης και αυξήστε την όπως απαιτείται. Ο δακτύλιος ρύθμισης ροπής στρέψης επιτρέπεται να ενεργοποιείται μόνο σε κατάσταση ακινησίας. Η απαιτούμενη ροπή στρέψης εξαρτάται από: - τον τύπο και τη σκληρότητα του υλικού στο οποίο θα γίνει επεξεργασία, - τον τύπο και το μήκος των χρησιμοποιούμενων βιδών. Μονάδα μοτέρ με πολυλειαντήρα PKGA2 Ασφαλίστε τη συσκευή έναντι ενεργοποίησης (δείτε «Ενεργοποίηση/Απενεργοποίηση»). Σε μη ηθελημένη ενεργοποίηση της συσκευής, υπάρχει κίνδυνος τραυματισμού. Τοποθέτηση/Απομάκρυνση φύλλου λείανσης Το φύλλο λείανσης ( 22) είναι εξοπλισμένο με μια επιφάνεια σκρατς για την γρήγορη τοποθέτηση του φύλλου λείανσης. Τοποθέτηση φύλλου λείανσης 1. Πιέστε το φύλλο λείανσης (24) ομοιόμορφα στην πλάκα λείανσης (22). Προσέξτε την ομοιομορφία κάλυψης των οπών στο φύλλο λείανσης με τα ανοίγματα της πλάκας λείανσης. Απομάκρυνση φύλλου λείανσης 2. Αφαιρέστε το φύλλο λείανσης (24) από την πλάκα λείανσης (22). Σύνδεση διάταξης αναρρόφησης σκόνης Συνδέοντας την διάταξη αναρρόφησης σκόνης μπορείτε να μειώσετε την συσσώ- 3 7
38 GR ρευση σκόνης κατά την λείανση. 1. Ωθήστε τον αντάπτορα (25) έως τον αναστολέα στο άνοιγμα στο προσάρτημα πολυλειαντήρα (23). 2. Συνδέστε τον εύκαμπτο σωλήνα αναρρόφησης μιας διάταξης αναρρόφησης σκόνης στον αντάπτορα (25). Μονάδα μοτέρ με σπαθοσέγα PKGA3 Συναρμολόγηση/Αλλαγή λεπίδας Ασφαλίστε τη συσκευή έναντι ενεργοποίησης (δείτε «Ενεργοποίηση/Απενεργοποίηση»). Σε μη ηθελημένη ενεργοποίηση της συσκευής, υπάρχει κίνδυνος τραυματισμού. Κατά το χειρισμό της λεπίδας, φοράτε προστατευτικά γάντια. Έτσι αποφεύγετε τραυματισμούς από κοπή. Προσοχή κίνδυνος τραυματισμού! - Μη χρησιμοποιείτε στομωμένες, λυγισμένες ή αλλιώς φθαρμένες λεπίδες. - Τοποθετείτε πάντα την αντίστοιχη λεπίδα. Μια επισκόπηση των κατάλληλων λεπίδων μπορείτε να βρείτε στο απόσπασμα «Ανταλλακτικά/Αξεσουάρ». Συναρμολόγηση λεπίδας: 1. Ωθήστε τον μοχλό (19) για την απασφάλιση φύλλου λείανσης έως τον αναστολέα προς τα επάνω. Τοποθετήστε το στέλεχος του φύλλου λείανσης (20/21) στην εγκοπή της υποδοχής φύλλου λείανσης. 2. Για την ασφάλιση, αφήστε τον μοχλό (19), θα γυρίσει στην αρχική θέση. 3. Ελέγξτε την σταθερή έδραση τραβώντας στην λεπίδα. Απομάκρυνση λεπίδας: 4. Ωθήστε τον μοχλό (19) για την απασφάλιση φύλλου λείανσης έως τον αναστολέα προς τα επάνω και αφαιρέστε το φύλλο λείανσης από την υποδοχή φύλλου λείανσης. Για συγκεκριμένες εργασίες μπορεί να χρησιμοποιηθεί η λεπίδα και γυρισμένη κατά 180. Χειρισμός σπαθοσέγας 1. Προσέξτε πριν από την ενεργοποίηση ώστε η συσκευή να μην αγγίζει το τεμάχιο επεξεργασίας. 2. Ενεργοποιήστε τη συσκευή. Με το διακόπτη ενεργοποίησης/απενεργοποίησης ( 11) μπορείτε να ρυθμίζετε αδιαβάθμητα τον αριθμό ταλαντώσεων. Ελαφριά πίεση: χαμηλός αριθμός ταλαντώσεων. Μεγαλύτερη πίεση: υψηλότερος αριθμός ταλαντώσεων. Ο διακόπτης ενεργο-/απενεργοποίησης δεν ασφαλίζεται. 3. Τοποθετήστε την πλάκα πέδιλου ( 18) επάνω στο τεμάχιο επεξεργασίας. 4. Πριονίζετε με ομοιόμορφη κίνηση τροφοδοσίας. 5. Μετά την εργασία απομακρύνετε την λεπίδα από την κοπή και μόνο στη συνέχεια απενεργοποιήστε την συσκευή. 3 8
39 GR Μονάδα μοτέρ με εργαλείο πολλαπλών λειτουργιών PKGA4 Αλλαγή εργαλείου Ασφαλίστε τη συσκευή έναντι ενεργοποίησης (δείτε «Ενεργοποίηση/Απενεργοποίηση»). Σε μη ηθελημένη ενεργοποίηση της συσκευής, υπάρχει κίνδυνος τραυματισμού. 1. Πιέστε τον μοχλό (27) για την απασφάλιση εργαλείου έως τον αναστολέα προς τα πίσω. 2. Αφαιρέστε το απασφαλισμένο στήριγμα εργαλείου (29) προς τα εμπρός. 3. Τοποθετήστε το επιθυμητό εργαλείο (30/32/33) στους άξονες υποδοχής (28). Είναι δυνατές 12 διαφορετικές θέσεις. 4. Πιέστε το στήριγμα εργαλείου (29) πάλι στην κεντρική υποδοχή. 5. Γυρίστε πάλι τον μοχλό (27) για την απασφάλιση εργαλείου προς τα εμπρός. Το στήριγμα εργαλείου έχει στερεωθεί με το εργαλείο. Τοποθέτηση/Απομάκρυνση φύλλου λείανσης Το φύλλο λείανσης τριβείου-δέλτα (30) είναι εξοπλισμένο με μια επιφάνεια σκρατς για την γρήγορη τοποθέτηση του φύλλου λείανσης. Τοποθέτηση φύλλου λείανσης 1. Πιέστε το φύλλο λείανσης (31) ομοιόμορφα στην πλάκα λείανσης τριβείου-δέλτα (30). Προσέξτε την ομοιομορφία κάλυψης των οπών στο φύλλο λείανσης με τα ανοίγματα της πλάκας λείανσης. Απομάκρυνση φύλλου λείανσης 2. Αφαιρέστε το φύλλο λείανσης (31) από την πλάκα λείανσης τριβείου-δέλτα (30). Υποδείξεις εργασίας Φοράτε κατά την εργασία με τη συσκευή κατάλληλο ρουχισμό και προστατευτικό εξοπλισμό. Βεβαιώνεστε πριν από κάθε χρήση, ότι η συσκευή έχει δυνατότητα λειτουργίας. Ο ατομικός προστατευτικός εξοπλισμός και μια συσκευή με δυνατότητα λειτουργίας εμποδίζουν τον κίνδυνο τραυματισμών και ατυχημάτων. Πριόνισμα Φοράτε προστασία για την ακοή. Φοράτε προστασία για τα μάτια. Χρησιμοποιείτε μόνο μη φθαρμένες λεπίδες σε άψογη κατάσταση. Για την επεξεργασία μετάλλου, χρησιμοποιείτε μόνο μεταλλικές λεπίδες. Προσέξτε για μια ασφαλή έδραση και κρατάτε σφιχτά τη συσκευή με τα δύο χέρια και με απόσταση από το σώμα σας. Ελέγχετε πριν από την κοπή το τεμάχιο επεξεργασίας για κρυφά ξένα σώματα όπως καρφιά, βίδες. Απομακρύνετέ τα. Οι κοπές με βύθισμα επιτρέπεται να διεξάγονται μόνο σε μαλακά υλικά όπως ξύλο ή γυψοσανίδες. 3 9
40 GR Επιλογή της λεπίδας Πριονολάμα για ξύλο Πριονολάμα για μέταλλο Πριονολάμα κοπής με βύθισμα Λείανση για ξύλο, πλαστικό, γυψοσανίδα για ελάσματα, προφίλ και σωλήνες για μαλακά υλικά όπως ξύλο ή γυψοσανίδες Χρησιμοποιείτε κατά τη λείανση με τον πολυλειαντήρα μια διάταξη αναρρόφησης σκόνης. Οδηγείτε το εργαλείο ενεργοποιημένο προς το τεμάχιο επεξεργασίας. Καθαρίστε την πλάκα λείανσης προτού τοποθετήσετε ένα φύλλο λείανσης. Να εργάζεστε μόνο με φύλλα λείανσης σε καλή κατάσταση, ώστε να έχετε καλά αποτελέσματα λείανσης. Να εργάζεστε με ελάχιστη και ομοιόμορφη δύναμη πίεσης. Έτσι προστατεύετε τη συσκευή και το φύλλο λείανσης. Μην λειαίνετε με το ίδιο φύλλο λείανσης διαφορετικά υλικά (π.χ. μέταλλο και κατόπιν ξύλο). Επιλογή του φύλλου λείανσης Κόκκωση Χρήση 60 για την προλείανση ακατέργαστων ξύλινων επιφανειών 80 / 120 για επιφανειακή λείανση για λείανση ακρίβειας ασταρωμένων 240 και βαμμένων επι- φανειών Ξύσιμο Επιλέξτε κατά το ξύσιμο υψηλό αριθμό ταλαντώσεων. Να εργάζεστε με ελάχιστη δύναμη πίεσης και μια επίπεδη γωνία, ώστε να μην προκληθεί ζημιά στο υλικό υπόβαθρου. Καθαρισμός και συντήρηση Αφήστε να εκτελούνται από το τμήμα μας εξυπηρέτησης πελατών οι εργασίες επισκευής που δεν περιγράφονται στις οδηγίες. Να χρησιμοποιείτε μόνο γνήσια ανταλλακτικά. Κίνδυνος τραυματισμού! Απενεργοποιήστε τη συσκευή και απομακρύνετε πριν από όλες τις εργασίες και για τη μεταφορά, το συσσωρευτή από τη συσκευή. Να εκτελείτε τακτικά τις ακόλουθες εργασίες καθαρισμού και συντήρησης. Έτσι εξασφαλίζετε την αξιοπιστία λειτουργίας και μακρόχρονη χρήση. Καθαρισμός Δεν επιτρέπεται ούτε να καθαρίσετε με υδροριπή τη συσκευή ούτε να την βάλετε μέσα σε νερό. Κίνδυνος ηλεκτροπληξίας! Να κρατάτε καθαρές τις σχισμές αερισμού, το περίβλημα του κινητήρα και τις λαβές τις συσκευής. Για τον καθαρισμό να χρησιμοποιείτε ένα νωπό πανί ή μία βούρτσα. Μη χρησιμοποιείτε καθαριστικά ή διαλύτες. Θα μπορούσαν να καταστρέψουν ανεπανόρθωτα τη συσκευή. 4 0
41 GR Συντήρησης Η συσκευή δεν χρειάζεται συντήρηση. Αποθήκευση Φυλάσσετε τη συσκευή σε ένα μέρος ξηρό, προφυλαγμένο από τη σκόνη και εκτός εμβέλειας των παιδιών. Εάν πρόκειται να αποθηκεύσετε τη συσκευή γιοα μεγαλύτερο χρονικό διάστημα, αφαιρέστε τη μπαταρία. Αποθηκεύετε το συσσωρευτή μόνο σε κατάσταση μερικής φόρτισης. Η κατάσταση φόρτισης πρέπει σε μακρά διάρκεια φόρτισης να ανέρχεται σε 40-60% (οι δύο λυχνίες LED της ένδειξης κατάστασης φόρτισης ( 9a) ανάβουν). Αποθηκεύετε το συσσωρευτή μεταξύ 10 C και 25 C. Κατά τη διάρκεια της αποθήκευσης αποφεύγετε ακραίο ψύχος ή θερμότητα, ώστε ο συσσωρευτής να μην χάνει την απόδοση του. Κατά τη διάρκεια μιας μακράς φάσης αποθήκευσης ελέγχετε σχεδόν κάθε 3 μήνες την κατάσταση φόρτισης του συσσωρευτή και εάν απαιτείται διεξάγετε φόρτιση. Απόσυρση/προστασία του περιβάλλοντος Αφαιρέστε τη μπαταρία από τη συσκευή και διαθέστε τη συσκευή, τη μπαταρία, τα αξεσουάρ και τη συσκευασία για ανακύκλωση με τρόπο φιλικό για το περιβάλλον. Ηλεκτρικές συσκευές δεν ανήκουν στα οικιακά απορρίμματα. Μη πετάτε τις μπαταρίες στα οικιακά απορρίμματα, στη φωτιά (κίνδυνος έκρηξης) ή στο νερό. Οι ελαττωματικές μπαταρίες μπορούν να βλάψουν το περιβάλλον και την υγεία σας εάν εκρεύσουν τοξικοί ατμοί ή υγρά. Παραδώστε τη συσκευή σε σημείο συλλογής προς ανακύκλωση. Τα χρησιμοποιηθέντα πλαστικά και μεταλλικά εξαρτήματα μπορούν να ξεχωριστούν και να αποσυρθούν με σκοπό την ανακύκλωσή τους. Προς το σκοπό αυτό απευθυνθείτε στο Κέντρο Σέρβις της εταιρίας μας. Να διαθέτετε τις μπαταρίες σε εκφορτισμένη κατάσταση. Συνιστούμε να καλύπτετε τους πόλους με κολλητική ταινία για προστασία από βραχυκύκλωμα. Μην ανοίγετε τη μπαταρία. Να διαθέτετε τις μπαταρίες ακολουθώντας τις τοπικές διατάξεις. Παραδίδετε τις μπαταρίες σε κέντρο συλλογής μεταχειρισμένων μπαταριών, όπου θα μεριμνηθεί η ανακύκλωσή τους με τρόπο φιλικό για το περιβάλλον. Ενημερωθείτε στην τοπική υπηρεσία απορριμμάτων ή στο κέντρο μας εξυπηρέτησης πελατών. Τη απόρριψη των ελαττωματικών σας συσκευών που μας στέλνετε την αναλαμβάνουμε δωρεάν. 4 1
42 GR Εγγύηση Αξιότιμη πελάτισσα, αξιότιμε πελάτη, για τη συσκευή αυτή σας προσφέρουμε εγγύηση 3 ετών από την ημερομηνία της αγοράς. Σε περίπτωση ελαττωμάτων αυτού του προϊόντος, έχετε απέναντι του πωλητή τα νόμιμα δικαιώματα. Αυτά τα νόμιμα δικαιώματα δεν περιορίζονται από την επακόλουθη εγγύησή μας. Όροι εγγύησης Η προθεσμία της εγγύησης αρχίζει από την ημερομηνία της αγοράς. Παρακαλούμε να φυλάξετε καλά την απόδειξη αγοράς. Θα σας χρειαστεί εάν θελήσετε να αποδείξετε την ημερομηνία και την αγορά της συσκευής. Εάν παρουσιαστεί ελάττωμα υλικού ή κατασκευής στο προϊόν αυτό εντός τριών ετών από την ημερομηνία αγοράς, θα σας επισκευάσουμε ή θα σας αντικαταστήσουμε δωρεάν το προϊόν αυτό, με δική μας επιλογή. Αυτή η παροχή εγγύησης προϋποθέτει πως εντός της τριετούς προθεσμίας θα μας προσκομιστεί η ελαττωματική συσκευή και η απόδειξη αγοράς και μία γραπτή περιγραφή του ελαττώματος και της ημερομηνίας που πρωτοπαρουσιάστηκε. Εάν το ελάττωμα καλύπτεται από την εγγύησή μας, θα σας επιστραφεί ή το επισκευασμένο ή ένα νέο προϊόν. Με την αντικατάσταση της συσκευής ξεκινάει μια νέα χρονική περίοδος εγγύησης. Με την επισκευή της συσκευής δεν ξεκινάει νέα χρονική περίοδος εγγύησης. Διάρκεια εγγύησης και νόμιμες αξιώσεις για ελαττώματα Η διάρκεια της εγγύησης δεν επεκτείνεται από την παροχή εγγύησης. Αυτό ισχύει και για αντικαταστημένα και επισκευασμένα εξαρτήματα. Ενδεχόμενα ελαττώματα που διαπιστώνονται κατά την αγορά, πρέπει να δηλωθούν αμέσως μετά το ξεπακετάρισμα. Για όλες τις επισκευές που καθίστανται απαραίτητες μετά τη λήξη της εγγύησης επιβαρύνεστε με τις σχετικές δαπάνες. Έκταση της εγγύησης Η συσκευή κατασκευάστηκε βάσει αυστηρών κριτηρίων ποιότητας και ελέγχθηκε ευσυνείδητα πριν την παράδοσή της. Η εγγύηση ισχύει για ελαττώματα στο υλικό ή στην κατασκευή. Αυτή η εγγύηση δεν συμπεριλαμβάνει τμήματα του προϊόντος που υφίστανται κοινή φθορά και θεωρούνται ως αναλώσιμα (π.χ. εργαλεία, ςυσσωρευτής) ή εύθραυστα τμήματα του προϊόντος (π.χ. διακόπτες). Αυτή η εγγύηση εκπίπτει σε περίπτωση που η συσκευή υπέστη βλάβη, δεν χρησιμοποιήθηκε ή δεν συντηρήθηκε σωστά. Για σωστή χρήση του προϊόντος πρέπει να ακολουθούνται όλες οι υποδείξεις που αναφέρονται στις οδηγίες χρήσης. Να αποφεύγονται οπωσδήποτε οι χρήσεις και πράξεις που δεν συνιστώνται στις Οδηγίες χρήσης ή για τις οποίες ισχύουν ειδικές προειδοποιήσεις. Το προϊόν προορίζεται μόνο για ιδιωτική και όχι για επαγγελματική χρήση. Σε περίπτωση καταχρηστικού και λάθος χειρισμού, άσκησης βίας και επεμβάσεων που δεν εκτελούνται από συμβεβλημένο συνεργείο μας, εκπίπτει η εγγύηση. Διακανονισμός σε περίπτωση εγγύησης Προς εξασφάλιση ταχείας επεξεργασίας παρακαλούμε να ακολουθήστε τις επόμενες υποδείξεις: Για όλα τα αιτήματα να έχετε πρόχειρα την απόδειξη αγοράς και τον αριθμό προϊόντος (ΙΑΝ ) ως αποδεικτι- 4 2
43 GR κό στοιχεί για την αγορά. Τον αριθμό προϊόντος θα τον βρείτε στην ετικέτα στοιχείων της συσκευής, σε χαραγμένη σημείωση στο προϊόν, στο εξώφυλλο των Οδηγιών χρήσης (κάτω αριστερά) ή σαν αυτοκόλλητο στην πίσω ή κάτω πλευρά. Εάν παρουσιαστούν σφάλματα λειτουργίας ή άλλα ελαττώματα, επικοινωνήστε πρώτα με το πιο κάτω αναφερόμενο τμήμα εξυπηρέτησης πελατών τηλεφωνικά ή με . Εκεί θα σας δοθούν περισσότερες πληροφορίες για τον διακανονισμό. Ένα ως ελαττωματικό καταχωρημένο προϊόν μπορείτε, μετά από συνεννόηση με το τμήμα μας εξυπηρέτησης πελατών, να το στείλετε, με δική μας επιβάρυνση με τα ταχυδρομικά, επισυνάπτοντας την απόδειξη αγοράς και στοιχεία για το ελάττωμα και την ημερομηνία που παρουσιάστηκε, στη διεύθυνση του σέρβις μας που σας κοινοποιήθηκε. Προς αποφυγή προβλημάτων παραλαβής και πρόσθετων δαπανών, παρακαλούμε να χρησιμοποιήσετε μόνο τη διεύθυνση που σας κοινοποιήθηκε. Σιγουρευτείτε πως η αποστολή δεν έγινε χωρίς πληρωμή των ταχυδρομικών τελών, σαν ογκώδες αντικείμενο, σαν εξπρές, ή με άλλο ειδικό τρόπο. Στείλτε τη συσκευή μαζί με όλα τα αξεσουάρ που σας παραδόθηκαν κατά την αγορά και φροντίστε για ασφαλή συσκευασία. Σέρβις επισκευής Επισκευές που δεν καλύπτονται από την εγγύηση μπορούν να εκτελεστούν από το υποκατάστημά μας για σέρβις έναντι πληρωμής. Το υποκατάστημα σέρβις θα σας υποβάλει προϋπολογισμό εξόδων. Μπορούμε να αναλάβουμε την επεξεργασία συσκευών που μας απεστάλησαν καλά συσκευασμένες και με πληρωμένα ταχυδρομικά τέλη. Προσοχή: Παρακαλούμε να στείλετε τη συσκευή σας στο υποκατάστημά μας για σέρβις, καλά καθαρισμένη και με την σχετική υπόδειξη για το ελάττωμα. Οι συσκευές που στέλνονται χωρίς να έχουν πληρωθεί τα ταχυδρομικά τέλη - με εξπρές, σαν ογκώδη αντικείμενα, ή με άλλο ειδικό τρόπο - δεν θα γίνονται δεκτές. Την απόρριψη των ελαττωματικών σας συσκευών που μας στέλνετε την αναλαμβάνουμε δωρεάν. Service-Center GR Σέρβις Κύπρος Tel.: grizzly@lidl.com.cy I AN Σέρβις Ελλάδα Tel.: (0,03 EUR/Min.) grizzly@lidl.gr I AN Εισαγωγέας Παρακαλούμε να λάβετε υπόψη σας πως η ακόλουθη διεύθυνση δεν είναι η διεύθυνση για σέρβις. Επικοινωνήστε πρώτα με το πιο πάνω αναφερόμενο κέντρο εξυπηρέτησης πελατών. Grizzly Tools GmbH & Co. KG Stockstädter Straße 20 DE Großostheim ΓΕΡΜΑΝΙΑ 4 3
44 GR Ανταλλακτικά / Αξεσουάρ Ανταλλακτικά και αξεσουάρ μπορείτε να βρείτε στη σελίδα Εάν δεν έχετε Internet, απευθυνθείτε τηλεφωνικά στο Κέντρο Σέρβις (βλέπε Service- Center στη σελίδα 43). Να έχετε πρόχειρους τους αριθμούς παραγγελίας που αναφέρονται πιο κάτω. Αρ. Αρ. Χαρακτηρισμός Αρ. είδους Οδηγιών Επί μέρoυς χρήσης σχεδιαγράμματα- 4 PKGA1 Εξαρτήματα δραπανοκατσάβιδου Συσσωρευτής Φορτιστής UK PKGA3 Σπαθοσέγα PKGA3-1 Πριονολάμα για μέταλλο (HSS 150 mm/18 TPI*) Πριονολάμα για ξύλο (HCS 150 mm/6 TPI*) PKGA2 Πολυλειαντήρας PKGA2-7 Φύλλα λείανσης - Πολυλειαντήρας (2 x 60, 2 x 120, 1 x 240**) PKGA2-9 Αντάπτορας για την διάταξη αναρρόφησης σκόνης PKGA4 Πολυεργαλείο Φύλλα λείανσης - Πλάκα λείανσης τριβείου-δέλτα (1 x 60, 1 x 80, 1 x 120**) Ξύστρα Βυθιζόμενη πριονολάμα * HSS = High Speed Steel * HCS = High Carbon Steel, χάλυβας με υψηλή περιεκτικότητα σε άνθρακα TPI = Teeth per inch, αριθμός των οδοντώσεων ανά 2,54 εκ. ** = Κόκκωση Περαιτέρω εξαρτήματα για κάθε σκοπό χρήσης διατίθενται στα ειδικά καταστήματα. 4 4
45 GR Ανίχνευση βλαβών Πρόβλημα Πιθανή αιτία Αντιμετώπιση σφάλματος Η συσκευή δεν εκκινείται Η συσκευή δουλεύει με διακοπές Το εργαλείο δεν κινείται, παρότι ο κινητήρας λειτουργεί Ελάχιστη απόδοση συσκευής Το εργαλείο φθείρεται γρήγορα Ο συσσωρευτής είναι εκφορτισμένος ( 9) Ο συσσωρευτής ( έχει τοποθετηθεί 9) δεν Ο διακόπτης ενεργο-/απενεργοποίησης ( 11) είναι ελαττωματικός Εσωτερική χαλαρή επαφή Ο διακόπτης ενεργο-/απενεργοποίησης ( 11) είναι ελαττωματικός Το προσάρτημα συσκευής ή το εργαλείο δεν έχουν συναρμολογηθεί σωστά Ακατάλληλο εργαλείο για το τεμάχιο προς επεξεργασία Το εργαλείο είναι στομωμένο ή φθαρμένο Λάθος ταχύτητα Ελάχιστη απόδοση συσσωρευτή Ακατάλληλο εργαλείο για το τεμάχιο προς επεξεργασία εφαρμόστηκε πολύ πίεση Πολύ υψηλή ταχύτητα Φορτίστε το συσσωρευτή (βλέπε «Διαδικασία φόρτισης») Τοποθετήστε το συσσωρευτή (βλέπε «Διαδικασία φόρτισης») Η επισκευή πρέπει να διεξαχθεί από το κέντρο σέρβις Η επισκευή πρέπει να διεξαχθεί από το κέντρο σέρβις Συναρμολογήστε σωστά το προσάρτημα εργαλείου ή το εργαλείο (δείτε «Χειρισμός») Χρησιμοποιήστε κατάλληλο εργαλείο Χρησιμοποιήστε ένα νέο εργαλείο Προσαρμόστε την ταχύτητα 9) (δεί- Φορτίστε τον συσσωρευτή ( τε «Διαδικασία φόρτισης») Χρησιμοποιήστε κατάλληλο εργαλείο (δείτε «Χρήση») Μειώστε την πίεση Μειώστε την ταχύτητα 4 5
46 DE AT CH Inhalt Einleitung Bestimmungsgemäße Verwendung..46 Allgemeine Beschreibung Lieferumfang...47 Übersicht...47 Technische Daten Sicherheitshinweise Symbole und Bildzeichen...49 Allgemeine Sicherheitshinweise für Elektrowerkzeuge...50 Weiterführende Sicherheitshinweise...53 Richtiger Umgang mit dem Akkuladegerät...56 Ladevorgang Akku entnehmen/einsetzen...57 Akku aufladen...57 Verbrauchte Akkus...57 Ladezustand des Akkus prüfen...58 Bedienung Geräteaufsätze wechseln...58 Ein-/Ausschalten...58 Motoreinheit mit Bohrschrauberaufsatz PKGA Motoreinheit mit Multischleifer-Aufsatz PKGA Motoreinheit mit Säbelsägen-Aufsatz PKGA Motoreinheit mit Multifunktionswerkzeug PKGA Arbeitshinweise Sägen...61 Schleifen...62 Schaben...62 Reinigung und Wartung Reinigung...62 Wartung...63 Lagerung Entsorgung/Umweltschutz Garantie Reparatur-Service Service-Center Importeur Ersatzteile/Zubehör Fehlersuche Original EG-Konformitätserklärung Explosionszeichnungen...71 Einleitung Herzlichen Glückwunsch zum Kauf Ihres neuen Gerätes. Sie haben sich damit für ein hochwertiges Gerät entschieden. Dieses Gerät wurde während der Produktion auf Qualität geprüft und einer Endkontrolle unterzogen. Die Funktionsfähigkeit Ihres Gerätes ist somit sichergestellt. Die Betriebsanleitung ist Bestandteil dieses Gerätes. Sie enthält wichtige Hinweise für Sicherheit, Gebrauch und Entsorgung. Machen Sie sich vor der Benutzung des Gerätes mit allen Bedien- und Sicherheitshinweisen vertraut. Benutzen Sie das Gerät nur wie beschrieben und für die angegebenen Einsatzbereiche. Bewahren Sie die Betriebsanleitung gut auf und händigen Sie alle Unterlagen bei Weitergabe des Gerätes an Dritte mit aus. Bestimmungsgemäße Verwendung Das Gerät ist zum Eindrehen und Lösen von Schrauben, sowie zum Bohren in Holz, Metall oder Kunststoff vorgesehen. Die Aufsatzwerkzeuge sind zum Schleifen, Sägen und Schaben vorgesehen. Dieses Gerät ist nicht zur gewerblichen Nutzung geeignet. Jede andere Verwendung, die in dieser Anleitung nicht ausdrücklich zugelassen wird, kann zu Schäden am Gerät führen und eine ernsthafte Gefahr für den Benutzer darstellen. Das Gerät ist zum Gebrauch durch Erwachsene bestimmt. Jugendliche über 16 Jahre dürfen das Gerät nur unter Aufsicht benutzen. Der Hersteller haftet nicht für Schäden, die durch bestimmungswidrigen Gebrauch oder falsche Bedienung verursacht wurden. 4 6
47 DE AT CH Allgemeine Beschreibung Lieferumfang Die Abbildung der wichtigsten Funktionsteile finden Sie auf den Ausklappseiten. Packen Sie das Gerät aus und kontrollieren Sie, ob es vollständig ist: Motoreinheit mit Akku und Bohrschrauberaufsatz Säbelsägen-Aufsatz Multischleifer-Aufsatz Multifunktionsgerät-Aufsatz Zubehör Bohrschrauberaufsatz - 6 Bohrerbits (1,5/2/3/4/5/6) - 6 Schrauberbits, 50 mm - Bithalter Zubehör Säbelsägen-Aufsatz - Holz-Sägeblatt - Metall-Sägeblatt Zubehör Multischleifer-Aufsatz - 5 Schleifblätter (2 x K 60, 2 x K 120, 1 x K 240) Zubehör Multifunktionsgerät-Aufsatz - Tauchsägeblatt - Schabmesser - Delta-Schleifplatte mit 3 Schleifblättern (1 x K 60, 1 x K 80, 1 x K 120) Ladegerät Aufbewahrungskoffer Betriebsanleitung Übersicht 1 Schnellspannbohrfutter 2 Drehmomenteinstellring 3 Gang-Wahlschalter 4 Bohrschrauberaufsatz PKGA1 5 Entriegelungshebel für Geräteaufsatz 6 Motoreinheit 7 Drehrichtungsschalter 8 Griff 9 Akku 10 Entriegelungstaste Akku 11 Ein-/Ausschalter 12 Bithalter 13 Schrauberbits, 50 mm 6-teilig 14 Bohrerbits 6-teilig 15 Ladegerät 16 Aufbewahrungskoffer 17 Säbelsägen-Aufsatz PKGA3 18 Fußplatte 19 Hebel für Sägeblattentriegelung 20 Metall-Sägeblatt 21 Holz-Sägeblatt 22 Schleifplatte 23 Multischleifer-Aufsatz PKGA Schleifblätter 25 Adapter für die Staubabsaugung 26 Multifunktionsgerät-Aufsatz PKGA4 27 Hebel für Werkzeugentriegelung 28 Aufnahmedorne 29 Werkzeughalter 30 Delta-Schleifplatte 31 3 Schleifblätter 32 Schabmesser 33 Tauchsägeblatt 4 7
48 DE AT CH Technische Daten 4-IN-1-AKKU-KOMBIGERÄT... PKGA 16 A1 Motorspannung V Leerlaufdrehzahl (n 0 ) min -1 Schalldruckpegel (L pa )... 86,7 db(a); K= 3 db Schallleistungspegel (L WA )... 97,7 db(a); K= 3 db Motoreinheit mit Bohrschrauberaufsatz...PKGA1 Leerlaufdrehzahl (n 0 ) / min -1 Drehmoment...max. 25 Nm Spannweite-Bohrfutter... 1,0-10 mm Bohrdurchmesser für Holz... max. 25 mm für Stahl... max. 8 mm Gewicht (ohne Ladegerät)...1,4 kg Vibration (a h ) Bohren in Metall..1,615 m/s 2, K= 1,5 m/s 2 Bohren in Holz...1,475 m/s 2, K= 1,5 m/s 2 Motoreinheit mit Multischleifer-Aufsatz...PKGA2 Leerlaufdrehzahl (n 0 ) min -1 Schleifpapier x 97 mm Gewicht (ohne Ladegerät)...1,3 kg Vibration (a h )...4,383 m/s 2, K= 1,5 m/s 2 Motoreinheit mit Säbelsägen-Aufsatz...PKGA3 Leerlaufdrehzahl (n 0 ) min -1 Hublänge mm Gewicht (ohne Ladegerät)...1,7 kg Vibration (a h ) Sägen von Brettern... 11,926 m/s 2 Sägen von Holzbalken... 12,392 m/s 2 K= 1,5 m/s 2 Motoreinheit mit Multifunktionsgerät-Aufsatz...PKGA4 Leerlaufdrehzahl (n 0 ) min -1 Oszillationswinkel...3,0 Gewicht (ohne Ladegerät)...1,3 kg Akku (Li-Ion)... PAP16 Nennspannung V Kapazität... 2,0 Ah Ladezeit...ca. 1 h Ladegerät...PLCP-016A Nennaufnahme...55 W Eingangsspannung V~; 50 Hz Ausgangsspannung... 16,8 V ; 2,4 A Schutzklasse... II Schutzart... IPX0 Der angegebene Schwingungsemissionswert ist nach einem genormten Prüfverfahren gemessen worden und kann zum Vergleich eines Elektrowerkzeugs mit einem anderen verwendet werden. Der angegebene Schwingungsemissionswert kann auch zu einer einleitenden Einschätzung der Aussetzung verwendet werden. Warnung: Der Schwingungsemissionswert kann sich während der tatsächlichen Benutzung des Elektrowerkzeugs von dem Angabewert unterscheiden, abhängig von der Art und Weise, in der das Elektrowerkzeug verwendet wird. Es besteht die Notwendigkeit, Sicherheitsmaßnahmen zum Schutz des Bedieners festzulegen, die auf einer Abschätzung der Aussetzung während der tatsächlichen Benutzungsbedingungen beruhen (hierbei sind alle Anteile des Betriebszyklus zu berücksichtigen, beispielsweise Zeiten, in denen das Elektrowerkzeug abgeschaltet ist, und solche, in denen es zwar eingeschaltet ist, aber ohne Belastung läuft). 4 8
49 DE AT CH Sicherheitshinweise Beim Gebrauch des Gerätes sind die Sicherheitshinweise zu beachten. Symbole und Bildzeichen Symbole in der Anleitung: Gefahrenzeichen mit Angaben zur Verhütung von Personen- oder Sachschäden. Gefahrenzeichen mit Angaben zur Verhütung von Personenschäden durch einen elektrischen Schlag. Gebotszeichen (anstelle des Ausrufungszeichens ist das Gebot erläutert) mit Angaben zur Verhütung von Schäden. Hinweiszeichen mit Informationen zum besseren Umgang mit dem Gerät. Bildzeichen auf dem Gerät: Lesen Sie die Bedienungsanleitung aufmerksam durch. Elektrogeräte gehören nicht in den Hausmüll. Gerät vor Gangwechsel stoppen. Verletzungsgefahr durch sich drehendes Werkzeug! Halten Sie Ihre Hände fern. Bildzeichen auf dem Akku: Werfen Sie den Akku nicht in den Hausmüll, ins Feuer oder ins Wasser. Setzen Sie den Akku nicht über längere Zeit starker Sonneneinstrahlung aus und legen Sie ihn nicht auf Heizkörpern ab (max. 45 C). Geben Sie Akkus an einer Altbatteriesammelstelle ab, wo sie einer umweltgerechten Wiederverwertung zugeführt werden. Lesen Sie die Bedienungsanleitung aufmerksam durch. Bildzeichen auf dem Ladegerät: Achtung! Vor dem Laden ist die Betriebsanleitung zu lesen. Das Ladegerät ist nur zur Verwendung in Räumen geeignet. Gerätesicherung Schutzklasse II (Doppelisolierung) Elektrogeräte gehören nicht in den Hausmüll. LED-Anzeige während des Ladevorgangs. Tragen Sie Augenschutz. 4 9
50 DE AT CH Allgemeine Sicherheitshinweise für Elektrowerkzeuge WARNUNG! Lesen Sie alle Sicherheitshinweise und Anweisungen. Versäumnisse bei der Einhaltung der Sicherheitshinweise und Anweisungen können elektrischen Schlag, Brand und/oder schwere Verletzungen verursachen. Bewahren Sie alle Sicherheitshinweise und Anweisungen für die Zukunft auf. Der in den Sicherheitshinweisen verwendete Begriff,,Elektrowerkzeug bezieht sich auf netzbetriebene Elektrowerkzeuge (mit Netzkabel) und auf akkubetriebene Elektrowerkzeuge (ohne Netzkabel). 1) ARBEITSPLATZSICHERHEIT a) Halten Sie Ihren Arbeitsbereich sauber und gut beleuchtet. Unordnung oder unbeleuchtete Arbeitsbereiche können zu UnfälIen führen. b) Arbeiten Sie mit dem Elektrowerkzeug nicht in expiosionsgefährdeter Umgebung, in der sich brennbare Flüssigkeiten, Gase oder Stäube befinden. Elektrowerkzeuge erzeugen Funken, die den Staub oder die Dämpfe entzünden können. c) Halten Sie Kinder und andere Personen während der Benutzung des EIektrowerkzeugs fern. Bei Ablenkung können Sie die Kontrolle über das Gerät verlieren. 2) ELEKTRISCHE SICHERHEIT a) Der Anschlussstecker des Elektrowerkzeuges muss in die Steckdose passen. Der Stecker darf in keiner Weise verändert werden. Verwenden Sie keine Adapterstecker gemeinsam mit schutzgeerdeten Elektrowerkzeugen. Unveränderte Stecker und passende Steckdosen verringern das Risiko eines elektrischen Schlages. b) Vermeiden Sie Körperkontakt mit geerdeten OberfIächen, wie von Rohren, Heizungen, Herden und Kühlschränken. Es besteht ein erhöhtes Risiko durch elektrischen Schlag, wenn Ihr Körper geerdet ist. c) Halten Sie Elektrowerkzeuge von Regen oder Nässe fern. Das Eindringen von Wasser in ein Elektrogerät erhöht das Risiko eines elektrischen Schlages. d) Zweckentfremden Sie das Kabel nicht, um das Elektrowerkzeug zu tragen, aufzuhängen oder um den Stecker aus der Steckdose zu ziehen. Halten Sie das Kabel fern von Hitze, Öl, scharfen Kanten oder sich bewegenden Geräteteilen. Beschädigte oder verwickelte Kabel erhöhen das Risiko eines elektrischen Schlages. e) Wenn Sie mit einem Elektrowerkzeug im Freien arbeiten, verwenden Sie nur Verlängerungskabel, die auch für den Außenbereich geeignet sind. Die Anwendung eines für den Außenbereich geeigneten Verlängerungskabels verringert das Risiko eines elekrischen Schlages. f) Wenn der Betrieb des Elektrowerkzeugs in feuchter Umgebung nicht vermeidbar ist, verwenden Sie einen Fehlerstromschutzschalter. Der Einsatz eines Fehlerstromschutzschalters vermindert das Risiko eines elektrischen Schlages. 5 0
51 DE AT CH 3) SICHERHEIT VON PERSONEN a) Seien Sie aufmerksam, achten Sie darauf, was Sie tun, und gehen Sie mit Vernunft an die Arbeit mit einem Elektrowerkzeug. Benutzen Sie kein Elektrowerkzeug, wenn Sie müde sind oder unter dem Einfluss von Drogen, Alkohol oder Medikamenten stehen. Ein Moment der Unachtsamkeit beim Gebrauch des Elektrowerkzeuges kann zu ernsthaften Verletzungen führen. b) Tragen Sie persönliche Schutzausrüstung und immer eine Schutzbrille. Das Tragen persönlicher Schutzausrüstung, wie Staubmaske, rutschfeste Sicherheitsschuhe, Schutzhelm oder Gehörschutz, je nach Art und Einsatz des Elektrowerkzeuges, verringert das Risiko von Verletzungen. c) Vermeiden Sie eine unbeabsichtigte lnbetriebnahme. Vergewissern Sie sich, dass das Elektrowerkzeug ausgeschaltet ist, bevor Sie es an die Stromversorgung und/oder den Akku anschließen, es aufnehmen oder tragen. Wenn Sie beim Tragen des Elektrowerkzeuges den Finger am Schalter haben oder das Gerät eingeschaltet an die Stromversorgung anschließen, kann dies zu Unfällen führen. d) Entfernen Sie Einstellwerkzeuge oder Schraubenschlüssel, bevor Sie das Elektrowerkzeug einschalten. Ein Werkzeug oder Schlüssel, der sich in einem drehenden Geräteteil befindet, kann zu Verletzungen führen. e) Vermeiden Sie eine abnormale Körperhaltung. Sorgen Sie für einen sicheren Stand und halten Sie jederzeit das Gleichgewicht. Dadurch können Sie das Elektrowerkzeug in unerwarteten Situationen besser kontrollieren. f) Tragen Sie geeignete Kleidung. Tragen Sie keine weite Kleidung oder Schmuck. Halten Sie Haare, Kleidung und Handschuhe fern von sich bewegenden Teilen. Lockere Kleidung, Schmuck oder lange Haare können von sich bewegenden Teilen erfasst werden. g) Wenn Staubabsaug- und -auffangeinrichtungen montiert werden können, vergewissern Sie sich, dass diese angeschlossen sind und richtig verwendet werden. Verwendung einer Staubabsaugung kann Gefährdungen durch Staub verringern. 4) VERWENDUNG UND BEHAND- LUNG DES ELEKTROWERK- ZEUGES a) Überlasten Sie das Gerät nicht. Verwenden Sie für Ihre Arbeit das dafür bestimmte Elektrowerkzeug. Mit dem passenden Elektrowerkzeug arbeiten Sie besser und sicherer im angegebenen Leistungsbereich. b) Benutzen Sie kein Elektrowerkzeug, dessen Schalter defekt ist. Ein Elektrowerkzeug, das sich nicht mehr ein- oder ausschalten Iässt, ist gefährlich und muss repariert werden. c) Ziehen Sie den Stecker aus der Steckdose und/oder entfernen Sie den Akku, bevor Sie GeräteeinsteIlungen vornehmen, Zubehörteile wechseln oder das Gerät weglegen. Diese Vorsichts- 5 1
52 DE AT CH maßnahme verhindert den unbeabsichtigten Start des Elektrowerkzeuges. d) Bewahren Sie unbenutzte Elektrowerkzeuge außerhalb der Reichweite von Kindern auf. Lassen Sie Personen das Gerät nicht benutzen, die mit diesem nicht vertraut sind oder diese Anweisungen nicht gelesen haben. Elektrowerkzeuge sind gefährlich, wenn sie von unerfahrenen Personen benutzt werden. e) Pflegen Sie Elektrowerkzeuge mit Sorgfalt. Kontrollieren Sie, ob bewegliche Teile einwandfrei funktionieren und nicht klemmen, ob Teile gebrochen oder so beschädigt sind, dass die Funktion des Elektrowerkzeuges beeinträchtigt ist. Lassen Sie beschädigte Teile vor dem Einsatz des Gerätes reparieren. Viele Unfälle haben ihre Ursache in schlecht gewarteten Elektrowerkzeugen. f) Halten Sie Schneidwerkzeuge scharf und sauber. SorgfäItig gepflegte Schneidwerkzeuge mit scharfen Schneidkanten verklemmen sich weniger und sind Ieichter zu führen. g) Verwenden Sie Elektrowerkzeug, Zubehör, Einsatzwerkzeuge usw. entsprechend diesen Anweisungen. Berücksichtigen Sie dabei die Arbeitsbedingungen und die auszuführende Tätigkeit. Der Gebrauch von Elektrowerkzeugen für andere als die vorgesehenen Anwendungen kann zu gefährlichen Situationen führen. h) Halten Sie das Gerät an den isolierten Griffflächen, wenn Sie Arbeiten ausführen, bei denen das Einsatzwerkzeug verbor- gene Stromleitungen oder das eigene Netzkabel treffen kann. Der Kontakt mit einer spannungsführenden Leitung kann auch metallene Geräteteile unter Spannung setzen und zu einem elektrischen Schlag führen. 5) VERWENDUNG UND BEHAND- LUNG DES AKKUWERKZEUGS a) Laden Sie die Akkus nur in Ladegeräten auf, die vom Hersteller empfohlen werden. Für ein Ladegerät, das für eine bestimmte Art von Akkus geeignet ist, besteht Brandgefahr, wenn es mit anderen Akkus verwendet wird. b) Verwenden Sie nur die dafür vorgesehenen Akkus in den Elektrowerkzeugen. Der Gebrauch von anderen Akkus kann zu Verletzungen und Brandgefahr führen. c) Halten Sie den nicht benutzten Akku fern von Büroklammern, Münzen, Schlüsseln, Nägeln, Schrauben oder anderen kleinen Metallgegenständen, die eine Überbrückung der Kontakte verursachen könnten. Ein Kurzschluss zwischen den Akkukontakten kann Verbrennungen oder Feuer zur Folge haben. d) Bei falscher Anwendung kann Flüssigkeit aus dem Akku austreten. Vermeiden Sie den Kontakt damit. Bei zufälligem Kontakt mit Wasser abspülen. Wenn die Flüssigkeit in die Augen kommt, nehmen Sie zusätzlich ärztliche Hilfe in Anspruch. Austretende Akkuflüssigkeit kann zu Hautreizungen oder Verbrennungen führen. 5 2
53 DE AT CH 6) SERVICE Lassen Sie lhr Elektrowerkzeug nur von qualifiziertem Fachpersonal und nur mit Original- Ersatzteilen reparieren. Damit wird sichergestellt, dass die Sicherheit des Gerätes erhalten bleibt. 7) SPEZIELLE SICHERHEITSHINWEISE FÜR AKKUGERÄTE a) Stellen Sie sicher, dass das Gerät ausgeschaltet ist, bevor Sie den Akku einsetzen. Das Einsetzen eines Akkus in ein Elektrowerkzeug, das eingeschaltet ist, kann zu Unfällen führen. b) Laden Sie Ihre Batterien nur im Innenbereich auf, weil das Ladegerät nur dafür bestimmt ist. c) Um das Risiko eines elektrischen Schlags zu reduzieren, ziehen Sie den Stecker des Ladegeräts aus der Steckdose heraus, bevor Sie es reinigen. d) Setzen Sie den Akku nicht über längere Zeit starker Sonneneinstrahlung aus und legen Sie ihn nicht auf Heizkörpern ab. Hitze schadet dem Akku und es besteht Explosionsgefahr. e) Lassen Sie einen erwärmten Akku vor dem Laden abkühlen. f) Öffnen Sie den Akku nicht und vermeiden Sie eine mechanische Beschädigung des Akkus. Es besteht die Gefahr eines Kurzschlusses und es können Dämpfe austreten, die die Atemwege reizen. Sorgen Sie für Frischluft und nehmen Sie bei Beschwerden zusätzlich ärztliche Hilfe in Anspruch. Spülen Sie bei Augen- Haut-Kontakt die betroffenen Stellen mit Wasser oder Neutralisator und suchen Sie einen Arzt auf. g) Verwenden Sie keine nicht wiederaufladbaren Batterien! Weiterführende Sicherheitshinweise Warnung! Beim Sägen oder Schleifen können gesundheitsschädliche Stäube entstehen (z. B. von Materialien wie bleihaltigen Farben, asbesthaltigem Material, Metallen oder einigen Holzarten), die für die Bedienperon oder in der Nähe befindliche Personen eine Gefährdung darstellen können. Sorgen Sie für eine gute Belüftung des Arbeitsplatzes. Tragen Sie stets eine Schutzbrille, Sicherheitshandschuhe und einen Atemschutz. Schließen Sie eine Staubabsaugung an. 1) SPEZIELLE SICHERHEITSHINWEISE FÜR DAS AKKU-KOMBIGERÄT Benutzen Sie mit dem Gerät gelieferte Zusatzhandgriffe. Der Verlust der Kontrolle kann zu Verletzungen führen. Halten Sie das Elektrowerkzeug an den isolierten Griffflächen, wenn Sie Arbeiten ausführen, bei denen das Einsatzwerkzeug oder die Schraube verborgene Stromleitungen treffen kann. Der Kontakt mit einer spannungsführenden Leitung kann auch metallene Geräteteile unter Spannung setzen und zu einem elektrischen Schlag führen. Verwenden Sie geeignete Suchgeräte, um verborgene Versor- 5 3
54 DE AT CH gungsleitungen aufzuspüren, oder fragen Sie die örtliche Versorgungsgesellschaft. Kontakt mit Elektroleitungen kann zu elektrischem Schlag und Feuer, Kontakt einer Gasleitung zur Explosion führen. Beschädigung einer Wasserleitung kann zu Sachbeschädigung und elektrischem Schlag führen. Sichern Sie das Werkstück. Ein mit Spannvorrichtungen oder Schraubstock festgehaltenes Werkstück ist sicherer gehalten als mit Ihrer Hand. Seien Sie beim Umgang mit Werkzeugen wie Säge, Schabmesser und Bohrer vorsichtig. Diese sind scharf, es besteht Verletzungsgefahr. Tragen Sie beim Wechsel der Aufsätze Schutzhandschuhe. So vermeiden Sie Verletzungen, wenn sich der Geräteaufsatz nach Benutzung erhitzt hat. 2) SPEZIELLE SICHERHEITSHINWEISE BEIM SÄGEN Halten Sie die Hände vom Sägebereich fern. Greifen Sie nicht unter das Werkstück. Stellen Sie sich beim Arbeiten immer seitlich zur Säge. Bei Kontakt mit dem Sägeblatt besteht Verletzungsgefahr. Führen Sie das Elektrowerkzeug nur eingeschaltet gegen das Werkstück. Es besteht die Gefahr eines Rückschlages, wenn das Einsatzwerkzeug im Werkstück verkantet. Achten Sie darauf, dass die Fußplatte beim Sägen immer am Werkstück anliegt. Das Sägeblatt kann verkanten und zum Verlust der Kontrolle über das Elektrowerkzeug führen. Schalten Sie nach Beendigung des Arbeitsvorgangs das Elektrowerkzeug aus und ziehen Sie das Sägeblatt erst dann aus dem Schnitt, wenn dieses zum Stillstand gekommen ist. So vermeiden Sie einen Rückschlag und können das Elektrowerkzeug sicher ablegen. Verwenden Sie nur unbeschädigte, einwandfreie Sägeblätter. Verbogene oder unscharfe Sägeblätter können brechen, den Schnitt negativ beeinflussen oder einen Rückschlag verursachen. Bremsen Sie das Sägeblatt nach dem Ausschalten nicht durch seitliches Gegendrücken ab. Das Sägeblatt kann beschädigt werden, brechen oder einen Rückschlag verursachen. Spannen Sie das Material gut fest. Stützen Sie das Werkstück nicht mit der Hand oder dem Fuß ab. Berühren Sie keine Gegenstände oder den Erdboden mit der laufenden Säge. Es besteht Rückschlaggefahr. Halten Sie das Elektrowerkzeug beim Arbeiten fest mit beiden Händen und sorgen Sie für einen sicheren Stand. Das Elektrowerkzeug wird mit zwei Händen sicherer geführt. Warten Sie, bis das Elektrowerkzeug zum Stillstand gekommen ist, bevor Sie es ablegen. Das Einsatzwerkzeug kann verkanten und zum Verlust der Kontrolle über das Elektrowerkzeug führen. Schalten Sie das Gerät sofort aus, wenn das Sägeblatt verkantet. Spreizen Sie den Sägeschnitt und ziehen Sie das 5 4
55 DE AT CH Sägeblatt vorsichtig heraus. Es kann zum Verlust der Kontrolle über das Elektrowerkzeug führen. 3) SPEZIELLE SICHERHEITSHINWEISE BEIM SCHLEIFEN UND SCHABEN Verwenden Sie das Elektrowerkzeug nur für den Trockenschliff. Schaben Sie keine angefeuchteten Materialien. Das Eindringen von Wasser in ein Elektrogerät erhöht das Risiko eines elektrischen Schlages. Vermeiden Sie eine Überhitzung des Schleifgutes und des Schleifers. Es besteht Brandgefahr. Das Werkstück wird beim Schleifen heiß. Nicht an der bearbeiteten Stelle anfassen, lassen Sie es abkühlen. Es besteht Verbrennungsgefahr. Verwenden Sie kein Kühlmittel oder ähnliches. Entleeren Sie vor Arbeitspausen stets den Staubbehälter. Schleifstaub im Staubsack, Microfilter, Papiersack (oder im Filtersack bzw. Filter des Staubsaugers) kann sich unter ungünstigen Bedingungen, wie Funkenflug beim Schleifen von Metallen, selbst entzünden. Besondere Gefahr besteht, wenn der Schleifstaub mit Lack-, Polyurethanresten oder anderen chemischen Stoffen vermischt ist und das Schleifgut nach langem Arbeiten heiß ist. 4) RESTRISIKEN Auch wenn Sie dieses Elektrowerkzeug vorschriftsmäßig bedienen, bleiben immer Restrisiken bestehen. Folgende Gefahren können im Zusammenhang mit der Bauweise und Ausführung dieses Elektrowerkzeugs auftreten: a) Lungenschäden, falls kein geeigneter Atemschutz getragen wird. b) Schnittverletzungen. c) Gehörschäden, falls kein geeigneter Gehörschutz getragen wird. d) Augenschäden, falls kein geeigneter Augenschutz getragen wird. e) Gesundheitsschäden, die aus Hand- Arm-Schwingungen resultieren, falls das Gerät über einen längeren Zeitraum verwendet wird oder nicht ordnungsgemäß geführt und gewartet wird. Warnung! Dieses Elektrowerkzeug erzeugt während des Betriebs ein elektromagnetisches Feld. Dieses Feld kann unter bestimmten Umständen aktive oder passive medizinische Implantate beeinträchtigen. Um die Gefahr von ernsthaften oder tödlichen Verletzungen zu verringern, empfehlen wir Personen mit medizinischen Implantaten ihren Arzt und den Hersteller des medizinischen Implantats zu konsultieren, bevor die Maschine bedient wird. 5 5
56 DE AT CH Richtiger Umgang mit dem Akkuladegerät Dieses Gerät kann von Kindern ab 8 Jahren und darüber sowie von Personen mit verringerten physischen, sensorischen oder mentalen Fähigkeiten oder Mangel an Erfahrung und Wissen benutzt werden, wenn sie beaufsichtigt oder bezüglich des sicheren Gebrauchs des Gerätes unterwiesen wurden und die daraus resultierenden Gefahren verstehen. Kinder dürfen nicht mit dem Gerät spielen. Reinigung und Benutzer-Wartung dürfen nicht von Kindern ohne Beaufsichtigung durchgeführt werden. Verwenden Sie zum Laden des Akkus ausschließlich das mitgelieferte Ladegerät. Es besteht Brand- und Explosionsgefahr. Überprüfen Sie vor jeder Benutzung Ladegerät, Kabel und Stecker und lassen Sie es von qualifiziertem Fachpersonal und nur mit Original-Ersatzteilen reparieren. Benutzen Sie ein defektes Ladegerät nicht und öffnen Sie es nicht selbst. Damit wird sichergestellt, dass die Sicherheit des Gerätes erhalten bleibt. Achten Sie darauf, dass die Netzspannung mit den Angaben des Typenschildes auf dem Ladegerät übereinstimmt. Es besteht die Gefahr eines elektrischen Schlags. Trennen Sie das Ladegerät vom Netz, bevor Verbindungen zum Elektrowerkzeug geschlossen oder geöffnet werden. Halten Sie das Ladegerät sauber und fern von Nässe und Regen. Benutzen Sie das Ladegerät niemals im Freien. Durch Verschmutzung und das Eindringen von Wasser erhöhen sich das Risiko eines elektrischen Schlags. Das Ladegerät darf nur mit den zugehörigen Original- Akkus betrieben werden. Das Laden von anderen Akkus kann zu Verletzungen und Brandgefahr führen. Vermeiden Sie mechanische Beschädigungen des Ladegerätes. Sie können zu inneren Kurzschlüssen führen. Das Ladegerät darf nicht auf brennbarem Untergrund (z. B. Papier, Textilien) betrieben werden. Es besteht Brandgefahr wegen der beim Laden auftretenden Erwärmung. Wenn die Anschlussleitung dieses Gerätes beschädigt wird, muss sie durch den Hersteller oder seinen Kundendienst oder eine ähnlich qualifizierte Person ersetzt werden, um Gefährdungen zu vermeiden. Laden Sie in dem Ladegerät keine nichtaufladbaren Batterien auf. Das Gerät könnte beschädigt werden. 5 6
57 DE AT CH Ladevorgang Laden Sie den Akku nur in trockenen Räumen auf. Die Außenfläche des Akkus muss sauber und trocken sein, bevor Sie das Ladegerät anschließen. Es besteht die Gefahr von Verletzungen durch Stromschlag. Laden Sie den Akku vor dem ersten Gebrauch auf. Laden Sie nur mit beiliegendem Original-Ladegerät auf. Eine wesentlich verkürzte Betriebszeit trotz Aufladung zeigt an, dass der Akku verbraucht ist und ersetzt werden muss. Verwenden Sie nur einen Original-Ersatzakku, den Sie über den Kundendienst beziehen können. Beachten Sie in jedem Falle die jeweils gültigen Sicherheitshinweise sowie Bestimmungen und Hinweise zum Umweltschutz. Defekte, die aus unsachgemäßer Handhabung resultieren, unterliegen nicht der Garantie. Akku entnehmen/einsetzen 1. Zum Herausnehmen des Akkus (9) aus dem Gerät drücken Sie die Entriegelungstaste (10) am Akku und ziehen den Akku heraus. 2. Zum Einsetzen des Akkus (9) schieben Sie den Akku entlang der Führungsschiene in das Gerät. Er rastet hörbar ein. Akku aufladen Die Ladezeit beträgt etwa 1 Stunde. 1. Nehmen Sie ggf. den Akku (9) aus dem Gerät. 2. Schieben Sie den Akku (9) auf das Ladegerät (15). Er rastet hörbar ein. 3. Schließen Sie das Ladegerät (15) an eine Steckdose an. 4. Nach erfolgtem Ladevorgang trennen Sie das Ladegerät (15) vom Netz. 5. Ziehen Sie den Akku (9) aus dem Ladegerät (15). Übersicht der LED-Kontrollanzeigen (15a) auf dem Ladegerät (15): grüne LED blinkt: Ladegerät ist ohne Akku an das Netz angeschlossen. rote LED leuchtet: Akku lädt. grüne LED leuchtet: Akku ist geladen. Verbrauchte Akkus Eine wesentlich verkürzte Betriebszeit trotz Aufladung zeigt an, dass der Akku verbraucht ist und ersetzt werden muss. Verwenden Sie nur einen Ersatz- Akku, den Sie über den Kundendienst beziehen können. Beachten Sie in jedem Falle die jeweils gültigen Sicherheitshinweise sowie Bestimmungen und Hinweise zum Umweltschutz (siehe Entsorgung/Umweltschutz ). 5 7
58 DE AT CH Ladezustand des Akkus prüfen Die Ladezustandsanzeige (9a) signalisiert den Ladezustand des Akkus (9). Drücken Sie die Taste (9b) am Akku (9). Der Ladezustand des Akkus wird durch Aufleuchten der farbigen LED- Leuchten der Ladezustands-Anzeige (9a) angezeigt: Alle LEDs leuchten: Akku ist voll geladen. Rote und gelbe LEDs leuchten: Akku verfügt über Restladung (< 90 %). Rote LED leuchtet: Akku ist leer, bitte aufladen. Bedienung Geräteaufsätze wechseln Sichern Sie das Gerät gegen Einschalten (siehe Ein-/Ausschalten ) oder nehmen Sie den Akku aus dem Gerät. Bei unbeabsichtigtem Einschalten besteht Verletzungsgefahr. Tragen Sie Schutzhandschuhe. Nach Benutzung kann sich der Geräteaufsatz erhitzt haben. Geräteaufsatz abnehmen 1. Schieben Sie den Entriegelungshebel (5) bis zum Anschlag in Stellung und halten Sie ihn in dieser Position. 2. Ziehen Sie den entriegelten Geräteaufsatz ab (4/17/23/26). 3. Lassen Sie den Entriegelungshebel (5) in die Stellung zurückgleiten. Geräteaufsatz aufsetzen 4. Schieben Sie den Geräteaufsatz (4/17/23/26) entlang der Führungsschiene in die Motoreinheit (6). Sie rastet hörbar ein. 5. Lassen Sie den Entriegelungshebel (5) in die Stellung zurückgleiten. 6. Prüfen Sie durch Ziehen am Geräteaufsatz den festen Sitz. Ein-/Ausschalten 1. Einschalten: Drücken Sie den Ein-/Ausschalter ( 11). Mit dem Ein-/Ausschalter ( 11) können Sie die Drehzahl stufenlos regulieren. Leichter Druck: niedrige Drehzahl Größerer Druck: höhere Drehzahl. 2. Ausschalten: Lassen Sie den Ein-/Ausschalter ( 11) los. Wenn Sie den Drehrichtungsschalter ( 7) in Mittelstellung bringen, ist das Gerät gegen Einschalten gesichert. Motoreinheit mit Bohrschrauberaufsatz PKGA1 Werkzeugwechsel Sichern Sie das Gerät gegen Einschalten (siehe Ein-/ Ausschalten ). Bei unbeabsichtigtem Einschalten des Gerätes besteht Verletzungsgefahr. 1. Drehen Sie das Schnellspannbohrfutter (1) gegen den Uhrzeigersinn auf, bis die Bohrfutteröffnung groß genug ist, um das Werkzeug aufzunehmen. 5 8
59 DE AT CH 2. Schieben Sie das Werkzeug soweit wie möglich in das Schnellspannbohrfutter (1) ein. 3. Drehen Sie das Schnellspannbohrfutter (1) im Uhrzeigersinn, um das Werkzeug fest zu klemmen. 4. Um das Werkzeug wieder zu entfernen, drehen Sie das Schnellspannbohrfutter (1) auf und ziehen Sie das Werkzeug heraus. Gangwahl Gerät vor Gangwechsel stoppen. 1. Warten Sie den Stillstand des Gerätes ab. 2 Schieben Sie den Gang-Wahlschalter ( 3) in die gewünschte Position: 1: niedrige Drehzahlvorwahl. 2: hohe Drehzahlvorwahl. Drehrichtung einstellen Mit dem Drehrichtungsschalter können Sie die Drehrichtung des Gerätes ändern. 1. Warten Sie den Stillstand des Gerätes ab. 2. Schieben Sie den Drehrichtungsschalter ( 7) in die gewünschte Position: Rechtslauf : zum Bohren und Eindrehen von Schrauben. Linkslauf : zum Lösen von Schrauben. 3. Wenn Sie den Drehrichtungsschalter ( 7) in Mittelstellung bringen, ist das Gerät gegen Einschalten gesichert. Der Drehrichtungsschalter darf nur im Stillstand betätigt werden! Drehmoment einstellen Sie können das maximale Drehmoment voreinstellen. Die Drehmomentstufen sind mit gekennzeichnet. 1. Warten Sie den Stillstand des Gerätes ab. 2. Wählen Sie das gewünschte Drehmoment durch Drehen am Drehmomenteinstellring (2). Schrauben: Stufe 1-19 Bohren: Stufe 3. Beginnen Sie bei einer kleineren Drehmoment-Stufe und erhöhen Sie diese nach Bedarf. Der Drehmomenteinstellring darf nur im Stillstand betätigt werden. Das erforderliche Drehmoment ist abhängig: - von der Art und Härte des zu bearbeitenden Materials; - von der Art und Länge der verwendeten Schrauben. Motoreinheit mit Multischleifer-Aufsatz PKGA2 Sichern Sie das Gerät gegen Einschalten (siehe Ein-/Ausschalten ). Bei unbeabsichtigtem Einschalten des Gerätes besteht Verletzungsgefahr. Schleifblatt anbringen/entfernen Die Schleifplatte ( 22) ist mit einem Klettgewebe ausgestattet zum schnellen Anbringen des Schleifblattes. Schleifblatt anbringen 1. Drücken Sie das Schleifblatt (24) 5 9
60 DE AT CH 1. Achten Sie vor dem Einschalten darauf, dass das Gerät das Werkstück nicht berührt. 2. Schalten Sie das Gerät ein. Mit dem Ein-/Ausschalter ( 11) können Sie die Hubzahl stufenlos regulieren. Leichter Druck: niedrige Hubzahl. Größerer Druck: höhere Hubzahl. Der Ein-/Ausschalter lässt sich nicht arretieren. 3. Setzen Sie die Fußplatte ( 18) auf das Werkstück auf. 4. Sägen Sie mit gleichmäßigem Vorgleichmäßig auf die Schleifplatte (22) auf. Achten Sie auf Deckungsgleichheit der Löcher im Schleifblatt mit den Öffnungen der Schleifplatte. Schleifblatt entfernen 2. Ziehen Sie das Schleifblatt (24) von der Schleifplatte (22) ab Staubabsaugung anschließen Mit Anschluss der Staubabsaugung können Sie das Staubaufkommen beim Schleifen verringern. 1. Schieben Sie den Adapter (25) bis zum Anschlag in die Öffnung am Mutlischleiferaufsatz (23) ein. 2. Schließen Sie den Saugschlauch eines Staubsaugers an den Adapter (25) an. Motoreinheit mit Säbelsägen- Aufsatz PKGA3 Sägeblatt montieren/wechseln Sichern Sie das Gerät gegen Einschalten (siehe Ein-/ Ausschalten ). Bei unbeabsichtigtem Einschalten des Gerätes besteht Verletzungsgefahr. Tragen Sie beim Hantieren mit dem Sägeblatt Handschuhe. So vermeiden Sie Schnittverletzungen. Achtung Verletzungsgefahr! - Verwenden Sie keine stumpfen, verbogenen oder anderweitig beschädigten Sägeblätter. - Setzen Sie stets das passende Sägeblatt ein. Eine Übersicht der geeigneten Sägeblätter finden Sie unter Ersatzteile/ Zubehör. Sägeblatt montieren: 1. Schieben Sie den Hebel (19) für die Sägeblattentriegelung bis zum Anschlag nach oben. Setzen Sie den Schaft des Sägeblatts (20/21) in den Schlitz der Sägeblattaufnahme ein. 2. Zum Verriegeln lassen Sie den Hebel (19) los, er dreht sich in die Ausgangsposition zurück. 3. Prüfen Sie durch Ziehen am Sägeblatt den festen Sitz. Sägeblatt entnehmen: 4. Schieben Sie den Hebel (19) für die Sägeblattentriegelung bis zum Anschlag nach oben und ziehen Sie das Sägeblatt aus der Sägeblattaufnahme heraus. Für bestimmte Arbeiten kann das Sägeblatt auch um 180 gedreht eingesetzt werden. Säbelsäge bedienen 6 0
61 DE AT CH schub. 5. Nehmen Sie nach der Arbeit das Sägeblatt aus dem Sägeschnitt und schalten Sie erst dann das Gerät aus. Motoreinheit mit Multifunktionswerkzeug PKGA4 Werkzeugwechsel Sichern Sie das Gerät gegen Einschalten (siehe Ein-/ Ausschalten ). Bei unbeabsichtigtem Einschalten des Gerätes besteht Verletzungsgefahr. 1. Drücken Sie den Hebel (27) für die Werkzeugentriegelung bis zum Anschlag nach hinten. 2. Ziehen Sie den entriegelten Werkzeughalter (29) nach vorne ab. 3. Setzen Sie das gewünschte Werkzeug (30/32/33) auf die Aufnahmedorne (28) auf. Es sind 12 verschiedene Positionen möglich. 4. Drücken Sie den Werkzeughalter (29) wieder in die zentrale Aufnahme ein. 5. Klappen Sie den Hebel (27) für die Werkzeugentriegelung wieder nach vorne. Der Werkzeughalter ist mit dem Werkzeug fixiert. Schleifblatt anbringen/ entfernen Die Delta-Schleifplatte (30) ist mit einem Klettgewebe ausgestattet zum schnellen Anbringen des Schleifblattes. Schleifblatt anbringen 1. Drücken Sie das Schleifblatt (31) gleichmäßig auf die Delta-Schleifplatte (30) auf. Achten Sie auf Deckungsgleichheit der Löcher im Schleifblatt mit den Öffnungen der Schleifplatte. Schleifblatt entfernen 2. Ziehen Sie das Schleifblatt (31) von der Delta-Schleifplatte (30) ab. Arbeitshinweise Sägen Tragen Sie beim Arbeiten mit dem Gerät geeignete Kleidung und angemessene Schutzausrüstung. Vergewissern Sie sich vor jeder Benutzung, dass das Gerät funktionstüchtig ist. Persönliche Schutzausrüstung und ein funktionstüchtiges Gerät vermindern das Risiko von Verletzungen und Unfällen. Tragen Sie Gehörschutz. Tragen Sie Augenschutz. Verwenden Sie nur unbeschädigte, einwandfreie Sägeblätter. Verwenden Sie für die Metallbearbeitung nur Metall- Sägeblätter. Achten Sie auf einen sicheren Stand und halten Sie das Gerät mit beiden Händen und mit Abstand vom eigenen Körper gut fest. Prüfen Sie vor dem Sägen das Werkstück auf verborgene Fremdkörper wie Nägel, Schrauben. Entfernen Sie diese. Tauchschnitte dürfen nur in weichen 6 1
62 DE AT CH Materialien wie Holz oder Gipskarton durchgeführt werden. Wahl des Sägeblattes Holz-Sägeblatt Metall-Sägeblatt Tauch-Sägeblatt Schleifen für Holz, Kunststoff, Gipskarton für Bleche, Profile und Rohre für weiche Materialien wie Holz oder Gipskarton Verwenden Sie beim Schleifen mit dem Multischleifer-Aufsatz eine Staubabsaugung. Führen Sie das Gerät eingeschaltet an das Werkstück. Säubern Sie die Schleifplatte, bevor Sie ein Schleifblatt aufsetzen. Arbeiten Sie nur mit einwandfreien Schleifblättern, um gute Schleifergebnisse zu erhalten. Arbeiten Sie mit geringem und gleichmäßigem Anpressdruck. So schonen Sie Gerät und Schleifblatt. Schleifen Sie mit demselben Schleifblatt nicht unterschiedliche Materialien (z. B. Metall und danach Holz). Wahl des Schleifblattes Körnung K Anwendung K 60 zum Vorschleifen von rohen Holzflächen K 80 K 120 zum Planschleifen K 240 zum Feinschleifen von grundierten und lackierten Flächen Schaben Wählen Sie beim Schaben eine hohe Schwingzahl. Arbeiten Sie mit geringem Anpressdruck und in einem flachen Winkel, um das Untergrundmaterial nicht zu beschädigen. Reinigung und Wartung Lassen Sie Instandsetzungsarbeiten und Wartungsarbeiten, die nicht in dieser Anleitung beschrieben sind, von unserem Service-Center durchführen. Verwenden Sie nur Originalteile. Schalten Sie das Gerät aus und nehmen Sie vor allen Arbeiten und zum Transport den Akku aus dem Gerät. Führen Sie folgende Reinigungs- und Wartungsarbeiten regelmäßig durch. Dadurch ist eine lange und zuverlässige Nutzung gewährleistet. Reinigung Das Gerät darf weder mit Wasser abgespritzt werden, noch in Wasser gelegt werden. Es besteht die Gefahr eines Stromschlages. Halten Sie Lüftungsschlitze, Motorgehäuse und Griffe des Gerätes sauber. Verwenden Sie dazu ein feuchtes Tuch oder eine Bürste. Verwenden Sie keine Reinigungs- bzw. Lösungsmittel. Sie könnten das Gerät damit irreparabel beschädigen. 6 2
63 DE AT CH Wartung Das Gerät ist wartungsfrei. Lagerung Bewahren Sie Gerät und Werkzeug an einem trockenen und staubgeschützten Ort auf, außerhalb der Reichweite von Kindern. Nehmen Sie den Akku vor einer längeren Lagerung (z. B. Überwinterung) aus dem Gerät. Lagern Sie den Akku nur im teilgeladenen Zustand. Der Ladezustand sollte während einer längeren Lagerzeit 40-60% betragen (zwei LED-Leuchten der Ladezustands-Anzeige ( 9a) leuchten). Prüfen Sie während einer längeren Lagerungsphase etwa alle 3 Monate den Ladezustand des Akkus und laden Sie bei Bedarf nach. Lagern Sie den Akku zwischen 10 C bis 25 C. Vermeiden Sie während der Lagerung extreme Kälte oder Hitze, damit der Akku nicht an Leistung verliert. Entsorgung/ Umweltschutz Nehmen Sie den Akku aus dem Gerät und führen Sie Gerät, Akku, Zubehör und Verpackung einer umweltgerechten Wiederverwertung zu. Elektrische Geräte gehören nicht in den Hausmüll. Werfen Sie den Akku nicht in den Hausmüll, ins Feuer (Explosionsgefahr) oder ins Wasser. Beschädigte Akkus können der Umwelt und ihrer Gesundheit schaden, wenn giftige Dämpfe oder Flüssigkeiten austreten. Geben Sie das Gerät und das Ladegerät an einer Verwertungsstelle ab. Die verwendeten Kunststoff- und Metallteile können sortenrein getrennt werden und so einer Wiederverwertung zugeführt werden. Fragen Sie hierzu unser Service-Center. Entsorgen Sie Akkus im entladenen Zustand. Wir empfehlen die Pole mit einem Klebestreifen zum Schutz vor einem Kurzschluss abzudecken. Öffnen Sie den Akku nicht. Entsorgen Sie Akkus nach den lokalen Vorschriften. Geben Sie Akkus an einer Altbatteriesammelstelle ab, wo sie einer umweltgerechten Wiederverwertung zugeführt werden. Fragen Sie hierzu Ihren lokalen Müllentsorger oder unser Service-Center. Die Entsorgung Ihrer defekten eingesendeten Geräte führen wir kostenlos durch. 6 3
64 DE AT CH Garantie Sehr geehrte Kundin, sehr geehrter Kunde, Sie erhalten auf dieses Gerät 3 Jahre Garantie ab Kaufdatum. Im Falle von Mängeln dieses Produkts stehen Ihnen gegen den Verkäufer des Produkts gesetzliche Rechte zu. Diese gesetzlichen Rechte werden durch unsere im Folgenden dargestellte Garantie nicht eingeschränkt. Garantiebedingungen Die Garantiefrist beginnt mit dem Kaufdatum. Bitte bewahren Sie den Original- Kassenbon gut auf. Diese Unterlage wird als Nachweis für den Kauf benötigt. Tritt innerhalb von drei Jahren ab dem Kaufdatum dieses Produkts ein Material- oder Fabrikationsfehler auf, wird das Produkt von uns nach unserer Wahl für Sie kostenlos repariert oder ersetzt. Diese Garantieleistung setzt voraus, dass innerhalb der Drei-Jahres-Frist das defekte Gerät und der Kaufbeleg (Kassenbon) vorgelegt und schriftlich kurz beschrieben wird, worin der Mangel besteht und wann er aufgetreten ist. Wenn der Defekt von unserer Garantie gedeckt ist, erhalten Sie das reparierte oder ein neues Produkt zurück. Mit Reparatur oder Austausch des Produkts beginnt kein neuer Garantiezeitraum. Garantiezeit und gesetzliche Mängelansprüche Die Garantiezeit wird durch die Gewährleistung nicht verlängert. Dies gilt auch für ersetzte und reparierte Teile. Eventuell schon beim Kauf vorhandene Schäden und Mängel müssen sofort nach dem Auspacken gemeldet werden. Nach Ablauf der Garantiezeit anfallende Reparaturen sind kostenpflichtig. Garantieumfang Das Gerät wurde nach strengen Qualitätsrichtlinien sorgfältig produziert und vor Anlieferung gewissenhaft geprüft. Die Garantieleistung gilt für Materialoder Fabrikationsfehler. Diese Garantie erstreckt sich nicht auf Produktteile, die normaler Abnutzung ausgesetzt sind und daher als Verschleißteile angesehen werden können (z. B. Werkzeuge) oder für Beschädigungen an zerbrechlichen Teilen (z. B. Schalter, Akkus oder die aus Glas gefertigt sind). Diese Garantie verfällt, wenn das Produkt beschädigt, nicht sachgemäß benutzt oder nicht gewartet wurde. Für eine sachgemäße Benutzung des Produkts sind alle in der Betriebsanleitung aufgeführten Anweisungen genau einzuhalten. Verwendungszwecke und Handlungen, von denen in der Betriebsanleitung abgeraten oder vor denen gewarnt wird, sind unbedingt zu vermeiden. Das Produkt ist lediglich für den privaten und nicht für den gewerblichen Gebrauch bestimmt. Bei missbräuchlicher und unsachgemäßer Behandlung, Gewaltanwendung und bei Eingriffen, die nicht von unserer autorisierten Service-Niederlassung vorgenommen wurden, erlischt die Garantie. Abwicklung im Garantiefall Um eine schnelle Bearbeitung Ihres Anliegens zu gewährleisten, folgen Sie bitte den folgenden Hinweisen: Bitte halten Sie für alle Anfragen den Kassenbon und die Identifikationsnummer (IAN ) als Nachweis für den Kauf bereit. Die Artikelnummer entnehmen Sie bitte dem Typenschild. Sollten Funktionsfehler oder sonstige Mängel auftreten kontaktieren Sie 6 4
65 DE AT CH zunächst die nachfolgend benannte Serviceabteilung telefonisch oder per . Sie erhalten dann weitere Informationen über die Abwicklung Ihrer Reklamation. Ein als defekt erfasstes Produkt können Sie, nach Rücksprache mit unserem Kundenservice, unter Beifügung des Kaufbelegs (Kassenbons) und der Angabe, worin der Mangel besteht und wann er aufgetreten ist, für Sie portofrei an die Ihnen mitgeteilte Service-Anschrift übersenden. Um Annahmeprobleme und Zusatzkosten zu vermeiden, benutzen Sie unbedingt nur die Adresse, die Ihnen mitgeteilt wird. Stellen Sie sicher, dass der Versand nicht unfrei, per Sperrgut, Express oder sonstiger Sonderfracht erfolgt. Senden Sie das Gerät bitte inkl. aller beim Kauf mitgelieferten Zubehörteile ein und sorgen Sie für eine ausreichend sichere Transportverpackung. Reparatur-Service Sie können Reparaturen, die nicht der Garantie unterliegen, gegen Berechnung von unserer Service-Niederlassung durchführen lassen. Sie erstellt Ihnen gerne einen Kostenvoranschlag. Wir können nur Geräte bearbeiten, die ausreichend verpackt und frankiert eingesandt wurden. Achtung: Bitte senden Sie Ihr Gerät gereinigt und mit Hinweis auf den Defekt an unsere Service-Niederlassung. Nicht angenommen werden unfrei - per Sperrgut, Express oder mit sonstiger Sonderfracht - eingeschickte Geräte. Die Entsorgung Ihrer defekten eingesendeten Geräte führen wir kostenlos durch. Service-Center DE AT CH Service Deutschland Tel.: grizzly@lidl.de IAN Service Österreich Tel.: (0,15 EUR/Min.) grizzly@lidl.at IAN Service Schweiz Tel.: (0,08 CHF/Min., Mobilfunk max. 0,40 CHF/Min.) grizzly@lidl.ch IAN Importeur Bitte beachten Sie, dass die folgende Anschrift keine Serviceanschrift ist. Kontaktieren Sie zunächst das oben genannte Service-Center. Grizzly Tools GmbH & Co. KG Stockstädter Straße 20 DE Großostheim GERMANY 6 5
66 DE AT CH Ersatzteile/Zubehör Ersatzteile und Zubehör erhalten Sie unter Sollten Sie kein Internet haben, so wenden Sie sich bitte telefonisch an das Service- Center (siehe Service-Center Seite 65). Halten Sie die unten genannten Bestellnummern bereit. Position Position Bezeichnung Bestell-Nr. Betriebs- Explosionsanleitung zeichnung 4 PKGA1 Bohrschrauberaufsatz Akku Ladegerät UK PKGA3 Säbelsägen-Aufsatz PKGA3-1 Metall-Sägeblatt (HSS 150 mm/18 TPI*) Holz-Sägeblatt (HCS 150 mm/6 TPI*) PKGA2 Multischleifer-Aufsatz PKGA2-7 Satz Schleifblätter für Multischleifer-Aufsatz (2 x K 60, 2 x K 120, 1 x K 240**) PKGA2-9 Adapter für die Staubabsaugung PKGA4 Multifunktionsgerät-Aufsatz Satz Schleifblätter für Delta-Schleifplatte (1 x K 60, 1 x K 80, 1 x K 120**) Schabmesser Tauchsägeblatt * HSS = High Speed Steel (Schnellarbeitsstahl) HCS = High Carbon Steel, Stahl mit hohem Kohlenstoffgehalt TPI = Teeth per inch, Anzahl der Zähne je 2,54 cm **K = Körnung Weiteres Zubehör ist im Handel für jeden Einsatzzweck erhältlich. 6 6
67 DE AT CH Fehlersuche Problem Mögliche Ursache Fehlerbehebung Akku ( 9) entladen Akku aufladen (siehe Ladevorgang ) Gerät startet nicht 9) nicht einge- Akku ( setzt Akku einsetzen (siehe Ladevorgang ) Gerät arbeitet mit Unterbrechungen Werkzeug bewegt sich nicht, obwohl der Motor läuft Ein-/Ausschalter ( 11) defekt Interner Wackelkontakt Ein-/Ausschalter ( 11) defekt Geräteaufsatz oder Werkzeug nicht korrekt montiert Werkzeug für das zu bearbeitenden Werkstück ungeeignet Reparatur durch Service-Center Reparatur durch Service-Center Geräteaufsatz oder Werkzeug korrekt montieren (siehe Bedienung ) Geeignetes Werkzeug einsetzen Geringe Geräteleistung Werkzeug nutzt schnell ab Werkzeug stumpf oder abgenutzt Falsche Geschwindigkeit Geringe Akkuleistung Werkzeug für das zu bearbeitenden Werkstück ungeeignet Zu viel Druck angewandt Geschwindigkeit zu hoch Neues Werkzeug einsetzen Geschwindigkeit anpassen Akku ( 9) aufladen (siehe Ladevorgang ) Geeignetes Werkzeug einsetzen (siehe Bedienung ) Druck verringern Geschwindigkeit verringern 6 7
68 DE AT CH 6 8
69 GB I E N I Translation of the original EC declaration of conformity GR Μετάφραση της πρωτότυπης Δήλωσης συμμόρφωσης CE We hereby confirm that the 4-IN-1 CORDLESS COMBINATION TOOL model PKGA 16 A1 Serial number conforms with the following applicable relevant version of the EU guidelines: 2006/42/EG 2014/30/EU 2014/35/EU 2011/65/EU* In order to guarantee consistency, the following harmonised standards as well as national standards and stipulations have been applied: Με το παρόν δηλώνουμε ότι το είδος ΠΟΛΥΜΗΧΑΝΗΜΑ ΜΠΑΤΑΡΙΑΣ 4 ΣΕ 1 σειρά PKGA 16 A1 Αριθμός σειράς ανταποκρίνεται στις ακόλουθες σχετικές οδηγίες της ΕΕ στην εκάστοτε ισχύουσα έκδοση: 2006/42/EC 2014/30/EU 2014/35/EU 2011/65/EU* Για να εξασφαλιστεί η συμβατικότητα, εφαρμόστηκαν οι παρακάτω εναρμονισμένες προδιαγρα-φές καθώς και εθνικές προ-διαγραφές και κανονισμοί: EN :2009/A11:2010 EN :2010 EN :2010 EN /A11:2011 EN :2010 EN ISO 12100:2010 EN :2012/A11:2014 EN :2004/A2:2010 EN 62233:2008 EN :2006/A2:2011 EN :2015 EN :2014 EN :2013 This declaration of conformity (17)** is issued under the sole responsibility of the manufacturer: Η αποκλειστική ευθύνη για την έκδοση της παρούσας δήλωσης συμμόρφωσης ανήκει στον κατασκευαστή (17)**: Grizzly Tools GmbH & Co. KG Stockstädter Straße Großostheim, Germany * The object of the declaration described above satisfies the provisions of Directive 2011/65/EU of the European Parliament and the Council of 8 June 2011 on limiting the use of certain harmful substances in electrical and electronic appliances. ** The last two digits of the year in which the CE marking was affixed. Christian Frank Documentation Representative, υπεύθυνος τεκμηρίωσης * Το ανωτέρω περιγραφόμενο αντικείμενο της δήλωσης πληροί τις προδιαγραφές της Οδηγίας 2011/65/ΕΕ του Ευρωπαϊκού Κοινοβουλίου και του Συμβουλίου της 8ης Ιουνίου 2011 για τον περιορισμό της χρήσης ορισμένων επικίνδυνων ουσιών σε ηλεκτρικό και ηλεκτρονικό εξοπλισμό. ** Τα δύο τελευταία ψηφία του έτους κατά το οποίο τοποθετήθηκε η σήμανση CE. 6 9
70 DE AT CH Original EG-Konformitätserklärung Hiermit bestätigen wir, dass das 4-IN-1-AKKU-KOMBIGERÄT Baureihe PKGA 16 A1 Seriennummer folgenden einschlägigen EU-Richtlinien in ihrer jeweils gültigen Fassung entspricht: 2006/42/EG 2014/30/EU 2014/35/EU 2011/65/EU* Um die Übereinstimmung zu gewährleisten, wurden folgende harmonisierte Normen sowie nationale Normen und Bestimmungen angewendet: EN :2009/A11:2010 EN :2010 EN :2010 EN /A11:2011 EN :2010 EN ISO 12100:2010 EN :2012/A11:2014 EN :2004/A2:2010 EN 62233:2008 EN :2006/A2:2011 EN :2015 EN :2014 EN :2013 Die alleinige Verantwortung für die Ausstellung dieser Konformitätserklärung (17)** trägt der Hersteller: Grizzly Tools GmbH & Co. KG Stockstädter Straße Großostheim, Germany Christian Frank (Dokumentationsbevollmächtigter) * Der oben beschriebene Gegenstand der Erklärung erfüllt die Vorschriften der Richtlinie 2011/65/EU des Europäischen Parlaments und des Rates vom 8. Juni 2011 zur Beschränkung der Verwendung bestimmter gefährlicher Stoffe in Elektro- und Elektronikgeräten. ** Die beiden letzten Ziffern des Jahres, in dem die CE-Kennzeichnung angebracht wurde. 7 0
71 Exploded Drawings Explosionszeichnungen Επί μέρoυς σχεδιαγράμματα PKGA 16 A1 informative, informativ, ενημερωτικό 7 1
72 PKGA1 PKGA2 7 2
73 PKGA3 PKGA rev02-gs 7 3


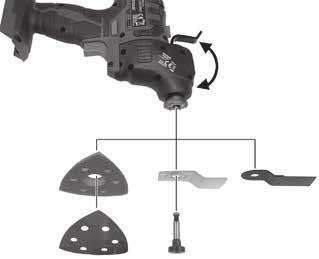


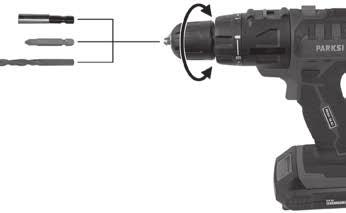
74 a a 9b
Περιεχόμενα / Contents
 Aερόθερμo / Fan Heater PTC-906 Περιεχόμενα / Contents GR... Σελίδες 3-8 EN... Pages 9-11 2 GR Ευχαριστούμε που επιλέξατε μια συσκευή της γκάμας θερμαντικών IZZY. Σημαντικές Οδηγίες Ασφαλείας Τα Μέρη της
Bid5500 ΚΡΟΥΣΤΙΚΟ ΔΡΑΠΑΝΟ. Owner s manual. Μετάφραση του πρωτοτύπου των οδηγιών χρήσης
 Bid5500 ΚΡΟΥΣΤΙΚΟ ΔΡΑΠΑΝΟ Μετάφραση του πρωτοτύπου των οδηγιών χρήσης Owner s manual Βασικά χαρακτηριστικά 1. Τσόκ 2. Διακόπτης ενεργοποίησης απενεργοποίησης λειτουργίας κρούσης 3. Ράβδος-στοπ βάθους διάτρησης
the total number of electrons passing through the lamp.
 1. A 12 V 36 W lamp is lit to normal brightness using a 12 V car battery of negligible internal resistance. The lamp is switched on for one hour (3600 s). For the time of 1 hour, calculate (i) the energy
Capacitors - Capacitance, Charge and Potential Difference
 Capacitors - Capacitance, Charge and Potential Difference Capacitors store electric charge. This ability to store electric charge is known as capacitance. A simple capacitor consists of 2 parallel metal
[1] P Q. Fig. 3.1
![[1] P Q. Fig. 3.1](/thumbs/79/80362156.jpg "[1] P Q. Fig. 3.1") 1 (a) Define resistance....... [1] (b) The smallest conductor within a computer processing chip can be represented as a rectangular block that is one atom high, four atoms wide and twenty atoms long. One
1 (a) Define resistance....... [1] (b) The smallest conductor within a computer processing chip can be represented as a rectangular block that is one atom high, four atoms wide and twenty atoms long. One
BFN3000 ΕΠΙΤΡΑΠΕΖΙΟΣ ΑΝΕΜΙΣΤΗΡΑΣ. Owner s manual. Μετάφραση του πρωτοτύπου των οδηγιών χρήσης
 BFN3000 ΕΠΙΤΡΑΠΕΖΙΟΣ ΑΝΕΜΙΣΤΗΡΑΣ Μετάφραση του πρωτοτύπου των οδηγιών χρήσης Owner s manual www.bormanntools.com GR Οδηγίες ασφαλούς λειτουργίας 1. Τα χαρακτηριστικά της παροχής ηλεκτρικού ρεύματος θα
Bbc7000 ΦΟΡΤΙΣΤΗΣ - ΕΚΚΙΝΗΤΗΣ ΜΠΑΤΑΡΙΑΣ. Art Nr: Owner s manual. Μετάφραση του πρωτοτύπου των οδηγιών χρήσης
 Bbc7000 ΦΟΡΤΙΣΤΗΣ - ΕΚΚΙΝΗΤΗΣ ΜΠΑΤΑΡΙΑΣ Μετάφραση του πρωτοτύπου των οδηγιών χρήσης Art Nr: 022213 Owner s manual Διαβάστε προσεχτικά όλες τις οδηγίες χρήσης και ασφάλειας πριν την λειτουργία του μηχανήματος.
ΜΙΚΡΑ ΑΛΛΑ ΔΥΝΑΤΑ! H κατηγορία των 10,8 Volt από τη Würth / The Würth 10.8 Volt Range. Τροφοδοσία με
 ΜΙΚΡΑ ΑΛΛΑ ΔΥΝΑΤΑ! H κατηγορία των 10,8 Volt από τη Würth / The Würth 10.8 Volt Range Τροφοδοσία με Κατσαβίδι ΜΠΑΤΑΡΙΑΣ s 10-a battery powered screwdriver s 10-a Κωδ. Αρ. 0700 662 x Μαγνητική βάση μύτης
Εγκατάσταση λογισμικού και αναβάθμιση συσκευής Device software installation and software upgrade
 Για να ελέγξετε το λογισμικό που έχει τώρα η συσκευή κάντε κλικ Menu > Options > Device > About Device Versions. Στο πιο κάτω παράδειγμα η συσκευή έχει έκδοση λογισμικού 6.0.0.546 με πλατφόρμα 6.6.0.207.
ΟΔΗΓΙΕΣ ΧΡΗΣΗΣ USE INSTRUCTIONS
 ΟΔΗΓΙΕΣ ΧΡΗΣΗΣ USE INSTRUCTIONS ΤΗΛΕΦΩΝΟ ΜΕ ΑΝΑΓΝΩΡΙΣΗ ΚΛΗΣΗΣ /CORDED PHONE WITH CALLER ID ΜΟΝΤΕΛΟ/MODEL: TM09-448 DC48V Παρακαλούμε διαβάστε προσεκτικά όλες τις οδηγίες χρήσης πριν την χρήση της συσκευής
Εγγύηση καλής λειτουργίας
 Εγγύηση καλής λειτουργίας Τα Smartphone Bitmore συνοδεύονται από Εγγύηση Καλής Λειτουργίας Δύο (2) Ετών. Please read carefully the Παρακαλούμε διαβάστε προσεκτικά τους όρους εγγύησης που συνοδεύουν το
IAN 94381. Φωτιστικό LED. Operation and Safety Notes. Υποδείξεις χειρισμού και ασφαλείας
 LED Multi-Function Light LED Multi-Function Light Operation and Safety Notes Φωτιστικό LED Υποδείξεις χειρισμού και ασφαλείας IAN 94381 94381_liv_BS_LED_Taschenlampe_cover_GB_CY.indd 4 24.09.13 09:59 GB
Code Breaker. TEACHER s NOTES
 TEACHER s NOTES Time: 50 minutes Learning Outcomes: To relate the genetic code to the assembly of proteins To summarize factors that lead to different types of mutations To distinguish among positive,
Strain gauge and rosettes
 Strain gauge and rosettes Introduction A strain gauge is a device which is used to measure strain (deformation) on an object subjected to forces. Strain can be measured using various types of devices classified
Quick Installation Guide
 A Installation 1 F H B E C D G 2 www.trust.com/17528/faq Quick Installation Guide C C D Freewave Wireless Audio Set 17528/ 17529 D Installation Configuration Windows XP 4 5 8 Windows 7/ Vista 6 7 9 10
ΑΚΑ ΗΜΙΑ ΕΜΠΟΡΙΚΟΥ ΝΑΥΤΙΚΟΥ ΜΑΚΕ ΟΝΙΑΣ ΣΧΟΛΗ ΜΗΧΑΝΙΚΩΝ ΠΤΥΧΙΑΚΗ ΕΡΓΑΣΙΑ ΘΕΜΑ : ΧΗΜΙΚΑ ΠΡΟΣΘΕΤΑ ΠΟΥ ΠΡΟΟΡΙΖΟΝΤΑΙ ΓΙΑ ΤΟ ΝΕΡΟ ΤΟΥ ΑΤΜΟΛΕΒΗΤΑ
 ΑΚΑ ΗΜΙΑ ΕΜΠΟΡΙΚΟΥ ΝΑΥΤΙΚΟΥ ΜΑΚΕ ΟΝΙΑΣ ΣΧΟΛΗ ΜΗΧΑΝΙΚΩΝ ΠΤΥΧΙΑΚΗ ΕΡΓΑΣΙΑ ΘΕΜΑ : ΧΗΜΙΚΑ ΠΡΟΣΘΕΤΑ ΠΟΥ ΠΡΟΟΡΙΖΟΝΤΑΙ ΓΙΑ ΤΟ ΝΕΡΟ ΤΟΥ ΑΤΜΟΛΕΒΗΤΑ ΣΠΟΥ ΑΣΤΗΣ : ΑΓΟΡΑΣΤΟΣ ΧΡΥΣΟΒΑΛΑΝΤΗΣ ΕΠΙΒΛΕΠΟΥΣΑ ΚΑΘΗΓΗΤΡΙΑ :
SPEEDO AQUABEAT. Specially Designed for Aquatic Athletes and Active People
 SPEEDO AQUABEAT TM Specially Designed for Aquatic Athletes and Active People 1 2 Decrease Volume Increase Volume Reset EarphonesUSBJack Power Off / Rewind Power On / Fast Forward Goggle clip LED Status
Οδηγίες Λειτουργίας. Assembly Operating instructions. Montageanleitung. Απογυμνωτές PV-AZM...3. Stripping pliers PV-AZM...3.
 MA000 MA267 (de_en) (gr_en) Montageanleitung Οδηγίες Λειτουργίας Απογυμνωτής PV-AZM... για MC3, MC4 MA000 MA267 (de_en) (gr_en) Assembly Operating instructions Stripping pliers PV-AZM... for MC3 and MC4
Surface Mount Multilayer Chip Capacitors for Commodity Solutions
 Surface Mount Multilayer Chip Capacitors for Commodity Solutions Below tables are test procedures and requirements unless specified in detail datasheet. 1) Visual and mechanical 2) Capacitance 3) Q/DF
Instruction Execution Times
 1 C Execution Times InThisAppendix... Introduction DL330 Execution Times DL330P Execution Times DL340 Execution Times C-2 Execution Times Introduction Data Registers This appendix contains several tables
VENERE. GR. Οδηγός Χρήσης EN. User Guide
 GR. Οδηγός Χρήσης EN. User Guide ΣΗΜΑΝΤΙΚΟ! ΚΡΑΤΗΣΤΕ ΓΙΑ ΜΕΛΛΟΝΤΙΚΗ ΑΝΑΦΟΡΑ: ΔΙΑΒΑΣΤΕ ΠΡΟΣΕΚΤΙΚΑ Κίνδυνος από φωτιά και άλλες πηγές έντονης θερμότητας, όπως ηλεκτρικές αντιστάσεις, υγραέριο, φωτιά κλπ,
INSTRUCTIONS MANUAL ΕΓΧΕΙΡΙΔΙΟ ΛΕΙΤΟΥΡΓΙΑΣ
 Model/Μοντέλο: WKH-1132 INSTRUCTIONS MANUAL ΕΓΧΕΙΡΙΔΙΟ ΛΕΙΤΟΥΡΓΙΑΣ ENGLISH General Safety Instructions Before commissioning this kettle, please read the instruction manual carefully. Please keep the instruction
ΟΔΗΓΙΕΣ ΣΥΝΑΡΜΟΛΟΓΗΣΗΣ/ ASSEMBLY INSTRUCTION ΤΟΜΜΥ ΚΡΕΒΑΤΙ/BED
 ΟΔΗΓΙΕΣ ΣΥΝΑΡΜΟΛΟΓΗΣΗΣ/ ASSEMBLY INSTRUCTION ΤΟΜΜΥ ΚΡΕΒΑΤΙ/BED 1. Παρακαλώ πολύ διαβάστε προσεκτικά τις οδηγίες πριν την συναρμολόγηση/ Please read the instructions carefully. 2. Παρακαλώ πολύ όπως ελέγξτε
IAN CORDLESS DRILL PBSA 12 B1 CORDLESS DRILL ΕΠΑΝΑΦΟΡΤΙΖΟΜΕΝΟ ΔΡΑΠΑΝΟΚΑΤΣΑΒΙΔΟ AKKU-BOHRSCHRAUBER. Translation of the original instructions
 CORDLESS DRILL PBSA 12 B1 CORDLESS DRILL Translation of the original instructions ΕΠΑΝΑΦΟΡΤΙΖΟΜΕΝΟ ΔΡΑΠΑΝΟΚΑΤΣΑΒΙΔΟ Μετάφραση των αυθεντικών οδηγιών λειτουργίας AKKU-BOHRSCHRAUBER Originalbetriebsanleitung
Door Hinge replacement (Rear Left Door)
") Door Hinge replacement (Rear Left Door) We will continue the previous article by replacing the hinges of the rear left hand side door. I will use again the same procedure and means I employed during the
Door Hinge replacement (Rear Left Door) We will continue the previous article by replacing the hinges of the rear left hand side door. I will use again the same procedure and means I employed during the
IAN CORDLESS DRILL PABSW 10.8 B3 ΕΠΑΝΑΦΟΡΤΙΖΟΜΕΝΟ ΔΡΑΠΑΝΟΚΑΤΣΑΒΙΔΟ CORDLESS DRILL AKKU-BOHRSCHRAUBER. Translation of the original instructions
 CORDLESS DRILL PABSW 10.8 B3 CORDLESS DRILL Translation of the original instructions ΕΠΑΝΑΦΟΡΤΙΖΟΜΕΝΟ ΔΡΑΠΑΝΟΚΑΤΣΑΒΙΔΟ Μετάφραση των αυθεντικών οδηγιών λειτουργίας AKKU-BOHRSCHRAUBER Originalbetriebsanleitung
CORDLESS SABRE SAW PSSA 18 A1
 CORDLESS SABRE SAW PSSA 18 A1 CORDLESS SABRE SAW Translation of the original instructions ΣΠΑΘΟΣΕΓΑ ΜΠΑΤΑΡΙΑΣ Μετάφραση των αυθεντικών οδηγιών λειτουργίας AKKU-SÄBELSÄGE Originalbetriebsanleitung IAN 104447
(REV:01) RYOBI 48 Volt Lawn Mower Model No. RY14110 Replacement Parts List
 RYOBI 48 Volt Lawn Mower Model No. RY14110 Replacement Parts List") 9800-86 2-0-0 (REV:0) RYOBI 48 Volt Lawn Mower Model No. RY0 Replacement Parts List RYOBI RY0 48 volt lawn mower 3 38 39 44 39 36 34 36 42 38 39 3 4 37 34 3 43 2 32 0 8 9 2 4 33 8 7 6 3 6 7 22 8 20 3 30
9800-86 2-0-0 (REV:0) RYOBI 48 Volt Lawn Mower Model No. RY0 Replacement Parts List RYOBI RY0 48 volt lawn mower 3 38 39 44 39 36 34 36 42 38 39 3 4 37 34 3 43 2 32 0 8 9 2 4 33 8 7 6 3 6 7 22 8 20 3 30
 60 61 62 63 64 65 Ο Δ Η Γ Ι Ε Σ Σ Υ Ν Τ Η Ρ Η Σ Η Σ Τ Ω Ν Κ Ο Υ Φ Ω Μ Α Τ Ω Ν Ι Ν S T R U C T I N O N S C O N C E R N I N G Τ Η Ε C A S E M E N T S M A I N T E N A N C E Ο τακτικός καθαρισμός των βαμμένων
Precision Metal Film Fixed Resistor Axial Leaded
 Features EIA standard colour-coding Non-Flame type available Low noise and voltage coefficient Low temperature coefficient range Wide precision range in small package Too low or too high ohmic value can
ΔΕΛΤΙΟ ΔΕΔΟΜΕΝΩN ΑΣΦΑΛΕΙΑΣ ΥΛΙΚΟΥ Styccobond B95
 Ημερομηνία αναθεώρησης 30/01/13 Aναθεώρηση 8 Ημερομηνία αντικατάστασης 10/02/12 ΔΕΛΤΙΟ ΔΕΔΟΜΕΝΩN ΑΣΦΑΛΕΙΑΣ ΥΛΙΚΟΥ ΤΜΗΜΑ 1: ΣΤΟΙΧΕΊΑ ΟΥΣΊΑΣ/ΠΑΡΑΣΚΕΥΆΣΜΑΤΟΣ ΚΑΙ ΕΤΑΙΡΕΊΑΣ/ΕΠΙΧΕΊΡΗΣΗΣ 1.1. Αναγνωριστικός
IAN CORDLESS ANGLE GRINDER PWSA 18 A1 ΓΩΝΙΑΚΟΣ ΤΡΟΧΟΣ ΜΠΑΤΑΡΙΑΣ CORDLESS ANGLE GRINDER AKKU-WINKELSCHLEIFER
 CORDLESS ANGLE GRINDER PWSA 18 A1 CORDLESS ANGLE GRINDER Translation of the original instructions ΓΩΝΙΑΚΟΣ ΤΡΟΧΟΣ ΜΠΑΤΑΡΙΑΣ Μετάφραση των αυθεντικών οδηγιών λειτουργίας AKKU-WINKELSCHLEIFER Originalbetriebsanleitung
(REV:01) RYOBI 48 Volt Lawn Mower Model No. RY14110A Replacement Parts List
 RYOBI 48 Volt Lawn Mower Model No. RY14110A Replacement Parts List") 9000-7 9-- (REV:0) RYOBI 4 Volt Lawn Mower Model No. RY0A Replacement Parts List RYOBI RY0A 4 VOLT LAWN MOWER 3 3 39 44 39 3 34 3 42 3 39 3 4 37 34 3 43 2 0 37 2 33 32 3 9 7 22 30 4 7 3 20 9 3 2 2 27 2
9000-7 9-- (REV:0) RYOBI 4 Volt Lawn Mower Model No. RY0A Replacement Parts List RYOBI RY0A 4 VOLT LAWN MOWER 3 3 39 44 39 3 34 3 42 3 39 3 4 37 34 3 43 2 0 37 2 33 32 3 9 7 22 30 4 7 3 20 9 3 2 2 27 2
NMBTC.COM /
 Common Common Vibration Test:... Conforms to JIS C 60068-2-6, Amplitude: 1.5mm, Frequency 10 to 55 Hz, 1 hour in each of the X, Y and Z directions. Shock Test:...Conforms to JIS C 60068-2-27, Acceleration
User s Manual / Οδηγίες Χρήσης
 User s Manual / Οδηγίες Χρήσης EUROPEAN STANDARDS Your child s safety depends on you. Proper bed rail usage cannot be assured unless you follow these instructions. DO NOT USE YOUR BED RAIL UNTILL YOU READ
Right Rear Door. Let's now finish the door hinge saga with the right rear door
 Right Rear Door Let's now finish the door hinge saga with the right rear door You may have been already guessed my steps, so there is not much to describe in detail. Old upper one file:///c /Documents
ΟΔΗΓΙΕΣ ΕΓΚΑΤΑΣTΑΣΗΣ ΓΙΑ ΠΑΤΩΜΑ WPC INSTALLATION GUIDE FOR WPC DECKING
 1/12 ΟΔΗΓΙΕΣ ΕΓΚΑΤΑΣTΑΣΗΣ ΓΙΑ ΠΑΤΩΜΑ WPC INSTALLATION GUIDE FOR WPC DECKING Ανοίγουμε τρύπες Ø8 x 80mm στο σημείο κατασκευής, με τρυπάνι. To προτεινόμενο πλάτος και μήκος μεταξύ των 2 οπών να είναι 30-35εκ.,
Surface Mount Aluminum Electrolytic Capacitors
 FEATURES CYLINDRICAL V-CHIP CONSTRUCTION LOW COST, GENERAL PURPOSE, 2000 HOURS AT 85 O C NEW EXPANDED CV RANGE (up to 6800µF) ANTI-SOLVENT (2 MINUTES) DESIGNED FOR AUTOMATIC MOUNTING AND REFLOW SOLDERING
UDZ Swirl diffuser. Product facts. Quick-selection. Swirl diffuser UDZ. Product code example:
 UDZ Swirl diffuser Swirl diffuser UDZ, which is intended for installation in a ventilation duct, can be used in premises with a large volume, for example factory premises, storage areas, superstores, halls,
Potential Dividers. 46 minutes. 46 marks. Page 1 of 11
 Potential Dividers 46 minutes 46 marks Page 1 of 11 Q1. In the circuit shown in the figure below, the battery, of negligible internal resistance, has an emf of 30 V. The pd across the lamp is 6.0 V and
IAN CORDLESS ANGLE GRINDER PWSA 12-LI A1. CORDLESS ANGLE GRINDER Translation of the original instructions
 CORDLESS ANGLE GRINDER PWSA 12-LI A1 CORDLESS ANGLE GRINDER Translation of the original instructions ΕΠΑΝΑΦΟΡΤΙΖΟΜΕΝΟΣ ΓΩΝΙΑΚΟΣ ΤΡΟΧΟΣ Μετάφραση των αυθεντικών οδηγιών λειτουργίας AKKU-WINKELSCHLEIFER
L18VFSS10E. Instruction Manual 45.7cm/18 High Power Floor Fan. Εγχειρίδιο Οδηγιών Επιδαπεδιος Ανεμιστηρας 45.7 Εκατοστομετρο
 L18VFSS10E Instruction Manual 45.7cm/18 High Power Floor Fan Εγχειρίδιο Οδηγιών Επιδαπεδιος Ανεμιστηρας 45.7 Εκατοστομετρο GB GR Contents GB Safety Warnings... 2 Unpacking... 5 Getting to Know Your Fan...
Bulletin 1489 UL489 Circuit Breakers
 Bulletin 489 UL489 Circuit Breakers Tech Data 489-A Standard AC Circuit Breaker 489-D DC Circuit Breaker 489-A, AC Circuit Breakers 489-D, DC Circuit Breakers Bulletin 489-A Industrial Circuit Breaker
ZLW Series. Single-stage Monoblock Centrifugal Pump ZL PUMP GROUP.,LTD
 ZLW Series Single-stage Monoblock Centrifugal Pump ZL PUMP GROUP.,LTD 1 Application Apply as the transportation of liquids in the fields of air condition, heating, sanitary water, water treatment cooling,
ΚΥΠΡΙΑΚΗ ΕΤΑΙΡΕΙΑ ΠΛΗΡΟΦΟΡΙΚΗΣ CYPRUS COMPUTER SOCIETY ΠΑΓΚΥΠΡΙΟΣ ΜΑΘΗΤΙΚΟΣ ΔΙΑΓΩΝΙΣΜΟΣ ΠΛΗΡΟΦΟΡΙΚΗΣ 19/5/2007
 Οδηγίες: Να απαντηθούν όλες οι ερωτήσεις. Αν κάπου κάνετε κάποιες υποθέσεις να αναφερθούν στη σχετική ερώτηση. Όλα τα αρχεία που αναφέρονται στα προβλήματα βρίσκονται στον ίδιο φάκελο με το εκτελέσιμο
(Type B) Το προϊόν αυτό δεν είναι κατάλληλο για σκοπούς πρωτογενούς θέρμανσης. ADM AEE
 Το προϊόν αυτό δεν είναι κατάλληλο για σκοπούς πρωτογενούς θέρμανσης. ADM AEE") (Type B) Το προϊόν αυτό δεν είναι κατάλληλο για σκοπούς πρωτογενούς θέρμανσης. ADM AEE 2310 85 30 61 80 00 18 Mklg 01. Rwnc A]SQ,ovb / D OPERATlON FUELING WARNING: uture storage of your heater. Use o NEVE
(Type B) Το προϊόν αυτό δεν είναι κατάλληλο για σκοπούς πρωτογενούς θέρμανσης. ADM AEE 2310 85 30 61 80 00 18 Mklg 01. Rwnc A]SQ,ovb / D OPERATlON FUELING WARNING: uture storage of your heater. Use o NEVE
CORDLESS SCREWDRIVER PSSA 3.6 C3
 CORDLESS SCREWDRIVER PSSA 3.6 C3 CORDLESS SCREWDRIVER Translation of the original instructions ΚΑΤΣΑΒΙΔΙ ΜΠΑΤΑΡΙΑΣ Μετάφραση των αυθεντικών οδηγιών λειτουργίας AKKU-STABSCHRAUBER Originalbetriebsanleitung
Assalamu `alaikum wr. wb.
 LUMP SUM Assalamu `alaikum wr. wb. LUMP SUM Wassalamu alaikum wr. wb. Assalamu `alaikum wr. wb. LUMP SUM Wassalamu alaikum wr. wb. LUMP SUM Lump sum lump sum lump sum. lump sum fixed price lump sum lump
Phys460.nb Solution for the t-dependent Schrodinger s equation How did we find the solution? (not required)
") Phys460.nb 81 ψ n (t) is still the (same) eigenstate of H But for tdependent H. The answer is NO. 5.5.5. Solution for the tdependent Schrodinger s equation If we assume that at time t 0, the electron starts
Phys460.nb 81 ψ n (t) is still the (same) eigenstate of H But for tdependent H. The answer is NO. 5.5.5. Solution for the tdependent Schrodinger s equation If we assume that at time t 0, the electron starts
HOMEWORK 4 = G. In order to plot the stress versus the stretch we define a normalized stretch:
 HOMEWORK 4 Problem a For the fast loading case, we want to derive the relationship between P zz and λ z. We know that the nominal stress is expressed as: P zz = ψ λ z where λ z = λ λ z. Therefore, applying
(C) 2010 Pearson Education, Inc. All rights reserved.
 2010 Pearson Education, Inc. All rights reserved.") Connectionless transmission with datagrams. Connection-oriented transmission is like the telephone system You dial and are given a connection to the telephone of fthe person with whom you wish to communicate.
Connectionless transmission with datagrams. Connection-oriented transmission is like the telephone system You dial and are given a connection to the telephone of fthe person with whom you wish to communicate.
First Sensor Quad APD Data Sheet Part Description QA TO Order #
 Responsivity (/W) First Sensor Quad PD Data Sheet Features Description pplication Pulsed 16 nm laser detection RoHS 211/65/EU Light source positioning Laser alignment ø mm total active area Segmented in
Ημερομηνία Τελευταίας Ενημέρωσης: Μαϊος 2017
 DegerHellas Μον.ΕΠΕ Ενεργειακά Συστήματα, Μεγάλου Αλεξάνδρου 169, 13562,Αγιοι Ανάργυροι, Αθήνα Τ: 211-0127290 F: 211-0127293, E: info-greece@degerenergie.com Θέμα: Κείμενο Εγγυήσεων DegerTrackers Ημερομηνία
IAN 104449 CORDLESS IMPACT DRIVER PDSSA 18 A1 ΚΡΟΥΣΤΙΚΟ ΔΡΑΠΑΝΟΚΑΤΣΑΒΙΔΟ ΜΠΑΤΑΡΙΑΣ CORDLESS IMPACT DRIVER AKKU-DREHSCHLAGSCHRAUBER
 CORDLESS IMPACT DRIVER PDSSA 18 A1 CORDLESS IMPACT DRIVER Translation of the original instructions ΚΡΟΥΣΤΙΚΟ ΔΡΑΠΑΝΟΚΑΤΣΑΒΙΔΟ ΜΠΑΤΑΡΙΑΣ Μετάφραση των αυθεντικών οδηγιών λειτουργίας AKKU-DREHSCHLAGSCHRAUBER
Modbus basic setup notes for IO-Link AL1xxx Master Block
 n Modbus has four tables/registers where data is stored along with their associated addresses. We will be using the holding registers from address 40001 to 49999 that are R/W 16 bit/word. Two tables that
CHAPTER 25 SOLVING EQUATIONS BY ITERATIVE METHODS
 CHAPTER 5 SOLVING EQUATIONS BY ITERATIVE METHODS EXERCISE 104 Page 8 1. Find the positive root of the equation x + 3x 5 = 0, correct to 3 significant figures, using the method of bisection. Let f(x) =
Math 6 SL Probability Distributions Practice Test Mark Scheme
 Math 6 SL Probability Distributions Practice Test Mark Scheme. (a) Note: Award A for vertical line to right of mean, A for shading to right of their vertical line. AA N (b) evidence of recognizing symmetry
EE512: Error Control Coding
 EE512: Error Control Coding Solution for Assignment on Finite Fields February 16, 2007 1. (a) Addition and Multiplication tables for GF (5) and GF (7) are shown in Tables 1 and 2. + 0 1 2 3 4 0 0 1 2 3
DC-DC Constant Current Step-Down LED driver LDD-300L LDD-350L LDD-500L LDD-600L LDD-700L CURRENT RANGE
 SPECIFICATION ORDER NO. LDD-00L LDD-0L LDD-00L LDD-00L LDD-700L CURRENT RANGE 00mA 0mA 00mA VOLTAGE RANGE Note. ~ VDC for LDD-00~700L/LW ; ~ 8VDC for LDD-00~700LS CURRENT ACCURACY (Typ.) ±% at VDC input
The Nottingham eprints service makes this work by researchers of the University of Nottingham available open access under the following conditions.
 Luevorasirikul, Kanokrat (2007) Body image and weight management: young people, internet advertisements and pharmacists. PhD thesis, University of Nottingham. Access from the University of Nottingham repository:
safty reasons. Disregarding could result in serious injury. Disregarding could result in injury or product damage. Forbidden.
 The following safety precautions are given throughout this manual. They must be strictly followed to protect those who install, use or maintain this product as well as to protect players, visitors and
OUR PRODUCT RANGE. www.rakson.gr
 ΤΑ ΑΛΛΑ ΕΙ Η ΠΡΟΪΟΝΤΑ ΜΑΣ ΜΕΤΑΣΧΗΜΑΤΙΣΤΕΣ ΚΟΥ ΟΥΝΙΩΝ ΚΟΥ ΟΥΝΙΑ ΜΠΟΥΤΟΝ ΚΟΥ ΟΥΝΙΩΝ ΑΥΤΟΜΑΤΟΙ ΚΛΙΜΑΚΟΣΤΑΣΙΟΥ ΚΛΕΙ ΑΡΙΕΣ ΑΝΙΧΝΕΥΤΕΣ ΚΙΝΗΣΗΣ ΣΥΣΤΗΜΑΤΑ ΕΠΙΚΟΙΝΩΝΙΑΣ Θυροτηλεοράσεις Θυροτηλέφωνα Ενδοεπικοινωνίες
CSR series. Thick Film Chip Resistor Current Sensing Type FEATURE PART NUMBERING SYSTEM ELECTRICAL CHARACTERISTICS
 FEATURE Operating Temperature: -55 ~ +155 C 3 Watts power rating in 1 Watt size, 1225 package High purity alumina substrate for high power dissipation Long side terminations with higher power rating PART
For safty reasons. Disregarding could result in serious injury. Disregarding could result in injury or product damage. Forbidden.
 The following safety precautions are given throughout this manual. They must be strictly followed to protect those who install, use or maintain this product as well as to protect players, visitors and
G 10SD2 G 12S2 G 13SD
 Disc Grinder G 10SD2 G 12S2 G 13SD Handling instructions G13SD Read through carefully and understand these instructions before use. 1 2 1 2 3 3 88 8 4 6 5 17 mm 6 mm 9 7 4! @ 0 2 English 1 Wrench 2 Wheel
ΑΙΤΗΣΗ ΓΙΑ ΑΔΕΙΟΔΟΤΗΣΗ ΣΕ ΛΙΜΕΝΙΚΗ ΠΕΡΙΟΧΗ PERMIT APPLICATION WITHIN PORT AREA 1. ΣΤΟΙΧΕΙΑ ΕΤΑΙΡΕΙΑΣ COMPANY DETAILS
 ΑΙΤΗΣΗ ΓΙΑ ΑΔΕΙΟΔΟΤΗΣΗ ΣΕ ΛΙΜΕΝΙΚΗ ΠΕΡΙΟΧΗ 1. ΣΤΟΙΧΕΙΑ ΕΤΑΙΡΕΙΑΣ COMPANY DETAILS Ονομα εταιρείας / Company name Περίοδος άδειας: Start End Τίτλος έργου / Project title Permit duration Αριθμός εγγραφής
66546_mel_LED-Lichtervorhang_Content_LB6+GR.indd :56
 1 2 3 4 3 66546_mel_LED-Lichtervorhang_Content_LB6+GR.indd 3 29.04.11 13:56 Table of contents Introduction Intended Use... Page 5 Description of parts... Page 5 Delivery scope... Page 6 Technical information...
ΟΔΗΓΙΕΣ ΧΡΗΣΗΣ USE INSTRUCTIONS
 ΟΔΗΓΙΕΣ ΧΡΗΣΗΣ USE INSTRUCTIONS ΗΛΕΚΤΡΙΚΗ ΕΣΤΙΑ ΚΑΦΕ COFFEE HOT PLATE Μοντέλο / Model : ES-2308 230V~50Hz 450W Παρακαλούμε διαβάστε προσεκτικά όλες τις οδηγίες χρήσης πριν την χρήση της συσκευής και φυλάξτε
Operating-instruction Manual ΟΔΗΓΙΕΣ ΧΡΗΣΕΩΣ
 Operating-instruction Manual ΟΔΗΓΙΕΣ ΧΡΗΣΕΩΣ 16 3 SPEED PEDESTAL FAN 16 ΑΝΕΜΙΣΤΗΡΑΣ ΟΡΘΟΣΤΑΤΗΣ 3 ΤΑΧΥΤΗΤΩΝ PLEASE READ ALL INSTRUCTIONS CAREFULLYAND KEEP FOR FUTURE USE ΠΑΡΑΚΑΛΩ ΔΙΑΒΑΣΤΕ ΤΙΣ ΟΔΗΓΙΕΣ ΧΡΗΣΗΣ
BS1080. Art Nr.: Μετάφραση του πρωτοτύπου των οδηγιών χρήσης. Owner s manual
 BS1080 Μετάφραση του πρωτοτύπου των οδηγιών χρήσης Owner s manual Art Nr.: 014751 Διαβάστε προσεχτικά και παρατηρήστε τις οδηγίες λειτουργίας και ασφάλειας πριν να χρησιμοποιήσετε το μηχάνημα. Επίσης σας
SFH-41 Fan Heater Αερόθερμο
 SFH-41 Fan Heater Αερόθερμο GB GR INSTRUCTION MANUAL ΒΙΒΛΙΟ ΟΔΗΓΙΩΝ GB ENGLISH... 3 GR EΛΛHNIKA... 7 ENGLISH PLEASE READ THESE INSTRUCTIONS CAREFULLY AND RETAIN FOR FUTURE REFER- ENCE SAFETY WARNINGS When
For safty reasons. Disregarding could result in serious injury. Disregarding could result in injury or product damage. Forbidden.
 The following safety precautions are given throughout this manual. They must be strictly followed to protect those who install, use or maintain this product as well as to protect players, visitors and
Physical DB Design. B-Trees Index files can become quite large for large main files Indices on index files are possible.
 B-Trees Index files can become quite large for large main files Indices on index files are possible 3 rd -level index 2 nd -level index 1 st -level index Main file 1 The 1 st -level index consists of pairs
derivation of the Laplacian from rectangular to spherical coordinates
 derivation of the Laplacian from rectangular to spherical coordinates swapnizzle 03-03- :5:43 We begin by recognizing the familiar conversion from rectangular to spherical coordinates (note that φ is used
IAN 70380. Cordless Hedge Trimmer FAH 18 B2. Cordless Hedge Trimmer Translation of original operation manual
 Cordless Hedge Trimmer FAH 18 B2 Cordless Hedge Trimmer Translation of original operation manual Κλαδευτήρι θαμνων μπαταριας Μετάφραση των αυθεντικών οδηγιών λειτουργίας Akku-HeCkensCHere Originalbetriebsanleitung
2 Composition. Invertible Mappings
 Arkansas Tech University MATH 4033: Elementary Modern Algebra Dr. Marcel B. Finan Composition. Invertible Mappings In this section we discuss two procedures for creating new mappings from old ones, namely,
IAN CORDLESS SCREWDRIVER RAPIDFIRE CORDLESS SCREWDRIVER. ΚΑΤΣΑΒΙΔΙ ΜΠΑΤΑΡΙΑΣ RAPIDFIRE Μετάφραση των αυθεντικών οδηγιών λειτουργίας RAPIDFIRE
 CORDLESS SCREWDRIVER RAPIDFIRE CORDLESS SCREWDRIVER RAPIDFIRE Translation of the original instructions ΚΑΤΣΑΒΙΔΙ ΜΠΑΤΑΡΙΑΣ RAPIDFIRE Μετάφραση των αυθεντικών οδηγιών λειτουργίας AKKU-WECHSELBITSCHRAUBER
MS SERIES MS DESK TOP ENCLOSURE APPLICATION EXAMPLE FEATURE. Measuring instruments. Power supply equipments
 MS SERIES MS DESK TOP ENCLOSURE FEATURE Available in 176 sizes. Screws are not appeared on the surface. Usable as rack mount case with optinal mounting bracket. There are no ventilation hole for cover
The challenges of non-stable predicates
 The challenges of non-stable predicates Consider a non-stable predicate Φ encoding, say, a safety property. We want to determine whether Φ holds for our program. The challenges of non-stable predicates
BS Owner s manual. Μετάφραση του πρωτοτύπου των οδηγιών χρήσης
 BS2000 Μετάφραση του πρωτοτύπου των οδηγιών χρήσης Owner s manual www.nakayamatools.com Διαβάστε τις οδηγίες χρήσης προσεχτικά και κρατήστε την για μελλοντική χρήση! Οδηγίες χρήσης για ψαλίδι κλάδου μπαταρίας
Cambridge International Examinations Cambridge International General Certificate of Secondary Education
 Cambridge International Examinations Cambridge International General Certificate of Secondary Education *4358398658* GREEK 0543/04 Paper 4 Writing May/June 2015 1 hour Candidates answer on the Question
Current Sensing Chip Resistor SMDL Series Size: 0201/0402/0603/0805/1206/1010/2010/2512/1225/3720/7520. official distributor of
 Product: Current Sensing Chip Resistor SMDL Series Size: 0201/0402/0603/0805/1206/1010/2010/2512/1225/3720/7520 official distributor of Current Sensing Chip Resistor (SMDL Series) 1. Features -3 Watts
ΕΡΙΤΟΡΕΣ ΚΑΙ ΑΝΘΩΡΟΙ ΚΛΕΙΔΙΑ ΑΝΑΘΕΣΘ ΑΓΩΝΑ ΓΑΦΕΙΟ ΑΓΩΝΩΝ ΟΓΑΝΩΤΙΚΘ ΕΡΙΤΟΡΘ. ζεκηλαρηο 1 ΡΑΓΚΟΣΜΙΑ ΟΜΟΣΡΟΝΔΙΑ (ISAF) ΕΛΛΘΝΙΚΘ ΟΜΟΣΡΟΝΔΙΑ (Ε.Ι.Ο.
 ΕΛΛΘΝΙΚΘ ΟΜΟΣΡΟΝΔΙΑ (Ε.Ι.Ο.") ΑΝΑΘΕΣΘ ΑΓΩΝΑ ΕΡΙΤΟΡΕΣ ΚΑΙ ΑΝΘΩΡΟΙ ΚΛΕΙΔΙΑ ΡΑΓΚΟΣΜΙΑ ΟΜΟΣΡΟΝΔΙΑ (ISAF) ΕΛΛΘΝΙΚΘ ΟΜΟΣΡΟΝΔΙΑ (Ε.Ι.Ο.) ΚΛΑΣΘ 6/6/2009 1 ΟΡΓΑΝΩΣΙΚΗ ΕΠΙΣΡΟΠΗ ΓΡΑΦΕΙΟ ΑΓΩΝΩΝ ΕΠΙΣΡΟΠΗ ΑΓΩΝΩΝ ΕΠΙΣΡΟΠΗ ΕΝΣΑΕΩΝ ΕΠΙΣΡΟΠΗ ΚΑΣΑΜΕΣΡΗΕΩΝ
ΑΝΑΘΕΣΘ ΑΓΩΝΑ ΕΡΙΤΟΡΕΣ ΚΑΙ ΑΝΘΩΡΟΙ ΚΛΕΙΔΙΑ ΡΑΓΚΟΣΜΙΑ ΟΜΟΣΡΟΝΔΙΑ (ISAF) ΕΛΛΘΝΙΚΘ ΟΜΟΣΡΟΝΔΙΑ (Ε.Ι.Ο.) ΚΛΑΣΘ 6/6/2009 1 ΟΡΓΑΝΩΣΙΚΗ ΕΠΙΣΡΟΠΗ ΓΡΑΦΕΙΟ ΑΓΩΝΩΝ ΕΠΙΣΡΟΠΗ ΑΓΩΝΩΝ ΕΠΙΣΡΟΠΗ ΕΝΣΑΕΩΝ ΕΠΙΣΡΟΠΗ ΚΑΣΑΜΕΣΡΗΕΩΝ
Heat exchanger. Type WT. For the reheating of airflows in rectangular ducting PD WT 1. 03/2017 DE/en
 X X testregistrierung Heat exchanger Type For the reheating of airflows in rectangular ducting Rectangular hot water heat exchanger for the reheating of airflows, suitable for VAV terminal units Type TVR,
ΚΥΠΡΙΑΚΗ ΕΤΑΙΡΕΙΑ ΠΛΗΡΟΦΟΡΙΚΗΣ CYPRUS COMPUTER SOCIETY ΠΑΓΚΥΠΡΙΟΣ ΜΑΘΗΤΙΚΟΣ ΔΙΑΓΩΝΙΣΜΟΣ ΠΛΗΡΟΦΟΡΙΚΗΣ 6/5/2006
 Οδηγίες: Να απαντηθούν όλες οι ερωτήσεις. Ολοι οι αριθμοί που αναφέρονται σε όλα τα ερωτήματα είναι μικρότεροι το 1000 εκτός αν ορίζεται διαφορετικά στη διατύπωση του προβλήματος. Διάρκεια: 3,5 ώρες Καλή
ΜΙΚΡΑ ΑΛΛΑ ΔΥΝΑΤΑ! H κατηγορία των 10,8 Volt από τη Würth / The Würth 10.8 Volt Range. Τροφοδοσία με
 ΜΙΚΡΑ ΑΛΛΑ ΔΥΝΑΤΑ! H κατηγορία των 10,8 Volt από τη Würth / The Würth 10.8 Volt Range Τροφοδοσία με Κατσαβίδι ΜΠΑΤΑΡΙΑΣ s 10-a battery powered screwdriver s 10-a Κωδ. Αρ. 0700 662 x Μαγνητική βάση μύτης
(1) Describe the process by which mercury atoms become excited in a fluorescent tube (3)
 Describe the process by which mercury atoms become excited in a fluorescent tube (3)") Q1. (a) A fluorescent tube is filled with mercury vapour at low pressure. In order to emit electromagnetic radiation the mercury atoms must first be excited. (i) What is meant by an excited atom? (1) (ii)
Q1. (a) A fluorescent tube is filled with mercury vapour at low pressure. In order to emit electromagnetic radiation the mercury atoms must first be excited. (i) What is meant by an excited atom? (1) (ii)
TIME SWITCHES AND TWILIGHT SWITCHES
 W ANALOG DIN-RAIL TIME SWITCH QUARTZ, SERIES TEMPUS ANALOG 244 W SCHRACK-INFO Analogue time switch 1 channel Daily program With power reserve (NiMH rechargeable battery) Synchronised with mains Shortest
IAN CORDLESS SCREWDRIVER PAS 4 A1 CORDLESS SCREWDRIVER ΚΑΤΣΑΒΙΔΙ ΜΠΑΤΑΡΙΑΣ AKKU-SCHRAUBER. Μετάφραση των αυθεντικών οδηγιών λειτουργίας
 CORDLESS SCREWDRIVER CORDLESS SCREWDRIVER Translation of the original instructions ΚΑΤΣΑΒΙΔΙ ΜΠΑΤΑΡΙΑΣ Μετάφραση των αυθεντικών οδηγιών λειτουργίας AKKU-SCHRAUBER Originalbetriebsanleitung IAN 280464 Before
ABS-18-B Set. GB Battery-powered screwdriver GR Επαναφορτιζόμενο δραπανοκατσάβιδο
 Akkuschrauber_380136.book Seite 1 Mittwoch, 16. September 2015 12:46 12 380 136 ABS-18-B Set GB Battery-powered screwdriver GR Επαναφορτιζόμενο δραπανοκατσάβιδο Akkuschrauber_380136.book Seite 2 Mittwoch,
Metal thin film chip resistor networks
 Metal thin film chip resistor networks AEC-Q200 Compliant Features Relative resistance and relative TCR definable among multiple resistors within package. Relative resistance : ±%, relative TCR: ±1ppm/
CYTA Cloud Server Set Up Instructions
 CYTA Cloud Server Set Up Instructions ΕΛΛΗΝΙΚΑ ENGLISH Initial Set-up Cloud Server To proceed with the initial setup of your Cloud Server first login to the Cyta CloudMarketPlace on https://cloudmarketplace.cyta.com.cy
IAN CORDLESS PRUNER FAHE 18 A1 ΤΗΛΕΣΚΟΠΙΚΌ ΑΛΥΣΟΠΡΊΟΝΟ ΜΠΑΤΑΡΊΑΣ CORDLESS PRUNER AKKU-HOCHENTASTER. Translation of original operation manual
 CORDLESS PRUNER FAHE 18 A1 CORDLESS PRUNER Translation of original operation manual ΤΗΛΕΣΚΟΠΙΚΌ ΑΛΥΣΟΠΡΊΟΝΟ ΜΠΑΤΑΡΊΑΣ Μετάφραση των αυθεντικών οδηγιών λειτουργίας AKKU-HOCHENTASTER Originalbetriebsanleitung
DC-DC Constant Current Step-Down LED driver LDD-300L LDD-350L LDD-500L LDD-600L LDD-700L CURRENT RANGE
 SPECIFICATION ORDER NO. LDD-00L LDD-0L LDD-00L LDD-00L LDD-700L CURRENT RANGE 00mA 0mA 00mA 00mA VOLTAGE RANGE Note. ~ VDC for LDD-00~700L/LW ; ~ 8VDC for LDD-00~700LS CURRENT ACCURACY (Typ.) ±% at VDC
ES Owner s manual. Μετάφραση του πρωτοτύπου των οδηγιών χρήσης
 ES2700 Μετάφραση του πρωτοτύπου των οδηγιών χρήσης Owner s manual Οδηγίες Ασφάλειας Το μηχάνημα είναι σύμφωνο με τις οδηγίες ασφάλειας των ηλεκτρικών εργαλείων. Διαβάστε τις οδηγίες πριν να ξεκινήσετε
RSDW08 & RDDW08 series
 /,, MODEL SELECTION TABLE INPUT ORDER NO. INPUT VOLTAGE (RANGE) NO LOAD INPUT CURRENT FULL LOAD VOLTAGE CURRENT EFFICIENCY (Typ.) CAPACITOR LOAD (MAX.) RSDW08F-03 344mA 3.3V 2000mA 80% 2000μF RSDW08F-05
Presenter SNP6000. Register your product and get support at Εγχειρίδιο χρήσης
 Register your product and get support at www.philips.com/welcome Presenter SNP6000 EL Εγχειρίδιο χρήσης 1 a b c d e 2 3 4 Federal Communication Commission Interference Statement This equipment has been
LR Series Metal Alloy Low-Resistance Resistor
 Tel : 881745 Fax : 881749 LR Series Metal Alloy LowResistance Resistor This specification is applicable to lead free, halogen free of RoHS directive for metal alloy lowresistance resistor. The product
Test Data Management in Practice
 Problems, Concepts, and the Swisscom Test Data Organizer Do you have issues with your legal and compliance department because test environments contain sensitive data outsourcing partners must not see?
ΦΎΛΛΟ ΔΕΔΟΜΈΝΩΝ 100/ /700 P5
 100/120 277/700 P5 OPTOTRONIC Σταθερού ρεύματος ECG για μονάδες LED ΠΕΡΙΟΧΈΣ ΕΦΑΡΜΟΓΉΣ Φωτισμός δρόμων και αστικός φωτισμός Βιομηχανία Κατάλληλο για φωτιστικά με κατηγορία προστασίας I ΠΛΕΟΝΕΚΤΉΜΑΤΑ ΠΡΟΪΌΝΤΟΣ