IAN ELECTRIC CHAINSAW FKS 2200 F3. ELECTRIC CHAINSAW Translation of the original instructions
|
|
|
- Ξένη Κούνδουρος
- 6 χρόνια πριν
- Προβολές:
Transcript

1 ELECTRIC CHAINSAW FKS 2200 F3 ELECTRIC CHAINSAW Translation of the original instructions ΗΛΕΚΤΡΙΚΟ ΑΛΥΣΟΠΡΙΟΝΟ Μετάφραση των αυθεντικών οδηγιών λειτουργίας ELEKTRO-KETTENSÄGE Originalbetriebsanleitung IAN
2 Before reading, unfold the page containing the illustrations and familiarise yourself with all functions of the device. Πριν ξεκινήσετε την ανάγνωση, ανοίξτε τη σελίδα με τις εικόνες και εξοικειωθείτε με όλες τις λειτουργίες της συσκευής. Klappen Sie vor dem Lesen die Seite mit den Abbildungen aus und machen Sie sich anschließend mit allen Funktionen des Gerätes vertraut. GB / IE / NI / CY Translation of the original instructions Page GR / CY Μετάφραση των αυθεντικών οδηγιών λειτουργίας Σελίδα DE / AT / CH Originalbetriebsanleitung Seite
3 Made in Germany 180 ml A MIN B 8 3 MIN C 2 MIN


4 K L M N O P 2 1 Q R S 4
5 G B IE NI C Y Content Introduction...5 Intended purpose...6 General description...6 Extent of the delivery...6 Overview...6 Function description...7 Technical Data...7 Notes on safety...8 Symbols used on the saw...8 Symbols used in the instructions...9 General notes on safety...9 General safety instructions for power tools...9 Causes and operator...13 prevention of kickback...13 Residual risks...13 Further safety directions...14 Safety functions...14 Assembly...14 Mount the saw chain...15 Mount the saw bar...15 Tensioning the saw chain...15 Chain lubrication...16 Operating the chainsaw...16 Switching on...17 Checking the chain brake...17 Checking the chain lubrication...17 Introduction Congratulations on the purchase of your new device. With it, you have chosen a high quality product. During production, this equipment has been checked for quality and subjected to a final inspection. The functionality of your equipment is therefore guaranteed. It cannot be ruled out that residual quantities of water or lubricants will remain on or in the equipment/hose lines in isolated cases. This is not a fault or defect and it represents no cause for concern. Changing the saw bar...18 Sawing techniques...18 General...18 Felling trees...18 Limbing...20 Bucking...20 Maintenance and cleaning...20 Cleaning...21 Maintenance intervals...21 Maintenance Interval Table...21 Oiling the saw chain...22 Sharpening the saw chain...22 Adjusting the chain tension...23 Starting up a new saw chain...23 Maintaining the chain bar...23 Turn the chain bar...23 Storage...24 Waste disposal and environmental protection...24 Replacement parts/accessories..25 Trouble shooting...26 Guarantee...27 Repair Service...28 Service-Center...28 Importer...28 Translation of the original EC declaration of conformity Exploded Drawing The operating instructions constitute part of this product. They contain important information on safety, use and disposal. Before using the product, familiarise yourself with all of the operating and safety instructions. Use the product only as described and for the applications specified. Keep this manual safely and in the event that the product is passed on, hand over all documents to the third party. 5
6 G B IE NI C Y Intended purpose The electric chainsaw is constructed for sawing wood only. The saw is not designed for any other types of application (e.g. cutting of brickwork, plastic or food). The chainsaw is designed for employment in the do-it-yourselfer sector. It was not designed for continuous employment in the commercial sector. The device is designed for use by adults. Young people over 16 years old may use the chainsaw under supervision only. The manufacturer is not liable for damages, which were caused through use in applications for which it was not designed, or incorrect operation. This electric chainsaw is to be used only by one person and only for sawing wood. The chainsaw must be held with the right hand on the rear handle and the left hand on the front handle. Before use, the user must have read and understood all of the information and directions in the operating instructions. The user must wear appropriate personal protective equipment (PPE). The chainsaw is to be used only for sawing wood. Materials such as plastic, stone, metal or wood containing foreign objects (e.g. nails or screws) must not be cut with the chain saw! General description The illustration of the principal functionin g parts can be found on the front and back foldout pages. Extent of the delivery Carefully unpack the appliance and check that it is complete: - Chainsaw - Chain bar (guide rail) (already mounted) - Saw chain (already mounted) - Saw bar protection sheath - Oil bottle with 180 ml bio chain oil - Instruction Manual Dispose of the packaging material correctly. Overview A 1 Rear handle 2 Oil filler cap 3 Chain brake handle, front hand guard 4 Chain bar 5 Saw chain 6 Nose sprocket 7 Bumper 8 Front handle 9 Electric motor 10 On/off switch 11 Safety lock 12 Chain catcher 13 Chain adjustment ring 14 Fastening bolt for sprocket chain wheel covering 15 Sprocket chain wheel covering 16 Rear hand guard 18 Mains cable 19 Saw bar protection sheath 20 Oil bottle C 21 Oil level indicator 22 Minimum mark MIN on the oil level indicator 6
7 G B IE NI C Y F 23 Bar bolt 24 Tensioning plate G 25 Sprocket 26 Tab J 27 Oil passages 28 Fixing screw 29 Clamping screw bolt Function description The chainsaw is driven by an electric motor. The circulating chain is led around a saw bar (guide rail). The tool is fitted with a rapid-action chaintensioning system and a fast-acting chain brake. An automatic oil dosing regulator ensures continuous chain lubrication. The chainsaw is equipped with various protection fittings for the protection of the user. Refer to the following descriptions for the function of control elements. Technical Data Electrical chainsaw... FKS 2200 F3 Rated input voltage U V~, 50 Hz Input power P W Safety class... II Protection category...ip20 Chain speed v m/s Weight (without guide rail and chain)... 5 kg Weight (with guide rail and chain)..5.9 kg Oiltank...approx. 190 ml Chain...Oregon 91P057X Chrome cutting teeth, low-kickback Chain bar... Oregon 16 Double-Guard SDEA Chain link separation mm Chain width mm Teeth of the sprocket chain wheel... 7 Length of the chain bar mm Sawing length mm Acoustic pressure level (L pa ) db (A); K pa = 3 db Sound power level (L WA ) measured db (A); K WA = 2.58 db guaranteed db(a) Vibration (a h ) m/s 2 ; K= 1.5 m/s 2 Noise and vibration values were determined according to the standards and stipulations mentioned in the declaration of conformity. The stated vibration emission value was measured in accordance with a standard testing procedure and may be used to compare one power tool to another. The stated vibration emission value may also be used for a preliminary exposure assessment. Warning: The vibration emission value may differ during actual use of the power tool from the stated value depending on the manner in which the power tool is used. Safety precautions aimed at protecting the user should be based on estimated exposure under actual usage conditions (all parts of the operating cycle are to be considered, including, for example, times during which the power tool is turned off and times when the tool is turned on but is running idle). 7
8 G B IE NI C Y Notes on safety This section deals with the basic safety regulations while working with the electric chainsaw. An electric chainsaw is a dangerous device, which can cause serious or even fatal injuries with incorrect or careless use. Thus, for your own safety and the safety of others, you should always take note of the instructions on safety and, in case of difficulties, consult a specialist for advice. Symbols used on the saw Make yourself familiar with all control elements before any work. Practice handling the saw and have explained the functions, operating methods and sawing techniques by a practiced user or specialist. The motor cannot be turned on if the chain brake has engaged. Release the chain brake by shifting the brake arm over against the front grip. Read and take note of the operating manual belonging to the machine! Wear personal protective equipment. Basically, wear protective goggles and ear protection Wear a safety helmet! Wear cut-resistant gloves! Wear anti-slip safety shoes! Use protective clothing! db Only use the saw with both hands on the device Caution! Spring-back - Be careful of spring-back of the machine during work. Do not expose the unit to rain. The device must not be wet, nor should it be operated in a moist environment. Caution! Remove the plug immediately from the plug socket in case of damage or cutting through of the mains cable LWA Information of the acoustic power level L WA in db. Graphical symbol on the nameplate: 460 mm Length of the chain bar Safety class II Machines do not belong with domestic waste. Graphical symbol beneath the chain sprocket cover: Observe direction of travel of the saw chain. Caution! Read the operating instructions. Graphical symbol on the blade: Direction of travel of the saw chain Graphical symbol on the oil tank cap: Saw chain lubrication. 8
9 G B IE NI C Y Graphical symbol on the fixing screw for the chain sprocket cover: OPEN CLOSE Graphical symbol on the chain brake lever: O chain brake: OFF I chain brake: ON Symbols used in the instructions Hazard symbols with information on prevention of personal injury and property damage. Precaution symbol (explanation of precaution instead of exclamation mark) with information on prevention of harm / damage. Notice symbol with information on how to handle the device properly. General notes on safety Before you do any work with the electric chainsaw, make yourself familiar with all operating parts. Practise using the saw (sawing logs on a sawhorse) and get an experienced user or a specialist to explain to you the function of the saw, the way of working, the techniques of sawing and the personal protection equipment. Observe noise control and local regulations. Caution! When using power tools, observe the following basic safety measures for the prevention of electric shocks and the risk of injury and fire. There is a risk of injury! General safety instructions for power tools WARNING! Read all safety directions and instructions. Omissions in the compliance with safety directions and instructions can cause electrical shock, fire and/or severe injuries. Retain all safety directions and instructions for future use. The term Power Tools used in the safety instructions refers to mains-operated power tools (with power cord) and to battery-operated power tools (without power cord). Work area safety Keep work area clean and well lit. Cluttered or dark areas invite accidents. Do not operate power tools in explosive atmospheres, such as in the presence of flammable Iiquids, gases or dust. Power tools create sparks which may ignite the dust or fumes. Keep children and bystanders away while operating a power tool. Distractions can cause you to lose control. Electrical safety CAUTION! The following states how to avoid accidents and injuries due to electric shock: Power tool plugs must match the outlet. Never modify the plug in any way. Do not use any adapter plugs with earthed (grounded) 9
10 G B IE NI C Y power tools. Unmodified plugs and matching outlets will reduce risk of electric shock Avoid body contact with earthed or grounded surfaces, such as pipes, radiators, ranges and refrigerators. There is an increased risk of electric shock if your body is earthed or grounded. Do not expose power tools to rain or wet conditions. Water entering a power tool will increase the risk of electric shock. If the supply cord of this power tool is damaged, it must be replaced by a specially prepared cord available through the service organization. If it is necessary to replace the connection cable, we recommend that this be performed by the manufacturer or an authorised representative (e.g. authorised workshop, customer service, etc.). Do not abuse the cord. Never use the cord for carrying, pulling or unplugging the power tool. Keep cord away from heat, oil, sharp edges or moving parts. Damaged or entangled cords increase the risk of electric shock. When operating a power tool outdoors, use an extension cord suitable for outdoor use. Use of a cord suitable for outdoor use reduces the risk of electric shock. If operating a power tool in a damp location is unavoidable, use a residual current device (RCD) protected supply. Use of an RCD reduces the risk of electric shock. Connect the appliance to a power socket with a residual current circuit breaker of rated residual current no more than 30 ma. Use only approved power cable of type H05RN-F, which are no more than 75 m in length and intended for use outdoors. The conductor cross section of the cord must be at least 2.5 mm 2. Always fully unroll a cable drum before use. Check the power cord for damage. Personal safety CAUTION: In this way you avoid accidents and injuries: Stay alert, watch what you are doing and use common sense when operating a power tool. Do not use a power tool while you are tired or under the influence of drugs, alcohol or medication. A moment of inattention white operating power tools may result in serious personal injury. Wear personal protective equipment and always wear safety glasses. Wearing personal protective equipment such as nonslip safety boots, cut protection trousers, a hard hat or ear protection reduces the risk of injuries. Prevent unintentional starting. Ensure the switch is in the off-position before connecting to power source and/or battery pack, picking up or carrying the tool. Carrying power tools with your finger on the switch or energising power tools that have the switch on invites accidents. Remove any adjusting key or wrench before turning the power tool on. A wrench or a key left attached to a rotating part of the power tool may result in personal injury. Do not overreach. Keep proper footing and balance at all times. This enables better control of the power tool in unexpected situations. 1 0
11 G B IE NI C Y Keep your hair, clothing and gloves away from moving parts. Jewellery or long hair can be caught in moving parts. Warning! During operation, this electric tool generates an electromagnetic field which, under certain circumstances, may impair the functionality of active or passive medical implants. To reduce the risk of serious or lethal injuries, we recommend that persons with medical implants consult their doctor and the manufacturer of their medical implant before operating the machine. Power tool use and care Do not force the power tool. Use the correct power tool for your application. The correct power tool will do the job better and safer at the rate for which it was designed. Do not use the power tool if the switch does not turn it on and off. Any power tool that cannot be controlled with the switch is dangerous and must be repaired. Disconnect the plug from the power source and/or the battery pack from the power tool before making any adjustments, changing accessories, or storing power tools. Such preventive safety measures reduce the risk of starting the power tool accidentaily. Store idle power tools out of the reach of children and do not allow persons unfamiliar with the power tool or these instructions to operate the power tool. Power tools are dangerous in the hands of untrained users. Maintain power tools. Check for misalignment or binding of moving parts, breakage of parts and any other condition that may affect the power tool s operation. If damaged, have the power tool repaired before use. Many accidents are caused by poorly maintained power tools. Keep cutting tools sharp and clean. Properly maintained cutting tools with sharp cutting edges are less Iikely to bind and are easier to control. Use the power tool, accessories and tool bits etc. in accordance with these instructions, taking into account the working conditions and the work to be performed. Use of the power tool for operations different from those intended could result in a hazardous situation. For sawing work on a slope, always stand above the tree trunk. To keep control at the moment of sawing through, reduce the contact pressure at the end of the cut without loosening the firm grip on the chainsaw handles. Ensure that the saw chain does not come into contact with the ground. After completing the cut, wait for the chainsaw to come to a standstill before removing the chainsaw. Always switch off the chainsaw motor before moving from one tree to another. Dirt, stones, loose bark, nails, staples and wire must be removed from the tree. Service Have your power tool serviced by a qualified repair person using only identical replacement parts. This will ensure that the safety of the power tool is maintained. Follow the maintenance, control and service instructions in this manual carefully. 1 1
12 G B IE NI C Y Damaged safety equipment and parts must be repaired or replaced professionally by our service centre, unless otherwise indicated in the operating instructions. Chain saw safety warnings: Keep all parts of the body away from the saw chain when the chain saw is operating. Before you start the chain saw, make sure the saw chain is not contacting anything. A moment of inattention white operating chain saws may cause entanglement of your clothing or body with the saw chain. Always hold the chain saw with your right hand on the rear handle and your left hand on the front handle. Holding the chain saw with a reversed hand configuration increases the risk of personal injury and should never be done. Hold the power tool only on the insulated handle surfaces, as the saw chain may come into contact with concealed power cables. Contact between the saw chain and a live cable may render metallic components live and result in an electric shock Wear safety glasses and ear protection. Other protective equipment for the head, hands, legs and feet is compulsory. Adequate protective clothing will reduce personal injury by flying debris or accidentai contact with the saw chain. Do not operate a chain saw in a tree. Operation of a chain saw white up in a tree may result in personal in jury. Always keep proper footing and operate the chain saw only when standing on fixed, secure and level surface. Slippery or unstable surfaces such as ladders may cause a loss of balance or control of the chain saw. When cutting a branch that is under tension be alert for spring back. When the tension in the wood fibres is released the spring loaded Iimb may strike the operator and/or throw the chain saw out of control. Use extreme caution when cutting brush and saplings. The slender material may catch the saw chain and be whipped toward you or pull you off balance. Carry the chain saw by the front handle with the chain saw switched off and away from your body. When transporting or storing the chain saw always fit the guide bar cover. Proper handling of the chain saw will reduce the Iikelihood of accidentai contact with the moving saw chain. Follow instructions for lubricating, chain tensioning and changing accessories. Improperly tensioned or lubricated chain may either break or increase the chance for kickback. Keep handles dry, clean, and free from oil and grease. Greasy, oily handles are slippery causing loss of control. Cut wood only. Do not use chain saw for purposes not intended. For example: do not use chain saw for cutting plastic, masonry or non-wood building materials. Use of the chain saw for operations different than intended could result in a hazardous situation 1 2
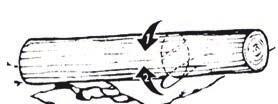
13 G B IE NI C Y Causes and operator prevention of kickback Beware of kickback! Be careful of kickback of the machine during work. There is danger of injury here. You can avoid kickbacks by exercising caution and using a correct sawing technique. Fig. 1 Kickback may occur when the nose or tip of the guide bar touches an object, or when the wood closes in and pinches the saw chain in the cut (cf. image 1/fig. B). Tip contact in some cases may cause a sudden reverse reaction, kicking the guide bar up and back towards the operator (cf. image 1/fig. A). Pinching the saw chain along the top of the guide bar may push the guide bar rapidly back towards the operator. Either of these reactions may cause you to lose control of the saw which could result in serious personal injury. Do not rely exclusively upon the safety devices built into your saw. As a chain saw user, you should take several steps to keep your cutting jobs free from accident or injury. Kickback is the result of tool misuse and/ or incorrect operating procedures or conditions and can be avoided by taking proper precautions as given below: Maintain a firm grip, with thumbs and fingers encircling the chain saw handles, with both hands on the saw and position your body and arm to allow you to resist kickback forces. Kickback forces can be controlled by the operator, if proper precautions are taken. Do not let go of the chain saw. Do not overreach and do not cut above shoulder height. This helps prevent unintended tip contact and enables better control of the chain saw in unexpected situations. Only use replacement bars and chains specified by the manufacturer. Incorrect replacement bars and chains may cause chain breakage and/or kickback. Follow the manufacturer s sharpening and maintenance instructions for the saw chain. Decreasing the depth gauge height can lead to increased kickback. Residual risks Even if properly operating and handling this electric tool, some residual risks will remain. Due to its construction and build, this electric tool may present the following hazards: a) Cuts b) Ear damage if working without ear protection. c) Damage to your health caused by swinging your hands and arms when operating the appliance for longer periods of time or if the unit is not held or maintained properly. Warning! During operation, this electric tool generates an electromagnetic field which, under certain circumstances, may impair the 1 3
14 G B IE NI C Y functionality of active or passive medical implants. To reduce the risk of serious or lethal injuries, we recommend that persons with medical implants consult their doctor and the manufacturer of their medical implant before operating the machine. Further safety directions If the supply cord of this power tool is damaged, it must be replaced by a specially prepared cord available through the service organization. If it is necessary to replace the connection cable, we recommend that this be performed by the manufacturer or an authorised representative (e.g. authorised workshop, customer service, etc.). Lay the extension cable in such a way that it will not be caught by branches or similar during sawing. Use a surge protector with a release current of 30 ma or less. Comply carefully with maintenance, control and service instructions in this manual. Damaged protective devices and parts have to be repared or changed except as noted otherwise in this manual. Safety functions A 1 Rear grip with hand guard (16) Protects the hand against branches and boughs in the case of springing away by the chain. 3 Chain braking lever/ hand guard Control system, which stops the saw chain immediately in case of a spring-back; lever can also be activated manually; protects the left hand of the operator if it slides from the front grip. The motor cannot be turned on if the chain brake has engaged. 5 Saw chain with small spring-back Helps you to catch spring-backs with specially developed control systems. 7 Metal stop claw Reinforces the stability when vertical cuts are carried out and facilitates sawing. 9 Electric motor Double insulated for safety reasons. 10 On-off switch with safety chain brake On releasing the On/Off switch, the device immediately switches off. 11 Switch-on block The switch-on block must be released for switching on the device. 12 Chain catcher Decreases the danger of injuries if the chain breaks or if it comes off. Assembly Always wear protective gloves when working with the chainsaw and employ only original parts. Pull out the power plug before doing any work on the chainsaw itself - injury hazard! Before putting the electric chain saw into operation, you must: - install the blade, saw chain and chain cover where necessary, - adjust the saw chain tension, - pour in chain oil, - check the function of the chain brake and the automatic oil pump. 1 4
15 G B IE NI C Y Mount the saw chain G 1. Spread the chain (5) out into a loop with the cutting edges running clockwise. 2. Relax the tensioning screw (24) against the clockwise direction. 3. Slide the saw chain (5) into the bar guide groove. To mount the guide bar (4), raise it to an angle of approx. 45 degrees. This will make it easier to replace the saw chain (5) onto the sprocket (25). It is normal that the saw chain (5) is slack. Sagging in the chain is normal. 4. Pre-tighten the chain (5) by turning the tensioning plate (24) clockwise. 5. Position the sprocket chain wheel covering (15). First place the tab (26) on the cover into the corresponding notch on the plate (15). Only lightly tighten the fastening bolt (14), as you will still have to tension the saw. Note that the saw can re-oil. Please note that the saw re-oils after use and oil may leak out if it is stored on its side or on the head. This is a normal process due to the necessary ventilation opening on the upper edge of the tank and does not constitute a reason for complaint. As each saw is checked during production and tested with oil, a small residue may be in the tank despite draining, which may slightly dirty the housing with oil in transit. Please clean the housing with a cloth. Prior to changing the chain, the nut of the guide rail must be cleaned of dirt because dirt deposits available can cause the chain to break out of the rail. The deposits can also absorb the chain oil. So the consequence would be that the chain oil would not or only a small part of it would reach the underside of the rail and the lubrication would be reduced. Mount the saw bar F 1. Lay the saw on a flat surface. 2. Turn the fastening bolt (14) anticlockwise ( ) to remove the sprocket chain wheel covering (15). 3. To fit the new bar, place the bar (4) onto the bar bolt (23) with the tensioning plate pointing outwards (24). Tensioning the saw chain Regularly tightening the saw chain provides safety for the user and reduces and/or prevents wear and chain damages. Before the start of work and in approx. 10 minute intervals, we recommend the user to examine the chain tension and correct it, if necessary. The chain warms up when working with the saw and thus expands slightly. These expansions can be expected especially from newer chains. Do not re-tighten or change the chain when it is hot because it shrinks slightly once it has cooled down. In case of non-observance, this can lead to damages on the guide rail or the engine because now the chain is too taut on the blade. Chain tension and chain lubrication have a significant impact on the service life of the chain. 1 5
16 G B IE NI C Y The chain is correctly tensioned if it does not sag at the rail underside and can be rotated completely around with the gloved hand. When the saw chain is tensioned with 9 N (approx. 1 kg), the gap between the saw chain and the guide rail may not be more than 2 mm. B 10 min 1. Ensure that the chain brake has been released, that is, that the chain brake lever (3) is pulled up against the front grip (8) (position I). 2. Unscrew the fastening bolt (14) ( ). 3. To tighten the saw, turn the chain adjustment ring (13) clockwise. To loosen the tension, turn the chain adjustment ring anti-clockwise. 4. Tighten up the fastening bolt (14) again ( ). With a new saw chain, you must readjust the chain tension after at least 5 cutting operations. Chain lubrication The rail and chain must never be without oil. If you operate the electric chainsaw with too little oil, the cutting performance and the lifetime of the saw chain is reduced, since the chain becomes blunt faster. You can identify a case of too little oil where smoke development or discoloration of the rail occurs. As soon as the motor is speeded up, the oil also flows faster to the chain bar ( A 4). Filling up with chain oil: Check the oil level indicator ( C 21) regularly and top-up the oil if the minimum mark MIN ( C 22) is reached on the oil level indicator. The oil tank holds about 190 ml of oil. Use Parkside bio-oil; this product contains additives that reduce wear and tear and does not damage the pump system. bio-oil is available from our Service-Center. If you have no Grizzly bio-oil available, use chain lubrication oil with low adhesive additive content. Empty the oil tank before longer periods (6-8 weeks) of non-use. C 1. Unscrew the oil fill cap (2) and fill up with chain oil. 2. Wipe off any spilled oil and close the cap (2) again. Always switch off the device and allow the motor to cool before filling with chain oil. There is a risk of fire if oil overflows. Operating the chainsaw Switch on the chainsaw only when chain bar, saw chain and sprocket chain wheel covering are correctly assembled. Ensure the voltage of the mains connection agrees with the label on the device. Make sure you have a secure stance. Make sure before you start that the electric chain saw is not touching anything. Caution! Saw can oil up, see notes on Assembly - Mount the saw chain 1 6
17 G B IE NI C Y Switching on D 1. Check before the start, whether sufficient chain oil is in the tank and, if necessary, refill with chain oil (see Chapter Operation Startup). 2. Connect the device to the mains voltage. 3. Release the chain brake, where you shift the brake arm (3) back against the front grip (8) (position I). 4. Hold the electric chainsaw firmly with both hands, with the right hand on the rear grip (1) and the left hand on the front handle (8). Thumb and finger must close securely over the handles. 5. For switching on, activate the switch-on block (11) with the right thumb and then press the On/Off switch (10), the electric power saw runs with highest speed. Release the switch-on block (11)again. 6. The power saw switches off when you release the On/Off switch (10) again. Switching for continuous running is not possible. Checking the chain brake E The motor cannot be turned on if the chain brake has engaged. Do not employ the chain brake in order to start the chainsaw or to switch it off. 1. Place the electric chainsaw onto a solid, flat surface. It must not contact any objects. 2. Connect the device to the mains voltage. 3. Release the chain brake by shifting the brake arm (3) over against the front grip (8) (position I). 4. Hold the electric chainsaw firmly with both hands, with the right hand on the rear handle ( A 1) and the left hand on the front handle (8). Thumb and finger must close securely over the handles. 5. Turn on the electric chainsaw. 6. Activate the chain braking lever (3), with running motor, with the left hand. To do so, push the chain braking lever/front hand protection (3) away from the front handle (8) (position O). Chain should stop abruptly. 7. Once the chain brake is working properly, release the on/off switch and the chain brake. If the chain brake does not function correctly, you must not use the electric chainsaw. A slack saw chain leads to danger of injury. Return the electric chainsaw to our Service-Center for repair. Checking the chain lubrication Check the oil level and the chain lubrication system before commencement of work. Switch on the chainsaw and hold it above a bright background. The saw must not touch the ground. If an oil trace can be seen, the chainsaw is working trouble-free. If no oil trace can be seen clean the oil passages or turn the chainsaw to our Service-Center for repair. 1 7
18 G B IE NI C Y J 4. Clean the oil passages of the chain bar (27), in order to guarantee a trouble-free, automatic oiling of the saw chain during operation. Use a brush or a cloth to help remove residues from the oil passage. Changing the saw bar F 1. Switch the saw off and unplug it from the mains ( A 18). 2. Lay the saw on a flat surface. 3. Turn the fastening bolt (14) anticlockwise ( ) and loose the chain adjustment ring ( A 13) to remove the sprocket chain wheel covering (15). 4. Remove the saw bar (4) and saw chain (5). To remove the guide bar (4), raise it to an angle of approx. 45 degrees. This will make it easier to take the saw chain (5) off the sprocket (25). 5. Loosen the screw (28) on the reverse side of the tension adjustment screw (24). Re-install the tension adjustment screw (24) in reverse order. In doing so, ensure that the tension adjustment screw bolt (29), as shown in Figure, is underneath (see also turn blade + ). 6. To fit the new bar, place the bar (4) onto the bar bolt (23) with the tensioning plate pointing outwards (24). Sawing techniques General You have better control when you saw with the bottom side of the chain bar (with pulling saw chain) and not to with the top side of the chain bar (with pushing saw chain). The saw chain must not contact either the ground or another object during sawing through or after sawing completion. Make sure that the saw chain does not become jammed in the wood. Do not let the tree trunk break or split off. Consider also the precautions against spring-back (see notes on safety). If the saw chain jams, you do not attempt to pull out the electric chainsaw using power. There is a danger of injury here. Switch off the motor and use a lever or wedge to free the electric chainsaw. Felling trees A lot of experience is necessary in felling trees. Cut down trees only when you can safely handle the electric chainsaw. In no case should you use the electric chainsaw if you feel unsure about anything. For safety reasons, we advise inexperienced users not to fell any logs with a rail length which is smaller than the trunk diameter. Ensure that no people or animals are in the field of action. The safety distance between the tree to be felled and the nearest-located workplace must be 2 ½ tree lengths. Note the felling direction: The user must be able to move safely near the felled tree, to saw off the tree easily and remove branches.it is to be avoided that the felled tree snags itself 1 8
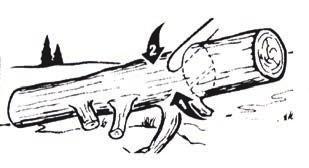
19 G B IE NI C Y on another tree. Note the natural felling direction, which is dependent on the slope and curvature characteristic of the tree, wind direction and the number of branches. In the case of sloping ground, stand above the tree to be felled. Small trees, with a diameter of cm, can usually be sawn off with one cut. In case of trees with a larger diameter, a notched cut and a back cut must be implemented (see diagram Q ). Do not fell any trees when a strong or changing wind is blowing, if the danger of property damage exists or if the tree could fall on electric wires. Immediately after termination of the sawing procedure, remove the ear protection so that you can hear hooter and alarm signals. O 1. Removal of branches: Remove hanging branches by positioning the cut from above the branch. With removal of branches, never work higher than shoulder level. P Q 2. Escape area: Remove the undergrowth around the tree to ensure an easy escape. The escape area (1) should be around 45 either side behind the planned felling direction (2). Q R S 3. Cutting notch (A): Make a felling notch in the direction in which you wish the tree to fall. Start with the bottom, horizontal cut. The cut depth should be around 1/3 of the trunk diameter. Now make a slanted saw cut from above at an angle of roughly 45 to meet exactly with the bottom saw cut. Never step in front of a tree which is notched. 4. Felling back cut (B): Make the back cut from the other side of the log, where you stand to the left of the log and saw with the chainsaw pulling. The back cut must run horizontally 5 cm above the horizontal notched cut. The back cut should be so deep that the separation distance between the back cut and the notch cutting line is at least 1/10 of the trunk diameter. The part of the log not sawed through is designated as a break dimension. 5. Insert a felling wedge or a crowbar into the back cut, as soon as the depth of cut permits this, in order to prevent a jamming of the chain bar. 6. If the trunk diameter is larger than the length of the chain bar, make two cuts. 7. After carrying out of the back cut, the tree falls by itself or with the aid of the felling wedge or crowbar. As soon as the tree begins to fall, pull out the saw from the section, stop the motor, place the electric chainsaw down and leave the workplace using the withdrawal path. 1 9
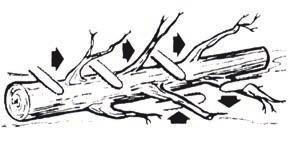
20 G B IE NI C Y O Limbing Limbing is the designation for the sawing off of branches and boughs from a felled tree. Many accidents occur during the removal of branches. Never cut tree limbs when you are standing on the log. Keep the spring-back area in mind if branches are under tension. Do not remove support branches until after the sawing off. Branches under tension must be sawed from below to above, in order to prevent jamming of the chainsaw. When working on thicker branches, use the same technique as when you are sawing up a felled trunk. Work to the left of the log and as near as possible to the electric chainsaw. As far as possible, the weight of the saw should rest on the log. Change position to saw off branches on the other side of the trunk. Branches sticking out are cut off separately. Bucking This refers to sawing up a felled tree trunk into smaller sections. Ensure that the saw chain does not come in contact with the ground during sawing. Make sure you have a secure stance and, in the case of sloping ground, stand above the log. K 1. Log is lying on the ground: Saw through the log completely from above and ensure at the end of the cut not to contact the ground. If you can turn the tree trunk, saw two-thirds of the way through it. Then turn the trunk around and saw the rest of the way through from above. L M N 2. Log is supported at one end: Start sawing from the bottom and work your way up (with the upper edge of the bar) a third of the way into the diameter of the trunk to prevent splitting. Then saw from the top downwards with the lower edge of the bar towards the first cut to prevent the bar from becoming jammed in the wood. 3. Log is supported at both ends: Start from the top and work down (with the lower edge of the bar) to a third of the diameter of the trunk. Then saw from underneath with the upper edge of the bar until the two cuts meet. 4. Sawing on a sawhorse: Hold the electric chainsaw steady with both hands, keeping the saw in front of you while sawing. Once the saw is through the wood, guide the machine passed you on the right (1). Hold your left arm as straight as you can (2). Watch out for the falling trunk. Position yourself to prevent any danger from the separated trunk. Watch your feet. The trunk may cause injuries when falling. Keep your balance (3). Maintenance and cleaning Basically, carry out maintenance and cleaning works with switched-off motor and power plug removed. Danger of injury! Leave any maintenance and servicing work not covered by this manual to our Service-Center. Use only original spare parts. 2 0
21 G B IE NI C Y Cleaning Allow the machine to cool down before all maintenance and cleaning works. Danger of burn injuries! Clean the machine thoroughly after every use. In this way, you extend the life of the machine and avoid accidents. Keep the gripping handles free of petrol, oil or grease. Clean the gripping handles, where appropriate, with a moist cloth soaked in soap. Use no solvents or petrol for cleaning! Clean the saw chain after every use. Use a paint brush or wipe for that. Do not use any liquids to clean the chain. After cleaning, oil the chain lightly with chain oil. When cleaning, also remove the chain wheel cover ( A 15) so that this area can be cleaned as well. Clean the chain bar (Guide) ( A 4). Clean the ventilation slots and the surfaces of the machine with a paint brush, whisk or dry cloth. Do not use any liquids for cleaning. Clean the oil passages of the chain bar ( 27), in order to guarantee a troublefree, automatic oiling of the saw chain during operation. Maintenance intervals Regularly carry out the maintenance operations listed in the following table. The life of the saw is extended by regular maintenance of your chainsaw. Furthermore, you get optimum cutting performance and avoid accidents. Maintenance Interval Table Machine part Action Before every use Components of the chain brake Check, replace if required After 10 hours of operation After every use Sprocket chain wheel ( 25) Check, replace if required Saw chain ( A 5) Check oil, regrind or replace if required Saw chain ( A 5) Clean and oil Guide bar ( A 4) Check, clean and oil Guide bar ( A 4) turn around Oil automatic system check and, where appropriate, clean oil outflow duct 2 1
22 G B IE NI C Y Oiling the saw chain Clean and oil the chain regularly. In this way, you keep the chain sharp and get optimum machine performance. In case of damage due to inadequate maintenance of the saw chain, the guarantee claim is invalid. Remove the power plug and use cutprotection gloves when you are handling the chain or the chain bar. Oil the chain after cleaning, after 10 hours of use or at least once weekly, depending on which comes first. Before oiling, the chain bar must be cleaned thoroughly, in particular the teeth of the rail. Use a whisk and a dry cloth for that. Oil the individual chain links with the aid of an oil suction gun with pinpoint tip (available in the specialist trade). Place individual oil drops onto the articulated links and onto the tooth tips of the individual chain links. Sharpening the saw chain An incorrectly sharpened saw chain increases the danger of spring-back! Use cut-protection gloves when you are handling the chain or the chain bar. A sharp chain guarantees an optimal cutting performance. It eats effortlessly through the wood and leaves large, long wooden chips. A saw chain is blunt if you have to press the cutting equipment through the wood and the wooden chips are very small. In the case of a very blunt saw chain, no chip cuttings result at all, only sawdust. The sawing parts of the chain are the cutting elements, which consist of a cutting tooth and a depth limiting projection. The vertical separation distance between these two determines the sharpness depth. The following values must be noted in sharpening the cutting teeth: H - Sharp edge angle (30 ) - Breast angle (85 ) - Sharpness depth (0.65 mm) Deviations from the measurement data of the cutting geometry can lead to an increase of the spring-back slope of the machine. Increased danger of accident! Special tools are necessary for sharpening the chain, which guarantee that the cutting edges are sharpened at the correct angle and to the correct depth. For the inexperienced user of chainsaws, we recommend to have the saw chain sharpened by a specialist or a specialist workshop. If you think yourself capable of sharpening the chain, you can acquire the special tools in the specialist trade. I 1. Switch the saw off and unplug it from the mains. 2. Remove the saw chain (refer to the section on operating the saw). The chain should be well-tensioned to ensure proper sharpening. 3. For the sharpening, a round file with 4.0 mm diameter is necessary. Other diameters damage the chain and can lead to danger during work! 2 2
23 G B IE NI C Y 4. Sharpen only from the inside to the outside. Guide the file from the inner side of the cutting teeth to the outer side. Lift the file when you are withdrawing it. 5. Sharpen first the teeth on one side. Turn the saw around and sharpen the teeth of the other side. 6. The chain is worn and must be replaced by a new saw chain if only approx. 4 mm of the cutting teeth is remaining. 7. After the sharpening, all cutting elements must now be equal in length and width. 8. After every third sharpening, the sharpness depth (depth limitation) must be checked and the height filed with the aid of a flat file. The depth limitation should be set back about 0.65 mm from the cutting tooth. After the setting back of depth limitation, round it off a little at the front. Adjusting the chain tension The adjustment of the chain tension is described in the chapter: Assembly, tensioning chainsaw. Starting up a new saw chain In the case of a new chain, the tensioning force decreases after some time. Therefore, you have to re-tension the chain after the first 5 cuts and no later than after 10 minutes sawing time. Never attach a new chain to a worn drive pinion or place onto a damaged or worn chain bar. The chain could spring back or break, potentially leading to serious injury. Maintaining the chain bar Use cut-protection gloves when handling the chain or the chain bar. 1. Switch off the saw and pull out the power plug ( A 18). 2. Remove the sprocket chain wheel covering ( A 15), the saw chain ( A 5) and the chain bar ( A 4). 3. Check the chain bar ( A 4) for wear. Remove burrs and straighten the guide surfaces with a flat file. 4. Clean the oil passages ( J 27) of the chain bar, in order to guarantee a trouble-free, automatic oiling of the saw chain during operation. 5. Mount chain bar ( A 4), chainsaw ( A 5) and sprocket chain wheel covering ( A 15) and tighten the chainsaw. With the oil nozzles in good condition and the oil regulator set correctly, the saw chain will spray a little oil off after starting. Turn the chain bar Use cut-protection gloves when handling the chain or the chain bar. The blade ( A 4) has to be reversed regularly after a working time of approximately 10 hours in order to ensure even wear. 1. Switch off the saw and pull out the power plug ( A 18). 2. Remove the sprocket chain wheel covering ( A 15), the saw chain ( A 5) and the chain bar ( A 4). 3. Put the sword (4) front and rotate it on the back. Loosen the fixation 2 3
24 G B IE NI C Y F screw (28) and remove the tensioning plate (24). 4. Attach the tensioning plate (24) with the fixing screw (28) from the other side to the sword (4). This, make sure that the clamping screw bolt (29) is down. The round nose (24a) the clamping screw sprocket must point in the direction. 5. Mount chain bar (4), chainsaw (5) and sprocket chain wheel covering (15) and tighten the chainsaw. Direction of travel of the saw chain Use the graphical symbol below the chain sprocket cover ( 15) as a guide to the alignment of the saw chain ( 5) when the blade is rotated. The illustrated direction of travel on the blade is no longer true. Storage Clean the device prior to storage. Empty the oil tank prior to longer periods of non-use. Dispose of used oil in an environmentally-responsible way (see Disposal/Environmental Protection ). Attach the protective blade cover. Store the device in a dry and dustproof location and out of reach of children. Waste disposal and environmental protection Do not dispose of used oil in the sewage system or drains. Dispose of used oil in an environmentally correct manner - bring it to a waste disposal center. Be environmentally friendly. Return the tool, accessories and packaging to a recycling centre when you have finished with them. Machines do not belong with domestic waste. Labelled products must not be disposed of with normal household waste but must be returned to a collection point for the recycling of electrical and electronic equipment. Recycling helps to reduce both the consumption of raw materials and the environmental impact. Information about disposal and the location of the nearest recycling centre may be obtained, for example, from your local waste management department or from Yellow Pages. Empty the oil tank carefully and hand in your electric chainsaw at a disposal center. The plastic and metal parts employed can be separated out and thus recycled use can be implemented. Ask our Service- Center for details. 2 4
25 G B IE NI C Y Replacement parts/accessories Spare parts and accessories can be obtained at If you do not have internet access, please contact the Service Centre via telephone (see Service-Center Page 28). Please have the order number mentioned below ready. Oil filler cap Saw chain Oregon 91P057X Saw chain Oregon 91VXL Chain bar Bio chain oil 1 liter Bio chain oil 5 liter The Oregon replacement saw chain is to be used only in conjunction with the associated Oregon blade and the electric chainsaw approved for this. There is a risk of injury. 2 5
26 G B IE NI C Y Trouble shooting Problem Possible cause Fault correction Chain brake locked into place. Check chain brake. Possibly release chain brake Device does not start Chain does not rotate Inferior cutting performance Saw runs with difficulty, chain comes off Chain becomes hot, smoke development during sawing, discoloration of the rail Mains voltage defective House protection fuse activated Defective On/Off switch ( A 10) Worn carbon brushes Defective motor Chain brake blocks saw chain ( A 5) Incorrectly mounted saw chain ( A 5) Saw chain ( A 5) blunt Chain tension insufficient Chain tension insufficient Too little chain oil Check plug socket, cable, line and plug, where appropriate, repair by electrical specialist. Check house protection fuse, see note Repair by customer service Repair by customer service Repair by customer service Check chain brake. Possibly release chain brake Mount saw chain correctly Sharpen cutting teeth or place on new chain Check chain tension Check chain tension Check oil level and, where appropriate, refill with chain oil, check oil automatic system and, where appropriate, clean oil outflow duct or have repaired by customer service 2 6
27 G B IE NI C Y Guarantee Dear Customer, This equipment is provided with a 3-year guarantee from the date of purchase. In case of defects, you have statutory rights against the seller of the product. These statutory rights are not restricted by our guarantee presented below. Terms of Guarantee The term of the guarantee begins on the date of purchase. Please retain the original receipt. This document is required as proof of purchase. If a material or manufacturing defect occurs within three years of the date of purchase of this product, we will repair or replace at our choice the product for you free of charge. This guarantee requires the defective equipment and proof of purchase to be presented within the three-year period with a brief written description of what constitutes the defect and when it occurred. If the defect is covered by our guarantee, you will receive either the repaired product or a new product. No new guarantee period begins on repair or replacement of the product. Guarantee Period and Statutory Claims for Defects The guarantee period is not extended by the guarantee service. This also applies for replaced or repaired parts. Any damages and defects already present at the time of purchase must be reported immediately after unpacking. Repairs arising after expiry of the guarantee period are chargeable. Guarantee Cover The equipment has been carefully produced in accordance with strict quality guidelines and conscientiously checked prior to delivery. The guarantee applies for all material and manufacturing defects. This guarantee does not extend to cover product parts that are subject to normal wear and may therefore be considered as wearing parts (e.g. saw chain) or to cover damage to breakable parts (e.g. switches). This guarantee shall be invalid if the product has been damaged, used incorrectly or not maintained. Precise adherence to all of the instructions specified in the operating manual is required for proper use of the product. Intended uses and actions against which the operating manual advises or warns must be categorically avoided. The product is designed only for private and not commercial use. The guarantee will be invalidated in case of misuse or improper handling, use of force, or interventions not undertaken by our authorised service branch. Processing in Case of Guarantee To ensure quick handling of you issue, please follow the following directions: Please have the receipt and item number (IAN ) ready as proof of purchase for all enquiries. Please find the item number on the rating plate. Should functional errors or other defects occur, please initially contact the service department specified below by telephone or by . You will then receive further information on the processing of your complaint. After consultation with our customer service, a product recorded as defective can be sent postage paid to the service address communicated to you, 2 7
28 G B IE NI C Y with the proof of purchase (receipt) and specification of what constitutes the defect and when it occurred. In order to avoid acceptance problems and additional costs, please be sure to use only the address communicated to you. Ensure that the consignment is not sent carriage forward or by bulky goods, express or other special freight. Please send the equipment inc. all accessories supplied at the time of purchase and ensure adequate, safe transport packaging. Repair Service For a charge, repairs not covered by the guarantee can be carried out by our service branch, which will be happy to issue a cost estimate for you. We can handle only equipment that has been sent with adequate packaging and postage. Attention: Please send your equipment to our service branch in clean condition and with an indication of the defect. Equipment sent carriage forward or by bulky goods, express or other special freight will not be accepted. We will dispose of your defective devices free of charge when you send them to us. Service-Center G IE NI C Y B Service Great Britain Tel.: ( 0.10/Min.) grizzly@lidl.co.uk IAN Service Ireland Service Northern Ireland Tel.: (0,08 EUR/Min., (peak)) (0,06 EUR/Min., (off peak)) grizzly@lidl.ie IAN Service Cyprus Tel.: grizzly@lidl.com.cy IAN Importer Please note that the following address is not a service address. Please initially contact the service centre specified above. Grizzly Tools GmbH & Co. KG Stockstädter Straße Großostheim Germany 2 8
29 G R C Y Περιεχόμενα εισαγωγή Ρύθμιση του... τανύσματος... Σκοπός χρήσης της αλυσίδας Γενική περιγραφή Προσαρμογή νέας πριονοαλυσίδας 52 Παραδοτέα υλικά...30 Συντήρηση κατευθυντήριας λάμας...52 Σύνοψη Αναποδογύρισμα κατευθυντήριας Περιγραφή λειτουργίας λάμας...52 Τεχνικά χαρακτηριστικά Φύλαξη Υποδείξεις ασφαλείας Απόσυρση και προστασία του Επιγραφές πάνω στη συσκευή...32 περιβάλλοντος Σύμβολα στις οδηγίες...33 Ανταλλακτικά Γενικές υποδείξεις ασφαλείας...33 Ανίχνευση βλαβών Γενικές υποδείξεις ασφαλείας για Εγγύηση ηλεκτρικά εργαλεία...34 Σέρβις επισκευής Μέτρα ασφαλείας κατά αντίκρουσης.38 Service-Center ΥΠΟΛΕΙΠΟΜΕΝΟΙ ΚΙΝΔΥΝΟΙ...39 εισαγωγέας Περαιτέρω υποδείξεις ασφαλείας...40 Μετάφραση της πρωτότυπης Λειτουργίες ασφαλείας Δήλωσης συμμόρφωσης CE Συναρμολόγηση Επί... μέρoυς σχεδιαγράμματα Συναρμολόγηση αλυσίδας...41 Συναρμολόγηση εισαγωγή κατευθυντήριας λάμας...42 Τάνυσμα της πριονοαλυσίδας Συγχαρητήρια για την αγορά της νέας Λίπανση αλυσίδας συσκευής σας. Προτιμήσατε να αγοράσετε Χειρισμός του αλυσοπρίονου ένα προϊόν ανώτερης ποιότητας. Ενεργοποίηση Η ποιότητα αυτής της συσκευής Έλεγχος του φρένου αλυσίδας ελέγχθηκε κατά τη διάρκεια της Έλεγχος της αυτόματης διάταξης παραγωγής, αλλά και σε τελικό έλεγχο. ρύθμισης λαδιού Με τον τρόπο αυτό εξασφαλίστηκε η Αντικατάσταση λόγχης...45 λειτουργικότητα της συσκευής σας. Τεχνικές πριονίσματος Γενικά Οι οδηγίες χρήσης αποτελούν Κόψιμο δέντρων αναπόσπαστο τμήμα αυτού του Κλάδεμα προϊόντος. Περιέχουν σημαντικές υποδείξεις Κόντεμα για την ασφάλεια, τη χρήση και διάθεση της Συντήρηση και καθαρισμός συσκευής. Πριν τη χρήση του προϊόντος Καθαρισμός να εξοικειωθείτε με όλες τις οδηγίες Διαστήματα συντήρησης χειρισμούς και τις υποδείξεις ασφαλείας. Πίνακας διαστήματα συντήρησης Να χρησιμοποιείτε το προϊόν μόνο όπως Λίπανση της πριονοαλυσίδας περιγράφεται και μόνο για τον αναφερόμενο Ακόνισμα της πριονοαλυσίδας σκοπό. Να φυλάξετε καλά τις οδηγίες και να τις παραδώσετε σε τρίτους μαζί με το προϊόν. 2 9
30 G R C Y Σκοπός χρήσης Το ηλεκτρικό αλυσοπρίονο είναι κατασκευασμένο μόνο για το πριόνισμα ξύλου. Το πριόνι δεν προβλέπεται για άλλα είδη χρήσης (π.χ. πριόνισμα τοίχων, πλαστικών ή τροφίμων). Το αλυσοπρίονο προορίζεται για τη χρησιμοποίηση στον τομέα εργασιών ερασιτέχνη τεχνίτη. Δεν κατασκευάστηκε για την επαγγελματική διαρκή χρησιμοποίηση. Η συσκευή προορίζεται για την χρήση από ενήλικους. Έφηβοι άνω των 16 ετών επιτρέπεται να χρησιμοποιήσουν το αλυσοπρίονο μόνο κάτω από την εποπτεία ενηλίκων. Ο κατασκευαστής δεν φέρει ευθύνη για ζημιές οι οποίες προκλήθηκαν λόγω μη σύμφωνης με τους κανονισμούς χρήσης ή λάθους χειρισμού. Αυτό το ηλεκτρικό αλυσοπρίονο να χρησιμοποιείται μόνο από ένα άτομο και μόνο για ξύλα. Να κρατάτε το αλυσοπρίονο πάντα με το δεξί σας χέρι στην πίσω λαβή και με το αριστερό χέρι στην μπροστινή λαβή. Πριν τη χρήση του αλυσοπρίονου ο χρήστης πρέπει να διαβάσει όλες τις υποδείξεις και τις οδηγίες χρήσης. Ο χρήστης πρέπει να χρησιμοποιεί κατάλληλα μέσα ατομικής προστασίας (ΜΑΠ). Με το αλυσοπρίονο επιτρέπεται να κόβετε μόνο ξύλα. Δεν επιτρέπεται η επεξεργασία υλικών όπως π.χ. πλαστικό, πέτρα, μέταλλο ή ξύλο με ξένα αντικείμενα (για παράδειγμα καρφιά ή βίδες)! Γενική περιγραφή Τις εικόνες για το χειρισμό και τη συντήρηση θα τις βρείτε στο μπροστινό αναδιπλούμενο εξώφυλλο. Παραδοτέα υλικά Βγάλτε τη συσκευή από τη συσκευασία και ελέγξτε, αν είναι πλήρης. Διαθέστε τα υλικά συσκευασίας σύμφωνα με τους κανονισμούς. - Ηλεκτρικό αλυσοπρίονο - Λόγχη (οδηγητική ράγα) (ήδη συναρμολογημένο) - Πριονοαλυσίδα (ήδη συναρμολογημένο) - προστατευτική θήκη κατευθυντήριας λάμας - Φιάλη λαδιού με 180 ml βιολογικό λάδι αλυσίδων - Οδηγιών χρήσης Σύνοψη A 1 Πισινή λαβή 2 Σκέπασμα ντεπόζιτου λαδιού 3 Μοχλός φρένου αλυσίδας/ μπροστινό προστατευτικό χεριού 4 Λόγχη (οδηγητική ράγα) 5 Πριονοαλυσίδα 6 Oδηγητικός αστέρας 7 Αναστολέας γάντζων 8 Μπροστινή λαβή 9 Ηλεκτροκινητήρας 10 Διακόπτης ενεργοποίησης/απενεργοποίησης 11 Μπλοκάρισμα ενεργοποίησης 12 Πίρος ασφαλείας αλυσίδας 13 Δακτύλιος τανύσματος αλυσίδας 14 Βίδα στερέωσης καλύμματος αλυσοτροχού 15 καλύμματος αλυσοτροχού 16 Πισινό προστατευτικό χεριού 18 Καλώδιο δικτύου 19 προστατευτική θήκη κατευθυντήριας λάμας 20 Μπουκάλι λάδι 3 0
31 G R C Y C F G 21 Ένδειξη στάθμης λαδιού 22 Σήμανση ελάχιστου «MIN» της ένδειξης στάθμης λαδιού 23 Προστατευτική θήκη λόγχηςι 24 Κάλυμμα αλυσοτροχού 25 πλάκα τανύσματος 26 εγκοπή στη συσκευή J 27 κατά τη λειτουργία 28 Βίδα στερέωσης 29 Μπουλόνι κοχλία σύσφιξης Περιγραφή λειτουργίας Το αλυσοπρίονο διαθέτει για τη μετάδοση κίνησης έναν ηλεκτροκινητήρα. Η περιμετρική αλυσίδα οδηγείται μέσω λόγχης (οδηγητική ράγα). Η συσκευή είναι εξοπλισμένη με σύστημα γρήγορου τανύσματος και φρένο αλυσίδας με άμεσο στοπ. Το αυτόματο σύστημα λαδιού φροντίζει για τη συνεχή λίπανση της αλυσίδας. Για την προστασία του χρήστη το αλυσοπρίονο διαθέτει διάφορες προστατευτικές διατάξεις. Τις λειτουργίες των στοιχείων λειτουργίας θα τις βρείτε στις ακόλουθες περιγραφές. Τεχνικά χαρακτηριστικά ηλεκτρικό αλυσοπρίονο...fks 2200 F3 Ονομαστική τάση εισόδου U V~, 50 Hz Κατανάλωση ισχύος P Watt Κατηγορία προστασίας... II Είδoς προστασίας... IP20 Ταχύτητα αλυσίδας v ,3 m/s Βάρος (χωρίς οδηγητική ράγα και αλυσίδα)...5 kg Βάρος (με οδηγητική ράγα και αλυσίδα)... 5,9 kg Το ντεπόζιτο λαδιού χωράε..περίπ. 190 ml Αλυσίδα...Oregon 91P057X... επιχρωμιωμένο δόντι, μικρή αναστρ. κίνηση Λόγχη...Oregon 16 DOUBLE-GUARD 160SDEA Απόσταση αλυσίδας...10 mm Πάχος αλυσίδας...1,3 mm Δόντια του αλυσοτροχού...7 Λόγχη (οδηγητική ράγα) mm Μήκος κοπής (ανώτατα) mm Στάθμη πίεσης ήχου (L pa )... 84,9 db (A); K pa = 3 db στάθμη ακουστικής ισχύος (L WA ) ,7 db (A); K WA = 2,58 db Εγγυημένη στάθμη ακουστικής ισχύος db (A) Κραδασμός (a h )... 7,612 m/s 2 ; K= 1,5 m/s 2 H αφερόμενη τιμή μετάδοσης δόνησης μετρήθηκε βάσει τυποποιημένης μεθόδου δοκιμής και μπορεί να χρησιμοποιηθεί για τη σύγκριση μίας ηλεκτρικής συσκευής με μία άλλη. Η αναφερόμενη τιμή μετάδοσης δόνησης μπορεί επίσης να χρησιμοποιηθεί και για αρχική εκτίμηση της έκθεσης. Προειδοποίηση: Η τιμή μετάδοσης της δόνησης μπορεί να διαφέρει κατά την πραγματική χρήση της ηλεκτρικής συσκευής από την αναφερόμενη τιμή, ανάλογα με τον τρόπο χρήσης της. Πρέπει να οριοσθούν μέτρα ασφαλεάις για την προστασία του χειριστή βασιζόμενα σε εκτίμηση της έκθεσης κατά τη διάρκεια των πραγματικών συνθηκών χρήσης (εδώ να ληφθούν 3 1
32 G R C Y υπόψη τα ποσοστά του κύκλου λειτουργίας, για παράδειγμα οι χρόνοι κατά τους οποίους είναι απενεργοποιημένη η συσκευή και οι χρόνοι κατά τους οποίους είναι μεν ενεργοποιημένη η συσκευή αλλά λειτουργεί χωρίς φορτίο). Οι τιμές θορύβου και δονήσεων εξακριβώνονται σύμφωνα με τους κανόνες και τους κανονισμούς που αναφέρονται στη δήλωση συμμόρφωσης. Υποδείξεις ασφαλείας Αυτή η παράγραφος περιγράφει τις βασικές υποδείξεις ασφαλείας κατά την εργασία με το ηλεκτρικό αλυσοπρίονο. Το ηλεκτρικό αλυσοπρίονο είναι μία επικίνδυνη συσκευή, η οποία μπορεί να προκαλέσει σε περίπτωση λάθους ή αμελούς μεταχείρισης, σοβαρούς ή ακόμα και θανατηφόρους τραυματισμούς. Γι αυτό προσέχετε προς δική σας ασφάλεια και προς ασφάλεια τρίτων πάντα τις παρακάτω υποδείξεις ασφαλείας και ρωτάτε, όταν δεν είστε βέβαιος για κάτι, έναν ειδικό. Επιγραφές πάνω στη συσκευή Εξοικειωθείτε καλά πριν αρχίσετε την εργασία με όλα τα στοιχεία χειρισμού. Εξασκηθείτε στον χειρισμό του πριονιού και αφήστε έναν ειδικό να σας εξηγήσει τη λειτουργία, τον τρόπο δράσης και τις τεχνικές πριονίσματος. Η αλυσίδα περιστρέφεται όταν έχει ασφαλίσει το φρένο αλυσίδας. Ενεργοποιήστε το φρένο αλυσίδας ωθώντας το μοχλό φρένου αντίθετα προς την μπροστινή λαβή. Διαβάστε και προσέξτε τις οδηγίες χειρισμού του μηχανήματος! Φοράτε προστατευτικά ματιών και ακοής. Φοράτε προστατευτικό κράνος. Φοράτε γάντια ασφαλή σε κοπή. Φοράτε αντιολισθητικά προστατευτικά γάντια Χρησιμοποιείτε ρουχισμό προστασίας! Να χρησιμοποιείτε το αλυσοπρίονο πάντα με τα δύο χέρια Προσοχή! Αναστροφική κίνηση - Προσέχετε κατά την εργασία την αναστροφική κίνηση του μηχανήματος. LWA Στοιχεία στάθμης ηχητικής ισχύος db Lwa σε db Μην εκθέτετε το μηχάνημα στη βροχή. Η συσκευή δεν επιτρέπεται ούτε να βραχεί ούτε να δουλέψει σε υγρό περιβάλλον. Προσοχή! Τραβήξτε και βγάλτε αμέσως τον ρευματολήπτη από την πρίζα σε περίπτωση βλάβης ή σε περίπτωση που κοπεί το καλώδιο. 3 2
33 G R C Y Εικονοσύμβολα επάνω στην πινακίδα τύπου: Κατηγορία προστασίας II Οι συσκευές δεν επιτρέπεται να καταλήγουν στα οικιακά απορρίμματα. 460 mm Λόγχη (οδηγητική ράγα) Εικονοσύμβολο κάτω από την επικάλυψη οδοντωτού τροχού: Προσέξτε την κατεύθυνση κίνησης της αλυσίδας. Προσοχή! Διαβάστε τις οδηγίες λειτουργίας. Εικονοσύμβολο επάνω στην κατευθυντήρια λάμα: Κατεύθυνση κίνησης της αλυσίδας Εικονοσύμβολο επάνω στο καπάκι δοχείου λαδιού: Λαδώστε την αλυσίδα. Εικονοσύμβολο επάνω στη βίδα στερέωσης για την επικάλυψη οδοντωτού τροχού: ΑΝΟΙΧΤΟ ΚΛΕΙΣΤΟ Εικονοσύμβολο στο μοχλό φρένου αλυσίδας: O Φρένο αλυσίδας: ΑΝΕΝΕΡΓΟ I Φρένο αλυσίδας: ΕΝΕΡΓΟ Σύμβολα στις οδηγίες Σύμβολα κινδύνου με στοιχεία για την πρόληψη προσωπικών και υλικών ζημιών. Σύμβολο υποχρέωσης (στη θέση του συμβόλου έκτακτης ανάγκης επεξηγείται η αντίστοιχη υποχρέωση) με στοιχεία για την πρόληψη ζημιών. Σύμβολο υπόδειξης με πληροφορίες για τον καλύτερο χειρισμό της συσκευής. Γενικές υποδείξεις ασφαλείας αρχίσετε την εργασία με το ηλεκτρικό αλυσοπρίονο εξοικειωθείτε καλά με όλα τα τεμάχια χειρισμού. Να εξοικειωθείτε πρώτα με το χειρισμό του πριονιού (κόψιμο σρογγυλών ξύλων σε βάση) και ζητήστε να σας εξηγηθεί η λειτουργία της, ο τρόπος επίδραης, οι μέθοδοι κοπής και τα μέσα ατομικής προστασίας από πεπειραμένο χρήστη ή ειδικευμένο τεχνίτη. Προσέχετε την οδηγία περί θορύβου και τις τοπικές διατάξεις κατά την κοπή ξύλων. Οι τοπικές διατάξεις ενδέχεται να απαιτούν έναν έλεγχο καταλληλότητας. Μπορείτε να ενημερωθείτε στη διεύθυνση δασών. Προσοχή! Κατά τη χρήση ηλεκτρικών εργαλείων, πρέπει να λαμβάνονται τα ακόλουθα βασικά μέτρα ασφαλείας, για την 3 3
34 G R C Y προστασία από ηλεκτροπληξία, κίνδυνο τραυματισμού και πυρκαγιάς: Υπάρχει κίνδυνος τραυματισμών. Γενικές υποδείξεις ασφαλείας για ηλεκτρικά εργαλεία ΠΡΟΕΙΔΟΠΟΙΗΣΗ! Διαβάστε όλες τις υποδείξεις ασφαλείας και τις οδηγίες. Παραλείψεις στην τήρηση των υποδείξεων ασφαλείας και των οδηγιών μπορούν να οδηγήσουν σε ηλεκτροπληξία, πυρκαγιά και/ή βαρείς τραυματισμούς. Διατηρείτε όλες τις υποδείξεις ασφαλείας και τις οδηγίες για μελλοντική αναφορά. Η έννοια ηλεκτρικά εργαλεία, που χρησιμοποιείται στις υποδείξεις ασφαλείας, αναφέρεται σε ηλεκτρικά εργαλεία που λειτουργούνται με το ηλεκτρικό δίκτυο (με καλώδιο ρεύματος) και σε ηλεκτρικά εργαλεία που λειτουργούνται με συσσωρευτή (δίχως καλώδιο ρεύματος). Aσφάλεια στη θέση εργασίας: Να διατηρείτε τη θέση εργασίας σας καθαρή και καλά φωτισμένη. Σε όχι τακτικούς ή όχι καλά φωτισμένους χώρους εργασίας δημιουργούνται ατυχήματα. Μην εργάζεστε με το ηλεκτρικό αλυσοπρίονο σε εκρηκτικό περιβάλλον, στο οποίο βρίσκονται εύφλεκτα υγρά, αέρια ή σκόνες. Τα ηλεκτρικά εργαλεία παράγουν σπινθήρες που μπορούν να αναφλέξουν τη σκόνη και τους ατμούς. Να κρατάτε μακριά τα παιδιά κατά τη διάρκεια χρήσης του ηλεκτρικού αλυσοπρίονου. Εάν δεν είστε καλά συγκεντρωμένοι, δεν αποκλείεται να χάσετε τον έλεγχο επί της συσκευής. Ηλεκτρική ασφάλεια: Προσοχή: Έτσι αοποφεύγετε ατυχήματα και τραυματισμούς από ηλεκτροπληξία: Το βύσμα του ηλεκτρικού αλυσοπρίονου πρέπει να ταιριάζει στην πρίζα. Δεν επιτρέπεται καμία τροποποίηση του βύσματος. Μη χρησιμοποιείτε προσαρμογές βυσμάτων μαζί με γειωμένες ηλεκτρικές συσκευές. Όταν δεν έχουν αλλαχτεί τα βύσματα και όταν χρησιμοποιείτε κατάλληλες πρίζες, μειώνεται ο κίνδυνος ηλεκτροπληξίας. Να αποφεύγετε την σωματική επαφή με γειωμένες επιφάνειες όπως τις γειωμένες επιφάνειες σωλήνων, θερμάνσεων, εστιών και ψυγείων. Υπάρχει ιδιαίτερος κίνδυνος ηλεκτροπληξίας, όταν το ωμα σας είναι γειωμένο. Μην εκθέτετε το ηλεκτρικό αλυσο ρίονο σε βροχή ή υγρασία. Η διείσδυση νερού σε ηλεκτρική συσκευή αυξάνει τον κίνδυνο ηλεκτροπληξίας. Μη μεταφέρετε το αλυσοπρίονο κρατώντας το από το καλώδιο, μη κρεμάτε τη συσκευή από το καλώδιο και μη χρησιμοποιείτε το καλώδιο για να τραβήξετε το βύσμα από την πρίζα. Να προστατεύετε το καλώδιο από ψηλές θερμοκρασίες, λάδι, αιχμηρές άκρες και κινούμενα τμήματα της συσκευής. 3 4
35 G R C Y Τα ελαττωματικά ή μπερδεμένα καλώδια αυξάνουν τον κίνδυνο ηλεκτροπληξίας. Εάν εργάζεστε με το ηλεκτρικό αλυσοπρίονο στο ύπαιθρο, να χρησιμοποιείτε μόνο μπαλαντέζες που είναι κατάλληλες για το ύπαιθρο. Η χρήση μίας μπαλαντέζας κατάλληλης για το ύπαιθρο μειώνει τον κίνδυνο ηλεκτροπληξίας. Εάν δεν μπορείτε να αποφύγετε τη λειτουργία ηλεκτρικών συσκευών σε υγρό περιβάλλον, να χρησιμοποιείτε διακόπτη ασφαλείας. Η χρήση ενός διακόπτη ασφαλείας μειώνει τον κίνδυνο ηλεκτροπληξίας. Να χρησιμοποιείτε διακόπτη ασφαλείας 30 ma ή λιγότερο. Να χρησιμοποιείτε μόνο εγκεκριμένα καλώδια δικτύου τύπου H05RN-F, τα οποία είναι το ανώτερο μήκους 75 μ. και προορίζονται για χρήση σε εξωτερικό χώρο. Η διατομή σύρματος του καλωδίου δικτύου πρέπει να ανέρχεται τουλάχιστον σε 2,5 mm 2. Ξετυλίγετε πάντα εντελώς το τύμπανο περιτύλιξης καλωδίου πριν τη χρήση. Ελέγξτε το καλώδιο δικτύου για ζημιές. Ασφάλεια ατόμων: Προσοχή: Έτσι αποφεύγετε τους τραυματισμούς: Να είστε προσεκτικοί, να προσέχετε τί κανετε, και να εργάζεστε συνετά με το ηλεκτρικό αλυσοπρίονο. Μη χρησιμοποιείτε το ηλεκτρικό αλυσοπρίονο όταν είστε κουρασμένοι ή υπό την επήρεια ναρκωτικών, οινοπνευματωδών ποτών ή φαρμάκων. Μόνο μία στιγμή απροσεξίας κατά τη χρήση του θαμνοκοπτικού μπορεί να προκαλέσει σοβαρούς τραυματισμούς. Να χρησιμοποιείτε τα μέσα ατομικής προστασίας και πάντα προστατευτικά γυαλιά. Η χρήση των μέσων ατομικής προστασίας όπως αντιολισθητικά υποδήματα, προστατευτικό κράνος και ωτοασπίδες, μειώνει τον κίνδυνο τραυματισμών. Να αποφεύγετε την αθέλητη θέση σε λειτουργία. Σιγουρευτείτε πως το ηλεκτρικό αλυσοπρίονο είναι απενεργοποιημένο πριν το συνδέσετε με την παροχή ρεύματος, πριν το σηκώσετε και πριν το μεταφέρετε. Εάν κατά την μεταφορά του ηλεκτρικού αλυσοπρίονου έχετε το χέρι σας στον διακόπτη ή η συσκευή είναι ενεργοποιημένη όταν τη συνδέσετε με την παροχή ρεύματος, δεν αποκλείονται ατυχήματα. Πριν ενεργοποιήσετε το ηλεκτρικό αλυσοπρίονο να αφαιρέστε ενδεχόμενα εργαλεία ρύθμισης ή κλειδιά. Ένα εργαλείο ρύθμισης ή κλειδί που βρίσκεται στο περιστρεφόμενο τμήμα της συσκευής, μπορεί να οδηγήσει σε τραυματισμούς. Να αποφεύγετε τη μη φυσιολογική στάση του σώματος. Φροντίστε να στέκεστε σταθερά και να κρατάτε πάντα την ισορροπία σας. Έτσι μπορείτε να ελέγχετε το ηλεκτρικό αλυσοπρίονο ακόμη και σε απρόοπτες περιστάσεις. Να φοράτε πάντα τον κατάλληλο ρουχισμό εργασίας. Μη φοράτε φαρδιά ρούχα ή κοσμήματα. Να κρατάτε τα μαλλιά, τα ρούχα και 3 5
36 G R C Y τα γάντια μακριά από κινούμενα εξαρτήματα. Τα φαρδιά ρούχα, τα κοσμήματα ή τα μακριά μαλλιά θα μπορούσαν να πιαστούν από τα κινούμενα εξαρτήματα. Εάν είναι δυνατή η συναρμολόγηση εξαρτημάτων απορρόφησης σκόνης ή σκούπας σιγουρευτείτε ότι είναι συναρμολογημένα και λειτουργούν σωστά. Η χρήση απορροφητή σκόνης μπορεί να μειώσει τους κινδύνους που προκαλεί η σκόνη. Προσοχή! Αυτό το ηλεκτρικό εργαλείο δημιουργεί κατά τη λειτουργία ένα ηλεκτρομαγνητικό πεδίο. Αυτό το πεδίο δεν αποκλείεται υπό ορισμένες συνθήκες να εηρεάσει τη λειτουργία, ενεργητικά ή παθηιτκά ιατρικά εμφυτεύματα. Προς αποφυγή του κινδύνου σοβαρών ή και θανατηφόρων τραυματισμών, συνιστούμε σε άτομα με ιατρικά εμφυτεύματα να συμβουλευθούν τον γιατρό τους και τον κατασκευαστή του ιατρικού εμφυτεύματος, πριν χειριστούν τη μηχανή. Χρήση και φροντίδα του ηλεκτρικού αλυσοπρίονου: Προσέξτε να μην υπερφορτώνετε τη συσκευή. Να χρησιμοποείτε τα ηλεκτρικά εργαλεία που είναι κατάλληλα για την εργασία σας. Με το κατάλληλο ηλεκτρικό εργαλείο εργάζεστε καλύτερα και ασφαλέστερα στο αναφερόμενο πεδίο ισχύος. Μη χρησιμοποιείτε ηλεκτρικά εργαλεία, ο διακόπτης των οποίων είναι ελαττωματικός. Ένα ηλεκτρικ οεργαλείο που δεν μπορεί να ενεργοποιηθεί ή να απενεργοποιηθεί είναι επικίνδυνο και πρέπει να επισκευαστεί. Βγάλτε το βύσμα από την πρίζα και/ή αφαιρέστε το συσσωρευτή προτού κάνετε τις ρυθμίσεις στη συσκευή, πριν αλλάξετε εξαρτήματα ή πριν ακουμπήσετε κάπου τη συσκευή. Με τον τρόπο αυτό δεν είναι δυνατή η αθέλητη ενεργοποίηση του ηλεκτρικού αλυσοπρίονου. Να φυλάγετε το ηλεκτρικό αλυσοπρίονο, όταν δεν το χρησιμοποιείτε, μακριά από παιδιά. Μην αφήνετε να χρησιμοποιούν τη συσκευή άτομα που δεν είναι εξοικειωμένα μαζί της ή που δεν διάβασαν αυτές τις οδηγίες. Τα ηλεκτρικά εργαλεία είναι επικίνδυνα, όταν χρησιμοποιούνται από άτομα χωρίς πείρα. Να περιποιείτε προσεκτικά το ηλεκτρικό σας αλυσοπρίονο. Ελέγξτε εάν λειτουργούν άψογα και δεν μπλοκάρουν όλα τα κινούμενα τμήματα ή εάν έχουν σπάσει εξαρτήματα ή ορισμένα τμήματα έχουν ζημιές που εμποδίζουν την άψογη λειτουργία του αλυσοπρίονου. Δώστε να επισκευαστούν τα ελαττωματικά εξαρτήματα πριν χρησιμοποιήσετε τη συσκευή. Πολλά ατυχήματα οφείλονται σε ηλεκτρικά εργαλεία που δεν έχουν συντηρηθεί σωστά. Τα κοπτικά εξαρτήματα να διατηρούνται πάντα ακονισμένα και καθαρά. Τα προσεγμένα κοπτικά εξαρτήματα με ακονισμένες λάμες δεν μπλοκάρουν εύκολα και κινούνται καλύτερα. Να χρησιμοποιείτε το ηλεκτρικό αλυσοπρίονο, τα εξαρτήματά 3 6
37 G R C Y του, τα πρόσθετα εργαλεία κλπ. μόνο σύμφωνα με αυτές τις οδηγίες. Nα λάβετε υπόψη σας τις συνθήκες εργασίας και το είδος της εργασίας σας. Η χρήση του ηλεκτρικού αλυσοπρίονου για άλλες εργασίες εκτός αυτών για τις οποίες προορίζεται, μπορεί να προκαλέσει επικίνδυνες περιστάσεις. Όταν εργάζεστε σε πλαγιές να στέκεστε πάντα πάνω από τον κορμό του δέντρου. Για να έχετε πάντα τον έλεγχο τη στιγμή που κόβετε, μειώνετε στο τέλος της κοπής την πίεση χωρίς να ελαττώσετε το σταθερό κράτημα στις χειρολαβές του αλυσοπρίονου. Προσέξτε να μην έρθει το αλυσοπρίονο σε επαφή με το έδαφος. Μόλις τελειώσετε την κοπή περιμένετε να ακινητοποιηθεί πρώτα το αλυσοπρίονο πριν το απομακρύνετε. Να σβήνετε πάντα το μοτέρ του αλυσοπρίονου πριν πάτε από δέντρο σε δέντρο. Να αφαιρείτε ακαθαρσίες, πέτρες, ξεκολλημένες φλούδες δέντρου, καρφιά, συνδέσμους και σύρματα από το δέντρο. Σέρβις: Η επισκευή του ηλεκτρικού σας εργαλείου ναέκτελείται μόνο από εξειδικευμένο προσωπικό και να χρησιμοποιούνται μόνο γνήσια ανταλλακτικά. Έτσι εξασφαλίζεται η ασφάλεια του ηλεκτρικού σας εργαλείου. Να ακολουθείτε προσεκτικά τις οδηγίες συντήρησης, ελέγχου και σέρβις που θα βρείτε σ αυτές τις οδηγίες χρήσης. Τα ελαττωματικά συστήματα ασφαλείας και τα εξαρτήματα προστασίας πρέπει να επισκευάζονται σωστά από το κέτρο μας εξυπηρέτησης πελατών ή να αντικαθίστανται σωστά από αναγνωρισμένο εξειδικευμένο συνεργείο εάν δεν αναφέρεται κάτι διαφορετικό στην Οδηγία χρήσης. Υποδείξεις ασφαλείας για όλα τα αλυσοπρίονα Όταν λειτουργεί το πριόνι να κρατάτε μακριά όλα τα μέλη του σώματος από την αλυσίδα. Σιγουρευτείτε πριν την έναρξη λειτουργίας του πριονιού, πως η αλυσίδα δεν έρχεται σε επαφή με τίποτα. Κατά την εργασία με αλυσοπρίονο μπορεί ακόμη και μία στιγμή απροσεξίας να έχει σαν συνέπεια το να πιαστούν ρούχα ή μέλη του σώματος από την αλυσίδα. Να κρατάτε το αλυσοπρίονο πάντα με το δεξί σας χέρι στην πίσω λαβή και με το αριστερό χέρι στην μπροστινή λαβή. Εάν κρατάτε το αλυσοπρίονο σε αντίστροφη στάση, αυξάνετε τον κίνδυνο των τραυματισμών, Να φοράτε προστατευτικά γυαλιά και ωτοασπίδες. Προδιαγράφονται και άλλα μέσα προστασίας για το κεφάλι, τον λαιμό, τα χέρια και τα πόδια. Τα κατάλληλα προστατευτικά ρούχα μειώνουν τον κίνδυνο τραυματισμών από εκσφενδονιζόμενα ροκανίδια και από κατά λάθος επαφή με την αλυσίδα. Μην εργάζεστε με το αλυσοπρίονο πάνω σε δέντρα. Κατά τη χρήση του αλυσοπρίονου πάνω σε δέντρα υφίσταται κίνδυνος τραυματισμού. Να προσέχετε πάντα την ευστάθειά σας και να χρησιμοποιείτε το 3 7

38 G R C Y αλυσοπρίονο μόνο όταν στέκεστε πάνω σε ασφαλή και επίπεδη επιφάνεια. Εάν η επιφάνεια είναι ολισθηρή ή ασταθής όπως μία σκάλα, μπορεί να χάσετε την ισορροπία σας ή και τον έλεγχο επί του αλυσοπρίονου. όταν κόβετε ένα κλαδί που βρίσκεται υπό ένταση, μην ξεχνάτε πως μπορεί να πεταχτεί προς τα πίσω. Όταν ελευθερωθεί η ένταση στις ίνες του ξύλου, μπορεί το κλαδί να κτυπήσει τον χειριστή και/ή να βγάλει το αλυσοπρίονο από τον έλεγχό του. Να είστε ιδιαίτερα προσεκτικοί όταν κόβετε χαμηλά κλαδιά και νέα δέντρα. Τα λεπτά κλαδιά μπορεί να πιαστούν στην αλυσίδα του πριονιού και να κτυπήσουν επάνω σας ή να σας κάνουν να χάσετε την ισορροπία σας. Να κρατάτε το αλυσοπρίονο στην μπροστινή λαβή και απενεργοποιημένο, με την αλυσίδα να δείχνει μακριά από το σώμα σας. Κατά τη μεταφορά ή τη φύλαξη του αλυσοπρίονου να τοποθετείτε πάντα το προστατευτικό κάλυμμα. Ο προσεκτικός χειρισμός του αλυσοπρίονου μειώνει την πιθανότητα μίας κατά λάθος επαφής με το αλυσοπρίονο που λειτουργεί. να ακολουθείτε τις οδηγίες για τη λίπανση, την ένταση της αλυσίδας και την αλλαγή των εξαρτημάτων. Εάν η αλυσίδα δεν έχει τη σωστή ένταση ή δεν έχει λιπανθεί σωστά, μπορεί είτε να σπάσει ή να αυξήσει τον κίνδυνο αντίκρουσης. Να διατηρείτε στεγνές τις χειρολαβές, καθαρές και ελεύθερες λάδια και λιπαντικά. Οι λιπαρές και λαδερές χειρολαβές είναι ολισθηρές και συνεπάγονται την απώλεια του ελέγχου. Να κόβετε μόνο ξύλα. Μη χρησιμοποιείτε το αλυσοπρίονο για εργασίες, για τις οποίες δεν προορίζεται Παράδειγμα: Μη χρησιμοποιείτε το αλυσοπρίονο για να κόβετε πλαστικά, τοίχους ή οικοδομικά υλικά που δεν είναι από ξύλο. Η χρήση του αλυσοπρίονου για εργασίες για τις οποίες δεν προορίζεται μπορεί να οδηγήσει σε επικίνδυνες περιστάσεις. Να κρατάτε το ηλεκτρικό εργαλείο μόνο από τις μονωμένες λαβές, επειδή το μαχαίρι κοπής μπορεί να έρθε σε επαφή με μη εμφανείς αγωγούς ρεύματος. Η επαφή του μαχαιριού με αγωγό υπό τάση μπορεί να θέσει τα μεταλλικά τμήματα της συσκευής υπό τάση και να προκαλέσει ηλεκτροπληξία. Μέτρα ασφαλείας κατά αντίκρουσης Προσοχή Αντίκρουση! Κατά την εργασία να προσέχετε ενδεχόμενη αντίκρουση της μηχανής. Υφίσταται κίνδυνος τραυματισμού. Αποφεύγετε την αντίκρουση με προσκετκική και σωστή μέθοδος εργασίας με το πριόνι. εικόνα 1 Αντίκρουση μπορεί να συμβεί όταν η μύτη του οδηγού της συσκευής ακουμπήσει σε αντικείμενο ή όταν το ξύλο λυγίζει και η αλυσίδα μπλοκαριστεί στο σημείο κοπής (βλ. Eικ. 1/απεικ.B). 3 8
39 G R C Y Μία επαφή με τη μύτη του οδηγού μπορεί σε μερικές περιπτώσεις να οδηγήσει σε αναπάντεχη αντίδραση προς τα πίσω, όπου ο οδηγός πετιέται προς τα πάνω και προς την κατεύθυνση του χειριστή (βλ. Εικ 1/απεικ. A). Το μπλοκάρισμα της αλυσίδας στην επάνω άκρη του οδηγού μπορεί να σπρώξει δυνατά τον οδηγό προς την κατεύθυνση του χειριστή. Κάθε μία από τις αντιδράσεις αυτές μπορεί να έχει σαν συνέπεια να χάσετε τον έλεγχο στο πριόνι και ενδεχομένως να τραυματιστείτε σοβαρά. Μην εμπιστεύεστε αποκλειστικά και μόνο στα συστήματα ασφαλείας που έχουν ενσωματωθεί στο αλυσοπρίονο. Σαν χειριστής του αλυσοπρίονου πρέπει να λαμβάνετε διαφορετικά μέτρα ώστε να εργάζεστε χωρίς ατυχήματα και τραυματισμούς. Μία αντίκρουση αποτελεί τη συνέπεια λάθος χειρισμού ή εσφαλμένης χρήσης του ηλεκτρικού εργαλείου. Μπορεί να αποφευχθεί με κτάλληλα μέτρα ασφαλείας, όπως περιγράφονται πιο κάτω: Να κρατάτε το πριόνι με τα δύο χέρια σας, περικλείοντας με τον αντίχειρα και τα δάκτυλα τις λαβές τους αλυσοπρίονου. Να φέρετε το σώμα σας και τα χέρια σας σε θέση, από την οποία θα μπορούσατε να αντιμετωπίσετε τις δυνάμεις αντίκρουσης. Εάν ληφθούν τα κατάλληλα μέτρα, ο χειριστής μπορεί να αντιμετωπίσει ενδεχόμενες αντικρούσεις. Ποτέ μην αφήσετε το αλυσοπρίονο από τα χέρια σας κατά τη λειτουργία. Να αποφεύγετε μία αφύσικη στάση του σώματος και μην κόβετε πάνω από το ύψος του ώμου. Έτσι αποφεύγετε μία ενδεχομένως αθέλητη επαφή με τη μύτη του οδηγού της συσκευής και έχετε καλύτερο έλεγχο του αλυσοπρίονου σε απρόβλεπτες περιστάσεις. Να χρησιμοποιείτε πάντα τα ανταλλακτικά και τις αλυσίδες που συνιστώνται από τον κατασκευαστή. Οι όχι σωστή ανταλλακτικοί οδηγοί και αλυσίδες μπορεί να προκαλέσουν το σχίσιμο της αλυσίδας κα/ή ενδεχόμενη αντίκρουση. Να ακολουθείτε τις οδηγίες του κατασκευαστή για το τρόχισμα και τη συντήρηση του αλυσοπρίονου. Τα πολύ χαμηλά τέρματα περιορισμού βάθους αυξάνουν την τάση προς αντίκρουση. ΥΠΟΛΕΙΠΟΜΕΝΟΙ ΚΙΝΔΥΝΟΙ Aκόμη και σε περίπτωση σωστής και κανονικής χρήσης αυτού του ηλεκτρικού εργαλείου, υφίστανται πάντα υπόλειπόμενοι κίνδυνοι. Oι ακόλουθοι κίνδυνοι μπορούν να παρουσιαστούν ανάλογα με το είδος κατασκευής και το μο ντέλο αυτού του ηλεκτρικού εργαλείου: α) Τέμνοντα τραύματα β) Bλάβες της ακοής, εάν δεν χρησιμοποιθεί κατάλληλη ηχοπροστασίας. γ) Βλάβες της υγείας που προκαλούνται από δονήσεις χεριού-βραχίονα, εάν η συσκευή χρησιμοποιηθεί για μεγαλύτερο χρονικό διάστημα ή δεν τηρείται και δεν συντηρείται σωστά. Προσοχή! Αυτό το ηλεκτρικό εργαλείο δημιουργεί κατά τη λειτουργία ένα ηλεκτρομαγνητικό πεδίο. Αυτό το πεδίο δεν αποκλείεται 3 9
40 G R C Y υπό ορισμένες συνθήκες να εηρεάσει τη λειτουργία, ενεργητικά ή παθηιτκά ιατρικά εμφυτεύματα. Προς αποφυγή του κινδύνου σοβαρών ή και θανατηφόρων τραυματισμών, συνιστούμε σε άτομα με ιατρικά εμφυτεύματα να συμβουλευθούν τον γιατρό τους και τον κατασκευαστή του ιατρικού εμφυτεύματος, πριν χειριστούν τη μηχανή. Περαιτέρω υποδείξεις ασφαλείας Σε περίπτωση βλάβης του καλωδίου αυτής της συσκευής, πρέπει να αντικατασταθεί από ειδικό καλώδιο που προσφέρει ο κατασκευαστής ή το τμήμα του εξυπηρέτησης πελατών. Συνιστούμε όταν χρειάζεται αντικατάσταση του καλωδίου σύνδεσης, αυτό να γίνεται από τον κατασκευαστή ή τον αντιπρόσωπό του (π.χ. εξουσιοδοτημένο συνεργείο, εξυπηρέτηση πελατών κ.λπ.). Να τοποθετείτε το καλώδιο σύνδεσης έτσι, ώστε να μην πιαστεί κατά τη διάρκεια της εργασίας από κλαδιά ή κάτι παρόμοιο. Συνδέετε τη συσκευή, κατά το δυνατόν, μόνο σε ρευματοδότες με διακόπτη κυκλώματος βλάβης γείωσης (διακόπτη FI) με ρεύμα απεμπλοκής που δεν ξεπερνά τα 30 ma. Τηρείτε επακριβώς τις οδηγίες συντήρησης, ελέγχου και συντήρησης στις παρούσες οδηγίες λειτουργίας. Φθαρμένες προστατευτικές διατάξεις και μέρη πρέπει να επισκευάζονται ή να αντικαθίστανται σωστά από το κέντρο σέρβις μας, εφόσον δεν ορίζεται άλλως στις οδηγίες λειτουργίας. Λειτουργίες ασφαλείας A 1 Πισινή λαβή με προστατευτικό χεριού (16) προστατεύει το χέρι από κλαδιά και σε περίπτωση που βγει η αλυσίδα. 3 Μοχλός φρένου αλυσίδας/ προστατευτικό χεριού Διάταξη ασφαλείας η οποία σταματά αμέσως την πριονοαλυσίδα σε περίπτωση αναστροφικής κίνησης. Ο μοχλός μπορεί να ενεργοποιηθεί και δια χειρός. Προστατεύει το αριστερό χέρι του χειριστή σε περίπτωση που γλιστρίσει από την μπροστινή λαβή. Ο κινητήρας δεν μπορεί να ενεργοποιηθεί εάν είναι πατημένο το φρένο αλυσίδας. 5 Πριονοαλυσίδα με μικρή αναστροφική κίνηση σας βοηθά με ειδικά ανεπτυγμένες διατάξεις ασφαλείας να προλαβαίνετε την αναστροφική κίνηση. 7 Αρπάγη αναστολής από μέταλλο μεγαλώνει τη σταθερότητα κατά το κάθετο κόψιμο και διευκολύνει το πριόνισμα. 9 Ηλεκτροκινητήρας είναι για λόγους ασφαλείας διπλά μονωμένος. 10 Διακόπτης ενεργοποίησης/ απενεργοποίησης με άμεσο στοπ αλυσίδας Μόλις αφήσετε τον διακόπτη ενεργοποίησης/απενεργοποίησης απενεργοποιείται αμέσως η συσκευή. 4 0
41 G R C Y 11 Μπλοκάρισμα ενεργοποίησης Για την ενεργοποίηση της συσκευής πρέπει να ξεμανδαλωθεί το μπλοκάρισμα ενεργοποίησης. 12 Πίρος ασφαλείας αλυσίδας μειώνει τον κίνδυνο τραυματισμού σε περίπτωση που κοπεί ή βγει η αλυσίδα. Συναρμολόγηση Φοράτε κατά την εργασία με την πριο-νοαλυσίδα πάντα προστατευτικά γάντια και χρησιμοποιείτε μόνο γνήσια τεμάχια. Βγάζετε, πριν από κάθε εργασία συντήρησης στο αλυσοπρίονο, τον ρευματολήπτη από την πρίζα. Προτού θέσετε σε λειτουργία το ηλεκτρικό αλυσοπρίονο πρέπει: - εάν απαιτείται να συναρμολογήσετε την κατευθυντήρια λάμα, την αλυσίδα και την επικάλυψη αλυσίδας, - να τανύσετε την αλυσίδα, - να γεμίσετε με λάδι αλυσίδας, - να ελέγξετε τη λειτουργία του φρένου αλυσίδας και του αυτόματου λαδιού. Συναρμολόγηση αλυσίδας G 1. Εκτείνετε την αλυσίδα (5) σε έναν βρόχο, έτσι ώστε οι ακμές κοπής να έχουν δεξιόστροφη ευθυγράμμιση. 2. Λασκάρετε τον κοχλία σύσφιξης (24) αριστερόστροφα. 3. Τοποθετήστε την αλυσίδα (5) στην εγκοπή κατευθυντήριας λάμας. Για τη συναρμολόγηση κρατάτε την κατευθυντήρια λάμα (4) σε μια γωνία περ. 45 μοιρών προς τα επάνω, ώστε να μπορείτε να οδηγήσετε την αλυσίδα (5) πιο εύκολα στον μικρό οδοντωτό τροχό αλυσοκίνησης (25). Είναι φυσιολογικό να κρεμάει η αλυσίδα (5). 4. Προτανύστε την αλυσίδα (5) περιστρέφοντας τον κοχλία σύσφιξης (24) δεξιόστροφα. 5. Τοποθετήστε την επικάλυψη οδοντωτού τροχού (15). Πρέπει τότε να τοποθετηθεί πρώτα η προεξοχή (26) στην επικάλυψη (15) στην προβλεπόμενη εγκοπή στη συσκευή. Σφίξτε τη βίδα στερέωσης (14) με ελαφριά δύναμη, διότι η αλυσίδα κοπής πρέπει ακόμα να τανυστεί. Προσοχή! Μπορεί να προκύπτει διαρροή λαδιού από το ηλεκτρικό πριόνι. Προσέξτε ότι από το ηλεκτρικό πριόνι μπορεί να τρέχει λάδι μετά τη χρήση και να προκύψει διαρροή λαδιού εάν το πριόνι τοποθετηθεί στα πλάγια ή στην κεφαλή. Πρόκειται για μια φυσιολογική διαδικασία λόγω του απαιτούμενου ανοίγματος αερισμού στο άνω άκρο δοχείου και δεν αποτελεί αιτία απαιτήσεων. Επειδή κάθε ηλεκτρικό πριόνι ελέγχεται κατά τη διαδικασία κατασκευής και δοκιμάζεται με λάδι, ενδέχεται παρά την εκκένωση να παραμείνουν υπολείμματα στο δοχείο, τα οποία βρωμίζουν ελαφρώς το περίβλημα με λάδι κατά τη διάρκεια της μεταφοράς. Καθαρίστε το περίβλημα με ένα πανί. Πριν από την αλλαγή της αλυσίδας πρέπει να καθαρίζεται η εγκοπή της ράγας 4 1
42 G R C Y οδήγησης, διότι σε υπάρχουσες εναποθέσεις ρύπων, η αλυσίδα μπορεί να πεταχτεί από τη ράγα. Οι εναποθέσεις μπορεί επίσης να απορροφήσουν το λάδι αλυσίδας. Το επακόλουθο θα ήταν το λάδι αλυσίδας να μην φτάνει ή να φτάνει πολύ λίγο στην κάτω πλευρά ράγας και να μειωθεί η λίπανση. Συναρμολόγηση κατευθυντήριας λάμας F 1. Τοποθετήστε τη συσκευή επάνω σε μια επίπεδη επιφάνεια. 2. Γυρίστε τη βίδα στερέωσης (14) αριστερόστροφα για να ( ) απομακρύνετε την επικάλυψη αλυσίδας (15). 3. Τοποθετήστε την κατευθυντήρια λάμα (4) επάνω στο μπουλόνι ράγας (23), έτσι ώστε ο κοχλίας σύσφιξης (24) να δείχνει προς τα έξω. Τάνυσμα της πριονοαλυσίδας Η τακτική τάνυση της αλυσίδας εξυπηρετεί την ασφάλεια του χειριστή και μειώνει ή εμποδίζει φθορές και ζημιές στην αλυσίδα. Συστήνουμε στο χειριστή, πριν από την έναρξη εργασίας και ανά διαστήματα περ. 10 λεπτών, να ελέγχει την τάνυση αλυσίδας και εάν απαιτείται να τη διορθώνει. Κατά την εργασία με το πριόνι η αλυσίδα θερμαίνεται και έτσι επιμηκύνεται λίγο. Αυτή η "επιμήκυνση" συμβαίνει ιδιαίτερα στις νέες αλυσίδες. Μην επανατανύζετε ή αλλάζετε την αλυσίδα όταν είναι καυτή, διότι μόλις κρυώσει θα συσταλεί πάλι λίγο. Σε μη τήρηση μπορεί να συμβούν ζημιές στη ράγα οδήγησης ή στο μοτέρ, διότι η αλυσίδα θα είναι τότε πολύ σφιχτή στη λόγχη. Η τάνυση και η λίπανση αλυσίδας επηρεάζουν σε μεγάλο βαθμό τη διάρκεια ζωής της αλυσίδας. Η αλυσίδα έχει τανυστεί σωστά εάν δεν κρεμάει στην κάτω πλευρά κατευθυντήριας λάμας και μπορείτε να την γυρίζετε γύρω-γύρω πλήρως φορώντας στο χέρι γάντια. Κατά την έλξη στην αλυσίδα με ισχύ έλξης 9 N (περ. 1 kg) η αλυσίδα και η κατευθυντήρια λάμα δεν επιτρέπεται να έχουν μεγαλύτερη απόσταση από 2 χιλ. 10 min B 1. Βεβαιωθείτε ότι λύθηκε το φρένο της αλυσίδας, αυτό σημαίνει ότι ο μοχλός φρένου αλυσίδας έχει πατηθεί κόντρα προς την πρόσθια λαβή (8) (Θέση I). 2. Λύστε τη βίδα στερέωσης (14) ( ). 3. Για το τάνυσμα του πριονιού στρέφετε το δακτύλιο τανύσματος αλυσίδας (13) δεξιόστροφα. Για χαλάρωση της έντασης στρέφετε το δακτύλιο τανύσματος αλυσίδας αριστερόστροφα. 4. Σφίξτε πάλι τη βίδα στερέωσης (14) ( ). Σε περίπτωση νέας πριονοαλυσίδας πρέπει να επαναρυθμίσετε το τέντωμα μετά από τουλάχιστον 5 κοψίματα. 4 2
43 G R C Y Λίπανση αλυσίδας Η ράγα και η αλυσίδα δεν κάνει ποτέ να μείνουν χωρίς λάδι. Εάν δουλεύετε το ηλεκτρικό αλυσοπρίονο με λίγο λάδι, μειώνεται η απόδοση κοπής και η διάρ-κεια ζωής της πριονοαλυσίδας, γιατί γίνεται η αλυσίδα γρηγορότερα αμβλεία. Το ότι έχει λίγο λάδι η αλυσίδα το κατα-λαβαίνετε από το γεγονός ότι δημιου-ργείται καπνός ή αλλάζει χρώμα η ράγα. Μόλις εκκινηθεί η λειτουργία του μοτέρ, το λάδι ρέει στην κατευθυντήρια λάμα ( A 4). Πλήρωση λαδιού αλυσίδας: Ελέγχετε τακτικά την ένδειξη στάθμης λαδιού ( C 21) και γεμίζετε με λάδι κατά την επίτευξη της σήμανσης ελάχιστου «ΜΙΝ» ( C 22) στην ένδειξη στάθμης λαδιού. Το δοχείο λαδιού έχει χωρητικότητα περ. για 190 ml λάδι. Να χρησιμοποιείτε το βιο-έλαιο Parkside, το οποίο εμπεριέχει πρόσθετα για μείωση τριβής και φθοράς και το οποίο δεν προκαλεί βλάβη στο αντλιακό σύστημα. Μπορείτε να το παραγγείλετε στο κέντρο σέρβις της εταιρείας μας (βλ. διεύθυνση σελίδα ). Εάν δεν υπάρχει διαθέσιμο βιολογικό λάδι Grizzly, χρησιμοποιήστε λιπαντικό λάδι με ελάχιστη αναλογία προσθέτων. Εκκενώνετε το δοχείο λαδιού πριν από παρατεταμένες παύσεις λειτουργίας (6-8 εβδομάδες). C 1. Ξεβιδώστε το καπάκι δοχείου λαδιού (2) και συμπληρώστε λάδι αλυσίδας μέσα στο δοχείο. 2. Σκουπίστε ενδεχομένως το λάδι που χύθηκε και κλείστε πάλι το σκέπασμα. Να απενεργοποιείτε τη συσκευή και να αφήνετε τον κινητήρα να κρυώσει πρώτα, πριν γεμίσετε λάδι για την αλυσίδα. Σε περίπτωση υπερχείλισης του λαδιού υφίσταται κίνδυνος πυρκαγιάς. Χειρισμός του αλυσοπρίονου Ενεργοποιείτε το ηλεκτρικό αλυσοπ-ρίονο μόνο αφού συναρμολογήσετε πρώτα σωστά την οδηγητική ράγα, την πριονοαλυσίδα και το κάλυμμα αλυσοτροχού. Προσέχετε να συμφωνεί η τάση δικτύου με τις ενδείξεις της πινακίδας κατασκευαστή. Προσέχετε κατά την ενεργοποίηση ώστε να στέκεστε σταθερά. Σιγουρευτείτε πριν από την ενεργοποίηση για το ότι το ηλεκτρικό αλυσοπρίονο δεν ακουμπά κανένα αντικείμενο. Προσοχή! Το πριόνι μπορεί να βγάλει λάδι μετά τη χρήση, βλέπε υποδείξεις ασφαλείας. Προσοχή! Μπορεί να τρέχει λάδι από το ηλεκτρικό πριόνι, δείτε το απόσπασμα «Συναρμολόγηση - Συναρμολόγηση αλυσίδας». 4 3
44 G R C Y Ενεργοποίηση D 1. Ελέγξτε πριν την εκκίνηση εάν υπάρχει αρκετό λάδι αλυσίδας στο δοχείο και εφόσον απαιτείται γεμίστε με λάδι (βλ. Κεφάλαιο «Πλήρωση λαδιού αλυσίδας»). 2. Συνδέστε τη συσκευή στην τάση δικτύου. 3. Ενεργοποιήστε το φρένο αλυσίδας τραβώντας το μοχλό φρένου αλυσίδας/μπροστινό προστατευτικό χεριού (3) αντίθετα προς την μπροστινή λαβή (8) (Θέση I). 4. Κρατήστε σφιχτά το ηλεκτρικό πριόνι και με τα δύο χέρια, με το δεξί χέρι στην πίσω λαβή (1) και με το αριστερό χέρι στην μπροστινή λαβή (8). Ο αντίχειρας και τα δάχτυλα πρέπει να περικυκλώνουν σφιχτά τις χειρολαβές. 5. Για την ενεργοποίηση πατήστε με το δεξιό αντίχειρα τη φραγή ενεργοποίησης (11) και πιέστε κατόπιν τον διακόπτη ενεργο-/ απενεργοποίησης (10), το ηλεκτρικό πριόνι λειτουργεί με την υψηλότερη ταχύτητα. Αφήστε πάλι τη φραγή ενεργοποίησης (11). 6. Το πριόνι απενεργοποιείται όταν αφήσετε πάλι τον διακόπτη ενεργο-/απενεργοποίησης (10). Μια αυτόματη διαρκής λειτουργία δεν είναι δυνατή. Έλεγχος του φρένου αλυσίδας Ο κινητήρας δεν μπορεί να ενεργοποιηθεί εάν είναι πατημένο το φρένο αλυσίδας. E 1. Ελευθερώστε το φρένο αλυσίδας σπρώχνοντας τον μοχλό φρένου προς την μπροστινή λαβή. 2. Τοποθετήστε το ηλεκτρικό αλυσοπρίονο επάνω σε μία σταθερή και επίπεδη βάση. Δεν κάνει να ακουμπά σε κανένα αντικείμενο. 3. Ενεργοποιήστε το φρένο αλυσίδας τραβώντας το μοχλό φρένου αλυσίδας/μπροστινό προστατευτικό χεριού (3) αντίθετα προς την μπροστινή λαβή (8) (Θέση I). 4. Κρατήστε σφιχτά το ηλεκτρικό πριόνι και με τα δύο χέρια, με το δεξί χέρι στην πίσω λαβή ( A 1) και με το αριστερό χέρι στην μπροστινή λαβή (8). Ο αντίχειρας και τα δάχτυλα πρέπει να περικυκλώνουν σφιχτά τις χειρολαβές. 5. Ενεργοποιήστε το ηλεκτρικό αλυσοπρίονο. 6. Χειριστείτε με ενεργοποιημένο κινητήρα τον μοχλό φρένου αλυσίδας (3) με το αριστερό χέρι. Ωθήστε για αυτό το μοχλό πέδησης αλυσίδας/την μπροστινή προστασία χειρός (3) μακριά από την έμπροσθεν λαβή (8) (Θέση O ). Ο κινητήρας και η αλυσίδα θα πρέπει να σταματήσουν απότομα. 7. Οταν λειτουργεί σωστά το φρένο αλυσίδας, ελευθερώστε το διακόπτη ενεργοποίησης/απενεργοποίησης και λύστε το φρένο αλυσίδας. Εάν δεν λειτουργεί σωστά το φρένο αλυσίδας, τότε δεν κάνει να χρησιμοποιήσετε το ηλεκτρικό αλυσοπρίονο. 4 4
45 G R C Y Κίνδυνος τραυματισμού από την αλυσίδα που συνεχίζει ίγο να κινείται. Αναθέστε την επιδιόρθωση του ηλεκτρικού αλυσοπρίονου στη υπηρεσία εξυπηρέτησης πελατών μας. Έλεγχος της αυτόματης διάταξης ρύθμισης λαδιού Ελέγξτε πριν αρχίσετε την εργασία την στάθμη λαδιού και την αυτόματη διάταξη ρύθμισης λαδιού. Ενεργοποιήστε το αλυσοπρίονο και κρατήστε το επάνω από ανοιχτόχρωμο έδαφος. Το πριόνι δεν επιτρέπεται να ακουμπά το έδαφος. Εάν διαπιστώσετε ίχνος λαδιού, αυτό σημαίνει ότι το ηλεκτρικό πριόνι δουλεύει σωστά. J Εάν δεν διαπιστώσετε ίχνος λαδιού, καθαρίστε ενδεχομένως τη διέλευση λαδιού ή επιτρέψτε την επισκευή του ηλεκτρικού αλυσοπρίονου από το τμήμα εξυπηρέτησης πελατών μας. Καθαρίστε τη δίοδο λαδιού (27) για να εξασφαλίσετε ένα απροβλημάτιστο, αυτόματο λάδωμα της αλυσίδας κατά τη διάρκεια της λειτουργίας. Χρησιμοποιήστε για αυτό ένα πινέλο ή ένα πανί για να σκουπίσετε υπολείμματα από τη διέλευση λαδιού. Αντικατάσταση λόγχης F 1. Απενεργοποιήστε το πριόνι και βγάλτε το βύσμα δικτύου. 2. Τοποθετήστε το πριόνι σε επίπεδη επιφάνεια. 3. Γυρίστε τη βίδα στερέωσης (14) αριστερόστροφα ( ) και λασκάρετε ομοιόμορφα τον δακτύλιο σύσφιξης αλυσίδας ( A 13), για να λασκάρετε την τάνυση αλυσίδας και να απομακρύνετε την επικάλυψη οδοντωτού τροχού (15). 4. Απομακρύνετε την κατευθυντήρια λάμα (4) και την αλυσίδα (5). Για την αποσυναρμολόγηση κρατήστε την κατευθυντήρια λάμα (4) σε μια γωνία περ. 45 μοιρών προς τα επάνω, ώστε να μπορείτε να απομακρύνετε την αλυσίδα (5) ευκολότερα από τον μικρό οδοντωτό τροχό αλυσοκίνησης (25). 5. Λασκάρετε τη βίδα (28) στην πίσω πλευρά του κοχλία σύσφιξης (24). Τοποθετήστε τον κοχλία σύσφιξης (24) με την αντίστροφη σειρά. Προσέξτε τότε ότι το μπουλόνι κοχλία σύσφιξης (29), όπως στην απεικόνιση, βρίσκεται κάτω (δείτε επίσης το απόσπασμα «Αναποδογύρισμα κατευθυντήριας λάμας», + ). 6. Για τη συναρμολόγηση τοποθετήστε την κατευθυντήρια λάμα (4) επάνω στο μπουλόνι ράγας (23), έτσι ώστε ο κοχλίας σύσφιξης (24) να δείχνει προς τα έξω. 4 5
46 G R C Y Τεχνικές πριονίσματος Γενικά Έχετε έναν καλύτερο έλεγχο εάν πριονίζετε με την κάτω πλευρά της οδηγητικής ράγας (με την πριονοαλυσίδα να έλκει) και όχι με την επάνω πλευρά της οδηγητικής ράγας (με την πριονοαλυσίδα να ωθεί). Η πριονοαλυσίδα δεν επιτρέπεται κατά το πριόνισμα ή μετά από αυτό να ακουμπάει ούτε το έδαφος ούτε κανένα άλλο αντικείμενο. Φροντίστε ώστε το αλυσοπρίονο να μην μπλοκάρει μέσα στην κοπή που δημιουργείται. Απαγορεύεται να σπάσει ή να διασπαστεί ο κορμός δέντρου. Προσέξτε και τα προνοητικά μέτρα εναντίον αναστροφικής κίνησης (βλέπε υποδείξεις ασφαλείας). Εάν σφηνώσει η πριονοαλυσίδα μην δοκιμάσετε να βγάλετε το ηλεκτρικό αλυσοπρίονο τραβώντας το με βία. Υπάρχει κίνδυνος τραυματισμού. Απενεργοποιήστε τον κινητήρα και χρησιμοποιήστε έναν μοχλοβραχίονα ή μία σφήνα για να απελευθερώσετε το ηλεκτρικό αλυσοπρίονο. Κόψιμο δέντρων Χρειάζεται μεγάλη πείρα για το κόψιμο δέντρων. Κόβετε δέντρα μόνο εάν μπορείτε να χειριστείτε καλά το ηλεκτρικό αλυσοπρίονο. Μην χρησιμοποιείτε σε καμία περίπτωση το ηλεκτρικό αλυσοπρίονο εάν δεν αισθάνεστε σίγουρος. Για λόγους ασφάλειας συστήνουμε στους άπειρους χρήστες να μην κόβουν ένα κορμό δέντρου όταν το μήκος κατευθυντήριας λάμας είναι μικρότερο από τη διάμετρο κορμού. Προσέχετε ώστε να μην βρίσκονται άνθρωποι ή ζώα κοντά στην περιοχή εργασίας σας. Η απόσταση ασφαλείας μεταξύ του δέντρου που πρόκειται να κοπεί και του επόμενου τόπου εργασίας πρέπει να έχει 2 ½ φορές το μήκος ενός δέντρου. Προσέχετε την κατεύθυνση πτώσης του δέντρου: Ο χρήστης πρέπει να μπορεί να κινηθεί με ασφάλεια στην περιοχή γύρω από το κομμένο δέντρο, για να μπορέσει να κοντύνει εύκολα το δέντρο και τα κλαδιά του. Πρέπει να αποφευχθεί το να μπλεχτεί το δέντρο που πέφτει με άλλο δέντρο. Προσέξτε την φυσική κατεύθυνση πτώσης του δέντρου η οποία εξαρτάται από την κλίση και την κυρτότητα του κορμού, την κατεύθυνση του αέρα και τον αριθμό των κλαδιών. Στέκεστε σε περίπτωση κατηφορικού εδάφους πάνω από τον κορμό που πρόκειται να κοπεί. Τα μικρά δέντρα με μία διάμετρο cm μπορούν συνήθως να κοπούν με μία τομή. Στα δέντρα με μεγαλύτερη διάμετρο πρέπει να γίνουν εντομές και μία τομή πτώσης (βλέπε κάτω Q ). Μην κόβετε δέντρα εάν φυσάει δυνατός αέρας ή αέρας που αλλάζει κατεύθυνση, αν υπάρχει κίνδυνος να γίνει ζημιά σε κάποια ιδιοκτησία ή εάν μπορεί το δέντρο να πέσει επάνω σε ηλεκτρικά σύρματα. 4 6
47 G R C Y O P Q Σηκώνετε απευθείας μετά από τη διαδικασία πριονίσματος τις ωτασπίδες, για να μπορείτε να ακούσετε ήχους και προειδοποιητικά σινιάλα. 1. Κλάδεμα: Απομακρύνετε τα κλαδιά που κρέμονται προς τα κάτω, εφαρμόζοντας πριόνισμα πάνω από τα κλαδιά. Μην κόβετε ποτέ κλαδιά πάνω από το ύψος του ώμου σας. 2. Περιοχή διαφυγής: Απομακρύνετε τα χαμόδεντρα γύρο από το δέντρο για να διασφαλίσετε εύκολη υποχώρηση. Η περιοχή διαφυγής (1) θα πρέπει να έχει κατά 45 απόκλιση πίσω από την προγραμματισμένη κατεύθυνση πτώσης κατά το κόψιμο (2). 3. Τομή της εγκοπής (A): Διεξάγετε μια σφηνοειδή εντομή στην πλευρά του κορμού προς την οποία θέλετε να πέσει το δένδρο. Αρχίστε με την οριζόντια κοπή στο κατώτερο σημείο. Το βάθος της κοπής να είναι περίπου 1/3 της διαμέτρου του κορμού. Κάνετε πρώτα μία λοξή τομή με γωνία περ. 45 από επάνω που να συναντά ακριβώς την κάτω τομή. Μην πηγαίνετε ποτέ μπροστά σε ένα δέντρο με εγκοπή. R S λυσίδα να έλκει. Η τομή πτώσης πρέ-πει να βρίσκεται οριζόντια περίπου 5 cm πάνω από την οριζόντια εντομή. Η τομή πτώσης θα πρέπει να είναι τόσο βαθιά, ώστε η απόσταση μεταξύ της τομής πτώσης και της ευθείας της εντομής να ανέρχεται τουλάχιστον στο 1/10 της διαμέτρου του κορμού του δέντρου. Το κομμάτι του κορμού που δεν έχει πριονιστεί χαρακτηρίζεται ως τσακιζόμενο κομμάτι. 5. πρώξτε, μόλις το επιτρέψει το βάθος της τομής, μία σφήνα ή έναν λοστό μέσα στην τομή πτώσης, για να αποφύγετε το σφήνωμα της οδηγητικής ράγας. 6. Εάν η διάμετρος του κορμού του δέντρου είναι μεγαλύτερη από το μήκος της οδηγητικής ράγας, διεξάγετε δύο τομές. 7. Αφού τελειώσετε με την τομή πτώσης θα πέσει το δέντρο από μόνο του ή με τη βοήθεια της σφήνας ή του λοστού. Μόλις αρχίσει το δέντρο να πέφτει τραβήξτε και βγάλτε το πριόνι από την τομή πτώσης, απενεργοποι-ήστε τον κινητήρα, ακουμπήστε κάπου το ηλεκτρικό αλυσόπρίονο και εγκαταλείψτε τον τόπο εργασίας μέσω του δρόμου οπισθοχώρησης. Q 4. Τομή πτώσης (B) Διεξάγετε την τομή πτώσης από την άλλη πλευρά του κορμού, στεκόμενος αριστερά από τον κορμό του δέντρου και πριονίζοντας με την πριονοα- O Κλάδεμα Κατά το κλάδεμα αφαιρείτε τα κλαδιά από ένα κομμένο δέντρο. 4 7
48 G R C Y Πολλά ατυχήματα συμβαίνουν κατά το κλάδεμα. Μην πριονίζετε ποτέ κλαδιά όταν στεκόσαστε επάνω στον κορμό του δέντρου. Προσέχετε τα κλαδιά που είναι τεντωμένα, γιατί πριονίζοντας μπορεί να σας τραυματίσουν. Αφαιρείτε τα πολύ μακριά κλαδιά, αφού πρώτα τα κοντύνετε. Κλαδιά που είναι τεντωμένα πρέπει να πριονιστούν από κάτω προς τα επάνω, για να αποφευχθεί το σφήνωμα του αλυσοπρίονου. Κατά το πριόνισμα χοντρών κλαδιών, εφαρμόστε την ίδια τεχνική με αυτή της κατά μήκους κοπής. Εργάζεστε αριστερά από τον κορμό και όσο το δυνατό πιο κοντά στο ηλεκτρικό αλυσοπρίονο. Εάν είναι δυνατόν στηρίζεται το βάρος του πριονιού επάνω στον κορμό. Αλλάζετε θέση εργασίας για να πριονίσετε τα κλαδιά γύρω από τον κορμό. Τα διακλαδωμένα κλαδιά πρέπει να τα κοντύνετε το καθένα ξεχωριστά. Κόντεμα Κατά μήκος κοπή είναι το τμηματικό πριόνισμα κομμένων κορμών. Προσέχετε ώστε να μην ακουμπήσει η πριονοαλυσίδα κατά το πριόνισμα το έδαφος. Προσέχετε ώστε να στέκεστε σταθερά και σε περίπτωση κατηφορικού εδάφους να βρίσκεστε πάνω από τον κορμό. K L M N 1. Ο κορμός βρίσκεται ξαπλωμένος στο έδαφος Πριονίστε από επάνω έως τέρμα τον κορμό και προσέξτε στο τέλος του κοψίματος να μην ακουμπήσετε το έδαφος. Αν έχετε τη δυνατότητα να στρέψετε τον κορμό, πριονίστε τον κατά τα 2/3. Στη συνέχεια περιστρέψτε τον κορμό και πριονίστε το υπόλοιπο του κορμού από πάνω. 2. Ο κορμός στηρίζεται στη μία άκρη Πριονίστε πρώτα από κάτω προς τα πάνω (με την πάνω πλευρά της λόγχης) το 1/3 της διαμέτρου κορμού, για να αποφύγετε με τον τρόπο αυτό τη διάσπαση. Στη συνέχεια πριονίστε από πάνω προς τα κάτω (με την κάτω πλευρά της λόγχης) μέχρι την πρώτη κοπή, για να αποφύγετε τυχόν μπλοκάρισμα. 3. Ο κορμός στηρίζεται και στα δύο άκρα Πριονίστε πρώτα από πάνω προς τα κάτω (με την κάτω πλευρά της λόγχης) το 1/3 της διαμέτρου κορμού. Στη συνέχεια πριονίστε από κάτω προς τα πάνω (με την πάνω πλευρά της λόγχης) μέχρι να συναντήσετε την πρώτη κοπή. 4. Το πριόνισμα επάνω σε τρίποδο Κρατήστε καλά με τα δύο σας χέρια το ηλεκτρικό αλυσοπριόνο και οδηγήστε το μηχάνημα καθ όλη τη διάρκεια της κοπής μακριά από το σώμα σας. Όταν κοπεί ο κορμός, περάστε το μηχάνημα από τα δεξιά του σώματός σας (1). Κρατήστε όσο 4 8
49 G R C Y το δυνατό πιο ίσια το αριστερό σας χέρι (2). Προσέξτε για τυχόν κομμάτια που πέφτουν. Μετακινηθείτε σε σημείο όπου δεν θα κινδυνεύετε από τον κορμό που πέφτει. Προσέξτε τα πόδια σας. Ο διαχωρισμένος κορμός μπορεί να προκαλέσει τραυματισμούς κατά την πτώση του. Κρατήστε ισορροπία (3). Συντήρηση και καθαρισμός Διεξάγετε εργασίες συντήρησης και καθαρισμού πάντοτε με απενεργοποιημένο κινητήρα και έχοντας βγάλει το καλώδιο από την πρίζα. Κίνδυνος τραυματισμού! Αναθέστε τις εργασίες φροντίδας και συντήρησης, οι οποίες δεν περιγράφονται στις παρούσες οδηγίες, στο ειδικό συνεργείο της εταιρείας μας. Χρησιμοποιείτε μόνο γνήσια ανταλλακτικά. Αφήστε το μηχάνημα πριν από κάθε εργασία συντήρησης και καθαρισμού να κρυώσει. Υπάρχει κίνδυνος εγκαυμάτων! Καθαρισμός Καθαρίζετε καλά το μηχάνημα μετά από κάθε χρήση. Έτσι μεγαλώνετε τη διάρκεια ζωής του μηχανήματος και αποφεύγετε δυστυχήματα. Κρατάτε τις λαβές ελεύθερες από βενζίνη, λάδι και λίπος. Καθαρίζετε τις λαβές ενδεχομένως με ένα νωπό, σε σαπουνάδα ξεπλυμένο πανί. Μην χρησιμοποιείτε για τον καθαρισμό διαλυτικά μέσα ή βενζίνη! Καθαρίζετε μετά από κάθε χρήση την πριονοαλυσίδα. Χρησιμοποιείτε γι αυτόν το σκοπό ένα πινέλο ή ένα σκουπάκι. Μην χρησιμοποιείτε υγρά για τον καθαρισμό της αλυσίδας. Λαδώνετε ελαφρά την αλυσίδα, μετά από τον καθαρισμό, με λάδι αλυσίδας. Κατά τον καθαρισμό αφαιρέστε επίσης το κάλυμμα του γραναζιού καδένας ( A 15), για να μπορείτε να καθαρίσετε καλύτερα σε αυτό το σημείο. Καθαρίστε την κατευθυντήρια λάμα ( A 4) (ράγα οδήγησης). Καθαρίζετε τις οπές εξαερισμού και τις επιφάνειες του μηχανήμτος με ένα πινέλο, σκουπάκι ή στεγνό πανί. Μην χρησιμοποιείτε υγρά για τον καθαρισμό. Καθαρίστε τη δίοδο λαδιού ( 27) για να εξασφαλίσετε ένα απροβλημάτιστο, αυτόματο λάδωμα της αλυσίδας κατά τη διάρκεια της λειτουργίας. Χρησιμοποιήστε για αυτό ένα πινέλο ή ένα πανί για να σκουπίσετε υπολείμματα από τη διέλευση λαδιού. Διαστήματα συντήρησης Διεξάγετε τακτικά τις εργασίες συντήρησης που αναφέρονται στον παρακάτω πίνακα. Με την τακτική συντήρηση του αλυσοπρίονού σας μεγαλώνει η διάρκεια ζωής του. Εκτός αυτού έχετε έτσι μία καλύτερη απόδοση κοπής και αποφεύγετε δυστυχήματα. 4 9
50 G R C Y Πίνακας διαστήματα συντήρησης Τεμάχιο μηχανήματος Ενέργεια Πριν από κάθε χρήση Μετά από 10 ώρες λειτουργίας Μετά από κάθε χρήση Εξαρτήματα του φρένου αλυσίδας Έλεγχος, εάν χρειάζεται αντικατάσταση Αλυσοτροχός Έλεγχος, εάν χρειάζεται αντικατάσταση Πριονοαλυσίδα ( A 5) Έλεγχος, λίπανση, εάν χρειάζεται ακόνισμα ή αντικατάσταση Πριονοαλυσίδα ( A 5) Καθαρισμός και λάδωμα Οδηγητική ράγα ( A 4) Έλεγχος, γύρισμα, καθαρισμός, λίπανση Οδηγητική ράγα ( A 4) Αναποδογύρισμα κατευθυντήριας λάμας Αυτόματος λαδιού Ελέγξτε, εάν απαιτείται καθαρίστε την εκροή λαδιού Λίπανση της πριονοαλυσίδας Καθαρίζετε και λαδώνετε την αλυσίδα τακτικά. Έτσι διατηρείτε την αλυσίδα κοφτερή και έχετε μία καλύτερη από-δοση του μηχανήματος. Σε περίπτωση βλάβηςεξαιτίας ανεπαρκούς συντήρησης της πριονοαλυσίδας, παύει να ισχύει η εγγύηση. Όταν χειρίζεστε την αλυσίδα ή την οδηγη-τική ράγα βγάζετε το καλώδιο από την πρίζα και χρησιμοποιείτε ασφαλή εναντίον κοψίματος γάντια. Λαδώνετε την αλυσίδα μετά από τον καθαρισμό, μετά από 10 ώρες χρησιμοποίησης ή τουλάχιστον μία φορά την εβδομάδα, αναλόγως με το πιο από αυτά προηγηθεί. Πριν από τη λίπανση πρέπει η οδηγητική ράγα, ιδιαίτερα τα δόντια της ράγας, να καθαριστούν καλά. Χρησιμοποιείτε γι αυτόν το σκοπό ένα σκουπάκι και ένα στεγνό πανί. Λαδώνετε τον καθένα κρίκο αλυσίδας με τη βοήθεια μιας σύριγγας ψεκασμού λαδιού με μύτη βελόνας (διαθέσιμη σε ειδικό κατάστημα). Στάξτε μεμονωμένες σταγόνες λαδιού επάνω στις αρθρώσεις και τις μύτες δοντιών του κάθε κρίκου αλυσίδας. 5 0
51 G R C Y Ακόνισμα της πριονοαλυσίδας Μία λάθος ακονισμένη πριονοαλυ-σίδα μεγαλώνει τον κίνδυνο αναστρο-φικής κίνησης! Χρησιμοποιείτε ασφαλή εναντίον κοψίματος γάντια όταν χειρίζεστε την αλυσίδα ή την οδηγητική ράγα. Μία κοφτερή αλυσίδα εξασφαλίζει μία καλύτερη απόδοση κοπής. Προχωρεί χωρίς κόπο πριονίζοντας μέσα στο ξύλο και αφήνει μεγάλα, μακριά πριονίδια. Η πριονοαλυσίδα είναι αμβλεία, όταν πρέπει να πιέσετε το αλυσοπρίονο μέσα στο ξύλο και όταν τα πριονίδια είναι πολύ μικρά. Όταν η πριονοαλυσίδα είναι πολύ αμβλεία δεν δημιουργούνται καθόλου πριονίδια, παρά μόνο ξυλόσκονη. Τα τμήματα κοπής της αλυσίδας αποτελούνται από το δόντι κοπής και από τη μύτη περιορισμού βάθους. Η απόσταση μεταξύ αυτών των δύο καθορίζει το βάθος ακονίσματος. Κατά το ακόνισμα των δοντιών κοπής πρέπει να ληφθούν υπόψη οι παρακάτω τιμές H - γωνία ακονίσματος (30 ) - γωνία εγκοπής (85 ) - βάθος ακονίσματος (0,65 mm) Αποκλίσεις από τα γεωμετρικά μέτρα των ακμών μπορούν να οδηγήσουν σε μεγαλύτερη τάση προς αναστροφική κίνηση του μηχανήματος. Μεγαλύτερος κίνδυνος τραυματισμού! Για το ακόνισμα της αλυσίδας χρειάζονται ειδικά εργαλεία τα οποία εξασφαλίζουν το ότι τα μαχαίρια είναι ακονισμένα στη σωστή γωνία και στο σωστό βάθος. Εάν δεν έχετε πείρα με τη χρήση αυσοπρίονων σάς συνιστούμε να πάτε για το ακόνισμα της πριονοαλυσίδας σε έναν ειδικό ή σε ειδικό συνεργείο. Εάν θέλετε να ακονίσετε την πριονοαλυσίδα μόνος σας, μπορείτε να αγοράσετε τα ειδικά εργαλεία σε ειδικό κατάστημα. I 1. Απενεργοποιήστε το πριόνι και βγάλτε το βύσμα δικτύου. 2. Για το ακόνισμα θα πρέπει η αλυσίδα να είναι καλά τανυσμένη για να γίνεται σωστό ακόνισμα. 3. Για το ακόνισμα χρειάζεται μία κυλινδρική λίμα με διάμετρο 4,0 mm. Με διαφορετικές διαμέτρους χαλάει η αλυσίδα και μπορεί να προκληθεί κίνδυνος κατά την εργασία. 4. Ακονίζετε μόνο από μέσα προς τα έξω. Οδηγείτε τη λίμα από την εσωτερική πλευρά του δοντιού κοπής προς τα έξω. Σηκώνετε τη λίμα όταν την γυρίζετε πίσω. 5. Ακονίστε πρώτα τα δόντια της μιας πλευράς. Γυρίστε έπειτα το πριόνι και ακονίστε τα δόντια της άλλης πλευράς. 6. Η αλυσίδα είναι φθαρμένη και πρέπει να αντικατασταθεί από μία νέα πριονοαλυσίδα, όταν έχουν μείνει μόνο περίπου 4 mm του δοντιού κοπής. 7. Μετά από το ακόνισμα πρέπει όλα τα τμήματα κοπής να έχουν το ίδιο μάκρος και πλάτος. 8. Μετά από κάθε τρίτο ακόνισμα πρέπει να ελέγχετε το βάθος ακονίσματος 5 1
52 G R C Y (περιορισμός βάθους) και να λιμάρετε το ύψος με τη βοήθεια μιας επίπεδης λίμας. Η μύτη περιορισμού βάθους θα πρέπει να βρίσκεται περίπου 0,65 mm πίσω από το δόντι κοπής. Στρογγυλεύστε ελαφρά στο τέλος μπροστά την μύτη περιορισμού βάθους. Ρύθμιση του τανύσματος της αλυσίδας Η ρύθμιση της τάνυσης αλυσίδας περιγράφεται στο Κεφάλαιο «Χειρισμός του αλυσοπρίονου - Τάνυση αλυσίδας». Προσαρμογή νέας πριονοαλυσίδας Όταν η αλυσίδα είναι καινούργια μειώνεται η ισχύς τάνυσης μετά από κάποιο χρονικό διάστημα. Γι αυτό πρέπει μετά τις πρώτες 5 κοπές, το αργότερο μετά από 10 λεπτά χρόνο κοπής, να επανατανύσετε την αλυσίδα. Μην στερεώνετε ποτέ μία νέα αλυσίδα επάνω σε φθαρμένο οδοντωτό αλυσοτροχό ή επάνω σε χαλασμένη ή φθαρμένη οδηγητική ράγα. Η αλυσίδα μπορεί να κοπεί ή να βγει από την τροχιά της. Μπορεί να προκληθούν σοβαροί τραυματισμοί. Συντήρηση κατευθυντήριας λάμας Χρησιμοποιείτε ανθεκτικά στην κοπή γάντια όταν μεταχειρίζεστε την αλυσίδα ή την κατευθυντήρια λάμα. 1. Απενεργοποιήστε τη συσκευή και τραβήξτε το βύσμα δικτύου ( A 18). 2. Απομακρύνετε την επικάλυψη οδοντωτού τροχού (15), την αλυσίδα ( A 5) και την κατευθυντήρια λάμα ( A 4). 3. Ελέγξτε την κατευθυντήρια λάμα ( A 4) για φθορές. Αφαιρέστε τα γρέζια και ευθυγραμμίστε τις επιφάνειες οδήγησης με μια επίπεδη λίμα. 4. Καθαρίστε τη δίοδο λαδιού ( J 27) για να εξασφαλίσετε ένα απροβλημάτιστο, αυτόματο λάδωμα της αλυσίδας κατά τη διάρκεια της λειτουργίας. 5. Συναρμολογήστε την κατευθυντήρια λάμα ( A 4), την αλυσίδα ( A 5) και την επικάλυψη οδοντωτού τροχού ( A 15) και τανύστε το ηλεκτρικό αλυσοπρίονο. Σε βέλτιστη κατάσταση της διόδου λαδιού η αλυσίδα ψεκάζει αυτόματα λίγο λάδι κάποια δευτερόλεπτα μετά την εκκίνηση του ηλεκτρικού αλυσοπρίονου. Αναποδογύρισμα κατευθυντήριας λάμας Χρησιμοποιείτε ανθεκτικά στην κοπή γάντια όταν μεταχειρίζεστε την αλυσίδα ή την κατευθυντήρια λάμα. Η κατευθυντήρια λάμα ( A 4) πρέπει να αναποδογυρίζεται περ. κάθε 10 ώρες εργασίας ώστε να εξασφαλίζεται ομοιόμορφη φθορά. 1. Απενεργοποιήστε τη συσκευή και τραβήξτε το βύσμα δικτύου ( A 18). 2. Απομακρύνετε την επικάλυψη οδοντωτού τροχού ( A 15), την αλυσίδα ( A 5) και την κατευθυντήρια λάμα ( A 4). 5 2
53 G R C Y F 3. Τοποθετήστε την κατευθυντήρια λάμα (4) μπροστά σας και γυρίστε την στην πίσω πλευρά. Λασκάρετε τη βίδα στερέωσης (28) και απομακρύνετε τον κοχλία σύσφιξης (24). 4. Στερεώστε τον κοχλία σύσφιξης (24) με τη βοήθεια της βίδας στερέωσης (28) από την άλλη πλευρά στην κατευθυντήρια λάμα (4). Προσέξτε τότε ότι το μπουλόνι κοχλία σύσφιξης (29) είναι κάτω. Η στρογγυλή προεξοχή (24a) του κοχλία σύσφιξης πρέπει να βλέπει στην κατεύθυνση του μικρού οδοντωτού τροχού αλυσοκίνησης. 5. Συναρμολογήστε την κατευθυντήρια λάμα (4), την αλυσίδα (5) και την επικάλυψη οδοντωτού τροχού (15) και τανύστε το ηλεκτρικό αλυσοπρίονο. Κατεύθυνση κίνησης της αλυσίδας Για την ευθυγράμμιση της αλυσίδας ( 5) μπορείτε να βοηθηθείτε από το εικονοσύμβολο κάτω από την επικάλυψη οδοντωτού τροχού ( 15) κατά την περιστροφή της κατευθυντήριας λάμας. Η απεικονιζόμενη κατεύθυνση κίνησης επάνω στην κατευθυντήρια λάμα δεν θα συμφωνεί πλέον. Φύλαξη Καθαρίζετε τη συσκευή πριν από τη φύλαξη. Εκκενώνετε το δοχείο λαδιού πριν από παρατεταμένες παύσεις λειτουργίας. Η απόρριψη του χρησιμοποιημένου λαδιού θα πρέπει να γίνεται με τρόπο φιλικό προς το περιβάλλον (δείτε «Απόρριψη/ Προστασία του περιβάλλοντος»). Τοποθετείτε την προστατευτική θήκη κατευθυντήριας λάμας. Φυλάτε τη συσκευή σε έναν στεγνό χώρο που προστατεύεται από τη σκόνη και εκτός εμβέλειας των παιδιών. Απόσυρση και προστασία του περιβάλλοντος Μην πετάτε το παλιό λάδι στο σύστημα αποχέτευσης ή στον νεροχύτη. Αποσύρετε το παλιό λάδι ευνοϊκά για το περιβάλλον παραδώστε το σε μία υπηρεσία απόσυρσης. Αποσύρετε συσκευή, εξαρτήματα και συσκευασία με οικολογικό τρόπο ανακύκλωσης. Τα μηχανήματα δεν ανήκουν στα οικιακά απορρίμματα. Τα προϊόντα με επισήμανση δεν επιτρέπεται να απορρίπτονται μέσω των φυσιολογικών οικιακών απορριμμάτων αλλά πρέπει να παραδίδονται σε μια υπηρεσία παραλαβής για την ανακύκλωση ηλεκτρικών και ηλεκτρονικών συσκευών. Η ανακύκλωση βοηθάει στη μείωση της κατανάλωσης πρώτων υλών και στην προστασία του περιβάλλοντος. Θα 5 3
54 G R C Y βρείτε πληροφορίες για την απόρριψη και την τοποθεσία της κοντινότερης εγκατάστασης ανακύκλωσης π.χ. στο τμήμα καθαριότητας της πόλης σας ή στο χρυσό οδηγό. Αδειάστε καλά το ντεπόζιτο λαδιού και παραδώστε το ηλεκτρικό αλυσοπρίονό σας σε μία υπηρεσία ανακύκλωσης. Τα χρησιμοποιημένα πλαστικά και μεταλλικά εξαρτήματα μπορούν να διαχωρι-στούν κατά είδος και έτσι να ανακυκλωθούν. Για το σκοπό αυτό, απευθυνθείτε στο κέντρο σέρβις της εταιρείας μας. Ανταλλακτικά Ανταλλακτικά και αξεσουάρ μπορείτε να βρείτε στη σελίδα w w w. g r i zzl y - s e r v i c e. e u Εάν δεν έχετε Internet, απευθυνθείτε τηλεφωνικά στο Κέντρο Σέρβις (βλέπε «Service-Center» στη σελίδα 57). Να έχετε πρόχειρους τους αριθμούς παραγγελίας που αναφέρονται πιο κάτω. Σκέπασμα ντεπόζιτου λαδιού Πριονοαλυσίδα Oregon 91P057X Πριονοαλυσίδα Oregon 91VXL Λόγχη Λάδι αλυσίδας Bio 1 λίτρο Λάδι αλυσίδας Bio 5 λίτρα Η ανταλλακτική αλυσίδα Oregon επιτρέπεται να χρησιμοποιηθεί μόνο σε συνδυασμό με την ανάλογη λόγχη Oregon και το για τον σκοπό αυτό εγκεκριμένο αλυσοπρίονο. Υφίσταται κίνδυνος τραυματισμού. 5 4
55 G R C Y Ανίχνευση βλαβών Πρόβλημα Πιθανή αιτία Άρση βλάβης Η συσκευή δεν ενεργοποιείται Η αλυσίδα δεν στρέφεται Άσχημη απόδοση κοπής Το πριόνι δουλεύει δύσκολα, η αλυσίδα βγαίνει Ασφαλισμένο φρένο αλυσίδας Δεν υπάρχει ρεύμα Ενεργοποιείται η ασφάλεια σπιτιού Διακόπτης ενεργοποίησης/ απενεργοποίησης ( A 10) χαλασμένος Ψήκτρες άνθρακος φθαρμένες Κινητήρας χαλασμένος Το φρένο αλυσίδας μπλοκάρει την πριονοαλυσίδα ( A 5) Λάθος συναρμολογημένη πριονοαλυσίδα ( A 5) Αμβλεία πριονοαλυσίδα ( A 5) Ανεπαρκές τέντωμα της αλυσίδας Ανεπαρκές τέντωμα της αλυσίδας Ελέγξτε το φρένο αλυσίδας, ενδεχομένως λύστε το φρένο αλυσίδας Ελέγξτε την πρίζα, το καλώδιο, τον ρευματολήπτη, ενδεχ. επισκευή από ειδικό ηλεκτρολόγο. Ελέγξτε την ασφάλεια σπιτιού, βλ. υπόδειξη Επισκευή μέσω υπηρεσίας service Επισκευή μέσω υπηρεσίας service Επισκευή μέσω υπηρεσίας service Ελέγξτε το φρένο αλυσίδας, ενδεχ. ελευθερώστε το φρένο αλυσίδας Συναρμολογήστε σωστά την πριονοαλυσίδα Ακονίστε τα δόντια κοπής ή περάστε νέα αλυσίδα Ελέγξτε το τέντωμα της αλυσίδας Ελέγξτε το τέντωμα της αλυσίδας Η αλυσίδα θερμαίνεται, δημιουργείται καπνός κατά το πριόνισμα, η ράγα αλλάζει χρώμα Πολύ λίγο λάδι αλυσίδας Ελέγξτε την στάθμη λαδιού και ενδεχ. εισάγετε λάδι αλυσίδας, ελέγξτε την αυτόματη διάταξη ρύθμισης λαδιού και ενδεχ. καθαρίστε τον αγωγό εκροής λαδιού ή επισκευή μέσω υπηρεσίας service Ελέγξτε τη ρύθμιση ακριβείας λαδιού (πλήκτρο ρύθμισης λαδιού) 5 5
56 G R C Y Εγγύηση Αξιότιμη πελάτισσα, αξιότιμε πελάτη, για τη συσκευή αυτή σας προσφέρουμε εγγύηση 3 ετών από την ημερομηνία της αγοράς. Σε περίπτωση ελαττωμάτων αυτού του προϊόντος, έχετε απέναντι του πωλητή τα νόμιμα δικαιώματα. Αυτά τα νόμιμα δικαιώματα δεν περιορίζονται από την επακόλουθη εγγύησή μας. Όροι εγγύησης Η προθεσμία της εγγύησης αρχίζει από την ημερομηνία της αγοράς. Παρακαλούμε να φυλάξετε καλά την απόδειξη αγοράς. Θα σας χρειαστεί εάν θελήσετε να αποδείξετε την ημερομηνία και την αγορά της συσκευής. Εάν παρουσιαστεί ελάττωμα υλικού ή κατασκευής στο προϊόν αυτό εντός τριών ετών από την ημερομηνία αγοράς, θα σας επισκευάσουμε ή θα σας αντικαταστήσουμε δωρεάν το προϊόν αυτό, με δική μας επιλογή. Αυτή η παροχή εγγύησης προϋποθέτει πως εντός της τριετούς προθεσμίας θα μας προσκομιστεί η ελαττωματική συσκευή και η απόδειξη αγοράς και μία γραπτή περιγραφή του ελαττώματος και της ημερομηνίας που πρωτοπαρουσιάστηκε. Εάν το ελάττωμα καλύπτεται από την εγγύησή μας, θα σας επιστραφεί ή το επισκευασμένο ή ένα νέο προϊόν. Με την αντικατάσταση της συσκευής ξεκινάει μια νέα χρονική περίοδος εγγύησης. Με την επισκευή της συσκευής δεν ξεκινάει νέα χρονική περίοδος εγγύησης. Διάρκεια εγγύησης και νόμιμες αξιώσεις για ελαττώματα Η διάρκεια της εγγύησης δεν επεκτείνεται από την παροχή εγγύησης. Αυτό ισχύει και για αντικαταστημένα και επισκευασμένα εξαρτήματα. Ενδεχόμενα ελαττώματα που διαπιστώνονται κατά την αγορά, πρέπει να δηλωθούν αμέσως μετά το ξεπακετάρισμα. Για όλες τις επισκευές που καθίστανται απαραίτητες μετά τη λήξη της εγγύησης επιβαρύνεστε με τις σχετικές δαπάνες. Έκταση της εγγύησης Η συσκευή κατασκευάστηκε βάσει αυστηρών κριτηρίων ποιότητας και ελέγχθηκε ευσυνείδητα πριν την παράδοσή της. Η εγγύηση ισχύει για ελαττώματα στο υλικό ή στην κατασκευή. Αυτή η εγγύηση δεν συμπεριλαμβάνει τμήματα του προϊόντος που υφίστανται κοινή φθορά και θεωρούνται ως αναλώσιμα (π.χ. Πριονοαλυσίδα) ή εύθραυστα τμήματα του προϊόντος (π.χ. διακόπτες). Αυτή η εγγύηση εκπίπτει σε περίπτωση που η συσκευή υπέστη βλάβη, δεν χρησιμοποιήθηκε ή δεν συντηρήθηκε σωστά. Για σωστή χρήση του προϊόντος πρέπει να ακολουθούνται όλες οι υποδείξεις που αναφέρονται στις οδηγίες χρήσης. Να αποφεύγονται οπωσδήποτε οι χρήσεις και πράξεις που δεν συνιστώνται στις Οδηγίες χρήσης ή για τις οποίες ισχύουν ειδικές προειδοποιήσεις. Το προϊόν προορίζεται μόνο για ιδιωτική και όχι για επαγγελματική χρήση. Σε περίπτωση καταχρηστικού και λάθος χειρισμού, άσκησης βίας και επεμβάσεων που δεν εκτελούνται από συμβεβλημένο συνεργείο μας, εκπίπτει η εγγύηση. Διακανονισμός σε περίπτωση εγγύησης Προς εξασφάλιση ταχείας επεξεργασίας παρακαλούμε να ακολουθήστε τις επόμενες υποδείξεις: Για όλα τα αιτήματα να έχετε πρόχειρα την απόδειξη αγοράς και τον αριθμό προϊόντος (ΙΑΝ ) ως αποδεικτικό στοιχεί για την αγορά. 5 6
57 G R C Y Τον αριθμό προϊόντος θα τον βρείτε στην ετικέτα στοιχείων της συσκευής, σε χαραγμένη σημείωση στο προϊόν, στο εξώφυλλο των Οδηγιών χρήσης (κάτω αριστερά) ή σαν αυτοκόλλητο στην πίσω ή κάτω πλευρά. Εάν παρουσιαστούν σφάλματα λειτουργίας ή άλλα ελαττώματα, επικοινωνήστε πρώτα με το πιο κάτω αναφερόμενο τμήμα εξυπηρέτησης πελατών τηλεφωνικά ή με e - m a. i l Εκεί θα σας δοθούν περισσότερες πληροφορίες για τον διακανονισμό. Ένα ως ελαττωματικό καταχωρημένο προϊόν μπορείτε, μετά από συνεννόηση με το τμήμα μας εξυπηρέτησης πελατών, να το στείλετε, με δική μας επιβάρυνση με τα ταχυδρομικά, επισυνάπτοντας την απόδειξη αγοράς και στοιχεία για το ελάττωμα και την ημερομηνία που παρουσιάστηκε, στη διεύθυνση του σέρβις μας που σας κοινοποιήθηκε. Προς αποφυγή προβλημάτων παραλαβής και πρόσθετων δαπανών, παρακαλούμε να χρησιμοποιήσετε μόνο τη διεύθυνση που σας κοινοποιήθηκε. Σιγουρευτείτε πως η αποστολή δεν έγινε χωρίς πληρωμή των ταχυδρομικών τελών, σαν ογκώδες αντικείμενο, σαν εξπρές, ή με άλλο ειδικό τρόπο. Στείλτε τη συσκευή μαζί με όλα τα αξεσουάρ που σας παραδόθηκαν κατά την αγορά και φροντίστε για ασφαλή συσκευασία. Σέρβις επισκευής Επισκευές που δεν καλύπτονται από την εγγύηση μπορούν να εκτελεστούν από το υποκατάστημά μας για σέρβις έναντι πληρωμής. Το υποκατάστημα σέρβις θα σας υποβάλει προϋπολογισμό εξόδων. Μπορούμε να αναλάβουμε την επεξεργασία συσκευών που μας απεστάλησαν καλά συσκευασμένες και με πληρωμένα ταχυδρομικά τέλη. Προσοχή: Παρακαλούμε να στείλετε τη συσκευή σας στο υποκατάστημά μας για σέρβις, καλά καθαρισμένη και με την σχετική υπόδειξη για το ελάττωμα. Οι συσκευές που στέλνονται χωρίς να έχουν πληρωθεί τα ταχυδρομικά τέλη - με εξπρές, σαν ογκώδη αντικείμενα, ή με άλλο ειδικό τρόπο - δεν θα γίνονται δεκτές. Την απόρριψη των ελαττωματικών σας συσκευών που μας στέλνετε την αναλαμβάνουμε δωρεάν. S e r v i c e - C e n t e r G R Σέρβις Ελλάδα Tel.: (0,03 EUR/Min.) grizzly@lidl.gr IA N C Y Σέρβις Κύπρος Tel.: grizzly@lidl.com.cy IA N εισαγωγέας Παρακαλούμε να λάβετε υπόψη σας πως η ακόλουθη διεύθυνση δεν είναι η διεύθυνση για σέρβις. Επικοινωνήστε πρώτα με το πιο πάνω αναφερόμενο κέντρο εξυπηρέτησης πελατών. Grizzly Tools GmbH & Co. KG Stockstädter Straße Großostheim Γερμανία 5 7
58 D E A T C H Inhalt Einleitung...58 Bestimmungsgemäße Verwendung...59 Allgemeine Beschreibung...59 Lieferumfang...59 Funktionsbeschreibung...59 Übersicht...60 Technische Daten...60 Sicherheitshinweise...61 Bildzeichen auf dem Gerät...61 Symbole in der Betriebsanleitung Allgemeine Sicherheitshinweise...62 Allgemeine Sicherheitshinweise für Elektrowerkzeuge...62 Vorsichtsmaßnahmen gegen Rückschlag...67 Restrisiken...68 Weiterführende Sicherheitshinweise.. 68 Sicherheitsfunktionen...68 Montage...69 Sägekette montieren...69 Schwert montieren...70 Sägekette spannen...70 Kettenschmierung...71 Bedienung...71 Einschalten...71 Kettenbremse prüfen...72 Einleitung Herzlichen Glückwunsch zum Kauf Ihres neuen Gerätes. Sie haben sich damit für ein hochwertiges Gerät entschieden. Dieses Gerät wurde während der Produktion auf Qualität geprüft und einer Endkontrolle unterzogen. Die Funktionsfähigkeit Ihres Gerätes ist somit sichergestellt. Kettenschmierung prüfen...72 Schwert wechseln...72 Sägetechniken...73 Allgemeines...73 Bäume fällen...73 Entasten...75 Ablängen...75 Wartung und Reinigung...76 Reinigung...76 Sägekette ölen...76 Wartungsintervalle...77 Tabelle Wartungsintervalle...77 Schneidzähne schärfen...77 Kettenspannung einstellen...78 Neue Sägekette einlaufen lassen Schwert warten...79 Schwert umdrehen...79 Aufbewahrung...79 Entsorgung/Umweltschutz...80 Ersatzteile/Zubehör...80 Fehlersuche...81 Garantie...82 Reparatur-Service...83 Service-Center...83 Importeur...83 Original EG-Konformitätserklärung...84 Explosionszeichnung...88 Die Betriebsanleitung ist Bestandteil dieses Gerätes. Sie enthält wichtige Hinweise für Sicherheit, Gebrauch und Entsorgung. Machen Sie sich vor der Benutzung des Gerätes mit allen Bedien- und Sicherheitshinweisen vertraut. Benutzen Sie das Gerät nur wie beschrieben und für die angegebenen Einsatzbereiche. Bewahren Sie die Betriebsanleitung gut auf und händigen Sie alle Unterlagen bei Weitergabe des Gerätes an Dritte mit aus. 5 8
59 D E A T C H Bestimmungsgemäße Verwendung Die Elektrokettensäge ist nur zum Sägen von Holz konstruiert. Für alle anderen Anwendungsarten (z. B. Schneiden von Mauerwerk, Kunststoff oder Lebensmitteln) ist das Gerät nicht vorgesehen. Die Elektrokettensäge ist für den Einsatz im Heimwerkerbereich bestimmt. Sie wurde nicht für den gewerblichen Dauereinsatz konzipiert. Das Gerät ist zum Gebrauch durch Erwachsene bestimmt. Jugendliche über 16 Jahre dürfen die Elektrokettensäge nur unter Aufsicht benutzen. Der Hersteller haftet nicht für Schäden, die durch bestimmungswidrigen Gebrauch oder falsche Bedienung verursacht wurden. Dieses Gerät ist nicht zur gewerblichen Nutzung geeignet. Bei gewerblichem Einsatz erlischt die Garantie. Diese Elektrokettensäge ist nur durch eine Person und nur zum Sägen von Holz zu benutzen. Die Elektrokettensäge muss mit der rechten Hand am hinteren Handgriff und mit der linken Hand am vorderen Handgriff gehalten werden. Vor Gebrauch der Elektrokettensäge muss der Benutzer alle Hinweise und Anweisungen in der Betriebsanleitung gelesen und verstanden haben. Der Benutzer muss angemessene persönliche Schutzausrüstung (PSA) tragen. Mit der Elektrokettensäge darf nur Holz gesägt werden. Materialien wie bspw. Kunststoff, Stein, Metall oder Holz, welches Fremdkörper enthält (bspw. Nägel oder Schrauben), dürfen nicht bearbeitet werden! Allgemeine Beschreibung Lieferumfang Die Abbildung der wichtigsten Funktionsteile finden Sie auf der vorderen und hinteren Ausklappseite. Packen Sie das Gerät aus und kontrollieren Sie, ob es vollständig ist: - Elektrokettensäge - Schwert (Führungsschiene) (bereits montiert) - Sägekette (bereits montiert) - Schwertschutzköcher - Ölflasche mit 180 ml Bio-Sägekettenöl - Betriebsanleitung Entsorgen Sie das Verpackungsmaterial ordnungsgemäß. Funktionsbeschreibung Die Elektrokettensäge besitzt als Antrieb einen Elektromotor. Die umlaufende Sägekette wird über ein Schwert (Führungsschiene) geführt. Das Gerät ist mit einem Kettenschnellspannsystem und einer Schnellstopp-Kettenbremse ausgestattet. Eine Öl-Automatik sorgt für die kontinuierliche Kettenschmierung. Zum Schutz des Anwenders ist die Elektrokettensäge mit verschiedenen Schutzeinrichtungen versehen. Die Funktion der Bedienteile entnehmen Sie bitte den nachfolgenden Beschreibungen. 5 9
60 D E A T CH Übersicht A C F G 1 Hinterer Griff 2 Öltankkappe 3 Kettenbremshebel/ vorderer Handschutz 4 Schwert (Führungsschiene) 5 Sägekette 6 Umlenkstern 7 Krallenanschlag 8 Vorderer Griff 9 Elektromotor 10 Ein-/Ausschalter 11 Einschaltsperre 12 Kettenfangbolzen 13 Kettenspannring 14 Befestigungsschraube für Kettenradabdeckung 15 Kettenradabdeckung 16 Hinterer Handschutz 18 Netzstecker 19 Schwertschutzköcher 20 Ölflasche 21 Ölstandsanzeige 22 Minimummarke MIN der Ölstandsanzeige 23 Schienenbolzen 24 Spannschnecke 25 Kettenritzel 26 Nase J 27 Öldurchlass 28 Fixierungsschraube 29 Spannschneckenbolzen Technische Daten Elektro-Kettensäge...FKS 2200 F3 Nenneingangsspannung U V~, 50 Hz Leistungsaufnahme P W Schutzklasse... II Schutzart... IP20 Kettengeschwindigkeit v ,3 m/s Gewicht ohne Schwert und Sägekette... 5 kg mit Schwert und Sägekette... 5,9 kg Tankinhalt... ca. 190 ml Sägekette... Oregon 91P057X verchromter Schneidzahn, rückschlagarm Schwert...Oregon 16 Double-Guard SDEA Kettenabstand mm Kettenstärke...1,3 mm Zahnung des Kettenrades...7 Schwertlänge mm Schnittlänge mm Schalldruckpegel (L pa )...84,9 db(a); K pa = 3 db Schallleistungspegel (L WA ) gemessen.. 107,7 db(a); K WA = 2,58 db garantiert db(a) Vibration (a h )... 7,612 m/s 2 ; K= 1,5 m/s 2 Der angegebene Schwingungsemissionswert ist nach einem genormten Prüfverfahren gemessen worden und kann zum Vergleich eines Elektrowerkzeugs mit einem anderen verwendet werden. Der angegebene Schwingungsemissionswert kann auch zu einer einleitenden Einschätzung der Aussetzung verwendet werden. Warnung: Der Schwingungsemissionswert kann sich während der tatsächlichen Benutzung des Elektrowerkzeugs von dem Angabewert 6 0

61 D E A T CH unterscheiden, abhängig von der Art und Weise, in der das Elektrowerkzeug verwendet wird. Es besteht die Notwendigkeit, Sicherheitsmaßnahmen zum Schutz des Bedieners festzulegen, die auf einer Abschätzung der Aussetzung während der tatsächlichen Benutzungsbedingungen beruhen (hierbei sind alle Anteile des Betriebszyklus zu berücksichtigen, beispielsweise Zeiten, in denen das Elektrowerkzeug abgeschaltet ist, und solche, in denen es zwar eingeschaltet ist, aber ohne Belastung läuft). Sicherheitshinweise Dieser Abschnitt behandelt die grundlegenden Sicherheitsvorschriften bei der Arbeit mit dem Gerät. Eine Elektrokettensäge ist ein gefährliches Gerät, das bei falscher oder nachlässiger Benutzung ernsthafte oder sogar tödliche Verletzungen verursachen kann. Beachten Sie daher zu Ihrer Sicherheit und der Sicherheit anderer stets nachfolgende Sicherheitshinweise und fragen Sie bei Unsicherheiten einen Fachmann um Rat. Bildzeichen auf dem Gerät Machen Sie sich vor der Arbeit mit allen Bedienelementen gut vertraut. Üben Sie den Umgang mit der Elektrokettensäge und lassen Sie sich Funktion, Wirkungsweise und Sägetechniken von einem Fachmann erklären. LWA db Die Sägekette dreht sich nicht, wenn die Kettenbremse eingerastet ist. Lösen Sie die Kettenbremse, indem Sie den Bremshebel gegen den vorderen Griff schieben. Lesen und beachten Sie die zur Maschine gehörende Betriebsanleitung! Tragen Sie persönliche Schutzausrüstung. Gehör- und Augenschutz tragen! Tragen Sie einen Kopfschutz! Tragen Sie Schutzhandschuhe, um Schnittverletzungen zu vermeiden! Tragen Sie Sicherheitsschuhe mit fester Sohle! Schutzkleidung benutzen! Verwenden Sie die Elektrokettensäge immer mit beiden Händen. Setzen Sie die Maschine nicht dem Regen aus. Das Gerät darf weder feucht sein, noch in feuchter Umgebung betrieben werden. Achtung! Rückschlag - Achten Sie beim Arbeiten auf Rückschlag der Maschine. Achtung! Ziehen Sie bei Beschädigung oder Durchschneiden des Netzkabels sofort den Netzstecker aus der Steckdose. Garantierter Schallleistungspegel 6 1
62 D E A T C H Bildzeichen auf dem Typenschild: 460 mm Elektrogeräte gehören nicht in den Hausmüll. Schwertlänge Schutzklasse II Bildzeichen unterhalb der Kettenradabdeckung: Laufrichtung der Sägekette beachten. Achtung! Betriebsanleitung lesen. Bildzeichen auf dem Schwert: Laufrichtung der Sägekette Bildzeichen auf der Öltankkappe: Sägekette ölen. Bildzeichen auf der Befestigungsschraube für die Kettenradabdeckung: AUF ZU Bildzeichen am Kettenbremshebel: O Kettenbremse: AUS I Kettenbremse: EIN Symbole in der Betriebsanleitung Gefahrenzeichen (anstelle des Ausrufungszeichens ist die Gefahr erläutert) mit Angaben zur Verhütung von Personen- oder Sachschäden. Gebotszeichen (an der Stelle des Ausrufungszeichens ist das Gebot erläutert) mit Angaben zur Verhütung von Schäden. Hinweiszeichen mit Informationen zum besseren Umgang mit dem Gerät. Allgemeine Sicherheitshinweise Bevor Sie mit der Elektrokettensäge arbeiten, machen Sie sich mit allen Bedienteilen gut vertraut. Üben Sie den Umgang mit der Elektrokettensäge (Ablängen von Rundholz auf einem Sägebock) und lassen Sie sich Funktion, Wirkungsweise, Sägetechniken und Personenschutzausrüstung von einem erfahrenen Anwender oder Fachmann erklären. Beachten Sie den Lärmschutz und örtliche Vorschriften beim Holzfällen. Örtliche Bestimmungen können eine Eignungsprüfung erforderlich machen. Fragen Sie bei der Forstverwaltung nach. Achtung! Beim Gebrauch von Elektrowerkzeugen sind zum Schutz gegen elektrischen Schlag, Verletzungs- und Brandgefahr folgende grundsätzliche Sicherheitsmaßnahmen zu beachten: Es besteht die Verletzungsgefahr. Allgemeine Sicherheitshinweise für Elektrowerkzeuge WARNUNG! Lesen Sie alle Sicherheitshinweise und Anweisungen. Versäumnisse bei der Einhaltung der Sicherheitshinweise und 6 2
63 D E A T C H Anweisungen können elektrischen Schlag, Brand und/oder schwere Verletzungen verursachen. Bewahren Sie alle Sicherheitshinweise und Anweisungen für die Zukunft auf. Der in den Sicherheitshinweisen verwendete Begriff,,Elektrowerkzeug bezieht sich auf netzbetriebene Elektrowerkzeuge (mit Netzkabel) und auf akkubetriebene Elektrowerkzeuge (ohne Netzkabel). Arbeitsplatzsicherheit: Halten Sie Ihren Arbeitsbereich sauber und gut beleuchtet. Unordnung oder unbeleuchtete Arbeitsbereiche können zu Unfällen führen. Arbeiten Sie mit der Elektrokettensäge nicht in explosionsgefährdeter Umgebung, in der sich brennbare Flüssigkeiten, Gase oder Stäube befinden. Elektrowerkzeuge erzeugen Funken, die den Staub oder die Dämpfe entzünden können. Halten Sie Kinder und andere Personen während der Benutzung der Elektrokettensäge fern. Bei Ablenkung können Sie die Kontrolle über das Gerät verlieren. Elektrische Sicherheit: Vorsicht: So vermeiden Sie Unfälle und Verletzungen durch elektrischen Schlag: Der Anschlussstecker der Elektrokettensäge muss in die Steckdose passen. Der Stecker darf in keiner Weise verändert werden. Verwenden Sie keine Adapterstecker gemeinsam mit schutzgeerdeten Elektrowerkzeugen. Unveränderte Stecker und passende Steckdosen verringern das Risiko eines elektrischen Schlages. Vermeiden Sie Körperkontakt mit geerdeten Oberflächen wie von Rohren, Heizungen, Herden und Kühlschränken. Es besteht ein erhöhtes Risiko durch elektrischen Schlag, wenn Ihr Körper geerdet ist. Halten Sie die Elektrokettensäge von Regen oder Nässe fern. Das Eindringen von Wasser in ein Elektrowerkzeug erhöht das Risiko eines elektrischen Schlages. Zweckentfremden Sie das Kabel nicht, um die Elektrokettensäge zu tragen, aufzuhängen oder um den Stecker aus der Steckdose zu ziehen. Halten Sie das Kabel fern von Hitze, Öl, scharfen Kanten oder sich bewegenden Geräteteilen. Beschädigte oder verwickelte Kabel erhöhen das Risiko eines elektrischen Schlages. Wenn Sie mit der Elektrokettensäge im Freien arbeiten, verwenden Sie nur Verlängerungskabel, die auch für den Außenbereich geeignet sind. Die Anwendung eines für den Außenbereich geeigneten Verlängerungskabels verringert das Risiko eines elektrischen Schlages. Wenn der Betrieb der Elektrokettensäge in feuchter Umgebung nicht vermeidbar ist, verwenden Sie einen Fehlerstromschutzschalter. Der Einsatz eines Fehlerstromschutzschalters vermindert das Risiko eines elektrischen Schlages. Benutzen Sie einen Fehlerstromschutzschalter mit einem Auslösestrom von 30 ma oder weniger. 6 3
64 D E A T C H Verwenden Sie nur zugelassene Netzkabel der Bauart H05RN-F, die höchstens 75 m lang und für den Gebrauch im Freien bestimmt sind. Der Litzenquerschnitt des Netzkabels muss mindestens 2,5 mm 2 betragen. Rollen Sie eine Kabeltrommel vor Gebrauch immer ganz ab. Überprüfen Sie das Netzkabel auf Schäden. Sicherheit von Personen: Vorsicht: So vermeiden Sie Unfälle und Verletzungen: Seien Sie aufmerksam, achten Sie darauf, was Sie tun, und gehen Sie mit Vernunft an die Arbeit mit der Elektrokettensäge. Benutzen Sie die Elektrokettensäge nicht, wenn Sie müde sind oder unter Einfluss von Drogen, Alkohol oder Medikamenten stehen. Ein Moment der Unachtsamkeit beim Gebrauch der Elektrokettensäge kann zu ernsthaften Verletzungen führen. Tragen Sie persönliche Schutzausrüstung und immer eine Schutzbrille. Das Tragen persönlicher Schutzausrüstung, wie Staubmaske, rutschfeste Sicherheitsschuhe, Schutzhelm oder Gehörschutz, je nach Art und Einsatz des Elektrowerkzeugs, verringert das Risiko von Verletzungen. Vermeiden Sie eine unbeabsichtigte Inbetriebnahme. Vergewissern Sie sich, dass das Elektrowerkzeug ausgeschaltet ist, bevor Sie es an die Stromversorgung und/oder den Akku anschließen, es aufnehmen oder tragen. Wenn Sie beim Tragen des Elektrowerkzeuges den Finger am Schalter haben oder das Gerät einge- schaltet an die Stromversorgung anschließen, kann dies zu Unfällen führen. Entfernen Sie Einstellwerkzeuge oder Schraubenschlüssel, bevor Sie die Elektrokettensäge einschalten. Ein Werkzeug oder Schlüssel, der sich in einem drehenden Geräteteil befindet, kann zu Verletzungen führen. Vermeiden Sie eine abnormale Körperhaltung. Sorgen Sie für einen sicheren Stand und halten Sie jederzeit das Gleichgewicht. Dadurch können Sie die Elektrokettensäge in unerwarteten Situationen besser kontrollieren. Tragen Sie geeignete Kleidung. Tragen Sie keine weite Kleidung oder Schmuck. Halten Sie Haare, Kleidung und Handschuhe fern von sich bewegenden Teilen. Lockere Kleidung, Schmuck oder lange Haare können von sich bewegenden Teilen erfasst werden. Wenn Staubabsaug- und -auffangeinrichtungen montiert werden können, vergewissern Sie sich, dass diese angeschlossen sind und richtig verwendet werden. Verwendung einer Staubabsaugung kann Gefährdungen durch Staub verringern. Warnung! Dieses Elektrowerkzeug erzeugt während des Betriebs ein elektromagnetisches Feld. Dieses Feld kann unter bestimmten Umständen aktive oder passive medizinische Implantate beeinträchtigen. Um die Gefahr von ernsthaften oder tödlichen Verletzungen zu verringern, empfehlen wir Personen mit medizinischen Implantaten ihren Arzt und den Hersteller vom medizinischen Implantat zu konsultieren, bevor die Maschine bedient wird. 6 4
65 D E A T C H Verwendung und Behandlung der Elektrokettensäge: Überlasten Sie das Gerät nicht. Verwenden Sie für Ihre Arbeit das dafür bestimmte Elektrowerkzeug. Mit dem passenden Elektrowerkzeug arbeiten Sie besser und sicherer im angegebenen Leistungsbereich. Benutzen Sie kein Elektrowerkzeug, dessen Schalter defekt ist. Ein Elektrowerkzeug, das sich nicht mehr ein- oder ausschalten lässt, ist gefährlich und muss repariert werden. Ziehen Sie den Stecker aus der Steckdose und/oder entfernen Sie den Akku, bevor Sie Geräteeinstellungen vornehmen, Zubehörteile wechseln oder das Gerät weglegen. Diese Vorsichtsmaßnahme verhindert den unbeabsichtigten Start des Elektrowerkzeuges. Bewahren Sie die unbenutzte Elektrokettensäge außerhalb der Reichweite von Kindern auf. Lassen Sie Personen das Gerät nicht benutzen, die mit diesem nicht vertraut sind oder diese Anweisungen nicht gelesen haben. Elektrowerkzeuge sind gefährlich, wenn sie von unerfahrenen Personen benutzt werden. Pflegen Sie die Elektrokettensäge mit Sorgfalt. Kontrollieren Sie, ob bewegliche Teile einwandfrei funktionieren und nicht klemmen, ob Teile gebrochen oder so beschädigt sind, dass die Funktion der Elektrokettensäge beeinträchtigt ist. Lassen Sie beschädigte Teile vor dem Einsatz des Gerätes reparieren. Viele Unfälle haben ihre Ursache in schlecht gewarteten Elektrowerkzeugen. Halten Sie Schneidwerkzeuge scharf und sauber. Sorgfältig gepflegte Schneidwerkzeuge mit scharfen Schneidkanten verklemmen sich weniger und sind leichter zu führen. Verwenden Sie die Elektrokettensäge, Zubehör, Einsatzwerkzeuge usw. entsprechend diesen Anweisungen. Berücksichtigen Sie dabei die Arbeitsbedingungen und die auszuführende Tätigkeit. Der Gebrauch der Elektrokettensäge für andere als die vorgesehenen Anwendungen kann zu gefährlichen Situationen führen. Bei Sägearbeiten am Hang stets oberhalb des Baumstammes stehen. Um im Moment des Durchsägens die volle Kontrolle zu behalten, gegen Ende des Schnitts den Anpressdruck reduzieren, ohne den festen Griff an den Handgriffen der Elektrokettensäge zu lösen. Darauf achten, dass die Sägekette nicht den Boden berührt. Nach Fertigstellung des Schnitts den Stillstand der Elektrokettensäge abwarten, bevor man die Elektrokettensäge dort entfernt. Den Motor der Elektrokettensäge immer ausschalten, bevor man von Baum zu Baum wechselt. Schmutz, Steine, lose Rinde, Nägel, Klammern und Draht sind vom Baum zu entfernen. Service: Lassen Sie Ihr Elektrowerkzeug nur von qualifiziertem Fachpersonal und nur mit Original-Ersatzteilen reparieren. Damit wird sichergestellt, dass die Sicherheit des Elektrowerkzeuges erhalten bleibt. Befolgen Sie sorgfältig die Wartungs-, Kontroll- und Serviceanweisungen in dieser Betriebsanleitung. 6 5
66 D E A T C H Beschädigte Schutzvorrichtungen und Teile müssen sachgemäß durch unser Service-Center repariert oder ausgewechselt werden, soweit nichts anderes in der Betriebsanleitung angegeben ist. Sicherheitshinweise für Kettensägen: Halten Sie bei laufender Säge alle Körperteile von der Sägekette fern. Vergewissern Sie sich vor dem Starten der Säge, dass die Sägekette nichts berührt. Beim Arbeiten mit einer Kettensäge kann ein Moment der Unachtsamkeit dazu führen, dass Bekleidung oder Körperteile von der Sägekette erfasst werden. Halten Sie die Kettensäge immer mit Ihrer rechten Hand am hinteren Griff und Ihrer linken Hand am vorderen Griff. Das Festhalten der Kettensäge in umgekehrter Arbeitshaltung erhöht das Risiko von Verletzungen und darf nicht angewendet werden. Halten Sie das Elektrowerkzeug nur an den isolierten Griffflächen, da die Sägekette in Berührung mit verborgenen Stromleitungen oder dem Netzkabel des Gerätes kommen kann. Der Kontakt der Sägekette mit einer spannungsführenden Leitung kann metallene Geräteteile unter Spannung setzen und zu einem elektrischen Schlag führen. Tragen Sie Schutzbrille und Gehörschutz. Weitere Schutzausrüstung für Kopf, Hände, Beine und Füße ist vorgeschrieben. Passende Schutzkleidung mindert die Verletzungsgefahr durch umherfliegendes Spanmaterial und zufälliges Berühren der Sägekette. Arbeiten Sie mit der Kettensäge nicht auf einem Baum. Bei Betrieb einer Kettensäge auf einem Baum besteht Verletzungsgefahr. Achten Sie immer auf festen Stand und benutzen Sie die Kettensäge nur, wenn Sie auf festem, sicherem und ebenem Grund stehen. Rutschiger Untergrund oder instabile Standflächen wie auf einer Leiter können zum Verlust des Gleichgewichtes oder zum Verlust der Kontrolle über die Kettensäge führen. Rechnen Sie beim Schneiden eines unter Spannung stehenden Astes damit, dass dieser zurückfedert. Wenn die Spannung in den Holzfasern freikommt, kann der gespannte Ast die Bedienperson treffen und/oder die Kettensäge der Kontrolle entreißen. Seien Sie besonders vorsichtig beim Schneiden von Unterholz und jungen Bäumen. Das dünne Material kann sich in der Sägekette verfangen und auf Sie schlagen oder Sie aus dem Gleichgewicht bringen. Tragen Sie die Kettensäge am vorderen Griff im ausgeschalteten Zustand, die Sägekette von Ihrem Körper abgewandt. Bei Transport oder Aufbewahrung der Kettensäge stets die Schutzabdeckung aufziehen. Sorgfältiger Umgang mit der Kettensäge verringert die Wahrscheinlichkeit einer versehentlichen Berührung mit der laufenden Sägekette. Befolgen Sie die Anweisungen für die Schmierung, die Kettenspannung und das Wechseln von Zubehör. Eine unsachgemäß gespannte oder geschmierte Kette kann entweder reißen oder das Rückschlagrisiko erhöhen. 6 6

67 D E A T C H Halten Sie Griffe trocken, sauber und frei von Öl und Fett. Fettige, ölige Griffe sind rutschig und führen zum Verlust der Kontrolle. Nur Holz sägen. Die Kettensäge nicht für Arbeiten verwenden, für die sie nicht bestimmt ist - Beispiel: Verwenden Sie die Kettensäge nicht zum Sägen von Plastik, Mauerwerk oder Baumaterialien, die nicht aus Holz sind. Die Verwendung der Kettensäge für nicht bestimmungsgemäße Arbeiten kann zu gefährlichen Situationen führen. Vorsichtsmaßnahmen gegen Rückschlag Bild 1 Achtung Rückschlag! Achten Sie beim Arbeiten auf Rückschlag der Maschine. Es besteht Verletzungsgefahr. Sie vermeiden Rückschläge durch Vorsicht und richtige Sägetechnik. Rückschlag kann auftreten, wenn die Spitze der Führungsschiene einen Gegenstand berührt oder wenn das Holz sich biegt und die Sägekette im Schnitt festklemmt (s. Bild 1/Abb. b). Eine Berührung mit der Schienenspitze kann in manchen Fällen zu einer unerwarteten nach hinten gerichteten Reaktion führen, bei der die Führungsschiene nach oben und in Richtung der Bedienperson geschlagen wird (s. Bild 1/Abb. a). Das Verklemmen der Sägekette an der Oberkante der Führungsschiene kann die Schiene heftig in Bedienerrichtung zurückstoßen. Jede dieser Reaktionen kann dazu führen, dass Sie die Kontrolle über die Säge verlieren und sich möglicherweise schwer verletzen. Verlassen Sie sich nicht ausschließlich auf die in der Kettensäge eingebauten Sicherheitseinrichtungen. Als Benutzer einer Kettensäge sollten Sie verschiedene Maßnahmen ergreifen, um unfall- und verletzungsfrei arbeiten zu können. Ein Rückschlag ist die Folge eines falschen oder fehlerhaften Gebrauchs des Elektrowerkzeugs. Er kann durch geeignete Vorsichtsmaßnahmen, wie nachfolgend beschrieben, verhindert werden: Halten Sie die Säge mit beiden Händen fest, wobei Daumen und Finger die Griffe der Kettensäge umschließen. Bringen Sie Ihren Körper und die Arme in eine Stellung, in der Sie den Rückschlagkräften standhalten können. Wenn geeignete Maßnahmen getroffen werden, kann die Bedienperson die Rückschlagkräfte beherrschen. Niemals die Kettensäge loslassen. Vermeiden Sie eine abnormale Körperhaltung und sägen Sie nicht über Schulterhöhe. Dadurch wird ein unbeabsichtigtes Berühren mit der Schienenspitze vermieden und eine bessere Kontrolle der Kettensäge in unerwarteten Situationen ermöglicht. Verwenden Sie stets vom Hersteller vorgeschriebene Ersatzschienen und Sägeketten. Falsche Ersatzschienen und Sägeketten können zum Reißen der Kette und/oder zu Rückschlag führen. 6 7
68 D E A T C H Halten Sie sich an die Anweisungen des Herstellers für das Schärfen und die Wartung der Sägekette. Zu niedrige Tiefenbegrenzer erhöhen die Neigung zu Rückschlag. Restrisiken Auch wenn Sie dieses Elektrowerkzeug vorschriftsmäßig bedienen, bleiben immer Restrisiken bestehen. Folgende Gefahren können im Zusammenhang mit der Bauweise und Ausführung dieses Elektrowerkzeugs auftreten: a) Schnittverletzungen b) Gehörschäden, falls kein geeigneter Gehörschutz getragen wird. c) Gesundheitsschäden, die aus Hand- Arm-Schwingungen resultieren, falls das Gerät über einen längeren Zeitraum verwendet wird oder nicht ordnungsgemäß geführt und gewartet wird. Wir empfehlen, wenn ein Ersatz der Anschlussleitung erforderlich ist, dann ist dies vom Hersteller oder seinem Vertreter (z. B. autorisierte Fachwerkstatt, Kundendienst usw.) auszuführen. Legen Sie die Anschlussleitung so, dass sie während des Sägens nicht von Ästen oder Ähnlichem erfasst wird. Benutzen Sie einen Fehlerstromschutzschalter mit einem Auslösestrom von 30 ma oder weniger. Befolgen Sie sorgfältig die Wartungs-, Kontroll- und Serviceanweisungen in dieser Betriebsanleitung. Beschädigte Schutzvorrichtungen und Teile müssen sachgemäß durch unser Service-Center repariert oder ausgewechselt werden, soweit nichts anderes in der Betriebsanleitung angegeben ist. Sicherheitsfunktionen 6 8 Warnung! Dieses Elektrowerkzeug erzeugt während des Betriebs ein elektromagnetisches Feld. Dieses Feld kann unter bestimmten Umständen aktive oder passive medizinische Implantate beeinträchtigen. Um die Gefahr von ernsthaften oder tödlichen Verletzungen zu verringern, empfehlen wir Personen mit medizinischen Implantaten ihren Arzt und den Hersteller des medizinischen Implantats zu konsultieren, bevor die Maschine bedient wird. Weiterführende Sicherheitshinweise Wenn die Anschlussleitung des Elektrowerkzeuges beschädigt ist, muss sie durch eine speziell vorgerichtete Anschlussleitung ersetzt werden, die über die Kundendienstorganisation erhältlich ist. A 1 Hinterer Griff mit Handschutz (16) schützt die Hand vor Ästen und Zweigen und bei abspringender Sägekette. 3 Kettenbremshebel/ vorderer Handschutz Sicherheitseinrichtung, die die Sägekette bei einem Rückschlag sofort stoppt; Hebel kann auch manuell betätigt werden; schützt die linke Hand des Bedieners, wenn er vom vorderen Griff abrutscht. Die Sägekette läuft nicht, wenn die Kettenbremse eingerastet ist. 5 Sägekette mit geringem Rückschlag hilft Ihnen mit speziell entwickelten Sicherheitseinrichtungen, Rückschläge abzufangen.
69 D E A T C H 7 Krallenanschlag verstärkt die Stabilität, wenn vertikale Schnitte ausgeführt werden und erleichtert das Sägen. 9 Elektromotor ist aus Sicherheitsgründen doppelt isoliert. 10 Ein-/Ausschalter mit Ketten- Sofort-Stopp Bei Loslassen des Ein-/ Ausschalters schaltet das Gerät sofort ab. 11 Einschaltsperre Zum Einschalten des Gerätes muss die Einschaltsperre entriegelt werden. 12 Kettenfangbolzen vermindert die Gefahr von Verletzungen, wenn die Sägekette reißt oder abspringt. Montage Tragen Sie beim Arbeiten mit der Sägekette stets Schutzhandschuhe und verwenden Sie nur Originalteile. Ziehen Sie vor allen Arbeiten an der Elektrokettensäge den Netzstecker. Es besteht Verletzungsgefahr! Bevor Sie die Elektrokettensäge in Betrieb nehmen, müssen Sie: - gegebenenfalls Schwert, Sägekette und Kettenabdeckung montieren, - die Sägekette spannen, - Kettenöl einfüllen, - die Funktion der Kettenbremse und die Öl-Automatik prüfen. Sägekette montieren G 1. Breiten Sie die Sägekette (5) in einer Schlaufe aus, so dass die Schnittkanten im Uhrzeigersinn ausgerichtet sind. 2. Entspannen Sie die Spannschnecke (24) gegen den Uhrzeigersinn. 3. Legen Sie die Sägekette (5) in die Schwertnut ein. Halten Sie das Schwert (4) zur Montage in einem Winkel von ca. 45 Grad nach oben geschwenkt, um die Sägekette (5) leichter auf das Kettenritzel (25) führen zu können. Es ist normal, wenn die Sägekette (5) durchhängt. 4. Spannen Sie die Sägekette (5) vor, indem Sie die Spannschnecke (24) im Uhrzeigersinn drehen. 5. Setzen Sie die Kettenradabdeckung (15) auf. Dabei muss zuerst die Nase (26) an der Abdeckung (15) in die dafür vorgesehene Kerbung am Gerät eingesetzt werden. Ziehen Sie die Befestigungsschraube (14) nur leicht an, da die Sägekette noch gespannt werden muss. Vorsicht! Elektrokettensäge kann nachölen. Bitte beachten Sie, dass die Elektrokettensäge nach Gebrauch nachölt und Öl auslaufen kann, wenn sie seitlich oder auf dem Kopf gelagert wird. Das ist ein normaler Vorgang, bedingt durch die notwendige Lüftungsöffnung am oberen Tankrand und kein Grund zur Reklamation. Da jede Elektrokettensäge während der Fertigung kontrolliert und mit Öl getestet wird, könnte 6 9
70 D E A T C H trotz Ausleeren ein kleiner Rest im Tank sein, der während des Transportes das Gehäuse leicht mit Öl beschmutzt. Bitte säubern Sie das Gehäuse mit einem Lappen. Vor dem Wechsel der Sägekette ist die Nut der Führungsschiene von Schmutz zu reinigen, da bei vorhandenen Schmutzablagerungen die Sägekette aus der Schiene springen kann. Die Ablagerungen können auch das Kettenöl aufsaugen. Die Folge wäre, dass das Kettenöl nicht oder nur zu einem geringen Teil an die Schienenunterseite gelangt und die Schmierung verringert wird. Schwert montieren F 1. Stellen Sie das Gerät auf eine flache Oberfläche. 2. Drehen Sie die Befestigungsschraube (14) gegen den Uhrzeigersinn ( ) um die Kettenradabdeckung (15) zu entfernen. 3. Setzen Sie das Schwert (4) auf den Schienenbolzen (23), so dass die Spannschnecke (24) nach außen zeigt. Sägekette spannen Das regelmäßige Spannen der Sägekette dient der Sicherheit des Benutzers und reduziert bzw. verhindert Verschleiß und Kettenschäden. Wir empfehlen dem Benutzer vor Arbeitsbeginn und in Abständen von ca. 10 Minuten die Kettenspannung zu kontrollieren und falls nötig zu korrigieren. Beim Arbeiten mit der Säge erwärmt sich die Sägekette und weitet sich dadurch etwas. Mit diesem Nachlängen ist besonders bei neuen Sägeketten zu rechnen. Die Sägekette nicht in heißem Zustand nachspannen oder wechseln, da sie sich nach dem Abkühlen wieder etwas zusammenzieht. Bei Nichtbeachtung kann dies zu Schäden an der Führungsschiene oder dem Motor führen, da die Sägekette nun zu straff an dem Schwert anliegt. Kettenspannung und Kettenschmierung beeinflussen in erheblichem Maß die Lebensdauer der Sägekette. Die Sägekette ist richtig gespannt, wenn sie an der Schwertunterseite nicht durchhängt und sich mit der behandschuhten Hand ganz herumziehen lässt. Beim Ziehen an der Sägekette mit 9 N (ca. 1 kg) Zugkraft dürfen Sägekette und Schwert nicht mehr als 2 mm Abstand haben. B 10 min 1. Vergewissern Sie sich, dass die Kettenbremse gelöst ist, d.h. der Kettenbremshebel (3) gegen den vorderen Griff (8) gedrückt ist (Stellung I). 2. Lösen Sie die Befestigungsschraube (14) ( ). 3. Zum Spannen der Sägekette drehen Sie den Kettenspannring (13) im Uhrzeigersinn. Zum Lockern der Spannung drehen Sie den Kettenspannring (13) gegen den Uhrzeigersinn. 4. Ziehen Sie die Befestigungsschraube (14) wieder an ( ). Bei einer neuen Sägekette müssen Sie die Kettenspannung nach maximal 5 Schnitten nachstellen. 7 0
71 D E A T C H Kettenschmierung Schwert und Sägekette dürfen nie ohne Öl sein. Betreiben Sie die Elektrokettensäge mit zu wenig Öl, nimmt die Schnittleistung und die Lebenszeit der Sägekette ab, da die Sägekette schneller stumpf wird. Zu wenig Öl erkennen Sie an Rauchentwicklung oder Verfärbung des Schwertes. Sobald der Motor läuft, fließt das Öl zum Schwert ( A 4). Kettenöl einfüllen: Prüfen Sie regelmäßig die Ölstandsanzeige ( C 21) und füllen Sie bei Erreichen der Minimummarke MIN ( C 22) der Ölstandsanzeige Öl nach. Der Öltank fasst ca. 190 ml Öl. Verwenden Sie Bio-Öl, das Zusätze zur Her absetzung von Reibung und Abnutzung enthält. Sie können es über unser Service-Center bestellen. Wenn Grizzly Bio-Öl nicht zur Verfügung steht, verwenden Sie Kettenschmieröl mit geringem Anteil an Haftzusätzen. Entleeren Sie den Öltank bei längerer Nichtbenutzung (6-8 Wochen). C 1. Schrauben Sie die Öltankkappe (2) ab und füllen Sie das Kettenöl in den Tank. 2. Wischen Sie eventuell verschüttetes Öl ab und schließen Sie die Öltankkappe (2) wieder. Schalten Sie immer das Gerät ab und lassen Sie den Motor abkühlen, bevor Sie Kettenöl einfüllen. Durch Überlaufen von Öl besteht Brandgefahr. Bedienung Schalten Sie die Elektrokettensäge erst ein, wenn Schwert, Sägekette und Ketten radabdeckung korrekt montiert sind. Achten Sie darauf, dass die Spannung des Netzanschlusses mit dem Typenschild am Gerät über einstimmt. Achten Sie beim Starten auf einen sicheren Stand. Vergewissern Sie sich vor dem Starten, dass die Elektrokettensäge keine Gegenstände berührt. Achtung! Die Elektrokettensäge kann nachölen, siehe Kapitel Montage - Sägekette montieren. Einschalten D 1. Überprüfen Sie vor dem Starten, ob sich genügend Kettenöl im Tank befindet und füllen Sie ggf. Kettenöl nach (siehe Kapitel Kettenöl einfüllen ). 2. Schließen Sie das Gerät an die Netzspannung an. 3. Lösen Sie die Kettenbremse, indem Sie den Kettenbremshebel/ vorderen Handschutz (3) gegen den vorderen Griff (8) ziehen. (Stellung I) 4. Halten Sie die Elektrokettensäge mit beiden Händen gut fest, mit der rechten Hand am hinteren (1) und mit der linken Hand am vorderen Griff (8). Daumen und Finger müssen die Handgriffe fest umschließen. 5. Zum Einschalten betätigen Sie mit dem rechten Daumen die Einschaltsperre (11) und drücken dann den Ein-/Ausschalter (10), die Elektrokettensäge läuft mit höchster 7 1
72 D E A T C H Geschwindigkeit. Lassen Sie die Einschaltsperre (11) wieder los. 6. Die Motorsäge schaltet ab, wenn Sie den Ein-/Ausschalter (10) wieder loslassen. Eine Dauerlaufschaltung ist nicht möglich. Kettenbremse prüfen Wenn die Kettenbremse nicht richtig funktioniert, dürfen Sie die Elektrokettensäge nicht verwenden. Es besteht Verletzungsgefahr durch die nachlaufende Sägekette. Lassen Sie die Elektrokettensäge von unserem Kundendienst reparieren. E 7 2 Die Sägekette läuft nicht, wenn die Kettenbremse eingerastet ist. 1. Legen Sie die Elektrokettensäge auf eine feste, ebene Unterlage. Sie darf keine Gegenstände berühren. 2. Schließen Sie das Gerät an die Netzspannung an. 3. Lösen Sie die Kettenbremse, indem Sie den Kettenbremshebel/ vorderen Handschutz (3) gegen den vorderen Griff (8) ziehen (Stellung I). 4. Halten Sie die Elektrokettensäge mit beiden Händen gut fest, mit der rechten Hand am hinteren ( A 1) und mit der linken Hand am vorderen (8) Griff. Daumen und Finger müssen die Handgriffe fest umschließen. 5. Schalten Sie die Elektrokettensäge ein. 6. Betätigen Sie bei laufendem Motor mit der linken Hand den Kettenbremshebel (3). Schieben Sie hierzu den Kettenbremshebel/vorderen Handschutz (3) vom vorderen Griff (8) weg (Stellung O). Die Sägekette sollte abrupt stoppen. 7. Wenn die Kettenbremse richtig funktioniert, lassen Sie den Ein-/Ausschalter los und lösen Sie die Kettenbremse. Kettenschmierung prüfen Prüfen Sie vor Arbeitsbeginn den Ölstand und die Funktion der Kettenschmierung. Schalten Sie die Elektrokettensäge ein und halten Sie sie über einen hellen Grund. Die Elektrokettensäge darf den Boden nicht berühren. Wenn sich eine Ölspur zeigt, arbeitet die Elektrokettensäge einwandfrei. J Wenn sich keine Ölspur zeigt, reinigen Sie eventuell den Öldurchlass oder lassen Sie die Elektrokettensäge von unserem Kundendienst reparieren. Reinigen Sie den Öldurchlass (27), um ein störungsfreies, automatisches Ölen der Sägekette während des Betriebs zu gewährleisten. Nehmen Sie hierzu einen Pinsel oder einen Lappen zur Hilfe, um Rückstände aus dem Öldurchlass auszuwischen. Schwert wechseln F 1. Schalten Sie das Gerät aus und ziehen Sie den Netzstecker ( A 18). 2. Stellen Sie das Gerät auf eine flache Oberfläche.
73 D E A T C H 3. Drehen Sie die Befestigungsschraube (14) gegen den Uhrzeigersinn ( ) und lösen Sie den Kettenspannring ( A 13), um die Kettenspannung zu lockern und die Kettenradabdeckung (15) zu entfernen. 4. Nehmen Sie das Schwert (4) und die Sägekette (5) ab. Halten Sie das Schwert (4) zur Demontage in einem Winkel von ca. 45 Grad nach oben geschwenkt, um die Sägekette (5) leichter vom Kettenritzel (25) abnehmen zu können. 5. Lösen Sie die Schraube (28) auf der Rückseite der Spannschnecke (24). Montieren Sie die Spannschnecke (24) in umgekehrter Reihenfolge wieder. Achten Sie hierbei darauf, dass der Spannschneckenbolzen (29), wie in Abbildung, unten ist (siehe auch Schwert umdrehen, + ). 6. Zur Montage setzen Sie das Schwert (4) auf den Schienenbolzen (23), so dass die Spannschnecke (24) nach außen zeigt. Sägetechniken Allgemeines Sie haben eine bessere Kontrolle, wenn Sie mit der Unterseite des Schwertes (mit ziehender Sägekette) und nicht mit der Oberseite des Schwertes (mit schiebender Sägekette) sägen. Die Sägekette darf während des Durchsägens oder danach weder den Erdboden noch einen anderen Gegenstand berühren. Achten Sie darauf, dass die Sägekette nicht im Sägeschnitt festklemmt. Der Baumstamm darf nicht brechen oder absplittern. Beachten Sie auch die Vorsichtsmaßnahmen gegen Rückschlag (siehe Sicherheitshinweise). Wenn die Sägekette festklemmt, versuchen Sie nicht, die Elektrokettensäge mit Gewalt herauszuziehen. Es besteht Verletzungsgefahr. Stellen Sie den Motor ab und benutzen Sie einen Hebelarm oder Keil, um die Elektrokettensäge freizubekommen. Bäume fällen Es ist viel Erfahrung erforderlich, um Bäume zu fällen. Fällen Sie nur Bäume, wenn Sie sicher mit der Elektrokettensäge umgehen können. Benutzen Sie die Elektrokettensäge auf keinen Fall, wenn Sie sich unsicher fühlen. Wir raten unerfahrenen Anwendern aus Sicherheitsgründen davon ab, einen Baumstamm mit einer Schwertlänge zu fällen, die kleiner ist als der Stammdurchmesser. Achten Sie darauf, dass sich keine Menschen oder Tiere in der Nähe des Arbeitsbereichs aufhalten. Der Sicherheitsabstand zwischen dem zu fällenden Baum und dem nächstliegenden Arbeitsplatz muss 2 ½ Baumlängen betragen. Achten Sie auf die Fällrichtung: Der Anwender muss sich in der Nähe des gefällten Baumes sicher bewegen 7 3
74 D E A T C H können, um den Baum leicht ablängen und entasten zu können. Es ist zu vermeiden, dass der fallende Baum sich in einem anderen Baum verfängt. Beachten Sie die natürliche Fallrichtung, die von Neigung und Krummschaftigkeit des Baumes, Windrichtung und Anzahl der Äste abhängig ist. Stehen Sie bei abschüssigem Gelände oberhalb des zu fällenden Baumes. Kleine Bäume mit einem Durchmesser von cm können gewöhnlich mit einem Schnitt abgesägt werden. Bei Bäumen mit einem größeren Durchmesser müssen Kerbschnitte und ein Fällschnitt angesetzt werden (siehe Q ). O P Fällen Sie keinen Baum, wenn ein starker oder wechselnder Wind weht, wenn die Gefahr einer Eigentumsbeschädigung besteht oder wenn der Baum auf Leitungen treffen könnte. Klappen Sie direkt nach Beenden des Sägevorgangs den Gehörschutz hoch, damit Sie Töne und Warnsignale hören können. 1. Entasten: Entfernen Sie nach unten hängende Äste, indem Sie den Schnitt oberhalb des Astes ansetzen. Entasten Sie niemals höher als bis zur Schulterhöhe. 2. Fluchtbereich: Entfernen Sie das Unterholz rund um den Baum, um einen leichten Rückzug zu sichern. Der Fluchtbereich (1) sollte etwa um 45 versetzt hinter der geplanten Fällrichtung (2) liegen. Q Q R S 3. Fallkerbe schneiden (A): Setzen Sie eine Fallkerbe in die Richtung, in die der Baum fallen soll. Beginnen Sie mit dem unteren, horizontalen Schnitt. Die Schnitttiefe soll etwa 1/3 des Stammdurchmessers betragen. Machen Sie nun einen schrägen Sägeschnitt mit einem Schnittwinkel von ungefähr 45, von oben, der exakt auf den unteren Sägeschnitt trifft. Treten Sie nie vor einen Baum, der eingekerbt ist. 4. Fällschnitt (B): Führen Sie den Fällschnitt von der anderen Seite des Stammes aus, während Sie links vom Baumstamm stehen und mit ziehender Sägekette sägen. Der Fällschnitt muss horizontal mindestens 5 cm oberhalb des horizontalen Kerbschnitts verlaufen. Er sollte so tief sein, dass der Abstand zur Kerbschnittlinie mindestens 1/10 des Stammdurchmessers beträgt. Der nicht durchgesägte Teil des Stammes wird als Brechmaß bezeichnet. 5. Schieben Sie einen Fällkeil oder ein Brecheisen in den Fällschnitt, sobald die Schnitttiefe dies gestattet, um ein Festklemmen des Schwertes zu verhindern. 6. Wenn der Stammdurchmesser größer ist als die Länge des Schwertes, machen Sie zwei Schnitte. 7. Nach Ausführen des Fällschnitts fällt der Baum von selbst oder mit Hilfe des Fällkeils oder Brecheisens. 7 4
75 D E A T C H Sobald der Baum zu fallen beginnt, ziehen Sie die Elektrokettensäge aus dem Schnitt heraus, stoppen den Motor, legen die Elektrokettensäge ab und verlassen den Arbeitsplatz über den Rückzugsweg. O Entasten Entasten ist die Bezeichnung für das Entfernen von Ästen und Zweigen von einem gefällten Baum. Viele Unfälle geschehen beim Entasten. Sägen Sie nie Äste ab, wenn Sie auf dem Baumstamm stehen. Behalten Sie den Rückschlagbereich im Auge, wenn Äste unter Spannung stehen. Entfernen Sie Stützzweige erst nach dem Ablängen. Unter Spannung stehende Äste müssen von unten nach oben gesägt werden, um ein Festklemmen der Elektrokettensäge zu verhindern. Beim Absägen von dickeren Ästen verwenden Sie dieselbe Technik wie beim Ablängen. Arbeiten Sie links vom Stamm und so nahe wie möglich an der Elektrokettensäge. Nach Möglichkeit ruht das Gewicht der Elektrokettensäge auf dem Stamm. Wechseln Sie den Standort, um Äste jenseits des Stammes abzusägen. Verzweigte Äste werden einzeln abgelängt. Ablängen Ablängen ist das Sägen von gefällten Baumstämmen in kleine Abschnitte. Achten Sie darauf, dass die Sägekette beim Sägen den Erdboden nicht berührt. Achten Sie auf guten Stand und stehen Sie bei abschüssigem Gelände oberhalb des Stammes. K L M N 1. Stamm liegt am Boden: Sägen Sie von oben den Stamm ganz durch und achten Sie am Ende des Schnittes darauf, den Boden nicht zu berühren. Wenn die Möglichkeit besteht, den Stamm zu drehen, sägen Sie ihn zu 2/3 durch. Dann drehen Sie den Stamm um und sägen den Rest des Stammes von oben durch. 2. Stamm ist an einem Ende abgestützt: Sägen Sie zuerst von unten nach oben (mit der Oberseite des Schwertes) 1/3 des Stammdurchmessers durch, um ein Splittern zu vermeiden. Sägen Sie dann von oben nach unten (mit der Unterseite des Schwertes) auf den ersten Schnitt zu, um ein Festklemmen zu vermeiden. 3. Stamm ist an beiden Enden abgestützt: Sägen Sie zuerst von oben nach unten (mit der Unterseite des Schwertes) 1/3 des Stammdurchmessers durch. Sägen Sie dann von unten nach oben (mit der Oberseite des Schwertes), bis sich die Schnitte treffen. 4. Sägen auf einem Sägebock: Halten Sie die Elektrokettensäge mit beiden Händen fest und führen Sie die Maschine während des Sägens vor dem Körper. Wenn der Stamm durchtrennt wird, führen Sie die Maschine rechts am Körper vorbei (1). Halten Sie den linken Arm so gerade wie möglich (2). Achten 7 5
76 D E A T C H Sie auf den herabfallenden Stamm. Stellen Sie sich so, dass der abgetrennte Stamm keine Gefährdung darstellt. Achten Sie auf Ihre Füße. Der abgetrennte Stamm könnte beim Herabfallen Verletzungen verursachen. Halten Sie das Gleichgewicht (3). Wartung und Reinigung Führen Sie Wartungs- und Reinigungsarbeiten grundsätzlich bei ausgeschaltetem Motor und gezogenem Netzstecker durch. Verletzungsgefahr! Lassen Sie Instandsetzungsarbeiten und Wartungsarbeiten, die nicht in dieser Betriebsanleitung beschrieben sind, von unserer Fachwerkstatt durchführen. Benutzen Sie nur originale Ersatzteile. Lassen Sie die Maschine vor allen Wartungs- und Reinigungsarbeiten abkühlen. Es besteht Verbrennungsgefahr! Reinigung Reinigen Sie die Maschine nach jedem Gebrauch gründlich. Dadurch verlängern Sie die Lebensdauer der Maschine und vermeiden Unfälle. Halten Sie die Griffe frei von Benzin, Öl oder Fett. Reinigen Sie die Griffe gegebenenfalls mit einem feuchten, in Seifenlauge ausgewaschenem Lappen. Benutzen Sie zur Reinigung keine Lösungsmittel oder Benzin! Reinigen Sie nach jeder Benutzung die Sägekette. Benutzen Sie hierzu einen Pinsel oder Handfeger. Benutzen Sie zur Reinigung der Sägekette keine Flüssigkeiten. Ölen Sie die Sägekette nach der Reinigung mit Kettenöl leicht ein. Entfernen Sie zur Reinigung auch die Kettenradabdeckung ( A 15), um auch an dieser Stelle reinigen zu können. Reinigen Sie das Schwert (Führungsschiene) ( A 4). Reinigen Sie die Lüftungsschlitze und die Oberflächen der Maschine mit einem Pinsel, Handfeger oder trockenem Lappen. Benutzen Sie zur Reinigung keine Flüssigkeiten. Reinigen Sie den Öldurchlass ( 27), um ein störungsfreies, automatisches Ölen der Sägekette während des Betriebs zu gewährleisten. Nehmen Sie hierzu einen Pinsel oder einen Lappen zur Hilfe, um Rückstände aus dem Öldurchlass auszuwischen. Sägekette ölen Reinigen und ölen Sie die Sägekette regelmäßig. Dadurch halten Sie die Sägekette scharf und erreichen eine optimale Maschinenleistung. Bei Schäden aufgrund unzureichender Wartung der Sägekette erlischt der Garantieanspruch. Ziehen Sie den Netzstecker und benutzen Sie schnittfeste Handschuhe, wenn Sie mit der Sägekette oder mit dem Schwert hantieren. Ölen Sie die Sägekette nach der Reinigung, nach 10-stündigem Einsatz oder mindestens einmal pro Woche, je nachdem was zuerst eintrifft. Vor dem Ölen muss das Schwert, insbesondere die Zahnung des Schwertes gründlich gereinigt werden. Benutzen Sie hierzu einen Handfeger und einen trockenen Lappen. 7 6
77 D E A T C H Ölen Sie die einzelnen Kettenglieder mit Hilfe einer Ölspritze mit Nadelspitze (im Fachhandel erhältlich). Tragen Sie einzelne Öltropfen auf die Gelenke und auf die Zahnspitzen der einzelnen Kettenglieder auf. Wartungsintervalle Führen Sie die in der nachfolgenden Tabelle aufgeführten Wartungsarbeiten regelmäßig durch. Durch regelmäßige Wartung Ihrer Elektrokettensäge wird die Lebensdauer der Elektrokettensäge verlängert. Sie erreichen zudem optimale Schnittleistungen und vermeiden Unfälle. Tabelle Wartungsintervalle Maschinenteil Aktion Vor jedem Gebrauch Komponenten der Kettenbremse Prüfen, bei Bedarf ersetzen Kettenritzel ( 25) Prüfen, bei Bedarf ersetzen Prüfen, ölen, bei Bedarf Sägekette ( A 5) nachschleifen oder ersetzen Nach 10 Betriebsstunden Nach jedem Gebrauch Sägekette ( A 5) Reinigen und ölen Schwert ( A 4) Prüfen, reinigen, ölen Schwert ( A 4) Schwert umdrehen Öl-Automatik Prüfen, bei Bedarf Öldurchlass reinigen Schneidzähne schärfen Eine falsch geschärfte Sägekette erhöht die Rückschlaggefahr! Benutzen Sie schnittfeste Handschuhe, wenn Sie mit der Sägekette oder mit dem Schwert hantieren. Eine scharfe Sägekette gewährleistet eine optimale Schnittleistung. Sie frisst sich mühelos durch das Holz und hinterlässt große, lange Holzspäne. Eine Sägekette ist stumpf, wenn Sie die Schneidausrüstung durch das Holz drücken müssen und die Holzspäne sehr klein sind. Bei einer sehr stumpfen Sägekette fallen überhaupt keine Späne, sondern nur Holzstaub an. 7 7
78 D E A T C H Die sägenden Teile der Sägekette sind die Schneidglieder, die aus einem Schneidezahn und einer Tiefenbegrenzernase bestehen. Der Höhenabstand zwischen diesen beiden bestimmt die Schärftiefe. Beim Schärfen der Schneidezähne müssen folgende Werte berücksichtigt werden: H - Schärfwinkel (30 ) - Brustwinkel (85 ) - Schärftiefe (0,65 mm) Abweichungen von den Maßangaben der Schneidengeometrie können zu einer Erhöhung der Rückschlagneigung der Maschine führen. Erhöhte Unfallgefahr! Zum Schärfen der Sägekette sind Spezialwerkzeuge erforderlich, die gewährleisten, dass die Messer im richtigen Winkel und in der richtigen Tiefe geschärft sind. Für den unerfahrenen Benutzer von Kettensägen empfehlen wir, die Sägekette von einem Fachmann oder von einer Fachwerkstatt schärfen zu lassen. Wenn Sie sich das Schärfen der Sägekette zutrauen, erwerben Sie die Werkzeuge im Fachhandel. I 1. Schalten Sie das Gerät aus und ziehen Sie den Netzstecker. 2. Zum Schärfen sollte die Sägekette straff gespannt sein, um ein richtiges Schärfen zu ermöglichen. 3. Zum Schärfen ist eine Rundfeile mit 4,0 mm Durchmesser erforderlich. Andere Durchmesser beschädigen die Sägekette und können zu einer Gefährdung beim Arbeiten führen! 4. Schärfen Sie nur von innen nach außen. Führen Sie die Feile von der Innenseite des Schneidzahns nach außen. Heben Sie die Feile ab, wenn Sie diese zurückziehen. 5. Schärfen Sie zuerst die Zähne einer Seite. Drehen Sie dann die Elektrokettensäge um und schärfen Sie die Zähne der anderen Seite. 6. Die Sägekette ist abgenutzt und muss gegen eine neue Sägekette ersetzt werden, wenn nur noch ca. 4 mm des Schneidzahns übrig ist. 7. Nach dem Schärfen müssen alle Schneidglieder gleich lang und breit sein. 8. Nach jedem dritten Schärfen muss die Schärftiefe (Tiefenbegrenzung) geprüft werden, und die Höhe mit Hilfe einer Flachfeile nachgefeilt werden. Die Tiefenbegrenzung sollte um ca. 0,65 mm gegenüber dem Schneidzahn zurückstehen. Runden Sie nach dem Zurücksetzen die Tiefenbegrenzung nach vorne etwas ab. Kettenspannung einstellen Das Einstellen der Kettenspannung ist im Kapitel Montage - Sägekette spannen beschrieben. Neue Sägekette einlaufen lassen Bei einer neuen Sägekette verringert sich die Spannkraft nach einiger Zeit. Deshalb müssen Sie nach den ersten 5 Schnitten, spätestens nach 10 Minuten Sägezeit die Sägekette nachspannen. Befestigen Sie eine neue Sägekette nie auf einem abgenutzten Kettenritzel oder auf einem beschädigten oder ab- 7 8
79 D E A T C H genutzten Schwert. Die Sägekette könnte abspringen oder reißen. Schwere Verletzungen können die Folge sein. Schwert warten Benutzen Sie schnittfeste Handschuhe, wenn Sie mit der Sägekette oder mit dem Schwert hantieren. 1. Schalten Sie das Gerät aus und ziehen Sie den Netzstecker ( A 18). 2. Nehmen Sie die Kettenradabdeckung ( A 15), die Sägekette ( A 5) und das Schwert ( A 4) ab. 3. Prüfen Sie das Schwert ( A 4) auf Abnutzung. Entfernen Sie Grate und begradigen Sie die Führungsflächen mit einer Flachfeile. 4. Reinigen Sie den Öldurchlass ( J 27), um ein störungsfreies, automatisches Ölen der Sägekette während des Betriebs zu gewährleisten. 5. Montieren Sie Schwert ( A 4), Sägekette ( A 5) und Kettenradabdeckung ( A 15) und spannen Sie die Elektrokettensäge. Bei optimalem Zustand des Öldurchlasses sprüht die Sägekette wenige Sekunden nach Anlassen der Elektrokettensäge automatisch etwas Öl ab. Schwert umdrehen Benutzen Sie schnittfeste Handschuhe, wenn Sie mit der Sägekette oder mit dem Schwert hantieren. Das Schwert ( A 4) muss alle ca.10 Arbeitsstunden umgedreht werden, um eine gleichmäßige Abnutzung zu gewährleisten. 1. Schalten Sie das Gerät aus und ziehen Sie den Netzstecker ( A 18). 2. Nehmen Sie die Kettenradabdeckung ( A 15), die Sägekette ( A 5) und das Schwert ( A 4) ab. 3. Legen Sie das Schwert (4) vor sich hin und drehen es auf die Rückseite. Lösen Sie die Fixierungsschraube (28) und entfernen Sie die Spannschnecke (24). 4. Befestigen Sie die Spannschnecke (24) mit Hilfe der Fixierungsschraube (28) von der anderen Seite an das Schwert (4). Achten Sie hierbei darauf, dass der Spannschneckenbolzen (29) unten ist. Die runde Nase (24a) der Spannschnecke muss in Richtung Kettenritzel zeigen. F 5. Montieren Sie Schwert (4), Sägekette (5) und Kettenradabdeckung (15) und spannen Sie die Elektrokettensäge. Laufrichtung der Sägekette Orientieren Sie sich zur Ausrichtung der Sägekette ( 5) an dem Bildzeichen unterhalb der Kettenradabdeckung ( 15), wenn das Schwert gedreht wird. Die abgebildete Laufrichtung auf dem Schwert stimmt dann nicht mehr. Aufbewahrung Reinigen Sie das Gerät vor der Aufbewahrung. Entleeren Sie den Öltank vor längeren Betriebspausen. Entsorgen Sie Altöl umweltgerecht (siehe Entsorgung/ Umweltschutz ). 7 9
80 D E A T C H Bringen Sie die Schwertschutzhülle an. Bewahren Sie das Gerät an einem trockenen und staubgeschützten Ort auf, außerhalb der Reichweite von Kindern. Entsorgung/ Umweltschutz Entsorgen Sie Altöl umweltgerecht - geben Sie es an einer Entsorgungsstelle ab. Schütten Sie Altöl nicht in die Kanalisation oder in den Abfluss. Führen Sie Gerät, Zubehör und Verpackung einer umweltgerechten Wiederverwertung zu. Elektrogeräte gehören nicht in den Hausmüll. Gekennzeichnete Produkte dürfen nicht über den normalen Hausmüll entsorgt werden, sondern müssen an einer Annahmestelle für das Recycling von elektrischen und elektronischen Geräten abgegeben werden. Recycling hilft, den Verbrauch von Rohstoffen zu reduzieren und die Umwelt zu entlasten. Informationen zur Entsorgung und der Lage des nächsten Recyclinghofes erhalten Sie z. B. bei Ihrer Stadtreinigung oder in den Gelben Seiten. Entleeren Sie den Öltank sorgfältig und geben Sie das Gerät an einer Verwertungsstelle ab. Die verwendeten Kunststoff- und Metallteile können sortenrein getrennt werden und so einer Wiederverwertung zugeführt werden. Fragen Sie hierzu unser Service-Center. Ersatzteile/Zubehör 8 0 Ersatzteile und Zubehör erhalten Sie unter Sollten Sie kein Internet haben, so wenden Sie sich bitte telefonisch an das Service-Center (siehe Service-Center Seite 83). Halten Sie die unten genannten Bestellnummern bereit. Öltankkappe Sägekette Oregon 91PX Sägekette Oregon 91VXL Oregon Ersatzschwert Bio-Sägekettenöl 1 l Bio-Sägekettenöl 5 l Die Oregon Ersatz-Sägekette darf nur in Verbindung mit dem zugehörigen Oregon-Schwert und der dafür zugelassenen Elektrokettensäge verwendet werden. Es besteht Verletzungsgefahr.
81 D E A T C H Fehlersuche Problem Mögliche Ursache Fehlerbehebung Gerät startet nicht Sägekette läuft nicht Schlechte Schneidleistung Gerät läuft schwer, Sägekette springt ab Sägekette wird heiß, Rauchentwicklung beim Sägen, Verfärbung der Schiene Kettenbremse eingerastet Netzspannung fehlt Haussicherung spricht an Ein-/Ausschalter ( A 10) defekt Kohlebürsten abgenutzt Motor defekt Kettenbremse blockiert Sägekette ( A 5) Sägekette ( A 5) falsch montiert Sägekette ( A 5) stumpf Kettenspannung ungenügend Kettenspannung ungenügend Zu wenig Kettenöl Kettenbremse überprüfen, evtl. Kettenbremse lösen Steckdose, Netzanschlussleitung, Leitung, Netzstecker prüfen, ggf. Reparatur durch Elektrofachmann. Haussicherung prüfen Reparatur durch Kundendienst Reparatur durch Kundendienst Reparatur durch Kundendienst Kettenbremse überprüfen, evtl. Kettenbremse lösen Sägekette richtig montieren Schneidzähne schärfen oder neue Sägekette aufziehen Kettenspannung überprüfen Kettenspannung überprüfen Ölstand prüfen und ggf. Kettenöl nachfüllen, Öl-Automatik prüfen und ggf. Öldurchlass reinigen oder Reparatur durch Kundendienst 8 1
82 D E A T C H Garantie Sehr geehrte Kundin, sehr geehrter Kunde, Sie erhalten auf dieses Gerät 3 Jahre Garantie ab Kaufdatum. Im Falle von Mängeln dieses Gerätes stehen Ihnen gegen den Verkäufer des Gerätes gesetzliche Rechte zu. Diese gesetzlichen Rechte werden durch unsere im Folgenden dargestellte Garantie nicht eingeschränkt. Garantiebedingungen Die Garantiefrist beginnt mit dem Kaufdatum. Bitte bewahren Sie den Original- Kassenbon gut auf. Diese Unterlage wird als Nachweis für den Kauf benötigt. Tritt innerhalb von drei Jahren ab dem Kaufdatum dieses Gerätes ein Materialoder Fabrikationsfehler auf, wird das Gerät von uns nach unserer Wahl für Sie kostenlos repariert oder ersetzt. Diese Garantieleistung setzt voraus, dass innerhalb der Drei-Jahres-Frist das defekte Gerät und der Kaufbeleg (Kassenbon) vorgelegt und schriftlich kurz beschrieben wird, worin der Mangel besteht und wann er aufgetreten ist. Wenn der Defekt von unserer Garantie gedeckt ist, erhalten Sie das reparierte oder ein neues Gerät zurück. Mit Reparatur oder Austausch des Gerätes beginnt kein neuer Garantiezeitraum. Garantiezeit und gesetzliche Mängelansprüche Die Garantiezeit wird durch die Gewährleistung nicht verlängert. Dies gilt auch für ersetzte und reparierte Teile. Eventuell schon beim Kauf vorhandene Schäden und Mängel müssen sofort nach dem Auspacken gemeldet werden. Nach Ablauf der Garantiezeit anfallende Reparaturen sind kostenpflichtig. Garantieumfang Das Gerät wurde nach strengen Qualitätsrichtlinien sorgfältig produziert und vor Anlieferung gewissenhaft geprüft. Die Garantieleistung gilt für Material- oder Fabrikationsfehler. Diese Garantie erstreckt sich nicht auf Geräteteile, die normaler Abnutzung ausgesetzt sind und daher als Verschleißteile angesehen werden können (z. B. Sägekette) oder für Beschädigungen an zerbrechlichen Teilen (z. B. Schalter). Diese Garantie verfällt, wenn das Gerät beschädigt, nicht sachgemäß benutzt oder nicht gewartet wurde. Für eine sachgemäße Benutzung des Gerätes sind alle in der Betriebsanleitung aufgeführten Anweisungen genau einzuhalten. Verwendungszwecke und Handlungen, von denen in der Betriebsanleitung abgeraten oder vor denen gewarnt wird, sind unbedingt zu vermeiden. Das Gerät ist lediglich für den privaten und nicht für den gewerblichen Gebrauch bestimmt. Bei missbräuchlicher und unsachgemäßer Behandlung, Gewaltanwendung und bei Eingriffen, die nicht von unserer autorisierten Service-Niederlassung vorgenommen wurden, erlischt die Garantie. Abwicklung im Garantiefall Um eine schnelle Bearbeitung Ihres Anliegens zu gewährleisten, folgen Sie bitte den folgenden Hinweisen: Bitte halten Sie für alle Anfragen den Kassenbon und die Artikelnummer (IAN ) als Nachweis für den Kauf bereit. Die Artikelnummer entnehmen Sie bitte dem Typenschild. Sollten Funktionsfehler oder sonstige Mängel auftreten, kontaktieren Sie zunächst die nachfolgend benannte Serviceabteilung telefonisch oder per 8 2
83 D E A T C H . Sie erhalten dann weitere Informationen über die Abwicklung Ihrer Reklamation. Ein als defekt erfasstes Gerät können Sie, nach Rücksprache mit unserem Kundenservice, unter Beifügung des Kaufbelegs (Kassenbons) und der Angabe, worin der Mangel besteht und wann er aufgetreten ist, für Sie portofrei an die Ihnen mitgeteilte Service-Anschrift übersenden. Um Annahmeprobleme und Zusatzkosten zu vermeiden, benutzen Sie unbedingt nur die Adresse, die Ihnen mitgeteilt wird. Stellen Sie sicher, dass der Versand nicht unfrei, per Sperrgut, Express oder sonstiger Sonderfracht erfolgt. Senden Sie das Gerät bitte inkl. aller beim Kauf mitgelieferten Zubehörteile ein und sorgen Sie für eine ausreichend sichere Transportverpackung. Reparatur-Service Sie können Reparaturen, die nicht der Garantie unterliegen, gegen Berechnung von unserer Service-Niederlassung durchführen lassen. Sie erstellt Ihnen gerne einen Kostenvoranschlag. Wir können nur Geräte bearbeiten, die ausreichend verpackt und frankiert eingesandt wurden. Achtung: Bitte senden Sie Ihr Gerät gereinigt und mit Hinweis auf den Defekt an unsere Service-Niederlassung. Nicht angenommen werden unfrei - per Sperrgut, Express oder mit sonstiger Sonderfracht - eingeschickte Geräte. Die Entsorgung Ihrer defekten eingesendeten Geräte führen wir kostenlos durch. Service-Center D E A T CH Service Deutschland Tel.: grizzly@lidl.de IAN Service Österreich Tel.: (0,15 EUR/Min.) grizzly@lidl.at IAN Service Schweiz Tel.: (0,08 CHF/Min., Mobilfunk max. 0,40 CHF/Min.) grizzly@lidl.ch IAN Importeur Bitte beachten Sie, dass die folgende Anschrift keine Serviceanschrift ist. Kontaktieren Sie zunächst das oben genannte Service-Center. Grizzly Tools GmbH & Co. KG Stockstädter Straße Großostheim Germany 8 3
84 D E A T CH Original EG- Konformitätserklärung Hiermit bestätigen wir, dass die Elektro-Kettensäge Baureihe FKS 2200 F3 Seriennummer folgenden einschlägigen EU-Richtlinien in ihrer jeweils gültigen Fassung entspricht: 2006/42/EG 2000/14/EG 2005/88/EG 2014/30/EU 2011/65/EU* Um die Übereinstimmung zu gewährleisten, wurden folgende harmonisierte Normen sowie nationale Normen und Bestimmungen angewendet: EN :2009/A11:2010 EN :2009/A1:2010 EN :2006/A2:2011 EN :2015 EN :2014 EN :2013 EN :2013 Zusätzlich wird entsprechend der Geräuschemissionsrichtlinie 2000/14/EG bestätigt: Schallleistungspegel garantiert: 110 db(a) gemessen: 107,7 db(a) Angewendetes Konformitätsbewertungsverfahren entsprechend Anhang V / 2000/14/EG Gemeldete Stelle: TÜV Süd, NB 0123 Baumusterbescheinigungs-Nr.: M6A Die alleinige Verantwortung für die Ausstellung dieser Konformitätserklärung trägt der Hersteller: Grizzly Tools GmbH & Co. KG Stockstädter Straße Großostheim, Germany Christian Frank Dokumentationsbevollmächtigter * Der oben beschriebene Gegenstand der Erklärung erfüllt die Vorschriften der Richtlinie 2011/65/EU des Europäischen Parlaments und des Rates vom 8. Juni 2011 zur Beschränkung der Verwendung bestimmter gefährlicher Stoffe in Elektro- und Elektronikgeräten. 8 4
85 G IE B NI C Y Translation of the original EC declaration of conformity We hereby confirm that the Electric Chainsaw Design Series FKS 2200 F3 Serial number conforms with the following applicable relevant version of the EU guidelines : 2006/42/EC 2000/14/EC 2005/88/EC 2014/30/EU 2011/65/EU* In order to guarantee consistency, the following harmonised standards as well as national standards and stipulations have been applied: EN :2009/A11:2010 EN :2009/A1:2010 EN :2006/A2:2011 EN :2015 EN :2014 EN :2013 EN :2013 We additionally confirm the following in accordance with the 2000/14/EC emissions guideline: Sound power level guaranteed: 110 db(a) measured: 107,7 db(a) Compliance evaluation process carried out in accordance with Appendix V, 2000/14/EC Registered Office: TÜV Süd, NB 0123 Design Type Certificate No.: M6A This declaration of conformity is issued under the sole responsibility of the manufacturer: Grizzly Tools GmbH & Co. KG Stockstädter Straße Großostheim, Germany Christian Frank Documentation Representative * The object of the declaration described above satisfies the provisions of Directive 2011/65/ EU of the European Parliament and the Council of 8 June 2011 on limiting the use of certain harmful substances in electrical and electronic appliances. 8 5
86 86

87 G R Μετάφραση της πρωτότυπης C Y Δήλωσης συμμόρφωσης CE Με την παρούσα βεβαιώνουμε ότι η ηλεκτρικό αλυσοπρίονο σειρά κατασκευής FKS 2200 F3 Αριθμός σειράς ανταποκρίνεται στις ακόλουθες Οδηγίες της ΕΕ στην εκάστοτε ισχύουσα μορφή τους: 2006/42/EC 2000/14/EC 2005/88/EC 2014/30/EU 2011/65/EU* Για να εξασφαλιστεί η συμβα-τικότητα, εφαρμόστηκαν οι παρακάτω εναρμονισμένες προδιαγραφές καθώς και εθνικές προδιαγραφές και κανονισμοί: EN :2009/A11:2010 EN :2009/A1:2010 EN :2006/A2:2011 EN :2015 EN :2014 EN :2013 EN :2013 Συμπληρωματικά βεβαιώνεται σύμφωνα με την Οδηγία για την εκπομπή θορύβων 2000/14EC: Επιτρεπόμενη στάθμη θορύβου εγγυημένη: 110 db(a) μετρημέvη: 107,7 db(a) Η διαδικασία που εφαρμό-στηκε για την εκτίμηση της συμβατικότητας ανταποκ-ρίνεται στο σχετικό σημείο του Παραρτήματος V/2000/14EC. Υπηρεσία δήλωσης: TÜV Süd, NB 0123, Βεβαίωση πρότυπου κατασκευής νούμ.: M6A Η αποκλειστική ευθύνη για την έκδοση της παρούσας δήλωσης συμμόρφωσης ανήκει στον κατασκευαστή: Grizzly Tools GmbH & Co. KG Stockstädter Straße Großostheim, Germany Christian Frank υπεύθυνος τεκμηρίωσης * Το ανωτέρω περιγραφόμενο αντικείμενο της δήλωσης πληροί τις προδιαγραφές της Οδηγίας 2011/65/ΕΕ του Ευρωπαϊκού Κοινοβουλίου και του Συμβουλίου της 8ης Ιουνίου 2011 για τον περιορισμό της χρήσης ορισμένων επικίνδυνων ουσιών σε ηλεκτρικό και ηλεκτρονικό εξοπλισμό. 8 7
88 Explosionszeichnung Exploded Drawing Επί μέρoυς σχεδιαγράμματα informativ, informative, ενημερωτικό FKS 2200 F _rev03_sh 8 8


89 MIN D E 3 8 F MIN G H I MIN J MIN
the total number of electrons passing through the lamp.
 1. A 12 V 36 W lamp is lit to normal brightness using a 12 V car battery of negligible internal resistance. The lamp is switched on for one hour (3600 s). For the time of 1 hour, calculate (i) the energy
Door Hinge replacement (Rear Left Door)
") Door Hinge replacement (Rear Left Door) We will continue the previous article by replacing the hinges of the rear left hand side door. I will use again the same procedure and means I employed during the
Door Hinge replacement (Rear Left Door) We will continue the previous article by replacing the hinges of the rear left hand side door. I will use again the same procedure and means I employed during the
Περιεχόμενα / Contents
 Aερόθερμo / Fan Heater PTC-906 Περιεχόμενα / Contents GR... Σελίδες 3-8 EN... Pages 9-11 2 GR Ευχαριστούμε που επιλέξατε μια συσκευή της γκάμας θερμαντικών IZZY. Σημαντικές Οδηγίες Ασφαλείας Τα Μέρη της
IAN Electric Chainsaw FKS 2200 E3. Electric Chainsaw Translation of the original instructions. Μετάφραση των αυθεντικών οδηγιών λειτουργίας
 Electric Chainsaw FKS 2200 E3 Electric Chainsaw Translation of the original instructions Ηλεκτρικό αλυσοπρίονο Μετάφραση των αυθεντικών οδηγιών λειτουργίας Elektro-Kettensäge Originalbetriebsanleitung
[1] P Q. Fig. 3.1
![[1] P Q. Fig. 3.1](/thumbs/79/80362156.jpg "[1] P Q. Fig. 3.1") 1 (a) Define resistance....... [1] (b) The smallest conductor within a computer processing chip can be represented as a rectangular block that is one atom high, four atoms wide and twenty atoms long. One
1 (a) Define resistance....... [1] (b) The smallest conductor within a computer processing chip can be represented as a rectangular block that is one atom high, four atoms wide and twenty atoms long. One
Capacitors - Capacitance, Charge and Potential Difference
 Capacitors - Capacitance, Charge and Potential Difference Capacitors store electric charge. This ability to store electric charge is known as capacitance. A simple capacitor consists of 2 parallel metal
Code Breaker. TEACHER s NOTES
 TEACHER s NOTES Time: 50 minutes Learning Outcomes: To relate the genetic code to the assembly of proteins To summarize factors that lead to different types of mutations To distinguish among positive,
Right Rear Door. Let's now finish the door hinge saga with the right rear door
 Right Rear Door Let's now finish the door hinge saga with the right rear door You may have been already guessed my steps, so there is not much to describe in detail. Old upper one file:///c /Documents
Strain gauge and rosettes
 Strain gauge and rosettes Introduction A strain gauge is a device which is used to measure strain (deformation) on an object subjected to forces. Strain can be measured using various types of devices classified
CHAPTER 25 SOLVING EQUATIONS BY ITERATIVE METHODS
 CHAPTER 5 SOLVING EQUATIONS BY ITERATIVE METHODS EXERCISE 104 Page 8 1. Find the positive root of the equation x + 3x 5 = 0, correct to 3 significant figures, using the method of bisection. Let f(x) =
(REV:01) RYOBI 48 Volt Lawn Mower Model No. RY14110 Replacement Parts List
 RYOBI 48 Volt Lawn Mower Model No. RY14110 Replacement Parts List") 9800-86 2-0-0 (REV:0) RYOBI 48 Volt Lawn Mower Model No. RY0 Replacement Parts List RYOBI RY0 48 volt lawn mower 3 38 39 44 39 36 34 36 42 38 39 3 4 37 34 3 43 2 32 0 8 9 2 4 33 8 7 6 3 6 7 22 8 20 3 30
9800-86 2-0-0 (REV:0) RYOBI 48 Volt Lawn Mower Model No. RY0 Replacement Parts List RYOBI RY0 48 volt lawn mower 3 38 39 44 39 36 34 36 42 38 39 3 4 37 34 3 43 2 32 0 8 9 2 4 33 8 7 6 3 6 7 22 8 20 3 30
ΚΥΠΡΙΑΚΗ ΕΤΑΙΡΕΙΑ ΠΛΗΡΟΦΟΡΙΚΗΣ CYPRUS COMPUTER SOCIETY ΠΑΓΚΥΠΡΙΟΣ ΜΑΘΗΤΙΚΟΣ ΔΙΑΓΩΝΙΣΜΟΣ ΠΛΗΡΟΦΟΡΙΚΗΣ 19/5/2007
 Οδηγίες: Να απαντηθούν όλες οι ερωτήσεις. Αν κάπου κάνετε κάποιες υποθέσεις να αναφερθούν στη σχετική ερώτηση. Όλα τα αρχεία που αναφέρονται στα προβλήματα βρίσκονται στον ίδιο φάκελο με το εκτελέσιμο
FKS 2200 B1. Ηλεκτρικό αλυσοπρίονο Μετάφραση των αυθεντικών οδηγιών λειτουργίας. Electric Chainsaw Translation of original operation manual
 FKS 2200 B1 Electric Chainsaw Translation of original operation manual Ηλεκτρικό αλυσοπρίονο Μετάφραση των αυθεντικών οδηγιών λειτουργίας 68815_flo_Elektro_Kettensaege_Cover_GB_IE_.indd 17 28.09.11 09:47
(REV:01) RYOBI 48 Volt Lawn Mower Model No. RY14110A Replacement Parts List
 RYOBI 48 Volt Lawn Mower Model No. RY14110A Replacement Parts List") 9000-7 9-- (REV:0) RYOBI 4 Volt Lawn Mower Model No. RY0A Replacement Parts List RYOBI RY0A 4 VOLT LAWN MOWER 3 3 39 44 39 3 34 3 42 3 39 3 4 37 34 3 43 2 0 37 2 33 32 3 9 7 22 30 4 7 3 20 9 3 2 2 27 2
9000-7 9-- (REV:0) RYOBI 4 Volt Lawn Mower Model No. RY0A Replacement Parts List RYOBI RY0A 4 VOLT LAWN MOWER 3 3 39 44 39 3 34 3 42 3 39 3 4 37 34 3 43 2 0 37 2 33 32 3 9 7 22 30 4 7 3 20 9 3 2 2 27 2
Instruction Execution Times
 1 C Execution Times InThisAppendix... Introduction DL330 Execution Times DL330P Execution Times DL340 Execution Times C-2 Execution Times Introduction Data Registers This appendix contains several tables
Bid5500 ΚΡΟΥΣΤΙΚΟ ΔΡΑΠΑΝΟ. Owner s manual. Μετάφραση του πρωτοτύπου των οδηγιών χρήσης
 Bid5500 ΚΡΟΥΣΤΙΚΟ ΔΡΑΠΑΝΟ Μετάφραση του πρωτοτύπου των οδηγιών χρήσης Owner s manual Βασικά χαρακτηριστικά 1. Τσόκ 2. Διακόπτης ενεργοποίησης απενεργοποίησης λειτουργίας κρούσης 3. Ράβδος-στοπ βάθους διάτρησης
HOMEWORK 4 = G. In order to plot the stress versus the stretch we define a normalized stretch:
 HOMEWORK 4 Problem a For the fast loading case, we want to derive the relationship between P zz and λ z. We know that the nominal stress is expressed as: P zz = ψ λ z where λ z = λ λ z. Therefore, applying
EE512: Error Control Coding
 EE512: Error Control Coding Solution for Assignment on Finite Fields February 16, 2007 1. (a) Addition and Multiplication tables for GF (5) and GF (7) are shown in Tables 1 and 2. + 0 1 2 3 4 0 0 1 2 3
Οδηγίες Λειτουργίας. Assembly Operating instructions. Montageanleitung. Απογυμνωτές PV-AZM...3. Stripping pliers PV-AZM...3.
 MA000 MA267 (de_en) (gr_en) Montageanleitung Οδηγίες Λειτουργίας Απογυμνωτής PV-AZM... για MC3, MC4 MA000 MA267 (de_en) (gr_en) Assembly Operating instructions Stripping pliers PV-AZM... for MC3 and MC4
C.S. 430 Assignment 6, Sample Solutions
 C.S. 430 Assignment 6, Sample Solutions Paul Liu November 15, 2007 Note that these are sample solutions only; in many cases there were many acceptable answers. 1 Reynolds Problem 10.1 1.1 Normal-order
Physical DB Design. B-Trees Index files can become quite large for large main files Indices on index files are possible.
 B-Trees Index files can become quite large for large main files Indices on index files are possible 3 rd -level index 2 nd -level index 1 st -level index Main file 1 The 1 st -level index consists of pairs
derivation of the Laplacian from rectangular to spherical coordinates
 derivation of the Laplacian from rectangular to spherical coordinates swapnizzle 03-03- :5:43 We begin by recognizing the familiar conversion from rectangular to spherical coordinates (note that φ is used
Surface Mount Multilayer Chip Capacitors for Commodity Solutions
 Surface Mount Multilayer Chip Capacitors for Commodity Solutions Below tables are test procedures and requirements unless specified in detail datasheet. 1) Visual and mechanical 2) Capacitance 3) Q/DF
Math 6 SL Probability Distributions Practice Test Mark Scheme
 Math 6 SL Probability Distributions Practice Test Mark Scheme. (a) Note: Award A for vertical line to right of mean, A for shading to right of their vertical line. AA N (b) evidence of recognizing symmetry
IAN ElEctric chainsaw FKs 2200 c2. ElEctric chainsaw. Ηλεκτρικό αλυσόπριόνό. ElEKtro-KEttEnsägE. Translation of original operation manual
 ElEctric chainsaw FKs 2200 c2 ElEctric chainsaw Translation of original operation manual Ηλεκτρικό αλυσόπριόνό Μετάφραση των αυθεντικών οδηγιών λειτουργίας ElEKtro-KEttEnsägE Originalbetriebsanleitung
SPEEDO AQUABEAT. Specially Designed for Aquatic Athletes and Active People
 SPEEDO AQUABEAT TM Specially Designed for Aquatic Athletes and Active People 1 2 Decrease Volume Increase Volume Reset EarphonesUSBJack Power Off / Rewind Power On / Fast Forward Goggle clip LED Status
The challenges of non-stable predicates
 The challenges of non-stable predicates Consider a non-stable predicate Φ encoding, say, a safety property. We want to determine whether Φ holds for our program. The challenges of non-stable predicates
 60 61 62 63 64 65 Ο Δ Η Γ Ι Ε Σ Σ Υ Ν Τ Η Ρ Η Σ Η Σ Τ Ω Ν Κ Ο Υ Φ Ω Μ Α Τ Ω Ν Ι Ν S T R U C T I N O N S C O N C E R N I N G Τ Η Ε C A S E M E N T S M A I N T E N A N C E Ο τακτικός καθαρισμός των βαμμένων
Modbus basic setup notes for IO-Link AL1xxx Master Block
 n Modbus has four tables/registers where data is stored along with their associated addresses. We will be using the holding registers from address 40001 to 49999 that are R/W 16 bit/word. Two tables that
VENERE. GR. Οδηγός Χρήσης EN. User Guide
 GR. Οδηγός Χρήσης EN. User Guide ΣΗΜΑΝΤΙΚΟ! ΚΡΑΤΗΣΤΕ ΓΙΑ ΜΕΛΛΟΝΤΙΚΗ ΑΝΑΦΟΡΑ: ΔΙΑΒΑΣΤΕ ΠΡΟΣΕΚΤΙΚΑ Κίνδυνος από φωτιά και άλλες πηγές έντονης θερμότητας, όπως ηλεκτρικές αντιστάσεις, υγραέριο, φωτιά κλπ,
BFN3000 ΕΠΙΤΡΑΠΕΖΙΟΣ ΑΝΕΜΙΣΤΗΡΑΣ. Owner s manual. Μετάφραση του πρωτοτύπου των οδηγιών χρήσης
 BFN3000 ΕΠΙΤΡΑΠΕΖΙΟΣ ΑΝΕΜΙΣΤΗΡΑΣ Μετάφραση του πρωτοτύπου των οδηγιών χρήσης Owner s manual www.bormanntools.com GR Οδηγίες ασφαλούς λειτουργίας 1. Τα χαρακτηριστικά της παροχής ηλεκτρικού ρεύματος θα
2 Composition. Invertible Mappings
 Arkansas Tech University MATH 4033: Elementary Modern Algebra Dr. Marcel B. Finan Composition. Invertible Mappings In this section we discuss two procedures for creating new mappings from old ones, namely,
ΑΚΑ ΗΜΙΑ ΕΜΠΟΡΙΚΟΥ ΝΑΥΤΙΚΟΥ ΜΑΚΕ ΟΝΙΑΣ ΣΧΟΛΗ ΜΗΧΑΝΙΚΩΝ ΠΤΥΧΙΑΚΗ ΕΡΓΑΣΙΑ ΘΕΜΑ : ΧΗΜΙΚΑ ΠΡΟΣΘΕΤΑ ΠΟΥ ΠΡΟΟΡΙΖΟΝΤΑΙ ΓΙΑ ΤΟ ΝΕΡΟ ΤΟΥ ΑΤΜΟΛΕΒΗΤΑ
 ΑΚΑ ΗΜΙΑ ΕΜΠΟΡΙΚΟΥ ΝΑΥΤΙΚΟΥ ΜΑΚΕ ΟΝΙΑΣ ΣΧΟΛΗ ΜΗΧΑΝΙΚΩΝ ΠΤΥΧΙΑΚΗ ΕΡΓΑΣΙΑ ΘΕΜΑ : ΧΗΜΙΚΑ ΠΡΟΣΘΕΤΑ ΠΟΥ ΠΡΟΟΡΙΖΟΝΤΑΙ ΓΙΑ ΤΟ ΝΕΡΟ ΤΟΥ ΑΤΜΟΛΕΒΗΤΑ ΣΠΟΥ ΑΣΤΗΣ : ΑΓΟΡΑΣΤΟΣ ΧΡΥΣΟΒΑΛΑΝΤΗΣ ΕΠΙΒΛΕΠΟΥΣΑ ΚΑΘΗΓΗΤΡΙΑ :
Section 8.3 Trigonometric Equations
 99 Section 8. Trigonometric Equations Objective 1: Solve Equations Involving One Trigonometric Function. In this section and the next, we will exple how to solving equations involving trigonometric functions.
ΟΔΗΓΙΕΣ ΕΓΚΑΤΑΣTΑΣΗΣ ΓΙΑ ΠΑΤΩΜΑ WPC INSTALLATION GUIDE FOR WPC DECKING
 1/12 ΟΔΗΓΙΕΣ ΕΓΚΑΤΑΣTΑΣΗΣ ΓΙΑ ΠΑΤΩΜΑ WPC INSTALLATION GUIDE FOR WPC DECKING Ανοίγουμε τρύπες Ø8 x 80mm στο σημείο κατασκευής, με τρυπάνι. To προτεινόμενο πλάτος και μήκος μεταξύ των 2 οπών να είναι 30-35εκ.,
First Sensor Quad APD Data Sheet Part Description QA TO Order #
 Responsivity (/W) First Sensor Quad PD Data Sheet Features Description pplication Pulsed 16 nm laser detection RoHS 211/65/EU Light source positioning Laser alignment ø mm total active area Segmented in
Συστήματα Διαχείρισης Βάσεων Δεδομένων
 ΕΛΛΗΝΙΚΗ ΔΗΜΟΚΡΑΤΙΑ ΠΑΝΕΠΙΣΤΗΜΙΟ ΚΡΗΤΗΣ Συστήματα Διαχείρισης Βάσεων Δεδομένων Φροντιστήριο 9: Transactions - part 1 Δημήτρης Πλεξουσάκης Τμήμα Επιστήμης Υπολογιστών Tutorial on Undo, Redo and Undo/Redo
ΟΔΗΓΙΕΣ ΣΥΝΑΡΜΟΛΟΓΗΣΗΣ/ ASSEMBLY INSTRUCTION ΤΟΜΜΥ ΚΡΕΒΑΤΙ/BED
 ΟΔΗΓΙΕΣ ΣΥΝΑΡΜΟΛΟΓΗΣΗΣ/ ASSEMBLY INSTRUCTION ΤΟΜΜΥ ΚΡΕΒΑΤΙ/BED 1. Παρακαλώ πολύ διαβάστε προσεκτικά τις οδηγίες πριν την συναρμολόγηση/ Please read the instructions carefully. 2. Παρακαλώ πολύ όπως ελέγξτε
The Nottingham eprints service makes this work by researchers of the University of Nottingham available open access under the following conditions.
 Luevorasirikul, Kanokrat (2007) Body image and weight management: young people, internet advertisements and pharmacists. PhD thesis, University of Nottingham. Access from the University of Nottingham repository:
NMBTC.COM /
 Common Common Vibration Test:... Conforms to JIS C 60068-2-6, Amplitude: 1.5mm, Frequency 10 to 55 Hz, 1 hour in each of the X, Y and Z directions. Shock Test:...Conforms to JIS C 60068-2-27, Acceleration
9.09. # 1. Area inside the oval limaçon r = cos θ. To graph, start with θ = 0 so r = 6. Compute dr
 9.9 #. Area inside the oval limaçon r = + cos. To graph, start with = so r =. Compute d = sin. Interesting points are where d vanishes, or at =,,, etc. For these values of we compute r:,,, and the values
Operating Instructions and Parts Manual 14-inch Woodworking Band Saw Models JWBS-14SF and JWBS-14SF-3
 Operating Instructions and Parts Manual 14-inch Woodworking Band Saw Models JWBS-14SF and JWBS-14SF-3 Model #714500 shown JET 427 New Sanford Road LaVergne, Tennessee 37086 Part No. M-714500 Ph.: 800-274-6848
3.4 SUM AND DIFFERENCE FORMULAS. NOTE: cos(α+β) cos α + cos β cos(α-β) cos α -cos β
 cos α + cos β cos(α-β) cos α -cos β") 3.4 SUM AND DIFFERENCE FORMULAS Page Theorem cos(αβ cos α cos β -sin α cos(α-β cos α cos β sin α NOTE: cos(αβ cos α cos β cos(α-β cos α -cos β Proof of cos(α-β cos α cos β sin α Let s use a unit circle
3.4 SUM AND DIFFERENCE FORMULAS Page Theorem cos(αβ cos α cos β -sin α cos(α-β cos α cos β sin α NOTE: cos(αβ cos α cos β cos(α-β cos α -cos β Proof of cos(α-β cos α cos β sin α Let s use a unit circle
Phys460.nb Solution for the t-dependent Schrodinger s equation How did we find the solution? (not required)
") Phys460.nb 81 ψ n (t) is still the (same) eigenstate of H But for tdependent H. The answer is NO. 5.5.5. Solution for the tdependent Schrodinger s equation If we assume that at time t 0, the electron starts
Phys460.nb 81 ψ n (t) is still the (same) eigenstate of H But for tdependent H. The answer is NO. 5.5.5. Solution for the tdependent Schrodinger s equation If we assume that at time t 0, the electron starts
Potential Dividers. 46 minutes. 46 marks. Page 1 of 11
 Potential Dividers 46 minutes 46 marks Page 1 of 11 Q1. In the circuit shown in the figure below, the battery, of negligible internal resistance, has an emf of 30 V. The pd across the lamp is 6.0 V and
ΟΔΗΓΙΕΣ ΧΡΗΣΗΣ USE INSTRUCTIONS
 ΟΔΗΓΙΕΣ ΧΡΗΣΗΣ USE INSTRUCTIONS ΤΗΛΕΦΩΝΟ ΜΕ ΑΝΑΓΝΩΡΙΣΗ ΚΛΗΣΗΣ /CORDED PHONE WITH CALLER ID ΜΟΝΤΕΛΟ/MODEL: TM09-448 DC48V Παρακαλούμε διαβάστε προσεκτικά όλες τις οδηγίες χρήσης πριν την χρήση της συσκευής
Main source: "Discrete-time systems and computer control" by Α. ΣΚΟΔΡΑΣ ΨΗΦΙΑΚΟΣ ΕΛΕΓΧΟΣ ΔΙΑΛΕΞΗ 4 ΔΙΑΦΑΝΕΙΑ 1
 Main source: "Discrete-time systems and computer control" by Α. ΣΚΟΔΡΑΣ ΨΗΦΙΑΚΟΣ ΕΛΕΓΧΟΣ ΔΙΑΛΕΞΗ 4 ΔΙΑΦΑΝΕΙΑ 1 A Brief History of Sampling Research 1915 - Edmund Taylor Whittaker (1873-1956) devised a
Operating Instructions and Parts Manual 14-inch Woodworking Band Saw Models JWBS-14SF and JWBS-14SF-3
 Operating Instructions and Parts Manual 14-inch Woodworking Band Saw Models JWBS-14SF and JWBS-14SF-3 Model #714500 shown JET 427 New Sanford Road LaVergne, Tennessee 37086 Part No. M-714500 Ph.: 800-274-6848
(Type B) Το προϊόν αυτό δεν είναι κατάλληλο για σκοπούς πρωτογενούς θέρμανσης. ADM AEE
 Το προϊόν αυτό δεν είναι κατάλληλο για σκοπούς πρωτογενούς θέρμανσης. ADM AEE") (Type B) Το προϊόν αυτό δεν είναι κατάλληλο για σκοπούς πρωτογενούς θέρμανσης. ADM AEE 2310 85 30 61 80 00 18 Mklg 01. Rwnc A]SQ,ovb / D OPERATlON FUELING WARNING: uture storage of your heater. Use o NEVE
(Type B) Το προϊόν αυτό δεν είναι κατάλληλο για σκοπούς πρωτογενούς θέρμανσης. ADM AEE 2310 85 30 61 80 00 18 Mklg 01. Rwnc A]SQ,ovb / D OPERATlON FUELING WARNING: uture storage of your heater. Use o NEVE
MS SERIES MS DESK TOP ENCLOSURE APPLICATION EXAMPLE FEATURE. Measuring instruments. Power supply equipments
 MS SERIES MS DESK TOP ENCLOSURE FEATURE Available in 176 sizes. Screws are not appeared on the surface. Usable as rack mount case with optinal mounting bracket. There are no ventilation hole for cover
safty reasons. Disregarding could result in serious injury. Disregarding could result in injury or product damage. Forbidden.
 The following safety precautions are given throughout this manual. They must be strictly followed to protect those who install, use or maintain this product as well as to protect players, visitors and
Εγκατάσταση λογισμικού και αναβάθμιση συσκευής Device software installation and software upgrade
 Για να ελέγξετε το λογισμικό που έχει τώρα η συσκευή κάντε κλικ Menu > Options > Device > About Device Versions. Στο πιο κάτω παράδειγμα η συσκευή έχει έκδοση λογισμικού 6.0.0.546 με πλατφόρμα 6.6.0.207.
Parts catalogue LAWN MOWER
 OREC ISSUED NO. GR535PRO-1 Parts catalogue LAWN MOWER (EXPORT MODEL) GR535PRO(2Action) MODEL GR535PRO CODE 0278- CONTENTS Fig.1 GEAR CASE------------------------------------------------------------ 1 Fig.2
For safty reasons. Disregarding could result in serious injury. Disregarding could result in injury or product damage. Forbidden.
 The following safety precautions are given throughout this manual. They must be strictly followed to protect those who install, use or maintain this product as well as to protect players, visitors and
(1) Describe the process by which mercury atoms become excited in a fluorescent tube (3)
 Describe the process by which mercury atoms become excited in a fluorescent tube (3)") Q1. (a) A fluorescent tube is filled with mercury vapour at low pressure. In order to emit electromagnetic radiation the mercury atoms must first be excited. (i) What is meant by an excited atom? (1) (ii)
Q1. (a) A fluorescent tube is filled with mercury vapour at low pressure. In order to emit electromagnetic radiation the mercury atoms must first be excited. (i) What is meant by an excited atom? (1) (ii)
For safty reasons. Disregarding could result in serious injury. Disregarding could result in injury or product damage. Forbidden.
 The following safety precautions are given throughout this manual. They must be strictly followed to protect those who install, use or maintain this product as well as to protect players, visitors and
INSTRUCTIONS MANUAL ΕΓΧΕΙΡΙΔΙΟ ΛΕΙΤΟΥΡΓΙΑΣ
 Model/Μοντέλο: WKH-1132 INSTRUCTIONS MANUAL ΕΓΧΕΙΡΙΔΙΟ ΛΕΙΤΟΥΡΓΙΑΣ ENGLISH General Safety Instructions Before commissioning this kettle, please read the instruction manual carefully. Please keep the instruction
Quick Installation Guide
 A Installation 1 F H B E C D G 2 www.trust.com/17528/faq Quick Installation Guide C C D Freewave Wireless Audio Set 17528/ 17529 D Installation Configuration Windows XP 4 5 8 Windows 7/ Vista 6 7 9 10
Econ 2110: Fall 2008 Suggested Solutions to Problem Set 8 questions or comments to Dan Fetter 1
 Eon : Fall 8 Suggested Solutions to Problem Set 8 Email questions or omments to Dan Fetter Problem. Let X be a salar with density f(x, θ) (θx + θ) [ x ] with θ. (a) Find the most powerful level α test
ΠΑΝΕΠΙΣΤΗΜΙΟ ΠΑΤΡΩΝ ΤΜΗΜΑ ΗΛΕΚΤΡΟΛΟΓΩΝ ΜΗΧΑΝΙΚΩΝ ΚΑΙ ΤΕΧΝΟΛΟΓΙΑΣ ΥΠΟΛΟΓΙΣΤΩΝ ΤΟΜΕΑΣ ΣΥΣΤΗΜΑΤΩΝ ΗΛΕΚΤΡΙΚΗΣ ΕΝΕΡΓΕΙΑΣ
 ΠΑΝΕΠΙΣΤΗΜΙΟ ΠΑΤΡΩΝ ΤΜΗΜΑ ΗΛΕΚΤΡΟΛΟΓΩΝ ΜΗΧΑΝΙΚΩΝ ΚΑΙ ΤΕΧΝΟΛΟΓΙΑΣ ΥΠΟΛΟΓΙΣΤΩΝ ΤΟΜΕΑΣ ΣΥΣΤΗΜΑΤΩΝ ΗΛΕΚΤΡΙΚΗΣ ΕΝΕΡΓΕΙΑΣ ιπλωµατική Εργασία του φοιτητή του τµήµατος Ηλεκτρολόγων Μηχανικών και Τεχνολογίας Ηλεκτρονικών
Assalamu `alaikum wr. wb.
 LUMP SUM Assalamu `alaikum wr. wb. LUMP SUM Wassalamu alaikum wr. wb. Assalamu `alaikum wr. wb. LUMP SUM Wassalamu alaikum wr. wb. LUMP SUM Lump sum lump sum lump sum. lump sum fixed price lump sum lump
User s Manual / Οδηγίες Χρήσης
 User s Manual / Οδηγίες Χρήσης EUROPEAN STANDARDS Your child s safety depends on you. Proper bed rail usage cannot be assured unless you follow these instructions. DO NOT USE YOUR BED RAIL UNTILL YOU READ
Surface Mount Aluminum Electrolytic Capacitors
 FEATURES CYLINDRICAL V-CHIP CONSTRUCTION LOW COST, GENERAL PURPOSE, 2000 HOURS AT 85 O C NEW EXPANDED CV RANGE (up to 6800µF) ANTI-SOLVENT (2 MINUTES) DESIGNED FOR AUTOMATIC MOUNTING AND REFLOW SOLDERING
Εγγύηση καλής λειτουργίας
 Εγγύηση καλής λειτουργίας Τα Smartphone Bitmore συνοδεύονται από Εγγύηση Καλής Λειτουργίας Δύο (2) Ετών. Please read carefully the Παρακαλούμε διαβάστε προσεκτικά τους όρους εγγύησης που συνοδεύουν το
G 10SD2 G 12S2 G 13SD
 Disc Grinder G 10SD2 G 12S2 G 13SD Handling instructions G13SD Read through carefully and understand these instructions before use. 1 2 1 2 3 3 88 8 4 6 5 17 mm 6 mm 9 7 4! @ 0 2 English 1 Wrench 2 Wheel
Advanced Subsidiary Unit 1: Understanding and Written Response
 Write your name here Surname Other names Edexcel GE entre Number andidate Number Greek dvanced Subsidiary Unit 1: Understanding and Written Response Thursday 16 May 2013 Morning Time: 2 hours 45 minutes
Smaller. 6.3 to 100 After 1 minute's application of rated voltage at 20 C, leakage current is. not more than 0.03CV or 4 (µa), whichever is greater.
, whichever is greater.") Low Impedance, For Switching Power Supplies Low impedance and high reliability withstanding 5000 hours load life at +05 C (3000 / 2000 hours for smaller case sizes as specified below). Capacitance ranges
Low Impedance, For Switching Power Supplies Low impedance and high reliability withstanding 5000 hours load life at +05 C (3000 / 2000 hours for smaller case sizes as specified below). Capacitance ranges
D36-42 D46-42 D50-42 MODEL DIESEL PILE HAMMER SPARE PARTS BOOK
 MODEL D36-42 D46-42 D50-42 DIESEL PILE HAMMER SPARE PARTS BOOK Corporate Office 7032 S. 196th Street Kent, WA, USA 98032 Tel: 1-800-248-8498 Tel: 1-253-872-0141 Fax: 1-253-872-8710 2 No. Parts-No. Description
ΚΥΠΡΙΑΚΗ ΕΤΑΙΡΕΙΑ ΠΛΗΡΟΦΟΡΙΚΗΣ CYPRUS COMPUTER SOCIETY ΠΑΓΚΥΠΡΙΟΣ ΜΑΘΗΤΙΚΟΣ ΔΙΑΓΩΝΙΣΜΟΣ ΠΛΗΡΟΦΟΡΙΚΗΣ 6/5/2006
 Οδηγίες: Να απαντηθούν όλες οι ερωτήσεις. Ολοι οι αριθμοί που αναφέρονται σε όλα τα ερωτήματα είναι μικρότεροι το 1000 εκτός αν ορίζεται διαφορετικά στη διατύπωση του προβλήματος. Διάρκεια: 3,5 ώρες Καλή
Homework 8 Model Solution Section
 MATH 004 Homework Solution Homework 8 Model Solution Section 14.5 14.6. 14.5. Use the Chain Rule to find dz where z cosx + 4y), x 5t 4, y 1 t. dz dx + dy y sinx + 4y)0t + 4) sinx + 4y) 1t ) 0t + 4t ) sinx
Οδηγίες Χρήσης BWR5106
 Οδηγίες Χρήσης BWR5106 Περιγραφή εργαλείου Οι αντλίες χειρός είναι ένα εργαλείο με την ικανότητα, πιέζοντας τον λεβιέ πάνω κάτω να πρεσάρει γράσο σε μεγάλη πίεση και με την βοήθεια αυτής να γρασάρει οπού
UDZ Swirl diffuser. Product facts. Quick-selection. Swirl diffuser UDZ. Product code example:
 UDZ Swirl diffuser Swirl diffuser UDZ, which is intended for installation in a ventilation duct, can be used in premises with a large volume, for example factory premises, storage areas, superstores, halls,
ANSWERSHEET (TOPIC = DIFFERENTIAL CALCULUS) COLLECTION #2. h 0 h h 0 h h 0 ( ) g k = g 0 + g 1 + g g 2009 =?
 COLLECTION #2. h 0 h h 0 h h 0 ( ) g k = g 0 + g 1 + g g 2009 =?") Teko Classes IITJEE/AIEEE Maths by SUHAAG SIR, Bhopal, Ph (0755) 3 00 000 www.tekoclasses.com ANSWERSHEET (TOPIC DIFFERENTIAL CALCULUS) COLLECTION # Question Type A.Single Correct Type Q. (A) Sol least
Teko Classes IITJEE/AIEEE Maths by SUHAAG SIR, Bhopal, Ph (0755) 3 00 000 www.tekoclasses.com ANSWERSHEET (TOPIC DIFFERENTIAL CALCULUS) COLLECTION # Question Type A.Single Correct Type Q. (A) Sol least
ΕΛΛΗΝΙΚΗ ΔΗΜΟΚΡΑΤΙΑ Ανώτατο Εκπαιδευτικό Ίδρυμα Πειραιά Τεχνολογικού Τομέα. Ξένη Ορολογία. Ενότητα 6: Working Capital
 ΕΛΛΗΝΙΚΗ ΔΗΜΟΚΡΑΤΙΑ Ανώτατο Εκπαιδευτικό Ίδρυμα Πειραιά Τεχνολογικού Τομέα Ξένη Ορολογία Ενότητα 6: Working Capital Ευαγγελία Κουτσογιάννη Τμήμα Λογιστικής & Χρηματοοικονομικής Άδειες Χρήσης Το παρόν εκπαιδευτικό
MSN DESK TOP ENCLOSURE WITH STAND / CARRYING HANDLE
 MSN SERIES MSN DESK TOP ENCLOSURE WITH STAND / CARRYING HANDLE W H FEATURE Available in 176 sizes. Stand / carrying handle can be adjusted in 30 degree. Maximum load is kg. There are no ventilation hole
Έλεγχος και Διασφάλιση Ποιότητας
 Έλεγχος και Διασφάλιση Ποιότητας Ενότητα 6: Κουππάρης Μιχαήλ Τμήμα Χημείας Εργαστήριο Αναλυτικής Χημείας General Successfully carry out the Preventive Maintenance Procedure and complete the Maintenance
Linear diffuser. Dimensions. Description
 Dimensions -- + D -- Description is a rectangular linear diffuser in aluminium. is suitable for both supply and exhaust air. is equipped with air guide baffles, making it possible to use for horizontal
MODEL D25-42 D30-42 DIESEL PILE HAMMER SPARE PARTS BOOK
 MODEL D25-42 D30-42 DIESEL PILE HAMMER SPARE PARTS BOOK Corporate Office 7032 S. 196th Street Kent, WA, USA 98032 Tel: 1-800-248-8498 Tel: 1-253-872-0141 Fax: 1-253-872-8710 2 No. Parts-No. Description
Approximation of distance between locations on earth given by latitude and longitude
 Approximation of distance between locations on earth given by latitude and longitude Jan Behrens 2012-12-31 In this paper we shall provide a method to approximate distances between two points on earth
ΔΕΛΤΙΟ ΔΕΔΟΜΕΝΩN ΑΣΦΑΛΕΙΑΣ ΥΛΙΚΟΥ Styccobond B95
 Ημερομηνία αναθεώρησης 30/01/13 Aναθεώρηση 8 Ημερομηνία αντικατάστασης 10/02/12 ΔΕΛΤΙΟ ΔΕΔΟΜΕΝΩN ΑΣΦΑΛΕΙΑΣ ΥΛΙΚΟΥ ΤΜΗΜΑ 1: ΣΤΟΙΧΕΊΑ ΟΥΣΊΑΣ/ΠΑΡΑΣΚΕΥΆΣΜΑΤΟΣ ΚΑΙ ΕΤΑΙΡΕΊΑΣ/ΕΠΙΧΕΊΡΗΣΗΣ 1.1. Αναγνωριστικός
MODEL D62-42 D70-42 DIESEL PILE HAMMER SPARE PARTS BOOK
 MODEL D62-42 D70-42 DIESEL PILE HAMMER SPARE PARTS BOOK Corporate Office 7032 S. 196th Street Kent, WA, USA 98032 Tel: 1-800-248-8498 Tel: 1-253-872-0141 Fax: 1-253-872-8710 2 No. Parts-No. Description
L18VFSS10E. Instruction Manual 45.7cm/18 High Power Floor Fan. Εγχειρίδιο Οδηγιών Επιδαπεδιος Ανεμιστηρας 45.7 Εκατοστομετρο
 L18VFSS10E Instruction Manual 45.7cm/18 High Power Floor Fan Εγχειρίδιο Οδηγιών Επιδαπεδιος Ανεμιστηρας 45.7 Εκατοστομετρο GB GR Contents GB Safety Warnings... 2 Unpacking... 5 Getting to Know Your Fan...
Precision Metal Film Fixed Resistor Axial Leaded
 Features EIA standard colour-coding Non-Flame type available Low noise and voltage coefficient Low temperature coefficient range Wide precision range in small package Too low or too high ohmic value can
Daewoo Technopark A-403, Dodang-dong, Wonmi-gu, Bucheon-city, Gyeonggido, Korea LM-80 Test Report
 LM-80 Test Report Approved Method: Measuring Lumen Maintenance of LED Light Sources Project Number: KILT1212-U00216 Date: September 17 th, 2013 Requested by: Dongbu LED Co., Ltd 90-1, Bongmyeong-Ri, Namsa-Myeon,
b. Use the parametrization from (a) to compute the area of S a as S a ds. Be sure to substitute for ds!
 to compute the area of S a as S a ds. Be sure to substitute for ds!") MTH U341 urface Integrals, tokes theorem, the divergence theorem To be turned in Wed., Dec. 1. 1. Let be the sphere of radius a, x 2 + y 2 + z 2 a 2. a. Use spherical coordinates (with ρ a) to parametrize.
MTH U341 urface Integrals, tokes theorem, the divergence theorem To be turned in Wed., Dec. 1. 1. Let be the sphere of radius a, x 2 + y 2 + z 2 a 2. a. Use spherical coordinates (with ρ a) to parametrize.
Parts catalogue LAWN MOWER
 OREC ISSUED NO. GRH535PRO-3 Parts catalogue LAWN MOWER (EXPORT MODEL) GRH535PRO(2Action) MODEL GRH535PRO CODE 0276- CONTENTS Fig. 1 GEAR CASE -------------------------------------- 1 Fig. 2 GEAR CASE INSIDE,
The Simply Typed Lambda Calculus
 Type Inference Instead of writing type annotations, can we use an algorithm to infer what the type annotations should be? That depends on the type system. For simple type systems the answer is yes, and
ΟΔΗΓΙΕΣ ΧΡΗΣΗΣ ΒΡΕΦΙΚΟΥ ΑΝΑΠΗΡΙΚΟΥ ΑΜΑΞΙΔΙΟΥ / Baby s Wheelchairs User Manual
 ΟΔΗΓΙΕΣ ΧΡΗΣΗΣ ΒΡΕΦΙΚΟΥ ΑΝΑΠΗΡΙΚΟΥ ΑΜΑΞΙΔΙΟΥ / Baby s Wheelchairs User Manual 0808818 ΟΔΗΓΙΕΣ ΕΓΚΑΤΑΣΤΑΣΗΣ/SETUP INSTRUCTIONS Ανοίξτε το αμαξίδιο, τραβώντας τις λαβές, δώστε πλήρη έκταση στο αμαξίδιο τραβώντας
Bring Your Own Device (BYOD) Legal Challenges of the new Business Trend MINA ZOULOVITS LAWYER, PARNTER FILOTHEIDIS & PARTNERS LAW FIRM
 Legal Challenges of the new Business Trend MINA ZOULOVITS LAWYER, PARNTER FILOTHEIDIS & PARTNERS LAW FIRM") Bring Your Own Device (BYOD) Legal Challenges of the new Business Trend MINA ZOULOVITS LAWYER, PARNTER FILOTHEIDIS & PARTNERS LAW FIRM minazoulovits@phrlaw.gr What is BYOD? Information Commissioner's Office
Bring Your Own Device (BYOD) Legal Challenges of the new Business Trend MINA ZOULOVITS LAWYER, PARNTER FILOTHEIDIS & PARTNERS LAW FIRM minazoulovits@phrlaw.gr What is BYOD? Information Commissioner's Office
ΕΛΛΗΝΙΚΗ ΔΗΜΟΚΡΑΤΙΑ Ανώτατο Εκπαιδευτικό Ίδρυμα Πειραιά Τεχνολογικού Τομέα. Ξενόγλωσση Τεχνική Ορολογία. Ενότητα: An Introduction to Tribology
 ΕΛΛΗΝΙΚΗ ΔΗΜΟΚΡΑΤΙΑ Ανώτατο Εκπαιδευτικό Ίδρυμα Πειραιά Τεχνολογικού Τομέα Ξενόγλωσση Τεχνική Ορολογία Ενότητα: An Introduction to Tribology Παναγιώτης Τσατσαρός Τμήμα Μηχανολόγων Μηχανικών ΤΕ Άδειες Χρήσης
Στο εστιατόριο «ToDokimasesPrinToBgaleisStonKosmo?» έξω από τους δακτυλίους του Κρόνου, οι παραγγελίες γίνονται ηλεκτρονικά.
 Διαστημικό εστιατόριο του (Μ)ΑστροΈκτορα Στο εστιατόριο «ToDokimasesPrinToBgaleisStonKosmo?» έξω από τους δακτυλίους του Κρόνου, οι παραγγελίες γίνονται ηλεκτρονικά. Μόλις μια παρέα πελατών κάτσει σε ένα
Section 1: Listening and responding. Presenter: Niki Farfara MGTAV VCE Seminar 7 August 2016
 Section 1: Listening and responding Presenter: Niki Farfara MGTAV VCE Seminar 7 August 2016 Section 1: Listening and responding Section 1: Listening and Responding/ Aκουστική εξέταση Στο πρώτο μέρος της
PREMIER SERIES BY P1206RB-7
 PREMIER SERIES BY P1206RB-7 1. Casting Mechanism Line Part Number Description Qt. Notes 1 100 1001 Face plate 1 2 100 1002 Screw 2 3 100 1003 Thread guide 1 4 100 1004 Thread guide
Εργαστήριο Ανάπτυξης Εφαρμογών Βάσεων Δεδομένων. Εξάμηνο 7 ο
 Εργαστήριο Ανάπτυξης Εφαρμογών Βάσεων Δεδομένων Εξάμηνο 7 ο Procedures and Functions Stored procedures and functions are named blocks of code that enable you to group and organize a series of SQL and PL/SQL
Test Data Management in Practice
 Problems, Concepts, and the Swisscom Test Data Organizer Do you have issues with your legal and compliance department because test environments contain sensitive data outsourcing partners must not see?
1. Πως μειώνεται η ταχύτητα των καυσαερίων από το σημείο εξόδου τους στο ακροφύσιο εξόδου του κινητήρα? 2. Με ποιους τρόπους γίνεται η σήμανση της
 1. Πως μειώνεται η ταχύτητα των καυσαερίων από το σημείο εξόδου τους στο ακροφύσιο εξόδου του κινητήρα? 2. Με ποιους τρόπους γίνεται η σήμανση της επικίνδυνης περιοχής μπροστά από το κινητήρα? 3. Ποιοιείναιοικύκλοιασφαλείαςγύρωαπότοαεροσκάφοςκαιτιαντιπροσωπεύουν?
2013 REV 01 ELECTRONICS CAPACITORS. DC Applications Metallized Polypropylene Film Self Healing
 2013 REV 01 POWER EECTRONICS CAPACITORS C Applications Metallized Polypropylene Film Healing OUR MISSION: POWER EECTRONICS AN SPECIA CAPACITORS M.V. PFC CAPACITORS AN BANKS IGHTING CAPACITORS MOTOR RUN
ΕΡΙΤΟΡΕΣ ΚΑΙ ΑΝΘΩΡΟΙ ΚΛΕΙΔΙΑ ΑΝΑΘΕΣΘ ΑΓΩΝΑ ΓΑΦΕΙΟ ΑΓΩΝΩΝ ΟΓΑΝΩΤΙΚΘ ΕΡΙΤΟΡΘ. ζεκηλαρηο 1 ΡΑΓΚΟΣΜΙΑ ΟΜΟΣΡΟΝΔΙΑ (ISAF) ΕΛΛΘΝΙΚΘ ΟΜΟΣΡΟΝΔΙΑ (Ε.Ι.Ο.
 ΕΛΛΘΝΙΚΘ ΟΜΟΣΡΟΝΔΙΑ (Ε.Ι.Ο.") ΑΝΑΘΕΣΘ ΑΓΩΝΑ ΕΡΙΤΟΡΕΣ ΚΑΙ ΑΝΘΩΡΟΙ ΚΛΕΙΔΙΑ ΡΑΓΚΟΣΜΙΑ ΟΜΟΣΡΟΝΔΙΑ (ISAF) ΕΛΛΘΝΙΚΘ ΟΜΟΣΡΟΝΔΙΑ (Ε.Ι.Ο.) ΚΛΑΣΘ 6/6/2009 1 ΟΡΓΑΝΩΣΙΚΗ ΕΠΙΣΡΟΠΗ ΓΡΑΦΕΙΟ ΑΓΩΝΩΝ ΕΠΙΣΡΟΠΗ ΑΓΩΝΩΝ ΕΠΙΣΡΟΠΗ ΕΝΣΑΕΩΝ ΕΠΙΣΡΟΠΗ ΚΑΣΑΜΕΣΡΗΕΩΝ
ΑΝΑΘΕΣΘ ΑΓΩΝΑ ΕΡΙΤΟΡΕΣ ΚΑΙ ΑΝΘΩΡΟΙ ΚΛΕΙΔΙΑ ΡΑΓΚΟΣΜΙΑ ΟΜΟΣΡΟΝΔΙΑ (ISAF) ΕΛΛΘΝΙΚΘ ΟΜΟΣΡΟΝΔΙΑ (Ε.Ι.Ο.) ΚΛΑΣΘ 6/6/2009 1 ΟΡΓΑΝΩΣΙΚΗ ΕΠΙΣΡΟΠΗ ΓΡΑΦΕΙΟ ΑΓΩΝΩΝ ΕΠΙΣΡΟΠΗ ΑΓΩΝΩΝ ΕΠΙΣΡΟΠΗ ΕΝΣΑΕΩΝ ΕΠΙΣΡΟΠΗ ΚΑΣΑΜΕΣΡΗΕΩΝ
UNIVERSITY OF CALIFORNIA. EECS 150 Fall ) You are implementing an 4:1 Multiplexer that has the following specifications:
 You are implementing an 4:1 Multiplexer that has the following specifications:") UNIVERSITY OF CALIFORNIA Department of Electrical Engineering and Computer Sciences EECS 150 Fall 2001 Prof. Subramanian Midterm II 1) You are implementing an 4:1 Multiplexer that has the following specifications:
UNIVERSITY OF CALIFORNIA Department of Electrical Engineering and Computer Sciences EECS 150 Fall 2001 Prof. Subramanian Midterm II 1) You are implementing an 4:1 Multiplexer that has the following specifications: