IAN STAINLESS STEEL MICROWAVE SMW 900 EDS B2. STAINLESS STEEL MICROWAVE Operating instructions. ΦΟΥΡΝΟΣ ΜΙΚΡΟΚΥΜΑΤΩΝ Οδηүίες χρήσης
|
|
|
- Κηφάς Γούναρης
- 8 χρόνια πριν
- Προβολές:
Transcript
1 STAINLESS STEEL MICROWAVE SMW 900 EDS B2 STAINLESS STEEL MICROWAVE Operating instructions ΦΟΥΡΝΟΣ ΜΙΚΡΟΚΥΜΑΤΩΝ Οδηүίες χρήσης EDELSTAHL-MIKROWELLE Bedienungsanleitung IAN 96324

2 Before reading, unfold the page containing the illustrations and familiarise yourself with all functions of the device. Πριν ξεκινήσετε την ανάγνωση, ανοίξτε τις δυο σελίδες με τις εικόνες και εξοικειωθείτε με όλες τις λειτουργίες της συσκευής. Klappen Sie vor dem Lesen die Seite mit den Abbildungen aus und machen Sie sich anschließend mit allen Funktionen des Gerätes vertraut. GB / IE / CY Operating instructions Page 1 GR / CY Οδηүίες χρήσης Σελίδα 27 DE / AT / CH Bedienungsanleitung Seite 53

3 A B C
4 INDEX PAGE Introduction 3 Intended Usage 3 Scope of delivery 3 Appliance description 3 Technical details 3 Important safety instructions 4 Before you begin 10 Basic principles of microwave cookery...10 Use suitable cookware...10 Commissioning 11 Installation of the appliance...11 Preparing the appliance...11 Place the turntable 3 inside...12 Operation 12 Setting the Clock...12 Standby mode...12 Setting the kitchen timer...12 Child lock...13 Query functions...13 Interrupt/cancel cooking or defrosting processes...13 Heating and cooking 13 Microwave operation...13 Grill function...14 Combination cooking process "Grill"...15 Convection operation...16 Convection operation with preheating...17 Combination cooking process "Convection"...17 Auto menu 18 Starting the Auto menu...18 Baking pizza...20 Defrosting 21 Defrosting by weight...21 Defrosting by time

5 Recipes 23 Meat patty...23 Baking frozen ready-made bread rolls...23 Potato gratin...23 Muffins...24 Cleaning and Care 24 Troubleshooting 25 Disposal 26 Warranty and Service 26 Importer

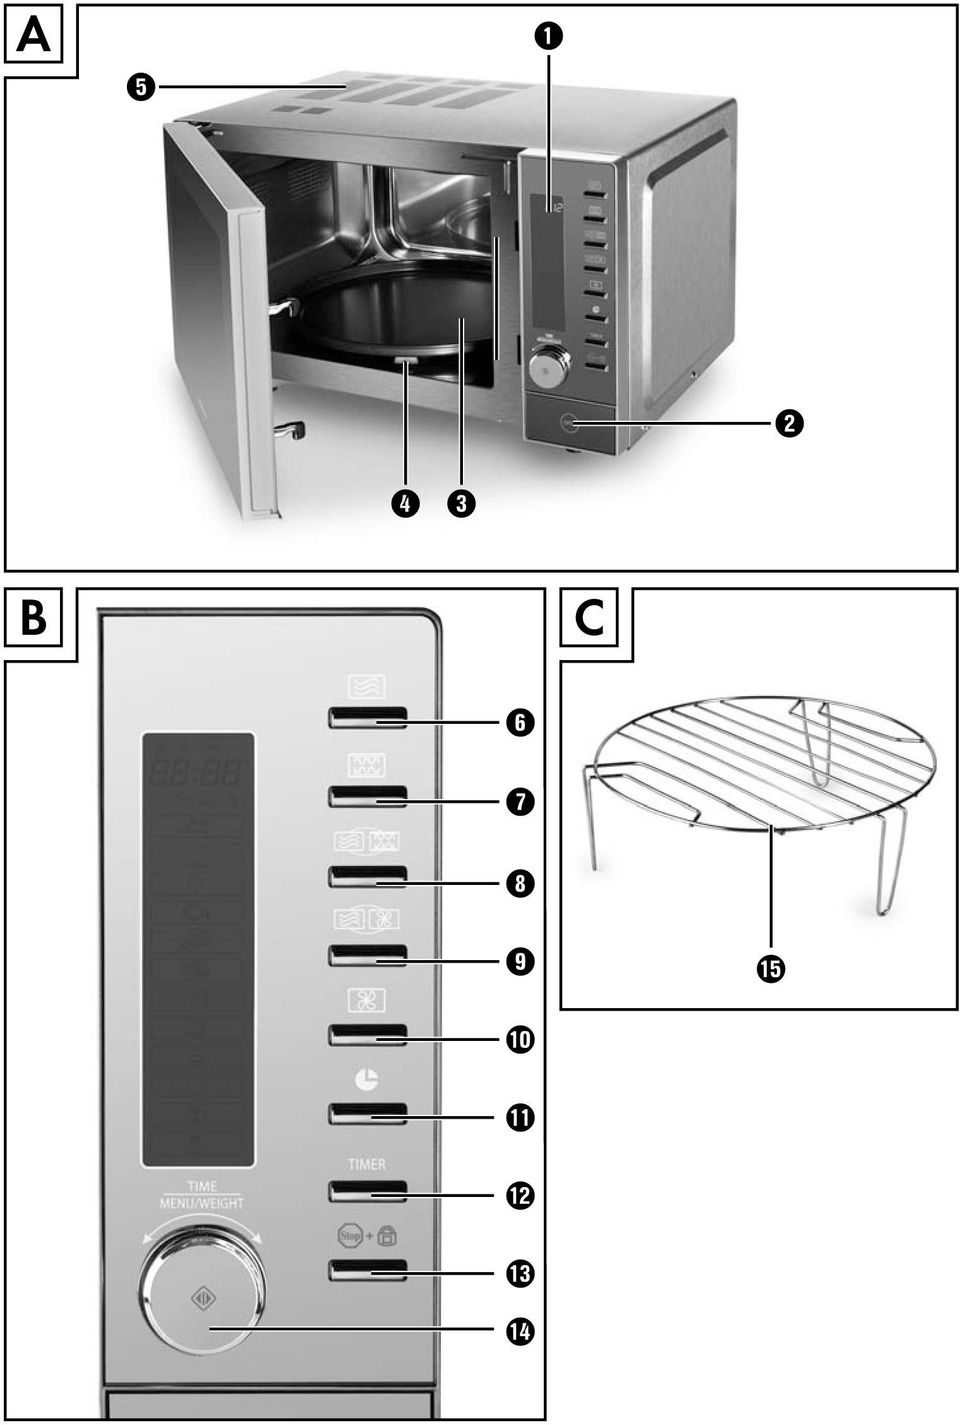
6 Stainless Steel Microwave Introduction Congratulations on the purchase of your new appliance. You have decided to purchase a high-quality product. The operating instructions are a constituent of this product. They contain important information regarding safety, use and disposal. Before using the product, familiarise yourself with all operating and safety instructions. Use this appliance only as described and only for the specified areas of application. Please also pass these operating instructions on to any future owner(s). Intended Usage This appliance is intended for the heating up and preparation of foods in accordance with the described procedures. Any modification to the appliance shall be deemed to be improper use and entails considerable accident hazards. The manufacturer accepts no responsibility for damages arising from usage contrary to the instructions specified below. This appliance is intended exclusively for use in domestic households! Do not use it in/for commercial, industrial or laboratory areas/applications! Scope of delivery Stainless Steel Microwave Turntable Grill stand Operating instructions Concise information (2 no.) Appliance description Figure A: 1 Display 2 Door opener button 3 Turntable 4 Rollers 5 Ventilation slot Figure B: 6 Microwave button 7 Grill button 8 Combination microwave - grill button 9 Combination microwave - convection button 0 Convection button q Clock button w TIMER button (kitchen timer) e Stop/child lock button r Rotary knob / Start/quick start button Figure C: t Grill stands Technical details Nominal voltage: V ~, 50 Hz Maximum power consumption Microwave: 1400 W Grill: 1500 W Convection: 1950 W Maximum power delivery Microwave: 900 W +/- 10% Microwave frequency: 2450 MHz - 3 -
.")
7 Important safety instructions Carefully read these safety and operating instructions before the first use and preserve them for future reference. Important! Warnings regarding damage to the appliance. Danger! / Risk of injury! Warning about physical injuries and electric shock! Risk of fire! Warning about risks of fire. Notice! Note Hints and tips for using the microwave. Safety precautions for the avoidance of excessive contact with microwave energy Do not try to operate the appliance while the door is open, as this can lead to you coming into contact with a potentially harmful dose of microwave radiation. It is also important not to break open or manipulate the safety locks. Do not jam anything between the front of the appliance and the door, and make sure that there is no residual food or cleaning agent on the seals. Risk of injury! If the door or the door seal is damaged, under no circumstances may you continue to use the appliance. Arrange for it to be repaired as soon as possible by qualified specialists. Never attempt to repair the appliance yourself. Removal of the appliance housing could cause the release of microwave energy. Arrange for the repair to be carried out only by qualified specialists. This appliance may be used by children of the age of 8 years or more and by persons with reduced physical, sensory or mental capabilities or lack of experience and/or knowledge if they are supervised or have been instructed how to use the appliance safely and have understood the potential risks. Children must not play with the appliance. Cleaning and user maintenance tasks should not be carried out by children, unless they are at least 8 years old or more and are constantly supervised

8 Children younger than 8 years of age are to be kept away from the appliance and the power cable. Only use this appliance for its intended purpose as described in this manual. Do not use any caustic chemicals or vapours in this appliance. This micro-wave oven is especially designed for heating, cooking, grilling, or drying foodstuffs. It is not intended for use in industrial applications or laboratories. Do not operate the microwave oven if the power cable or plug are damaged. To avoid injury, arrange for damaged power cables or plugs to be exchanged by qualified specialists before re-using the appliance. Keep children well away from the microwave oven when it is in use. Risk of Burns! Under no circumstances should you remove the microwave oven housing. Should the lamp in the interior of the microwave oven need replacing, arrange for this to be done by a qualified specialist. Never touch the microwave oven door, housing, ventilation openings, accessories or the dinnerware directly after the grill, combi or automatic menu process. The parts will be very hot. Allow them to cool down before cleaning them. Ensure that the plug is at all times easily accessible, so that it can be quickly removed in the event of an emergency. People fitted with a heart pacemaker should consult their doctor about the possible risks of using a microwave oven before taking one into use. Do not allow the power cable to hang from a table or work surface. Children could pull on it. After they have been warmed up, always open containers, popcorn-bags etc. with the opening pointing away from your body. Escaping steam could lead to scalds. Never stand directly against the microwave oven when opening the door. Escaping steam could lead to scalds. Do not fry in the microwave. Hot oil can damage parts of the appliance and utensils and even cause skin burns. Always shake-up or stir warmed up baby glasses or bottles! The contents could have heated up unevenly and the baby could be burned/scalded by them. At all events, check their temperature before feeding them to the baby! Do not modify the microwave oven

9 Microwave radiation is dangerous! Maintenance and repairs requiring the removal of access covers, which are intended for protection against contact with microwave radiation, are to be carried out by trained specialists only. Before consumption, check the temperature, so as to avoid a potentially life-threatening scalding for babies. Cooking utensils may become hot from the heat emitted by the food, so that you may require oven gloves to touch them. In this case, a check should also be made to ensure that the cooking utensils are suitable for use with the microwave oven. Attention! Hot surfaces! Risk of fire! Never leave the microwave oven unattended if you are heating foodstuffs packed in plastics or paper. Never place flammable materials close to the microwave oven or the ventilation openings. Remove ALL metallic closures from the packaging of the foodstuff that you intend to warm up. Risk of fire! When making popcorn, use only popcorn-bags suitable for microwave ovens. Do not use the microwave oven to warm up cushions filled with kernels, cherry stones or gels. Risk of fire! Do not use the microwave oven for storing foodstuffs or other objects. Do not exceed the cooking times detailed by the manufacturer. Do not place any objects on the microwave oven when it is in use. The ventilation openings would be blocked! Do not place the microwave oven adjacent to other appliances discharging heat, for example, an oven. Clean the microwave oven thoroughly after warming up greasy foods, especially if they were not covered. Allow the appliance to cool down completely before cleaning it. Residues such as fat or grease cannot be allowed to collect on the heating elements of the grill. They could possibly ignite. Do not thaw frozen fat or oil in the microwave oven. The fat or oil could ignite. Do not use an external timing switch or a separate remote control system to operate the appliance

10 This microwave is designed to be used for heating foods and drinks. Drying foods or clothing or the warming of heating pads, slippers, sponges, damp cloths or similar can lead to injuries, ignition of the material or fires. Important! Appliance Damage! Do not use the microwave oven when it is empty. The only exception is for the initial commissioning (see chapter "Commissioning"). Never insert foreign objects into the ventilation openings or the door safety locks. Do not use metallic utensils which reflect microwaves and lead to sparking. Do not place tins in the microwave oven. Do not place plastic containers in the microwave oven immediately after a grill, combi or automatic menu process. The plastic could melt. This microwave oven may not be located in areas with high humidity or where moisture could collect. Liquids and other foods must not be heated in airtight containers, as these may explode and damage the appliance. Do not lean on the microwave oven door. Insufficient cleanliness of the appliance could lead to the destruction of the upper surfaces, which themselves influence its useful lifespan and could possibly also lead to dangerous situations. Danger! Never submerse the appliance, the power cable or the plug in water or other fluids. Keep the power cable away from hot surfaces. Do not lead it in front of the appliance door. The heat could damage the cable. Never pour fluids into the ventilation openings or the safety locks. Should fluids ever enter them, immediately switch the appliance off and remove the plug from the mains power socket. Arrange for the appliance to be checked by qualified specialists

11 Safety tips To minimize the risk of fire in the appliance: When heating food in plastic or paper containers, always keep an eye on the appliance when it is in operation, as these materials can catch fire. When heating drinks in the appliance, bubbling may be delayed when the drink boils. Therefore, be careful when handling the container. To avoid sudden simmering: If possible, place a glass rod in the fluid for as long as it is being heated. To avoid an unexpected reboiling, leave the fluid to stand in the appliance oven for ca. 20 seconds after being warmed up. Puncture the skins of potatoes, sausages or similar. Otherwise, they could explode. Proceed with caution when warming up fluids. Use only open containers, so that any air bubbles produced can escape. If the appliance starts to give off smoke it should be switched off immediately or the plug removed from the mains and the door should be kept closed to smother any flames that might otherwise escape. Eggs in their shells and hard-boiled eggs should not be heated in the appliance as they could explode, even on completion of the heating process. Food with thick skins, such as potatoes, whole pumpkins, apples and chestnuts must be pricked before cooking. Do not transport the appliance when it is in use

12 Earthing information/correct installation This appliance must be earthed. This appliance is to be connected only to a correctly earthed power socket. An individual circuit, solely for the connection of the appliance, is recommended. Danger: Improper use of the earthing connector could increase the risk of an electric shock. Notice: Should you have any questions about earthing or about the instructions on the use of this electrical appliance given here, please consult an electrician or a maintenance technician. Neither the manufacturer nor the dealer can accept liability for damage to the appliance or injury to persons resulting from failure to comply with the instructions for electrical connection. Interference with other appliances The operation of the appliance may cause interference on your radio, television or similar appliances. If such interference should occur, they may be reduced or corrected by the following remedial measures: Clean the door and the seal of the appliance. Re-align the receiver antenna of your radio or television. Position the appliance in a different place to the receiver. Move the appliance away from the receiver. Plug the appliance into another wall socket. The appliance and the receiver should be connected to different circuits

13 Before you begin Basic principles of microwave cookery Arrange the food with consideration. The thickest parts near the edges. Pay attention to the cooking time. Select the shortest possible stated cooking time and increase as required. Food that is cooked too long can begin to smoke or catch fire. Cover the food during cooking with a lid suitable for microwave cookery. The lid prevents splashing and helps in the even cooking of the food. While cooking, turn the food in the microwave once so that items such as chicken or hamburgers are cooked more quickly. Large pieces of food, such as joints of meat, must be turned at least once. Completely re-arrange foods such as meatballs after half the cooking time. Turn them and move the meatballs from the middle of the cookware to the edge. Use suitable cookware The ideal material for a microwave oven is microwave-permeable, allowing the energy to penetrate the container to heat the food. Microwaves cannot permeate metal. For this reason metal containers and cookware may not be used. When using the microwave for heating do not use products made of recycled paper. These can contain minute fragments of metal, which can generate sparks and/or fires. We recommend the use of round/oval cookware instead of square or oblong containers, as food in corner areas tends to overcook. The following list provides general hints to assist you in selecting the correct cookware. Cookware Heat-resistant glass Combination Non-heatresistant glass Heat-resistant ceramics Plastic crockery suitable for microwave Microwave oven Grill Convection Yes Yes Yes Yes No No No No Yes Yes Yes Yes Yes No No No Kitchen roll Yes No No No Metal tray/plate No Yes Yes No Grill stand No Yes Yes No Alufoil & Foil containers No Yes Yes No

14 Risk of fire! NEVER use the grill stand or other metallic objects when you are using the appliance in the microwave mode or in the combination cooking process. Metals reflect the microwave radiation and it leads to the generation of sparks. This could cause a fire and irreparably damage the appliance! Commissioning Installation of the appliance Risk of fire! This microwave oven is not suitable for installation in a kitchen cabinet. In closed cabinets sufficient ventilation for the appliance cannot be assured. The appliance could be damaged and there would be the additional risk of a fire! Select an even surface offering sufficient space for the adequate ventilation of the appliance: Ensure that you maintain a minimum distance of 10 cm from neighbouring walls/surfaces. Make sure that the door of the microwave oven can be opened easily. Maintain a gap of at least 20 cm above the microwave oven. Ensure that the electrical plug is accessible without problem, so that in case of danger it can be easily reached and removed. Do not remove the pads underneath the microwave oven. Do not block the ventilation openings 5. If you do, it could cause damage to the appliance. Install the appliance as far away as possible from radios and televisions. The operation of the microwave oven can cause malfunctions of radio and televsision reception. Warning: Do not install the microwave above a cooker or any other appliance generating heat. Installation at such a location could cause damage to the appliance and thereby a subsequent lapse of the warranty provisions. Preparing the appliance Remove the packaging material and the protective film applied to the panel and the door opener button 2. Do not remove the light grey flimmer cover plate, which is mounted in the cooking compartment to protect the magnetron. Insert the plug into a mains power socket. Use a V ~, 50 Hz, mains power socket with a 16 A fuse. We recommend that the microwave is powered by its own mains circuit. If you are unsure about how to connect the microwave oven, consult a specialist. Before the first regular usage of the microwave oven the appliance must be heated up to remove any remaining production residues. Once you have plugged the plug into the socket, open the microwave door once by pressing the Door opener button 2. Switch the appliance on in grill operating mode without foods and without accessories (turntable 3 and grill stands t):

15 Press the Grill button 7. "Gr 1" will appear in the display. Turn the rotary knob r, as far as "Gr 3" and the and symbols appear in the display, then confirm the selection by pressing the Start/quick start button r. Use the rotary knob r to set a cooking time of 10 minutes. Press the Start/quick start button r to start the grill process. Note Light smoke generation and a slight smell can occur on first usage, this is due to production residues. These are not harmful. Provide sufficient ventilation. For example, open a window. After 10 minutes the appliance will switch itself off automatically. Wait until it has cooled down completely. Remove the plug from the mains power socket then, after cleaning the appliance with a moist cloth, dry it carefully. Place the turntable 3 inside Place the turntable 3 centrally over the axle in the cooking compartment. Ensure that it slides completely onto the axle and is firmly seated. Operation Setting the Clock After inserting the mains plug into the socket, open the microwave door once. The display 1 shows "1:00". Re-close the door. 1. Press the Clock button q. "Hr 12" appears in the display Select the required mode (Hr 24 or Hr 12) by turning the rotary knob r and then confirm your selection by pressing the Start/quick start button r. Note The time display will only appear once you turn the rotary knob r again, which enables you to set the hour. 3. Select the required hour by turning the rotary knob r and confirm your selection by pressing the Start/quick start button r. 4. Select the required minutes by turning the rotary knob r and confirm your selection by pressing the Start/quick start button r. The time display is now programmed. To read the current time while the microwave is in operation, press the Clock button q ; the time is then shown in the display 1 for a few seconds. Standby mode The microwave automatically switches over to standby mode, and the time is displayed, if no button is pressed for a longer period. The display illumination also dims a few seconds after switching over to standby mode. Setting the kitchen timer The microwave oven is provided with a kitchen timer which you can use independently of the microwave operation. 1. Press the TIMER button w while the appliance is in standby mode. "0:00" is shown in the display 1 along with symbol. 2. Now set the required time using the rotary knob r. You can select any time range from 10 seconds to 95 minutes

16 3. Press the Start/quick start button r. The appliance emits an acoustic signal. The countdown begins. After approx. 3 seconds the current time is shown once again. The kitchen timer will continue to run in the background. If you want to check the kitchen timer inbetween times, press the TIMER button w. The kitchen timer appears for a moment. As soon as the set time period has expired, signal tones sound. Child lock Engage this setting to prevent accidental activation by children and other persons not familiar with the operation of the appliance. The symbol for the child lock appears in the display 1, which means that the appliance cannot be operated as long as this function is activated. Press the Stop/child lock button e and hold it down until a signal tone is sounded and the symbol for the child lock appears in the display 1. The buttons and the control dial now no longer have a function. To deactivate the child lock, press the Stop/child lock button e and hold it down until a signal tone is sounded and the symbol for the child lock goes out. Query functions Query the time during operation During the cooking process, press the Clock button q. The time will appear for a few seconds in the display 1. Query the power level operation During the cooking process, press the Microwave button 6. The activated power level will appear for a few seconds in the display 1. Interrupt/cancel cooking or defrosting processes Press the Stop button e, once in order to interrupt a cooking or defrosting process. The appliance interrupts the process and stops countdown of the remaining time. Press the Start/quick start button r to continue the process. Press the Stop button e twice to cancel a cooking process. The appliance reverts to standby mode. Heating and cooking Note This microwave is equipped with a cooling function. This means that the machine fan continues running for about 3 minutes after a cooking or grill process which takes at least two minutes. This is not a malfunction of the appliance! The rapid cooling helps to prolong the life of the appliance. Microwave operation Note During the cooking process, drops of water can form on the oven door or on the housing. This is normal and is not an indication of a malfunction. When the appliance has cooled down, wipe the moisture off with a dry cloth. Fire hazard! NEVER use the grill stand t or other metallic objects when you are using the appliance in the microwave mode. Metals reflect the microwave radiation and it leads to the generation of sparks. This could cause a fire and irreparably damage the appliance!

17 Selecting the operation level 1. Press the Microwave button 6. "900" (900 W power) appears in the display Now set the required power level using the rotary knob r. 3. Press the Start/quick start button r to confirm the power level you have set. Programming the cooking time After you have selected the power level, programme in the desired cooking time: Turn the rotary knob r until the required cooking time has been set. The stages for the rotary knob r setting times are as follows: from 0 sec to 5 min: in 10 second increments from 5 to 10 min: in 30 second increments from 10 to 30 min: in 1 minute increments from 30 to 95 min: in 5 minute increments Aborting/stopping an input process Press the Stop button e once to cancel and exit an input process. The appliance reverts to standby mode. Starting the cooking process When you have set the power and cooking time, you can start the cooking process: Press the Start/quick start button r to start the cooking process. The symbol for microwave operation appears in the display 1. The set time will now count down backwards. Once the set time has expired, "End" and "Hot" are shown alternating in the display 1. A signal tone is heard repeatedly. Quick start 1 When in standby mode, turn the rotary knob r to the right and set the required cooking period. Start the cooking process with 900 W power by pressing the Start/quick start button r. Quick start 2 You can use this function to start cooking immediately for 30 seconds (or longer, up to 95 min) at 900 W power. Press the Start/quick start button r once. The symbol for microwave operation appears in the display 1 in addition to "00:30". The microwave starts the cooking process for 30 seconds. The countdown begins. If you want to cook for longer than 30 seconds, press the Start/quick start button r several times until the required time has been set. The time levels are apportioned as follows: from 30 sec to 5 min: in 30 second increments from 5 min to 95 min: in 1 minute increments Grill function Note Always use the grill stands t when grilling. This achieves an optimal grilling result. Always placed the grill stands t on the turntable 3. Fire hazard! When using the grill functions, under no circumstances should you use any form of covering or cookware that is not heat-resistant, as these could melt or ignite themselves!

18 3 grill functions are available: "Top heat" grill function (Gr 1): With this function, the heat only comes from above. Only the top grill is activated. This grill function is therefore suitable for grilled sandwiches and gratins. "Bottom heat" grill function (Gr 2): With this function, the heat only comes from below. Only the bottom grill is activated. This grill function is therefore suitable for meals or foods which need to be cooked or grilled from below. "Top and bottom heat" grill function (Gr 3): With this function, the heat comes from above and below. The top and the bottom grills are activated. This grill function is therefore suitable for thin slices of meat, steaks, hamburgers, sausages or chicken pieces. 1. Press the Grill button 7 once to activate the grill function. The symbol for the "Top heat" grill function appears in the display 1 along with "Gr 1". 2. Now set the required grill function using the rotary knob r : "Gr 1" for top heat, "Gr 2" for bottom heat, "Gr 3" for top and bottom heat. Confirm your selection by pressing the Start/quick start button r. 3. Now set the required cooking time using the rotary knob r. The maximum possible cooking time setting is 95 minutes. 4. To start grill function, press the Start/quick start button r. The symbol for the selected grill function / / appears in the display 1. The set time will now count down backwards. Once the set time has expired, "End" and "Hot" are shown alternating in the display 1. A signal tone is heard repeatedly. Combination cooking process "Grill" This function combines the grill function and the normal microwave operation. During the combination mode, a certain amount of time for cooking and the remaining time for grilling is carried out automatically and in one process. You may notice a quiet clicking noise when the oven is switching between modes. Fire hazard! Never use the grill stand t or other metallic objects when you are using the microwave for combined cooking processes. Metals reflect the microwave radiation and it leads to the generation of sparks. This could cause a fire and irreparably damage the appliance! When using the "Grill" combined cooking functions, under no circumstances should you use any form of covering or cookware that is not heat-resistant, as these could melt or ignite themselves! 4 combinations are available: Combination 1 (C 1): For Combination 1, the microwave power is 30% and the grill power is 70% of the cooking time. This is suitable for fish or gratins, for example. The microwave function and the grill function "top heat" are used. Combination 2 (C 2): For Combination 2, the microwave power is 55% and the grill power is 45% of the cooking time. This is suitable for puddings, omelets or lasagne, for example. The microwave function and the "top heat" grill function are used. Combination 3 (C 3): For Combination 3, the microwave power is 30% and the grill power is 70% of the cooking time. This is suitable for potatoes, for example. The microwave function and the grill functions "top and bottom heat" are used
: With this function, the heat comes from above and below. The top and the bottom grills are activated.")
19 Combination 4 (C 4): For Combination 4, the microwave power is 55% and the grill power is 45% of the cooking time. This is suitable for poultry dishes, for example. The microwave function and the grill functions "top and bottom heat" are used. 1. Press the Combination microwave-grill button 8 once to activate Combination 1 (C 1).,, and "C 1" are shown in the display Now set the required combination using the rotary knob r : "C 1" for combination 1, "C 2" for combination 2, "C 3" for combination 3, "C 4" for combination 4. Confirm your selection by pressing the Start/quick start button r. 3. Now set the required cooking time using the rotary knob r. The maximum possible cooking time setting is 95 minutes. 4. Press the Start/quick start button r to start the process. The symbols of the cooking process being used,, appear on the screen 1. The programmed time counts backwards. Once the set time has expired, "End" and "Hot" are shown alternating in the display 1. A signal tone is heard repeatedly. Convection operation When cooking with convection, hot air circulates in the cooking compartment. Convection is especially recommended for cooking souffles or crunchy foods. You can set a temperature of between 110 C and 200 C and a duration of max. 95 min. 1. Press the Convection button 0. "200C" (= 200 C) appears in the display along with the symbol for convection operation. 2. Use the rotary knob r to set the required temperature and confirm your selection by pressing the Start/quick start button r. 3. Now set the required cooking time using the rotary knob r. 4. Press the Start/quick start button r to start the cooking process. The symbol for convection operation appears in the display 1. The programmed time counts backwards. Once the set time has expired, "End" and "Hot" are shown alternating in the display 1. A signal tone is heard repeatedly

20 Convection operation with preheating You can also preheat your microwave before you start a cooking process: 1. Select the required temperature by pressing the Convection button 0 and use the rotary knob r to set the temperature. You do NOT need to confirm this setting by pressing the Start/quick start button r. 2. To start preheating, press the Convection button 0. "30:00" appears in the display 1 and the symbol for convection operation flashes. The countdown begins. Assumes the set temperature is reached, signal tones will sound and the time will stop. 3. Open the door and place the foods to be cooked inside. 4. Turn the rotary knob r to set the temperature and confirm the temperature by pressing the Start/quick start button r. 5. Now set the required cooking time using the rotary knob r. The maximum possible cooking time setting is 95 minutes. 6. Press the Start/quick start button r to start the process. The symbol for convection operation appears in the display 1 permanently. The programmed time counts backwards. Once the set time has expired, "End" and "Hot" are shown alternating in the display 1. A signal tone is heard repeatedly. Combination cooking process "Convection" This function combines the convection function with the normal microwave operation. With this, for example, meat is juicy and tender but still crisp. Fire hazard! Never use the grill stand t or other metallic objects when you are using the microwave for combined cooking processes. Metals reflect the microwave radiation and it leads to the generation of sparks. This could cause a fire and irreparably damage the appliance! 1. Press the Combination microwave-convection button 9. The preset temperature "200C" and the symbols and appear in the display Now set the required temperature using the rotary knob r : 110 C, 140 C, 170 C or 200 C. Confirm your selection by pressing the Start/quick start button r. 3. Now set the required cooking time using the rotary knob r. The maximum cooking time is 95 minutes. Press the Start/quick start button r to confirm the set cooking time. The combination process starts. The symbols for the combination cooking process "Convection", appear on the screen 1. The programmed time counts backwards. Once the set time has expired, "End" and "Hot" are shown alternating in the display 1. A signal tone is heard repeatedly

21 Auto menu For foods to be prepared in automatic menu mode, it is not necessary to enter the cooking time or power setting. It is quite sufficient to enter which type of food is to be cooked/boiled, and its weight. Fire hazard! Under NO circumstances may you use covers or non-heat-resistant dishes for programmes with enabled Grill function (A-01, A-02, A-03, A-04, A-05), as they can melt or catch fire! Note The microwave will calculate the time/power level for fresh foods. Deep-frozen foods will not be cooked properly using the times specified by the microwave (with the exception of the "Pizza" automatic programme). If needs be, defrost frozen foods with the defrost programme beforehand (see section "Defrosting"). Starting the Auto menu 1. Turn the rotary knob r (in standby mode) slowly to the left to call up the automatic menu mode. A number (e.g. "A - 02" for automatic programme 2 (pork)) and the "Pork" symbol appear in the display 1. Turn the rotary knob r to select the appropriate automatic menu for your food. Note If you have entered automatic menu mode by turning the rotary knob r to the left, you can turn the rotary knob to the right afterwards to select the automatic menus in the sequence of A01, A02, A Display Symbol Food Weight A-01 Beef g A-02 Pork g A-03 Poultry g A-04 Fish g A-05 Pizza A-06 Fruit/ vegetables *P g P g P g g A-07 Potatoes g A-08 Warming g A-09 Beverages ml A-10 Entrees 300 / 500 g A-11 Defrosting by weight - A-12 Defrosting by time - *Please refer to the chapter entitled "Baking pizzas" for more information on the pizza programme
22 2. Confirm your selection by pressing the Start/quick start button r. 3. Turn the rotary knob r to set the weight, and then confirm this by pressing the Start/quick start button r. The cooking process is started and the calculated time will countdown backwards. The cooking process starts. The symbols for the cooking and grill functions that are being used for the selected automatic programme appear on the display. Microwave function, grill function Top heat, grill function Bottom heat. The calculated time starts running down. Note To obtain uniform warming or cooking, some foods should be turned after 2/3 of the cooking process duration. The microwave automatically stops after this time, 4 signal tones sound and "Turn" appears in the display 1. Display Symbol Food A-01 Beef A-02 Pork A-03 Poultry A-04 Fish Turn over after... 2/3 of the time 2/3 of the time 2/3 of the time 2/3 of the time Turn the food over. Proceed cautiously with food which may already be hot. Press the Start/quick start button r to continue the cooking process. Note If you do not want to turn the food, just wait for the signal tones to stop. The appliance will automatically continue the cooking process. We recommend that you do turn the food. This will ensure even cooking. Note If the meal is not completely cooked after the automatic menu has finished, proceed as follows: Use the cooking process stated in the table for re-cooking. Start this process for a few minutes, and check the cooking result. When re-cooking a pizza using automatic menu "P2", interrupt the cooking process by pressing the Stop/child lock button as soon as the pizza has been cooked enough. Display Symbol Food A-01 Beef A-02 Pork A-03 Poultry A-04 Fish A-05 Pizza A-06 Fruit/ vegetables Re-cook with... "Grill" combination cooking process - C 3 "Grill" combination cooking process - C 3 "Grill" combination cooking process - C 3 "Grill" combination cooking process - C 3 "Pizza" automatic menu - P2 Microwave operation with 900 W power
23 A-07 Potatoes A-08 Warming A-09 Beverages A-10 Entrees A-11 A-12 Risk of injury! The turntable 3 is always very hot after a cooking process using the grill! You should therefore always use an oven cloth or heat-resistant oven gloves when removing it from the cooking compartment. Note Defrosting by weight Defrosting by time Microwave operation with 900 W power Microwave operation with 900 W power Microwave operation with 900 W power Microwave operation with 900 W power Microwave operation with 100 W power Microwave operation with 100 W power Please note that the size, shape and the type of foodstuff determines the result of the cooking process. Example 1: Proceed as follows to cook 400 g vegetables or fruit: 1. Turn the rotary knob r to the left (when in standby mode) until "A-06" appears in the display 1 and then confirm your selection by pressing the Start/quick start button r. 2. Now set a weight of "400" using the rotary knob r. 3. Press the Start/quick start button r to start the cooking process. Example 2: To heat 300 ml water, proceed as follows: 1. Turn the rotary knob r to the left (when in standby mode) until "A-09" appears in the display 1 and then confirm your selection by pressing the Start/quick start button r. 2. Now set a weight of "300" using the rotary knob r. 3. Press the Start/quick start button r to start the cooking process. Example 3: To heat 300 g of appetizers, proceed as follows: 1. Turn the rotary knob r to the left (when in standby mode) until "A-10" appears in the display 1 and then confirm your selection by pressing the Start/quick start button r. 2. Since "300" is always the first selection in the display, press the Start/quick start button r to start the cooking process. Baking pizza With the automatic programme "Pizza" you can prepare delicious pizzas in the microwave. In this case you can select between pizza programmes "P-01" (deep-frozen pizza), "P-02" (refrigerated pizza) and "P-03" (fresh pizza). 1. Turn the rotary knob r slowly to the left (when in standby mode) until "A-05" appears in the display Press the Start/quick start button r. 3. Now set the required pizza programme using the rotary knob r :
24 "P-01" for deep-frozen pizza, temperature approx. -18, weight 150g 450g ("P-01" appears in the display 1). "P-02" for refrigerated pizza, temperature approx. 5, weight 150g 450g ("P-02" appears in the display 1). "P-03" for fresh pizza, temperature approx. 20, weight 150g 450g ("P-03" appears in the display 1). 4. Confirm your selection by pressing the Start/quick start button r. 5. Turn the rotary knob r to set the required weight, and then confirm this by pressing the Start/quick start button r. The cooking process starts. Note If you are cooking pizza, you can place this directly on the turntable 3. It will be very crispy. Ensure that the edge of the pizza does not extend up to the walls of the cooking compartment during cooking. Example: Proceed as follows to cook a deep-frozen pizza weighing 450 g: 1. Turn the rotary knob r slowly to the left (when in standby mode) until "A-05" appears in the display Press the Start/quick start button r. 3. Now set the programme "P-01" using the rotary knob r : 4. Press the Start/quick start button r. 5. Now set a weight of "450" using the rotary knob r. 6. Press the Start/quick start button r to start the cooking process. The appliance calculates the time required automatically. Defrosting Defrosting by weight Note Always place the food to be defrosted on dishes suitable for use in a microwave oven. Never place it directly on the turntable 3! You can use this function to defrost. The defrosting time and the power level are calculated and set automatically once you have entered the weight. 1. When in standby mode, turn the rotary knob r anticlockwise until "A-11" appears in the display 1 and flashes (see chapter "Automatic menu"). 2. Press the Start/quick start button r. 3. Now select the food to be defrosted by turning the rotary knob r. The following appears in the display 1 : "d-01" and "d-02" and "d-03" and "d-04" and "d-05" and "d-06" and "d-07" and for "beef" for "pork" for "poultry" for "fish" for "pizza" for "fruit/vegetables" for "potatoes" 4. When the required food appears in the display 1, press the Start/quick start button r. 5. Turn the rotary knob r to set the weight
25 The following weights can be set: "d-01"/ / "beef" g "d-02"/ / "pork" g "d-03"/ / "poultry" g "d-04"/ / "fish" g "d-05"/ / "pizza" g "d-06"/ /"fruit/vegetables " g "d-07"/ / "potatoes" g 5. When the required weight appears in the display 1, press the Start/quick start button r. The appliance will then automatically calculate the required defrosting time. Note To ensure optimum defrosting, it is necessary to turn the food during the defrosting process. The appliance will remind you to turn the food over by sounding a signal tone and showing "turn" in the display 1. Open the appliance door, turn the food and then reclose the door. Press the Start/quick start button r to continue the defrosting process. If you do not want to turn the food, just wait for the signal tones to stop. The appliance will automatically continue the defrosting process. We recommend that you do turn the food. This will ensure even defrosting. Defrosting by time Note Always place the food to be defrosted on dishes suitable for use in a microwave oven. Never place it directly on the turntable 3! 1. When in standby mode, turn the rotary knob r anticlockwise until 1 "A-12" and appear in the display. 2. Press the Start/quick start button r. 3. Now set the required time using the rotary knob r. 4. Press the Start/quick start button r to start the defrosting process. The countdown begins. Note To ensure optimum defrosting, it is necessary to turn the food during the defrosting process. The appliance will remind you to turn the food over by sounding a signal tone and showing "turn" in the display 1. Open the appliance door, turn the food and then reclose the door. Press the Start/quick start button r to continue the defrosting process. If you do not want to turn the food, just wait for the signal tones to stop. The appliance will automatically continue the defrosting process. We recommend that you do turn the food. This will ensure an even defrosting
26 Recipes Meat patty Use around 125 g of minced beef to form each patty (diameter approx. 75 mm, height approx. 35mm). Distribute the patties evenly around the turntable 3. Preparation You will achieve the best results if you alternate between the convection and microwave functions. Always wait until the set cooking process has completed before setting the next process. 1. Convection 200 C, 4:00 min. 2. Microwave 900 W power, 5:30 min. 3. Convection 200 C, 2:00 min. (depending on personal taste, a time of up to 4:00 min can also be used). Baking frozen ready-made bread rolls Select the convection function to bake bread rolls. Place 3-4 bread rolls on the turntable 3. Pre-heating of the microwave is not required. Select the following settings for the baking process: Convection 170 C, duration: 12 minutes If you wish to bake additional rolls directly afterwards, shorten the baking time for these by about 1-2 minutes, as the appliance is now already preheated. Potato gratin Ingredients 750 g waxy potatoes, peeled 300 g cream 100 g grated cheese with a fat content of 25% to 30 % fat in dry matter. Spices to taste (e.g., salt/pepper) Use a microwave-proof, round dish with a lid, height 5-6 cm and a diameter of about 22 cm. Preparation Cut the potatoes into slices around 3-4 mm thick. Place around half of the potato slices in the baking dish in "roofing tile" formation. Sprinkle the potatoes with around half of the cheese. Add half of the spices in addition to approx. 150 g of cream. Now place the rest of the potato slices in "roofing tile" formation over the first layer. Sprinkle the rest of the cheese over the potatoes and pour the rest of the cream over this. Sprinkle the remaining spices over the gratin. Cover the dish with the cover and place it in the centre of the turntable 3. Preparation You will achieve the best results if you alternate between the convection and microwave functions. Always wait until the set cooking process has completed before setting the next process. 1. Microwave 900 W power, 10:00 min. 2. Convection 200 C, 13:00 min. 3. Microwave 900 W power, 10:00 min. Pre-heating is not required
27 Muffins Ingredients This recipe yields 10 to 20 muffins. Baking margarine (80% fat content) or salted butter 170 g granulated sugar (up to 0.3 mm grain size) 3 eggs (55-60 g with shell/size M) 225 g wheat flour 7 g baking powder 0,25 g salt Preparation Mix all ingredients well. Fill the muffin pastry into commercial paper baking cases (diameter 45 mm, height 28 mm) Preheat the oven with the convection function to 170 C. Note Should, due to the number of muffins, multiple baking operations be necessary, preheating is required only once. Distribute the muffins evenly on the turntable 3. Select the following settings for the baking process: Convection 170 C, Duration: 12 Minutes Cleaning and Care Risk of injury! Before cleaning, switch the microwave oven off and remove the plug from the mains power socket. Otherwise, there is the great risk of receiving an electric shock! UNDER NO CIRCUMSTANCES should you immerse the appliance in water or other liquids. This could result in you receiving a fatal electric shock and the appliance could be damaged. Always keep the interior of the microwave oven clean. If splashes of food or spilt liquids stick to the walls of the microwave, wipe them off with a damp cloth. Use a mild detergent if the microwave is more heavily soiled. Avoid using cleaning sprays and other aggressive cleaning agents, as they can cause stains, stripes or a blurring of the door surface. Clean the external walls with a damp cloth. To avoid damage to the functional components in the interior of the microwave, do not let liquids to seep in through the ventilation slits 5. Regularly remove splashes or contaminants. Clean the door, both sides of the viewing window, door seals and adjacent components with a damp cloth. Do not use abrasive cleaning agents. Should steam collect on or around the outside of the appliance door, wipe it off with a soft towel. This can happen if the microwave is operated in extremely humid conditions
28 Clean the turntable 3 regularly. Clean the plate in warm soapy water. Clean the grill stand t in warm dishwater and dry it well. Regularly eliminate odours. Place a deep microwave bowl with a cup of water and the juice and peel of a lemon into the microwave oven. Heat it up for 5 minutes. Wipe off thoroughly and rub dry with a cloth. Should replacement of the bulb in the microwave be necessary, arrange for it to be exchanged by a dealer or consult our Service Department. Troubleshooting The display 1 indicates nothing. The plug is not inserted into a power socket. Check the plug. The mains power socket is defective. Try another mains power socket. The display 1 is defective. Contact our Customer Services Department. The appliance does not respond to pressing the buttons. The Child safety facility is activated. Deactivate the Child safety facility (see chapter "Operation ). The appliance does not start the cooking/ warming process. The door is not properly closed. Close the door correctly. The turntable 3 generates loud noise when revolving. The turntable 3 is not correctly positioned on the axle. Insert the turntable 3 correctly into the cooking area. The small rollers 4 and/or the floor of the cooking area are unclean. Clean the rollers 4 and the floor of the cooking area. The display 1 indicates "E01" and signal tones sound. The microwave is overheated. Terminate the current programme immediately. Remove the plug from the mains power socket, open the microwave door and allow the appliance to cool down. The display 1 indicates "E02" and signal tones sound. There is an error on the sensor. Interrupt the programme and let the appliance cool down. Then restart the microwave. If the error occurs again, contact Customer Support. There is an error during the heating up of the appliance. Interrupt the programme and let the appliance cool down. Then restart the microwave. If the error occurs again, contact Customer Support. The display 1 indicates "E03" and signal tones sound. Due to a short circuit or open circuit voltage, the microwave has switched into fault protection. Stop the programme and remove the power plug. If possible, eliminate the problem, e.g. metals in the cooking area, which can lead to the above problem when using the microwave function. Otherwise, please contact our Customer Support
29 Disposal Do not dispose of this appliance in your normal domestic waste. This product is subject to the provisions of European Directive 2012/19/EU. Dispose of the appliance through an approved disposal centre or at your community waste facility. Observe the currently applicable regulations. In case of doubt, please contact your waste disposal centre. Dispose of all packaging materials in an environmentally friendly manner. Warranty and Service You receive a 3-year warranty for this appliance as of the purchase date. This appliance has been manufactured with care and meticulously examined before delivery. Please retain your receipt as proof of purchase. In the case of a warranty claim, please make contact by telephone with our service department. Only in this way can a post-free despatch for your goods be assured. The warranty covers only claims for material and manufacturing defects, not for transport damages, worn parts or for damage to fragile components, e.g. buttons or batteries. This product is for private use only and is not intended for commercial applications. In the event of misuse and improper handling, use of force and interference not carried out by our authorized service branch, the warranty will become void.. Your statutory rights are not restricted in any way by this warranty. The warranty period is not extended by repairs effected under warranty. This applies also to replaced and repaired parts. Damages or defects discovered after purchase are to be reported directly after unpacking, at the latest two days after the purchase date. Repairs carried out after lapse of the warranty period are subject to charge. Service Great Britain Tel.: ( 0.10/Min.) kompernass@lidl.co.uk IAN Service Ireland Tel.: (0,08 EUR/Min., (peak)) (0,06 EUR/Min., (off peak)) kompernass@lidl.ie IAN CY Service Cyprus Tel.: kompernass@lidl.com.cy IAN Hotline availability: Monday to Friday 08:00-20:00 (CET) Importer KOMPERNASS HANDELS GMBH BURGSTRASSE BOCHUM GERMANY
Περιεχόμενα / Contents
 Aερόθερμo / Fan Heater PTC-906 Περιεχόμενα / Contents GR... Σελίδες 3-8 EN... Pages 9-11 2 GR Ευχαριστούμε που επιλέξατε μια συσκευή της γκάμας θερμαντικών IZZY. Σημαντικές Οδηγίες Ασφαλείας Τα Μέρη της
Instruction Execution Times
 1 C Execution Times InThisAppendix... Introduction DL330 Execution Times DL330P Execution Times DL340 Execution Times C-2 Execution Times Introduction Data Registers This appendix contains several tables
Εγκατάσταση λογισμικού και αναβάθμιση συσκευής Device software installation and software upgrade
 Για να ελέγξετε το λογισμικό που έχει τώρα η συσκευή κάντε κλικ Menu > Options > Device > About Device Versions. Στο πιο κάτω παράδειγμα η συσκευή έχει έκδοση λογισμικού 6.0.0.546 με πλατφόρμα 6.6.0.207.
IAN STAINLESS STEEL MICROWAVE SMW 900 EDS B4 STAINLESS STEEL MICROWAVE ΦΟΥΡΝΟΣ ΜΙΚΡΟΚΥΜΑΤΩΝ EDELSTAHL-MIKROWELLE.
 STAINLESS STEEL MICROWAVE STAINLESS STEEL MICROWAVE Operating instructions ΦΟΥΡΝΟΣ ΜΙΚΡΟΚΥΜΑΤΩΝ Οδηүίες χρήσης EDELSTAHL-MIKROWELLE Bedienungsanleitung IAN 275170 Before reading, unfold the page containing
ΟΔΗΓΙΕΣ ΧΡΗΣΗΣ USE INSTRUCTIONS
 ΟΔΗΓΙΕΣ ΧΡΗΣΗΣ USE INSTRUCTIONS ΤΗΛΕΦΩΝΟ ΜΕ ΑΝΑΓΝΩΡΙΣΗ ΚΛΗΣΗΣ /CORDED PHONE WITH CALLER ID ΜΟΝΤΕΛΟ/MODEL: TM09-448 DC48V Παρακαλούμε διαβάστε προσεκτικά όλες τις οδηγίες χρήσης πριν την χρήση της συσκευής
Capacitors - Capacitance, Charge and Potential Difference
 Capacitors - Capacitance, Charge and Potential Difference Capacitors store electric charge. This ability to store electric charge is known as capacitance. A simple capacitor consists of 2 parallel metal
BFN3000 ΕΠΙΤΡΑΠΕΖΙΟΣ ΑΝΕΜΙΣΤΗΡΑΣ. Owner s manual. Μετάφραση του πρωτοτύπου των οδηγιών χρήσης
 BFN3000 ΕΠΙΤΡΑΠΕΖΙΟΣ ΑΝΕΜΙΣΤΗΡΑΣ Μετάφραση του πρωτοτύπου των οδηγιών χρήσης Owner s manual www.bormanntools.com GR Οδηγίες ασφαλούς λειτουργίας 1. Τα χαρακτηριστικά της παροχής ηλεκτρικού ρεύματος θα
MICROWAVE SMW 800 C3 MICROWAVE ΦOΥΡΝΟΣ ΜΙΚΡΟΚΥΜΑΤΩΝ. Οδηүίες χρήσης. Operating instructions MIKROWELLE. Bedienungsanleitung IAN /279042
 MICROWAVE MICROWAVE Operating instructions ΦOΥΡΝΟΣ ΜΙΚΡΟΚΥΜΑΤΩΝ Οδηүίες χρήσης MIKROWELLE Bedienungsanleitung IAN 279041/279042 Before reading, unfold the page containing the illustrations and familiarise
Right Rear Door. Let's now finish the door hinge saga with the right rear door
 Right Rear Door Let's now finish the door hinge saga with the right rear door You may have been already guessed my steps, so there is not much to describe in detail. Old upper one file:///c /Documents
MICROWAVE SMW 800 B2 MICROWAVE ΦΟΥΡΝΟΣ ΜΙΚΡΟΚΥΜΑΤΩΝ. Operating instructions. Οδηүίες χρήσης MIKROWELLE. Bedienungsanleitung IAN /100045
 MICROWAVE SMW 800 B2 MICROWAVE Operating instructions ΦΟΥΡΝΟΣ ΜΙΚΡΟΚΥΜΑΤΩΝ Οδηүίες χρήσης MIKROWELLE Bedienungsanleitung IAN 100044/100045 Before reading, unfold the page containing the illustrations and
Door Hinge replacement (Rear Left Door)
") Door Hinge replacement (Rear Left Door) We will continue the previous article by replacing the hinges of the rear left hand side door. I will use again the same procedure and means I employed during the
Door Hinge replacement (Rear Left Door) We will continue the previous article by replacing the hinges of the rear left hand side door. I will use again the same procedure and means I employed during the
MICROWAVE SMW 800 C3 MICROWAVE. Φoύρνος μικροκυμάτων. Οδηүίες χρήσης. Operating instructions MIKROWELLE. Bedienungsanleitung IAN /270743
 MICROWAVE SMW 800 C3 MICROWAVE Operating instructions Φoύρνος μικροκυμάτων Οδηүίες χρήσης MIKROWELLE Bedienungsanleitung IAN 270739/270743 Before reading, unfold the page containing the illustrations and
2 Composition. Invertible Mappings
 Arkansas Tech University MATH 4033: Elementary Modern Algebra Dr. Marcel B. Finan Composition. Invertible Mappings In this section we discuss two procedures for creating new mappings from old ones, namely,
ΚΥΠΡΙΑΚΗ ΕΤΑΙΡΕΙΑ ΠΛΗΡΟΦΟΡΙΚΗΣ CYPRUS COMPUTER SOCIETY ΠΑΓΚΥΠΡΙΟΣ ΜΑΘΗΤΙΚΟΣ ΔΙΑΓΩΝΙΣΜΟΣ ΠΛΗΡΟΦΟΡΙΚΗΣ 6/5/2006
 Οδηγίες: Να απαντηθούν όλες οι ερωτήσεις. Ολοι οι αριθμοί που αναφέρονται σε όλα τα ερωτήματα είναι μικρότεροι το 1000 εκτός αν ορίζεται διαφορετικά στη διατύπωση του προβλήματος. Διάρκεια: 3,5 ώρες Καλή
Οδηγίες Αγοράς Ηλεκτρονικού Βιβλίου Instructions for Buying an ebook
 Οδηγίες Αγοράς Ηλεκτρονικού Βιβλίου Instructions for Buying an ebook Βήμα 1: Step 1: Βρείτε το βιβλίο που θα θέλατε να αγοράσετε και πατήστε Add to Cart, για να το προσθέσετε στο καλάθι σας. Αυτόματα θα
[1] P Q. Fig. 3.1
![[1] P Q. Fig. 3.1](/thumbs/79/80362156.jpg "[1] P Q. Fig. 3.1") 1 (a) Define resistance....... [1] (b) The smallest conductor within a computer processing chip can be represented as a rectangular block that is one atom high, four atoms wide and twenty atoms long. One
1 (a) Define resistance....... [1] (b) The smallest conductor within a computer processing chip can be represented as a rectangular block that is one atom high, four atoms wide and twenty atoms long. One
English Ελληνικά Deutsch... 65
 English... 2 Ελληνικά... 33 Deutsch... 65 V 1.3 Table of Contents 1. Introduction... 3 2. Safety instructions... 4 3. Intended use... 11 4. Copyright... 11 5. Package contents... 12 6. Technical specifications...
the total number of electrons passing through the lamp.
 1. A 12 V 36 W lamp is lit to normal brightness using a 12 V car battery of negligible internal resistance. The lamp is switched on for one hour (3600 s). For the time of 1 hour, calculate (i) the energy
Modbus basic setup notes for IO-Link AL1xxx Master Block
 n Modbus has four tables/registers where data is stored along with their associated addresses. We will be using the holding registers from address 40001 to 49999 that are R/W 16 bit/word. Two tables that
Δημιουργία Λογαριασμού Διαχείρισης Business Telephony Create a Management Account for Business Telephony
 Δημιουργία Λογαριασμού Διαχείρισης Business Telephony Create a Management Account for Business Telephony Ελληνικά Ι English 1/7 Δημιουργία Λογαριασμού Διαχείρισης Επιχειρηματικής Τηλεφωνίας μέσω της ιστοσελίδας
Στο εστιατόριο «ToDokimasesPrinToBgaleisStonKosmo?» έξω από τους δακτυλίους του Κρόνου, οι παραγγελίες γίνονται ηλεκτρονικά.
 Διαστημικό εστιατόριο του (Μ)ΑστροΈκτορα Στο εστιατόριο «ToDokimasesPrinToBgaleisStonKosmo?» έξω από τους δακτυλίους του Κρόνου, οι παραγγελίες γίνονται ηλεκτρονικά. Μόλις μια παρέα πελατών κάτσει σε ένα
PortSip Softphone. Ελληνικά Ι English 1/20
 PortSip Softphone Ελληνικά Ι English 1/20 1. Περιεχόμενα 2. Εγκατάσταση σε Smartphone & Tablet (Android ή ios)... 1 3. Εγκατάσταση σε ηλεκτρονικό υπολογιστή (Windows ή Mac).... 5 4. Installation in Smartphone
SPEEDO AQUABEAT. Specially Designed for Aquatic Athletes and Active People
 SPEEDO AQUABEAT TM Specially Designed for Aquatic Athletes and Active People 1 2 Decrease Volume Increase Volume Reset EarphonesUSBJack Power Off / Rewind Power On / Fast Forward Goggle clip LED Status
(1) Describe the process by which mercury atoms become excited in a fluorescent tube (3)
 Describe the process by which mercury atoms become excited in a fluorescent tube (3)") Q1. (a) A fluorescent tube is filled with mercury vapour at low pressure. In order to emit electromagnetic radiation the mercury atoms must first be excited. (i) What is meant by an excited atom? (1) (ii)
Q1. (a) A fluorescent tube is filled with mercury vapour at low pressure. In order to emit electromagnetic radiation the mercury atoms must first be excited. (i) What is meant by an excited atom? (1) (ii)
Quick Installation Guide
 A Installation 1 F H B E C D G 2 www.trust.com/17528/faq Quick Installation Guide C C D Freewave Wireless Audio Set 17528/ 17529 D Installation Configuration Windows XP 4 5 8 Windows 7/ Vista 6 7 9 10
EE512: Error Control Coding
 EE512: Error Control Coding Solution for Assignment on Finite Fields February 16, 2007 1. (a) Addition and Multiplication tables for GF (5) and GF (7) are shown in Tables 1 and 2. + 0 1 2 3 4 0 0 1 2 3
Οδηγίες Χρήσης / Instructions Manual Ελληνικά (GR) English (EN) Αντικολλητική Γάστρα Non-Stick Roaster
 English (EN) Αντικολλητική Γάστρα Non-Stick Roaster") ΓΙΑ ΠΕΡΙΣΣΟΤΕΡΕΣ ΠΛΗΡΟΦΟΡΙΕΣ: FOR FURTHER INFORMATION: Χ. ΜΠΕΝΡΟΥΜΠΗ & ΥΙΟΣ Α.Ε. H. BENRUBI & FILS S.A. Αγ. Θωμά 27, 15124, Μαρούσι-Αθήνα 27 Aghiou Thoma str. GR 15124, Maroussi-Athens Τηλ. 210 6156400,
ΓΙΑ ΠΕΡΙΣΣΟΤΕΡΕΣ ΠΛΗΡΟΦΟΡΙΕΣ: FOR FURTHER INFORMATION: Χ. ΜΠΕΝΡΟΥΜΠΗ & ΥΙΟΣ Α.Ε. H. BENRUBI & FILS S.A. Αγ. Θωμά 27, 15124, Μαρούσι-Αθήνα 27 Aghiou Thoma str. GR 15124, Maroussi-Athens Τηλ. 210 6156400,
OUR PRODUCT RANGE. www.rakson.gr
 ΤΑ ΑΛΛΑ ΕΙ Η ΠΡΟΪΟΝΤΑ ΜΑΣ ΜΕΤΑΣΧΗΜΑΤΙΣΤΕΣ ΚΟΥ ΟΥΝΙΩΝ ΚΟΥ ΟΥΝΙΑ ΜΠΟΥΤΟΝ ΚΟΥ ΟΥΝΙΩΝ ΑΥΤΟΜΑΤΟΙ ΚΛΙΜΑΚΟΣΤΑΣΙΟΥ ΚΛΕΙ ΑΡΙΕΣ ΑΝΙΧΝΕΥΤΕΣ ΚΙΝΗΣΗΣ ΣΥΣΤΗΜΑΤΑ ΕΠΙΚΟΙΝΩΝΙΑΣ Θυροτηλεοράσεις Θυροτηλέφωνα Ενδοεπικοινωνίες
ΚΥΠΡΙΑΚΗ ΕΤΑΙΡΕΙΑ ΠΛΗΡΟΦΟΡΙΚΗΣ CYPRUS COMPUTER SOCIETY ΠΑΓΚΥΠΡΙΟΣ ΜΑΘΗΤΙΚΟΣ ΔΙΑΓΩΝΙΣΜΟΣ ΠΛΗΡΟΦΟΡΙΚΗΣ 19/5/2007
 Οδηγίες: Να απαντηθούν όλες οι ερωτήσεις. Αν κάπου κάνετε κάποιες υποθέσεις να αναφερθούν στη σχετική ερώτηση. Όλα τα αρχεία που αναφέρονται στα προβλήματα βρίσκονται στον ίδιο φάκελο με το εκτελέσιμο
derivation of the Laplacian from rectangular to spherical coordinates
 derivation of the Laplacian from rectangular to spherical coordinates swapnizzle 03-03- :5:43 We begin by recognizing the familiar conversion from rectangular to spherical coordinates (note that φ is used
9.09. # 1. Area inside the oval limaçon r = cos θ. To graph, start with θ = 0 so r = 6. Compute dr
 9.9 #. Area inside the oval limaçon r = + cos. To graph, start with = so r =. Compute d = sin. Interesting points are where d vanishes, or at =,,, etc. For these values of we compute r:,,, and the values
Surface Mount Multilayer Chip Capacitors for Commodity Solutions
 Surface Mount Multilayer Chip Capacitors for Commodity Solutions Below tables are test procedures and requirements unless specified in detail datasheet. 1) Visual and mechanical 2) Capacitance 3) Q/DF
IAN 94381. Φωτιστικό LED. Operation and Safety Notes. Υποδείξεις χειρισμού και ασφαλείας
 LED Multi-Function Light LED Multi-Function Light Operation and Safety Notes Φωτιστικό LED Υποδείξεις χειρισμού και ασφαλείας IAN 94381 94381_liv_BS_LED_Taschenlampe_cover_GB_CY.indd 4 24.09.13 09:59 GB
Precision Metal Film Fixed Resistor Axial Leaded
 Features EIA standard colour-coding Non-Flame type available Low noise and voltage coefficient Low temperature coefficient range Wide precision range in small package Too low or too high ohmic value can
Popcorn Maker SPCM 1200 A1
 KITCHEN TOOLS Popcorn Maker SPCM 1200 A1 Popcorn Maker Operating instructions Συσκευή παρασκευής ποπ κορν Οδηγίες χρήσης KOMPERNASS GMBH BURGSTRASSE 21 D-44867 BOCHUM www.kompernass.com ID-Nr.: SPCM 1200
The Nottingham eprints service makes this work by researchers of the University of Nottingham available open access under the following conditions.
 Luevorasirikul, Kanokrat (2007) Body image and weight management: young people, internet advertisements and pharmacists. PhD thesis, University of Nottingham. Access from the University of Nottingham repository:
UK PART-3. ARRANGING FOOD IN THE APPLIANCE Refrigerator Compartment To set the refrigerator compartment to 5 graphic bar will be enough for normal con
 UK PART-3. ARRANGING FOOD IN THE APPLIANCE Refrigerator Compartment To set the refrigerator compartment to 5 graphic bar will be enough for normal conditions. To reduce humidity and consequent increase
HOMEWORK 4 = G. In order to plot the stress versus the stretch we define a normalized stretch:
 HOMEWORK 4 Problem a For the fast loading case, we want to derive the relationship between P zz and λ z. We know that the nominal stress is expressed as: P zz = ψ λ z where λ z = λ λ z. Therefore, applying
INSTRUCTIONS MANUAL ΕΓΧΕΙΡΙΔΙΟ ΛΕΙΤΟΥΡΓΙΑΣ
 Model/Μοντέλο: WKH-1132 INSTRUCTIONS MANUAL ΕΓΧΕΙΡΙΔΙΟ ΛΕΙΤΟΥΡΓΙΑΣ ENGLISH General Safety Instructions Before commissioning this kettle, please read the instruction manual carefully. Please keep the instruction
How to register an account with the Hellenic Community of Sheffield.
 How to register an account with the Hellenic Community of Sheffield. (1) EN: Go to address GR: Πηγαίνετε στη διεύθυνση: http://www.helleniccommunityofsheffield.com (2) EN: At the bottom of the page, click
ΑΚΑ ΗΜΙΑ ΕΜΠΟΡΙΚΟΥ ΝΑΥΤΙΚΟΥ ΜΑΚΕ ΟΝΙΑΣ ΣΧΟΛΗ ΜΗΧΑΝΙΚΩΝ ΠΤΥΧΙΑΚΗ ΕΡΓΑΣΙΑ ΘΕΜΑ : ΧΗΜΙΚΑ ΠΡΟΣΘΕΤΑ ΠΟΥ ΠΡΟΟΡΙΖΟΝΤΑΙ ΓΙΑ ΤΟ ΝΕΡΟ ΤΟΥ ΑΤΜΟΛΕΒΗΤΑ
 ΑΚΑ ΗΜΙΑ ΕΜΠΟΡΙΚΟΥ ΝΑΥΤΙΚΟΥ ΜΑΚΕ ΟΝΙΑΣ ΣΧΟΛΗ ΜΗΧΑΝΙΚΩΝ ΠΤΥΧΙΑΚΗ ΕΡΓΑΣΙΑ ΘΕΜΑ : ΧΗΜΙΚΑ ΠΡΟΣΘΕΤΑ ΠΟΥ ΠΡΟΟΡΙΖΟΝΤΑΙ ΓΙΑ ΤΟ ΝΕΡΟ ΤΟΥ ΑΤΜΟΛΕΒΗΤΑ ΣΠΟΥ ΑΣΤΗΣ : ΑΓΟΡΑΣΤΟΣ ΧΡΥΣΟΒΑΛΑΝΤΗΣ ΕΠΙΒΛΕΠΟΥΣΑ ΚΑΘΗΓΗΤΡΙΑ :
C.S. 430 Assignment 6, Sample Solutions
 C.S. 430 Assignment 6, Sample Solutions Paul Liu November 15, 2007 Note that these are sample solutions only; in many cases there were many acceptable answers. 1 Reynolds Problem 10.1 1.1 Normal-order
UDZ Swirl diffuser. Product facts. Quick-selection. Swirl diffuser UDZ. Product code example:
 UDZ Swirl diffuser Swirl diffuser UDZ, which is intended for installation in a ventilation duct, can be used in premises with a large volume, for example factory premises, storage areas, superstores, halls,
Advanced Subsidiary Unit 1: Understanding and Written Response
 Write your name here Surname Other names Edexcel GE entre Number andidate Number Greek dvanced Subsidiary Unit 1: Understanding and Written Response Thursday 16 May 2013 Morning Time: 2 hours 45 minutes
Potential Dividers. 46 minutes. 46 marks. Page 1 of 11
 Potential Dividers 46 minutes 46 marks Page 1 of 11 Q1. In the circuit shown in the figure below, the battery, of negligible internal resistance, has an emf of 30 V. The pd across the lamp is 6.0 V and
The Simply Typed Lambda Calculus
 Type Inference Instead of writing type annotations, can we use an algorithm to infer what the type annotations should be? That depends on the type system. For simple type systems the answer is yes, and
Αναερόβια Φυσική Κατάσταση
 Αναερόβια Φυσική Κατάσταση Γιάννης Κουτεντάκης, BSc, MA. PhD Αναπληρωτής Καθηγητής ΤΕΦΑΑ, Πανεπιστήµιο Θεσσαλίας Περιεχόµενο Μαθήµατος Ορισµός της αναερόβιας φυσικής κατάστασης Σχέσης µε µηχανισµούς παραγωγής
CHAPTER 25 SOLVING EQUATIONS BY ITERATIVE METHODS
 CHAPTER 5 SOLVING EQUATIONS BY ITERATIVE METHODS EXERCISE 104 Page 8 1. Find the positive root of the equation x + 3x 5 = 0, correct to 3 significant figures, using the method of bisection. Let f(x) =
Math 6 SL Probability Distributions Practice Test Mark Scheme
 Math 6 SL Probability Distributions Practice Test Mark Scheme. (a) Note: Award A for vertical line to right of mean, A for shading to right of their vertical line. AA N (b) evidence of recognizing symmetry
Surface Mount Aluminum Electrolytic Capacitors
 FEATURES CYLINDRICAL V-CHIP CONSTRUCTION LOW COST, GENERAL PURPOSE, 2000 HOURS AT 85 O C NEW EXPANDED CV RANGE (up to 6800µF) ANTI-SOLVENT (2 MINUTES) DESIGNED FOR AUTOMATIC MOUNTING AND REFLOW SOLDERING
User s Manual / Οδηγίες Χρήσης
 User s Manual / Οδηγίες Χρήσης EUROPEAN STANDARDS Your child s safety depends on you. Proper bed rail usage cannot be assured unless you follow these instructions. DO NOT USE YOUR BED RAIL UNTILL YOU READ
safty reasons. Disregarding could result in serious injury. Disregarding could result in injury or product damage. Forbidden.
 The following safety precautions are given throughout this manual. They must be strictly followed to protect those who install, use or maintain this product as well as to protect players, visitors and
ΟΔΗΓΙΕΣ ΕΓΚΑΤΑΣTΑΣΗΣ ΓΙΑ ΠΑΤΩΜΑ WPC INSTALLATION GUIDE FOR WPC DECKING
 1/12 ΟΔΗΓΙΕΣ ΕΓΚΑΤΑΣTΑΣΗΣ ΓΙΑ ΠΑΤΩΜΑ WPC INSTALLATION GUIDE FOR WPC DECKING Ανοίγουμε τρύπες Ø8 x 80mm στο σημείο κατασκευής, με τρυπάνι. To προτεινόμενο πλάτος και μήκος μεταξύ των 2 οπών να είναι 30-35εκ.,
Physical DB Design. B-Trees Index files can become quite large for large main files Indices on index files are possible.
 B-Trees Index files can become quite large for large main files Indices on index files are possible 3 rd -level index 2 nd -level index 1 st -level index Main file 1 The 1 st -level index consists of pairs
7 Present PERFECT Simple. 8 Present PERFECT Continuous. 9 Past PERFECT Simple. 10 Past PERFECT Continuous. 11 Future PERFECT Simple
 A/ Ονόματα και ένα παράδειγμα 1 Present Simple 7 Present PERFECT Simple 2 Present Continuous 8 Present PERFECT Continuous 3 Past Simple (+ used to) 9 Past PERFECT Simple she eats she is eating she ate
b. Use the parametrization from (a) to compute the area of S a as S a ds. Be sure to substitute for ds!
 to compute the area of S a as S a ds. Be sure to substitute for ds!") MTH U341 urface Integrals, tokes theorem, the divergence theorem To be turned in Wed., Dec. 1. 1. Let be the sphere of radius a, x 2 + y 2 + z 2 a 2. a. Use spherical coordinates (with ρ a) to parametrize.
MTH U341 urface Integrals, tokes theorem, the divergence theorem To be turned in Wed., Dec. 1. 1. Let be the sphere of radius a, x 2 + y 2 + z 2 a 2. a. Use spherical coordinates (with ρ a) to parametrize.
VENERE. GR. Οδηγός Χρήσης EN. User Guide
 GR. Οδηγός Χρήσης EN. User Guide ΣΗΜΑΝΤΙΚΟ! ΚΡΑΤΗΣΤΕ ΓΙΑ ΜΕΛΛΟΝΤΙΚΗ ΑΝΑΦΟΡΑ: ΔΙΑΒΑΣΤΕ ΠΡΟΣΕΚΤΙΚΑ Κίνδυνος από φωτιά και άλλες πηγές έντονης θερμότητας, όπως ηλεκτρικές αντιστάσεις, υγραέριο, φωτιά κλπ,
Approximation of distance between locations on earth given by latitude and longitude
 Approximation of distance between locations on earth given by latitude and longitude Jan Behrens 2012-12-31 In this paper we shall provide a method to approximate distances between two points on earth
QUICKTRONIC PROFESSIONAL QTP5
 osram.com QUICKTRONIC PROFESSIONA QTP5 ECG for T5/ 16mm, T8/ 26mm, DUUX fluorescent lamps QTP5 i.e. UMIUX T5 HO ES 01 Product Features: Up to 100.000 hours lifetime 1 amp start with optimized filament
Section 8.3 Trigonometric Equations
 99 Section 8. Trigonometric Equations Objective 1: Solve Equations Involving One Trigonometric Function. In this section and the next, we will exple how to solving equations involving trigonometric functions.
For safty reasons. Disregarding could result in serious injury. Disregarding could result in injury or product damage. Forbidden.
 The following safety precautions are given throughout this manual. They must be strictly followed to protect those who install, use or maintain this product as well as to protect players, visitors and
Συστήματα Διαχείρισης Βάσεων Δεδομένων
 ΕΛΛΗΝΙΚΗ ΔΗΜΟΚΡΑΤΙΑ ΠΑΝΕΠΙΣΤΗΜΙΟ ΚΡΗΤΗΣ Συστήματα Διαχείρισης Βάσεων Δεδομένων Φροντιστήριο 9: Transactions - part 1 Δημήτρης Πλεξουσάκης Τμήμα Επιστήμης Υπολογιστών Tutorial on Undo, Redo and Undo/Redo
3.4 SUM AND DIFFERENCE FORMULAS. NOTE: cos(α+β) cos α + cos β cos(α-β) cos α -cos β
 cos α + cos β cos(α-β) cos α -cos β") 3.4 SUM AND DIFFERENCE FORMULAS Page Theorem cos(αβ cos α cos β -sin α cos(α-β cos α cos β sin α NOTE: cos(αβ cos α cos β cos(α-β cos α -cos β Proof of cos(α-β cos α cos β sin α Let s use a unit circle
3.4 SUM AND DIFFERENCE FORMULAS Page Theorem cos(αβ cos α cos β -sin α cos(α-β cos α cos β sin α NOTE: cos(αβ cos α cos β cos(α-β cos α -cos β Proof of cos(α-β cos α cos β sin α Let s use a unit circle
CITRUS JUICER INSTRUCTIONS
 CITRUS JUICER INSTRUCTIONS Model No.: J85SS Safty warning Intended use The citrus juicer is suitable for extracting juice from citrus fruit(lemons,oranges etc).it is designed for juicing domestic portions
 60 61 62 63 64 65 Ο Δ Η Γ Ι Ε Σ Σ Υ Ν Τ Η Ρ Η Σ Η Σ Τ Ω Ν Κ Ο Υ Φ Ω Μ Α Τ Ω Ν Ι Ν S T R U C T I N O N S C O N C E R N I N G Τ Η Ε C A S E M E N T S M A I N T E N A N C E Ο τακτικός καθαρισμός των βαμμένων
EN User manual 2. EL Οδηγίες Χρήσης 22. Oven Φούρνος ZOP37902
 EN User manual 2 EL Οδηγίες Χρήσης 22 Oven Φούρνος ZOP37902 Contents Safety information 2 Safety instructions 3 Product description _ 5 Before first use 6 Daily use _ 6 Clock functions 8 Safety information
For safty reasons. Disregarding could result in serious injury. Disregarding could result in injury or product damage. Forbidden.
 The following safety precautions are given throughout this manual. They must be strictly followed to protect those who install, use or maintain this product as well as to protect players, visitors and
The challenges of non-stable predicates
 The challenges of non-stable predicates Consider a non-stable predicate Φ encoding, say, a safety property. We want to determine whether Φ holds for our program. The challenges of non-stable predicates
31 Litre Stainless Steel Microwave with Grill K31GSS10E. instruction manual εγχειρίδιο οδηγιών
 31 Litre Stainless Steel Microwave with Grill K31GSS10E instruction manual εγχειρίδιο οδηγιών Contents GB Περιεχόμενα GR safety warnings...3 unpacking...18 getting ready...19 introducing microwave cooking...20
Section 1: Listening and responding. Presenter: Niki Farfara MGTAV VCE Seminar 7 August 2016
 Section 1: Listening and responding Presenter: Niki Farfara MGTAV VCE Seminar 7 August 2016 Section 1: Listening and responding Section 1: Listening and Responding/ Aκουστική εξέταση Στο πρώτο μέρος της
Phys460.nb Solution for the t-dependent Schrodinger s equation How did we find the solution? (not required)
") Phys460.nb 81 ψ n (t) is still the (same) eigenstate of H But for tdependent H. The answer is NO. 5.5.5. Solution for the tdependent Schrodinger s equation If we assume that at time t 0, the electron starts
Phys460.nb 81 ψ n (t) is still the (same) eigenstate of H But for tdependent H. The answer is NO. 5.5.5. Solution for the tdependent Schrodinger s equation If we assume that at time t 0, the electron starts
Dynamic types, Lambda calculus machines Section and Practice Problems Apr 21 22, 2016
 Harvard School of Engineering and Applied Sciences CS 152: Programming Languages Dynamic types, Lambda calculus machines Apr 21 22, 2016 1 Dynamic types and contracts (a) To make sure you understand the
PTC FUNCTION for Delta C2000 and CP2000
 FUNCTION for Delta C2000 and CP2000 CONTENTS: GENERAL... 2. for motor temperature protection... 2.2 Standards... 2.3 Motor layout... 2.4 characteristic... 2.4. Definitions... 3.4.2 curve... 3.4.3 switching
Bbc7000 ΦΟΡΤΙΣΤΗΣ - ΕΚΚΙΝΗΤΗΣ ΜΠΑΤΑΡΙΑΣ. Art Nr: Owner s manual. Μετάφραση του πρωτοτύπου των οδηγιών χρήσης
 Bbc7000 ΦΟΡΤΙΣΤΗΣ - ΕΚΚΙΝΗΤΗΣ ΜΠΑΤΑΡΙΑΣ Μετάφραση του πρωτοτύπου των οδηγιών χρήσης Art Nr: 022213 Owner s manual Διαβάστε προσεχτικά όλες τις οδηγίες χρήσης και ασφάλειας πριν την λειτουργία του μηχανήματος.
L18VFSS10E. Instruction Manual 45.7cm/18 High Power Floor Fan. Εγχειρίδιο Οδηγιών Επιδαπεδιος Ανεμιστηρας 45.7 Εκατοστομετρο
 L18VFSS10E Instruction Manual 45.7cm/18 High Power Floor Fan Εγχειρίδιο Οδηγιών Επιδαπεδιος Ανεμιστηρας 45.7 Εκατοστομετρο GB GR Contents GB Safety Warnings... 2 Unpacking... 5 Getting to Know Your Fan...
Assalamu `alaikum wr. wb.
 LUMP SUM Assalamu `alaikum wr. wb. LUMP SUM Wassalamu alaikum wr. wb. Assalamu `alaikum wr. wb. LUMP SUM Wassalamu alaikum wr. wb. LUMP SUM Lump sum lump sum lump sum. lump sum fixed price lump sum lump
ΟΔΗΓΙΕΣ ΧΡΗΣΗΣ USE INSTRUCTIONS
 ΟΔΗΓΙΕΣ ΧΡΗΣΗΣ USE INSTRUCTIONS ΗΛΕΚΤΡΙΚΗ ΕΣΤΙΑ ΚΑΦΕ COFFEE HOT PLATE Μοντέλο / Model : ES-2308 230V~50Hz 450W Παρακαλούμε διαβάστε προσεκτικά όλες τις οδηγίες χρήσης πριν την χρήση της συσκευής και φυλάξτε
SFH-41 Fan Heater Αερόθερμο
 SFH-41 Fan Heater Αερόθερμο GB GR INSTRUCTION MANUAL ΒΙΒΛΙΟ ΟΔΗΓΙΩΝ GB ENGLISH... 3 GR EΛΛHNIKA... 7 ENGLISH PLEASE READ THESE INSTRUCTIONS CAREFULLY AND RETAIN FOR FUTURE REFER- ENCE SAFETY WARNINGS When
(Type B) Το προϊόν αυτό δεν είναι κατάλληλο για σκοπούς πρωτογενούς θέρμανσης. ADM AEE
 Το προϊόν αυτό δεν είναι κατάλληλο για σκοπούς πρωτογενούς θέρμανσης. ADM AEE") (Type B) Το προϊόν αυτό δεν είναι κατάλληλο για σκοπούς πρωτογενούς θέρμανσης. ADM AEE 2310 85 30 61 80 00 18 Mklg 01. Rwnc A]SQ,ovb / D OPERATlON FUELING WARNING: uture storage of your heater. Use o NEVE
(Type B) Το προϊόν αυτό δεν είναι κατάλληλο για σκοπούς πρωτογενούς θέρμανσης. ADM AEE 2310 85 30 61 80 00 18 Mklg 01. Rwnc A]SQ,ovb / D OPERATlON FUELING WARNING: uture storage of your heater. Use o NEVE
TIME SWITCHES AND TWILIGHT SWITCHES
 W ANALOG DIN-RAIL TIME SWITCH QUARTZ, SERIES TEMPUS ANALOG 244 W SCHRACK-INFO Analogue time switch 1 channel Daily program With power reserve (NiMH rechargeable battery) Synchronised with mains Shortest
Statistical Inference I Locally most powerful tests
 Statistical Inference I Locally most powerful tests Shirsendu Mukherjee Department of Statistics, Asutosh College, Kolkata, India. shirsendu st@yahoo.co.in So far we have treated the testing of one-sided
Οδηγίες Χρήσης / Instructions Manual Ελληνικά (GR) English (EN) Γάστρα Roaster XL B-08
 English (EN) Γάστρα Roaster XL B-08") ΓΙΑ ΠΕΡΙΣΣΟΤΕΡΕΣ ΠΛΗΡΟΦΟΡΙΕΣ: FOR FURTHER INFORMATION: Χ. ΜΠΕΝΡΟΥΜΠΗ & ΥΙΟΣ Α.Ε. H. BENRUBI & FILS S.A. Αγ. Θωμά 27, 15124, Μαρούσι-Αθήνα 27 Aghiou Thoma str. GR 15124, Maroussi-Athens Τηλ. 210 6156400,
ΓΙΑ ΠΕΡΙΣΣΟΤΕΡΕΣ ΠΛΗΡΟΦΟΡΙΕΣ: FOR FURTHER INFORMATION: Χ. ΜΠΕΝΡΟΥΜΠΗ & ΥΙΟΣ Α.Ε. H. BENRUBI & FILS S.A. Αγ. Θωμά 27, 15124, Μαρούσι-Αθήνα 27 Aghiou Thoma str. GR 15124, Maroussi-Athens Τηλ. 210 6156400,
OΔΗΓΙΕΣ ΧΡΗΣΗΣ ΙΝSTRUCTIONS MANUAL
 ΓΙΑ ΠΕΡΙΣΣOΤΕΡΕΣ ΠΛΗΡOΦOΡΙΕΣ: FOR MORE INFORMATION CONTACT: X. MΠΕΝΡΟΥΜΠΗ & ΥΙΟΣ A.E. H. BENRUBI & FILS SA Αγ. Θωμά 27, 15124, Μαρoύσι Αθήνα 27 Aghiou Thoma str, GR15124 Τηλ.: 210 6156400 Maroussi Athens
2013 REV 01 ELECTRONICS CAPACITORS. DC Applications Metallized Polypropylene Film Self Healing
 2013 REV 01 POWER EECTRONICS CAPACITORS C Applications Metallized Polypropylene Film Healing OUR MISSION: POWER EECTRONICS AN SPECIA CAPACITORS M.V. PFC CAPACITORS AN BANKS IGHTING CAPACITORS MOTOR RUN
ΚΥΠΡΙΑΚΗ ΕΤΑΙΡΕΙΑ ΠΛΗΡΟΦΟΡΙΚΗΣ CYPRUS COMPUTER SOCIETY ΠΑΓΚΥΠΡΙΟΣ ΜΑΘΗΤΙΚΟΣ ΔΙΑΓΩΝΙΣΜΟΣ ΠΛΗΡΟΦΟΡΙΚΗΣ 24/3/2007
 Οδηγίες: Να απαντηθούν όλες οι ερωτήσεις. Όλοι οι αριθμοί που αναφέρονται σε όλα τα ερωτήματα μικρότεροι του 10000 εκτός αν ορίζεται διαφορετικά στη διατύπωση του προβλήματος. Αν κάπου κάνετε κάποιες υποθέσεις
Modern Greek Extension
 Centre Number 2017 HIGHER SCHOOL CERTIFICATE EXAMINATION Student Number Modern Greek Extension Written Examination General Instructions Reading time 10 minutes Working time 1 hour and 50 minutes Write
Important Σημαντικό ENGLISH ΕΛΛΗΝΙΚΑ R-20ST MICROWAVE OVEN - OPERATION MANUAL ΦΟΥΡΝΟΣ ΜΙΚΡΟΚΥΜΑΤΩΝ - ΕΓΧΕΙΡΙΔΙΟ ΛΕΙΤΟΥΡΓΙΑΣ 800 W (IEC 60705)
") ΕΛΛΗΝΙΚΑ ENGLISH Important Σημαντικό R-20ST MICROWAVE OVEN - OPERATION MANUAL ΦΟΥΡΝΟΣ ΜΙΚΡΟΚΥΜΑΤΩΝ - ΕΓΧΕΙΡΙΔΙΟ ΛΕΙΤΟΥΡΓΙΑΣ 800 W (IEC 60705) GB This operation manual contains important information which
ΕΛΛΗΝΙΚΑ ENGLISH Important Σημαντικό R-20ST MICROWAVE OVEN - OPERATION MANUAL ΦΟΥΡΝΟΣ ΜΙΚΡΟΚΥΜΑΤΩΝ - ΕΓΧΕΙΡΙΔΙΟ ΛΕΙΤΟΥΡΓΙΑΣ 800 W (IEC 60705) GB This operation manual contains important information which
TaxiCounter Android App. Περδίκης Ανδρέας ME10069
 TaxiCounter Android App Περδίκης Ανδρέας ME10069 Content Android Operating System Development Tools Taxi Counter Algorithm Design Development Process Android Operating System Android is a Linux-based operating
Galatia SIL Keyboard Information
 Galatia SIL Keyboard Information Keyboard ssignments The main purpose of the keyboards is to provide a wide range of keying options, so many characters can be entered in multiple ways. If you are typing
Έλεγχος και Διασφάλιση Ποιότητας
 Έλεγχος και Διασφάλιση Ποιότητας Ενότητα 6: Κουππάρης Μιχαήλ Τμήμα Χημείας Εργαστήριο Αναλυτικής Χημείας General Successfully carry out the Preventive Maintenance Procedure and complete the Maintenance
RSDW08 & RDDW08 series
 /,, MODEL SELECTION TABLE INPUT ORDER NO. INPUT VOLTAGE (RANGE) NO LOAD INPUT CURRENT FULL LOAD VOLTAGE CURRENT EFFICIENCY (Typ.) CAPACITOR LOAD (MAX.) RSDW08F-03 344mA 3.3V 2000mA 80% 2000μF RSDW08F-05
Code Breaker. TEACHER s NOTES
 TEACHER s NOTES Time: 50 minutes Learning Outcomes: To relate the genetic code to the assembly of proteins To summarize factors that lead to different types of mutations To distinguish among positive,
ΠΑΝΕΠΙΣΤΗΜΙΟ ΠΑΤΡΩΝ ΤΜΗΜΑ ΗΛΕΚΤΡΟΛΟΓΩΝ ΜΗΧΑΝΙΚΩΝ ΚΑΙ ΤΕΧΝΟΛΟΓΙΑΣ ΥΠΟΛΟΓΙΣΤΩΝ ΤΟΜΕΑΣ ΣΥΣΤΗΜΑΤΩΝ ΗΛΕΚΤΡΙΚΗΣ ΕΝΕΡΓΕΙΑΣ ΕΡΓΑΣΤΗΡΙΟ ΥΨΗΛΩΝ ΤΑΣΕΩΝ
 ΠΑΝΕΠΙΣΤΗΜΙΟ ΠΑΤΡΩΝ ΤΜΗΜΑ ΗΛΕΚΤΡΟΛΟΓΩΝ ΜΗΧΑΝΙΚΩΝ ΚΑΙ ΤΕΧΝΟΛΟΓΙΑΣ ΥΠΟΛΟΓΙΣΤΩΝ ΤΟΜΕΑΣ ΣΥΣΤΗΜΑΤΩΝ ΗΛΕΚΤΡΙΚΗΣ ΕΝΕΡΓΕΙΑΣ ΕΡΓΑΣΤΗΡΙΟ ΥΨΗΛΩΝ ΤΑΣΕΩΝ Διπλωµατική Εργασία Της Φοιτήτριας του Τµήµατος Ηλεκτρολόγων
Presenter SNP6000. Register your product and get support at Εγχειρίδιο χρήσης
 Register your product and get support at www.philips.com/welcome Presenter SNP6000 EL Εγχειρίδιο χρήσης 1 a b c d e 2 3 4 Federal Communication Commission Interference Statement This equipment has been
CYTA Cloud Server Set Up Instructions
 CYTA Cloud Server Set Up Instructions ΕΛΛΗΝΙΚΑ ENGLISH Initial Set-up Cloud Server To proceed with the initial setup of your Cloud Server first login to the Cyta CloudMarketPlace on https://cloudmarketplace.cyta.com.cy
ΟΔΗΓΙΕΣ ΧΡΗΣΗΣ USE INSTRUCTIONS
 ΟΔΗΓΙΕΣ ΧΡΗΣΗΣ USE INSTRUCTIONS ΗΛΕΚΤΡΙΚΗ ΣΟΜΠΑ QUARTZ/ QUARTZ HEATER ΜΟΝΤΕΛΟ/MODEL: LX-2800L 220-240V 50/60HZ 2400W Παρακαλούμε διαβάστε προσεκτικά όλες τις οδηγίες χρήσης πριν την χρήση της συσκευής
ΟΔΗΓΙΕΣ ΣΥΝΑΡΜΟΛΟΓΗΣΗΣ/ ASSEMBLY INSTRUCTION ΤΟΜΜΥ ΚΡΕΒΑΤΙ/BED
 ΟΔΗΓΙΕΣ ΣΥΝΑΡΜΟΛΟΓΗΣΗΣ/ ASSEMBLY INSTRUCTION ΤΟΜΜΥ ΚΡΕΒΑΤΙ/BED 1. Παρακαλώ πολύ διαβάστε προσεκτικά τις οδηγίες πριν την συναρμολόγηση/ Please read the instructions carefully. 2. Παρακαλώ πολύ όπως ελέγξτε
Strain gauge and rosettes
 Strain gauge and rosettes Introduction A strain gauge is a device which is used to measure strain (deformation) on an object subjected to forces. Strain can be measured using various types of devices classified
Operating instructions Multiple socket with overvoltage protection device. Eγχειρίδιο οδηγιών χρήσης Πολύπριζο με διάταξη προστασίας υπέρτασης
 Operating instructions Multiple socket with overvoltage protection device Eγχειρίδιο οδηγιών χρήσης Πολύπριζο με διάταξη προστασίας υπέρτασης GB GR BAT Lindenstraße 35 72074 Tübingen Deutschland 0453234