1.B. NOTA: Para volver a fijar la fecha, repite los pasos indicados arriba. La modificación de la fecha no afecta a las funciones de ahorro.
|
|
|
- Ῥούθ Σπηλιωτόπουλος
- 9 χρόνια πριν
- Προβολές:
Transcript
1 bank-plan
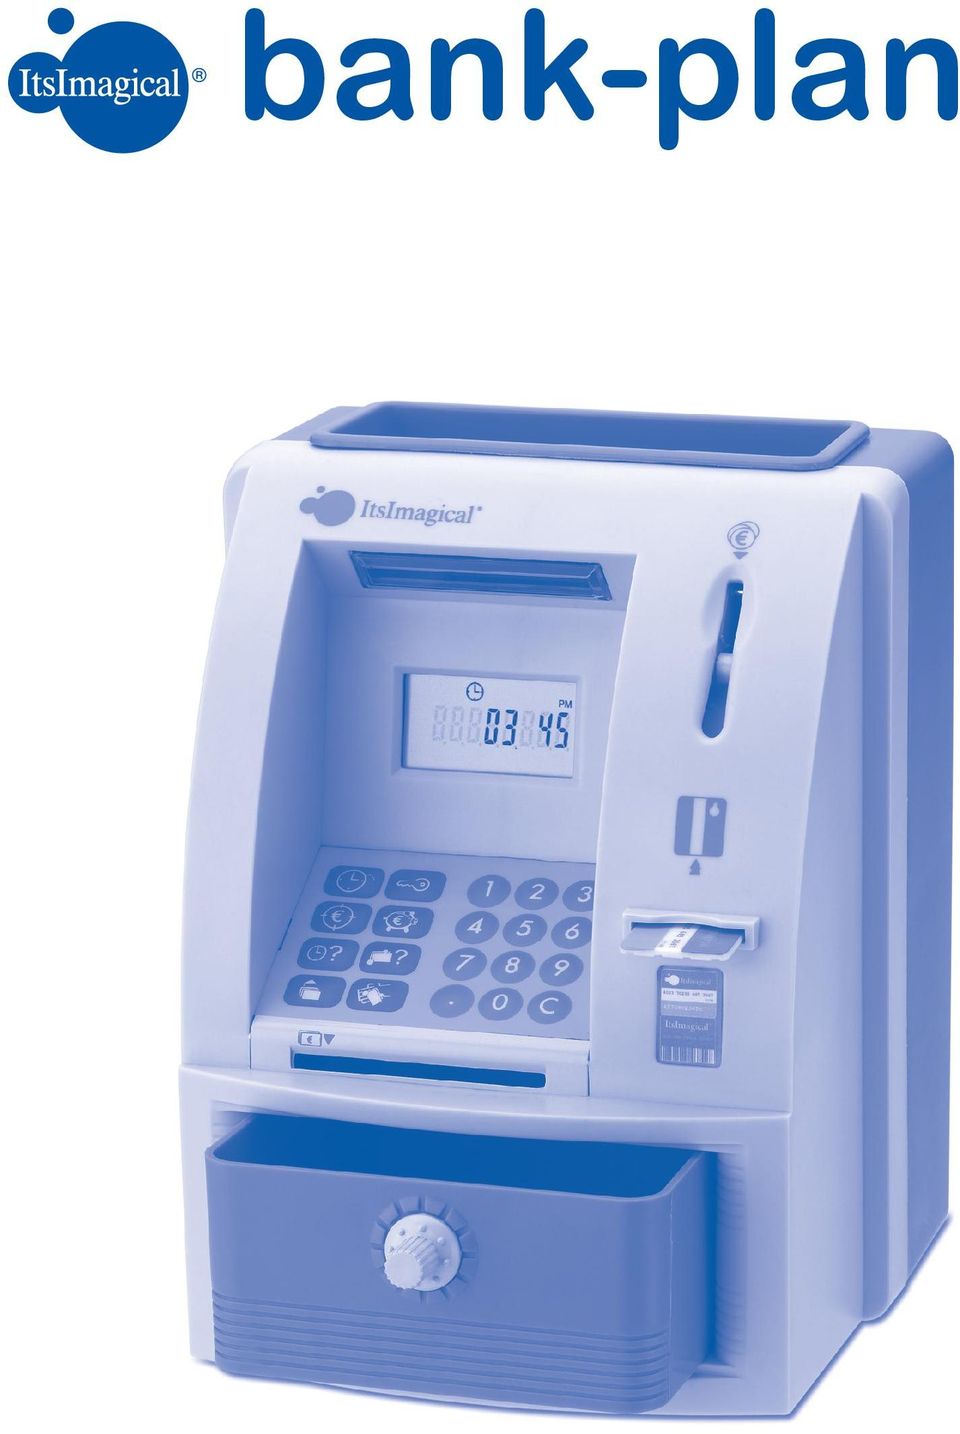
2 1.G 1.A F 1.E 1.B D 1.C Crea tu propio plan de ahorro y descubre qué divertido es ahorrar con tu propio banco-hucha. Como un banco de verdad! Contenido: 1 Banco-Hucha 1 Tarjeta de seguridad 1 Instrucciones 1. Partes y botones A. Ranura para monedas B. Ranura para tarjeta C. Cajón D. Ranura para billetes E. Panel de control F. Pantalla LCD G. Indicador luminoso 2. Características - Funciones sencillas de un cajero automático. - Crear un plan de ahorro: - Fijar un objetivo de ahorro. - Conocer el total ahorrado. - Conocer cuánto dinero falta para alcanzar el objetivo. - Calcular cuántos días costará alcanzar el objetivo. - Tarjeta de acceso con clave personal de seguridad. - Clave personal para retirar fondos. - Pantalla LCD que señala fecha y hora. - Sonido: - Encendido. - Al alcanzar o no alcanzar el objetivo de ahorro. - Error (cálculo, retirar dinero o teclear datos). - Apertura de caja para retirar fondos. 3. Botones del panel de control 3.1. Reloj 3.2. Clave 3.3. Objetivo de ahorro 3.4. Total ahorro 3.5. Días que faltan 3.6. Dinero que falta 3.7. Ingreso 3.8. Reintegro 4. Cómo funciona 4.1. Consejos antes de empezar - Ten cuidado de no dejar caer la tarjeta dentro del cajero. - La tarjeta de seguridad es tu acceso a las funciones de ahorro y se necesita para ingresar billetes, hacer reintegros (junto con la clave), re-ajustar fecha y hora, cambiar la clave o utilizar las funciones de ahorro. El ingreso de monedas y la consulta de fecha y hora se puede hacer sin la tarjeta. - Cuando fijes un nuevo objetivo de ahorro, tus cuentas se actualizarán teniendo en cuenta la cantidad que llevas ahorrada. También puedes retirar todo el dinero para empezar a ahorrar desde cero Cómo fijar la hora 1. Introduce tu tarjeta como muestra la imagen. Sonará una melodía. 2. Pulsa el botón RELOJ del panel de control durante un mínimo de 2 segundos hasta que los dos primeros números de la pantalla empiecen a parpadear. 3. Con las teclas numéricas, introduce la hora correcta en el orden siguiente: Hora (en 2 dígitos, por ejemplo: 03), Minutos (en 2 dígitos, por ejemplo: 15). 4. Para seleccionar AM/PM pulsa el botón de DECIMAL (.). 5. Pulsa el botón RELOJ para confirmar. NOTA: Para volver a fijar la hora, repite los pasos indicados arriba. La modificación de los datos del reloj no afecta a las funciones de ahorro. La hora aparece siempre que no se utilicen otras funciones P.1 del cajero Cómo fijar la fecha 1. Después de fijar la hora, aparecerán otros dígitos y par padearán los dos primeros. 2. La fecha se deberá fijar en el orden siguiente: Día-Mes-Año. 3. Introduce los 6 dígitos y pulsa el botón RELOJ para confirmar. Por ejemplo: 31 de agosto de 2010, introduce: y pulsa RELOJ. NOTA: Para volver a fijar la fecha, repite los pasos indicados arriba. La modificación de la fecha no afecta a las funciones de ahorro Para introducir monedas. Puedes introducir monedas en cualquier momento sin utilizar la tarjeta. La ranura para monedas las identifica y las suma al total de los ahorros. NOTA: Deja pasar 3 segundos entre una moneda y otra. Para garantizar un cálculo exacto, sujeta la moneda firmemente en posición vertical al introducirla. Sólo funciona con monedas de EURO. Reconoce monedas de 1, 2, 5, 10, 20 y 50 céntimos, 1 y Para utilizar la tarjeta. La tarjeta es necesaria para: - Cambiar la hora. - Cambiar la fecha. - Ingresar billetes. - Fijar un objetivo de ahorro. - Fijar el plazo de ahorro. - Consultar la cantidad ahorrada. - Cambiar la clave personal. - Sacar dinero. Introduce siempre la tarjeta en el sentido correcto, tal y como se indica. Evita que la tarjeta caiga dentro del cajero Para introducir billetes. Para introducir billetes es necesario acceder a las funciones de la cuenta, por eso necesitas la tarjeta. Sigue estos pasos: 1. Introduce tu tarjeta en la ranura en el sentido correcto. 2. Pulsa el botón INGRESO. 3. Introduce el billete doblado por la ranura indicada. 4. Teclea en los números la cantidad que quieres ingresar. Los números aparecerán en la pantalla. Si te equivocas, simplemente pulsa el botón C para borrar y teclear la cantidad correcta. 5. Pulsa el botón INGRESO para confirmar la operación. 6. Finalmente, saca la tarjeta Cómo sacar dinero del cajero. Para poder sacar dinero debes introducir la tarjeta y teclear la clave, de este modo: 1. Introduce la tarjeta de seguridad. 2. Pulsa el botón REINTEGRO. 3. Teclea en los números la cantidad que quieres sacar* y ésta aparecerá en la pantalla. 4. Pulsa el botón REINTEGRO otra vez para confirmar la cantidad. Si te equivocas, pulsa el botón C de la calcula dora para borrar y teclear la cantidad correcta. 5. La pantalla te pedirá la clave (viene predeterminada como 0000). 6. Si la introduces bien, se enciende la luz y el cajón se des bloquea para acceder a tus ahorros. Debes sacar la cantidad exacta, si no, el saldo de ahorro no será correcto. Tienes 10 segundos para sacar el dinero. Si la puerta no se abre, no se restará de la cuenta ningún dinero. 7. Cierra la puerta y retira la tarjeta de seguridad. * Nota: Si intentas sacar más dinero del que tienes ahorrado, aparecerá el mensaje ERROR en la pantalla, con su sonido y deberás marcar otra cantidad. No intentes abrir la puerta por la fuerza, se romperán las bisagras y se disparará la alarma Cómo cambiar la clave. Puedes cambiar la clave siempre que quieras (4 dígitos), de este modo: 1. Inserta la tarjeta. 2. Pulsa el botón CLAVE. 3. Cuando empiece a parpadear, introduce la clave predeter minada Teclea los 4 números de tu nueva clave (ej: 1234). 5. Pulsa el botón CLAVE para confirmarla. 6. Para volver a cambiar la clave, introduce la clave actual (1234) y a continuación la nueva clave (ej: 2584). Nota: Debes recordar la clave. Si se te olvida, deberás sacar las pilas, volverlas a colocar y poner el juguete en funcionamiento otra vez. Así se activará de nuevo la clave predeterminada Cómo consultar el saldo de tus ahorros. Para consultar el saldo de tus ahorros necesitas la tarjeta. 1. Introduce la tarjeta. 2. Pulsa el botón TOTAL AHORRO. 3. La pantalla mostrará cuánto dinero hay ahorrado. 4. Saca la tarjeta, la pantalla volverá a mostrar el reloj Cómo crear un plan de ahorro. Si quieres ahorrar, este cajero puede ayudarte, con él verás cómo tus ahorros progresan hacia el objetivo. 1. Introduce la tarjeta para acceder a las funciones de la cuenta. 2. Pulsa el botón OBJETIVO DE AHORRO durante un mínimo de 2 segundos, hasta que aparezca el icono $ en la pantalla y el número parpadee. 3. Teclea la cantidad que te gustaría ahorrar (máximo ,00), ésta aparecerá en la pantalla. Si te equivocas, simplemente pulsa el botón C de la calculadora para borrar y teclear la cantidad correcta. 4. Una vez introducida la cantidad, el icono DAY aparecerá en la pantalla; introducir el número de días en los que quieres efectuar el ahorro (máximo 999 días), por ejemplo: introduce 030 para 30 días. 5. Pulsa OBJETIVO DE AHORRO de nuevo para confirmar. NOTA: Para fijar un nuevo objetivo de ahorro puedes retirar todo el dinero y empezar desde cero. O dejar tu dinero ahorrado dentro, de modo que el cajero reste este dinero del nuevo objetivo y marque el tiempo de ahorro necesario para el nuevo objetivo. Una vez fijado el objetivo de ahorro, el cajero lo memorizará y realizará un seguimiento de los progresos hacia la consecución de tu objetivo. Las siguientes funciones ayudarán a controlar tus ahorros: 1. Pulsa el botón DINERO QUE FALTA para ver cuánto dinero falta por ahorrar. 2. Pulsa el botón DÍAS QUE FALTAN para ver cuántos días quedan para terminar el plan de ahorro. 3. Habrá indicaciones sonoras cuando: - Se alcance el objetivo de ahorro en la fecha fijada o antes de esta fecha. - No se consiga alcanzar el objetivo (ni la cantidad, ni la fecha). 5. Mantenimiento: - Guárdalo siempre en posición vertical. - No presiones la pantalla, esto podría dañar la imagen. - Su peso aumentará con las monedas, ten cuidado al

3 levantarlo o guardarlo. - No lo cargues más de lo necesario. - No introduzcas objetos no indicados por las ranuras. - No eches ningún líquido dentro o encima, esto podría dañar sus componentes. - Cuando se gasten las pilas, cámbialas lo antes posible. - Limpiar sólo con un trapo seco. - Evita doblar o dañar la tarjeta y guárdala en un sitio seguro. 6. Solución de problemas. - Si la pantalla muestra una imagen difusa o no muestra ninguna imagen: Puede que las pilas estén gastadas. Cámbialas, y limpia los contactos. - Si no se abre el cajón del dinero: Asegúrate de que has procesado correctamente la clave de la tarjeta. Comprueba que no se ha atascado ninguna moneda en la bisagra. Por si acaso, inclínalo con cuidado para desatas carla. - Si se ha borrado el registro de ahorros: El registro de los ahorros se borrará cada vez que se cam bien las pilas. Deberás volver a programar el cajero. - Si las cifras no cuadran: Puede que se haya producido un error al introducir una moneda o un billete. Saca todo el dinero, vuelve a programar el cajero y vuelve a introducir el dinero. - Si el cajero no responde: Quita las pilas y vuélvelas a colocar. Vuelve a programar el cajero. Create your own savings plan and discover how much fun it is to save with your own money box-savings bank. Just like a real bank! Contents: 1 Money box-savings bank 1 Security card 1 Set of instructions 1. Parts and controls A. Coin slot B. Card slot C. Drawer D. Slot for notes E. Control panel F. LCD screen G. Indicator light 2. Features - Simple functions of an automated cash machine. - Create a savings plan: - Setting a savings target. - Know the total amount saved. - Know how much money is needed to reach the target. - Calculate how many days it will take to reach the target. - Access card with PIN code. - PIN code to withdraw money. - LCD screen showing the time and date. - Sound: - On switch. - When the savings target is reached or not reached. - Error (calculation, money withdrawal or entering informa tion). - Opening the cash drawer to withdraw money. 3. Control panel buttons 3.1. Clock 3.2. Code 3.3. Savings target 3.4. Total savings 3.5. Days left 3.6. Money needed 3.7. Deposit 3.8. Withdrawal 4. How it works 4.1. Tips before you begin - Be careful not to let the card fall into the money box. - The security card is your way to access the savings functions and you need it to put in notes, make withdrawals (together with the PIN code), reset the time and date, change the code or use the savings functions. Coins can be put in and the date and time can be checked without the card. - When you set a new savings target, your accounts will be updated taking the amount you have saved into account. You can also withdraw all the money and start saving again from zero How to set the time 1. Put your card in as shown in the picture. A tune will be played. 2. Press and hold down the CLOCK button on the control panel for at least 2 seconds until the first two numbers on the screen start to flash. 3. Use the number keys to type in the correct time in the fol lowing order: Hour (using two digits, for example: 03), Minutes (using two digits, for example: 15). 4. To select AM/PM press the DECIMAL button (.). 5. Press the CLOCK button to confirm. NOTE: Repeat the steps above to reset the time. Modifying the clock information does not affect the savings functions. The time will appear on screen at all times unless other functions are being used How to set the date 1. After you set the time, other digits will appear and the first two will be flashing. 2. The date must be set in the following order: Day-Month-Year. 3. Key in the 6 digits and press the CLOCK button to confirm. For example: for 31 August 2010, enter: and press CLOCK. NOTE: Repeat the steps above to reset the date. Modifying the date does not affect the savings functions To insert coins. You can insert coins at any time without using the card. The coin slot identifies the coins and adds them to the savings total. NOTE: Wait 3 seconds between inserting coins. To guarantee an accurate calculation, hold the coin firmly in a vertical position as you insert it. The machine only works with EURO coins. It recognises 1, 2, 5, 10, 20 and 50 cent, 1 and 2 coins Using the card. The card is needed for: - Changing the time. - Changing the date. - Inserting notes. - Setting a savings target. - Setting a savings deadline. - Checking the amount saved. - Changing the PIN code. - Withdrawing money. Always insert the card in the correct position, as shown. Do not let the card fall inside the dispenser Inserting notes. You have to access the account functions to insert notes, for which you will need to use the card. Follow these steps: 1. Insert your card into the slot in the correct position. 2. Press the DEPOSIT button. 3. Insert the folded note into the slot indicated. 4. Key in the amount you want to deposit. The numbers will appear on the screen. If you make a mistake, just press the C button to delete and then type the correct amount. 5. Press the DEPOSIT button to confirm the transaction. 6. Lastly, remove the card How to take money out of the money box. In order to withdraw money you have to insert the card and type your PIN code as follows: 1. Insert the security card. 2. Press the WITHDRAWAL button. 3. Type in the amount you want to take out* and this will appear on the screen. 4. Press the WITHDRAWAL button again to confirm the amount. If you make a mistake, press the C button to delete and then type the correct amount. 5. The screen will ask for your PIN code (the default setting is 0000). 6. If you enter it correctly the light comes on and the drawer unlocks so you can access your savings. You must take out the exact amount, if not, the savings balance will be incorrect. You have 10 seconds to take out the money. If the door does not open, no money will be deducted from the account. 7. Close the door and remove the security card. * Note: If you try to take out more money than you have saved, the message ERROR will appear on the screen along with the error sound and you will have to type in another amount. Do not try to force the door to open, the hinges will break and the alarm will go off How to change the PIN code. You can change the code as often as you want (4 digits), as follows: 1. Insert the card. 2. Press the CODE button. 3. When it starts to flash, enter the default code Type in the 4 numbers of your new code (e.g. 1234). 5. Press the CODE button to confirm. 6. To change the code again, enter the current code (1234) and then enter the new code (e.g.: 2584). Note: You must remember the code. If you forget it you will have to remove the batteries, then put them back in and turn on the toy again. This will reactivate the default code How to check your savings balance. You need the card to check your savings balance. 1. Insert the card. 2. Press the TOTAL SAVINGS button. 3. The screen will show how much money has been saved. 4. Remove the card, the screen will return to the clock How to create a savings plan. This cash dispenser can help you if you want to save money; you will see how your savings grow towards that target. 1. Insert the card to access the account functions. 2. Press and hold down the SAVINGS TARGET button for at least 2 seconds, until the $ icon appears on the screen and the number flashes. 3. Type in the amount that you would like to save (maximum ) and this will appear on the screen. If you make a mistake, just press the C button to delete and then type the correct amount. 4. Once you have entered the amount, the DAY icon will appear on the screen; enter the number of days you would like to have for saving (maximum 999 days), for example: enter 030 for 30 days. 5. Press SAVINGS TARGET again to confirm. NOTE: To set a new savings target you can take out all the money and start again from zero. Or leave your savings inside so that the money box deducts this amount from the new target and marks the savings time needed for the new target. Once the savings target has been set, the money box will memorise it and will monitor progress until you reach your target. The following functions will help you to manage your savings: 1. Press the MONEY NEEDED button to see how much money you have left to save. 2. Press the DAYS LEFT button to see how many days are left until the end of the savings plan. 3. The box will make a sound when: - The savings target is reached on or before the set date. - The target is not reached (neither amount nor date). 5. Maintenance: - Always keep it in an upright position. - Do not press the screen, this may damage the picture. - It will be heavier when filled with coins, take care when lifting and setting it down. - Do not overfill it. - Do not insert unsuitable objects into the slots. - Do not pour liquid into or onto the box as this could damage its parts. - When the batteries run out, change them as soon as possible. - Clean with a dry cloth only. - Do not fold or damage the card and keep it in a safe place. 6. Troubleshooting. - If the picture on the screen is fuzzy or there is no picture: The batteries may be spent. Change them and clean the contacts. - If the money drawer does not open: Ensure you have entered the correct PIN code. Check that there is no coin stuck in the hinge. Just in case, gently tilt it to one side to remove the stuck coin. - If the savings register has been deleted: The savings register will be deleted every time the batteries are changed. You will have to re-programme the money box. - If the figures do not add up: An error may have occurred when a coin or a note was inserted. Take out all the money, re-programme the money box and insert the money again. - If the money box does not respond: Remove and then replace the batteries. Re-programme the money box. Établis ton propre plan d épargne et découvre comme il est facile de gérer tes économies avec cette tirelire-guichet automatique. Comme une vraie banque! Contenu : 1 tirelire-guichet distributeur 1 carte de sécurité 1 mode d emploi 1. Touches et éléments A. Fente où insérer les pièces B. Fente où introduire la carte C. Compartiment D. Fente où introduire les billets E. Tableau de contrôle F. Écran LCD G. Voyant lumineux 2. CARACTÉRISTIQUES - Fonctions de base d un guichet automatique. - Créer un plan d épargne : - Fixer un objectif d épargne. - Connaître le montant total des économies réalisées. - Connaître la somme manquante pour parvenir à l objectif. - Calculer le nombre de jours pour parvenir à l objectif. - Carte d accès avec code secret. - Code secret pour retirer de l argent. - Écran LCD indiquant la date et l heure. - Son : - Mise en marche. - Objectif d épargne atteint ou non. - Erreur (de calcul, lors de retrait ou de la saisie de don nées). - Ouverture du compartiment pour retirer de l argent. 3. Touches du tableau de contrôle 3.1. Horloge 3.2. Code secret 3.3. Objectif d épargne 3.4. Total épargne 3.5. Jours restants 3.6. Somme manquante 3.7. Dépôt 3.8. Retrait 4. Fonctionnement 4.1. Conseils préalables à l utilisation - Veiller à ce que la carte ne tombe pas à l intérieur du guichet. - La carte permet d avoir accès aux fonctions d épargne et sert à introduire des billets, à retirer de l argent (en saisissant le code secret), à régler la date et l heure, à changer le code secret ou à utiliser les fonctions d épargne. La carte n est pas nécessaire pour introduire des pièces ou consulter la date et l heure. - Lorsqu un nouvel objectif d épargne est fixé, les sommes P.2

4 seront actualisées en tenant compte du montant déjà économisé. Il est également possible de retirer tout l argent pour commencer à économiser de zéro Réglage de l heure 1. Introduire la carte comme indiqué sur l image. Une mélodie retentit alors. 2. Appuyer sur la touche HORLOGE du tableau de contrôle pendant au moins 2 secondes jusqu à ce que les deux pre miers chiffres apparaissant sur l écran se mettent à clignoter. 3. À l aide des touches numériques, saisir l heure correcte dans l ordre suivant : Heure (à 2 chiffres, par exemple : 03), Minutes (à 2 chiffres, par exemple : 15). 4. Pour sélectionner AM/PM, appuyer sur la touche des décimales (.). 5. Appuyer sur la touche HORLOGE pour confirmer. REMARQUE : Pour modifier l heure, suivre les étapes précédentes. La modification de l heure n altère pas les fonctions d épargne. L heure s affiche lorsque les autres fonctions du guichet automatique ne sont pas utilisées Réglage de la date 1. Une fois le réglage de l heure effectué apparaîtront d autres chiffres sur l écran. Les deux premiers clignoteront. 2. La date doit être réglée dans l ordre suivant : Jour-Mois- Annnée. 3. Introduire les 6 chiffres et appuyer sur la touche HORLOGE pour confirmer. Par exemple, pour le 31 août 2010, saisir puis appuyer sur HORLOGE. REMARQUE : Pour modifier la date, suivre les étapes précédentes. La modification de la date n altère pas les fonctions d épargne Pour introduire des pièces. Il est possible d introduire des pièces à tout moment sans utiliser la carte. La fente servant à insérer les pièces les identifie et calcule le montant total des économies. REMARQUE : attendre 3 secondes avant d introduire une autre pièce. Pour que la tirelire effectue correctement le calcul, introduire les pièces verticalement. Fonctionne uniquement avec des pièces en EUROS. Reconnaît les pièces de 1, 2, 5, 10, 20 et 50 centimes et de 1 et Utilisation de la carte. La carte sert à réaliser les opérations suivantes : - Modifier l heure. - Modifier la date. - Introduire des billets. - Fixer un objectif d épargne. - Fixer le délai d épargne. - Consulter le montant économisé. - Modifier le code secret. - Retirer de l argent. Introduire toujours la carte dans le sens correct, comme indiqué. Veiller à ce que la carte ne tombe pas à l intérieur du guichet automatique Introduction de billets. Pour introduire des billets, il faut utiliser la carte qui permet d avoir accès aux différentes fonctions. Etapes à suivre : 1. Introduire la carte dans la fente dans le sens correct. 2. Appuyer sur la touche DÉPÔT. 3. Insérer le billet plié dans la fente indiquée. 4. Saisir le montant déposé à l aide des touches numériques. Il s affichera sur l écran. En cas d erreur, appuyer sur la touche «C» pour effacer puis saisir le montant correct. 5. Appuyer sur la touche DÉPÔT pour confirmer l opération. 6. Retirer la carte Retrait d argent du guichet automatique. Pour retirer de l argent, il faut introduire la carte et saisir le code secret comme indiqué ci-dessous : 1. Introduire la carte. 2. Appuyer sur la touche RETRAIT. 3. A l aide des touches numériques, saisir le montant du retrait souhaité*. La somme s affichera sur l écran. 4. Appuyer à nouveau sur la touche RETRAIT pour confirmer le montant. En cas d erreur, appuyer sur la touche «C» de la calculatrice pour effacer puis saisir le montant correct. 5. L écran affichera alors un message demandant le code secret (code par défaut : 0000). 6. Si le code est correct, le voyant s allume et le compartiment se débloque pour permettre l accès aux économies. Il faut retirer le montant exact. Dans le cas contraire, le solde ne concordera pas. Le délai pour retirer l argent est de 10 secondes. Si le compartiment n est pas ouvert, le montant ne sera pas déduit du total. 7. Fermer le compartiment et retirer la carte. * Remarque : Si tu essaies de retirer plus d argent que tu n en as économisé, le message «ERREUR» s affichera sur l écran et l appareil émettra un son. Introduire alors un autre montant. Ne pas forcer le compartiment au risque de casser les charnières et d activer l alarme Modification du code secret. Il est possible de modifier le code secret (4 chiffres) à tout moment, de la manière suivante : 1. Introduire la carte. 2. Appuyer sur la touche CODE SECRET. 3. Quand l écran clignote, introduire le code par défaut Saisir les 4 chiffres du nouveau code secret (par ex. : 1234). P.3 5. Appuyer sur la touche CODE SECRET pour confirmer. 6. Pour toute nouvelle modification du code, saisir le code actuel (par ex. : 1234) puis le nouveau code choisi (par ex. : 2584). Remarque : Il est important de se souvenir du code. En cas d oubli, retirer les piles, puis les remettre en place et mettre l appareil en marche.le code 0000 s activera par défaut Consultation du solde épargné. La carte est nécessaire pour consulter le montant des économies réalisées. 1. Introduire la carte. 2. Appuyer sur la touche TOTAL ÉPARGNE. 3. L écran indiquera la somme d argent épargnée. 4. Retirer la carte ; l heure s affichera de nouveau sur l écran Création d un plan d épargne. Cet appareil peut t aider à gérer tes économies car il permet de voir comment tes économies augmentent pour atteindre l objectif que tu t es fixé. 1. Introduire la carte pour avoir accès aux fonctions du compte. 2. Appuyer sur la touche OBJECTIF D ÉPARGNE pendant au moins 2 secondes, jusqu à ce que le symbole «$» s affiche sur l écran et que le numéro commence à clignoter. 3. Saisir le montant que tu souhaites épargner (maximum ,00) : il s affichera alors sur l écran. En cas d erreur, appuyer sur la touche «C» de la calculatrice pour effacer puis saisir le montant correct. 4. Une fois le montant saisi, le symbole «DAY» s affichera sur l écran. Saisir le nombre de jours souhaité pour parvenir à cette somme (maximum 999 jours), par exemple : 030 pour 30 jours. 5. Appuyer de nouveau sur OBJECTIF D ÉPARGNE pour confirmer. REMARQUE : Pour fixer un nouvel objectif d épargne, il est possible de retirer tout l argent et de recommencer à zéro.il est également possible de laisser les économies réalisées de telle sorte que le guichet déduit ce montant du nouvel objectif et indique la durée d épargne nécessaire pour parvenir au nouvel objectif. Une fois l objectif fixé, le guichet le mémorisera et effectuera un suivi de l évolution jusqu à ce que l objectif soit atteint. Les fonctions suivantes t aideront à gérer tes économies : 1. Appuyer sur la touche SOMME MANQUANTE pour voir le montant qu il manque pour atteindre l objectif. 2. Appuyer sur la touche JOURS RESTANTS pour voir le nombre de jours restants pour que le plan d épargne prenne fin. 3. L appareil émettra des signaux sonores lorsque : - L objectif d épargne est atteint à la date fixée ou avant cette date. - L objectif n est pas atteint (ni le montant, ni la date). 5. Entretien : - Toujours ranger le jouet en position verticale. - Ne pas appuyer sur l écran au risque d endommager la visualisation de l image. - Le poids augmentant avec les pièces stockées, soulever et ranger l appareil en faisant attention. - Ne pas surcharger l appareil. - Ne pas introduire d objets autres que ceux indiqués. - Ne verser aucun liquide sur ou dans l appareil, au risque d endommager ses composants. - Changer les piles dès que possible lorsqu elles sont usées. - Nettoyer à l aide d un chiffon humide. - Ne pas plier ou endommager la carte et veiller à la ranger dans un endroit sûr. 6. Dépannage. - L image s affichant sur l écran n est pas nette ou aucune image ne s affiche sur l écran. Il se peut que les piles soient usées. Changer les piles et nettoyer les contacts. - Le compartiment où se trouve l argent ne s ouvre pas : Vérifier que le code secret saisi est correct. Vérifier qu aucune pièce n est restée bloquée au niveau de la charnière. Incliner délicatement l appareil pour la débloquer. - Les données d épargne mémorisées sont effacées : Les données mémorisées s effacent à chaque changement des piles. Dans ce cas, il est nécessaire de programmer à nouveau le guichet automatique. - Les chiffres ne correspondent pas : Une erreur a pu se produire lors de l introduction d une pièce ou d un billet. Retirer tout l argent, programmer à nouveau le guichet automatique et introduire à nouveau les billets et les pièces. - Le guichet automatique ne fonctionne pas : Retirer les piles puis les remettre en place. Programmer à nouveau le guichet automatique. Gestalte deinen eigenen Sparplan. Du wirdst sehen, wie spannend es ist, mit deiner eigenen Bank-Spardose zu sparen. Wie eine echte Bank! Inhalt: 1 Bank-Spardose 1 Sicherheitskarte 1 Anleitung 1. Teile und Tasten A) Münzschlitz B) Kartenschlitz C) Schublade D) Geldscheinschlitz E) Steuerpanel F) LCD-Display G) Leuchtanzeige 2. Eigenschaften - Einfache Funktionen eines Geldautomaten. - Einen Sparplan gestalten: - Ein Sparziel festlegen. - Die Gesamtersparnisse kennen. - Wissen, wie viel Geld bis zum Sparziel fehlt. - Ausrechnen, in wie vielen Tagen das Ziel erreicht ist. - Zugangskarte mit persönlichem Sicherheits-PIN. - Persönlicher PIN zum Geldabheben. - LCD-Anzeige mit Datum und Uhrzeit. - Ton: - Einschalten. - Wenn das Sparziel erreicht bzw. nicht erreicht wurde. - Fehler (Berechnung, Geldabhebung oder Dateneingabe). - Öffnen der Kasse zum Geldabheben. 3. Tasten des Steuerpanels 3.1. Uhr 3.2. PIN 3.3. Sparziel 3.4. Gesamtersparnisse 3.5. Fehlende Tage 3.6. Fehlendes Geld 3.7. Einzahlung 3.8. Auszahlung 4. So funktioniert s 4.1. Tipps, bevor es losgeht. - Achte darauf, dass die Karte nicht in den Geldautomaten fällt. - Die Sicherheitskarte ist dein Zugang zu den Sparfunktionen und ist notwendig, um Geld einzuzahlen, Geld abzuheben (zusammen mit dem PIN), das Datum und die Uhrzeit anzupassen, den PIN zu ändern oder die Sparfunktionen zu nutzen. Das Einzahlen von Münzen und das Ablesen von Datum und Uhrzeit sind ohne Karte möglich. - Wenn du ein neues Sparziel festlegst, werden deine Berechnungen unter Berücksichtigung der bereits gesparten Summe aktualisiert. Du kannst auch das gesamte Geld entnehmen, um bei Null anzufangen Einstellen der Uhrzeit 1. Führe die Karte wie abgebildet ein. Eine Melodie ertönt. 2. Drücke die Taste UHR des Steuerpanels 2 Sekunden lang, bis die ersten Ziffern des Displays blinken. 3. Gib mit den numerischen Tasten die richtige Uhrzeit in fol gender Reihenfolge ein: Stunde (in 2 Ziffern, z. B. 03), Minuten (in 2 Ziffern, z. B. 15). 4. Drücke zur Auswahl von AM/PM die Taste DEZIMAL (.). 5. Drücke zum Bestätigen die Taste UHR. ANMERKUNG: Wiederhole die oben angegebenen Schritte, wenn du die Uhrzeit erneut einstellen möchtest. Die Veränderung der Uhrzeit wirkt sich nicht auf die Sparfunktionen aus. Die Uhrzeit erscheint immer, wenn keine anderen Funktionen des Geldautomaten verwendet werden Einstellen des Datums 1. Nach dem Einstellen der Uhrzeit erscheinen weitere Ziffern, von denen die ersten zwei blinken. 2. Das Datum muss in folgender Reihenfolge eingestellt werden: Tag-Monat-Jahr. 3. Gib die 6 Ziffern ein und drücke zur Bestätigung die Taste UHR. Beispiel: Für den 31. August 2010 musst du eingeben und UHR drücken. ANMERKUNG: Wiederhole die oben angegebenen Schritte, wenn du das Datum erneut einstellen möchtest. Die Veränderung des Datums wirkt sich nicht auf die Sparfunktionen aus Einzahlen von Münzen Du kannst jederzeit ohne Karte Münzen einzahlen. Der Münzschlitz identifiziert sie und addiert sie zu den Gesamtersparnissen hinzu. ANMERKUNG: Lasse zwischen den Münzen jeweils 3 Sekunden Zeit vergehen. Halte die Münze beim Einführen senkrecht, damit die Berechnung garantiert genau ist. Funktioniert nur mit Euro-Münzen. Erkennt 1, 2, 5, 10, 20 und 50 Cent Stücke sowie 1 und Verwenden der Karte Die Karte ist notwendig für: - Uhrzeit ändern - Datum ändern - Geldscheine einzahlen - Sparplan festlegen - Sparlaufzeit festlegen - Ersparnisse abfragen - Persönlichen PIN ändern - Geld abheben Führe die Karte immer richtig herum ein, so wie abgebildet. Achte darauf, dass die Karte nicht in den Geldautomaten fällt Einzahlen von Geldscheinen Zum Einzahlen von Scheinen musst du auf die Kontofunktionen zugreifen, für die die Karte notwendig ist. Befolge diese Schritte: 1. Führe die Karte richtig herum in den Schlitz ein. 2. Drücke die Taste EINZAHLUNG. 3. Führe den Geldschein gefaltet in den abgebildeten Schlitz ein. 4. Tippe die Summe ein, die du einzahlen möchtest. Die Zahlen erscheinen auf dem Display. Wenn du einen Fehler machst,
, Minutes (à 2 chiffres, par exemple : 15). 4.")
5 drücke die Taste C zum Löschen und gib die richtige Summe ein. 5. Drücken zum Bestätigen die Taste EINZAHLEN. 6. Zum Schluss entnimmst du die Karte Geld abheben Zum Geldabheben musst du die Karte einführen und den PIN wie folgt eintippen: 1. Führe die Sicherheitskarte ein. 2. Drücke die Taste AUSZAHLUNG. 3. Gib mit den Zahlentasten die gewünschte Abhebesumme* ein, sie erscheint auf dem Display. 4. Drücke zum Bestätigen der Summe die Taste AUSZAHLEN. Wenn du einen Fehler machst, drücke die Taste C zum Löschen und gib die richtige Summe ein. 5. Das Display verlangt die Eingabe des PIN (Werkseinstel lung 0000). 6. Wenn du ihn richtig eingibst, geht das Licht an und die Schublade entsperrt sich, damit du auf deine Ersparnisse zugreifen kannst. Du musst die richtige Summe entnehmen, da sonst der Sparsaldo nicht mehr stimmt. Zur Geldentnahme hast du 10 Sekunden Zeit. Falls sich die Tür nicht öffnet, wird kein Geld vom Konto abgezogen. 7. Verschließe die Tür erneut und entnimm die Sicherheitskarte. * Anmerkung: Wenn du versuchst, mehr Geld abzuheben, als du gespart hast, erscheint auf dem Display die Nachricht ERROR mit einem Ton und du musst eine andere Summe eingeben. Versuche nicht, die Tür mit Gewalt zu öffnen, da die Scharniere kaputt gehen und der Alarm ausgelöst wird Ändern des PIN Du kannst den PIN (4 Ziffern) jederzeit wie folgt ändern: 1. Führe die Karte ein. 2. Drücke die Taste PIN. 3. Wenn das Display blinkt, gib den voreingestellten PIN 0000 ein. 4. Gib die gewünschten 4 Ziffern des neuen PIN ein (z. B.: 1234). 5. Drücke zum Bestätigen die Taste PIN. 6. Zum erneuten Ändern gibst du den aktuellen PIN ein (1234) und dann den neuen PIN (z.b. 2584). Anmerkung: Du musst dir den PIN merken. Wenn du ihn vergisst, musst du die Batterien entnehmen, sie wieder einlegen und das Spielzeug erneut einstellen. Auf diese Weise wird der voreingestellte PIN 0000 wieder aktiviert Abfragen deines Sparsaldos Hierzu benötigst du die Karte. 1. Führe die Karte ein. 2. Drücke die Taste GESAMTERSPARNISSE. 3. Das Display zeigt an, wie viel Geld du gespart hast. 4. Entnimm die Karte, auf dem Bildschirm erscheint wieder die Uhr Einrichten eines Sparplans Wenn du sparen möchtest, kann dieser Geldautomat dir dabei helfen. Er zeigt dir, wie deine Ersparnisse anwachsen, bis du dein Ziel erreichst. 1. Gib die Karte ein, um auf die Kontofunktionen zuzugreifen. 2. Drücke die Taste SPARZIEL mindestens 2 Sekunden lang, bis das Symbol $ auf dem Display erscheint und die Zahl blinkt. 3. Gib die Summe ein, die du sparen möchtest (höchstens ,00), sie erscheint auf dem Display. Wenn du einen Fehler machst, drücke die Taste C zum Löschen und gib die richtige Summe ein. 4. Nach Eingabe der Summe erscheint auf dem Display das Symbol DAY. Gib die Anzahl der Tage an, in der du das Sparziel erreichen möchtest (höchstens 999 Tage). Beispiel: Für 30 Tage musst du 030 eingeben. 5. Drücke zum Bestätigen erneut die Taste SPARZIEL. ANMERKUNG: Zur Festlegung eines neuen Sparziels kannst du alles Geld entnehmen und von Null anfangen. Oder lasse dein Erspartes im Geldautomaten. Dann wird das schon gesparte Geld vom neuen Sparziel abgezogen, und du musst die Zeit eingeben, in der du dein neues Ziel erreichen willst. Der Geldautomat speichert das festgelegte Sparziel und verfolgt die Fortschritte auf dem Weg zum Ziel. Die folgenden Funktionen helfen dir, deine Ersparnisse zu kontrollieren: 1. Drücke die Taste FEHLENDES GELD, um zu sehen, wie viel Geld bis zum Sparziel fehlt. 2. Drücke die Taste FEHLENDE TAGE, um zu sehen, wie viele Tage bis zum Ende des Sparplans fehlen. 3. Tonhinweise zeigen Folgendes an: - Das Sparziel wurde am festgelegten Datum oder davor erreicht. - Das Ziel wird nicht erreicht (weder Summe noch Datum). 5. Wartung - Immer senkrecht aufbewahren. - Nicht auf das Display drücken, das Bild könnte beschädigt werden. - Das Gewicht steigt mit den Münzen, sei vorsichtig beim Hochheben oder Wegstellen. - Überlade den Geldautomaten nicht. - Stecke keine anderen Gegenstände in den Schlitz. - Schütte keine Flüssigkeit über oder in den Geldautomaten. Die Komponenten könnten beschädigt werden. - Tausche leere Batterien so schnell wie möglich aus. - Nur mit einem trockenen Tuch abwischen. - Die Karte nicht knicken oder beschädigen und an einem sicheren Ort aufbewahren. 6. Problembehebung - Das Bild auf dem Display erscheint verschwommen oder gar nicht: Eventuell sind die Batterien leer. Tausche sie aus und säubere die Kontakte. - Die Geldschublade öffnet sich nicht: Vergewissere dich, dass du den PIN richtig eingegeben hast. Sieh nach, ob eine Münze im Scharnier feststeckt. Halte den Geldautomaten schräg, um eventuell feststeckende Münzen zu lösen. - Die Sparsumme wurde aus dem Speicher gelöscht: Bei jedem Batteriewechsel wird der Speicher gelöscht. Du musst den Geldautomaten neu programmieren. - Die Berechnung stimmt nicht: Vielleicht ist bei der Eingabe einer Münze oder eines Scheins ein Fehler aufgetreten. Nimm alles Geld heraus, program miere den Automaten neu und zahle das Geld erneut ein. - Der Geldautomat reagiert nicht: Nimm die Batterien heraus und lege sie wieder ein. Du musst den Geldautomaten neu programmieren. Crea la tua strategia di risparmio e scopri come è divertente risparmiare con la tua banca-salvadanaio. Funziona proprio coma una vera banca! Contenuto: 1 Banca-Salvadanaio 1 Tessera di sicurezza 1 Istruzioni 1. Parti e pulsanti A. Fessura per monete B. Fessura per la tessera C. Cassa D. Fessura per banconote E. Pannello di controllo F. Schermo LCD G. Indicatore luminoso 2. CARATTERISTICHE - Funzioni semplici salvadanaio. - Creare una strategia di risparmio: - Stabilire un obiettivo di risparmio. - Sapere il totale che si è risparmiato. - Sapere quanto manca per raggiungere l obiettivo. - Calcolare in quanti giorni si raggiungerà l obiettivo. - Tessera d accesso con password personale di sicurezza. - Password per ritirare i fondi. - Schermo LCD con data ed ora. - Suono: - Acceso. - Quando si raggiunge o meno l obiettivo di risparmio. - Errore (di calcolo, nel ritirare i contanti o nel digitare i dati). - Apertura della cassa per ritirare i fondi. 3. Pulsanti del pannello di controllo 3.1. Orologio 3.2. Password 3.3. Obiettivo di risparmio 3.4. Totale risparmio 3.5. Giorni mancanti 3.6. Importo mancante 3.7. Entrata 3.8. Rimborso 4. Come funziona 4.1. Consigli previ all utilizzo - Attento a non far cadere la tessera nel salvadanaio. - La tessera di sicurezza ti permette l accesso alle funzioni di risparmio e serve per inserire banconote, effettuare rimborsi (con la password), rimettere a posto la data e l ora, modificare la password o utilizzare le funzioni di risparmio. L inserimento di monete e la verifica di data ed ora non richiedono l uso della tessera. - Nel momento in cui si sceglie un nuovo obiettivo di risparmio i conti si aggiornano e si considerano anche gli importi già risparmiati. Puoi anche scegliere di tirar fuori tutti i soldini per iniziare a risparmiare partendo da zero Come configurare l ora 1. Inserisci la tessera come si mostra nell immagine. Suonerà una melodia. 2. Premi il pulsante OROLOGIO del pannello di controllo per almeno due secondi fino a che le due prime cifre dello schermo iniziano a lampeggiare. 3. Con i tasti numerici puoi introdurre l ora corretta nel seguente ordine: Ora (con 2 cifre, per esempio: 03), Minuti (con 2 cifre, per esempio: 15). 4. Per scegliere AM/PM premi il pulsante dei DECIMALI (.). 5. Premi il pulsante OROLOGIO per confermare. NOTA: Per configurare nuovamente l ora, ripeti i passi descritti sopra. La modifica dei dati dell orologio non influisce sulle funzioni di risparmio. L ora appare ogni volta che non si usano le altre funzioni del salvadanaio Come configurare la data 1. Una volta configurata l ora appariranno altre cifre e le prime due inizieranno a lampeggiare. 2. La data dovrà essere configurata in quest ordine: Giorno- Mese-Anno. 3. Inserisci i 6 digiti e premi il pulsante OROLOGIO per confermare. Ad esempio: 31 Agosto 2010, inserisci: e premi OROLOGIO. NOTA: Per configurare nuovamente la data, ripeti i passi descritti sopra. La modifica della data non influisce sulle funzioni di risparmio Per inserire monete. Puoi sempre inserire le monete senza bisogno di utilizzare la tessera. La fessura per le monete permette di identificarle ed aggiungerle al totale risparmiato. NOTA: Devi far trascorrere 3 secondi tra l inserimento di una moneta e l altra. Per garantire un calcolo esatto mantieni la moneta ben ferma in verticale al momento di inserirla. Funziona solo con monete EURO. Riconosce le monete da 1, 2, 5, 10, 20 e 50 centesimi, 1 e Per utilizzare la tessera. La tessera è necessaria per: - Cambiare l ora. - Cambiare la data. - Inserire banconote. - Stabilire un obiettivo di risparmio. - Stabilire il periodo di risparmio. - Verificare la quantità risparmiata. - Cambiare la password personale. - Tirar fuori i soldini. Inserisci la tessera sempre nella direzione corretta, come indicato. Evita che la tessera scivoli dentro al salvadanaio Per inserire banconote. Per inserire banconote è necessario accedere alle funzioni del conto e per far ciò avrai bisogno della tessera. Segui questi passi: 1. Inserisci la tessera nella fessura nella direzione corretta. 2. Premi il pulsante VERSAMENTO. 3. Inserisci la banconota ripiegata nella fessura indicata. 4. Digita la quantità che desideri inserite. I numeri appariranno sullo schermo. Se ti sbagli basta premere il pulsante C per cancellare e digitare la quantità corretta. 5. Premi il pulsante VERSAMENTO per confermare l operazione. 6. Infine, ritira la tessera Come ritirare contante dal salvadanaio. Per poter ritirare contante devi inserire la tessera e digitare la password in questo modo: 1. Inserisci la tessera di sicurezza. 2. Premi il pulsante PRELIEVO. 3. Digita la quantità che desideri estrarre* che apparirà sullo schermo. 4. Premi il pulsante PRELIEVO ancora una volta per confer mare la quantità. Se ti sbagli premere il pulsante C della calcolatrice per cancellare e digita la quantità corretta. 5. Lo schermo ti chiederà la password (quella preimpostata è 0000). 6. Se la inserisci correttamente si accende la luce e si sblocca la cassa per farti accedere ai tuoi risparmi. Devi ritirare la quantità corretta altrimenti l estratto non sarà corretto. Hai 10 secondi per tirare fuori i soldini. Se la porta non si apre non verrà sottratto contante dal conto. 7. Chiudi la porta e ritira la tessera di sicurezza. * Nota: Se cerchi di ritirare una quantità superiore ai tuoi risparmi apparirà il messaggio ERRORE sullo schermo con il suono corrispondente e dovrai digitare nuovamente la quantità. Non cercare di aprire la porta con la forza perché si romperanno le chiusure e scatterà l allarme Come cambiare la password. Puoi cambiare la password ogni volta che lo desideri (4 cifre) in questo modo: 1. Inserisci la tessera. 2. Premi il pulsante PASSWORD. 3. Quando inizia a lampeggiare introduci la password prestabilita Digita i 4 numeri della nuova password (per es.: 1234). 5. Premi il pulsante PASSWORD per confermarla. 6. Per cambiare nuovamente la password, inserisci la password attiva (1234) e poi digita la nuova password (per es.: 2584). Nota: Devi ricordarti la password. Se te la dimentichi devi estrarre le pile, rimetterle ed accendere il giocattolo di nuovo. In questo modo si attiverà di nuovo la password prestabilita Come verificare l estratto conto dei tuoi risparmi. Per verificare l estratto conto dei tuoi risparmi hai bisogno della tessera. 1. Inserisci la tessera. 2. Premi il pulsante TOTALE RISPARMIO. 3. Lo schermo mostrerà l ammontare dei risparmi. 4. Estrai la tessera e lo schermo mostrerà nuovamente l orologio Come creare una strategia di risparmio. Se vuoi risparmiare questo salvadanaio può aiutarti e vedrai come i tuoi risparmi avanzano verso l obiettivo. 1. Inserisci la tessera per accedere alle funzioni del conto. 2. Premi il pulsante OBIETTIVO DI RISPARMIO per almeno 2 secondi fino a far apparire il simbolo $ sullo schermo e vedi che il numero inizia a lampeggiare. 3. Digita la quantità che vorresti risparmiare (massimo ,00) che apparirà sullo schermo. Se ti sbagli basta premere il pulsante C della calcolatrice per cancellare e digitare la quantità corretta. 4. Una volta introdotta la quantità, apparirà sullo schermo il sim bolo DAY e a questo punto devi introdurre il numero di giorni in cui vuoi risparmiare, (massimo 999 giorni), ad esempio: inserisci 030 per 30 giorni. 5. Premi nuovamente OBIETTIVO DI RISPARMIO per P.4
. 6.")
6 confermare. NOTA: Per stabilire un nuovo obiettivo di risparmio puoi estrarre tutto il contante ed iniziare da zero. O lasciare dentro i tuoi risparmi in modo tale che il salvadanaio li sottragga dal nuovo obiettivo e possa marcare il tempo necessario per l obiettivo. Una volta stabilito l obiettivo di risparmio, il salvadanaio lo memorizzerà e controllerà l evoluzione verso il raggiungimento dello stesso. Le seguenti funzioni ti aiuteranno a controllare i tuoi risparmi: 1. Premi il pulsante IMPORTO MANCANTE per vedere quanti soldini devi ancora risparmiare. 2. Premi il pulsante GIORNI MANCANTI per vedere quanti giorni ti restano per portare a termine l obiettivo di risparmio. 3. I suoni ti indicheranno quando: - Si raggiunge l obiettivo di risparmio nella data prestabilita o prima della data. - Non si raggiunge l obiettivo (né per quantità, né per data). 5. Manutenzione: - Mantienilo sempre in posizione verticale. - Non premere sullo schermo poiché l immagine si può danneggiare. - Il peso del salvadanaio aumenta con le monete quindi stai attento quando lo tiri su o lo metti via. - Non riempirlo più del necessario. - Non inserire oggetti non indicati nelle fessure. - Non spandere liquidi all interno o al di sopra poiché potrebbe danneggiarne i componenti. - Una volta esaurite le pile, cambiale il prima possibile. - Pulire solo con un panno asciutto. - Evita di piegare o danneggiare la tessera e conservala in un posto sicuro. 6. Risoluzione problemi - Se lo schermo mostra una immagine diffusa o non si mostra l immagine: Può essere che le pile si siano esaurite. Cambiale e pulisci i contatti. - Se non si apre la cassa con i contanti: Assicurati di aver inserito correttamente la password della tessera. Verifica che non sia rimasta incastrata qualche moneta nella chiusura. Per sicurezza inclinalo facendo attenzione per sbloccarla. - Se si sono cancellati i dati di risparmio: I dati del risparmio si cancellano ogni volta che si cambiano le pile. Dovrai programmare nuovamente il salvadanaio. - Se i conti non tornano: Si può essere verificato un errore nell introdurre una moneta o una banconota. Estrarre tutto il contante, riprogrammare il salvadanaio ed inserire nuovamente i soldini. - Se il salvadanaio non risponde: Tira fuori le pile e rimettile. Riprogramma il salvadanaio. Cria o teu próprio plano de poupança e descobre como é divertido poupar com a tua própria caixa-automática. É como um banco a sério! Conteúdo: 1 Caixa-automática 1 Cartão de segurança 1 Instruções 1. Componentes e botões A. Ranhura para moedas B. Ranhura para o cartão C. Gaveta D. Ranhura para notas E. Painel de controlo F. Ecrã LCD G. Indicador luminoso 2. Características - Funções simples de uma caixa-automática. - Criar um plano de poupança: - Fixar um objectivo de poupança. - Saber o total poupado. - Saber o dinheiro que falta para alcançar o objectivo. - Calcular o número de dias que serão necessários para alcançar o objectivo. - Cartão de acesso com código pessoal de segurança. - Código pessoal para retirar fundos. - Ecrã LCD que indica a data e a hora. - Som: - Ligado. - Ao alcançar ou não alcançar o objectivo de poupança. - Erro (cálculo, retirar dinheiro ou digitar dados). - Abertura da caixa para retirar fundos. 3. Botões do painel de controlo 3.1. Relógio 3.2. Código 3.3. Objectivo de poupança 3.4. Total poupança 3.5. Dias que faltam 3.6. Dinheiro que falta 3.7. Depósito 3.8. Retirada 4. Como funciona 4.1. Alguns conselhos antes de começar - Tem cuidado para não deixares cair o cartão dentro da caixa-automática. - O cartão de segurança serve para acederes às funções de P.5 poupança e é necessário para depositar notas, retirar dinheiro (junto com o código), reajustar a data e a hora, alterar o código e utilizar as funções de poupança. É possível depositar moedas e consultar a data e a hora sem o cartão. - Quando fixares um novo objectivo de poupança, as tuas contas actualizar-se-ão tendo em conta a quantia já poupada. Também podes retirar todo o dinheiro para começares a poupar desde zero Como acertar a hora 1. Introduz o teu cartão tal como se indica na imagem. Ouvirse-á uma melodia. 2. Prime o botão RELÓGIO do painel de controlo durante pelo menos 2 segundos até os dois primeiros números do ecrã começarem a piscar. 3. Com as teclas numéricas, introduz a hora correcta pela seguinte ordem: Hora (em 2 dígitos, por exemplo: 03), Minutos (em 2 dígitos, por exemplo: 15). 4. Para seleccionares AM/PM prime o botão de DECIMAL (.). 5. Prime o botão RELÓGIO para confirmar. NOTA: Para voltares a fixar a hora, repete os passos acima indicados. A modificação dos dados do relógio não afecta as funções de poupança. A hora aparece quando não estão a ser utilizadas outras funções do caixa automático Como acertar a data 1. Depois de ajustar a hora, aparecem outros dígitos e os dois primeiros começam a piscar. 2. A data deverá ser fixada pela seguinte ordem: Dia-Mês-Ano. 3. Introduz os 6 dígitos e prime o botão RELÓGIO para confirmar. Por exemplo, para 31 de Agosto de 2010, introduz e prime RELÓGIO. NOTA: Para voltares a fixar a data, repete os passos acima indicados. A modificação da data não afecta as funções de poupança Para introduzir moedas. Podes introduzir moedas quando quiseres sem utilizar o cartão. A ranhura para moedas identifica as moedas, somando-as ao total das poupanças. NOTA: Ao introduzires as moedas, deixa passar 3 segundos entre uma e outra moeda. Para um cálculo exacto, segura bem as moedas na posição vertical ao introduzi-las na ranhura. Funciona apenas com moedas de EURO. Reconhece moedas de 1, 2, 5, 10, 20 e 50 cêntimos, 1 e Para utilizar o cartão. O cartão é necessário para: - Alterar a hora. - Alterar a data. - Depositar notas. - Fixar um objectivo de poupança. - Fixar o prazo de poupança. - Consultar a quantia poupada. - Alterar o código pessoal. - Retirar dinheiro. Introduz o cartão sempre no sentido correcto, tal como se indica na figura. Evita que o cartão caia dentro da caixaautomática Para introduzir notas. Para introduzir notas na caixa-automática é necessário utilizar o cartão, para poderes aceder às funções da conta. Segue os seguintes passos: 1. Introduz o teu cartão na ranhura no sentido correcto. 2. Prime o botão DEPÓSITO. 3. Introduz a nota dobrada na ranhura indicada. 4. Com o teclado numérico, digita a quantia que queres depositar. No ecrã aparecerá a indicação da quantia. Se te enganares, prime o botão C para apagar, e volta a digitar a quantia correcta. 5. Prime o botão DEPÓSITO para confirmar a operação. 6. Finalmente, retira o cartão Como retirar dinheiro da caixa-automática. Para poderes retirar dinheiro, deves introduzir o cartão e digitar o código, da seguinte maneira: 1. Introduz o cartão de segurança. 2. Prime o botão RETIRAR DINHEIRO. 3. Digita a quantia que queres retirar*. Esta aparecerá indicada no ecrã. 4. Prime novamente o botão RETIRADA para confirmar a quantia. Se te enganares, prime o botão C da máquina de calcular para apagar, e volta a digitar a quantia correcta. 5. No ecrã aparecerá uma mensagem pedindo-te que introdu zas o código de segurança (o código pré-determinado é 0000). 6. Se introduzires o código correctamente, acende-se a luz e a gaveta ficará desbloqueada para poderes aceder às tuas poupanças. Deves retirar a quantia exacta porque, se não o fizeres, o saldo de poupança não será correcto. Tens 10 segundos para retirar o dinheiro. Se a porta não se abrir, não será subtraído nenhum dinheiro da conta. 7. Fecha a porta e retira o cartão de segurança. * Nota: Se tentares retirar mais dinheiro do que aquele que poupaste, aparecerá a mensagem ERRO no ecrã, com o respectivo som e deverás marcar outra quantia. Não tentes forçar a porta para a abrir porque, se o fizeres as dobradiças podem partir-se, e o alarme disparará Como alterar o código. Podes alterar o teu código de segurança quando quiseres (4 dígitos), da seguinte maneira: 1. Insere o cartão. 2. Prime o botão CÓDIGO 3. Quando começar a piscar, introduz o código prédeterminado Digita os 4 números do teu novo código (por ex: 1234). 5. Prime o botão CÓDIGO para confirmares a tua selecção. 6. Para voltares a alterar o código, introduz o código actual (1234) e, a seguir, o novo código (por ex: 2584). Nota: É muito importante que memorizes o código. Se te esqueceres do código, deverás retirar as pilhas, voltar a colocá-las e colocar outra vez a caixa-automática em funcionamento. Deste modo activar-se-á novamente o código pré-determinado Como consultar o saldo das tuas poupanças. Para consultares o saldo das tuas poupanças precisas do cartão. 1. Insere o cartão. 2. Prime o botão TOTAL POUPANÇA. 3. No ecrã aparecerá o dinheiro que já poupaste. 4. Retira o cartão. O ecrã voltará a mostrar o relógio Como criar um plano de poupança. Esta caixa-automática pode ajudar-te a poupar. Com ela, verás como as tuas poupanças avançam para o objectivo! 1. Introduz o cartão para aceder às funções da conta. 2. Prime o botão OBJECTIVO DE POUPANÇA durante pelo menos 2 segundos até aparecer no ecrã o ícone $ e o número começar a piscar. 3. Digita a quantia que gostarias de poupar (máximo ,00). Esta aparecerá no ecrã. Se te enganares, prime o botão C da máquina de calcular para apagar, e volta a digitar a quantia correcta. 4. Depois de introduzires a quantia, aparecerá o ícone DAY no ecrã; introduz o número de dias em que queres efectuar a poupança (máximo 999 dias), por exemplo, 030 para 30 dias. 5. Prime novamente OBJECTIVO DE POUPANÇA para confirmar. NOTA: Para fixares um novo objectivo de poupança, podes retirar todo o dinheiro e começar de zero. Também podes optar por deixar o dinheiro que já poupaste no seu interior, de modo que a caixa-automática subtraia este dinheiro do novo objectivo e marque o tempo de poupança que é necessário para alcançar o novo objectivo. Depois de fixares o objectivo de poupança, a caixa-automática memorizá-lo-á e realizará um seguimento dos avanços levados a cabo para alcançares o teu objectivo. Para controlares as tuas poupanças, poderás contar com a ajuda das seguintes funções: 1. Prime o botão DINHEIRO QUE FALTA para veres o dinheiro que falta poupar. 2. Prime o botão DIAS QUE FALTAM para veres os dias que faltam para o plano de poupança terminar. 3. A caixa emitirá um aviso sonoro nas seguintes situações: - Quando se alcançar o objectivo de poupança na data fixada ou antes desta data. - Quando não se conseguir alcançar o objectivo (nem a quantia, nem a data). 5. Manutenção: - Guarda sempre a caixa-automática na posição vertical. - Não pressiones o ecrã, porque poderias danificar a imagem. - O peso da caixa-automática aumentará com as moedas, por isso, deves ter cuidado ao levantá-la e ao guardá-la. - Não carregues demasiado a caixa. - Não introduzas objectos não indicados nas ranhuras. - Não derrames nenhum líquido no seu interior ou por cima da caixa-automática, porque poderias danificar os seus componentes. - Quando as pilhas se gastarem, substitui-as o mais cedo possível. - Limpar apenas com um trapo seco. - Evita dobrar ou danificar o teu cartão, e guarda-o num local seguro. 6. Resolução de problemas. - Se a imagem do ecrã for difusa ou não aparecer qualquer imagem: É possível que as pilhas estejam gastas. Substitui-as e limpa bem os contactos. - Se a gaveta do dinheiro não se abrir: Assegura-te de que processaste correctamente o código do cartão. Verifica se não ficou nenhuma moeda presa na dobradiça. Se for o caso, inclina a caixa-automática com cuidado para a soltares. - Se o registo de poupanças se apagou: O registo das poupanças apaga-se sempre que as pilhas são substituídas. Deverás programar novamente a caixaautomática. - Se as quantias não forem correctas: Pode ter ocorrido um erro ao introduzir uma moeda ou uma nota. Retira todo o dinheiro, volta a programar a caixaautomática e introduz novamente o dinheiro. - Se a caixa-automática não responde: Tira as pilhas e volta a colocá-las novamente. Programa novamente a caixa-automática. Creează-ţi propriul plan de economisire şi descoperă ce amuzant este să faci economii cu propria bancă-puşculiţă. Ca o bancă adevărată!

7 Conţinut: 1 bancă-puşculiţă 1 card de siguranţă 1 instrucţiuni 1. Elemente componente şi butoane A. Fantă pentru monede B. Fantă pentru card C. Cutia D. Fantă pentru bancnote E. Panou de control F. Ecran LCD G. Indicator luminos 2. Caracteristici - Funcţii simple ale unei case. - Crearea unui plan de economisire: - Stabilirea unui obiectiv de economisire. - Cunoaşterea sumei totale economisite. - Cunoaşterea sumei rămase pentru atingerea obiectivului. - Calcularea zilelor în care poate fi atins obiectivul. - Card de acces cu parolă personală de siguranţă. - Parolă personală pentru retragerea banilor. - Ecran LCD ce semnalează data şi ora. - Sunet: - Pornire. - La atingerea sau nu a obiectivului de economisire. - Eroare (calcul, retragere bani sau tastare date). - Deschiderea casei pentru a retrage fonduri. 3. Butoanele panoului de control 3.1. Ceas 3.2. Cod 3.3. Obiectiv de economisire 3.4. Sumă totală economisită 3.5. Zile rămase 3.6. Suma rămasă 3.7. Depunere 3.8. Retragere 4. Cum funcţionează 4.1. Recomandări înainte de a începe - Aveţi grijă să nu cadă cardul în casă. - Cardul de siguranţă îţi facilitează accesul la funcţiile de economisire şi este necesar pentru introducerea bancnotelor, realizarea retragerilor (cu ajutorul codului), reajustarea datei şi a orei, schimbarea parolei sau utilizarea funcţiilor de economisire. Depunerea monedelor şi consultarea datei şi orei se pot face fără card. - Atunci când stabileşti un nou obiectiv de economisire, conturile tale se vor actualiza ţinând cont de suma economisită până atunci. Poţi, de asemenea, retrage toţi banii pentru a începe să economiseşti de la zero Cum se modifică ora 1. Introduce cardul conform imaginii. Se va auzi o melodie. 2. Apasă butonul CEAS din panoul de control cel puţin 2 secunde, până când primele două numere de pe ecran încep să clipească. 3. Cu tastele numerice introdu ora corectă în următoarea ordine: Ora (din 2 cifre, de exemplu: 03), Minutele (din 2 cifre, de exemplu: 15). 4. Pentru a selecta AM/PM apasă butonul ZECIMAL (.). 5. Apasă butonul CEAS pentru a confirma. OBSERVAŢIE: Pentru a modifica din nou ora, repetă paşii indicaţi mai sus. Modificarea datelor ceasului nu afectează funcţiile de economisire. Ora apare de fiecare dată când nu sunt utilizate alte funcţii ale casei Cum se modifică data 1. După modificarea orei, vor apărea alte două cifre şi vor clipi primele două. 2. Data trebuie modificată în următoarea ordine: ziua-luna-anul. 3. Introdu cele 6 cifre şi apasă butonul CEAS pentru a confirma. De exemplu: 31 august 2010, introdu: şi apasă CEAS. OBSERVAŢIE: Pentru a modifica din nou data, repetă paşii indicaţi mai sus. Modificarea datei nu afectează funcţiile de economisire Pentru introducerea monedelor. Poţi introduce monede în orice moment, fără a utiliza cardul. Fanta pentru monede le identifică şi le adaugă la totalul sumei economisite. OBSERVAŢIE: Lasă să treacă 3 secunde între o monedă şi alta. Pentru a garanta un calcul exact, susţine moneda bine în poziţie verticală în momentul în care o introduci. Funcţionează doar cu monede de EURO. Recunoaşte monede de 1, 2, 5, 10, 20 şi 50 cenţi, 1 şi Pentru utilizarea cardului. Cardul este necesar pentru: - Modificarea orei. - Modificarea datei. - Introducerea de bancnote. - Stabilirea unui obiectiv de economisire. - Stabilirea unui termen de economisire. - Consultarea sumei economisite. - Modificarea parolei personale. - Retragerea banilor. Introdu întotdeauna cardul în sensul corect, conform indicaţiilor. Evită căderea cardului în casă Pentru introducerea bancnotelor. Pentru introducerea bancnotelor este necesară accesarea funcţiilor contului, de aceea ai nevoie de card. Urmează aceşti paşi: 1. Introdu cardul în fantă în sensul corect. 2. Apasă butonul DEPUNERE. 3. Introdu bancnota îndoită prin fanta indicată. 4. Tastează ca numere suma pe care doreşti să o depui. Numerele vor apărea pe ecran. Dacă greşeşti, apasă butonul C pentru a şterge şi tasta suma corectă. 5. Apasă butonul DEPUNERE pentru a confirma operaţiunea. 6. La sfârşit, scoate cardul Cum se scot bani din casă. Pentru a putea scoate bani trebuie să introduci cardul şi să tastezi parola, după cum urmează: 1. Introdu cardul de siguranţă. 2. Apasă butonul RETRAGERE. 3. Tastează numerele sumei pe care doreşti să o scoţi* şi aceasta va apărea pe ecran. 4. Apasă butonul RETRAGERE din nou pentru a confirma suma. Dacă greşeşti, apasă butonul C de la calculator pentru a şterge şi tasta suma corectă. 5. Ecranul îţi va cere codul (este predeterminat 0000). 6. Dacă îl introduci bine, se aprinde lumina şi sertarul se deblochează pentru a-ţi accesa economiile. Trebuie să scoţi suma exactă, dacă nu, soldul economiilor nu va fi corect. Ai 10 secunde pentru a scoate banii. Dacă uşiţa nu se deschide, nu se va scădea din cont nicio sumă. 7. Închide uşiţa şi scoate cardul de siguranţă. * Observaţie: Dacă încerci să scoţi mai mulţi bani decât ai economisit, va apărea mesajul EROARE pe ecran, cu sunetul caracteristic şi trebuie să tastezi o altă sumă. Nu încerca să deschizi uşiţa cu forţa, deoarece se rup balamalele şi se declanşează alarma Cum se modifică parola. Poţi modifica parola de câte ori doreşti (4 cifre), după cum urmează: 1. Introdu cardul. 2. Apasă butonul PAROLĂ. 3. Atunci când începe să clipească, introdu parola predeterminată Tastează cele 4 numere ale noii parole (de ex.: 1234). 5. Apasă butonul PAROLĂ pentru a o confirma. 6. Pentru a modifica din nou parola, introdu parola actuală (1234) şi în continuare noua parolă (de ex.: 2584). Observaţie: Trebuie să-ţi aminteşti parola. Dacă o uiţi, trebuie să scoţi bateriile, să le pui la loc şi să pui jucăria din nou în funcţiune. Astfel se va activa din nou parola predeterminată Cum se consultă soldul economiilor. Pentru a consulta soldul economiilor ai nevoie de card. 1. Introdu cardul. 2. Apasă butonul TOTAL ECONOMII. 3. Ecranul va arăta câţi bani ai economisit. 4. Scoate cardul, ecranul va arăta din nou ceasul Cum se creează un plan de economisire. Dacă doreşti să economiseşti, această casă te poate ajuta, cu ajutorul acesteia vei vedea cum economiile tale progresează către obiectivul stabilit. 1. Introdu cardul pentru a accesa funcţiile contului. 2. Apasă butonul OBIECTIV DE ECONOMISIRE cel puţin 2 secunde, până când pictograma $ apare pe ecran şi numărul clipeşte. 3. Tastează suma pe care ai dori să o economiseşti (maximum ,00), aceasta va apărea pe ecran. Dacă greşeşti, apasă butonul C de la calculator pentru a şterge şi tasta suma corectă. 4. După ce ai introdus suma, pictograma DAY va apărea pe ecran; introdu numărul de zile în care doreşti să efectuezi economia (maximum 999 zile), de exemplu: introdu 030 pentru 30 zile. 5. Apasă OBIECTIV DE ECONOMISIRE din nou pentru confirmare. OBSERVAŢIE: Pentru a stabili un nou obiectiv de economisire poţi scoate toţi banii şi începe de la zero. Sau poţi lăsa banii economisiţi înăuntru, astfel încât casa să scadă această sumă din noul obiectiv şi marchează perioada de economisire necesară pentru noul obiectiv. După stabilirea obiectivului de economisire, casa îl va memora şi va realiza o urmărire a progresului până la atingerea obiectivului. Următoarele funcţii te vor ajuta să-ţi controlezi economiile: 1. Apasă butonul SUMA RĂMASĂ pentru a vedea câţi bani mai trebuie să strângi. 2. Apasă butonul ZILE RĂMASE pentru a vedea câte zile mai rămân pentru terminarea planului de economii. 3. Vor exista indicaţii sonore atunci când: - Se atinge obiectivul de economisire la data stabilită sau înaintea acestei date. - Nu se atinge obiectivul (nici suma, nici data). 5. Întreţinerea: - Păstreaz-o întotdeauna în poziţie verticală. - Nu apăsa ecranul, acest lucru poate afecta imaginea. - Greutatea sa va creşte odată cu monedele, ai grijă atunci când o ridici sau o pui la păstrare. - Nu o încărca mai mult decât este necesar. - Nu introdu obiecte neindicate prin fante. - Nu turna niciun lichid înăuntru sau la suprafaţă, acest lucru poate dăuna componentelor. - Atunci când se termină bateriile, schimbă-le cât mai repede posibil. - Curăţă-o doar cu o cârpă uscată. - Nu îndoi cardul şi nu-l strica şi păstrează-l la loc sigur. 6. Rezolvarea problemelor. - Dacă ecranul prezintă o imagine difuză sau nu prezintă nicio imagine: Se poate ca bateriile să fie epuizate. Schimbă-le şi curăţă bornele de contact. - Dacă nu se deschide sertarul cu bani: Asigură-te că ai procesat corect parola cardului. Verifică să nu se fi blocat nicio monedă în fantă. În orice caz, înclin-o cu atenţie pentru a o debloca. - Dacă s-a şters registrul economiilor: Registrul economiilor se va şterge de fiecare dată când se schimbă bateriile. Trebuie să programezi casa din nou. - Dacă cifrele nu se potrivesc: Poate că s-a produs o eroare la introducerea unei monede sau a unei bancnote. Scoate toţi banii, programează din nou casa şi introdu banii din nou. - În cazul în care casa nu răspunde: Scoate bateriile şi pune-le la loc. Programează casa din nou. Δημιουργήστε το δικό σας αποταμιευτικό πρόγραμμα και δείτε πόσο διασκεδαστική είναι η αποταμίευση με τη δική σας τράπεζα-κουμπαρά! Είναι σαν αληθινή τράπεζα! Περιεχόμενο συσκευασίας 1 Τράπεζα-Κουμπαράς 1 Κάρτα Ασφαλείας 1 Οδηγίες 1. Πλήκτρα και μέρη A. Υποδοχή κερμάτων B. Υποδοχή κάρτας Γ. Συρτάρι Δ. Υποδοχή χαρτονομισμάτων E. Πίνακας ελέγχου ΣΤ. Οθόνη LCD Ζ. Φωτεινή Ένδειξη 2. ΧΑΡΑΚΤΗΡΙΣΤΙΚΑ - Απλές λειτουργίες μηχανήματος ανάληψης μετρητών. - Δημιουργία αποταμιευτικού προγράμματος: - Να καθορίσετε τον στόχο αποταμίευσης. - Ενημέρωση σχετικά με το σύνολο του αποταμιευμένου ποσού. - Ενημέρωση σχετικά με το ποσό που υπολείπεται για την επίτευξη του στόχου. - Υπολογισμός των ημερών που χρειάζονται για την επίτευξη του στόχου. - Κάρτα πρόσβασης με προσωπικό κωδικό ασφαλείας. - Προσωπικός κωδικός για αναλήψεις. - Οθόνη LCD με ένδειξη ημερομηνίας και ώρας. - Ήχος: - Ενεργοποιημένο. - Με την επίτευξη ή μη επίτευξη του στόχου αποταμίευσης. - Σφάλμα (υπολογισμού, ποσού ανάληψης ή πληκτρολόγησης στοιχείων). - Άνοιγμα συρταριού για αναλήψεις. 3. Πλήκτρα πίνακα ελέγχου 3.1. Ρολόι 3.2. Κωδικός 3.3. Στόχος αποταμίευσης 3.4. Σύνολο ποσού αποταμίευσης 3.5. Ημέρες που υπολείπονται 3.6. Ποσό που υπολείπεται 3.7. Κατάθεση 3.8. Ανάληψη 4. Πώς λειτουργεί 4.1. Συμβουλές πριν από τη χρήση - Προσέξτε να μην πέσει η κάρτα μέσα στο μηχάνημα. - Με την κάρτα ασφαλείας έχετε πρόσβαση στις λειτουργίες αποταμίευσης που είναι απαραίτητες για να βάζετε χαρτονομίσματα στο μηχάνημα, να κάνετε αναλήψεις (με τον κωδικό σας), να ξαναρυθμίζετε την ημερομηνία και την ώρα, να αλλάζετε τον κωδικό ή να χρησιμοποιείτε τις λειτουργίες αποταμίευσης. Η κάρτα δεν χρειάζεται για να βάλετε κέρματα στο μηχάνημα ή να δείτε την ημερομηνία και την ώρα. - Όταν καθορίζετε ένα νέο στόχο αποταμίευσης, ο λογαριασμός σας ενημερώνεται και υπολογίζεται το ποσό που έχετε αποταμιεύσει. Μπορείτε ακόμη να κάνετε ανάληψη όλου του ποσού για να αρχίσετε να αποταμιεύετε από το μηδέν Πώς ρυθμίζεται η ώρα 1. Εισάγετε την κάρτα όπως δείχνει η εικόνα.θα ακουστεί μια μελωδία. 2. Πατήστε το πλήκτρο ΡΟΛΟΙ του πίνακα ελέγχου για τουλάχιστο 2 δευτερόλεπτα ώσπου να αρχίσουν να αναβοσβήνουν οι πρώτοι αριθμοί στην οθόνη. 3. Με τα αριθμητικά πλήκτρα εισάγετε τη σωστή ώρα με την παρακάτω σειρά: Ώρα (με διψήφιο αριθμό, π.χ.: 03), Λεπτά (με διψήφιο αριθμό, π.χ.: 15). 4. Για να επιλέξετε AM/PM, πατήστε το πλήκτρο ΥΠΟΔΙΑΣΤΟΛΗΣ (.). 5. Πατήστε το πλήκτρο ΡΟΛΟΙ για επιβεβαίωση. ΣΗΜΕΙΩΣΗ: Για να ξαναρυθμίσετε την ώρα, επαναλάβετε τα παραπάνω βήματα.η τροποποίηση των στοιχείων του ρολογιού P.6

8 είναι ανεξάρτητη από τις λειτουργίες αποταμίευσης. Η ώρα εμφανίζεται όταν δεν χρησιμοποιούνται άλλες λειτουργίες του μηχανήματος Πώς ρυθμίζεται η ημερομηνία 1. Αφού ρυθμίσετε την ώρα, θα εμφανιστούν άλλα ψηφία από τα οποία θα αρχίσουν να αναβοσβήνουν τα δύο πρώτα. 2. Η ημερομηνία πρέπει να ρυθμιστεί με την παρακάτω σειρά: Ημέρα-Μήνας-Έτος. 3. Πληκτρολογήστε τα 6 ψηφία και πατήστε το πλήκτρο ΡΟΛΟΙ για επιβεβαίωση. Παράδειγμα: 31 Αυγούστου 2010, πληκτρολογήστε: και πατήστε ΡΟΛΟΙ. ΣΗΜΕΙΩΣΗ: Για να ξαναρυθμίσετε την ημερομηνία, επαναλάβετε τα παραπάνω βήματα. Η τροποποίηση της ημερομηνίας είναι ανεξάρτητη από τις λειτουργίες αποταμίευσης Για να εισάγετε κέρματα. Μπορείτε να βάλετε κέρματα στο μηχάνημα οποιαδήποτε στιγμή, χωρίς την κάρτα.η υποδοχή για κέρματα τα αναγνωρίζει και τα προσθέτει στο σύνολο του ποσού αποταμίευσης. ΣΗΜΕΙΩΣΗ: Αφήστε να περάσουν 3 δευτερόλεπτα μεταξύ του κάθε κέρματος. Για να γίνει ο υπολογισμός με ακρίβεια, κρατήστε το κέρμα σταθερά και σε κάθετη θέση πριν το ρίξετε. Λειτουργεί μόνο με κέρματα ΕΥΡΩ. Αναγνωρίζει κέρματα των 1, 2, 5, 10, 20 και 50 λεπτών, 1 και Για να χρησιμοποιήσετε την κάρτα. Η κάρτα είναι απαραίτητη για: - Να αλλάξετε την ώρα. - Να αλλάξετε την ημερομηνία. - Να καταθέσετε χαρτονομίσματα. - Να καθορίσετε τον στόχο αποταμίευσης. - Να καθορίσετε το χρονικό όριο αποταμίευσης. - Να ενημερωθείτε για το αποταμιευμένο ποσό. - Να αλλάξετε τον προσωπικό σας κωδικό. - Να κάνετε αναλήψεις. Να εισάγετε πάντα την κάρτα προς τη σωστή κατεύθυνση, όπως υποδεικνύεται. Μην αφήνετε την κάρτα να πέσει μέσα στο μηχάνημα Για να εισάγετε χαρτονομίσματα. Για να εισάγετε χαρτονομίσματα πρέπει να έχετε πρόσβαση στις λειτουργίες του λογαριασμού, γι αυτό χρειάζεστε την κάρτα. Ακολουθήστε τα εξής βήματα: 1. Εισάγετε την κάρτα στην υποδοχή προς τη σωστή κατεύθυνση. 2. Πατήστε το πλήκτρο ΚΑΤΑΘΕΣΗ. 3. Εισάγετε το χαρτονόμισμα διπλωμένο στην υποδοχή που υποδεικνύεται. 4. Πληκτρολογήστε τους αριθμούς του ποσού που θέλετε να καταθέσετε.οι αριθμοί εμφανίζονται στην οθόνη. Αν κάνετε λάθος, απλά πατήστε το πλήκτρο C για να το σβήσετε και να πληκτρολογήσετε το σωστό ποσό. 5. Πατήστε το πλήκτρο ΚΑΤΑΘΕΣΗ για επιβεβαίωση. 6. Τέλος, βγάλτε την κάρτα από την υποδοχή Πώς γίνεται η ανάληψη από το μηχάνημα. Για να κάνετε ανάληψη, πρέπει να εισάγετε την κάρτα και να πληκτρολογήσετε τον κωδικό με τον εξής τρόπο: 1. Εισάγετε την κάρτα ασφαλείας. 2. Πατήστε το πλήκτρο ΑΝΑΛΗΨΗ. 3. Πληκτρολογήστε τους αριθμούς του ποσού που θέλετε να κάνετε ανάληψη* και το ποσό θα εμφανιστεί στην οθόνη σας. 4. Πατήστε πάλι το πλήκτρο ΑΝΑΛΗΨΗ για επιβεβαίωση του ποσού. Αν κάνετε λάθος, πατήστε το πλήκτρο C για να το σβήσετε και να πληκτρολογήσετε το σωστό ποσό. 5. Η οθόνη θα σας ζητήσει τον κωδικό (εμφανίζεται ο προκαθορισμένος 0000). 6. Αν τον εισάγετε σωστά, ανάβει το φως και ανοίγει το συρταράκι για να δείτε τα χρήματα που έχετε αποταμιεύσει. Πρέπει να βγάλετε το ακριβές ποσό, αλλιώς το υπόλοιπο της αποταμίευσης δεν θα είναι σωστό. Έχετε 10 δευτερόλεπτα για να βγάλετε τα χρήματα. Αν δεν ανοίξει το πορτάκι, δεν θα αφαιρεθεί κανένα ποσό από το λογαριασμό σας. 7. Κλείστε το πορτάκι και βγάλτε την κάρτα ασφαλείας. * Σημείωση: Αν προσπαθήσετε να βγάλετε περισσότερα χρήματα από αυτά που έχετε αποταμιευμένα, θα εμφανιστεί στην οθόνη το μήνυμα ΣΦΑΛΜΑ με τον αντίστοιχο ήχο και θα πρέπει να πληκτρολογήσετε άλλο ποσό. Μην προσπαθείτε να ανοίξετε το πορτάκι δια της βίας, γιατί θα σπάσουν οι μεντεσέδες και θα χτυπήσει ο συναγερμός Πώς τροποποιείται ο κωδικός πρόσβασης Μπορείτε να αλλάξετε τον κωδικό πρόσβασης όποτε θέλετε (4 ψηφία), με τον εξής τρόπο: 1. Εισάγετε την κάρτα. 2. Πατήστε το πλήκτρο ΚΩΔΙΚΟΣ. 3. Όταν αρχίσει να αναβοσβήνει, εισάγετε τον προκαθορισμένο κωδικό Πληκτρολογήστε τους 4 αριθμούς του νέου κωδικού πρόσβασης (π.χ.: 1234). 5. Πατήστε το πλήκτρο ΚΩΔΙΚΟΣ για επιβεβαίωση. 6. Για να αλλάξετε πάλι τον κωδικό, εισάγετε τον παλιό κωδικό (1234) και στη συνέχεια το νέο κωδικό (π.χ.: 2584). Σημείωση: Πρέπει να θυμάστε τον κωδικό σας. Αν τον ξεχάσετε, πρέπει να βγάλετε τις μπαταρίες, να τις τοποθετήσετε ξανά και να θέσετε το παιχνίδι πάλι σε λειτουργία. Με αυτό τον τρόπο θα ενεργοποιηθεί εκ νέου ο προκαθορισμένος κωδικός Πώς θα ενημερωθείτε για το υπόλοιπο της αποταμίευσής σας. Για να δείτε το υπόλοιπο της αποταμίευσής σας, χρειάζεστε την κάρτα. 1. Εισάγετε την κάρτα. 2. Πατήστε το πλήκτρο ΣΥΝΟΛΟ ΑΠΟΤΑΜΙΕΥΣΗΣ. 3. Η οθόνη θα δείξει πόσα χρήματα έχουν αποταμιευθεί. 4. Βγάλτε την κάρτα και θα εμφανιστεί πάλι το ρολόι στην οθόνη Πώς θα δημιουργήσετε ένα αποταμιευτικό πρόγραμμα. Αν θέλετε να κάνετε αποταμίευση, αυτό το μηχάνημα θα σας βοηθήσει δείχνοντας την πορεία της αποταμίευσής σας προς τον στόχο που έχετε καθορίσει. 1. Εισάγετε την κάρτα για να έχετε πρόσβαση στις λειτουργίες του λογαριασμού σας. 2. Πατήστε το πλήκτρο ΣΤΟΧΟΣ ΑΠΟΤΑΜΙΕΥΣΗΣ για τουλάχιστο 2 δευτερόλεπτα ώσπου να εμφανιστεί στην οθόνη το εικονίδιο $ και να αρχίσει να αναβοσβήνει ο αριθμός. 3. Πληκτρολογήστε το ποσό που θέλετε να αποταμιεύσετε (μέγιστο όριο ,00), και αυτό θα εμφανιστεί στην οθόνη. Αν κάνετε λάθος, πατήστε το πλήκτρο C για να το σβήσετε και να πληκτρολογήσετε το σωστό ποσό. 4. Αφού εισάγετε το ποσό, θα εμφανιστεί στην οθόνη το εικονίδιο DAY. Εισάγετε τον αριθμό των ημερών που θέλετε να κάνετε αποταμίευση (μέγιστο όριο 999 ημέρες), παράδειγμα: εισάγετε 030 για 30 ημέρες. 5. Πατήστε πάλι ΣΤΟΧΟΣ ΑΠΟΤΑΜΙΕΥΣΗΣ για επιβεβαίωση. ΣΗΜΕΙΩΣΗ: Για να καθορίσετε έναν καινούργιο στόχο αποταμίευσης, μπορείτε να βγάλετε όλα τα χρήματα και να αρχίσετε πάλι από το μηδέν. Ή να αφήσετε μέσα τα χρήματά σας, ώστε το μηχάνημα να τα αφαιρέσει από τον καινούργιο στόχο και να δείξει το χρόνο που χρειάζεται για τον καινούργιο στόχο. Αφού καθορίσετε τον στόχο αποταμίευσης, το μηχάνημα θα τον απομνημονεύσει και θα κάνει έλεγχο των διαδικασιών μέχρι την επίτευξη του στόχου σας. Για τον έλεγχο της αποταμίευσής σας θα σας βοηθήσουν οι ακόλουθες λειτουργίες: 1. Πατήστε το πλήκτρο ΧΡΗΜΑΤΑ ΠΟΥ ΥΠΟΛΕΙΠΟΝΤΑΙ για να δείτε πόσα χρήματα ακόμη πρέπει να αποταμιευτούν. 2. Πατήστε το πλήκτρο ΗΜΕΡΕΣ ΠΟΥ ΥΠΟΛΕΙΠΟΝΤΑΙ για να δείτε πόσες μέρες απομένουν για να λήξει το αποταμιευτικό πρόγραμμα. 3. Θα ακουστούν ηχητικές ενδείξεις όταν: - Επιτευχθεί ο στόχος αποταμίευσης στην καθορισμένη ημερομηνία ή πριν από αυτή. - Δεν έχει επιτευχθεί ο στόχος (ούτε το ποσό, ούτε η ημερομηνία). 5. Συντήρηση: - Να το φυλάσσετε πάντα σε κάθετη θέση. - Μην πιέζετε την οθόνη γιατί μπορεί να αλλοιωθεί η εικόνα. - Επειδή το βάρος του θα αυξηθεί με τα νομίσματα, προσέξτε όταν το σηκώνετε ή το φυλάσσετε. - Μην το φορτώνετε υπερβολικά. - Μην τοποθετείτε μέσα στις υποδοχές αντικείμενα που δεν υποδεικνύονται στις οδηγίες. - Μη ρίχνετε κανένα υγρό μέσα ούτε επάνω στο μηχάνημα γιατί ενδέχεται να προκληθεί βλάβη στα εξαρτήματά του. - Όταν αδειάσουν οι μπαταρίες, αλλάξτε τις το συντομότερο δυνατό. - Καθαρίζετέ το μόνο με στεγνό πανί. - Μη διπλώνετε, μην φθείρετε την κάρτα και φυλάξτε τη σε ασφαλές μέρος. 6. Επίλυση προβλημάτων - Αν η εικόνα στην οθόνη είναι θολή ή δεν υπάρχει εικόνα: Ενδέχεται οι μπαταρίες να έχουν αδειάσει.αλλάξτε τις και καθαρίστε τις επαφές. - Αν δεν ανοίγει το συρταράκι για τα χρήματα: Βεβαιωθείτε ότι έχετε πληκτρολογήσει σωστά τον κωδικό της κάρτας. Βεβαιωθείτε ότι δεν έχει μαγκώσει κανένα κέρμα στον μεντεσέ. Για κάθε ενδεχόμενο, γυρίστε το μηχάνημα στο πλάι με προσοχή για να το αποφράξετε. - Αν έχει σβηστεί η καταχώριση των αποταμιεύσεων: Η καταχώριση των αποταμιεύσεων σβήνει κάθε φορά που αλλάζετε τις μπαταρίες.πρέπει να προγραμματίσετε πάλι το μηχάνημα. - Αν δεν βγαίνουν σωστά τα ψηφία: Ενδέχεται να έχει γίνει κάποιο λάθος κατά την εισαγωγή ενός κέρματος ή χαρτονομίσματος.βγάλτε όλα τα χρήματα, προγραμματίστε ξανά το μηχάνημα και τοποθετήστε πάλι μέσα τα χρήματα. - Αν το μηχάνημα δεν λειτουργεί: Βγάλτε τις μπαταρίες και τοποθετήστε τις πάλι. Προγραμματίστε πάλι το μηχάνημα. bank-plan ref: Imaginarium, S.A. Plataforma Logística PLA-ZA, C./ Osca, nº Zaragoza - España CIF A

Tipologie installative - Installation types Type d installation - Installationstypen Tipos de instalación - Τυπολογίες εγκατάστασης
 AMPADE MOOCROMATICHE VIMAR DIMMERABII A 0 V~ - VIMAR 0 V~ DIMMABE MOOCHROME AMP AMPE MOOCHROME VIMAR VARIATEUR 0 V~ - DIMMERFÄHIGE MOOCHROMATICHE AMPE VO VIMAR MIT 0 V~ ÁMPARA MOOCROMÁTICA VIMAR REGUABE
English PDFsharp is a.net library for creating and processing PDF documents 'on the fly'. The library is completely written in C# and based
 English PDFsharp is a.net library for creating and processing PDF documents 'on the fly'. The library is completely written in C# and based exclusively on safe, managed code. PDFsharp offers two powerful
Δημιουργία Λογαριασμού Διαχείρισης Business Telephony Create a Management Account for Business Telephony
 Δημιουργία Λογαριασμού Διαχείρισης Business Telephony Create a Management Account for Business Telephony Ελληνικά Ι English 1/7 Δημιουργία Λογαριασμού Διαχείρισης Επιχειρηματικής Τηλεφωνίας μέσω της ιστοσελίδας
Instruction Execution Times
 1 C Execution Times InThisAppendix... Introduction DL330 Execution Times DL330P Execution Times DL340 Execution Times C-2 Execution Times Introduction Data Registers This appendix contains several tables
Tipologie installative - Installation types Types d installation - Die einbauanweisungen Tipos de instalación - Τυπολογίες εγκατάστασης
 Types d installation Die einbauanweisungen Tipos de instalación Τυπολογίες εγκατάστασης AMPADE MOOCROMATICHE VIMAR DIMMERABII A 0 V~ MOOCHROME DIMMABE AMP VIMAR 0 V~ AMPE MOOCHROME VIMAR DIMMABE 0 V~ EUCHTE
Advanced Subsidiary Unit 1: Understanding and Written Response
 Write your name here Surname Other names Edexcel GE entre Number andidate Number Greek dvanced Subsidiary Unit 1: Understanding and Written Response Thursday 16 May 2013 Morning Time: 2 hours 45 minutes
Στο εστιατόριο «ToDokimasesPrinToBgaleisStonKosmo?» έξω από τους δακτυλίους του Κρόνου, οι παραγγελίες γίνονται ηλεκτρονικά.
 Διαστημικό εστιατόριο του (Μ)ΑστροΈκτορα Στο εστιατόριο «ToDokimasesPrinToBgaleisStonKosmo?» έξω από τους δακτυλίους του Κρόνου, οι παραγγελίες γίνονται ηλεκτρονικά. Μόλις μια παρέα πελατών κάτσει σε ένα
CONFIGURAZIONE DELLA CASELLA DI POSTA ELETTRONICA CERTIFICATA (P.E.C.)
") CONFIGURAZIONE DELLA CASELLA DI POSTA ELETTRONICA CERTIFICATA (P.E.C.) Consigliamo di configurare ed utilizzare la casella di posta elettronica certificata tramite il webmail dedicato fornito dal gestore
CONFIGURAZIONE DELLA CASELLA DI POSTA ELETTRONICA CERTIFICATA (P.E.C.) Consigliamo di configurare ed utilizzare la casella di posta elettronica certificata tramite il webmail dedicato fornito dal gestore
How to register an account with the Hellenic Community of Sheffield.
 How to register an account with the Hellenic Community of Sheffield. (1) EN: Go to address GR: Πηγαίνετε στη διεύθυνση: http://www.helleniccommunityofsheffield.com (2) EN: At the bottom of the page, click
Οδηγίες Αγοράς Ηλεκτρονικού Βιβλίου Instructions for Buying an ebook
 Οδηγίες Αγοράς Ηλεκτρονικού Βιβλίου Instructions for Buying an ebook Βήμα 1: Step 1: Βρείτε το βιβλίο που θα θέλατε να αγοράσετε και πατήστε Add to Cart, για να το προσθέσετε στο καλάθι σας. Αυτόματα θα
PortSip Softphone. Ελληνικά Ι English 1/20
 PortSip Softphone Ελληνικά Ι English 1/20 1. Περιεχόμενα 2. Εγκατάσταση σε Smartphone & Tablet (Android ή ios)... 1 3. Εγκατάσταση σε ηλεκτρονικό υπολογιστή (Windows ή Mac).... 5 4. Installation in Smartphone
CYTA Cloud Server Set Up Instructions
 CYTA Cloud Server Set Up Instructions ΕΛΛΗΝΙΚΑ ENGLISH Initial Set-up Cloud Server To proceed with the initial setup of your Cloud Server first login to the Cyta CloudMarketPlace on https://cloudmarketplace.cyta.com.cy
VBA ΣΤΟ WORD. 1. Συχνά, όταν ήθελα να δώσω ένα φυλλάδιο εργασίας με ασκήσεις στους μαθητές έκανα το εξής: Version 25-7-2015 ΗΜΙΤΕΛΗΣ!!!!
 VBA ΣΤΟ WORD Version 25-7-2015 ΗΜΙΤΕΛΗΣ!!!! Μου παρουσιάστηκαν δύο θέματα. 1. Συχνά, όταν ήθελα να δώσω ένα φυλλάδιο εργασίας με ασκήσεις στους μαθητές έκανα το εξής: Εγραφα σε ένα αρχείο του Word τις
Εγκατάσταση λογισμικού και αναβάθμιση συσκευής Device software installation and software upgrade
 Για να ελέγξετε το λογισμικό που έχει τώρα η συσκευή κάντε κλικ Menu > Options > Device > About Device Versions. Στο πιο κάτω παράδειγμα η συσκευή έχει έκδοση λογισμικού 6.0.0.546 με πλατφόρμα 6.6.0.207.
Paper Reference. Paper Reference(s) 1776/04 Edexcel GCSE Modern Greek Paper 4 Writing. Thursday 21 May 2009 Afternoon Time: 1 hour 15 minutes
 1776/04 Edexcel GCSE Modern Greek Paper 4 Writing. Thursday 21 May 2009 Afternoon Time: 1 hour 15 minutes") Centre No. Candidate No. Paper Reference(s) 1776/04 Edexcel GCSE Modern Greek Paper 4 Writing Thursday 21 May 2009 Afternoon Time: 1 hour 15 minutes Materials required for examination Nil Paper Reference
Centre No. Candidate No. Paper Reference(s) 1776/04 Edexcel GCSE Modern Greek Paper 4 Writing Thursday 21 May 2009 Afternoon Time: 1 hour 15 minutes Materials required for examination Nil Paper Reference
Right Rear Door. Let's now finish the door hinge saga with the right rear door
 Right Rear Door Let's now finish the door hinge saga with the right rear door You may have been already guessed my steps, so there is not much to describe in detail. Old upper one file:///c /Documents
SOAP API. https://bulksmsn.gr. Table of Contents
 SOAP API https://bulksmsn.gr Table of Contents Send SMS...2 Query SMS...3 Multiple Query SMS...4 Credits...5 Save Contact...5 Delete Contact...7 Delete Message...8 Email: sales@bulksmsn.gr, Τηλ: 211 850
CHAPTER 25 SOLVING EQUATIONS BY ITERATIVE METHODS
 CHAPTER 5 SOLVING EQUATIONS BY ITERATIVE METHODS EXERCISE 104 Page 8 1. Find the positive root of the equation x + 3x 5 = 0, correct to 3 significant figures, using the method of bisection. Let f(x) =
3 Lösungen zu Kapitel 3
 3 Lösungen zu Kapitel 3 31 Lösungen der Aufgaben zu Abschnitt 31 311 Lösung Die Abbildung D : { R 4 R 4 R 4 R 4 R, a 1, a 2, a 3, a 4 ) D( a 1, a 2, a 3, a 4 ) definiere eine Determinantenform (auf R 4
 OST-7080HD Διασυνδέσεις Sleep ΠΛΗΚΤΡΟ ΜΑΘΗΣΗΣ: Το τηλεχειριστήριο του ψηφιακού δέκτη έχει 6 πλήκτρα μάθησης. Κάθε πλήκτρο μπορεί να είναι αντίγραφο κάθε πλήκτρου λειτουργίας του τηλεχειριστηρίου. Οδηγίες
Phys460.nb Solution for the t-dependent Schrodinger s equation How did we find the solution? (not required)
") Phys460.nb 81 ψ n (t) is still the (same) eigenstate of H But for tdependent H. The answer is NO. 5.5.5. Solution for the tdependent Schrodinger s equation If we assume that at time t 0, the electron starts
Phys460.nb 81 ψ n (t) is still the (same) eigenstate of H But for tdependent H. The answer is NO. 5.5.5. Solution for the tdependent Schrodinger s equation If we assume that at time t 0, the electron starts
M14/1/AYMGR/HP1/GRE/TZ0/XX
 M14/1/AYMGR/HP1/GRE/TZ0/XX 22142045 MODERN GREEK A: LANGUAGE AND LITERATURE HIGHER LEVEL PAPER 1 GREC MODERNE A : LANGUE ET LITTÉRATURE NIVEAU SUPÉRIEUR ÉPREUVE 1 GRIEGO MODERNO A: LENGUA Y LITERATURA
The challenges of non-stable predicates
 The challenges of non-stable predicates Consider a non-stable predicate Φ encoding, say, a safety property. We want to determine whether Φ holds for our program. The challenges of non-stable predicates
EE512: Error Control Coding
 EE512: Error Control Coding Solution for Assignment on Finite Fields February 16, 2007 1. (a) Addition and Multiplication tables for GF (5) and GF (7) are shown in Tables 1 and 2. + 0 1 2 3 4 0 0 1 2 3
Section 8.3 Trigonometric Equations
 99 Section 8. Trigonometric Equations Objective 1: Solve Equations Involving One Trigonometric Function. In this section and the next, we will exple how to solving equations involving trigonometric functions.
PLUGIN BASIC TS (en) indication, that electrical appliance is switched on
 indication, that electrical appliance is switched on") PLUGIN BASIC TS (en) indication, that electrical appliance is switched on after pressing the ON button, will be the connected appliance permantely switched on. after pressing the button, will be the connected
PLUGIN BASIC TS (en) indication, that electrical appliance is switched on after pressing the ON button, will be the connected appliance permantely switched on. after pressing the button, will be the connected
Galatia SIL Keyboard Information
 Galatia SIL Keyboard Information Keyboard ssignments The main purpose of the keyboards is to provide a wide range of keying options, so many characters can be entered in multiple ways. If you are typing
HOMEWORK 4 = G. In order to plot the stress versus the stretch we define a normalized stretch:
 HOMEWORK 4 Problem a For the fast loading case, we want to derive the relationship between P zz and λ z. We know that the nominal stress is expressed as: P zz = ψ λ z where λ z = λ λ z. Therefore, applying
ΚΥΠΡΙΑΚΗ ΕΤΑΙΡΕΙΑ ΠΛΗΡΟΦΟΡΙΚΗΣ CYPRUS COMPUTER SOCIETY ΠΑΓΚΥΠΡΙΟΣ ΜΑΘΗΤΙΚΟΣ ΔΙΑΓΩΝΙΣΜΟΣ ΠΛΗΡΟΦΟΡΙΚΗΣ 19/5/2007
 Οδηγίες: Να απαντηθούν όλες οι ερωτήσεις. Αν κάπου κάνετε κάποιες υποθέσεις να αναφερθούν στη σχετική ερώτηση. Όλα τα αρχεία που αναφέρονται στα προβλήματα βρίσκονται στον ίδιο φάκελο με το εκτελέσιμο
3.4 SUM AND DIFFERENCE FORMULAS. NOTE: cos(α+β) cos α + cos β cos(α-β) cos α -cos β
 cos α + cos β cos(α-β) cos α -cos β") 3.4 SUM AND DIFFERENCE FORMULAS Page Theorem cos(αβ cos α cos β -sin α cos(α-β cos α cos β sin α NOTE: cos(αβ cos α cos β cos(α-β cos α -cos β Proof of cos(α-β cos α cos β sin α Let s use a unit circle
3.4 SUM AND DIFFERENCE FORMULAS Page Theorem cos(αβ cos α cos β -sin α cos(α-β cos α cos β sin α NOTE: cos(αβ cos α cos β cos(α-β cos α -cos β Proof of cos(α-β cos α cos β sin α Let s use a unit circle
ΚΥΠΡΙΑΚΟΣ ΣΥΝΔΕΣΜΟΣ ΠΛΗΡΟΦΟΡΙΚΗΣ CYPRUS COMPUTER SOCIETY 21 ος ΠΑΓΚΥΠΡΙΟΣ ΜΑΘΗΤΙΚΟΣ ΔΙΑΓΩΝΙΣΜΟΣ ΠΛΗΡΟΦΟΡΙΚΗΣ Δεύτερος Γύρος - 30 Μαρτίου 2011
 Διάρκεια Διαγωνισμού: 3 ώρες Απαντήστε όλες τις ερωτήσεις Μέγιστο Βάρος (20 Μονάδες) Δίνεται ένα σύνολο από N σφαιρίδια τα οποία δεν έχουν όλα το ίδιο βάρος μεταξύ τους και ένα κουτί που αντέχει μέχρι
Modbus basic setup notes for IO-Link AL1xxx Master Block
 n Modbus has four tables/registers where data is stored along with their associated addresses. We will be using the holding registers from address 40001 to 49999 that are R/W 16 bit/word. Two tables that
!Stato di tensione triassiale!stato di tensione piano!cerchio di Mohr
 !Stato di tensione triassiale!stato di tensione piano!cerchio di Mohr Stato di tensione F A = F / A F Traione pura stato di tensione monoassiale F M A M Traione e torsione stato di tensione piano = F /
ΟΔΗΓΙΕΣ ΧΡΗΣΗΣ USE INSTRUCTIONS
 ΟΔΗΓΙΕΣ ΧΡΗΣΗΣ USE INSTRUCTIONS ΤΗΛΕΦΩΝΟ ΜΕ ΑΝΑΓΝΩΡΙΣΗ ΚΛΗΣΗΣ /CORDED PHONE WITH CALLER ID ΜΟΝΤΕΛΟ/MODEL: TM09-448 DC48V Παρακαλούμε διαβάστε προσεκτικά όλες τις οδηγίες χρήσης πριν την χρήση της συσκευής
Example Sheet 3 Solutions
 Example Sheet 3 Solutions. i Regular Sturm-Liouville. ii Singular Sturm-Liouville mixed boundary conditions. iii Not Sturm-Liouville ODE is not in Sturm-Liouville form. iv Regular Sturm-Liouville note
Mission Berlin. Deutsch lernen und unterrichten Arbeitsmaterialien. Mission Berlin 26 Πειράµατα µε τον χρόνο
 26 Πειράµατα µε τον χρόνο Επιστρέφοντας στο παρόν η Άννα προσπαθεί να µπλοκάρει τη µηχανή του χρόνου, αλλά δεν έχει τον κωδικό. Η γυναίκα µε τα κόκκινα εµφανίζεται. Θα χαλάσει η «αρχηγός» τα σχέδια της
derivation of the Laplacian from rectangular to spherical coordinates
 derivation of the Laplacian from rectangular to spherical coordinates swapnizzle 03-03- :5:43 We begin by recognizing the familiar conversion from rectangular to spherical coordinates (note that φ is used
ΚΥΠΡΙΑΚΗ ΕΤΑΙΡΕΙΑ ΠΛΗΡΟΦΟΡΙΚΗΣ CYPRUS COMPUTER SOCIETY ΠΑΓΚΥΠΡΙΟΣ ΜΑΘΗΤΙΚΟΣ ΔΙΑΓΩΝΙΣΜΟΣ ΠΛΗΡΟΦΟΡΙΚΗΣ 6/5/2006
 Οδηγίες: Να απαντηθούν όλες οι ερωτήσεις. Ολοι οι αριθμοί που αναφέρονται σε όλα τα ερωτήματα είναι μικρότεροι το 1000 εκτός αν ορίζεται διαφορετικά στη διατύπωση του προβλήματος. Διάρκεια: 3,5 ώρες Καλή
Εργαστήριο Ανάπτυξης Εφαρμογών Βάσεων Δεδομένων. Εξάμηνο 7 ο
 Εργαστήριο Ανάπτυξης Εφαρμογών Βάσεων Δεδομένων Εξάμηνο 7 ο Procedures and Functions Stored procedures and functions are named blocks of code that enable you to group and organize a series of SQL and PL/SQL
1) Formulation of the Problem as a Linear Programming Model
 Formulation of the Problem as a Linear Programming Model") 1) Formulation of the Problem as a Linear Programming Model Let xi = the amount of money invested in each of the potential investments in, where (i=1,2, ) x1 = the amount of money invested in Savings Account
1) Formulation of the Problem as a Linear Programming Model Let xi = the amount of money invested in each of the potential investments in, where (i=1,2, ) x1 = the amount of money invested in Savings Account
7 Present PERFECT Simple. 8 Present PERFECT Continuous. 9 Past PERFECT Simple. 10 Past PERFECT Continuous. 11 Future PERFECT Simple
 A/ Ονόματα και ένα παράδειγμα 1 Present Simple 7 Present PERFECT Simple 2 Present Continuous 8 Present PERFECT Continuous 3 Past Simple (+ used to) 9 Past PERFECT Simple she eats she is eating she ate
La Déduction naturelle
 La Déduction naturelle Pierre Lescanne 14 février 2007 13 : 54 Qu est-ce que la déduction naturelle? En déduction naturelle, on raisonne avec des hypothèses. Qu est-ce que la déduction naturelle? En déduction
TRIGONOMETRIA: ANGOLI ASSOCIATI
 FACOLTÀ DI INGEGNERIA CORSO DI AZZERAMENTO - MATEMATICA ANNO ACCADEMICO 010-011 ESERCIZI DI TRIGONOMETRIA: ANGOLI ASSOCIATI Esercizio 1: Fissata in un piano cartesiano ortogonale xoy una circonferenza
ULX Wireless System USER GUIDE SUPPLEMENT RENSEIGNEMENT SUPPLÉMENTAIRES INFORMACION ADICIONAL. M1 ( MHz)
") ULX Wireless System USER GUIDE SUPPLEMENT RENSEIGNEMENT SUPPLÉMENTAIRES INFORMACION ADICIONAL M1 (662 698 MHz) 2003, Shure Incorporated 27B8733A (Rev. 4) Printed in U.S.A. SPECIFICATIONS ULX1 Transmitter
ULX Wireless System USER GUIDE SUPPLEMENT RENSEIGNEMENT SUPPLÉMENTAIRES INFORMACION ADICIONAL M1 (662 698 MHz) 2003, Shure Incorporated 27B8733A (Rev. 4) Printed in U.S.A. SPECIFICATIONS ULX1 Transmitter
The Simply Typed Lambda Calculus
 Type Inference Instead of writing type annotations, can we use an algorithm to infer what the type annotations should be? That depends on the type system. For simple type systems the answer is yes, and
ANSWERSHEET (TOPIC = DIFFERENTIAL CALCULUS) COLLECTION #2. h 0 h h 0 h h 0 ( ) g k = g 0 + g 1 + g g 2009 =?
 COLLECTION #2. h 0 h h 0 h h 0 ( ) g k = g 0 + g 1 + g g 2009 =?") Teko Classes IITJEE/AIEEE Maths by SUHAAG SIR, Bhopal, Ph (0755) 3 00 000 www.tekoclasses.com ANSWERSHEET (TOPIC DIFFERENTIAL CALCULUS) COLLECTION # Question Type A.Single Correct Type Q. (A) Sol least
Teko Classes IITJEE/AIEEE Maths by SUHAAG SIR, Bhopal, Ph (0755) 3 00 000 www.tekoclasses.com ANSWERSHEET (TOPIC DIFFERENTIAL CALCULUS) COLLECTION # Question Type A.Single Correct Type Q. (A) Sol least
Potential Dividers. 46 minutes. 46 marks. Page 1 of 11
 Potential Dividers 46 minutes 46 marks Page 1 of 11 Q1. In the circuit shown in the figure below, the battery, of negligible internal resistance, has an emf of 30 V. The pd across the lamp is 6.0 V and
9.09. # 1. Area inside the oval limaçon r = cos θ. To graph, start with θ = 0 so r = 6. Compute dr
 9.9 #. Area inside the oval limaçon r = + cos. To graph, start with = so r =. Compute d = sin. Interesting points are where d vanishes, or at =,,, etc. For these values of we compute r:,,, and the values
Physical DB Design. B-Trees Index files can become quite large for large main files Indices on index files are possible.
 B-Trees Index files can become quite large for large main files Indices on index files are possible 3 rd -level index 2 nd -level index 1 st -level index Main file 1 The 1 st -level index consists of pairs
Griechisches Staatszertifikat - Deutsch
 ΥΠΟΥΡΓΕΙΟ ΕΘΝΙΚΗΣ ΠΑΙ ΕΙΑΣ ΚΑΙ ΘΡΗΣΚΕΥΜΑΤΩΝ ΚΡΑΤΙΚΟ ΠΙΣΤΟΠΟΙΗΤΙΚΟ ΓΛΩΣΣΟΜΑΘΕΙΑΣ Griechisches Ministerium für Bildung und Religion Griechisches Staatszertifikat - Deutsch Niveau A1 & A2 Entspricht dem Gemeinsamen
Μπορώ να κάνω ανάληψη στην [χώρα] χωρίς να πληρώσω προμήθεια; Fragen, ob Gebühren anfallen, wenn man in einem bestimmten Land Geld abhebt
![Μπορώ να κάνω ανάληψη στην [χώρα] χωρίς να πληρώσω προμήθεια; Fragen, ob Gebühren anfallen, wenn man in einem bestimmten Land Geld abhebt](/thumbs/103/158265587.jpg "Μπορώ να κάνω ανάληψη στην [χώρα] χωρίς να πληρώσω προμήθεια; Fragen, ob Gebühren anfallen, wenn man in einem bestimmten Land Geld abhebt") - Allgemeines Μπορώ να κάνω ανάληψη στην [χώρα] χωρίς να πληρώσω προμήθεια; Fragen, ob Gebühren anfallen, wenn man in einem bestimmten Land Geld abhebt Πόσα κοστίζει όταν χρησιμοποιώ μηχανές αυτόματης
- Allgemeines Μπορώ να κάνω ανάληψη στην [χώρα] χωρίς να πληρώσω προμήθεια; Fragen, ob Gebühren anfallen, wenn man in einem bestimmten Land Geld abhebt Πόσα κοστίζει όταν χρησιμοποιώ μηχανές αυτόματης
Can I withdraw money in [country] without paying fees? Fragen, ob Gebühren anfallen, wenn man in einem bestimmten Land Geld abhebt
![Can I withdraw money in [country] without paying fees? Fragen, ob Gebühren anfallen, wenn man in einem bestimmten Land Geld abhebt](/thumbs/103/158266251.jpg "Can I withdraw money in [country] without paying fees? Fragen, ob Gebühren anfallen, wenn man in einem bestimmten Land Geld abhebt") - Allgemeines Can I withdraw money in [country] without paying fees? Fragen, ob Gebühren anfallen, wenn man in einem bestimmten Land Geld abhebt What are the fees if I use external ATMs? Μπορώ να κάνω
- Allgemeines Can I withdraw money in [country] without paying fees? Fragen, ob Gebühren anfallen, wenn man in einem bestimmten Land Geld abhebt What are the fees if I use external ATMs? Μπορώ να κάνω
Homework 3 Solutions
 Homework 3 Solutions Igor Yanovsky (Math 151A TA) Problem 1: Compute the absolute error and relative error in approximations of p by p. (Use calculator!) a) p π, p 22/7; b) p π, p 3.141. Solution: For
G. Parmeggiani, 15/1/2019 Algebra Lineare, a.a. 2018/2019, numero di MATRICOLA PARI. Svolgimento degli Esercizi per casa 12
 G. Parmeggiani, 5//9 Algebra Lineare, a.a. 8/9, Scuola di Scienze - Corsi di laurea: Studenti: Statistica per l economia e l impresa Statistica per le tecnologie e le scienze numero di MATRICOLA PARI Svolgimento
DEUTSCHE SCHULE ATHEN ΓΕΡΜΑΝΙΚΗ ΣΧΟΛΗ ΑΘΗΝΩΝ
 Herzlich Willkommen zu unserem Elternabend Übergang aus dem Elternhaus in den Kindergarten Καλωσορίσατε στη συνάντηση γονέων με θέμα τη μετάβαση από το οικογενειακό περιβάλλον στο προνηπιακό τμήμα 1 Überblick
Finite Field Problems: Solutions
 Finite Field Problems: Solutions 1. Let f = x 2 +1 Z 11 [x] and let F = Z 11 [x]/(f), a field. Let Solution: F =11 2 = 121, so F = 121 1 = 120. The possible orders are the divisors of 120. Solution: The
10/3/ revolution = 360 = 2 π radians = = x. 2π = x = 360 = : Measures of Angles and Rotations
 //.: Measures of Angles and Rotations I. Vocabulary A A. Angle the union of two rays with a common endpoint B. BA and BC C. B is the vertex. B C D. You can think of BA as the rotation of (clockwise) with
Session novembre 2009
 ΥΠΟΥΡΓΕΙΟ ΕΘΝΙΚΗΣ ΠΑΙΔΕΙΑΣ ΚΑΙ ΘΡΗΣΚΕΥΜΑΤΩΝ ΚΡΑΤΙΚΟ ΠΙΣΤΟΠΟΙΗΤΙΚΟ ΓΛΩΣΣΟΜΑΘΕΙΑΣ MINISTÈRE GREC DE L ÉDUCATION NATIONALE ET DES CULTES CERTIFICATION EN LANGUE FRANÇAISE NIVEAU ÉPREUVE B1 sur l échelle proposée
SPEEDO AQUABEAT. Specially Designed for Aquatic Athletes and Active People
 SPEEDO AQUABEAT TM Specially Designed for Aquatic Athletes and Active People 1 2 Decrease Volume Increase Volume Reset EarphonesUSBJack Power Off / Rewind Power On / Fast Forward Goggle clip LED Status
MARKSCHEME BARÈME DE NOTATION ESQUEMA DE CALIFICACIÓN
 IB DIPLOMA PROGRAMME PROGRAMME DU DIPLÔME DU BI PROGRAMA DEL DIPLOMA DEL BI M06/2/ABMGR/SP1/GRE/TZ0/XX/M MARKSCHEME BARÈME DE NOTATION ESQUEMA DE CALIFICACIÓN May / mai / mayo 2006 MODERN GREEK / GREC
Matrices and Determinants
 Matrices and Determinants SUBJECTIVE PROBLEMS: Q 1. For what value of k do the following system of equations possess a non-trivial (i.e., not all zero) solution over the set of rationals Q? x + ky + 3z
Partial Trace and Partial Transpose
 Partial Trace and Partial Transpose by José Luis Gómez-Muñoz http://homepage.cem.itesm.mx/lgomez/quantum/ jose.luis.gomez@itesm.mx This document is based on suggestions by Anirban Das Introduction This
Εργαστήριο 9. Styling with Javascript
 Εργαστήριο 9 Styling with Javascript Pimp my Text with Javascript Today you'll write a page where the user can type text into a box, and by clicking on UI controls, the user can "pimp out" the text by
Οδηγίες χρήσης. Registered. Οδηγίες ένταξης σήματος D-U-N-S Registered στην ιστοσελίδα σας και χρήσης του στην ηλεκτρονική σας επικοινωνία
 Οδηγίες χρήσης υλικού D-U-N-S Registered Οδηγίες ένταξης σήματος D-U-N-S Registered στην ιστοσελίδα σας και χρήσης του στην ηλεκτρονική σας επικοινωνία Οδηγίες χρήσης υλικού D-U-N-S Για οποιαδήποτε ερώτηση
Επιτραπέζιος Η/Υ ASUS M12AD and M52AD Εγχειρίδιο χρήστη
 Επιτραπέζιος Η/Υ ASUS M12AD and M52AD Εγχειρίδιο χρήστη M12AD M52AD GK9559 Πρώτη Έκδοση Ιούλιος 2014 Copyright 2014 ASUSTeK Computer Inc. Διατηρούνται όλα τα δικαιώματα. Απαγορεύεται η αναπαραγωγή οποιουδήποτε
Door Hinge replacement (Rear Left Door)
") Door Hinge replacement (Rear Left Door) We will continue the previous article by replacing the hinges of the rear left hand side door. I will use again the same procedure and means I employed during the
Door Hinge replacement (Rear Left Door) We will continue the previous article by replacing the hinges of the rear left hand side door. I will use again the same procedure and means I employed during the
2 Composition. Invertible Mappings
 Arkansas Tech University MATH 4033: Elementary Modern Algebra Dr. Marcel B. Finan Composition. Invertible Mappings In this section we discuss two procedures for creating new mappings from old ones, namely,
Πληροφόρηση σχετικά με το αν πρέπει να πληρώσετε ποσοστά προμήθειας όταν κάνετε ανάληψη σε μια συγκεκριμένη χώρα
 - Γενικά Can I withdraw money in [country] without paying fees? Puedo sacar dinero en (país) sin pagar comisiones? Πληροφόρηση σχετικά με το αν πρέπει να πληρώσετε ποσοστά προμήθειας όταν κάνετε ανάληψη
TMA4115 Matematikk 3
 TMA4115 Matematikk 3 Andrew Stacey Norges Teknisk-Naturvitenskapelige Universitet Trondheim Spring 2010 Lecture 12: Mathematics Marvellous Matrices Andrew Stacey Norges Teknisk-Naturvitenskapelige Universitet
ΚΥΠΡΙΑΚΗ ΕΤΑΙΡΕΙΑ ΠΛΗΡΟΦΟΡΙΚΗΣ CYPRUS COMPUTER SOCIETY ΠΑΓΚΥΠΡΙΟΣ ΜΑΘΗΤΙΚΟΣ ΔΙΑΓΩΝΙΣΜΟΣ ΠΛΗΡΟΦΟΡΙΚΗΣ 24/3/2007
 Οδηγίες: Να απαντηθούν όλες οι ερωτήσεις. Όλοι οι αριθμοί που αναφέρονται σε όλα τα ερωτήματα μικρότεροι του 10000 εκτός αν ορίζεται διαφορετικά στη διατύπωση του προβλήματος. Αν κάπου κάνετε κάποιες υποθέσεις
Επιτραπέζιος Η/Υ K30AM / K30AM-J Εγχειρίδιο χρήστη
 Επιτραπέζιος Η/Υ K30AM / K30AM-J Εγχειρίδιο χρήστη GK9380 Ελληνικα Πρώτη Έκδοση Μάιος 2014 Copyright 2014 ASUSTeK Computer Inc. Διατηρούνται όλα τα δικαιώματα. Απαγορεύεται η αναπαραγωγή οποιουδήποτε τμήματος
Τεστ Κατάταξης 1 Grading Test 1
 HELLENIC CULTURE CENTRE - Education, Language and Culture www.hcc.edu.gr, e-mail: Ifigenia@hcc.edu.gr, Tel.: (+30) 210 5238149, Fax: (+30) 210 8836494 Τεστ Κατάταξης 1 Grading Test 1 Οδηγίες Πρέπει να
Mission Berlin. Deutsch lernen und unterrichten Arbeitsmaterialien. Mission Berlin 22 Έλα τώρα, κουνήσου
 22 Έλα τώρα, κουνήσου Η Άννα µεταφέρεται στο Βερολίνο του έτους 1989, όπου κυριαρχεί ο ενθουσιασµός για την πτώση του Τείχους. Πρέπει να περάσει µέσα από το πλήθος και να πάρει τη θήκη. Θα τα καταφέρει;
Math 6 SL Probability Distributions Practice Test Mark Scheme
 Math 6 SL Probability Distributions Practice Test Mark Scheme. (a) Note: Award A for vertical line to right of mean, A for shading to right of their vertical line. AA N (b) evidence of recognizing symmetry
MATERIALIEN ZUR VORBEREITUNG AUF DIE KLAUSUR INFORMATIK II FÜR VERKEHRSINGENIEURWESEN ANTEIL VON PROF. VOGLER IM WINTERSEMESTER 2011/12
 Fakultät Informatik Institut für Angewandte Informatik, Professur Technische Informationssysteme MATERIALIEN ZUR VORBEREITUNG AUF DIE KLAUSUR INFORMATIK II FÜR VERKEHRSINGENIEURWESEN ANTEIL VON PROF. VOGLER
department listing department name αχχουντσ ϕανε βαλικτ δδσϕηασδδη σδηφγ ασκϕηλκ τεχηνιχαλ αλαν ϕουν διξ τεχηνιχαλ ϕοην µαριανι
 She selects the option. Jenny starts with the al listing. This has employees listed within She drills down through the employee. The inferred ER sttricture relates this to the redcords in the databasee
Section 1: Listening and responding. Presenter: Niki Farfara MGTAV VCE Seminar 7 August 2016
 Section 1: Listening and responding Presenter: Niki Farfara MGTAV VCE Seminar 7 August 2016 Section 1: Listening and responding Section 1: Listening and Responding/ Aκουστική εξέταση Στο πρώτο μέρος της
Integrali doppi: esercizi svolti
 Integrali doppi: esercizi svolti Gli esercizi contrassegnati con il simbolo * presentano un grado di difficoltà maggiore. Esercizio. Calcolare i seguenti integrali doppi sugli insiemi specificati: a) +
ΚΥΠΡΙΑΚΗ ΕΤΑΙΡΕΙΑ ΠΛΗΡΟΦΟΡΙΚΗΣ CYPRUS COMPUTER SOCIETY ΠΑΓΚΥΠΡΙΟΣ ΜΑΘΗΤΙΚΟΣ ΔΙΑΓΩΝΙΣΜΟΣ ΠΛΗΡΟΦΟΡΙΚΗΣ 11/3/2006
 ΠΑΓΚΥΠΡΙΟΣ ΜΑΘΗΤΙΚΟΣ ΔΙΑΓΩΝΙΣΜΟΣ ΠΛΗΡΟΦΟΡΙΚΗΣ 11/3/26 Οδηγίες: Να απαντηθούν όλες οι ερωτήσεις. Ολοι οι αριθμοί που αναφέρονται σε όλα τα ερωτήματα μικρότεροι το 1 εκτός αν ορίζεται διαφορετικά στη διατύπωση
Fourier Series. MATH 211, Calculus II. J. Robert Buchanan. Spring Department of Mathematics
 Fourier Series MATH 211, Calculus II J. Robert Buchanan Department of Mathematics Spring 2018 Introduction Not all functions can be represented by Taylor series. f (k) (c) A Taylor series f (x) = (x c)
Stucco Natural / Stucco Mítiko. Στόκος με βάση τον ασβέστη.
 Stucco Natural / Stucco Mítiko Στόκος με βάση τον ασβέστη. 5Kg Stucco Mítiko + 480ml Esencia 05 Stuco Natural / Stucco Mítiko Στόκος, για εσωτερική χρήση που χαρίζει ένα πολυτελές παλαιωμένο αποτέλεσμα,
Fragen, ob Gebühren anfallen, wenn man in einem bestimmten Land Geld abhebt
 - Allgemeines Μπορώ να κάνω ανάληψη στην [χώρα] χωρίς να πληρώσω προμήθεια; Kann ich in [Land] gebührenfrei Geld abheben? Fragen, ob Gebühren anfallen, wenn man in einem bestimmten Land Geld abhebt Πόσα
ΕΣΩΤΕΡΙΚΗ ΜΟΝΑΔΑ ΚΛΙΜΑΤΙΣΤΙΚΟ ΔΙΑΙΡΟΥΜΕΝΟΥ ΤΥΠΟΥ ΜΟΝΤΕΛΟ RAD-18RPA RAD-25RPA RAD-35RPA RAD-50RPA. Eλληνικά ΕΣΩΤΕΡΙΚΗ ΜΟΝΑΔΑ
 ΚΛΙΜΑΤΙΣΤΙΚ ΔΙΑΙΡΥΜΕΝΥ ΤΥΠΥ ΕΣΩΤΕΡΙΚΗ ΜΝΑΔΑ ΜΝΤΕΛ RAD-18RPA RAD-25RPA RAD-35RPA RAD-50RPA ΕΣΩΤΕΡΙΚΗ ΜΝΑΔΑ RAD-18RPA RAD-25RPA RAD-35RPA RAD-50RPA Instruction manual Page 1~12 To obtain the best performance
Block Ciphers Modes. Ramki Thurimella
 Block Ciphers Modes Ramki Thurimella Only Encryption I.e. messages could be modified Should not assume that nonsensical messages do no harm Always must be combined with authentication 2 Padding Must be
ELECTRONIC DIGITAL METERED DISPENSER
 Οδηγίες Χρήσης Operating Instructions ELECTRONIC DIGITAL METERED DISPENSER Manufactured by: SPRING AIR LTD 2 DELIGIORGI & IONIAS STR., 174 56 ALIMOS - ATHENS - GREECE PHONE NUM.: +30210 9734805 FAX: +30210
14 Lesson 2: The Omega Verb - Present Tense
 Lesson 2: The Omega Verb - Present Tense Day one I. Word Study and Grammar 1. Most Greek verbs end in in the first person singular. 2. The present tense is formed by adding endings to the present stem.
Dynamic types, Lambda calculus machines Section and Practice Problems Apr 21 22, 2016
 Harvard School of Engineering and Applied Sciences CS 152: Programming Languages Dynamic types, Lambda calculus machines Apr 21 22, 2016 1 Dynamic types and contracts (a) To make sure you understand the
Stato di tensione triassiale Stato di tensione piano Cerchio di Mohr
 Stato di tensione triassiale Stato di tensione iano Cerchio di Mohr Stato di tensione F A = F / A F Traione ura stato di tensione monoassiale F M A M Traione e torsione stato di tensione iano = F / A =
Οι αδελφοί Montgolfier: Ψηφιακή αφήγηση The Montgolfier Βrothers Digital Story (προτείνεται να διδαχθεί στο Unit 4, Lesson 3, Αγγλικά Στ Δημοτικού)
") Οι αδελφοί Montgolfier: Ψηφιακή αφήγηση The Montgolfier Βrothers Digital Story (προτείνεται να διδαχθεί στο Unit 4, Lesson 3, Αγγλικά Στ Δημοτικού) Προσδοκώμενα αποτελέσματα Περιεχόμενο Ενδεικτικές δραστηριότητες
Οι αδελφοί Montgolfier: Ψηφιακή αφήγηση The Montgolfier Βrothers Digital Story (προτείνεται να διδαχθεί στο Unit 4, Lesson 3, Αγγλικά Στ Δημοτικού) Προσδοκώμενα αποτελέσματα Περιεχόμενο Ενδεικτικές δραστηριότητες
Strain gauge and rosettes
 Strain gauge and rosettes Introduction A strain gauge is a device which is used to measure strain (deformation) on an object subjected to forces. Strain can be measured using various types of devices classified
Homework 8 Model Solution Section
 MATH 004 Homework Solution Homework 8 Model Solution Section 14.5 14.6. 14.5. Use the Chain Rule to find dz where z cosx + 4y), x 5t 4, y 1 t. dz dx + dy y sinx + 4y)0t + 4) sinx + 4y) 1t ) 0t + 4t ) sinx
Οδηγίες χρήσης υλικού D U N S Registered
 Οδηγίες χρήσης υλικού D U N S Registered Οδηγίες ένταξης σήματος D U N S Registered στην ιστοσελίδα σας και χρήσης του στην ηλεκτρονική σας επικοινωνία Για οποιαδήποτε ερώτηση, σας παρακαλούμε επικοινωνήστε
Exercises 10. Find a fundamental matrix of the given system of equations. Also find the fundamental matrix Φ(t) satisfying Φ(0) = I. 1.
 satisfying Φ(0) = I. 1.") Exercises 0 More exercises are available in Elementary Differential Equations. If you have a problem to solve any of them, feel free to come to office hour. Problem Find a fundamental matrix of the given
Exercises 0 More exercises are available in Elementary Differential Equations. If you have a problem to solve any of them, feel free to come to office hour. Problem Find a fundamental matrix of the given
Wenn ihr nicht werdet wie die Kinder...
 Wenn ihr nicht werdet wie die Kinder... . Der Memoriam-Garten Schön, dass ich mir keine Sorgen machen muss! Mit dem Memoriam-Garten bieten Ihnen Friedhofsgärtner, Steinmetze
LESSON 14 (ΜΑΘΗΜΑ ΔΕΚΑΤΕΣΣΕΡΑ) REF : 202/057/34-ADV. 18 February 2014
 REF : 202/057/34-ADV. 18 February 2014") LESSON 14 (ΜΑΘΗΜΑ ΔΕΚΑΤΕΣΣΕΡΑ) REF : 202/057/34-ADV 18 February 2014 Slowly/quietly Clear/clearly Clean Quickly/quick/fast Hurry (in a hurry) Driver Attention/caution/notice/care Dance Σιγά Καθαρά Καθαρός/η/ο
LESSON 14 (ΜΑΘΗΜΑ ΔΕΚΑΤΕΣΣΕΡΑ) REF : 202/057/34-ADV 18 February 2014 Slowly/quietly Clear/clearly Clean Quickly/quick/fast Hurry (in a hurry) Driver Attention/caution/notice/care Dance Σιγά Καθαρά Καθαρός/η/ο
the total number of electrons passing through the lamp.
 1. A 12 V 36 W lamp is lit to normal brightness using a 12 V car battery of negligible internal resistance. The lamp is switched on for one hour (3600 s). For the time of 1 hour, calculate (i) the energy
Mission Berlin. Deutsch lernen und unterrichten Arbeitsmaterialien. Mission Berlin 13 Βοήθεια εκ Θεού
 13 Βοήθεια εκ Θεού Η εκκλησία φαίνεται πως είναι το σωστό µέρος για να πάρει κανείς πληροφορίες. Ο πάστορας εξηγεί στην Άννα τη µελωδία και της λέει ότι είναι το κλειδί για µια µηχανή του χρόνου. Αλλά
Ρύθμιση e-mail σε whitelist
 Ρύθμιση e-mail σε whitelist «Δουλεύω Ηλεκτρονικά, Δουλεύω Γρήγορα και με Ασφάλεια - by e-base.gr» Web : www.e-base.gr E-mail : support@e-base.gr Facebook : Like Twitter : @ebasegr Πολλές φορές αντιμετωπίζετε