MANUALE D USO MODULO 9V. evolution
|
|
|
- Εἰλείθυια Μιχαηλίδης
- 9 χρόνια πριν
- Προβολές:
Transcript
1 MANUALE D USO MODULO 9V evolution I 002 UK 023 F 000 D 000 E 000 P 000 GR 000 PL

2 Modulo di comando evolution Ringraziando per la fi ducia concessa con l acquisto di questo prodotto, consigliamo di leggere attentamente questo manuale di istruzioni prima di iniziare la programmazione. Ogni paragrafo vi dar tutte le indicazioni su come eseguire correttamente ogni singola operazione. MODULO DI COMANDO EVOLUTION I Dichiarazione di conformit Claber S.P.A. Via Pontebbana Fiume Veneto Pordenone Italy Assumendone la piena responsabilit dichiariamo che il prodotto: Modulo di comando conforme alla direttiva europea 2004/108/CE con riferimento alle norme tecniche EN :2007 (immunit) e EN :2007 (emissione). DISPLAY COPERCHIO TRASPARENTE GRUPPO DI COMANDO TASTO AVANTI Fiume Veneto, 11/01/2010 Il Responsabile 2010 Dott. Marzona Federico Raccomandazioni 1. Utilizzare esclusivamente batterie alcaline da 9V nuove. 2. Sostituire la batteria all inizio di ogni stagione. 3. Controllare periodicamente l integrit delle guarnizioni di tenuta del coperchio e del tappo dell alloggiamento della batteria. 4. Controllare periodicamente che i collegamenti elettrici della batteria e del solenoide siano ben fi ssati. 5. Chiudere sempre il coperchio per garantire la tenuta stagna del prodotto. TASTO ENTER TASTO INDIETRO 2 3

3 Installazione INSTALLAZIONE I Il modulo di comando a perfetta tenuta stagna e funziona anche immerso permanentemente in acqua fi no a un metro di profondit (grado di protezione IP68). Pu essere installato all aperto o all interno di pozzetti. Attenzione: per ottenere l ermeticit del prodotto necessario assicurarsi che il gruppo di comando sia allineato ed inserito nella apposita guida 1 e che il coperchio trasparente sia perfettamente avvitato, con la guarnizione di tenuta ben posizionata nella sede

4 Installazione INSTALLAZIONE I Il modulo di comando pu pilotare fi no a due elettrovalvole con solenoide bistabile a 9V. 1. Collegare il fi lo verde al polo (-) di ciascuna elettrovalvola (comune). 2. Collegare il fi lo bianco al polo (+) dell elettrovalvola A. 3. Collegare il fi lo marrone al polo (+) dell elettrovalvola B. Elettrovalvola A verde - comune bianco - linea A Elettrovalvole bistabili 9-12V F M /2 M marrone - linea B 75 cm inclusi max 30 m (sezione 1,5 mm 2 ) Elettrovalvola B 6 7

5 Collegamento ad un Rain Sensor Inserimento della batteria I possibile collegare al modulo di comando un sensore di pioggia (Rain Sensor Claber cod ). Il sensore di pioggia interrompe i programmi di irrigazione in caso di pioggia, ripristinandoli automaticamente quando l acqua raccolta al suo interno evaporata. 1. Interrompere il collegamento tra i fi li giallo e grigio, tagliando il giunto alla loro estremit Collegare i fi li giallo e grigio ai fi li provenienti dal sensore di pioggia 2. Attenzione: se il sensore di pioggia non viene utilizzato, occorre assicurarsi che i fi li giallo e grigio siano collegati tra loro, ripristinando se necessario il giunto. giallo grigio 1 1. Svitare il coperchio trasparente 1 ed estrarre il gruppo di comando Svitare il tappo dell alloggiamento della batteria Connettere la batteria rispettando la polarit 4 e reinserire la batteria nell alloggiamento Riavvitare il tappo controllando che la guarnizione di tenuta sia correttamente posizionata in sede. Attenzione: utilizzare esclusivamente batterie alcaline da 9V Rain Sensor cm inclusi max 30 m

6 Stato di carica della batteria Display Tastiera I Il display visualizza lo stato di carica della batteria: Indicatore di carica della batteria Stato di carica BA T T E RY BA T T E BA T BA T Batteria Batteria completamente parzialmente carica carica Batteria scarica da sostituire (LAMPEGGIANTE) Batteria esaurita da sostituire Note: Una batteria alcalina consente di irrigare per un intera stagione con una media di 6 irrigazioni giornaliere. Quando la batteria esaurita le valvole si chiudono, le funzioni del programmatore si interrompono automaticamente e l indicatore di carica della batteria inizia a lampeggiare. Per evitare la perdita di dati, le operazioni di sostituzione della batteria devono essere eseguite in un tempo inferiore a 30 secondi. Dopo la sostituzione della batteria controllare ed eventualmente reimpostare l ora corrente. Si consiglia di togliere la batteria durante i periodi di inutilizzo del programmatore. Per lo smaltimento delle batterie esaurite utilizzare gli appositi contenitori di raccolta. Funzionamento manuale Indicatore del nr. di programma giornaliero selezionato (in programmazione) e della linea selezionata A o B (in manuale) Giorni della settimana Cursore Indicatore di carica della batteria Richiesta di un comando (premere un tasto) Tastiera Indietro Scorre indietro le pagine Modifi ca le impostazioni Programmi Giornalieri (da 1 a 6) Indicatore di valvola chiusa Indicatore di valvola aperta Indicatore numerico dell orologio e degli orari di apertura e chiusura della valvola Modalit di modifi ca delle impostazioni Avanti Scorre avanti le pagine Modifi ca le impostazioni Enter Entra nelle pagine per modifi care le impostazioni Conferma le modifi che 10 11

7 Programmazione PROGRAMMAZIONE I Sono disponibili 6 programmi di irrigazione giornalieri, ciascuno dei quali composto da un orario di apertura e da un orario di chiusura della valvola. La programmazione gestita a pagine, ordinate come mostrato in fi gura a pagina seguente: Orologio (pagina iniziale). Programmi giornalieri (da 1 a 6). Programma settimanale. Manuale LINEA A. Manuale LINEA B. Premendo ripetutamente il tasto (oppure per procedere a ritroso) si scorrono le varie pagine di programmazione. Una volta selezionata una pagina di programmazione, premendo ENTER si entra in modalit di modifi ca delle impostazioni (il simbolo OK sul display acceso). A questo punto agendo sui tasti e si pu modifi care l impostazione. Il simbolo indica la richiesta di un comando (premere un tasto). Premendo nuovamente ENTER si conferma il cambiamento effettuato. Orologio Programma 1 Linea A Programma 2 Linea B 1 a apertura 1 a chiusura 2 2 a chiusura a apertura Programma 3 Linea A Programma 4 Linea B 3 a apertura 3 a chiusura 4 4 a chiusura a apertura Programma 5 Linea A Programma 6 Linea B 5 a apertura 5 a chiusura 6 6 a chiusura a apertura Programma settimanale Manuale LINEA A Manuale LINEA B 12 13
.")
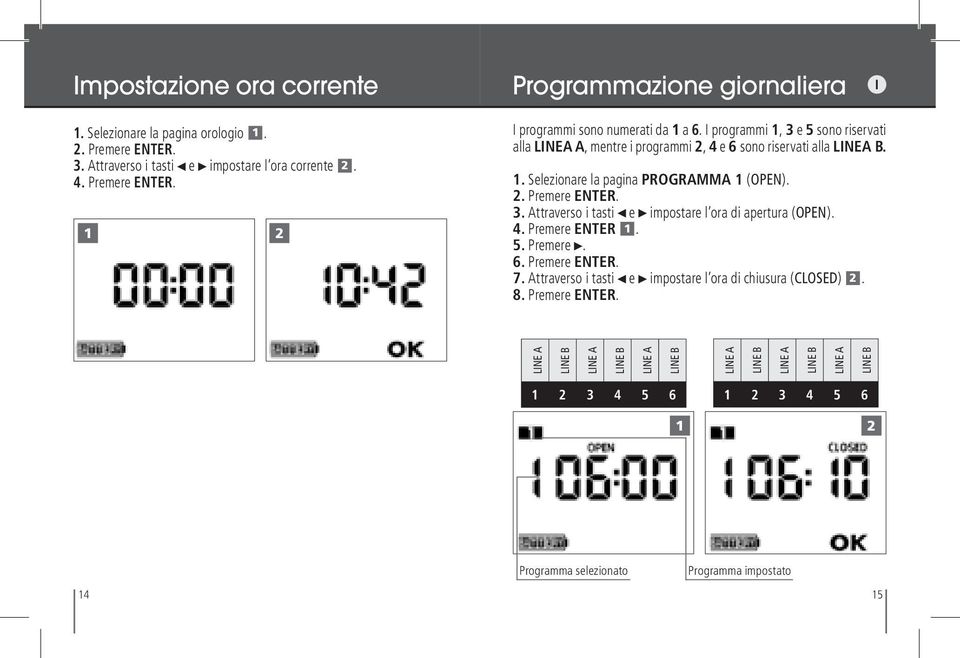
8 Impostazione ora corrente Programmazione giornaliera I 1. Selezionare la pagina orologio Premere ENTER. 3. Attraverso i tasti e impostare l ora corrente Premere ENTER. 1 2 I programmi sono numerati da 1 a 6. I programmi 1, 3 e 5 sono riservati alla LINEA A, mentre i programmi 2, 4 e 6 sono riservati alla LINEA B. 1. Selezionare la pagina PROGRAMMA 1 (OPEN). 2. Premere ENTER. 3. Attraverso i tasti e impostare l ora di apertura (OPEN). 4. Premere ENTER Premere. 6. Premere ENTER. 7. Attraverso i tasti e impostare l ora di chiusura (CLOSED) Premere ENTER. LINE A LINE B LINE A LINE B LINE A LINE B LINE A LINE B LINE A LINE B LINE A LINE B Programma selezionato Programma impostato 14 15
9 Programmazione giornaliera Programmazione settimanale I Procedere in modo analogo se si desidera impostare anche i programmi successivi. Attenzione: i programmi possono essere inseriti solo in ordine numerico e di orario crescenti. In caso di modifi ca non sono consentite sovrapposizioni tra programmi. Esempio: Programma 1 (LINEA A): 06:00 (OPEN), 06:10 (CLOSED) Programma 2 (LINEA B): 08:00 (OPEN), 08:30 (CLOSED) Programma 3 (LINEA A): 20:00 (OPEN), 20:15 (CLOSED) Per impostare la seconda apertura sulla LINEA A (Programma 3), bisogna prima inserire il Programma 2 e quindi un apertura sulla LINEA B; il Programma 2 pu anche essere inserito provvisoriamente e cancellato in un secondo tempo. Cancellazione dei programmi giornalieri 1. Selezionare la pagina CLOSED del programma che si intende cancellare. 2. Premere ENTER Premere contemporaneamente i tasti e Nota: dopo aver impostato per la prima volta uno o pi programmi giornalieri, il numero 1 viene associato al giorno corrente della settimana, e indicato nella pagina OROLOGIO. Se ad esempio luned, si avr che 1=luned, 2=marted, 3=mercoled, ecc. La programmazione settimanale consente di disattivare o riattivare l irrigazione in uno o pi giorni della settimana. 1. Selezionare la pagina PROGRAM- MA SETTIMANALE. 2. Premere ENTER. 3. Posizionare il cursore in corrispondenza del giorno della settimana di cui si desidera modifi care l impostazione. 4. Premere ENTER per disattivare l irrigazione nel giorno selezionato (il relativo numero sul display scompare), oppure per riattivare l irrigazione. 5. Per uscire dalla funzione posizionare il cursore su EXIT e premere ENTER
, bisogna prima inserire il Programma 2 e quindi un apertura sulla LINEA B; il Programma 2 pu anche essere inserito provvisoriamente e cancellato in un secondo tempo.")
10 Funzionamento manuale Lettura del display I 1. Selezionare la pagina MANUALE della linea che si intende comandare (LINEA A o LINEA B) Premere ENTER Premere per aprire oppure per chiudere la valvola. 4. Con la valvola chiusa, premere ENTER per uscire dalla funzione manuale e tornare al menu principale. Nota: se non si interviene manualmente per interrompere l irrigazione, la valvola si chiude automaticamente dopo 5 minuti dall apertura. Il display indica il tempo di irrigazione residuo Lettura del display nella pagina dell ora corrente Programmi impostati (simbolo lampeggiante se l irrigazione attiva) Ora corrente Giorno della settimana ( il quinto giorno a partire dalla prima programmazione) Stato di carica della batteria 3 Linea selezionata Tempo di irrigazione residuo Caratteristiche tecniche Programmatore a 2 linee (A e B), utilizzabile con elettrovalvole a solenoide bistabile a 9-12 VDC Possibilit di pilotare le elettrovalvole fi no a 30 m di distanza 6 Programmi giornalieri di irrigazione (3 sulla LINEA A e 3 sulla LINEA B) Tempi di irrigazione da 1 minuto a 23 ore 59 minuti Programmazione settimanale Funzione manuale Ingresso per sensore di pioggia Temperatura di esercizio da +5 a +70 C Grado di protezione IP
 Ora corrente Giorno della settimana ( il quinto giorno a partire dalla prima")
11 Garanzia I Smaltimento (RAEE) Il simbolo in questione applicato sul prodotto o sulla confezione indica che il prodotto non deve essere considerato come un normale rifi uto domestico, ma deve essere portato nel punto di raccolta appropriato per il riciclaggio di apparecchiature elettriche ed elettroniche. Provvedendo a smaltire questo prodotto in modo appropriato si contribuisce ad evitare potenziali conseguenze negative, che potrebbero derivare da uno smaltimento inadeguato del prodotto. Per informazioni pi dettagliate sul riciclaggio di questo prodotto, contattare l'uffi cio comunale, il servizio locale di smaltimento rifi uti o il negoziante da cui stato acquistato il prodotto. L apparecchio garantito per due anni dalla data di acquisto che sar certifi cata dalla fattura, ricevuta o scontrino fi scale rilasciato all atto dell acquisto. La garanzia decade in caso di manomissione dell apparecchio o per la mancanza di uno dei giustifi cativi fi scali. Riportare il numero di matricola Condizioni di garanzia Claber garantisce che il prodotto esente da difetti di materiale o di fabbricazione. Entro il periodo di due anni dalla data di consegna al consumatore, Claber provveder senza addebito alla riparazione o alla sostituzione di parti della stessa riconosciute difettose, in prodotti impiegati in condizioni di normale esercizio e corretta manutenzione che non siano stati manipolati o modifi cati. Claber non accetta alcuna responsabilit per danni derivati da uso non corretto ed improprio o da errori di installazione ed uso del prodotto, n per prodotti non dalla stessa fabbricati, anche se usati in combinazione con i propri. La merce viaggia interamente a carico e a rischio e pericolo del proprietario. L assistenza data dai laboratori autorizzati Claber. Per qualsiasi informazione aggiuntiva sui Centri Assistenza attivi potete telefonare alla Claber spa tel o mandare un fax allo o inviare una mail all indirizzo: info@claber.com. Per ogni altro aspetto fanno testo le Condizioni Generali di Vendita. SPA info@claber.com SPA 20 21

12 INSTRUCTION MANUAL 9V CONTROL UNIT evolution UK

13 Evolution control unit Thank you for choosing this product. Please read this instruction manual carefully before programming. Each section contains all the formation required for the correct execution of each step. EVOLUTION CONTROL UNIT UK Declaration of conformity Claber S.P.A. Via Pontebbana Fiume Veneto Pordenone Italy We declare, under our sole responsibility that the product: Control module Is in conformity with European Directive 2004/108/CE in respect of industry standards EN :2007 (immunity) and EN :2007 (emission) Fiume Veneto, 11/01/2010 Certifi cation Offi cer 2010 Dott. Marzona Federico Reminders 1. Use only new 9 volt alkaline batteries. 2. Charge the battery at the beginning of each season. 3. Periodically inspect the cover seal and the battery housing. 4. Check periodically that the electrical connections of the battery and the solenoid are fi rm and secure. 5. Always keep the cover sealed to ensure the product is watertight. DISPLAY TRANSPARENT COVER CONTROL UNIT FORWARD KEY ENTER KEY BACK KEY 24 25
 and EN 61000-6-3:2007 (emission) Fiume Veneto, 11/01/2010 Certifi cation Offi cer 2010 Dott. Marzona Federico Reminders 1.")
14 Installation INSTALLATION UK The control module is fully watertight and can function even in total immersion when (IP68 standard). It can be installed above ground, or in a valve box. Warning: To ensure the perfect watertightness of the product the control unit must be in line and fi tted in its slide, 1 and the transparent cover fully screwed on, with the seal properly positioned in its seat

15 Installation INSTALLATION UK The control unit can pilot one or two 9V bistable solenoid valve. 1. Connect the green wire to the negative pole (-) of each solenoid valve (common). 2. Connect the white wire to the positive pole (+) of the solenoid valve A. 3. Connect the brown wire to the positive pole (+) of the solenoid valve B. green - common white - line A Solenoid valve A brown - line B Bistable solenoid valves 9-12V F M /2 M 75 cm inclusive max 30 m (section 1.5 mm 2 ) Solenoid valve B 28 29
 of the solenoid valve B.")
16 Connection to a Rain Sensor Fitting the battery UK The control unit can be connected a Claber Rain Sensor (code 90915). In the event of rainfall, the watering programme will be suspended by the rain sensor until the water in the sensor evaporates; the programme then resumes automatically. 1. Break the connection between the yellow and grey wires, by cutting 1 the connection at the end. 2. Connect the yellow and grey wires to the wires of the rain sensor 2. Warning: if the rain sensor is not used, ensure that the yellow and grey wires are joined together, restoring the connection if required. 1. Unscrew the transparent cover 1 and remove the control unit Unscrew the battery housing Connect the battery, checking the correct polarity, 4 and replace the battery in the housing Screw the cover on, checking that the seal is fi tted correctly in its seat. Warning: use only 9 volt alkaline batteries. 1 2 yellow grey 1 2 Rain Sensor cm inclusive max 30 m

17 Battery charge status Display Keypad UK The display indicates the charge status of the battery: Manual operation Daily programmes (from 1 to 6). Battery charge indicator Charge status BA T T E RY BA T T E BA T BA T Battery fully charged Battery partially charged Battery low, needs replacing. (BLINKING) Battery flat, needs replacing. Indicator showing daily programme number selected (in programming mode) and line selected A or B (manual mode) Days of the week Cursor Battery charge indicator Command prompt (press a key) Closed valve indicator Open valve indicator Numeric indicator showing clock and valve open / valve close time settings Change settings mode Notes: One alkaline battery will last an entire watering season, assuming an average rate of 6 cycles daily. When the battery runs down, the battery charge indicator starts blinking and the timer automatically interrupts operations by cosing the solenoid valve. To avoid data, the battery replacement needs to be completed in a time of less than 30 seconds. After replacing the battery, check the current time and set it again, if necessary. Always remove the battery when the timer is not in use. Dispose of dead batteries and throw them into a battery bin. Keypad Back Scrolls the pages backwards Changes the settings Forward Scrolls the pages forward Changes the settings Enter Accesses the pages on which settings can be changed Confi rms changes 32 33

18 Programming PROGRAMMING UK There are 6 daily watering programmes available, each one consisting of a valve opening and closing time. Programming is managed by pages, ordered as shown in the picture on the following page. Clock (initial page). Daily programmes (from 1 to 6). Weekly program. Manual LINE A. Manual LINE B. The various programming pages are scrolled through by pressing the key repeatedly (or the key to go backwards). Once a programming page has been selected, press ENTER and modify the settings (the message OK symbol appears in the display). At this point, the setting can be changed using the and keys. The symbol indicates a command prompt (press a key). Pressing ENTER a second time, the selected change is confi rmed. Clock Program 1 Line A Program 2 Line B Open 1 Closed 2 Closed 1 Open 2 Program 3 Linea A Program 4 Linea B Open 3 Closed 4 Closed 3 Open 4 Program 5 Linea A Program 6 Linea B Open 5 Closed 6 Closed 5 Open 6 Weekly program Manual LINE A Manual LINE B 34 35
. At this point, the setting can be changed using the and keys.")
19 Setting the current time Daily programming UK 1. Select the clock page Press ENTER. 3. Use the and keys to set the current time Press ENTER. 1 2 The programs are numbered from 1 to 6. Programs 1, 3 and 5 are dedicated to LINE A; programs 2, 4 and 6 are dedicated to LINE B. 1. Select the PROGRAM 1(OPEN) page. 2. Press ENTER. 3. Use the and keys to set the OPEN TIME. 4. Press ENTER Press. 6. Press ENTER. 7. Use the and keys to set the CLOSED time Press ENTER. LINE A LINE B LINE A LINE B LINE A LINE B LINE A LINE B LINE A LINE B LINE A LINE B Program selected Program set 36 37

20 Daily programming If subsequent programs are to be set, repeat the same procedure. Warning: programs can be added only in numerical and chronological increasing order. If changes are to be made, programs cannot overlap. Example: Program 1 (LINE A): 06:00 (OPEN), 06:10 (CLOSED) Program 2 (LINE B): 08:00 (OPEN), 08:30 (CLOSED) Program 3 (LINE A): 20:00 (OPEN), 20:15 (CLOSED) To set the second open time on LINE A (Program 3), fi rst select Program 2 and set an open time on LINE B; If necessary, Program 2 can be selected temporarily and then cancelled later. Deleting daily programs 1. Select the CLOSED page of the program to be deleted. 2. Press ENTER Press the and keys simultaneously Weekly programming Note: after setting one or more daily programs for the fi rst time, the number 1 is associated with the current day of the week and indicated on the CLOCK page. If the current day is Monday, for example, then 1=Monday, 2=Tuesday, 3=Wednesday, etc. With the weekly programming, watering can be deactivated or reactivated on one or more days of the week. 1. Select the WEEKLY PROGRAM page. 2. Press ENTER. 3. Position the cursor on the day of the week for which the setting is to be changed. 4. Press ENTER to exclude that day from the watering cycle (the relative number disappears from the display), or to restore it again. 5. To quit the function, position the cursor on exit and press ENTER. UK 38 39
, fi rst select Program 2 and set an open time on LINE B; If necessary, Program 2 can be selected temporarily and then cancelled later. Deleting daily programs 1.")
21 Manual operation Information displayed UK 1. Select the MANUAL page for therequired line (LINE A or LINE B) Press ENTER Press to open or to close the valve. 4. With the valve closed, press ENTER to quit the manual function and go back to the main menu. Note: if the watering cycle is not interrupted manually, the valve will close automatically after 5 minutes. The display indicates the time left until the closing of the valve Information displayed on the current time page Programs set (Blinking symbol when watering is in progress) Current time Day of the week (The fi fth day starting from the initial selection) Battery charge status 3 Line selected Watering time countdown Technical specifi cations Timer controlling 2 lines (A and B), compatible with 9-12 VDC bistable solenoid valves It can operate the solenoid valves at a distance of up to 30 m 6 Daily watering programs (3 on LINE A, 3 on LINE B) Watering times from 1 minute to 23 hours 59 minutes Weekly programming Manual operation Rain sensor input Operating temperature from +5 to +70 C Standard IP
22 Warranty UK Disposal (WEEE) When this symbol appears on products or packaging, it means that the product is not classifi able as normal household refuse, but must be carried to a special centre for the collection and recycling of electrical waste and electronic equipment (WEEE). Take care to dispose of this product in the proper way; this will help to avoid the after math from unsorted collection or dumping. For more detailed information on the recycling of this product, contact the municipal authority, the local refuse collection service or the dealer from whom the item was purchased. The valve is warranted for a period of two years from the date of purchase, that is certifi ed by the invoice or receipt when purchasing. The warranty is void if the product has been damaged by accident, misuse or abuse or in lack of the bill showing the purchase date. Write the serie number General conditions of warranty Claber guarantees that its appliance does not present defects regarding the materials employed and the construction. During the 24-month period following the date of delivery to the customer, Claber shall either replace or repair the defective product free of charge if the appliance has been employed in normal working conditions, if maintenance has been carried out by authorized personnel and if it has not been modifi ed in any way. Claber shall not be liable for damage due to the customer s misuse or to errors occured during installation. Follow the instructions and installation prescriptions regarding the use of our product. Claber shall not be liable for damage of products manufactured by other companies even if combined with their appliances. The product can be mailed to our assistance center only if the customer has been authorized to do so; the risks which occur during transport are entirely charged to the customer. Refer to the general sales conditions in force whatever else should occur. For any further information on our servicing, you may contact Claber spa, tel. (+39) Fax (+39) SPA info@claber.com SPA 42 43
23 NOTICE D INSTRUCTIONS MODULE 9V volution F
24 Module de commande volution Nous vous remercions de votre confi ance pour l achat de ce produit et vous conseillons de lire attentivement ce manuel d instructions avant de commencer la programmation. Chaque paragraphe vous donnera toutes les indications sur la manire d effectuer correctement chaque opration. MODULE DE COMMANDE VOLUTION F Dclaration de conformit Claber S.P.A. Via Pontebbana Fiume Veneto Pordenone Italy En assumant toute la responsabilit, nous dclarons que le produit: Module de commande est conforme la directive europenne 2004/108/ CE faisant rfrence aux normes techniques EN :2007 (immunit) et EN :2007 (mission). AFFICHEUR COUVERCLE TRANSPARENT GROUPE DE COMMANDE TOUCHE EN AVANT Fiume Veneto, 11/01/2010 Le responsable 2010 Dott. Marzona Federico Recommandations 1. Utiliser exclusivement des piles alcalines de 9V neuves. 2. Remplacer la pile au dbut de chaque saison. 3. Contrler de faon priodique l tat des joints d tanchit du couvercle et du bouchon de logement de la pile. 4. Contrler priodiquement que les connexions lectriques de la pile et du solnode sont bien fi xes. 5. Fermer toujours le couvercle pour garantir l tanchit du produit. TOUCHE ENTER TOUCHE EN ARRIRE 46 47
25 Installation INSTALLATION F L lectrovanne programmable est parfaitement tanche et fonctionne mme plonge de faon permanente dans de l eau jusqu un mtre de profondeur (degr de protection IP68). Elle peut tre installe ciel ouvert ou l intrieur d un rgard. Attention : Pour obtenir l tanchit du produit s assurer que le groupe de commande est align et install sur le repre ad hoc 1 et que le couvercle transparent est parfaitement viss, avec le joint d tanchit en place sur son logement
26 Installation Le module de commande peut piloter jusqu 2 lectrovannes avec solnode bistable 9V. INSTALLATION 1. Relier le fi l vert au ple (-) de chaque lectrovanne (commun). 2. Relier le fi l blanc au ple (+) de l lectrovanne A. 3. Relier le fi l marron au ple (+) de l lectrovanne B. F vert - commun blanc - ligne A Electrovanne A marron - ligne B Electrovannes bistables 9-12V F M /2 M 75 cm inclus max 30 m (section 1,5 mm 2 ) Electrovanne B 50 51
27 Branchement un capteur de pluie Installation de la batterie F Il est possible de brancher un capteur de pluie (RAIN SENSOR Claber cod ) votre module. En cas de pluie, le capteur de pluie interrompt le programme d arrosage, et le redmarre automatiquement ds que l eau qu il contient est vapore. 1. Interrompre le branchement entre les fi ls jaune et gris, en coupant le joint l extrmit Relier les fi ls jaune et gris provenant du capteur de pluie 2. Attention : si le capteur de pluie n est pas utilis, s assurer que les fi ls jaune et gris sont relis entre eux, en rtablissant le joint si ncessaire. 1. Dvisser le couvercle transparent 1 et extraire le groupe de commande Dvisser le bouchon du logement de la pile Connecter la pile en respectant la polarit 4 et remettre en place la pile dans son logement Revisser le bouchon en contrlant que le joint d tanchit soit correctement mis en place. Attention : utiliser exclusivement des piles alcalines de 9V. 1 2 jaune gris 1 2 Capteur de pluie cm inclus max 30 m
28 tat de charge de la pile Affi cheur clavier F L afficheur visualise l tat de charge de la pile : Indicateur de charge de la pile Etat de charge BA T T E RY BA T T E BA T BA T Pile compltement charge Pile partiellement charge (CLIGNOTANT) Pile Pile faible charge puise remplacer remplacer REMARQUE : Une pile alcaline permet d arroser pendant une saison entire une moyenne de 6 arrosages quotidiens. Quand la pile est puise la vanne se ferme, les fonctions du programmateur s interrompent automatiquement et l indicateur de charge de la pile commence clignoter. Pour viter la perte de donnes, le remplacement de la pile doit se faire dans un dlai infrieur 30 secondes. Aprs le remplacement de la pile contrler et reprogrammer ventuellement l heure courante. Il est conseill de retirer la pile pendant les priodes d inutilisation du programmateur. Pour la mise au rebut des piles dcharges, utilisez les conteneurs spcialement prvus cet effet. Fonctionnement manuel Indicateur du n du programme journalier slectionn (en programmation) et de la ligne slectionne A ou B (en manuel) Jours de la semaine Curseur Indicateur de charge de la pile Demande d une commande (appuyer une touche) Clavier Arrire Parcoure en arrire les pages Modifi er les paramtrages Programmes journaliers (de 1 6) Indicateur de vanne ferme Indicateur de vanne ouverte Affi cheur numrique de l horloge et des heures d ouverture et de fermeture de la vanne Mode de modifi cation des paramtrages Avant Parcoure en avant les pages Modifi er les paramtrages Enter Entrer dans les pages pour modifi er les paramtrages Confi rmer les modifi cations 54 55
29 Programmation Le systme dispose de 6 programmes d arrosage journaliers, constitu chacun d une heure d ouverture et d une heure de fermeture de la vanne d eau. La programmation est gre aux pages, classes comme indiqu sur la fi gure dans la page suivante: Horloge (page initiale). Programmes journaliers (de 1 6). Programme hebdomadaire. Manuel LIGNE A. Manuel LIGNE B. En appuyant de faon rpte la touche (ou pour revenir en arrire) on parcoure les pages de programmation. Une fois slectionne une page de programmation, en appuyant ENTER on entre en mode modifi cation des programmations (le symbole OK sur l affi cheur est allum). A ce stade en actionnant les touches et on peut modifi er la programmation. Le symbole indique une demande de commande (appuyer une touche). En appuyant de nouveau ENTER on confi rme le changement effectu. Horloge Programme 1 Ligne A Programme 3 Ligne A PROGRAMMATION Programme 2 Ligne B 1 er ouverture 1 er fermeture 2 e ouverture 2 e fermeture Programme 4 Ligne B 3 me me 3 me ouverture fermeture 4 ouverture 4 me fermeture Programme 5 Ligne A Programme 6 Ligne B 5 me me 5 me ouverture fermeture 6 ouverture 6 me fermeture F Programme hebdomadaire Manuel LINEA A Manuel LINEA B 56 57
30 Programmation heure courante Programmation quotidienne F 1. Slectionner la page horloge Appuyer ENTER. 3. Avec les touches et programmer l heure courante Appuyer ENTER. 1 2 Les programmes sont numrots de 1 6. Les programmes 1, 3 et 5 sont rservs la LIGNE A, et les programmes 2, 4 et 6 sont rservs la LIGNE B. 1. Slectionner la page PROGRAMME 1 (OPEN). 2. Appuyer ENTER. 3. Par les touches et programmer L HEURE D OUVERTURE (OPEN). 4. Appuyer ENTER Appuyer. 6. Appuyer ENTER. 7. Avec les touches et programmer L HEURE DE FERMETURE (closed) Appuyer ENTER. LIGNE A LIGNE B LIGNE A LIGNE B LIGNE A LIGNE B LIGNE A LIGNE B LIGNE A LIGNE B LIGNE A LIGNE B Programme slectionn Programme paramtr 58 59
31 Programmation quotidienne Programmation hebdomadaire F Procder de la mme faon si vous voulez paramtrer les programmes suivants. Attention : Les programmes peuvent tre saisis dans un ordre numrique et d horaire croissant. En cas de modifi cation les superpositions entre programmes ne sont pas autorises. Exemple : Programme 1 ( LIGNE A ): 06:00 ( OPEN ), 06:10 ( CLOSED) Programme 2 ( LIGNE B ): 08:00 ( OPEN ), 08:30 ( CLOSED) Programme 3 ( LIGNE A ): 20:00 ( OPEN ), 20:15 ( CLOSED) Pour programmer la seconde ouverture sur la LIGNE A ( Programme 3 ), paramtrer le Programme 2 et ensuite une ouverture sur la LIGNE B; le Programme 2 peut galement tre paramtr provisoirement et effac ensuite. Effacement des programmes journaliers 1. Slectionner la page CLOSED du programme que l on entend effacer. 2. Appuyer ENTER Appuyer simultanment les touches et Remarque : Aprs avoir paramtr une premire fois un ou plusieurs programmes journaliers, le numro est associ 1 au jour courant de la semaine, et indiqu la page HORLOGE. Si par exemple on est lundi, on aura 1=lundi 2=mardi 3=mercredi etc. La programmation hebdomadaire permet de dsactiver ou ractiver l arrosage un ou plusieurs jours par semaine. 1. Slectionner la page PRO- GRAMME HEBDOMADAIRE. 2. Appuyer ENTER. 3. Positionner le curseur au niveau du jour de la semaine dont on dsire modifi er le paramtrage. 4. Appuyer ENTER pour dsactiver l arrosage le jour slectionn (le jour correspondant sur l affi cheur s efface), ou pour ractiver l arrosage. 5. Pour sortir de la fonction placer le curseur sur EXIT et appuyer ENTER
32 Fonctionnement manuel Lecture de l afficheur F 1. Slectionner la page MANUEL de la ligne commander ( LIGNE A ou LIGNE B ) Appuyer ENTER Appuyer pour ouvrir ou pour fermer la vanne. 4. Avec la vanne ferme, appuyer ENTER pour sortir de la fonction manuelle et revenir au menu principal. Remarque : En l absence d une intervention manuelle pour interrompre l arrosage, la vanne se ferme automatiquement 5 minutes aprs l ouverture. L affi cheur indique le temps d arrosage rsiduel Lecture de l afficheur sur la page de l heure courante Programmes saisis (Symbole clignotant si l arrosage est activ) Heure courante Jour de la semaine (LE CINQUIME JOUR PARTIR de la premire programmation) tat de charge de la pile 3 Ligne slectionne Temps d arrosage rsiduel Caractristiques techniques Programmateur 2 lignes ( A et B ), dot d lectrovannes solnode bistable 9-12 VDC Possibilit de piloter les lectrovannes jusqu 30 m de distance 6 programmes journaliers d arrosage (3 sur la LIGNE A et 3 sur la LIGNE B) Temps d arrosage de 1 minute 23 heures 59 minutes Programmation hebdomadaire Fonction manuelle Entre pour branchement du capteur de pluie Temprature d exercice de C Indice de protection : IP
33 Garantie F limination (WEEE) Le symbole en question appliqu sur le produit ou l emballage indique que le produit ne doit pas tre considr comme un dchet domestique normal, mais doit tre port au point de collecte appropri au recyclage des appareils lectriques et lectroniques. En liminant ce produit de faon correcte on contribue viter les consquences ngatives qui pourraient driver d une limination inadquate du produit. Pour toute information plus dtaille sur le recyclage du produit, contacter le service de la mairie, le service local de collecte des ordures ou le ngociant auprs de qui le produit a t achet. Cet appareil est garanti deux ans partir de la date d achat qui sera certifi e par la facture, le reu ou le ticket caisse qui vous a t dlivr au moment de l achat. La garantie n est plus valable en cas d interventions faites sur l appareil ou en l absence de l un des justifi catifi s fi scaux. Indiquer le numero de matricule Conditions de garantie Claber garantit que le produit ne prsente aucun dfaut de fabrication. Pendant deux ans, partir de la date de livraison, au Client, claber rparera au remplacera gratuitement les pices qui se sont dmontres dfectueuses, dans le cas d appareils utiliss et entretenus de faon normale, qui n ont pas t manipuls ou modifi s. Claber dcline toute responsabilit dans le cas d appareils endommags cause d une mauvaise utilisation de l appareil; la socit dcline aussi toute responsabilit pour le produits qu elle ne fabrique pas, mme si on les utilise sur ses appareils. Toute restitution ou rparation doit tre autorise par Claber; la marchandise voyage uniquement aux risques et aux frais du propritaire. Pour tout autre problme, se reporter aux conditions de vente gnrales. L assistance est fournie par les laboratoires agres Claber, sur l imprim contenu dans l emballage. Pour toute information complmentaire sur les centres d assistance disponibles, vous pouvez tlphoner Claber France, 44 Rue Armand Carrel, Montreuil Cedex - tl Fax: Pour tout autre aspect, les conditions appliques sont les conditions gnrales de vente. SPA info@claber.com SPA 64 65
34 9V MODUL Evolution GEBRAUCHSANWEISUNGEN D
35 Steuermodul Evolution STEUERMODUL EVOLUTION D Wir bedanken uns fr das Vertrauen, das Sie uns durch den Kauf dieses Produkts entgegengebracht haben. Bitte lesen Sie diese Gebrauchsanweisungen vor der Programmierung sorgfltig durch. Jeder Abschnitt stellt Ihnen alle Anleitungen zur sachgerechten Ausfhrung smtlicher Arbeitsschritte bereit. Konformittserklrung Claber S.P.A. Via Pontebbana Fiume Veneto Pordenone Italy Unter voller Haftungsbernahme besttigen wir, dass das Produkt: Steuermodul der EU-Richtlinie 2004/108/EG unter Bezugnahme auf die technischen Normen EN :2007 (Immunity) und EN :2007 (Emission) entspricht. Fiume Veneto, 11/01/2010 Der zustndige Leiter 2010 Dott. Marzona Federico Empfehlungen 1. Verwenden Sie ausschlielich neue 9V alkaline Batterien. 2. Wechseln Sie die Batterie zu jedem Saisonbeginn aus. 3. Prfen Sie regelmig, ob die Dichtungen der Abdeckung und des Verschlusses des Batteriefachs unversehrt sind. 4. Prfen Sie regelmig, ob die elektrischen Anschlsse der Batterie und des Magnetventils fest verbunden sind. 5. Achten Sie auf den festen Verschluss der Abdeckung, damit die Abdichtung des Gerts gewhrleistet ist. DISPLAY TRANSPARENTE ABDECKUNG STEUEREINHEIT TASTE WEITER TASTE ENTER TASTE ZURCK 68 69
36 Installation INSTALLATION D Das Steuermodul ist perfekt abgedichtet und auch permanent unter Wasser bis zu einem Meter Tiefe funktionstchtig (Schutzklasse IP68). Installierbar sowohl im Auenbereich wie auch in Schchten. Achtung: Zur Abdichtung des Gerts mssen Sie sicherstellen, dass die Steuereinheit fl uchtgenau auf der entsprechenden Fhrungsschiene ausgerichtet 1 und die transparente Abdeckung bei sachgerecht in ihrer Aufnahme sitzenden Dichtung fest verschraubt ist
37 Installation INSTALLATION D Das Steuermodul kann bis zu zwei bistabile 9V Magnetventile bettigen. 1. Schlieen Sie den grnen Draht an den (-) Pol jedes Magnetventils an (gemeinsam). 2. Schlieen Sie den weien Draht an den (+) Pol des Magnetventils an A. 3. Schlieen Sie den braunen Draht an den (+) Pol des Magnetventils an B. Magnetventil A grn - gemeinsam wei - Weg A Bistabile 9-12V Magnetventile Innengewinde Auengewinde /2 Innengewinde braun - Weg B 75 cm einschlielich max. 30 m (Querschnitt 1,5 mm 2 ) Magnetventil B 72 73
38 Anschluss an einen Regenfhler Batterie einsetzen D Sie knnen an das Steuermodul einen Regenfhler (Rain Sensor Claber Cod ) anschlieen. Der Regenfhler unterbricht die Bewsserungsprogramme bei Regen und setzt sie automatisch wieder in Betrieb, sobald das im Fhler angesammelte Wasser verdunstet ist. 1. Trennen Sie die Verbindung zwischen gelbem und grauem Draht an deren Enden ab Schlieen Sie den gelben und den grauen Draht an die vom Regenfhler kommenden Drhte an 2. Achtung: Wird der Regenfhler nicht verwendet, mssen Sie die Verbindung zwischen gelbem und grauem Draht bei Bedarf wiederherstellen. 1. Schrauben Sie die transparente Abdeckung ab 1 und nehmen Sie die Steuereinheit heraus Schrauben Sie den Verschluss des Batteriefachs auf Schlieen Sie die Batterie entsprechend der Polaritt an 4 und setzen Sie sie wieder in ihr Fach Verschrauben Sie den Verschluss und prfen Sie dabei den korrekten Sitz der Dichtung. Achtung: Verwenden Sie ausschlielich 9V alkaline Batterien. 1 2 gelb grau 1 2 Regenfhler cm einschlielich max. 30 m
39 Ladezustand der Batterie Display Tastenfeld D Das Display zeigt den Ladezustand der Batterie an: Anzeige Ladezustand der Batterie Batterie Ladezustand vollstndig geladen BA T T E RY BA T T E BA T BA T Batterie nur teilweise geladen Batterie nicht geladen zu ersetzen (BLINKT) Batterie erschpft zu ersetzen Hinweise: Eine alkaline Batterie reicht fr die Bewsserung whrend einer ganzen Saison mit durchschnittlich 6 Bewsserungszyklen pro Tag aus. Wenn die Batterie erschpft ist, schlieen sich die Ventile, werden die Funktionen des Programmiergerts automatisch unterbrochen, und die Anzeige des Ladezustands der Batterie beginnt zu blinken. Damit keine Daten verloren gehen, mssen Sie den Batterieersatz in weniger als 30 Sekunden vornehmen. Kontrollieren Sie und stellen Sie die aktuelle Uhrzeit nach dem Batterieersatz bei Bedarf neu ein. Whrend den Stillstandzeiten des Programmiergerts sollten Sie die Batterie entfernen. Entsorgen Sie erschpfte Batterien in den ausdrcklich dafr vorgesehenen Sammelbehltern. Handbetrieb Anzeige Nr. des gewhlten Tagesprogramms (das programmiert wird) und des gewhlten Wegs A oder B (manuell) Wochentage Cursor Anzeige Ladezustand der Batterie Schaltbefehl anfordern (eine Taste drcken) Tastenfeld Zurck Blttert die Seiten zurck ndert die Einstellungen Tagesprogramme (1 bis 6) Anzeige Ventil geschlossen Anzeige Ventil geffnet Numerische Anzeige der Uhr und der ffnungs- und Schliezeiten des Ventils nderungsmodus der Einstellungen Weiter Blttert die Seiten weiter ndert die Einstellungen Enter Ruft die Seiten zum ndern der Einstellungen auf Besttigt die nderungen 76 77
40 Programmierung Zur Verfgung stehen 6 tgliche Bewsserungsprogramme, wovon jedes ber jeweils eine Ventilffnungs- und eine Ventilschliezeit verfgt. Die Programmierung wird anhand von Seiten gesteuert, die wie auf der Abbildung auf der folgenden Seite sortiert sind: Uhr (Anfangsseite). Tagesprogramme (1 bis 6). Wochenprogramm. Manuell WEG A. Manuell WEG B. Durch wiederholtes Drcken der Taste (oder, wenn Sie zurckblttern wollen) knnen Sie die einzelnen Programmierseiten durchblttern. Nachdem Sie eine Programmierseite gewhlt haben, erhalten Sie ber ENTER Zugriff auf den nderungsmodus (das Symbol OK am Display leuchtet). Nun knnen Sie ber die Tasten und die Einstellung ndern. Das Symbol zeigt die Anforderung eines Schaltbefehls an (eine Taste drcken). Durch erneutes Drcken von ENTER besttigen Sie die vorgenommene nderung. Uhr Programm 1 Weg A Programm 3 Weg A PROGRAMMIERUNG Programma 2 Weg B ffnen 1 Schlieen 1 ffnen 2 Schlieen 2 Programm 4 Weg B ffnen 3 Schlieen 3 ffnen 4 Schlieen 4 Programm 5 Weg A Programm 6 Weg B ffnen 5 Schlieen 5 ffnen 6 Schlieen 6 D Wochenprogramm Manuell WEG A Manuell WEG B 78 79
41 Aktuelle Uhrzeit einstellen Tgliche Programmierung D 1. Seite Uhr 1 whlen. 2. Drcken Sie ENTER. 3. Stellen Sie ber die Tasten und die aktuelle Uhrzeit ein Drcken Sie ENTER. 1 2 Die Programme sind von 1 bis 6 nummeriert. Die Programme 1, 3 und 5 sind WEG A vorbehalten, die Programme 2, 4 und 6 dagegen WEG B. 1. Whlen Sie die Seite PROGRAMM 1 (OPEN). 2. Drcken Sie ENTER. 3. Stellen Sie ber die Tasten und die ffnungszeit ein (OPEN). 4. Drcken Sie ENTER Drcken Sie. 6. Drcken Sie ENTER. 7. Stellen Sie ber die Tasten und die Schliezeit ein (CLOSED) Drcken Sie ENTER. WEG A WEG B WEG A WEG B WEG A WEG B WEG A WEG B WEG A WEG B WEG A WEG B Gewhltes Programm Eingestelltes Programm 80 81
42 Tgliche Programmierung Wchentliche Programmierung D Gehen Sie zum Einstellen der anderen Programme genauso vor. Achtung: Die Programme lassen sich nur in aufsteigender Zahlen- und Zeitfolge einfgen. Bei nderungen sind keine Programmberlagerungen zulssig. Beispiel: Programm 1 (WEG A): 06:00 (OPEN), 06:10 (CLOSED) Programm 2 (WEG B): 08:00 (OPEN), 08:30 (CLOSED) Programm 3 (WEG A): 20:00 (OPEN), 20:15 (CLOSED) Zum Einstellen der zweiten ffnung auf WEG A (Programm 3) mssen Sie zuerst das Programm 2 und dann eine ffnung auf WEG B eingeben; das Programm 2 brauchen Sie auch blo provisorisch einzugeben und knnen es zu einem spteren Zeitpunkt lschen. Lschen der Tagesprogramme 1. Whlen Sie die Seite CLOSED des Programms, das gelscht werden soll. 2. Drcken Sie ENTER Drcken Sie gleichzeitig die Tasten und Anm.: Nach der erstmaligen Einstellung eines oder mehrerer Tages-programme wird die Nummer 1 dem aktuellen Wochentag zugewiesen und auf der Seite UHR ANGE- ZEIGT. Wenn z.b. Montag ist, ergibt sich, dass 1=Montag, 2=Dienstag, 3=Mittwoch usw. Mit der wchentlichen Programmierung knnen Sie die Bewsserung an einem oder mehreren Wochentagen de- bzw. reaktivieren. 1. Seite WOCHENPROGRAMM WHLEN. 2. Drcken Sie ENTER. 3. Setzen Sie den Cursor auf den Wochentag, dessen Einstellung gendert werden soll. 4. Drcken Sie ENTER, um die Bewsserung am gewhlten Tag zu deaktivieren (die bezgliche Nummer am Display erlischt) oder zu reaktivieren. 5. Setzen Sie den Cursor auf EXIT und drcken Sie ENTER zum Beenden der Funktion
43 Handbetrieb Ablesen des Displays D 1. Whlen Sie die Seite MANUELL des zu steuernden Wegs (WEG A oder WEG B) Drcken Sie ENTER Jeweils oder drcken, um das Ventil zu ffnen bzw. zu schlieen. 4. Drcken Sie bei geschlossenem Ventil ENTER, um den Handbetrieb zu verlassen und zum Hauptmen zurckzugehen. Anm.: Wird die Bewsserung nicht manuell unterbrochen, schliet sich das Ventil automatisch 5 Minuten nach der ffnung. Das Display zeigt die verbleibende Bewsserungszeit an Ablesen des Displays auf der Seite der aktuellen Uhrzeit Eingestellte Programme (Symbol blinkt, falls die Bewsserung aktiviert ist) Aktuelle Uhrzeit Wochentag (der fnfte Tag nach der erstmaligen Programmierung) Ladezustand der Batterie 3 gewhlter Weg Verbleibende Bewsserungszeit Technische Kenndaten 2-Wege-Programmiergert (A und B), anwendbar mit 9-12 V DC BISTABILEN MAGNETVENTILEN Magnetventilsteuerung bis zu 30 m Entfernung 6 tgliche Bewsserungsprogramme (3 auf WEG A und 3 auf WEG B) Bewsserungsdauer zwischen 1 Minute und 23 Stunden plus 59 Minuten Wchentliche Programmierung Handbetrieb Eingang fr Regenfhler Betriebstemperatur zwischen +5 und +70 C Schutzklasse IP
44 Garantie D Entsorgung (ELEKTRO- UND ELEKTRONIKALTGERTE) (WEEE) Das entsprechende Symbol am Gert oder an seiner Verpackung weist daraufhin, dass es sich um keinen herkmmlichen Siedlungsabfall handelt, sondern um Sonderabfall, der bei den fr das Recycling von Elektro- und Elektronikaltgerten zustndigen Sammelstellen abzugeben ist. Indem Sie dieses Gert sachgerecht entsorgen, leisten Sie einen Beitrag zum Verhindern mglicher schdlicher Auswirkungen, die durch eine unsachgeme Entsorgung des Gerts hervorgerufen werden knnen. Nhere Informationen zum Recycling dieses Gerts kann Ihnen das zustndige Gemeindeamt, die Abfallentsorgungsstelle am Ort oder der Hndler erteilen, bei dem Sie das Gert gekauft haben. L apparecchio garantito per due anni dalla data di acquisto che sar certifi cata dalla fattura, ricevuta o scontrino fi scale rilasciato all atto dell acquisto. La garanzia decade in caso di manomissione dell apparecchio o per la mancanza di uno dei giustifi cativi fi scali. Riportare il numero di matricola Manca Condizioni di garanzia Claber garantisce che il prodotto esente da difetti di materiale o di fabbricazione. Entro il periodo di due anni dalla data di consegna al consumatore, Claber provveder senza addebito alla riparazione o alla sostituzione di parti della stessa riconosciute difettose, in prodotti impiegati in condizioni di normale esercizio e corretta manutenzione che non siano stati manipolati o modifi cati. Claber non accetta alcuna responsabilit per danni derivati da uso non corretto ed improprio o da errori di installazione ed uso del prodotto, n per prodotti non dalla stessa fabbricati, anche se usati in combinazione con i propri. La merce viaggia interamente a carico e a rischio e pericolo del proprietario. L assistenza data dai laboratori autorizzati Claber. Per qualsiasi informazione aggiuntiva sui Centri Assistenza attivi potete telefonare alla Claber spa tel o mandare un fax allo o inviare una mail all indirizzo: info@claber.com. Per ogni altro aspetto fanno testo le Condizioni Generali di Vendita. SPA info@claber.com SPA 86 87
45 MANUAL DE UTILIZACIN MDULO 9V evolution E
46 Mdulo de mando evolution Agradecemos la confi anza depositada en Claber al adquirir este producto. lea atentamente este manual de instrucciones antes de empezar la programacin. En cada apartado encontrar todas las indicaciones necesarias para realizar correctamente cada operacin. MDULO DE MANDO EVOLUTION E Declaracin de conformidad Claber S.P.A. Via Pontebbana Fiume Veneto Pordenone Italy declara bajo su responsabilidad que el producto: Mdulo de mando es conforme a la directiva europea 2004/108/CE con referencia a las normas tcnicas EN :2007 (inmunidad) y EN :2007 (emisin). PANTALLA TAPA TRANSPARENTE CONJUNTO DE MANDO TECLA ADELANTE Fiume Veneto, 11/01/2010 El Responsable 2010 Dott. Marzona Federico Recomendaciones 1. Utilice exclusivamente pilas alcalinas de 9 V nuevas. 2. Cambie la pila al principio de cada temporada. 3. Compruebe peridicamente el estado de las juntas estancas de la tapa y del tapn del alojamiento de la pila. 4. Compruebe peridicamente que las conexiones elctricas de la pila y del solenoide estn bien sujetas. 5. Cierre siempre la tapa para garantizar la estanqueidad del producto. TECLA ENTER TECLA ATRS 90 91
47 Instalacin INSTALACIN E El mdulo de mando es estanco y funciona aunque est permanentemente sumergido en agua hasta un metro de profundidad (grado de proteccin IP68). Se puede instalar al aire libre o en una arqueta. Atencin: para mantener la estanqueidad del producto, asegrese que el conjunto de mando est alineado e introducido en su gua 1 y que la tapa transparente est perfectamente apretada, con la junta correctamente colocada en su alojamiento
48 Instalacin El mdulo de mando puede controlar hasta dos electrovlvulas con solenoide biestable de 9 V. INSTALACIN 1. Conecte el hilo verde al polo (-) de cada electrovlvula (comn). 2. Conecte el hilo blanco al polo (+) de la electrovlvula A. 3. Conecte el hilo marrn al polo (+) de la electrovlvula B. E Electrovlvula A verde - comn blanco - lnea A Electrovlvulas biestables 9-12 V H M /2 M marrn - lnea B 75 cm incluidos mx. 30 m (seccin 1,5 mm 2 ) Electrovlvula B 94 95
49 Conexin a un sensor de lluvia Colocacin de la pila E Es posible conectar un sensor de lluvia (Rain Sensor Claber cd ) al mdulo de mando. El sensor de lluvia interrumpe los programas de riego en caso de lluvia y los restablece automticamente cuando se evapora el agua en su interior. 1. Interrumpa la conexin entre el hilo amarillo y el gris, cortando el empalme en su extremo Conecte el hilo amarillo y el gris a los hilos procedentes del sensor de lluvia 2. Atencin: si no se utiliza el sensor de lluvia, hay que asegurarse de que el hilo amarillo y el gris estn conectados entre s, restableciendo el empalme si fuera necesario. amarillo gris 1 1. Suelte la tapa transparente 1 y retire el conjunto de mando Suelte el tapn del alojamiento de la pila Conecte la pila respetando la polaridad 4 e introdzcala en su alojamiento Apriete el tapn comprobando que la junta de estanqueidad est colocada correctamente. Atencin: utilice exclusivamente pilas alcalinas de 9 V Sensor de lluvia cm incluidos mx. 30 m
50 Estado de carga de la pila La pantalla muestra el estado de carga de la pila: Pantalla Teclado Funcionamiento manual E Programas diarios (de 1 a 6) Estado de carga de la pila Estado de carga BA T T E RY BA T T E BA T BA T Pila totalmente cargada Pila parcialmente cargada Pila descargada, hay que cambiarla (PARPADEANTE) Pila agotada, hay que cambiarla Nmero de programa diario seleccionado (en programacin) y lnea seleccionada A o B (en manual) Das de la semana Cursor Estado de carga de la pila Activacin de un mando (pulsar una tecla) Vlvula cerrada Vlvula abierta Reloj y horas de apertura y cierre de la vlvula Modifi cacin de las confi guraciones Notas: Una pila alcalina permite regar durante toda una temporada con un promedio de 6 riegos diarios. Cuando la pila se agota, las funciones del programador se interrumpen automticamente y el indicador de carga de la pila empieza a parpadear. Para evitar la prdida de datos, las operaciones de cambio de la pila se deben realizar en un plazo mximo de 30 segundos. Tras cambiar la pila, compruebe la hora actual y ajstela si procede. Se recomienda retirar la pila cuando no se utiliza el programador. Deposite las pilas usadas en los contenedores especfi cos para su recogida. Teclado Atrs Pasar las pginas hacia atrs Modifi car las confi guraciones Adelante Pasar las pginas hacia adelante Modifi car las confi guraciones Enter Entrar en las pginas para modifi car las confi guraciones Confi rmar los cambios 98 99
Tipologie installative - Installation types Type d installation - Installationstypen Tipos de instalación - Τυπολογίες εγκατάστασης
 AMPADE MOOCROMATICHE VIMAR DIMMERABII A 0 V~ - VIMAR 0 V~ DIMMABE MOOCHROME AMP AMPE MOOCHROME VIMAR VARIATEUR 0 V~ - DIMMERFÄHIGE MOOCHROMATICHE AMPE VO VIMAR MIT 0 V~ ÁMPARA MOOCROMÁTICA VIMAR REGUABE
Tipologie installative - Installation types Types d installation - Die einbauanweisungen Tipos de instalación - Τυπολογίες εγκατάστασης
 Types d installation Die einbauanweisungen Tipos de instalación Τυπολογίες εγκατάστασης AMPADE MOOCROMATICHE VIMAR DIMMERABII A 0 V~ MOOCHROME DIMMABE AMP VIMAR 0 V~ AMPE MOOCHROME VIMAR DIMMABE 0 V~ EUCHTE
ΟΔΗΓΙΕΣ ΧΡΗΣΗΣ USE INSTRUCTIONS
 ΟΔΗΓΙΕΣ ΧΡΗΣΗΣ USE INSTRUCTIONS ΤΗΛΕΦΩΝΟ ΜΕ ΑΝΑΓΝΩΡΙΣΗ ΚΛΗΣΗΣ /CORDED PHONE WITH CALLER ID ΜΟΝΤΕΛΟ/MODEL: TM09-448 DC48V Παρακαλούμε διαβάστε προσεκτικά όλες τις οδηγίες χρήσης πριν την χρήση της συσκευής
PLUGIN BASIC TS (en) indication, that electrical appliance is switched on
 indication, that electrical appliance is switched on") PLUGIN BASIC TS (en) indication, that electrical appliance is switched on after pressing the ON button, will be the connected appliance permantely switched on. after pressing the button, will be the connected
PLUGIN BASIC TS (en) indication, that electrical appliance is switched on after pressing the ON button, will be the connected appliance permantely switched on. after pressing the button, will be the connected
Εγκατάσταση λογισμικού και αναβάθμιση συσκευής Device software installation and software upgrade
 Για να ελέγξετε το λογισμικό που έχει τώρα η συσκευή κάντε κλικ Menu > Options > Device > About Device Versions. Στο πιο κάτω παράδειγμα η συσκευή έχει έκδοση λογισμικού 6.0.0.546 με πλατφόρμα 6.6.0.207.
Modbus basic setup notes for IO-Link AL1xxx Master Block
 n Modbus has four tables/registers where data is stored along with their associated addresses. We will be using the holding registers from address 40001 to 49999 that are R/W 16 bit/word. Two tables that
English PDFsharp is a.net library for creating and processing PDF documents 'on the fly'. The library is completely written in C# and based
 English PDFsharp is a.net library for creating and processing PDF documents 'on the fly'. The library is completely written in C# and based exclusively on safe, managed code. PDFsharp offers two powerful
derivation of the Laplacian from rectangular to spherical coordinates
 derivation of the Laplacian from rectangular to spherical coordinates swapnizzle 03-03- :5:43 We begin by recognizing the familiar conversion from rectangular to spherical coordinates (note that φ is used
the total number of electrons passing through the lamp.
 1. A 12 V 36 W lamp is lit to normal brightness using a 12 V car battery of negligible internal resistance. The lamp is switched on for one hour (3600 s). For the time of 1 hour, calculate (i) the energy
!Stato di tensione triassiale!stato di tensione piano!cerchio di Mohr
 !Stato di tensione triassiale!stato di tensione piano!cerchio di Mohr Stato di tensione F A = F / A F Traione pura stato di tensione monoassiale F M A M Traione e torsione stato di tensione piano = F /
Advanced Subsidiary Unit 1: Understanding and Written Response
 Write your name here Surname Other names Edexcel GE entre Number andidate Number Greek dvanced Subsidiary Unit 1: Understanding and Written Response Thursday 16 May 2013 Morning Time: 2 hours 45 minutes
Stato di tensione triassiale Stato di tensione piano Cerchio di Mohr
 Stato di tensione triassiale Stato di tensione iano Cerchio di Mohr Stato di tensione F A = F / A F Traione ura stato di tensione monoassiale F M A M Traione e torsione stato di tensione iano = F / A =
[1] P Q. Fig. 3.1
![[1] P Q. Fig. 3.1](/thumbs/79/80362156.jpg "[1] P Q. Fig. 3.1") 1 (a) Define resistance....... [1] (b) The smallest conductor within a computer processing chip can be represented as a rectangular block that is one atom high, four atoms wide and twenty atoms long. One
1 (a) Define resistance....... [1] (b) The smallest conductor within a computer processing chip can be represented as a rectangular block that is one atom high, four atoms wide and twenty atoms long. One
Instruction Execution Times
 1 C Execution Times InThisAppendix... Introduction DL330 Execution Times DL330P Execution Times DL340 Execution Times C-2 Execution Times Introduction Data Registers This appendix contains several tables
ΕΣΩΤΕΡΙΚΗ ΜΟΝΑΔΑ ΚΛΙΜΑΤΙΣΤΙΚΟ ΔΙΑΙΡΟΥΜΕΝΟΥ ΤΥΠΟΥ ΜΟΝΤΕΛΟ RAD-18RPA RAD-25RPA RAD-35RPA RAD-50RPA. Eλληνικά ΕΣΩΤΕΡΙΚΗ ΜΟΝΑΔΑ
 ΚΛΙΜΑΤΙΣΤΙΚ ΔΙΑΙΡΥΜΕΝΥ ΤΥΠΥ ΕΣΩΤΕΡΙΚΗ ΜΝΑΔΑ ΜΝΤΕΛ RAD-18RPA RAD-25RPA RAD-35RPA RAD-50RPA ΕΣΩΤΕΡΙΚΗ ΜΝΑΔΑ RAD-18RPA RAD-25RPA RAD-35RPA RAD-50RPA Instruction manual Page 1~12 To obtain the best performance
CONFIGURAZIONE DELLA CASELLA DI POSTA ELETTRONICA CERTIFICATA (P.E.C.)
") CONFIGURAZIONE DELLA CASELLA DI POSTA ELETTRONICA CERTIFICATA (P.E.C.) Consigliamo di configurare ed utilizzare la casella di posta elettronica certificata tramite il webmail dedicato fornito dal gestore
CONFIGURAZIONE DELLA CASELLA DI POSTA ELETTRONICA CERTIFICATA (P.E.C.) Consigliamo di configurare ed utilizzare la casella di posta elettronica certificata tramite il webmail dedicato fornito dal gestore
Potential Dividers. 46 minutes. 46 marks. Page 1 of 11
 Potential Dividers 46 minutes 46 marks Page 1 of 11 Q1. In the circuit shown in the figure below, the battery, of negligible internal resistance, has an emf of 30 V. The pd across the lamp is 6.0 V and
CHAPTER 25 SOLVING EQUATIONS BY ITERATIVE METHODS
 CHAPTER 5 SOLVING EQUATIONS BY ITERATIVE METHODS EXERCISE 104 Page 8 1. Find the positive root of the equation x + 3x 5 = 0, correct to 3 significant figures, using the method of bisection. Let f(x) =
Οδηγίες Αγοράς Ηλεκτρονικού Βιβλίου Instructions for Buying an ebook
 Οδηγίες Αγοράς Ηλεκτρονικού Βιβλίου Instructions for Buying an ebook Βήμα 1: Step 1: Βρείτε το βιβλίο που θα θέλατε να αγοράσετε και πατήστε Add to Cart, για να το προσθέσετε στο καλάθι σας. Αυτόματα θα
ANSWERSHEET (TOPIC = DIFFERENTIAL CALCULUS) COLLECTION #2. h 0 h h 0 h h 0 ( ) g k = g 0 + g 1 + g g 2009 =?
 COLLECTION #2. h 0 h h 0 h h 0 ( ) g k = g 0 + g 1 + g g 2009 =?") Teko Classes IITJEE/AIEEE Maths by SUHAAG SIR, Bhopal, Ph (0755) 3 00 000 www.tekoclasses.com ANSWERSHEET (TOPIC DIFFERENTIAL CALCULUS) COLLECTION # Question Type A.Single Correct Type Q. (A) Sol least
Teko Classes IITJEE/AIEEE Maths by SUHAAG SIR, Bhopal, Ph (0755) 3 00 000 www.tekoclasses.com ANSWERSHEET (TOPIC DIFFERENTIAL CALCULUS) COLLECTION # Question Type A.Single Correct Type Q. (A) Sol least
ΚΥΠΡΙΑΚΗ ΕΤΑΙΡΕΙΑ ΠΛΗΡΟΦΟΡΙΚΗΣ CYPRUS COMPUTER SOCIETY ΠΑΓΚΥΠΡΙΟΣ ΜΑΘΗΤΙΚΟΣ ΔΙΑΓΩΝΙΣΜΟΣ ΠΛΗΡΟΦΟΡΙΚΗΣ 19/5/2007
 Οδηγίες: Να απαντηθούν όλες οι ερωτήσεις. Αν κάπου κάνετε κάποιες υποθέσεις να αναφερθούν στη σχετική ερώτηση. Όλα τα αρχεία που αναφέρονται στα προβλήματα βρίσκονται στον ίδιο φάκελο με το εκτελέσιμο
ΚΥΠΡΙΑΚΗ ΕΤΑΙΡΕΙΑ ΠΛΗΡΟΦΟΡΙΚΗΣ CYPRUS COMPUTER SOCIETY ΠΑΓΚΥΠΡΙΟΣ ΜΑΘΗΤΙΚΟΣ ΔΙΑΓΩΝΙΣΜΟΣ ΠΛΗΡΟΦΟΡΙΚΗΣ 6/5/2006
 Οδηγίες: Να απαντηθούν όλες οι ερωτήσεις. Ολοι οι αριθμοί που αναφέρονται σε όλα τα ερωτήματα είναι μικρότεροι το 1000 εκτός αν ορίζεται διαφορετικά στη διατύπωση του προβλήματος. Διάρκεια: 3,5 ώρες Καλή
Δημιουργία Λογαριασμού Διαχείρισης Business Telephony Create a Management Account for Business Telephony
 Δημιουργία Λογαριασμού Διαχείρισης Business Telephony Create a Management Account for Business Telephony Ελληνικά Ι English 1/7 Δημιουργία Λογαριασμού Διαχείρισης Επιχειρηματικής Τηλεφωνίας μέσω της ιστοσελίδας
ΚΥΠΡΙΑΚΟΣ ΣΥΝΔΕΣΜΟΣ ΠΛΗΡΟΦΟΡΙΚΗΣ CYPRUS COMPUTER SOCIETY 21 ος ΠΑΓΚΥΠΡΙΟΣ ΜΑΘΗΤΙΚΟΣ ΔΙΑΓΩΝΙΣΜΟΣ ΠΛΗΡΟΦΟΡΙΚΗΣ Δεύτερος Γύρος - 30 Μαρτίου 2011
 Διάρκεια Διαγωνισμού: 3 ώρες Απαντήστε όλες τις ερωτήσεις Μέγιστο Βάρος (20 Μονάδες) Δίνεται ένα σύνολο από N σφαιρίδια τα οποία δεν έχουν όλα το ίδιο βάρος μεταξύ τους και ένα κουτί που αντέχει μέχρι
3.4 SUM AND DIFFERENCE FORMULAS. NOTE: cos(α+β) cos α + cos β cos(α-β) cos α -cos β
 cos α + cos β cos(α-β) cos α -cos β") 3.4 SUM AND DIFFERENCE FORMULAS Page Theorem cos(αβ cos α cos β -sin α cos(α-β cos α cos β sin α NOTE: cos(αβ cos α cos β cos(α-β cos α -cos β Proof of cos(α-β cos α cos β sin α Let s use a unit circle
3.4 SUM AND DIFFERENCE FORMULAS Page Theorem cos(αβ cos α cos β -sin α cos(α-β cos α cos β sin α NOTE: cos(αβ cos α cos β cos(α-β cos α -cos β Proof of cos(α-β cos α cos β sin α Let s use a unit circle
Capacitors - Capacitance, Charge and Potential Difference
 Capacitors - Capacitance, Charge and Potential Difference Capacitors store electric charge. This ability to store electric charge is known as capacitance. A simple capacitor consists of 2 parallel metal
MATERIALIEN ZUR VORBEREITUNG AUF DIE KLAUSUR INFORMATIK II FÜR VERKEHRSINGENIEURWESEN ANTEIL VON PROF. VOGLER IM WINTERSEMESTER 2011/12
 Fakultät Informatik Institut für Angewandte Informatik, Professur Technische Informationssysteme MATERIALIEN ZUR VORBEREITUNG AUF DIE KLAUSUR INFORMATIK II FÜR VERKEHRSINGENIEURWESEN ANTEIL VON PROF. VOGLER
Esercizi sui circoli di Mohr
 Esercizi sui circoli di Mohr ESERCIZIO A Sia assegnato lo stato tensionale piano nel punto : = -30 N/mm² = 30 N/mm² x = - N/mm² 1. Determinare le tensioni principali attraverso il metodo analitico e mediante
Στο εστιατόριο «ToDokimasesPrinToBgaleisStonKosmo?» έξω από τους δακτυλίους του Κρόνου, οι παραγγελίες γίνονται ηλεκτρονικά.
 Διαστημικό εστιατόριο του (Μ)ΑστροΈκτορα Στο εστιατόριο «ToDokimasesPrinToBgaleisStonKosmo?» έξω από τους δακτυλίους του Κρόνου, οι παραγγελίες γίνονται ηλεκτρονικά. Μόλις μια παρέα πελατών κάτσει σε ένα
ULX Wireless System USER GUIDE SUPPLEMENT RENSEIGNEMENT SUPPLÉMENTAIRES INFORMACION ADICIONAL. M1 ( MHz)
") ULX Wireless System USER GUIDE SUPPLEMENT RENSEIGNEMENT SUPPLÉMENTAIRES INFORMACION ADICIONAL M1 (662 698 MHz) 2003, Shure Incorporated 27B8733A (Rev. 4) Printed in U.S.A. SPECIFICATIONS ULX1 Transmitter
ULX Wireless System USER GUIDE SUPPLEMENT RENSEIGNEMENT SUPPLÉMENTAIRES INFORMACION ADICIONAL M1 (662 698 MHz) 2003, Shure Incorporated 27B8733A (Rev. 4) Printed in U.S.A. SPECIFICATIONS ULX1 Transmitter
VBA ΣΤΟ WORD. 1. Συχνά, όταν ήθελα να δώσω ένα φυλλάδιο εργασίας με ασκήσεις στους μαθητές έκανα το εξής: Version 25-7-2015 ΗΜΙΤΕΛΗΣ!!!!
 VBA ΣΤΟ WORD Version 25-7-2015 ΗΜΙΤΕΛΗΣ!!!! Μου παρουσιάστηκαν δύο θέματα. 1. Συχνά, όταν ήθελα να δώσω ένα φυλλάδιο εργασίας με ασκήσεις στους μαθητές έκανα το εξής: Εγραφα σε ένα αρχείο του Word τις
La Déduction naturelle
 La Déduction naturelle Pierre Lescanne 14 février 2007 13 : 54 Qu est-ce que la déduction naturelle? En déduction naturelle, on raisonne avec des hypothèses. Qu est-ce que la déduction naturelle? En déduction
Math 6 SL Probability Distributions Practice Test Mark Scheme
 Math 6 SL Probability Distributions Practice Test Mark Scheme. (a) Note: Award A for vertical line to right of mean, A for shading to right of their vertical line. AA N (b) evidence of recognizing symmetry
UDZ Swirl diffuser. Product facts. Quick-selection. Swirl diffuser UDZ. Product code example:
 UDZ Swirl diffuser Swirl diffuser UDZ, which is intended for installation in a ventilation duct, can be used in premises with a large volume, for example factory premises, storage areas, superstores, halls,
Επιτραπέζιος Η/Υ K30AM / K30AM-J Εγχειρίδιο χρήστη
 Επιτραπέζιος Η/Υ K30AM / K30AM-J Εγχειρίδιο χρήστη GK9380 Ελληνικα Πρώτη Έκδοση Μάιος 2014 Copyright 2014 ASUSTeK Computer Inc. Διατηρούνται όλα τα δικαιώματα. Απαγορεύεται η αναπαραγωγή οποιουδήποτε τμήματος
TIME SWITCHES AND TWILIGHT SWITCHES
 W ANALOG DIN-RAIL TIME SWITCH QUARTZ, SERIES TEMPUS ANALOG 244 W SCHRACK-INFO Analogue time switch 1 channel Daily program With power reserve (NiMH rechargeable battery) Synchronised with mains Shortest
M14/1/AYMGR/HP1/GRE/TZ0/XX
 M14/1/AYMGR/HP1/GRE/TZ0/XX 22142045 MODERN GREEK A: LANGUAGE AND LITERATURE HIGHER LEVEL PAPER 1 GREC MODERNE A : LANGUE ET LITTÉRATURE NIVEAU SUPÉRIEUR ÉPREUVE 1 GRIEGO MODERNO A: LENGUA Y LITERATURA
Επιτραπέζιος Η/Υ ASUS M12AD and M52AD Εγχειρίδιο χρήστη
 Επιτραπέζιος Η/Υ ASUS M12AD and M52AD Εγχειρίδιο χρήστη M12AD M52AD GK9559 Πρώτη Έκδοση Ιούλιος 2014 Copyright 2014 ASUSTeK Computer Inc. Διατηρούνται όλα τα δικαιώματα. Απαγορεύεται η αναπαραγωγή οποιουδήποτε
(C) 2010 Pearson Education, Inc. All rights reserved.
 2010 Pearson Education, Inc. All rights reserved.") Connectionless transmission with datagrams. Connection-oriented transmission is like the telephone system You dial and are given a connection to the telephone of fthe person with whom you wish to communicate.
Connectionless transmission with datagrams. Connection-oriented transmission is like the telephone system You dial and are given a connection to the telephone of fthe person with whom you wish to communicate.
Assalamu `alaikum wr. wb.
 LUMP SUM Assalamu `alaikum wr. wb. LUMP SUM Wassalamu alaikum wr. wb. Assalamu `alaikum wr. wb. LUMP SUM Wassalamu alaikum wr. wb. LUMP SUM Lump sum lump sum lump sum. lump sum fixed price lump sum lump
ΚΥΠΡΙΑΚΗ ΕΤΑΙΡΕΙΑ ΠΛΗΡΟΦΟΡΙΚΗΣ CYPRUS COMPUTER SOCIETY ΠΑΓΚΥΠΡΙΟΣ ΜΑΘΗΤΙΚΟΣ ΔΙΑΓΩΝΙΣΜΟΣ ΠΛΗΡΟΦΟΡΙΚΗΣ 24/3/2007
 Οδηγίες: Να απαντηθούν όλες οι ερωτήσεις. Όλοι οι αριθμοί που αναφέρονται σε όλα τα ερωτήματα μικρότεροι του 10000 εκτός αν ορίζεται διαφορετικά στη διατύπωση του προβλήματος. Αν κάπου κάνετε κάποιες υποθέσεις
IMPARA LE LINGUE CON I FILM AL CLA
 UNIVERSITÀ DEGLI STUDI DI PADOVA - CENTRO LINGUISTICO DI ATENEO IMPARA LE LINGUE CON I FILM AL CLA Vedere film in lingua straniera è un modo utile e divertente per imparare o perfezionare una lingua straniera.
Strain gauge and rosettes
 Strain gauge and rosettes Introduction A strain gauge is a device which is used to measure strain (deformation) on an object subjected to forces. Strain can be measured using various types of devices classified
4K HDMI Splitter 1x4. User s Guide / Bedienungsanleitung / Εγχειρίδιο Χρήστη
 4K HDMI Splitter 1x4 User s Guide / Bedienungsanleitung / Εγχειρίδιο Χρήστη INTRODUCTION The EDISION 4K HDMI Splitter 1x4 uses a single HDMI input source, to distribute it to 4 HDMI outputs. The splitter
Wenn ihr nicht werdet wie die Kinder...
 Wenn ihr nicht werdet wie die Kinder... . Der Memoriam-Garten Schön, dass ich mir keine Sorgen machen muss! Mit dem Memoriam-Garten bieten Ihnen Friedhofsgärtner, Steinmetze
ΟΔΗΓΙΕΣ ΣΥΝΑΡΜΟΛΟΓΗΣΗΣ/ ASSEMBLY INSTRUCTION ΤΟΜΜΥ ΚΡΕΒΑΤΙ/BED
 ΟΔΗΓΙΕΣ ΣΥΝΑΡΜΟΛΟΓΗΣΗΣ/ ASSEMBLY INSTRUCTION ΤΟΜΜΥ ΚΡΕΒΑΤΙ/BED 1. Παρακαλώ πολύ διαβάστε προσεκτικά τις οδηγίες πριν την συναρμολόγηση/ Please read the instructions carefully. 2. Παρακαλώ πολύ όπως ελέγξτε
SPEEDO AQUABEAT. Specially Designed for Aquatic Athletes and Active People
 SPEEDO AQUABEAT TM Specially Designed for Aquatic Athletes and Active People 1 2 Decrease Volume Increase Volume Reset EarphonesUSBJack Power Off / Rewind Power On / Fast Forward Goggle clip LED Status
1000 VDC 1250 VDC 125 VAC 250 VAC J K 125 VAC, 250 VAC
 Metallized Polyester Film Capacitor Type: ECQE(F) Non-inductive construction using metallized Polyester film with flame retardant epoxy resin coating Features Self-healing property Excellent electrical
Phys460.nb Solution for the t-dependent Schrodinger s equation How did we find the solution? (not required)
") Phys460.nb 81 ψ n (t) is still the (same) eigenstate of H But for tdependent H. The answer is NO. 5.5.5. Solution for the tdependent Schrodinger s equation If we assume that at time t 0, the electron starts
Phys460.nb 81 ψ n (t) is still the (same) eigenstate of H But for tdependent H. The answer is NO. 5.5.5. Solution for the tdependent Schrodinger s equation If we assume that at time t 0, the electron starts
Τεστ Κατάταξης 1 Grading Test 1
 HELLENIC CULTURE CENTRE - Education, Language and Culture www.hcc.edu.gr, e-mail: Ifigenia@hcc.edu.gr, Tel.: (+30) 210 5238149, Fax: (+30) 210 8836494 Τεστ Κατάταξης 1 Grading Test 1 Οδηγίες Πρέπει να
(see figure 2). κουμπί για να προχωρήσετε την ώρα σε βήματα Two rotary dials for setting the 84054 watering Η.Π.Α. interval and.
. κουμπί για να προχωρήσετε την ώρα σε βήματα Two rotary dials for setting the 84054 watering Η.Π.Α. interval and.") SUM252172 94050-24 ra 12/23/05 2:52 PM Page 1 START INTERVAL ONCE DAILY 4hr 90 60 DURATION ON 30 15 5 10 Dual Dial Hose Timer with Electronic Display Minuterie numérique d arrossage à deux boutons Timer
SUM252172 94050-24 ra 12/23/05 2:52 PM Page 1 START INTERVAL ONCE DAILY 4hr 90 60 DURATION ON 30 15 5 10 Dual Dial Hose Timer with Electronic Display Minuterie numérique d arrossage à deux boutons Timer
Section 8.3 Trigonometric Equations
 99 Section 8. Trigonometric Equations Objective 1: Solve Equations Involving One Trigonometric Function. In this section and the next, we will exple how to solving equations involving trigonometric functions.
Approximation of distance between locations on earth given by latitude and longitude
 Approximation of distance between locations on earth given by latitude and longitude Jan Behrens 2012-12-31 In this paper we shall provide a method to approximate distances between two points on earth
G. Parmeggiani, 15/1/2019 Algebra Lineare, a.a. 2018/2019, numero di MATRICOLA PARI. Svolgimento degli Esercizi per casa 12
 G. Parmeggiani, 5//9 Algebra Lineare, a.a. 8/9, Scuola di Scienze - Corsi di laurea: Studenti: Statistica per l economia e l impresa Statistica per le tecnologie e le scienze numero di MATRICOLA PARI Svolgimento
Homework 8 Model Solution Section
 MATH 004 Homework Solution Homework 8 Model Solution Section 14.5 14.6. 14.5. Use the Chain Rule to find dz where z cosx + 4y), x 5t 4, y 1 t. dz dx + dy y sinx + 4y)0t + 4) sinx + 4y) 1t ) 0t + 4t ) sinx
Surface Mount Multilayer Chip Capacitors for Commodity Solutions
 Surface Mount Multilayer Chip Capacitors for Commodity Solutions Below tables are test procedures and requirements unless specified in detail datasheet. 1) Visual and mechanical 2) Capacitance 3) Q/DF
2 Composition. Invertible Mappings
 Arkansas Tech University MATH 4033: Elementary Modern Algebra Dr. Marcel B. Finan Composition. Invertible Mappings In this section we discuss two procedures for creating new mappings from old ones, namely,
PortSip Softphone. Ελληνικά Ι English 1/20
 PortSip Softphone Ελληνικά Ι English 1/20 1. Περιεχόμενα 2. Εγκατάσταση σε Smartphone & Tablet (Android ή ios)... 1 3. Εγκατάσταση σε ηλεκτρονικό υπολογιστή (Windows ή Mac).... 5 4. Installation in Smartphone
Οδηγίες χρήσης. Registered. Οδηγίες ένταξης σήματος D-U-N-S Registered στην ιστοσελίδα σας και χρήσης του στην ηλεκτρονική σας επικοινωνία
 Οδηγίες χρήσης υλικού D-U-N-S Registered Οδηγίες ένταξης σήματος D-U-N-S Registered στην ιστοσελίδα σας και χρήσης του στην ηλεκτρονική σας επικοινωνία Οδηγίες χρήσης υλικού D-U-N-S Για οποιαδήποτε ερώτηση
3 Lösungen zu Kapitel 3
 3 Lösungen zu Kapitel 3 31 Lösungen der Aufgaben zu Abschnitt 31 311 Lösung Die Abbildung D : { R 4 R 4 R 4 R 4 R, a 1, a 2, a 3, a 4 ) D( a 1, a 2, a 3, a 4 ) definiere eine Determinantenform (auf R 4
ΑΡΙΣΤΟΤΕΛΕΙΟ ΠΑΝΕΠΙΣΤΗΜΙΟ ΘΕΣΣΑΛΟΝΙΚΗΣ ΤΜΗΜΑ ΟΔΟΝΤΙΑΤΡΙΚΗΣ ΕΡΓΑΣΤΗΡΙΟ ΟΔΟΝΤΙΚΗΣ ΚΑΙ ΑΝΩΤΕΡΑΣ ΠΡΟΣΘΕΤΙΚΗΣ
 ΑΡΙΣΤΟΤΕΛΕΙΟ ΠΑΝΕΠΙΣΤΗΜΙΟ ΘΕΣΣΑΛΟΝΙΚΗΣ ΤΜΗΜΑ ΟΔΟΝΤΙΑΤΡΙΚΗΣ ΕΡΓΑΣΤΗΡΙΟ ΟΔΟΝΤΙΚΗΣ ΚΑΙ ΑΝΩΤΕΡΑΣ ΠΡΟΣΘΕΤΙΚΗΣ ΣΥΓΚΡΙΤΙΚΗ ΜΕΛΕΤΗ ΤΗΣ ΣΥΓΚΡΑΤΗΤΙΚΗΣ ΙΚΑΝΟΤΗΤΑΣ ΟΡΙΣΜΕΝΩΝ ΠΡΟΚΑΤΑΣΚΕΥΑΣΜΕΝΩΝ ΣΥΝΔΕΣΜΩΝ ΑΚΡΙΒΕΙΑΣ
HOMEWORK 4 = G. In order to plot the stress versus the stretch we define a normalized stretch:
 HOMEWORK 4 Problem a For the fast loading case, we want to derive the relationship between P zz and λ z. We know that the nominal stress is expressed as: P zz = ψ λ z where λ z = λ λ z. Therefore, applying
TRIGONOMETRIA: ANGOLI ASSOCIATI
 FACOLTÀ DI INGEGNERIA CORSO DI AZZERAMENTO - MATEMATICA ANNO ACCADEMICO 010-011 ESERCIZI DI TRIGONOMETRIA: ANGOLI ASSOCIATI Esercizio 1: Fissata in un piano cartesiano ortogonale xoy una circonferenza
38BXCS STANDARD RACK MODEL. DCS Input/Output Relay Card Series MODEL & SUFFIX CODE SELECTION 38BXCS INSTALLATION ORDERING INFORMATION RELATED PRODUCTS
 DCS Input/Output Relay Card Series STANDARD RACK MODEL 38BXCS MODEL & SUFFIX CODE SELECTION 38BXCS MODEL CONNECTOR Y1 :Yokogawa KS2 cable use Y2 :Yokogawa KS9 cable use Y6 :Yokogawa FA-M3/F3XD32-3N use
Integrali doppi: esercizi svolti
 Integrali doppi: esercizi svolti Gli esercizi contrassegnati con il simbolo * presentano un grado di difficoltà maggiore. Esercizio. Calcolare i seguenti integrali doppi sugli insiemi specificati: a) +
NMBTC.COM /
 Common Common Vibration Test:... Conforms to JIS C 60068-2-6, Amplitude: 1.5mm, Frequency 10 to 55 Hz, 1 hour in each of the X, Y and Z directions. Shock Test:...Conforms to JIS C 60068-2-27, Acceleration
Οδηγός χρήστη. USB Charger UCH20
 Οδηγός χρήστη USB Charger UCH20 Περιεχόμενα Εισαγωγή... 3 Πληροφορίες για το φορτιστή USB Charger...3 Χρήση του φορτιστή USB...4 Φόρτιση της συσκευής σας... 4 Νομικές πληροφορίες...5 Declaration of Conformity...6
ELECTRONIC DIGITAL METERED DISPENSER
 Οδηγίες Χρήσης Operating Instructions ELECTRONIC DIGITAL METERED DISPENSER Manufactured by: SPRING AIR LTD 2 DELIGIORGI & IONIAS STR., 174 56 ALIMOS - ATHENS - GREECE PHONE NUM.: +30210 9734805 FAX: +30210
Partial Trace and Partial Transpose
 Partial Trace and Partial Transpose by José Luis Gómez-Muñoz http://homepage.cem.itesm.mx/lgomez/quantum/ jose.luis.gomez@itesm.mx This document is based on suggestions by Anirban Das Introduction This
Magnetic Charging Dock DK48
 Οδηγός χρήστη Magnetic Charging Dock DK48 Περιεχόμενα Εισαγωγή...3 Πληροφορίες για τη μαγνητική βάση φόρτισης...3 Χρήση της μαγνητικής βάσης φόρτισης...4 Επιλογή προσάρτησης για το τηλέφωνό σας...4 Φόρτιση
Πρόβλημα 1: Αναζήτηση Ελάχιστης/Μέγιστης Τιμής
 Πρόβλημα 1: Αναζήτηση Ελάχιστης/Μέγιστης Τιμής Να γραφεί πρόγραμμα το οποίο δέχεται ως είσοδο μια ακολουθία S από n (n 40) ακέραιους αριθμούς και επιστρέφει ως έξοδο δύο ακολουθίες από θετικούς ακέραιους
Paper Reference. Paper Reference(s) 1776/04 Edexcel GCSE Modern Greek Paper 4 Writing. Thursday 21 May 2009 Afternoon Time: 1 hour 15 minutes
 1776/04 Edexcel GCSE Modern Greek Paper 4 Writing. Thursday 21 May 2009 Afternoon Time: 1 hour 15 minutes") Centre No. Candidate No. Paper Reference(s) 1776/04 Edexcel GCSE Modern Greek Paper 4 Writing Thursday 21 May 2009 Afternoon Time: 1 hour 15 minutes Materials required for examination Nil Paper Reference
Centre No. Candidate No. Paper Reference(s) 1776/04 Edexcel GCSE Modern Greek Paper 4 Writing Thursday 21 May 2009 Afternoon Time: 1 hour 15 minutes Materials required for examination Nil Paper Reference
The challenges of non-stable predicates
 The challenges of non-stable predicates Consider a non-stable predicate Φ encoding, say, a safety property. We want to determine whether Φ holds for our program. The challenges of non-stable predicates
Session novembre 2009
 ΥΠΟΥΡΓΕΙΟ ΕΘΝΙΚΗΣ ΠΑΙΔΕΙΑΣ ΚΑΙ ΘΡΗΣΚΕΥΜΑΤΩΝ ΚΡΑΤΙΚΟ ΠΙΣΤΟΠΟΙΗΤΙΚΟ ΓΛΩΣΣΟΜΑΘΕΙΑΣ MINISTÈRE GREC DE L ÉDUCATION NATIONALE ET DES CULTES CERTIFICATION EN LANGUE FRANÇAISE NIVEAU ÉPREUVE B1 sur l échelle proposée
Metal Oxide Varistors (MOV) Data Sheet
 Data Sheet") Φ SERIES Metal Oxide Varistors (MOV) Data Sheet Features Wide operating voltage (V ma ) range from 8V to 0V Fast responding to transient over-voltage Large absorbing transient energy capability Low clamping
Φ SERIES Metal Oxide Varistors (MOV) Data Sheet Features Wide operating voltage (V ma ) range from 8V to 0V Fast responding to transient over-voltage Large absorbing transient energy capability Low clamping
ΕΙΣΑΓΩΓΗ ΣΤΗ ΣΤΑΤΙΣΤΙΚΗ ΑΝΑΛΥΣΗ
 ΕΙΣΑΓΩΓΗ ΣΤΗ ΣΤΑΤΙΣΤΙΚΗ ΑΝΑΛΥΣΗ ΕΛΕΝΑ ΦΛΟΚΑ Επίκουρος Καθηγήτρια Τµήµα Φυσικής, Τοµέας Φυσικής Περιβάλλοντος- Μετεωρολογίας ΓΕΝΙΚΟΙ ΟΡΙΣΜΟΙ Πληθυσµός Σύνολο ατόµων ή αντικειµένων στα οποία αναφέρονται
Surface Mount Aluminum Electrolytic Capacitors
 FEATURES CYLINDRICAL V-CHIP CONSTRUCTION LOW COST, GENERAL PURPOSE, 2000 HOURS AT 85 O C NEW EXPANDED CV RANGE (up to 6800µF) ANTI-SOLVENT (2 MINUTES) DESIGNED FOR AUTOMATIC MOUNTING AND REFLOW SOLDERING
EE512: Error Control Coding
 EE512: Error Control Coding Solution for Assignment on Finite Fields February 16, 2007 1. (a) Addition and Multiplication tables for GF (5) and GF (7) are shown in Tables 1 and 2. + 0 1 2 3 4 0 0 1 2 3
Απόκριση σε Μοναδιαία Ωστική Δύναμη (Unit Impulse) Απόκριση σε Δυνάμεις Αυθαίρετα Μεταβαλλόμενες με το Χρόνο. Απόστολος Σ.
 Απόκριση σε Δυνάμεις Αυθαίρετα Μεταβαλλόμενες με το Χρόνο. Απόστολος Σ.") Απόκριση σε Δυνάμεις Αυθαίρετα Μεταβαλλόμενες με το Χρόνο The time integral of a force is referred to as impulse, is determined by and is obtained from: Newton s 2 nd Law of motion states that the action
Απόκριση σε Δυνάμεις Αυθαίρετα Μεταβαλλόμενες με το Χρόνο The time integral of a force is referred to as impulse, is determined by and is obtained from: Newton s 2 nd Law of motion states that the action
Εργαστήριο Ανάπτυξης Εφαρμογών Βάσεων Δεδομένων. Εξάμηνο 7 ο
 Εργαστήριο Ανάπτυξης Εφαρμογών Βάσεων Δεδομένων Εξάμηνο 7 ο Procedures and Functions Stored procedures and functions are named blocks of code that enable you to group and organize a series of SQL and PL/SQL
DC-DC Constant Current Step-Down LED driver LDD-300L LDD-350L LDD-500L LDD-600L LDD-700L CURRENT RANGE
 SPECIFICATION ORDER NO. LDD-00L LDD-0L LDD-00L LDD-00L LDD-700L CURRENT RANGE 00mA 0mA 00mA VOLTAGE RANGE Note. ~ VDC for LDD-00~700L/LW ; ~ 8VDC for LDD-00~700LS CURRENT ACCURACY (Typ.) ±% at VDC input
 OST-7080HD Διασυνδέσεις Sleep ΠΛΗΚΤΡΟ ΜΑΘΗΣΗΣ: Το τηλεχειριστήριο του ψηφιακού δέκτη έχει 6 πλήκτρα μάθησης. Κάθε πλήκτρο μπορεί να είναι αντίγραφο κάθε πλήκτρου λειτουργίας του τηλεχειριστηρίου. Οδηγίες
Example Sheet 3 Solutions
 Example Sheet 3 Solutions. i Regular Sturm-Liouville. ii Singular Sturm-Liouville mixed boundary conditions. iii Not Sturm-Liouville ODE is not in Sturm-Liouville form. iv Regular Sturm-Liouville note
LR Series Metal Alloy Low-Resistance Resistor
 Tel : 881745 Fax : 881749 LR Series Metal Alloy LowResistance Resistor This specification is applicable to lead free, halogen free of RoHS directive for metal alloy lowresistance resistor. The product
TMA4115 Matematikk 3
 TMA4115 Matematikk 3 Andrew Stacey Norges Teknisk-Naturvitenskapelige Universitet Trondheim Spring 2010 Lecture 12: Mathematics Marvellous Matrices Andrew Stacey Norges Teknisk-Naturvitenskapelige Universitet
DESIGN OF MACHINERY SOLUTION MANUAL h in h 4 0.
 DESIGN OF MACHINERY SOLUTION MANUAL -7-1! PROBLEM -7 Statement: Design a double-dwell cam to move a follower from to 25 6, dwell for 12, fall 25 and dwell for the remader The total cycle must take 4 sec
Magnetic Charging Dock DK30/DK31
 Οδηγός χρήστη Magnetic Charging Dock DK30/DK31 Περιεχόμενα Οδηγός χρήστη Magnetic Charging Dock...3 Εισαγωγή...4 Η φόρτιση έγινε εύκολη υπόθεση...4 Χρήση της μαγνητικής βάσης φόρτισης...5 Χρήση των προσαρτήσεων...5
Code Breaker. TEACHER s NOTES
 TEACHER s NOTES Time: 50 minutes Learning Outcomes: To relate the genetic code to the assembly of proteins To summarize factors that lead to different types of mutations To distinguish among positive,
Οι αδελφοί Montgolfier: Ψηφιακή αφήγηση The Montgolfier Βrothers Digital Story (προτείνεται να διδαχθεί στο Unit 4, Lesson 3, Αγγλικά Στ Δημοτικού)
") Οι αδελφοί Montgolfier: Ψηφιακή αφήγηση The Montgolfier Βrothers Digital Story (προτείνεται να διδαχθεί στο Unit 4, Lesson 3, Αγγλικά Στ Δημοτικού) Προσδοκώμενα αποτελέσματα Περιεχόμενο Ενδεικτικές δραστηριότητες
Οι αδελφοί Montgolfier: Ψηφιακή αφήγηση The Montgolfier Βrothers Digital Story (προτείνεται να διδαχθεί στο Unit 4, Lesson 3, Αγγλικά Στ Δημοτικού) Προσδοκώμενα αποτελέσματα Περιεχόμενο Ενδεικτικές δραστηριότητες
ΔΕΛΤΙΟ ΔΕΔΟΜΕΝΩN ΑΣΦΑΛΕΙΑΣ ΥΛΙΚΟΥ
 Ημερομηνία αναθεώρησης 01/08/2014 Aναθεώρηση 3 Ημερομηνία αντικατάστασης 01/08/2014 ΔΕΛΤΙΟ ΔΕΔΟΜΕΝΩN ΑΣΦΑΛΕΙΑΣ ΥΛΙΚΟΥ MASTER INTERIOR CLEANING ΤΜΗΜΑ 1: ΣΤΟΙΧΕΊΑ ΟΥΣΊΑΣ/ΠΑΡΑΣΚΕΥΆΣΜΑΤΟΣ ΚΑΙ ΕΤΑΙΡΕΊΑΣ/ΕΠΙΧΕΊΡΗΣΗΣ
Galatia SIL Keyboard Information
 Galatia SIL Keyboard Information Keyboard ssignments The main purpose of the keyboards is to provide a wide range of keying options, so many characters can be entered in multiple ways. If you are typing
Bohrbild im Längsholz. Einstellbereich
 Montageanleitung/Construction Manual GIGANT 120 Fräsbild Art. Nr. K051 a=h x 0,7 im Längsholz Bauzugelassene Holzbauverbindung im Hirnholz 26,5 ±0,25 40 +2-0 h a + 47 Schraubenbild im Längsholz Schraubenbild
Aluminum Electrolytic Capacitors (Large Can Type)
") Aluminum Electrolytic Capacitors (Large Can Type) Snap-In, 85 C TS-U ECE-S (U) Series: TS-U Features General purpose Wide CV value range (33 ~ 47,000 µf/16 4V) Various case sizes Top vent construction
Aluminum Electrolytic Capacitors (Large Can Type) Snap-In, 85 C TS-U ECE-S (U) Series: TS-U Features General purpose Wide CV value range (33 ~ 47,000 µf/16 4V) Various case sizes Top vent construction
65W PWM Output LED Driver. IDLV-65 series. File Name:IDLV-65-SPEC
 ~ A File Name:IDLV65SPEC 07050 SPECIFICATION MODEL OUTPUT OTHERS NOTE DC VOLTAGE RATED CURRENT RATED POWER DIMMING RANGE VOLTAGE TOLERANCE PWM FREQUENCY (Typ.) SETUP TIME Note. AUXILIARY DC OUTPUT Note.
ΟΔΗΓΙΕΣ ΕΓΚΑΤΑΣTΑΣΗΣ ΓΙΑ ΠΑΤΩΜΑ WPC INSTALLATION GUIDE FOR WPC DECKING
 1/12 ΟΔΗΓΙΕΣ ΕΓΚΑΤΑΣTΑΣΗΣ ΓΙΑ ΠΑΤΩΜΑ WPC INSTALLATION GUIDE FOR WPC DECKING Ανοίγουμε τρύπες Ø8 x 80mm στο σημείο κατασκευής, με τρυπάνι. To προτεινόμενο πλάτος και μήκος μεταξύ των 2 οπών να είναι 30-35εκ.,
Smaller. 6.3 to 100 After 1 minute's application of rated voltage at 20 C, leakage current is. not more than 0.03CV or 4 (µa), whichever is greater.
, whichever is greater.") Low Impedance, For Switching Power Supplies Low impedance and high reliability withstanding 5000 hours load life at +05 C (3000 / 2000 hours for smaller case sizes as specified below). Capacitance ranges
Low Impedance, For Switching Power Supplies Low impedance and high reliability withstanding 5000 hours load life at +05 C (3000 / 2000 hours for smaller case sizes as specified below). Capacitance ranges
ΠΑΝΔΠΙΣΗΜΙΟ ΜΑΚΔΓΟΝΙΑ ΠΡΟΓΡΑΜΜΑ ΜΔΣΑΠΣΤΥΙΑΚΧΝ ΠΟΤΓΧΝ ΣΜΗΜΑΣΟ ΔΦΑΡΜΟΜΔΝΗ ΠΛΗΡΟΦΟΡΙΚΗ
 ΠΑΝΔΠΙΣΗΜΙΟ ΜΑΚΔΓΟΝΙΑ ΠΡΟΓΡΑΜΜΑ ΜΔΣΑΠΣΤΥΙΑΚΧΝ ΠΟΤΓΧΝ ΣΜΗΜΑΣΟ ΔΦΑΡΜΟΜΔΝΗ ΠΛΗΡΟΦΟΡΙΚΗ ΑΝΑΠΣΤΞΗ ΓΤΝΑΜΙΚΗ ΙΣΟΔΛΙΓΑ ΓΙΑ ΣΟ ΓΔΝΙΚΟ ΚΑΣΑΣΗΜΑ ΚΡΑΣΗΗ ΓΡΔΒΔΝΧΝ ΜΔ ΣΗ ΒΟΗΘΔΙΑ PHP MYSQL Γηπισκαηηθή Δξγαζία ηνπ Υξήζηνπ
Οδηγίες χρήσης υλικού D U N S Registered
 Οδηγίες χρήσης υλικού D U N S Registered Οδηγίες ένταξης σήματος D U N S Registered στην ιστοσελίδα σας και χρήσης του στην ηλεκτρονική σας επικοινωνία Για οποιαδήποτε ερώτηση, σας παρακαλούμε επικοινωνήστε