Downloaded from FSMH1621D
|
|
|
- Χριστός Ηλιόπουλος
- 8 χρόνια πριν
- Προβολές:
Transcript
1 FSMH1621D
2 A B C D E 2
3 F G H I J 3

4 K L M N 4

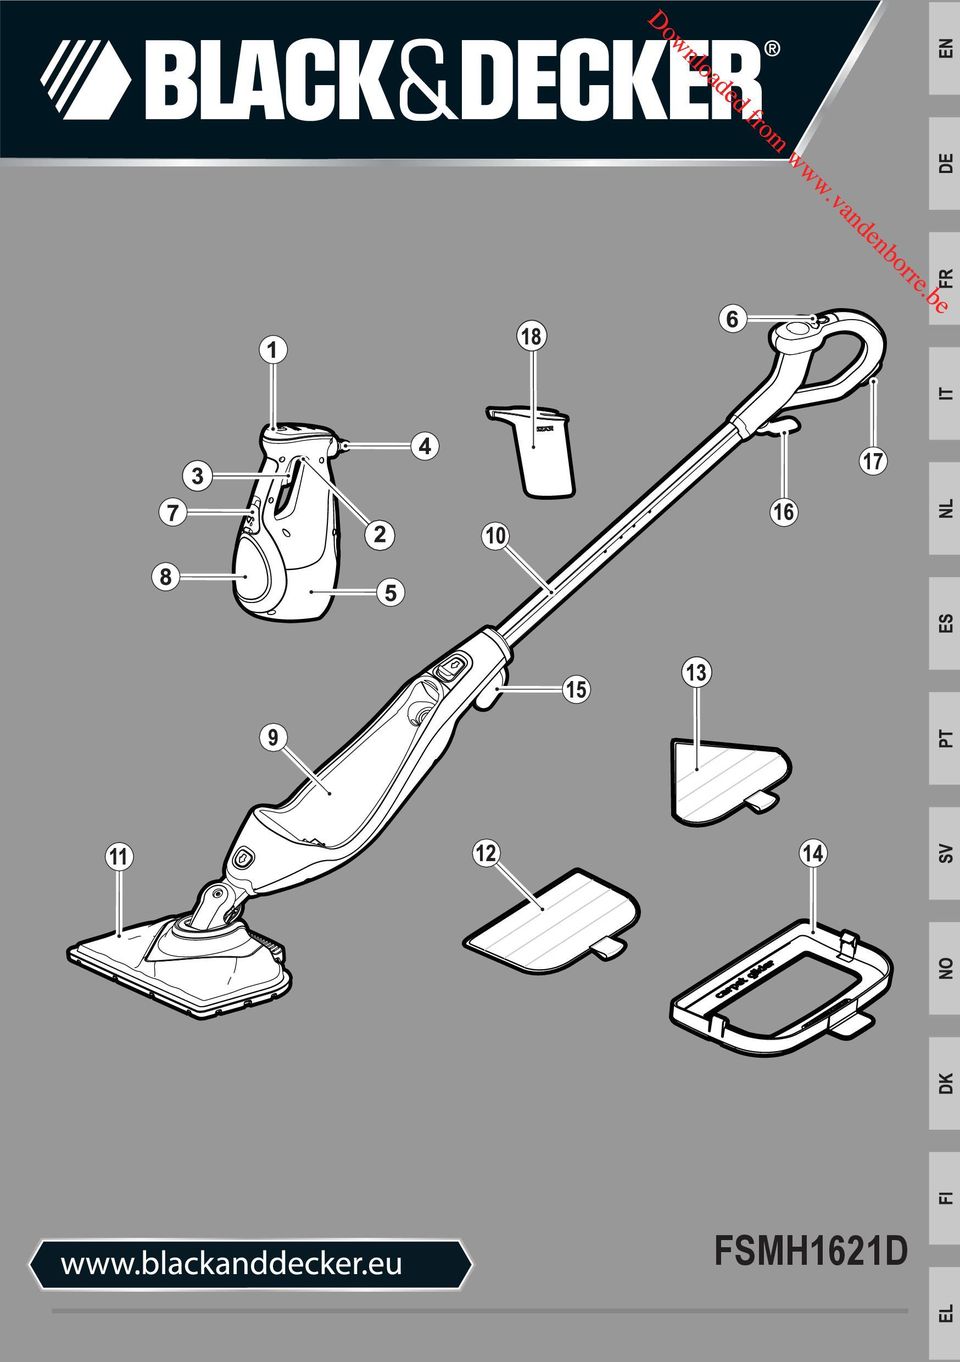
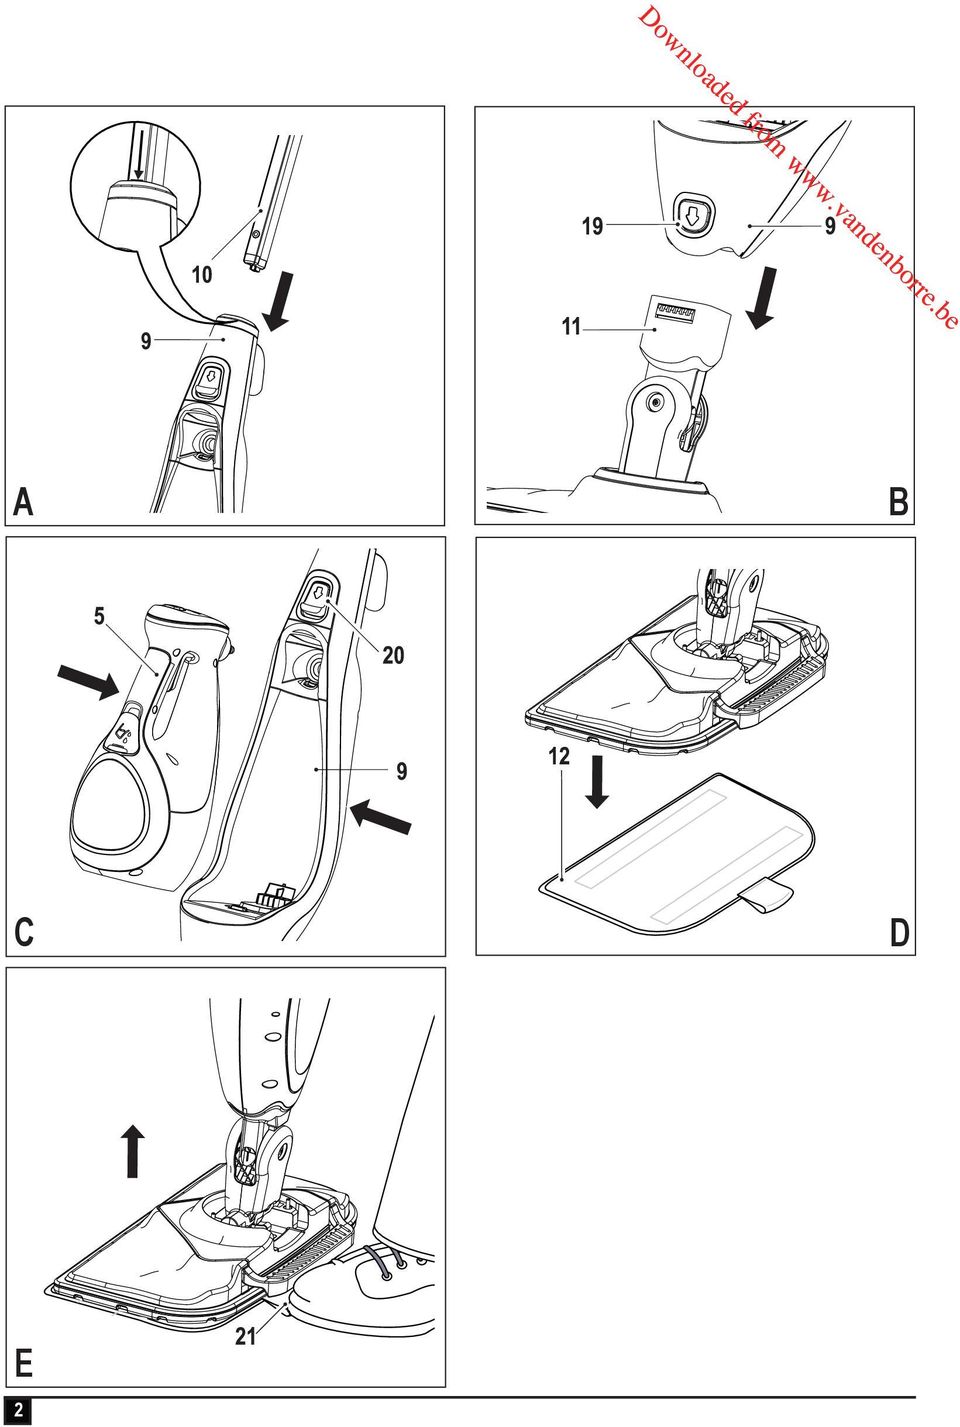
5 (Original instructions) ENGLISH Intended use Your Black & Decker steam mop has been designed for sanitising and cleaning sealed hardwood, sealed laminate, linoleum, vinyl, ceramic tile, stone and marble floors and for refreshing carpets. This appliance is intended for indoor household use only. Warning! Read all of the 'Safety, Maintenance, Service' manual carefully before operating this appliance. Read all of this manual carefully before operating the appliance. Features This appliance includes some or all of the following features. 1. ON/Off switch 2. Lock off button 3. Trigger switch 4. Steam nozzle 5. Hand held steam cleaner 6. Autoselect TM button 7. Filler cap 8. Water tank 9. Steam mop body 10. Handle 11. Steam head 12. Steam head cleaning pad 13. Delta head cleaning pad 14. Carpet glider 15. Bottom cable tidy hook 16. Top cable tidy hook 17. Cable management clip 18. Jug Assembly Warning! Before attempting any of the following operations, make sure that the appliance is switched off and unplugged and that the appliance is cold and does not contain any water. Attaching the handle (Fig. A) u Slide the bottom end of the handle (10) into the top end of the steam mop body (9) until it clicks into place. The arrow on the handle (10) should be aligned with the top of the steam mop body (9). Attaching the steam head (Fig. B) u Slide the bottom end of the steam mop body (9) onto the steam head (11) until it clicks into place. u The steam head can be removed from the Steam mop body by pressing the steam head release button (19) and pulling the steam mop body (9) off the steam head (11). Attaching the hand held steam cleaner (Fig. C) u Holding the back of the steam mop body (9) Push the hand held steam cleaner (5) firmly into the steam mop body (9) until it clicks into place. Caution! Always ensure the handle command lights up to confirm the unit is docked. Warning! Inspect that the seal (26 Fig. J) on the steam nozzle (4) before fitting the hand held steam mop to the steam mop body. If the seal is missing or damaged then please contact your nearest authorised repair agent. Do not use the appliance. Removing the hand held steam cleaner (Fig. C) u Push the release button (20) down and pull the hand held steam cleaner (5) away from the steam mop body Attaching a cleaning pad (Fig. D) Replacement cleaning pads are available from your Black & Decker dealer: Steam head cleaning pad (12) - cat. no. FSMP20-XJ. Delta head cleaning pad (13) - cat. no. FSMP30-XJ. u Place a cleaning pad (12 or 13) on the floor with the hook & loop side facing up. u Lightly press the steam mop down onto the cleaning pad (12 or 13). Caution! Always place your steam mop with the handle (10) in the upright position when stationary and make sure the steam mop is turned off when not in use. Removing a cleaning pad (Fig. E) Caution! Always wear suitable shoes when changing the cleaning pad on your steam mop. Do not wear slippers or open toed footwear. u Return the handle (10) to the upright position and turn the steam mop OFF. u Wait until the steam mop cools down. (approximately five minutes) u Place the front of your shoe onto the cleaning pad removal tab (21) and press down firmly. u Lift the steam mop up off the cleaning pad. Caution! Always place your steam mop with the handle (10) in the upright position when stationary and make sure the steam mop is turned off when not in use. Filling the water tank (Fig. F) This Steam cleaner incorporates an anti-calc system to help prolong the life of the system. Note: Fill the water tank with clean tap water. Note: In areas of very hard water, the use of de-ionised water is recommended. u Open the filler cap (7) by flipping it down. u Using the jug, fill the water tank (8) with water. 5

6 ENGLISH (Original instructions) Warning! Your water tank has a 0.36 litre capacity. u Re-fit the filler cap (7). Note: Ensure the filler cap is firmly secured. Note: When not in use, the jug (18) may be clipped to the handle for convenient storage. Note: Do not use chemical cleaners with your steam mop.. Attaching the carpet glider (Fig. G) (For use on carpets only) u Place carpet glider on the floor. u Attach a cleaning pad to the unit. u Lightly press the steam mop down onto the carpet glider (14) until it clicks into place. Caution! Always place your steam mop with the handle (10) in the upright position when stationary and make sure the steam mop is turned off when not in use. Removing the carpet glider (Fig. G) Caution! Always wear suitable shoes when changing the carpet glider on your steam mop. Do not wear slippers or open toed footwear. u Return the handle (10) to the upright position and turn the steam mop OFF. u Wait until the steam mop cools down. (approximately five minutes) u Place the front of your shoe onto the carpet glider removal tab (22) and press down firmly. u Lift the steam mop up off the carpet glider (14). Caution! Always place your steam mop with the handle (10) in the upright position when stationary and make sure the steam mop is turned off when not in use. The Delta Head (Fig. H) This Steam Mop incorporates a built in delta head which enables you to access into tight corners and narrow gaps. Caution! Always wear suitable shoes when accessing the delta head on your steam mop. Do not wear slippers or open toed footwear. u Return the handle (10) to the upright position and turn the steam mop OFF. u Wait until the steam mop cools down. (approximately five minutes) u Place the front of your shoe onto the steam head removal tab (24) and press down gently. u Lift the delta head (23) up off the steam head (5). u Fit the delta head cleaning pad to the bottom of the delta head. Note: Remove the cleaning pad before re-fitting the delta head to the steam head. u To refit the delta head, place the tip of the delta head into the steam head then press down firmly ensuring that the delta head clicks into place. Caution! Always place your steam mop with the handle (10) in the upright position when stationary and make sure the steam mop is turned off when not in use. Attaching the hose and accessories to the Hand held steam cleaner (Fig. J & K) Warning! Inspect the seal (26) on the steam nozzle (4) and hose (27) before each use. If the seal is missing or damaged then please contact your nearest authorised repair agent. Do not use the appliance. Attaching the hose (Fig. J) u Press in the clips (28) on either side of the hose (27). u Press the hose (27) onto the steam nozzle (4) and release the clips (28). Important! Ensure that the hose (27) is securely fastened before using the hand held steam cleaner. If steam escapes from the joint then the hose is not correctly fit, allow the unit to cool then remove and re-fit the hose. Attaching the variable steam jet nozzle (Fig. K) u Press in the clips (30) on either side of the variable steam jet nozzle (31). u Press the variable steam jet nozzle onto the steam nozzle (4) or the hose (27) and release the clips (30). Important! Ensure that the variable steam jet nozzle (31) is securely fastened before using the hand held steam cleaner. If steam escapes from the joint then the variable steam jet nozzle is not correctly fit, allow the unit to cool then remove and re-fit the variable steam jet nozzle. Attaching other accessories (Fig. J) u Align the lugs on the hose with the recesses on the accessory. u Press the accessory (29) onto the hose (27) and twist anti-clockwise until the accessory clicks into place. Note! The variable steam jet nozzle may be used without the hose by fitting them directly to steam nozzle. All other accessories must be connected to the hose for use. Removing the hose and accessories(fig. J & K) Warning! The Steam nozzle, variable steam jet nozzle, hose and accessories become hot during use. Allow the unit and all accessories to cool before removing any accessories. Removing an accessory (Fig. J) u Twist the accessory (29) clockwise then pull away from the hose (27). Removing the hose (Fig. J) u Press in the clips (29) on either side of the hose (27) and pull away from the steam nozzle (4). 6
 in the upright position when stationary and make sure the steam mop is turned off when not in use. Removing the carpet glider (Fig.")
7 (Original instructions) ENGLISH Removing the variable steam jet nozzle (Fig. K) u Press in the clips (30) on either side of the variable steam jet nozzle (31) and pull away from the steam nozzle (4). Use Important! This unit will kill 99.9% of bacteria & germs when used in accordance with this manual and with the micro fibre pad fitted and a continuous run time of 90 seconds. Switching on and off (Steam mop) u To switch the appliance on, press the ON/OFF button (1). It takes approximately 15 seconds for the steam mop to heat up. Note: When the steam mop is first turned on the water reservoir will glow red. Once the steam mop is ready to use the water reservoir will glow blue. u To switch the appliance off, press the ON/OFF button (1). Caution! Never leave the steam mop in one spot on any surface for any period of time. Always place the steam mop with the handle (10) in the upright position when stationary and make sure the steam mop is turned off when not in use. Caution! Always empty the steam mop after use. Note: When first filled or after running dry it can take up to 45 seconds for steam to be produced. Autoselect TM Technology (Fig. I) This steam mop is fitted with an Autoselect TM button (6) which shows various cleaning applications. They are used to select the correct operating mode for your particular cleaning operation. Using Autoselect TM, choose from one of the following applications by pressing the autoselect button (6) until the required setting is selected: Wood/Laminate Stone/Marble Tiles/Vinyl The steam mop will select the correct volume of steam required for your particular cleaning operation. Note: Always check you are using the correct setting before using your steam mop. For convenience the steam mop will remember the last setting you chose. Steam burst (Fig. I) The steam mop is equipped with a steam burst button to aid in the removal of stubborn marks and stains. u During use, press the steam burst button (25) to apply extra cleaning power. Note: The steam burst will last for 10 seconds then the steam mop will return to the chosen setting. Switching on and off (Hand held steam cleaner) (Fig. L) u To switch the appliance on, press the ON/OFF button (1). It takes approximately 15 seconds for the hand held steam cleaner to heat up. Note: When the hand held steam cleaner is first turned on the water reservoir will glow red. Once the hand held steam cleaner is ready to use the water reservoir will glow blue. u Lift the lock off switch (2) and pull the trigger switch (3). After a few seconds steam will be produced. u To switch the appliance off, release the trigger switch (3) then press the ON/OFF button (1). Caution! Always empty the hand held steam cleaner after use. Caution! Steam may continue to be produced for a short time after the trigger switch (3) is released, this is normal. Switch off and allow the unit to cool before removing any accessories. Hints for optimum use General Caution! Never use the steam mop without first attaching a cleaning pad. u During steam mop use you can use the cable management clip (17) to keep your cable out of the way of the work area.. u Always vacuum or sweep the floor before using the steam mop. u The easiest way to use the machine is to tilt the handle to a 45 angle and clean slowly, covering a small area at a time. u Do not use chemical cleaners with your steam mop. To remove stubborn stains from vinyl or linoleum floors, you can use the steam burst button to apply extra steam to the area or pre-treat with a mild detergent and some water before using the steam mop. Steam cleaning with the mop u Fit hand held steam cleaner (5) to the steam mop body (9). u Place a cleaning pad (12) on the floor with the hook & loop side facing up. u Lightly press the steam mop down onto the cleaning pad (12). u Connect the steam mop to the mains. u Press the ON/OFF button (1). It takes approximately 15 seconds for the steam mop to heat up. u Press the Autoselect TM button (6) till the required setting is reached. 7

8 ENGLISH (Original instructions) u Pulling the handle (10) back will activate the steam pump. After a few seconds steam will start to come out of the steam head. Note: When first filled or after running dry it can take up to 45 seconds for steam to be produced. u It takes a few seconds for steam to enter the cleaning pad. The steam mop will now glide easily over the surface to be sanitised/cleaned. u Push and pull the steam mop slowly across the floor to thoroughly steam clean each section. Note: During use you may turn off the steam pump by returning the handle to the upright position, this convenient feature will allow you to leave the steam mop for a short time so that you may move items of furniture, then continue cleaning without the need to switch the appliance off. u When you have finished using the steam mop, return the handle (10) to the upright position and turn it OFF and wait until the steam mop cools down. (approximately five minutes) Caution! It is important to monitor the water level in the water tank. To refill the water tank and continue to sanitise/clean, return the handle (10) to the upright position and turn the steam mop OFF. Unplug the unit from the electrical wall outlet, refill the water tank (8). Caution! Never leave the steam mop in one spot on any surface for any period of time. Always place the steam mop with the handle (10) in the upright position when stationary and make sure the steam mop is turned off when not in use. Carpet refreshing u Place a cleaning pad (12) on the floor with the hook & loop side facing up. u Lightly press the steam mop down onto the cleaning pad (12). u Place the carpet glider (14) on the floor. u Lightly press the steam mop down onto the carpet glider (14) until it clicks into place. u Connect the steam mop to the mains. u Press the ON/OFF button (1). It takes approximately 15 seconds for the steam mop to heat up. u Press the Autoselect TM button (6) to the Wood/Laminate setting. u Pulling the handle (10) back will activate the steam pump. After a few seconds steam will start to come out of the steam head. Note: When first filled or after running dry it can take up to 45 seconds for steam to be produced. u Push and pull the steam mop slowly across the carpet to thoroughly refresh each section. 8 Note: During use you may turn off the steam pump by returning the handle to the upright position, this convenient feature will allow you to leave the steam mop for a short time so that you may move items of furniture, then continue cleaning without the need to switch the appliance off. u When you have finished using the steam mop, return the handle (10) to the upright position and turn it OFF and wait until the steam mop cools down. (approximately five minutes) Caution! If steam is observed escaping from the join between the hand held steam cleaner and the steam mop body, switch off and disconnect the unit from the mains supply. Allow to cool. Remove the hand held steam cleaner from the steam mop body. Inspect the seal (26) on the steam nozzle (4) and hose (27) (fig. J). If the seal is missing or damaged then please contact your nearest authorised repair agent. Do not use the appliance. If the seal is in good condition re-fit the hand held steam cleaner to the steam mop body ensuring that it is seated firmly in place. Caution! It is important to monitor the water level in the water tank. To refill the water tank and continue to sanitise/clean, return the handle (10) to the upright position and turn the steam mop OFF. Unplug the unit from the electrical wall outlet, refill the water tank (8). Caution! Never leave the steam mop in one spot on any surface for any period of time. Always place the steam mop with the handle (10) in the upright position when stationary and make sure the steam mop is turned off when not in use. After use (Fig. M & N) u Return the handle (10) to the upright position and turn the steam mop OFF, u Wait until the steam mop cools down. (approximately five minutes) u Unplug the steam mop from the electrical wall outlet. u Empty the water tank (8). u Remove the cleaning pad (12) and wash it ready for next use. (Take care to follow the wash care instructions printed on the cleaning pad). u Wrap the supply cable around the cable tidy hooks (15 & 16). Note: The top cable tidy hook (16) rotates to easily release the cable ready for next use. u Clip the supply cable onto itself using the cable tidy clip (32) close to the plug. Note: With the handle (10) in the upright position, the cable neatly wrapped around the cable tidy hooks (15 & 16) and secured with the cable tidy clip (32) your steam mop will stand on its own for storage. Alternatively there is a hanging bracket (33) built into the hand grip (34) which will allow your steam mop to be hung from a suitable hook on the wall. Always ensure that your wall hook is capable of supporting the weight of the steam mop safely.

9 (Original instructions) ENGLISH Hand held steam cleaning u Attach the required accessory. u Connect the hand held steam cleaner to the mains. u Press the ON/OFF button (1). It takes approximately 15 seconds for the hand held steam cleaner to heat up. u Lift the lock off (2) and pull the trigger switch (3) to activate the steam pump. After a few seconds steam will start to come out of the accessory. Note: When first filled or after running dry it can take up to 45 seconds for steam to be produced. Note: During use you may turn off the steam pump by releasing the trigger switch, this convenient feature will allow you to place the hand held steam cleaner down for a short time so that you may move items of furniture, then continue cleaning without the need to switch the appliance off. u When you have finished using the hand held steam cleaner, release the trigger switch (3), turn it OFF and disconnect from the mains supply. Wait until the steam mop cools down before storing. (approximately five minutes) Caution! It is important to monitor the water level in the water tank. To refill the water tank and continue to sanitise/clean, turn the hand held steam cleaner OFF. Unplug the unit from the electrical wall outlet, refill the water tank (8). Caution! Steam may continue to be produced for a short time after the trigger switch (3) is released, this is normal. Switch off and allow the unit to cool before removing any accessories. Accessories The performance of your appliance depends on the accessory used. Black & Decker accessories are engineered to high quality standards and designed to enhance the performance of your appliance. By using these accessories you will get the very best from your appliance. Technical data Voltage V ac 230 Power Tank capacity W ml FSMH1621D (Type 1) Weight kg 3.6 Troubleshooting If your appliance seems not to operate properly, follow the instructions below. If this does not solve the problem, please contact your local Black & Decker repair agent. Problem Step Possible solutions The steam mop is not turning on. The digital controls do not light up. The steam mop is not producing steam. The digital controls go out during use. The steam mop stops producing steam during use. The steam mop is producing too much steam during use. The steam mop is producing too little steam during use. 1 Check the unit is plugged in at the wall socket. 2 Check the unit is switched on using the on/ off switch (1). 3 Check the fuse in the plug. 4 Check that the handle (10) of the steam mop is pushed firmly into the steam mop body (9). Check that the arrow on the handle is flush with the top of the steam mop body (9). 5 Check that the hand held steam cleaner (5) is firmly docked into the steam mop body (9). 6 Check steps 1, then 2, then 3. 7 The steam mop will only produce steam once the handle is pulled back from the upright position. 8 Check that the water tank (8) is full. NOTE: When first filled or after running dry it can take up to 45 seconds for steam to be produced. 9 Check that the Steam head (11) is firmly docked into the steam mop body (9). 10 Check steps 5, then 1, then 2, then Check steps 4, then 5, then 1, then 2, then 3 12 Check steps 7, then 8, then 9, then 5, then The steam mop has 3 settings. Press the autoselect button (6) to reduce the amount of steam being produced. 14 Check that the steam burst button (25) has not been pressed. 15 The steam mop has 3 settings. Press the autoselect button (6) to increase the amount of steam being produced. 16 Press the steam burst button (25) to temporarily increase the amount of steam. 9

10 ENGLISH (Original instructions) Problem Step Possible solutions No steam is being produced from the hand held steam cleaner when the trigger is pulled. The hand held steam cleaner is producing too little steam during use. The hand held steam cleaner will not come out from the steam mop body. The accessories keep falling off the unit. Steam is escaping from unexpected areas of the unit. Where can I get further information / accessories for my steam mop. 17 The hand held steam cleaner has a lock off feature. Lift the lock off switch (2) and pull the trigger switch (3). After a few seconds steam will be produced. 18 Check steps 8, then 1, then 2, then The hand held steam cleaner will begin to produce steam after 15 seconds and will reach maximum steam flow after 45 seconds. 20 Firmly press the hand held steam cleaner release button (20) down, then pull the hand held steam (5) cleaner from the steam mop body (9). 21 Refer to the assembly chapter of the manual for correct fitting instructions of all parts and accessories. 22 Refer to the assembly chapter of the manual for correct fitting instructions of all parts and accessories
 and pull the trigger switch (3). After a few seconds steam will be produced. 18 Check steps 8, then 1, then 2, then 3.")
11 (Übersetzung der ursprünglichen Anweisungen) DEUTSCH Bestimmungsgemäße Verwendung Ihr Black & Decker Dampfreiniger wurde zum hygienischen Säubern von Bodenbelägen aus versiegeltem Hartholz, Laminat, Linoleum, PVC, Keramikfliesen, Stein und Marmor sowie dem Behandeln von Teppichböden entwickelt. Dieses Gerät darf nur im Innenbereich verwendet werden und ist nicht für den gewerblichen Einsatz vorgesehen. Achtung! Lesen Sie die Anleitung "Sicherheit, Pflege und Wartung" vollständig und aufmerksam durch, bevor Sie das Gerät verwenden. Lesen Sie diese Anleitung vollständig und aufmerksam durch, bevor Sie das Gerät verwenden. Merkmale Dieses Gerät verfügt über einige oder alle der folgenden Merkmale: 1. Ein-/Ausschalter 2. Einschaltsperre 3. Auslöser 4. Dampfdüse 5. Handdampfreiniger 6. Autoselect TM -Taste 7. Verschlusskappe 8. Wassertank 9. Gerätegehäuse 10. Griff 11. Reinigungskopf 12. Reinigungskopf-Bodentuch 13. Deltakopf-Bodentuch 14. Teppichgleiter 15. Untere Kabelhalterung 16. Obere Kabelhalterung 17. Kabelclip 18. Einfüllbecher Montage Achtung! Vergewissern Sie sich vor Ausführung der folgenden Schritte, dass das Gerät ausgeschaltet ist und der Netzstecker gezogen wurde. Weiterhin muss das Gerät abgekühlt sein und darf kein Wasser enthalten. Anbringen des Griffs (Abb. A) u Schieben Sie das untere Ende des Griffs (10) in die obere Öffnung des Gerätegehäuses (9), bis dieser einrastet. Der Pfeil auf dem Griff (10) sollte auf die Oberseite des Gerätegehäuses (9) ausgerichtet werden. Anbringen des Reinigungskopfs (Abb. B) u Schieben Sie den unteren Teil des Gerätegehäuses (9) auf den Reinigungskopf (11), bis dieser einrastet. u Zum Verstauen kann der Reinigungskopf vom Gerät abgezogen werden, indem die Entriegelungstaste des Reinigungskopfs (19) betätigt und das Gerätegehäuse (9) vom Reinigungskopf (11) abgezogen wird. Anbringen des Handdampfreinigers (Abb. C) u Halten Sie das Gerät an der Rückseite des Gerätegehäuses (9) fest. Drücken Sie den Handdampfreiniger (5) fest auf das Gerätegehäuse (9), bis dieser einrastet. Achtung! Überprüfen Sie stets, ob die Leuchten am Griff aufleuchten. Dadurch wird angezeigt, dass der Handdampfreiniger ordnungsgemäß angebracht ist. Achtung! Überprüfen Sie die Dichtung (26, Abb. J) an der Dampfdüse (4), bevor Sie den Handdampfreiniger am Gerätegehäuse anbringen. Wenden Sie sich an eine Vertragswerkstatt in Ihrer Nähe, wenn die Dichtung fehlt oder beschädigt ist. Das Gerät darf nicht weiter verwendet werden. Abnehmen des Handdampfreinigers (Abb. C) u Drücken Sie die Entriegelungstaste (20), und ziehen Sie den Handdampfreiniger (5) vom Gerätegehäuse ab. Anbringen eines Bodentuchs (Abb. D) Ersatzbodentücher erhalten Sie im Black & Decker Fachhandel: Reinigungskopf-Bodentuch (12) Katalognr. FSMP20-XJ. Deltakopf-Bodentuch (13) Katalognr. FSMP30-XJ. u Legen Sie ein Bodentuch (12 oder 13) mit den Klettverschlüssen nach oben auf den Boden. u Drücken Sie den Dampfreiniger vorsichtig auf das Bodentuch (12 oder 13). Achtung! Stellen Sie den Dampfreiniger stets mit dem Griff (10) in aufrechter Stellung ab. Stellen Sie sicher, dass der Dampfreiniger ausgeschaltet ist, wenn er nicht verwendet wird. Entfernen eines Bodentuchs (Abb. E) Achtung! Tragen Sie beim Wechseln des Bodentuchs stets zweckmäßiges Schuhwerk. Tragen Sie keine Hausschuhe oder Sandalen. u Bewegen Sie den Griff (10) in die aufrechte Stellung, und schalten Sie den Dampfreiniger aus. u Warten Sie, bis der Dampfreiniger abgekühlt ist (ca. fünf Minuten). u Drücken Sie die Lasche zum Entfernen des Bodentuchs (21) mit einer Spitze Ihres Schuhs fest nach unten. u Heben Sie den Dampfreiniger vom Bodentuch ab. Achtung! Stellen Sie den Dampfreiniger stets mit dem Griff (10) in aufrechter Stellung ab. Stellen Sie sicher, dass der Dampfreiniger ausgeschaltet ist, wenn er nicht verwendet wird. 11

12 DEUTSCH (Übersetzung der ursprünglichen Anweisungen) Füllen des Wassertanks (Abb. F) Dieser Dampfreiniger ist mit einem Kalkschutz zur Verlängerung der Lebensdauer des Geräts ausgestattet. Hinweis: Füllen Sie den Wassertank mit sauberem Leitungswasser. Hinweis: In Regionen mit besonders kalkhaltigem Wasser wird die Verwendung von destilliertem Wasser empfohlen. u Öffnen Sie die Verschlusskappe (7), indem Sie diese nach unten klappen. u Füllen Sie den Wassertank (8) mithilfe einer Kanne. Achtung! Der Tank hat ein Fassungsvermögen von 0.36 l. u Bringen Sie die Verschlusskappe (7) wieder an. Hinweis: Stellen Sie sicher, dass die Verschlusskappe fest sitzt. Hinweis: Der Einfüllbecher (18) lässt sich einfach am Griff anbringen, wenn dieser nicht verwendet wird. Hinweis: Verwenden Sie bei der Arbeit mit dem Dampfreiniger keine chemischen Reinigungsmittel. Anbringen des Teppichgleiters (Abb. G) (nur für Teppiche) u Legen Sie den Teppichgleiter auf den Boden. u Bringen Sie ein Bodentuch an. u Drücken Sie den Dampfreiniger vorsichtig auf den Teppichgleiter (14), bis dieser einrastet. Achtung! Stellen Sie den Dampfreiniger stets mit dem Griff (10) in aufrechter Stellung ab. Stellen Sie sicher, dass der Dampfreiniger ausgeschaltet ist, wenn er nicht verwendet wird. Entfernen des Teppichgleiters (Abb. G) Achtung! Tragen Sie beim Wechseln des Teppichgleiters stets zweckmäßiges Schuhwerk. Tragen Sie keine Hausschuhe oder Sandalen. u Bewegen Sie den Griff (10) in die aufrechte Stellung, und schalten Sie den Dampfreiniger aus. u Warten Sie, bis der Dampfreiniger abgekühlt ist (ca. fünf Minuten). u Drücken Sie die Lasche zum Entfernen des Teppichgleiters (33) mit einer Spitze Ihres Schuhs fest nach unten. u Heben Sie den Dampfreiniger vom Teppichgleiter (14) ab. Achtung! Stellen Sie den Dampfreiniger stets mit dem Griff (10) in aufrechter Stellung ab. Stellen Sie sicher, dass der Dampfreiniger ausgeschaltet ist, wenn er nicht verwendet wird. Deltakopf (Abb. H) Dieser Dampfreiniger verfügt über einen Deltakopf, mit dem Sie Ecken und schmale Lücken erreichen. Achtung! Tragen Sie bei Kontakt mit dem Deltakopf stets zweckmäßiges Schuhwerk. Tragen Sie keine Hausschuhe oder Sandalen. 12 u Bewegen Sie den Griff (10) in die aufrechte Stellung, und schalten Sie den Dampfreiniger aus. u Warten Sie, bis der Dampfreiniger abgekühlt ist (ca. fünf Minuten). u Drücken Sie die Lasche zum Entfernen des Reinigungskopfs (24) mit einer Spitze Ihres Schuhs vorsichtig nach unten. u Heben Sie den Deltakopf (23) vom Reinigungskopf (5) ab. u Befestigen Sie das Deltakopf-Bodentuch an der Unterseite des Deltakopfs. Hinweis: Entfernen Sie das Reinigungstuch, bevor Sie den Deltakopf erneut am Reinigungskopf befestigen. u Zum erneuten Anbringen des Deltakopfs platzieren Sie dessen Spitze im Reinigungskopf und drücken ihn dann fest nach unten, um sicherzustellen, dass er einrastet. Achtung! Stellen Sie den Dampfreiniger stets mit dem Griff (10) in aufrechter Stellung ab. Stellen Sie sicher, dass der Dampfreiniger ausgeschaltet ist, wenn er nicht verwendet wird. Anbringen des Schlauchs und Zubehörs am Handdampfreiniger (Abb. J und K) Achtung! Überprüfen Sie vor jeder Verwendung die Dichtung (26) an der Dampfdüse (4) und am Schlauch (27). Wenden Sie sich an eine Vertragswerkstatt in Ihrer Nähe, wenn die Dichtung fehlt oder beschädigt ist. Das Gerät darf nicht weiter verwendet werden. Anbringen des Schlauchs (Abb. J) u Drücken Sie die Clips (28) an beiden Seiten des Schlauchs (27). u Drücken Sie den Schlauch (27) auf die Dampfdüse (4), und lassen Sie die Clips (28) los. Wichtig! Stellen Sie vor der Verwendung des Handdampfreinigers sicher, dass der Schlauch (27) ordnungsgemäß angebracht ist. Der Schlauch ist nicht ordnungsgemäß angebracht, wenn an der Anschlussstelle Dampf austritt. Warten Sie, bis das Gerät abgekühlt ist, nehmen Sie den Schlauch ab, und bringen Sie diesen erneut an. Anbringen der verstellbaren Dampfstrahldüse (Abb. K) u Drücken Sie die Clips (30) an beiden Seiten der verstellbaren Dampfstrahldüse (31). u Drücken Sie die verstellbare Dampfstrahldüse auf die Dampfdüse (4) oder den Schlauch (27), und lassen Sie die Clips (30) los. Wichtig! Stellen Sie vor der Verwendung des Handdampfreinigers sicher, dass die verstellbare Dampfstrahldüse (31) ordnungsgemäß angebracht ist. Der verstellbare Dampfstrahldüse ist nicht ordnungsgemäß angebracht, wenn an der Anschlussstelle Dampf austritt. Warten Sie, bis das Gerät abgekühlt ist, nehmen Sie die verstellbare Dampfstrahldüse ab, und bringen Sie diese erneut an.
 wieder an. Hinweis: Stellen Sie sicher, dass die Verschlusskappe fest sitzt.")
13 (Übersetzung der ursprünglichen Anweisungen) DEUTSCH Anbringen anderer Zubehörteile (Abb. J) u Richten Sie die Halterungen am Schlauch an den Aussparungen am Zubehörteil aus. u Drücken Sie das Zubehörteil (29) auf den Schlauch (27), und drehen Sie das Zubehörteil entgegen dem Uhrzeigersinn, bis dieses einrastet. Hinweis! Die verstellbare Dampfstrahldüse kann ohne den Schlauch verwendet werden, indem diese direkt auf die Dampfdüse aufgesetzt wird. Alle anderen Zubehörteile müssen am Schlauch angebracht werden. Entfernen des Schlauchs und Zubehörs (Abb. J und K) Achtung! Die Dampfdüse, die verstellbare Dampfstrahldüse, der Schlauch und die Zubehörteile erhitzen sich während der Verwendung. Warten Sie vor dem Entfernen von Zubehörteilen, bis das Gerät und alle Zubehörteile abgekühlt sind. Entfernen von Zubehör (Abb. J) u Drehen Sie das Zubehörteil (29) im Uhrzeigersinn, und ziehen Sie es vom Schlauch (27) ab. Entfernen des Schlauchs (Abb. J) u Drücken Sie die Clips (29) an beiden Seiten des Schlauchs (27), und ziehen Sie diesen von der Dampfdüse (4) ab. Entfernen der verstellbaren Dampfstrahldüse (Abb. K) u Drücken Sie die Clips (30) an beiden Seiten der verstellbaren Dampfstrahldüse (31), und ziehen Sie diesen von der Dampfdüse (4) ab. Verwendung Wichtig! Mit diesem Gerät können 99.9 % der Bakterien und Keime abgetötet werden, wenn es gemäß dieser Anleitung mit dem Mikrofasertuch und mindestens 90 Sekunden lang verwendet wird. Ein- und Ausschalten (Gerät) u Drücken Sie den Ein-/Ausschalter (1), um das Gerät einzuschalten. Der Dampfreiniger benötigt zum Erreichen der Betriebstemperatur ca. 15 Sekunden. Hinweis: Der Wasserbehälter leuchtet beim Einschalten des Dampfreinigers zunächst rot. Die Farbe des Wasserbehälters wechselt zu blau, sobald der Dampfreiniger betriebsbereit ist. u Drücken Sie den Ein-/Ausschalter (1), um das Gerät auszuschalten. Achtung! Stellen Sie den Dampfreiniger ungeachtet der jeweiligen Oberfläche keinesfalls längere Zeit an einer Stelle ab. Stellen Sie den Dampfreiniger stets mit dem Griff (10) in aufrechter Stellung ab. Stellen Sie sicher, dass der Dampfreiniger ausgeschaltet ist, wenn er nicht verwendet wird. Achtung! Leeren Sie den Dampfreiniger nach jedem Gebrauch. Hinweis: Nach dem ersten Befüllen oder nachdem der Tank vollständig leer war, kann es bis zu 45 Sekunden dauern, bis Dampf erzeugt wird. Autoselect TM -Technologie (Abb. I) Dieser Dampfreiniger ist mit einer Autoselect TM -Taste (6) für unterschiedliche Reinigungsanwendungen ausgestattet. Die Programmwahl dient zum Auswählen des richtigen Betriebsmodus für die entsprechende Reinigungsanwendung. Wählen Sie über Autoselect TM eine der folgenden Anwendungen aus, indem Sie die Autoselect-Taste (6) drücken, bis die gewünschte Einstellung angezeigt wird: Holz/Laminat Stein/Marmor Fliesen/PVC Der richtige Dampfausstoß für die entsprechende Reinigungsanwendung wird vom Dampfreiniger automatisch ausgewählt. Hinweis: Überprüfen Sie vor dem Verwenden des Dampfreinigers stets, ob die richtige Einstellung ausgewählt ist. Der Einfachheit halber wird die zuletzt ausgewählte Einstellung des Dampfreinigers beibehalten. Dampfstoßfunktion (Abb. I) Der Dampfreiniger ist mit einer Dampfstoßtaste ausgestattet, mit der Sie auch hartnäckige Flecken entfernen können. u Wenn Sie bei der Verwendung die Dampfstoßtaste (25) drücken, wird die Reinigungsleistung verstärkt. Hinweis: Der Dampfstoß hält 10 Sekunden lang an. Anschließend kehrt der Dampfreiniger zur ausgewählten Einstellung zurück. Ein- und Ausschalten (Handdampfreiniger) (Abb. L) u Drücken Sie den Ein-/Ausschalter (1), um das Gerät einzuschalten. Der Handdampfreiniger benötigt zum Erreichen der Betriebstemperatur ca. 15 Sekunden. Hinweis: Der Wasserbehälter leuchtet beim Einschalten des Handdampfreinigers zunächst rot. Die Farbe des Wasserbehälters wechselt zu blau, sobald der Handdampfreiniger betriebsbereit ist. u Betätigen Sie die Einschaltsperre (2), und drücken Sie auf den Auslöser (3). Nach wenigen Sekunden wird Dampf erzeugt. 13
 Achtung! Die Dampfdüse, die verstellbare Dampfstrahldüse, der Schlauch und die Zubehörteile erhitzen sich während der Verwendung.")
14 DEUTSCH (Übersetzung der ursprünglichen Anweisungen) u Schalten Sie das Gerät aus, indem Sie den Auslöser (3) loslassen und anschließend den Ein-/Ausschalter (1) drücken. Achtung! Leeren Sie den Handdampfreiniger nach jedem Gebrauch. Achtung! Auch nach dem Loslassen des Auslösers (3) wird noch eine kurze Zeit lang Dampf erzeugt. Das ist normal. Schalten Sie das Gerät aus, und warten Sie, bis es abgekühlt ist, bevor Sie Zubehörteile entfernen. Hinweise für optimale Arbeitsergebnisse Allgemeine Hinweise Achtung! Verwenden Sie den Dampfreiniger keinesfalls ohne Bodentuch. u Während des Gebrauchs können Sie den Kabelclip (17) verwenden, um das Kabel aus dem Arbeitsbereich fernzuhalten. u Reinigen Sie den Boden vor der Verwendung des Dampfreinigers stets mit einem Staubsauger bzw. einem Besen. u Das Gerät lässt sich am einfachsten verwenden, wenn Sie den Griff in einem Winkel von 45 Grad neigen und jeweils nur eine kleine Fläche bearbeiten. u Verwenden Sie bei der Arbeit mit dem Dampfreiniger keine chemischen Reinigungsmittel. Um hartnäckige Flecken auf PVC- oder Linoleumböden zu entfernen, können Sie den jeweiligen Bereich mit einem zusätzlichen Dampfstoß reinigen oder mit einem milden Reinigungsmittel und Wasser vorbehandeln. Dampfreinigung mit dem Mopp u Bringen Sie den Handdampfreiniger (5) am Gerätegehäuse (9) an. u Legen Sie ein Bodentuch (12) mit den Klettverschlüssen nach oben auf den Boden. u Drücken Sie den Dampfreiniger vorsichtig auf das Bodentuch (12). u Schließen Sie den Dampfreiniger an die Stromversorgung an. u Drücken Sie den Ein-/Ausschalter (1). Der Dampfreiniger benötigt zum Erreichen der Betriebstemperatur ca. 15 Sekunden. u Drücken Sie die Autoselect TM -Taste (6), bis die gewünschte Einstellung ausgewählt ist. u Die Dampfpumpe wird aktiviert, sobald Sie den Griff (10) nach hinten ziehen. Nach wenigen Sekunden tritt Dampf aus dem Reinigungskopf aus. Hinweis: Nach dem ersten Befüllen oder nachdem der Tank vollständig leer war, kann es bis zu 45 Sekunden dauern, bis Dampf erzeugt wird. u Es dauert einige Sekunden, bis der Dampf das Bodentuch durchdringt. Anschließend gleitet der Dampfreiniger mühelos über die zu reinigende Oberfläche. 14 u Bewegen Sie den Dampfreiniger langsam über den Boden, um alle Bereiche gründlich zu reinigen. Hinweis: Die Dampfpumpe lässt sich während dem Gebrauch einfach ausschalten, indem Sie den Griff zurück in die aufrechte Stellung bewegen. Diese praktische Funktion ermöglicht es, den Dampfreiniger unbeaufsichtigt zu lassen, z. B wenn Sie Möbel umstellen möchten, bevor Sie mit dem Reinigen fortfahren. Das Gerät muss hierbei nicht ausgeschaltet werden. u Bewegen Sie nach dem Gebrauch des Dampfreinigers den Griff (10) zurück in die aufrechte Stellung, schalten Sie das Gerät aus, und warten Sie, bis das Gerät abgekühlt ist (ca. fünf Minuten). Achtung! Achten Sie stets auf den Wasserpegel im Tank. Bewegen Sie den Griff (10) zurück in die aufrechte Stellung, und schalten Sie das Gerät aus, um den Wassertank aufzufüllen und mit dem Reinigen fortzufahren. Trennen Sie das Gerät von der Stromversorgung, und füllen Sie den Wassertank (8). Achtung! Stellen Sie den Dampfreiniger ungeachtet der jeweiligen Oberfläche keinesfalls längere Zeit an einer Stelle ab. Stellen Sie den Dampfreiniger stets mit dem Griff (10) in aufrechter Stellung ab. Stellen Sie sicher, dass der Dampfreiniger ausgeschaltet ist, wenn er nicht verwendet wird. Behandeln von Teppichböden u Legen Sie ein Bodentuch (12) mit den Klettverschlüssen nach oben auf den Boden. u Drücken Sie den Dampfreiniger vorsichtig auf das Bodentuch (12). u Legen Sie den Teppichgleiter (14) auf den Boden. u Drücken Sie den Dampfreiniger vorsichtig auf den Teppichgleiter (14), bis dieser einrastet. u Schließen Sie den Dampfreiniger an die Stromversorgung an. u Drücken Sie den Ein-/Ausschalter (1). Der Dampfreiniger benötigt zum Erreichen der Betriebstemperatur ca. 15 Sekunden. u Wählen Sie mit der Autoselect TM -Taste (6) die Einstellung für Holz/Laminat aus. u Die Dampfpumpe wird aktiviert, sobald Sie den Griff (10) nach hinten ziehen. Nach wenigen Sekunden tritt Dampf aus dem Reinigungskopf aus. Hinweis: Nach dem ersten Befüllen oder nachdem der Tank vollständig leer war, kann es bis zu 45 Sekunden dauern, bis Dampf erzeugt wird. u Bewegen Sie den Dampfreiniger langsam über den Teppich, um alle Bereiche gründlich zu behandeln.
 verwenden, um das Kabel aus dem Arbeitsbereich fernzuhalten.")
15 (Übersetzung der ursprünglichen Anweisungen) DEUTSCH Hinweis: Die Dampfpumpe lässt sich während dem Gebrauch einfach ausschalten, indem Sie den Griff zurück in die aufrechte Stellung bewegen. Diese praktische Funktion ermöglicht es, den Dampfreiniger unbeaufsichtigt zu lassen, z. B wenn Sie Möbel umstellen möchten, bevor Sie mit dem Reinigen fortfahren. Das Gerät muss hierbei nicht ausgeschaltet werden. u Bewegen Sie nach dem Gebrauch des Dampfreinigers den Griff (10) zurück in die aufrechte Stellung, schalten Sie das Gerät aus, und warten Sie, bis das Gerät abgekühlt ist (ca. fünf Minuten). Achtung! Schalten Sie das Gerät aus, und trennen Sie es von der Stromversorgung, wenn Dampf an der Verbindung zwischen dem Handdampfreiniger und dem Gerätegehäuse austritt. Lassen Sie das Gerät abkühlen. Entfernen Sie den Handdampfreiniger vom Gerätegehäuse. Überprüfen Sie vor jeder Verwendung die Dichtung (26) an der Dampfdüse (4) und am Schlauch (27) (Abb. J). Wenden Sie sich an eine Vertragswerkstatt in Ihrer Nähe, wenn die Dichtung fehlt oder beschädigt ist. Das Gerät darf nicht weiter verwendet werden. Bringen Sie den Handdampfreiniger wieder am Gerätegehäuse an, wenn sich die Dichtung in ordnungsgemäßem Zustand befindet, und stellen Sie sicher, dass der Handdampfreiniger fest sitzt. Achtung! Achten Sie stets auf den Wasserpegel im Tank. Bewegen Sie den Griff (10) zurück in die aufrechte Stellung, und schalten Sie das Gerät aus, um den Wassertank aufzufüllen und mit dem Reinigen fortzufahren. Trennen Sie das Gerät von der Stromversorgung, und füllen Sie den Wassertank (8). Achtung! Stellen Sie den Dampfreiniger ungeachtet der jeweiligen Oberfläche keinesfalls längere Zeit an einer Stelle ab. Stellen Sie den Dampfreiniger stets mit dem Griff (10) in aufrechter Stellung ab. Stellen Sie sicher, dass der Dampfreiniger ausgeschaltet ist, wenn er nicht verwendet wird. Nach dem Gebrauch (Abb. M und N) u Bewegen Sie den Griff (10) in die aufrechte Stellung, und schalten Sie den Dampfreiniger aus. u Warten Sie, bis der Dampfreiniger abgekühlt ist (ca. fünf Minuten). u Ziehen Sie den Netzstecker. u Leeren Sie den Wassertank (8). u Entfernen Sie das Bodentuch (12), und reinigen Sie es vor dem nächsten Gebrauch. (Befolgen Sie hierbei die Reinigungsanweisungen auf dem Bodentuch.) u Wickeln Sie das Netzkabel auf den dafür vorgesehenen Halterungen (15 und 16) auf. Hinweis: Die obere Halterung (16) lässt sich drehen, damit das Kabel bei der nächsten Verwendung schnell abgenommen werden kann. u Befestigen Sie das Netzkabel kurz oberhalb des Steckers mit dem dafür vorgesehenen Clip (32). Hinweis: Wenn sich der Griff (10) in der aufrechten Stellung befindet, das Kabel ordnungsgemäß auf den Halterungen (15 und 16) aufgewickelt ist und mithilfe des Clips (32) gesichert wird, kann der Dampfreiniger ohne Befestigung gelagert werden. Zusätzlich verfügt der Handgriff (33) über eine Öse (34), mit der der Dampfreiniger an einem geeigneten Wandhaken aufgehängt werden kann. Achten Sie darauf, dass der Haken ausreichend tragfähig ist, um das Gewicht des Dampfreinigers sicher zu halten. Verwenden des Handdampfreinigers u Bringen Sie das gewünschte Zubehörteil an. u Stecken Sie den Netzstecker des Handdampfreinigers ein. u Drücken Sie den Ein-/Ausschalter (1). Der Handdampfreiniger benötigt zum Erreichen der Betriebstemperatur ca. 15 Sekunden. u Drücken Sie die Einschaltsperre (2), und drücken Sie auf den Auslöser (3), um die Dampfpumpe einzuschalten. Nach wenigen Sekunden tritt Dampf aus dem Zubehörteil aus. Hinweis: Nach dem ersten Befüllen oder nachdem der Tank vollständig leer war, kann es bis zu 45 Sekunden dauern, bis Dampf erzeugt wird. Hinweis: Die Dampfpumpe lässt sich während des Gebrauchs einfach ausschalten, indem Sie den Auslöser loslassen. Diese praktische Funktion ermöglicht es, den Handdampfreiniger kurzzeitig auf der Unterlage abzustellen, z. B wenn Sie Möbel umstellen möchten, bevor Sie mit dem Reinigen fortfahren. Das Gerät muss hierbei nicht ausgeschaltet werden. u Lassen Sie nach dem Gebrauch den Auslöser (3) los, schalten die den Handdampfreiniger aus, und ziehen Sie den Netzstecker. Warten Sie, bis der Dampfreiniger abgekühlt ist, bevor Sie diesen verstauen (ca. fünf Minuten). Achtung! Achten Sie stets auf den Wasserpegel im Tank. Schalten Sie den Handdampfreiniger aus, um den Wassertank aufzufüllen und mit dem Reinigen fortzufahren. Trennen Sie das Gerät von der Stromversorgung, und füllen Sie den Wassertank (8). Achtung! Auch nach dem Loslassen des Auslösers (3) wird noch eine kurze Zeit lang Dampf erzeugt. Das ist normal. Schalten Sie das Gerät aus, und warten Sie, bis es abgekühlt ist, bevor Sie Zubehörteile entfernen. Zubehörteile Das verwendete Zubehör hat wesentlichen Einfluss auf die Leistung des Geräts. Zubehörteile von Black & Decker erfüllen höchste Qualitätsstandards und wurden speziell für die Verwendung mit Ihrem Gerät entwickelt. Bei Verwendung dieses Zubehörs erzielen Sie stets optimale Ergebnisse. 15
 zurück in die aufrechte Stellung, schalten Sie das Gerät aus, und warten Sie, bis das Gerät abgekühlt ist (ca. fünf Minuten). Achtung!")
16 DEUTSCH Technische Daten (Übersetzung der ursprünglichen Anweisungen) Problem Schritt Lösungsmöglichkeiten FSMH1621D (Typ 1) Spannung V ac 230 Leistung Fassungsvermögen des Tanks W ml Gewicht kg 3.6 Problembehebung Wenn das Gerät nicht richtig zu funktionieren scheint, befolgen Sie die nachfolgenden Hinweise. Sollte sich das Problem nicht beheben lassen, wenden Sie sich an eine Black & Decker Vertragswerkstatt in Ihrer Nähe. Problem Schritt Lösungsmöglichkeiten Der Dampfreiniger lässt sich nicht einschalten. Die Digitalanzeige leuchtet nicht. Das Gerät erzeugt keinen Dampf. Die Digitalanzeige erlischt während der Verwendung. 1 Überprüfen Sie, ob das Gerät eingesteckt ist. 2 Überprüfen Sie, ob das Gerät mit dem Ein-/ Ausschalter (1) eingeschaltet wurde. 3 Überprüfen Sie die Sicherung im Stecker. 4 Stellen Sie sicher, dass der Griff (10) des Dampfreinigers richtig im Gerätegehäuse (9) sitzt. Stellen Sie sicher, dass der Pfeil auf dem Griff auf die Oberseite des Gerätegehäuses (9) ausgerichtet ist. 5 Stellen Sie sicher, dass der Handdampfreiniger (5) sicher am Gerätegehäuse (9) angebracht ist. 6 Überprüfen Sie die Schritte 1, 2 und 3. 7 Das Gerät erzeugt nur Dampf, nachdem der Griff aus der aufrechten Stellung zurückgezogen wird. 8 Überprüfen Sie, ob der Wassertank (8) gefüllt ist. HINWEIS: Nach dem ersten Befüllen oder nachdem der Tank vollständig leer war, kann es bis zu 45 Sekunden dauern, bis Dampf erzeugt wird. 9 Stellen Sie sicher, dass der Reinigungskopf (11) sicher am Gerätegehäuse (9) angebracht ist. 10 Überprüfen Sie die Schritte 5, 1, 2 und Überprüfen Sie die Schritte 4, 5, 1, 2 und 3. Das Gerät erzeugt während der Verwendung keinen Dampf mehr. Das Gerät erzeugt während der Verwendung zu viel Dampf. Das Gerät erzeugt während der Verwendung zu wenig Dampf. Es wird kein Dampf erzeugt, wenn der Auslöser des Handdampfreinigers betätigt wird. Der Handdampfreiniger erzeugt während der Verwendung zu wenig Dampf. Der Handdampfreiniger lässt sich nicht aus dem Gerätegehäuse lösen. Das Zubehör fällt vom Gerät ab. An nicht dafür vorgesehenen Stellen des Geräts tritt Dampf aus. Wo erhalte ich weitere Informationen/ Zubehör für den Dampfreiniger? 12 Überprüfen Sie die Schritte7, 8, 9, 5 und Der Dampfreiniger verfügt über 3 Einstellungen. Stellen Sie die Autoselect-Programmwahl (6) auf einer geringere Dampferzeugung ein. 14 Überprüfen Sie, ob die Dampfstoßtaste (25) gedrückt wurde. 15 Der Dampfreiniger verfügt über 3 Einstellungen. Drücken Sie die Autoselect-Programmwahl (6), um die erzeugte Dampfmenge zu erhöhen. 16 Drücken Sie die Dampfstoßtaste (25), um die erzeugte Dampfmenge vorübergehend zu erhöhen. 17 Der Handdampfreiniger verfügt über eine Sperrfunktion. Betätigen Sie die Einschaltsperre (2), und drücken Sie auf den Auslöser (3). Nach einigen Sekunden wird Dampf erzeugt. 18 Überprüfen Sie die Schritte 8, 1, 2 und Der Handdampfreiniger erzeugt nach 15 Sekunden Dampf. Die maximale Dampferzeugung wird nach 45 Sekunden erreicht. 20 Drücken Sie die Entriegelungstaste für den Handampfreiniger (20) fest nach unten, und ziehen Sie den Handdampfreiniger (5) vom Gerätegehäuse (9) ab. 21 Überprüfen Sie den Montageabschnitt in der Anleitung. Hier finden Sie Anweisungen zum richtigen Anbringen sämtlicher Teile sowie des Zubehörs. 22 Überprüfen Sie den Montageabschnitt in der Anleitung. Hier finden Sie Anweisungen zum richtigen Anbringen sämtlicher Teile sowie des Zubehörs

17 (Traduction des instructions initiales) FRANÇAIS Utilisation Votre balai vapeur Black & Decker a été conçu pour désinfecter et nettoyer les planchers vernis, les sols en bois lamellés vernis, en lino, en vinyle, en carrelage, en pierre et en marbre. Il convient également au rafraîchissement des moquettes. Il est destiné à une utilisation à l intérieur et exclusivement domestique. Attention! Lisez attentivement et entièrement le manuel Sécurité, Maintenance, Entretien avant d utiliser l appareil. Lisez attentivement et entièrement ce manuel avant d utiliser l appareil. Caractéristiques Cet appareil comprend certains, ou tous, les éléments suivants : 1. Bouton marche/arrêt 2. Bouton de déblocage 3. Déclencheur 4. Embout vapeur 5. Nettoyeur à vapeur portable 6. Sélecteur Auto Select TM 7. Bouchon de remplissage 8. Réservoir d eau 9. Logement du balai vapeur 10. Manche 11. Embout vapeur 12. Patin de nettoyage à la vapeur 13. Tampon de nettoyage Delta 14. Accessoire moquette 15. Crochet pour câble en bas 16. Crochet pour câble en haut 17. Clip d'accrochage de câble 18. Récipient Assemblage Attention! Avant d exécuter ce qui suit, assurez-vous que l appareil est éteint, débranché et que l appareil est froid et ne contient pas d eau. Fixation du manche (figure A) u Glissez l'extrémité du manche (10) en haut du corps du balai vapeur (9) jusqu à ce qu elle soit enclenchée. La flèche sur le manche (10) doit être alignée avec le haut du corps du balai vapeur (9). Fixation de l'embout vapeur (figure B) u Glissez l extrémité inférieure du corps du balai vapeur (9) sur l embout vapeur (11) jusqu'à ce qu'elle soit enclenchée. u L embout vapeur peut être retiré du corps du balai vapeur en appuyant sur le bouton de dégagement (19) sur le manche et en dégageant le corps du balai vapeur (9) de l embout vapeur (11). Fixation du nettoyeur à vapeur portable (figure C) u En maintenant le corps du balai vapeur (9) à l'arrière, poussez fermement le nettoyeur à vapeur portable (5) dans le corps du balai vapeur (9) pour l'enclencher. Attention! La commande du manche doit être allumée pour confirmer que l'installation est correcte. Attention! Vérifiez si le joint (26, figure J) se trouve sur l'embout vapeur (4) avant d'installer le balai vapeur portable dans son logement. Si le joint est endommagé ou manquant, contactez le réparateur agréé Black & Decker le plus proche. N utilisez pas l appareil. Retrait du nettoyeur à vapeur portable (figure C) u Enfoncez le bouton de dégagement (20) et tirez le nettoyeur à vapeur portable (5) hors du logement. Fixation d un tampon nettoyeur (figure D) Vous trouverez des tampons nettoyeurs chez votre revendeur Black & Decker. Tampon de nettoyage à la vapeur (12) : (cat. N FSMP20-XJ). Tampon de nettoyage Delta (13) : (cat. N FSMP30-XJ) u Placez un tampon nettoyeur (12 ou 13) au sol avec le système "hook & loop" vers le haut. u Appuyez légèrement le balai vapeur sur le tampon nettoyeur (12 ou 13). Attention! À l arrêt, placez toujours votre balai vapeur en positionnant le manche (10) à la verticale et veillez à éteindre le balai vapeur lorsque vous ne l'utilisez pas. Retrait du tampon nettoyeur (figure E) Attention! Portez toujours des chaussures adaptées pour changer le tampon nettoyeur du balai vapeur. Ne portez pas de chaussons ou de sandalettes. u Placez le manche (10) en position verticale et éteignez le balai vapeur (OFF). u Attendez que le balai vapeur refroidisse (environ cinq minutes). u Placez l avant de votre chaussure sur la languette de dégagement du patin nettoyeur (21) et appuyez fermement dessus. u Soulevez le balai vapeur pour dégager le tampon nettoyeur.. Attention! À l arrêt, placez toujours votre balai vapeur en positionnant le manche (10) à la verticale et veillez à éteindre le balai vapeur lorsque vous ne l'utilisez pas. 17

18 FRANÇAIS (Traduction des instructions initiales) Remplissage du réservoir d eau (figure F) Ce nettoyeur à vapeur est doté d un système anti-calcaire qui permet de prolonger la durée de vie du système. Remarque : Remplissez le réservoir avec de l eau du robinet. Remarque : Dans les zones où l eau est très calcaire, l utilisation d eau distillée est recommandée. u Ouvrez le couvercle de remplissage (7) en le soulevant. u Avec le récipient, remplissez le réservoir d'eau (8) avec de l eau. Attention! La capacité du réservoir d'eau est de 0.36 L. u Ré-installez le couvercle de remplissage (7). Remarque : Vérifiez l'installation du couvercle de remplissage. Remarque : Pour un côté pratique, quand le récipient (18) n est pas utilisé, fixez-le au manche. Remarque : N'utilisez pas de nettoyants chimiques avec votre balai vapeur. Fixation de l accessoire moquette (figure G) (pour moquettes uniquement) u Posez l accessoire moquette sur le sol. u Attachez un patin de nettoyage sur l'appareil. u Appuyez légèrement le balai vapeur sur l accessoire moquette (14) jusqu à ce qu il soit enclenché. Attention! À l arrêt, placez toujours votre balai vapeur en positionnant le manche (10) à la verticale et veillez à éteindre le balai vapeur lorsque vous ne l'utilisez pas. Retrait de l accessoire moquette (figure G) Attention! Portez toujours des chaussures adaptées pour changer l accessoire moquette du balai vapeur. Ne portez pas de chaussons ou de sandalettes. u Placez le manche (10) en position verticale et éteignez le balai vapeur (OFF). u Attendez que le balai vapeur refroidisse (environ cinq minutes). u Placez le bout de votre chaussure sur la languette de dégagement de l accessoire moquette (33) et appuyez dessus fermement. u Soulevez le balai vapeur pour dégager l accessoire moquette (14). Attention! À l arrêt, placez toujours votre balai vapeur en positionnant le manche (10) à la verticale et veillez à éteindre le balai vapeur lorsque vous ne l'utilisez pas. Embout Delta (figure H) Ce balai vapeur est doté d'un embout Delta qui permet d'atteindre les zones étroites et les coins. Attention! Portez toujours des chaussures adaptées pour utiliser l'embout Delta du balai vapeur. Ne portez pas de chaussons ou de sandalettes. u Placez le manche (10) en position verticale et éteignez le balai vapeur. 18 u Attendez que le balai vapeur refroidisse (environ cinq minutes). u Placez l avant de votre chaussure sur la languette de dégagement de l'embout vapeur (24) et appuyez fermement dessus. u Soulevez l'embout Delta (23) pour dégager l'embout vapeur (5). u Installez le tampon de nettoyage Delta en bas de l'embout Delta. Remarque : Retirez le tampon de nettoyage avant de réinstaller l'embout Delta sur l'embout vapeur.. u Pour réinstaller l'embout Delta, placez l'extrémité de l'embout Delta sur l'embout vapeur, puis appuyez fermement vers le bas pour bien enclencher l'embout Delta. Attention! À l arrêt, placez toujours votre balai vapeur en positionnant le manche (10) à la verticale et veillez à éteindre le balai vapeur lorsque vous ne l'utilisez pas. Fixation du tuyau et des accessoires sur le nettoyeur à vapeur portable (figure J et K) Attention! Vérifiez le joint (26) sur l'embout vapeur (4) et le tuyau (27) avant chaque utilisation. Si le joint est endommagé ou manquant, contactez le réparateur agréé Black & Decker le plus proche. N utilisez pas l appareil. Fixation du tuyau (figure J) u Appuyez sur les clips (28) de chaque côté du tuyau (27). u Enfoncez le tuyau (27) sur l'embout vapeur (4) et relâchez les clips (28). Important! Assurez-vous que le tuyau (27) est correctement fixé avant d'utiliser le nettoyeur à vapeur portable. Si la vapeur sort au niveau du joint, le tuyau est mal fixé. Laissez l'appareil refroidir et installez de nouveau le tuyau. Fixation de l'embout variateur (figure K) u Appuyez sur les clips (30) de chaque côté de l'embout variateur (31). u Enfoncez l'embout variateur sur l'embout vapeur (4) ou le tuyau (27) et relâchez les clips (30). Important! Assurez-vous que l'embout variateur (31) est correctement fixé avant d'utiliser le nettoyeur à vapeur portable. Si la vapeur sort au niveau du joint, l'embout variateur est mal fixé. Laissez l'appareil refroidir et installez de nouveau l'embout variateur. Fixation des autres accessoires (figure J) u Alignez les goujons sur les encoches de l'accessoire. u Enfoncez l'accessoire (29) sur le tuyau (27) et tournez-le dans le sens inverse des aiguilles d'une montre pour l enclencher.
. Remarque : Vérifiez l'installation du couvercle de remplissage.")
19 (Traduction des instructions initiales) FRANÇAIS Remarque! L'embout variateur peut être utilisé sans le tuyau en l'installant directement sur l'embout vapeur. Tous les autres accessoires doivent être raccordés au tuyau pour être utilisés. Retrait du tuyau et des accessoires (figures J et K) Attention! L'embout vapeur, l'embout variateur, le tuyau et les accessoires chauffent pendant l'utilisation. Avant de retirer un accessoire, laissez-le refroidir ainsi que l'appareil. Retrait d un accessoire (figure J) u Tournez l'accessoire (29) dans le sens des aiguilles d'une montre, puis le tirer du tuyau (27). Retrait du tuyau (figure J) u Appuyez sur les clips (29) de chaque côté du tuyau (27) pour l'extraire de l'embout vapeur (4). Retrait de l'embout variateur (figure K) u Appuyez sur les clips (30) de chaque côté de l'embout variateur (31) pour l'extraire de l'embout vapeur (4). Utilisation Important! Cet appareil détruit 99.9 % des bactéries et germes pour autant qu'il soit utilisé conformément aux consignes décrites dans le présent manuel, avec un filtre en microfibre et en fonctionnement continu pendant 90 secondes. Démarrage et arrêt (balai vapeur) u Pour mettre l appareil en marche, appuyez sur le bouton marche/arrêt (1). Le balai vapeur prend environ 15 secondes pour chauffer. Remarque : Quand le balai vapeur est mis en marche, le réservoir d eau s allume en rouge. Quand il est prêt à être utilisé, le réservoir d eau s allume en bleu. u Pour éteindre l appareil, appuyez sur le bouton marche/ arrêt (1). Attention! Ne laissez jamais longtemps le balai vapeur au même endroit. À l arrêt, placez toujours le balai vapeur en positionnant le manche (10) à la verticale et veillez à éteindre le balai vapeur lorsque vous ne l'utilisez pas Attention! Videz toujours le balai vapeur après l utilisation. Remarque : Au premier remplissage ou après une utilisation à sec, la production de vapeur peut prendre jusqu'à 45 minutes. Technologie Autoselect TM (figure I) Ce balai vapeur est doté d un sélecteur Autoselect TM (6) qui permet différents types de nettoyage. Elles permettent de sélectionner le mode de fonctionnement approprié au nettoyage que vous souhaitez. Avec le sélecteur Autoselect TM, choisissez une des applications suivantes en appuyant sur le sélecteur (6) pour obtenir le réglage approprié : Bois/Lamellé Pierre/Marbre Carrelage/Vinyle Le balai vapeur sélectionne le volume de vapeur approprié au nettoyage choisi. Remarque : Vérifiez toujours le réglage avant d'utiliser votre balai vapeur. Le balai vapeur mémorise le dernier réglage choisi. Jet de vapeur (figure I) Le balai vapeur est doté d'un bouton permettant de déclencher un jet de vapeur pour venir à bout des taches et les traces tenaces. u Pendant l'utilisation, appuyez sur le bouton du jet de vapeur (25) pour appliquer plus de vapeur. Remarque : Le jet de vapeur dure 10 secondes. Le réglage sélectionné se remet ensuite en place. Mise en marche/arrêt (nettoyeur à vapeur portable) (figure L) u Pour mettre l appareil en marche, appuyez sur le bouton marche/arrêt (1). Le nettoyeur à vapeur portable prend environ 15 secondes pour chauffer. Remarque : Quand le nettoyeur à vapeur portable est mis en marche, le réservoir d eau s allume en rouge. Quand il est prêt à être utilisé, le réservoir d eau s allume en bleu. u Soulevez le bouton de déblocage (2) et actionnez le déclencheur (3). La formation de vapeur prend quelques secondes. u Pour éteindre l appareil, relâchez le déclencheur (3), puis appuyez sur le bouton marche/arrêt (1).. Attention! Videz toujours le nettoyeur à vapeur portable après l utilisation. Attention! La formation de vapeur peut continuer pendant une courte période une fois le déclencheur (3) relâché. Ceci est un phénomène normal. Avant de retirer un accessoire, arrêtez l'appareil et laissez-le refroidir. Conseils pour une utilisation optimale Généralités Attention! N utilisez jamais le balai vapeur sans avoir d abord fixé un patin de nettoyage. u Vous pouvez utiliser le clip d'accrochage du câble (17) pour éviter que ce dernier ne traîne et n'encombre la zone de travail. 19
 u Tournez l'accessoire (29) dans le sens des aiguilles d'une montre, puis le tirer du tuyau (27).")
20 FRANÇAIS (Traduction des instructions initiales) u Aspirez toujours ou balayez le sol avant d utiliser le balai vapeur. u Le moyen le plus simple d utiliser l appareil est d incliner le manche de 45 et de nettoyer lentement par petites zones. u N'utilisez pas de nettoyants chimiques avec le balai vapeur. Pour éliminer les taches qui résistent sur des sols en vinyle ou en lino, vous pouvez utiliser le jet de vapeur ou vous pouvez prétraiter avec un mélange détergent doux et eau avant d utiliser le balai vapeur. Nettoyage à la vapeur avec le balai u Fixez le nettoyeur à vapeur portable (5) dans le logement du balai vapeur (9). u Placez un tampon nettoyeur (12) au sol avec le système "hook & loop" vers le haut. u Appuyez légèrement le balai vapeur sur le tampon nettoyeur (12). u Branchez le balai vapeur au secteur. u Appuyez sur le bouton marche/arrêt (1). Le balai vapeur prend environ 15 secondes pour chauffer. u Appuyez sur le sélecteur Autoselect TM (6) pour obtenir la position désirée. u En tirant sur le manche (10), la pompe à vapeur s active. Après quelques secondes, la vapeur se forme et est évacuée par l embout. Remarque : Au premier remplissage ou après une utilisation à sec, la production de vapeur peut prendre jusqu'à 45 minutes. u La vapeur prend quelques secondes pour atteindre le patin de nettoyage. Le balai vapeur peut alors glisser facilement sur la surface à désinfecter/nettoyer. u Poussez lentement d avant en arrière le balai vapeur sur le sol pour nettoyer à fond. Remarque : Pendant le nettoyage, vous pouvez arrêter la pompe à vapeur en replaçant le manche en position verticale. Vous pourrez ainsi abandonner le balai vapeur pendant un court instant afin de déplacer les meubles, puis continuer à nettoyer sans avoir à éteindre l'appareil. u Quand vous avez terminé d'utiliser le balai vapeur, placez le manche (10) en position verticale, éteignez l appareil et attendez qu'il refroidisse (environ cinq minutes). Attention! Il est important de surveiller le niveau d eau dans le réservoir. Pour remplir d eau et continuer à nettoyer/désinfecter, placez le manche (10) en position verticale et éteignez le balai vapeur (OFF). Débranchez l appareil de la prise et remplissez le réservoir d'eau (8). Attention! Ne laissez jamais longtemps le balai vapeur au même endroit. À l arrêt, placez toujours le balai vapeur en positionnant le manche (10) à la verticale et veillez à éteindre le balai vapeur lorsque vous ne l'utilisez pas. Rafraîchissement de moquette u Placez un tampon nettoyeur (12) au sol avec le système "hook & loop" vers le haut. u Appuyez légèrement le balai vapeur sur le tampon nettoyeur (12). u Placez l accessoire moquette (14) sur le sol. u Appuyez légèrement le balai vapeur sur l accessoire moquette (14) jusqu à ce qu il soit enclenché. u Branchez le balai vapeur au secteur. u Appuyez sur le bouton marche/arrêt (1). Le balai vapeur prend environ 15 secondes pour chauffer. u Appuyez sur le sélecteur Autoselect TM (6) pour obtenir la position Bois/Lamellé. u En tirant sur le manche (10), la pompe à vapeur s active. Après quelques secondes, la vapeur se forme et est évacuée par l embout. Remarque : Au premier remplissage ou après une utilisation à sec, la production de vapeur peut prendre jusqu'à 45 minutes. u Poussez et tirez lentement le balai vapeur sur la moquette pour nettoyer à fond. Remarque : Pendant le nettoyage, vous pouvez arrêter la pompe à vapeur en replaçant le manche en position verticale. Vous pourrez ainsi abandonner le balai vapeur pendant un court instant afin de déplacer les meubles, puis continuer à nettoyer sans avoir à éteindre l'appareil. u Quand vous avez terminé d'utiliser le balai vapeur, placez le manche (10) en position verticale, éteignez l appareil et attendez qu'il refroidisse (environ cinq minutes). Attention! Si la vapeur est évacuée au niveau du joint entre le nettoyeur à vapeur portable et le logement du balai vapeur, éteignez l'appareil et débranchez-le du secteur. Laissez l appareil refroidir. Retirez le nettoyeur à vapeur portable du logement du balai vapeur. Vérifiez le joint (26) sur l'embout vapeur (4) et le tuyau (27) (figure J). Si le joint est endommagé ou manquant, contactez le réparateur agréé Black & Decker le plus proche. N utilisez pas l appareil. Si le joint est en bon état, réinstallez le nettoyeur à vapeur portable sur le logement du balai vapeur et assurez-vous qu'il est bien en place. Attention! Il est important de surveiller le niveau d eau dans le réservoir. Pour remplir d eau et continuer à nettoyer/désinfecter, placez le manche (10) en position verticale et éteignez le balai vapeur (OFF). Débranchez l appareil de la prise et remplissez le réservoir d'eau (8). Attention! Ne laissez jamais longtemps le balai vapeur au même endroit. À l arrêt, placez toujours le balai vapeur en positionnant le manche (10) à la verticale et veillez à éteindre le balai vapeur lorsque vous ne l'utilisez pas. Après l utilisation (figures M et N) u Retournez le manche (10) en position verticale et éteignez le balai vapeur (OFF). 20
 dans le logement du balai vapeur (9).")
Περιεχόμενα / Contents
 Aερόθερμo / Fan Heater PTC-906 Περιεχόμενα / Contents GR... Σελίδες 3-8 EN... Pages 9-11 2 GR Ευχαριστούμε που επιλέξατε μια συσκευή της γκάμας θερμαντικών IZZY. Σημαντικές Οδηγίες Ασφαλείας Τα Μέρη της
QC5015 A D E 1 2 3 4 F M H 5 6 7 1 B G 2 I 8 9 10 1 J K L 2 C 11 1 12 13 2 14 15 16 17 18
 QC5015 A D E 1 2 3 4 M F H 5 1 6 7 B G 2 I J K L 1 8 9 10 2 C 11 1 12 13 2 14 15 16 17 18 Deutsch Einführung Herzlichen Glückwunsch zu Ihrem Kauf und willkommen bei Philips! Um den Support von Philips
FSMH1321 FSMH1351SM FSMH13101SM FSMH13151SM FSMH1321J FSMH1321JSM FSMH1321JMD
 6 7 4 8 9 0 www.blackanddecker.eu H H H0 H HJ HJ HJD 8 0 a A B C 4 a C 7 6 E 9 b 6 6a 0 7 0a 9 8 a a b c c d a b 6 8 G 7 0 8 7 8 9 H a c b I a 4 J c d b K 7a a 7 7 L N O P 4 O Intended use Your BLACK+DECKER
SPEEDO AQUABEAT. Specially Designed for Aquatic Athletes and Active People
 SPEEDO AQUABEAT TM Specially Designed for Aquatic Athletes and Active People 1 2 Decrease Volume Increase Volume Reset EarphonesUSBJack Power Off / Rewind Power On / Fast Forward Goggle clip LED Status
Εγκατάσταση λογισμικού και αναβάθμιση συσκευής Device software installation and software upgrade
 Για να ελέγξετε το λογισμικό που έχει τώρα η συσκευή κάντε κλικ Menu > Options > Device > About Device Versions. Στο πιο κάτω παράδειγμα η συσκευή έχει έκδοση λογισμικού 6.0.0.546 με πλατφόρμα 6.6.0.207.
VBA ΣΤΟ WORD. 1. Συχνά, όταν ήθελα να δώσω ένα φυλλάδιο εργασίας με ασκήσεις στους μαθητές έκανα το εξής: Version 25-7-2015 ΗΜΙΤΕΛΗΣ!!!!
 VBA ΣΤΟ WORD Version 25-7-2015 ΗΜΙΤΕΛΗΣ!!!! Μου παρουσιάστηκαν δύο θέματα. 1. Συχνά, όταν ήθελα να δώσω ένα φυλλάδιο εργασίας με ασκήσεις στους μαθητές έκανα το εξής: Εγραφα σε ένα αρχείο του Word τις
3 Lösungen zu Kapitel 3
 3 Lösungen zu Kapitel 3 31 Lösungen der Aufgaben zu Abschnitt 31 311 Lösung Die Abbildung D : { R 4 R 4 R 4 R 4 R, a 1, a 2, a 3, a 4 ) D( a 1, a 2, a 3, a 4 ) definiere eine Determinantenform (auf R 4
Advanced Subsidiary Unit 1: Understanding and Written Response
 Write your name here Surname Other names Edexcel GE entre Number andidate Number Greek dvanced Subsidiary Unit 1: Understanding and Written Response Thursday 16 May 2013 Morning Time: 2 hours 45 minutes
Capacitors - Capacitance, Charge and Potential Difference
 Capacitors - Capacitance, Charge and Potential Difference Capacitors store electric charge. This ability to store electric charge is known as capacitance. A simple capacitor consists of 2 parallel metal
English PDFsharp is a.net library for creating and processing PDF documents 'on the fly'. The library is completely written in C# and based
 English PDFsharp is a.net library for creating and processing PDF documents 'on the fly'. The library is completely written in C# and based exclusively on safe, managed code. PDFsharp offers two powerful
Οδηγίες Αγοράς Ηλεκτρονικού Βιβλίου Instructions for Buying an ebook
 Οδηγίες Αγοράς Ηλεκτρονικού Βιβλίου Instructions for Buying an ebook Βήμα 1: Step 1: Βρείτε το βιβλίο που θα θέλατε να αγοράσετε και πατήστε Add to Cart, για να το προσθέσετε στο καλάθι σας. Αυτόματα θα
OUR PRODUCT RANGE. www.rakson.gr
 ΤΑ ΑΛΛΑ ΕΙ Η ΠΡΟΪΟΝΤΑ ΜΑΣ ΜΕΤΑΣΧΗΜΑΤΙΣΤΕΣ ΚΟΥ ΟΥΝΙΩΝ ΚΟΥ ΟΥΝΙΑ ΜΠΟΥΤΟΝ ΚΟΥ ΟΥΝΙΩΝ ΑΥΤΟΜΑΤΟΙ ΚΛΙΜΑΚΟΣΤΑΣΙΟΥ ΚΛΕΙ ΑΡΙΕΣ ΑΝΙΧΝΕΥΤΕΣ ΚΙΝΗΣΗΣ ΣΥΣΤΗΜΑΤΑ ΕΠΙΚΟΙΝΩΝΙΑΣ Θυροτηλεοράσεις Θυροτηλέφωνα Ενδοεπικοινωνίες
Code Breaker. TEACHER s NOTES
 TEACHER s NOTES Time: 50 minutes Learning Outcomes: To relate the genetic code to the assembly of proteins To summarize factors that lead to different types of mutations To distinguish among positive,
Griechisches Staatszertifikat - Deutsch
 ΥΠΟΥΡΓΕΙΟ ΕΘΝΙΚΗΣ ΠΑΙ ΕΙΑΣ ΚΑΙ ΘΡΗΣΚΕΥΜΑΤΩΝ ΚΡΑΤΙΚΟ ΠΙΣΤΟΠΟΙΗΤΙΚΟ ΓΛΩΣΣΟΜΑΘΕΙΑΣ Griechisches Ministerium für Bildung und Religion Griechisches Staatszertifikat - Deutsch Niveau A1 & A2 Entspricht dem Gemeinsamen
Double Speed GC6107, GC6104, GC6103
 Double Speed G6107, G6104, G6103 2 3 4 ENGLISH 6 15 22 30 G6107, G6104, G6103 6 ENGLISH General description A Supply hose B Temperature light Temperature dial and indicator D Steam activator and lock -
3 1 A B C D N H E M F G L I J K
 SCF870 2 3 A 1 B C D N H E F G M I J L K 4 English 6 Deutsch 18 Ελληνικα 31 Français 46 한국어 59 Nederlands 71 SCF870 6 English Introduction Congratulations on your purchase and welcome to Philips AVENT!
4K HDMI Splitter 1x4. User s Guide / Bedienungsanleitung / Εγχειρίδιο Χρήστη
 4K HDMI Splitter 1x4 User s Guide / Bedienungsanleitung / Εγχειρίδιο Χρήστη INTRODUCTION The EDISION 4K HDMI Splitter 1x4 uses a single HDMI input source, to distribute it to 4 HDMI outputs. The splitter
ΟΔΗΓΙΕΣ ΣΥΝΑΡΜΟΛΟΓΗΣΗΣ/ ASSEMBLY INSTRUCTION ΤΟΜΜΥ ΚΡΕΒΑΤΙ/BED
 ΟΔΗΓΙΕΣ ΣΥΝΑΡΜΟΛΟΓΗΣΗΣ/ ASSEMBLY INSTRUCTION ΤΟΜΜΥ ΚΡΕΒΑΤΙ/BED 1. Παρακαλώ πολύ διαβάστε προσεκτικά τις οδηγίες πριν την συναρμολόγηση/ Please read the instructions carefully. 2. Παρακαλώ πολύ όπως ελέγξτε
Instruction Execution Times
 1 C Execution Times InThisAppendix... Introduction DL330 Execution Times DL330P Execution Times DL340 Execution Times C-2 Execution Times Introduction Data Registers This appendix contains several tables
ΚΡΑΤΙΚΟ ΠΙΣΤΟΠΟΙΗΤΙΚΟ ΓΛΩΣΣΟΜΑΘΕΙΑΣ HÖRVERSTEHEN. Mai 2012
 ΥΠΟΥΡΓΕΙΟ ΠΑΙΔΕΙΑΣ ΔΙΑ ΒΙΟΥ ΜΑΘΗΣΗΣ ΚΑΙ ΘΡΗΣΚΕΥΜΑΤΩΝ ΚΡΑΤΙΚΟ ΠΙΣΤΟΠΟΙΗΤΙΚΟ ΓΛΩΣΣΟΜΑΘΕΙΑΣ Griechisches Ministerium für Bildung, Lebenslanges Lernen und Religionsangelegenheiten Griechisches Staatszertifikat
ΕΡΓΑΖΟΜΕΝΩΝ Bildung älterer Arbeitnehmer
 ΚΑΤΑΡΤΙΣΗ ΩΡΙΜΩΝ ΕΡΓΑΖΟΜΕΝΩΝ Bildung älterer Arbeitnehmer Kassandra Teliopoulos IEKEP 06/03/06 ΜΕΡΙΚΑ ΣΗΜΕΙΑ ΚΛΕΙΔΙΑ Einige Gedankenansätze!Στις περισσότερες χώρες μέλη της Ε.Ε. μεγάλης ηλικίας εργαζόμενοι
UNIVERSITY OF CAMBRIDGE INTERNATIONAL EXAMINATIONS International General Certificate of Secondary Education
 UNIVERSITY OF CAMBRIDGE INTERNATIONAL EXAMINATIONS International General Certificate of Secondary Education *2517291414* GREEK 0543/02 Paper 2 Reading and Directed Writing May/June 2013 1 hour 30 minutes
Quick Installation Guide
 A Installation 1 F H B E C D G 2 www.trust.com/17528/faq Quick Installation Guide C C D Freewave Wireless Audio Set 17528/ 17529 D Installation Configuration Windows XP 4 5 8 Windows 7/ Vista 6 7 9 10
(Type B) Το προϊόν αυτό δεν είναι κατάλληλο για σκοπούς πρωτογενούς θέρμανσης. ADM AEE
 Το προϊόν αυτό δεν είναι κατάλληλο για σκοπούς πρωτογενούς θέρμανσης. ADM AEE") (Type B) Το προϊόν αυτό δεν είναι κατάλληλο για σκοπούς πρωτογενούς θέρμανσης. ADM AEE 2310 85 30 61 80 00 18 Mklg 01. Rwnc A]SQ,ovb / D OPERATlON FUELING WARNING: uture storage of your heater. Use o NEVE
(Type B) Το προϊόν αυτό δεν είναι κατάλληλο για σκοπούς πρωτογενούς θέρμανσης. ADM AEE 2310 85 30 61 80 00 18 Mklg 01. Rwnc A]SQ,ovb / D OPERATlON FUELING WARNING: uture storage of your heater. Use o NEVE
BFN3000 ΕΠΙΤΡΑΠΕΖΙΟΣ ΑΝΕΜΙΣΤΗΡΑΣ. Owner s manual. Μετάφραση του πρωτοτύπου των οδηγιών χρήσης
 BFN3000 ΕΠΙΤΡΑΠΕΖΙΟΣ ΑΝΕΜΙΣΤΗΡΑΣ Μετάφραση του πρωτοτύπου των οδηγιών χρήσης Owner s manual www.bormanntools.com GR Οδηγίες ασφαλούς λειτουργίας 1. Τα χαρακτηριστικά της παροχής ηλεκτρικού ρεύματος θα
Right Rear Door. Let's now finish the door hinge saga with the right rear door
 Right Rear Door Let's now finish the door hinge saga with the right rear door You may have been already guessed my steps, so there is not much to describe in detail. Old upper one file:///c /Documents
FAVORIT 78400 I DE GESCHIRRSPÜLER BENUTZERINFORMATION 2 EL ΠΛΥΝΤΉΡΙΟ ΠΙΆΤΩΝ ΟΔΗΓΊΕΣ ΧΡΉΣΗΣ 25 RU ПОСУДОМОЕЧНАЯ МАШИНА ИНСТРУКЦИЯ ПО ЭКСПЛУАТАЦИИ
 FAVORIT 78400 I DE GESCHIRRSPÜLER BENUTZERINFORMATION 2 EL ΠΛΥΝΤΉΡΙΟ ΠΙΆΤΩΝ ΟΔΗΓΊΕΣ ΧΡΉΣΗΣ 25 RU ПОСУДОМОЕЧНАЯ МАШИНА ИНСТРУКЦИЯ ПО ЭКСПЛУАТАЦИИ 48 2 FÜR PERFEKTE ERGEBNISSE Danke, dass Sie sich für dieses
Double Speed GC6107, GC6104, GC6103
 Double Speed G6107, G6104, G6103 2 3 4 ENGLISH 6 15 22 G6107, G6104, G6103 6 ENGLISH General description A Supply hose B Temperature light Temperature dial and indicator D Steam activator and lock - D1.
ΟΔΗΓΙΕΣ ΧΡΗΣΗΣ USE INSTRUCTIONS
 ΟΔΗΓΙΕΣ ΧΡΗΣΗΣ USE INSTRUCTIONS ΤΗΛΕΦΩΝΟ ΜΕ ΑΝΑΓΝΩΡΙΣΗ ΚΛΗΣΗΣ /CORDED PHONE WITH CALLER ID ΜΟΝΤΕΛΟ/MODEL: TM09-448 DC48V Παρακαλούμε διαβάστε προσεκτικά όλες τις οδηγίες χρήσης πριν την χρήση της συσκευής
derivation of the Laplacian from rectangular to spherical coordinates
 derivation of the Laplacian from rectangular to spherical coordinates swapnizzle 03-03- :5:43 We begin by recognizing the familiar conversion from rectangular to spherical coordinates (note that φ is used
9.09. # 1. Area inside the oval limaçon r = cos θ. To graph, start with θ = 0 so r = 6. Compute dr
 9.9 #. Area inside the oval limaçon r = + cos. To graph, start with = so r =. Compute d = sin. Interesting points are where d vanishes, or at =,,, etc. For these values of we compute r:,,, and the values
CHAPTER 25 SOLVING EQUATIONS BY ITERATIVE METHODS
 CHAPTER 5 SOLVING EQUATIONS BY ITERATIVE METHODS EXERCISE 104 Page 8 1. Find the positive root of the equation x + 3x 5 = 0, correct to 3 significant figures, using the method of bisection. Let f(x) =
Εμπορική αλληλογραφία Ηλεκτρονική Αλληλογραφία
 - Εισαγωγή Sehr geehrter Herr Präsident, Sehr geehrter Herr Präsident, Εξαιρετικά επίσημη επιστολή, ο παραλήπτης έχει ένα ειδικό τίτλο ο οποίος πρέπει να χρησιμοποιηθεί αντί του ονόματος του Sehr geehrter
FAVORIT 55402 I DE GESCHIRRSPÜLER BENUTZERINFORMATION 2 EL ΠΛΥΝΤΉΡΙΟ ΠΙΆΤΩΝ ΟΔΗΓΊΕΣ ΧΡΉΣΗΣ 24
 FAVORIT 55402 I DE GESCHIRRSPÜLER BENUTZERINFORMATION 2 EL ΠΛΥΝΤΉΡΙΟ ΠΙΆΤΩΝ ΟΔΗΓΊΕΣ ΧΡΉΣΗΣ 24 2 FÜR PERFEKTE ERGEBNISSE Danke, dass Sie sich für dieses AEG Produkt entschieden haben. Wir haben es geschaffen,
HQ6990, HQ6970, HQ6950, HQ6920 CHARGE
 HQ6990, HQ6970, HQ6950, HQ6920 1 2 3 4 5 6 7 CHARGE 8 9 10 2 1 11 2 12 13 1 14 15 16 1 2 17 18 19 2 20 21 22 1 ENGLISH Introduction Congratulations on your purchase and welcome to Philips! To fully benefit
The Simply Typed Lambda Calculus
 Type Inference Instead of writing type annotations, can we use an algorithm to infer what the type annotations should be? That depends on the type system. For simple type systems the answer is yes, and
MSN DESK TOP ENCLOSURE WITH STAND / CARRYING HANDLE
 MSN SERIES MSN DESK TOP ENCLOSURE WITH STAND / CARRYING HANDLE W H FEATURE Available in 176 sizes. Stand / carrying handle can be adjusted in 30 degree. Maximum load is kg. There are no ventilation hole
Griechisches Staatszertifikat - Deutsch
 ΥΠΟΥΡΓΕΙΟ ΕΘΝΙΚΗΣ ΠΑΙ ΕΙΑΣ ΚΑΙ ΘΡΗΣΚΕΥΜΑΤΩΝ ΚΡΑΤΙΚΟ ΠΙΣΤΟΠΟΙΗΤΙΚΟ ΓΛΩΣΣΟΜΑΘΕΙΑΣ Griechisches Ministerium für Bildung und Religion Griechisches Staatszertifikat - Deutsch Niveau A1 & A2 Entspricht dem Gemeinsamen
Geschirrspüler Πλυντήριο πιάτων Mosogatógép Lavavajillas
 DE Benutzerinformation 2 EL Οδηγίες Χρήσης 15 HU Használati útmutató 30 ES Manual de instrucciones 44 Geschirrspüler Πλυντήριο πιάτων Mosogatógép Lavavajillas ZDV 12001 Inhalt Sicherheitshinweise _ 2 Gerätebeschreibung
Section 8.3 Trigonometric Equations
 99 Section 8. Trigonometric Equations Objective 1: Solve Equations Involving One Trigonometric Function. In this section and the next, we will exple how to solving equations involving trigonometric functions.
CYTA Cloud Server Set Up Instructions
 CYTA Cloud Server Set Up Instructions ΕΛΛΗΝΙΚΑ ENGLISH Initial Set-up Cloud Server To proceed with the initial setup of your Cloud Server first login to the Cyta CloudMarketPlace on https://cloudmarketplace.cyta.com.cy
The challenges of non-stable predicates
 The challenges of non-stable predicates Consider a non-stable predicate Φ encoding, say, a safety property. We want to determine whether Φ holds for our program. The challenges of non-stable predicates
ΚΥΠΡΙΑΚΗ ΕΤΑΙΡΕΙΑ ΠΛΗΡΟΦΟΡΙΚΗΣ CYPRUS COMPUTER SOCIETY ΠΑΓΚΥΠΡΙΟΣ ΜΑΘΗΤΙΚΟΣ ΔΙΑΓΩΝΙΣΜΟΣ ΠΛΗΡΟΦΟΡΙΚΗΣ 19/5/2007
 Οδηγίες: Να απαντηθούν όλες οι ερωτήσεις. Αν κάπου κάνετε κάποιες υποθέσεις να αναφερθούν στη σχετική ερώτηση. Όλα τα αρχεία που αναφέρονται στα προβλήματα βρίσκονται στον ίδιο φάκελο με το εκτελέσιμο
MS SERIES MS DESK TOP ENCLOSURE APPLICATION EXAMPLE FEATURE. Measuring instruments. Power supply equipments
 MS SERIES MS DESK TOP ENCLOSURE FEATURE Available in 176 sizes. Screws are not appeared on the surface. Usable as rack mount case with optinal mounting bracket. There are no ventilation hole for cover
Δημιουργία Λογαριασμού Διαχείρισης Business Telephony Create a Management Account for Business Telephony
 Δημιουργία Λογαριασμού Διαχείρισης Business Telephony Create a Management Account for Business Telephony Ελληνικά Ι English 1/7 Δημιουργία Λογαριασμού Διαχείρισης Επιχειρηματικής Τηλεφωνίας μέσω της ιστοσελίδας
Door Hinge replacement (Rear Left Door)
") Door Hinge replacement (Rear Left Door) We will continue the previous article by replacing the hinges of the rear left hand side door. I will use again the same procedure and means I employed during the
Door Hinge replacement (Rear Left Door) We will continue the previous article by replacing the hinges of the rear left hand side door. I will use again the same procedure and means I employed during the
Αναερόβια Φυσική Κατάσταση
 Αναερόβια Φυσική Κατάσταση Γιάννης Κουτεντάκης, BSc, MA. PhD Αναπληρωτής Καθηγητής ΤΕΦΑΑ, Πανεπιστήµιο Θεσσαλίας Περιεχόµενο Μαθήµατος Ορισµός της αναερόβιας φυσικής κατάστασης Σχέσης µε µηχανισµούς παραγωγής
ΕΡΙΤΟΡΕΣ ΚΑΙ ΑΝΘΩΡΟΙ ΚΛΕΙΔΙΑ ΑΝΑΘΕΣΘ ΑΓΩΝΑ ΓΑΦΕΙΟ ΑΓΩΝΩΝ ΟΓΑΝΩΤΙΚΘ ΕΡΙΤΟΡΘ. ζεκηλαρηο 1 ΡΑΓΚΟΣΜΙΑ ΟΜΟΣΡΟΝΔΙΑ (ISAF) ΕΛΛΘΝΙΚΘ ΟΜΟΣΡΟΝΔΙΑ (Ε.Ι.Ο.
 ΕΛΛΘΝΙΚΘ ΟΜΟΣΡΟΝΔΙΑ (Ε.Ι.Ο.") ΑΝΑΘΕΣΘ ΑΓΩΝΑ ΕΡΙΤΟΡΕΣ ΚΑΙ ΑΝΘΩΡΟΙ ΚΛΕΙΔΙΑ ΡΑΓΚΟΣΜΙΑ ΟΜΟΣΡΟΝΔΙΑ (ISAF) ΕΛΛΘΝΙΚΘ ΟΜΟΣΡΟΝΔΙΑ (Ε.Ι.Ο.) ΚΛΑΣΘ 6/6/2009 1 ΟΡΓΑΝΩΣΙΚΗ ΕΠΙΣΡΟΠΗ ΓΡΑΦΕΙΟ ΑΓΩΝΩΝ ΕΠΙΣΡΟΠΗ ΑΓΩΝΩΝ ΕΠΙΣΡΟΠΗ ΕΝΣΑΕΩΝ ΕΠΙΣΡΟΠΗ ΚΑΣΑΜΕΣΡΗΕΩΝ
ΑΝΑΘΕΣΘ ΑΓΩΝΑ ΕΡΙΤΟΡΕΣ ΚΑΙ ΑΝΘΩΡΟΙ ΚΛΕΙΔΙΑ ΡΑΓΚΟΣΜΙΑ ΟΜΟΣΡΟΝΔΙΑ (ISAF) ΕΛΛΘΝΙΚΘ ΟΜΟΣΡΟΝΔΙΑ (Ε.Ι.Ο.) ΚΛΑΣΘ 6/6/2009 1 ΟΡΓΑΝΩΣΙΚΗ ΕΠΙΣΡΟΠΗ ΓΡΑΦΕΙΟ ΑΓΩΝΩΝ ΕΠΙΣΡΟΠΗ ΑΓΩΝΩΝ ΕΠΙΣΡΟΠΗ ΕΝΣΑΕΩΝ ΕΠΙΣΡΟΠΗ ΚΑΣΑΜΕΣΡΗΕΩΝ
Strain gauge and rosettes
 Strain gauge and rosettes Introduction A strain gauge is a device which is used to measure strain (deformation) on an object subjected to forces. Strain can be measured using various types of devices classified
SPARE PARTS LIST. for. Infrared oil heater. Model. Daystar. Type. PH5 for 120V 60Hz. May, 2017
 SPARE PARTS LIST for Infrared oil heater Model Daystar Type PH5 for 120V 60Hz May, 2017 *PRICES AND SPECIFICATIONS ARE SUBJECT TO CHANGE WITHOUT NOTICE..* 2017 J.S.O'will, Inc.. Shizuoka Seiki Co. Ltd.
*2354431106* GREEK 0543/02 Paper 2 Reading and Directed Writing May/June 2009
 UNIVERSITY OF CAMBRIDGE INTERNATIONAL EXAMINATIONS International General Certificate of Secondary Education *2354431106* GREEK 0543/02 Paper 2 Reading and Directed Writing May/June 2009 1 hour 30 minutes
the total number of electrons passing through the lamp.
 1. A 12 V 36 W lamp is lit to normal brightness using a 12 V car battery of negligible internal resistance. The lamp is switched on for one hour (3600 s). For the time of 1 hour, calculate (i) the energy
Auswandern Studieren Studieren - Universität Griechisch Θα ήθελα να εγγραφώ σε πανεπιστήμιο. Angeben, dass man sich einschreiben will Japanisch Θα ήθε
 - Universität Θα ήθελα να εγγραφώ σε πανεπιστήμιο. Angeben, dass man sich einschreiben will Θα ήθελα να γραφτώ για. Angeben, dass man sich für einen anmelden möchte ένα προπτυχιακό ένα μεταπτυχιακό ένα
User s Manual / Οδηγίες Χρήσης
 User s Manual / Οδηγίες Χρήσης EUROPEAN STANDARDS Your child s safety depends on you. Proper bed rail usage cannot be assured unless you follow these instructions. DO NOT USE YOUR BED RAIL UNTILL YOU READ
PLUGIN BASIC TS (en) indication, that electrical appliance is switched on
 indication, that electrical appliance is switched on") PLUGIN BASIC TS (en) indication, that electrical appliance is switched on after pressing the ON button, will be the connected appliance permantely switched on. after pressing the button, will be the connected
PLUGIN BASIC TS (en) indication, that electrical appliance is switched on after pressing the ON button, will be the connected appliance permantely switched on. after pressing the button, will be the connected
ΚΥΠΡΙΑΚΗ ΕΤΑΙΡΕΙΑ ΠΛΗΡΟΦΟΡΙΚΗΣ CYPRUS COMPUTER SOCIETY ΠΑΓΚΥΠΡΙΟΣ ΜΑΘΗΤΙΚΟΣ ΔΙΑΓΩΝΙΣΜΟΣ ΠΛΗΡΟΦΟΡΙΚΗΣ 6/5/2006
 Οδηγίες: Να απαντηθούν όλες οι ερωτήσεις. Ολοι οι αριθμοί που αναφέρονται σε όλα τα ερωτήματα είναι μικρότεροι το 1000 εκτός αν ορίζεται διαφορετικά στη διατύπωση του προβλήματος. Διάρκεια: 3,5 ώρες Καλή
Tipologie installative - Installation types Type d installation - Installationstypen Tipos de instalación - Τυπολογίες εγκατάστασης
 AMPADE MOOCROMATICHE VIMAR DIMMERABII A 0 V~ - VIMAR 0 V~ DIMMABE MOOCHROME AMP AMPE MOOCHROME VIMAR VARIATEUR 0 V~ - DIMMERFÄHIGE MOOCHROMATICHE AMPE VO VIMAR MIT 0 V~ ÁMPARA MOOCROMÁTICA VIMAR REGUABE
Cambridge International Examinations Cambridge International General Certificate of Secondary Education
 Cambridge International Examinations Cambridge International General Certificate of Secondary Education GREEK 0543/04 Paper 4 Writing For Examination from 2015 SPECIMEN PAPER Candidates answer on the Question
Volume of a Cuboid. Volume = length x breadth x height. V = l x b x h. The formula for the volume of a cuboid is
 Volume of a Cuboid The formula for the volume of a cuboid is Volume = length x breadth x height V = l x b x h Example Work out the volume of this cuboid 10 cm 15 cm V = l x b x h V = 15 x 6 x 10 V = 900cm³
www.philips.com/welcome
 Register your product and get support at www.philips.com/welcome GC4800 series 1 English 6 Deutsch 23 Ελληνικα 42 Français 62 Nederlands 80 GC4800 series 6 English Introduction Congratulations on your
How to register an account with the Hellenic Community of Sheffield.
 How to register an account with the Hellenic Community of Sheffield. (1) EN: Go to address GR: Πηγαίνετε στη διεύθυνση: http://www.helleniccommunityofsheffield.com (2) EN: At the bottom of the page, click
Potential Dividers. 46 minutes. 46 marks. Page 1 of 11
 Potential Dividers 46 minutes 46 marks Page 1 of 11 Q1. In the circuit shown in the figure below, the battery, of negligible internal resistance, has an emf of 30 V. The pd across the lamp is 6.0 V and
INSTRUCTIONS MANUAL ΕΓΧΕΙΡΙΔΙΟ ΛΕΙΤΟΥΡΓΙΑΣ
 Model/Μοντέλο: WKH-1132 INSTRUCTIONS MANUAL ΕΓΧΕΙΡΙΔΙΟ ΛΕΙΤΟΥΡΓΙΑΣ ENGLISH General Safety Instructions Before commissioning this kettle, please read the instruction manual carefully. Please keep the instruction
Cambridge International Examinations Cambridge International General Certificate of Secondary Education
 Cambridge International Examinations Cambridge International General Certificate of Secondary Education *4358398658* GREEK 0543/04 Paper 4 Writing May/June 2015 1 hour Candidates answer on the Question
HOMEWORK 4 = G. In order to plot the stress versus the stretch we define a normalized stretch:
 HOMEWORK 4 Problem a For the fast loading case, we want to derive the relationship between P zz and λ z. We know that the nominal stress is expressed as: P zz = ψ λ z where λ z = λ λ z. Therefore, applying
www.philips.com/welcome
 Register your product and get support at www.philips.com/welcome GC4800 series 1 English 6 Deutsch 23 Ελληνικα 42 Français 62 Nederlands 80 GC4800 series 6 English Introduction Congratulations on your
MATERIALIEN ZUR VORBEREITUNG AUF DIE KLAUSUR INFORMATIK II FÜR VERKEHRSINGENIEURWESEN ANTEIL VON PROF. VOGLER IM WINTERSEMESTER 2011/12
 Fakultät Informatik Institut für Angewandte Informatik, Professur Technische Informationssysteme MATERIALIEN ZUR VORBEREITUNG AUF DIE KLAUSUR INFORMATIK II FÜR VERKEHRSINGENIEURWESEN ANTEIL VON PROF. VOGLER
Math 6 SL Probability Distributions Practice Test Mark Scheme
 Math 6 SL Probability Distributions Practice Test Mark Scheme. (a) Note: Award A for vertical line to right of mean, A for shading to right of their vertical line. AA N (b) evidence of recognizing symmetry
Οδηγίες Χρήσης BWR5106
 Οδηγίες Χρήσης BWR5106 Περιγραφή εργαλείου Οι αντλίες χειρός είναι ένα εργαλείο με την ικανότητα, πιέζοντας τον λεβιέ πάνω κάτω να πρεσάρει γράσο σε μεγάλη πίεση και με την βοήθεια αυτής να γρασάρει οπού
2 Composition. Invertible Mappings
 Arkansas Tech University MATH 4033: Elementary Modern Algebra Dr. Marcel B. Finan Composition. Invertible Mappings In this section we discuss two procedures for creating new mappings from old ones, namely,
Paper Reference. Paper Reference(s) 1776/04 Edexcel GCSE Modern Greek Paper 4 Writing. Thursday 21 May 2009 Afternoon Time: 1 hour 15 minutes
 1776/04 Edexcel GCSE Modern Greek Paper 4 Writing. Thursday 21 May 2009 Afternoon Time: 1 hour 15 minutes") Centre No. Candidate No. Paper Reference(s) 1776/04 Edexcel GCSE Modern Greek Paper 4 Writing Thursday 21 May 2009 Afternoon Time: 1 hour 15 minutes Materials required for examination Nil Paper Reference
Centre No. Candidate No. Paper Reference(s) 1776/04 Edexcel GCSE Modern Greek Paper 4 Writing Thursday 21 May 2009 Afternoon Time: 1 hour 15 minutes Materials required for examination Nil Paper Reference
ΑΚΑ ΗΜΙΑ ΕΜΠΟΡΙΚΟΥ ΝΑΥΤΙΚΟΥ ΜΑΚΕ ΟΝΙΑΣ ΣΧΟΛΗ ΜΗΧΑΝΙΚΩΝ ΠΤΥΧΙΑΚΗ ΕΡΓΑΣΙΑ ΘΕΜΑ : ΧΗΜΙΚΑ ΠΡΟΣΘΕΤΑ ΠΟΥ ΠΡΟΟΡΙΖΟΝΤΑΙ ΓΙΑ ΤΟ ΝΕΡΟ ΤΟΥ ΑΤΜΟΛΕΒΗΤΑ
 ΑΚΑ ΗΜΙΑ ΕΜΠΟΡΙΚΟΥ ΝΑΥΤΙΚΟΥ ΜΑΚΕ ΟΝΙΑΣ ΣΧΟΛΗ ΜΗΧΑΝΙΚΩΝ ΠΤΥΧΙΑΚΗ ΕΡΓΑΣΙΑ ΘΕΜΑ : ΧΗΜΙΚΑ ΠΡΟΣΘΕΤΑ ΠΟΥ ΠΡΟΟΡΙΖΟΝΤΑΙ ΓΙΑ ΤΟ ΝΕΡΟ ΤΟΥ ΑΤΜΟΛΕΒΗΤΑ ΣΠΟΥ ΑΣΤΗΣ : ΑΓΟΡΑΣΤΟΣ ΧΡΥΣΟΒΑΛΑΝΤΗΣ ΕΠΙΒΛΕΠΟΥΣΑ ΚΑΘΗΓΗΤΡΙΑ :
UNIVERSITY OF CAMBRIDGE INTERNATIONAL EXAMINATIONS General Certificate of Education Ordinary Level
 UNIVERSITY OF CAMBRIDGE INTERNATIONAL EXAMINATIONS General Certificate of Education Ordinary Level * 6 3 1 7 7 7 6 4 0 6 * MATHEMATICS (SYLLABUS D) 4024/21 Paper 2 October/November 2013 Candidates answer
DC-DC Constant Current Step-Down LED driver LDD-300L LDD-350L LDD-500L LDD-600L LDD-700L CURRENT RANGE
 SPECIFICATION ORDER NO. LDD-00L LDD-0L LDD-00L LDD-00L LDD-700L CURRENT RANGE 00mA 0mA 00mA VOLTAGE RANGE Note. ~ VDC for LDD-00~700L/LW ; ~ 8VDC for LDD-00~700LS CURRENT ACCURACY (Typ.) ±% at VDC input
Always here to help you
 Always here to help you Register your product and get support at www.philips.com/welcome SCF870 1 ENGLISH 6 DEUTSCH 19 ΕΛΛΗΝΙΚΑ 34 FRANÇAIS 51 NEDERLANDS 66 90 SCF870 6 ENGLISH Introduction Congratulations
LESSON 14 (ΜΑΘΗΜΑ ΔΕΚΑΤΕΣΣΕΡΑ) REF : 202/057/34-ADV. 18 February 2014
 REF : 202/057/34-ADV. 18 February 2014") LESSON 14 (ΜΑΘΗΜΑ ΔΕΚΑΤΕΣΣΕΡΑ) REF : 202/057/34-ADV 18 February 2014 Slowly/quietly Clear/clearly Clean Quickly/quick/fast Hurry (in a hurry) Driver Attention/caution/notice/care Dance Σιγά Καθαρά Καθαρός/η/ο
LESSON 14 (ΜΑΘΗΜΑ ΔΕΚΑΤΕΣΣΕΡΑ) REF : 202/057/34-ADV 18 February 2014 Slowly/quietly Clear/clearly Clean Quickly/quick/fast Hurry (in a hurry) Driver Attention/caution/notice/care Dance Σιγά Καθαρά Καθαρός/η/ο
Cambridge International Examinations Cambridge International General Certificate of Secondary Education
 Cambridge International Examinations Cambridge International General Certificate of Secondary Education *3148288373* GREEK 0543/04 Paper 4 Writing May/June 2016 1 hour Candidates answer on the Question
ἀξιόω! στερέω! ψεύδομαι! συγγιγνώσκω!
 Assimilation νλ λλ νμ μμ νβ/νπ/νφ μβ/μπ/μφ νγ/νκ/νχ γγ/γκ/γχ attisches Futur bei Verben auf -ίζω: -ιῶ, -ιεῖς, -ιεῖ usw. Dehnungsaugment: ὠ- ὀ- ἠ- ἀ-/ἐ- Zur Vorbereitung die Stammveränderungs- und Grundformkarten
PortSip Softphone. Ελληνικά Ι English 1/20
 PortSip Softphone Ελληνικά Ι English 1/20 1. Περιεχόμενα 2. Εγκατάσταση σε Smartphone & Tablet (Android ή ios)... 1 3. Εγκατάσταση σε ηλεκτρονικό υπολογιστή (Windows ή Mac).... 5 4. Installation in Smartphone
Section 7.6 Double and Half Angle Formulas
 09 Section 7. Double and Half Angle Fmulas To derive the double-angles fmulas, we will use the sum of two angles fmulas that we developed in the last section. We will let α θ and β θ: cos(θ) cos(θ + θ)
b. Use the parametrization from (a) to compute the area of S a as S a ds. Be sure to substitute for ds!
 to compute the area of S a as S a ds. Be sure to substitute for ds!") MTH U341 urface Integrals, tokes theorem, the divergence theorem To be turned in Wed., Dec. 1. 1. Let be the sphere of radius a, x 2 + y 2 + z 2 a 2. a. Use spherical coordinates (with ρ a) to parametrize.
MTH U341 urface Integrals, tokes theorem, the divergence theorem To be turned in Wed., Dec. 1. 1. Let be the sphere of radius a, x 2 + y 2 + z 2 a 2. a. Use spherical coordinates (with ρ a) to parametrize.
3.4 SUM AND DIFFERENCE FORMULAS. NOTE: cos(α+β) cos α + cos β cos(α-β) cos α -cos β
 cos α + cos β cos(α-β) cos α -cos β") 3.4 SUM AND DIFFERENCE FORMULAS Page Theorem cos(αβ cos α cos β -sin α cos(α-β cos α cos β sin α NOTE: cos(αβ cos α cos β cos(α-β cos α -cos β Proof of cos(α-β cos α cos β sin α Let s use a unit circle
3.4 SUM AND DIFFERENCE FORMULAS Page Theorem cos(αβ cos α cos β -sin α cos(α-β cos α cos β sin α NOTE: cos(αβ cos α cos β cos(α-β cos α -cos β Proof of cos(α-β cos α cos β sin α Let s use a unit circle
Geometrische Methoden zur Analyse dynamischer Systeme
 Geometrische Methoden zur Analyse dynamischer Systeme Markus Schöberl markus.schoeberl@jku.at Institut für Regelungstechnik und Prozessautomatisierung Johannes Kepler Universität Linz KV Ausgewählte Kapitel
Din brugermanual PHILIPS GC7430/02 http://da.yourpdfguides.com/dref/5483626
 Du kan læse anbefalingerne i brugervejledningen, den tekniske guide eller i installationsguiden. Du finder svarene til alle dine spørgsmål i i brugermanualen (information, specifikationer, sikkerhedsråd,
Bbc7000 ΦΟΡΤΙΣΤΗΣ - ΕΚΚΙΝΗΤΗΣ ΜΠΑΤΑΡΙΑΣ. Art Nr: Owner s manual. Μετάφραση του πρωτοτύπου των οδηγιών χρήσης
 Bbc7000 ΦΟΡΤΙΣΤΗΣ - ΕΚΚΙΝΗΤΗΣ ΜΠΑΤΑΡΙΑΣ Μετάφραση του πρωτοτύπου των οδηγιών χρήσης Art Nr: 022213 Owner s manual Διαβάστε προσεχτικά όλες τις οδηγίες χρήσης και ασφάλειας πριν την λειτουργία του μηχανήματος.
Econ 2110: Fall 2008 Suggested Solutions to Problem Set 8 questions or comments to Dan Fetter 1
 Eon : Fall 8 Suggested Solutions to Problem Set 8 Email questions or omments to Dan Fetter Problem. Let X be a salar with density f(x, θ) (θx + θ) [ x ] with θ. (a) Find the most powerful level α test
HQ6940, HQ
 HQ6940, HQ6900 1 2 3 4 5 6 7 8 9 10 2 1 11 12 13 2 1 14 15 16 1 2 17 18 19 2 1 Introduction Congratulations on your purchase and welcome to Philips! To fully benefit from the support that Philips offers,
C.S. 430 Assignment 6, Sample Solutions
 C.S. 430 Assignment 6, Sample Solutions Paul Liu November 15, 2007 Note that these are sample solutions only; in many cases there were many acceptable answers. 1 Reynolds Problem 10.1 1.1 Normal-order
Auswandern Dokumente Dokumente - Allgemeines Griechisch Koreanisch Dokumente - Persönliche Informationen
 - Allgemeines Πού μπορώ να βρω τη φόρμα για ; Fragen wo man ein Formular findet Πότε εκδόθηκε το [έγγραφο] σας; Fragen wann ein Dokument ausgestellt wurde Πού εκδόθηκε το [έγγραφο] σας; Fragen wo ein Dokument
Phys460.nb Solution for the t-dependent Schrodinger s equation How did we find the solution? (not required)
") Phys460.nb 81 ψ n (t) is still the (same) eigenstate of H But for tdependent H. The answer is NO. 5.5.5. Solution for the tdependent Schrodinger s equation If we assume that at time t 0, the electron starts
Phys460.nb 81 ψ n (t) is still the (same) eigenstate of H But for tdependent H. The answer is NO. 5.5.5. Solution for the tdependent Schrodinger s equation If we assume that at time t 0, the electron starts
The Nottingham eprints service makes this work by researchers of the University of Nottingham available open access under the following conditions.
 Luevorasirikul, Kanokrat (2007) Body image and weight management: young people, internet advertisements and pharmacists. PhD thesis, University of Nottingham. Access from the University of Nottingham repository:
( ) 2 and compare to M.
 2 and compare to M.") Problems and Solutions for Section 4.2 4.9 through 4.33) 4.9 Calculate the square root of the matrix 3!0 M!0 8 Hint: Let M / 2 a!b ; calculate M / 2!b c ) 2 and compare to M. Solution: Given: 3!0 M!0 8
Problems and Solutions for Section 4.2 4.9 through 4.33) 4.9 Calculate the square root of the matrix 3!0 M!0 8 Hint: Let M / 2 a!b ; calculate M / 2!b c ) 2 and compare to M. Solution: Given: 3!0 M!0 8
(1) Describe the process by which mercury atoms become excited in a fluorescent tube (3)
 Describe the process by which mercury atoms become excited in a fluorescent tube (3)") Q1. (a) A fluorescent tube is filled with mercury vapour at low pressure. In order to emit electromagnetic radiation the mercury atoms must first be excited. (i) What is meant by an excited atom? (1) (ii)
Q1. (a) A fluorescent tube is filled with mercury vapour at low pressure. In order to emit electromagnetic radiation the mercury atoms must first be excited. (i) What is meant by an excited atom? (1) (ii)
EE512: Error Control Coding
 EE512: Error Control Coding Solution for Assignment on Finite Fields February 16, 2007 1. (a) Addition and Multiplication tables for GF (5) and GF (7) are shown in Tables 1 and 2. + 0 1 2 3 4 0 0 1 2 3
Wenn ihr nicht werdet wie die Kinder...
 Wenn ihr nicht werdet wie die Kinder... . Der Memoriam-Garten Schön, dass ich mir keine Sorgen machen muss! Mit dem Memoriam-Garten bieten Ihnen Friedhofsgärtner, Steinmetze
Οδηγίες Χρήσεως ΒΒQ-2000 Ηλεκτρικό Barbeque
 Οδηγίες Χρήσεως ΒΒQ-2000 Ηλεκτρικό Barbeque Οδηγίες Ασφαλείας Πριν χρησιμοποιήσετε τη συσκευή σας, σιγουρευτείτε ότι έχει την ίδια τάση ρεύματος με του σπιτιού σας. Προσοχή: 1. Ποτέ μην καλύπτετε τη σχάρα
DEUTSCHE SCHULE ATHEN ΓΕΡΜΑΝΙΚΗ ΣΧΟΛΗ ΑΘΗΝΩΝ
 Herzlich Willkommen zu unserem Elternabend Übergang aus dem Elternhaus in den Kindergarten Καλωσορίσατε στη συνάντηση γονέων με θέμα τη μετάβαση από το οικογενειακό περιβάλλον στο προνηπιακό τμήμα 1 Überblick
User s Manual / Οδηγίες Χρήσης
 User s Manual / Οδηγίες Χρήσης 63 200 N. MOUDANIA GREECE www.babystar.gr NEW Your child s safety depends on you. Proper playard usage cannot be assured unless you follow these instructions. Η ασφάλεια