WARNING. Cod Release 00 del 08_2006 pag. 1
|
|
|
- Ἀζαρίας Βάμβας
- 10 χρόνια πριν
- Προβολές:
Transcript
1 GB GB GB GB WARNNG Thank you for choosing Moto Guzzi genuine accessories for installation on your motorcycle. t is extremely important that the accessories be installed correctly, so read and thoroughly understand this instruction sheet before you attempt to install your Moto Guzzi genuine accessory. Grazie per aver scelto accessori originali Moto Guzzi da installare sulla Vostra motocicletta. Prima di installare un accessorio originale Moto Guzzi è necessario leggere attentamente le istruzioni riportate nelle pagine seguenti. Merci d avoir choisi les accessoires originaux Moto Guzzi, à installer sur votre moto. Avant de monter un accessoire original Moto Guzzi, lire très attentivement les notices des suivantes pages. Wir danken hnen dafür, dass Sie sich für Originalzubehör von Moto Guzzi zur nstallierung an hrem Motorrad entschieden haben. Vor der Montage eines Originalzubehörteils von Moto Guzzi ist es erforderlich, dass Sie die Anleitung der folgenden Seiten aufmerksam durchlesen. Gracias por haber escogido sólo accesorios originales Moto Guzzi para instalar sobre su motocicleta. Antes de montar un accesorio original Moto Guzzi, es necesario leer atentamente las instrucciones de las páginas siguientes. Σας ευχαριστούμε που επιλέξατε να εγκαταστήσετε στη μηχανή σας τα αυθεντικά αξεσουάρ Moto Guzzi. Πριν την τοποθέτηση ενός αυθεντικού αξεσουάρ Moto Guzzi, διαβάστε πολύ προσεκτικά τις οδηγίες των ακόλουθων σελίδων. mproper installation of accessories can severely compromise the safety of your vehicle. mproper installation can lead to a loss of stability or wheel lock up, with subsequent serious accident and injury or even death. f you have any question about the proper installation of your Moto Guzzi genuine accessory, do not ride your vehicle. Take it to your local Moto Guzzi dealer who will have the appropriate tools and equipment to properly and safely install your accessory. Un installazione non corretta degli accessori può compromettere la sicurezza del veicolo, in quanto si può verificare la perdita di stabilità o un blocco ruote, che possono portare a gravi incidenti, anche fatali. n caso di dubbi sulla corretta installazione di un accessorio originale Moto Guzzi, non utilizzate il veicolo e recatevi presso un rivenditore Ufficiale Moto Guzzi, il quale Vi eseguirà una corretta installazione mediante l attrezzatura appropriata. Une mauvaise installation des accessoires peut compromettre la sécurité du véhicule : une perte de stabilité ou un blocage des roues peuvent entraîner de graves accidents, voire un accident fatal. n cas de doutes sur la bonne installation de votre accessoire original Moto Guzzi, évitez de le monter vous-même et rendez-vous chez votre revendeur Moto Guzzi le plus proche, qui l installera correctement à l aide de l outillage approprié. ine nicht korrekte nstallation des Zubehörs kann die Sicherheit des ahrzeugs gefährden, denn dadurch könnte die Stabilität verloren gehen oder die Räder könnten blockiert werden dies könnte zu schweren, auch lebensgefährlichen Unfällen führen. alls Sie Zweifel an der korrekten Anbringung hres Moto Guzzi-Originalzubehörteils haben, verwenden Sie das ahrzeug nicht, sondern begeben Sie sich wegen der korrekten nstallation mit den entsprechenden Werkzeugen zu hrem nächsten Moto Guzzi-achhändler. La instalación incorrecta de los accesorios puede afectar la seguridad del vehículo, puesto que se puede presentar una pérdida de estabilidad o el bloqueo de las ruedas, lo cual puede causar accidentes inclusive graves o hasta fatales. n caso de dudas sobre la correcta instalación de un accesorio original Moto Guzzi, no utilizar el vehículo y dirigirse al concesionario Moto Guzzi más cercano para una instalación correcta y con las herramientas adecuadas. Μια κακή εγκατάσταση των αξεσουάρ μπορεί να θέσει σε κίνδυνο την ασφάλεια του οχήματος: μια απώλεια ευστάθειας ή μια εμπλοκή των τροχών μπορεί να επιφέρει σοβαρά ατυχήματα, ακόμη και θανατηφόρο ατύχημα. Σε περίπτωση αμφιβολιών σχετικά με την ορθή εγκατάσταση του αυθεντικού σας αξεσουάρ Moto Guzzi, αποφύγετε να το τοποθετήσετε εσείς ο ίδιος και απευθυνθείτε στον πλησιέστερο σε εσάς μεταπωλητή Moto Guzzi, ο οποίος θα το εγκαταστήσει ορθά με τη βοήθεια των κατάλληλων συνέργων. or all load-carrying accessories, such as luggage boxes or saddle bags, always observe the recommended loading and attaching instructions. ailure to heed this warning can lead to a degradation in vehicle handling, with subsequent vehicle upset, accident, serious injury or even death. Per tutti gli accessori relativi al trasporto di carichi, per esempio portapacchi, bauletti o valigie laterali, è necessario seguire attentamente le istruzioni riportanti il corretto montaggio e il corretto alloggiamento/fissaggio del carico, in modo da evitare una minore manovrabilità del veicolo con conseguenti cadute o gravi incidenti, anche fatali. Concernant tous les accessoires pour le transport de chargements, par exemple les coffres à bagages ou les malles à deux sacoches, suivre attentivement la notice pour le chargement et le montage, afin d éviter une manoeuvrabilité réduite de la machine, ce qui entraînerait des chutes possibles, des accidents graves, voire un accident fatal. Bei allen Zubehörteilen zum Transport von Lasten, zum Beispiel bei Köfferchen für Gepäck oder Taschen mit zwei ächern, ist es erforderlich, die Anleitung zur Beladung und Montage aufmerksam zu lesen, damit eine geringere Manövrierbarkeit des ahrzeugs vermieden werden kann, die zu Stürzen und schweren, auch lebensgefährlichen Unfällen führen könnte. Para todos los accesorios para transportar carga, por ejemplo portapaquetes para equipaje o valijas de doble bolso, es necesario seguir atentamente las instrucciones para la carga y el montaje, con el fin de evitar una reducción de la maniobrabilidad del vehículo, con consiguientes caídas y accidentes graves o inclusive fatales. Αναφορικά με όλα τα αξεσουάρ για τη μεταφορά φορτίων, παραδείγματος όπως οι τσάντες αποσκευών ή τα σακίδια με δύο θήκες, ακολουθείτε προσεκτικά τις οδηγίες για τη φόρτωση και την τοποθέτηση, ώστε να αποφύγετε τη μείωση της ικανότητας ελιγμών της μηχανής, που θα μπορούσε να επιφέρει πιθανές πτώσεις, σοβαρά ατυχήματα, ακόμη και θανατηφόρο ατύχημα. Carbon fiber components, when broken, are extremely sharp, and can cause deep and serious cuts. Never attempt to repair a carbon fiber part. Never trim a carbon fiber part with any operation that uses sawing, grinding or sanding, as the fibers are toxic and extremely injurious to your health. componenti in fibra di carbonio, quando si rompono, presentano parti estremamente taglienti che possono provocare tagli gravi e profondi. Non cercate di riparare un pezzo in fibra di carbonio, né di tagliarlo utilizzando seghe, mole o smerigliatrici perché le fibre sono tossiche ed estremamente pericolose per la salute. Si les composants en fibre de carbone se cassent, ils présentent des extrémités extrêmement coupantes qui peuvent causer des coupures graves et profondes. N essayez jamais de réparer une pièce en fibre de carbone, ni de la couper à l aide d une scie, d une meule ou d une ponceuse, car les fibres sont toxiques et extrêmement dangereuses pour la santé. Wenn Teile aus Kohlenstofffaser zerbrechen, entstehen scharfe lächen, die tiefe Schnitte verursachen können. Versuchen Sie nicht, Teile aus Kohlenstofffaser zu reparieren oder mit Sägen, Schleifmaschinen oder Schmirgelmaschinen zu bearbeiten, denn die asern sind giftig und extrem gesundheitsgefährdend. Cuando se rompen, los componentes en fibra de carbono presentan partes extremadamente filudas que pueden causar cortaduras graves y profundas. No se debe tratar de reparar una pieza en fibra de carbono, y tampoco hay que cortarla utilizando serruchos, muelas o lijadoras, ya que las fibras son tóxicas y extremadamente peligrosas para la salud. Εάν τα συστατικά από ίνες άνθρακα σπάσουν, παρουσιάζουν εξαιρετικά αιχμηρά άκρα, που μπορεί να προκαλέσουν σοβαρές και βαθιές τομές. Μην προσπαθείτε ποτέ να επισκευάσετε ένα εξάρτημα από ίνες άνθρακα, ούτε να το κόψετε με τη βοήθεια ενός πριονιού, ενός τροχού ή ενός λειαντήρα, διότι οι ίνες είναι τοξικές και εξαιρετικά επικίνδυνες για την υγεία. Cod Release 00 del 08_2006 pag. 1

2 GB NSTRUCTONS OR TTNG TH S PANNR KT WTH HOOKNG SYSTM TO TH MOTO GUZZ NORG STRUZON PR L MONTAGGO L KT VALG LATRAL CON SSTMA AGGANCO SU MOTO GUZZ NORG NSTRUCTONS POUR L MONTAG U KT S VALSS LATRALS AVC SYSTM ACCROCHAG SUR MOTO GUZZ NORG MONTAGANLTUNG SATZ ÜR STLCH KORAUHÄNGUNG AM MOTORRA GUZZ NORG NSTRUCCONS PARA L MONTAJ L JUGO MALTAS LATRALS CON SSTMA NGANCH SOBR MOTO GUZZ NORG ΟΔΗΓΙΕΣ ΓΙΑ ΤΗΝ ΣΥΝΑΡΜΟΛΟΓΗΣΗ ΤΟΥ ΚΙΤ ΤΣΑΝΤΑΣ ΑΠΟΣΚΕΥΩΝ ΜΕ ΣΥΣΤΗΜΑ ΑΓΚΙΣΤΩΣΗΣ ΣΕ ΜΗΧΑΝΕΣ GUZZ NORG GB Position the motorcycle on the centrestand on a flat surface, wait till the various parts of the engine/silencer have cooled down completely and assemble the pannier attachment kit by following the sequence of instructions below. f any fitting operations prove difficult, refer to an official Moto Guzzi dealer. Posizionare la moto sul cavalletto centrale su un terreno piano e solido, attendere che le varie parti del motore/ silenziatore siano completamente raffreddate e assemblare il kit aggancio valigie seguendo le fasi dei punti sotto elencati. Nel caso si presentassero delle operazioni difficoltose di montaggio, rivolgersi ad un Concessionario Ufficiale Moto Guzzi. Positionner la moto sur la béquille centrale, sur un terrain plat et solide, attendre que les différents éléments du moteur/silencieux soient entièrement refroidis et assembler le kit d accrochage des valises en suivant les phases des points énumérés ci-dessous. Si le montage se présente difficile, s adresser à un Concessionnaire Officiel Moto Guzzi. as Motorrad auf einem ebenen und festen Boden auf den Zentralständer stellen und abwarten, bis sich die verschiedenen Teile des Motors/Schalldämpfers ganz abkühlen. en Satz der Kofferaufhängung montieren und dabei die unten genannten Punkte befolgen. alls sich die Montage als schwierig erweisen sollte, sich an einen Vertragshändler von Moto Guzzi wenden. Posicionar la moto sobre el soporte central en un terreno plano y sólido, esperar que las diferentes partes del motor/ silenciador estén completamente frías y ensamblar el juego de enganche de las maletas siguiendo las fases que se indican a continuación. n caso de presentarse operaciones difíciles para el montaje, dirigirse a un Concesionario Oficial Moto Guzzi. Τοποθετήστε την μηχανή στο κεντρικό καβαλέτο σε ένα επίπεδο και σταθερό έδαφος, περιμένετε να κρυώσουν εντελώς τα διάφορα μέρη του κινητήρα/ του σιγαστήρα και συναρμολογήστε το κιτ αγκίστρωσης των τσαντών αποσκευών εκτελώντας τις φάσεις των σημείων που αναφέρονται παρακάτω. Σε περίπτωση που παρουσιαστούν δύσκολες εργασίες συναρμολόγησης, απευθυνθείτε σε ένα Επίσημο Αντιπρόσωπο Μηχανών Guzzi. pag. 2

3 C B A GB ASSMBLNG TH UPPR S SUPPORTS Unscrew and remove bolts A, remove washers B, hooks C and spacers. it the three rubbers 2 onto the RGHT-HAN support 1 (see the mark on the rear of the support) and assemble parts A - B - (previously removed from hooks C) as shown in the drawing. Locate support 1 in the housings on the bike previously occupied by hooks C. Partially tighten bolts A, first the rear bolt and then the front. Take great care when carrying out this operation not to damage the threaded housings on the motorcycle. Make sure that the pannier support is positioned correctly and then tighten bolts A. Tightening torque for bolts A: 18.1 ftlb (25 Nm) Carry out the same operations for fitting the LT-HAN SUPPORT. C B A C B A ASSMBLAGGO SUPPORT SUPROR LATRAL Svitare e togliere le viti A, rimuovere le rondelle B, i ganci C e le bussole distanziali. nserire i tre gommini 2 sul supporto STRO 1 (vedi marchiato sul retro del supporto) e assemblare come da disegno la minuteria A-B- (precedentemente rimossa dai ganci C). Posizionare il supporto 1 nelle sedi della moto dei ganci C. Avvitare parzialmente le viti A, inizialmente la vite posteriore e successivamente la vite anteriore. Prestare attenzione nell eseguire questa operazione in modo da non danneggiare le apposite sedi filettate della moto. Accertarsi che il supporto valigia sia posizionato correttamente e serrare bene le viti A. Coppia di serraggio viti A: 25 Nm (2,5 Kgm) seguire le stesse operazione per il montaggio del supporto SNSTRO ASSMBLAG S SUPPORTS SUPÉRURS LATÉ- RAUX évisser et enlever les vis A, enlever les rondelles B, les crochets C et les douilles entretoises. ntroduire les trois caoutchoucs 2 sur le support ROT 1 (voir marqué sur l arrière du support) et assembler la menuiserie suivant le schéma A-B- (que l on a précédemment sortie des crochets C). Positionner le support 1 dans les emplacements des crochets C. Visser partiellement les vis A, tout d abord la vis postérieure, puis la vis antérieure. Lors de ces opérations, veiller à ne pas abîmer les emplacements filetés. S assurer que le support de la valise est positionné correctement, et bien serrer les vis A. Couple de serrage de la vis A : 25 Nm (2,5 Kgm) ffectuer les mêmes opérations pour monter le support GAUCH. A pag. 3

4 C B A MONTAG R STLCHN, OBRN HALTRUN- GN ie Schrauben A lösen, die Scheiben B, Haken C und Abstandsbuchsen abnehmen. ie drei Gummis 2 auf die Halterung RCHTS 1 (siehe - auf der Rückseite der Halterung markiert) einsetzen und der Zeichnung entsprechend die Kleinteile A-B- montieren (diese wurden zuvor von den Haken C abgenommen). ie Halterung 1 in die Aufnahmestellen der Haken C einführen. Schrauben A teilweise anschrauben, zuerst die hintere, dann die vordere Schraube. Bei der Ausführung dieses Arbeitsschritts die mit Gewinde versehenen Aufnahmestellen des Motorrads nicht beschädigen. Sicherstellen, dass die Kofferhalterung einwandfrei positioniert wurde und Schrauben A fest anziehen. Anzugsmoment Schrauben A: 25 Nm (2,5 Kgm) Nun die gleichen Arbeitschritte für die Montage der LNKN Halterung ausführen. C 2 B A C B 1 2 A 1 N S A M B L A J S S O P O R T S S U P R O R S LATRALS esenroscar y quitar los tornillos A, remover las arandelas B, los ganchos C y los casquillos distanciadores. ntroducir las tres piezas en goma 2 en el soporte RCHO 1 (ver indicado en la parte posterior del soporte) y ensamblar como se indica en el dibujo, los accesorios A-B- (previamente removidos de los ganchos C). Posicionar el soporte 1 en los alojamientos de la moto de los ganchos C. Atornillar parcialmente los tornillos A, primero el tornillo posterior y luego el anterior. Al realizar esta operación, tener cuidado de no dañar los alojamientos fileteados de la moto. Verificar que el soporte de la maleta esté posicionado correctamente y apretar bien los tornillos A. Par de fijación tornillos A: 25 Nm (2,5 Kgm) Realizar las mismas operaciones para el montaje del soporte ZQURO. ΣΥΝΑΡΜΟΛΟΓΗΣΗ ΤΩΝ ΑΝΩ ΠΛΑΪΝΩΝ ΥΠΟΣΤΗΡΙΓΜΑΤΩΝ Ξεβιδώστε και αφαιρέστε τις βίδες A, αφαιρέστε τις ροδέλες B, τα άγκιστρα C και τα στυλίδια αποστάτη. Εισάγετε τα τρία ελαστικά 2 στο ΔΕΞΙΟ υποστήριγμα 1 (βλέπετε σήμανση στο πίσω μέρος του υποστηρίγματος) και συναρμολογήστε όπως φαίνεται στο σχέδιο τα στοιχεία A-B- (που αφαιρέσατε πριν από τα άγκιστρα C). Τοποθετήστε το υποστήριγμα 1 στις έδρες των αγκίστρων της μηχανής C. Βιδώστε μερικά τις βίδες A, αρχικά την πίσω βίδα και έπειτα την μπροστινή βίδα. Δώστε προσοχή στην εκτέλεση αυτής της εργασίας έτσι ώστε να μην χαλάσετε τις ειδικές ελικοειδής έδρες της μηχανής. Βεβαιωθείτε ότι το υποστήριγμα υποστήριξης της τσάντας αποσκευών είναι σωστά τοποθετημένο και σφίξτε καλά τις βίδες A. Ζεύγος σύσφιξης βιδών A: 25 Nm (2,5 Kgm) Εκτελέστε τις ίδιες εργασίες συναρμολόγησης του ΑΡΙΣΤΕΡΟΥ στηρίγματος. A pag. 4

5 3 GB ASSMBLNG TH LOWR HOOKS Locate the RGHT-HAN lower hook 3 on the back side of the passenger footrest guard, screw in bolt 4 (T M6x16) and security shear-bolt 5 with their flanged washers 6 and safety washers 7. o not fully tighten bolts 4 and 5. The bracket must be free to move through the entire range allowed by the slotted holes. Carry out the same operations for fitting the LT-HAN SUP- PORT. Tighten bolts 4 and 5 only after completing the fitting. ASSMBLAGGO AGGANC NROR Posizionare l aggancio inferiore STRO 3 sul retro della protezione pedana passeggero, avvitare la vite 4 (T M6x16), la vite a strappo di sicurezza 5 con le relative rondelle flangiate 6 e le rondelle di sicurezza 7. Non serrare definitivamente le viti 4 e 5. L attacco deve avere la possibilità di traslare su tutta la lunghezza dei fori asolati. seguire le stesse operazioni per il montaggio dell aggancio SNSTRO. Serrare le viti 4 e 5 solo dopo aver completato del montaggio ASSMBLAG S ACCROCHAGS NRURS Positionner l accrochage inférieur ROT 3 à l arrière de la protection du repose-pieds passager, visser la vis 4 (T M6x16), la vis à arrachement de sécurité 5 et ses rondelles à brides 6, ainsi que les rondelles de sécurité 7. Ne pas serrer définitivement les vis 4 et 5. L accrochage doit pouvoir coulisser sur toute la longueur des trous à oeillets. ffectuer les mêmes opérations pour monter l accrochage GAUCH. Serrer les vis 4 et 5 uniquement après avoir terminé le montage. 4 5 MONTAG R UNTRN AUHÄNGUNGN ie untere Aufhängung RCHTS 3 auf die Rückseite des Schutzes für das Beifahrertrittbrett stellen, die Schraube 4 (T M6x16), die Sicherungsschraube 5 mit den lanschscheiben 6 und die Sicherungsscheiben 7 festschrauben. ie Schrauben 4 und 5 nicht definitiv anziehen. er Ansatz muss entlang der gesamten Länge der Schlitzöffnung bewegt werden können. Nun die gleichen Arbeitschritte für die Montage der LNKN Aufhängung ausführen. ie Schrauben 4 und 5 erst nach beendeter Montage anziehen. NSAMBLAJ NGANCHS NRORS Posicionar el enganche inferior RCHO 3 en la parte posterior de la protección del estribo pasajero, atornillar el tornillo 4 (T M6x16), el tornillo de seguridad de tirón 5 con sus correspondientes arandelas rebordeadas 6 y las arandelas de seguridad 7. No apretar definitivamente los tornillos 4 y 5. La unión debe tener la posibilidad de desplazarse sobre toda la longitud de los orificios de ojete. Realizar las mismas operaciones para el montaje del enganche ZQURO. Apretar los tornillos 4 y 5 sólo después de completar el montaje. ΣΥΝΑΡΜΟΛΟΓΗΣΗ ΚΑΤΩ ΑΓΚΙΣΤΡΩΝ Τοποθετήστε το κάτω ΔΕΞΙ άγκιστρο 3 στο πίσω μέρος της προστασίας βατήρα επιβάτη, βιδώστε την βίδα 4 (T M6x16), την βίδα με απόσπαση ασφαλείας 5 με τις σχετικές φλαντζαρισμένες ροδέλες 6 και τις ροδέλες ασφαλείας 7. Μην σφίξετε εντελώς τις βίδες 4 και 5. Η σύνδεση θα πρέπει να έχει την δυνατότητα να φέρει σε όλο το μήκος του θηλύκωτες οπές. Εκτελείστε τις ίδιες εργασίες για την συναρμολόγηση του ΑΡΙΣΤΕΡΟΥ άγκιστρου. Σφίξτε τις βίδες 4 και 5 μόνο αφού ολοκληρώσετε την συναρμολόγηση. pag. 5
, la vite a strappo di sicurezza 5 con le relative rondelle")
6 9 GB ASSMBLNG TH RAR CROSS-PC OR SUPPORTNG TH PANNRS Remove the numberplate from its bracket, unscrew and remove the two screws holding the numberplate bracket, locate the cross-piece 8 in its housings in the mudguard (with the adjustment system facing downwards), and screw in screws 9 (TB M5x16). Make sure that the cross-piece is positioned correctly, then tighten screws 9. Tightening torque for screws 9: 4.3 ftlb (6 Nm) ASSMBLAGGO TRAVRSNO POSTROR APPOGGO VALG Rimuovere la targa dall apposito supporto, svitare e togliere le due viti che fissano il supporto targa, posizionare il traversino 8 (con il sistema di regolazione rivolto verso il basso) nelle apposite sedi del parafango e avvitare le viti 9 (TB M5x16). Accertarsi che il traversino sia posizionato correttamente e fissare bene le viti 9. Coppia di serraggio viti 9: 6 Nm (0,6 Kgm) ASSMBLAG L NTRTOS POSTRUR APPU S VALSS nlever la plaque de son support, dévisser et enlever les deux vis de fixation du support de la plaque, positionner l entretoise 8 (le système de réglage doit être tourné vers le bas) dans les emplacements du garde-boue et visser les vis 9 (TB M5x16). S assurer que l entretoise est positionnée correctement et bien fixer les vis 9. Couple de serrage de la vis 9 : 6 Nm (0,6 Kgm) 9 8 MONTAG S HNTRN KORTRÄS as Nummernschild vom Halter abnehmen, die beiden Schrauben des Nummernschildhalters lösen, den Träger 8 (mit dem Regelsystem nach unten) in die betreffenden Aufnahmestellen des Kotflügels einführen und die Schrauben 9 (TB M5x16) anschrauben. Sicherstellen, dass der Träger einwandfrei positioniert wurde; die Schrauben 9 fest anziehen. Anzugsmoment Schrauben 9: 6 Nm (0,6 Kgm) NSAMBLAJ AMARR TRANSVRSAL POSTROR APOYO MALTAS Remover la placa de su soporte, desenroscar y quitar los dos tornillos que fijan el soporte de la placa, posicionar el amarre transversal 8 (con el sistema de regulación orientado hacia abajo) en los correspondientes alojamientos situados en el guardabarros y atornillar los tornillos 9 (TB M5x16). Verificar que el amarre transversal esté posicionado correctamente y apretar bien los tornillos 9. Par de fijación tornillos 9: 6 Nm (0,6 Kgm) ΣΥΝΑΡΜΟΛΟΓΗΣΗ ΠΙΣΩ ΠΛΑΓΙΟΔΕΤΗΣ ΣΤΗΡΙΞΗΣ ΤΣΑΝΤΩΝ ΑΠΟΣΚΕΥΩΝ Αφαιρέστε την πινακίδα από το ειδικό στήριγμα, ξεβιδώστε και αφαιρέστε τις δύο βίδες που σταθεροποιούν το υποστήριγμα πινακίδας, τοποθετήστε τον πλαγιοδέτη 8 (με το σύστημα ρύθμισης γυρισμένο προς τα κάτω) στις ειδικές έδρες του προφυλακτήρα και βιδώστε τις βίδες 9 (TB M5x16). Βεβαιωθείτε ότι ο πλαγιοδέκτης είναι σωστά τοποθετημένος και σταθεροποιήστε καλά τις βίδες 9. Ζεύγος σύσφιξης βιδών 9: 6 Nm (0,6 Kgm) pag. 6
 ASSMBLAGGO TRAVRSNO POSTROR APPOGGO VALG Rimuovere la targa dall apposito supporto, svitare e togliere le due viti che fissano il supporto targa, posizionare il traversino 8 (con il")
7 G GB LOWRNG TH SLNCR Slack off bolt slightly, unscrew and remove nut and set aside washer G. Lower the silencer carefully by rotating it downwards, locate washer G and bracket 13, and partially tighten the self-locking nut 14. Support the silencer and, using screw 15, bush 16 and nut (removed earlier), fix the silencer to bracket 13. Tighten nuts and 14 and bolt well. Tightening torque for nuts and 14: 18.1 ftlb (25 Nm) Tightening torque for bolt : 7.2 ftlb (10 Nm) ABBASSAMNTO SLNZATOR Allentare leggermente la vite, svitare e togliere il dado e recuperare la rondella G. Abbassare con cura il silenziatore facendolo ruotare verso il basso, posizionare la rondella G, la staffetta 13 e avvitare parzialmente il dado autobloccante 14. Sollevare il silenziatore e tramite la vite 15, la bussola 16 e il dado (precedentemente rimosso) fissare il silenziatore sulla staffa 13. Serrare bene i dadi -14 e la vite. Coppia di serraggio dadi e 14: 25 Nm (2,5 Kgm) Coppia di serraggio vite : 10 Nm (1 Kgm) ABASSR L SLNCUX esserrer légèrement la vis, dévisser et enlever l écrou et récupérer la rondelle G. Abaisser soigneusement le silencieux en le faisant tourner vers le bas, positionner la rondelle G, l étrier 13 et visser partiellement l écrou auto-bloquant 14. Soulever le silencieux. A l aide de la vis 15, de la douille 16 et de l écrou (enlevé précédemment), fixer le silencieux sur l étrier 13. G Bien serrer les écrous -14 et la vis. Couple de serrage des écrous et 14 : 25 Nm (2,5 Kgm) Couple de serrage de la vis : 10 Nm (1 Kgm) SNKUNG S SCHALLÄMPRS ie Schraube etwas lockern, die Mutter lösen und die Scheibe G zur Seite legen. en Schalldämpfer durch rehung nach unten sorgsam absenken; die Scheibe G, den Bügel 13 positionieren und die Sicherungsmutter 14 teilweise anschrauben. en Schalldämpfer anhand der Schraube 15, der Buchse 16 und der Mutter (zuvor abgenommen) anheben. en Schalldämpfer am Bügel 13 befestigen. Muttern -14 und Schraube fest anziehen. Anzugsmoment Muttern und 14: 25 Nm (2,5 Kgm) Anzugsmoment Schraube : 10 Nm (1 Kgm) BAJAA SLNCAORA flojar ligeramente el tornillo, desenroscar y quitar la tuerca y recuperar la arandela G. Bajar con cuidado el silenciador haciéndolo girar hacia abajo, posicionar la arandela G, el estribo 13 y atornillar parcialmente la tuerca de autobloqueo 14. Levantar el silenciador y, con el tornillo 15, el casquillo 16 y la tuerca (previamente removida), fijar el silenciador al estribo 13. Apretar bien las tuercas -14 y el tornillo. Par de fijación tuercas y 14: 25 Nm (2,5 Kgm) Par de fijación tornillo : 10 Nm (1 Kgm) ΧΑΜΗΛΩΜΑ ΣΙΓΑΣΤΗΡΑ Χαλαρώστε ελαφρά την βίδα, ξεβιδώστε και αφαιρέστε το παξιμάδι και ανακτήσετε την ροδέλα G. Χαμηλώστε με φροντίδα τον σιγαστήρα γυρίζοντάς τον προς τα κάτων, τοποθετήστε την ροδέλα G, το υποστήριγμα 13 και βιδώστε μερικά το αυτομπλοκαριζόμενο παξιμάδι 14. Ανασηκώστε τον σιγαστήρα και μέσο της βίδας 15, την ροδάντσα 16 και το παξιμάδι (που αφαιρέσατε προηγουμένως) σταθεροποιήστε τον σιγαστήρα στο υποστήριγμα 13. Σφίξτε καλά τα παξιμάδια -14 και την βίδα. Ζεύγος σύσφιξης παξιμαδιών και 14: 25 Nm (2,5 Kgm) Ζεύγος σύσφιξης βίδας : 10 Nm (1 Kgm) pag. 7
 Tightening torque for bolt : 7.2 ftlb (10 Nm) ABBASSAMNTO SLNZATOR Allentare leggermente la vite, svitare e togliere il dado e recuperare la rondella G.")
8 GB Remove centrestand stop rubber H and replace it with rubber 17 (shallow), supplied in the kit. Make sure rubber 17 is securely fitted. H Rimuovere il gommino H di fine corsa cavalletto e sostituirlo con il gommino 17 (basso) in dotazione al kit. Serrare bene a fine corsa il gommino 17. nlever le caoutchouc H de fin de course de la béquille et le remplacer par le caoutchouc 17 (bas) fourni avec le kit. Bien serrer en fin de course le caoutchouc as ndgummi H des Ständers abnehmen und durch das zum Satz gehörende Gummi 17 (unten) auswechseln. Gummi 17 am nde fest anziehen. Remover la pieza en goma H de tope del soporte y reemplazarla con la pieza 17 (baja) en dotación con el juego. Apretar bien al tope la pieza en goma 17. Αφαιρέστε το ελαστικό H τέλους πορείας και αντικαταστήστε το με το ελαστικό 17 (χαμηλά) που σας παρέχεται με το κιτ. Σφίξτε καλά στο τέλος πορείας το ελαστικό GB POSTONNG AN SCURNG TH PANNR HOOKS Make sure the hook 10 has been slightly loosened so that it can move the entire length of the slot. Rotate the ring 11 (upwards) into a vertical position, and place the right-hand pannier onto the motorcycle. Make sure the hooks on the pannier are properly fitted into their housings in the upper support,and push the pannier towards the front of the motor cycle, making sure that hook 10 clicks into the pannier housing. Make sure the hooks on the pannier are at the end of the support slots (towards the front of the motor cycle), and hook the rear strap onto the bush on the pannier. Push the hook 10 towards the pannier housing until it clicks onto the inner pannier lock. it the nut 12 and the screw 4, detach the rear strap and carry out a test of hooking/unhooking the pannier (see the instructions provided with the panniers). f the hooking/unhooking mechanism works properly, tighten the screws 4 and 5 (screw 5 is a theft-prevention screw, tighten until the hex head comes off), tighten the nut 12 while holding the hook 10 so that it does not rotate out of position (i.e.the position with the pannier). Tightening torque for screw 5: 7.2 ftlb (10 Nm) Tightening torque for screw 12: 18.1 ftlb (25 Nm) f the hooking/unhooking operation is rather troublesome, adjust the hook as described below. Carry out the same operations for locating/securing the LT-HAN hook pag. 8
 auswechseln. Gummi 17 am nde fest anziehen.")
9 POSZONAMNTO SSAGGO AGGANC VALG Accertarsi che l aggancio 10 sia parzialmente allentato in modo che possa spostarsi su tutta la lunghezza del foro asolato. Ruotare (verso l alto) l anello 11 in posizione verticale, posizionare la valigia destra sulla moto, accertarsi che gli agganci della valigia siano correttamente inseriti sulle sedi del supporto superiore, spingere la valigia verso la parte anteriore della moto prestando attenzione che l aggancio 10 si inserisca nella apposita sede della valigia. Accertarsi che gli agganci della valigia si trovino a fine corsa delle asole del supporto (verso la parte anteriore della moto), agganciare il tirante posteriore nella boccola della valigia. Spingere l aggancio 10 verso la sede della valigia affinché questo si agganci alla serratura interna della valigia. issare il dado 12 e la vite 4, sganciare il tirante posteriore ed eseguire una prova di aggancio/sgancio della valigia (vedi le istruzioni allegate alle valigie). Verificato l esatto funzionamento dell aggancio/sgancio delle valigie, serrare la vite 4 e la vite 5 (la vite 5 è una vite di sicurezza al furto:serrare la vite sino ad ottenere il distacco della testa esagonale), serrare il dado 12 trattenendo l aggancio 10 in modo che questo non ruoti rispetto la posizione precedentemente memorizzata con la valigia. Coppia di serraggio vite 5: 10 Nm (1 Kgm) Coppia di serraggio dado 12: 25 Nm (2,5 Kgm) Se l operazione di aggancio/sgancio si presenta difficoltosa, regolare l aggancio 10 seguendo le indicazioni del seguente punto. seguire le stesse operazioni per il posizionamento/fissaggio dell aggancio SNSTRO. POSTONNMNT T XATON CROCHTS VALSS S assurer que le crochet 10 soit partiellement relâché de telle sorte qu il puisse se déplacer sur toute la longueur du trou à boutonnière. Tourner (vers le haut) la bague 11 en position verticale, positionner la valise gauche sur la moto, contrôler que les crochets de la valise soient correctement introduits dans les emplacements du support de la moto, pousser la valise vers la partie avant de la moto, en veillant à ce que le crochet 10 s introduise dans l emplacement de la valise prévu à cet effet. Vérifier que les crochets de la valise se trouvent à la fin des boutonnières du support (vers l avant de la moto), accrocher le tirant arrière dans la bague de la valise. Pousser le crochet 10 vers l emplacement de la valise afin qu il s accroche à la serrure interne de la valise. ixer l écrou 12 et la vis 4, décrocher le tirant arrière et faire un essai accrochage/décrochage de la valise (voir les instructions annexées aux valises). Après s être assuré du bon fonctionnement de l accrochage/décrochage des valises, serrer les vis 4 et 5 (la vis 5 est une vis de sécurité contre le vol, serrer la vis jusqu à ce que se détache la tête hexagonale), serrer le boulon 12 en maintenant le crochet 10 de façon à ce que celui-ci ne tourne pas par rapport à la position précédemment mémorisée avec la valise. Couple de serrage vis 5: 10 Nm (1 Kgm) Couple de serrage boulon 12: 25 Nm (2,5 Kgm) Si l opération d accrochage/décrochage semble difficile, régler le crochet 9 comme indiqué ci-dessous. ffectuer la même opération pour positionner/fixer l accrochage GAUCH pag. 9
, agganciare il tirante posteriore nella boccola della valigia.")
10 POSTONRUNG UN BSTGUNG R KORAUHÄNGUNG Sicherstellen, dass die Aufhängung 10 teilweise gelockert ist, so dass sie entlang der gesamten Länge der Schlitzöffnung bewegt werden kann. en Ring 11 in Vertikalstellung (nach oben) drehen, den rechten Koffer am Motorrad positionieren; sicherstellen, dass die Aufhängungen des Koffers korrekt in die Aufnahmestellen der oberen Halterungen greifen, und den Koffer in Richtung Motorradvorderteil schieben; dabei achten, dass die Aufhängung 10 in die vorgesehene Aufnahmestelle des Koffers greift. Sicherstellen, dass sich die Aufhängungen des Koffers am nde der Halterungsöffnungen befinden (Richtung Vorderteil des Motorrads), den hinteren Haltezug in der Buchse des Koffers befestigen. ie Aufhängung 10 in Richtung Aufnahmestelle des Koffers schieben, sodass sie in das innere Schloss des Koffers einhakt. ie Mutter 12 und die Schraube 4 anschrauben, den hinteren Zug aushaken und eine Aufhäng-/Aushängprobe des Koffers durchführen (siehe die den Koffern beiliegenden Anweisungen) Nach Überprüfung des korrekten unktionierens der Aufhängung/Aushängung der Koffer, die Schrauben 4 und 5 festziehen (die Schraube 5 ist eine iebstahlssicherungsschraube: ie Schraube bis zur Abtrennung des Sechseckkopfes anziehen), die Mutter 12 anziehen und die Aufhängung 10 festhalten, damit diese sich nicht um die vorher mit dem Koffer eingestellte Stellung dreht. Anzugsmoment Schraube 5: 10 Nm (1 Kgm) Anzugsmoment Mutter 12: 25 Nm (2,5 Kgm) Wenn das Aufhängen/Aushängen schwierig ist, Aufhängung 10 wie im folgenden Punkt beschrieben regulieren. Nun die gleichen Arbeitschritte für die Positionierung/Befestigung der LNKN Aufhängung ausführen. COLOCACON Y JACON ANCLAJS MALTAS Comprobar que el anclaje 10 esté un poco flojo para que se pueda desplazar por toda la longitud del orificio en ojete. Girar (hacia arriba) el anillo 11 en posición vertical, colocar la maleta izquierda en la moto, verificar que los anclajes de la maleta estén correctamente colocados en el soporte de la moto, empujar la maleta hacia la parte delantera de la moto teniendo en cuenta que el anclaje 10 se coloque en la sede correspondiente de la maleta. Comprobar que los anclajes de la maleta se encuentren al final de los ojetes del soporte (hacia la parte delantera de la moto), enganchar el tirante trasero en el casquillo de la maleta. mpujar el anclaje 10 hacia donde está la maleta hasta que éste se enganche en la cerradura interior de la maleta. ijar la tuerca 12 y el tornillo 4, desenganchar el tirante posterior y realizar una prueba de enganche /desenganche de la maleta (ver las instrucciones sobre las maletas). Una vez se haya comprobado que el enganche/desenganche de las maletas funciona correctamente, apretar los tornillos 4 y 5 (el tornillo 5 es un tornillo de seguridad antirobo, apretar el tornillo hasta que se separe de la cabeza hexagonal), apretar la tuerca 12 sujetando el enganche 10 de manera que no gire según la posición que ha memorizado anteriormente con la maleta. Par de fijación tornillo 5: 10 Nm (1 Kgm) Par de fijación tuerca 12: 25 Nm (2,5 Kgm) Si la operación de enganche/desenganche es difícil, regular el enganche 10 como se indica en el siguiente punto. Realizar las mismas operaciones para el posicionamiento / fijación del enganche ZQURO pag. 10
, den hinteren Haltezug in der Buchse des Koffers befestigen.")
11 ΤΟΠΟΘΕΤΗΣΗ ΚΑΙ ΣΤΑΘΕΡΟΠΟΙΗΣΗ ΤΩΝ ΑΓΚΙΣΤΩΝ ΤΩΝ ΤΣΑΝΤΩΝ ΑΠΟΣΚΕΥΗΣ Βεβαιωθείτε ότι το άγκιστρο 10 είναι μερικά χαλαρωμένο έτσι ώστε να μπορεί να μετακινηθεί σε όλο το μήκος της θηλυκωτής οπής. Περιστρέψτε (προς τα επάνω ) τον δακτύλιο 11 σε κάθετη θέση, τοποθετήστε την τσάντα αποσκευή στα δεξιά της μηχανής, βεβαιωθείτε ότι τα άγκιστρα της τσάντας αποσκευής έχουν εισαχθεί σωστά στις έδρες του άνω στηρίγματος, σφίξτε την τσάντα αποσκευών προς το μπροστινό μέρος της μηχανής έτσι ώστε το άγκιστρο 10 να εισαχθεί στην ειδική θέση της τσάντας αποσκευής. Βεβαιωθείτε ότι τα άγκιστρα της τσάντας αποσκευής βρίσκονται στο τέλος της πορείας των θηλιών υποστήριξης (προς το μπροστινό μέρος της μηχανής), αγκιστρώστε τον πίσω εντατήρα στην έδρα της τσάντας αποσκευής. Σπρώξτε το άγκιστρο 10 προς την έδρα της τσάντας αποσκευής έτσι ώστε να αγκιστρωθεί στην εσωτερική κλειδαριά της βαλίτσας. Σταθεροποιήστε το παξιμάδι 12 και την βίδα 4, απαγκιστρώστε τον πίσω εντατήρα και εκτελέστε μια δοκιμή αγκίστρωσης /απαγκίστρωσης στης τσάντας αποσκευής (βλέπετε τις οδηγίες που είναι συνημμένες με τις τσάντες αποσκευών). Αφού ελέγξετε την σωστή λειτουργία αγκίστρωσης /απαγκίστρωσης των τσαντών αποσκευής, βιδώστε την βίδα 4 και την βίδα 5 (η βίδα 5 είναι μια βίδα ασφαλείας για την κλοπή: συσφίξτε την βίδα έως να αποσπαστεί η εξαγωνική κεφαλή), συσφίξτε το παξιμάδι 12 συγκρατώντας το άγκιστρο 10 έτσι ώστε αυτό να μην περιστρέφεται σε σχέση με την προηγούμενη θέση που είχατε καθορίσει με την τσάντα αποσκευών. Ζεύγος σύσφιξης βίδας 5: 10 Nm (1 Kgm) Ζεύγος σύσφιξης παξιμαδιού 12: 25 Nm (2,5 Kgm) Εάν η εργασία της αγκίστρωσης /απαγκίστρωσης είναι δύσκολη, ρυθμίστε το άγκιστρο 10 ακολουθώντας τις ενδείξεις που ακόλουθου σημείου. Εκτελέστε τις ίδιες εργασίες για την τοποθέτηση /σταθεροποίηση του ΑΡΙΣΤΕΡΟΥ άγκιστρου pag. 11
, αγκιστρώστε τον πίσω εντατήρα στην έδρα της τσάντας")
12 GB AJUSTNG TH HOOK AN POSTON O TH RUBBR PAS ON TH RAR CROSSPC Adjusting the pre-loading of pannier hook-up/unhooking f the pannier can be hooked up too easily or too much effort is required, partially unscrew nut 12 and nudge the hook 10 towards the front or rear of the motor cycle. When the right position has been found, secure the nut 12. Tightening torque for the nut 12: 18.1 ftlb (25 Nm) RGOLAZON AGGANCO POSZONAMNTO GOMMN TRAVRSNO POSTROR Regolazione precarica aggancio /sgancio valigia Nel caso si verificasse un eccessivo sforzo o contrariamente una eccessiva facilità per l aggancio della valigia, svitare parzialmente il dado 12 e con piccoli spostamenti, traslare l aggancio 10 verso la parte posteriore o anteriore della moto. Trovata l esatta posizione dell aggancio, serrare il dado 12. Coppia di serraggio dado 12: 25 Nm (2,5 Kgm) RGLAG CROCHT T POSTON S CAPSULS N CAOUTCHOUC U TRAVRSN POSTRUR Réglage précharge pour attacher/détacher la valise. n cas de difficulté ou de facilité excessive au moment de la mise en place de la valise, dévisser partiellement l écrou 12 et déplacer par petits gestes le crochet 10 vers l arrière ou l avant de la moto. Une fois trouvée la position exacte du crochet, serrer l écrou 12. Couple de serrage écrou 12: 25 Nm (2,5 Kgm) NSTLLUNG R AUGHÄNGUNG UN ANBRNGUNG R GUMMTL S HNTRN TRÄS Vorspannung der Auf-/Aushängung des Koffers alls das inhängen des Koffers einen zu großen oder geringen Kraftaufwand erfordert, die Mutter 12 teilweise lockern und die Aufhängung 10 am Motorrad mit kleinen Bewegungen nach hinten oder vorne verschieben. Wenn die Aufhängung genau positioniert ist, Mutter 12 festziehen. Anzugsmoment Mutter 12: 25 Nm (2,5 Kgm) RGULACON L NGANCH Y COLOCACON LOS PVOTS L ROLLO TRASRO Regulación precarga enganche/desenganche maleta. n el caso de que se hiciera un esfuerzo excesivo o por el contrario, fuera demasiado fácil enganchar la maleta, desenroscar un poco la tuerca 12 y con pequeños desplazamientos, trasladar el enganche 10 hacia la parte trasera o delantera de la moto. Una vez que se haya encontrado la posición exacta del anclaje, apretar la tuerca 12. Par de fijación tuerca 12: 25 Nm (2,5 Kgm) ΡΥΘΜΙΣΗ ΑΓΚΙΣΤΡΟΥ ΚΑΙ ΤΟΠΟΘΕΤΗΣΗ ΕΛΑΣΤΙΚΩΝ ΤΟΥ ΠΙΣΩ ΠΛΑΓΙΟΔΕΤΗ Προσωρινή ρύθμιση αγκίστρωσης /απαγκίστρωσης τσάντας αποσκευής Σε περίπτωση που υπάρξει μια υπερβολική ενέργεια ή αντίθετα μια υπερβολική ευκολία για την απαγκίστρωση της αποσκευής, ξεβιδώστε μερικώς το παξιμάδι 12 και με μικρές μετακινήσεις, μετακινήστε το άγκιστρο 10 προς το πίσω ή το μπροστινό μέρος της μηχανής. Αφού βρείτε την ακριβή θέση του αγκίστρου, σφίξτε το παξιμάδι 12. Ζεύγος σύσφιξης παξιμαδιού 12: 25 Nm (2,5 Kgm) pag. 12

13 GB Adjusting the support rubbers With the cross-piece fully extended (see the paragraph on adjusting the cross-piece), slacken nut 18 and screw/unscrew rubber 19 until it is lightly preloaded against the surface of the pannier. Having found the correct position, tighten nut 18. Regolazione gommini di appoggio Con il traversino tutto esteso (vedi punto regolazione traversino), allentare il dado 18 e avvitare/svitare il gommino 19 sino a portare il gommino leggermente precaricato sulla superficie della valigia. Trovata l esatta posizione, serrare il dado 18. Réglage des caoutchoucs d appui Avec l entretoise ouverte (voir le point de réglage de l entretoise), desserrer l écrou 18 et visser/dévisser le caoutchouc 19 jusqu à ce qu il soit légèrement en pré-charge sur la surface de la valise. Une fois la position exacte trouvée, serrer l écrou 18. instellung des Stützgummis ie Mutter 18 bei ganz ausgedehntem Träger (siehe Trägereinstellung) lockern und das Gummi 19 an-/abschrauben, bis es an der Kofferfläche leicht vorgespannt vorliegt. Sobald die richtige Position gefunden wurde, Mutter 18 festziehen. Regulación piezas en goma de apoyo Con el amarre transversal en su máxima extensión (ver regulación amarre transversal), aflojar la tuerca 18 y atornillar/desenroscar la pieza en goma 19 hasta que la goma quede ligeramente precargada sobre la superficie de la maleta. Una vez encontrada la posición exacta, apretar la tuerca 18. Ρύθμιση ελαστικών στήριξης Με τον πλαγιοδέτη σε ολική έκταση (βλέπετε σημείο ρύθμισης πλαγιοδέτη), χαλαρώστε το παξιμάδι 18 και βιδώστε/ ξεβιδώστε το ελαστικό 19 έως να φέρετε το ελαστικό ελαφρά προ-φορτισμένο στην επιφάνεια της αποσκευής. Αφού βρείτε την σωστή θέση, σφίξτε το παξιμάδι pag. 13

14 GB AJUSTNG TH WTH O TH CROSS-PC f the bike is to be used without the panniers, the width of cross-piece 8 can be reduced as follows. On both sides of the cross-piece, slacken nut 20 and slide the end section inwards or outwards. Having decided the position, tighten nut 20. Tightening torque for nut 20: 7.2 ftlb (10 Nm) Warning: when the panniers are in use, the cross-piece must be in the fully-extended position (with nut 20 at the end of the slotted hole) so that the rubbers are lightly preloaded against the surface of the pannier. RGOLAZON LARGHZZA TRAVRSNO Nel caso dell utilizzo della moto senza valigie, si ha la possibilità di diminuire la larghezza del traversino 8. Su entrambi i lati del traversino, allentare il dado 20 e traslare verso l interno o verso l esterno la parte terminale. efinita la posizione, serrare il dado 20. Coppia di serraggio dado 20: 10 Nm (1 Kgm) Attenzione: con l utilizzo delle valigie, il traversino deve essere in posizione tutta estesa (dado 20 a fine foro asolato) in modo che i gommini siano leggermente precaricati sulla superficie della valigia. RGLAG LA LARGUR L NTRTOS ans le cas d utilisation de la moto sans valises, il est possible de diminuer la largeur de l entretoise 8. Sur les deux côtés de l entretoise, desserrer l écrou 20 et faire glisser l extrémité vers l intérieur ou vers l extérieur. Après avoir défini la position, serrer l écrou 20. Couple de serrage de l écrou 20 : 10 Nm (1 Kgm) Attention : si vous utilisez les valises, l entretoise devra être entièrement ouverte (écrou 20 au bout du trou à oeillet) de façon à ce que les caoutchoucs soient légèrement en pré-charge sur la surface de la valise. NSTLLUNG R TRÄBRT alls das Motorrad ohne Koffer benutzt wird, kann die Breite des Trägers 8 verringert werden. An beiden Trägerseiten die Mutter 20 lockern und den ndteil nach innen oder außen schieben. Nach der Positionierung die Mutter 20 festziehen. Anzugsmoment Mutter 20: 10 Nm (1 Kgm) Achtung: Bei der Verwendung von Koffern hat der Träger ganz ausgedehnt vorzuliegen (Mutter 20 am nde der Schlitzöffnung), so dass die Gummiteile an der Kofferfläche leicht vorgespannt sind. 8 RGULACÓN ANCHO AMARR TRANSVRSAL n caso de usar la moto sin maletas, se tiene la posibilidad de reducir el ancho del amarre transversal 8. n ambos lados del amarre transversal, aflojar la tuerca 20 y deslizar hacia adentro o hacia afuera la parte terminal. Luego de definir la posición, apretar la tuerca 20. Par de fijación tuerca 20: 10 Nm (1 Kgm) Atención: cuando se utilizan las maletas, el amarre transversal debe estar en posición totalmente extendida (tuerca 20 al final del orificio de ojete), en manera que las piezas en goma queden ligeramente precargadas sobre la superficie de la maleta. 20 ΡΥΘΜΙΣΗ ΠΛΑΤΟΥΣ ΠΛΑΓΙΟΔΕΤΗ Σε περίπτωση χρήσης της μηχανής χωρίς αποσκευές, έχετε την δυνατότητα να μειώσετε το πλάτος του πλαγιοδέτη 8. Και στις δύο πλευρές του πλαγιοδέτη, χαλαρώστε το παξιμάδι 20 και μετακινήστε προς το εσωτερικό ή προς το εξωτερικό το τελικό μέρος. Αφού καθοριστεί η θέση, σφίξτε το παξιμάδι 20. Ζεύγος σύσφιξης παξιμαδιού 20: 10 Nm (1 Kgm) Προσοχή: με την χρήση των αποσκευών, ο πλαγιοδέτης θα πρέπει να είναι σε θέση ολοκληρωμένης έκτασης (παξιμάδι 20 στο τέλος της θηλύκωτης οπής) έτσι ώστε τα ελαστικά να είναι ελαφρώς προ-φορτισμένα στην επιφάνεια της αποσκευής. pag. 14

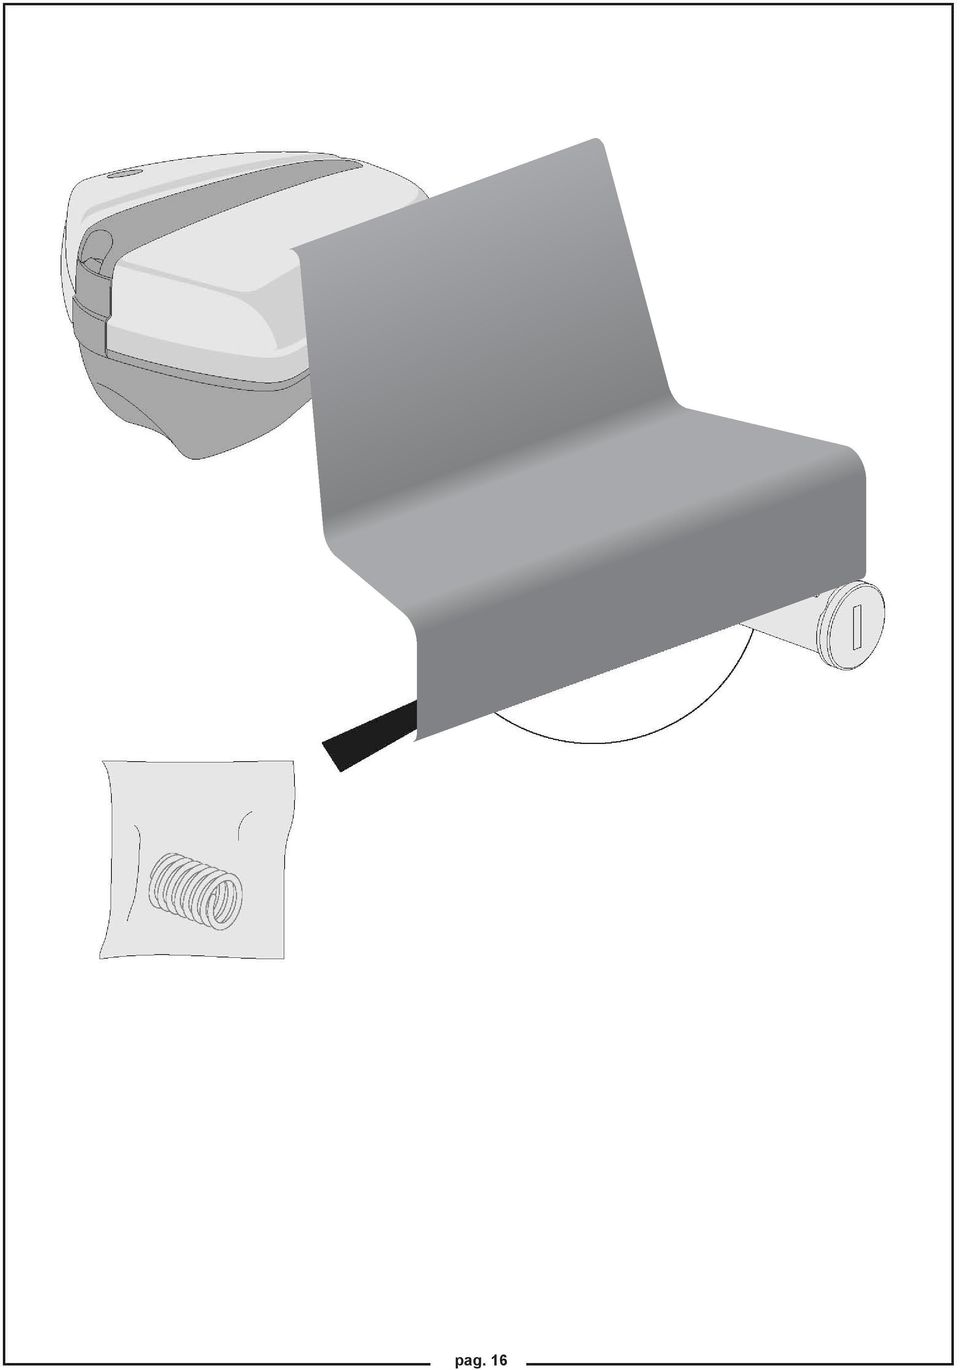
15 GB NSTRUCTONS OR TH US O S SUTCASS STRUZON PR L UTLZZO LL VALG LATRAL NSTRUCTONS POUR L UTLSATON S VALSS LATRALS ANLTUNG ZUR VRWNUNG R STNKOR NSTRUCCONS PARA UTLZAR LAS MALTAS LATRALS ΟΔΗΓΙΕΣ ΓΙΑ ΤΗΝ ΧΡΗΣΗ ΤΩΝ ΠΛΑΪΝΩΝ ΑΠΟΣΚΕΥΩΝ GB TTNG TH LOCK The lock kit is not supplied as part of the pannier kit. Locate on the handle in the interlocker centre spring provided. Use the lock kit supplied with the motorcycle at the time of purchase and assemble it to the panniers (see drawing). The operations described below are valid for both the right-hand and the left-hand panniers. MONTAGGO SRRATURA l kit serratura non è in dotazione al kit valigie. Posizionare al centro della sede serratura sulla maniglia la molla in dotazione. Utilizzare il kit serratura fornito con la moto al momento dell acquisto e assemblarlo alla valigia facendo attenzione al corretto posizionamentio della molla (vedi disegno). Le operazioni di seguito riportate sono valide sia per la valigia X che per la SX. MONTAG LA SRRUR Le kit serrure n est pas fourni avec les valises. Positionner le ressort fourni au centre de l emplacement de la serrure, sur la poignée. Utiliser le kit serrure fourni avec la moto au moment de l achat et l assembler à la valise (voir figure). Les opérations reportées ci-dessous sont valables pour la valise de droite et de gauche. MONTAG S SCHLOSSS er Schloss-Satz ist im Koffersatz nicht inbegriffen. ie zum Lieferumfang gehörende eder in die Mitte des Schloss-Aufnahmesitzes am Griff legen. en im Kauf des Motorrads inbegriffenen Schloss-Satz am Koffer einsetzen dabei die eder korrekt positionieren (siehe Zeichnung). Nachstehende Arbeitsschritte gelten sowohl für den Koffer R als auch L. MONTAJ CRRAURA l juego cerradura no viene en dotación con el juego de maletas. Posizionare al centro della sede serratura sulla maniglia la molla in dotazione Utilizar el juego de cerradura que se entrega con la moto al momento de la compra y ensamblarlo en la maleta (ver dibujo). Las operaciones que se indican a continuación son válidas tanto para la maleta derecha como para la izquierda. ΣΥΝΑΡΜΟΛΟΓΗΣΗ ΚΛΕΙΔΑΡΙΑΣ Το κιτ κλειδαριάς δεν παρέχεται με το κιτ αποσκευών. Τοποθετήστε στο κέντρο της έδρας της κλειδαριάς στην λαβή το ελατήριο που σας παρέχεται. Χρησιμοποιήστε το κιτ κλειδαριάς που παρέχεται με την μηχανή την στιγμή της αγοράς και συναρμολογήστε το στην αποσκευή δίνοντας προσοχή στην σωστή τοποθέτηση του ελατηρίου (βλέπετε σχέδιο). Οι εργασίες που ακολουθούν ισχύουν για την Δεξιά και για την Αριστερή. pag. 15

16 ( - pag. 16
17 GB OPNNG TH COVR 1. Unlatch the side hook by pressing the button. 2. it the key into the lock and turn 90 clockwise. 3. Lift the closing lever, using the key itself. 4. ree the cover lever hook and open the suitcase. CAUTON: Make sure that the side hook is unlatched. APRTURA COPRCHO 1. Aprire il gancio laterale premendo il pulsante. 2. nserire la chiave nella serratura e ruotarla di 90 in senso orario. 3. Sollevare la leva di chiusura accompagnando il movimento con la chiave stessa. 4. Svincolare l aggancio della leva dal coperchio e aprire la valigia. ATTNZON: Assicurarsi che il gancìio laterale sia aperto. OUVRTUR COUVRCL 1. Ouvrir le crochet latéral en appuyant sur le bouton. 2. nsérer la clé dans la serrure et la tourner de 90 dans le sens des aiguilles d une montre. 3. Soulever le levier de fermeture en accompagnant le mouvement avec la clé. 4. Libérer le crochet du levier du couvercle et ouvrir la valise. ATTNTON : s assurer que le crochet latéral est ouvert. ÖNN S CKLS 1. en Seitenhaken durch Betätigung der rucktaste öffnen. 2. en Schlüssel in das Schloss stecken und um 90 im Uhrzeigersinn drehen. 3. en Öffnungshebel anheben, und die Bewegung mit dem Schlüssel begleiten. 4. en Hebelhaken vom eckel abhaken und den Koffer öffnen. ACHTUNG: Sicherstellen, dass der Seitenhaken offen ist. APRTURA LA TAPA 1. Abrir el gancho lateral presionando el broche. 2. Colocar la llave en la cerradura y girarla 90 hacia la derecha. 3. Levantar la palanca de cierre acompañando el movimiento con la misma llave. 4. esenganchar la palanca de la tapa y abrir la maleta. ATNCÓN: Asegurarse que el gancho lateral esté abierto. ΑΝΟΙΓΜΑ ΚΑΠΑΚΙΟΥ 1. Ανοίξτε το πλαϊνό άγκιστρο πιέζοντας το κουμπί. 2. Ανοίξτε το κλειδί στην κλειδαριά και περιστρέψτε το κατά 90 από τα αριστερά προς τα δεξιά. 3. Ανυψώστε το μοχλό κλεισίματος συνοδεύοντας την κίνηση με το ίδιο το κλειδί. 4. Απελευθερώστε το άγκιστρο από τον μοχλό από το καπάκι και ανοίξτε την αποσκευή. ΠΡΟΣΟΧΗ: Βεβαιωθείτε ότι το πλαϊνό άγκιστρο είναι ανοιχτό. pag. 16

18 GB LLNG TH SUTCAS ree the elastic strap buckles, fill evenly and secure with the elastic straps and buckles. To make this easier, unhook/hook up the wires of the small cover bushes. Make sure nothing prevents the proper closing of the base/ cover and guide tooth. Complete crash-helmet housing. Over-filling the suitcase may affect water-proofing. ALLOGGAMNTO L CONTNUTO NLLA VALGA Sganciare le fibbie degli elastici, posizionare in modo uniforme il contenuto e riagganciare le fibbie degli elastici. Per facilitare l operazione, sganciare/agganciare i cavetti dalle boccole piccole del coperchio. Verificare che non ci siano particolari che interferiscono sulla chiusura tra base/coperchio e staffa guida. Alloggiamento del casco integrale. Un esagerato volume di contenuto all interno della valigia, può comprometterne l impermeabilità. PLACMNT U CONTNU ANS LA VALS Ouvrir les boucles des élastiques, placer le contenu de façon uniforme et refermer les boucles des élastiques. Afin de faciliter l opération, détacher/attacher les câbles des petites bagues du couvercle. Vérifier qu il n y ait aucun élément qui interfère sur la fermeture entre la base/couvercle et le cran de guidage. Logement du casque intégral. Un volume excessif d objets à l intérieur de la valise peut en compromettre l étanchéité. UNTRBRNGUNG S GPÄCKS M KOR ie Schnallen der Gummizüge aushaken, das Gepäck gleichmäßig verteilen und die Schnallen der Gummizüge wieder einhaken. Zur rleichterung der Handgriffe, die Kabelzüge an den kleinen Büchsen des eckels ein/aushängen. Sicherstellen, dass nichts den Verschluss zwischen eckel/ Koffer und ührungszahn behindert. Unterbringung des ntegralhelms. in zu hohes Gepäckvolumen kann die Undurchlässigkeit des Koffers beeinträchtigen. COLOCACON L CONTNO N LA MALTA esenganchar las hebillas de las gomas, colocar uniformemente el contenido y volver a enganchar las hebillas de las gomas. Para que sea más fácil la operación, desenganchar/enganchar los cablecitos de los casquillos pequeños de la tapa. Comprobar que no haya nada que moleste cuando se cierre la base / tapa y diente guía. Compartimiento del casco integral. Un volumen exagerado del contenido dentro de la maleta, puede provocar que hayan problemas de impermeabilidad. pag. 17 ΘΕΣΗ ΤΟΥ ΠΕΡΙΕΧΟΜΕΝΟΥ ΤΗΣ ΑΠΟΣΚΕΥΗΣ Απαγκιστρώστε τις αγκράφες των ελαστικών, τοποθετήστε με ομοιόμορφο τρόπο το περιεχόμενο και επαναγκιστρώστε τις αγκράφες των ελαστικών. Για να διευκολυνθεί η εργασία, απαγκιστρώστε/ αγκιστρώστε τα μικρά καλώδια των μικρών εδράνων του καπακιού. Ελέγξτε ότι δεν υπάρχουν αντικείμενα που επεμβαίνουν με το κλείσιμο μεταξύ της βάσης/ καπακιού και υποστηρίγματος οδηγού. Θέση του ολοκληρωμένου κράνους. Ένας υπερβολικός όγκος που περιέχεται στο εσωτερικό της αποσκευής, μπορεί να εμποδίζει την αδιάβροχη ιδιότητά της.

19 GB CLOSNG TH COVR 1. When closing, centre the cover on the base so that the guide tooth can be fitted inside the base. 2. Make sure nothing prevents proper closing between the base and cover. 3. Hook the closing lever onto the cover housing. 4. With the key in the open/closed position (rotated through 90 ), press the lever down. 5. Make sure the lever hooks onto the cover properly, rotate the key 90 anticlockwise so that it is in the central, closing position and remove the key. Make certain that the side hook is latched. CHUSURA COPRCHO 1. n fase di chiusura, centrare il coperchio con la base, in modo da inserire il dente guida all interno della base. 2. Verificare che non ci siano particolari che interferiscono sulla chiusura tra base e coperchio. 3. Agganciare la leva di chiusura nell apposita sede del coperchio. 4. Con la chiave in posizione di apertura/chiusura (ruotata di 90 ), premere la leva verso il basso. 5. Accertarsi dell esatto aggancio della leva nel coperchio, ruotare la chiave in senso antiorario di 90 portandola in posizione centrale di chiusura ed estrarre la chiave. Accertarsi della chiusura del gancio laterale. RMTUR COUVRCL 1. ans la phase de la fermeture, centrer le couvercle par rapport à la base, de manière à introduire le cran de guidage à l intérieur de la base. 2. Vérifier que rien n entrave la fermeture entre la base et le couvercle. 3. Accrocher le levier de fermeture dans l emplacement du couvercle prévu à cet effet. 4. Avec la clé en position d ouverture/fermeture (tournée à 90 ), appuyer le levier vers le bas. 5. Vérifier que le levier soit bien accroché dans le couvercle, tourner la clé de 90 dans le sens contraire des aiguilles d une montre, l amenant ainsi dans la position centrale de fermeture et sortir la clé. S assurer que le crochet latéral est fermé. 90 VRSCHLSSN S CKLS 1. Beim Schliessen den eckel so auf den Koffer klappen, dass der ührungszahn im Koffer einrastet. 2. Sicherstellen, dass der Verschluss zwischen eckel und Koffer durch nichts behindert wird. 3. en Verschlusshebel an entsprechender Stelle am eckel einhängen. 4. Mit Schlüssel in Öffnen/Schließen-Stellung (rehung um 90 ) den Hebel nach unten drücken. 5. Sicherstellen, dass der Hebel richtig am eckel eingehängt ist, den Schlüssel um 90 gegen den Uhrzeigersinn drehen, in mittlere Schließstellung bringen und abziehen. Sicherstellen, ass der Seitenhaken geschlossen ist. pag. 18

20 CRR LA TAPA 1. n fase de cierre centrar la tapa con la base, de tal manera que el diente guía entre en la base. 2. Comprobar que no hay nada que obstruya el cierre entre la base y la tapa. 3. nganchar la palanca de cierre con la posición correspondiente de la tapa. 4. Con la llave en posición de apertura/cierre (girada 90 ), presionar la palanca hacia abajo. 5. Comprobar que la palanca está bien enganchada a la tapa, girar la llave hacia la izquierda 90 llevándola hacia la posición central de cierre y sacar la llave. Verificar el cierre del gancho lateral. ΚΛΕΙΣΙΜΟ ΚΑΠΑΚΙΟΥ 1. Στην φάση κλεισίματος, κεντράρετε το καπάκι με την βάση, έτσι ώστε να εισάγετε το δόντι οδηγού στο εσωτερικό της βάσης. 2. Ελέγξτε ότι δεν υπάρχουν αντικείμενα που επεμβαίνουν στο κλείσιμο της βάσης με το καπάκι. 3. Αγκιστρώστε το μοχλό στην ειδική έδρα του καπακιού. 4. Με το κλειδί στην θέση ανοίγματος/ κλεισίματος (περιστρέψτε κατά 90 ), πιέστε το μοχλό προς τα κάτω. 5. Βεβαιωθείτε για την σωστή αγκίστρωση του μοχλού στο καπάκι, περιστρέψτε το κλειδί από τα δεξιά προς τα αριστερά 90 φέρνοντας το στο κεντρικό κλείσιμο και αφαιρέστε το κλειδί. Βεβαιωθείτε για το κλείσιμο του πλαϊνού αγκίστρου. 90 pag. 19

Make sure that the engine and the thermal parts of the scooter are cold before carrying out the following instructions.
 GB I F E GR INSTRUCTIONS OF THE KIT SIE STAN ON SCOOTER PIAGGIO P121 ISTRUZIONI I MONTAGGIO EL KIT CAVALLETTO LATERALE SU SCOOTER PIAGGIO P121 INSTRUCTIONS E MONTAGE E LA BÉQUILLE LATÉRALE SUR LE SCOOTER
Tipologie installative - Installation types Type d installation - Installationstypen Tipos de instalación - Τυπολογίες εγκατάστασης
 AMPADE MOOCROMATICHE VIMAR DIMMERABII A 0 V~ - VIMAR 0 V~ DIMMABE MOOCHROME AMP AMPE MOOCHROME VIMAR VARIATEUR 0 V~ - DIMMERFÄHIGE MOOCHROMATICHE AMPE VO VIMAR MIT 0 V~ ÁMPARA MOOCROMÁTICA VIMAR REGUABE
(REV:01) RYOBI 48 Volt Lawn Mower Model No. RY14110 Replacement Parts List
 RYOBI 48 Volt Lawn Mower Model No. RY14110 Replacement Parts List") 9800-86 2-0-0 (REV:0) RYOBI 48 Volt Lawn Mower Model No. RY0 Replacement Parts List RYOBI RY0 48 volt lawn mower 3 38 39 44 39 36 34 36 42 38 39 3 4 37 34 3 43 2 32 0 8 9 2 4 33 8 7 6 3 6 7 22 8 20 3 30
9800-86 2-0-0 (REV:0) RYOBI 48 Volt Lawn Mower Model No. RY0 Replacement Parts List RYOBI RY0 48 volt lawn mower 3 38 39 44 39 36 34 36 42 38 39 3 4 37 34 3 43 2 32 0 8 9 2 4 33 8 7 6 3 6 7 22 8 20 3 30
Tipologie installative - Installation types Types d installation - Die einbauanweisungen Tipos de instalación - Τυπολογίες εγκατάστασης
 Types d installation Die einbauanweisungen Tipos de instalación Τυπολογίες εγκατάστασης AMPADE MOOCROMATICHE VIMAR DIMMERABII A 0 V~ MOOCHROME DIMMABE AMP VIMAR 0 V~ AMPE MOOCHROME VIMAR DIMMABE 0 V~ EUCHTE
ΛΙΣΤΑ ΕΞΑΡΤΗΜΑΤΩΝ Ο ΗΓΙΕΣ ΣΥΝΑΡΜΟΛΟΓΗΣΗΣ
 ΠΟΛΥΟΡΓΑΝΟ BR300 Ο ΗΓΙΕΣ ΣΥΝΑΡΜΟΛΟΓΗΣΗΣ ΛΙΣΤΑ ΕΞΑΡΤΗΜΑΤΩΝ NUMBER DESCRIPTION QUANTITY 1 LEFT MAIN BASE FRAME 1 2 RIGHT MAIN BASE FRAME 1 3 CENTER MAIN BASE FRAME 1 4 FRONT MAIN BASE FRAME 1 5 UPRIGHT 2
(REV:01) RYOBI 48 Volt Lawn Mower Model No. RY14110A Replacement Parts List
 RYOBI 48 Volt Lawn Mower Model No. RY14110A Replacement Parts List") 9000-7 9-- (REV:0) RYOBI 4 Volt Lawn Mower Model No. RY0A Replacement Parts List RYOBI RY0A 4 VOLT LAWN MOWER 3 3 39 44 39 3 34 3 42 3 39 3 4 37 34 3 43 2 0 37 2 33 32 3 9 7 22 30 4 7 3 20 9 3 2 2 27 2
9000-7 9-- (REV:0) RYOBI 4 Volt Lawn Mower Model No. RY0A Replacement Parts List RYOBI RY0A 4 VOLT LAWN MOWER 3 3 39 44 39 3 34 3 42 3 39 3 4 37 34 3 43 2 0 37 2 33 32 3 9 7 22 30 4 7 3 20 9 3 2 2 27 2
Right Rear Door. Let's now finish the door hinge saga with the right rear door
 Right Rear Door Let's now finish the door hinge saga with the right rear door You may have been already guessed my steps, so there is not much to describe in detail. Old upper one file:///c /Documents
ΟΔΗΓΙΕΣ ΣΥΝΑΡΜΟΛΟΓΗΣΗΣ/ ASSEMBLY INSTRUCTION ΤΟΜΜΥ ΚΡΕΒΑΤΙ/BED
 ΟΔΗΓΙΕΣ ΣΥΝΑΡΜΟΛΟΓΗΣΗΣ/ ASSEMBLY INSTRUCTION ΤΟΜΜΥ ΚΡΕΒΑΤΙ/BED 1. Παρακαλώ πολύ διαβάστε προσεκτικά τις οδηγίες πριν την συναρμολόγηση/ Please read the instructions carefully. 2. Παρακαλώ πολύ όπως ελέγξτε
WARNING. Cod. B Release 03 del 02_2014 pag. 1
 WRNNG Thank you for choosing Moto Guzzi genuine accessories for installation on your motorcycle. t is extremely important that the accessories be installed correctly, so read and thoroughly understand
Operating Instructions and Parts Manual 14-inch Woodworking Band Saw Models JWBS-14SF and JWBS-14SF-3
 Operating Instructions and Parts Manual 14-inch Woodworking Band Saw Models JWBS-14SF and JWBS-14SF-3 Model #714500 shown JET 427 New Sanford Road LaVergne, Tennessee 37086 Part No. M-714500 Ph.: 800-274-6848
User s Manual / Οδηγίες Χρήσης
 User s Manual / Οδηγίες Χρήσης EUROPEAN STANDARDS Your child s safety depends on you. Proper bed rail usage cannot be assured unless you follow these instructions. DO NOT USE YOUR BED RAIL UNTILL YOU READ
English PDFsharp is a.net library for creating and processing PDF documents 'on the fly'. The library is completely written in C# and based
 English PDFsharp is a.net library for creating and processing PDF documents 'on the fly'. The library is completely written in C# and based exclusively on safe, managed code. PDFsharp offers two powerful
Owner s Manual / Οδηγίες Χρήσης
 Owner s Manual / Οδηγίες Χρήσης 63 200 N. MOUDANIA GREECE www.babystar.gr NEW Κάθισμα Αυτοκινήτου Μεταφοράς Travel System Car Seat Για βρέφη έως 13 κιλά / Σύμφωνα με ECE R44.03 παγκοσμίως For infants up
!Stato di tensione triassiale!stato di tensione piano!cerchio di Mohr
 !Stato di tensione triassiale!stato di tensione piano!cerchio di Mohr Stato di tensione F A = F / A F Traione pura stato di tensione monoassiale F M A M Traione e torsione stato di tensione piano = F /
Parts catalogue LAWN MOWER
 OREC ISSUED NO. GR535PRO-1 Parts catalogue LAWN MOWER (EXPORT MODEL) GR535PRO(2Action) MODEL GR535PRO CODE 0278- CONTENTS Fig.1 GEAR CASE------------------------------------------------------------ 1 Fig.2
ACCESSORIES. FITTING INSTRUCTION Fog Lamps. EINBAUANLEITUNG Nebelscheinwerfer. INSTRUCTION DE MONTAGE Projecteurs Antibrouillard
 ACCESSORIES WARNING Accessories which are not properly fitted can be dangerous. Read the instructions carefully prior to fitting. Whilst fitting, comply with the instructions at all times. If in doubt,
DISCOVERY ACCESSORIES. FITTING INSTRUCTION Towing Electrics - 13 Pin. EINBAUANLEITUNG Elektrosatz - 13-polig
 CCESSORIES WRNING ccessories which are not properly fitted can be dangerous. Read the instructions carefully prior to fitting. Whilst fitting, comply with the instructions at all times. If in doubt, contact
LAND ROVER ACCESSORIES. Ο ΗΓΙΑ ΤΟΠΟΘΕΤΗΣΗΣ Σύστηµα ιακοπής Λειτουργίας του "Εργάτη" Winch Cut-Out Kit. Windenabschaltung
 ACCSSORS WARNNG Accessories which are not properly fitted can be dangerous. Read the instructions carefully prior to fitting. Whilst fitting, comply with the instructions at all times. f in doubt, contact
Drum Head Assembly Exploded View
 Drum Head Assembly Exploded View 27 Drum Head Assembly Parts List 1...70-4102... Motor... 1-3/4HP, 115V... 1...70-4102MF... Motor Fan (not shown)...... 1...70-4102MFC... Motor Fan Cover (not shown)......
Ε Γ Χ Ε Ι Ρ Ι Δ Ι Ο Χ Ρ Η Σ Τ Η. Διάδρομος LOHAS T4
 Ε Γ Χ Ε Ι Ρ Ι Δ Ι Ο Χ Ρ Η Σ Τ Η Διάδρομος LOHAS T4 µ. µ µ, µ µ µ. µ µ µ. µ µ., µ. www.kinissis.eu www.kinissis.eu αριστερά εμπρός δεξιά ΟΔΗΓΙΕΣ ΣΥΝΑΡΜΟΛΟΓΗΣΗΣ LOHAS T4 Αφού βγάλετε το όργανο γυμναστικής
Operating Instructions and Parts Manual 14-inch Woodworking Band Saw Models JWBS-14SF and JWBS-14SF-3
 Operating Instructions and Parts Manual 14-inch Woodworking Band Saw Models JWBS-14SF and JWBS-14SF-3 Model #714500 shown JET 427 New Sanford Road LaVergne, Tennessee 37086 Part No. M-714500 Ph.: 800-274-6848
EN FR IT DE GR. PENTA 300 PENTA K100 INSTALLATION MANUAL
 EN FR IT DE GR www.karag.it PENTA 300 PENTA K100 INSTALLATION MANUAL KARAG is not responsible for any spelling or typographical mistakes. 2 3 1. Level and screw the vertical wall profi les. Niveler et
M14/1/AYMGR/HP1/GRE/TZ0/XX
 M14/1/AYMGR/HP1/GRE/TZ0/XX 22142045 MODERN GREEK A: LANGUAGE AND LITERATURE HIGHER LEVEL PAPER 1 GREC MODERNE A : LANGUE ET LITTÉRATURE NIVEAU SUPÉRIEUR ÉPREUVE 1 GRIEGO MODERNO A: LENGUA Y LITERATURA
FR: Robot culbuteur EL: Ρομπότ-που-πέφτει
 FR: Robot culbuteur EL: Ρομπότ-που-πέφτει FR: Vous aurez besoin de : EL: Θα χρειαστείτε: FR: Ciseaux EL: Ψαλίδι FR: 2 piles AA EL: 2 μπαταρίες ΑΑ FR: Élastique de ménage EL: Λαστιχάκι FR: Pièce de monnaie
Κατάλογος Βάσεων Στήριξης Για Βιομηχανική Οροφή Base Cataloge For Industrial Rooftops ΚΑΤΑΛΟΓΟΣ ΥΛΙΚΩΝ - PRODUCT CATALOGE
 ΚΑΤΑΛΟΓΟΣ ΥΛΙΚΩΝ - PRODUCT CATALOGE Κατάλογος Βάσεων Στήριξης Για Βιομηχανική Οροφή Base Cataloge For Industrial Rooftops tel: 00302109653270 fax: 00302109653180 mail:info@pvmounting.gr ΠΕΡΙΓΡΑΦΗ ΣΥΣΤΗΜΑΤΟΣ
Door Hinge replacement (Rear Left Door)
") Door Hinge replacement (Rear Left Door) We will continue the previous article by replacing the hinges of the rear left hand side door. I will use again the same procedure and means I employed during the
Door Hinge replacement (Rear Left Door) We will continue the previous article by replacing the hinges of the rear left hand side door. I will use again the same procedure and means I employed during the
La Déduction naturelle
 La Déduction naturelle Pierre Lescanne 14 février 2007 13 : 54 Qu est-ce que la déduction naturelle? En déduction naturelle, on raisonne avec des hypothèses. Qu est-ce que la déduction naturelle? En déduction
Εγκατάσταση λογισμικού και αναβάθμιση συσκευής Device software installation and software upgrade
 Για να ελέγξετε το λογισμικό που έχει τώρα η συσκευή κάντε κλικ Menu > Options > Device > About Device Versions. Στο πιο κάτω παράδειγμα η συσκευή έχει έκδοση λογισμικού 6.0.0.546 με πλατφόρμα 6.6.0.207.
Οδηγίες Λειτουργίας. Assembly Operating instructions. Montageanleitung. Απογυμνωτές PV-AZM...3. Stripping pliers PV-AZM...3.
 MA000 MA267 (de_en) (gr_en) Montageanleitung Οδηγίες Λειτουργίας Απογυμνωτής PV-AZM... για MC3, MC4 MA000 MA267 (de_en) (gr_en) Assembly Operating instructions Stripping pliers PV-AZM... for MC3 and MC4
Ε Γ Χ Ε Ι Ρ Ι Δ Ι Ο Χ Ρ Η Σ Τ Η. Πάγκος Γυμναστικής Β-16
 Ε Γ Χ Ε Ι Ρ Ι Δ Ι Ο Χ Ρ Η Σ Τ Η Πάγκος Γυμναστικής Β-16 ΛΙΣΤΑ ΚΟΜΜΑΤΙΩΝ 1-1x BACK REST - ΠΛΑΤΗ ΚΑΘΙΣΜΑΤΟΣ 2-1x SEAT PAD - ΚΑΘΙΣΜΑ 3-1x ARMREST ΘΕΣΗ ΧΕΡΙΩΝ 4-1x MAIN BEAM ΚΥΡΙΩΣ ΔΟΚΟΣ 5-1x CROSS BEAM ΟΡΙΖΟΝΤΙΑ
H-2079 POLY STRAPPING MACHINE
 ON OFF 2 0 3 M 4 MAX 5 π POWER LENGTH RESET FEED CONTROL PANEL DIAGRAM AND PC BOARD HOUSING 51 51 34 21 22 51 19 2 4 7 53 8 1 3 20 6 52 62 51 5 12 14 2 30 16 9 64 15 PAGE 1 OF 17 1214 P CONTROL PANEL PARTS
DISCOVERY ACCESSORIES. FITTING INSTRUCTION Occasional Seats. EINBAUANLEITUNG Gelegentliche Sitze. INSTRUCTION DE MONTAGE Gelegentliche Sitze
 CCESSORIES WRNING ccessories which are not properly fitted can be dangerous. Read the instructions carefully prior to fitting. Whilst fitting, comply with the instructions at all times. If in doubt, contact
Οδηγίες Χρήσης Πολύσπαστου Κρεβατιού. Two Cranks Manual Folding Bed User Manual
 Οδηγίες Χρήσης Πολύσπαστου Κρεβατιού Two Cranks Manual Folding Bed User Manual Το κρεβάτι αποτελείται από τα παρακάτω μέρη, όπως φαίνονται στην Εικόνα # 1 Two cranks manual folding bed installation parts
Parts catalogue LAWN MOWER
 OREC ISSUED NO. GRH535PRO-3 Parts catalogue LAWN MOWER (EXPORT MODEL) GRH535PRO(2Action) MODEL GRH535PRO CODE 0276- CONTENTS Fig. 1 GEAR CASE -------------------------------------- 1 Fig. 2 GEAR CASE INSIDE,
FREELANDER ACCESSORIES. FITTING INSTRUCTION Navigation System. EINBAUANLEITUNG Navigationssystem. INSTRUCTION DE MONTAGE Système de navigation
 ACCESSORIES WARNING Accessories which are not properly fitted can be dangerous. Read the instructions carefully prior to fitting. Whilst fitting, comply with the instructions at all times. If in doubt,
User s Manual / Οδηγίες Χρήσης. Baby stroller CΙΤΥ European standards EN 1888
 User s Manual / Οδηγίες Χρήσης Baby stroller CΙΤΥ European standards 1888 Your child s safety depends on you. Proper baby stroller usage cannot be assured unless you follow these instructions. DO NOT USE
ΟΔΗΓΙΕΣ ΕΓΚΑΤΑΣTΑΣΗΣ ΓΙΑ ΠΑΤΩΜΑ WPC INSTALLATION GUIDE FOR WPC DECKING
 1/12 ΟΔΗΓΙΕΣ ΕΓΚΑΤΑΣTΑΣΗΣ ΓΙΑ ΠΑΤΩΜΑ WPC INSTALLATION GUIDE FOR WPC DECKING Ανοίγουμε τρύπες Ø8 x 80mm στο σημείο κατασκευής, με τρυπάνι. To προτεινόμενο πλάτος και μήκος μεταξύ των 2 οπών να είναι 30-35εκ.,
ΠΟΡΤΕΣ ΑΝΑΚΑΙΝΙΣΗΣ DOORS FOR MODERNIZATION
 ΠΟΡΤΕΣ ΑΝΑΚΑΙΝΙΣΗΣ DOORS FOR MODERNIZATION ΠΟΡΤΑ ΟΡΟΦΟΥ ΚΕΝΤΡΙΚΗ 2ΦΥΛΛΗ 2 PANELS CENTRE PARTING LANDING DOOR.1. Πόρτα ορόφου χωρίς κάσωμα, για ανακαινίσεις Landing door without frames, for modernization
Οδηγίες Χρήσης Μονόσπαστου Κρεβατιού. Single Crank Manual Folding Bed User Manual
 Οδηγίες Χρήσης Μονόσπαστου Κρεβατιού Single Crank Manual Folding Bed User Manual Το κρεβάτι αποτελείται από τα παρακάτω μέρη, όπως φαίνονται στην Εικόνα # 1 Single crank manual folding bed installation
WARNING. Cod Release 00 del 09_2006 pag. 1
 WARNNG Thank you for choosing Moto Guzzi genuine accessories for installation on your motorcycle. t is extremely important that the accessories be installed correctly, so read and thoroughly understand
HOMEWORK 4 = G. In order to plot the stress versus the stretch we define a normalized stretch:
 HOMEWORK 4 Problem a For the fast loading case, we want to derive the relationship between P zz and λ z. We know that the nominal stress is expressed as: P zz = ψ λ z where λ z = λ λ z. Therefore, applying
Lógica Proposicional. Justificación de la validez del razonamiento?
 Proposicional educción Natural Proposicional - 1 Justificación de la validez del razonamiento? os maneras diferentes de justificar Justificar que la veracidad de las hipótesis implica la veracidad de la
T624 IT REVISION A-24 TIRE CHANGER
 T IT.00.00 REVISION A- TIRE CHANGER 0 0 0 0 0 0 0 0 0 T IT.00.00 TIRE CHANGER A- 00000 WASHER 0000 SCREW MX-N 0000 INFLATOR COVER ASSEMBLY 000 SCREW MX 0000 PRESS COVER 0000 TURNTABLE ASSEMBLY 0000 SCREW
User s Manual / Οδηγίες Χρήσης STANDARDS ECE R44/04
 User s Manual / Οδηγίες Χρήσης STANDARDS ECE R44/04 Your child s safety depends on you. Proper car seat usage cannot be assured unless you follow these instructions. DO NOT USE YOUR CAR SEAT UNTILL YOU
Integrali doppi: esercizi svolti
 Integrali doppi: esercizi svolti Gli esercizi contrassegnati con il simbolo * presentano un grado di difficoltà maggiore. Esercizio. Calcolare i seguenti integrali doppi sugli insiemi specificati: a) +
 ΕΝΔΕΙΚΤΙΚΕΣ ΚΑΤΑΣΚΕΥΕΣ - INDICATIVE STRUCTURES 4 Πάνελ Κάθετα 4 Panel Portrait 6660 Ψαλίδι για 4 κάθετα πάνελ. Διατίθεται επίσης σε 12 και 10 μοίρες. Base for 4 portrait panels. Also available at 12 and
MODEL D62-42 D70-42 DIESEL PILE HAMMER SPARE PARTS BOOK
 MODEL D62-42 D70-42 DIESEL PILE HAMMER SPARE PARTS BOOK Corporate Office 7032 S. 196th Street Kent, WA, USA 98032 Tel: 1-800-248-8498 Tel: 1-253-872-0141 Fax: 1-253-872-8710 2 No. Parts-No. Description
ASSEMBLY INSTRUCTIONS ΟΔΗΓΙΕΣ ΣΥΝΑΡΜΟΛΟΓΗΣΗΣ MODEL/ΜΟΝΤΕΛΟ: MEK
 ASSEMBLY INSTRUCTIONS ΟΔΗΓΙΕΣ ΣΥΝΑΡΜΟΛΟΓΗΣΗΣ MODEL/ΜΟΝΤΕΛΟ: 9918-MEK TOOLS REQUIRED Phillips Screwdriver - Not Included Standard (Flat Head Screwdriver) - Not Included Wrench - Included Allen Key - Included
3 Lösungen zu Kapitel 3
 3 Lösungen zu Kapitel 3 31 Lösungen der Aufgaben zu Abschnitt 31 311 Lösung Die Abbildung D : { R 4 R 4 R 4 R 4 R, a 1, a 2, a 3, a 4 ) D( a 1, a 2, a 3, a 4 ) definiere eine Determinantenform (auf R 4
KIT DE DRENAJE DE CONDENSADOS
 KIT DE DRENAJE DE CONDENSADOS Estas instrucciones forman parte integrante del manual que acompaña el aparato en el cual está instalado este Kit. Este manual se refiere a ADVERTENCIAS GENERALES y REGLAS
Advanced Subsidiary Unit 1: Understanding and Written Response
 Write your name here Surname Other names Edexcel GE entre Number andidate Number Greek dvanced Subsidiary Unit 1: Understanding and Written Response Thursday 16 May 2013 Morning Time: 2 hours 45 minutes
COURBES EN POLAIRE. I - Définition
 Y I - Définition COURBES EN POLAIRE On dit qu une courbe Γ admet l équation polaire ρ=f (θ), si et seulement si Γ est l ensemble des points M du plan tels que : OM= ρ u = f(θ) u(θ) Γ peut être considérée
ΕΣΩΤΕΡΙΚΗ ΜΟΝΑΔΑ ΚΛΙΜΑΤΙΣΤΙΚΟ ΔΙΑΙΡΟΥΜΕΝΟΥ ΤΥΠΟΥ ΜΟΝΤΕΛΟ RAD-18RPA RAD-25RPA RAD-35RPA RAD-50RPA. Eλληνικά ΕΣΩΤΕΡΙΚΗ ΜΟΝΑΔΑ
 ΚΛΙΜΑΤΙΣΤΙΚ ΔΙΑΙΡΥΜΕΝΥ ΤΥΠΥ ΕΣΩΤΕΡΙΚΗ ΜΝΑΔΑ ΜΝΤΕΛ RAD-18RPA RAD-25RPA RAD-35RPA RAD-50RPA ΕΣΩΤΕΡΙΚΗ ΜΝΑΔΑ RAD-18RPA RAD-25RPA RAD-35RPA RAD-50RPA Instruction manual Page 1~12 To obtain the best performance
CONFIGURAZIONE DELLA CASELLA DI POSTA ELETTRONICA CERTIFICATA (P.E.C.)
") CONFIGURAZIONE DELLA CASELLA DI POSTA ELETTRONICA CERTIFICATA (P.E.C.) Consigliamo di configurare ed utilizzare la casella di posta elettronica certificata tramite il webmail dedicato fornito dal gestore
CONFIGURAZIONE DELLA CASELLA DI POSTA ELETTRONICA CERTIFICATA (P.E.C.) Consigliamo di configurare ed utilizzare la casella di posta elettronica certificata tramite il webmail dedicato fornito dal gestore
Lógica Proposicional
 Proposicional educción Natural Proposicional - 1 Justificación de la validez del razonamiento os maneras diferentes de justificar Justificar que la veracidad de las hipótesis implica la veracidad de la
4K HDMI Splitter 1x4. User s Guide / Bedienungsanleitung / Εγχειρίδιο Χρήστη
 4K HDMI Splitter 1x4 User s Guide / Bedienungsanleitung / Εγχειρίδιο Χρήστη INTRODUCTION The EDISION 4K HDMI Splitter 1x4 uses a single HDMI input source, to distribute it to 4 HDMI outputs. The splitter
9.09. # 1. Area inside the oval limaçon r = cos θ. To graph, start with θ = 0 so r = 6. Compute dr
 9.9 #. Area inside the oval limaçon r = + cos. To graph, start with = so r =. Compute d = sin. Interesting points are where d vanishes, or at =,,, etc. For these values of we compute r:,,, and the values
ΕΓΧΕΙΡΙΔΙΟ ΧΡΗΣΗΣ IS901
 ΕΓΧΕΙΡΙΔΙΟ ΧΡΗΣΗΣ IS901 LEG PRESS & HACK SQUAT ΠΡΟΣΟΧΗ! Διαβάστε προσεκτικά όλες τις οδηγίες πριν χρησιμοποιήσετε αυτό το προϊόν! ΠΕΡΙΕΧΟΜΕΝΑ ΠΡΙΝ ΞΕΚΙΝΗΣΕΤΕ...1 ΣΗΜΑΝΤΙΚΕΣ ΟΔΗΓΙΕΣ ΑΣΦΑΛΕΙΑΣ... 2 ΒΑΣΙΚΑ
the total number of electrons passing through the lamp.
 1. A 12 V 36 W lamp is lit to normal brightness using a 12 V car battery of negligible internal resistance. The lamp is switched on for one hour (3600 s). For the time of 1 hour, calculate (i) the energy
Gima S.p.A. Via Marconi, Gessate (MI) Italy - M32692-M-Rev.0.01.
 Italy - M32692-M-Rev.0.01.") PROFESSIONAL MEDICAL PRODUCTS Gima S.p.A. Via Marconi, 1-20060 Gessate (MI) Italy gima@gimaitaly.com - export@gimaitaly.com www.gimaitaly.com SFIGMOMANOMETRO YTON BRACCIALE UNICO YTON SPHYGMOMANOMETERS
PROFESSIONAL MEDICAL PRODUCTS Gima S.p.A. Via Marconi, 1-20060 Gessate (MI) Italy gima@gimaitaly.com - export@gimaitaly.com www.gimaitaly.com SFIGMOMANOMETRO YTON BRACCIALE UNICO YTON SPHYGMOMANOMETERS
Code Breaker. TEACHER s NOTES
 TEACHER s NOTES Time: 50 minutes Learning Outcomes: To relate the genetic code to the assembly of proteins To summarize factors that lead to different types of mutations To distinguish among positive,
ENGLISH FRANÇAIS ESPAÑOL
 ENGLISH Attention! Please make sure you assemble the product over a non-damaging surface. In case any piece has blue protective plastic film, please remove it carefully. Use screws and dowels suited to
Οδηγίες Χρήσης BWR5106
 Οδηγίες Χρήσης BWR5106 Περιγραφή εργαλείου Οι αντλίες χειρός είναι ένα εργαλείο με την ικανότητα, πιέζοντας τον λεβιέ πάνω κάτω να πρεσάρει γράσο σε μεγάλη πίεση και με την βοήθεια αυτής να γρασάρει οπού
Οδηγίες Αγοράς Ηλεκτρονικού Βιβλίου Instructions for Buying an ebook
 Οδηγίες Αγοράς Ηλεκτρονικού Βιβλίου Instructions for Buying an ebook Βήμα 1: Step 1: Βρείτε το βιβλίο που θα θέλατε να αγοράσετε και πατήστε Add to Cart, για να το προσθέσετε στο καλάθι σας. Αυτόματα θα
ΑΡΙΣΤΟΤΕΛΕΙΟ ΠΑΝΕΠΙΣΤΗΜΙΟ ΘΕΣΣΑΛΟΝΙΚΗΣ ΤΜΗΜΑ ΟΔΟΝΤΙΑΤΡΙΚΗΣ ΕΡΓΑΣΤΗΡΙΟ ΟΔΟΝΤΙΚΗΣ ΚΑΙ ΑΝΩΤΕΡΑΣ ΠΡΟΣΘΕΤΙΚΗΣ
 ΑΡΙΣΤΟΤΕΛΕΙΟ ΠΑΝΕΠΙΣΤΗΜΙΟ ΘΕΣΣΑΛΟΝΙΚΗΣ ΤΜΗΜΑ ΟΔΟΝΤΙΑΤΡΙΚΗΣ ΕΡΓΑΣΤΗΡΙΟ ΟΔΟΝΤΙΚΗΣ ΚΑΙ ΑΝΩΤΕΡΑΣ ΠΡΟΣΘΕΤΙΚΗΣ ΣΥΓΚΡΙΤΙΚΗ ΜΕΛΕΤΗ ΤΗΣ ΣΥΓΚΡΑΤΗΤΙΚΗΣ ΙΚΑΝΟΤΗΤΑΣ ΟΡΙΣΜΕΝΩΝ ΠΡΟΚΑΤΑΣΚΕΥΑΣΜΕΝΩΝ ΣΥΝΔΕΣΜΩΝ ΑΚΡΙΒΕΙΑΣ
Section 9.2 Polar Equations and Graphs
 180 Section 9. Polar Equations and Graphs In this section, we will be graphing polar equations on a polar grid. In the first few examples, we will write the polar equation in rectangular form to help identify
Λεπτομερές Σχέδιο για τη Συναρμολόγηση. Κατάλογος εξαρτημάτων. Κατάλογος υλικού. A. Δίσκος (1) Β. Διάταξη ασφάλισης (1) C. Μπροστινό πλαίσιο (1)
 Β. Διάταξη ασφάλισης (1) C. Μπροστινό πλαίσιο (1)") Terratek Imports Agia Marina, Koropi Attiki Greece 2291078902 www.gorillacarts.gr Questions, problems, missing parts? Before returning to your retailer, visit us online at www.gorillacarts.gr or call the
Terratek Imports Agia Marina, Koropi Attiki Greece 2291078902 www.gorillacarts.gr Questions, problems, missing parts? Before returning to your retailer, visit us online at www.gorillacarts.gr or call the
1. Αφετηρία από στάση χωρίς κριτή (self start όπου πινακίδα εκκίνησης) 5 λεπτά µετά την αφετηρία σας από το TC1B KALO LIVADI OUT
 5 λεπτά µετά την αφετηρία σας από το TC1B KALO LIVADI OUT") Date: 21 October 2016 Time: 14:00 hrs Subject: BULLETIN No 3 Document No: 1.3 --------------------------------------------------------------------------------------------------------------------------------------
Date: 21 October 2016 Time: 14:00 hrs Subject: BULLETIN No 3 Document No: 1.3 --------------------------------------------------------------------------------------------------------------------------------------
Homework 8 Model Solution Section
 MATH 004 Homework Solution Homework 8 Model Solution Section 14.5 14.6. 14.5. Use the Chain Rule to find dz where z cosx + 4y), x 5t 4, y 1 t. dz dx + dy y sinx + 4y)0t + 4) sinx + 4y) 1t ) 0t + 4t ) sinx
MODEL D25-42 D30-42 DIESEL PILE HAMMER SPARE PARTS BOOK
 MODEL D25-42 D30-42 DIESEL PILE HAMMER SPARE PARTS BOOK Corporate Office 7032 S. 196th Street Kent, WA, USA 98032 Tel: 1-800-248-8498 Tel: 1-253-872-0141 Fax: 1-253-872-8710 2 No. Parts-No. Description
D36-42 D46-42 D50-42 MODEL DIESEL PILE HAMMER SPARE PARTS BOOK
 MODEL D36-42 D46-42 D50-42 DIESEL PILE HAMMER SPARE PARTS BOOK Corporate Office 7032 S. 196th Street Kent, WA, USA 98032 Tel: 1-800-248-8498 Tel: 1-253-872-0141 Fax: 1-253-872-8710 2 No. Parts-No. Description
2 Composition. Invertible Mappings
 Arkansas Tech University MATH 4033: Elementary Modern Algebra Dr. Marcel B. Finan Composition. Invertible Mappings In this section we discuss two procedures for creating new mappings from old ones, namely,
A, B. Before installation of the foam parts (A,B,C,D) into the chambers we put silicone around. We insert the foam parts in depth shown on diagram.
 into the chambers we put silicone around. We insert the foam parts in depth shown on diagram.") Corner Joints Machining, Frame edge sealing. Page ID: frame01 D D C A, B A C B C A 20 60 Before installation of the foam parts (A,B,C,D) into the chambers we put silicone around. We insert the foam parts
Corner Joints Machining, Frame edge sealing. Page ID: frame01 D D C A, B A C B C A 20 60 Before installation of the foam parts (A,B,C,D) into the chambers we put silicone around. We insert the foam parts
RECARO Sport Reha. Group I III. Montage- und Gebrauchsanleitung für Reha-Version (Ergänzung)... 3
... 3") RECARO Sport Reha Group I III Montage- und Gebrauchsanleitung für Reha-Version (Ergänzung)... 3 Instructions for assembly and use of the Reha version (supplement)... 5 Instructions for assembly and use
RECARO Sport Reha Group I III Montage- und Gebrauchsanleitung für Reha-Version (Ergänzung)... 3 Instructions for assembly and use of the Reha version (supplement)... 5 Instructions for assembly and use
Strain gauge and rosettes
 Strain gauge and rosettes Introduction A strain gauge is a device which is used to measure strain (deformation) on an object subjected to forces. Strain can be measured using various types of devices classified
Soglia Transit estensibile Ausziehbare Bodenschwelle Umbral Transit extensible Κατωκάσι Transit προεκτάσιμο
 VALORIZZIAMO IL SERRAMENTO TECHNIK DIE BEWEGT DAMOS VALOR A LA VENTANA ΑΞΙΟΠΟΙΟΥΜΕ ΤΑ ΚΟΥΦΩΜΑΤΑ BODENSCHWELLEN SISTEMA DE UMBRAL ANTIBARRERAS ISTRUZIONI DI MONTAGGIO ANSCHLAGANLEITUNG INSTRUCCIONES DE
Θέμα εργασίας: Η διάκριση των εξουσιών
 Μάθημα: Συνταγματικό Δίκαιο Εξάμηνο: Α Υπεύθυνος καθηγητής: κ. Δημητρόπουλος Ανδρέας Θέμα εργασίας: Η διάκριση των εξουσιών Ονοματεπώνυμο: Τζανετάκου Βασιλική Αριθμός μητρώου: 1340200400439 Εξάμηνο: Α
SPARE PARTS ORDER LIST
 SPARE PARTS ORDER LIST GoDEX EZ2250i / EZ2350i Godex Spare Part Order List EZ2250i / EZ2350i Release Version:V1.2 Release Date:2013.01.15 P/N : 920-014614-00 CHAPTER 1 PRINTER ASSEMBLY PARTS LIST... 2
Stato di tensione triassiale Stato di tensione piano Cerchio di Mohr
 Stato di tensione triassiale Stato di tensione iano Cerchio di Mohr Stato di tensione F A = F / A F Traione ura stato di tensione monoassiale F M A M Traione e torsione stato di tensione iano = F / A =
Math 6 SL Probability Distributions Practice Test Mark Scheme
 Math 6 SL Probability Distributions Practice Test Mark Scheme. (a) Note: Award A for vertical line to right of mean, A for shading to right of their vertical line. AA N (b) evidence of recognizing symmetry
PREMIER SERIES BY P1206RB-7
 PREMIER SERIES BY P1206RB-7 1. Casting Mechanism Line Part Number Description Qt. Notes 1 100 1001 Face plate 1 2 100 1002 Screw 2 3 100 1003 Thread guide 1 4 100 1004 Thread guide
3.4 SUM AND DIFFERENCE FORMULAS. NOTE: cos(α+β) cos α + cos β cos(α-β) cos α -cos β
 cos α + cos β cos(α-β) cos α -cos β") 3.4 SUM AND DIFFERENCE FORMULAS Page Theorem cos(αβ cos α cos β -sin α cos(α-β cos α cos β sin α NOTE: cos(αβ cos α cos β cos(α-β cos α -cos β Proof of cos(α-β cos α cos β sin α Let s use a unit circle
3.4 SUM AND DIFFERENCE FORMULAS Page Theorem cos(αβ cos α cos β -sin α cos(α-β cos α cos β sin α NOTE: cos(αβ cos α cos β cos(α-β cos α -cos β Proof of cos(α-β cos α cos β sin α Let s use a unit circle
S.Barbarino - Esercizi svolti di Campi Elettromagnetici. Esercizi svolti di Antenne - Anno 2004 I V ...
 SBarbarino - Esercizi svolti di Campi Elettromagnetici Esercizi svolti di Antenne - Anno 004 04-1) Esercizio n 1 del 9/1/004 Si abbia un sistema di quattro dipoli hertziani inclinati, disposti uniformemente
Τεστ Κατάταξης 1 Grading Test 1
 HELLENIC CULTURE CENTRE - Education, Language and Culture www.hcc.edu.gr, e-mail: Ifigenia@hcc.edu.gr, Tel.: (+30) 210 5238149, Fax: (+30) 210 8836494 Τεστ Κατάταξης 1 Grading Test 1 Οδηγίες Πρέπει να
TIRE CHANGER GT REVISION A-06
 0 0 0 0 0 0 0 TIRE CHANGER GT0.00.00 REVISION A-0 GT0.00.00 TIRE CHANGER A-0 000 SCREW MX0-N 0000 PRESS COVER 0000 TURNTABLE ASSEMBLY 0000 SCREW MX0 000 PLAIN WASHERS 000 CLAMP RING 0000 BPLT MX--N 000
ΟΔΗΓΙΕΣ ΧΡΗΣΗΣ USE INSTRUCTIONS
 ΟΔΗΓΙΕΣ ΧΡΗΣΗΣ USE INSTRUCTIONS ΤΗΛΕΦΩΝΟ ΜΕ ΑΝΑΓΝΩΡΙΣΗ ΚΛΗΣΗΣ /CORDED PHONE WITH CALLER ID ΜΟΝΤΕΛΟ/MODEL: TM09-448 DC48V Παρακαλούμε διαβάστε προσεκτικά όλες τις οδηγίες χρήσης πριν την χρήση της συσκευής
x2 x4 STC 50323 Ø7mm STC 50082AA 1/11 2/11 Ø 5mm
 ACCSSORS WARNNG Accessories which are not properly fitted can be dangerous. Read the instructions carefully prior to fitting. Whilst fitting, comply with the instructions at all times. f in doubt, contact
Επιτραπέζιος Η/Υ ASUS M12AD and M52AD Εγχειρίδιο χρήστη
 Επιτραπέζιος Η/Υ ASUS M12AD and M52AD Εγχειρίδιο χρήστη M12AD M52AD GK9559 Πρώτη Έκδοση Ιούλιος 2014 Copyright 2014 ASUSTeK Computer Inc. Διατηρούνται όλα τα δικαιώματα. Απαγορεύεται η αναπαραγωγή οποιουδήποτε
Επιτοίχιος νιπτήρας γόνατο διακόπτης για κρύο και ζεστό νερό
 Επιτοίχιος νιπτήρας γόνατο διακόπτης για κρύο και ζεστό νερό Ref. 061202 461004 460404 461604 454202 2x 409824 461206 2x 461802 2x 2 3 421240 1 4 FRICOSMOS FRICOSMOS Verifique el contenido. Evite la suciedad
W-898 Tire Changer Parts
 W-898 Tire Changer Parts 19 30 53 37 32 27 40 54 43 47 44 48 49 45 46 10 8 7 6 5 4 42 51 52 16 17 18 14 24 15 22 21 20 39 43 23 13 12 26 25 3 30 33 31 37 32 29 28 36 38 35 34 11 50 9 1 2 41 32 321 REVISION
INTRODUCTION / ΕΙΣΑΓΩΓΗ. Warning: Shock and pre-load adjustment unit are pressurized! Improper use can lead to serious injuries, including death.
 ΕΛΛΗΝΙΚΑ / ENGLISH INTRODUCTION / ΕΙΣΑΓΩΓΗ Warning: Shock and pre-load adjustment unit are pressurized! Improper use can lead to serious injuries, including death. Συγχαρητήρια για την αγορά των WP αναρτήσεων
Ge m i n i. il nuovo operatore compatto e leggero. η καινούργια και ελαφριά αυτόματη πόρτα
 Ge m i n i 6 il nuovo operatore compatto e leggero η καινούργια και ελαφριά αυτόματη πόρτα Porte Gemini 6 Operatore a movimento lineare per porte automatiche a scorrimento orizzontale. Leggero, robusto
 ΨΑΛΙΔΙΑ ΔΩΜΑΤΟΣ - ROOF BASES Ψαλίδι για 2 κάθετα πάνελ. Βase for 2 portrait panels. Ενιαιο ψαλίδι για 6 οριζόντια πάνελ. Single Base for 6 landscape panels. 401,7 15 6175,5 Ψαλίδι για μονό πάνελ. Βase
SPARE PARTS ORDER LIST
 SPARE PARTS ORDER LIST GODEX EZ-6000PLUS SERIES Godex Spare Part Order List EZ-6000plus Series Release Version:V.2 Release Date:200.06.5 CHAPTER PRINTER ASSEMBLY PARTS LIST... 2. THERMAL PRINT HEAD MODULE
Esercizi sui circoli di Mohr
 Esercizi sui circoli di Mohr ESERCIZIO A Sia assegnato lo stato tensionale piano nel punto : = -30 N/mm² = 30 N/mm² x = - N/mm² 1. Determinare le tensioni principali attraverso il metodo analitico e mediante
derivation of the Laplacian from rectangular to spherical coordinates
 derivation of the Laplacian from rectangular to spherical coordinates swapnizzle 03-03- :5:43 We begin by recognizing the familiar conversion from rectangular to spherical coordinates (note that φ is used
ΠΟΛΥ-ΟΡΓΑΝΟ BR 100 Ο ΗΓΟΣ ΧΡΗΣΗΣ
 ΠΟΛΥ-ΟΡΓΑΝΟ BR 100 Ο ΗΓΟΣ ΧΡΗΣΗΣ ΛΙΣΤΑ ΚΑΙ ΟΝΟΜΑΣΙΑ ΕΞΑΡΤΗΜΑΤΩΝ NUMBER DESCRIPTION QUANTITY A MAIN BASE 1 B BACK BASE 1 C GUIDE ROD 2 D LEG EXTENSION SUPPORT 1 E SEAT SUPPORT 1 F METAL SHELL 2 G MAIN
Operating Instructions and Parts Manual Drum Sander Model PM2244
 Operating Instructions and Parts Manual Drum Sander Model PM2244 Powermatic 427 New Sanford Road LaVergne, Tennessee 37086 Part No. M-1792244 Ph.: 800-274-6848 Edition 1 08/2015 www.powermatic.com Copyright
Bohrbild im Längsholz. Einstellbereich
 Montageanleitung/Construction Manual GIGANT 120 Fräsbild Art. Nr. K051 a=h x 0,7 im Längsholz Bauzugelassene Holzbauverbindung im Hirnholz 26,5 ±0,25 40 +2-0 h a + 47 Schraubenbild im Längsholz Schraubenbild