|
|
|
- Παρθενορή Γερμανού
- 9 χρόνια πριν
- Προβολές:
Transcript
1

2
3
4
5
6
7
8
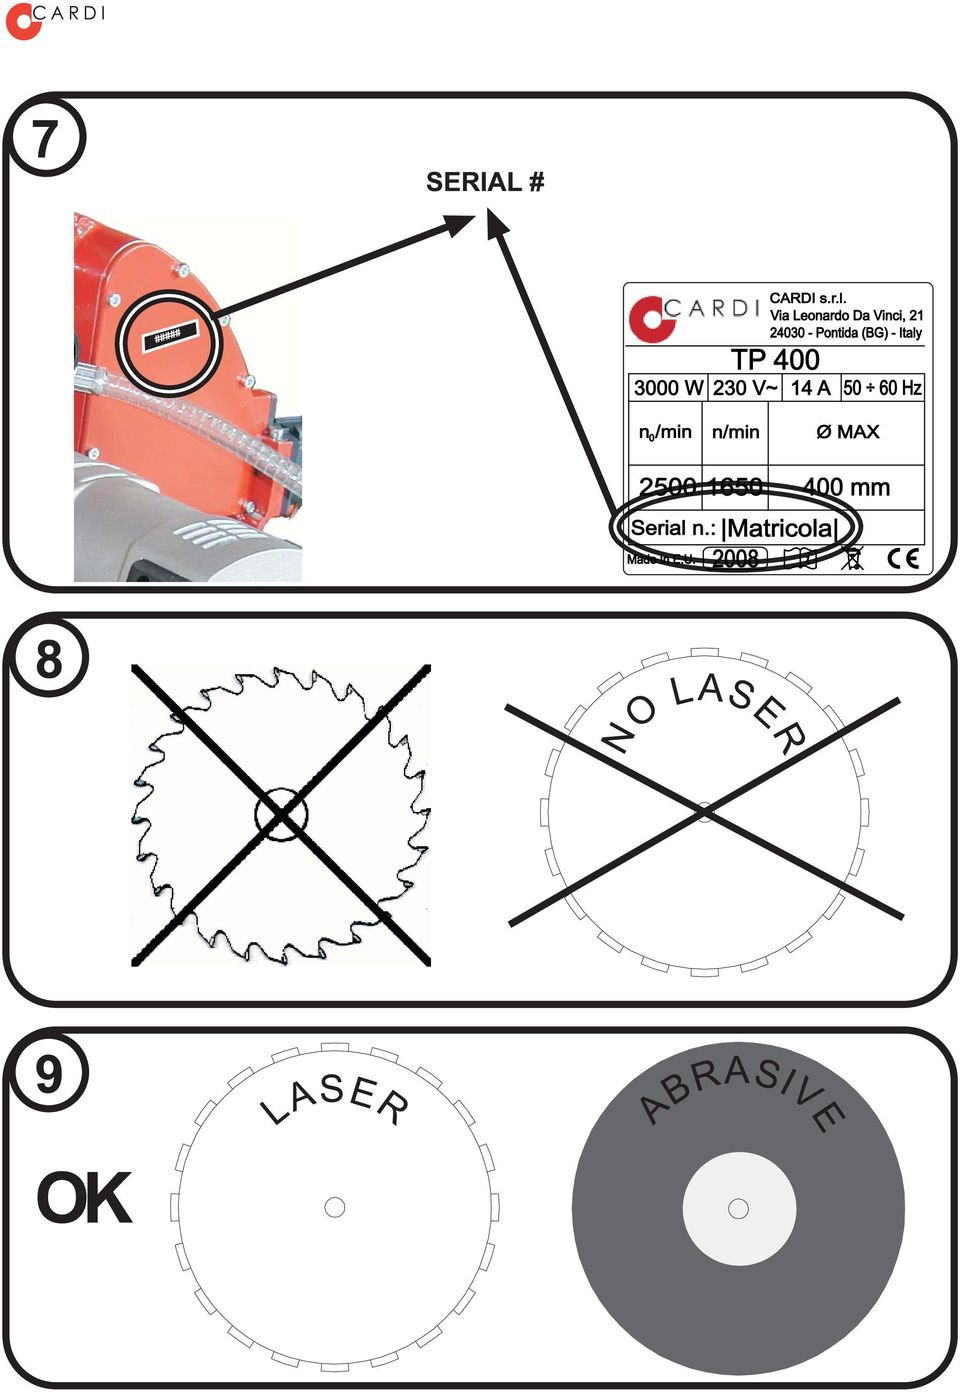
9 1 Italiano La vostra troncatrice portatile CARDI è un utensile elettrico progettato per eseguire tagli rettilinei su materiali lapidei, come cemento armato, mattoni, muratura, pietra naturale, metalli ecc. utilizzando o dischi diamantati saldati al laser oppure dischi abrasivi. È assolutamente vietato utilizzare dischi dentati per sega circolare o altri dischi di tipo diverso da quello prescritto per la troncatrice portatile CARDI (figura 8 e 9). Norme di sicurezza generale ATTENZIONE! Leggere tutte le istruzioni. La mancata ottemperanza a tutte le istruzioni sotto elencate può dare luogo a scosse elettriche, incendi e/o lesioni serie. Il termine "utensile elettrico" di tutte le avvertenze elencate qui sotto si riferisce agli utensili elettrici azionati mediante collegamento alla rete (con cavo) o azionati a batteria (senza cavo). CONSERVARE QUESTE ISTRUZIONI 1) Area di lavoro a) Tenere pulita e ben illuminata l'area di lavoro. Le aree ingombre e buie possono provocare incidenti. b) Non azionare utensili elettrici in atmosfere esplosive, ad esempio in presenza di liquidi, gas o polveri infiammabili. Gli utensili elettrici creano scintille che possono provocare l'accensione di polveri o fumi. c) Tenere i bambini e i passanti ad adeguata distanza durante l azionamento di un utensile elettrico. Le distrazioni possono far perdere il controllo dell'utensile. 2) Sicurezza elettrica a) La spina dell'utensile elettrico deve corrispondere alla presa. Mai modificare la spina in alcun modo. Non utilizzare spine adattatrici con utensili elettrici dotati di messa a terra (a massa). Spine non modificate e prese corrispondenti riducono il rischio di scossa elettrica. b) Evitare il contatto del corpo con superfici messe a terra o a massa quali tubi, radiatori, cucine e frigoriferi. Se il corpo è a terra o a massa, il rischio di scossa elettrica aumenta. c) Non esporre gli utensili elettrici alla pioggia e non utilizzarli in luoghi umidi. L'ingresso di acqua in un utensile elettrico aumenta il rischio di scossa elettrica. d) Non maltrattare il cavo. Non utilizzare mai il cavo per trasportare, tirare o scollegare dalla presa di rete l'utensile elettrico. Tenere il cavo distante da calore, olio, bordi affilati o parti in movimento. Cavi danneggiati o attorcigliati aumentano il rischio di scossa elettrica. e) Quando si aziona un utensile elettrico all'esterno, usare un cavo di estensione (prolunga) adeguato per l'uso in esterni. L'uso di un cavo adeguato riduce il rischio di scossa elettrica. 3) Sicurezza personale a) Non distrarsi mai, controllare quello che si sta facendo e usare il buon senso quando si azionano utensili elettrici. Non azionare l'utensile quando si è stanchi o sotto l'influsso di droghe, alcol o medicazioni. Un momento di disattenzione durante l'azionamento di utensili elettrici può dare luogo a serie lesioni personali. b) Usare attrezzature di sicurezza. Indossare sempre protezioni per gli occhi. L'uso appropriato di attrezzature di sicurezza quali maschere anti-polvere, calzature di sicurezza antiscivolo, casco di sicurezza o protezioni per l'udito riduce la possibilità di subire lesioni personali. c) Evitare le accensioni accidentali. Assicurarsi che l'interruttore sia in posizione di spento prima di collegare l'utensile alla rete elettrica. Trasportare utensili elettrici con il dito sull'interruttore o collegati in rete con l interruttore in posizione di accensione può provocare incidenti. d) Rimuovere qualsiasi chiave di regolazione prima di accendere l'utensile elettrico. Una chiave lasciata attaccata a una parte rotante dell'utensile elettrico può provocare lesioni personali. e) Non sbilanciarsi. Mantenere sempre la posizione e l'equilibrio appropriati. Questo permette di controllare meglio l'utensile elettrico in situazioni impreviste. f) Vestirsi in modo appropriato. Non indossare vestiti larghi, collane o oggetti pendenti. Tenere capelli, indumenti e guanti distanti dalle parti in movimento. Vestiti larghi, collane, oggetti pendenti o capelli lunghi possono impigliarsi nelle parti in movimento. g) Se sono previsti dispositivi da collegare ad impianti per l'estrazione e la raccolta di polvere, accertarsi che siano collegati e usati in maniera appropriata. L'uso di questi dispositivi può ridurre i rischi correlati alla polvere. h) Usare l'impugnatura ausiliaria fornita con l'utensile elettrico. Il mancato uso dell'impugnatura ausiliaria può causare la perdita di controllo dell'utensile che può dare luogo a serie lesioni personali. 4) Uso e manutenzione degli utensili elettrici a) Non forzare l'utensile elettrico. Usare l'utensile adatto per l'operazione da eseguire. L'utensile elettrico appropriato permette di eseguire il lavoro con maggiore efficienza e sicurezza senza essere costretti a superare i parametri d'uso di progetto. b) Non usare l'utensile elettrico se l'interruttore di accensione o spegnimento non si aziona correttamente. Qualsiasi utensile elettrico che non può essere controllato con l interruttore è pericoloso e deve essere sottoposto a riparazioni. c) Scollegare la spina dalla rete di alimentazione prima di effettuare qualsiasi regolazione, cambiare accessori o riporre gli utensili elettrici. Tale misura di sicurezza preventiva riduce il rischio di avvio accidentale dell utensile elettrico. d) Riporre gli utensili elettrici inutilizzati fuori della portata dei bambini e non permetterne l'uso a persone inesperte o che non conoscano queste istruzioni. Gli utensili elettrici sono pericolosi se utilizzati da persone inesperte. e) Effettuare la manutenzione necessaria sugli utensili elettrici. Verificare il possibile errato allineamento o bloccaggio delle parti in movimento, la rottura delle parti e qualsiasi altra condizione che possa influenzare il funzionamento degli utensili elettrici. Se è danneggiato, far riparare l'utensile elettrico prima di utilizzarlo. Numerosi incidenti sono provocati

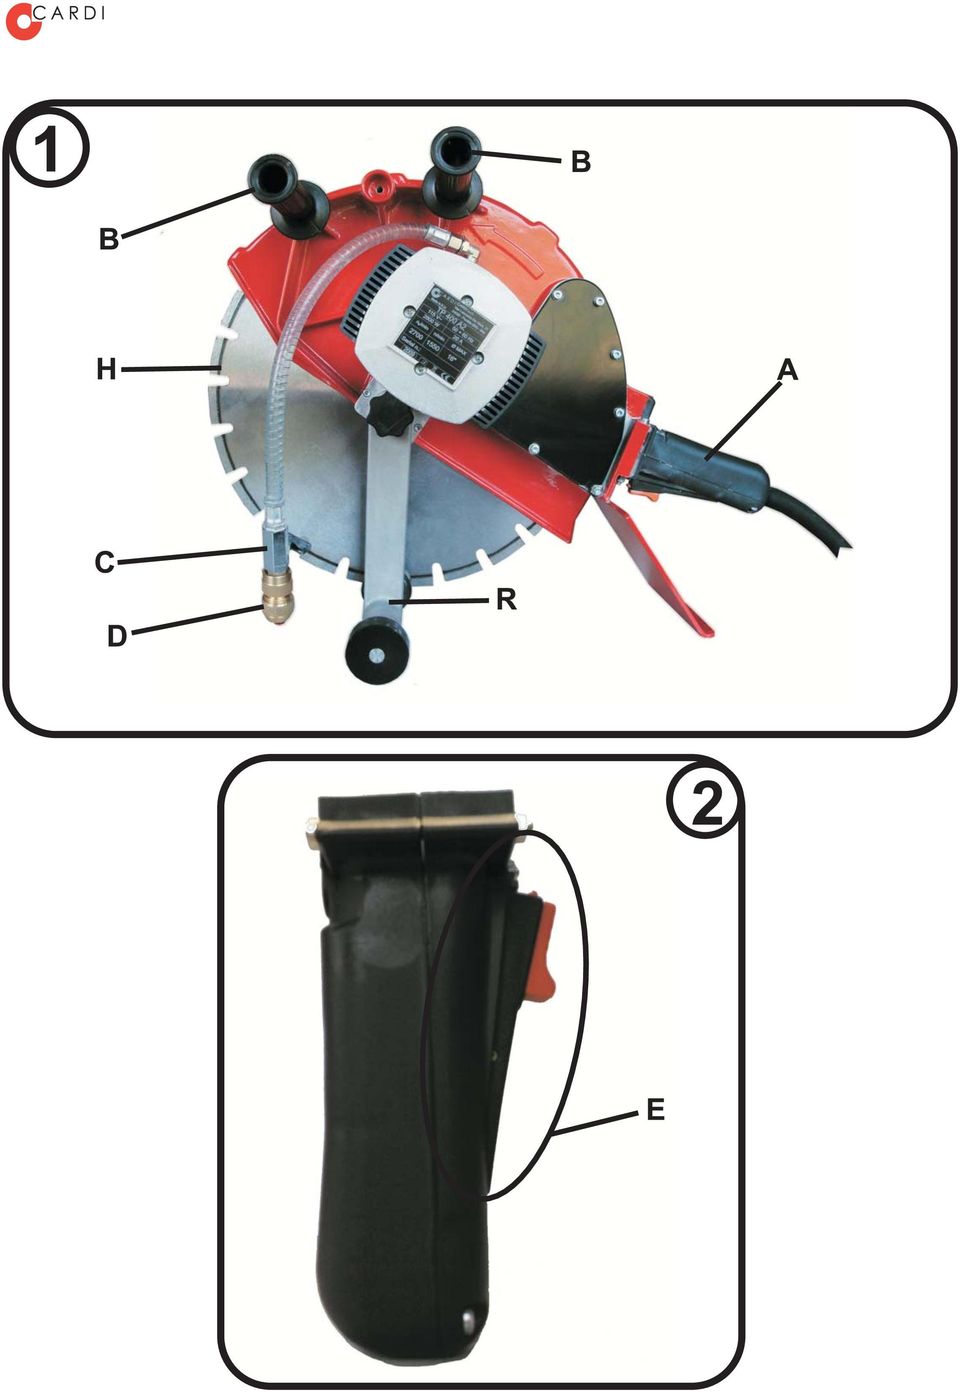
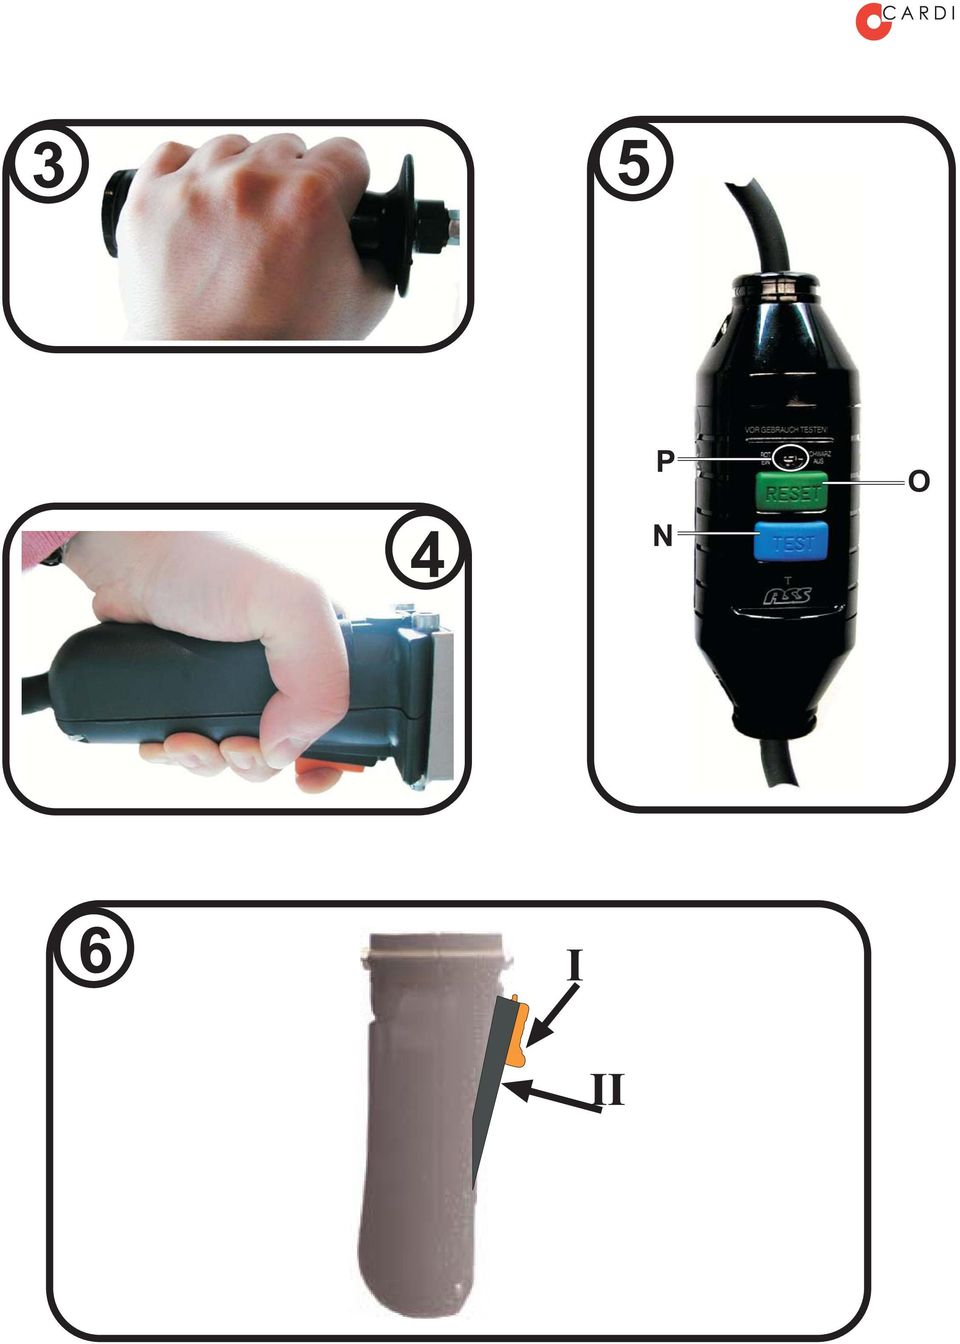
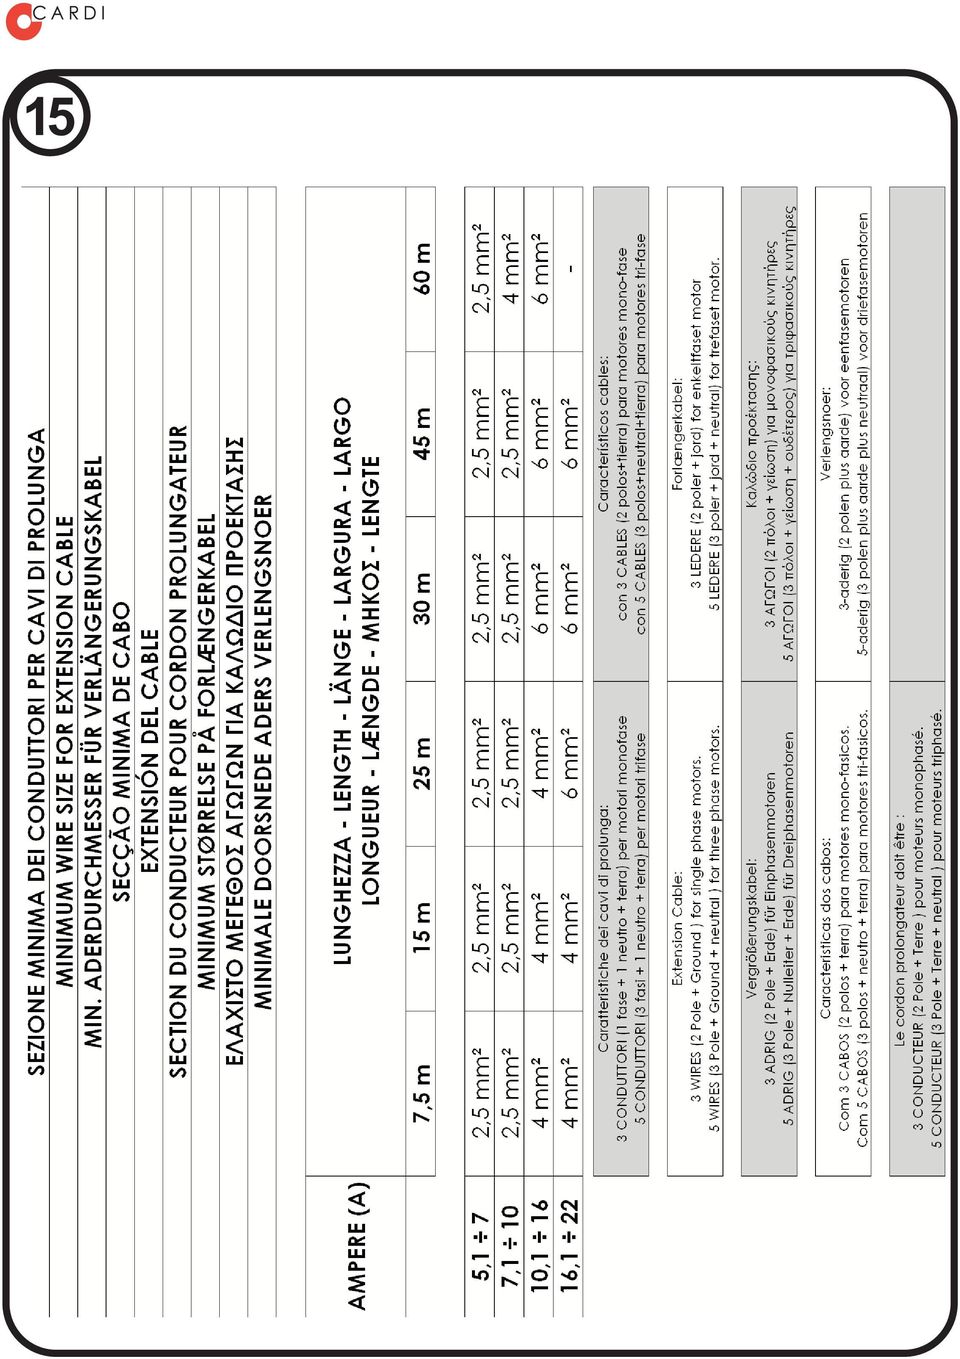
10 Italiano 2 proprio dal cattivo stato di manutenzione degli utensili elettrici. f) Mantenere puliti e affilati gli strumenti di taglio. Strumenti di taglio in buone condizioni di manutenzione e con bordi di taglio affilati soffrono di blocchi con minore probabilità e sono più facili da controllare. g) Usare l'utensile elettrico, gli accessori e le punte ecc., in conformità con queste istruzioni e nel modo previsto per il tipo particolare di utensile elettrico, tenendo conto delle condizioni di lavorazione e dell'operazione da eseguire. L uso dell utensile elettrico per operazioni diverse da quelle previste può dare luogo a situazioni pericolose. 5) Assistenza a) Far riparare l'utensile elettrico solo da tecnici qualificati e utilizzare soltanto ricambi identici. Questo garantisce la costante sicurezza dell utensile elettrico. Ulteriori disposizioni di sicurezza per seghe murali Indossare sempre occhiali protettivi Indossare calzature protettive Indossare guanti protettivi Indossare maschere antipolvere Indossare sempre protezioni per l udito Istruzioni da seguire prima della messa in funzione Leggere attentamente i dati riportati nella scheda Dati tecnici fornita con il prodotto. Per le illustrazioni si faccia riferimento alle pagine iniziali di questo manuale. Nel testo che segue le figure sono identificate da numeri mentre i singoli particolari, all'interno delle figure, sono identificati da lettere. Alimentazione elettrica Messa a terra la vostra troncatrice portatile è dotata di collegamento a terra delle parti metalliche (messa a terra); assicurarsi quindi che anche la presa ed eventuali prolunghe o multiple a cui viene collegata la macchina siano dotati di conduttore di terra e che l'impianto elettrico di alimentazione sia debitamente messo a terra; Attenzione: questo requisito di sicurezza è di fondamentale importanza. In caso di dubbio richiedere un controllo accurato dell'impianto da parte di personale professionalmente qualificato. Prolunghe nel caso in cui il materiale da tagliare sia lontano da una presa di corrente possono essere utilizzati cavi di prolunga che devono essere di sezione adeguata e provvisti di conduttore di terra; tali cavi di prolunga, costituiti da cavo, spina e presa, devono essere adatti all'uso esterno e preferibilmente in gomma e del tipo H07RN-F; attenersi scrupolosamente alla tabella in figura 15 di questo manuale per la scelta della sezione dei conduttori; se si utilizza più di un cavo di prolunga accertarsi che ciascun cavo di prolunga abbia una sezione dei conduttori non inferiore a quanto indicato nella tabella in relazione alla lunghezza totale; limitare al minimo possibile la lunghezza delle prolunghe in quanto ogni prolunga provoca una caduta di tensione e peggiora il funzionamento della troncatrice portatile. Preparazione della troncatrice portatile Per preparare la vostra troncatrice portatile al taglio, operare come indicato nei punti successivi, accertandosi, prima, che la spina sia staccata dalla rete di alimentazione elettrica. a) fissare le impugnature ausiliarie (B) così come indicato in figura 1, nella posizione che risulti più comoda per la tipologia di lavoro che verrà effettuato; Attenzione: il mancato utilizzo delle impugnature ausiliarie può dar luogo alla perdita di controllo dell'utensile e a serie lesioni personali. b) collegare il tubo di adduzione dell'acqua alla valvola acquastop rappresentata in figura 1 con la lettera D. Mantenere chiuso il rubinetto C; c) selezionare la profondità di taglio: si veda il paragrafo corrispondente; PRCD: interruttore differenziale portatile montato sul cavo di alimentazione la vostra troncatrice portatile è dotata di un interruttore differenziale (PRCD) montato sul cavo, rappresentato nella figura 5; non utilizzare mai il prodotto senza il PRCD montato sul cavo; prima di cominciare ad utilizzare il vostro prodotto verificare il corretto funzionamento del dispositivo PRCD: collegare la troncatrice portatile all'impianto di alimentazione e quindi premere il tasto verde Reset (O). Questo provoca l accensione di una spia rossa (P) che segnala le disponibilità di tensione. Azionare quindi il tasto blu Test (N), che verifica il funzionamento del dispositivo che deve automaticamente scattare in posizione 0 (OFF), parallelamente a questo la spia rossa deve spegnersi; se durante il lavoro l'interruttore differenziale dovesse scattare, interrompendo l'alimentazione, sospendere il lavoro, posizionare l'interruttore di comando della troncatrice portatile in posizione OFF e provvedere a ricercare ed eliminare la causa di dispersione ricorrendo alle prestazioni di un centro di assistenza qualificato. Interruttore di comando L utilizzo dell interruttore di comando (figura 2 E) viene spiegato in figura 6. La vostra troncatrice portatile CARDI è dotata di un interruttore di comando con dispositivo lock-off, che rende necessari due passaggi (prima I poi II) per mettere in funzione la macchina. Questo riduce notevolmente il rischio di accensione accidentale della troncatrice portatile. Attenzione: quando si spegne la macchina a motore in moto, i dischi non si fermano immediatamente. Adduzione dell'acqua L adduzione dell acqua ha la funzione di eliminare i rischi legati alla produzione di polvere durante il taglio. Per questo è preferibile utilizzare la troncatrice portatile con l adduzione dell acqua. Verificare che il disco sia adatto al taglio in umido. Nell utilizzo a secco indossare apposite maschere antipolvere. Nel taglio in umido, seguire queste indicazioni: utilizzare esclusivamente il tubo dell acqua (rappresentato in figura 1) fornito con la macchina.

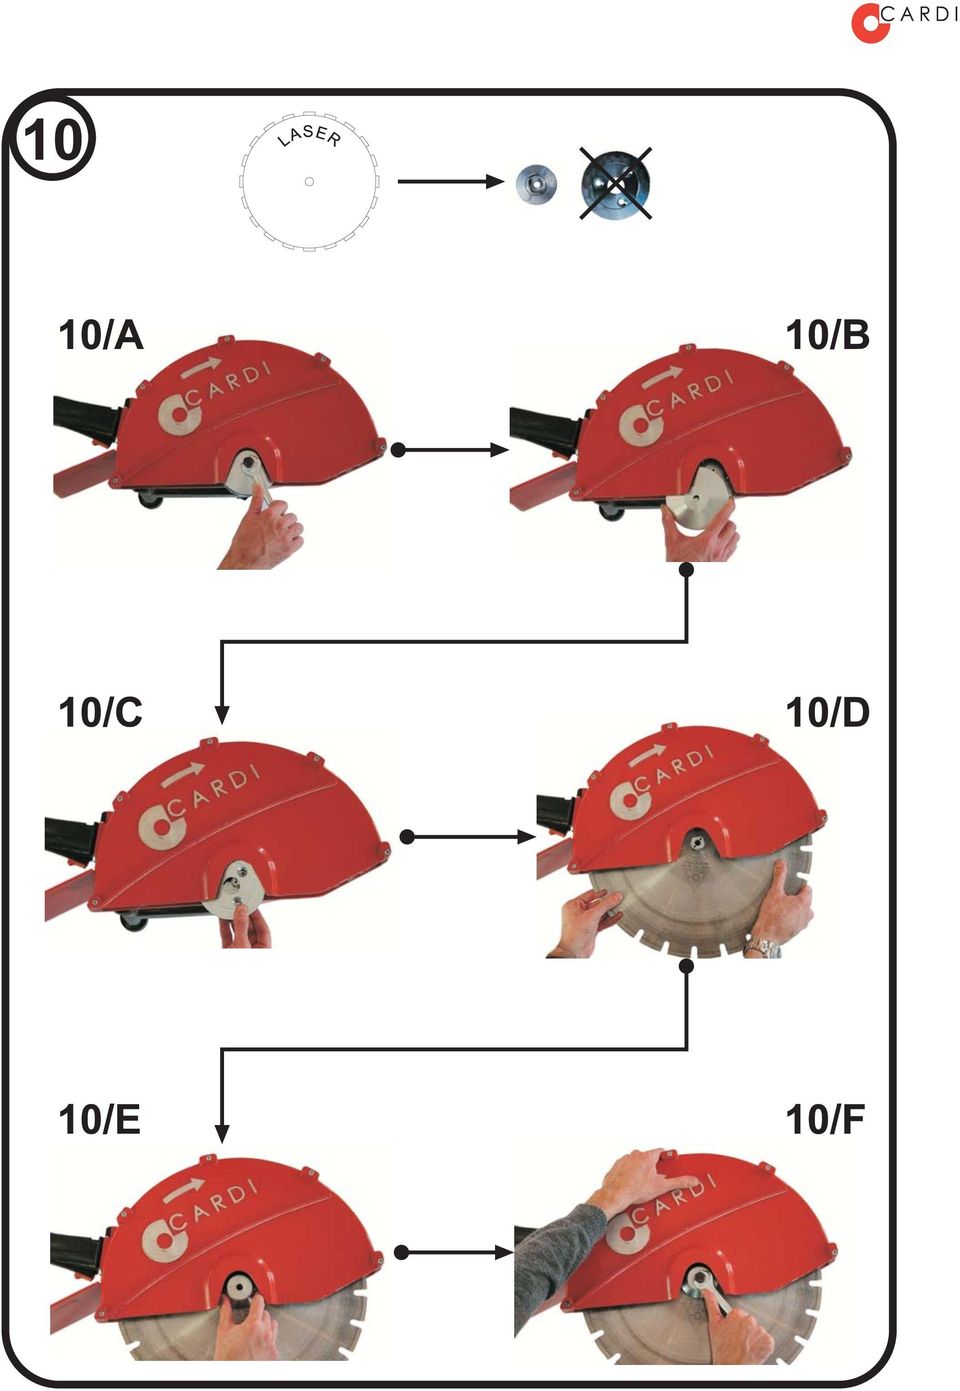
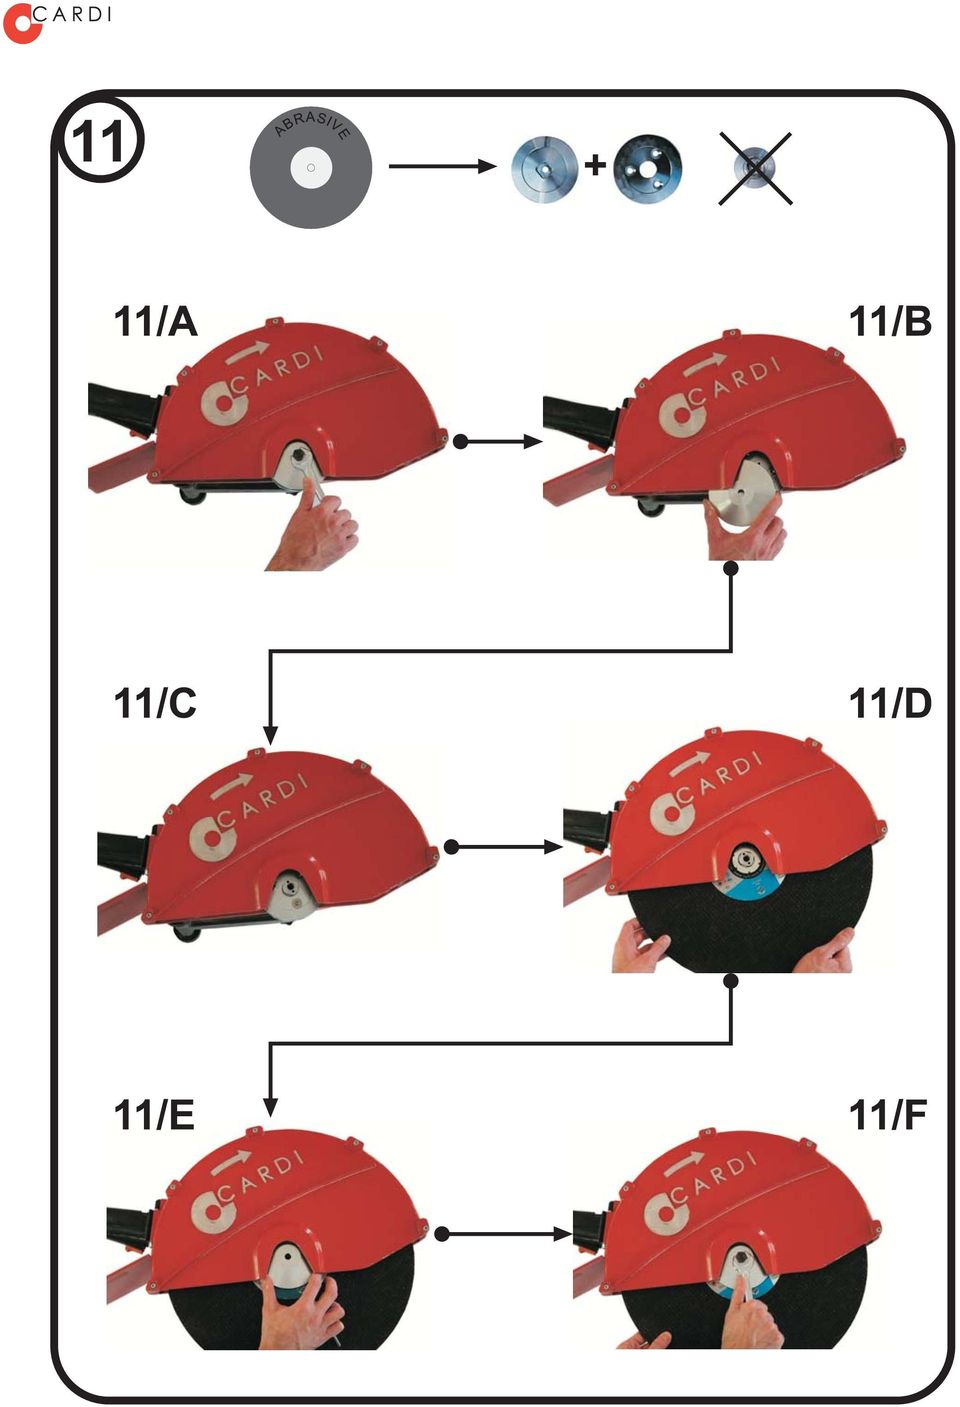
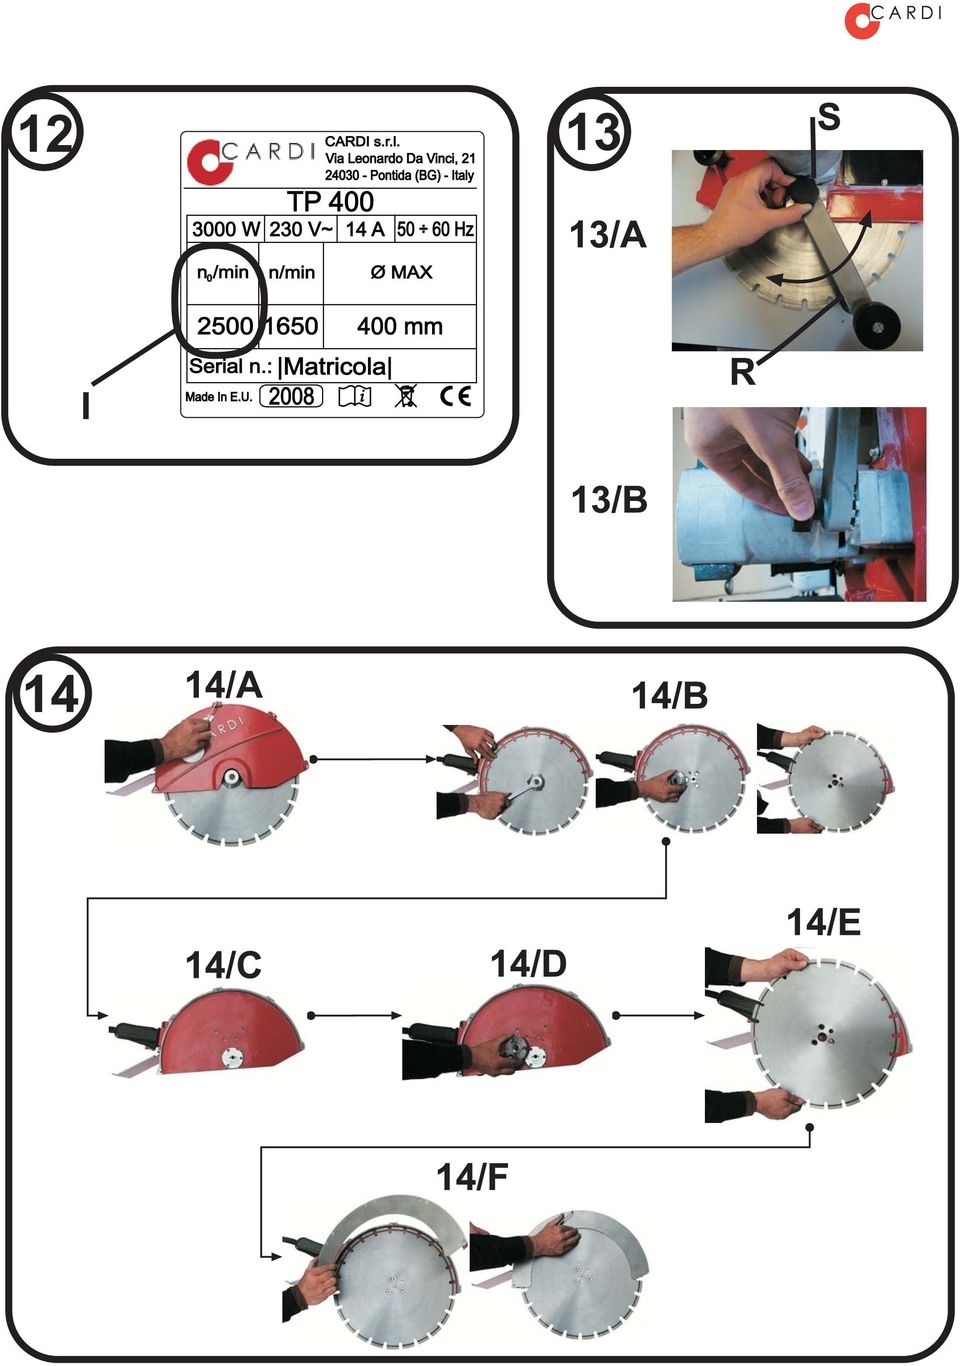
11 3 Italiano Il tubo originale è dotato di un rubinetto (C) e di una valvola acquastop (D) di sicurezza; l acqua immessa deve avere una pressione inferiore a 4 bar; l acqua immessa deve essere pulita; regolare, tramite il rubinetto (C), il flusso, in particolare facendo affluire la quantità minima di acqua che permetta di abbattere le polveri generate; impedire che l acqua entri in contatto con le parti elettriche della troncatrice portatile; verificare l integrità dei componenti di adduzione dell acqua: il rubinetto (C), la valvola acquastop (D) il gomito di ingresso. Selezione della profondità di taglio Per la selezione della profondità di taglio far riferimento alla figura 13. Procedere come segue: sbloccare guida mobile R svitando il pomolo S e quindi ruotare la guida per selezionare la profondità di taglio desiderata (13/A); bloccare quindi la guida avvitando il pomolo S verificando che la guida mobile si impegni nella base come rappresentato in figura 13/B; Per applicazioni nelle quali questo dispositivo possa essere di disturbo, è possibile posizionarlo completamente ritratto verso l interruttore. Accessorio per il taglio a raso Per montare l accessorio per il taglio a raso far riferimento alla figura 14. Attenzione: per il taglio a raso utilizzare dischi con fori svasati adatti alla flangia (disponibili come accessorio CARDI) Attenzione: nel taglio a raso non utilizzare dischi abrasivi. Procedere come segue: svitare le 5 viti che trattengono il carter e rimuovere il carter (14/A); svitare la vite di serraggio disco, rimuovere la flangia e il disco (14/B); rimuovere la flangia interna svitando le 3 viti con la chiave in dotazione (14/C); posizionare la flangia in dotazione all accessorio per il taglio a raso come in figura (14/D); posizionare il disco con le svasature verso l esterno, quindi fissare il disco con le 3 (oppure 6) viti (14/E); posizionare il carter per taglio a raso e fissarlo con le 5 viti (14/F); Controlli e precauzioni per evitare danni alla struttura o ad impianti esistenti Prima di utilizzare la vostra troncatrice portatile assicurarsi presso il capo cantiere o il progettista che le operazioni di taglio: non alterino le caratteristiche strutturali della costruzione; non danneggino tubazioni dell'acqua o del gas o conduttori elettrici di ogni sorta. Scelta del tipo di disco La vostra troncatrice portatile CARDI è progettata per tagliare materiali come cemento, cemento armato, mattoni, muratura, pietra naturale, utilizzando dischi diamantati saldati al laser o metallo usando dischi abrasivi (fig. 8 e 9). Attenzione: è assolutamente vietato utilizzare dischi dentati per sega circolare o altri dischi di tipo diverso da quanto prescritto per la troncatrice portatile CARDI. Contattare il vostro distributore per informazioni sul disco da utilizzare secondo le vostre necessità operative. Il disco, rappresentato in figura 1 H, deve avere le caratteristiche dimensionali definite nella schede Dati tecnici. Verificare inoltre che: il diametro del foro sia di 25,4 mm (1 pollice). È possibile utilizzare dischi con foro di 30 mm utilizzando un apposito distanziale; la velocità di rotazione massima, indicata dal produttore del disco, superiore alla velocità di rotazione massima dell'albero della troncatrice portatile CARDI, indicata in targhetta dati (si veda l esempio in figura 12 I). Usare solo dischi il cui diametro, foro e spessore siano compatibili con il vostro modello di troncatrice portatile CARDI. Dischi con caratteristiche dimensionali non appropriate possono dare luogo a disassamento, vibrazioni, rotazione irregolare e perdita di controllo con possibile rischio di danni a cose o persone; Non utilizzare mai dischi danneggiati. Ispezionare il disco prima di ogni uso per verificarne l'integrità. Montaggio e sostituzione del disco Prima di montare o sostituire il disco (figura 1 H), interrompere l'alimentazione elettrica, staccando la spina dalla rete di alimentazione. Il montaggio del disco è diverso a seconda della tipologia di disco: Dischi diamantati (no flangia interna + flangia piccola) Per il montaggio e sostituzione del disco fare riferimento alla figura 10. Operare seguendo queste indicazioni: svitare la vite di serraggio disco (10/A) utilizzando la chiave fornita con la troncatrice portatile e rimuoverla; rimuovere la flangia di serraggio disco (10/B), se presente rimuovere il disco; utilizzando la chiave a brugola in dotazione, rimuovere le quattro viti che fissano la flangia interna e rimuoverla (10/C); inserire il disco diamantato (10/D), verificare che la direzione delle frecce riportate sul disco siano concordi con il senso di rotazione indicato dalla freccia sul carter; montare la flangia piccola di serraggio disco, verificando che sia impegnata sull albero (10/E); inserire la vite di serraggio disco e stringerla (10/F); Dischi abrasivi (flangia interna + flangia grande) Per il montaggio e sostituzione del disco fare riferimento alla figura 11. Operare seguendo queste indicazioni: svitare la vite di serraggio disco (11/A) utilizzando la chiave fornita con la troncatrice portatile e rimuoverla; rimuovere la flangia di serraggio disco (11/B), se presente rimuovere il disco; verificare che la flangia interna sia montata (11/C). Nel caso in cui non sia montata montarla e fissarla con tutte le viti utilizzando la chiave a brugola in dotazione; inserire il disco abrasivo (11/D); montare la flangia grande di serraggio disco (11/E), assicurandosi che la flangia sia quella corretta; inserire la vite di serraggio disco, verificando che sia impegnata sull albero e stringerla (11/F);

12 Italiano 4 Attenzione: per la vostra sicurezza è importante che nel caso di taglio con dischi abrasivi, la flangia interna sia montata e che la flangia esterna utilizzata sia quella grande. Fissaggio del pezzo in lavorazione / Limiti dimensionali del pezzo in lavorazione si presti particolare attenzione nel caso in cui si taglino blocchi di materiale che non siano parte integrante di una costruzione. In tal caso si provveda a fissarli rigidamente; evitare assolutamente che, durante il taglio, tali blocchi possano muoversi o essere strappati dagli ancoraggi. Limitazioni alle condizioni ambientali non esporre la troncatrice portatile a pioggia, grandine o neve ed evitare in ogni caso che qualsiasi liquido entri in contatto con le parti elettriche della vostra troncatrice portatile; non utilizzare la troncatrice portatile in atmosfere esplosive, per esempio in presenza di liquidi, gas o polveri infiammabili. La troncatrice portatile, in quanto utensile elettrico, crea scintille che possono provocare l'accensione di polveri o fumi. Taglio sopratesta Attenzione: la vostra troncatrice portatile NON è adatta alla realizzazione di taglio sopratesta (taglio soffitti). Istruzioni per il taglio Operare come segue Per effettuare il taglio, dopo aver preparato la troncatrice portatile come indicato precedentemente nel paragrafo Preparazione della troncatrice portatile, seguire le seguenti indicazioni: Attenzione: non toccare con mani o con altre parti del corpo gli organi in movimento come corone, dischi o alberi. avviare la troncatrice portatile ed avvicinarsi alla superficie da tagliare con il disco in movimento fino a sfiorarla, quindi aumentare la spinta verso il materiale da tagliare facendo penetrare il disco. Quindi, far avanzare la troncatrice portatile per eseguire il taglio. la vostra troncatrice portatile è adatta ad eseguire unicamente tagli rettilinei; mantenere fisso l'orientamento del disco durante il taglio. Questo evita il sovraccarico del motore causato dall eccessivo attrito dei lati del disco contro il materiale. Attenzione: durante le operazioni di taglio assicuratevi di mantenere una posizione sicura. Tenete la troncatrice portatile sempre con entrambe le mani. Il disco potrebbe bloccarsi quindi siate sempre pronti per questa evenienza: l elettronica della vostra macchina vi consente di muovere la stessa in modo da liberare la lama e proseguire il lavoro; per la vostra incolumità mantenete sempre salda la presa, con entrambe le mani, sulle impugnature della troncatrice portatile, come rappresentato in figura 3 e 4 e mantenersi sempre pronti a contrastare i movimenti della vostra troncatrice portatile; la presenza nell'area di taglio di materiali teneri quali legno, sughero, gomma, polistirolo, ecc. può creare difficoltà nell'avanzamento del disco costringendo talvolta a sospendere il taglio. In tal caso rimuovere le parti di materiale di ostacolo. Qualora questo non fosse possibile scegliere un'altra posizione per il vostro taglio; concluse le operazioni di taglio, spegnere l'interruttore, attendere il completo arresto del disco e rimuovere la troncatrice portatile dal taglio. Quindi chiudere il rubinetto di adduzione dell acqua; a taglio effettuato, prestare attenzione al fatto che il disco e l area di taglio potrebbero essere caldi e causare ustioni. Elettronica La vostra troncatrice portatile è dotata dell'elettronica multifunzione CARDI che comprende un sistema di soft-start e una frizione elettronica: il soft-start permette la partenza lenta, riduce il valore della corrente di spunto all'avviamento, facilita l inizio del taglio con la messa in movimento graduale del disco, evitando strappi all'operatore, e permette l'impiego della troncatrice portatile anche collegata a reti elettriche civili dotate di interruttori automatici; la frizione elettronica toglie potenza al motore nel caso di eccessivo sovraccarico, evitando possibili danni alla troncatrice portatile e limitando ulteriormente strappi sulle braccia dell operatore. Non appena viene meno la causa all'origine del sovraccarico la frizione elettronica ridà automaticamente piena potenza al motore; un intervento frequente della frizione elettronica è tipicamente causato da velocità di avanzamento eccessiva, deviazione laterale del disco o eccessiva profondità di taglio. Manutenzione - Assistenza- Garanzia Operazioni periodiche di pulizia, manutenzione e lubrificazione al termine di ogni giornata di lavoro, dopo aver rimosso il disco, soffiare un getto d'aria all'interno del motore, con motore in moto, per espellere eventuali impurità. Effettuare tale operazione indossando occhiali protettivi; prima di eseguire le altre operazioni di manutenzione, pulizia o lubrificazione assicurarsi che la troncatrice portatile sia disconnessa dalla rete elettrica; mantenere pulita ed asciutta la troncatrice portatile, in particolare le impugnature e le parti mobili; non utilizzare solventi o altri prodotti chimici aggressivi per pulire la troncatrice portatile; dopo l'uso riporre la troncatrice portatile in un luogo asciutto, sicuro ed inaccessibile ai bambini; il riduttore è lubrificato con olio e/o grasso adatti a qualsiasi temperatura ambientale. Non sono necessari controlli di livello o rabbocchi; disinserire sempre la spina dalla rete di alimentazione quando ispezionate la macchina o sostituite l'utensile di taglio; non staccare mai la spina dalla presa di corrente utilizzando il cavo di alimentazione; ispezionare spesso il cavo di alimentazione ed eventuali prolunghe, accertandosi che non vi siano danni quali tagli, abrasioni o conduttori in vista. In

13 5 Italiano tal caso richiedere la sostituzione ad un centro assistenza CARDI; non utilizzare la troncatrice portatile con parti danneggiate o con difetti di funzionamento, in particolare nel caso in cui l'interruttore dovesse presentare difetti nell'accensione o nello spegnimento. In questi casi provvedere a fare sostituire tali parti presso un centro di assistenza autorizzato. Assistenza è necessario far controllare l'intera macchina dopo un periodo di 250 ore di lavoro presso il più vicino centro di assistenza autorizzato CARDI; eventuali riparazioni o interventi di assistenza devono essere effettuati esclusivamente da un centro di assistenza autorizzato CARDI. Rivolgersi al vostro rivenditore per identificare il centro assistenza autorizzato più vicino. il numero di matricola della vostra troncatrice portatile è stampigliato sulla macchina oppure indicato sulla targhetta dati come nella figura 7; richiedere sempre l'uso di parti di ricambio originali CARDI. Garanzia da parte del costruttore Questo prodotto è coperto da garanzia di 24 mesi della data di acquisto contro difetti di materiale ed errori di progetto o fabbricazione. La garanzia copre il costo della sostituzione delle parti interessate, il costo delle operazioni di sostituzione e il materiale di consumo, come olio e lubrificanti, se integri al momento della riparazione. La garanzia non comprende la sostituzione di: parti di prodotti che hanno subito interventi da parte di persone non autorizzate; parti danneggiate per incuria, uso non adeguato o sovraccarico; parti del prodotto al quale elementi di sicurezza siano stati rimossi o manomessi; materiale di consumo esaurito, sostituito durante la riparazione. L'entrata dell'acqua nelle parti elettriche, la mancanza di pulizia periodica, il danneggiamento delle parti filettate o dei piani di appoggio degli alberi ecc., sono considerate incurie e fanno decadere il diritto all'assistenza in garanzia. La durata delle parti di consumo non è definibile a priori, essendo in relazione al tempo di utilizzo del prodotto e all'intensità di lavoro. Esempi di parti di consumo sono: interruttori, spine e cavi, spazzole, collettore, dischi frizione, cuscinetti a rulli e a sfera non in bagno d olio, anelli di tenuta, sistemi di guida, filtri, ecc. Se durante la riparazione in garanzia vengono rilevati deterioramenti di parti di consumo, che possono influenzare la sicurezza o la funzionalità del prodotto, al cliente è chiesto di accettare l'onere del pagamento delle parti non soggette alla garanzia. Il rifiuto di ristabilire le condizioni della sicurezza iniziale porta al rifiuto di ogni prestazione di riparazione. ATTENZIONE: IL COSTRUTTORE DECLINA OGNI RESPONSABILITA' IN CASO DI DANNI A PERSONE, ANIMALI O COSE PROVOCATI DALLA MANCATA OSSERVANZA DELLE NORME DI SICUREZZA E D'USO SOPRA ELENCATE La garanzia assicura la sostituzione gratuita delle parti riconosciute difettose, per fabbricazione o per montaggio, di prodotti resi ad un centro autorizzato se: è fornita una prova della data di acquisto del prodotto. Sono ritenute prove valide i DDT (documenti di trasporto) e le fatture accompagnatorie; è stata eseguita correttamente la manutenzione programmata ogni 250 ore di funzionamento con la sostituzione delle parti soggette a usura, come ad esempio le spazzole; il prodotto non è stato manomesso da personale non adeguatamente istruito ed autorizzato da CARDI; il prodotto è stato sempre usato in conformità a quanto indicato in questo manuale di istruzioni; le indicazione di sicurezza riportate nel manuale di istruzioni siano state osservate. CARDI non riconoscerà la riparazione in garanzia se: il prodotto è stato manomesso da personale non autorizzato espressamente da CARDI; i danni sono stati provocati da un utilizzo scorretto o da incuria. Ammaccature dovute a cadute o colpi ricevuti saranno considerate effetti di incuria; i danni sono stati provocati da sovraccarico meccanico o elettrico; i danni sono stati causati da ingresso dell acqua o di fanghi all'interno del prodotto. Nel periodo del garanzia, in alcuni casi, come nel caso in cui i tecnici autorizzati CARDI ritengano la riparazione troppo onerosa, è prevista la sostituzione gratuita del prodotto. La sostituzione in garanzia del prodotto viene garantita, inoltre, dopo due tentativi infruttuosi di riparazione e dopo un colloquio con i responsabili di un centro assistenza CARDI. In caso di sostituzione del prodotto viene normalmente addebitato l ammontare corrispondente alla normale usura delle parti del prodotto sostituito. Elenco delle parti sostituibili dall'utente Nessuna parte del vostro utensile elettrico CARDI è sostituibile se non rivolgendosi ad un riparatore autorizzato CARDI. Centri di assistenza CARDI - Elenco indirizzi Per l'elenco dei centri di assistenza rivolgersi al rivenditore. Elenco dei contenuti della confezione Fare riferimento alla Distinta Ricambi, specifica per il vostro modello, contenuta nella confezione insieme a questo manuale. Prodotti giunti a fine vita. Il simbolo a sinistra, che compare sull'etichetta del vostro prodotto CARDI o sulla sua confezione, indica che il prodotto non può essere smaltito come rifiuto domestico al termine della sua vita. In base alla direttiva europea 2002/96/EC, esso deve essere consegnato ad un punto di raccolta adatto per il riciclo di apparecchi elettrici o elettronici. È essenziale che questo prodotto venga riciclato o smaltito correttamente. In questa maniera si aiuta a prevenire potenziali conseguenze negative per l ambiente e per la salute delle persone. Per informazioni dettagliate su cosa fare quando il prodotto non è più funzionante e non è più riparabile, vi preghiamo di contattare il rivenditore da cui avete acquistato il prodotto. Questo prodotto è stato immesso nuovo sul mercato dopo il 13 agosto Questo manuale è soggetto a modifiche senza preavviso.

14 English 6 Your CARDI hand-held hand saw (or hand saw) is a power tool designed to make straight cuts in stone-like materials (ex. reinforced concrete, bricks, masonry, natural stone) using laser-welded diamond blades or metal using abrasive blades. Warning: do NOT use circular saw blades or other kind of blades not suitable for this product. Failure to follow this warning may result in serious personal injury (fig. 8 and 9). General safety rules WARNING! Read all instructions. Failure to follow all instructions listed below may result in electric shock, fire and/or serious injury. The term "power tool" in all of the warnings listed below refers to your mains operated (corded) power tool or battery operated (cordless) powertool. SAVE THESE INSTRUCTIONS 1) Work area a) Keep working area clean and well lit. Cluttered and dark areas invite accidents. b) Do not operate power tools in explosive atmospheres, such as in the presence of flammable liquids, gases or dust. Power tools create sparks which may ignite the dust or fumes. c) Keep children and bystanders away while operating a power tool. Distractions can cause you to lose control. 2) Electrical safety a) Power tool plugs must match the outlet. Never modify the plug in any way. Do not use any adapter plugs with earthed (grounded) power tools. Unmodified plugs and matching outlets will reduce risk of electric shock. b) Avoid body contact with earthed or grounded surfaces such as pipes, radiators, ranges and refrigerators. There is an increased risk of electric shock if your body is earthed or grounded. c) Do not expose power tools to rain or wet conditions. Water entering a power tool will increase the risk of electric shock. d) Do not abuse the cord. Never use the cord for carrying, pulling or unplugging the power tool. Keep cord away from heat, oil, sharp edges or moving parts. Damaged or entangled cords increase the risk of electric shock. e) When operating a power tool outdoors, use an extension cord suitable for outdoor use. Use of a cord suitable for outdoor use reduces the risk of electric shock. 3) Personal safety a) Stay alert, watch what you are doing and use common sense when operating a power tool. Do not use a power tool while you are tired or under the influence of drugs, alcohol or medication. A moment of inattention while operating power tools may result in serious personal injury. b) Use safety equipments: always wear eye protection. Safety equipment such as dust mask, non-skid safety shoes, hard hat, or hearing protection used for appropriate conditions will reduce personal injuries. c) Avoid accidental starting. Ensure the switch is in the off position before plugging in. Carrying power tools with your finger on the switch or plugging in power tools that have the switch on invites accidents. d) Remove any adjusting key or wrench before turning the power tool on. A wrench or a key left attached to a rotating part of the power tool may result in personal injury. e) Do not overreach. Keep proper footing and balance at all times. This enables better control of the power tool in unexpected situations. f) Dress properly. Do not wear loose clothing or jewellery. Keep your hair, clothing and gloves away from moving parts. Loose clothes, jewellery and long hair can be caught in moving parts. g) If devices are provided for the connection of dust extraction and collection facilities, ensure these are connected and properly used. Use of these devices can reduce dust related hazards. h) Use auxiliary handles supplied with the tool. Loss of control can cause personal injury. 4) Power tool use and care a) Do not force the power tool. Use the correct power tool for your application. The correct power tool will do the job better and safer at the rate for which it was designed. b) Do not use the power tool if the switch does not turn it on and off. Any power tool that cannot be controlled with the switch is dangerous and must be repaired. c) Disconnect the plug from the power source before making any adjustments, changing accessories, or storing power tools. Such preventive safety measures reduce the risk of starting the power tool accidentally. d) Store idle power tools out of the reach of children and do not allow persons unfamiliar with the power tool or these instructions to operate the power tool. Power tools are dangerous in the hands of untrained users. e) Maintain power tools. Check for misalignment or binding of moving parts, breakage of parts and any other condition that may affect the power tools operation. lf damaged, have the power tool repaired before use. Many accidents are caused by poorly maintained power tools. f) Keep cutting tools sharp and clean. Properly maintained cutting tools with sharp cutting edges are less likely to binf and are easier to control. g) Use the power tool, accessories and tool bits etc., in accordance with these instructions and in the manner intended for the particular type of power tool, taking into account the working conditions and the work to be performed. Use of the power tool for operations different from intended could result in a hazardous situation. 5) Service a) Have your power tool serviced by a qualified repair person using only identical replacement parts. This will ensure that the safety of the power tool is maintained.

15 7 English Additional safety rules for hand saws Always wear safety goggles Always wear safety shoes Always wear safety gloves Always wear dust mask Instructions before use Always wear ear protection Read carefully the data written on the Technical Data sheet that you will find in the package together with your product. In the following text, figures are identified by numbers, details inside the figures by letters. Figures are depicted on the first pages of this user manual. Power supply Ground the metallic parts of your hand saw are connected to the ground. make sure that the socket and any extension cords and plugs have the ground connection and that your electrical system is properly connected to the ground. Warning: for your safety, it is important that the whole system (electrical system, extension cords, sockets etc.) is connected to the ground. If you are not sure, ask a qualified electrician for a check. Extension cords when you have to operate with your hand saw far from an electrical outlet, you can use an extension cord. If you use it make sure that the section of the cord is suitable and that the cord is provided with ground conductor; the extension cord (made up of cable, plug and socket) must be suitable for outdoor use. It is better if the cord is made of rubber and it is H07RN-F; follow the chart shown in figure 15 on this manual for the choice of the right section of the conductors; if you use more than one extension cord make sure that every cable in each extension cord has a section not lower than the value shown on the chart in figure 15, considering the total length of the extension cords; remember the longer an extension cord the higher the drop in voltage. This causes loss of rpm and therefore cooling as well as loss of power operating your hand saw. Don t use extension cords if you have to operate too far from the electrical outlet. Preliminary operations In order to prepare your hand saw to operate, proceed as follows, make sure before you start that your machine is unplugged. a) fasten the auxiliary handles (B) in the more comfortable position according to the kind of cut you are going to perform. See figure 1; Warning: not using auxiliary and main handles can result in loss of control of your hand saw and serious personal injury. b) connect the quick hose connector (figure 1 D) to a proper water supply, keep the valve C close till you start to cut; c) select the cutting depth: see paragraph Setting cutting depth. PRCD-GFI: portable residual current device or GFI: Ground Fault Interrupter your hand saw is equipped with a safety portable residual current device (PRCD or GFI) assembled on the cord. This device is shown in figure 5; never use hand saw without PRCD-GFI; before starting to cut make sure the PRCD-GFI works properly. In order to do so, plug the hand saw in and press the green button Reset (O): a red led will light up (P) showing that electricity is available to the hand saw. Than press the blue button Test (N) that tests if the device works properly. When you press it, the circuit breaker inside the PRCD-GFI should cut the power off leading the switch automatically to go to the off position and the red led to go off; if, during operation, the PRCD-GFI cuts the power: stop working, put the main switch of you hand saw on the OFF position and bring your hand saw to an authorized service centre in order to remove the causes of the electrical malfunction. ON/OFF switch See figure 6 in order to understand how to use the switch (figure 2 E). Your switch is equipped with a safety lock device. With this device you can switch on the motor only if you follow first step I and than step II, as shown in figure 6. This prevents the hand saw from starting accidentally. Caution: after switching off, the machine will not be idle immediately. Connection to a water supply Wet cutting reduces risks connected with dusty environment. We recommend operating your hand saw with water. Make sure the blade is suitable for wet cutting. If you want to cut without water wear a proper dust mask to protect yourself from dust inhalation. While wet cutting: use only the water hose (figure 1) provided with your hand saw. The water hose includes also a valve (C) and a quick hose connector (D); the maximum pressure of incoming water cannot exceed 4 bar; use always clean water; control the flow of water by turning the valve (C). A small amount of water is enough to suppress saw dust; prevent water from entering the motor or other electrical components; check at regular intervals that none of the water system components are damaged. Check in particular the valve (C), the quick hose connector (D) and the pipe. Setting cutting depth Refer to figure 13, proceed as follows: unlock the roller guide R by loosening the S knob; than turn the roller guide to select the cutting depth (13/A); to lock the guide, tighten the S knob, making sure that the guide is engaged as shown in figure 13/B; For applications where the guide is not needed, fasten the guide fully turned toward the switch.

16 English 8 Flush cutting accessory To mount the flush cutting accessory refer to figure 14. Warning: always use blades with countersunk holes suitable for the flange (this kind of blades are available as accessory). Warning: do not use abrasive blades when flush cutting. Proceed as follows: remove the guard by loosening the 5 screws (14/A); loosen the blade-tightening screw and remove the flange and the blade (14/B); remove the internal flange by unscrewing the 3 screws using the provided Allen key (14/C); position the flange provided together with the flush cutting accessory as shown in figure (14/D); position a suitable blade and fasten it by tightening all 4 (or 6) screws (14/E); position and fasten the flush cutting guard by tightening the 5 screws (14/F). Checks and precautions to avoid structural objects damages and damages to Before starting any cutting activity, talk with the construction manager or the planner in order to make sure that the cut doesn t: make any damage to the structure of the building and doesn t change the structural characteristics of the construction; damage any water or gas pipeline or any electrical circuits. Blade choice Your Cardi hand saw has been designed to cut building materials such as concrete, reinforced concrete, bricks, masonry, natural stone, tiles etc, using laser welded diamond blades (figure 10 and 11) or metal using abrasive blades. Warning: Do NOT use circular saw blades or other kind of blades not laser-welded. Failure to follow this warning may result in serious personal injury. See figure 10 and 11. Ask your dealer about the best blade for your application. The blade must have: a) maximum diameter: 400 mm (16 inches) b) arbor hole diameter 25,4 mm (1 inch). You can use a blade with a 30 mm arbor hole using a proper distance piece; c) width between 2 and 3 mm ( inch); d) maximum rotating speed (provided by the blade manufacturer), higher than the maximum rotating speed of the arbor of your hand saw, shown on the data plate (see figure 14 I). Use blades with diameter, arbor hole and rotating speed compatible with your specific hand saw model. Use of blades with inappropriate dimensions can result in misalignment, vibrations, irregular rotation and loss of control causing serious injury. Check the blade before use. Do not use damaged blades. Blade mounting and replacement Before mounting or replacing the blade (figure 1 H), make sure the hand saw is unplugged. Refer to the following directions depending on the kind of blade you are using: Diamond blades (no internal flange + small flange) For blade mounting and replacement refer to figure 10. Proceed as follows: loosen and remove the blade-tightening screw (10/A) using the key provided; remove the flange and the blade (if already mounted) (10/B); using the Allen key provided loosen the screws and remove the internal flange (10/C) (if not already removed); position the diamond blade (10/D), making sure the arrow on the blade meets the direction of rotation on the guard; mount the small flange as shown in figure (10/E). fasten the blade by tightening the blade tightening screw (10/F); Abrasive blades (internal flange + big flange) For blade mounting and replacement refer to figure 11. Proceed as follows: loosen and remove the blade-tightening screw (11/A) using the key provided; remove the flange and the blade (if already mounted) (11/B); make sure the internal flange is mounted (11/C). If not, assemble the flange and fasten it by tightening the screws. Use the Allen key provided; position the abrasive blade (11/D); mount the big flange (11/E), make sure the flange is the right one; position and tighten the blade-tightening screw (11/F); Warning: for your safety, when using abrasive blades, make sure the internal flange is mounted to the machine and make sure that the external flange is the big one. Fastening the work piece and size of the work piece if the work object is a block and not part of a structure, fasten it in order to prevent its movement; prevent the work piece from shifting, moving or falling when you are cutting. Environmental conditions do not expose the hand saw to rain, ice or snow; prevent water or any other liquid from coming into contact with the electrical parts of your machine; do not use the hand saw in explosive atmospheres, for instance flammable liquids, gas or dust. The electric hand saw produces sparks which can ignite fumes, dust or smoke. Overhead cutting (ceiling cutting) Warning: your hand saw is NOT intended to perform overhead cutting (upward).
; position the flange provided together with the flush cutting accessory as shown in figure (14/D); position a suitable blade and fasten it by tightening all")
17 9 English Operating Instructions After having followed the instructions given in the previous Preliminary operations paragraph, proceed as follows in order to perform the cut. Warning: do not touch any moving parts of your hand saw, in particular the blade, when operating. turn your hand saw on and move closer to the material to be cut. When the blade touches the surface, push the hand saw toward the material and let the blade going inside the material till you reach the desired cutting depth. Than move the hand saw parallel to the surface in order to perform the cut; your hand saw is intended to perform straight cuts only; avoid friction between the blade-side and the work piece: move the hand saw just forward avoiding side movement of the blade. The friction can overload the motor; Warning: When working, make sure you stand safely. Always hold your machine with both hands. The blade can jam, so be always ready to face this event: the electronic of your machine allows you to move the machine out, to free the blade and to continue cutting. use the handles and hold your hand saw firmly with both hands (see figure 3 and 4) and be ready to resist to possible saw s movements; cutting materials containing wood, cork, rubber, foam polystyrene can result in problems moving forward the machine. If you have this kind of problems, stop cutting and remove all materials listed before and proceed with cutting operations. If you cannot remove these materials, stop cutting and cut in another position; in case the electric power goes off, position the switch in the off position to prevent the machine from accidentally self starting; when you complete the cut, switch off your hand saw and wait till the blade comes to a complete stop. Then pull the hand saw out of the cut and close the water valve (C). Watch out! The blade and the cutting area can be very hot and cause severe burns. Electronic devices Your hand saw is equipped with a CARDI multifunction electronic device that includes a soft-start and an electronic clutch: the soft-start allows the motor to start gradually, reducing peak current that occurs when you switch the motor on, helps you when you begin cutting, allowing gradual blade rotation and avoiding jerks at the operator s arm. It allows you to use your hand saw connected to household electrical outlet. the electronic clutch cuts off power to the motor in case of excessive overload, increasing the operator safety and preventing damage to the motor. When the overload is over, the device gives back power to the motor that begins working again; if the electronic clutch operates frequently means that the hand saw is not used properly. Possible causes can be a not suitable forward speed, an excessive friction between the blade-side and the material, excessive cutting depth. In these cases, stop cutting and let the machine turn with no load for some seconds, helping the motor cool down. Maintenance - Service - Warranty Periodic maintenance at the end of the work, after having removed the blade, blow compressed air inside the rotating motor in order to remove dust and powder. Do this operation wearing protective goggles; before starting any other cleaning, maintenance or lubrication operation make sure that the hand saw is unplugged; keep your hand saw clean and dry, in particular its handles and its moving parts; never use solvents or other harsh chemicals for cleaning your hand saw; after use put your hand saw in a dry, safe place inaccessible to children place; gears are lubricated by lubricating oil and grease which are suited for any external temperature. You don t have to check the oil level or to fill it up. always unplug the hand saw during check or blade replacement; never unplug the hand saw by pulling the cord; inspect often the power cable and extension cords, making sure that they don t have any damage like cuts, abrasions or exposed wires. If you find a damage, ask to a CARDI authorized service centre for replacement; do not use the hand saw with damaged components or with malfunctions, in particular when the switch doesn t work properly. In these cases, ask a CARDI authorized service centre for replacement. Service after 250 hours of work, bring your hand saw to a CARDI authorized service centre for periodical check; any repairing on your hand saw must be carried out by CARDI authorized service personnel only. Ask your dealer for the list of the CARDI authorized service centres; your machine's serial number is stamped on the machine or printed on the data plate as shown in figure 7; use original CARDI spare parts only. Warranty Your product is under CARDI warranty for 24 months, starting from the date of purchase. This warranty is against faulty workmanship, flaws in material and design problems. The warranty covers free components replacement, manpower needed for replacement and wearing materials such as oil and lubricants if intact before the repairing operation. The warranty doesn't cover the replacement of: components of the product replaced or modified by people not authorized by CARDI; components damaged by carelessness, not suitable use or overloaded; components of products from which safety devices have been removed; worn out wearing parts replaced during repair. This warranty does not apply to products that have been damaged by carelessness like water entering the hand saw, lack of periodic cleaning and maintenance, damage of the threaded components or the spindle etc. The life of wearing parts is variable depending on using time and the kind of job they are used for. Examples of wearing parts are: cables, switches and plugs, brushes, armatures,

18 English 10 clutch plates, ball and roller bearing not in oil, sealing rings, transmission spindles, filters, etc. If during repairing under warranty, a wearing part is worn and this can affect the safety and the operation of your product, the customer is asked to pay for the replacement of these components not under warranty. If the customer refuses this, no repairing operation will be carried out. The warranty covers free replacement of components which are defective due to wrong manufacturing or assembly, if the product is brought to an authorized service centre and if: the product is together with a purchasing document stating when the product has been purchased. Valid purchasing documents are invoices or delivery certificates including serial numbers; maintenance operations have been carried out every 250 working hours, replacing the worn wearing parts; no unauthorized people have operated on the product; the product has not been misused and it has been used accordingly with the directions given in this user manual; all safety directions have been followed. Your CARDI product is not under warranty if: the product has been serviced by people not authorized by CARDI. damages are due to incorrect use and/or carelessness. Dents due to drops or strokes will be considered evidence of carelessness; damages have been caused by mechanical or electrical overload; damages have been caused by water, mud or any other liquid entering the product. When your product is under warranty, in some cases, for example when CARDI authorized service personnel think the repairing is too expensive to be carried out, the free substitution of the product is possible. In addition, the substitution under warranty is provided after two fruitless reparation attempts and after the authorization of a CARDI service manager. In case of substitution, the customer is, usually, requested to pay for the worn wearing parts of the product that has been replaced. User-replaceable components No components of your CARDI product can be replaced by the user. Replacement must be carried out by CARDI authorized personnel only. CARDI service centres - Address list: Ask your dealer for a CARDI service centres address list. Package Contents For the list of contents refer to the Spare Parts List, specific for your model, located in the package together with this manual. WARNING: THE MANUFACTURER DECLINES ALL RESPONSABILITY IN CASE OF NO RESPECT OF THE ABOVE WRITTEN "SAFETY AND OPERATING INSTRUCTIONS". Disposal of the product The symbol on the left, that you can find on the product or on its packaging indicates that this product may not be treated as household waste. At the end of its life the products must be handed over to the applicable collection point for the recycling of electrical and electronic equipment. Be sure that this product is disposed correctly. You will help prevent potential negative consequences for the environment and human health. For more detailed information about what to do when your product doesn't work and is not fixable, contact the dealer where you did purchase the product. Your product has been introduced new on the market after August 13 th This manual is subject to modifications without notice.

19 11 Deutsch Ihre CARDI-Handsäge ist ein Elektrowerkzeug, mit dem Sie gerade Schnitte in verschiedenen Gesteinsmaterialien (z.b. Ziegel, Kalksand-, Mauer-, Natur- und Kunststein sowie Beton mit und ohne Armierung) mit lasergeschweißten Diamantblättern oder in Metall mit den entsprechend geeigneten Trenn- und Schruppscheiben machen können. Warnung: Verwenden Sie keine Kreissägeblätter oder andere Trennscheiben, die nicht für dieses Produkt geeignet sind. Wenn Sie diese Warnung nicht befolgen, können sich Personen schwer verletzen (Abb. 8 und 9). Allgemeine Warnhinweise zur Sicherheit ACHTUNG! Lesen Sie sämtliche icherheitswarnhinweise und sonstigen Anweisungen. Die Nichteinhaltung der nachstehend aufgeführten Warnhinweise und sonstigen Anweisungen kann einen elektrischen Schlag, Brand und/oder schwere Verletzungen verursachen. Der nachfolgend verwendete Begriff "Gerät" bezieht sich auf netzbetriebene Geräte (mit Netzkabel) und auf akkubetriebene Geräte (ohne Netzkabel). Bewahren Sie alle Warnhinweise und sonstigen Anweisungen zur künftigen Bezugnahme auf. 1) Arbeitsbereich-Sicherheit a) Halten Sie Ihren Arbeitsbereich sauber und gut ausgeleuchtet. Unordnung und dunkle Arbeitsbereiche fordern Unfälle geradezu heraus. b) Arbeiten Sie mit Geräten nicht in explosionsgefährdeter Umgebung, in der sich brennbare Flüssigkeiten, Gase oder Stäube befinden. Geräte erzeugen Funken, die den Staub oder die Dämpfe entzünden können. c) Halten Sie Kinder und andere Personen während der Benutzung des Gerätes fern. Bei Ablenkung können Sie die Kontrolle verlieren. 2) Elektrische Sicherheit a) Der Anschlußstecker des Gerätes muß in die Steckdose passen. Der Stecker darf in keiner Weise verändert werden. Verwenden Sie keine Adapterstecker gemeinsam mit schutzgeerdeten Geräten. Unveränderte Stecker und passende Steckdosen verringern das Risiko eines elektrischen Schlages. b) Vermeiden Sie Körperkontakt mit geerdeten Oberflächen von Rohren, Heizungen, Herden und Kühlschränken. Es besteht ein erhöhtes Risiko eines elektrischen Schlags, wenn Ihr Körper geerdet ist. c) Halten Sie Geräte von Regen und Nässe fern. Das Eindringen von Wasser in ein Gerät erhöht das Risiko eines elektrischen Schlages. d) Mißbrauchen Sie nicht das Kabel. Verwenden Sie das Kabel niemals zum Tragen, Ziehen oder Trennen des Gerätes vom Netz. Halten Sie das Kabel fern von Hitze, Öl, scharfen Kanten oder sich bewegenden Teilen. Beschädigte oder verwickelte Kabel erhöhen das Risiko eines elektrischen Schlages. e) Wenn Sie mit einem Gerät im Freien arbeiten, verwenden Sie nur Verlängerungskabel, die auch für den Außenbereich zugelassen sind. Die Verwendung eines für den Außenbereich geeigneten Verlängerungskabels verringert das Risiko eines elektrischen Schlages. 3) Sicherheit von Personen a) Seien Sie aufmerksam, achten Sie darauf, was Sie tun, und gehen Sie vernünftig mit einem Gerät um. Benutzen Sie das Gerät nicht, wenn Sie müde sind oder unter dem Einfluß von Drogen, Alkohol oder Medikamenten stehen. Ein Moment der Unachtsamkeit beim Gebrauch von Geräten kann zu ernsthaften Verletzungen führen. b) Verwenden Sie Schutzausrüstung. Tragen Sie stets einen Augenschutz. Schutzausrüstung wie Staubmaske, rutschfeste Sicherheitsschuhe, Schutzhelm oder Gehörschutz, je nach Art und Einsatz des Gerätes, verringert das Risiko von Verletzungen. c) Vermeiden Sie eine unbeabsichtigte Inbetriebnahme. Stellen Sie sicher, daß sich der Schalter in der Aus-Stellung befindet, bevor das Gerät mit dem Netz verbunden wird. Durch das Tragen des Gerätes mit dem Finger am Schalter oder durch das Verbinden eingeschalteter Geräte werden Unfälle provoziert. d) Entfernen Sie Einstell- oder Schraubenschlüssel, bevor Sie das Gerät einschalten. Ein Schlüssel, der sich in einem sich drehenden Teil befindet, kann zu Verletzungen führen. e) Nicht zu weit nach vorne strecken! Achten Sie auf einen sicheren Stand, um in jeder Arbeitsposition das Gleichgewicht zu halten. Dadurch können Sie das Gerät in unerwarteten Situationen besser unter Kontrolle halten. f) Tragen Sie geeignete Kleidung. Tragen Sie keine weite Kleidung oder Schmuck. Halten Sie Haare, Kleidung und Handschuhe fern von sich bewegenden Teilen. Lockere Kleidung, Schmuck oder lange Haare können von sich bewegenden Teilen erfaßt werden. g) Falls Staubabsaug- und fangvorrichtungen vorhanden sind, vergewissern Sie sich, daß diese angeschlossen sind und richtig verwendet werden. Die Verwendung von Staubfangeinrichtungen kann die mit Staub verbundenen Gefahren verringern. 4) Gebrauch und Pflege von Geräten a) Überlasten Sie das Gerät nicht. Verwenden Sie für Ihre Arbeit das dafür bestimmte Gerät. Mit dem passenden Gerät arbeiten Sie besser und sicherer im angegebenen Leistungsbereich. b) Benutzen Sie kein Gerät, dessen Schalter defekt ist. Ein Gerät, das sich nicht mehr ein- oder ausschalten läßt, ist gefährlich und muß repariert werden. c) Trennen Sie den Stecker von der Stromquelle und/oder das Akkupaket vom Elektrowerkzeug, bevor Einstellungen vorgenommen, Zubehör gewechselt oder Elektrowerkzeuge verstaut werden. Diese Vorsichtsmaßnahmen verhindern den unbeabsichtigten Start des Gerätes. d) Bewahren Sie unbenutzte Geräte außerhalb der Reichweite von Kindern auf. Lassen Sie Geräte nicht von Personen benutzen, die damit nicht vertraut sind oder diese Anweisungen nicht
. Allgemeine Warnhinweise zur Sicherheit ACHTUNG!")
20 Deutsch 12 gelesen haben. Geräte sind gefährlich, wenn Sie von unerfahrenen Personen benutzt werden. e) Halten Sie Geräte in einem einwandfreien Zustand. Kontrollieren Sie, ob bewegliche Teile falsch ausgerichtet sind oder klemmen und ob Teile gebrochen oder so beschädigt sind, daß die Funktion des Geräts beeinträchtigt ist. Lassen Sie beschädigte Geräte vor dem Gebrauch reparieren. Viele Unfälle haben ihre Ursache in schlecht gewarteten Geräten. f) Halten Sie Schneidgeräte scharf und sauber. Sorgfältig gepflegte Schneidgeräte mit scharfen Schneidkanten verklemmen sich weniger und sind leichter zu führen. g) Verwenden Sie das Elektrowerkzeug, Zubehör sowie Werkzeug-Bits, usw. entsprechend diesen Anweisungen. Berücksichtigen Sie dabei die Arbeitsbedingungen sowie die durchzuführende Arbeit. Der Gebrauch von Geräten für andere als die vorgesehenen Anwendungen kann zu gefährlichen Situationen führen. 5) Service a) Lassen Sie Ihr Gerät nur von qualifiziertem Fachpersonal und nur mit Original- Ersatzteilen reparieren. Damit wird gewährleistet, daß die Sicherheit des Geräts erhalten bleibt. Zusätzliche Sicherheitsregeln für Handsägen Tragen Sie stets eine Schutzbrille. Tragen Sie stets Sicherheitsschuhe Tragen Sie stets Sicherheits handschuhe. Tragen Sie stets eine Staubmaske. Anweisungen vor der Anwendung Tragen Sie stets einen Gehör schutz. Lesen Sie die Angaben im Technischen Datenblatt, das Sie in der Verpackung zusammen mit Ihrem Produkt finden, sorgfältig durch. Im folgenden Text werden Abbildungen durch Nummern und Details in den Abbildungen durch Buchstaben gekennzeichnet. Die Abbildungen werden auf den ersten Seiten dieses Benutzerhandbuchs beschrieben. Erdung Die Metallteile Ihrer Handsäge sind geerdet. Überzeugen Sie sich davon, dass die Steckdose und mögliche Verlängerungskabel und Mehrfachsteckdosen einen Erdleiter haben und Ihr Elektrosystem richtig geerdet ist. Warnung: Zu Ihrer Sicherheit ist es wichtig, dass das gesamte System (Elektrosystem, Verlängerungskabel, Steckdosen usw.) an die Erde angeschlossen ist. Wenn Sie nicht sicher sind, lassen Sie das von einem qualifizierten Elektriker überprüfen. Verlängerungskabel Wenn Sie mit Ihrer Handsäge fern von einer Steckdose arbeiten müssen, können Sie ein Verlängerungskabel benutzen. Wenn Sie es benutzen, achten Sie darauf, dass der Querschnitt des Kabels ausreichend groß ist und dass das Kabel einen Erdleiter hat. Das Verlängerungskabel (bestehend aus Kabel, Stecker und Steckdose) muss für die Verwendung im Freien geeignet sein. Am besten ist es aus Kupfer und vom Typ H07RN-F. Für die richtige Auswahl des Leiterquerschnitts beachten Sie die in Abbildung 11 dieses Handbuchs gezeigte Tabelle. Wenn Sie mehr als ein Verlängerungskabel benutzen, achten Sie darauf, dass kein Kabel in allen Verlängerungskabeln einen kleineren Querschnitt als den in der Tabelle der Abbildung 11 gezeigten hat, wobei die Gesamtlänge der Verlängerungskabel zugrunde zu legen ist. Denken Sie daran, dass der Spannungsabfall umso größer ist und die Leistung Ihrer Handsäge umso schlechter ist, desto länger ein Verlängerungskabel ist. Verwenden Sie keine Verlängerungskabel, wenn Sie zu weit weg von einer Steckdose arbeiten müssen. Vor der Inbetriebnahme Um Ihre Handsäge betriebsbereit zu machen, ist wie folgt zu verfahren. Bevor Sie beginnen, achten Sie darauf, dass der Stecker Ihrer Maschine abgezogen ist. a) Befestigen Sie die Hilfsgriffe (B) derart, daß Sie die Handsäge während des Trennschnittes jederzeit sicher und bequem halten können. Siehe Abb. 1. Warnung: Wenn Sie die Hilfs- und Hauptgriffe nicht benutzen, können Sie die Kontrolle über Ihre Handsäge verlieren und sich schwer verletzen. b) Schließen Sie den Schnellschlauchanschluss (Abb. 1 D) an eine geeignete Wasserversorgung an. Lassen Sie das Ventil C bis zum Start des Trennprozesses geschlossen. c) Wählen Sie die Schnitttiefe aus: Siehe Abschnitt Einstellung der Schnitttiefe. PRCD- Personenschutzschalter Ihre Handsäge ist mit einem 10 Milliampere PRCD Personenschutzschalter ausgestattet, der im Zuleitungskabel der Handsäge angebracht ist und die Stromzufuhr bei einem Fehlerstrom ab 10 Milliampere sofort unterbricht. Benutzen Sie die Handsäge nie ohne PRCD-GFI. Bevor Sie beginnen zu sägen, überzeugen Sie sich davon, dass das PRCD-GFI richtig funktioniert. Das machen Sie, indem Sie die Handsäge in die Steckdose stecken und die grüne Reset-Taste (O) drücken. Es leuchtet eine rote Lampe (P) auf, womit angezeigt wird, dass die Handsäge Strom hat. Wenn der PRCD-GFI bei der Arbeit den Strom abschaltet, hören Sie auf zu arbeiten, schalten Sie den Hauptschalter Ihrer Handsäge aus, und bringen Sie Ihre Handsäge in eine autorisierte Reparaturwerkstatt, um die Ursache der elektrischen Störung beseitigen zu lassen. An-/Ausschalter Siehe Abb. 6, damit Sie verstehen, wie der Schalter (Abb. 2 E) zu benutzen ist. Ihr Schalter ist mit einer Sicherheitssperre ausgestattet. Mit dieser Vorrichtung können Sie den Motor nur anschalten,
 Verwenden Sie das Elektrowerkzeug, Zubehör sowie Werkzeug-Bits, usw.")
Bid5500 ΚΡΟΥΣΤΙΚΟ ΔΡΑΠΑΝΟ. Owner s manual. Μετάφραση του πρωτοτύπου των οδηγιών χρήσης
 Bid5500 ΚΡΟΥΣΤΙΚΟ ΔΡΑΠΑΝΟ Μετάφραση του πρωτοτύπου των οδηγιών χρήσης Owner s manual Βασικά χαρακτηριστικά 1. Τσόκ 2. Διακόπτης ενεργοποίησης απενεργοποίησης λειτουργίας κρούσης 3. Ράβδος-στοπ βάθους διάτρησης
Περιεχόμενα / Contents
 Aερόθερμo / Fan Heater PTC-906 Περιεχόμενα / Contents GR... Σελίδες 3-8 EN... Pages 9-11 2 GR Ευχαριστούμε που επιλέξατε μια συσκευή της γκάμας θερμαντικών IZZY. Σημαντικές Οδηγίες Ασφαλείας Τα Μέρη της
the total number of electrons passing through the lamp.
 1. A 12 V 36 W lamp is lit to normal brightness using a 12 V car battery of negligible internal resistance. The lamp is switched on for one hour (3600 s). For the time of 1 hour, calculate (i) the energy
[1] P Q. Fig. 3.1
![[1] P Q. Fig. 3.1](/thumbs/79/80362156.jpg "[1] P Q. Fig. 3.1") 1 (a) Define resistance....... [1] (b) The smallest conductor within a computer processing chip can be represented as a rectangular block that is one atom high, four atoms wide and twenty atoms long. One
1 (a) Define resistance....... [1] (b) The smallest conductor within a computer processing chip can be represented as a rectangular block that is one atom high, four atoms wide and twenty atoms long. One
SPEEDO AQUABEAT. Specially Designed for Aquatic Athletes and Active People
 SPEEDO AQUABEAT TM Specially Designed for Aquatic Athletes and Active People 1 2 Decrease Volume Increase Volume Reset EarphonesUSBJack Power Off / Rewind Power On / Fast Forward Goggle clip LED Status
Door Hinge replacement (Rear Left Door)
") Door Hinge replacement (Rear Left Door) We will continue the previous article by replacing the hinges of the rear left hand side door. I will use again the same procedure and means I employed during the
Door Hinge replacement (Rear Left Door) We will continue the previous article by replacing the hinges of the rear left hand side door. I will use again the same procedure and means I employed during the
 60 61 62 63 64 65 Ο Δ Η Γ Ι Ε Σ Σ Υ Ν Τ Η Ρ Η Σ Η Σ Τ Ω Ν Κ Ο Υ Φ Ω Μ Α Τ Ω Ν Ι Ν S T R U C T I N O N S C O N C E R N I N G Τ Η Ε C A S E M E N T S M A I N T E N A N C E Ο τακτικός καθαρισμός των βαμμένων
Instruction Execution Times
 1 C Execution Times InThisAppendix... Introduction DL330 Execution Times DL330P Execution Times DL340 Execution Times C-2 Execution Times Introduction Data Registers This appendix contains several tables
ΑΚΑ ΗΜΙΑ ΕΜΠΟΡΙΚΟΥ ΝΑΥΤΙΚΟΥ ΜΑΚΕ ΟΝΙΑΣ ΣΧΟΛΗ ΜΗΧΑΝΙΚΩΝ ΠΤΥΧΙΑΚΗ ΕΡΓΑΣΙΑ ΘΕΜΑ : ΧΗΜΙΚΑ ΠΡΟΣΘΕΤΑ ΠΟΥ ΠΡΟΟΡΙΖΟΝΤΑΙ ΓΙΑ ΤΟ ΝΕΡΟ ΤΟΥ ΑΤΜΟΛΕΒΗΤΑ
 ΑΚΑ ΗΜΙΑ ΕΜΠΟΡΙΚΟΥ ΝΑΥΤΙΚΟΥ ΜΑΚΕ ΟΝΙΑΣ ΣΧΟΛΗ ΜΗΧΑΝΙΚΩΝ ΠΤΥΧΙΑΚΗ ΕΡΓΑΣΙΑ ΘΕΜΑ : ΧΗΜΙΚΑ ΠΡΟΣΘΕΤΑ ΠΟΥ ΠΡΟΟΡΙΖΟΝΤΑΙ ΓΙΑ ΤΟ ΝΕΡΟ ΤΟΥ ΑΤΜΟΛΕΒΗΤΑ ΣΠΟΥ ΑΣΤΗΣ : ΑΓΟΡΑΣΤΟΣ ΧΡΥΣΟΒΑΛΑΝΤΗΣ ΕΠΙΒΛΕΠΟΥΣΑ ΚΑΘΗΓΗΤΡΙΑ :
Capacitors - Capacitance, Charge and Potential Difference
 Capacitors - Capacitance, Charge and Potential Difference Capacitors store electric charge. This ability to store electric charge is known as capacitance. A simple capacitor consists of 2 parallel metal
Potential Dividers. 46 minutes. 46 marks. Page 1 of 11
 Potential Dividers 46 minutes 46 marks Page 1 of 11 Q1. In the circuit shown in the figure below, the battery, of negligible internal resistance, has an emf of 30 V. The pd across the lamp is 6.0 V and
Quick Installation Guide
 A Installation 1 F H B E C D G 2 www.trust.com/17528/faq Quick Installation Guide C C D Freewave Wireless Audio Set 17528/ 17529 D Installation Configuration Windows XP 4 5 8 Windows 7/ Vista 6 7 9 10
BFN3000 ΕΠΙΤΡΑΠΕΖΙΟΣ ΑΝΕΜΙΣΤΗΡΑΣ. Owner s manual. Μετάφραση του πρωτοτύπου των οδηγιών χρήσης
 BFN3000 ΕΠΙΤΡΑΠΕΖΙΟΣ ΑΝΕΜΙΣΤΗΡΑΣ Μετάφραση του πρωτοτύπου των οδηγιών χρήσης Owner s manual www.bormanntools.com GR Οδηγίες ασφαλούς λειτουργίας 1. Τα χαρακτηριστικά της παροχής ηλεκτρικού ρεύματος θα
HOMEWORK 4 = G. In order to plot the stress versus the stretch we define a normalized stretch:
 HOMEWORK 4 Problem a For the fast loading case, we want to derive the relationship between P zz and λ z. We know that the nominal stress is expressed as: P zz = ψ λ z where λ z = λ λ z. Therefore, applying
G 10SD2 G 12S2 G 13SD
 Disc Grinder G 10SD2 G 12S2 G 13SD Handling instructions G13SD Read through carefully and understand these instructions before use. 1 2 1 2 3 3 88 8 4 6 5 17 mm 6 mm 9 7 4! @ 0 2 English 1 Wrench 2 Wheel
Εγκατάσταση λογισμικού και αναβάθμιση συσκευής Device software installation and software upgrade
 Για να ελέγξετε το λογισμικό που έχει τώρα η συσκευή κάντε κλικ Menu > Options > Device > About Device Versions. Στο πιο κάτω παράδειγμα η συσκευή έχει έκδοση λογισμικού 6.0.0.546 με πλατφόρμα 6.6.0.207.
Right Rear Door. Let's now finish the door hinge saga with the right rear door
 Right Rear Door Let's now finish the door hinge saga with the right rear door You may have been already guessed my steps, so there is not much to describe in detail. Old upper one file:///c /Documents
!Stato di tensione triassiale!stato di tensione piano!cerchio di Mohr
 !Stato di tensione triassiale!stato di tensione piano!cerchio di Mohr Stato di tensione F A = F / A F Traione pura stato di tensione monoassiale F M A M Traione e torsione stato di tensione piano = F /
Code Breaker. TEACHER s NOTES
 TEACHER s NOTES Time: 50 minutes Learning Outcomes: To relate the genetic code to the assembly of proteins To summarize factors that lead to different types of mutations To distinguish among positive,
Strain gauge and rosettes
 Strain gauge and rosettes Introduction A strain gauge is a device which is used to measure strain (deformation) on an object subjected to forces. Strain can be measured using various types of devices classified
Thin Film Chip Resistors
 FEATURES PRECISE TOLERANCE AND TEMPERATURE COEFFICIENT EIA STANDARD CASE SIZES (0201 ~ 2512) LOW NOISE, THIN FILM (NiCr) CONSTRUCTION REFLOW SOLDERABLE (Pb FREE TERMINATION FINISH) Type Size EIA PowerRating
Οδηγίες Λειτουργίας. Assembly Operating instructions. Montageanleitung. Απογυμνωτές PV-AZM...3. Stripping pliers PV-AZM...3.
 MA000 MA267 (de_en) (gr_en) Montageanleitung Οδηγίες Λειτουργίας Απογυμνωτής PV-AZM... για MC3, MC4 MA000 MA267 (de_en) (gr_en) Assembly Operating instructions Stripping pliers PV-AZM... for MC3 and MC4
Συστήματα Διαχείρισης Βάσεων Δεδομένων
 ΕΛΛΗΝΙΚΗ ΔΗΜΟΚΡΑΤΙΑ ΠΑΝΕΠΙΣΤΗΜΙΟ ΚΡΗΤΗΣ Συστήματα Διαχείρισης Βάσεων Δεδομένων Φροντιστήριο 9: Transactions - part 1 Δημήτρης Πλεξουσάκης Τμήμα Επιστήμης Υπολογιστών Tutorial on Undo, Redo and Undo/Redo
ΟΔΗΓΙΕΣ ΧΡΗΣΗΣ USE INSTRUCTIONS
 ΟΔΗΓΙΕΣ ΧΡΗΣΗΣ USE INSTRUCTIONS ΤΗΛΕΦΩΝΟ ΜΕ ΑΝΑΓΝΩΡΙΣΗ ΚΛΗΣΗΣ /CORDED PHONE WITH CALLER ID ΜΟΝΤΕΛΟ/MODEL: TM09-448 DC48V Παρακαλούμε διαβάστε προσεκτικά όλες τις οδηγίες χρήσης πριν την χρήση της συσκευής
ZLW Series. Single-stage Monoblock Centrifugal Pump ZL PUMP GROUP.,LTD
 ZLW Series Single-stage Monoblock Centrifugal Pump ZL PUMP GROUP.,LTD 1 Application Apply as the transportation of liquids in the fields of air condition, heating, sanitary water, water treatment cooling,
EE512: Error Control Coding
 EE512: Error Control Coding Solution for Assignment on Finite Fields February 16, 2007 1. (a) Addition and Multiplication tables for GF (5) and GF (7) are shown in Tables 1 and 2. + 0 1 2 3 4 0 0 1 2 3
The Simply Typed Lambda Calculus
 Type Inference Instead of writing type annotations, can we use an algorithm to infer what the type annotations should be? That depends on the type system. For simple type systems the answer is yes, and
(1) Describe the process by which mercury atoms become excited in a fluorescent tube (3)
 Describe the process by which mercury atoms become excited in a fluorescent tube (3)") Q1. (a) A fluorescent tube is filled with mercury vapour at low pressure. In order to emit electromagnetic radiation the mercury atoms must first be excited. (i) What is meant by an excited atom? (1) (ii)
Q1. (a) A fluorescent tube is filled with mercury vapour at low pressure. In order to emit electromagnetic radiation the mercury atoms must first be excited. (i) What is meant by an excited atom? (1) (ii)
VENERE. GR. Οδηγός Χρήσης EN. User Guide
 GR. Οδηγός Χρήσης EN. User Guide ΣΗΜΑΝΤΙΚΟ! ΚΡΑΤΗΣΤΕ ΓΙΑ ΜΕΛΛΟΝΤΙΚΗ ΑΝΑΦΟΡΑ: ΔΙΑΒΑΣΤΕ ΠΡΟΣΕΚΤΙΚΑ Κίνδυνος από φωτιά και άλλες πηγές έντονης θερμότητας, όπως ηλεκτρικές αντιστάσεις, υγραέριο, φωτιά κλπ,
ΟΔΗΓΙΕΣ ΕΓΚΑΤΑΣTΑΣΗΣ ΓΙΑ ΠΑΤΩΜΑ WPC INSTALLATION GUIDE FOR WPC DECKING
 1/12 ΟΔΗΓΙΕΣ ΕΓΚΑΤΑΣTΑΣΗΣ ΓΙΑ ΠΑΤΩΜΑ WPC INSTALLATION GUIDE FOR WPC DECKING Ανοίγουμε τρύπες Ø8 x 80mm στο σημείο κατασκευής, με τρυπάνι. To προτεινόμενο πλάτος και μήκος μεταξύ των 2 οπών να είναι 30-35εκ.,
derivation of the Laplacian from rectangular to spherical coordinates
 derivation of the Laplacian from rectangular to spherical coordinates swapnizzle 03-03- :5:43 We begin by recognizing the familiar conversion from rectangular to spherical coordinates (note that φ is used
CYTA Cloud Server Set Up Instructions
 CYTA Cloud Server Set Up Instructions ΕΛΛΗΝΙΚΑ ENGLISH Initial Set-up Cloud Server To proceed with the initial setup of your Cloud Server first login to the Cyta CloudMarketPlace on https://cloudmarketplace.cyta.com.cy
TRIGONOMETRIA: ANGOLI ASSOCIATI
 FACOLTÀ DI INGEGNERIA CORSO DI AZZERAMENTO - MATEMATICA ANNO ACCADEMICO 010-011 ESERCIZI DI TRIGONOMETRIA: ANGOLI ASSOCIATI Esercizio 1: Fissata in un piano cartesiano ortogonale xoy una circonferenza
Surface Mount Multilayer Chip Capacitors for Commodity Solutions
 Surface Mount Multilayer Chip Capacitors for Commodity Solutions Below tables are test procedures and requirements unless specified in detail datasheet. 1) Visual and mechanical 2) Capacitance 3) Q/DF
Modbus basic setup notes for IO-Link AL1xxx Master Block
 n Modbus has four tables/registers where data is stored along with their associated addresses. We will be using the holding registers from address 40001 to 49999 that are R/W 16 bit/word. Two tables that
Advanced Subsidiary Unit 1: Understanding and Written Response
 Write your name here Surname Other names Edexcel GE entre Number andidate Number Greek dvanced Subsidiary Unit 1: Understanding and Written Response Thursday 16 May 2013 Morning Time: 2 hours 45 minutes
Homework 8 Model Solution Section
 MATH 004 Homework Solution Homework 8 Model Solution Section 14.5 14.6. 14.5. Use the Chain Rule to find dz where z cosx + 4y), x 5t 4, y 1 t. dz dx + dy y sinx + 4y)0t + 4) sinx + 4y) 1t ) 0t + 4t ) sinx
2013 REV 01 ELECTRONICS CAPACITORS. DC Applications Metallized Polypropylene Film Self Healing
 2013 REV 01 POWER EECTRONICS CAPACITORS C Applications Metallized Polypropylene Film Healing OUR MISSION: POWER EECTRONICS AN SPECIA CAPACITORS M.V. PFC CAPACITORS AN BANKS IGHTING CAPACITORS MOTOR RUN
How to register an account with the Hellenic Community of Sheffield.
 How to register an account with the Hellenic Community of Sheffield. (1) EN: Go to address GR: Πηγαίνετε στη διεύθυνση: http://www.helleniccommunityofsheffield.com (2) EN: At the bottom of the page, click
CONFIGURAZIONE DELLA CASELLA DI POSTA ELETTRONICA CERTIFICATA (P.E.C.)
") CONFIGURAZIONE DELLA CASELLA DI POSTA ELETTRONICA CERTIFICATA (P.E.C.) Consigliamo di configurare ed utilizzare la casella di posta elettronica certificata tramite il webmail dedicato fornito dal gestore
CONFIGURAZIONE DELLA CASELLA DI POSTA ELETTRONICA CERTIFICATA (P.E.C.) Consigliamo di configurare ed utilizzare la casella di posta elettronica certificata tramite il webmail dedicato fornito dal gestore
Istruzioni per l uso Οδηγίες χρήσης RASOIO DEPILATORE. IT pagina 1 ΕΛ σελίδα 12
 Istruzioni per l uso Οδηγίες χρήσης RASOIO DEPILATORE IT pagina 1 ΕΛ σελίδα 12 [A] [B1] [B2] [B3] 4 [E] 1 2 1 3 2 5 [C1] [C2] [D1] 3 4 7 6 [D2] [D3] 5 6 8 9 10 Type E1101 IPX5 IN: 3V Battery Battery Ni-MH
ΚΥΠΡΙΑΚΗ ΕΤΑΙΡΕΙΑ ΠΛΗΡΟΦΟΡΙΚΗΣ CYPRUS COMPUTER SOCIETY ΠΑΓΚΥΠΡΙΟΣ ΜΑΘΗΤΙΚΟΣ ΔΙΑΓΩΝΙΣΜΟΣ ΠΛΗΡΟΦΟΡΙΚΗΣ 6/5/2006
 Οδηγίες: Να απαντηθούν όλες οι ερωτήσεις. Ολοι οι αριθμοί που αναφέρονται σε όλα τα ερωτήματα είναι μικρότεροι το 1000 εκτός αν ορίζεται διαφορετικά στη διατύπωση του προβλήματος. Διάρκεια: 3,5 ώρες Καλή
safty reasons. Disregarding could result in serious injury. Disregarding could result in injury or product damage. Forbidden.
 The following safety precautions are given throughout this manual. They must be strictly followed to protect those who install, use or maintain this product as well as to protect players, visitors and
PortSip Softphone. Ελληνικά Ι English 1/20
 PortSip Softphone Ελληνικά Ι English 1/20 1. Περιεχόμενα 2. Εγκατάσταση σε Smartphone & Tablet (Android ή ios)... 1 3. Εγκατάσταση σε ηλεκτρονικό υπολογιστή (Windows ή Mac).... 5 4. Installation in Smartphone
OUR PRODUCT RANGE. www.rakson.gr
 ΤΑ ΑΛΛΑ ΕΙ Η ΠΡΟΪΟΝΤΑ ΜΑΣ ΜΕΤΑΣΧΗΜΑΤΙΣΤΕΣ ΚΟΥ ΟΥΝΙΩΝ ΚΟΥ ΟΥΝΙΑ ΜΠΟΥΤΟΝ ΚΟΥ ΟΥΝΙΩΝ ΑΥΤΟΜΑΤΟΙ ΚΛΙΜΑΚΟΣΤΑΣΙΟΥ ΚΛΕΙ ΑΡΙΕΣ ΑΝΙΧΝΕΥΤΕΣ ΚΙΝΗΣΗΣ ΣΥΣΤΗΜΑΤΑ ΕΠΙΚΟΙΝΩΝΙΑΣ Θυροτηλεοράσεις Θυροτηλέφωνα Ενδοεπικοινωνίες
Οδηγίες Αγοράς Ηλεκτρονικού Βιβλίου Instructions for Buying an ebook
 Οδηγίες Αγοράς Ηλεκτρονικού Βιβλίου Instructions for Buying an ebook Βήμα 1: Step 1: Βρείτε το βιβλίο που θα θέλατε να αγοράσετε και πατήστε Add to Cart, για να το προσθέσετε στο καλάθι σας. Αυτόματα θα
For safty reasons. Disregarding could result in serious injury. Disregarding could result in injury or product damage. Forbidden.
 The following safety precautions are given throughout this manual. They must be strictly followed to protect those who install, use or maintain this product as well as to protect players, visitors and
ΚΥΠΡΙΑΚΗ ΕΤΑΙΡΕΙΑ ΠΛΗΡΟΦΟΡΙΚΗΣ CYPRUS COMPUTER SOCIETY ΠΑΓΚΥΠΡΙΟΣ ΜΑΘΗΤΙΚΟΣ ΔΙΑΓΩΝΙΣΜΟΣ ΠΛΗΡΟΦΟΡΙΚΗΣ 19/5/2007
 Οδηγίες: Να απαντηθούν όλες οι ερωτήσεις. Αν κάπου κάνετε κάποιες υποθέσεις να αναφερθούν στη σχετική ερώτηση. Όλα τα αρχεία που αναφέρονται στα προβλήματα βρίσκονται στον ίδιο φάκελο με το εκτελέσιμο
Ακαδημαϊκός Λόγος Εισαγωγή
 - Nel presente studio/saggio/lavoro si andranno ad esaminare/investigare/analizzare/individuare... Γενική εισαγωγή για μια εργασία/διατριβή Per poter rispondere a questa domanda, mi concentrerò in primo
Precision Metal Film Fixed Resistor Axial Leaded
 Features EIA standard colour-coding Non-Flame type available Low noise and voltage coefficient Low temperature coefficient range Wide precision range in small package Too low or too high ohmic value can
MOTORI PER VENTILATORI MOTORS FOR BLOWERS
 MOTORI PER VENTILATORI MOTORS FOR BLOWERS LR 91167 FLANGIA TIPO A FLANGE TYPE A TIPO / TYPE A B C D E F G H I* L M N O P Q BM.80.A2.1000 315 250 290 20 225 φ 7 155 33 19 h7 114 84 6 21.5 M 8 3/8 BM.80.A2.1001
ΕΛΛΗΝΙΚΗ ΔΗΜΟΚΡΑΤΙΑ Ανώτατο Εκπαιδευτικό Ίδρυμα Πειραιά Τεχνολογικού Τομέα. Ξενόγλωσση Τεχνική Ορολογία
 ΕΛΛΗΝΙΚΗ ΔΗΜΟΚΡΑΤΙΑ Ανώτατο Εκπαιδευτικό Ίδρυμα Πειραιά Τεχνολογικού Τομέα Ξενόγλωσση Τεχνική Ορολογία Ενότητα: Principles of an Internal Combustion Engine Παναγιώτης Τσατσαρός Τμήμα Μηχανολόγων Μηχανικών
Οδηγίες Χρήσης BWR5106
 Οδηγίες Χρήσης BWR5106 Περιγραφή εργαλείου Οι αντλίες χειρός είναι ένα εργαλείο με την ικανότητα, πιέζοντας τον λεβιέ πάνω κάτω να πρεσάρει γράσο σε μεγάλη πίεση και με την βοήθεια αυτής να γρασάρει οπού
Δημιουργία Λογαριασμού Διαχείρισης Business Telephony Create a Management Account for Business Telephony
 Δημιουργία Λογαριασμού Διαχείρισης Business Telephony Create a Management Account for Business Telephony Ελληνικά Ι English 1/7 Δημιουργία Λογαριασμού Διαχείρισης Επιχειρηματικής Τηλεφωνίας μέσω της ιστοσελίδας
2 Composition. Invertible Mappings
 Arkansas Tech University MATH 4033: Elementary Modern Algebra Dr. Marcel B. Finan Composition. Invertible Mappings In this section we discuss two procedures for creating new mappings from old ones, namely,
Stato di tensione triassiale Stato di tensione piano Cerchio di Mohr
 Stato di tensione triassiale Stato di tensione iano Cerchio di Mohr Stato di tensione F A = F / A F Traione ura stato di tensione monoassiale F M A M Traione e torsione stato di tensione iano = F / A =
Math 6 SL Probability Distributions Practice Test Mark Scheme
 Math 6 SL Probability Distributions Practice Test Mark Scheme. (a) Note: Award A for vertical line to right of mean, A for shading to right of their vertical line. AA N (b) evidence of recognizing symmetry
ΟΔΗΓΙΕΣ ΣΥΝΑΡΜΟΛΟΓΗΣΗΣ/ ASSEMBLY INSTRUCTION ΤΟΜΜΥ ΚΡΕΒΑΤΙ/BED
 ΟΔΗΓΙΕΣ ΣΥΝΑΡΜΟΛΟΓΗΣΗΣ/ ASSEMBLY INSTRUCTION ΤΟΜΜΥ ΚΡΕΒΑΤΙ/BED 1. Παρακαλώ πολύ διαβάστε προσεκτικά τις οδηγίες πριν την συναρμολόγηση/ Please read the instructions carefully. 2. Παρακαλώ πολύ όπως ελέγξτε
CHAPTER 25 SOLVING EQUATIONS BY ITERATIVE METHODS
 CHAPTER 5 SOLVING EQUATIONS BY ITERATIVE METHODS EXERCISE 104 Page 8 1. Find the positive root of the equation x + 3x 5 = 0, correct to 3 significant figures, using the method of bisection. Let f(x) =
Operating Temperature Range ( C) ±1% (F) ± ~ 1M E-24 NRC /20 (0.05) W 25V 50V ±5% (J) Resistance Tolerance (Code)
 ±1% (F) ± ~ 1M E-24 NRC /20 (0.05) W 25V 50V ±5% (J) Resistance Tolerance (Code)") FEATURES EIA STANDARD SIZING 0201(1/20), 0402(1/16), 0603(1/10), 0805(1/8), 1206(1/4), 1210(1/3), 2010(3/4) AND 2512(1) METAL GLAZED THICK FILM ON HIGH PURITY ALUMINA SUBSTRATE..(CERMET) PROVIDES UNIFORM
FEATURES EIA STANDARD SIZING 0201(1/20), 0402(1/16), 0603(1/10), 0805(1/8), 1206(1/4), 1210(1/3), 2010(3/4) AND 2512(1) METAL GLAZED THICK FILM ON HIGH PURITY ALUMINA SUBSTRATE..(CERMET) PROVIDES UNIFORM
(REV:01) RYOBI 48 Volt Lawn Mower Model No. RY14110 Replacement Parts List
 RYOBI 48 Volt Lawn Mower Model No. RY14110 Replacement Parts List") 9800-86 2-0-0 (REV:0) RYOBI 48 Volt Lawn Mower Model No. RY0 Replacement Parts List RYOBI RY0 48 volt lawn mower 3 38 39 44 39 36 34 36 42 38 39 3 4 37 34 3 43 2 32 0 8 9 2 4 33 8 7 6 3 6 7 22 8 20 3 30
9800-86 2-0-0 (REV:0) RYOBI 48 Volt Lawn Mower Model No. RY0 Replacement Parts List RYOBI RY0 48 volt lawn mower 3 38 39 44 39 36 34 36 42 38 39 3 4 37 34 3 43 2 32 0 8 9 2 4 33 8 7 6 3 6 7 22 8 20 3 30
Section 1: Listening and responding. Presenter: Niki Farfara MGTAV VCE Seminar 7 August 2016
 Section 1: Listening and responding Presenter: Niki Farfara MGTAV VCE Seminar 7 August 2016 Section 1: Listening and responding Section 1: Listening and Responding/ Aκουστική εξέταση Στο πρώτο μέρος της
Gruppo idraulico solare a singola via
 Gruppo idraulico a singola via per impianti solari termici ΣΥΓΚΡΟΤΗΜΑ ΚΥΚΛΟΦΟΡΗΤΗ ΜΟΝΗΣ ΓΡΑΜΜΗΣ ΓΙΑ ΗΛΙΑΚΑ ΣΥΣΤΗΜΑΤΑ ΒΕΒΙΑΣΜΕΝΗΣ ΚΥΚΛΟΦΟΡΙΑΣ Il Descrizione Περιγραφή gruppo di circolazione viene utilizzato
Surface Mount Aluminum Electrolytic Capacitors
 FEATURES CYLINDRICAL V-CHIP CONSTRUCTION LOW COST, GENERAL PURPOSE, 2000 HOURS AT 85 O C NEW EXPANDED CV RANGE (up to 6800µF) ANTI-SOLVENT (2 MINUTES) DESIGNED FOR AUTOMATIC MOUNTING AND REFLOW SOLDERING
Assalamu `alaikum wr. wb.
 LUMP SUM Assalamu `alaikum wr. wb. LUMP SUM Wassalamu alaikum wr. wb. Assalamu `alaikum wr. wb. LUMP SUM Wassalamu alaikum wr. wb. LUMP SUM Lump sum lump sum lump sum. lump sum fixed price lump sum lump
Bulletin 1489 UL489 Circuit Breakers
 Bulletin 489 UL489 Circuit Breakers Tech Data 489-A Standard AC Circuit Breaker 489-D DC Circuit Breaker 489-A, AC Circuit Breakers 489-D, DC Circuit Breakers Bulletin 489-A Industrial Circuit Breaker
(REV:01) RYOBI 48 Volt Lawn Mower Model No. RY14110A Replacement Parts List
 RYOBI 48 Volt Lawn Mower Model No. RY14110A Replacement Parts List") 9000-7 9-- (REV:0) RYOBI 4 Volt Lawn Mower Model No. RY0A Replacement Parts List RYOBI RY0A 4 VOLT LAWN MOWER 3 3 39 44 39 3 34 3 42 3 39 3 4 37 34 3 43 2 0 37 2 33 32 3 9 7 22 30 4 7 3 20 9 3 2 2 27 2
9000-7 9-- (REV:0) RYOBI 4 Volt Lawn Mower Model No. RY0A Replacement Parts List RYOBI RY0A 4 VOLT LAWN MOWER 3 3 39 44 39 3 34 3 42 3 39 3 4 37 34 3 43 2 0 37 2 33 32 3 9 7 22 30 4 7 3 20 9 3 2 2 27 2
Section 8.3 Trigonometric Equations
 99 Section 8. Trigonometric Equations Objective 1: Solve Equations Involving One Trigonometric Function. In this section and the next, we will exple how to solving equations involving trigonometric functions.
English 3 Italiano 6 Ελληνικά 10
 2 English 3 Italiano 6 Ελληνικά 10 3 5 3 4 6 2 ENGLISH English Intended use Your Black and Decker sandwich maker/healthy grill has been designed for making toasted sandwiches and grilling food as described
ES Owner s manual. Μετάφραση του πρωτοτύπου των οδηγιών χρήσης
 ES2700 Μετάφραση του πρωτοτύπου των οδηγιών χρήσης Owner s manual Οδηγίες Ασφάλειας Το μηχάνημα είναι σύμφωνο με τις οδηγίες ασφάλειας των ηλεκτρικών εργαλείων. Διαβάστε τις οδηγίες πριν να ξεκινήσετε
Daewoo Technopark A-403, Dodang-dong, Wonmi-gu, Bucheon-city, Gyeonggido, Korea LM-80 Test Report
 LM-80 Test Report Approved Method: Measuring Lumen Maintenance of LED Light Sources Project Number: KILT1212-U00216 Date: September 17 th, 2013 Requested by: Dongbu LED Co., Ltd 90-1, Bongmyeong-Ri, Namsa-Myeon,
Στο εστιατόριο «ToDokimasesPrinToBgaleisStonKosmo?» έξω από τους δακτυλίους του Κρόνου, οι παραγγελίες γίνονται ηλεκτρονικά.
 Διαστημικό εστιατόριο του (Μ)ΑστροΈκτορα Στο εστιατόριο «ToDokimasesPrinToBgaleisStonKosmo?» έξω από τους δακτυλίους του Κρόνου, οι παραγγελίες γίνονται ηλεκτρονικά. Μόλις μια παρέα πελατών κάτσει σε ένα
Αποτελέσματα έρευνας σε συνδικαλιστές
 From law to practice-praxis Αποτελέσματα έρευνας σε συνδικαλιστές Το πρόγραμμα συγχρηματοδοτείται από την ΕΕ Συγχρηματοδοτείται από την Ευρωπαϊκή Ένωση Γνωρίζετε τι προβλέπει η Οδηγία 2002/14; Sa che cosa
RE34. Gioco angolare in uscita. Backlash output shaft. Rapporti Ratios. Weight DIMENSIONI RIDUTTORE - GEAR DIMENSION
 RE34 1 0,8 1,2 95 5000 0,2 4 6,25 8 2 1,8 2,5 91 5000
Writing for A class. Describe yourself Topic 1: Write your name, your nationality, your hobby, your pet. Write where you live.
 Topic 1: Describe yourself Write your name, your nationality, your hobby, your pet. Write where you live. Χρησιμοποίησε το and. WRITE your paragraph in 40-60 words... 1 Topic 2: Describe your room Χρησιμοποίησε
Operating-instruction Manual ΟΔΗΓΙΕΣ ΧΡΗΣΕΩΣ
 Operating-instruction Manual ΟΔΗΓΙΕΣ ΧΡΗΣΕΩΣ 16 3 SPEED PEDESTAL FAN 16 ΑΝΕΜΙΣΤΗΡΑΣ ΟΡΘΟΣΤΑΤΗΣ 3 ΤΑΧΥΤΗΤΩΝ PLEASE READ ALL INSTRUCTIONS CAREFULLYAND KEEP FOR FUTURE USE ΠΑΡΑΚΑΛΩ ΔΙΑΒΑΣΤΕ ΤΙΣ ΟΔΗΓΙΕΣ ΧΡΗΣΗΣ
LR Series Metal Alloy Low-Resistance Resistor
 Tel : 881745 Fax : 881749 LR Series Metal Alloy LowResistance Resistor This specification is applicable to lead free, halogen free of RoHS directive for metal alloy lowresistance resistor. The product
Έλεγχος και Διασφάλιση Ποιότητας
 Έλεγχος και Διασφάλιση Ποιότητας Ενότητα 6: Κουππάρης Μιχαήλ Τμήμα Χημείας Εργαστήριο Αναλυτικής Χημείας General Successfully carry out the Preventive Maintenance Procedure and complete the Maintenance
Un calcolo deduttivo per la teoria ingenua degli insiemi. Giuseppe Rosolini da un università ligure
 Un calcolo deduttivo per la teoria ingenua degli insiemi Giuseppe Rosolini da un università ligure Non è quella in La teoria ingenua degli insiemi Ma è questa: La teoria ingenua degli insiemi { < 3} è
ΠΑΝΕΠΙΣΤΗΜΙΟ ΠΑΤΡΩΝ ΤΜΗΜΑ ΗΛΕΚΤΡΟΛΟΓΩΝ ΜΗΧΑΝΙΚΩΝ ΚΑΙ ΤΕΧΝΟΛΟΓΙΑΣ ΥΠΟΛΟΓΙΣΤΩΝ ΤΟΜΕΑΣ ΣΥΣΤΗΜΑΤΩΝ ΗΛΕΚΤΡΙΚΗΣ ΕΝΕΡΓΕΙΑΣ
 ΠΑΝΕΠΙΣΤΗΜΙΟ ΠΑΤΡΩΝ ΤΜΗΜΑ ΗΛΕΚΤΡΟΛΟΓΩΝ ΜΗΧΑΝΙΚΩΝ ΚΑΙ ΤΕΧΝΟΛΟΓΙΑΣ ΥΠΟΛΟΓΙΣΤΩΝ ΤΟΜΕΑΣ ΣΥΣΤΗΜΑΤΩΝ ΗΛΕΚΤΡΙΚΗΣ ΕΝΕΡΓΕΙΑΣ ιπλωµατική Εργασία του φοιτητή του τµήµατος Ηλεκτρολόγων Μηχανικών και Τεχνολογίας Ηλεκτρονικών
NMBTC.COM /
 Common Common Vibration Test:... Conforms to JIS C 60068-2-6, Amplitude: 1.5mm, Frequency 10 to 55 Hz, 1 hour in each of the X, Y and Z directions. Shock Test:...Conforms to JIS C 60068-2-27, Acceleration
1. Πως μειώνεται η ταχύτητα των καυσαερίων από το σημείο εξόδου τους στο ακροφύσιο εξόδου του κινητήρα? 2. Με ποιους τρόπους γίνεται η σήμανση της
 1. Πως μειώνεται η ταχύτητα των καυσαερίων από το σημείο εξόδου τους στο ακροφύσιο εξόδου του κινητήρα? 2. Με ποιους τρόπους γίνεται η σήμανση της επικίνδυνης περιοχής μπροστά από το κινητήρα? 3. Ποιοιείναιοικύκλοιασφαλείαςγύρωαπότοαεροσκάφοςκαιτιαντιπροσωπεύουν?
9.09. # 1. Area inside the oval limaçon r = cos θ. To graph, start with θ = 0 so r = 6. Compute dr
 9.9 #. Area inside the oval limaçon r = + cos. To graph, start with = so r =. Compute d = sin. Interesting points are where d vanishes, or at =,,, etc. For these values of we compute r:,,, and the values
ΕΛΛΗΝΙΚΗ ΔΗΜΟΚΡΑΤΙΑ Ανώτατο Εκπαιδευτικό Ίδρυμα Πειραιά Τεχνολογικού Τομέα. Ξενόγλωσση Τεχνική Ορολογία. Ενότητα: An Introduction to Tribology
 ΕΛΛΗΝΙΚΗ ΔΗΜΟΚΡΑΤΙΑ Ανώτατο Εκπαιδευτικό Ίδρυμα Πειραιά Τεχνολογικού Τομέα Ξενόγλωσση Τεχνική Ορολογία Ενότητα: An Introduction to Tribology Παναγιώτης Τσατσαρός Τμήμα Μηχανολόγων Μηχανικών ΤΕ Άδειες Χρήσης
3.4 SUM AND DIFFERENCE FORMULAS. NOTE: cos(α+β) cos α + cos β cos(α-β) cos α -cos β
 cos α + cos β cos(α-β) cos α -cos β") 3.4 SUM AND DIFFERENCE FORMULAS Page Theorem cos(αβ cos α cos β -sin α cos(α-β cos α cos β sin α NOTE: cos(αβ cos α cos β cos(α-β cos α -cos β Proof of cos(α-β cos α cos β sin α Let s use a unit circle
3.4 SUM AND DIFFERENCE FORMULAS Page Theorem cos(αβ cos α cos β -sin α cos(α-β cos α cos β sin α NOTE: cos(αβ cos α cos β cos(α-β cos α -cos β Proof of cos(α-β cos α cos β sin α Let s use a unit circle
Οι αδελφοί Montgolfier: Ψηφιακή αφήγηση The Montgolfier Βrothers Digital Story (προτείνεται να διδαχθεί στο Unit 4, Lesson 3, Αγγλικά Στ Δημοτικού)
") Οι αδελφοί Montgolfier: Ψηφιακή αφήγηση The Montgolfier Βrothers Digital Story (προτείνεται να διδαχθεί στο Unit 4, Lesson 3, Αγγλικά Στ Δημοτικού) Προσδοκώμενα αποτελέσματα Περιεχόμενο Ενδεικτικές δραστηριότητες
Οι αδελφοί Montgolfier: Ψηφιακή αφήγηση The Montgolfier Βrothers Digital Story (προτείνεται να διδαχθεί στο Unit 4, Lesson 3, Αγγλικά Στ Δημοτικού) Προσδοκώμενα αποτελέσματα Περιεχόμενο Ενδεικτικές δραστηριότητες
Metal thin film chip resistor networks
 Metal thin film chip resistor networks AEC-Q200 Compliant Features Relative resistance and relative TCR definable among multiple resistors within package. Relative resistance : ±%, relative TCR: ±1ppm/
Εγγύηση καλής λειτουργίας
 Εγγύηση καλής λειτουργίας Τα Smartphone Bitmore συνοδεύονται από Εγγύηση Καλής Λειτουργίας Δύο (2) Ετών. Please read carefully the Παρακαλούμε διαβάστε προσεκτικά τους όρους εγγύησης που συνοδεύουν το
First Sensor Quad APD Data Sheet Part Description QA TO Order #
 Responsivity (/W) First Sensor Quad PD Data Sheet Features Description pplication Pulsed 16 nm laser detection RoHS 211/65/EU Light source positioning Laser alignment ø mm total active area Segmented in
Operating Instructions and Parts Manual 14-inch Woodworking Band Saw Models JWBS-14SF and JWBS-14SF-3
 Operating Instructions and Parts Manual 14-inch Woodworking Band Saw Models JWBS-14SF and JWBS-14SF-3 Model #714500 shown JET 427 New Sanford Road LaVergne, Tennessee 37086 Part No. M-714500 Ph.: 800-274-6848
X815 X715. www.blackanddecker.co.uk
 www.blackanddecker.co.uk X815 X715 English 1. Spray button 2. Steam control dial 3. Steam burst button 4. Temperature control dial 5. Heating light 6. Heel rest 7. Self-clean button 8. Cord storage 9.
Model: RT33D6AAE. Compact Double Door Refrigerator. Owner s manual
 Model: RT33D6AAE Compact Double Door Refrigerator Owner s manual COPYRIGHT STATEMENT 2015 Hisense Company Ltd. All Rights Reserved. All material in this Owner's Manual is the property of Hisense Company
Other Test Constructions: Likelihood Ratio & Bayes Tests
 Other Test Constructions: Likelihood Ratio & Bayes Tests Side-Note: So far we have seen a few approaches for creating tests such as Neyman-Pearson Lemma ( most powerful tests of H 0 : θ = θ 0 vs H 1 :
Heat exchanger. Type WT. For the reheating of airflows in rectangular ducting PD WT 1. 03/2017 DE/en
 X X testregistrierung Heat exchanger Type For the reheating of airflows in rectangular ducting Rectangular hot water heat exchanger for the reheating of airflows, suitable for VAV terminal units Type TVR,
SFH-41 Fan Heater Αερόθερμο
 SFH-41 Fan Heater Αερόθερμο GB GR INSTRUCTION MANUAL ΒΙΒΛΙΟ ΟΔΗΓΙΩΝ GB ENGLISH... 3 GR EΛΛHNIKA... 7 ENGLISH PLEASE READ THESE INSTRUCTIONS CAREFULLY AND RETAIN FOR FUTURE REFER- ENCE SAFETY WARNINGS When
Smaller. 6.3 to 100 After 1 minute's application of rated voltage at 20 C, leakage current is. not more than 0.03CV or 4 (µa), whichever is greater.
, whichever is greater.") Low Impedance, For Switching Power Supplies Low impedance and high reliability withstanding 5000 hours load life at +05 C (3000 / 2000 hours for smaller case sizes as specified below). Capacitance ranges
Low Impedance, For Switching Power Supplies Low impedance and high reliability withstanding 5000 hours load life at +05 C (3000 / 2000 hours for smaller case sizes as specified below). Capacitance ranges
TMA4115 Matematikk 3
 TMA4115 Matematikk 3 Andrew Stacey Norges Teknisk-Naturvitenskapelige Universitet Trondheim Spring 2010 Lecture 12: Mathematics Marvellous Matrices Andrew Stacey Norges Teknisk-Naturvitenskapelige Universitet
Galatia SIL Keyboard Information
 Galatia SIL Keyboard Information Keyboard ssignments The main purpose of the keyboards is to provide a wide range of keying options, so many characters can be entered in multiple ways. If you are typing