GB F D E P GR ISTRUZIONI D USO INSTRUCTIONS FOR USE INSTRUCTIONS POUR L UTILISATION BETRIEBSANLEITUNG INSTRUCCIONES DE FUNCIONAMIENTO
|
|
|
- Καρπός Δραγούμης
- 9 χρόνια πριν
- Προβολές:
Transcript
1 Ballerina I GB F D E P GR Scopa elettrica ISTRUZIONI D USO Electric broom INSTRUCTIONS FOR USE Balai électrique INSTRUCTIONS POUR L UTILISATION Elektischer Staubsauger BETRIEBSANLEITUNG Escoba eléctrica INSTRUCCIONES DE FUNCIONAMIENTO Vassoura elétrica INSTRUÇÕES DE UTILIZAÇAÕ Ηλεκτρική σκούπα ΟΔΗΓΙΕΣ ΧΡΗΣΗΣ

2 230 V~ 50/60 Hz 1400 W p. m. 2

3 OPTIONAL 6 7 3
4 I AVVERTENZE GENERALI Conservate con cura il presente manuale e leggetene attentamente le avvertenze; esse forniscono importanti indicazioni riguardanti la sicurezza, l uso immediato e futuro dell apparecchio. Questo apparecchio, adatto per il solo uso domestico, dovrà essere destinato solo alla funzione per il quale è stato espressamente concepito. Ogni altro uso è da considerarsi improprio e pericoloso. Il costruttore non può essere considerato responsabile per eventuali danni derivanti da usi impropri, errati ed irragionevoli. L installazione dovrà essere effettuata secondo le prescrizioni del costruttore. Una errata installazione può causare danni a persone, animali, cose, il costruttore non può esserne ritenuto responsabile. La sicurezza delle apparecchiature elettriche è garantita solo se queste sono collegate ad un impianto elettrico provvisto di idonea messa a terra secondo quanto stabilito dagli attuali standard vigenti in materia di sicurezza elettrica. Gli elementi dell imballaggio (sacchetti in plastica, chiodi, polistirolo espanso, ecc.) non devono essere lasciati alla portata di bambini o incapaci in quanto rappresentano potenziali fonti di pericolo. Prima di collegare l apparecchio accertarsi che i dati di targa siano rispondenti a quelli della rete di distribuzione elettrica. In caso di incompatibilità tra la presa e la spina rivolgersi a personale qualificato per le necessarie operazioni di adeguamento. Non utilizzare adattatori, prese multiple e/o prolunghe. Qualora il loro uso si rendesse indispensabile utilizzare esclusivamente materiale conforme alle vigenti norme di sicurezza ed aventi requisiti di compatibilità con apparecchio e rete di distribuzione elettrica. Utilizzando l apparecchio per la prima volta, assicurarsi di aver tolto ogni etichetta o foglio di protezione. Se l apparecchio è dotato di prese d aria, assicurarsi che non vengano mai occluse nemmeno parzialmente. L uso di qualsiasi apparecchio elettrico comporta l osservanza di alcune regole fondamentali ed in particolare: Non immergere o bagnare l apparecchio; non usarlo vicino ad acqua, in vasca, nel lavello o in prossimità di altro recipiente con liquidi. Nel caso l apparecchio dovesse cadere accidentalmente in acqua NON cercare di recuperarlo ma innanzitutto togliere immediatamente la spina dalla presa di corrente. Successivamente portarlo in un centro assistenza qualificato per i necessari controlli. Durante l uso, l apparecchio deve essere lontano da qualsiasi oggetto o sostanza infiammabile od esplosiva. Non toccare l apparecchio con mani bagnate o umide. Non usare l apparecchio a piedi nudi. Non tirare l apparecchio o il cavo per staccare la spina dalla presa. Non lasciare l apparecchio esposto ad agenti atmosferici (pioggia, sole). Si raccomanda di tenere l apparecchio fuori dalla portata di bambini od incapaci e di non permetterne loro l utilizzo. Scollegare la spina dalla presa di corrente quando l apparecchio non viene utilizzato e prima di effettuare qualsiasi operazione di pulizia o manutenzione. Il cavo di alimentazione deve essere srotolato per tutta la sua lunghezza al fine di evitarne il surriscaldamento. Il cavo di alimentazione non deve essere avvicinato a fonti di calore e/o superfici taglienti. In caso di cavo di alimentazione danneggiato, provvedere alla sostituzione che deve 4

5 essere effettuata da personale qualificato. In caso di guasto e/o cattivo funzionamento spegnere l apparecchio e rivolgersi a personale qualificato. Eventuali manomissioni o interventi effettuati da personale non qualificato fanno decadere i diritti di garanzia. Per pulire l apparecchio usare solo un panno morbido e non abrasivo. Quando l apparecchio, risulta inutilizzabile e si desidera eliminarlo, asportarne i cavi e smaltirlo presso un ente qualificato al fine di non contaminare l ambiente. Se nel prodotto vi sono parti in vetro, queste non sono coperte da garanzia. ATTENZIONE: Le parti in plastica del prodotto non sono coperte da garanzia. Il simbolo sul prodotto o sulla confezione indica che il prodotto non deve essere considerato come un normale rifiuto domestico, ma deve essere portato nel punto di raccolta appropriato per il riciclaggio di apparecchiature elettriche ed elettroniche. Provvedendo a smaltire questo prodotto in modo appropriato, si contribuisce a evitare potenziali conseguenze negative per l ambiente e per la salute, che potrebbero derivare da uno smaltimento inadeguato del prodotto. Per informazioni più dettagliate sul riciclaggio di questo prodotto, contattare l ufficio comunale, il servizio locale di smaltimento rifiuti o il negozio in cui è stato acquistato il prodotto. ATTENZIONE: I danni del cavo di alimentazione, derivanti dall usura non sono coperti da garanzia; l eventuale riparazione sarà pertanto a carico del proprietario ATTENZIONE: Se si rendesse necessario portare o spedire l apparecchio al centro assistenza autorizzato, si raccomanda di pulirlo accuratamente in tutte le sue parti. Se l apparecchio risultasse anche minimamente sporco o incrostato o presentasse depositi di cibo, depositi calcarei, depositi di polvere o altro; esternamente o internamente: per motivi igenico-sanitari, il centro assistenza respingerà l apparecchio stesso senza visionarlo. 5

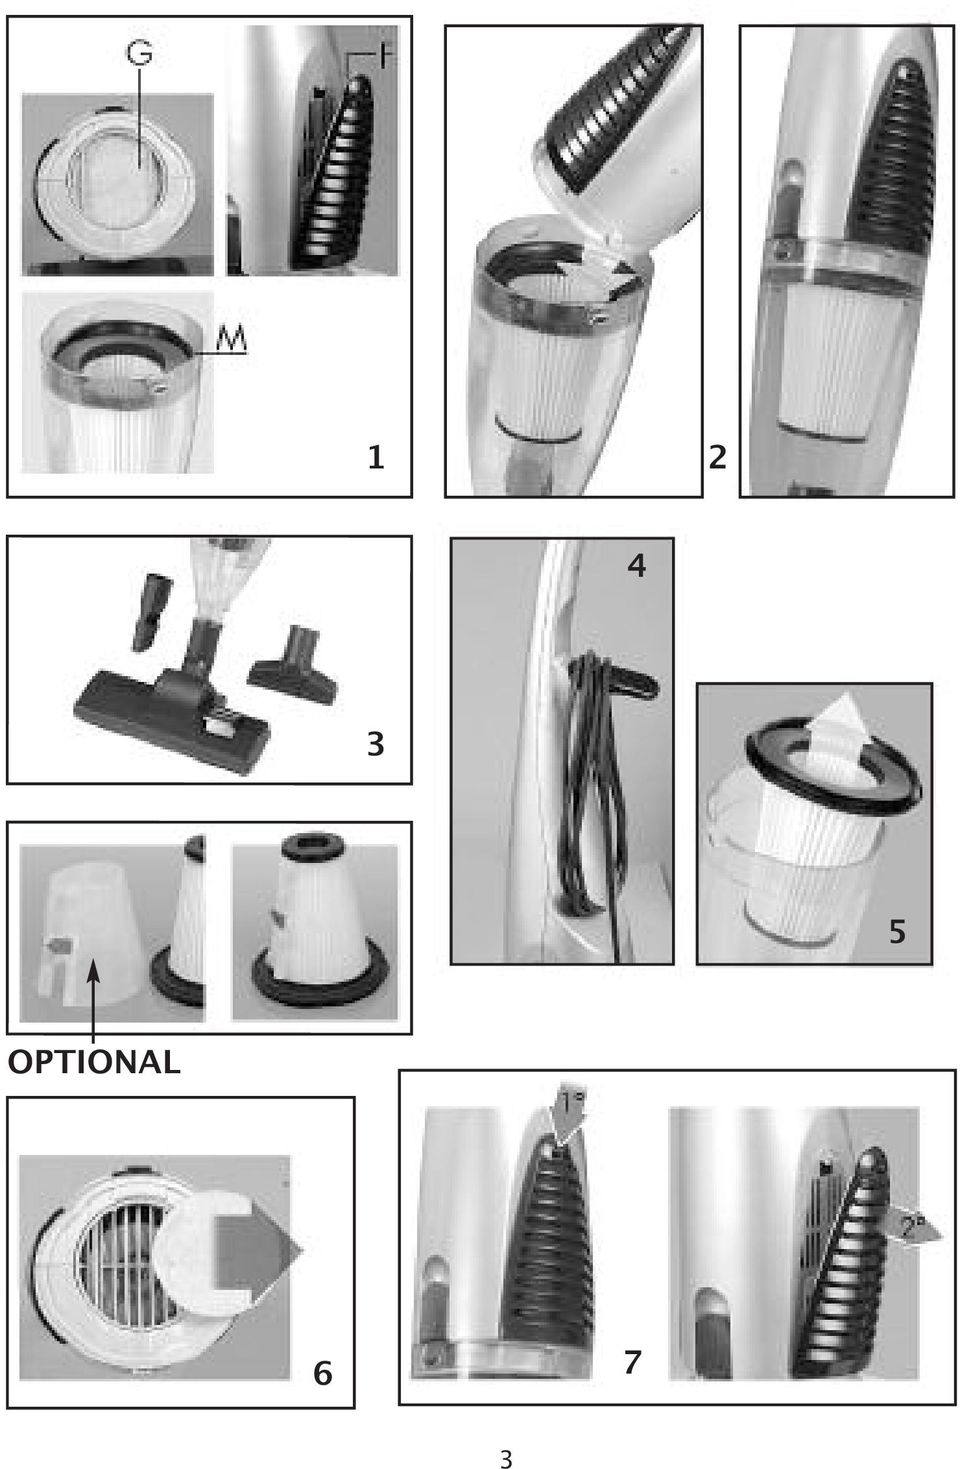
6 AVVERTENZE PARTICOLARI Non aspirate mai corpi incandescenti (tizzoni o ceneri ardenti, mozziconi accesi), sostanze liquide, solventi, infiammabili, esplosive (benzine, alcool, diluenti), polveri dannose alla salute e neppure corpi appuntiti. Non utilizzate mai l'apparecchio in ambienti saturi di gas. Non tenete mai la parte aspirante dell'apparecchio vicino ad occhi, orecchie, naso o capelli. In caso di malfunzionamento, o rottura di parti, portate l'apparecchio presso un Centro di assistenza autorizzato. Controllate che tutti i filtri siano posizionati correttamente nelle loro sedi. Non fate mai funzionare l apparecchio senza i medesimi. COMPONENTI A. Semicorpo inferiore B. Semicorpo superiore C. Interruttore di accensione/spegnimento D. Gancio porta filo E. Griglie porta filtri laterali F. Filtri laterali G. Filtro motore H. Griglietta ferma filtro motore M.Filtro HEPA K. Chiusura frontale X. Dentello semicorpo B Y. Alloggiamento per x O. Lancia, concentra l aspirazione, per pulire angoli e fessure. P. Bocchetta per imbottiti, divani, pareti. Q. Bocchetta multifunzionale, con selettore a pedale per pavimenti lisci o tappeti e moquette. ISTRUZIONI D'USO Estrarre dalla confezione le componenti della scopa elettrica. 1. Controllare sul semicorpo B, la presenza dei filtri laterali e del filtro motore. Controllare nel semicorpo A, la presenza del filtro HEPA M. Nel caso mancasse anche solo uno di questi filtri, rivolgersi ad un centro assistenza autorizzato. Non far funzionare la scopa elettrica se priva anche di un solo filtro. 2. Unire i due semicorpi A-B. incastrando il dentello X del semicorpo B nell alloggiamento Y del semicorpo A e bloccare con la chiusura frontale K. 3. Inserire a fondo sull'apparecchio l accessorio più idoneo al lavoro da svolgere. 4. Ruotare verso il basso il gancio D situato sul retro dell'impugnatura, srotolando completamente il cavo ed inserire la spina in una presa elettrica idonea a riceverla. Ora, agendo sul tasto di accensione C è possibile attivare l'aspirazione di sostanze solide. Non aspirare liquidi o altri materiali dannosi! Terminato ogni uso si consiglia di svuotare lo sporco raccolto nel semicorpo A prima di riporre l apparecchio: operazione da effettuare con apparecchio spento e spina disinserita dalla rete elettrica. Sollevare la chiusura frontale K per separare i 2 semicorpi A-B. 5. Estrarre il filtro HEPA M dal semicorpo A. Rovesciare il semicorpo A per svuotare lo sporco raccolto e ripulirlo sia esternamente che internamente. Rimontare accuratamente l apparecchio prima di riporlo. Se il tempo di utilizzo arriva a 15 minuti, spegnere l apparecchio e lasciar riposare il motore per almeno 5 minuti prima di riaccenderlo. Periodicamente pulire tutti i filtri dell apparecchio e se danneggiati sostituirli, tale 6

7 operazione è da effettuare con apparecchio spento e spina disinserita dalla rete elettrica come spiegato di seguito. PULIZIA del filtro motore G 6. Estrarre il filtro G dalla griglia Z Lavarlo con acqua corrente e asciugarlo. Riposizionatelo. Non fate mai funzionare l'apparecchio senza questo filtro! PULIZIA dei semicorpi A e B Operazione da effettuare con apparecchio spento e spina disinserita dalla rete elettrica. Utilizzare un panno morbido non abrasivo e asciutto. Non adatta ad aspirare polveri fini. PULIZIA o sostituzione dei filtri laterali F 7. Sganciare la griglia E premendo sul gancio. Asportare i filtri F. Lavarli e asciugarli accuratamente. Riposizionarli nelle griglie E rimettere in posizione la griglia E, prima inserendola nell'innesto inbasso e poi bloccandola a pressione con il gancio. Attenzione: rimontare il filro/griglia destro a destra e il filro/griglia sinistro a sinistra. PULIZIA del filtro HEPA M Estrarre il filtro M. Ripulirlo per ripristinare le caratteristiche di filtratura iniziali. Se necessario è possibile lavarlo con acqua corrente. Asciugarlo accuratamente e riposizionarlo. Non fate mai funzionare l'apparecchio senza questo filtro! Nel riposizionamento del filtro, fare attenzione al verso di ingresso di questo nel semicorpo A. Non essendo simmetrico, solo un verso permetterà il corretto montaggio. 7

8 GB GENERAL SAFETY REQUIRE- MENTS Carefully read the requirements in this manual and keep in a safe place. It contains important instructions on the safety, use and future of your appliance. This appliance is only for domestic use and must only to be used for the purpose it was specifically designed. Any other use is considered improper and dangerous. The manufacturer cannot be held responsible for any damages caused by improper, incorrect and negligent use. The installation must be carried out according to the manufacturer s instructions. The manufacturer shall not be held responsible for any damages to people, animals or objects caused by incorrect installation. The safety of the electrical equipment is only guaranteed if it is connected to an electrical installation equipped with a suitable earthing system in compliance with the current standards on electrical safety. Do not leave parts of packaging (plastic bags, foam polystyrene, nails, etc) within reach of children or incapacitated people since they are potential sources of danger. Before connecting the appliance, check that the technical data on the rating label corresponds to those of the main electricity network. In case of incompatibility between the outlet and the plug, contact a qualified electrician for the necessary adjustments. Do not use adaptors, multiple plugs and extension leads. However, if absolutely necessary only use materials that conform to the current safety standards and that are compatible with the appliance and the main electricity network. On using the appliance for the first time, remove any labels or protective sheets. If the appliance is equipped with air inlets, make sure they are never blocked not even partially. The use of any electrical appliance involves the observance of some fundamental rules. In particular: Do not immerge the appliance in water and do not wet; do not use it near water, in the tub, washbasin or near other recipients with liquids. If the appliance should accidentally fall in water, DO NOT try to touch it but immediately disconnect the plug from the mains power. Then bring it to an authorised service centre for the necessary controls. During use, the appliance must be kept away from any inflammable objects or substances or explosives. Do not touch the appliance with wet hands or feet. Do not use the appliance with bare feet. Do not pull on the power cord or on the appliance itself to disconnect the plug from the power outlet. Do not leave the appliance exposed to atmospheric agents (sun, rain ) Keep the appliance out of reach of children or incapacitated people and do not let them use it. Disconnect the plug from the power outlet when the appliance is not being used and before carrying out any cleaning or maintenance. The power cord must be completely unwound to prevent it from overheating. The power cord must be kept away from heat sources and/or sharp edges. If power cord is damaged, have it replaced by qualified personnel. Switch off and contact a qualified technician if the appliance should breakdown and/or not function properly. Any tampering or interventions executed by unqualified people will cancel the guarantee. 8

9 Use a soft and non-abrasive cloth to clean the appliance. When the appliance is unserviceable and must be eliminated, remove its cords and dispose of it at an authorised disposal centre in order to protect the environment. Warranty does not cover any glass parts of the product. ATTENTION: The damages of the power supply cord, originate by the wear aren t covered by guarantee; the repair will be in charge to the owner. ATTENTION: Warranty does not cover any plastic parts of the product The symbol on the product or on its packaging indicates that this product may not be treated as household waste. Instead it shall be handed over to the applicable collection point for the recycling of electrical and electronic equipment. By ensuring this product is disposed of correctly, you will help prevent potential negative consequences for the environment and human health, which could otherwise be caused by inappropriate waste handling of this product. For more detailed information about recycling of this product, please contact your local city office, your household waste disposal service or the shop where you purchased the product. ATTENTION: If the need should arise to take or send the appliance to an authorised service centre, make sure to clean all its parts thoroughly. For hygienic purposes, the service centre shall reject appliances that are not perfectly clean on the outside or inside without making any controls or repairs. 9

10 SPECIAL SAFETY REQUIREMENTS Never vacuum burning objects (embers or hot ashes, lit cigarette stubs), liquids, solvents, inflammable substances, explosives (petrol, alcohol, dilutents), harmful powders or sharp objects. Never use the appliance in environments saturated with gas. Never keep the vacuuming part of the appliance near the eyes, ears, nose or hair. In case of malfunctioning or broken parts, take the appliance to an authorised service centre. Check that all the filters are correctly positioned in their lodgings. Never start the machine without them. PARTS A. Lower body-half B. Upper body-half C. ON/OFF button D. Filter door hook E. Side filter holder grills F. Side filters G. Motor filter H. Motor filter stopping grill M.HEPA filter K. Front closure X. Body-half (B) tooth Y. Slot for X O. Nozzle it concentrates the vacuuming process. Useful to clean angles and recesses. P. Multi-use nozzle to clean walls, sofas, etc. Q. Multifunction nozzle, with pedal selector for floors, carpets and wall-to-wall carpeting INSTRUCTIONS FOR USE Remove the parts of the electric broom from the packaging. 1. Check that the side filters and motor filter are present on the upper body-half (B) Check that the HEPA filter (M) is present on the lower body-half (A). Contact an authorised Service Centre if only one of these filters is missing. Do not start the electric broom if one of these filters is missing. 2. Join the two body halves (A and B) by inserting the tooth (X) of the body-half (B) in to the slot (Y) of the other body-half (A). Block into place with the front closure (K). 3. Attach the accessory most suitable to the work that needs to be carried out at the end of the appliance. 4. Turn the hook (D) located on the back of the handle downwards, completely unwind the cord and insert the plug into a compatible power outlet. Now, turn on the appliance via the ON button to vacuum solid substances. Do not vacuum liquids or other harmful materials! After each use, empty the dirt collected in the body half (A) before replacing the appliance: this operation must be carried out with the appliance OFF and the plug disconnected from the power outlet. Raise the front closure (K) to separate the two halves (A and B). 5. Remove the HEPA filter (M) from the body half (A). Turn the body half (A) upside down to empty the dirt collected and clean the outside and inside. Accurately reassemble the appliance before storing it away. If the operating time reaches 15 minutes, turn off the appliance and let the motor rest for at least 5 minutes before restarting it. Periodically clean all the filters of the appliance and if damaged, replace. This operation must be carried out with the appliance OFF and disconnected from the electrical network as explained below. 10

11 CLEANING the motor filter (G) 6. Extract the filter (G) from the grill (Z). Wash it with running water and dry. Replace it. Never operate the appliance without this filter! CLEANING or replacing the side filters (F) 7) Release the grill (E) by pressing on the hook. Remove the filters (F). Wash them and dry thoroughly. Replace them in the grill (E). Reposition the grill (E) before inserting it into the lower coupling and then block it by pressing down on the hook. Attention: Reassemble the right filter/grill in the right side and the left filter/grill in the left side. CLEANING the filter HEPA (M) Remove the filter (M). Clean it to restore the initial filtering characteristics. If necessary, wash with running water. Dry thoroughly and replace. Never operate the appliance without this filter! When replacing the filter, pay attention to the direction of the insertion of this bodyhalf (A). Since it is not symmetrical, it can only be assembled in one direction. CLEANING the body halves (A and B) This operation must be carried out with the appliance OFF and the plug disconnected from the power outlet. Use a non-abrasive soft and dry cloth. Not suitable for vacuum fine dust. 11
 Remove the filter (M).")
12 F AVERTISSEMENTS GÉNÉRAUX Conservez avec soin cette notice et lisez en attentivement les avertissements: ils fournissent d importantes indications au sujet de la sécurité et de l utilisation immédiate et future de l appareil. Cet appareil, adapté à l usage domestique, ne devra être destiné qu à la fonction pour laquelle il a été expressément créé. Toute autre utilisation doit être considérée impropre et dangereuse. Le constructeur ne peut être considéré responsable pour les éventuels dommages dérivant d utilisations impropres, incorrectes et déraisonnables. L installation devra être effectuée selon les prescriptions du constructeur. Une installation incorrecte peut causer des dommages aux personnes, aux animaux et aux choses ; le constructeur ne peut pas en être considéré responsable. La sécurité des appareillages électriques n est garantie que s ils sont branchés à une installation électrique munie de mise à la terre conformément aux standards en vigueur en matière de sécurité électrique. Les éléments d emballage (sachets en plastique, clous, polystyrol expansé, etc.) ne doivent pas être laissés à la portée des enfants ou des handicapés mentaux étant donné qu ils s agit de sources potentielle de danger. Avant de brancher l appareil, s assurer que les données de la plaquette correspondent à celle du réseau de distribution électrique. En cas d incompatibilité entre la prise et la fiche, s adresser à du personnel qualifié pour les opérations d adaptations appropriées. Ne pas utiliser d adaptateurs, de prises multiples et/ou de rallonges. Si leur emploi devait être indispensable, n utiliser que du matériel conforme aux normes de sécurité en vigueur et ayant des caractéristiques compatibles avec l appareil et le réseau de distribution électrique. Lors de la première utilisation de l appareil, s assurer d avoir enlevé toute étiquette ou feuille de protection. Si l appareil est muni de prises d air, s assurer qu elles ne soient jamais bouchées même partiellement. L utilisation de tout appareil électrique implique le respect de certaines règles fondamentales et en particulier: Ne pas plonger dans l eau ou mouiller l appareil, ne pas l utiliser près de l eau, dans la baignoire, dans le lavabo ou à proximité d un autre récipient avec des liquides. Si l appareil devait tomber dans l eau ou même seulement être mouillé, N essayez PAS de le récupérer mais avant tout débranchez immédiatement la fiche de la prise de courant. Successivement le confier à un service d assistance après-vente pour les contrôles nécessaires. Pendant l utilisation, l appareil doit rester loin de tout objet ou substance inflammable ou explosive. Ne pas toucher l appareil avec les mains mouillées ou humides. Ne pas utiliser l appareil pieds nus. Ne pas tirer l appareil ou le câble pour débrancher la fiche de la prise. Ne pas laisser l appareil exposé aux agents atmosphériques (pluie, soleil). On recommande de garder l appareil hors de la portée des enfants ou des handicapés mentaux et ne pas les autoriser à l utiliser. Débrancher la fiche de la prise de courant quand l appareil n est pas utilisé et avant d effectuer toute opération de nettoyage ou d entretien. Le câble d alimentation doit être déroulé sur toute sa longueur afin d en éviter la surchauffe. Le câble d alimentation ne doit pas être approché de sources de chaleur et/ou surfaces coupantes. Si le câble d alimentation est endommagé, son remplacement doit être fait par du personnel qualifié. En cas de panne et/ou de mauvais fonctionnement, éteindre l appareil et s adresser à du personnel qualifié. Les éventuelles manipulations ou interven- 12

13 tions effectuées par du personnel non qualifié annulent les droits de garantie. Pour nettoyer l appareil n utiliser qu un chiffon humide et non abrasif. Quand l appareil est inutilisable et l on veut le jeter, enlever les câbles et le remettre à une structure qualifiée à cet effet afin de ne pas contaminer la nature. Les parties en verre éventuellement présentes dan le produit ne sont pas couvertes par la garantie. ATTENTION: Les endommagements du câbles d alimentation dérivant de l usure ne sont pas couverts par la garantie; l éventuelle réparation sera donc à la charge du propriétaire. ATTENTION: Les parties en plastique du produit ne sont pas couvertes par la garantie. Le symbole sur le produit ou son emballage indique que ce produit ne peut être traité comme déchet ménager. Il doit plutôt être remis au point de ramassage concerné, se chargeant du recyclage du matériel électrique et électronique. En vous assurant que ce produit est éliminé correctement, vous favorisez la prévention des conséquences négatives pour l environnement et la santé humaine qui, sinon, seraient le résultat d un traitement inapproprié des déchets de ce produit. Pour obtenir plus de détails sur le recyclage de ce produit, veuillez prendre contact avec le bureau municipal de votre région, votre service d élimination des déchets ménagers ou le magasin où vous avez acheté le produit. ATTENTION: S il est nécessaire d amener ou d expédier l appareil au centre d assistance agréé, nous recommandons de nettoyer soigneusement toutes ses parties. Si l appareil est sale, même légèrement, ou si des dépôts d aliments, calcaires, de poussière ou autre s y trouvent, à l extérieur ou à l intérieur: pour des raisons hygiéniques et sanitaires, le centre d assistance refusera l appareil sans même l examiner. 13

14 AVERTISSEMENTS PARTICULIERS N aspirez jamais de corps incandescents (braises ou cendres ardentes, mégots allumés), de substances liquides, solvantes, inflammables, explosives (essences, alcool, diluants), de poudres nocives pour la santé, ni de corps pointus. Ne jamais utiliser l appareil dans des lieux saturés de gaz. Ne jamais garder la partie aspirante de l appareil près des yeux, des oreilles, du nez ou des cheveux. En cas de dysfonctionnement ou de rupture de pièces, amenez l appareil dans un Centre d assistance après-vente agréé. Contrôlez que tous les filtres sont correctement placés dans leur siège. Ne jamais faire fonctionner l appareil sans ceux-ci. COMPOSANTS A. demi-corps inférieur B. Demi-corps supérieur C. Interrupteur d allumage/extinction D. Crochet porte-fil E. Grilles porte-filtres latérales F. Filtre latéraux G. Filtre moteur H. Petite grille de fixation filtre moteur M.Filtre HEPA K. Fermeture frontale X. Dent du demi-corps B Y. Logement pour x O. Suceur long pour concentrer l aspiration et nettoyer les angles et les recoins. P. Suceur multi-usage pour nettoyer parois, divans, fauteils, etc. Q. Embout multifonction, avec sélecteur à pédale pour planchers lisses ou tapis ou moquette. INSTRUCTIONS D EMPLOI Extraire de l emballage les composants de l aspirateur balai. 1. Contrôler sur le demi-corps B, la présence des filtres latéraux et du filtre moteur. Contrôler dans le demi-corps A, la présence du filtre HEPA M. En cas d absence d un de ces filtres, s adresser à un Service après-vente agréé. Ne pas faire fonctionner l aspirateur balai même s il n en manque qu un. 2. Unir les deux demi-corps A-B. en emboîtant la dent X du demi-corps B dans le logement Y du demi-corps A et bloquer la fermeture frontale K. 3. Introduire à fond sur l appareil l accessoire plus approprié au travail à effectuer. 4. Tourner vers le bas le crochet D situé sur l arrière de la poignée, en déroulant complètement le câble et introduire la fiche dans une prise électrique appropriée. L aspiration de substances solides peut maintenant avoir lieu en agissant sur le bouton d allumage C. Ne pas aspirer de liquides ou de matières dangereuses! Une fois l utilisation terminée, il est conseillé de vider la saleté recueillie dans le demi-corps A avant de ranger l appareil. cette opération doit être faite avec l appareil éteint et la fiche débranchée. Soulever la fermeture frontale K pour séparer les 2 demi-corps A-B. 5. Extraire le filtre HEPA M du demi-corps A. Renverser le demi-corps A pour vider la saleté recueillie et le nettoyer à l extérieur et à l intérieur. Remonter soigneusement l appareil avant de le ranger l appareil. Si le temps d utilisation arrive à 15 minutes, éteindre l appareil et laisser reposer le moteur pendant au moins 5 minutes avant de le rallumer. Périodiquement, nettoyer les filtres de l appareil et, s ils sont endommagés, les 14

15 remplacer; cette opération doit être faite avec l appareil éteint et la fiche débranchée du secteur, comme cela est expliqué plus loin. NETTOYAGE du filtre moteur G 6. Extraire le filtre G de la grille Z. Le laver à l eau courante et l essuyer. Le replacer. Ne jamais faire fonctionner l appareil sans ce filtre! NETTOYAGE des semi-corps A et B Opération doit être faite avec l appareil éteint et la fiche débranchée du secteur. Utiliser un chiffon souple non abrasif et sec. Ne convient pas pour la poussière sous vide fines. NETTOYAGE ou remplacement des filtres latéraux F 7. Décrocher la grille E en appuyant sur le crochet. Enlever les filtres F. Les laver et les essuyer soigneusement. Les replacer dans les grilles E. remettre la grille E en place, en l emboîtant d abord en bas et ensuite en la bloquant par pression avec le crochet. Attention: remonter le filtre/grille droit à droite et le filtre/grille gauche à gauche. NETTOYAGE du filtre HEPA M Extraire le filtre M. Le nettoyer pour rétablir les caractéristiques de filtrage initiales. Si nécessaire, le laver sous l eau courante. L essuyer soigneusement et le replacer. Ne jamais faire fonctionner l appareil sans ce filtre! Lors du repositionnement du filtre, faire attention au sens d introduction de celuici dans le demi-corps A. Puisqu il n est pas symétrique, le montage correct ne sera possible que dans un seul sens. 15

16 D ALLGEMEINE HINWEISE Das vorliegende Handbuch sorgfältig aufbewahren und alle Hinweise aufmerksam lesen; sie liefern wichtige Angaben betreffend die Sicherheit, die sofortige und zukünftige Benutzung des Gerätes. Dieses Gerät, das nur für den Hausgebrauch gedacht ist, darf nur zu den Zwecken benutzt werden, für die es ausdrücklich vorgesehen ist. Jede andere Benutzung ist als ungeeignet und gefährlich zu betrachten. Der Hersteller kann nicht verantwortlich gemacht werden für eventuelle Schäden, die durch ungeeignete, falsche oder unvernünftige Benutzung entstehen. Die Installierung muss nach den Vorschriften des Herstellers erfolgen. Eine falsche Installierung kann Schäden an Personen, Tieren und Sachen verursachen, für die der Hersteller nicht verantwortlich gemacht werden kann. Die Sicherheit der Elektrogeräte ist nur gewährleistet, wenn diese an ein entsprechend geerdetes Netz angeschlossen sind, wie durch die heute gültigen Sicherheitsvorschriften für Elektrogeräte festgelegt ist. Das Verpackungsmaterial (Plastikbeutel, Nägel, Schaumpolystyrol usw.) dürfen nicht Kindern oder Behinderten zugänglich aufbewahrt werden, da sie potentielle Gefahrenquellen darstellen. Vor dem Anschliessen des Gerätes sollte sich vergewissert werden, dass die auf dem Schild angegebenen Daten denen des Stromnetzes entsprechen. Sollten Steckdose und Stecker nicht zusammenpassen, muss für die notwendigen Anpassungsarbeiten Fachpersonal hinzugezogen werden. Keine Adapter, Mehrfachsteckdosen und/oder Verlängerungen benutzen. Sollte es für die Benutzung unvermeidbar sein, nur Material verwenden, das den gültigen Sicherheitsvorschriften entspricht und die Voraussetzung der Übereinstimmung zwischen Gerät und Stromnetz hat. Bei der erstmaligen Benutzung des Gerätes sich vergewissern, dass alle Aufkleber und Schutzfolien entfernt worden sind. Wenn das Gerät mit Luftansaugöffnungen versehen ist, dafür sorgen, dass diese auch nicht teilweise abgedichtet werden. Die Benutzung jedes Elektrogerätes erfordert die Beachtung einiger Grundregeln, und insbesondere: Das Gerät nicht in Wasser tauchen oder nass werden lassen; nicht benutzen in der Nähe der Badewanne, des Waschbeckens oder eines anderen mit Flüssigkeit gefüllten Behälters. Sollte das Gerät ungewollt ins Wasser fallren, NICHT versuchen, es herauszunehmen, sondern unverzüglich den Stecker aus der Steckdose ziehen. Anschliessend in eine Kundendienstwerkstatt bringen, um die notwendigen Kontrollen ausführen zu lassen. Während der Benutzung muss das Gerät von jedem entflammbaren oder explosiven Gegenstand oder Substanz entfernt gehalten werden. Das Gerät nicht mit nassen oder feuchten Händen berühren. Das Gerät nicht barfuss benutzen. Zum Herausziehen des Steckers nicht an dem Gerät oder dem Kabel ziehen. Das Gerät keinen Witterungseinflüssen (Regen, Sonne) ausgesetzt lassen. Es wird empfohlen, das Gerät für Kinder oder Behinderte unzugänglich aufzubewahren nd diesen nicht die Benutzung zu erlauben. Bei Nichtbenutzung des Gerätes und vor dem Ausführen irgendwelcher Reinigungsarbeiten den Stecker aus der Steckdose ziehen. Das Speisungskabel muss über die ge- 16

17 samte Länge abgewickelt sein, m dessen Überhitzung zu vermeiden. Das Speisungskabel darf nicht in der Nähe von Hitzquellen und/oder scharfenkantigen Oberflächen verlaufen. Im Falle eines beschädigten Kabels soll der Austausch durch qualifiziertes Personal erfolgen. Im Falle eines Schadens und/oder eines gestörten Betriebes das Gerät abschalten und sich an Fachpersonal wenden. Eventuelle Handhabungen oder Eingriffe, die von nicht qulifiziertem Personal ausgeführt wurden, führen zum Verfall des Garantierechts. Zum Reinigen des Gerätes nur ein weiches Tuch und keine reibende Substanz verwenden. Wenn sich das Gerät als nicht mehr benutzbar erweist und man es entsorgen möchte, die Kabel abnehmen und es durch ein qualifiziertes Unternehmen entsorgen lassen, um nicht die Umwelt zu belasten. Wenn in dem Produkt Teile aus Glas vorhanden sind, fallen diese nicht unter die Garantie. ACHTUNG: Die aus Kunststoff hergestellten Teile des Produktes fallen nicht unter die Garantie. ACHTUNG: Sollte es notwendig sein, das Gerät zu einer Kundendienstwerkstatt bringen oder senden zu müssen, wird eine sorgfältige Reinigung aller Teile empfohlen. Sollte das Gerät auch nur minimal verschmutzt oder verkrustet sein oder Ablagerungen von Speiseresten, Kalk, Staub oder anderes aufweisen; ob aussen oder innen, wird das Gerät vom Kundendienst ohne es zu prüfen aus hygienischen Gründen zurückgewiesen. Das Symbol auf dem Produkt oder seiner Verpackung weist darauf hin, dass dieses Produkt nicht als normaler Haushaltsabfall zu behandeln ist, sondern an einem Sammelpunkt für das Recycling von elektrischen und elektronischen Geräten abgegeben werden muss. Durch Ihren Beitrag zum korrekten Entsorgen dieses Produkts schützen Sie die Umwelt und die Gesundheit Ihrer Mitmenschen. Umwelt und Gesundheit werden durch falsches Entsorgen gefährdet. Weitere Informationen über das Recycling dieses Produkts erhalten Sie von Ihrem Rathaus, Ihrer Müllabfuhr oder dem Geschäft, in dem Sie das Produkt gekauft haben. ACHTUNG: Die durch Verschleiss verursachten Beschädigungen des Speisungskabels sind nicht in der Garantie enthalten; die eventuelle Reparatur geht daher zu Lasten des Eigentümers. 17

18 BESONDERE HINWEISE Niemals brennende Gegenstände ansaugen (Kohlestücke oder glühende Asche, brennende Zigarettenstummel), flüssige Substanzen, Lösungsmittel, entflammbare, esplosive Substanzen (Benzin, Alkohol, Verdünner), gesundheitsschädlichen Staub und auch keine spitzen Körper. Das Gerät niemals in mit Gas angereicherten Räumen verwenden. Den Ansaugteil nicht in die Nähe der Augen, Ohren, Nase oder Haare bringen. Im Falle von Betriebsstörungen oder Bruch von Teilen das Gerät zu einem Vertragskundendienst bringen. Überprüfen, ob alle Filter korrekt in ihre Sitze eingesetzt sind. Das Gerät niemals ohne diese in Betriebs nehmen. BESTANDTEILE A. Untere Hälfte B. Obere Hälfte C. Schalter zum Ein- und Ausschalten D. Kabelhaken E. Bitter seitliche Filterhalterungen F. Seitliche Filter G. Motorfilter H. Haltegitter Motorfilter M.HEPA Filter K. Vorderer Verschluss X. Zahn an Hälfte B Y. Aufnahme für X O. Saugstab konzentriert die Ansaugkraft, nützlich zum Reinigen von Ecken und Schlitzen. P. Universalstutzen zum Reinigen von Wänden, Polstermöbeln usw. Q. Mehrfunktionsstutzen, mit Fusschalter für glatte Fussböden oder Teppiche und Bodenbeläge. BETRIEBSANLEITUNG Die Teile des Staubsaugers aus der Verpackung nehmen. 1. An der Hälfte B das Vorhandensein der seitlichen Filter und des Motorfilters kontrollieren. An der Hälfte A das Vorhandensein des HEPA Filters M kontrollieren. Falls auch nur einer dieser Filter fehlen sollte, bitte sich an einen Vertragskundendienst wenden. Den Staubsauger nicht in Betrieb nehmen, wenn auch nur einer diesel Filter fehlt. 2. Die beiden Hälften A-B zusammensetzen, wobei der Zahn X der Hälfte B in die Aufnahme Y der Hälfte A eingesetzt wird, und mit dem vorderen Verschluss K feststellen. 3. Unten an dem Gerät das für die auszuführenden Arbeiten geeignete Zubehör anbringen. 4. Den Haken D nach unten drehen, der sich an der Rückseite des Griffes befindet, das Kabel vollständig abwickeln und den Stecker in eine geeignete Steckdose stecken. Nun ist es durch das Betätigen der Taste C möglich, mit dem Ansaugen von festen Substanzen zu beginnen. Keine Flüssigkeiten oder andere schädliche Materialien ansaugen! Es wird empfohlen, nach jeder Benutzung den in der Hälfte A angesammelten Schmutz zu entfernen, bevor das Gerät fortgestellt wird: dies muss bei abgeschaltetem Gerät und bei aus der Steckdose herausgezogenem Stecker erfolgen. Den vorderen Verschluss K hochziehen, um die beiden Hälften A-B zu trennen. 5. Den HEPA Filter M aus der Hälfte A. Die Hälfte A umdrehen, um den angesammelten Schmutz zu entfernen und aussen und innen reinigen. 18

19 Vor dem Fortstellen das Gerät sorgfältig wieder zusammensetzen. Wenn die Betriebsdauer 15 Minuten erreicht, das Gerät abschalten und den Motor für wenigstens 5 Minuten abkühlen lassen, bevor es wieder eingeschaltet wird. Regelmässig alle Filter des Gerätes reinigen und, falls sie beschädigt sind, austauschen. Diese Arbeit muss bei abgeschaltetem Gerät und aus der Steckdose herausgezogenem Stecker ausgeführt werden, wie nachstehend erklärt wird. REINIGUNG des Motorfilters G 6. Den Filter G aus dem Gitter Z nehmen Unter fliessendem Wasser spülen und trocknen. Wieder einsetzen. Nie das Gerät ohne diesen Filter laufen lassen! Beim Wiedereinsetzen des Filters auf die Eintrittsrichtung von diesem in die Hälfte A achten. Da er nicht symmetrisch ist, erlaubt nur eine Richtung die korrekte Montage. REINIGUNG der Hälftem A und B Die Arbeit muss bei abgeschaltetem Gerät und bei aus der Steckdose herausgezogenem Stecker ausgeführt werden. Ein weiches, nicht reibendes und trockenes Tuch verwenden. Nicht geeignet für Vakuum-Feinstaub. REINIGUNG oder Austausch der seitlichen Filter F 7. Durch Druck auf den Haken das Gitter E freigeben. Die Filter F herausnehmen. Sorgfältig abspülen und trocknen. Wieder in die Gitter E einsetzen. Das Gitter E in die richtige Position bringen, bevor es nach unten eingerastet wird, und dann durch Druck mit dem Haken befestigen. Achtung: rechten Filter/Gitter rechts montieren und linken Filter/Gitter links montieren. REINIGUNG des HEPA Filters M Den Filter M herausnehmen. Reinigen, um die ursprünglichen Filtereigenschaften wiederherzustellen. Falls notwendig, kann er unter fliessendem Wasser abgespült werden. Sorgfältig trocknen und wieder einsetzen. Das Gerät niemals ohne diesen Filter laufen lassen! 19

20 E ADVERTENCIAS GENERALES Conserve con cuidado el presente manual y lea atentamente las advertencias; Estas suplen importantes indicaciones referentes a la seguridad, el uso inmediato y futuro del aparato. Este aparato, idóneo solo para el uso doméstico, debe ser destinado solo a la función para la cual ha sido expresamente concebido. Cualquier otro uso es de considerarse impropio y peligroso. El constructor no puede ser considerado responsable por eventuales daños derivantes de usos impropios, erróneos e irracionales. La instalación deberá ser efectuada según las prescripciones del constructor. Una errónea instalación puede causar daños a personas, animales, cosas, el constructor no puede ser retenido responsable. La seguridad de los aparatos eléctricos está garantizada solo si estos son conectados a una instalación eléctrica provisto de idónea puesta a tierra según cuanto establecido por los actuales estándares vigentes en materia de seguridad eléctrica. Los elementos del empaque (saco de plástica, clavos, poliéster expansivo, etc.) no deben ser dejados al alcance de niños o incapaces ya que representan potenciales fuentes de peligro. Antes de conectar el aparato asegúrese que los datos de la placa se correspondan a aquellos de la red de distribución eléctrica. En caso de incompatibilidad entre la toma de corriente y el enchufe diríjase a personal calificado para las necesarias operaciones de adecuación. No utilice adaptadores, tomas múltiples y / o extensiones. Si el uso de una de estas fuese indispensable utilice exclusivamente material conforme a las vigentes normas de seguridad y que cumplan los requisitos de compatibilidad con el aparato y red de distribución eléctrica. Al utilizar el aparato por primera vez, asegúrese de haber retirado cada etiqueta o papel de protección. Si el aparato está dotado de toma de aire, asegúrese que no venga nunca obstruida ni siquiera parcialmente. El uso de cualquier aparato eléctrico comporta la observación de algunas reglas fundamentales y en particular: No sumerja o bañe el aparato; no lo use cercano a agua, en la ducha, en el lavamanos o en cercanía de otros recipientes con líquidos. En caso de que el aparato cayese accidentalmente en agua NO trate de recuperarlo sin antes de nada retirar inmediatamente el enchufe de la toma de corriente. Sucesivamente llévelo a un centro de asistencia calificado para los necesarios controles. Durante el uso, el aparato debe permanecer lejanos de cualquier objeto o sustancia inflamable o explosiva. No toque el aparato con las manos bañadas o húmidas. No use el aparato con pies descalzos. No tire del aparato o del cable para desconectar el enchufe de la toma de corriente. No deje el aparato expuesto a agentes atmosféricos (lluvia, sol). Se recomienda mantener el aparato fuera del alcance de niños o incapaces y no les permita a ellos su empleo. Desconecte el enchufe de la toma de corriente cuando el aparato no viene utilizado y antes de efectuar cualquier operación de limpieza o mantenimiento. El cable de alimentación debe ser desenrollado por todo su largo a fin de evitar el sobrecalentamiento. 20

21 El cable de alimentación no debe ser avecinado a fuentes de calor y / o superficies cortante. En caso de cable de alimentación dañado, proceda a la sustitución que debe ser efectuada por personal calificado. En caso de daño y / o mal funcionamiento apague el aparato y diríjase a personal calificado. Eventuales maniobras o intervenciones efectuadas por personal no calificado hacen decaer los derechos de garantía. Para limpiar el aparato use solo un paño suave y no abrasivo. Cuando el aparato, resulta inutilizable y se desee eliminarlo, corte los cables y bótelo a través de un ente calificado a fin de no contaminar el ambiente. Si en el producto hay partes en vidrio, estas no están cubiertas por la garantía. El símbolo sobre el producto o sobre la confección indica que el producto no debe ser considerado como un normal desecho doméstico, sino que debe ser llevado al punto de recogida apropiado para el reciclaje de aparatos eléctricos y electrónicos. Procediendo a deschar este producto en modo apropiado, se contribuye a evitar potenciales consecuencias negativas para el ambiente y para la salud, que pudiesen derivar de un descho inadecuado del producto. Para informaciones mas detalladas sobre el reciclaje de este producto, contacte la oficina comunal, el servicio local de desecho de desperdicios o el negocio en el cual ha sido comprado el producto. ATENCION: Las partes plásticas del producto no están cubiertas por la garantía. ATENCION: Los daños del cable de alimentación, derivados del uso no son cubiertos por la garantía; eventuales reparaciones serán por lo tanto a cargo del propietario ATENCION: Si fuese necesario llevar o transportar el aparato al centro asistencia autorizado, se recomienda limpiarlo cuidadosamente en todas sus partes. Si el aparato estuviese sucio o con costra o presenta depósitos de alimento, depósitos calcáreos, depósitos de polvo u otros; externa o internamente: por motivos higiénico-sanitarios, el centro de asistencia devolverá el aparato mismo sin verificarlo. 21
22 ADVERTENCIAS PARTICULARES No aspire nunca cuerpos incandescentes (tizones o cenizas ardientes, colillas encendidadas), sustancias líquidas, solventes, inflamables, explosivos (gasolina, alcohol, diluentes), polvos dañinos a la salud y ni siquiera cuerpos puntiagudos. No utilice nunca el aparato en ambientes saturados de gas. No coloque nunca la parte aspirante del aparato cercana a los ojos, orejas, nariz o cabellos. En caso de mal funcionamiento, o rotura de partes, lleve el aparato hacia un Centro de asistencia autorizado. Controle que todos los filtros estén colocados correctamente en sus sedes. No haga funcionar nunca el aparato sin los mismos. COMPONENTES A. Semi cuerpo inferior B. Semi cuerpo superior C. Interruptor de encendido / apagado D. Gancho porta cable E. Rejilla porta filtros laterales F. Filtros laterales G. Filtro motor H. Rejilla detención del filtro motor M.Filtro HEPA K. Cierre frontal X. Diente del semi cuerpo B Y. Alojamiento para X O. Lanza concentra la aspiraccíon, útil para limpiar esquinas y fisuras. P. Boquilla multiuso para limpiar paredes, acolchados, divanes etc. Q. Boquilla multifuncional, con selector a pedal para pavimentos lisos o tapizados y alfombras. INSTRUCCIONES DE USO Extraiga de la confección los componentes de la escoba eléctrica. 1. Controle sobre el semi cuerpo B, la presencia de los filtros laterales y del filtro motor. Controle en el semi cuerpo A, la presencia del filtro HEPA M. En el caso de que faltase aunque sea solo uno de estos filtros, diríjase a un centro de asistencia autorizado. No haga funcionar la escoba eléctrica si le falta un solo de estos filtros. 2. Una los dos semi cuerpos A-B. encastrando el diente X del semi cuerpo B en el alojamiento Y del semi cuerpo A y bloquée con el cierre frontal K. 3. Introduzca hasta el fondo sobre el aparato el accesorio más idóneo al trabajo por realizar. 4. Rote hacia abajo el gancho D situado sopbre el posterior de la empuñadura, desenrollando completamente el cable e introduciendo el enchufe en una toma eléctrica idónea a recibirla. Ahora, accionando sobre el pulsante de encendido C es posible activar la aspiración de sustancias sólidas. No aspirar líquidos u otros materiales dañinos! Finalizado cada uso se aconseja el vaciar el sucio recogido en el semi cuerpo A antes de guardar el aparato: operación a ser efectuada con aparato apagado y enchufe desconectado de la red eléctrica. Levante el cierre frontal K para separar los dos 2 semi cuerpos A-B. 5. Extraiga el filtro HEPA M del semi cuerpo A. Voltee el semi cuerpo A paara vaciar el sucio recogido y límpielo sea externamente que internamente. Vuelva a montar cuidadosamente el aparato antes de retirarlo. Si el tiempo de uso llega a a 15 minutos, apague el aparato y deje reposar el motor por al menos 5 minutos antes de reencenderlo. 22
23 Periódicamente limpie todos los filtros del aparato y si están dañados sustitúyalos, tal operación es de efectuarse con aparato apagado y enchufe desconectado de la red eléctrica como explicado a seguidas. LIMPIEZA del filtro motor G 6. Extraiga el filtro G de la rejilla Z. Lávelo con agua corriente y séquelo. Vuelva a colocarlo. No haga nunca funcionar el aparato sin este filtro! Al volver a colocar el filtro, preste atención al sentido de entrada de éste en el semi cuerpo A. No siendo simétrico, solo un sentido permitirá el correcto montaje. LIMPIEZA de los semicuerpos A y B Operación a ser efectuada con aparato apagado y enchufe desconectado de la red eléctrica. Utilice un paño suave no abrasivo y seco. No es apto para el polvo fino de vacío. LIMPIEZA o sustitución de los filtros laterales F 7. Desenganche la rejilla E oprimiendo sobre el gancho. Retire los filtros F. Lave y seque cuidadosamente. Vuelva a colocarlos en las rejillas E. Coloque en su posición la rejilla E, antes introduciéndola en el enganche de abajo y después bloqueándola a presión con el gancho. Atención: vuelva a montar el filtro / rejilla derecho a la derecha y el filtro / rejilla izquierdo a la izquierda. LIMPIEZA del filtro HEPA M Extraiga el filtro M. Límpielo para devolver las características de filtrado iniciales. Si es necesario, es posible lavarlo con agua corriente. Séquelo cuidadosamente y vuelva a colocarlo. No haga funcionar nunca el aparato sin este filtro! 23
24 P AVISOS GERAIS Guardar com cuidado o presente manual e ler os avisos com atenção; os mesmos fornecem indicações importantes relativas à segurança, ao uso imediato e futuro do aparelho. Este aparelho, apropriado somente para o uso doméstico, deverá ser destinado apenas para a função para a qual foi expressamente projetado. Qualquer outro uso deve ser considerado impróprio e perigoso. O fabricante não pode ser considerado responsável por eventuais danos decorrentes de uso impróprio, errados e irracionais. A instalação deverá ser efetuada de acordo com as instruções do fabricante. Uma instalação errada pode causar danos a pessoas, animais, coisas, o fabricante não pode ser considerado responsável. A segurança das aparelhagens elétricas é garantida somente se estas são ligadas a uma instalação elétrica com uma ligação de terra idônea de acordo com quanto estabelecido pelos padrões atuais vigentes em matéria de segurança elétrica. Os elementos da embalagem (sacos de plástico, pregos, isopor, etc.) não devem ser deixados ao alcance de crianças ou incapazes porque representam fontes potenciais de perigo. Antes de ligar o aparelho verificar que os dados da placa sejam correspondentes àqueles da rede de abastecimento elétrico. No caso de incompatibilidade entre a tomada e o plugue chamar pessoal especializado para as operações necessárias de adaptação. Não devem ser utilizados adaptadores, tomadas múltiplas e/ou extensões. Se porventura o seu uso for indispensável, utilizar exclusivamente material conforme às normas vigentes de segurança e como os requisitos de compatibilidade com aparelho e rede de abastecimento elétrico. Ao utilizar o aparelho pela primeira vez, certificar-se de ter removido todas as etiquetas ou folha de proteção. Se o aparelho for dotado de tomadas de ar, certificar-se que nunca sejam obstruídas nem mesmo parcialmente. O uso de qualquer aparelho elétrico implica na observação de algumas regras fundamentais e sobretudo: Não mergulhar ou molhar o aparelho; não usá-lo próximo de água, na banheira, no lavatório ou próximo de outro recipiente com líquidos. Se o aparelho cair acidentalmente na água, NÃO tentar tirá-lo fora mas deve-se extrair imediatamente o plugue da tomada de corrente. A seguir levá-lo num centro de assistência qualificado para os controles necessários. Durante o uso, o aparelho deve ficar longe de qualquer objeto ou substância inflamável ou explosiva. Não tocar o aparelho com mãos molhadas ou úmidas. Não usar o aparelho com pés descalços. Não puxar o aparelho ou o fio para desligar o plugue da tomada. Não deixar o aparelho exposto a agentes atmosféricos (chuva, sol). Recomenda-se de manter o aparelho longe do alcance de crianças ou incapazes e não deixar que os mesmos o utilizem. Desligar o plugue da tomada de corrente quando o aparelho não for utilizado e antes de efetuar qualquer operação de limpeza ou manutenção. O fio de alimentação deve ser desenrolado ao longo de todo o seu comprimento a fim de evitar o seu superaquecimento. O fio de alimentação não deve ser aproximado a fontes de calor e/ou superfícies que cortam. No caso de fio de alimentação danificado, 24
Tipologie installative - Installation types Type d installation - Installationstypen Tipos de instalación - Τυπολογίες εγκατάστασης
 AMPADE MOOCROMATICHE VIMAR DIMMERABII A 0 V~ - VIMAR 0 V~ DIMMABE MOOCHROME AMP AMPE MOOCHROME VIMAR VARIATEUR 0 V~ - DIMMERFÄHIGE MOOCHROMATICHE AMPE VO VIMAR MIT 0 V~ ÁMPARA MOOCROMÁTICA VIMAR REGUABE
Tipologie installative - Installation types Types d installation - Die einbauanweisungen Tipos de instalación - Τυπολογίες εγκατάστασης
 Types d installation Die einbauanweisungen Tipos de instalación Τυπολογίες εγκατάστασης AMPADE MOOCROMATICHE VIMAR DIMMERABII A 0 V~ MOOCHROME DIMMABE AMP VIMAR 0 V~ AMPE MOOCHROME VIMAR DIMMABE 0 V~ EUCHTE
Περιεχόμενα / Contents
 Aερόθερμo / Fan Heater PTC-906 Περιεχόμενα / Contents GR... Σελίδες 3-8 EN... Pages 9-11 2 GR Ευχαριστούμε που επιλέξατε μια συσκευή της γκάμας θερμαντικών IZZY. Σημαντικές Οδηγίες Ασφαλείας Τα Μέρη της
FILTRO DE RED METÁLICA
 FILTRO DE RED METÁLICA Estas instrucciones forman parte integrante del manual que acompaña el aparato en el cual está instalado el accesorio. Este manual se refiere a ADVERTENCIAS GENERALES y a REGLAS
BFN3000 ΕΠΙΤΡΑΠΕΖΙΟΣ ΑΝΕΜΙΣΤΗΡΑΣ. Owner s manual. Μετάφραση του πρωτοτύπου των οδηγιών χρήσης
 BFN3000 ΕΠΙΤΡΑΠΕΖΙΟΣ ΑΝΕΜΙΣΤΗΡΑΣ Μετάφραση του πρωτοτύπου των οδηγιών χρήσης Owner s manual www.bormanntools.com GR Οδηγίες ασφαλούς λειτουργίας 1. Τα χαρακτηριστικά της παροχής ηλεκτρικού ρεύματος θα
GB F D E P GR ISTRUZIONI D USO INSTRUCTIONS FOR USE INSTRUCTIONS POUR L UTILISATION BETRIEBSANLEITUNG INSTRUCCIONES DE FUNCIONAMIENTO
 Aspy I GB F D E P GR Aspirapolvere con super filtratura ISTRUZIONI D USO Vacuum cleaner with super filtering INSTRUCTIONS FOR USE Aspirateur avec Super filtrage INSTRUCTIONS POUR L UTILISATION Staubsauger
La Déduction naturelle
 La Déduction naturelle Pierre Lescanne 14 février 2007 13 : 54 Qu est-ce que la déduction naturelle? En déduction naturelle, on raisonne avec des hypothèses. Qu est-ce que la déduction naturelle? En déduction
Termoventilatore con termostato e programmatore 24 ore. Thermoventilateur à thermostat et programmateur 24 heures INSTRUCTIONS POUR L UTILISATION
 Mare Monti I GB F D E P GR Termoventilatore con termostato e programmatore 24 ore ISTRUZIONI D USO Fan heater with thermostat and 24-hour timer INSTRUCTIONS FOR USE Thermoventilateur à thermostat et programmateur
KIT DE DRENAJE DE CONDENSADOS
 KIT DE DRENAJE DE CONDENSADOS Estas instrucciones forman parte integrante del manual que acompaña el aparato en el cual está instalado este Kit. Este manual se refiere a ADVERTENCIAS GENERALES y REGLAS
English PDFsharp is a.net library for creating and processing PDF documents 'on the fly'. The library is completely written in C# and based
 English PDFsharp is a.net library for creating and processing PDF documents 'on the fly'. The library is completely written in C# and based exclusively on safe, managed code. PDFsharp offers two powerful
ΕΣΩΤΕΡΙΚΗ ΜΟΝΑΔΑ ΚΛΙΜΑΤΙΣΤΙΚΟ ΔΙΑΙΡΟΥΜΕΝΟΥ ΤΥΠΟΥ ΜΟΝΤΕΛΟ RAD-18RPA RAD-25RPA RAD-35RPA RAD-50RPA. Eλληνικά ΕΣΩΤΕΡΙΚΗ ΜΟΝΑΔΑ
 ΚΛΙΜΑΤΙΣΤΙΚ ΔΙΑΙΡΥΜΕΝΥ ΤΥΠΥ ΕΣΩΤΕΡΙΚΗ ΜΝΑΔΑ ΜΝΤΕΛ RAD-18RPA RAD-25RPA RAD-35RPA RAD-50RPA ΕΣΩΤΕΡΙΚΗ ΜΝΑΔΑ RAD-18RPA RAD-25RPA RAD-35RPA RAD-50RPA Instruction manual Page 1~12 To obtain the best performance
DSL DSL2000 - (AU02700) Lampeggiante ISTRUZIONI PER L INSTALLAZIONE. Flashing light INSTRUCTIONS FOR INSTALLATIONS I UK F E D P NL GR
 Lampeggiante ISTRUZIONI PER L INSTALLAZIONE. Flashing light INSTRUCTIONS FOR INSTALLATIONS I UK F E D P NL GR") DSL DSL2000 - (AU0200) Lampeggiante ISTRUZIONI PER L INSTALLAZIONE Flashing light INSTRUCTIONS FOR INSTALLATIONS I UK F E D P NL GR 2 DSL Optional A: cod. 0 B: cod. AU020 B: cod. AU0220 B: cod. AU0224
DSL DSL2000 - (AU0200) Lampeggiante ISTRUZIONI PER L INSTALLAZIONE Flashing light INSTRUCTIONS FOR INSTALLATIONS I UK F E D P NL GR 2 DSL Optional A: cod. 0 B: cod. AU020 B: cod. AU0220 B: cod. AU0224
Montage - Raccordement Implantation EURO-RELAIS MINI & BOX. Mini & Box
 Montage - Raccordement Implantation EURO-RELAIS MINI & BOX 3 Fiche technique EURO-RELAIS MINI & BOX DESCRIPTIF La borne Euro-Relais MINI est en polyester armé haute résistance totalement neutre à la corrosion
INSTRUCCIONES DE FUNCIONAMIENTO
 Choppy Trita & amalgama ISTRUZIONI D USO Chops & mixes INSTRUCTIONS FOR USE Hache & mélange INSTRUCTIONS POUR L UTILISATION Muele y amalgama INSTRUCCIONES DE FUNCIONAMIENTO Mói & amassa INSTRUÇÕES DE UTILIZAÇAÕ
INSTRUCCIONES PARA LA INSTALACIÓN INSTRUÇÕES DE INSTALAÇÃO ISTRUZIONI PER IL MONTAGGIO
 ES INSTRUCCIONES PARA LA INSTALACIÓN SUJECTO A MODIFICACIÓN Lea las INSTRUCCIONES PARA LA INSTALACIÓN antes de ponerla en marcha. Guarde estas INSTRUCCIONES PARA LA INSTALACIÓN como referencia para el
DISCOVERY ACCESSORIES. FITTING INSTRUCTION Towing Electrics - 13 Pin. EINBAUANLEITUNG Elektrosatz - 13-polig
 CCESSORIES WRNING ccessories which are not properly fitted can be dangerous. Read the instructions carefully prior to fitting. Whilst fitting, comply with the instructions at all times. If in doubt, contact
4K HDMI Splitter 1x4. User s Guide / Bedienungsanleitung / Εγχειρίδιο Χρήστη
 4K HDMI Splitter 1x4 User s Guide / Bedienungsanleitung / Εγχειρίδιο Χρήστη INTRODUCTION The EDISION 4K HDMI Splitter 1x4 uses a single HDMI input source, to distribute it to 4 HDMI outputs. The splitter
Right Rear Door. Let's now finish the door hinge saga with the right rear door
 Right Rear Door Let's now finish the door hinge saga with the right rear door You may have been already guessed my steps, so there is not much to describe in detail. Old upper one file:///c /Documents
3.4 SUM AND DIFFERENCE FORMULAS. NOTE: cos(α+β) cos α + cos β cos(α-β) cos α -cos β
 cos α + cos β cos(α-β) cos α -cos β") 3.4 SUM AND DIFFERENCE FORMULAS Page Theorem cos(αβ cos α cos β -sin α cos(α-β cos α cos β sin α NOTE: cos(αβ cos α cos β cos(α-β cos α -cos β Proof of cos(α-β cos α cos β sin α Let s use a unit circle
3.4 SUM AND DIFFERENCE FORMULAS Page Theorem cos(αβ cos α cos β -sin α cos(α-β cos α cos β sin α NOTE: cos(αβ cos α cos β cos(α-β cos α -cos β Proof of cos(α-β cos α cos β sin α Let s use a unit circle
QC5015 A D E 1 2 3 4 F M H 5 6 7 1 B G 2 I 8 9 10 1 J K L 2 C 11 1 12 13 2 14 15 16 17 18
 QC5015 A D E 1 2 3 4 M F H 5 1 6 7 B G 2 I J K L 1 8 9 10 2 C 11 1 12 13 2 14 15 16 17 18 Deutsch Einführung Herzlichen Glückwunsch zu Ihrem Kauf und willkommen bei Philips! Um den Support von Philips
Εμπορική αλληλογραφία Ηλεκτρονική Αλληλογραφία
 - Εισαγωγή Sehr geehrter Herr Präsident, Sehr geehrter Herr Präsident, Εξαιρετικά επίσημη επιστολή, ο παραλήπτης έχει ένα ειδικό τίτλο ο οποίος πρέπει να χρησιμοποιηθεί αντί του ονόματος του Sehr geehrter
ΟΔΗΓΙΕΣ ΧΡΗΣΗΣ USE INSTRUCTIONS
 ΟΔΗΓΙΕΣ ΧΡΗΣΗΣ USE INSTRUCTIONS ΤΗΛΕΦΩΝΟ ΜΕ ΑΝΑΓΝΩΡΙΣΗ ΚΛΗΣΗΣ /CORDED PHONE WITH CALLER ID ΜΟΝΤΕΛΟ/MODEL: TM09-448 DC48V Παρακαλούμε διαβάστε προσεκτικά όλες τις οδηγίες χρήσης πριν την χρήση της συσκευής
TERMOFORO. Istruzioni per l uso Operating instructions Instrucciones de uso Οδηγίες χρήσης IT pagina 1 GB page 5 ES página 9 EL σελίδα 13 TERMOFORO
 MI000126 Istruzioni per l uso Operating instructions Instrucciones de uso Οδηγίες χρήσης IT pagina 1 GB page 5 ES página 9 EL σελίδα 13 TERMOFORO TERMOFORO HEATING PAD TERMÓFORO ΘΕΡΜΟΦΟΡΑ www. imetec.com
Gima S.p.A. - Via Marconi, Gessate (MI) Italy -
 Italy -") Gima S.p.A. - Via Marconi, 1-20060 Gessate (MI) Italy gima@gimaitaly.com - export@gimaitaly.com www.gimaitaly.com EU Representative Lama per laringoscopio Gimalite Gimalite laryngoscope blade Lame de laryngoscope
Gima S.p.A. - Via Marconi, 1-20060 Gessate (MI) Italy gima@gimaitaly.com - export@gimaitaly.com www.gimaitaly.com EU Representative Lama per laringoscopio Gimalite Gimalite laryngoscope blade Lame de laryngoscope
Istruzioni per l uso Οδηγίες χρήσης RASOIO DEPILATORE. IT pagina 1 ΕΛ σελίδα 12
 Istruzioni per l uso Οδηγίες χρήσης RASOIO DEPILATORE IT pagina 1 ΕΛ σελίδα 12 [A] [B1] [B2] [B3] 4 [E] 1 2 1 3 2 5 [C1] [C2] [D1] 3 4 7 6 [D2] [D3] 5 6 8 9 10 Type E1101 IPX5 IN: 3V Battery Battery Ni-MH
Advanced Subsidiary Unit 1: Understanding and Written Response
 Write your name here Surname Other names Edexcel GE entre Number andidate Number Greek dvanced Subsidiary Unit 1: Understanding and Written Response Thursday 16 May 2013 Morning Time: 2 hours 45 minutes
GB F D E P GR ISTRUZIONI D USO INSTRUCTIONS FOR USE INSTRUCTIONS POUR L UTILISATION BETRIEBSANLEITUNG INSTRUCCIONES DE FUNCIONAMIENTO
 Galaxy I GB F D E P GR Sistema stirante con caldaia ISTRUZIONI D USO Steam ironing system with boiler INSTRUCTIONS FOR USE Système repassant à la vapeur avec réservoir INSTRUCTIONS POUR L UTILISATION Bugeleisen
Βασιλική Σαμπάνη 2013. Μαντάμ Μποβαρύ: Αναπαραστάσεις φύλου και σεξουαλικότητας
 Βασιλική Σαμπάνη 2013 Μαντάμ Μποβαρύ: Αναπαραστάσεις φύλου και σεξουαλικότητας 200 Διαγλωσσικές Θεωρήσεις μεταφρασεολογικός η-τόμος Interlingual Perspectives translation e-volume ΜΑΝΤΑΜ ΜΠΟΒΑΡΥ: ΑΝΑΠΑΡΑΣΤΑΣΕΙΣ
TERMOFORO. Istruzioni per l uso Operating instructions Instrucciones de uso Οδηγίες χρήσης IT pagina 1 EN page 6 ES página 11 EL σελίδα 16 TERMOFORO
 MI001068 Istruzioni per l uso Operating instructions Instrucciones de uso Οδηγίες χρήσης IT pagina 1 EN page 6 ES página 11 EL σελίδα 16 TERMOFORO TERMOFORO HEATING PAD TERMÓFORO ΘΕΡΜΟΦΟΡΑ www. imetec.com
!Stato di tensione triassiale!stato di tensione piano!cerchio di Mohr
 !Stato di tensione triassiale!stato di tensione piano!cerchio di Mohr Stato di tensione F A = F / A F Traione pura stato di tensione monoassiale F M A M Traione e torsione stato di tensione piano = F /
90ΚΥΡΙΟΣ ΟΔΗΓΟΣ ΠΕΡΙΕΧΟΜΕΝΑ
 90ΚΥΡΙΟΣΟΔΗΓΟΣ ΤοRazerNagaείναιτοαπόλυτοποντίκιγιαMassivelyMultiplayerOnlineGamingτοοποίομετατοπίζει τηνισορροπίαμεταξύτουπληκτρολογίουκαιτουποντικιούτοποθετώνταςένανπρωτόγνωροαριθμό εσωτερικώνεντολώντουπαιχνιδιούσεμιαθέση.έναπλέγμααντίχειραπολλαπλώνκουμπιώνμε
SCALDAPIEDI. Istruzioni per l uso Operating instructions Instrucciones de uso Οδηγίες χρήσης. IT pagina 1 GB page 5 ES página 9 ΕΛ σελίδα 13
 MI000125 Istruzioni per l uso Operating instructions Instrucciones de uso Οδηγίες χρήσης SCALDAPIEDI SCALDAPIEDI Footwarmer CALIENTAPIÉS ΘΕΡΜΟΦΟΡΑ ΠΟΔΙΩΝ IT pagina 1 GB page 5 ES página 9 ΕΛ σελίδα 13
User s Manual / Οδηγίες Χρήσης
 User s Manual / Οδηγίες Χρήσης EUROPEAN STANDARDS Your child s safety depends on you. Proper bed rail usage cannot be assured unless you follow these instructions. DO NOT USE YOUR BED RAIL UNTILL YOU READ
Door Hinge replacement (Rear Left Door)
") Door Hinge replacement (Rear Left Door) We will continue the previous article by replacing the hinges of the rear left hand side door. I will use again the same procedure and means I employed during the
Door Hinge replacement (Rear Left Door) We will continue the previous article by replacing the hinges of the rear left hand side door. I will use again the same procedure and means I employed during the
derivation of the Laplacian from rectangular to spherical coordinates
 derivation of the Laplacian from rectangular to spherical coordinates swapnizzle 03-03- :5:43 We begin by recognizing the familiar conversion from rectangular to spherical coordinates (note that φ is used
The Simply Typed Lambda Calculus
 Type Inference Instead of writing type annotations, can we use an algorithm to infer what the type annotations should be? That depends on the type system. For simple type systems the answer is yes, and
Stato di tensione triassiale Stato di tensione piano Cerchio di Mohr
 Stato di tensione triassiale Stato di tensione iano Cerchio di Mohr Stato di tensione F A = F / A F Traione ura stato di tensione monoassiale F M A M Traione e torsione stato di tensione iano = F / A =
Operating-instruction Manual ΟΔΗΓΙΕΣ ΧΡΗΣΕΩΣ
 Operating-instruction Manual ΟΔΗΓΙΕΣ ΧΡΗΣΕΩΣ Model: AF-0827 Midi oven with 3 hot plates and grill function Ηλεκτρικό φουρνάκι με 3 εστίες και λειτουργία grill ΠΑΡΑΚΑΛΩ ΔΙΑΒΑΣΤΕ ΤΙΣ ΟΔΗΓΙΕΣ ΧΡΗΣΗΣ ΠΡΟΣΕΧΤΙΚΑ
the total number of electrons passing through the lamp.
 1. A 12 V 36 W lamp is lit to normal brightness using a 12 V car battery of negligible internal resistance. The lamp is switched on for one hour (3600 s). For the time of 1 hour, calculate (i) the energy
SCALDA E ASCIUGA SCARPE
 SCALDA E ASCIUGA SCARPE MANUALE DI ISTRUZIONI (pag. 2) SHOES DRYER - USE INSTRUCTIONS (pag. 8) CHAUFFE ET SÈCHE CHAUSSURES MANUEL D INSTRUCTIONS (pag. 13) SCHUHWÄRMER BETRIEBSANLEITUNG ( PAG. 19) SECADOR
ITALIANO. pag. 3 ENGLISH. pag. 9 FRANÇAIS. pag. 14 DEUTSCH. pag. 20 ESPAÑOL. pag. 26 ΕΛΛΗΝΙΚΗ. pag. 32
 CENTRIFUGA XXL - MANUALE DI ISTRUZIONI XXL JUICE EXTRACTOR - USE INSTRUCTIONS CENTRIFUGEUSE XXL - MANUEL D INSTRUCTIONS ENTSAFTER XXL - BETRIEBSANLEITUNG LICUADORA XXL - MANUAL DE INSTRUCCIONES XXL ΑΠΟΧΥΜΩΤΗΣ
TERMOFORO. Istruzioni per l uso Operating instructions Instrucciones de uso Οδηγίες χρήσης IT pagina 1 GB page 6 ES página 11 EL σελίδα 16 TERMOFORO
 MI001067 Istruzioni per l uso Operating instructions Instrucciones de uso Οδηγίες χρήσης IT pagina 1 GB page 6 ES página 11 EL σελίδα 16 TERMOFORO TERMOFORO HEATING PAD TERMÓFORO ΘΕΡΜΟΦΟΡΑ www. imetec.com
Istruzioni per l uso Οδηγίες χρήσης ΑΤΜΟΣΥΣΤΗΜΑ
 Istruzioni per l uso Οδηγίες χρήσης Sistema stirante ΑΤΜΟΣΥΣΤΗΜΑ Indice - Περιεχόμενα IT Descrizione... 4 Descrizione... 4 Pannello comandi... 4 Ferro di tipo professionale... 4 Ferro di tipo domestico...
Επιτοίχιος νιπτήρας γόνατο διακόπτης για κρύο και ζεστό νερό
 Επιτοίχιος νιπτήρας γόνατο διακόπτης για κρύο και ζεστό νερό Ref. 061202 461004 460404 461604 454202 2x 409824 461206 2x 461802 2x 2 3 421240 1 4 FRICOSMOS FRICOSMOS Verifique el contenido. Evite la suciedad
SFH-41 Fan Heater Αερόθερμο
 SFH-41 Fan Heater Αερόθερμο GB GR INSTRUCTION MANUAL ΒΙΒΛΙΟ ΟΔΗΓΙΩΝ GB ENGLISH... 3 GR EΛΛHNIKA... 7 ENGLISH PLEASE READ THESE INSTRUCTIONS CAREFULLY AND RETAIN FOR FUTURE REFER- ENCE SAFETY WARNINGS When
ITALIANO. pag. 3 ENGLISH. pag. 7 FRANÇAIS. pag. 11 DEUTSCH. pag. 15 ESPAÑOL. pag. 19 ΕΛΛΗΝΙΚΗ. pag. 23
 SCALDAMANI MANOLO - MANUALE DI ISTRUZIONI HAND WARMER MANOLO - USE INSTRUCTIONS CHAUFFE-MAINS MANOLO - MANUEL D INSTRUCTIONS HANDWÄRMER MANOLO - BETRIEBSANLEITUNG CALENTADOR PARA LAS MANOS MANOLO MANUAL
ISTRUZIONI IMPORTANTI DA CONSERVARE PER ULTERIORI CONSULTAZIONI.
 Art.4H01 ISTRUZIONI PER L USO - TERMOFORO INSTRUCTIONS FOR USE - HEATING PAD MODE D EMPLOI - THERMOPHORE BEDIENUNGSANLEITUNG - HEIZKISSEN FOLLETO DE INSTRUCCIONES - ALMOHADILLA TÉRMICA ΟΔΗΓΙΕΣ ΧΡΗΣΕΩΣ
Τεστ Κατάταξης 1 Grading Test 1
 HELLENIC CULTURE CENTRE - Education, Language and Culture www.hcc.edu.gr, e-mail: Ifigenia@hcc.edu.gr, Tel.: (+30) 210 5238149, Fax: (+30) 210 8836494 Τεστ Κατάταξης 1 Grading Test 1 Οδηγίες Πρέπει να
ITALIANO. pag. 3 ENGLISH. pag. 7 FRANÇAIS. pag. 11 DEUTSCH. pag. 15 ESPAÑOL. pag. 19 ΕΛΛΗΝΙΚΗ. pag. 23
 SCALDAPIEDI - MANUALE DI ISTRUZIONI FOOT WARMER - USE INSTRUCTIONS RÉCHAUFFE PIEDS - MANUEL D INSTRUCTIONS FUSSWÄRMER - BETRIEBSANLEITUNG CALENTADOR PARA LOS PIES MANUAL DE INSTRUCCIONES ΘΕΡΜΑΝΤΙΚΟ ΓΙΑ
GR Ψεθηαθόο ζηεγλσηήξαο καιιηώλ κε ζύζηεκα ηνληζκνύ ΟΓΗΓΙΔ ΧΡΗΗ
 I Asciugacapelli digitale con dispositivo ionizzante ISTRUZIONI D USO GB Digital hairdryer with ionising device INSTRUCTIONS FOR USE F Sèche-cheveux numérique avec dispositif ioniseur INSTRUCTIONS POUR
L18VFSS10E. Instruction Manual 45.7cm/18 High Power Floor Fan. Εγχειρίδιο Οδηγιών Επιδαπεδιος Ανεμιστηρας 45.7 Εκατοστομετρο
 L18VFSS10E Instruction Manual 45.7cm/18 High Power Floor Fan Εγχειρίδιο Οδηγιών Επιδαπεδιος Ανεμιστηρας 45.7 Εκατοστομετρο GB GR Contents GB Safety Warnings... 2 Unpacking... 5 Getting to Know Your Fan...
ΟΔΗΓΙΕΣ ΣΥΝΑΡΜΟΛΟΓΗΣΗΣ/ ASSEMBLY INSTRUCTION ΤΟΜΜΥ ΚΡΕΒΑΤΙ/BED
 ΟΔΗΓΙΕΣ ΣΥΝΑΡΜΟΛΟΓΗΣΗΣ/ ASSEMBLY INSTRUCTION ΤΟΜΜΥ ΚΡΕΒΑΤΙ/BED 1. Παρακαλώ πολύ διαβάστε προσεκτικά τις οδηγίες πριν την συναρμολόγηση/ Please read the instructions carefully. 2. Παρακαλώ πολύ όπως ελέγξτε
Instruction Execution Times
 1 C Execution Times InThisAppendix... Introduction DL330 Execution Times DL330P Execution Times DL340 Execution Times C-2 Execution Times Introduction Data Registers This appendix contains several tables
Η ΕΝΕΡΓΕΙΑΚΗ ΣΗΜΑΝΣΗ ΚΑΙ ERP
 Η ΕΝΕΡΓΕΙΑΚΗ ΣΗΜΑΝΣΗ ΚΑΙ ERP 2 1 ΠΛΑΙΣΙΟ ΓΙΑΤΙ ΕΝΕΡΓΕΙΑΚΗ ΣΗΜΑΝΣΗ ΚΑΙ ErP? Αντιμετωπίζοντας την κλιματική αλλαγή, διασφαλίζοντας την ασφάλεια της παροχής ενέργειας2 και την αύξηση της ανταγωνιστικότητα
Επιτοίχιος νιπτήρας με πεντάλ για κρύο και ζεστό νερό
 Επιτοίχιος νιπτήρας με πεντάλ για κρύο και ζεστό νερό Verifique el contenido. Evite la suciedad en tuberías y el entorno antes de instalar. Si la instalación de fontanería es nueva, dejar correr el agua.
Επιτοίχιος νιπτήρας διπλό πεντάλ για κρύο και ζεστό νερό
 Επιτοίχιος νιπτήρας διπλό πεντάλ για κρύο και ζεστό νερό Ref. 061208 1 2x 460602 461004 461602 2x 461206 2 461202 3 FRICOSMOS 462002 454202 8x 409822 8x 421038 2x 409824 2x 421240 4 FRICOSMOS Verifique
SPAZZOLA IONICA LISCIANTE MANUALE DI ISTRUZIONI HOT IONIC BRUSH - USE INSTRUCTIONS BROSSE IONIQUE LISSANTE MANUEL D INSTRUCTIONS
 SPAZZOLA IONICA LISCIANTE MANUALE DI ISTRUZIONI HOT IONIC BRUSH - USE INSTRUCTIONS BROSSE IONIQUE LISSANTE MANUEL D INSTRUCTIONS IONBÜRSTE-GLÄTTEISEN - BETRIEBSANLEITUNG CEPILLO IÓNICO ALISADOR MANUAL
LAND ROVER ACCESSORIES. Ο ΗΓΙΑ ΤΟΠΟΘΕΤΗΣΗΣ Σύστηµα ιακοπής Λειτουργίας του "Εργάτη" Winch Cut-Out Kit. Windenabschaltung
 ACCSSORS WARNNG Accessories which are not properly fitted can be dangerous. Read the instructions carefully prior to fitting. Whilst fitting, comply with the instructions at all times. f in doubt, contact
COURBES EN POLAIRE. I - Définition
 Y I - Définition COURBES EN POLAIRE On dit qu une courbe Γ admet l équation polaire ρ=f (θ), si et seulement si Γ est l ensemble des points M du plan tels que : OM= ρ u = f(θ) u(θ) Γ peut être considérée
ELEKTRISCHER ZYKLON-STAUBSAUGER ESCOBA ELÉCTRICA CICLONICA MANUAL DE INSTRUCCIONES ΚΥΚΛΩΝΙΚΗ ΗΛΕΚΤΡΙΚΗ ΣΚΟΥΠΑ
 SCOPA ELETTRICA CICLONICA - MANUALE DI ISTRUZIONI CYCLONIC VACUUM CLEANER - USE INSTRUCTIONS BALAI CYCLONIQUE ÉLECTRIQUE MANUEL D INSTRUCTIONS ELEKTRISCHER ZYKLON-STAUBSAUGER BETRIEBSANLEITUNG ESCOBA ELÉCTRICA
ΜΕΤΑΠΤΥΧΙΑΚΗ ΔΙΠΛΩΜΑΤΙΚΗ ΕΡΓΑΣΙΑ «ΘΕΜΑ»
 ΠΑΝΕΠΙΣΤΗΜΙΟ ΑΙΓΑΙΟΥ ΣΧΟΛΗ ΑΝΘΡΩΠΙΣΤΙΚΩΝ ΕΠΙΣΤΗΜΩΝ ΤΜΗΜΑ ΕΠΙΣΤΗΜΩΝ ΤΗΣ ΠΡΟΣΧΟΛΙΚΗΣ ΑΓΩΓΗΣ ΚΑΙ ΤΟΥ ΕΚΠΑΙΔΕΥΤΙΚΟΥ ΣΧΕΔΙΑΣΜΟΥ Π.Μ.Σ. «ΠΕΡΙΒΑΛΛΟΝΤΙΚΗ ΕΚΠΑΙΔΕΥΣΗ» ΜΕΤΑΠΤΥΧΙΑΚΗ ΔΙΠΛΩΜΑΤΙΚΗ ΕΡΓΑΣΙΑ «ΘΕΜΑ» «Εφαρμογή
OUR PRODUCT RANGE. www.rakson.gr
 ΤΑ ΑΛΛΑ ΕΙ Η ΠΡΟΪΟΝΤΑ ΜΑΣ ΜΕΤΑΣΧΗΜΑΤΙΣΤΕΣ ΚΟΥ ΟΥΝΙΩΝ ΚΟΥ ΟΥΝΙΑ ΜΠΟΥΤΟΝ ΚΟΥ ΟΥΝΙΩΝ ΑΥΤΟΜΑΤΟΙ ΚΛΙΜΑΚΟΣΤΑΣΙΟΥ ΚΛΕΙ ΑΡΙΕΣ ΑΝΙΧΝΕΥΤΕΣ ΚΙΝΗΣΗΣ ΣΥΣΤΗΜΑΤΑ ΕΠΙΚΟΙΝΩΝΙΑΣ Θυροτηλεοράσεις Θυροτηλέφωνα Ενδοεπικοινωνίες
Νιπτήρας επιδαπέδιος ποδοκίνητος διπλός διακόπτης
 Νιπτήρας επιδαπέδιος ποδοκίνητος διπλός διακόπτης Ref. 061014 461004 2x 461202 2x 460404 461602 461206 462002 454202 4x 409822 4x 421038 2 3 1 4 FRICOSMOS FRICOSMOS Verifique el contenido. Evite la suciedad
3 Lösungen zu Kapitel 3
 3 Lösungen zu Kapitel 3 31 Lösungen der Aufgaben zu Abschnitt 31 311 Lösung Die Abbildung D : { R 4 R 4 R 4 R 4 R, a 1, a 2, a 3, a 4 ) D( a 1, a 2, a 3, a 4 ) definiere eine Determinantenform (auf R 4
ITALIANO. pag. 3 ENGLISH. pag. 7 FRANÇAIS. pag. 11 DEUTSCH. pag. 15 ESPAÑOL. pag. 19 ΕΛΛΗΝΙΚΗ. pag. 23
 SCALDA SPALLE - MANUALE DI ISTRUZIONI SHOULDER WARMER - USE INSTRUCTIONS RÉCHAUFFE ÉPAULES - MANUEL D INSTRUCTIONS SCHULTERWÄRMER - BETRIEBSANLEITUNG CALENTADOR PARA LOS HOMBROS MANUAL DE INSTRUCCIONES
ITALIANO. pag. 3 ENGLISH. pag. 7 FRANÇAIS. pag. 11 DEUTSCH. pag. 15 ESPAÑOL. pag. 19 ΕΛΛΗΝΙΚΗ. pag. 23
 SCALDA SCHIENA - MANUALE DI ISTRUZIONI WAIST WARMER - USE INSTRUCTIONS RÉCHAUFFE DOS - MANUEL D INSTRUCTIONS RÜCKENWÄRMER - BETRIEBSANLEITUNG CALENTADOR PARA LA ESPALDA MANUAL DE INSTRUCCIONES ΘΕΡΜΑΝΤΙΚΟ
ITALIANO. pag. 3 ENGLISH. pag. 7 FRANÇAIS. pag. 11 DEUTSCH. pag. 15 ESPAÑOL. pag. 20 ΕΛΛΗΝΙΚΗ. pag. 24. Fig. 1
 VENTILATORE - MANUALE DI ISTRUZIONI FAN - USE INSTRUCTIONS VENTILATEUR - MANUEL D INSTRUCTIONS VENTILATOR - BETRIEBSANLEITUNG VENTILADOR - MANUAL DE INSTRUCCIONES ΑΝΕΜΙΣΤΗΡΑΣ ΟΡΘΟΣΤΑΤΗΣ - ΕΓΧΕΙΡΊΔΙΟ ΟΔΗΓΙΏΝ
90 C. x 2. min. min 560
 90 C x 2 514 494 542 373 20 80 305 385 20 595 550 min 380 min 560 7 = = 2 X EL ΟΔΗΓΙΕΣ ΓΙΑ ΤΗΝ ΑΣΦΑΛΕΙΑ ΣΗΜΑΝΤΙΚΟ! ΔΙΑΒΑΣΤΕ ΚΑΙ ΤΗΡΕΙΤΕ Πριν χρησιμοποιήσετε τη συσκευή, διαβάστε αυτές τις οδηγίες για την
INSTRUCTIONS MANUAL ΕΓΧΕΙΡΙΔΙΟ ΛΕΙΤΟΥΡΓΙΑΣ
 Model/Μοντέλο: WKH-1132 INSTRUCTIONS MANUAL ΕΓΧΕΙΡΙΔΙΟ ΛΕΙΤΟΥΡΓΙΑΣ ENGLISH General Safety Instructions Before commissioning this kettle, please read the instruction manual carefully. Please keep the instruction
Επιτοίχιος νιπτήρας με πεντάλ για κρύο και ζεστό νερό
 Επιτοίχιος νιπτήρας με πεντάλ για κρύο και ζεστό νερό Ref. 061204 4x 2x 461004 461210 460602 461604 454202 409822 4x 421038 2x 421240 409824 3 2 4 1 FRICOSMOS FRICOSMOS Verifique el contenido. Evite la
SFIGMOMANOMETRI SPHYGMOMANOMETERS TENSIOMETRES BLUTDRUCKMESSGERÄTE ESFIGMOMANOMETROS ESFIGMOMANMETROS ΣΦΥΓΜΟΜΑΝΟΜΕΤΡΑ
 PROFESSIONAL MEDICAL PRODUCTS Gima S.p.A. Via Marconi, 1-20060 Gessate (MI) Italy gima@gimaitaly.com - export@gimaitaly.com www.gimaitaly.com SFIGMOMANOMETRI SPHYGMOMANOMETERS TENSIOMETRES BLUTDRUCKMESSGERÄTE
Οι αδελφοί Montgolfier: Ψηφιακή αφήγηση The Montgolfier Βrothers Digital Story (προτείνεται να διδαχθεί στο Unit 4, Lesson 3, Αγγλικά Στ Δημοτικού)
") Οι αδελφοί Montgolfier: Ψηφιακή αφήγηση The Montgolfier Βrothers Digital Story (προτείνεται να διδαχθεί στο Unit 4, Lesson 3, Αγγλικά Στ Δημοτικού) Προσδοκώμενα αποτελέσματα Περιεχόμενο Ενδεικτικές δραστηριότητες
Οι αδελφοί Montgolfier: Ψηφιακή αφήγηση The Montgolfier Βrothers Digital Story (προτείνεται να διδαχθεί στο Unit 4, Lesson 3, Αγγλικά Στ Δημοτικού) Προσδοκώμενα αποτελέσματα Περιεχόμενο Ενδεικτικές δραστηριότητες
VENERE. GR. Οδηγός Χρήσης EN. User Guide
 GR. Οδηγός Χρήσης EN. User Guide ΣΗΜΑΝΤΙΚΟ! ΚΡΑΤΗΣΤΕ ΓΙΑ ΜΕΛΛΟΝΤΙΚΗ ΑΝΑΦΟΡΑ: ΔΙΑΒΑΣΤΕ ΠΡΟΣΕΚΤΙΚΑ Κίνδυνος από φωτιά και άλλες πηγές έντονης θερμότητας, όπως ηλεκτρικές αντιστάσεις, υγραέριο, φωτιά κλπ,
IMETEC ECO EXTREME SILENCE
 MI001523 Istruzioni per l uso Operating instructions Instrucciones para el uso Instruções para o uso Οδηγίες χρήσης IT pagina 1 EN page 9 ES página 17 PT página 25 EL σελίδα 33 IMETEC ECO EXTREME SILENCE
HAL1200 Halogen heater Θερμάστρα αλογόνου
 HAL1200 Halogen heater Θερμάστρα αλογόνου GB GR INSTRUCTION MANUAL ΒΙΒΛΙΟ ΟΔΗΓΙΩΝ ENGLISH Please read these instructions carefully before using the appliance, and instruct other persons using it too, when
Operating-instruction Manual ΟΔΗΓΙΕΣ ΧΡΗΣΕΩΣ
 Operating-instruction Manual ΟΔΗΓΙΕΣ ΧΡΗΣΕΩΣ 16 3 SPEED PEDESTAL FAN 16 ΑΝΕΜΙΣΤΗΡΑΣ ΟΡΘΟΣΤΑΤΗΣ 3 ΤΑΧΥΤΗΤΩΝ PLEASE READ ALL INSTRUCTIONS CAREFULLYAND KEEP FOR FUTURE USE ΠΑΡΑΚΑΛΩ ΔΙΑΒΑΣΤΕ ΤΙΣ ΟΔΗΓΙΕΣ ΧΡΗΣΗΣ
Session novembre 2009
 ΥΠΟΥΡΓΕΙΟ ΕΘΝΙΚΗΣ ΠΑΙΔΕΙΑΣ ΚΑΙ ΘΡΗΣΚΕΥΜΑΤΩΝ ΚΡΑΤΙΚΟ ΠΙΣΤΟΠΟΙΗΤΙΚΟ ΓΛΩΣΣΟΜΑΘΕΙΑΣ MINISTÈRE GREC DE L ÉDUCATION NATIONALE ET DES CULTES CERTIFICATION EN LANGUE FRANÇAISE NIVEAU ÉPREUVE B1 sur l échelle proposée
MARQUE: CALOR REFERENCE: CF 3610CO SO CURLS CODIC:
 MARQUE: CALOR REFERENCE: CF 3610CO SO CURLS CODIC: 4083105 FR EN DE NL IT ES PT EL TR NO SV DA FI AR SO CURLS FA Lire attentivement le mode d emploi ainsi que les consignes de sécurité FR avant toute utilisation.
[1] P Q. Fig. 3.1
![[1] P Q. Fig. 3.1](/thumbs/79/80362156.jpg "[1] P Q. Fig. 3.1") 1 (a) Define resistance....... [1] (b) The smallest conductor within a computer processing chip can be represented as a rectangular block that is one atom high, four atoms wide and twenty atoms long. One
1 (a) Define resistance....... [1] (b) The smallest conductor within a computer processing chip can be represented as a rectangular block that is one atom high, four atoms wide and twenty atoms long. One
Επιτραπέζιος Η/Υ ASUS M12AD and M52AD Εγχειρίδιο χρήστη
 Επιτραπέζιος Η/Υ ASUS M12AD and M52AD Εγχειρίδιο χρήστη M12AD M52AD GK9559 Πρώτη Έκδοση Ιούλιος 2014 Copyright 2014 ASUSTeK Computer Inc. Διατηρούνται όλα τα δικαιώματα. Απαγορεύεται η αναπαραγωγή οποιουδήποτε
IMETEC ECO EXTREME COMPACT
 MI001524 Istruzioni per l uso Operating instructions Mode d emploi Instrucciones para el uso Instruções para o uso Οδηγίες χρήσης IT pagina 1 EN page 9 FR page 17 ES página 25 PT página 33 EL σελίδα 41
Επιτραπέζιος Η/Υ K30AM / K30AM-J Εγχειρίδιο χρήστη
 Επιτραπέζιος Η/Υ K30AM / K30AM-J Εγχειρίδιο χρήστη GK9380 Ελληνικα Πρώτη Έκδοση Μάιος 2014 Copyright 2014 ASUSTeK Computer Inc. Διατηρούνται όλα τα δικαιώματα. Απαγορεύεται η αναπαραγωγή οποιουδήποτε τμήματος
SPACE WINNER Utility 4 Shelves
 A-366-57457-print.pdf 6/08/5 SPAE WINNER Utility 4 Shelves EN ASSEBL INSTRUTINS FR INSTRUTINS DE NTAGE DE NTAGEANLEITUNG NL NTAGEVRSHRIFT INSTRUINES DE NTAJE IT ISTRUZINI DI NTAGGI INSTRUÇÕES DE NTAGE
Section 8.3 Trigonometric Equations
 99 Section 8. Trigonometric Equations Objective 1: Solve Equations Involving One Trigonometric Function. In this section and the next, we will exple how to solving equations involving trigonometric functions.
Capacitors - Capacitance, Charge and Potential Difference
 Capacitors - Capacitance, Charge and Potential Difference Capacitors store electric charge. This ability to store electric charge is known as capacitance. A simple capacitor consists of 2 parallel metal
Cod.: VE.401BL. Cod.: VE.401G
 VENTILATORE USB - MANUALE DI ISTRUZIONI USB FAN - USE INSTRUCTIONS VENTILATEUR USB - MANUEL D INSTRUCTIONS USB-VENTILATOR - BETRIEBSANLEITUNG VENTILADOR USB - MANUAL DE INSTRUCCIONES ΑΝΕΜΙΣΤΗΡΑΣ USB -
Declaration of Performance According to Annex III of Regulation (EU) no. 305/2011
 no. 305/2011") Declaration of Performance According to Annex III of Regulation (EU) no. 305/2011 Document-no. 0317-0015-17 1. Unique identification code of the product type 2. Usage Cables for general applications in
Declaration of Performance According to Annex III of Regulation (EU) no. 305/2011 Document-no. 0317-0015-17 1. Unique identification code of the product type 2. Usage Cables for general applications in
Το σύστημα των αξιών της ελληνικής κοινωνίας μέσα στα σχολικά εγχειρίδια της Λογοτεχνίας του Δημοτικού Σχολείου
 ΔΗΜΟΚΡΙΤΕΙΟ ΠΑΝΕΠΙΣΤΗΜΙΟ ΘΡΑΚΗΣ ΠΑΙΔΑΓΩΓΙΚΟ ΤΜΗΜΑ ΔΗΜΟΤΙΚΗΣ ΕΚΠ/ΣΗΣ ΔΙΔΑΣΚΑΛΕΙΟ «ΘΕΟΔΩΡΟΣ ΚΑΣΤΑΝΟΣ» Το σύστημα των αξιών της ελληνικής κοινωνίας μέσα στα σχολικά εγχειρίδια της Λογοτεχνίας του Δημοτικού
SPEEDO AQUABEAT. Specially Designed for Aquatic Athletes and Active People
 SPEEDO AQUABEAT TM Specially Designed for Aquatic Athletes and Active People 1 2 Decrease Volume Increase Volume Reset EarphonesUSBJack Power Off / Rewind Power On / Fast Forward Goggle clip LED Status
ΑΚΑ ΗΜΙΑ ΕΜΠΟΡΙΚΟΥ ΝΑΥΤΙΚΟΥ ΜΑΚΕ ΟΝΙΑΣ ΣΧΟΛΗ ΜΗΧΑΝΙΚΩΝ ΠΤΥΧΙΑΚΗ ΕΡΓΑΣΙΑ ΘΕΜΑ : ΧΗΜΙΚΑ ΠΡΟΣΘΕΤΑ ΠΟΥ ΠΡΟΟΡΙΖΟΝΤΑΙ ΓΙΑ ΤΟ ΝΕΡΟ ΤΟΥ ΑΤΜΟΛΕΒΗΤΑ
 ΑΚΑ ΗΜΙΑ ΕΜΠΟΡΙΚΟΥ ΝΑΥΤΙΚΟΥ ΜΑΚΕ ΟΝΙΑΣ ΣΧΟΛΗ ΜΗΧΑΝΙΚΩΝ ΠΤΥΧΙΑΚΗ ΕΡΓΑΣΙΑ ΘΕΜΑ : ΧΗΜΙΚΑ ΠΡΟΣΘΕΤΑ ΠΟΥ ΠΡΟΟΡΙΖΟΝΤΑΙ ΓΙΑ ΤΟ ΝΕΡΟ ΤΟΥ ΑΤΜΟΛΕΒΗΤΑ ΣΠΟΥ ΑΣΤΗΣ : ΑΓΟΡΑΣΤΟΣ ΧΡΥΣΟΒΑΛΑΝΤΗΣ ΕΠΙΒΛΕΠΟΥΣΑ ΚΑΘΗΓΗΤΡΙΑ :
Panel lateral/de esquina de la Synergy. Synergy πλαϊνή σταθερή πλευρά τετράγωνης καμπίνας. Rohová/boční zástěna Synergy
 Instrucciones de instalación Suministrar al usuario ADVERTENCIA! Este producto pesa más de 19 kg, puede necesitarse ayuda para levantarlo Lea con atención las instrucciones antes de empezar la instalación.
Puerta corredera de la Synergy Synergy Συρόμενη πόρτα Posuvné dveře Synergy Porta de correr da Synergy
 Instrucciones de instalación Suministrar al usuario ADVERTENCIA! Este producto pesa más de 19 kg, puede necesitarse ayuda para levantarlo Lea con atención las instrucciones antes de empezar la instalación.
Ref FRICOSMOS FRICOSMOS
 Απαγορεύεται η πλήρης ή μερική ανατύπωση του παρόντος εγγράφου δίχως προηγούμενη γραπτή ή προφορική άδεια της εταιρίας FRICOSMOS, S.A. Οι πληροφορίες που περιλαμβάνονται στο παρόν έγγραφο μπορούν να τροποποιηθούν
Finite Field Problems: Solutions
 Finite Field Problems: Solutions 1. Let f = x 2 +1 Z 11 [x] and let F = Z 11 [x]/(f), a field. Let Solution: F =11 2 = 121, so F = 121 1 = 120. The possible orders are the divisors of 120. Solution: The
AMORTIGUADORES DE VIBRACIÓN
 AMORTIGUADORES DE VIBRACIÓN Estas instrucciones forman parte integrante del manual que acompaña el aparato en el cual se va a instalar este accesorio. Este manual se refiere a ADVERTENCIAS GENERALES y
HOMEWORK 4 = G. In order to plot the stress versus the stretch we define a normalized stretch:
 HOMEWORK 4 Problem a For the fast loading case, we want to derive the relationship between P zz and λ z. We know that the nominal stress is expressed as: P zz = ψ λ z where λ z = λ λ z. Therefore, applying
 Assembly Instructions Instructions d assemblage Montageanleitung Οδηγίες Συναρμολόγησης Montage-instructies Instrucciones de armado Montagevoorschrift Instruções de montagem ProvEnce Rattan Style Table
Technisches Handbuch. Pergola Top Star 120X70. metaform Bescha ungssysteme
 02 Technisches Handbuch Pergola Top Star 120X70 Exklusiv von Metaform ΑVΕΕ entworfen, ist es die Innova on bei der professionellen Bescha ung, denn das wegweisende Hebesystem erlaubt es Ihnen, sie an jeder
ΕΦΑΡΜΟΓΗ APPLICAZIONE APPLICATION APPLICATION. Sublime Colours 2,5L (10-12m2/L) Esencia 25 ml 100 ml. Damasco 2,5L (6-8m2/L)
 Esencia 25 ml 100 ml. Damasco 2,5L (6-8m2/L)") DAMASCO Διακριτική και κομψή διακόσμηση εμπνευσμένη από τα πολυτελή υφάσματα της αρχαιότητας, για όσους επιθυμούν οι τοίχοι να είναι επενδεδυμένοι με ένα προϊόν που παρέχει μεταξένια και βελούδινη αντανάκλαση.
DAMASCO Διακριτική και κομψή διακόσμηση εμπνευσμένη από τα πολυτελή υφάσματα της αρχαιότητας, για όσους επιθυμούν οι τοίχοι να είναι επενδεδυμένοι με ένα προϊόν που παρέχει μεταξένια και βελούδινη αντανάκλαση.