OWNER S MANUAL CA-301 Power Amplifier
|
|
|
- Ευρυβία Βαμβακάς
- 8 χρόνια πριν
- Προβολές:
Transcript
1 OWNER S MANUAL CA-301 Power Amplifier ENGLISH...1 FRANÇAIS...3 DEUTSCH...5 ESPAÑOL...7 NEDERLANDS...10 ΕΛΛΗΝΙΚΑ SPECIFICATIONS...17 V1.0

2 Figure 1 Jumper settings J3 J2 J1 J0 ADDRESS RC Button Auto ON X X X X 0 Amp 1 No X X X Out 1 Amp 2 No X X Out X 2 Amp 3 No X X Out Out 3 Amp 4 No X Out X X 4 Amp 5 No X Out X Out 5 Amp 6 No X Out Out X 0 Amp 1 No X Out Out Out 0 Amp 1 Yes Figure 2 Rear view

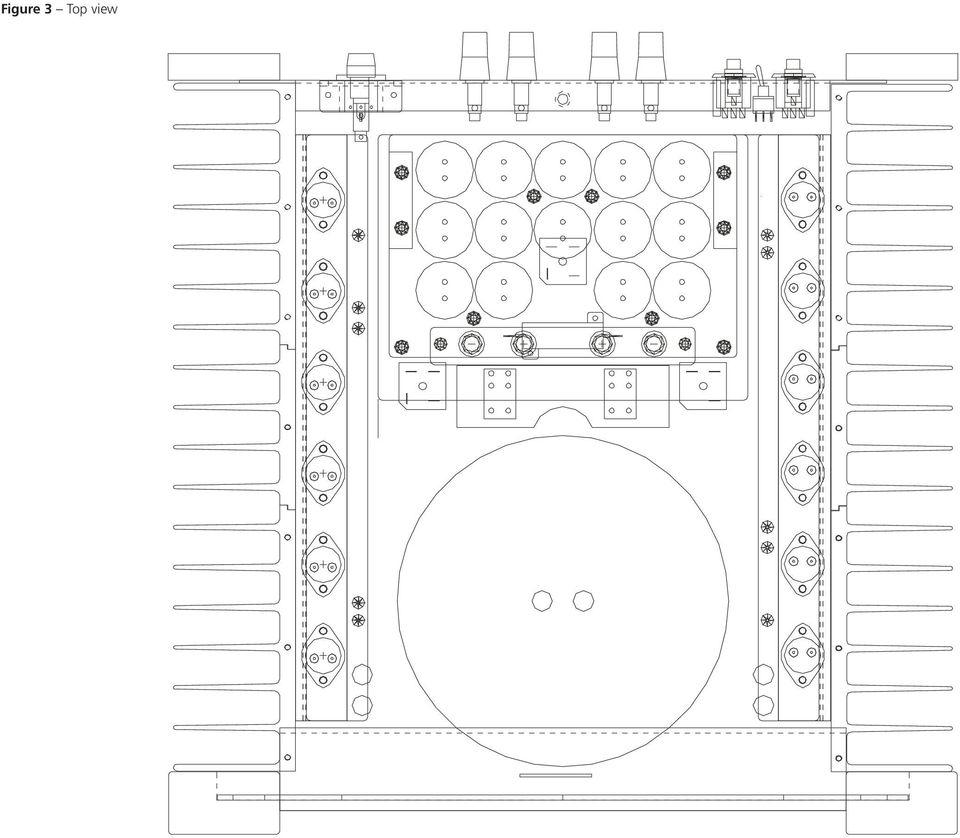
3 Figure 3 Top view
4 THANK YOU FROM EVERYONE AT CLASSÉ Thank you for purchasing the Classé CA-301 power amplifier. We take great pride in offering components that combine exceptional sonic performance and long-term reliability. To do that, we have invested in extraordinary design and manufacturing facilities. We trust that you will enjoy your purchase for many years to come. CLASSÉ DESIGN PHILOSOPHY All of our components benefit from the same rigorous design goal: All Classé products must reproduce music with the harmonic and spatial integrity typical of fine instruments heard in a live, unamplified performance. UNPACKING & SET-UP Your CLASSÉ CA-301 power amplifier is packed in high density, semi-rigid foam placed in a special cardboard box. To remove the unit, open and spread all the top flaps of the box and by its sides, lift out the entire unit and put it on a large flat surface. Take it out of the plastic bag and inspect the unit for any concealed damage. Apart from this owner's manual, please ensure the following has also been included: ONE (1) DETACHABLE A.C. LINECORD Please report any damage or missing parts to your dealer immediately. Place the CA-301 at or near its final set-up position, allowing 8 inches at the rear for tightening the speaker output connectors. Stereo Input and output connectors are clearly marked on the back of the amplifier. Left/Right connections are oriented from the front of the unit. Stereo output connections are marked above the connectors. Switch stereo/mono switch to STEREO position. (The CA-301 is preset at the factory for STEREO.) Use only high quality interconnect and loudspeaker cables, and make all connections tight. If the RCA input plugs are loose, remove them and pinch down the ground leaves slightly with pliers. Observe correct phasing of the loudspeaker connections, and tighten. DO NOT OVERTIGHTEN the output connectors. When powering up the CA-301 in stereo mode, the front LED will blink RED for approximately 20 seconds, when the sequence is completed, will be solid RED. Single Circuit Design To this end, we make extensive use of carefully optimized versions of the same basic circuit precisely matched to specific power requirements. This means that all Classé line level components and power amplifiers benefit from years of refinement. However, our efforts do not stop here. Listening: The Critical Design Element Once we determine general circuit values for a particular application, we listen carefully while exchanging and mixing different parts (transistors, capacitors, wiring, PC boards, etc.) and adjusting specific operating voltages within proper engineering ranges. Extended Real-World Lifespan Every Classé component, even the most affordable, benefits from our painstaking approach to design parameters. The result is an optimum balance between the often-conflicting demands of exceptional performance and longterm reliability. Our most expensive components gain from even tighter tolerance parts and highly segmented and exceptionally robust power supplies with large reserve-current capabilities. Our Pride in Manufacturing, Your Pride in Ownership We build all of our components to the highest possible standards. From multi-layer glass-epoxy circuit boards, the full sized power-supplies, and the massive faceplates, every Classé product is a tribute to both the science and art of sound reproduction. We hope that you derive as much pleasure and satisfaction in using your Classé as we did in producing it. The power transformer in the CA-301 are located at the front-center of the unit. Ideally, a few feet should separate this area from components which potentially could pick up hum. These include preamplifiers, turntables, and interconnect cables. In terms of providing adequate airspace for cooling, a good rule of thumb is to allow 6 inches above and 3 inches on each side of the unit. Check the Serial Number sticker on the back of the unit for the correct operating voltage. The CA-301 has one external AC fuse, the rating of which should be as follows: LINE VOLTAGE FUSE RATING 100 or 120 V.A.C. 12 AMP SLOW BLOW, 125 or 250 volts 220 or 240 V.A.C. 10 AMP SLOW BLOW, 250 volts GENERAL CONNECTIONS A.C. Line Insert the linecord into the A.C. receptacle on the rear of the unit. PLEASE MAKE SURE YOU HAVE PREVIOUSLY HOOKED UP THE SPEAKERS AND PREAMPLIFIER TO YOUR AMPLIFIER BEFORE CONNECTING THE AC POWER CORD TO THE AMPLIFIER. IMPORTANT NOTE CAUTION: Safety Instructions Disconnect the AC line cable before making any other connections. Floating the ground, or defeating the ground on a 3-prong linecord may create a shock hazard. Connect all interconnect cables between the electronics before connecting the A.C. linecord to the wall outlets. This will reduce the potential shock hazard. Mono Please read through the previous Stereo section for general notes on securing good connections, and safety tips. If the unit has been previously used in stereo, make sure it is OFF, and remove all connections, including the AC line cable. Make sure the STEREO/MONO switch is switched to the MONO position. NOTE: The Stereo-Mono switch will not operate if the amplifier is turned on, you will NOT be able to change from one mode to the other, as the mode is locked while the amplifier is on. The MONO Input is the left channel input, as marked. The unused right channel input is automatically disconnected. Correct output phase MONO connections are marked below the connectors. Repeat the above MONO settings and connections on the second CA-301 to be used for the other channel. Please remember that the negative output connection of a bridged amplifier is NOT a ground. Do not use a common ground switchbox set-up. Do not use with electronic crossovers which have a common ground. Connecting two bridged amplifiers to a common ground device of any sort will cause the amplifiers to fail. Mono Operation As stated before, either the line or balanced inputs can be used in stereo or mono. Connect a single interconnect, either line or balanced, to the left channel input of each amplifier. See the Mono section above for complete details. NOTE: Neither the Stereo-Mono switch nor the LINE/ BALANCED switch will operate while the amplifier is turned on. You will NOT be able to change from one mode to the other, as these modes are locked while the amplifier is on. To activate the circuit, turn off the unit and engage the STEREO/MONO switch to LINE. If the unit has not been turned off before engaging the switch, turn off the unit, wait for about 10 seconds, and turn the unit on again, the circuit will then engage. 1

5 CONNECTIONS FOR LINE OR BALANCED INPUTS: The CLASSÉ CA-301 power amplifier is equipped with both line and balanced inputs. Either one may be used SEPARATELY, BUT NOT SIMULTANEOUSLY. The balanced inputs must be connected to a pre-amplifier which has balanced main outputs. Balanced inter-connects with XLR connectors are also required. Regardless of the amplifier inputs used, stereo or mono operation is possible on the CA-301. Line Inputs Engage the LINE/BALANCED switch to the position marked LINE. (The amplifier is factory set for LINE.) NOTE: The LINE/ BALANCED switch will not operate if the amplifier is turned on, you will NOT be able to change from one mode to the other, as the mode is locked while the amplifier is on. To activate the circuit, turn off the unit and engage the LINE/BALANCED switch to LINE. If the unit has not been turned off before engaging the switch, turn off the unit, wait for about 10 seconds, and turn the unit on again, the circuit will then engage. Connect the line interconnects to the RCA input jacks on the rear panels of the CA-301. The balanced connectors are automatically disabled. Balanced Inputs Switch the LINE/BALANCED switch to the position marked BALANCED. A balanced preamplifier and balanced interconnects are also required. NOTE: The LINE/ BALANCED switch will not operate if the amplifier is turned on, you will NOT be able to change from one mode to the other, as the mode is "locked" while the amplifier is on. If the unit has not been turned off before engaging the switch, turn off the unit, wait for about 10 seconds, and turn the unit on again, the circuit will then engage. For use with balanced preamplifiers other than Classé, the wiring of the 3-pin XLR connectors must be matched to that of the CLASSÉ CA-301 which are wired as follows: PIN 1: GROUND PIN 2: POSITIVE (NON-INVERTED) SIGNAL, HOT PIN 3: NEGATIVE (INVERTED) SIGNAL All Classé preamplifiers and amplifiers are configured as above. Some preamplifiers from other manufacturers have PIN-3 set as the positive or HOT side. If this is true of your preamplifier, and you wish to maintain absolute phase throughout your system, the interconnects must have the wire which is connected to PIN-3 at the preamplifier output end switched to PIN-2 at the amplifier input end and the wire which is connected to PIN-2 at the preamplifier output switched to PIN-3 at the amplifier input end. Having confirmed the correct connections, plug the XLR connectors of the balanced interconnects into the locking XLR connectors on the rear panel of the CA-301. Push the connectors in until the locking mechanism clicks. (To remove the connectors, press the tab above the connector while pulling gently on the connector body.) Protection Circuit A special circuit in the Classé CA-301 continuously monitors the output audio signal to detect output overload, clipping or DC content. In addition, each channel has two front end supply voltage fuses ( 3 /4 amp fast blow), located on the front end voltage regulation board, to protect the input circuitry from damage due to overload. There is also an AC line fuse, located at the rear of the amplifier immediately above the IEC receptacle. If the protection circuit of the unit is triggered or any of the protection fuses has blown, the FRONT PANEL POWER LED will go to BLINKING GREEN. IF THE PROTECTION CIRCUIT HAS BEEN TRIGGERED, TURN THE CA-301 OFF. After the situation which has triggered the protection circuit has been clearly identified and corrected, attempt to re-start the unit. IF THE UNIT STILL GOES INTO PROTECTION MODE, OR IF IT APPEARS THAT PROTECTION FUSES DID BLOW, CONTACT YOUR LOCAL DEALER. DO NOT TRY TO CHANGE A BLOWN FUSE. REPLACING A FUSE WITHOUT CHECKING FOR COMPONENT FAILURE COULD RESULT IN FURTHER, SERIOUS DAMAGE TO VITAL COMPONENTS IN YOUR AMPLIFIER. CONTACT YOUR LOCAL DEALER or Customer Service at the Classé Audio, Inc +1(514) IR Out and In: The CA-301 may also be turned on and off using our SSP-75 Surround Sound Processor, utilising the IR OUT and IN jacks. To turn on your CA-301 with the SSP-75, Disconnect you CA-301 from the AC line completely, open the top cover and locate the 4 internal jumpers inside the CA-301 located to the right side of the regulator board (top board located at the back of the unit). When facing the amplifier from the front, remove the jumper located completely at the back (the last in the row) and save this jumper. Re-install the top cover. Install a mini jack into IR IN at the back of the CA-301 and plug the other end of the mini jack into the 5VDC mini jack at the back of your SSP-75. When the Standby button of the SSP-75 is pressed, it will now activate the turn on turn off circuitry of your CA-301. Several amplifiers may be turned on automatically in sequence or all at once, depending upon the configuration of the jumper settings in the amplifier. The table in Fig 1 tells you which jumper should be inserted or removed to obtain the correct sequence on which you will want your amplifier to turn on. J3 J2 J1 J0 ADDRESS RC Auto Button ON X X X X 0 Amp 1 No X X X out 1 Amp 2 No X X out X 2 Amp 3 No X X out out 3 Amp 4 No X out X X 4 Amp 5 No X out X out 5 Amp 6 No X out out X 0 Amp 1 No X out out out 0 Amp 1 Yes CA-301 FEATURES: Newly developed special Classé symetrical circuitry from input to output. Current capacity increased above standard units. One massive toroidal transformer totalizing 2 KVA. Over µf storage capacity for each channel. Ten high current/voltage Bi-Polar devices per channel. Discrete high voltage/current regulation for the pre-driver and input sections. Metalized polypropylene capacitors bypassing each output device. Heavily gold plated bars connecting all supplies for the ouput devices. Heavily gold plated input and output connectors. All signal carrying cables are shielded and have Litz type configuration. All other wiring is oxygen free copper. Notice to all Classé Product owners: Thank you for your purchase of a Classé Audio component. All of us at Classé have taken extreme care to ensure that your purchase will become a prized investment. We are proud to inform you that all Classé Audio components have been officially approved for the European Community CE mark. This means that your Classé product has been subjected to the most rigorous manufacturing and safety tests in the world, and have proven to meet or exceed all European Community CE requirements for unit to unit consistency and consumer safety. All of us at Classé Audio wish you many years of musical enjoyment. As of July 18, 1996, Classé Audio has been granted Certificate No: C401CLA1.MGS, which indicates CE approval for all models of the Classé Audio product line. CLASSÉ AUDIO 5070 François Cusson Lachine, Québec Canada H8T 1B3 Telephone: +1 (514) Fax: +1 (514)

6 FRANÇAIS TOUTE L ÉQUIPE DE CLASSÉ VOUS REMERCIE! Nous vous remercions pour l achat de ce amplificateur de puissance CLASSÉ CA-301. Nous prenons un soin jaloux à concevoir et proposer des maillons qui associent une musicalité exceptionnelle avec une fiabilité hors pair. Pour cela, nous avons choisi un dessin très original pour nos appareils, et l avons équipé de nombreuses fonctions particulièrement ergonomiques. Nous sommes ainsi certains que vous profiterez de votre achat pendant de très nombreuses années. PHILOSOPHIE DE CONCEPTION CLASSÉ Tous nos maillons sont conçus dans le même souci de perfection et de rigueur : les appareils Classé doivent reproduire intégralement la musique, avec tous ses harmoniques, et le respect total de la position et de l ampleur des instruments dans l espace. Exactement comme dans une écoute en direct, sans amplification électronique aucune. Un circuit électronique unique Pour cela, nous utilisons principalement un circuit électronique de conception unique, reprenant sur tous nos maillons les mêmes principes de base adaptés aux demandes en puissance de chaque appareil. C est ainsi que tous les préamplificateurs Ligne et amplificateurs de puissance Classé bénéficient depuis des années de la même qualité sonore. Cependant, nos efforts ne s arrêtent pas là. L écoute : l élément le plus critique pendant la conception Une fois que nous avons déterminé les valeurs précises de chaque circuit électronique, en fonction de chaque application particulière, nous procédons à de très nombreuses écoutes attentives en modifiant et en associant certains composants (transistors, condensateurs, câblage, cartes circuits imprimés, etc.). Puis nous réglons très précisément les différentes tensions nécessaires au parfait fonctionnement de ces composants. Une durée de vie exceptionnelle Chaque maillon Classé, même le plus abordable, bénéficie de cette très soigneuse approche dans la conception. Le résultat est un équilibre parfait entre les demandes souvent opposées que représentent une musicalité exceptionnelle et une fiabilité à toute épreuve. Dans ces deux domaines, les gains sont obtenus par l utilisation de composants aux tolérances très strictes, avec une implantation large et soignée, et l emploi d alimentations exceptionnellement robustes, disposant toujours de très grandes réserves de courant. Notre fierté est dans la fabrication. La vôtre est dans la possession Nous construisons donc tous nos maillons selon les standards en vigueur les plus élevés. Qu il s agisse des circuits imprimés multicouches en verre époxy, des alimentations surdimensionnées, ou des très épaisses faces avant des appareils, chaque appareil Classé devient une référence dans l art de maîtriser à la fois la technique électronique et celui de la reproduction sonore et musicale. Nous espérons que vous tirerez autant de plaisir et de satisfaction à utiliser votre nouveau Classé que nous en avons eu à le concevoir et à le fabriquer. DÉBALLAGE & MISE EN SERVICE Votre amplificateur de puissance CLASSÉ CA-301 est emballé dans une coquille moulée semirigide, placée dans un carton spécial. Pour sortir l appareil, ouvrez et repliez tous les rabats supérieurs du carton, tirez l ensemble appareil plus protection interne et posez-le sur une surface plane. Ôtez le sac plastique de protection et inspectez soigneusement l appareil pour repérer tout dommage éventuel. En plus de ce manuel d utilisation, vous trouverez également dans l emballage : CÂBLE SECTEUR DÉTACHABLE Veuillez avertir immédiatement votre revendeur de toute détérioration constatée sur l appareil, ou accessoire manquant. Posez le CA-301 à proximité de sa position normale, ou directement en place, en veillant à conserver un espace de 15 à 20 centimètres derrière ses prises de branchement pour les enceintes acoustiques. Pour les meilleures performances musicales possibles, nous vous conseillons le câble secteur optionnel CLASSÉ REFERENCE A.C. LINECORD. Consultez votre revendeur pour vous procurer cet accessoire. Le transformateur d alimentation du CA-301 est placé au centre et à l avant du châssis de l appareil. Idéalement, les autres maillons du système susceptibles de capter des parasites dus au secteur doivent rester éloigner de quelques centimètres de ce transformateur. Cela inclut les préamplificateurs, platines tourne-disque et câbles de liaison. Afin de permettre une bonne ventilation, conservez un espace d environ 15 centimètres au-dessus de l amplificateur, et une dizaine de centimètres de part et d autre. Vérifiez les inscriptions portées sur l étiquette en face arrière de l appareil, indiquant la tension correcte de fonctionnement. Le CA-301 dispose aussi d un fusible de protection secteur externe, qui doit porter les inscriptions suivantes : TENSION VALEUR D ALIMENTATION DU FUSIBLE 100 ou 120 V AC 12 A, fusion retardée, 125 ou 250 volts 220 ou 240 V AC 10 A, fusion retardée, 250 volts BRANCHEMENTS GÉNÉRAUX Câble secteur Insérez le câble secteur dans la prise correspondante en face arrière de l appareil. AVANT CELA, VÉRIFIEZ QUE LES ENCEINTES ACOUSTIQUES ET LE PRÉAMPLIFICATEUR ONT ÉTÉ CORRECTEMENT BRANCHES SUR L AMPLIFICATEUR DE PUISSANCE. Note importante ATTENTION : Instructions de sécurité Débranchez le câble secteur des que vous effectuez un branchement. L utilisation d une masse flottante, ou l absence de branchement effectif de la terre peut être cause d électrocution. Branchez toujours tous les câbles de liaison entre les différents maillons électroniques avant de brancher les câbles secteur dans les prises murales. Cela réduit les risques potentiels d électrocution. Stereo Les canaux sur les prises d entrée et de sortie sont clairement indiqués à l arrière de l amplificateur. Les branchements gauche/droite (left/right) sont orientés par rapport à la face avant. Les branchements des sorties stéréo sont marqués sur les prises correspondantes. Placez le sélecteur stereo/mono sur sa position STEREO. (Cette position est préréglée en usine). Utilisez uniquement des câbles de liaison de très grande qualité, et vérifiez la qualité de tous les contacts. Si les prises RCA tournent trop librement, débranchez-les et pliez très délicatement leurs pattes périphériques avec des petites pinces. Vérifiez la mise en phase correcte des enceintes acoustiques (respect du plus et du moins), et vissez correctement les bornes. NE PAS CHERCHER A VISSER TROP VIOLEMMENT ces bornes de sortie, sous peine de détérioration. Lors de la mise sous tension en fonctionnement Stéréo, la diode rouge de la face avant clignote pendant environ 20 secondes, puis, une fois cette temporisation terminée, s allume de manière fixe. Mono Veuillez lire les indications sur la qualité des connexions développées dans le paragraphe précédent STEREO. Si l appareil était auparavant utilisé en stéréophonie, vérifiez qu il soit éteint et débranchez tous les câbles, y compris le câble secteur. Vérifiez que le sélecteur MONO/STEREO est placé sur sa position MONO. NOTE : ce sélecteur n a aucun effet si l amplificateur est encore sous tension, car le choix reste volontairement verrouillé tant que l amplificateur est en position de fonctionnement. L entrée à utiliser en mode MONO est l entrée gauche (left), comme repéré. L entrée droite (right) inutilisée est automatiquement déconnectée. Les branchements corrects à respecter en mode MONO sont gravés sous les prises. 3

7 Répétez ces mêmes opérations sur le second amplificateur CA-301 éventuellement utilisé pour le second canal. N oubliez pas que la prise de sortie négative (le moins ) utilisé dans ce mode ponté mono n est PAS une masse. N utilisez jamais une boîte de commutation dite à masse commune. N utilisez pas non plus cette configuration avec des filtres actifs électroniques possédant une masse commune. Le branchement de deux amplificateurs pontés en mono sur un même maillon présentant une masse commune entraîne instantanément la mise hors service des deux amplificateurs. Fonctionnement en monophonie Comme déjà expliqué, les entrées symétriques comme les entrées classiques peuvent être utilisées en monophonie comme en stéréophonie. Dans le cas d un seul branchement, utilisez simplement la prise de gauche, symétrique ou asymétrique. Voir le paragraphe MONO précédent pour de plus amples informations à ce sujet. NOTE : ni le sélecteur Stereo-Mono, ni le sélecteur asymétrique-symétrique LINE-BALANCED ne fonctionnent lorsque l amplificateur est sous tension. Le mode de fonctionnement est en effet volontairement verrouillé tant que l amplificateur est allumé. Pour activer le mode de fonctionnement MONO, éteignez d abord l amplificateur, puis placez le sélecteur STEREO/MONO sur MONO. Si l amplificateur n était pas encore éteint au moment de cette modification, éteignez-le, attendez 10 secondes puis rallumer l amplificateur pour que le mode de fonctionnement soit activé. BRANCHEMENTS SUR LES ENTRÉES ASYMÉTRIQUES OU SYMÉTRIQUES : L amplificateur de puissance CLASSÉ CA-301 est équipé à la fois d entrées asymétriques et d entrées symétriques. Les unes ou les autres peuvent être utilisées AU CHOIX, MAIS JAMAIS SIMULTANÉMENT. Les entrées symétriques doivent être branchées sur un préamplificateur qui possède aussi des entrées symétriques. On utilise alors des prises de type XLR. Quel que soit le type de liaison choisie (symétrique ou asymétrique), l amplificateur CA-301 peut fonctionner en mono comme en stéréo. Entrées asymétriques normales (Le réglage par défaut de l amplificateur est LINE, c est-à-dire entrées normales asymétriques). Si vous désirez utiliser cet amplificateur avec un préamplificateur à sortie asymétrique et que l amplificateur est réglé sur le mode SYMÉTRIQUE BALANCED, éteignez-le et déplacez le commutateur repéré LINE/ BALANCED sur la position marquée LINE. NOTE : ce sélecteur LINE/BALANCED n a aucun effet si l amplificateur est encore sous tension, car le choix reste volontairement verrouillé tant que l amplificateur est en position de fonctionnement. Si l amplificateur n était pas encore éteint au moment de cette modification, éteignez-le, attendez 10 secondes puis rallumer l amplificateur pour que le mode de fonctionnement soit activé. Branchez les câbles normaux sur les prises d entrée RCA à l arrière du CA-301. Les prises XLR symétriques sont alors automatiquement déconnectées. Entrées symétriques balanced (Le réglage par défaut de l amplificateur est LINE, c est-à-dire entrées normales asymétriques). Si vous désirez utiliser cet amplificateur avec un préamplificateur à sortie symétrique et que l amplificateur est réglé sur le mode ASYMÉTRIQUE LINE, éteignez-le et déplacez le commutateur repéré LINE/ BALANCED sur la position marquée BALANCED. NOTE : ce sélecteur LINE/BALANCED n a aucun effet si l amplificateur est encore sous tension, car le choix reste volontairement verrouillé tant que l amplificateur est en position de fonctionnement. Si l amplificateur n était pas encore éteint au moment de cette modification, éteignez-le, attendez 10 secondes puis rallumer l amplificateur pour que le mode de fonctionnement soit activé. Branchez les câbles sur les prises d entrée RCA à l arrière du CA-301. Les prises XLR symétriques sont alors automatiquement déconnectées. Si vous utilisez un préamplificateur à sorties symétriques autre qu un modèle Classé, le câblage des trois broches des prises XLR, pour s adapter à celles du CLASSÉ CA-301, doit être réalisé comme suit : BROCHE 1 : MASSE BROCHE 2 : POSITIF (NON INVERSÉ) BROCHE 3 : NÉGATIF (INVERSÉ) Tous les préamplificateurs et amplificateurs Classé sont configurés comme indiqué ci-dessus. Quelques préamplificateurs d autres marques utilisent la broche 3 en POSITIF. Si c est le cas du vôtre, et que vous souhaitez maintenir la phase absolue tout au long de votre système, vous devrez inverser les broches 2 et 3 à une extrémité de votre câble symétrique. Un autre moyen, plus simple, de conserver la phase absolue consiste simplement à inverser les bornes + et - sur les enceintes acoustiques. (Dans tous les cas, il est utile de se renseigner auprès du constructeur pour s assurer que l appareil n est pas inverseur de phase entre son entrée et sa sortie). Une fois que vous avez vérifié la bonne conservation de la phase absolue, vérifiez que l amplificateur est bien hors tension, puis branchez les prises symétriques XLR verrouillables à l arrière du CA-301. Insérez les prises jusqu à entendre le clic du verrouillage. (Pour débrancher ces prises, appuyez d abord sur la languette au-dessus de la prise, puis tirez doucement la prise vers vous.) Circuit de protection Le Classé CA-301 possède un circuit pour la détection d une distorsion inhabituelle et/ou de la présence d une tension continue dans le signal d entrée. Il est de plus équipé de fusibles destinés à protéger les circuits d entrée d alimentation (0,75 ampère, fusion retardée, placés près du circuit de régulation de tension, pour protéger les circuits d entrée de toute surcharge. Un fusible secteur protège également l alimentation. Il est placé en face arrière, juste à côté de la prise secteur. Si le circuit de protection entre en action ou qu un fusible fond, la DIODE LED EN FACE AVANT SE MET A CLIGNOTER EN VERT. SI LE CIRCUIT DE PROTECTION EST ENTRE EN SERVICE, ÉTEIGNEZ IMMÉDIATEMENT LE CA-301. Lorsque le problème a été clairement identifié et corrigé, tentez de rallumer l amplificateur. SI L APPAREIL SE REMET TOUT DE SUITE EN PROTECTION, OU QU UN FUSIBLE FOND, CONTACTEZ VOTRE REVENDEUR. NE TENTEZ PAS DE CHANGER VOUS-MÊME UN FUSIBLE FONDU SANS AVOIR PU REPÉRER ET CORRIGER DE MANIÈRE CERTAINE LE PROBLÈME. DANS LE CAS CONTRAIRE, DE SÉRIEUX PROBLÈMES PEUVENT SURVENIR A DES COMPOSANTS VITAUX DE L AMPLIFICATEUR. CONTACTEZ IMMÉDIATEMENT VOTRE REVENDEUR. Prises IR Out et In (entrée et sortie signal infrarouge) : Le CA-301 peut également être mis sous ou hors tension en utilisant notre processeur Surround SSP-75, avec ses prises repérées IR OUT et IN. Pour cela, commencez par débrancher complètement le CA-301 du secteur, ouvrez son capot et localisez les quatre cavaliers internes dans le CA-301, sur le côté droit du circuit de régulation (circuit de dessus à l arrière du coffret). En regardant l amplificateur depuis l avant, retirez le cavalier situé complètement à l arrière (le dernier de la rangée) et conservez-le en lieu sûr. Remettez le capot. Branchez une prise mini-jack dans la prise IR IN à l arrière du CA-301, et branchez la prise mini-jack de l autre extrémité du câble dans la prise repérée 5VDC à l arrière du SSP-75. Lorsque la touche de mise en veille Standby du SSP-75 est pressée, elle active aussi le circuit de mise en/hors tension du CA-301. Plusieurs amplificateurs peuvent ainsi être allumés les uns derrière les autres ou simultanément, suivant la configuration des cavaliers internes de l appareil. Le tableau de la figure 1 vous indique quels cavaliers doivent être retirés ou laissés en place pour obtenir la séquence correcte d allumage des amplificateurs. 4

8 J3 J2 J1 J0 ADDRESS RC Auto Button ON X X X X 0 Amp 1 non X X X Ôté 1 Amp 2 non X X Ôté X 2 Amp 3 non X X Ôté Ôté 3 Amp 4 non X Ôté X X 4 Amp 5 non X Ôté X Ôté 5 Amp 6 non X Ôté Ôté X 0 Amp 1 non X Ôtét Ôté Ôté 0 Amp 1 Yes CARACTÉRISTIQUES DU CA-301 : Nouveau circuit spécifique à Classé entièrement symétrique de l entrée à la sortie. Capacité en courant accrue par rapport aux appareils standards. Très gros transformateur d alimentation torique de 2 kva. Plus de µf de capacité de stockage par canal. Dix éléments bipolaires haut courant/tension par canal. Régulation haut courant/tension à composants discrets pour les étages d entrée et pré-driver. Condensateurs polypropylène métallisés court-circuitant chaque sortie. Connexions plaquées or de très forte section pour les sorties. Prises d entrées et de sorties plaquées or. Tous les câbles transportant le signal sont blindés, et de configuration Litz. Les autres conducteurs sont en cuivre désoxygéné. Note à tous les propriétaires d appareils Classé : Nous vous remercions pour l acquisition de ce maillon Classé Audio. Nous avons pris un soin extrême pour garantir que votre achat soit un réel investissement. Nous sommes fiers de vous préciser que tous les appareils Classé Audio ont été officiellement agréés par les normes CE de la Communauté Européenne. Cela signifie que votre appareil Classé satisfait aux normes électriques et de sécurité les plus rigoureuses au monde et qu il a satisfait à tous les tests d homologation pour atteindre ou dépasser les exigences de la CE Communauté Européenne en terme de sécurité du consommateur. Toute l équipe de Classé Audio vous souhaite très sincèrement de très nombreuses années de plaisir musical. Le 18 juillet 1996, tous les appareils du constructeur Classé Audio ont reçu l agrément CE de la Communauté Européenne, sous le certificat N C401CLA1.MGS. CLASSÉ AUDIO 5070 François-Cusson Lachine, Québec Canada H8T 1B3 Téléphone : +1 (514) Fax : +1 (514) DEUTSCH SICHERHEITSHINWEISE Bitte lesen Sie sich die Bedienungsanleitung vor Gebrauch des Gerätes genau durch. Sie enthält wichtige Sicherheitsvorschriften, die unbedingt zu beachten sind! Bewahren Sie die Bedienungsanleitung so auf, dass sie jederzeit zugänglich ist. Nehmen Sie das Gerät nur bei geschlossenem Gehäuse in Betrieb. Ansonsten setzen Sie sich gefährlichen Spannungen aus. Bevor Sie das Gerät in Betrieb nehmen, prüfen Sie, ob die Betriebsspannung mit der örtlichen Netzspannung übereinstimmt. Die Betriebsspannung ist an der Rückseite des Gerätes angegeben. Stellen Sie das Gerät nicht in die Nähe von Wärmequellen (Heizkörper, Wärmespeicher, Öfen oder sonstige wärmeerzeugende Geräte). Extreme Wärme kann zu einer Beschädigung des Gerätes führen. Dieses Gerät darf nur in trockenen Räumen betrieben werden. Um die Gefahr von Feuer oder eines elektrischen Schlages auszuschließen, dürfen keine Flüssigkeiten oder Fremdkörper in das Gerät gelangen. Sollte dieser Fall trotzdem einmal eintreten, trennen Sie das Gerät sofort vom Netz. Lassen Sie es von einem autorisierten Fachmann prüfen und die notwendigen Reparaturarbeiten durchführen. Das Gerät ist ausschließlich von einem autorisierten Fachmann zu öffnen und zu reparieren. Bei Gewitter oder wenn Sie das Gerät für eine längere Zeit nicht in Betrieb nehmen, ziehen Sie den Netzstecker aus der Steckdose. Dieses Gerät sollte, wie andere Elektrogeräte auch, nicht unbeaufsichtigt betrieben werden. VIELEN DANK Wir möchten Ihnen herzlich danken, dass Sie sich für die Classé-Endstufe CA-301 entschieden haben. Wir sind stolz darauf, Ihnen Komponenten mit außergewöhnlicher Klangqualität und langfristiger Zuverlässigkeit bieten zu können. Um dazu in der Lage zu sein, arbeiten wir stets an Verbesserungen hinsichtlich der Entwicklung und Herstellung unserer Produkte. Wir sind sicher, dass Sie in den nächsten Jahren viel Freude an Ihrem Gerät haben werden. DIE CLASSÉ-PHILOSOPHIE Bei der Entwicklung unserer Komponenten haben wir stets die originalgetreue Wiedergabe von Musik im Auge. Unser Ziel sind Produkte, die Musik mit derselben Harmonie und räumlichen Abbildung darbieten, die charakteristisch für Live-Konzerte mit feinsten Musikinstrumenten ohne Verstärkereinsatz sind. Einzigartiges Platinenlayout An diesem Punkt arbeiten wir an der Optimierung des Platinenlayouts, um dieses exakt an die gestellten Leistungsanforderungen anzupassen. Das bedeutet, dass alle Classé- Geräte im Zuge jahrelanger Entwicklungsarbeit stetig verbessert worden sind. Ein Prozess, der natürlich kontinuierlich weiter fortgesetzt wird. Hörtests: Das entscheidende Element bei der Entwicklung Haben wir die allgemeinen Platinenparameter für einen besonderen Anwendungsfall festgelegt, machen wir intensive Hörtests. Dabei werden verschiedene Bauteile (Transistoren, Kondensatoren, Kabel, Platinen usw.) ausgetauscht und miteinander kombiniert und bei bestimmten Betriebsspannungen innerhalb der technischen Grenzen aufeinander abgestimmt. Extrem hohe Lebensdauer Ausnahmslos jedes Classé-Produkt profitiert von unserem unermüdlichen Streben nach Optimierung der Konstruktionsparameter. Das Ergebnis ist ein optimales Gleichgewicht zwischen den oftmals im Widerspruch zueinander stehenden Bemühungen um eine außergewöhnliche Leistungsfähigkeit bei gleichzeitig langfristiger Zuverlässigkeit. Unsere exklusiveren Komponenten profitieren darüber hinaus von noch enger tolerierten Bauteilen und außergewöhnlich stabilen Netzteilen mit enormer Stromlieferfähigkeit. Erstklassige Ergebnisse Unsere Komponenten werden nach den höchsten Standards gefertigt. Von den mehrschichtigen Glas-Epoxyd-Platinen, den großzügig dimensionierten Netzteilen bis hin zu den massiven Frontplatten repräsentiert jedes Classé-Produkt in puncto Musikwiedergabe den Stand der Technik. Wir hoffen, dass Sie so viel Freude an Ihrem Classé-Produkt haben werden, wie wir bei seiner Herstellung hatten. AUSPACKEN & SETUP Ihre CLASSÉ-ENDSTUFE CA-301 ist von einem stabilen Kunststoffbeutel und halbstarrem Dämmmaterial umgeben sicher in einem Spezialkarton verpackt. Möchten Sie das Gerät aus der Verpackung nehmen, öffnen Sie die oberen Kartonlaschen und klappen diese zur Seite. Greifen Sie das Gerät an beiden Seiten und heben Sie es komplett mit dem Dämmmaterial aus dem Karton. Ziehen Sie das Dämmmaterial gerade vom Gerät ab. Stellen Sie das Gerät auf eine große, flache Oberfläche und entfernen Sie den Kunststoffbeutel. Prüfen Sie, ob das Gerät versteckte Beschädigungen aufweist. Neben der Bedienungsanleitung befindet sich folgendes Zubehör im Karton: EIN ABNEHMBARES NETZKABEL. 5

9 Bitte setzen Sie sich bei etwaigen Beschädigungen oder fehlenden Teilen umgehend mit Ihrem Fachhändler in Verbindung. Stellen Sie die CA-301 in ihre endgültige oder in die Nähe ihrer endgültigen Position. Lassen Sie dabei einen Abstand von 20 cm an der Rückseite, um die Ausgangsanschlüsse für die Lautsprecher festzuziehen. Zur Klangoptimierung empfehlen wir das separat erhältliche CLASSÉ REFERENCE- Netzkabel. Lassen Sie sich diesbezüglich von Ihrem autorisierten Fachhändler beraten. Der Leistungstransformator ist vorne mittig in das Gerät integriert. Idealerweise sollte die CA-301 in sicherem Abstand zu störanfälligen Komponenten (z.b. Vorverstärkern, Plattenspielern, Verbindungskabeln) aufgestellt werden. Um eine ausreichende Luftzirkulation zur Kühlung zu gewährleisten, sollte oberhalb ein Freiraum von 15 cm und an beiden Seiten des Gerätes ein Freiraum von 8 cm gelassen werden. Bevor Sie das Gerät in Betrieb nehmen, prüfen Sie, ob die Betriebsspannung mit der örtlichen Netzspannung übereinstimmt. Die Betriebsspannung ist an der Rückseite des Gerätes angegeben. Die CA-301 verfügt über eine externe Netzsicherung mit den folgenden Werten: NETZSPANNUNG WERT DER SICHERUNG 100 bzw. 12 A, träge, 120 V Wechselspannung 125 bzw. 250 V 220 bzw. 10 A, träge, 250 V 240 V Wechselspannung ANSCHLUSSMÖGLICHKEITEN Netzeingang Schließen Sie das Netzkabel an den Netzeingang an der Geräterückseite an. SCHLIESSEN SIE ERST DIE LAUTSPRECHER UND DEN VORVERSTÄRKER AN DIE ENDSTUFE AN, BEVOR SIE DAS NETZKABEL MIT DEM NETZEINGANG DER ENDSTUFE VERBINDEN. VORSICHT: Trennen Sie das Netzkabel vom Netz, wenn Sie Anschlüsse herstellen oder Verbindungen ändern möchten. Stellen Sie erst alle Verbindungen zwischen den einzelnen Komponenten her, bevor Sie die Netzkabel mit den Wandsteckdosen verbinden. Dies vermindert die Gefahr eines Stromschlages. Stereo Die Ein- und Ausgangsanschlüsse an der Geräterückseite sind deutlich gekennzeichnet. Wie die Lautsprecher bei Stereo-Betrieb anzuschließen sind, können Sie der Kennzeichnung oberhalb der Schraubklemmen entnehmen. Setzen Sie den STEREO/MONO- Schalter in die STEREO-Position. (Die CA-301 ist im Auslieferungszustand auf STEREO voreingestellt.) Verwenden Sie nur hochwertige Verbindungsund Lautsprecherkabel. Stellen Sie sicher, dass alle Verbindungen ordnungsgemäß hergestellt werden. Achten Sie auf die korrekte Polarität der Anschlüsse. DREHEN SIE DIE LAUTSPRECHERANSCHLUSSKLEMMEN NICHT ZU FEST. Im Stereomodus blinkt die Front-LED in der Einschaltphase von ca. 20 Sekunden ROT. Ist dieser Vorgang abgeschlossen, leuchtet sie ROT. Mono Bitte lesen Sie sich den Abschnitt STEREO gründlich durch, der Sicherheitshinweise und allgemeine Hinweise zur Herstellung der Anschlüsse enthält. Ist das Gerät vorher im Stereo-Modus betrieben worden, schalten Sie das Gerät aus und entfernen alle Anschlusskabel, einschließlich des Netzkabels. Stellen Sie sicher, dass der STEREO/MONO-Schalter an der Geräterückseite auf MONO gesetzt wird. HINWEIS: Die Einstellung des STEREO/MONO- Schalters kann nicht bei eingeschalteter Endstufe geändert werden. Sie können also nicht von einem Modus in den anderen schalten, da der Modus bei eingeschaltetem Verstärker festgelegt ist. Der MONO- Eingang ist der linke Eingangskanal. Der ungenutzte rechte Kanaleingang wird automatisch deaktiviert. Wie der Lautsprecher bei Monobetrieb anzuschließen ist, ist unterhalb der Lautsprecheranschlussklemmen angegeben. Schließen Sie auch die für den zweiten Kanal genutzte Endstufe wie oben angegeben an und nehmen Sie die entsprechenden Einstellungen für den MONO-Betrieb vor. Bitte beachten Sie, dass der negative Ausgangsanschluss der Lautsprecher NICHT mit dem Erdungsanschluss des Gerätes verwechselt werden darf. Verwenden Sie keine elektronischen Frequenzweichen, die eine gemeinsame Erde aufweisen. Der Anschluss zweier gebrückter Endstufen an ein herkömmlich geerdetes Gerät jeglicher Art kann zu einem Ausfall der Endstufen führen. Mono-Betrieb Wie oben bereits gesagt, kann die Endstufe, unabhängig davon, welche Eingangsanschlüsse genutzt werden, im Stereo- oder Mono-Modus betrieben werden. Verbinden Sie ein einzelnes Kabel (symmetrisch oder unsymmetrisch) mit dem linken Eingang an jeder Endstufe. Weitere Details können Sie dem Abschnitt MONO oben entnehmen. HINWEIS: Bevor Sie von einem Modus in den anderen schalten können, müssen Sie die Endstufe abschalten. Dies gilt sowohl für den STEREO/MONO- als auch für den LINE/BALANCED-Schalter an der Geräterückseite. UNSYMMETRISCHE UND SYMMETRISCHE EINGÄNGE Die CLASSÉ-Endstufe CA-301 ist sowohl mit unsymmetrischen als auch mit symmetrischen Eingängen bestückt. Jede Anschlussmöglichkeit kann FÜR SICH, JEDOCH NIEMALS BEIDE GLEICHZEITIG GENUTZT WERDEN. Die symmetrischen Eingänge müssen an einen Vorverstärker mit symmetrischen Hauptausgängen angeschlossen werden. Dazu sind symmetrische Kabel erforderlich. Unabhängig von den genutzten Verstärkereingängen kann die CA-301 im Stereooder Mono-Modus betrieben werden. Unsymmetrische Eingänge (Im Auslieferungszustand befindet sich der LINE/BALANCED-Schalter an der Geräterückseite in der LINE-Position.) Möchten Sie die unsymmetrischen Eingänge an der Endstufe nutzen und befindet sich das Gerät im BALANCED-Modus, schalten Sie die Endstufe ab und setzen den LINE/BALANCED-Schalter in die LINE-Position. HINWEIS: Sie können nur bei abgeschalteter Endstufe von einem Modus in den anderen schalten. Verbinden Sie die Cinch-Kabel mit den Cinch-Buchsen an der Rückseite der CA-301. Die symmetrischen Anschlüsse werden automatisch deaktiviert. Symmetrische Eingänge (Im Auslieferungszustand befindet sich der LINE/BALANCED-Schalter an der Geräterückseite in der LINE-Position.) Möchten Sie die symmetrischen Eingänge der Endstufe nutzen, schalten Sie die Endstufe ab und setzen den LINE/BALANCED-Schalter in die BALANCED- Position. Darüber hinaus muss der angeschlossene Vorverstärker über symmetrische Ausgänge verfügen und die Verbindung über symmetrische Kabel hergestellt werden. HINWEIS: Sie können nur bei abgeschalteter Endstufe von einem Modus in den anderen schalten. Um die symmetrischen Eingänge der CA-301 mit einem mit symmetrischen Ausgängen ausgestatteten Vorverstärker zu verbinden, ist ein Kabel mit XLR-Anschlüssen erforderlich. Alle Classé-Produkte verfügen an den symmetrischen Anschlüssen über dieselbe Pin-Belegung: PIN 1: MASSE PIN 2: POSITIVES (NICHT-INVERTIERTES) SIGNAL PIN 3: NEGATIVES (INVERTIERTES) SIGNAL Andere Hersteller nutzen möglicherweise eine andere Konfiguration. Möchten Sie daher Classé- Produkte an die Geräte anderer Hersteller anschließen, sollten Sie sich mit dem jeweiligen Hersteller in Verbindung setzen, um eine absolute Phasengleichheit sicherzustellen. Schutzschaltung Eine Spezialschaltung in der Classé-Endstufe CA-301 überwacht regelmäßig das Audio- Ausgangssignal und schützt die Endstufe so vor einer Überlastung am Ausgang, Clipping und Gleichspannungsanteilen im ankommenden 6

10 Signal. Darüber hinaus befinden sich im Front- End für jeden Kanal zwei flinke 3 /4-A-Sicherungen zum Schutz vor Überlastspannung. Ferner schützt eine Netzsicherung das Gerät. Sie befindet sich an der Geräterückseite direkt über dem Netzeingang. Reagiert die Schutzschaltung oder ist eine der Sicherungen durchgebrannt, BLINKT DIE POWER- LED AN DER GERÄTEFRONT GRÜN und zeigt so an, dass eine Störung vorliegt. SCHALTEN SIE DIE CA-301 NACH AUSLÖSEN DER SCHUTZSCHALTUNG AB UND SETZEN SIE SICH MIT IHREM AUTORISIERTEN FACHHÄNDLER IN VERBINDUNG. WICHTIGER HINWEIS: VERSUCHEN SIE AUF KEINEN FALL, EINE DURCHGEBRANNTE SICHERUNG SELBST ZU WECHSELN. SIE VERLIEREN DADURCH IHRE GARANTIEANSPRÜCHE. DAS AUSTAUSCHEN DER SICHERUNGEN UND ERNEUTES EINSCHALTEN OHNE PRÜFUNG DES GERÄTES AUF FEHLERHAFTE BAUTEILE KANN ZU WEITEREN SCHWERWIEGENDEN BESCHÄDIGUNGEN WICHTIGER BAUTEILE IN IHREM GERÄT FÜHREN. IR Out und In Die CA-301 kann auch über den Surround- Prozessor SSP-75 ein- und abgeschaltet werden, indem Sie die Geräte über die IR OUT- und IR IN- Buchsen verbinden. WICHTIG: Die im Folgenden aufgeführten Arbeiten sind nur von einem autorisierten Fachmann durchzuführen. Sie würden dadurch Ihren Garantieanspruch verlieren. Öffnen Sie die obere Abdeckung. Auf der rechten Seite der hinteren, oberen Platine an der Geräterückseite befinden sich im Innern der Endstufe 4 interne Jumper. Sehen Sie von vorne in die CA-301, entfernen Sie den Jumper ganz hinten (den letzten in der Reihe) und bewahren ihn auf. Befestigen Sie die obere Abdeckung. Schließen Sie einen Mini-Stecker an die IR IN- Buchse an der Geräterückseite der CA-301 an und verbinden Sie das andere Ende des Kabels mit der 5VDC-Mini-Buchse an der Rückseite des SSP-75. Mit Drücken der Standby-Taste am SSP-75 wird der Turn On/Turn Off-Stromkreis an Ihrer CA-301 aktiviert. Mehrere Endstufen können, abhängig von der Jumper-Konfiguration im Geräteinnern, automatisch nacheinander oder gleichzeitig eingeschaltet werden. Der folgenden Tabelle entnehmen Sie, welcher Jumper eingesetzt oder herausgenommen werden muss, um die Reihenfolge, in der Sie Ihre Endstufen einschalten möchten, festzulegen. J3 J2 J1 J0 ADDRESS RC Auto Button ON X X X X 0 Amp 1 No X X X out 1 Amp 2 No X X out X 2 Amp 3 No X X out out 3 Amp 4 No X out X X 4 Amp 5 No X out X out 5 Amp 6 No X out out X 0 Amp 1 No X out out out 0 Amp 1 Yes Hinweis für alle Besitzer eines Classé-Produktes: Vielen Dank, dass Sie sich für ein Produkt von Classé Audio entschieden haben. Alle Mitarbeiter von Classé haben mit äußerster Sorgfalt gearbeitet, um Ihnen als Käufer ein zuverlässiges Gerät anbieten zu können. Wir sind stolz darauf, dass alle Komponenten von Classé Audio offiziell für das CE-Zeichen der Europäischen Gemeinschaft zertifiziert sind. Das bedeutet, dass alle Classé-Produkte die weltweit strengsten Herstellungs- und Sicherheitsprüfungen erfolgreich bestanden haben. Classé Audio wünscht Ihnen für viele Jahre echten Musikgenuss. Am 18. Juli 1996 erhielt Classé Audio die Zertifizierungs-Nr.: C401CLA1.MGS, die für eine CE-Zertifizierung aller Modelle der Produktlinie von Classé Audio steht. ESPAÑOL GRACIAS POR HABER CONFIADO EN CLASSÉ Gracias por haber adquirido la Etapa de Potencia Estereofónica Classé Audio CA-301. Nos esforzamos mucho para ofrecer productos que combinen prestaciones sonoras excepcionales y fiabilidad a largo plazo. Para conseguirlo, hemos invertido muchos recursos en la puesta a punto de unas instalaciones de diseño y fabricación extraordinarias. Confiamos en que durante los próximos años disfrutará con el producto que acaba de adquirir. LA FILOSOFIA DE DISEÑO DE CLASSÉ Todos nuestros componentes se benefician de un mismo y riguroso criterio de diseño: todos los productos Classé deben ser capaces de reproducir la música con un nivel de integridad armónica y espacial equiparable al percibido en una interpretación en directo ejecutada con instrumentos no amplificados de la máxima calidad posible. Diseño circuital único En Classé Audio hacemos un uso intensivo de versiones cuidadosamente optimizadas del mismo circuito de base que han sido precisamente adaptadas a las necesidades específicas de cada diseño. Esto quiere decir que todos los preamplificadores, fuentes de sonido y amplificadores de Classé se benefician de años y años de refinamiento continuado. Aún así, nuestros esfuerzos no se detienen aquí. La escucha: el elemento de diseño crítico Una vez que hemos determinado los valores circuitales genéricos para una aplicación particular, procedemos a una cuidadosa y exhaustiva evaluación auditiva del mismo intercambiando y mezclando distintos componentes (transistores, condensadores, cables, placas de circuito impreso, etc.) y ajustando tensiones eléctricas de funcionamiento específicas en rangos adecuados calculados con un elevado grado de precisión. Una fiabilidad extraordinaria Cada componente Classé, incluso el más asequible, se beneficia de nuestro riguroso y perfeccionista enfoque de los parámetros de diseño. El resultado es un óptimo equilibrio entre las a menudo conflictivas exigencias derivadas de reunir prestaciones excepcionales y fiabilidad a largo plazo. En el caso concreto de nuestros productos de mayor nivel, las mejoras son aún más radicales como consecuencia del empleo de componentes con tolerancias muy estrictas y fuentes de alimentación altamente segmentadas y excepcionalmente robustas que poseen una enorme capacidad de entrega de corriente. 7

11 Nuestro orgullo por fabricarlo. Su orgullo por poseerlo Construimos todos nuestros productos respetando los más altos estándares de calidad posibles. Desde las placas de circuito impreso multicapa de vidrio epoxy, las fuentes de alimentación sobredimensionadas y los chasis y paneles frontales masivos, cada producto de Classé Audio es por igual un tributo a la ciencia y al arte de la reproducción sonora. Esperamos que durante la utilización de su producto Classé experimente el mismo placer y la misma satisfacción que nosotros al construirlo. DESEMBALAJE Y PUESTA A PUNTO Su etapa de potencia Classé CA-301 está embalada en una espuma semi-rígida de alta densidad colocada en una caja de cartón especial. Para sacar el producto del embalaje, abra y extienda las aletas superiores de la caja sujetándolas a continuación por los lados de ésta, levante la totalidad del aparato y colóquelo sobre una superficie plana de grandes dimensiones. Quite la bolsa protectora de plástico e inspeccione el amplificador para asegurarse de que no haya sufrido ningún daño durante su transporte. Aparte del presente manual, asegúrese de que en el embalaje también figuran los siguientes elementos: Un (1) cable de red extraíble Le rogamos que informe de inmediato a su detallista autorizado sobre cualquier daño o ausencia que haya detectado. Coloque la CA-301 en su ubicación definitiva o cerca de la misma, dejando un mínimo de 20 centímetros de espacio libre en su panel posterior para poder fijar los conectores de salida a las cajas acústicas. El transformador de alimentación principal de la CA-301 está localizado en el centro de su panel frontal. Idealmente, debería haber una separación mínima de medio metro entre este área y componentes potencialmente capaces de captar el flujo disperso del transformador (entre los que habría que incluir a preamplificadores, giradiscos y cables de interconexión). Una buena regla empírica a la hora de disponer el espacio adecuado para la refrigeración del aparato consiste en dejar 15 centímetros libres en su parte superior y 8 centímetros alrededor de cada uno de sus paneles laterales. Verifique el Número de Serie en la etiqueta autoadhesiva que figura en el panel posterior de la CA-301 para conocer el valor correcto de la tensión de alimentación. La CA-301 incluye un fusible de protección de corriente alterna externo cuyo valor debería ser el siguiente: TENSIÓN DE RED VALOR DEL FUSIBLE 100 ó 120 V de CA 12 A, ACCION LENTA; 125 ó 250 V 220 ó 240 V de CA 10 A, ACCION LENTA; 250 V CONEXIONES GENERALES Alimentación Inserte el cable de alimentación en el receptáculo para la entrada de corriente alterna situado en el panel posterior del aparato. POR FAVOR, ASEGURESE DE HABER CONECTADO PREVIAMENTE LAS CAJAS ACUSTICAS Y EL PREAMPLIFICADOR A SU ETAPA DE POTENCIA ANTES DE PROCEDER A LA CONEXIÓN DEL CABLE DE ALIMENTACION A ESTA ULTIMA. NOTA IMPORTANTE PRECAUCIÓN: Instrucciones de seguridad Antes de llevar a cabo cualquier conexión, desconecte el cable de alimentación. El establecimiento de una masa flotante o la desconexión del cable de masa en un cable de red de tres clavijas puede provocar una descarga eléctrica. Conecte todos los cables de interconexión entre las diferentes electrónicas del equipo antes de conectar el cable de alimentación a una toma de corriente eléctrica alterna. De este modo se reducirán las posibilidades de que se produzca una descarga eléctrica. Conexiones para funcionamiento en estéreo Los conectores de entrada y salida están claramente identificados en el panel posterior del amplificador. El sentido de las conexiones Izquierda/Derecha está referido al panel frontal del aparato. Las conexiones de salida correspondientes al modo de funcionamiento estereofónico están marcadas encima de los conectores. Sitúe el conmutador estéreo/mono en la posición STEREO (la CA-301 se sirve de fábrica ajustada en esta posición). Utilice únicamente cables de interconexión y de conexión a cajas acústicas de alta calidad y realice todas las conexiones firmemente. En caso de que las clavijas de los conectores RCA estén flojas, quítelas y apriete ligeramente las hojas de los terminales de masa. Asimismo, observe que se respete la fase correcta en las conexiones a las cajas acústicas y fije firmemente los correspondientes terminales. NO APRIETE EXCESIVAMENTE los conectores de salida ya que podría dañar el aparato. Cuando ponga en marcha la CA-301 en el modo de funcionamiento estereofónico, el indicador luminoso correspondiente al canal izquierdo parpadeará durante aproximadamente 20 segundos, tiempo durante el cual se completará la secuencia de arranque. Conexiones para funcionamiento en mono Le rogamos que lea cuidadosamente la sección anterior -conexiones para funcionamiento en estéreo- para todo lo referente a la seguridad de las conexiones y a seguridad en general. Si el aparato ha sido utilizado anteriormente en modo estereofónico, asegúrese de que esté APAGADO y quite todas las conexiones, incluyendo el cable de alimentación. Asegúrese de que el conmutador STEREO/MONO esté en la posición MONO. NOTA: El conmutador Stereo/Mono no funcionará si el amplificador está activado; NO intente realizar dicho cambio puesto que el modo de funcionamiento seleccionado permanece enganchado (es decir fijado) mientras el amplificador está en marcha. La Entrada MONO es, tal y como se indica debidamente, la entrada del canal izquierdo. La entrada correspondiente al canal derecho, ahora no utilizada, es automáticamente desconectada. Las conexiones de salida correctas correspondientes a la fase de la conexión en modo MONO están marcadas debajo de los conectores pertinentes. Repita los ajustes y conexiones anteriores correspondientes a la conexión en MONO para la segunda CA-301, que será utilizada para el otro canal. Recuerde que la conexión de salida negativa de un amplificador puenteado NO es una masa. No utilice una caja de conmutaciones con masa común. No utilice filtros electrónicos (activos) que tengan una masa común. La conexión de dos amplificadores puenteados a un dispositivo que tenga una masa común provocará el fallo de los mismos. Funcionamiento en modo monofónico Tal y como se acaba de decir, pueden utilizarse tanto las entradas no balanceadas como las balanceadas para el funcionamiento en los modos estereofónico y monofónico. Conecte un único cable, estándar (no balanceado) o balanceado, a la entrada correspondiente al canal izquierdo de cada amplificador. Para más detalles, diríjase a la sección anterior. NOTA: Ni el conmutador STEREO/MONO ni el LINE/BALANCED funcionarán mientras el amplificador esté activado. En consecuencia, le será imposible cambiar de un modo a otro puesto que los modos que hayan sido seleccionados previamente estarán bloqueados mientras el amplificador esté en marcha. Para activar el circuito, desconecte el aparato y sitúe el conmutador STEREO/MONO en LINE. Si el aparato no ha sido desactivado antes de activar el conmutador, desconéctelo, espere unos 10 segundos y conéctelo de nuevo para que el mencionado circuito esté operativo. CONEXIONES PARA ENTRADAS BALANCEADAS Y NO BALANCEADAS La etapa de potencia Classé CA-301 está equipada con entradas tanto no balanceadas como balanceadas. Cada una de ellas debe ser utilizada POR SEPARADO, JAMAS SIMULTANEAMENTE con la otra. Las entradas balanceadas deben conectarse a un preamplificador que incorpore salidas principales balanceadas. Para ello se necesitan también cables equipados con conectores balanceados de tipo XLR. Independientemente de cuales sean las entradas que se utilicen, la CA-301 puede funcionar tanto en mono como en estéreo. 8

12 Entradas no balanceadas Sitúe el conmutador LINE/BALANCED en la posición "LINE" (el amplificador se sirve de fábrica ajustado en esta posición). NOTA: El conmutador LINE/BALANCED no funcionará si el amplificador está activado, lo que significa que usted NO podrá cambiar desde una modalidad a otra al estar la previamente elegida "enganchada" (fijada). Para activar el circuito, desactive el aparato y coloque el conmutador LINE/BALANCED en su posición LINE. Si el aparato no ha sido desactivado antes de accionar el conmutador, desactívelo, espere durante unos 10 segundos y vuélvalo a activar de nuevo; ahora, el circuito se activará. Conecte los cables terminados con conectores no balanceados a las tomas RCA de entrada que figuran en el panel posterior de la CA-301. Los conectores balanceados se desactivarán automáticamente. Entradas balanceadas Sitúe el conmutador LINE/BALANCED en la posición "BALANCED". Evidentemente, necesitará un preamplificador equipado con salidas balanceadas y cables de interconexión balanceados. NOTA: El conmutador LINE/BALANCED no funcionará si el amplificador está activado, lo que significa que usted NO podrá cambiar desde una modalidad a otra al estar la modalidad previamente elegida "enganchada" (fijada). Si el aparato no ha sido desactivado antes de accionar el conmutador, desactívelo, espere durante unos 10 segundos y vuélvalo a activar de nuevo; ahora, el circuito se activará. Para la conexión a preamplificadores que no sean de Classé Audio, el cableado de los conectores XLR de 3 patillas debe disponerse de tal modo que concuerde con el de las tomas balanceadas de la CA-301, es decir: PATILLA 1: MASA PATILLA 2: SEÑAL POSITIVA O VIVO (NO INVERTIDA) PATILLA 3: SEÑAL NEGATIVA (INVERTIDA) Todos los preamplificadores y etapas de potencia de Classé están configurados tal y como se acaba de indicar. Algunos preamplificadores de otros fabricantes tienen asignada la polaridad positiva a la PATILLA 3. Si este es el caso de su preamplificador y usted desea mantener la fase absoluta a lo largo de todo su equipo, los cables de interconexión que se utilicen deben tener el conductor correspondiente a la PATILLA 3 de la salida del preamplificador conectado al de la PATILLA 2 de la entrada de la etapa de potencia y el conductor correspondiente a la PATILLA 2 de la salida del preamplificador conectado a la PATILLA 3 de la entrada de la etapa de potencia. Una vez verificadas las conexiones, conecte los conectores XLR de los cables de interconexión balanceados a los terminales XLR con mecanismo de fijación del panel posterior de la CA-301. Para quitar los conectores, presione la lengüeta de fijación situada encima del terminal de conexión y a la vez estire suavemente el cuerpo del conector. Circuitería de protección Un circuito especial de la Classé CA-301 monitoriza permanentemente la señal de audio de salida para detectar posibles sobrecargas, recortes en la señal ( clipping ) o la presencia de corriente continua en la misma. Además, cada canal incorpora dos fusibles de protección (de 3 /4 A y acción rápida) ubicados en la placa correspondiente a la circuitería de regulación de voltaje (parte frontal de la placa superior situada en la parte posterior del aparato) para proteger a los circuitos de entrada de posibles daños debidos a sobrecargas. Hay también un fusible de protección de red ubicado en el panel posterior del amplificador inmediatamente encima del receptáculo del cable de alimentación IEC. Si el circuito de protección del aparato se dispara o alguno de los fusibles se ha fundido, el INDICADOR LUMINOSO DE PUESTA DEL PANEL FRONTAL se pondrá a PARPADEAR EN COLOR VERDE. SI EL CIRCUITO DE PROTECCION SE HA DISPARADO, DESCONECTE LA CA-301. Una vez que la situación causante del disparo del circuito de protección haya sido claramente identificada y corregida, intente poner de nuevo en marcha el aparato. SI EL APARATO SIGUE TENIENDO LA CIRCUITERIA DE PROTECCION ACTIVADA O SI SE DA EL CASO DE QUE LOS FUSIBLES DE PROTECCION SE HAN FUNDIDO, CONTACTE CON SU DETALLISTA CLASSE LOCAL. NO INTENTE CAMBIAR UN FUSIBLE FUNDIDO. LA SUSTITUCION DE UN FUSIBLE SIN VERIFICAR PREVIAMENTE SI SE HA PRODUCIDO UN FALLO EN ALGUN COMPONENTE PUEDE PROVOCAR FALLOS POSTERIORES EN ELEMENTOS VITALES DE SU ETAPA DE POTENCIA. CONTACTE CON SU DETALLISTA LOCAL DE CLASSE AUDIO o al Servicio de Atención al Cliente de Classé Audio, Inc. ( ). Entrada y salida de rayos infrarrojos La CA-301 también puede activarse y desactivarse con el Procesador de Sonido Envolvente SSP-75 utilizando las tomas IR IN y OUT. Para activar su CA-301 con el SSP-75, desconecte por completo la primera de la red eléctrica, abra la cubierta superior y localice los cuatro puentes internos ubicados en la parte derecha de la placa de circuito impreso correspondiente al sistema de regulación (placa superior situada en la parte posterior del aparato). Mirando el amplificador desde su panel frontal, quite el puente situado detrás de todo (el último de la hilera) y guárdelo. Vuelva a poner en su sitio la cubierta superior. Inserte una minitoma en el terminal IR IN situado en el panel posterior de la CA-301 y conecte la toma del otro extremo en el terminal 5VDC del panel posterior de su SSP-75. Cuando el botón Standby del SSP-75 sea pulsado, activará la circuitería de conexión/desconexión de su CA-301. Pueden activarse varias etapas de potencia de manera secuencial o todas a la vez en función de cual sea la configuración de los puentes de su amplificador. La tabla de la figura 3 le muestra qué puente debería ser insertado o eliminado para obtener la secuencia de arranque correcta de su amplificador. J3 J2 J1 J0 POSICION Botón ARRANQUE RC Automático X X X X 0 Amp 1 No X X X Fuera 1 Amp 2 No X X Fuera X 2 Amp 3 No X X Fuera Fuera 3 Amp 4 No X Fuera X X 4 Amp 5 No X Fuera X Fuera 5 Amp 6 No X Fuera Fuera X 0 Amp 1 No X Fuera Fuera Fuera 0 Amp 1 Sí CARACTERISTICAS RELEVANTES DE LA CA-301: Circuitería simétrica especialmente desarrollada por Classé desde la entrada hasta la salida. Capacidad en corriente incrementada con respecto a los productos de su clase. Transformador toroidal de grandes dimensiones y 2 KVA de potencia. Más de uf de capacidad de almacenamiento de energía para cada canal. Diez transistores de potencia bipolares de alta corriente y alta tensión por canal. Circuitos de regulación con alta capacidad en tensión/corriente para las secciones de entrada y ataque. Condensadores de polipropileno metalizados para el desacoplo de cada dispositivo de salida. Conectores de entrada y salida generosamente bañados en oro. Todos los cables de transporte de señal están apantallados y su configuración es de tipo Litz. El resto de cables utilizan conductores de cobre libre de iones de oxígeno. Nota para todos los propietarios de Productos Classé: Gracias por adquirir un componente de Classé Audio. Todos en Classé hemos cuidado especialmente que su compra se convierta en una preciada inversión. Nos enorgullece informarle de que todos los productos de Classé Audio han sido oficialmente autorizados para que incorporen la marca de calidad CE de la Comunidad Europea. Esto significa que su producto Classé ha sido sometido a los procesos de fabricación y evaluación más rigurosos del mundo y ha demostrado que satisface o excede todas las exigencias de la Comunidad Europea en lo que respecta a la homogeneidad entre las especificaciones técnicas de un mismo producto y la seguridad del consumidor. Le deseamos sinceramente que disfrute muchos años escuchando su música favorita a través de este producto Classé. Con fecha de 18 de Julio de 1996, Classé Audio ha recibido la Certificación Número C401CLA1.MGS, que indica el cumplimiento de la normativa de la CE para todos los modelos de la gama de productos de Classé Audio. 9

13 NEDERLANDS UITPAKKEN & OPSTELLEN CLASSÉ AUDIO 5070 François Cusson Lachine, Quebec Canadá H8T 1B3 Teléfono: Fax: NAMENS IEDEREEN BIJ CLASSÉ, BEDANKT! Dank u voor het kiezen van de Classé CA-301 eindversterker. Wij zijn er trots op componenten te fabriceren waarin uitzonderlijke klank en betrouwbaarheid op lange termijn wordt gecombineerd. Daarvoor hebben we geïnvesteerd in een buitengewoon ontwerp en dito fabricage faciliteiten. Wij zijn ervan overtuigd dat u vele jaren plezier zult hebben van uw aankoop. Uw Classé CA-301 eindversterker is zorgvuldig verpakt in zwaar plastic, beschermd door piepschuim schalen, het geheel in een speciale doos. Om het apparaat uit de doos te halen klapt u beide flaps van de doos open. Til het apparaat er aan de zijkanten uit en laat de piepschuim schalen intact. Verwijder elke schaal door deze er recht af te trekken. Verwijder de plastic bescherming en controleer het apparaat op eventuele beschadigingen. Buiten deze handleiding dient het volgende aanwezig te zijn: 1 AFNEEMBAAR NETSNOER CLASSÉ ONTWERP FILOSOFIE Al onze componenten hebben één belangrijk pluspunt: alle Classé producten zijn gemaakt om muziek te reproduceren met de harmonie en ruimtelijke werking die kenmerkend zijn voor de instrumenten in werkelijkheid, bij een niet versterkte uitvoering. Enkelvoudige opzet Om dat te bereiken maken we uitgebreid gebruik van een zorgvuldig voor elk doel geoptimaliseerde en identieke schakeling, aangepast aan het gevraagde vermogen. Dat wil zeggen dat alle Classé lijnniveau componenten en eindversterkers profiteren van die vele jaren, steeds verder gaande verfijning. Meld elke schade of het ontbreken van een of ander direct aan uw leverancier. Plaats de CA-301 op een tijdelijke of zijn definitieve plaats en laat aan de achterzijde ca. 20 cm vrij voor het aansluiten van de luidsprekeraansluitingen. De voedingstransformator van de CA-301 is midden voorin de versterker gemonteerd. Het is raadzaam de opstelling zo te kiezen dat deze zeker 50 cm van een voor brom gevoelige component vandaan blijft; dat geldt voor voorversterkers, platenspelers en signaalkabels. Voor wat betreft de ruimte die nodig is voor adequate ventilatie, geldt als uitgangspunt dat er boven de versterker zo n 15 cm en rondom zo n 10 cm vrij dient te blijven. Luisteren: Kritische Factor in het Ontwerp Zijn de algemene eisen die aan een schakeling gesteld moeten worden voor een bepaalde toepassing eenmaal vastgesteld, dan wordt zorgvuldig geluisterd naar steeds wisselende en combinatie van onderdelen transistoren, condensatoren, bedrading, printplaten, enzovoort en het aanpassen van de bedrijfsspanning binnen de vastgelegde bereiken. Controleer het typeplaatje op de achterzijde op de juiste netspanning. De CA-301 heeft één externe netzekering; de juiste waarde daarvan is: NETSPANNING ZEKERING V AC 12 A, traag, 125 of 250 V V AC 10 A, traag, 250 V AANSLUITINGEN Zeer Lange Levensduur Elke Classé component, ook de meest betaalbare, profiteert van onze uiterst zorgvuldige benadering van de ontwerpcriteria. Het resultaat is een optimale balans tussen de vaak tegenstrijdige eisen voor uitzonderlijke prestaties en lange termijn betrouwbaarheid. In onze duurste componenten worden onderdelen met nog nauwere toleranties gebruikt, naast ruim gesegmenteerde en bijzonder robuuste voedingen met grote stroomreserves. Onze trots, uw kostelijk bezit. Al onze componenten worden gebouwd op het hoogst denkbare niveau. Dat geldt zowel voor de meerlaags printplaten van epoxieglas, de zwaar uitgevoerde voedingen, als de solide frontplaten: elk Classé product is een ode zowel aan de wetenschap, als aan muziekweergave. Wij hopen dat u evenveel plezier beleeft aan het luisteren naar uw Classé als wij aan het fabriceren ervan! Lichtnet Verbind het netsnoer met de lichtnetaansluiting op de achterzijde. SLUIT HET LICHTNET PAS AAN NADAT ALLE ANDERE VERBINDINGEN, LUIDSPREKERS EN ANDERE COMPONENTEN, ZIJN GEMAAKT. VEILIGHEID WAARSCHUWING: Neem de stekker uit het stopcontact wanneer u iets aan de verbindingen verandert. Maak alle verbindingen voordat u de stekker in het stopcontact steekt. Zo wordt de kans op ongelukken en schade verminderd. Zie ook de garantie bepalingen. Het is verstandig het apparaat te aarden. Stereo verbindingen De in- en uitgangen zijn duidelijk aangegeven op de achterzijde van de versterker. De linker en rechter kanalen zijn gezien vanuit de voorzijde van de versterker. De stereo uitgangen zijn aangegeven boven de aansluitingen. Zet de STEREO/MONO schakelaar op STEREO, wat tevens de fabrieksinstelling is. 10

14 Gebruik uitsluitend hoogwaardige signaal- en luidsprekerkabels en zorg dat alle verbindingen stevig bevestigd zijn. Bij loszittende cinch pluggen kunnen de vinnen van de massa voorzichtig iets naar binnen worden gedrukt. Vergeet bij de luidsprekers niet op de juiste fase te letten. Draai de uitgangen niet te vast aan. Bij het inschakelen van de CA-301 in stereo, knippert de LED voor het linker kanaal gedurende ca. 20 seconden tot het inschakelen is voltooid. Mono Voor mono gelden natuurlijk dezelfde punten over solide verbindingen en veiligheid als bij stereo. Is de versterker voorheen als stereoversterker gebruikt, controleer dan of deze uitgeschakeld is, en verwijder alle verbindingen, óók het netsnoer. Controleer of de STEREO/MONO schakelaar op MONO staat. OPMERKING: de STEREO/MONO schakelaar werkt niet wanneer de versterker aan staat. De linker ingang wordt gebruikt voor MONO, als aangegeven. Het niet gebruikte rechter kanaal wordt automatisch losgekoppeld. De juiste fase van de MONO ingang is onder de aansluitingen aangegeven. Herhaal bovenstaande MONO instellingen en aansluitingen voor de tweede CA-301 van het andere kanaal. Onthoud dat de negatieve uitgangsaansluiting van een gebrugde versterker GEEN massa is! Gebruik daarom ook geen schakelkastjes of elektronische wisselfilters met een gemeenschappelijk massapunt. Het verbinden van twee gebrugde versterkers op een apparaat met gemeenschappelijke massa leidt onherroepelijk tot defecten. Mono gebruik Eerder is al gesteld dat zowel de gewone als de symmetrische ingangen voor mono en stereo gebruikt kunnen worden. Verbind een enkele signaalkabel, normaal of symmetrisch, met het linker kanaal van de versterker. Details vindt u in het voorgaande stuk. OPMERKING: noch de STEREO/MONO schakelaar, noch de LINE/BALANCED (normaal/symmetrisch) schakelaar werken wanneer de versterker aan staat; beide functies zijn dan geblokkeerd. Om de functie te activeren het apparaat uitschakelen en de MONO/STEREO schakelaar op MONO zetten. Wanneer het apparaat nog aan staat terwijl de schakelaar werd verzet, het apparaat uitschakelen, ca. 10 seconden wachten weer inschakelen, waarop de schakelaar zal reageren. AANSLUITEN NORMALE EN SYMMETRISCHE INGANGEN: De Classé CA-301 eindversterker is uitgerust met zowel normale (cinch, asymmetrisch) als symmetrische (balanced) ingangen. Deze kunnen AFZONDERLIJK, MAAR NIET TEGELIJK worden gebruikt. De symmetrische ingangen worden verbonden met een versterker die een symmetrische uitgang heeft, waarvoor symmetrische kabels met XLR pluggen nodig zijn. Ongeacht de ingangen die worden gebruikt, kan de CA-301 in mono of stereo worden toegepast. Normale ingangen (line) Zet de LINE/BALANCED schakelaar op LINE, wat ook de fabrieksinstelling is. OPMERKING: de LINE/BALANCED (normaal/symmetrisch) schakelaar werkt niet wanneer de versterker aan staat; de functie is dan geblokkeerd. Om de functie te activeren het apparaat uitschakelen en de LINE/ BALANCED schakelaar op LINE zetten. Wanneer het apparaat nog aan staat terwijl de schakelaar werd verzet, het apparaat uitschakelen, ca. 10 seconden wachten weer inschakelen, waarop de schakelaar zal reageren. Verbind de cinch kabel met de cinch ingangen op de achterzijde van de CA-301. De symmetrische ingangen worden dan automatisch geblokkeerd. Symmetrische ingangen (balanced) Zet de LINE/BALANCED schakelaar op BALANCED. Verbind deze ingangen met de symmetrische uitgang van een voorversterker en gebruik hiervoor een symmetrische kabel. OPMERKING: de LINE/BALANCED (normaal/symmetrisch) schakelaar werkt niet wanneer de versterker aan staat; de functie is dan geblokkeerd. Om de functie te activeren het apparaat uitschakelen en de LINE/BALANCED schakelaar op BALANCED zetten. Wanneer het apparaat nog aan staat terwijl de schakelaar werd verzet, het apparaat uitschakelen, ca. 10 seconden wachten weer inschakelen, waarop de schakelaar zal reageren. Voor gebruik met andere dan Classé voorversterkers, dient de bedrading van de 3-pens XLR plug overeen te komen met die van de CA-301, die als volgt bedraad is: PEN 1: MASSA PEN 2: POSITIEF (NIET-GEÏNVERTEERD) SIGNAAL PEN 3: NEGATIEF (GEÏNVERTEERD) SIGNAAL Alle Classé voor- en eindversterkers zijn op die manier bedraad. Bij sommige voorversterkers van andere fabrikaten (Japanse) zijn pen 2 en 3 verwisseld, wat tot een fase omkering leidt. Om een juiste absolute fase in uw systeem te bereiken dienen de beide draden van pen 2 en 3 in de plug aan één zijde verwisseld te worden. Merk die kabel dan met bijvoorbeeld een stukje rode tape ten teken dat die kabel de fase omkeert! Nadat de verbindingen zijn gecontroleerd sluit u de XLR pluggen aan op de vergrendelende ingangen op de achterzijde van de CA-301. Druk de plug aan tot de grendel klikt. Om de plug te verwijderen eerst de grendel indrukken. Beveiliging Een speciale schakeling in de Classé CA-301 bewaakt voortdurend het audio uitgangssignaal op overbelasting, clipping of gelijkstroomcomponenten. Bovendien heeft elk kanaal twee zekeringen van 750 ma snel, in de voeding van de ingangsschakeling, die op de stabilisatieprint zijn aangebracht, om de ingangen tegen overbelasting door een te hoge ingangsspanning te beveiligen. Er is verder nog een netzekering, gemonteerd op de achterzijde van de versterker, direct boven de netentree. Wanneer de beveiliging van het apparaat geactiveerd is, of een van de zekeringen is doorgeslagen, zal de lichtnetindicatie LED (POWER) op de voorzijde GROEN KNIPPEREN. SCHAKEL DE CA-301 UIT WANNEER DE BEVEILIGING GEACTIVEERD WORDT. Schakel de versterker alleen weer in wanneer de oorzaak van het ingrijpen van de beveiliging is gevonden en verholpen. GAAT HET APPARAAT WEDEROM IN DE BEVEILIGING, OF LIJKT HET ER OP DAT ER ÉÉN OF MEERDERE ZEKERINGEN ZIJN OPGEBLAZEN, NEEM DAN CONTACT OP MET UW LEVERANCIER. VERVANG EEN ZEKERING NIET ZELF. VERVANGEN VAN EEN DOORGESLAGEN ZEKERING ZONDER TE CONTROLEREN WAAROM DEZE IS DOORGESLAGEN, KAN LEIDEN TOT ERNSTIGE SCHADE AAN VITALE ONDERDELEN VAN DE VERSTERKER. IR In en Out: De CA-301 kan ook worden in- en uitgeschakeld via onze SSP-75 Surround Sound Processor, via de IR in- en uitgangen. Om de CA-301 met de SSP-75 in te schakelen, neemt u de stekker van de CA-301 uit het stopcontact, u opent de bovenzijde en zoekt de 4 interne jumpers in de CA-301, rechts van de stabilisatieprint (bovenste print achterin de CA-301). Gezien vanaf de voorzijde verwijdert u de achterste jumper de laatste in de rij maar bewaar de jumper wel! Breng de bovenzijde weer aan. Verbind een minijack kabel met de IR IN aansluiting op de achterzijde van de CA-301 en het andere einde met de 5V DC minijack op de achterzijde van de SSP-75. Zodra de standby toets van de SSP-75 wordt ingedrukt zal nu ook de inschakelelektronica van de CA-301 worden geactiveerd. Meerdere versterkers kunnen op deze wijze automatisch worden geschakeld, afhankelijk van de jumper instelling in de versterker. De tabel in afb. 1 geeft aan hoe de jumpers voor de verschillende situaties geplaatst dienen te zijn: J3 J2 J1 J0 Adres Bedient Automatisch aan X X X X 0 Versterker 1 Nee X X X los 1 Versterker 2 Nee X X los X 2 Versterker 3 Nee X X los los 3 Versterker 4 Nee X los X X 4 Versterker 5 Nee X los X los 5 Versterker 6 Nee X los los X 0 Versterker 1 Nee X los los los 0 Versterker 1 Ja EIGENSCHAPPEN CA-301: Nieuw ontwikkelde speciale Classé symmetrische schakeling van ingang tot uitgang. Stroomafgifte opgevoerd tot boven die van standaard apparaten. De CA-301 heeft een zware toroïdale transformator met een vermogen van 2 KVA, 11

15 aangevuld met een totaal van µf aan afvlakcondensatoren per kanaal. Verder 10 hoge spanning/stroom Bi-Polaire eindtrappen per kanaal. Discrete hoge spanning/stroom stabilisatie voor de pre-driver en ingangstrappen. De voeding van de eindtrappen via zware, vergulde verbindingsstrips; ook de in- en uitgangen zijn verguld. De bedrading is van zuurstofvrij koper en alle signaalvoerende bekabeling is van Litze draad en grondig afgeschermd. Belangrijk voor alle eigenaren van een Classé product: Dank u voor de aanschaf van een Classé Audio product. Iedereen bij Classé heeft zich volledig ingezet om er voor te zorgen dat uw nieuwe aanwinst u optimaal plezier zal bezorgen. En we zijn er trots op dat alle Classé Audio producten officieel zijn goedgekeurd om het CE merk van de Europese Unie te dragen. Dit betekent dat uw Classé product onderworpen werd aan de meest rigoureuze tests op kwaliteit en veiligheid ter wereld, en dat werd vastgesteld dat aan alle CE eisen van de Europese Unie omtrent constantheid van productei en veiligheid werd voldaan of dat deze zelfs werden overtroffen. Wij van Classé Audio wensen u vele jaren ongestoord luisterplezier. M.i.v. 18 juli 1996 werd Classé Audio het certificaat nr. C401CLA1.MGS verleend, dat de CD goedkeuring aangeeft voor alle modellen van het Classé Audio programma. CLASSÉ AUDIO 5070 François-Cusson Lachine, Quebec Canada H8T 1B3 Telefoon: Fax: ΕΛΛΗΝΙΚΑ ΈΝΑ ΜΕΓΑΛΟ ΕΥΧΑΡΙΣΤΩ ΑΠΟ ΌΛΟΥΣ ΕΜΑΣ ΣΤΗΝ CLASSÉ Σας ευχαριστούµε που αγοράσατε τον τελικό ενισχυτή CA-301 της Classé Audio. Είµαστε περήφανοι γιατί κατασκευάζουµε συσκευές που συνδυάζουν εκπληκτική ηχητική απόδοση και εξαιρετική αξιοπιστία για πολλά χρόνια. Για να το πετύχουµε αυτό έχουµε επενδύσει σε τεχνολογικά προηγµένες εγκαταστάσεις για το σχεδιασµό και την κατασκευή των προϊόντων µας. Είµαστε βέβαιοι ότι η συσκευή που αγοράσατε θα παραµείνει για σας πηγή ακουστικής απόλαυσης για πολύ καιρό. Η ΣΧΕ ΙΑΣΤΙΚΗ ΦΙΛΟΣΟΦΙΑ ΤΗΣ CLASSÉ Όλες οι συσκευές µας σχεδιάζονται µε ένα βασικό στόχο: Να αναπαράγουν τη µουσική µε τον αρµονικό ρεαλισµό και την ακουστική πληρότητα που συναντάµε στις συναυλίες, όπου τα όργανα ακούγονται φυσικά, χωρίς ενίσχυση ή οποιαδήποτε ηλεκτρονική επεξεργασία. Ένα βασικό κύκλωµα Για το σκοπό αυτό, χρησιµοποιούµε ένα βασικό κύκλωµα σε όλες µας τις υλοποιήσεις, το οποίο το αναβαθµίζουµε συνεχώς και το προσαρµόζουµε µε ακρίβεια στις απαιτήσεις ισχύος της κάθε συσκευής. Αυτό σηµαίνει ότι όλες οι συσκευές επιπέδου line και όλοι οι τελικοί ενισχυτές της Classé βελτιώνονται διαρκώς, εδώ και χρόνια. Όµως οι προσπάθειές µας δεν σταµατούν εδώ. Ακρόαση: Το βασικότερο κριτήριο Αφού καθορίσουµε τις βασικές τιµές του κυκλώµατος για κάθε συσκευή, περνάµε σε εκτεταµένες προσεκτικές ακροάσεις, κατά τη διάρκεια των οποίων αλλάζουµε και συνδυάζουµε διαφορετικά εξαρτήµατα (ηµιαγωγούς, πυκνωτές, καλώδια, πλακέτες κ.λπ.) και ρυθµίζουµε τις τάσεις λειτουργίας έτσι ώστε να είναι καλύπτουν πλήρως τις σχετικές προδιαγραφές. Οι διαδικασία αυτή ολοκληρώνεται µόνο όταν το τελικό ηχητικό αποτέλεσµα µας ικανοποιεί απόλυτα. Εξαιρετική απόδοση µε µεγάλη διάρκεια σε πραγµατικές συνθήκες λειτουργίας Όλες οι συσκευές της Classé, ακόµη και οι πιο προσιτές οικονοµικά, έχουν τα µοναδικά πλεονεκτήµατα ενός τόσο σχολαστικού καθορισµού των σχεδιαστικών τους παραµέτρων. Το αποτέλεσµα είναι µία τέλεια ισορροπία µεταξύ των συχνά αλληλοσυγκρουόµενων απαιτήσεων για εξαιρετική απόδοση και µακρόχρονη αξιοπιστία. Οι διαφορές µε τα πιο ακριβά µοντέλα µας βρίσκονται στην ποιότητα ορισµένων εξαρτηµάτων και στην ικανότητα των ισχυρών τροφοδοτικών τους να διαχειρίζονται µε άνεση µεγάλη ποσότητα ηλεκτρικού ρεύµατος. Νιώθουµε περήφανοι που κατασκευάσαµε τον CA-301. Θα νιώσετε το ίδιο που τον αγοράσατε. Kατασκευάζουµε όλες τις συσκευές µας βάσει των υψηλότερων προδιαγραφών. Από τις πλακέτες πολλαπλών στρωµάτων εποξικού γυαλιού µέχρι τα ισχυρά τροφοδοτικά και τις συµπαγείς µάσκες (εµπρόσθιες όψεις), κάθε προϊόν της Classé συνδυάζει µοναδικά την επιστήµη και την τέχνη της ηχητικής αναπαραγωγής. Ελπίζουµε ότι η ικανοποίηση που θα αισθανθείτε ακούγοντας µουσική από µία συσκευή της Classé θα είναι ίδια µε αυτή που αισθανθήκαµε εµείς κατασκευάζοντάς την. ΑΠΟΣΥΣΚΕΥΑΣΙΑ ΚΑΙ ΤΟΠΟΘΕΤΗΣΗ Η εσωτερική συσκευασία του τελικού ενισχυτή CA-301 της CLASSÉ είναι από ένα ηµι-συµπαγές αφρώδες υλικό υψηλής πυκνότητας, ενώ η εξωτερική του συσκευασία είναι ένα ειδικά σχεδιασµένο κιβώτιο από χαρτόνι. Για να βγάλετε τον ενισχυτή από τη συσκευασία, ανοίξτε εντελώς τα επάνω φύλλα του χαρτοκιβωτίου, και πιάνοντας τον ενισχυτή από τις πλευρές, σηκώστε τον και τοποθετήστε τον σε µία µεγάλη επίπεδη επιφάνεια. Αφαιρέστε την πλαστική συσκευασία και ελέγξτε αν υπάρχει κάποια ζηµιά στο εξωτερικό της συσκευής. Βεβαιωθείτε ότι εκτός από αυτό το φυλλάδιο, στη συσκευασία περιλαµβάνεται και ένα αφαιρούµενο καλώδιο τροφοδοσίας. Αν διαπιστώσετε ότι η συσκευή έχει υποστεί οποιαδήποτε εξωτερική ζηµιά ή ότι λείπει οποιοδήποτε εξάρτηµα ή παρελκόµενο, παρακαλούµε αναφέρετέ το αµέσως στο κατάστηµα από όπου την αγοράσατε. Τοποθετήστε τον CA-301 στην τελική του θέση (ή κοντά σε αυτή), αφήνοντας κενό 20 περίπου εκατοστών στην πίσω πλευρά του για να µπορέσετε να συνδέσετε τα καλώδια των ηχείων. Ο µετασχηµατιστής του CA-301 είναι τοποθετηµένος µπροστά και στο κέντρο της συσκευής. Ο προενισχυτής, το πικάπ, τα καλώδια διασύνδεσης µεταξύ των συσκευών του συστήµατός σας κ.λπ., µπορεί να επηρεαστούν από το µετασχηµατιστή και να βγάλουν θόρυβο. Για το λόγο αυτό, καλό είναι αυτές οι συσκευές να απέχουν αρκετά από τον CA-301. Επίσης, θα πρέπει να υπάρχει κενό τουλάχιστον 15 εκατοστών επάνω και 8 εκατοστών πίσω από τον ενισχυτή, προκειµένου να γίνεται καλή κυκλοφορία του αέρα και να ψύχεται επαρκώς η συσκευή. είτε τη σωστή τάση λειτουργίας του ενισχυτή στο αυτοκόλλητο που υπάρχει 12

16 στην πίσω πλευρά του. Ο CA-301 έχει µία εξωτερική ασφάλεια εναλλασσοµένου ρεύµατος (AC), τα χαρακτηριστικά της οποίας θα πρέπει να είναι τα εξής: ΤΑΣΗ ΧΑΡΑΚΤΗΡΙΣΤΙΚΑ ΛΕΙΤΟΥΡΓΙΑΣ ΑΣΦΑΛΕΙΑΣ 100 ή 120 Volts AC: 12 AMP SLOW BLOW 125 ή 250 volts 220 ή 240 Volts AC: 10 AMP SLOW BLOW 250 volts ΣΥΝ ΕΣΕΙΣ Παροχή ρεύµατος Τοποθετήστε τη µία άκρη του καλωδίου ρεύµατος στην υποδοχή τροφοδοσίας ( AC RECEPTACLE ) που υπάρχει στην πίσω πλευρά της συσκευής. ΜΗΝ ΣΥΝ ΕΣΕΤΕ ΤΟ ΚΑΛΩ ΙΟ ΡΕΥΜΑΤΟΣ ΣΤΟΝ CA-301 ΚΑΙ ΣΤΗΝ ΠΡΙΖΑ ΠΡΙΝ ΟΛΟΚΛΗΡΩΣΕΤΕ ΤΙΣ ΥΠΟΛΟΙΠΕΣ ΣΥΝ ΕΣΕΙΣ (ΠΡΟΕΝΙΣΧΥΤΗΣ, ΗΧΕΙΑ). ΠΡΟΣΟΧΗ: Οδηγίες για την ασφαλή χρήση της συσκευής Μην συνδέσετε το καλώδιο ρεύµατος πριν ολοκληρώσετε τις υπόλοιπες συνδέσεις. Η µεταβολή (FLOATING) ή παράκαµψη (DEFEATING) της γείωσης σε ένα καλώδιο τροφοδοσίας 3 ακροδεκτών µπορεί να προκαλέσει ηλεκτροπληξία. Συνδέστε πρώτα όλα τα καλώδια µεταξύ των συσκευών του συστήµατός σας και µεταξύ του ενισχυτή και των ηχείων, και αφήστε τελευταίο το καλώδιο τροφοδοσίας. Στερεοφωνική λειτουργία Οι υποδοχές σύνδεσης εισόδου (µε τον προενισχυτή INPUT ) και εξόδου (µε τα ηχεία OUTPUT ) του CA-301 βρίσκονται στην πίσω πλευρά του. Η θέση των ηχείων όπως σηµειώνεται επάνω από τους ακροδέκτες [ RIGHT (δεξί) LEFT (αριστερό)], εννοείται σε σχέση µε τη θέση του ακροατή. Οι ακροδέκτες σύνδεσης των ηχείων για τη στερεοφωνική λειτουργία έχουν την ένδειξη STEREO. Βεβαιωθείτε ότι ο διακόπτης STEREO/MONO είναι στη θέση STEREO, όπου έχει τοποθετηθεί από το εργοστάσιο. Χρησιµοποιήστε µόνο καλώδια υψηλής ποιότητας για τη σύνδεση του CA-301 µε τον προενισχυτή και τα ηχεία. Αν τα βύσµατα RCA των καλωδίων σύνδεσης µε τον προενισχυτή είναι χαλαρά, βγάλτε τα και σφίξτε λίγο τα εξωτερικά µεταλλικά ελάσµατα (γείωση) µε µία πένσα. Τοποθετήστε τα καλώδια των ηχείων στους ακροδέκτες ( OUTPUT ) και σφίξτε τους. Φροντίστε ώστε να τηρήσετε τη σωστή πολικότητα (+, ). ΜΗΝ ΣΦΙΞΕΤΕ ΥΠΕΡΒΟΛΙΚΑ τους ακροδέκτες γιατί µπορεί να προκαλέσετε ζηµιά στη συσκευή. Κάθε φορά που θα θέτετε σε λειτουργία τον ενισχυτή, η φωτεινή ένδειξη λειτουργίας της εµπρόσθιας όψης θα αναβοσβήνει µε κόκκινο χρώµα για 20 δευτερόλεπτα, και µόλις ολοκληρωθεί η διαδικασία ενεργοποίησης θα παραµείνει αναµµένη. Μονοφωνική λειτουργία Ο CA-301 µπορεί να γεφυρωθεί και να χρησιµοποιηθεί και ως ισχυρός µονοφωνικός ενισχυτής (οπότε σε ένα στερεοφωνικό σύστηµα θα χρειαστείτε δύο CA-301, έναν για κάθε ηχείο για περισσότερες λεπτοµέρειες σχετικά µε τη συγκεκριµένη διάταξη συστήµατος απευθυνθείτε στην αντιπροσωπεία της Classé). Για να χρησιµοποιήσετε τον ενισχυτή µονοφωνικά, θα πρέπει να βάλετε το διακόπτη STEREO/MONO της εµπρόσθιας όψης στη θέση MONO. Ισχύουν και εδώ οι οδηγίες που αναφέρθηκαν στις προηγούµενες ενότητες, σχετικά µε την ασφαλή χρήση της συσκευής και το σωστό τρόπο σύνδεσης των καλωδίων. Πριν βάλετε το διακόπτη στη θέση MONO, θα πρέπει να θέσετε τον ενισχυτή εκτός λειτουργίας και να αποσυνδέσετε τον προενισχυτή, τα ηχεία και το καλώδιο τροφοδοσίας. ΣΗΜΕΙΩΣΗ: Ο διακόπτης STEREO/MONO δεν λειτουργεί όταν ο ενισχυτής είναι σε λειτουργία. Κατά συνέπεια, δεν µπορείτε να αλλάξετε τη θέση του διακόπτη από STEREO σε MONO ή αντίστροφα, παρά µόνο αν κλείσετε τον ενισχυτή, αφού ο τρόπος λειτουργίας (stereo ή mono) κλειδώνει όταν ο ενισχυτής είναι ενεργοποιηµένος. Στη µονοφωνική λειτουργία µόνο µία έξοδος του προενισχυτή συνδέεται στον CA-301 (η δεύτερη έξοδος του προενισχυτή συνδέεται στον δεύτερο τελικό). Η είσοδος σύνδεσης του CA-301 που χρησιµοποιείται είναι η αριστερή [ INPUT LEFT (MONO) ], ενώ η δεξιά είσοδος ( INPUT RIGHT ) απενεργοποιείται αυτόµατα. Το ηχείο συνδέεται στους κάτω ακροδέκτες, µε την ένδειξη MONO. Η πολικότητα σηµειώνεται δίπλα στους ακροδέκτες (+, ). Οι πιο πάνω ρυθµίσεις και συνδέσεις ισχύουν και για τον δεύτερο CA-301 που θα συνδέσετε στο σύστηµα. Σηµειώστε ότι αν γεφυρώσετε έναν ενισχυτή, η αρνητική έξοδος ( OUTPUT ) δεν είναι γείωση. Μην χρησιµοποιήσετε συσκευή κοινής γείωσης (common ground) ή ηλεκτρονικά crossovers µε κοινή γείωση. Αν συνδέσετε δύο γεφυρωµένους ενισχυτές σε µία συσκευή κοινής γείωσης, δεν θα λειτουργήσουν. MONO Μπορείτε και στη µονοφωνική λειτουργία να χρησιµοποιήστε οποιονδήποτε από τους δύο τύπους εισόδων (RCA ή XLR βλ. σχετική ενότητα) για να συνδέσετε τον CA-301 µε τον προενισχυτή. Συνδέστε το κατάλληλο καλώδιο σε οποιαδήποτε από τις αριστερές ( LEFT ) υποδοχές RCA ή XLR (για περισσότερες λεπτοµέρειες διαβάστε την ενότητα Μονοφωνική λειτουργία ). ΣΗΜΕΙΩΣΗ: Οι διακόπτες Stereo-Mono και LINE/BALANCED δεν λειτουργούν όταν ο ενισχυτής είναι σε λειτουργία. εν µπορείτε να αλλάξετε τη θέση των διακοπτών αυτών παρά µόνο αν κλείσετε τον ενισχυτή, αφού ο τρόπος λειτουργίας (STEREO/MONO και LINE/BALANCED) κλειδώνει όταν ο ενισχυτής είναι ενεργοποιηµένος. Αν αλλάξατε τη θέση κάποιου από τους διακόπτες πριν κλείσετε τον ενισχυτή, κλείστε τον ενισχυτή και ανοίξτε τον πάλι µετά από 10 δευτερόλεπτα ώστε να ενεργοποιηθεί το κύκλωµα. ΕΙΣΟ ΟΙ RCA (LINE) ΚΑΙ XLR (BALANCED): Ο CA-301 διαθέτει απλές εισόδους µε υποδοχές RCA (το επάνω ζεύγος εισόδων) και ισορροπηµένες εισόδους (balanced) µε υποδοχές τύπου XLR (το κάτω ζεύγος εισόδων). Μπορείτε να χρησιµοποιήσετε οποιονδήποτε από τους δύο τύπους εισόδων για να συνδέσετε τον CA-301 µε τον προενισχυτή, αλλά όχι ταυτόχρονα (δηλαδή θα πρέπει να χρησιµοποιήσετε είτε τις εισόδους RCA είτε τις εισόδους XLR). Οι είσοδοι XLR µπορούν να χρησιµοποιηθούν µόνο αν και ο προενισχυτής σας έχει αντίστοιχες εξόδους. Ο CA-301 µπορεί να λειτουργήσει στερεοφωνικά ή µονοφωνικά (βλ. σχετική ενότητα) ανεξάρτητα από τον τύπο εισόδων που θα επιλέξετε. Είσοδοι RCA (LINE) [Οι προεπιλεγµένες είσοδοι από το εργοστάσιο είναι οι είσοδοι RCA ( LINE )] Αν θέλετε να χρησιµοποιήσετε τις εισόδους RCA και ο ενισχυτής είναι ρυθµισµένος για τις εισόδους XLR, θα πρέπει να κλείσετε τον ενισχυτή και να βάλετε το διακόπτη LINE/BALANCED στη θέση LINE. ΣΗΜΕΙΩΣΗ: Ο διακόπτης LINE/ BALANCED δεν λειτουργεί όταν ο ενισχυτής είναι σε λειτουργία. Κατά συνέπεια, δεν µπορείτε να αλλάξετε τη θέση του διακόπτη από BALANCED σε LINE ή αντίστροφα, παρά µόνο αν κλείσετε τον ενισχυτή, αφού ο τρόπος λειτουργίας (LINE ή BALANCED) κλειδώνει όταν ο ενισχυτής είναι ενεργοποιηµένος. Αν αλλάξατε τη θέση του διακόπτη πριν κλείσετε τον ενισχυτή, κλείστε τον ενισχυτή και ανοίξτε τον πάλι µετά από 10 δευτερόλεπτα ώστε να ενεργοποιηθεί το κύκλωµα. Χρησιµοποιήστε καλώδια RCA για να συνδέσετε τον CA-301 µε τον προενισχυτή µέσω των υποδοχών RCA (LINE). Οι υποδοχές XLR θα απενεργοποιηθούν αυτόµατα. 13
.")
17 Είσοδοι XLR (BALANCED) [Οι προεπιλεγµένες είσοδοι από το εργοστάσιο είναι οι είσοδοι RCA ( LINE )]. Αν θέλετε να χρησιµοποιήσετε τις εισόδους XLR και ο ενισχυτής είναι ρυθµισµένος για τις εισόδους RCA, θα πρέπει να κλείσετε τον ενισχυτή και να βάλετε το διακόπτη LINE/BALANCED στη θέση BALANCED. Στην περίπτωση αυτή θα πρέπει ο προενισχυτής σας να έχει αντίστοιχες εξόδους και να χρησιµοποιήσετε καλώδια µε βύσµατα XLR. ΣΗΜΕΙΩΣΗ: Ο διακόπτης LINE/BALANCED δεν λειτουργεί όταν ο ενισχυτής είναι σε λειτουργία. Κατά συνέπεια, δεν µπορείτε να αλλάξετε τη θέση του διακόπτη από BALANCED σε LINE ή αντίστροφα, παρά µόνο αν κλείσετε τον ενισχυτή, αφού ο τρόπος λειτουργίας (LINE ή BALANCED) κλειδώνει όταν ο ενισχυτής είναι ενεργοποιηµένος. Αν αλλάξατε τη θέση του διακόπτη πριν κλείσετε τον ενισχυτή, κλείστε τον ενισχυτή και ανοίξτε τον πάλι µετά από 10 δευτερόλεπτα ώστε να ενεργοποιηθεί το κύκλωµα. Αν ο προενισχυτής µε τον οποίο θα χρησιµοποιήσετε τον CA-301 είναι άλλου κατασκευαστή και όχι της Classé, θα πρέπει να ελέγξετε αν η καλωδίωση των τριών ακίδων των υποδοχών XLR αντιστοιχεί σε αυτή του CA-301, που είναι η εξής: ΑΚΙ Α 1: ΓΕΙΩΣΗ ΑΚΙ Α 2: ΘΕΤΙΚΟ ΣΗΜΑ (ΜΗ ΑΝΤΕΣΤΡΑΜΜΕΝΟ) ΑΚΙ Α 3: ΑΡΝΗΤΙΚΟ ΣΗΜΑ (ΑΝΤΕΣΤΡΑΜΜΕΝΟ) Όλοι οι προενισχυτές και οι τελικοί της Classé ακολουθούν την πιο πάνω διάταξη. Κάποιοι προενισχυτές άλλων κατασκευαστών έχουν το θετικό ( HOT ) στην Ακίδα (pin) 3. Αν αυτό συµβαίνει και µε το δικό σας προενισχυτή και θέλετε να διατηρήσετε απόλυτη φάση σε ολόκληρο το σύστηµα, θα πρέπει στο άκρο που καταλήγει στην είσοδο του CA-301, το καλώδιο που στην έξοδο του προενισχυτή ξεκινά από την Ακίδα 3 να συνδεθεί στην Aκίδα 2, και αντίστοιχα, στο ίδιο άκρο (αυτό που καταλήγει στην είσοδο του CA-301), το καλώδιο που στην έξοδο του προενισχυτή ξεκινά από την Ακίδα 2 να συνδεθεί στην Aκίδα 3. ΣΗΜΕΙΩΣΗ: Σε καµία περίπτωση µην προσπαθήσετε να αντιστρέψετε τη φάση µόνος/η σας γιατί µπορεί να προκαλέσετε ζηµιά στη συσκευή, η οποία δεν καλύπτεται από την εγγύηση, ενώ υπάρχει και ο κίνδυνος ηλεκτροπληξίας. Η εργασία αυτή θα πρέπει να ανατεθεί στο τµήµα service της αντιπροσωπείας της Classé. Αφού βεβαιωθείτε ότι η φάση είναι σωστή και ότι ενισχυτής είναι εκτός λειτουργίας, συνδέστε τα καλώδια στις εξόδους XLR του προενισχυτή και στις αντίστοιχες εισόδους του CA-301, προσέχοντας ώστε να αντιστοιχήσετε σωστά τα κανάλια [η έξοδος XLR του δεξιού καναλιού (RIGHT ή R) του προενισχυτή θα πρέπει να συνδεθεί στην είσοδο XLR µε την ένδειξη RIGHT του CA-301, και η έξοδος XLR του αριστερού καναλιού (LEFT ή L) του προενισχυτή θα πρέπει να συνδεθεί στην είσοδο XLR µε την ένδειξη LEFT του CA-301]. Τοποθετήστε το βύσµα XLR στην υποδοχή µέχρι να ακούσετε το χαρακτηριστικό κλικ που δηλώνει ότι το βύσµα έχει κλειδώσει (για να βγάλετε το βύσµα, θα πρέπει να πιέσετε το διακόπτη που βρίσκεται επάνω σε αυτό και να το τραβήξετε προσεκτικά). Κύκλωµα προστασίας Ο CA-301 διαθέτει ένα ειδικό κύκλωµα που διαρκώς παρακολουθεί το ηχητικό σήµα εξόδου και το ελέγχει για πιθανή υπερφόρτωση, παραµόρφωση ή παρουσία συνεχούς ρεύµατος. Επιπλέον, υπάρχουν δύο ασφάλειες (3/4 amp fast blow), τοποθετηµένες στο εµπρόσθιο τµήµα της πλακέτας που ρυθµίζει την τάση, οι οποίες ελέγχουν την παροχή τάσης και προστατεύουν τα κυκλώµατα εισόδου σε περίπτωση υπερφόρτωσης. Τέλος, στην πίσω πλευρά της συσκευής, επάνω από την υποδοχή του καλωδίου τροφοδοσίας υπάρχει µία ασφάλεια προστασίας για την παροχή εναλλασσοµένου ρεύµατος. Αν ενεργοποιηθεί το κύκλωµα προστασίας του ενισχυτή ή καεί κάποια από τις ασφάλειες, η φωτεινή ένδειξη λειτουργίας (led) της εµπρόσθιας όψης θα αρχίσει να αναβοσβήνει µε πράσινο χρώµα, δείχνοντας ότι υπάρχει κάποιο πρόβληµα στη λειτουργία του ενισχυτή. Αν ενεργοποιηθεί το κύκλωµα προστασίας ή καεί οποιαδήποτε από τις ασφάλειες, κλείστε τον ενισχυτή, και αν εντοπίσετε και διορθώσετε το πρόβληµα, προσπαθήστε να τον ενεργοποιήσετε πάλι. Αν η φωτεινή ένδειξη της εµπρόσθιας όψης συνεχίζει να αναβοσβήνει, δείχνοντας ότι το πρόβληµα παραµένει, ή αν διαπιστώσετε ότι έχει καεί κάποια ασφάλεια, επικοινωνήστε µε την αντιπροσωπεία της Classé. Σε καµία περίπτωση µην επιχειρήσετε να αλλάξετε την καµένη ασφάλεια µόνος/η σας. Αν αντικαταστήσετε µία ασφάλεια χωρίς πρώτα να ελέγξετε αν υπάρχει πρόβληµα σε κάποιο από τα εξαρτήµατα του ενισχυτή µπορεί να προκαλέσετε µεγαλύτερη ζηµιά στη συσκευή. Επικοινωνήστε µε την αντιπροσωπεία της Classé ή µε το τµήµα εξυπηρέτησης πελατών της Classé Audio, Inc στο (514) IR OUT και IN: Ο CA-301 µπορεί επίσης να τεθεί σε ή εκτός λειτουργίας µέσω του επεξεργαστή surround SSP-75 της Classé, χρησιµοποιώντας τις υποδοχές IR OUT και IN που υπάρχουν στην πίσω πλευρά του CA-301. Για να γίνει αυτό θα πρέπει πρώτα να αλλάξετε τις ρυθµίσεις των διακοπτών jumper που βρίσκονται στο εσωτερικό του ενισχυτή. Η διαδικασία αυτή απαιτεί κάποια βασική εξοικείωση µε τα ηλεκτρονικά. Αν δεν είστε βέβαιος/η ότι µπορείτε να την εκτελέσετε, απευθυνθείτε στην αντιπροσωπεία της Classé. Πριν ξεκινήσετε θα πρέπει να θέσετε τον ενισχυτή εκτός λειτουργίας και να τον βγάλετε από την πρίζα, διαφορετικά υπάρχει σοβαρός κίνδυνος ηλεκτροπληξίας. Ανοίξτε το επάνω κάλυµµα του CA-301 και εντοπίστε τα τέσσερα jumpers που υπάρχουν στο εσωτερικό του [βρίσκονται δεξιά από την πλακέτα ρύθµισης (regulator η επάνω πλακέτα, στην πίσω πλευρά της συσκευής)] Έχοντας την εµπρόσθια όψη του CA-301 στραµµένη προς το µέρος σας, αφαιρέστε το jumper που βρίσκεται πίσω-πίσω (τελευταίο στη σειρά) και κρατήστε το γιατί µπορεί να σας χρειαστεί αργότερα. Τοποθετήστε πάλι το επάνω κάλυµµα του ενισχυτή. Συνδέστε την υποδοχή IR IN του CA-301 στην υποδοχή 5VDC που υπάρχει στην πίσω πλευρά του επεξεργαστή SSP-75 [οι υποδοχές αυτές δέχονται βύσµα 1/8 (µικρό καρφί )]. Πλέον, θα µπορείτε να ενεργοποιείτε και να απενεργοποιείτε τον CA-301 µε το διακόπτη λειτουργίας του SSP-75. Αν έχετε ένα πιο πολύπλοκο σύστηµα που περιλαµβάνει περισσότερους από έναν ενισχυτές, µπορείτε χρησιµοποιώντας αυτόν τον τρόπο σύνδεσης, να τους ενεργοποιείτε όλους αυτόµατα (ταυτόχρονα ή µε συγκεκριµένη σειρά) µε την πίεση ενός µόνο πλήκτρου. Η σειρά µε την οποία θα θέτονται σε λειτουργία οι ενισχυτές του συστήµατός σας καθορίζεται από τα 4 jumpers που βρίσκονται στο εσωτερικό της συσκευής. Ο πίνακας της Εικόνας 1 δείχνει ποιό jumper θα πρέπει να αφαιρεθεί ή να τοποθετηθεί, ώστε ο κάθε ενισχυτής να ενεργοποιείται µε τη σειρά που θέλετε. J3 J2 J1 J0 ADDRESS Πλήκτρο Αυτόµατη RC ενεργοποίηση X X X X 0 Ενισχυτής 1 Όχι X X X εκτός 1 Ενισχυτής 2 Όχι X X εκτός X 2 Ενισχυτής 3 Όχι X X εκτός εκτός 3 Ενισχυτής 4 Όχι X εκτός X X 4 Ενισχυτής 5 Όχι X εκτός X εκτός 5 Ενισχυτής 6 Όχι X εκτός εκτός X 0 Ενισχυτής 1 Όχι X εκτός εκτός εκτός 0 Ενισχυτής 1 Ναι ΣΗΜΕΙΩΣΗ: Η διαδικασία αυτή αφορά συστήµατα που περιλαµβάνουν περισσότερους από έναν ενισχυτές. Η συνδέσεις και οι ρυθµίσεις ενός τέτοιου συστήµατος είναι προφανώς πιο πολύπλοκες από αυτές ενός απλού στερεοφωνικού συγκροτήµατος και ενδεχοµένως απαιτούν κάποια προηγούµενη εµπειρία µε παρόµοια συστήµατα. Συνιστούµε να µην επιχειρήσετε να στήσετε µόνος/η σας το σύστηµα αν δεν είστε απόλυτα βέβαιος/η ότι έχετε κατανοήσει πλήρως τη διαδικασία 14

18 που περιγράφεται πιο πάνω. Σε περίπτωση που έχετε οποιαδήποτε αµφιβολία ή απορία, µην διστάσετε να επικοινωνήσετε µε την αντιπροσωπεία της Classé όπου θα βρείτε ανθρώπους πρόθυµους να σας βοηθήσουν. Σηµείωση για όλους τους κατόχους προϊόντων της Classé: Σας ευχαριστούµε που αγοράσατε αυτή τη συσκευή της Classé. Όλοι στην Classé επιδιώξαµε µε τον καλύτερο δυνατό τρόπο, να σας προσφέρουµε ένα προϊόν που θα αποτελέσει για σάς µία πολύ επιτυχηµένη επένδυση. Αισθανόµαστε περήφανοι που µπορούµε να σας ανακοινώσουµε ότι όλες οι συσκευές της Classé Audio έχουν εγκριθεί από την Ευρωπαϊκή Ένωση και µπορούν να φέρουν την ένδειξη CE. Αυτό σηµαίνει ότι η συσκευή που αγοράσατε έχει περάσει από τους πιο αυστηρούς ελέγχους κατασκευής και ασφαλείας που υπάρχουν στον κόσµο, και έχει αποδειχτεί ότι καλύπτει και ξεπερνάει όλες τις προδιαγραφές λειτουργίας και ασφαλείας CE που έχει θέσει η Ευρωπαϊκή Ένωση. Όλοι στην Classé σας ευχόµαστε πολλά χρόνια µουσικής απόλαυσης. Από τις 18 Ιουλίου του 1996, η Classé Audio έχει λάβει το πιστοποιητικό C401CLA1.MGS, που δίνει έγκριση CE σε όλα τα µοντέλα συσκευών ήχου της Classé. CLASSÉ AUDIO 5070 François Cusson Lachine, Québec Canada H8T 1B3 Telephone: (514) Fax: (514)

19 16

20 CA-301 SPECIFICATIONS Frequency response: Sensitivity: Input Impedance: Output Impedance: THD+Noise: Rated Output: 8 Ohms: 4 Ohms: Dimensions: Gross: Net: Weight: Gross: Net: 20 Hz to 20 KHz ± 0.1 db 1.75 Volts in for rated output 16 K ohms 0.03 Ohm 0.002% Stereo Mono Watts Watts 30" W. x 30" D. x 15" H. (76 x 76 x 38 cm) 19" W. x 19" D. x 9" H. (48 x 48 x 23 cm) 120 lbs. (54.4kg) 106 lbs. (48kg) 17
 19\" W. x 19\" D. x 9\" H. (48 x 48 x 23 cm) 120 lbs. (54.4kg) 106 lbs.")
OWNER S MANUAL CA-401 Power Amplifier
 OWNER S MANUAL CA-401 Power Amplifier ENGLISH...1 FRANÇAIS...3 DEUTSCH...5 ESPAÑOL...7 NEDERLANDS...10 ΕΛΛΗΝΙΚΑ...12...15 SPECIFICATIONS...18 V1.0 Figure 1 Rear view O U T P U T MONO OUT IN IR Figure 2
Tipologie installative - Installation types Type d installation - Installationstypen Tipos de instalación - Τυπολογίες εγκατάστασης
 AMPADE MOOCROMATICHE VIMAR DIMMERABII A 0 V~ - VIMAR 0 V~ DIMMABE MOOCHROME AMP AMPE MOOCHROME VIMAR VARIATEUR 0 V~ - DIMMERFÄHIGE MOOCHROMATICHE AMPE VO VIMAR MIT 0 V~ ÁMPARA MOOCROMÁTICA VIMAR REGUABE
OWNER S MANUAL CA-201 Power Amplifier
 OWNER S MANUAL CA-201 Power Amplifier ENGLISH...1 FRANÇAIS...3 DEUTSCH...5 ESPAÑOL...7 NEDERLANDS...10 ΕΛΛΗΝΙΚΑ...12...15 SPECIFICATIONS...17 V1.0 Figure 1 Rear view Figure 2 Top view LC JST + Mosfet fuse
4K HDMI Splitter 1x4. User s Guide / Bedienungsanleitung / Εγχειρίδιο Χρήστη
 4K HDMI Splitter 1x4 User s Guide / Bedienungsanleitung / Εγχειρίδιο Χρήστη INTRODUCTION The EDISION 4K HDMI Splitter 1x4 uses a single HDMI input source, to distribute it to 4 HDMI outputs. The splitter
OWNER S MANUAL CA-101 Power Amplifier
 OWNER S MANUAL CA-101 Power Amplifier ENGLISH...1 FRANÇAIS...3 DEUTSCH...5 ESPAÑOL...7 ΕΛΛΗΝΙΚΑ...9 SPECIFICATIONS...12 V1.0 Figure 1 Rear view Figure 2 Top view THANK YOU FROM EVERYONE AT CLASSÉ Thank
ULX Wireless System USER GUIDE SUPPLEMENT RENSEIGNEMENT SUPPLÉMENTAIRES INFORMACION ADICIONAL. M1 ( MHz)
") ULX Wireless System USER GUIDE SUPPLEMENT RENSEIGNEMENT SUPPLÉMENTAIRES INFORMACION ADICIONAL M1 (662 698 MHz) 2003, Shure Incorporated 27B8733A (Rev. 4) Printed in U.S.A. SPECIFICATIONS ULX1 Transmitter
ULX Wireless System USER GUIDE SUPPLEMENT RENSEIGNEMENT SUPPLÉMENTAIRES INFORMACION ADICIONAL M1 (662 698 MHz) 2003, Shure Incorporated 27B8733A (Rev. 4) Printed in U.S.A. SPECIFICATIONS ULX1 Transmitter
OWNER S MANUAL Omega Monaural power amplifier
 OWNER S MANUAL Omega Monaural power amplifier ENGLISH...1 DEUTSCH...4 ΕΛΛΗΝΙΚΑ...7 SPECIFICATIONS...10 V1.0 L Figure 1 Omega monaural amplifier rear view WARNING CHECK OPERATING VOLTAGE BEFORE CONNECTING
Tipologie installative - Installation types Types d installation - Die einbauanweisungen Tipos de instalación - Τυπολογίες εγκατάστασης
 Types d installation Die einbauanweisungen Tipos de instalación Τυπολογίες εγκατάστασης AMPADE MOOCROMATICHE VIMAR DIMMERABII A 0 V~ MOOCHROME DIMMABE AMP VIMAR 0 V~ AMPE MOOCHROME VIMAR DIMMABE 0 V~ EUCHTE
Modbus basic setup notes for IO-Link AL1xxx Master Block
 n Modbus has four tables/registers where data is stored along with their associated addresses. We will be using the holding registers from address 40001 to 49999 that are R/W 16 bit/word. Two tables that
La Déduction naturelle
 La Déduction naturelle Pierre Lescanne 14 février 2007 13 : 54 Qu est-ce que la déduction naturelle? En déduction naturelle, on raisonne avec des hypothèses. Qu est-ce que la déduction naturelle? En déduction
the total number of electrons passing through the lamp.
 1. A 12 V 36 W lamp is lit to normal brightness using a 12 V car battery of negligible internal resistance. The lamp is switched on for one hour (3600 s). For the time of 1 hour, calculate (i) the energy
3 Lösungen zu Kapitel 3
 3 Lösungen zu Kapitel 3 31 Lösungen der Aufgaben zu Abschnitt 31 311 Lösung Die Abbildung D : { R 4 R 4 R 4 R 4 R, a 1, a 2, a 3, a 4 ) D( a 1, a 2, a 3, a 4 ) definiere eine Determinantenform (auf R 4
[1] P Q. Fig. 3.1
![[1] P Q. Fig. 3.1](/thumbs/79/80362156.jpg "[1] P Q. Fig. 3.1") 1 (a) Define resistance....... [1] (b) The smallest conductor within a computer processing chip can be represented as a rectangular block that is one atom high, four atoms wide and twenty atoms long. One
1 (a) Define resistance....... [1] (b) The smallest conductor within a computer processing chip can be represented as a rectangular block that is one atom high, four atoms wide and twenty atoms long. One
CHAPTER 25 SOLVING EQUATIONS BY ITERATIVE METHODS
 CHAPTER 5 SOLVING EQUATIONS BY ITERATIVE METHODS EXERCISE 104 Page 8 1. Find the positive root of the equation x + 3x 5 = 0, correct to 3 significant figures, using the method of bisection. Let f(x) =
Εγκατάσταση λογισμικού και αναβάθμιση συσκευής Device software installation and software upgrade
 Για να ελέγξετε το λογισμικό που έχει τώρα η συσκευή κάντε κλικ Menu > Options > Device > About Device Versions. Στο πιο κάτω παράδειγμα η συσκευή έχει έκδοση λογισμικού 6.0.0.546 με πλατφόρμα 6.6.0.207.
Advanced Subsidiary Unit 1: Understanding and Written Response
 Write your name here Surname Other names Edexcel GE entre Number andidate Number Greek dvanced Subsidiary Unit 1: Understanding and Written Response Thursday 16 May 2013 Morning Time: 2 hours 45 minutes
Right Rear Door. Let's now finish the door hinge saga with the right rear door
 Right Rear Door Let's now finish the door hinge saga with the right rear door You may have been already guessed my steps, so there is not much to describe in detail. Old upper one file:///c /Documents
English PDFsharp is a.net library for creating and processing PDF documents 'on the fly'. The library is completely written in C# and based
 English PDFsharp is a.net library for creating and processing PDF documents 'on the fly'. The library is completely written in C# and based exclusively on safe, managed code. PDFsharp offers two powerful
Capacitors - Capacitance, Charge and Potential Difference
 Capacitors - Capacitance, Charge and Potential Difference Capacitors store electric charge. This ability to store electric charge is known as capacitance. A simple capacitor consists of 2 parallel metal
Owner s Manual Omega Preamp MKIII
 Owner s Manual Omega Preamp MKIII ENGLISH...1 FRANÇAIS...3 DEUTSCH...6 ESPAÑOL...9 NEDERLANDS...13 ΕΛΛΗΝΙΚΑ...15...16 SPECIFICATIONS...19 V1.1 Figure 1 Rear view Figure 2 Front view Figure 3 Remote handset
HOMEWORK 4 = G. In order to plot the stress versus the stretch we define a normalized stretch:
 HOMEWORK 4 Problem a For the fast loading case, we want to derive the relationship between P zz and λ z. We know that the nominal stress is expressed as: P zz = ψ λ z where λ z = λ λ z. Therefore, applying
derivation of the Laplacian from rectangular to spherical coordinates
 derivation of the Laplacian from rectangular to spherical coordinates swapnizzle 03-03- :5:43 We begin by recognizing the familiar conversion from rectangular to spherical coordinates (note that φ is used
SPBW06 & DPBW06 series
 /,, MODEL SELECTION TABLE INPUT ORDER NO. INPUT VOLTAGE (RANGE) NO LOAD INPUT CURRENT FULL LOAD VOLTAGE CURRENT EFFICIENCY (TYP.) CAPACITOR LOAD (MAX.) SPBW06F-03 310mA 3.3V 0 ~ 1500mA 81% 4700μF SPBW06F-05
SPEEDO AQUABEAT. Specially Designed for Aquatic Athletes and Active People
 SPEEDO AQUABEAT TM Specially Designed for Aquatic Athletes and Active People 1 2 Decrease Volume Increase Volume Reset EarphonesUSBJack Power Off / Rewind Power On / Fast Forward Goggle clip LED Status
OWNER S MANUAL CAP-151 Remote Control Integrated Amplifier
 OWNER S MANUAL CAP-151 Remote Control Integrated Amplifier ENGLISH...1 FRANÇAIS...4 DEUTSCH...7 ESPAÑOL...10 NEDERLANDS...14 ΕΛΛΗΝΙΚΑ...16...20 SPECIFICATIONS...23 V1.0 Figure 1 Top view J7 J8 J6 J5 Mounting
3.4 SUM AND DIFFERENCE FORMULAS. NOTE: cos(α+β) cos α + cos β cos(α-β) cos α -cos β
 cos α + cos β cos(α-β) cos α -cos β") 3.4 SUM AND DIFFERENCE FORMULAS Page Theorem cos(αβ cos α cos β -sin α cos(α-β cos α cos β sin α NOTE: cos(αβ cos α cos β cos(α-β cos α -cos β Proof of cos(α-β cos α cos β sin α Let s use a unit circle
3.4 SUM AND DIFFERENCE FORMULAS Page Theorem cos(αβ cos α cos β -sin α cos(α-β cos α cos β sin α NOTE: cos(αβ cos α cos β cos(α-β cos α -cos β Proof of cos(α-β cos α cos β sin α Let s use a unit circle
ΕΣΩΤΕΡΙΚΗ ΜΟΝΑΔΑ ΚΛΙΜΑΤΙΣΤΙΚΟ ΔΙΑΙΡΟΥΜΕΝΟΥ ΤΥΠΟΥ ΜΟΝΤΕΛΟ RAD-18RPA RAD-25RPA RAD-35RPA RAD-50RPA. Eλληνικά ΕΣΩΤΕΡΙΚΗ ΜΟΝΑΔΑ
 ΚΛΙΜΑΤΙΣΤΙΚ ΔΙΑΙΡΥΜΕΝΥ ΤΥΠΥ ΕΣΩΤΕΡΙΚΗ ΜΝΑΔΑ ΜΝΤΕΛ RAD-18RPA RAD-25RPA RAD-35RPA RAD-50RPA ΕΣΩΤΕΡΙΚΗ ΜΝΑΔΑ RAD-18RPA RAD-25RPA RAD-35RPA RAD-50RPA Instruction manual Page 1~12 To obtain the best performance
OUR PRODUCT RANGE. www.rakson.gr
 ΤΑ ΑΛΛΑ ΕΙ Η ΠΡΟΪΟΝΤΑ ΜΑΣ ΜΕΤΑΣΧΗΜΑΤΙΣΤΕΣ ΚΟΥ ΟΥΝΙΩΝ ΚΟΥ ΟΥΝΙΑ ΜΠΟΥΤΟΝ ΚΟΥ ΟΥΝΙΩΝ ΑΥΤΟΜΑΤΟΙ ΚΛΙΜΑΚΟΣΤΑΣΙΟΥ ΚΛΕΙ ΑΡΙΕΣ ΑΝΙΧΝΕΥΤΕΣ ΚΙΝΗΣΗΣ ΣΥΣΤΗΜΑΤΑ ΕΠΙΚΟΙΝΩΝΙΑΣ Θυροτηλεοράσεις Θυροτηλέφωνα Ενδοεπικοινωνίες
ΚΥΠΡΙΑΚΗ ΕΤΑΙΡΕΙΑ ΠΛΗΡΟΦΟΡΙΚΗΣ CYPRUS COMPUTER SOCIETY ΠΑΓΚΥΠΡΙΟΣ ΜΑΘΗΤΙΚΟΣ ΔΙΑΓΩΝΙΣΜΟΣ ΠΛΗΡΟΦΟΡΙΚΗΣ 6/5/2006
 Οδηγίες: Να απαντηθούν όλες οι ερωτήσεις. Ολοι οι αριθμοί που αναφέρονται σε όλα τα ερωτήματα είναι μικρότεροι το 1000 εκτός αν ορίζεται διαφορετικά στη διατύπωση του προβλήματος. Διάρκεια: 3,5 ώρες Καλή
RSDW08 & RDDW08 series
 /,, MODEL SELECTION TABLE INPUT ORDER NO. INPUT VOLTAGE (RANGE) NO LOAD INPUT CURRENT FULL LOAD VOLTAGE CURRENT EFFICIENCY (Typ.) CAPACITOR LOAD (MAX.) RSDW08F-03 344mA 3.3V 2000mA 80% 2000μF RSDW08F-05
Section 8.3 Trigonometric Equations
 99 Section 8. Trigonometric Equations Objective 1: Solve Equations Involving One Trigonometric Function. In this section and the next, we will exple how to solving equations involving trigonometric functions.
38BXCS STANDARD RACK MODEL. DCS Input/Output Relay Card Series MODEL & SUFFIX CODE SELECTION 38BXCS INSTALLATION ORDERING INFORMATION RELATED PRODUCTS
 DCS Input/Output Relay Card Series STANDARD RACK MODEL 38BXCS MODEL & SUFFIX CODE SELECTION 38BXCS MODEL CONNECTOR Y1 :Yokogawa KS2 cable use Y2 :Yokogawa KS9 cable use Y6 :Yokogawa FA-M3/F3XD32-3N use
Οδηγίες Αγοράς Ηλεκτρονικού Βιβλίου Instructions for Buying an ebook
 Οδηγίες Αγοράς Ηλεκτρονικού Βιβλίου Instructions for Buying an ebook Βήμα 1: Step 1: Βρείτε το βιβλίο που θα θέλατε να αγοράσετε και πατήστε Add to Cart, για να το προσθέσετε στο καλάθι σας. Αυτόματα θα
0.635mm Pitch Board to Board Docking Connector. Lead-Free Compliance
 .635mm Pitch Board to Board Docking Connector Lead-Free Compliance MINIDOCK SERIES MINIDOCK SERIES Features Specifications Application.635mm Pitch Connector protected by Diecasted Zinc Alloy Metal Shell
Quick Installation Guide
 A Installation 1 F H B E C D G 2 www.trust.com/17528/faq Quick Installation Guide C C D Freewave Wireless Audio Set 17528/ 17529 D Installation Configuration Windows XP 4 5 8 Windows 7/ Vista 6 7 9 10
Montage - Raccordement Implantation EURO-RELAIS MINI & BOX. Mini & Box
 Montage - Raccordement Implantation EURO-RELAIS MINI & BOX 3 Fiche technique EURO-RELAIS MINI & BOX DESCRIPTIF La borne Euro-Relais MINI est en polyester armé haute résistance totalement neutre à la corrosion
Instruction Execution Times
 1 C Execution Times InThisAppendix... Introduction DL330 Execution Times DL330P Execution Times DL340 Execution Times C-2 Execution Times Introduction Data Registers This appendix contains several tables
OWNER S MANUAL CP-47.5 Remote Control Balanced Line Pre-Amplifier
 OWNER S MANUAL CP-47.5 Remote Control Balanced Line Pre-Amplifier ENGLISH...1 FRANÇAIS...3 DEUTSCH...6 ESPAÑOL...8 NEDERLANDS...11 ΕΛΛΗΝΙΚΑ...14...17 SPECIFICATIONS...20 V1.0 Figure 1 Remote handset front
2 Composition. Invertible Mappings
 Arkansas Tech University MATH 4033: Elementary Modern Algebra Dr. Marcel B. Finan Composition. Invertible Mappings In this section we discuss two procedures for creating new mappings from old ones, namely,
Door Hinge replacement (Rear Left Door)
") Door Hinge replacement (Rear Left Door) We will continue the previous article by replacing the hinges of the rear left hand side door. I will use again the same procedure and means I employed during the
Door Hinge replacement (Rear Left Door) We will continue the previous article by replacing the hinges of the rear left hand side door. I will use again the same procedure and means I employed during the
Digital motor protection relays
 Digital motor protection relays Specification DMP -S & DMP -Sa DMP -T & DMP -Ta Model No. DMP06-S/Sa DMP60-S/Sa DMP06-T/Ta DMP60-T/Ta Wiring Screw type Tunnel type Panel mount Unit or Extension Note1)
UNIVERSITY OF CALIFORNIA. EECS 150 Fall ) You are implementing an 4:1 Multiplexer that has the following specifications:
 You are implementing an 4:1 Multiplexer that has the following specifications:") UNIVERSITY OF CALIFORNIA Department of Electrical Engineering and Computer Sciences EECS 150 Fall 2001 Prof. Subramanian Midterm II 1) You are implementing an 4:1 Multiplexer that has the following specifications:
UNIVERSITY OF CALIFORNIA Department of Electrical Engineering and Computer Sciences EECS 150 Fall 2001 Prof. Subramanian Midterm II 1) You are implementing an 4:1 Multiplexer that has the following specifications:
1. Πως μειώνεται η ταχύτητα των καυσαερίων από το σημείο εξόδου τους στο ακροφύσιο εξόδου του κινητήρα? 2. Με ποιους τρόπους γίνεται η σήμανση της
 1. Πως μειώνεται η ταχύτητα των καυσαερίων από το σημείο εξόδου τους στο ακροφύσιο εξόδου του κινητήρα? 2. Με ποιους τρόπους γίνεται η σήμανση της επικίνδυνης περιοχής μπροστά από το κινητήρα? 3. Ποιοιείναιοικύκλοιασφαλείαςγύρωαπότοαεροσκάφοςκαιτιαντιπροσωπεύουν?
Matrices and Determinants
 Matrices and Determinants SUBJECTIVE PROBLEMS: Q 1. For what value of k do the following system of equations possess a non-trivial (i.e., not all zero) solution over the set of rationals Q? x + ky + 3z
Εμπορική αλληλογραφία Ηλεκτρονική Αλληλογραφία
 - Εισαγωγή Sehr geehrter Herr Präsident, Sehr geehrter Herr Präsident, Εξαιρετικά επίσημη επιστολή, ο παραλήπτης έχει ένα ειδικό τίτλο ο οποίος πρέπει να χρησιμοποιηθεί αντί του ονόματος του Sehr geehrter
Section 7.6 Double and Half Angle Formulas
 09 Section 7. Double and Half Angle Fmulas To derive the double-angles fmulas, we will use the sum of two angles fmulas that we developed in the last section. We will let α θ and β θ: cos(θ) cos(θ + θ)
OWNER S MANUAL Omega Series Pre-Amplifier
 OWNER S MANUAL Omega Series Pre-Amplifier ENGLISH... DEUTSCH... ESPAÑOL...6 NEDERLANDS...9 ΕΛΛΗΝΙΚΑ......5 SPECIFICATIONS...8 V.0 Figure Rear view OUTPUT OUTPUT TAPE OUT TAPE IN INPUT INPUT INPUT INPUT
Potential Dividers. 46 minutes. 46 marks. Page 1 of 11
 Potential Dividers 46 minutes 46 marks Page 1 of 11 Q1. In the circuit shown in the figure below, the battery, of negligible internal resistance, has an emf of 30 V. The pd across the lamp is 6.0 V and
1000 VDC 1250 VDC 125 VAC 250 VAC J K 125 VAC, 250 VAC
 Metallized Polyester Film Capacitor Type: ECQE(F) Non-inductive construction using metallized Polyester film with flame retardant epoxy resin coating Features Self-healing property Excellent electrical
OWNER S MANUAL CAM350 Mono Power Amplifier
 OWNER S MANUAL CAM350 Mono Power Amplifier ENGLISH...1 FRANÇAIS...2 DEUTSCH...4 ESPAÑOL...6 NEDERLANDS...8 ΕΛΛΗΝΙΚΑ...10...12 SPECIFICATIONS...14 V1.0 Figure 1 Jumper settings J3 J2 J1 J0 ADDRESS RC Button
MATERIALIEN ZUR VORBEREITUNG AUF DIE KLAUSUR INFORMATIK II FÜR VERKEHRSINGENIEURWESEN ANTEIL VON PROF. VOGLER IM WINTERSEMESTER 2011/12
 Fakultät Informatik Institut für Angewandte Informatik, Professur Technische Informationssysteme MATERIALIEN ZUR VORBEREITUNG AUF DIE KLAUSUR INFORMATIK II FÜR VERKEHRSINGENIEURWESEN ANTEIL VON PROF. VOGLER
Γιπλυμαηική Δπγαζία. «Ανθπυποκενηπικόρ ζσεδιαζμόρ γέθςπαρ πλοίος» Φοςζιάνηρ Αθανάζιορ. Δπιβλέπυν Καθηγηηήρ: Νηθφιανο Π. Βεληίθνο
 ΔΘΝΙΚΟ ΜΔΣΟΒΙΟ ΠΟΛΤΣΔΥΝΔΙΟ ΥΟΛΗ ΝΑΤΠΗΓΩΝ ΜΗΥΑΝΟΛΟΓΩΝ ΜΗΥΑΝΙΚΩΝ Γιπλυμαηική Δπγαζία «Ανθπυποκενηπικόρ ζσεδιαζμόρ γέθςπαρ πλοίος» Φοςζιάνηρ Αθανάζιορ Δπιβλέπυν Καθηγηηήρ: Νηθφιανο Π. Βεληίθνο Σπιμελήρ Δξεηαζηική
The Simply Typed Lambda Calculus
 Type Inference Instead of writing type annotations, can we use an algorithm to infer what the type annotations should be? That depends on the type system. For simple type systems the answer is yes, and
b. Use the parametrization from (a) to compute the area of S a as S a ds. Be sure to substitute for ds!
 to compute the area of S a as S a ds. Be sure to substitute for ds!") MTH U341 urface Integrals, tokes theorem, the divergence theorem To be turned in Wed., Dec. 1. 1. Let be the sphere of radius a, x 2 + y 2 + z 2 a 2. a. Use spherical coordinates (with ρ a) to parametrize.
MTH U341 urface Integrals, tokes theorem, the divergence theorem To be turned in Wed., Dec. 1. 1. Let be the sphere of radius a, x 2 + y 2 + z 2 a 2. a. Use spherical coordinates (with ρ a) to parametrize.
Finite Field Problems: Solutions
 Finite Field Problems: Solutions 1. Let f = x 2 +1 Z 11 [x] and let F = Z 11 [x]/(f), a field. Let Solution: F =11 2 = 121, so F = 121 1 = 120. The possible orders are the divisors of 120. Solution: The
OWNER S MANUAL CP-35 Remote Control Balanced Pre-Amplifier
 OWNER S MANUAL CP-35 Remote Control Balanced Pre-Amplifier ENGLISH...1 FRANÇAIS...3 DEUTSCH...5 ESPAÑOL...8 NEDERLANDS...11 ΕΛΛΗΝΙΚΑ...13...16 SPECIFICATIONS...19 V1.0 Figure 1 Remote handset front Figure
Αναερόβια Φυσική Κατάσταση
 Αναερόβια Φυσική Κατάσταση Γιάννης Κουτεντάκης, BSc, MA. PhD Αναπληρωτής Καθηγητής ΤΕΦΑΑ, Πανεπιστήµιο Θεσσαλίας Περιεχόµενο Μαθήµατος Ορισµός της αναερόβιας φυσικής κατάστασης Σχέσης µε µηχανισµούς παραγωγής
ASL BS ,00 ASL BS ,00 ASL BS ,80 ASL BS ,60 ASL TP SET 1 817,20 ASL TP SET 2 997,20 ASL TP SET ,20
 www.asl-inter.com BASIC SERIES ASL BS 217 Κεντρική μονάδα intercom 2 καναλιών. Κάθε κανάλι διαθέτει φωτιζόμενο κουμπί Talk και Call και volume για τον έλεγχο της έντασης. Στην πίσω πλευρά διαθέτει μια
MARKSCHEME BARÈME DE NOTATION ESQUEMA DE CALIFICACIÓN
 IB DIPLOMA PROGRAMME PROGRAMME DU DIPLÔME DU BI PROGRAMA DEL DIPLOMA DEL BI M06/2/ABMGR/SP1/GRE/TZ0/XX/M MARKSCHEME BARÈME DE NOTATION ESQUEMA DE CALIFICACIÓN May / mai / mayo 2006 MODERN GREEK / GREC
ΚΥΠΡΙΑΚΗ ΕΤΑΙΡΕΙΑ ΠΛΗΡΟΦΟΡΙΚΗΣ CYPRUS COMPUTER SOCIETY ΠΑΓΚΥΠΡΙΟΣ ΜΑΘΗΤΙΚΟΣ ΔΙΑΓΩΝΙΣΜΟΣ ΠΛΗΡΟΦΟΡΙΚΗΣ 19/5/2007
 Οδηγίες: Να απαντηθούν όλες οι ερωτήσεις. Αν κάπου κάνετε κάποιες υποθέσεις να αναφερθούν στη σχετική ερώτηση. Όλα τα αρχεία που αναφέρονται στα προβλήματα βρίσκονται στον ίδιο φάκελο με το εκτελέσιμο
Συστήματα Διαχείρισης Βάσεων Δεδομένων
 ΕΛΛΗΝΙΚΗ ΔΗΜΟΚΡΑΤΙΑ ΠΑΝΕΠΙΣΤΗΜΙΟ ΚΡΗΤΗΣ Συστήματα Διαχείρισης Βάσεων Δεδομένων Φροντιστήριο 9: Transactions - part 1 Δημήτρης Πλεξουσάκης Τμήμα Επιστήμης Υπολογιστών Tutorial on Undo, Redo and Undo/Redo
Phys460.nb Solution for the t-dependent Schrodinger s equation How did we find the solution? (not required)
") Phys460.nb 81 ψ n (t) is still the (same) eigenstate of H But for tdependent H. The answer is NO. 5.5.5. Solution for the tdependent Schrodinger s equation If we assume that at time t 0, the electron starts
Phys460.nb 81 ψ n (t) is still the (same) eigenstate of H But for tdependent H. The answer is NO. 5.5.5. Solution for the tdependent Schrodinger s equation If we assume that at time t 0, the electron starts
Strain gauge and rosettes
 Strain gauge and rosettes Introduction A strain gauge is a device which is used to measure strain (deformation) on an object subjected to forces. Strain can be measured using various types of devices classified
EE512: Error Control Coding
 EE512: Error Control Coding Solution for Assignment on Finite Fields February 16, 2007 1. (a) Addition and Multiplication tables for GF (5) and GF (7) are shown in Tables 1 and 2. + 0 1 2 3 4 0 0 1 2 3
Wenn ihr nicht werdet wie die Kinder...
 Wenn ihr nicht werdet wie die Kinder... . Der Memoriam-Garten Schön, dass ich mir keine Sorgen machen muss! Mit dem Memoriam-Garten bieten Ihnen Friedhofsgärtner, Steinmetze
Bulletin 1489 UL489 Circuit Breakers
 Bulletin 489 UL489 Circuit Breakers Tech Data 489-A Standard AC Circuit Breaker 489-D DC Circuit Breaker 489-A, AC Circuit Breakers 489-D, DC Circuit Breakers Bulletin 489-A Industrial Circuit Breaker
First Sensor Quad APD Data Sheet Part Description QA TO Order #
 Responsivity (/W) First Sensor Quad PD Data Sheet Features Description pplication Pulsed 16 nm laser detection RoHS 211/65/EU Light source positioning Laser alignment ø mm total active area Segmented in
Math 6 SL Probability Distributions Practice Test Mark Scheme
 Math 6 SL Probability Distributions Practice Test Mark Scheme. (a) Note: Award A for vertical line to right of mean, A for shading to right of their vertical line. AA N (b) evidence of recognizing symmetry
PLUGIN BASIC TS (en) indication, that electrical appliance is switched on
 indication, that electrical appliance is switched on") PLUGIN BASIC TS (en) indication, that electrical appliance is switched on after pressing the ON button, will be the connected appliance permantely switched on. after pressing the button, will be the connected
PLUGIN BASIC TS (en) indication, that electrical appliance is switched on after pressing the ON button, will be the connected appliance permantely switched on. after pressing the button, will be the connected
ΕΡΙΤΟΡΕΣ ΚΑΙ ΑΝΘΩΡΟΙ ΚΛΕΙΔΙΑ ΑΝΑΘΕΣΘ ΑΓΩΝΑ ΓΑΦΕΙΟ ΑΓΩΝΩΝ ΟΓΑΝΩΤΙΚΘ ΕΡΙΤΟΡΘ. ζεκηλαρηο 1 ΡΑΓΚΟΣΜΙΑ ΟΜΟΣΡΟΝΔΙΑ (ISAF) ΕΛΛΘΝΙΚΘ ΟΜΟΣΡΟΝΔΙΑ (Ε.Ι.Ο.
 ΕΛΛΘΝΙΚΘ ΟΜΟΣΡΟΝΔΙΑ (Ε.Ι.Ο.") ΑΝΑΘΕΣΘ ΑΓΩΝΑ ΕΡΙΤΟΡΕΣ ΚΑΙ ΑΝΘΩΡΟΙ ΚΛΕΙΔΙΑ ΡΑΓΚΟΣΜΙΑ ΟΜΟΣΡΟΝΔΙΑ (ISAF) ΕΛΛΘΝΙΚΘ ΟΜΟΣΡΟΝΔΙΑ (Ε.Ι.Ο.) ΚΛΑΣΘ 6/6/2009 1 ΟΡΓΑΝΩΣΙΚΗ ΕΠΙΣΡΟΠΗ ΓΡΑΦΕΙΟ ΑΓΩΝΩΝ ΕΠΙΣΡΟΠΗ ΑΓΩΝΩΝ ΕΠΙΣΡΟΠΗ ΕΝΣΑΕΩΝ ΕΠΙΣΡΟΠΗ ΚΑΣΑΜΕΣΡΗΕΩΝ
ΑΝΑΘΕΣΘ ΑΓΩΝΑ ΕΡΙΤΟΡΕΣ ΚΑΙ ΑΝΘΩΡΟΙ ΚΛΕΙΔΙΑ ΡΑΓΚΟΣΜΙΑ ΟΜΟΣΡΟΝΔΙΑ (ISAF) ΕΛΛΘΝΙΚΘ ΟΜΟΣΡΟΝΔΙΑ (Ε.Ι.Ο.) ΚΛΑΣΘ 6/6/2009 1 ΟΡΓΑΝΩΣΙΚΗ ΕΠΙΣΡΟΠΗ ΓΡΑΦΕΙΟ ΑΓΩΝΩΝ ΕΠΙΣΡΟΠΗ ΑΓΩΝΩΝ ΕΠΙΣΡΟΠΗ ΕΝΣΑΕΩΝ ΕΠΙΣΡΟΠΗ ΚΑΣΑΜΕΣΡΗΕΩΝ
15W DIN Rail Type DC-DC Converter. DDR-15 series. File Name:DDR-15-SPEC
 DIN Rail Type DC-DC Converter ± : DIN Rail Type DC-DC Converter SPECIFICATION MODEL OUTPUT INPUT PROTECTION ENVIRONMENT SAFETY & EMC (Note 5) OTHERS DC VOLTAGE RATED CURRENT CURRENT RANGE RATED POWER RIPPLE
COURBES EN POLAIRE. I - Définition
 Y I - Définition COURBES EN POLAIRE On dit qu une courbe Γ admet l équation polaire ρ=f (θ), si et seulement si Γ est l ensemble des points M du plan tels que : OM= ρ u = f(θ) u(θ) Γ peut être considérée
 Distributed by: www.jameco.com -800-83-4242 The content and copyrights of the attached material are the property of its owner. Single-Chip Voice Record/Playback Devices 60-, 75-, 90-, and 20-Second Durations
department listing department name αχχουντσ ϕανε βαλικτ δδσϕηασδδη σδηφγ ασκϕηλκ τεχηνιχαλ αλαν ϕουν διξ τεχηνιχαλ ϕοην µαριανι
 She selects the option. Jenny starts with the al listing. This has employees listed within She drills down through the employee. The inferred ER sttricture relates this to the redcords in the databasee
Bounding Nonsplitting Enumeration Degrees
 Bounding Nonsplitting Enumeration Degrees Thomas F. Kent Andrea Sorbi Università degli Studi di Siena Italia July 18, 2007 Goal: Introduce a form of Σ 0 2-permitting for the enumeration degrees. Till now,
Approximation of distance between locations on earth given by latitude and longitude
 Approximation of distance between locations on earth given by latitude and longitude Jan Behrens 2012-12-31 In this paper we shall provide a method to approximate distances between two points on earth
15W DIN Rail Type DC-DC Converter. DDR-15 s e r i e s. File Name:DDR-15-SPEC
 DIN Rail Type DC-DC Converter ± : DIN Rail Type DC-DC Converter SPECIFICATION MODEL OUTPUT INPUT PROTECTION ENVIRONMENT SAFETY & EMC (Note 5) OTHERS NOTE DC VOLTAGE RATED CURRENT CURRENT RANGE RATED POWER
9.09. # 1. Area inside the oval limaçon r = cos θ. To graph, start with θ = 0 so r = 6. Compute dr
 9.9 #. Area inside the oval limaçon r = + cos. To graph, start with = so r =. Compute d = sin. Interesting points are where d vanishes, or at =,,, etc. For these values of we compute r:,,, and the values
Physical DB Design. B-Trees Index files can become quite large for large main files Indices on index files are possible.
 B-Trees Index files can become quite large for large main files Indices on index files are possible 3 rd -level index 2 nd -level index 1 st -level index Main file 1 The 1 st -level index consists of pairs
PARTIAL NOTES for 6.1 Trigonometric Identities
 PARTIAL NOTES for 6.1 Trigonometric Identities tanθ = sinθ cosθ cotθ = cosθ sinθ BASIC IDENTITIES cscθ = 1 sinθ secθ = 1 cosθ cotθ = 1 tanθ PYTHAGOREAN IDENTITIES sin θ + cos θ =1 tan θ +1= sec θ 1 + cot
M14/1/AYMGR/HP1/GRE/TZ0/XX
 M14/1/AYMGR/HP1/GRE/TZ0/XX 22142045 MODERN GREEK A: LANGUAGE AND LITERATURE HIGHER LEVEL PAPER 1 GREC MODERNE A : LANGUE ET LITTÉRATURE NIVEAU SUPÉRIEUR ÉPREUVE 1 GRIEGO MODERNO A: LENGUA Y LITERATURA
NMBTC.COM /
 Common Common Vibration Test:... Conforms to JIS C 60068-2-6, Amplitude: 1.5mm, Frequency 10 to 55 Hz, 1 hour in each of the X, Y and Z directions. Shock Test:...Conforms to JIS C 60068-2-27, Acceleration
65W PWM Output LED Driver. IDLV-65 series. File Name:IDLV-65-SPEC
 ~ A File Name:IDLV65SPEC 07050 SPECIFICATION MODEL OUTPUT OTHERS NOTE DC VOLTAGE RATED CURRENT RATED POWER DIMMING RANGE VOLTAGE TOLERANCE PWM FREQUENCY (Typ.) SETUP TIME Note. AUXILIARY DC OUTPUT Note.
(1) Describe the process by which mercury atoms become excited in a fluorescent tube (3)
 Describe the process by which mercury atoms become excited in a fluorescent tube (3)") Q1. (a) A fluorescent tube is filled with mercury vapour at low pressure. In order to emit electromagnetic radiation the mercury atoms must first be excited. (i) What is meant by an excited atom? (1) (ii)
Q1. (a) A fluorescent tube is filled with mercury vapour at low pressure. In order to emit electromagnetic radiation the mercury atoms must first be excited. (i) What is meant by an excited atom? (1) (ii)
CYTA Cloud Server Set Up Instructions
 CYTA Cloud Server Set Up Instructions ΕΛΛΗΝΙΚΑ ENGLISH Initial Set-up Cloud Server To proceed with the initial setup of your Cloud Server first login to the Cyta CloudMarketPlace on https://cloudmarketplace.cyta.com.cy
The challenges of non-stable predicates
 The challenges of non-stable predicates Consider a non-stable predicate Φ encoding, say, a safety property. We want to determine whether Φ holds for our program. The challenges of non-stable predicates
DC-DC Constant Current Step-Down LED driver LDD-300L LDD-350L LDD-500L LDD-600L LDD-700L CURRENT RANGE
 SPECIFICATION ORDER NO. LDD-00L LDD-0L LDD-00L LDD-00L LDD-700L CURRENT RANGE 00mA 0mA 00mA VOLTAGE RANGE Note. ~ VDC for LDD-00~700L/LW ; ~ 8VDC for LDD-00~700LS CURRENT ACCURACY (Typ.) ±% at VDC input
Επιτραπέζιος Η/Υ K30AM / K30AM-J Εγχειρίδιο χρήστη
 Επιτραπέζιος Η/Υ K30AM / K30AM-J Εγχειρίδιο χρήστη GK9380 Ελληνικα Πρώτη Έκδοση Μάιος 2014 Copyright 2014 ASUSTeK Computer Inc. Διατηρούνται όλα τα δικαιώματα. Απαγορεύεται η αναπαραγωγή οποιουδήποτε τμήματος
Homework 3 Solutions
 Homework 3 Solutions Igor Yanovsky (Math 151A TA) Problem 1: Compute the absolute error and relative error in approximations of p by p. (Use calculator!) a) p π, p 22/7; b) p π, p 3.141. Solution: For
Assalamu `alaikum wr. wb.
 LUMP SUM Assalamu `alaikum wr. wb. LUMP SUM Wassalamu alaikum wr. wb. Assalamu `alaikum wr. wb. LUMP SUM Wassalamu alaikum wr. wb. LUMP SUM Lump sum lump sum lump sum. lump sum fixed price lump sum lump
Other Test Constructions: Likelihood Ratio & Bayes Tests
 Other Test Constructions: Likelihood Ratio & Bayes Tests Side-Note: So far we have seen a few approaches for creating tests such as Neyman-Pearson Lemma ( most powerful tests of H 0 : θ = θ 0 vs H 1 :
Srednicki Chapter 55
 Srednicki Chapter 55 QFT Problems & Solutions A. George August 3, 03 Srednicki 55.. Use equations 55.3-55.0 and A i, A j ] = Π i, Π j ] = 0 (at equal times) to verify equations 55.-55.3. This is our third
Econ 2110: Fall 2008 Suggested Solutions to Problem Set 8 questions or comments to Dan Fetter 1
 Eon : Fall 8 Suggested Solutions to Problem Set 8 Email questions or omments to Dan Fetter Problem. Let X be a salar with density f(x, θ) (θx + θ) [ x ] with θ. (a) Find the most powerful level α test
Inverse trigonometric functions & General Solution of Trigonometric Equations. ------------------ ----------------------------- -----------------
 Inverse trigonometric functions & General Solution of Trigonometric Equations. 1. Sin ( ) = a) b) c) d) Ans b. Solution : Method 1. Ans a: 17 > 1 a) is rejected. w.k.t Sin ( sin ) = d is rejected. If sin
TMA4115 Matematikk 3
 TMA4115 Matematikk 3 Andrew Stacey Norges Teknisk-Naturvitenskapelige Universitet Trondheim Spring 2010 Lecture 12: Mathematics Marvellous Matrices Andrew Stacey Norges Teknisk-Naturvitenskapelige Universitet
OWNER S MANUAL CAV-180 Multi-channel Power Amplifier
 OWNER S MANUAL CAV-180 Multi-channel Power Amplifier ENGLISH...1 FRANÇAIS...4 DEUTSCH...7 ESPAÑOL...10 NEDERLANDS...13 ΕΛΛΗΝΙΚΑ...14...19 SPECIFICATIONS...22 V1.0 2 NC3FAH2 2 PUSH 2 3 NC3FAH2 2 PUSH PUSH
PTC FUNCTION for Delta C2000 and CP2000
 FUNCTION for Delta C2000 and CP2000 CONTENTS: GENERAL... 2. for motor temperature protection... 2.2 Standards... 2.3 Motor layout... 2.4 characteristic... 2.4. Definitions... 3.4.2 curve... 3.4.3 switching
Overview: Relay Modules
 20 Overview: Relay Modules 859 Series 857 Series 788 Series 858 Series 288 and 287 Series 286 Series 789 Series Relays with Changeover Contacts 1 changeover contact Item No. Page Item No. Page Item No.