English Română Български Ελληνικά Deutsch
|
|
|
- Κλωθώ Ρόκας
- 10 χρόνια πριν
- Προβολές:
Transcript
1
2
3 English... 2 Română Български Ελληνικά Deutsch V 1.63

4 Table of Contents Introduction... 3 Intended use... 3 Package contents... 3 Technical specifications... 4 Copyright... 4 Safety instructions... 4 Batteries... 6 Children and persons with disabilities... 6 Maintenance / cleaning... 6 Operating environment... 7 Inserting the batteries... 7 Before you start... 7 Important note on compatibility... 8 Trademark and brand information... 8 Getting started... 8 Remote control buttons... 8 Configuration menus Menu structure Setting the Menu Language (LANGUAGE) Programming the remote control (CODE SETUP) Brand code search (BRAND SRCH) Automatic code search (AUTO SRCH) Direct code input (CODE SET) Flex mode System configuration (CONFIGURE) Setting the time (TIME SETUP) Setting the date (DATE SETUP) Adjusting the keypad light time (TIME) Global volume adjustment (VOL THROUGH) Adjusting the global volume (VPT SETUP) Disabling the global volume adjustment (CANCEL VPT) Global recording/playback control (PLAYBACK) Child lock (KIDS LOCK) Locking the configuration menu (LOCK SETUP) Resetting to factory defaults (RESET) The learn function (LEARNING) Programming via the learn function (LEARN KEY) Deleting individual button codes (DELETE KEY) Deleting the device codes of an individual device (DELETE DEV) Deleting all button codes (DELETE ALL) The macro function (MACRO) Programming a macro Running a macro Deleting a macro Configuring favourite channels (FAV CH) Setting up favourites Switching to favourite channel Deleting all favourite channels (DEL ALL) The timer function (TIMER) SLEEP TIMER Event timers (TIMER 1.TIMER 4) Deleting a timer The All on/all off feature Troubleshooting Device does not respond to the remote control commands Some buttons do not work properly The LCD display does not work TOP Text buttons not working in Teletext mode Environmental regulations and disposal information Conformity notes Warranty and Service Information English
... 13 Automatic code search (AUTO SRCH)... 14 Direct code input (CODE SET)... 15 Flex mode... 15 System configuration (CONFIGURE).")
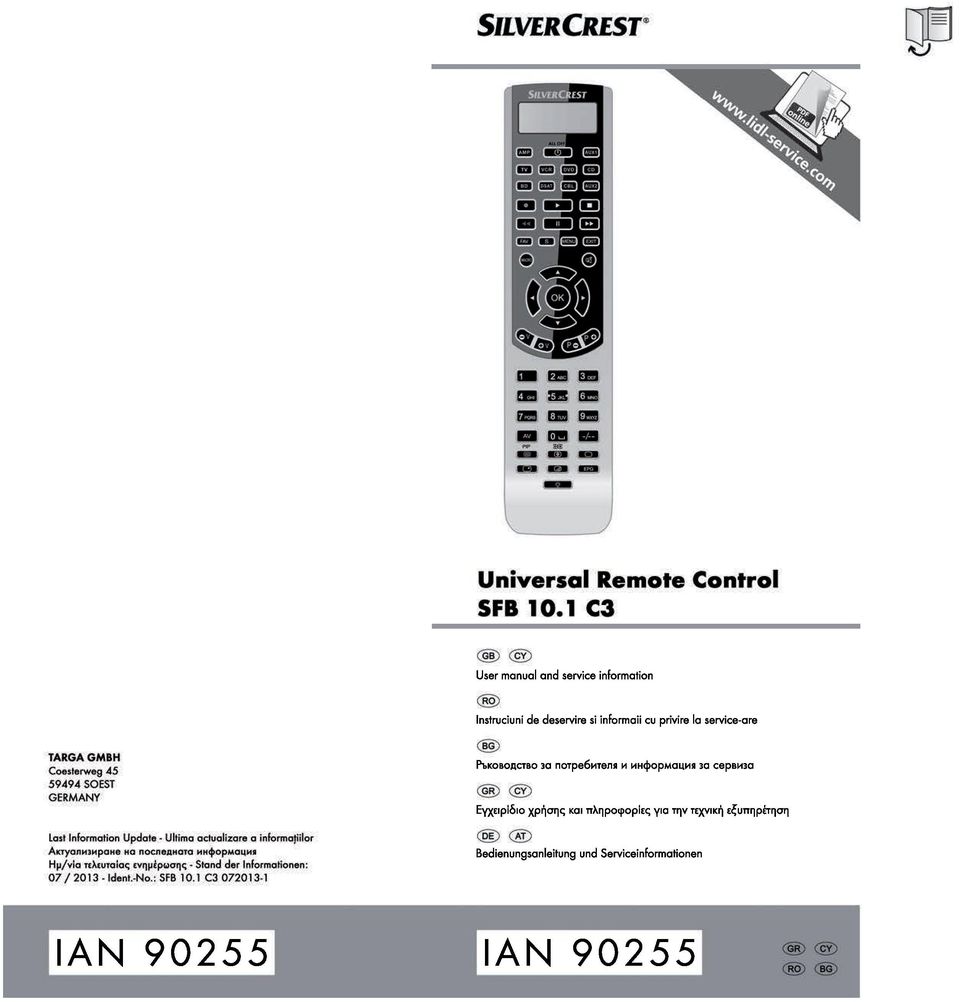
5 Introduction Thank you for choosing a SilverCrest product. The SilverCrest SFB 10.1 C3 universal remote control, hereinafter called "remote control", is a high-end device that offers a wide range of functions. It is easy to handle and has a modern, appealing design. The remote control can learn external signals and is therefore suitable for most TVs, set-top boxes, tape and disc devices. It allows you to conveniently control the functions of up to 10 different consumer electronics devices. Intended use This remote control is a consumer electronics device. It is suitable only for private use, not for industrial or commercial purposes. The remote control may also not be used outdoors or in tropical climates. This remote control fulfils all norms and standards relating to CE conformity. The manufacturer is not liable for any damage or problems caused by unauthorised modifications to the remote control. Only use the accessories recommended by the manufacturer. Observe the regulations and laws in the country of use. Package contents 1. SilverCrest SFB 10.1 C3 remote control 2. 2 batteries of type Micro AAA, LR03, 1.5V 3. These operating instructions (line-art illustration) 4. List of device codes (line-art illustration) English - 3

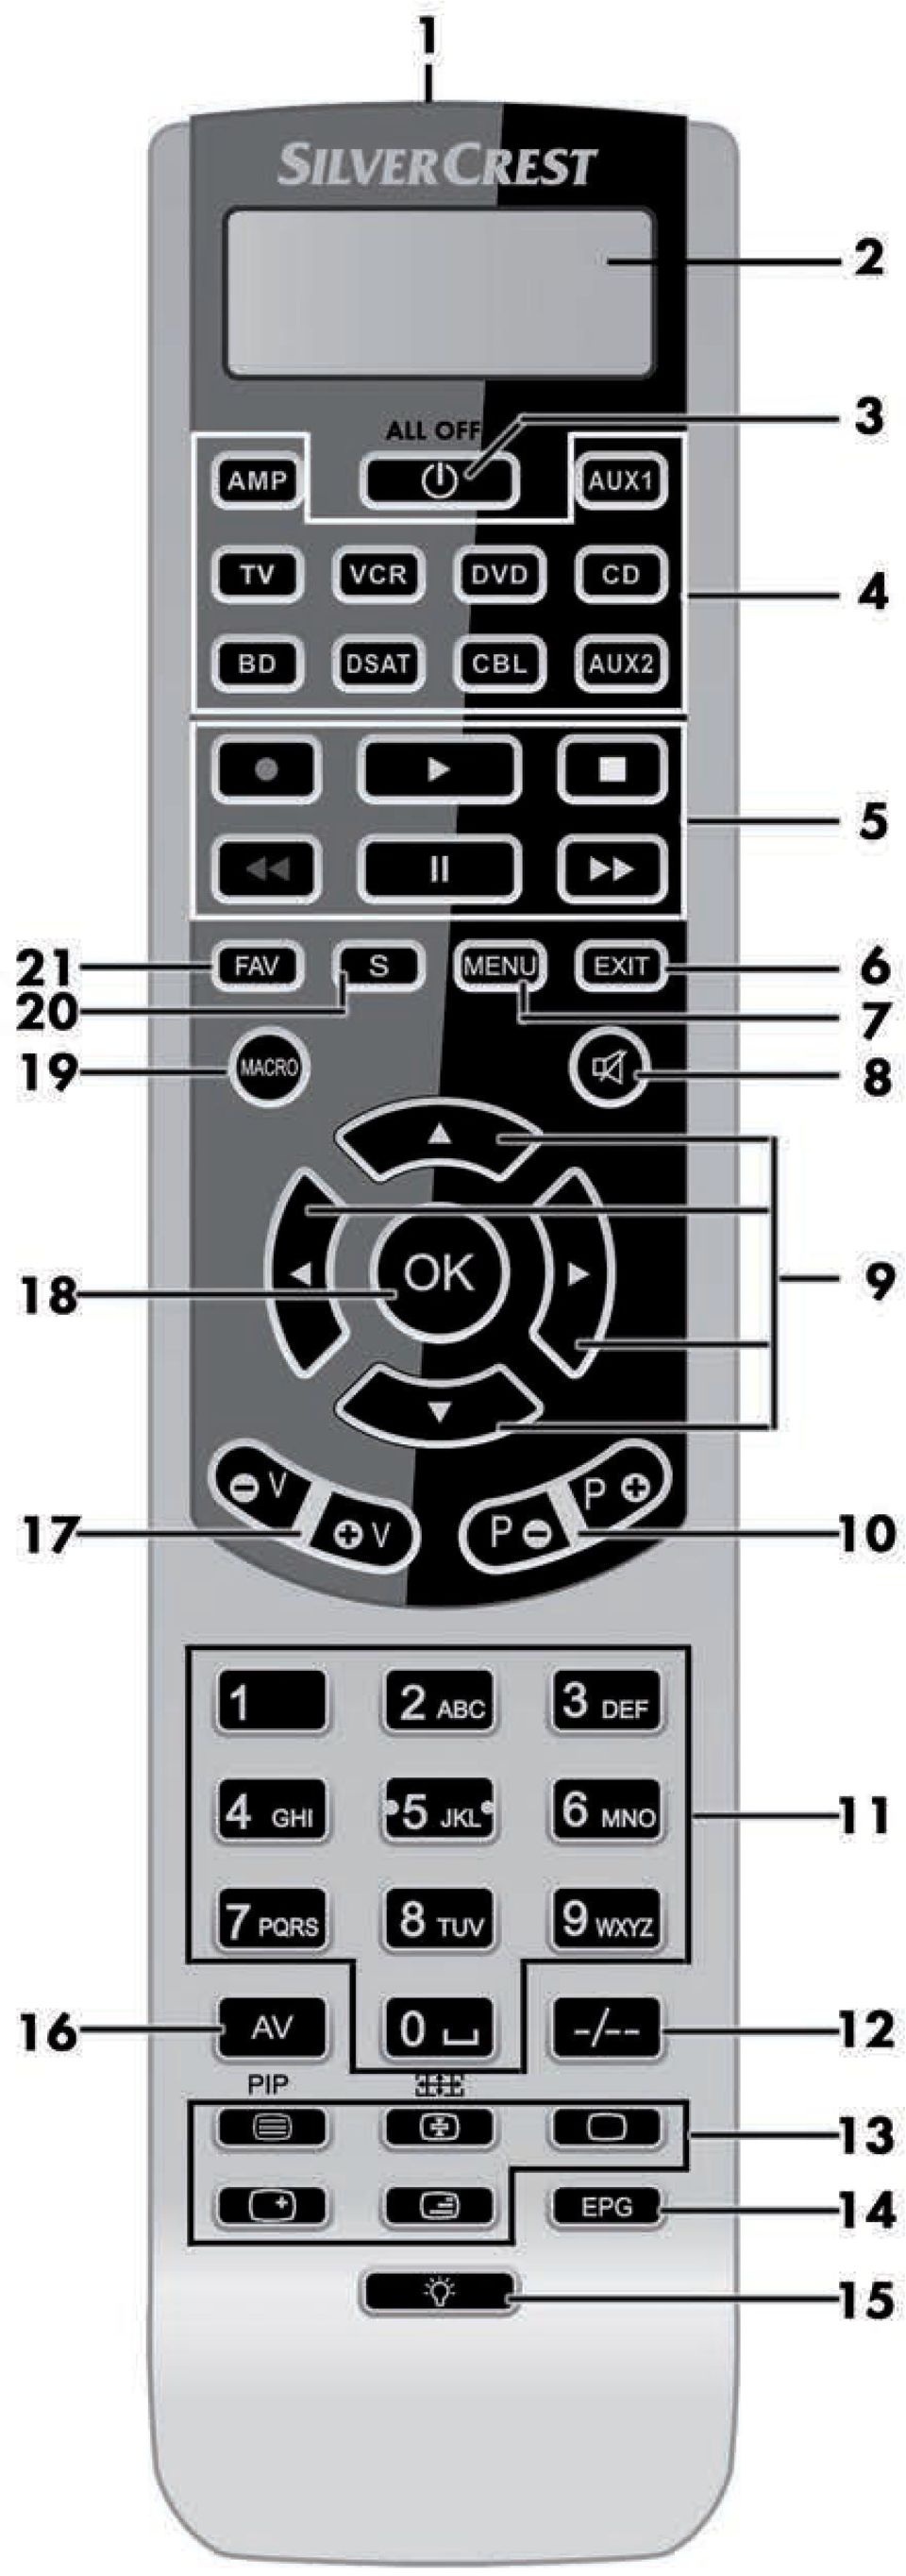
6 These operating instructions have a fold-out cover. The inside of the cover shows a diagram of the SilverCrest SFB 10.1 C3 remote control is with component parts numbered. The meanings of the numbers are as follows: 1 Infrared LED (transmitter / receiver) 2 LCD display 3 On/Off -- All on/all off button 4 Device buttons 5 Recording / playback control buttons 6 EXIT button 7 MENU button 8 MUTE button 9 Navigation buttons 10 Next (+) / previous (-) channel button 11 Numeric keypad numeric buttons Toggle button for one/two-digit channel numbers 13 Videotext keypad 14 EPG button 15 Light on/off button 16 AV button 17 Volume up (+) / down (-) button 18 OK button 19 MACRO button 20 S button 21 FAV button Technical specifications Model: Programming functions: 10 programmable devices Power supply: Dimensions (H x W x D) : Weight: Operating temperature: Operating humidity: Storage temperature: SilverCrest SFB 10.1 C3 Code list, learn function TV/VCR/CD/DVD/BD/DSAT/ CBL/AUX1/AUX2/AMP 2 batteries of type Micro AAA, LR03, 1.5V 23 x 50 x 210mm approx. 100g (without batteries) +5 C to +35 C 85% rel. humidity 0 C to +50 C The technical specifications and design can be changed without prior notice. Copyright All the contents of this user manual are protected by copyright and provided to the reader for information only. Copying data and information without the prior explicit written consent of the author is strictly forbidden. This also applies to any commercial use of the contents and information. All texts and diagrams are up to date as of the date of printing. Subject to change without notice. Safety instructions Before you use the remote control for the first time, please read and comply with these instructions and warnings, even if you are familiar with 4 - English
 / down (-) button 18 OK button 19 MACRO button 20 S button 21 FAV button Technical specifications Model: Programming")
7 handling electronic devices! Keep these operating instructions in a safe place for future reference. If you sell the remote control or give it away, pass on the operating instructions at the same time. This symbol denotes important information for the safe operation of the product and user safety. This symbol denotes further information on the topic. This remote control may be used by children older than 8 years as well as by persons with reduced physical, sensory or mental capacities or those persons and have lack of knowledge or experience, as long as they are supervised or they have received instructions regarding the proper use of the remote control and they understand the associated risks. Do not allow children to play with the remote control. Any cleaning or maintenance of the product must not be performed by children unless they are supervised. Keep the packaging materials out of the reach of children. There is a risk of suffocation! If smoke, unusual noises or smells are noticed, remove the batteries from remote control immediately. If this occurs, the remote control should no longer be used until it has been inspected by authorized service personnel. Never inhale smoke from a possible device fire. If you do inadvertently inhale smoke, seek medical attention. Smoke inhalation can be damaging to your health. The remote control and its accessories must not be damaged in order to avoid any further risks. Make sure that no fire hazards (e.g. burning candles) are placed on or near the remote control as there is a risk of fire. Do not expose the remote control to any direct heat sources (e.g. heaters), direct sunlight or strong artificial light. The remote control must not be exposed to spray or dripping water or abrasive liquids. Do not use the remote control near water. The remote control must especially never be immersed (do not place any recipients containing liquids such as beverages, vases, etc. onto or next to the remote control). The remote control must not be subject to any great temperature changes as this could lead to condensation of moisture in the air which could cause short-circuiting. If the device has been exposed to strong temperature variations, wait for it to reach the ambient temperature before switching it on (about 2 hours). Take care that the remote control is not subject to excessive impacts or vibrations. Do not introduce any foreign bodies into the device, otherwise the remote control can be damaged. English - 5

8 Batteries The remote control uses a Laser Class 1 infrared lightemitting diode (LED). Do not look at the infrared LED using any optical devices, as this could damage your eyes. Insert the batteries with the correct polarity. Refer to the diagram on the batteries and inside the battery compartment. Do not attempt to recharge the batteries and do not throw the batteries into a fire. Do not mix battery types (old and new or carbon and alkaline, etc.). Do not mix rechargeable and conventional batteries. Batteries must never be opened or deformed. Otherwise there is a risk of leaking chemicals. If the chemicals become in contact with your skin or eyes, rinse with plenty of fresh water immediately and seek medical aid. Remove the batteries when the remote control is not to be used for a long time. This will avoid any damage due to leaking. Improper use could cause explosions or leaks. Children and persons with disabilities Electrical devices are not suitable for children. People with disabilities should only use electrical devices within the limits of their abilities. Do not allow children or persons with disabilities to use electrical devices when not under supervision. Unless they are instructed accordingly and supervised by a competent person responsible for their safety. Children should always be supervised to ensure that they do not play with the product. Any cleaning or maintenance of the product must not be performed by children unless they are supervised. Batteries and small parts represent potential choking hazards. Keep the packaging away from children and persons with disabilities too. Danger of suffocation! Maintenance / cleaning Repairs are required if the remote control has been damaged in any way, for example if the device housing is damaged, when liquids or objects have penetrated into the remote control or when the product has been exposed to rain or moisture. Repairs are also necessary if the product does not perform normally or if it has been dropped. If you notice smoke, unusual noises or smells, remove the batteries immediately. If this occurs, the remote control should no longer be used until it has been inspected by authorized service personnel. All repairs must be carried out by qualified service personnel. Never open the housing of the remote control. Only use a clean, dry cloth for cleaning the remote control. Never use any corrosive liquids. Do not attempt to open the remote control housing, this would void your warranty. 6 - English

9 Operating environment The device is not designed for use in environments with high temperatures or humidity (e.g. bathrooms) or those with above-average levels of dust. Operating temperature and operating humidity: 5 C to 35 C, max. 85 % RH. Inserting the batteries The programmed codes and the language settings are stored permanently and are not lost if you change the batteries. The date and time are lost. Open the battery compartment on the back of the remote control by removing the battery compartment cover in the direction shown. Insert the batteries with the correct polarity, as shown in the diagram. The correct polarity is labelled on the batteries and inside the battery compartment. Close the battery compartment cover. If the devices fail to respond to the remote control, replace the batteries with new batteries of the same type. The device does not give any indication when the batteries are running low. Before you start The remote control is powered by 2 batteries of type Micro AAA, LR03, 1.5V. They are included in the package. On delivery, the batteries are already inserted into the battery compartment. You just need to remove the plastic film that is inserted between the batteries and the battery contacts. The procedure is as follows: 1. Open the battery compartment. 2. Remove the plastic film. English - 7

10 Important note on compatibility All functions described in these operating instructions are valid only if the keypad layout of your original remote control matches exactly the one of your 10-in-1 remote control. But this only very rarely the case. This means that if you are unable to use all functions of your original remote control, it does not mean there is a fault with your 10-in-1 remote control. Trademark and brand information All brand and/or product names mentioned in these operating instructions and in the device code list are property of their respective owners and are used for product description and identification purposes only. Getting started After inserting the batteries, the display lights up and the start window appears after about 1 second. The start window shows the device, code, day of the week and time. The default setting is TV, Monday and 12.00AM. From the start window you can toggle to the device that you want to control by using the device buttons (4). The device code for the selected device is displayed at the same time. Briefly press the button to display the selected device, the day of the week and the full date. If no button is pressed for a while, the remote control light will go off. You can set the light delay time in the CONFIGURE menu. Remote control buttons Device buttons Symbol Device type Audio amplifier Television Blu-ray player Video recorder Digital satellite receiver DVD player Cable TV receiver Auxiliary device 1 CD player Auxiliary device 2 Numeric keypad / number buttons Symbol Function You can use these buttons to enter channel numbers, to enter device codes manually and to enter numbers. 8 - English

11 Recording / playback control keypad Symbol Function Teletext keypad 1. Record ; 2. TOP text red 1. Rewind ; 2. TOP text blue 1. Start playback ; 2. TOP text green Pause, pause playback 1. Stop playback, recording, rewind or fast forward ; 2. TOP text yellow Fast-forward Symbol Function Other buttons Access Teletext Enlarges the Teletext page display Stops automatic page scrolling for multi-page Teletext The Teletext is shown with transparent background over the TV picture. Exit Teletext 1. Powers the device on/off. 2. Press this button for 3 seconds or longer to power all the programmed devices on or off. Press this button to access programmed favourites. Press this button to open your selected device s EPG function, as long as the device supports it. 1. Press and hold this button for at least 3 seconds to show the CONFIGURE menu. 2. Briefly press this button to switch from time to date display. After approx. 30 seconds the time is displayed again. You can also briefly press the button again to toggle back to the time display. 3. When programming macros or event timers, press this button to confirm the end of the command sequence you have entered. 4. Pressing it when using the LEARN KEY function returns to the previous menu level. Opens the menu of the selected device. English - 9

12 1. Press this button while the menu of the selected device is shown to return to the previous menu level or to quit the menu. Exception: Pressing the button when using the LEARN KEY function returns to the previous menu level. 2. Press this button while the remote control CONFIGURE menu is shown to return to the previous menu level or to quit the menu. Executes a macro when used together with one of the number buttons 1 to 6. Mutes or restores the sound output (MUTE). Confirms a menu item in the remote control CONFIGURE menu or in the menu of the selected device. Menu navigation: move up Menu navigation: move down Menu navigation: move left Menu navigation: move right Increase/decrease volume 1. TV mode: Next / previous channel 2. CD/DVD mode: SKIP function AV input selection for the selected device Use this button to enter two-digit channel numbers. This function depends on the selected device. To enter a twodigit channel number, first press the button and then enter the channel number. Pressing the button again allows you to enter a single-digit channel number. Toggles the remote control light on/off. Configuration menus Press and hold the button for 3 seconds to open the menu. The default sub-menu is LANGUAGE. To program the remote control according to your needs, use the buttons to navigate to the sub-menu you want or press to return to the start window. Press the button to open the selected sub-menu. If no entry is made for 30 seconds in setup mode, the remote control returns to the start window. If necessary, start programming again English
. Confirms a menu item in the remote control CONFIGURE menu or in the menu of the selected device.")
13 Make your selection and then press to confirm and finish programming. The display reads SUCCESS. The new settings are stored for the device currently selected providing no other device was selected while programming. The following settings can be made in the CONFIGURE menu: Programming of devices you want to control Menu language; date and time; light delay time; volume; playback; child lock and setup lock; restore to default. Learning function Programming macros Saving favourites Timer settings Menu structure Below is a graphical overview of the entire menu structure: English - 11

14 12 - English To open the configuration menu it is necessary to keep the button pressed (approx. 3 seconds) until the display toggles to setup mode. Setting the Menu Language (LANGUAGE) The LANGUAGE main menu item allows you to select the desired language for the remote control. You can choose one of the following menu languages: English, German, Italian, Spanish or French. Proceed as follows: 1. Press and hold the button for 3 seconds. Press, select LANGUAGE and then press.

15 Upon factory delivery the device is set to the English language. Therefore the first option shown is LANGUAGE. 2. Press, select one of the 5 languages offered and then press to confirm. The display reads SUCCESS. Press to go back one menu level. To return to the start window, press one of the device buttons (4). Programming the remote control (CODE SETUP) This main menu item allows you to program the remote control according to your needs. The following 3 methods are available: 1. Brand code search BRAND SRCH. If the manufacturer of your device is in the device code list of the remote control, this is the fastest programming method. 2. Automatic code search AUTO SRCH. This method runs through all the codes available on the code list and sends them to your device. This method takes a relatively long time. 3. Direct code input CODE SET. This method requires entering the code found in the device code list manually. The operating instructions below help you program the remote control using any of the above programming methods. Before programming a device button by using brand code search or automatic search, please carry out a RESET for this device button. If this device had previously been programmed using the learn function, any learned keys would not be overwritten by the new programming. For more information, see the chapter Resetting to factory defaults (RESET) on page 19. Brand code search (BRAND SRCH) 1. Press the device button of the device that you want to program. 2. Press and hold the button for 3 seconds. 3. Press, select CODE SETUP and press to confirm. 4. Press, select BRAND SRCH and press to confirm. The first brand name alphabetically for the preset devices appears on the display. 5. Press to navigate to the brand name you want, e.g. SilverCrest. 6. To accelerate the brand search you can enter the first or all characters of the brand name via the numeric keypad (11). Then press to go to the selected brand. If you only enter the first character of the brand name (e.g. S for SilverCrest), pressing the button will show the first brand name starting with S. Then you need to press the buttons to manually scroll to the SilverCrest brand. As well as the digits, the keypad buttons also have characters or symbols assigned that you can select by pressing them once or more. The characters or symbols assigned are printed on the number keys. After selecting a character and waiting for a few seconds, this character is applied and you can enter the next character. You can enter up to 11 English - 13

16 characters for a brand name. If you make a mistake, press to delete the last character and enter it again. 7. Typically, different device manufacturers use different codes for their remote controls. At this point you ll have to find the optimum code. The current code is shown under the selected brand name. You can press the buttons to select the preset codes for the desired brand. 8. Now test the code selected by pointing the remote control at the device and checking if it responds properly to the button pressed. It is not necessary to exit the setup mode to perform this test. The following buttons cannot be used for the function test:,,, the device buttons (4) the numeric keypad (11) 9. If most of the buttons work properly, press. The code is saved for the device button selected. 10. If no buttons work properly or only a few do, press to select the next code and repeat the test as described in step 8. Repeat this procedure as many times as necessary until you have found suitable code. Press to go back one menu level. To return to the start window, press one of the device buttons. Repeat the above procedure for all devices you wish to control with your new remote control. Automatic code search (AUTO SRCH) 1. Press and hold the button for 3 seconds. 2. Press, select CODE SETUP and then press. Press and select AUTO SRCH. Press. 3. Press the device button for the device you wish to program. Then press. The remote control starts sending all available codes. This is indicated by a flashing IR icon on the display. By default the remote control sends the code for the button. If no code is assigned to the button, the following codes will be send for the different devices: TV: the remote control sends the code CH+. DVD/CD/VCR: the remote control sends the code PLAY. DSAT/CBL: the remote control sends the code CH+. AMP: the remote control sends the code MUTE. Other devices: the remote control sends the code CH+. 4. If your device responds to the sent code by powering on or off or by executing one of the above functions, press to stop the search. At this point you are close to the correct code, but you may not yet have found the one that matches completely, as the 14 - English
 the numeric keypad (11) 9. If most of the buttons work properly, press.")
17 automatic search had been stopped with a slight delay and further codes have been sent. During the automatic search, the remote control responds to the and buttons only. 5. After you have pressed the button to stop searching you can press the buttons to send the previous or next codes manually. If your device responds again to a code, you have found a suitable code. Press to exit the automatic search. The codes are saved and the display reads SUCCESS. 6. Or press to exit the automatic search. This will not save any codes. 7. After the remote control has finished transmitting the last available code from the code list, the search will stop and after a few seconds the start window appears. Press to go back one menu level. To return to the start window, press one of the device buttons. Direct code input (CODE SET) 1. Press and hold the button for 3 seconds. 2. Press, select CODE SETUP and then press. 3. Press, select CODE SET and press to confirm. The selected device flashes and the currently set device code appears on the display. At this point you can select a different device by using the device buttons. Confirm your selection with. 4. The first digit of the 4-digit device code currently set flashes. 5. Enter the correct 4-digit code for the device selected by using the number buttons. You can find the 4-digit code in the device code list supplied. 6. Press to confirm the entry. The display reads SUCCESS followed by CODE SET. 7. Invalid CODES cannot be found in the CODE list. If you enter an invalid code NOT FOUND appears on the display and you can then enter the correct code. Press to go back one menu level. To return to the start window, press one of the device buttons. Flex mode For the different device buttons there are preset code lists for specific device groups. Normally, you will assign the corresponding device types to the device buttons. For example, you will assign programming a VCR to the device button, a DVD player to the device button, etc. Furthermore, the Flex mode conveniently lets you assign a device from any device group to the and buttons. The requisite is that you assign the code list of the desired device group (where the device belongs to) to the or button you want to use for this device. The code lists (e.g. 0 for TV or 2 for DVD) belonging to each device group can be found in the table below: TV VCR DVD DSAT BD AMP CBL CD For direct code input: 1. Press and hold the button for 3 seconds. 2. Press, select CODE SETUP and press to confirm. English - 15

18 3. Press, select CODE SET and press to confirm. 4. Then press the device button or that you wish to program and press to confirm. 5. The first digit of the 4-digit device code currently set flashes. 6. Enter the correct 4-digit code for the selected device using the number buttons, then enter the number of the corresponding code list (0 to 7) and press to confirm. 7. Press to confirm the entry. The display reads SUCCESS followed by CODE SET. 8. Invalid CODES cannot be found in the CODE list. If you enter an invalid code NOT FOUND appears on the display and you can then enter the correct code. Press to go back one menu level. To return to the start window, press one of the device buttons. On the left of the time the code assigned to the device button or is shown on the display. The selected code list (0 to 7) is also displayed to the left of the day of the week. Before you can program the device buttons or using the brand code search or automatic search, it is necessary to assign the code list to the device button. To do so, proceed as described in the previous section, select the number 0001 as your code and select the number of the desired code list (0 to 7). This assigns the code list to the device button or so you can proceed with programming. At this point, programming the device buttons or works the same way as described in the Automatic code search (AUTO SRCH) and Brand code search (BRAND SRCH) chapters. System configuration (CONFIGURE) Setting the time (TIME SETUP) 1. Press and hold the button for 3 seconds. 2. Press, select CONFIGURE and press to confirm. 3. Press, select TIME SETUP and press to confirm. 4. Press, select between 12HR and 24HR. 5. Press to toggle to time setting mode. The hour display flashes. 6. Press and select the correct value for the hour. You can also adjust the value by using the numeric keypad (11). 7. Press to toggle to minute setting mode. 8. Press and select the correct value for the minutes. You can also adjust the value by using the numeric keypad (11). 9. If you selected 12HR in step 4, you can press to select the PM/AM setting. Press to toggle between PM and AM. 10. Press to confirm your entry and save the setting. The display reads SUCCESS followed by TIME SETUP. Press to go back one menu level. To return to the start window, press one of the device buttons English

19 Setting the date (DATE SETUP) 1. Press and hold the button for 3 seconds. SilverCrest SFB 10.1 C3 2. Press, select CONFIGURE and press to confirm. 3. Press, select DATE SETUP and press to confirm. 4. The current date appears and the year flashes. Press the buttons to set the correct year. 5. Press until the month display flashes. Press the buttons to set the correct month. 6. Press until the day display flashes. Press the buttons to set the correct day. Press to confirm your entries. The display reads SUCCESS followed by DATE SETUP. 7. Once the date has been set properly, in the upper right corner of the display the abbreviated day of the week is shown. Press to go back one menu level. To return to the start window, press one of the device buttons. Adjusting the keypad light time (TIME) 1. Press and hold the button for 3 seconds. 2. Press, select CONFIGURE and press to confirm. 3. Press, select LIGHT-TIME and press to confirm. 4. Press to set the light duration of the remote control in 5-second increments between 0 and 60 seconds. If you select 0 seconds, the light remains off when any button is pressed. When set to 0 seconds, the light can be switched on manually by pressing the button. In this case it will light for 5 seconds. 5. Press to confirm your entry and save the setting. The display reads SUCCESS followed by LIGHT-TIME. Press to go back one menu level. To return to the start window, press one of the device buttons. Please note that setting a longer light duration will shorten the battery life. Global volume adjustment (VOL THROUGH) The global volume adjustment/mute feature allows you to assign the volume adjustment of a device that does not have this feature (e.g. a DVD player) to a different device (e.g. a TV). The advantage is that it is not necessary to press a device button (in the above example, the TV device button) first and then another device button to switch back to the playback device (the DVD player in the above example). Adjusting the global volume (VPT SETUP) Switching on: 1. Press and hold the button for at least 3 seconds. 2. Press, select CONFIGURE and press to confirm. 3. Press, select VOL THROUGH and press to confirm. 4. Press, select VPT SETUP and press to confirm. The display reads TO DEV. English - 17

20 5. Next press the device button of the device that you want to assign the volume control to, e.g. DVD. Then the display shows FROM DEV. 6. Next, press the device button of the device from which you want to use the volume control to, e.g. TV. Then the display will show SUCCESS followed by VOL THROUGH. After you have finished performing these steps, you can use the and buttons to adjust the volume and also mute the sound of the TV even while in DVD mode. Disabling the global volume adjustment (CANCEL VPT) Switching off: 1. Press and hold the button for at least 3 seconds. 2. Press, select CONFIGURE and press to confirm. 3. Press, select VOL THROUGH and press to confirm. 4. Press, select CANCEL VPT and press to confirm. The display briefly shows SUCCESS to confirm. This cancels the global volume adjustment/mute function. Press to go back one menu level. To return to the start window, press one of the device buttons. Global recording/playback control (PLAYBACK) This function allows you to control a VCR, DVD player or Blu-ray player with the recording / playback control buttons (5) without having to select the corresponding device first by using the device buttons. To use this function, a valid code for the desired device needs to be assigned to the corresponding device button. This function is limited to the, and device buttons. The default setting is OFF. 1. Press and hold the button for 3 seconds. 2. Press, select CONFIGURE and press to confirm. 3. Press, select PLAYBACK and press to confirm. 4. Press, select VCR for a video recorder, DVD for a DVD player or BD for a Blu-ray player. Or select OFF to disable this function. Confirm your selection with. The display reads SUCCESS followed by PLAYBACK. Press to go back one menu level. To return to the start window, press one of the device buttons. Child lock (KIDS LOCK) This feature allows you to lock one or more device buttons so that the associated device cannot be operated any more. The and buttons will still be working without any restrictions. All devices assigned to non-locked device buttons can still be controlled without any restrictions. 1. Press and hold the button for 3 seconds. 2. Press, select CONFIGURE and press to confirm. 3. Press, select KIDS LOCK and press to confirm. 4. Press the device button of the device that you wish to lock for children. 5. Press and choose between ON or OFF to enable or disable the child lock. 6. Press to confirm your entry and save the setting. The display reads SUCCESS followed by KIDS LOCK English
 Switching off: 1. Press and hold the button for at least 3 seconds. 2. Press, select CONFIGURE and press to confirm. 3. Press, select VOL THROUGH and press to confirm.")
21 Press to go back one menu level. To return to the start window, press one of the device buttons. Locking the configuration menu (LOCK SETUP) This menu item lets you lock access to all configuration menus. While the lock is enabled, "LOCKED" is displayed if a configuration menu is accessed. The only option available will be the unlock option. 1. Press and hold the S button for 3 seconds. 2. Press, select CONFIGURE and press to confirm. 3. Press, select LOCK SETUP and press to confirm. LOCK appears on the display. Press to confirm. The display reads SUCCESS followed by LOCK SETUP. The configuration menus are now locked. 4. If you now attempt to change anything in a menu, the message LOCKED appears. Press to go back one menu level. To return to the start window, press one of the device buttons. 5. To unlock, press and hold the S button for 3 seconds. 6. Press, select CONFIGURE and press to confirm. 7. Press, select LOCK SETUP and press to confirm. LOCK appears on the display. 8. Press, select UNLOCK and press to confirm. The display reads SUCCESS followed by LOCK SETUP. 9. The configuration menus are now unlocked. Press to go back one menu level. To return to the start window, press one of the device buttons. Resetting to factory defaults (RESET) 1. Press and hold the button for 3 seconds. 2. Press, select CONFIGURE and press to confirm. 3. Press, select RESET and press to confirm. 4. Press and choose between ALL RESET and MODE. 5. Press to confirm your entry. Choosing ALL RESET will restore the settings for all devices. The procedure is as follows: 6. After choosing ALL RESET, press to confirm. The display will read CONFIRM RST. You can still press to cancel the reset at this point. 7. Press to confirm your entry. The display reads OK and then returns to the start window. The day of the week and the time are not reset. Choosing MODE restores the settings for the selected device only. The procedure is as follows: 8. After you confirm your selection MODE by pressing, the display shows the device currently selected. Select the device you want by pressing the corresponding device button. 9. After confirming your choice with, the display will read "CONFIRM RST". You can still press to cancel the reset at this point. English - 19
22 10. Press to confirm your entry. The display reads OK and then returns to the start window. Press to go back one menu level. To return to the start window, press one of the device buttons. The learn function (LEARNING) Programming via the learn function (LEARN KEY) This function allows the remote control to learn individual buttons for a selected device. 1. Press the device button for the device that you wish to program. 2. Press and hold the button for 3 seconds. 3. Press, select LEARNING and press to confirm. 4. Press, select LEARN KEY and press to confirm. 5. The display reads SELECT KEY. All buttons except the device buttons support learning. 6. Press the button that you wish to learn a command. The display reads WAITING. 7. Place the original remote control so its IR LED and the IR LED (2) of your 10-in-1 remote control face each other and are no greater than 5 cm apart. 8. Next press the button on the original remote control from which you wish to copy the signal. The successful detection of the button code is indicated by SUCCESS on the display. 9. Repeat steps 5 to 8 for each button that you wish to learn a function. 10. If the transmission of the original code fails or no code is sent during the next 30 seconds, FAIL appears on the display. In this case, repeat steps 5 to 8. You can quit learning mode by pressing the button if the display reads SELECT KEY. Pressing any of the device buttons takes you back to the start window. If you experience any problems with the learn function, the batteries of the original remote control could be low. Replace them if necessary. Deleting individual button codes (DELETE KEY) This function allows you to delete the learned code for an individual button for a selected device. 1. Press the device button for the device that you wish to program. 2. Press and hold the button for 3 seconds. 3. Press, select LEARNING and press to confirm. 4. Press, select DELETE KEY and press to confirm. 5. The display reads SELECT KEY. 6. Press the button for which you want to delete the code. The display reads SURE DELET English
23 7. Press to confirm. The display reads DELETED and then again SELECT KEY. 8. Repeat steps 6 and 7 for each button for which you wish to delete the code. Press to go back one menu level. To return to the start window, press one of the device buttons. Deleting the device codes of an individual device (DELETE DEV) This function allows you to delete all learned codes for a selected device. 1. Press and hold the button for 3 seconds. 2. Press, select LEARNING and press to confirm. 3. Press, select DELETE DEV and press to confirm. 4. The display reads SELECT DEV. 5. Press the device button of the device for which you want to delete the code. The display reads SURE DELET. 6. Press to confirm. The display reads DELETED and then again SELECT DEV. 7. Repeat steps 5 and 6 for each device for which you wish to delete the codes. Press to go back one menu level. To return to the start window, press one of the device buttons. Deleting all button codes (DELETE ALL) This function allows you to delete all learned codes for all devices at once. 1. Press and hold the button for 3 seconds. 2. Press, select LEARNING and press to confirm. 3. Press, select DELETE ALL and press to confirm. The display reads SURE DELET. 4. Press to confirm. The display reads DELETED and then again DELETE ALL. Press to go back one menu level. To return to the start window, press one of the device buttons. The macro function (MACRO) The macro function lets you save up to 16 commands for a device that will be sent in sequence when pressing one single button. Example: Power on TV > Select channel 11 > Display Teletext > Open Teletext page 222. Programming a macro 1. Press and hold the button for 3 seconds. 2. Press, select MACRO and press to confirm. 3. Press, select "MACRO1 (or "MACRO2.. "MACRO6 and press to confirm. 4. The display reads SET UP. Press to confirm. 5. If you select a macro that already has a command sequence assigned, the display reads MACRO HAS. In this case you have to delete this macro before entering commands or select a different, free macro. 6. The device currently selected is shown. English - 21
24 7. Enter the button commands sequence you want. Always start with the device button of the device you want to record the macro for, otherwise the message ERROR KEY appears. 8. By default, the different macro commands are transmitted sequentially every second. As this could be too fast for some devices, you can adjust the delay time in 2-second increments from 5 to 21 seconds. 9. To do this, press the button after a button command. Each press of the button delays the pause time after the last command for 2 more seconds and the set value is shown on the display. 10. After you have finished entering the command sequence, press. The display reads SUCCESS. You can press up to 16 buttons per macro, including the device button. After this, the macro is applied automatically and the display reads SUCCESS. Press to go back one menu level. To return to the start window, press one of the device buttons. Running a macro 1. Press the button. 2. Within the next 5 seconds, press the number button 1 to 6 which corresponds to the macro you want. 3. The command sequence programmed for this macro is sent. If you do not press the corresponding number button within 5 seconds after you press the button or if you press a wrong button that has no macro assigned, the remote control light flashes 4 times. Deleting a macro 1. Press and hold the button for at least 3 seconds. 2. Press, select MACRO and press to confirm. 3. Press, select "MACRO1 (or "MACRO2.. "MACRO6 and press to confirm. The display reads SET UP. 4. Press, select DELETE and press to confirm. The display reads SURE DELET. 5. Press to confirm. The display reads DELETED. The selected macro is shown again on the display. Press to go back one menu level. To return to the start window, press one of the device buttons. Configuring favourite channels (FAV CH) This function is supported in the modes TV, DSAT, CBL and AUX (if the AUX device button has been programmed accordingly) only You can save preferred channels as favourites. Setting up favourites 1. Press the device button for the device that you wish to program. 2. Press and hold the button for at least 3 seconds. 3. Press, select FAV CH and press to confirm. 4. Press, select CONFIGURE and press to confirm. The display reads FAV-CH Press, select FAV-CH01 (or FAV-CH02.. FAV- CH15 ) and press to confirm. The display reads SELECT KEY. 6. Enter the channel that you wish to save. You can save up to 6 entries (digits or -/- -) per channel preset. The entered digits are not shown 22 - English
25 on the display. When you have finished, press to save your input. The display reads SUCCESS. Then the next favourite channel preset appears on the display. Press to select a different favourite preset. 7. After entering 6 buttons for one preset, it is saved automatically when you press the 6 th button. The display reads SUCCESS. Then the next favourite channel preset appears on the display. Press to select a different favourite preset. 8. If you select a favourite preset that is in use already, your entry overwrites any existing channel. Press to go back one menu level. To return to the start window, press one of the device buttons. Switching to favourite channel Press the button once or more to switch your favourite channels in sequence. Once you reach the last saved favourite channel, the selection starts again from the beginning. Deleting all favourite channels (DEL ALL) It is only possible to delete all favourite channels at once. Individual favourite channels cannot be deleted but they can be overwritten. 1. Press the device button for the device that you wish to program. 2. Press and hold the button for at least 3 seconds. 3. Press, select FAV CH and press to confirm. 4. Press, select DELETE ALL and press to confirm. The display reads SURE DELET. 5. Press to confirm. The display reads DELETED and then SETUP. Next you can program more favourite channels or exit the menu. Press to go back one menu level. To return to the start window, press one of the device buttons. The timer function (TIMER) SLEEP TIMER This feature lets you set a delay time after which a selected device will switch off. 1. Press the device button for the device that you wish to program. 2. Press and hold the button for at least 3 seconds. 3. Press, select TIMER and press to confirm. 4. Press, select SLEEP TIMER and press to confirm. The display reads SET TIMER and suggests a delay time of 30. The first digit flashes. 5. Use the number buttons to enter a value between 01 and 99 minutes. Press to confirm. The display reads SUCCESS and then SLEEP TIMER. 6. When the sleep timer is programmed, the icon appears on the left of the display. Press to go back one menu level. To return to the start window, press one of the device buttons. Event timers (TIMER 1.TIMER 4) The remote control includes 4 event timers that allow the remote control to send a preset command sequence at a set time. English - 23
26 1. Press and hold the button for at least 3 seconds. 2. Press, select TIMER and press to confirm. The display reads SLEEP TIMER. 3. Press, select a desired timer from TIMER1 to TIMER4 and press to confirm. The display shows a 4-digit time. The first two digits representing the hour flash. Here, you set the time at which you want the command sequence to be sent. 4. You can use the number buttons to set a time from 00:00 to 23:59. Use the buttons to toggle between the 4 digits, e.g. to correct any mistakes. Press to confirm the set time. The timer is always set in 24-hour format. If you have set the remote control preferences to the 12-hour format, please note the following: In this case the remote control automatically converts the 24-hour format to the 12-hour format. Example: To program a timer for 03:30PM, enter 15: Next press the device button for the device you want and then enter the command sequence (max. 14 buttons) that you want to send at the set time. It is necessary to press a device button before entering a command sequence, otherwise the display reads ERROR KEY. 6. By default, the different timer commands are transmitted sequentially every second. As this could be too fast for some devices, you can adjust the delay time in 2-second increments from 5 to 21 seconds. To do so, press the button, more than once, if necessary. The current delay time is indicated on the display. 7. When you are done, press to confirm your entry. The display reads SUCCESS. 8. You can press up to 15 buttons per event timer, including the device button. After this, the programming is applied automatically and the display reads SUCCESS. 9. If required, you can program more event timers. 10. When an event timer is programmed, the icon appears on the left of the display. After an event timer has completed it is erased automatically. Press to go back one menu level. To return to the start window, press one of the device buttons. Deleting a timer To delete a programmed timer ( SLEEP TIMER, TIMER1 to TIMER4 ): 1. Press and hold the button for at least 3 seconds. 2. Press, select TIMER and press to confirm. 3. Select the timer that you wish to delete and press to confirm. The display reads CLEAR. Press to confirm. The display reads SUCCESS. The selected timer is deleted. The display shows the name of the selected timer ( SLEEP TIMER, TIMER1 to TIMER4 ). Press to go back one menu level. To return to the start window, press one of the device buttons English
27 The All on/all off feature If you have programmed your remote control to control several devices, this feature lets you switch all of them on or off at the same time by just pressing one button. To do so, press and hold the button (3) for a few seconds. This switches all the devices on or off at the same time. Depending on the number of devices programmed, this can take up to 10 seconds. The following is required for this feature to work: A clear line of sight between the remote control and each device you want to switch on/off. All devices need to support powering on/off via remote control. The automatic code search, brand code search and macro functions must be disabled. Troubleshooting Device does not respond to the remote control commands Please check that you have selected the correct device with the remote control. Point the remote control directly at the device. Check if the remote control has been programmed with the correct code for your device. It is possible that the device is not compatible with programming using the code list. In this case, please program the remote control by using the learn function. The batteries are low or empty. Replace the batteries with new batteries of the same type. See also the chapter Inserting the batteries. Some buttons do not work properly It is possible that not all functions of your original remote control are supported. The code entered does not support all the functions of your device. Try to find a code that matches your device better. Program any buttons that do not work properly using the learn function. Before programming a device button using brand code search or automatic search, please carry out a RESET for this button first. If this device had previously been programmed using the learn function, any learned keys would not be overwritten by the new programming. The LCD display does not work The batteries are low or empty. Replace the batteries with new batteries of the same type. See also the chapter Inserting the batteries. TOP Text buttons not working in Teletext mode While the PLAYBACK function is enabled, the recording/playback control buttons (5) are used to control the selected tape or disc player. In this case, these buttons cannot be used for the TV TOP Text functions. English - 25
28 Environmental regulations and disposal information Devices marked with this symbol are subject to European Directive 2002/96/EC. All electrical and electronic devices must be disposed of separately from household waste at official disposal centres. Proper disposal of old devices prevents damage to the environment or your health. For further information about proper disposal, contact your local council, recycling centre or the shop where you bought the device. Respect the environment. Old batteries do not belong in with domestic waste. They must be handed in at a collection point for waste batteries. Please note that batteries must be disposed of fully discharged at appropriate collection points for old batteries. If disposing of batteries which are not fully discharged, take precautions to prevent short circuits. Dispose of all packaging in an environmentally-friendly manner. Cardboard packaging can be taken to paper recycling containers or public collection points for recycling. Any film or plastic contained in the packaging should be taken to your public collection points for disposal. Conformity notes This device complies with the basic and other relevant requirements of EMC Directive 2004/108/EC and the RoHS Directive 2011/65/EU. The corresponding Declaration of Conformity can be found at the end of this User Manual. Warranty and Service Information Warranty of TARGA GmbH This device is sold with three years warranty from the date of purchase. Please keep the original receipt in a safe place as proof of purchase. Before using your product for the first time, please read the enclosed documentation or online help. Should any problems arise which cannot be solved in this way, please call our hotline. Please have the article number and, if available, the serial number to hand for all enquiries. If it is not possible to solve the problem on the phone, our hotline support staff will initiate further servicing procedures depending on the fault. Within the warranty period the product will be repaired or replaced free of charge as we deem appropriate. No new warranty period commences if the product is repaired or replaced. Consumables such as batteries, rechargeable batteries and lamps are not covered by the warranty. Your statutory rights towards the seller are not affected or restricted by this warranty English
English Română Български Ελληνικά Deutsch
 English... 2 Română... 30 Български... 64 Ελληνικά... 100 Deutsch... 135 V 1.1 Table of Contents Introduction... 3 Intended use... 3 Package contents... 4 Technical specifications... 5 Copyright... 5 Safety
ΟΔΗΓΙΕΣ ΧΡΗΣΗΣ USE INSTRUCTIONS
 ΟΔΗΓΙΕΣ ΧΡΗΣΗΣ USE INSTRUCTIONS ΤΗΛΕΦΩΝΟ ΜΕ ΑΝΑΓΝΩΡΙΣΗ ΚΛΗΣΗΣ /CORDED PHONE WITH CALLER ID ΜΟΝΤΕΛΟ/MODEL: TM09-448 DC48V Παρακαλούμε διαβάστε προσεκτικά όλες τις οδηγίες χρήσης πριν την χρήση της συσκευής
SPEEDO AQUABEAT. Specially Designed for Aquatic Athletes and Active People
 SPEEDO AQUABEAT TM Specially Designed for Aquatic Athletes and Active People 1 2 Decrease Volume Increase Volume Reset EarphonesUSBJack Power Off / Rewind Power On / Fast Forward Goggle clip LED Status
Instruction Execution Times
 1 C Execution Times InThisAppendix... Introduction DL330 Execution Times DL330P Execution Times DL340 Execution Times C-2 Execution Times Introduction Data Registers This appendix contains several tables
Δημιουργία Λογαριασμού Διαχείρισης Business Telephony Create a Management Account for Business Telephony
 Δημιουργία Λογαριασμού Διαχείρισης Business Telephony Create a Management Account for Business Telephony Ελληνικά Ι English 1/7 Δημιουργία Λογαριασμού Διαχείρισης Επιχειρηματικής Τηλεφωνίας μέσω της ιστοσελίδας
ΚΥΠΡΙΑΚΗ ΕΤΑΙΡΕΙΑ ΠΛΗΡΟΦΟΡΙΚΗΣ CYPRUS COMPUTER SOCIETY ΠΑΓΚΥΠΡΙΟΣ ΜΑΘΗΤΙΚΟΣ ΔΙΑΓΩΝΙΣΜΟΣ ΠΛΗΡΟΦΟΡΙΚΗΣ 19/5/2007
 Οδηγίες: Να απαντηθούν όλες οι ερωτήσεις. Αν κάπου κάνετε κάποιες υποθέσεις να αναφερθούν στη σχετική ερώτηση. Όλα τα αρχεία που αναφέρονται στα προβλήματα βρίσκονται στον ίδιο φάκελο με το εκτελέσιμο
2 Composition. Invertible Mappings
 Arkansas Tech University MATH 4033: Elementary Modern Algebra Dr. Marcel B. Finan Composition. Invertible Mappings In this section we discuss two procedures for creating new mappings from old ones, namely,
Εγκατάσταση λογισμικού και αναβάθμιση συσκευής Device software installation and software upgrade
 Για να ελέγξετε το λογισμικό που έχει τώρα η συσκευή κάντε κλικ Menu > Options > Device > About Device Versions. Στο πιο κάτω παράδειγμα η συσκευή έχει έκδοση λογισμικού 6.0.0.546 με πλατφόρμα 6.6.0.207.
the total number of electrons passing through the lamp.
 1. A 12 V 36 W lamp is lit to normal brightness using a 12 V car battery of negligible internal resistance. The lamp is switched on for one hour (3600 s). For the time of 1 hour, calculate (i) the energy
Οδηγίες Αγοράς Ηλεκτρονικού Βιβλίου Instructions for Buying an ebook
 Οδηγίες Αγοράς Ηλεκτρονικού Βιβλίου Instructions for Buying an ebook Βήμα 1: Step 1: Βρείτε το βιβλίο που θα θέλατε να αγοράσετε και πατήστε Add to Cart, για να το προσθέσετε στο καλάθι σας. Αυτόματα θα
10-in-1 Remote Control
 H O M E T E C H 10-in-1 Remote Control SFB 10.1 B2 10-in-1 Remote Control Operating manual Τηλεχειριστήριο γενικής χρήσης Οδηγία χρήσης KOMPERNASS GMBH BURGSTRASSE 21 D-44867 BOCHUM www.kompernass.com
ΚΥΠΡΙΑΚΗ ΕΤΑΙΡΕΙΑ ΠΛΗΡΟΦΟΡΙΚΗΣ CYPRUS COMPUTER SOCIETY ΠΑΓΚΥΠΡΙΟΣ ΜΑΘΗΤΙΚΟΣ ΔΙΑΓΩΝΙΣΜΟΣ ΠΛΗΡΟΦΟΡΙΚΗΣ 6/5/2006
 Οδηγίες: Να απαντηθούν όλες οι ερωτήσεις. Ολοι οι αριθμοί που αναφέρονται σε όλα τα ερωτήματα είναι μικρότεροι το 1000 εκτός αν ορίζεται διαφορετικά στη διατύπωση του προβλήματος. Διάρκεια: 3,5 ώρες Καλή
(C) 2010 Pearson Education, Inc. All rights reserved.
 2010 Pearson Education, Inc. All rights reserved.") Connectionless transmission with datagrams. Connection-oriented transmission is like the telephone system You dial and are given a connection to the telephone of fthe person with whom you wish to communicate.
Connectionless transmission with datagrams. Connection-oriented transmission is like the telephone system You dial and are given a connection to the telephone of fthe person with whom you wish to communicate.
UNIVERSAL REMOTE CONTROL SFB 10.1 B2
 Before reading, unfold the page containing the illustrations and familiarise yourself with all functions of the device. UNIVERSAL REMOTE CONTROL SFB 10.1 B2 Πριν ξεκινήσετε την ανάγνωση, ανοίξτε τις δυο
Modbus basic setup notes for IO-Link AL1xxx Master Block
 n Modbus has four tables/registers where data is stored along with their associated addresses. We will be using the holding registers from address 40001 to 49999 that are R/W 16 bit/word. Two tables that
Physical DB Design. B-Trees Index files can become quite large for large main files Indices on index files are possible.
 B-Trees Index files can become quite large for large main files Indices on index files are possible 3 rd -level index 2 nd -level index 1 st -level index Main file 1 The 1 st -level index consists of pairs
PortSip Softphone. Ελληνικά Ι English 1/20
 PortSip Softphone Ελληνικά Ι English 1/20 1. Περιεχόμενα 2. Εγκατάσταση σε Smartphone & Tablet (Android ή ios)... 1 3. Εγκατάσταση σε ηλεκτρονικό υπολογιστή (Windows ή Mac).... 5 4. Installation in Smartphone
Right Rear Door. Let's now finish the door hinge saga with the right rear door
 Right Rear Door Let's now finish the door hinge saga with the right rear door You may have been already guessed my steps, so there is not much to describe in detail. Old upper one file:///c /Documents
Συστήματα Διαχείρισης Βάσεων Δεδομένων
 ΕΛΛΗΝΙΚΗ ΔΗΜΟΚΡΑΤΙΑ ΠΑΝΕΠΙΣΤΗΜΙΟ ΚΡΗΤΗΣ Συστήματα Διαχείρισης Βάσεων Δεδομένων Φροντιστήριο 9: Transactions - part 1 Δημήτρης Πλεξουσάκης Τμήμα Επιστήμης Υπολογιστών Tutorial on Undo, Redo and Undo/Redo
CHAPTER 25 SOLVING EQUATIONS BY ITERATIVE METHODS
 CHAPTER 5 SOLVING EQUATIONS BY ITERATIVE METHODS EXERCISE 104 Page 8 1. Find the positive root of the equation x + 3x 5 = 0, correct to 3 significant figures, using the method of bisection. Let f(x) =
Έλεγχος και Διασφάλιση Ποιότητας
 Έλεγχος και Διασφάλιση Ποιότητας Ενότητα 6: Κουππάρης Μιχαήλ Τμήμα Χημείας Εργαστήριο Αναλυτικής Χημείας General Successfully carry out the Preventive Maintenance Procedure and complete the Maintenance
Code Breaker. TEACHER s NOTES
 TEACHER s NOTES Time: 50 minutes Learning Outcomes: To relate the genetic code to the assembly of proteins To summarize factors that lead to different types of mutations To distinguish among positive,
Potential Dividers. 46 minutes. 46 marks. Page 1 of 11
 Potential Dividers 46 minutes 46 marks Page 1 of 11 Q1. In the circuit shown in the figure below, the battery, of negligible internal resistance, has an emf of 30 V. The pd across the lamp is 6.0 V and
10-in-1 Remote Control
 3 B 10-in-1 Remote Control KH 2158 10-in-1 Remote Control Operating manual Τηλεχειριστήριο γενικής χρήσης Οδηγία χρήσης KOMPERNASS GMBH BURGSTRASSE 21 D-44867 BOCHUM www.kompernass.com ID-Nr.: KH2158-04/10-V3
department listing department name αχχουντσ ϕανε βαλικτ δδσϕηασδδη σδηφγ ασκϕηλκ τεχηνιχαλ αλαν ϕουν διξ τεχηνιχαλ ϕοην µαριανι
 She selects the option. Jenny starts with the al listing. This has employees listed within She drills down through the employee. The inferred ER sttricture relates this to the redcords in the databasee
SOAP API. https://bulksmsn.gr. Table of Contents
 SOAP API https://bulksmsn.gr Table of Contents Send SMS...2 Query SMS...3 Multiple Query SMS...4 Credits...5 Save Contact...5 Delete Contact...7 Delete Message...8 Email: sales@bulksmsn.gr, Τηλ: 211 850
BFN3000 ΕΠΙΤΡΑΠΕΖΙΟΣ ΑΝΕΜΙΣΤΗΡΑΣ. Owner s manual. Μετάφραση του πρωτοτύπου των οδηγιών χρήσης
 BFN3000 ΕΠΙΤΡΑΠΕΖΙΟΣ ΑΝΕΜΙΣΤΗΡΑΣ Μετάφραση του πρωτοτύπου των οδηγιών χρήσης Owner s manual www.bormanntools.com GR Οδηγίες ασφαλούς λειτουργίας 1. Τα χαρακτηριστικά της παροχής ηλεκτρικού ρεύματος θα
Ρύθμιση e-mail σε whitelist
 Ρύθμιση e-mail σε whitelist «Δουλεύω Ηλεκτρονικά, Δουλεύω Γρήγορα και με Ασφάλεια - by e-base.gr» Web : www.e-base.gr E-mail : support@e-base.gr Facebook : Like Twitter : @ebasegr Πολλές φορές αντιμετωπίζετε
Στο εστιατόριο «ToDokimasesPrinToBgaleisStonKosmo?» έξω από τους δακτυλίους του Κρόνου, οι παραγγελίες γίνονται ηλεκτρονικά.
 Διαστημικό εστιατόριο του (Μ)ΑστροΈκτορα Στο εστιατόριο «ToDokimasesPrinToBgaleisStonKosmo?» έξω από τους δακτυλίους του Κρόνου, οι παραγγελίες γίνονται ηλεκτρονικά. Μόλις μια παρέα πελατών κάτσει σε ένα
Περιεχόμενα / Contents
 Aερόθερμo / Fan Heater PTC-906 Περιεχόμενα / Contents GR... Σελίδες 3-8 EN... Pages 9-11 2 GR Ευχαριστούμε που επιλέξατε μια συσκευή της γκάμας θερμαντικών IZZY. Σημαντικές Οδηγίες Ασφαλείας Τα Μέρη της
Εργαστήριο Ανάπτυξης Εφαρμογών Βάσεων Δεδομένων. Εξάμηνο 7 ο
 Εργαστήριο Ανάπτυξης Εφαρμογών Βάσεων Δεδομένων Εξάμηνο 7 ο Procedures and Functions Stored procedures and functions are named blocks of code that enable you to group and organize a series of SQL and PL/SQL
Math 6 SL Probability Distributions Practice Test Mark Scheme
 Math 6 SL Probability Distributions Practice Test Mark Scheme. (a) Note: Award A for vertical line to right of mean, A for shading to right of their vertical line. AA N (b) evidence of recognizing symmetry
VBA ΣΤΟ WORD. 1. Συχνά, όταν ήθελα να δώσω ένα φυλλάδιο εργασίας με ασκήσεις στους μαθητές έκανα το εξής: Version 25-7-2015 ΗΜΙΤΕΛΗΣ!!!!
 VBA ΣΤΟ WORD Version 25-7-2015 ΗΜΙΤΕΛΗΣ!!!! Μου παρουσιάστηκαν δύο θέματα. 1. Συχνά, όταν ήθελα να δώσω ένα φυλλάδιο εργασίας με ασκήσεις στους μαθητές έκανα το εξής: Εγραφα σε ένα αρχείο του Word τις
9.09. # 1. Area inside the oval limaçon r = cos θ. To graph, start with θ = 0 so r = 6. Compute dr
 9.9 #. Area inside the oval limaçon r = + cos. To graph, start with = so r =. Compute d = sin. Interesting points are where d vanishes, or at =,,, etc. For these values of we compute r:,,, and the values
derivation of the Laplacian from rectangular to spherical coordinates
 derivation of the Laplacian from rectangular to spherical coordinates swapnizzle 03-03- :5:43 We begin by recognizing the familiar conversion from rectangular to spherical coordinates (note that φ is used
EE512: Error Control Coding
 EE512: Error Control Coding Solution for Assignment on Finite Fields February 16, 2007 1. (a) Addition and Multiplication tables for GF (5) and GF (7) are shown in Tables 1 and 2. + 0 1 2 3 4 0 0 1 2 3
Advanced Subsidiary Unit 1: Understanding and Written Response
 Write your name here Surname Other names Edexcel GE entre Number andidate Number Greek dvanced Subsidiary Unit 1: Understanding and Written Response Thursday 16 May 2013 Morning Time: 2 hours 45 minutes
ENGLISH. S-Video. Composite
 CMP-USBVG6 ENGLISH 1.) Hardware Introduction 1. USB 2.0 connector 2. Audio input Left / Right 3. Composite Input 4. S-Video Input VHS Player Camera S-Video DVD Player Multiple devices Set-top Box Game
Thin Film Chip Resistors
 FEATURES PRECISE TOLERANCE AND TEMPERATURE COEFFICIENT EIA STANDARD CASE SIZES (0201 ~ 2512) LOW NOISE, THIN FILM (NiCr) CONSTRUCTION REFLOW SOLDERABLE (Pb FREE TERMINATION FINISH) Type Size EIA PowerRating
10-in-1 Remote Control
 H O M E T E C H 10-in-1 Remote Control SFB 10.1 A1 10-in-1 Remote Control Operating manual Τηλεχειριστήριο γενικής χρήσης Οδηγία χρήσης KOMPERNASS GMBH BURGSTRASSE 21 D-44867 BOCHUM www.kompernass.com
HOMEWORK 4 = G. In order to plot the stress versus the stretch we define a normalized stretch:
 HOMEWORK 4 Problem a For the fast loading case, we want to derive the relationship between P zz and λ z. We know that the nominal stress is expressed as: P zz = ψ λ z where λ z = λ λ z. Therefore, applying
Υλοποίηση Δικτυακών Υποδομών και Υπηρεσιών: OSPF Cost
 Υλοποίηση Δικτυακών Υποδομών και Υπηρεσιών: OSPF Cost Πανεπιστήμιο Πελοποννήσου Τμήμα Επιστήμης & Τεχνολογίας Τηλεπικοινωνιών Ευάγγελος Α. Κοσμάτος Basic OSPF Configuration Υλοποίηση Δικτυακών Υποδομών
Section 1: Listening and responding. Presenter: Niki Farfara MGTAV VCE Seminar 7 August 2016
 Section 1: Listening and responding Presenter: Niki Farfara MGTAV VCE Seminar 7 August 2016 Section 1: Listening and responding Section 1: Listening and Responding/ Aκουστική εξέταση Στο πρώτο μέρος της
10-IN-1 REMOTE CONTROL SFB 10.1 B2. TELECOMANDĂ UNIVERSALĂ Instrucţiuni de utilizare. УНИВЕРСАЛНО ДИСТАНЦИОННО УПРАВЛЕНИЕ Ръководство за експлоатация
 Before reading, unfold both pages containing illustrations and familiarise yourself with all functions of the device. Înainte de a citi instrucţiunile, priviţi ambele pagini cu imagini şi familiarizaţi-vă
The municipality of Apokoronas has created a new app for your smart phone.
 1 The municipality of Apokoronas has created a new app for your smart phone. It is now available from itunes and the Google Play Store For Apple Smart Phones: https://itunes.apple.com/us/app/%ce%b4%ce%ae%ce%bc%ce%bf%cf%82-
 OST-7080HD Διασυνδέσεις Sleep ΠΛΗΚΤΡΟ ΜΑΘΗΣΗΣ: Το τηλεχειριστήριο του ψηφιακού δέκτη έχει 6 πλήκτρα μάθησης. Κάθε πλήκτρο μπορεί να είναι αντίγραφο κάθε πλήκτρου λειτουργίας του τηλεχειριστηρίου. Οδηγίες
ΚΥΠΡΙΑΚΟΣ ΣΥΝΔΕΣΜΟΣ ΠΛΗΡΟΦΟΡΙΚΗΣ CYPRUS COMPUTER SOCIETY 21 ος ΠΑΓΚΥΠΡΙΟΣ ΜΑΘΗΤΙΚΟΣ ΔΙΑΓΩΝΙΣΜΟΣ ΠΛΗΡΟΦΟΡΙΚΗΣ Δεύτερος Γύρος - 30 Μαρτίου 2011
 Διάρκεια Διαγωνισμού: 3 ώρες Απαντήστε όλες τις ερωτήσεις Μέγιστο Βάρος (20 Μονάδες) Δίνεται ένα σύνολο από N σφαιρίδια τα οποία δεν έχουν όλα το ίδιο βάρος μεταξύ τους και ένα κουτί που αντέχει μέχρι
How to register an account with the Hellenic Community of Sheffield.
 How to register an account with the Hellenic Community of Sheffield. (1) EN: Go to address GR: Πηγαίνετε στη διεύθυνση: http://www.helleniccommunityofsheffield.com (2) EN: At the bottom of the page, click
Capacitors - Capacitance, Charge and Potential Difference
 Capacitors - Capacitance, Charge and Potential Difference Capacitors store electric charge. This ability to store electric charge is known as capacitance. A simple capacitor consists of 2 parallel metal
[1] P Q. Fig. 3.1
![[1] P Q. Fig. 3.1](/thumbs/79/80362156.jpg "[1] P Q. Fig. 3.1") 1 (a) Define resistance....... [1] (b) The smallest conductor within a computer processing chip can be represented as a rectangular block that is one atom high, four atoms wide and twenty atoms long. One
1 (a) Define resistance....... [1] (b) The smallest conductor within a computer processing chip can be represented as a rectangular block that is one atom high, four atoms wide and twenty atoms long. One
The Simply Typed Lambda Calculus
 Type Inference Instead of writing type annotations, can we use an algorithm to infer what the type annotations should be? That depends on the type system. For simple type systems the answer is yes, and
Οδηγίες χρήσης. Registered. Οδηγίες ένταξης σήματος D-U-N-S Registered στην ιστοσελίδα σας και χρήσης του στην ηλεκτρονική σας επικοινωνία
 Οδηγίες χρήσης υλικού D-U-N-S Registered Οδηγίες ένταξης σήματος D-U-N-S Registered στην ιστοσελίδα σας και χρήσης του στην ηλεκτρονική σας επικοινωνία Οδηγίες χρήσης υλικού D-U-N-S Για οποιαδήποτε ερώτηση
Οι αδελφοί Montgolfier: Ψηφιακή αφήγηση The Montgolfier Βrothers Digital Story (προτείνεται να διδαχθεί στο Unit 4, Lesson 3, Αγγλικά Στ Δημοτικού)
") Οι αδελφοί Montgolfier: Ψηφιακή αφήγηση The Montgolfier Βrothers Digital Story (προτείνεται να διδαχθεί στο Unit 4, Lesson 3, Αγγλικά Στ Δημοτικού) Προσδοκώμενα αποτελέσματα Περιεχόμενο Ενδεικτικές δραστηριότητες
Οι αδελφοί Montgolfier: Ψηφιακή αφήγηση The Montgolfier Βrothers Digital Story (προτείνεται να διδαχθεί στο Unit 4, Lesson 3, Αγγλικά Στ Δημοτικού) Προσδοκώμενα αποτελέσματα Περιεχόμενο Ενδεικτικές δραστηριότητες
Strain gauge and rosettes
 Strain gauge and rosettes Introduction A strain gauge is a device which is used to measure strain (deformation) on an object subjected to forces. Strain can be measured using various types of devices classified
Phys460.nb Solution for the t-dependent Schrodinger s equation How did we find the solution? (not required)
") Phys460.nb 81 ψ n (t) is still the (same) eigenstate of H But for tdependent H. The answer is NO. 5.5.5. Solution for the tdependent Schrodinger s equation If we assume that at time t 0, the electron starts
Phys460.nb 81 ψ n (t) is still the (same) eigenstate of H But for tdependent H. The answer is NO. 5.5.5. Solution for the tdependent Schrodinger s equation If we assume that at time t 0, the electron starts
Galatia SIL Keyboard Information
 Galatia SIL Keyboard Information Keyboard ssignments The main purpose of the keyboards is to provide a wide range of keying options, so many characters can be entered in multiple ways. If you are typing
LR Series Metal Alloy Low-Resistance Resistor
 Tel : 881745 Fax : 881749 LR Series Metal Alloy LowResistance Resistor This specification is applicable to lead free, halogen free of RoHS directive for metal alloy lowresistance resistor. The product
Κωδικός QR ενεργοποίησης
 Εγχειρίδιο χρήσης Το εγχειρίδιο αυτό ισχύει για τα κλιματιστικά MORRIS με λειτουργία WiFi. Παρακαλούμε να διαβάσετε το εγχειρίδιο προσεκτικά πριν την χρήση του κλιματιστικού και να το κρατήσετε για μελλοντική
ΓΡΑΜΜΙΚΟΣ & ΔΙΚΤΥΑΚΟΣ ΠΡΟΓΡΑΜΜΑΤΙΣΜΟΣ
 ΓΡΑΜΜΙΚΟΣ & ΔΙΚΤΥΑΚΟΣ ΠΡΟΓΡΑΜΜΑΤΙΣΜΟΣ Ενότητα 12: Συνοπτική Παρουσίαση Ανάπτυξης Κώδικα με το Matlab Σαμαράς Νικόλαος Άδειες Χρήσης Το παρόν εκπαιδευτικό υλικό υπόκειται σε άδειες χρήσης Creative Commons.
CYTA Cloud Server Set Up Instructions
 CYTA Cloud Server Set Up Instructions ΕΛΛΗΝΙΚΑ ENGLISH Initial Set-up Cloud Server To proceed with the initial setup of your Cloud Server first login to the Cyta CloudMarketPlace on https://cloudmarketplace.cyta.com.cy
Door Hinge replacement (Rear Left Door)
") Door Hinge replacement (Rear Left Door) We will continue the previous article by replacing the hinges of the rear left hand side door. I will use again the same procedure and means I employed during the
Door Hinge replacement (Rear Left Door) We will continue the previous article by replacing the hinges of the rear left hand side door. I will use again the same procedure and means I employed during the
Dynamic types, Lambda calculus machines Section and Practice Problems Apr 21 22, 2016
 Harvard School of Engineering and Applied Sciences CS 152: Programming Languages Dynamic types, Lambda calculus machines Apr 21 22, 2016 1 Dynamic types and contracts (a) To make sure you understand the
OUR PRODUCT RANGE. www.rakson.gr
 ΤΑ ΑΛΛΑ ΕΙ Η ΠΡΟΪΟΝΤΑ ΜΑΣ ΜΕΤΑΣΧΗΜΑΤΙΣΤΕΣ ΚΟΥ ΟΥΝΙΩΝ ΚΟΥ ΟΥΝΙΑ ΜΠΟΥΤΟΝ ΚΟΥ ΟΥΝΙΩΝ ΑΥΤΟΜΑΤΟΙ ΚΛΙΜΑΚΟΣΤΑΣΙΟΥ ΚΛΕΙ ΑΡΙΕΣ ΑΝΙΧΝΕΥΤΕΣ ΚΙΝΗΣΗΣ ΣΥΣΤΗΜΑΤΑ ΕΠΙΚΟΙΝΩΝΙΑΣ Θυροτηλεοράσεις Θυροτηλέφωνα Ενδοεπικοινωνίες
Οδηγίες χρήσης υλικού D U N S Registered
 Οδηγίες χρήσης υλικού D U N S Registered Οδηγίες ένταξης σήματος D U N S Registered στην ιστοσελίδα σας και χρήσης του στην ηλεκτρονική σας επικοινωνία Για οποιαδήποτε ερώτηση, σας παρακαλούμε επικοινωνήστε
Modern Greek Extension
 Centre Number 2017 HIGHER SCHOOL CERTIFICATE EXAMINATION Student Number Modern Greek Extension Written Examination General Instructions Reading time 10 minutes Working time 1 hour and 50 minutes Write
Block Ciphers Modes. Ramki Thurimella
 Block Ciphers Modes Ramki Thurimella Only Encryption I.e. messages could be modified Should not assume that nonsensical messages do no harm Always must be combined with authentication 2 Padding Must be
ΑΚΑ ΗΜΙΑ ΕΜΠΟΡΙΚΟΥ ΝΑΥΤΙΚΟΥ ΜΑΚΕ ΟΝΙΑΣ ΣΧΟΛΗ ΜΗΧΑΝΙΚΩΝ ΠΤΥΧΙΑΚΗ ΕΡΓΑΣΙΑ ΘΕΜΑ : ΧΗΜΙΚΑ ΠΡΟΣΘΕΤΑ ΠΟΥ ΠΡΟΟΡΙΖΟΝΤΑΙ ΓΙΑ ΤΟ ΝΕΡΟ ΤΟΥ ΑΤΜΟΛΕΒΗΤΑ
 ΑΚΑ ΗΜΙΑ ΕΜΠΟΡΙΚΟΥ ΝΑΥΤΙΚΟΥ ΜΑΚΕ ΟΝΙΑΣ ΣΧΟΛΗ ΜΗΧΑΝΙΚΩΝ ΠΤΥΧΙΑΚΗ ΕΡΓΑΣΙΑ ΘΕΜΑ : ΧΗΜΙΚΑ ΠΡΟΣΘΕΤΑ ΠΟΥ ΠΡΟΟΡΙΖΟΝΤΑΙ ΓΙΑ ΤΟ ΝΕΡΟ ΤΟΥ ΑΤΜΟΛΕΒΗΤΑ ΣΠΟΥ ΑΣΤΗΣ : ΑΓΟΡΑΣΤΟΣ ΧΡΥΣΟΒΑΛΑΝΤΗΣ ΕΠΙΒΛΕΠΟΥΣΑ ΚΑΘΗΓΗΤΡΙΑ :
AKC Spectrum Analyzer User s Manual.
 AKC-1291 Spectrum Analyzer User s Manual u ano un ao Prohibiting to removal the cover e m Keep the power insert clean RF in/output rating oae o n DC Power nt Restore this instrument 1. Introduction 2.
Quick Installation Guide
 A Installation 1 F H B E C D G 2 www.trust.com/17528/faq Quick Installation Guide C C D Freewave Wireless Audio Set 17528/ 17529 D Installation Configuration Windows XP 4 5 8 Windows 7/ Vista 6 7 9 10
TaxiCounter Android App. Περδίκης Ανδρέας ME10069
 TaxiCounter Android App Περδίκης Ανδρέας ME10069 Content Android Operating System Development Tools Taxi Counter Algorithm Design Development Process Android Operating System Android is a Linux-based operating
5.4 The Poisson Distribution.
 The worst thing you can do about a situation is nothing. Sr. O Shea Jackson 5.4 The Poisson Distribution. Description of the Poisson Distribution Discrete probability distribution. The random variable
3.4 SUM AND DIFFERENCE FORMULAS. NOTE: cos(α+β) cos α + cos β cos(α-β) cos α -cos β
 cos α + cos β cos(α-β) cos α -cos β") 3.4 SUM AND DIFFERENCE FORMULAS Page Theorem cos(αβ cos α cos β -sin α cos(α-β cos α cos β sin α NOTE: cos(αβ cos α cos β cos(α-β cos α -cos β Proof of cos(α-β cos α cos β sin α Let s use a unit circle
3.4 SUM AND DIFFERENCE FORMULAS Page Theorem cos(αβ cos α cos β -sin α cos(α-β cos α cos β sin α NOTE: cos(αβ cos α cos β cos(α-β cos α -cos β Proof of cos(α-β cos α cos β sin α Let s use a unit circle
6.003: Signals and Systems. Modulation
 6.003: Signals and Systems Modulation May 6, 200 Communications Systems Signals are not always well matched to the media through which we wish to transmit them. signal audio video internet applications
The Nottingham eprints service makes this work by researchers of the University of Nottingham available open access under the following conditions.
 Luevorasirikul, Kanokrat (2007) Body image and weight management: young people, internet advertisements and pharmacists. PhD thesis, University of Nottingham. Access from the University of Nottingham repository:
TIME SWITCHES AND TWILIGHT SWITCHES
 W ANALOG DIN-RAIL TIME SWITCH QUARTZ, SERIES TEMPUS ANALOG 244 W SCHRACK-INFO Analogue time switch 1 channel Daily program With power reserve (NiMH rechargeable battery) Synchronised with mains Shortest
C.S. 430 Assignment 6, Sample Solutions
 C.S. 430 Assignment 6, Sample Solutions Paul Liu November 15, 2007 Note that these are sample solutions only; in many cases there were many acceptable answers. 1 Reynolds Problem 10.1 1.1 Normal-order
Section 8.3 Trigonometric Equations
 99 Section 8. Trigonometric Equations Objective 1: Solve Equations Involving One Trigonometric Function. In this section and the next, we will exple how to solving equations involving trigonometric functions.
(1) Describe the process by which mercury atoms become excited in a fluorescent tube (3)
 Describe the process by which mercury atoms become excited in a fluorescent tube (3)") Q1. (a) A fluorescent tube is filled with mercury vapour at low pressure. In order to emit electromagnetic radiation the mercury atoms must first be excited. (i) What is meant by an excited atom? (1) (ii)
Q1. (a) A fluorescent tube is filled with mercury vapour at low pressure. In order to emit electromagnetic radiation the mercury atoms must first be excited. (i) What is meant by an excited atom? (1) (ii)
Daewoo Technopark A-403, Dodang-dong, Wonmi-gu, Bucheon-city, Gyeonggido, Korea LM-80 Test Report
 LM-80 Test Report Approved Method: Measuring Lumen Maintenance of LED Light Sources Project Number: KILT1212-U00216 Date: September 17 th, 2013 Requested by: Dongbu LED Co., Ltd 90-1, Bongmyeong-Ri, Namsa-Myeon,
Precision Metal Film Fixed Resistor Axial Leaded
 Features EIA standard colour-coding Non-Flame type available Low noise and voltage coefficient Low temperature coefficient range Wide precision range in small package Too low or too high ohmic value can
Assalamu `alaikum wr. wb.
 LUMP SUM Assalamu `alaikum wr. wb. LUMP SUM Wassalamu alaikum wr. wb. Assalamu `alaikum wr. wb. LUMP SUM Wassalamu alaikum wr. wb. LUMP SUM Lump sum lump sum lump sum. lump sum fixed price lump sum lump
Partial Trace and Partial Transpose
 Partial Trace and Partial Transpose by José Luis Gómez-Muñoz http://homepage.cem.itesm.mx/lgomez/quantum/ jose.luis.gomez@itesm.mx This document is based on suggestions by Anirban Das Introduction This
THICK FILM LEAD FREE CHIP RESISTORS
 Features Suitable for lead free soldering. Compatible with flow and reflow soldering Applications Consumer Electronics Automotive industry Computer Measurement instrument Electronic watch and camera Configuration
The challenges of non-stable predicates
 The challenges of non-stable predicates Consider a non-stable predicate Φ encoding, say, a safety property. We want to determine whether Φ holds for our program. The challenges of non-stable predicates
Concrete Mathematics Exercises from 30 September 2016
 Concrete Mathematics Exercises from 30 September 2016 Silvio Capobianco Exercise 1.7 Let H(n) = J(n + 1) J(n). Equation (1.8) tells us that H(2n) = 2, and H(2n+1) = J(2n+2) J(2n+1) = (2J(n+1) 1) (2J(n)+1)
ΚΥΠΡΙΑΚΗ ΕΤΑΙΡΕΙΑ ΠΛΗΡΟΦΟΡΙΚΗΣ CYPRUS COMPUTER SOCIETY ΠΑΓΚΥΠΡΙΟΣ ΜΑΘΗΤΙΚΟΣ ΔΙΑΓΩΝΙΣΜΟΣ ΠΛΗΡΟΦΟΡΙΚΗΣ 11/3/2006
 ΠΑΓΚΥΠΡΙΟΣ ΜΑΘΗΤΙΚΟΣ ΔΙΑΓΩΝΙΣΜΟΣ ΠΛΗΡΟΦΟΡΙΚΗΣ 11/3/26 Οδηγίες: Να απαντηθούν όλες οι ερωτήσεις. Ολοι οι αριθμοί που αναφέρονται σε όλα τα ερωτήματα μικρότεροι το 1 εκτός αν ορίζεται διαφορετικά στη διατύπωση
Surface Mount Aluminum Electrolytic Capacitors
 FEATURES CYLINDRICAL V-CHIP CONSTRUCTION LOW COST, GENERAL PURPOSE, 2000 HOURS AT 85 O C NEW EXPANDED CV RANGE (up to 6800µF) ANTI-SOLVENT (2 MINUTES) DESIGNED FOR AUTOMATIC MOUNTING AND REFLOW SOLDERING
LR(-A) Series Metal Alloy Low-Resistance Resistor
 Series Metal Alloy Low-Resistance Resistor") LR(A) Series Metal Alloy LowResistance Resistor This specification is applicable to lead free, halogen free of RoHS directive for metal alloy lowresistance resistor. The product is for general purpose.
LR(A) Series Metal Alloy LowResistance Resistor This specification is applicable to lead free, halogen free of RoHS directive for metal alloy lowresistance resistor. The product is for general purpose.
LR Series Metal Alloy Low-Resistance Resistor
 LR Series Metal Alloy LowResistance Resistor This specification is applicable to lead free, halogen free of RoHS directive for metal alloy lowresistance resistor. The product is for general purpose. The
Πώς μπορεί κανείς να έχει έναν διερμηνέα κατά την επίσκεψή του στον Οικογενειακό του Γιατρό στο Ίσλινγκτον Getting an interpreter when you visit your
 Πώς μπορεί κανείς να έχει έναν διερμηνέα κατά την επίσκεψή του στον Οικογενειακό του Γιατρό στο Ίσλινγκτον Getting an interpreter when you visit your GP practice in Islington Σε όλα τα Ιατρεία Οικογενειακού
ΚΥΠΡΙΑΚΗ ΕΤΑΙΡΕΙΑ ΠΛΗΡΟΦΟΡΙΚΗΣ CYPRUS COMPUTER SOCIETY ΠΑΓΚΥΠΡΙΟΣ ΜΑΘΗΤΙΚΟΣ ΔΙΑΓΩΝΙΣΜΟΣ ΠΛΗΡΟΦΟΡΙΚΗΣ 24/3/2007
 Οδηγίες: Να απαντηθούν όλες οι ερωτήσεις. Όλοι οι αριθμοί που αναφέρονται σε όλα τα ερωτήματα μικρότεροι του 10000 εκτός αν ορίζεται διαφορετικά στη διατύπωση του προβλήματος. Αν κάπου κάνετε κάποιες υποθέσεις
User s Manual / Οδηγίες Χρήσης
 User s Manual / Οδηγίες Χρήσης EUROPEAN STANDARDS Your child s safety depends on you. Proper bed rail usage cannot be assured unless you follow these instructions. DO NOT USE YOUR BED RAIL UNTILL YOU READ
Paper Reference. Paper Reference(s) 1776/04 Edexcel GCSE Modern Greek Paper 4 Writing. Thursday 21 May 2009 Afternoon Time: 1 hour 15 minutes
 1776/04 Edexcel GCSE Modern Greek Paper 4 Writing. Thursday 21 May 2009 Afternoon Time: 1 hour 15 minutes") Centre No. Candidate No. Paper Reference(s) 1776/04 Edexcel GCSE Modern Greek Paper 4 Writing Thursday 21 May 2009 Afternoon Time: 1 hour 15 minutes Materials required for examination Nil Paper Reference
Centre No. Candidate No. Paper Reference(s) 1776/04 Edexcel GCSE Modern Greek Paper 4 Writing Thursday 21 May 2009 Afternoon Time: 1 hour 15 minutes Materials required for examination Nil Paper Reference
UNIVERSITY OF CALIFORNIA. EECS 150 Fall ) You are implementing an 4:1 Multiplexer that has the following specifications:
 You are implementing an 4:1 Multiplexer that has the following specifications:") UNIVERSITY OF CALIFORNIA Department of Electrical Engineering and Computer Sciences EECS 150 Fall 2001 Prof. Subramanian Midterm II 1) You are implementing an 4:1 Multiplexer that has the following specifications:
UNIVERSITY OF CALIFORNIA Department of Electrical Engineering and Computer Sciences EECS 150 Fall 2001 Prof. Subramanian Midterm II 1) You are implementing an 4:1 Multiplexer that has the following specifications:
Chapter 2 * * * * * * * Introduction to Verbs * * * * * * *
 Chapter 2 * * * * * * * Introduction to Verbs * * * * * * * In the first chapter, we practiced the skill of reading Greek words. Now we want to try to understand some parts of what we read. There are a
Section 9.2 Polar Equations and Graphs
 180 Section 9. Polar Equations and Graphs In this section, we will be graphing polar equations on a polar grid. In the first few examples, we will write the polar equation in rectangular form to help identify
Approximation of distance between locations on earth given by latitude and longitude
 Approximation of distance between locations on earth given by latitude and longitude Jan Behrens 2012-12-31 In this paper we shall provide a method to approximate distances between two points on earth
Πρόβλημα 1: Αναζήτηση Ελάχιστης/Μέγιστης Τιμής
 Πρόβλημα 1: Αναζήτηση Ελάχιστης/Μέγιστης Τιμής Να γραφεί πρόγραμμα το οποίο δέχεται ως είσοδο μια ακολουθία S από n (n 40) ακέραιους αριθμούς και επιστρέφει ως έξοδο δύο ακολουθίες από θετικούς ακέραιους
Calculating the propagation delay of coaxial cable
 Your source for quality GNSS Networking Solutions and Design Services! Page 1 of 5 Calculating the propagation delay of coaxial cable The delay of a cable or velocity factor is determined by the dielectric