SISTEMA STEREO ENCODING MP3/CD/SD/USB/CASSETTE/RADIO CON GIRADISCHI ISTRUZIONI PER L'USO
|
|
|
- Δευκαλίων Γιαννόπουλος
- 9 χρόνια πριν
- Προβολές:
Transcript
1 TT 1064 E SISTEMA STEREO ENCODING MP3/CD/SD/USB/CASSETTE/RADIO CON GIRADISCHI ISTRUZIONI PER L'USO
2 ATTENZIONE 1. ATTENZIONE: leggere attentamente le informazioni sulla parte inferiore della scatola riguardanti la sicurezza e i rischi elettrici prima di installare o utilizzare l'apparecchio. 2. ATTENZIONE: per ridurre il rischio di incendio o scosse elettriche, non esporre l'apparecchio a pioggia o umidità. L'apparecchio non deve essere esposto all'acqua: non appoggiarvi oggetti (ad es. vasi) contenenti liquidi. 3. ATTENZIONE: la batteria (batteria, batterie o pacco batterie) non deve essere esposta a fonti di calore eccessivo (raggi solari, fiamme o simili). 4. ATTENZIONE: la spina di rete si usa come dispositivo di scollegamento. Il dispositivo di scollegamento deve essere mantenuto sempre pronto per l'utilizzo. 5. Il laser dell'apparecchio, quando aperto, può emettere radiazioni invisibili e i dispositivi di sicurezza si annullano. Evitare l'esposizione ai raggi laser. Corretto smaltimento del prodotto. Il simbolo riportato sull'apparecchiatura indica che il rifiuto deve essere oggetto di "raccolta separata" pertanto il prodotto non deve essere smaltito insieme ai rifiuti urbani. L'utente dovrà consegnare il prodotto presso gli appositi "centri di raccolta differenziata" predisposti dalle amministrazioni comunali, oppure consegnarlo al rivenditore contro acquisto di un nuovo prodotto. La raccolta differenziata del rifiuto e le successive operazioni di trattamento, recupero e smaltimento favoriscono la produzione di apparecchiature con materiali riciclati e limitano gli effetti negativi sull'ambiente e sulla salute causati da una gestione impropria del rifiuto. Lo smaltimento abusivo del prodotto comporta l'applicazione di sanzioni amministrative.

3 ATTENZIONE PER PREVENIRE IL RISCHIO DI INCENDIO O SCOSSE, NON ESPORRE L'APPARECCHIO A PIOGGIA O UMIDITÀ. PRECAUZIONI RISCHIO DI SCOSSA ELETTRICA - NON ATTENZIONE: RISCHIO DI SCOSSA - NON APRIRE L'unità presenta la seguente etichetta, indicante la corretta procedura per lavorare con i raggi laser: ETICHETTA PRODOTTO LASER DI CLASSE 1 Questa etichetta avverte che l'apparecchio contiene un componente laser. ETICHETTA RIGUARDANTE LA PRESENZA DI RADIAZIONI - Questa etichetta si trova all'interno dell'unità. (vedere illustrazione a lato). L'etichetta indica altri pericoli inerenti all'apparecchio. L'apparecchio contiene un laser che irradia raggi eccedenti il limite dei prodotti di cui alla classe 1. IL LAMPO CON LA PUNTA A FORMA DI FRECCIA inserito in un triangolo equilatero avvisa l utilizzatore della presenza di tensione pericolosa, senza isolamento, all interno dell apparecchio che potrebbe essere sufficientemente alta da generare il rischio di scossa elettrica. PUNTO ESCLAMATIVO all interno di un triangolo equilatero, viene utilizzato per indicare la necessità di sostituire un elemento unicamente con quello indicato nell apposita documentazione, per non comprometterne la sicurezza.
. L'etichetta indica altri pericoli inerenti all'apparecchio.")
4 ISTRUZIONI DI SICUREZZA 1. LEGGERE LE ISTRUZIONI - È necessario leggere attentamente le istruzioni di sicurezza e di funzionamento prima di utilizzare l apparecchio. 2. CONSERVARE LE ISTRUZIONI - Le istruzioni di sicurezza e di funzionamento devono essere conservate per riferimenti futuri. 3. ATTENERSI ALLE AVVERTENZE - Attenersi alle avvertenze e alle istruzioni di funzionamento dell'apparecchio. 4. SEGUIRE LE ISTRUZIONI - Seguire tutte le istruzioni di funzionamento. 5. ACQUA E UMIDITÀ - Non usare l apparecchio vicino ad acqua, es. vasche da bagno, lavabi, lavandini, lavatoi, piscine o in scantinati umidi. 6. AERAZIONE - L apparecchio deve essere collocato in posizioni che favoriscano un adeguata aerazione. Per esempio, evitare di posizionarlo su letti, divani, poltrone o superfici simili, che possono bloccare le aperture di aerazione, o luoghi che impediscano la circolazione dell aria, quali librerie chiuse o armadi. 7. CALORE - L'apparecchio deve essere posizionato lontano da fonti di calore come radiatori, stufe o qualsiasi altro apparecchio (compresi gli amplificatori) che generi calore. 8. ALIMENTAZIONE - Collegare l apparecchio ad una fonte di alimentazione del tipo indicato nelle istruzioni o sull apparecchio stesso. 9. PROTEZIONE DEI CAVI DI ALIMENTAZIONE - I cavi di alimentazione devono essere stesi in modo da evitarne il calpestio o l aggancio da parte di oggetti vicini. 10. LINEE ELETTRICHE - L antenna esterna deve essere posizionata lontano dalle linee elettriche. 11. OGGETTI E LIQUIDI - Evitare l introduzione e la caduta di corpi estranei, oggetti e liquidi nell apparecchio. 12. AVVERTENZA - Se il display non funziona correttamente o se l'apparecchio non risponde ai comandi, ciò può essere dovuto ad una scarica elettrostatica. Spegnere e scollegare l'apparecchio. Ricollegarlo dopo qualche secondo. 13. DANNI E ASSISTENZA - L apparecchio deve essere portato presso un centro di assistenza specializzato quando: a. Il cavo di alimentazione o la spina sono stati danneggiati. b. È stato versato liquido sull apparecchio o sono stati introdotti degli oggetti all interno dello stesso. c. L'apparecchio è stato esposto a pioggia. d. L'apparecchio è stato fatto cadere o è stato danneggiato. e. L'apparecchio non sembra funzionare correttamente. 14. ASSISTENZA- L utente deve evitare interventi diversi da quelli illustrati nelle istruzioni. Affidare gli altri interventi di manutenzione a personale qualificato. Note: a. CD sporchi o graffiati potrebbero causare problemi di riproduzione. Pulire o sostituire il CD. b. Se viene visualizzato un errore o se si verifica un malfunzionamento, scollegare il cavo AC e rimuovere tutte le batterie. Dopodiché, accendere nuovamente l'apparecchio. PRIMA DELL'USO Note sui CD:. Poiché dischi sporchi, danneggiati o deformati possono danneggiare l apparecchio, prestare attenzione a: a. Compact disc riutilizzabili. Utilizzare solo compact disc contrassegnati dal marchio sottostante. b. Utilizzare solo compact disc contenenti segnali audio digitali.

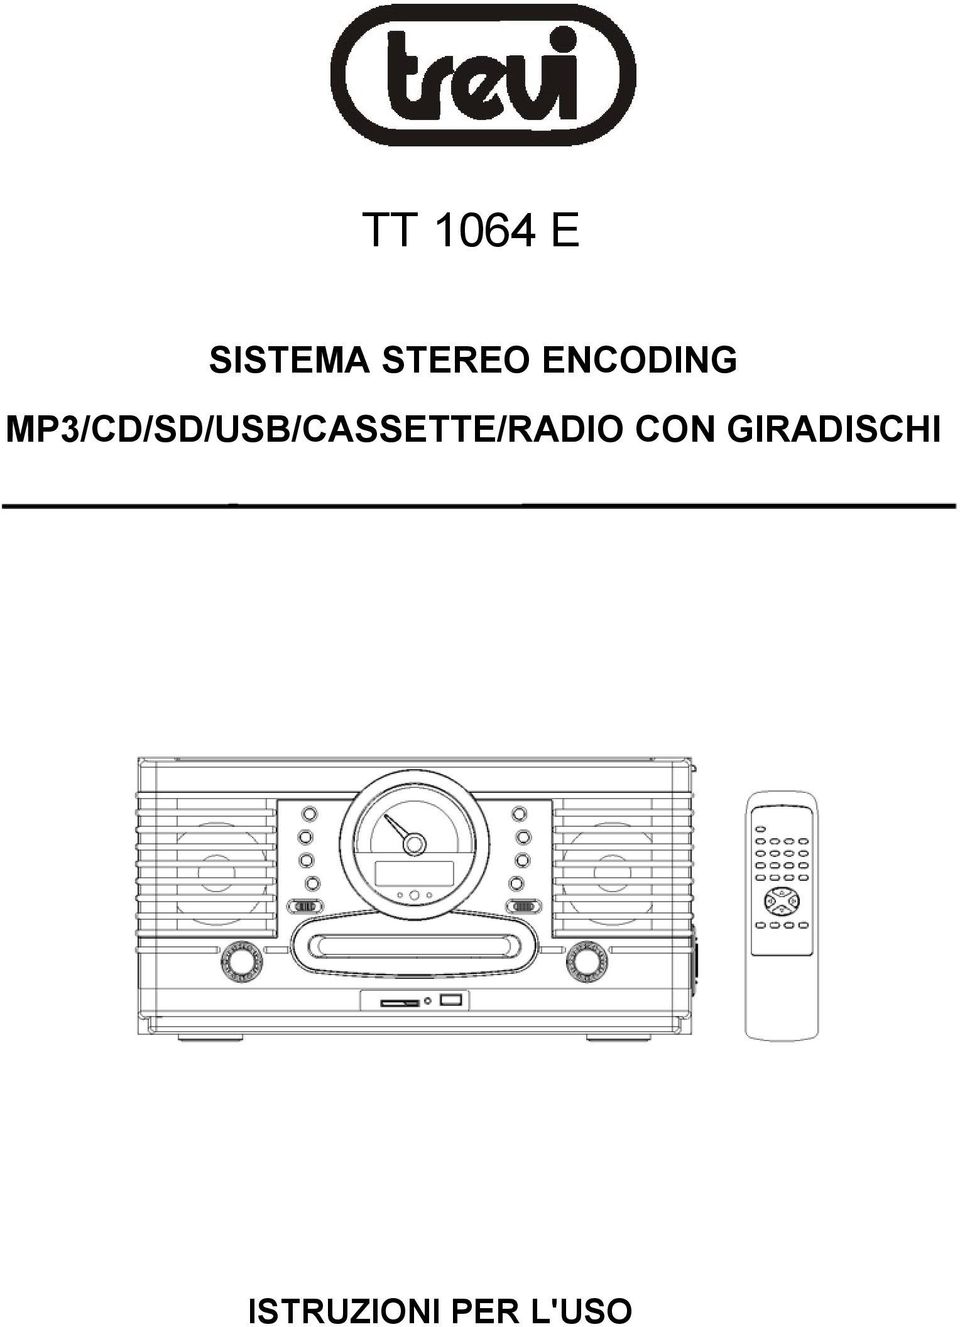
5 POSIZIONE DEI COMANDI DISPLAY LCD INDICATORE DI SINTONIA SKIP + SKIP - MODE ALBUM SELETTORE DI FUNZIONE INDICATORE FM ST. CONTROLLO VOLUME SENSORE TELECOMANDO PROGRAM PLAY / PAUSE STOP RECORD OPEN / CLOSE SELETTORE DI BANDA INDICATORE POWER CONTROLLO SINTONIA SPORTELLINO CD INGRESSO SD CARD INGRESSO USB ANTENNA FM INTERRUTTORE GENERALE CAVO DI ALIMENTAZIONE VANO CASSETTE

6 POSIZIONE DEI COMANDI SELETTORE DI VELOCITÀ BRACCIO PIATTO TESTINA DEL PIATTO DEL GIRADISCHI MONTAGGIO COPERCHIO FONOGRAFO 1. Muovere la staffa metallica come indicato nella figura. 2. Collegare la staffa metallica al coperchio del fonografo. ALIMENTAZIONE AC ALIMENTAZIONE Collegare il cavo AC all'apposita presa sul retro dell apparecchio e inserire la spina in una presa a muro. Controllare che la tensione dell apparecchio corrisponda a quella delle rete elettrica.

7 TELECOMANDO 1. REC 2. BIT RATE 3. USB / SD PROGRAM 6. INFO 7. SKIP + 8. STOP 9. SKIP MUTE 11. RANDOM 12. ALBUM ALBUM PLAY / PAUSE 15. REPEAT 16. INTRO INSTALLAZIONE DELLE BATTERIE Inserire 2 batterie di tipo AAA nel vano batterie. Accertarsi che le batterie siano inserite correttamente per evitare danni al telecomando. Rimuovere le batterie quando il telecomando non viene utilizzato per lungo tempo, per evitare perdite di liquidi e danni all'apparecchio. Note: - Utilizzare batterie dello stesso tipo. Non inserire due tipi di batterie diverse nel telecomando. - Se la distanza necessaria tra il telecomando e l'apparecchio diminuisce, significa che le batterie si stanno scaricando. In tal caso, sostituire le batterie. FINESTRA DEL SENSORE DEL RICEVITORE - Anche se il telecomando viene utilizzato correttamente, eventuali ostacoli tra il telecomando e l'apparecchio potrebbero impedirne il funzionamento. - Se il telecomando viene utilizzato in prossimità di altri apparecchi che emettono raggi infrarossi, o se altri telecomandi a raggi infrarossi vengono utilizzati in prossimità dell'apparecchio, questo potrebbe

8 RADIO FUNZIONI GENERALI 1. Posizionare il "SELETTORE DI FUNZIONE" su "RADIO". 2. Selezionare la banda desiderata tramite il "SELETTORE DI BANDA". 3. Regolare la frequenza della radio tramite il "CONTROLLO SINTONIA". 4. Regolare il volume al livello desiderato. RICEZIONE FM / FM-STEREO - Posizionare il "SELETTORE DI BANDA" su FM per ricezione MONO. - Posizionare il "SELETTORE DI BANDA" su FM ST. per ricezione FM STEREO. La relativa spia si accende per indicare la modalità FM ST. PER UNA MIGLIORE RICEZIONE FM - Il ricevitore ha un'antenna a filo FM integrata nella parte posteriore dell'apparecchio. Il filo può essere completamente districato ed esteso per migliorare le ricezione. AM - L'apparecchio è dotato di un'antenna direzionale in ferrite. Ruotare l'unità per ottenere una migliore ricezione. CASSETTE 1. Accendere l'unità spostando il tasto "VOLUME" verso destra e posizionare il "SELETTORE DI FUNZIONE" su "TAPE". 2. Inserire una cassetta preregistrata nel vano cassette, in modo che il lato rialzato del nastro si trovi dalla parte opposta del tasto "EJECT". Per maggiori dettagli, vedere a pagina Assicurarsi che la cassetta sia completamente inserita, premendo verso il meccanismo della cassetta. La riproduzione parte automaticamente. 4. Regolare il tasto "VOLUME" al livello desiderato. 5. Per interrompere la riproduzione della cassetta, premere a fondo il tasto "EJECT" sul lato sinistro del vano cassette. La cassetta viene espulsa dal vano. 6. Quando la cassetta raggiunge la fine in modalità di ascolto, si interrompe automaticamente.

9 FUNZIONI GENERALI CD / MP3 Premere per iniziare la riproduzione di un disco CD / MP3. Premere di nuovo per interrompere temporaneamente la riproduzione. Premere di nuovo per ripristinare la riproduzione. Premere per passare alla traccia successiva o per tornare alla traccia precedente. Premere e tenere premuto durante la riproduzione fino a raggiungere il punto del brano desiderato. Premere per interrompere la riproduzione. RIPRODUZIONE 1. Posizionare il "SELETTORE DI FUNZIONE" su "CD". 2. Premere il tasto OPEN / CLOSE per aprire lo sportellino CD e posizionare un CD con l'etichetta rivolta verso l'alto nel vano CD. 3. Premere di nuovo il tasto OPEN / CLOSE per chiudere lo sportellino CD. 4. La ricerca inizia con la lettura del numero totale di tracce. 5. Il disco viene riprodotto automaticamente dalla prima traccia. 6. Regolare il volume al livello desiderato. 7. Premere di nuovo il tasto "PLAY / PAUSE" per interrompere temporaneamente la riproduzione. 8. Premere il tasto "STOP" per interrompere la riproduzione. SELEZIONE CARTELLA Premere il tasto ALBUM + o ALBUM - sul telecomando per selezionare la cartella. (La funzione di selezione cartella è attiva solo se esistono almeno due directory/file all'interno del disco).

10 CD / MP3 PROGRAMMAZIONE Accertarsi di premere il tasto "STOP" prima dell'utilizzo. 1. Premere il tasto "MODE": sul display appare la scritta P-01 e "MEMORY". 2. Premere il tasto ALBUM + o ALBUM - sul telecomando per selezionare la cartella. (In modalità MP3, la funzione di selezione cartella è attiva solo se esistono almeno due directory/file all'interno del disco). 3. Selezionare la traccia desiderata tramite il tasto SKIP + o SKIP Premere di nuovo il tasto MODE per confermare la traccia desiderata nella memoria di programmazione. 5. Ripetere i punti da 2 a 4 per aggiungere tracce nella memoria di programmazione. 6. Quando tutte le tracce sono state programmate, premere il tasto PLAY / PAUSE per riprodurre il disco nell'ordine programmato. 7. Premere due volte il tasto "STOP" per interrompere la riproduzione programmata. MODE Premere il tasto MODE durante la riproduzione di un disco CD / MP3 / USB / SD card. A ogni pressione del tasto corrisponde quanto segue:

11 USB / SD FUNZIONI GENERALI Premere per iniziare la riproduzione delle tracce da USB / SD card. Premere di nuovo per interrompere temporaneamente la riproduzione. Premere di nuovo per ripristinare la riproduzione. Premere per passare alla traccia successiva o per tornare alla traccia precedente. Premere e tenere premuto durante la riproduzione fino a raggiungere il punto del brano desiderato. Premere per interrompere la riproduzione. RIPRODUZIONE 1. Inserire un dispositivo USB o una SD card nella porta corrispondente. 2. Posizionare il "SELETTORE DI FUNZIONE" su "CD". 3. Se nessun disco è inserito, la riproduzione USB / SD card partirà automaticamente. 4. Se vi è un disco inserito, la riproduzione del disco partirà automaticamente. 5. Premere e tenere premuto il tasto PLAY / PAUSE per alcuni secondi per accedere alla modalità USB / SD. 6. Premere e tenere premuto il tasto STOP per alcuni secondi per passare da USB a SD card. 7. Premere il tasto USB / SD sul telecomando per scegliere tra DISC o USB / SD. SELEZIONE CARTELLA, PROGRAMMAZIONE, REPEAT, RANDOM Le modalità SELEZIONE CARTELLA, PROGRAMMAZIONE, REPEAT e RANDOM sono quelle descritte alla sezione CD / MP3. Vedere la sezione CD / MP3.

12 FONOGRAFO FUNZIONI GENERALI Note: Rimuovere la protezione della puntina del giradischi. Accertarsi che il braccio sia sollevato dal supporto prima dell'utilizzo. Dopo l'utilizzo, riporlo sul supporto. 1. Posizionare il "SELETTORE DI FUNZIONE" su "PHONO". 2. Impostare il "SELETTORE DI VELOCITÀ" alla velocità indicata per il tipo di disco da riprodurre. 3. Posizionare il disco sul piatto. 4. Sollevare il braccio dal supporto e spostarlo lentamente sul lato del disco. Il piatto inizierà a girare. 5. Posizionare il braccio sulla posizione desiderata. 6. Regolare il volume al livello desiderato. 7. Alla fine del disco, il piatto smetterà di girare automaticamente. Sollevare il braccio dal disco e riposizionarlo sul supporto. 8. Per interrompere la riproduzione manualmente, sollevare il braccio dal disco e riposizionarlo sul supporto. Note: Alcuni dischi possono interrompersi prima della fine, poiché l'area del disco non coincide con le impostazioni di questo apparecchio. In tal caso, posizionare il selettore AUTO - STOP su "OFF". In questo modo, il disco verrà riprodotto fino alla fine, ma non si fermerà automaticamente. (Posizionare il SELETTORE DI FUNZIONE su "OFF" o il selettore AUTO - STOP su ON per interrompere la riproduzione). Riposizionare il braccio sul supporto. SOSTITUZIONE DELLA PUNTINA DEL GIRADISCHI Per sostituire la puntina del giradischi (ad es. se usurata), procedere come segue: 1. Per rimuovere la vecchia puntina, estrarre il blocco puntina secondo il verso indicato, tenendo stretto il portatestina con l'altra mano. 2. Dopodiché installare la nuova puntina premendo leggermente (tenere stretto dal

13 REGISTRAZIONE ENCODING DI SINGOLI BRANI DA DISCO CD / MP3 A DISPOSITIVO USB / SD CARD 1. Posizionare il "SELETTORE DI FUNZIONE" su "CD". 2. Aprire lo sportellino CD e posizionare un disco CD / MP3 con l'etichetta rivolta verso l'alto nel vano CD. 3. Chiudere lo sportellino CD. 4. La ricerca inizia con la lettura del numero totale di tracce e la riproduzione parte automaticamente. 5. Premere il tasto "STOP" per interrompere l'autoriproduzione. 6. Premere il tasto BIT RATE, poi il tasto SKIP + o SKIP - per scegliere il bit rate desiderato. Premete nuovamente il tasto BIT RATE per confermare. (*solo CD) 7. Premete il tasto PLAY per riprodurre la traccia. 8. Inserire un dispositivo USB o una SD card nella porta corrispondente. 9. Premere il tasto REC : sul display appare la scritta REC e USB / CARD, USB lampeggia. 10.Premere il tasto SKIP + o SKIP - per scegliere il supporto desiderato. 11.Premere di nuovo il tasto REC : l'apparecchio inizia la registrazione dall'inizio alla fine del brano. ENCODING DI TUTTI I BRANI DA DISCO CD / MP3 A DISPOSITIVO USB / SD CARD 1. Posizionare il "SELETTORE DI FUNZIONE" su "CD". 2. Aprire lo sportellino CD e posizionare un disco CD / MP3 con l'etichetta rivolta verso l'alto nel vano CD. 3. Chiudere lo sportellino CD. 4. La ricerca inizia con la lettura del numero totale di tracce e la riproduzione parte automaticamente. 5. Premere il tasto "STOP" per interrompere l'autoriproduzione. 6. Premere il tasto BIT RATE, poi il tasto SKIP + o SKIP - per scegliere il bit rate desiderato. Premete nuovamente il tasto BIT RATE per confermare. (*solo CD) 7. Inserire un dispositivo USB o una SD card nella porta corrispondente. 8. Premere il tasto REC : sul display appare la scritta REC e USB / CARD, USB lampeggia. 9. Premere il tasto SKIP + o SKIP - per scegliere il supporto desiderato. 10.Premere di nuovo il tasto REC : l'apparecchio inizia la registrazione dall'inizio alla fine del CD / MP3. ENCODING DA FONOGRAFO A DISPOSITIVO USB / SD CARD 1. Posizionare il "SELETTORE DI FUNZIONE" su "PHONO". Il fonografo inizia la riproduzione. 2. Inserire un dispositivo USB o una SD card nella porta corrispondente. 3. Premere il tasto BIT RATE, poi il tasto SKIP + o SKIP - per scegliere il bit rate desiderato. Premete nuovamente il tasto BIT RATE per confermare. 4. Premere due volte il tasto REC : sul display appare la scritta lampeggiante REC. L'apparecchio inizia la registrazione. Premere il tasto "STOP" per terminare.
 7.")
14 REGISTRAZIONE ENCODING DA NASTRO A DISPOSITIVO USB / SD CARD 1. Posizionare il "SELETTORE DI FUNZIONE" su "TAPE". Il nastro inizia la riproduzione. 2. Inserire un dispositivo USB o una SD card nella porta corrispondente. 3. Premere il tasto BIT RATE, poi il tasto SKIP + o SKIP - per scegliere il bit rate desiderato. Premete nuovamente il tasto BIT RATE per confermare. 4. Premere due volte il tasto REC : sul display appare la scritta lampeggiante REC. L'apparecchio inizia la registrazione. Premere il tasto "STOP" per terminare. ENCODING DI UN SINGOLO BRANO DA DISPOSITIVO USB A SD CARD E ENCODING DA SD CARD A DISPOSITIVO USB 1. Posizionare il "SELETTORE DI FUNZIONE" su "CD". 2. Inserire un dispositivo USB o una SD card nella porta corrispondente. 3. Premere il tasto USB / SD sul telecomando per scegliere il supporto da riprodurre. 4. Premere il tasto REC : l'apparecchio inizia la registrazione dall'inizio alla fine del brano. ENCODING DI TUTTI I BRANI DA DISPOSITIVO USB A SD CARD E ENCODING DA SD CARD A DISPOSITIVO USB 1. Posizionare il "SELETTORE DI FUNZIONE" su "CD". 2. Inserire un dispositivo USB o una SD card nella porta corrispondente. 3. Premere il tasto USB / SD sul telecomando per scegliere il supporto desiderato. 4. Premere il tasto "STOP" per interrompere l'autoriproduzione. 5. Premere il tasto REC : l'apparecchio inizia la registrazione dall'inizio alla fine di tutti i brani. ENCODING DA UNA TRACCIA PROGRAMMATA A DISPOSITIVO USB / SD CARD 1. Selezionare la traccia desiderata nella memoria di programmazione. 2. Premere il tasto REC : l'apparecchio inizia la registrazione di tutte le tracce programmate.

15 REGISTRAZIONE CANCELLAZIONE DI UNA SINGOLA TRACCIA DA DISPOSITIVO USB / SD CARD 1. Accertarsi di aver inserito un dispositivo USB o una SD card nella porta corrispondente. 2. Premere il tasto USB / SD sul telecomando per scegliere il supporto desiderato. 3. Premere il tasto "STOP" per interrompere l'autoriproduzione. 4. Premere e tenere premuto il tasto REC finché non appare la scritta DEL 001 sul display. 5. Premere il tasto SKIP + o SKIP - per scegliere la traccia da eliminare. 6. Premere di nuovo il tasto REC : sul display appare la scritta "YES" e "NO". 7. Premere il tasto SKIP + o SKIP - per scegliere e premere il tasto "REC" per confermare. CANCELLAZIONE DI UNA CARTELLA DA DISPOSITIVO USB / SD CARD 1. Accertarsi di aver inserito un dispositivo USB o una SD card nella porta corrispondente. 2. Premere il tasto USB / SD sul telecomando per scegliere il supporto desiderato. 3. Premere il tasto "STOP" per interrompere l'autoriproduzione. 4. Premere due volte e tenere premuto il tasto REC finché non appare la scritta DIR 01 sul display. 5. Premere il tasto SKIP + o SKIP - per scegliere la cartella da eliminare. 6. Premere di nuovo il tasto REC : sul display appare la scritta "YES" e "NO". 7. Premere il tasto SKIP + o SKIP - per scegliere e premere il tasto "REC" per confermare. FORMATTAZIONE DI UN DISPOSITIVO USB / SD CARD 1. Accertarsi di aver inserito un dispositivo USB o una SD card nella porta corrispondente. 2. Premere il tasto USB / SD sul telecomando per scegliere il supporto desiderato. 3. Premere il tasto "STOP" per interrompere l'autoriproduzione. 4. Premere due volte e tenere premuto il tasto REC finché non appare la scritta FORMAT e "N" sul display. 5. Premere il tasto SKIP + o SKIP - per scegliere e premere il tasto "REC" per confermare.

16 ALTRE FUNZIONI INTRO 1. Premere il tasto INTRO sul telecomando per riprodurre 10 secondi di ogni canzone. 2. Premere di nuovo il tasto "INTRO" per ripristinare la normale riproduzione. MUTE 1. Premere il tasto MUTE per disattivare il suono durante la riproduzione di un disco. 2. Premere di nuovo il tasto "MUTE" per riattivare il suono.

17 WARNING 1. WARNING : Please refer the information on exterior bottom enclosure for electrical and safety information before installing or operating the apparatus. 2. WARNING : To reduce the risk of fire or electric shock, do not expose this apparatus to rain or moisture. The apparatus shall not be exposed to dripping or splashing and that no objects filled with liquids, such as vases, shall not be placed on apparatus. 3. WARNING: The battery (battery or batteries or battery pack) shall not be exposed to excessive heat such as sunshine, fire or the like. 4. WARNING: The mains plug is used as disconnect device, the disconnect device shall remain readily operable. 5. Invisible laser radiation when open and interlocks defeated. Avoid exposure to beam of laser. 6. Correct Disposal of this product. This marking indicates that this product should not be disposed with other household wastes throughout the EU. To prevent possible harm to the environment or human health from uncontrolled waste disposal, recycle it responsibly to promote the sustainable reuse of material resources. To return your used device, please use the return and collection systems or contact the retailer where the product was purchased. They can take this product for environmental safe recycling. 7. No naked flame sources, such as lighted candles, should be placed on the apparatus. 8. Attention should be drawn to environmental aspects of battery disposal. 9. Use of the apparatus in moderate climates. 10. The rating and marking information are located at the bottom of the unit. 11. Excessive sound pressure from earphone and headphones can cause hearing loss. 12. The mains plug of unit should be obstructed or should be easily accessed during intended use. 13. To be completely disconnect the power input, the mains plug of apparatus shall be disconnected from the mains. CAUTION Danger of explosion if battery is incorrectly replaced. Replace only with the same or equivalent type
 shall not be exposed to excessive heat such as sunshine, fire or the like. 4.")
18 WARNING TO PREVENT FIRE OR SHOCK HAZARD DO NOT EXPOSE THIS APPLIANCE TO RAIN OR MOISTURE. CAUTION RISK OF ELECTRIC SHOCK DO NOT OPEN WARNING : SHOCK HAZARD-DO NOT OPEN The following label has been affixed to the unit, listing the proper procedure for working with the laser beam: CLASS 1 LASER PRODUCT LABEL - This label is attached to the place as illustrated to inform that the apparatus contains a laser component. WARNING LABEL INFORMING OF RADIATION - This label is placed inside the unit. As shown in the illustration. To warn against further measures on the unit. The equipment contains a laser radiating laser rays according to the limit of laser product of class 1. LIGHTNING FLASH WITH ARROWHEAD SYMBOL - within an equilateral triangle, is intended to alert the user to the presence of uninsulated dangerous voltage within the products enclosure that may be of sufficient magnitude to constitude a risk of electric shock to persons. EXCLAMATION POINT - within an equilateral triangle, is used to indicate that a specific component shall be replaced only by the component specified in that documentation for safety reason.

19 SAFETY INSTRUCTIONS 1. READ INSTRUCTIONS - All the safety and operating instructions should be read before the appliance is operated. 2. RETAIN INSTRUCTIONS - The safety and operating instruction should be retained for future reference. 3. HEED WARNINGS - All warnings on the appliance and in the operating instructions should be adhered to. 4. FOLLOW INSTRUCTIONS - All operating instructions should be followed. 5. WATER AND MOISTURE - The appliance should not be used near water, for example, near a bathtub, washbowl, kitchen sink, laundrytub, swimming pool or in a wet basement. 6. VENTILATION - The appliance should be situated so that its location or position does not interfere with its proper ventilation. Do not place on bed, sofa, rug or similar surface that may block the ventilation openings, in a built-in installation, such as a bookcase or cabinet that may impede the flow of air through the ventilation openings. 7. HEAT - The appliance should be situated away from heat sources such as radiators, stoves, or other appliances (including amplifiers) that produce heat. 8. POWER SOURCE - The appliance should be connected to power supply only of the type described in the operating instructions or as marked on the appliance. 9. POWER CORD PROTECTION - Power supply cords should be routed so that they are not likely to be walked on or pinched by items placed upon or against them. 10. POWER LINES - An outdoor antenna should be located away from power lines. 11. OBJECT and LIQUID ENTRY - Care should be taken so that objects do not fall and liquids are not spilled into the enclosure through openings. 12. ESD WARNING - The display does not function properly or no reaction to operation of any the control may due to the electrostatic discharge. Switch off and unplug the set. Reconnect after a few seconds. 13. DAMAGE REQUIRING SERVICE - The appliance should be serviced by qualified service personnel when: a. The power-supply cord or plug has been damaged. b. Objects have fallen into, or liquid has been spilled into the appliance enclosure. c. The appliance has been exposed to rain. d. The appliance has been dropped, or the enclosure damaged. e. The appliance does not appear to operate normally. 14. SERVICING - The user should not attempt to service the appliance beyond that described in the user operating instructions. All other servicing should be referred to qualified service personnel. Notes: a. Dirty or scratched CD may cause a skipping problem. Clean or replace the CD. b. If an error display or malfunction occurs, disconncet the AC cord and remove all the batteries. Then turn the power back on. BEFORE OPERATION Notes: CONCERNING COMPACT DISCS. Since dirty, damaged or warped discs may damage the appliance, care should be taken of the followings items: a. Usable compact discs. Use only compact disc with the mark shown below. b. CD compact disc only with digital audio signals.

20 LOCATION OF CONTROL LCD DISPLAY DIAL POINTER PROGRAM SKIP + SKIP - MODE ALBUM FUNCTION SELECTOR FM ST. INDICATOR VOLUME CONTROL REMOTE SENSOR PLAY / PAUSE STOP RECORD OPEN / CLOSE BAND SELECTOR POWER INDICATOR TUNING CONTROL CD DOOR SD CARD SOLT USB SLOT FM ANTENNA MAIN POWER POWER CORD SLOT-IN CASSETTE

21 LOCATION OF CONTROL SPEED SELECTOR TONE ARM PLATTER TURNTABLE HEAD PHONO COVER ASSEMBLY 1. Push the metal bracket to rear side. 2. Connect the metal bracket to the phono cover. AC POWER POWER SOURCE You can power your appliance by plugging the detachable AC power cord into the AC inlet at the back of the appliance and into a wall AC power outlet. Check that the rated voltage of your appliance matches your local voltage.
22 REMOTE CONTROL 1. REC 2. BIT RATE 3. USB / SD PROGRAM 6. INFO 7. SKIP + 8. STOP 9. SKIP MUTE 11. RANDOM 12. ALBUM ALBUM PLAY / PAUSE 15. REPEAT 16. INTRO BATTERY INSTALLATION Insert 2 x AAA size batteries into the battery compartment. Be sure that the batteries are inserted correctly to avoid damage to the remote control. Always remove the batteries when the remote control will not be used for a long period of time, as this will cause leakage to the batteries and subsequently damage to your set. Notes : - Use batteries of the same type. Never use different types of batteries togethe r. - If the distance required between the remote control and the appliance decreases, the batteries are exhausted. In this case replace the batteries with new one. SENSOR WINDOW OF THE RECEIVER - Even if the remote control is operated within the effective range, its operation may be impossible if there are any obstacies between the appliance and the remote control. - If the remote control is operated near other appliances which generate infrared rays, or if other remote control devices using infrared rays are used near the appliance, it may operate incorrectly.
23 RADIO OPERATION GENERAL OPERATION 1. Set the FUNCTION selector to RADIO mode. 2. Select desired band by using the BAND selector. 3. Adjust radio frequency to your desired station by using the TUNING control. 4. Adjust the VOLUME control to the desired level. FM / FM-STEREO RECEPTION - Set the BAND selector to FM mode for MONO reception. - Set the BAND selector to FM ST. mode for FM STEREO reception. The Stereo indicator light up to show FM ST. mode. FOR BETTER RECEPTION FM - The receiver has a built - in FM wire antenna located from the rear cabinet. This wire be completely unraveled and extended for best reception. AM - This appliance is equipped with a built - in directional ferrite antenna. Rotate the unit to get the best reception. CASSETTE OPERATION 1. Turn ON the unit by tuning the VOLUME button to the right and set the FUNCTION selector to TAPE mode. 2. Insert a pre-recorded cassette into the cassette slot, and ensure that the exposed tape side of the cassette is facing away from the EJECT button. Refer to page 3 for details. 3. Ensure that the cassette is fully inserted by pushing it into the cassette mechanism and it will start to play automatically. 4. Adjust the VOLUME button to the desired sound level. 5. To stop the tape when playing, press the EJECT button on the left side of cassette slot completely in. The tape will eject from the slot. 6. When the tape reaches its end in the play mode, it will stop automatically.
24 CD / MP3 OPERATION GENERAL OPERATION Press to start playing CD / MP3 disc. Press again to stop playing CD / MP3 operation temporarily. Press again to resume playback. Press to go to the next track or back to the previous track. Press and hold while playing until you find the point of the sound. Press to stop all CD / MP3 operation. PLAYBACK 1. Set the FUNCTION selector to CD mode. 2. Press the OPEN / CLOSE button to open the CD door and place a CD disc with the label up int the CD compartment. 3. Press the OPEN / CLOSE button again to close the CD door. 4. Focus search is performed if disc is inside. 5. Playback will start automatically from the first track. 6. Adjust the VOLUME control to the desired level. 7. Press the PLAY / PAUSE button again when you want to stop playback temporarily. 8. Press the STOP button when finished. FOLDER SELECT Press the ALBUM + or ALBUM - button on remote control to select folder. ( Folder select function can only operate if disc store with at least 2 directories / files. )
25 CD / MP3 OPERATION PROGRAM Be sure to press the STOP button before use. 1. Press the MODE button, the display will show P-01 and MEMORY. 2. Press the ALBUM + or ALBUM - button on remote control to select folder. ( For MP3 only, folder select function can only operate if disc store with at least 2 directories / files. ) 3. Select desired track by using the SKIP + or SKIP - button. 4. Press the MODE button again to confirm desired track into the program memory. 5. Repeat step 2 to 4 to enter additional tracks into the program memory. 6. When all the desired tracks have programmed. Press the PLAY / PAUSE button to play the disc in the order you have programmed. 7. Press the STOP button twice to terminate programmed playback. MODE Press the MODE button during playing CD / MP3 disc / USB / SD card, each press switches the repeat function as follows:
26 USB / SD OPERATION GENERAL OPERATION Press to start playing tracks from the USB / SD card. Press again to stop playing USB / SD operation temporarily. Press again to resume playback. Press to go to the next track or back to the previous track. Press and hold while playing until you find the point of the sound. Press to stop all USB / SD operation. PLAYBACK 1. Plug or slot in USB / SD card device to the port. 2. Set the FUNCTION selector to CD mode. 3. It will read and automatic playing USB / SD card, if no disc on disc tray. 4. It will read and automatic playing DISC, if have disc on disc tray. 5. Press and hold the PLAY / PAUSE button for a few seconds to entry USB / SD mode. 6. Press and hold the STOP button for a few seconds to change play USB or SD card. 7. Press the USB / SD button on the remote control to choose DISC or USB / SD play. FOLDER SELECT, PROGRAM, REPEAT, RANDOM The operation of FOLDER SELECT, PROGRAM, REPEAT and RANDOM mode are as the same as that of CD / MP3. Please refer to CD / MP3 OPERATION.
27 PHONO OPERATION GENERAL OPERATION Notes: Remove the stylus protector. Be sure that the tone arm is detached from the tone arm rest before operation and resecured again afterward. 1. Set the FUNCTION selector to PHONO mode. 2. Set the SPEED selector to the proper speed depending on the record to be played. 3. Place the record on the platter. 4. Lift the tone arm from the rest and slowly move it to the record side. The platter will begin to rotate. 5. Place the tone arm on the desired position. 6. Adjust the VOLUME control to the desired level. 7. At the end of the record, the platter will automatically stop rotation. Lift the tone arm from the record and return it to the rest. 8. To stop manually, lift the tone arm from the record, and return it to the rest. Notes: As some kind of record the auto - stop area was out of the unit setting, so it will stop before the last track finish. In the case, set the AUTO - STOP selector to OFF mode, then it will run to the end of the record but will not stop automatically. ( Set the FUNCTION selector to OFF mode or set the AUTO - STOP selector to ON mode to stop the playback. ) Put back the tone arm to the rest. STYLUS REPLACEMENT Replacement of a worn stylus can be easily accomplished as follows: 1. To remove the old stylus, pull out the stylus assembly in direction shown, holding the head shell with your other hand. 2. Then install the new stylus by pushing it gently into the cartridge ( hold by the edge to prevent damage to stylus. ) until it clicks into place.
28 RECORD OPERATION ENCODING SINGLE SONG FROM CD / MP3 DISC TO USB / SD CARD DEVICE 1. Set the FUNCTION selector to CD mode. 2. Open the CD door and place a CD / MP3 disc with the lable up in the CD compartment. 3. Close the CD door. 4. Focus search is performed and will auto play if disc is inside. 5. Press the STOP button to stop the auto playback. 6. Press the BIT RATE button and press the SKIP + or SKIP - button to choose the desired bit rate. Press the BIT RATE button again to confirm. (*CD only) 7. Press the PLAY button to play track. 8. Plug or slot in USB / SD card device to the port. 9. Press the REC button, the display will show REC and USB / CARD, USB is flash. 10.Press the SKIP + or SKIP - button to choose the desired media. 11.Press the REC button again, the appliance will start recording from the begining to the end of the song. ENCODING ALL SONG FROM CD / MP3 DISC TO USB / SD CARD DEVIC 1. Set the FUNCTION selector to CD mode. 2. Open the CD door and place a CD / MP3 disc with the lable up in the CD compartment. 3. Close the CD door. 4. Focus search is performed and will auto play if disc is inside. 5. Press the STOP button to stop the auto playback. 6. Press the BIT RATE button and press the SKIP + or SKIP - button to choose the desired bit rate. Press the BIT RATE button again to confirm. (*CD only) 7. Plug or slot in USB / SD card device to the port. 8. Press the REC button, the display will show REC and USB / CARD, USB is flash. 9. Press the SKIP + or SKIP - button to choose the desird media. 10.Press the REC button again, the appliance will start recording from the beginning to the end of the CD / MP3. ENCODING FROM PHONO TO USB / SD CARD DEVICE 1. Set the FUNCTION selector to PHONO mode. Phono be playing. 2. Plug or slot in USB / SD card device to the port. 3. Press the BIT RATE button and press the SKIP + or SKIP - button to choose the desired bit rate. Press the BIT RATE button again to confirm. 4. Press the REC button twice, the display will show REC and flash. Appliance will start recording. Press the STOP button to complete.
29 RECORD OPERATION ENCODING FROM TAPE TO USB / SD CARD DEVICE 1. Set the FUNCTION selector to TAPE mode. TAPE be playing. 2. Plug or slot in USB / SD card device to the port. 3. Press the BIT RATE button and press the SKIP + or SKIP - button to choose the desired bit rate. Press the BIT RATE button again to confirm. 4. Press the REC button twice, the display will show REC and flash. Appliance will start recording. Press the STOP button to complete. ENCODING SINGLE SONG FROM USB TO SD CARD DEVICE AND ENCODING FROM SD CARD TO USB DEVICE 1. Set the FUNCTION selector to CD mode. 2. Plug or slot in USB / SD card device to the port. 3. Press the USB / SD button on the remote control to choose the desird media to play. 4. Press the REC button, the appliance will start recording from the beginning to the end of the song. ENCODING ALL SONG FROM USB TO SD CARD DEVICE AND ENCODING FROM SD CARD TO USB DEVICE 1. Set the FUNCTION selector to CD mode. 2. Plug or slot in USB / SD card device to the port. 3. Press the USB / SD button on the remote control to choose the desird media. 4. Press the STOP button to stop the auto playback. 5. Press the REC button, the appliance will start recording from the beginning to the end of all song. ENCODING FROM PROGRAMMED TRACK TO USB / SD CARD DEVICE 1. Select desired track into the program memory. 2. Press the REC button, the appliance will start recording all the programmed track.
30 RECORD OPERATION SINGLE TRACK DELETE OF USB / SD CARD DEVICE 1. Be sure to plug slot the USB / SD card device to the port. 2. Press the USB / SD button on the remote control to choose the desird media. 3. Press the STOP button to stop the auto playback. 4. Press and hold the REC button until the display shows DEL Press the SKIP + or SKIP - button to choose the track desired to delete. 6. Press the REC button again, the display will show YES and NO. 7. Press the SKIP + or SKIP - button to choose and press the REC button to confirm. FOLDER DELETE OF USB / SD CARD DEVICE 1. Be sure to plug slot the USB / SD card device to the port. 2. Press the USB / SD button on the remote control to choose the desird media. 3. Press the STOP button to stop the auto playback. 4. Press and hold the REC button twice until the display shows DIR Press the SKIP + or SKIP - button to choose the folder desired to delete. 6. Press the REC button again, the display will show YES and NO. 7. Press the SKIP + or SKIP - button to choose and press the REC button to confirm. FORMAT OF USB / SD CARD DEVICE 1. Be sure to plug slot the USB / SD card device to the port. 2. Press the USB / SD button on the remote control to choose the desird media. 3. Press the STOP button to stop the auto playback. 4. Press and hold the REC button twice until the display shows FORMAT and N. 5. Press the SKIP + or SKIP - button to choose and press the REC button to confirm.
31 OTHER FEATURES INTRO 1. Press the INTRO button on remote control to play each song for 10 seconds. 2. Press the INTRO button again to resume normal playback. MUTE 1. Press the MUTE button to remove the sound during playing disc. 2. Press the MUTE button again to resume the sound.
32 ATTENTION 1. ATTENTION : lisez attentivement les informations sur la partie inférieure de la boîte concernant la sécurité et les risques électriques avant l'installation ou l'utilisation de cet appareil. 2. ATTENTION : pour réduire le risque d'incendie ou de décharges électriques, n'exposez pas l'appareil à la pluie ou à l'humidité. Ne pas exposer l'appareil à l'eau: n'appuyez pas d'objets (comme des vases) contenant des liquides. 3. ATTENTION : la batterie (batterie, batteries ou bloc batteries) ne doit pas être exposée à des sources de chaleur excessives (rayons solaires, flammes ou similaires). 4. ATTENTION : la fiche est considérée comme dispositif de débranchement de l'appareil. Le dispositif de débranchement doit être toujours prêt à l'emploi. 5. Le laser de l'appareil, si ouvert, peut émettre des radiations invisibles et les dispositifs de sécurité se désactivent. Évitez toute exposition aux rayons laser. 6. Correcte élimination du produit. Ce symbole indique que le produit, utilisé à l'intérieur de l'ue, ne doit pas être éliminé avec les autres déchets domestiques. Pour prévenir tout éventuel dommage à l'environnement ou à la santé causé par une mauvaise élimination des déchets, recyclez le produit de manière responsable pour promouvoir la réutilisation durable des ressources matérielles. Si le produit n'est plus utilisé, adressez-vous aux entreprises de collecte ou bien contactez votre revendeur. C'est lui qui s'occupera du recyclage du produit. 7. Gardez les flammes nues, par exemples les bougies, à l'écart de l'appareil. 8. Faites attention aux aspects environnementaux de l'élimination des batteries. 9. Utilisez l'appareil uniquement dans des lieux à température modérée. 10. Les informations concernant la catégorie et l'évaluation de l'appareil se trouvent dans la partie inférieure de l'unité. 11. Une pression acoustique excessive provenant des écouteurs et du casque pourrait endommager votre ouïe. 12. La fiche de l'unité doit être toujours bien accessible pendant l'utilisation de l'appareil. 13. Pour débrancher complètement l'appareil, retirez la fiche. PRÉCAUTIONS Danger d'explosions si la batterie n'est pas correctement remplacée. Remplacez uniquement
33 ATTENTION POUR PRÉVENIR LE RISQUE D INCENDIE OU DE DÉCHARGES, N EXPOSEZ PAS L APPAREIL À LA PLUIE OU À L'HUMIDITÉ. PRÉCAUTIONS RISQUE DE DÉCHARGES ÉLECTRIQUES - NE ATTENTION : RISQUE DE DÉCHARGE - NE PAS OUVRIR Cette unité présente l'étiquette suivante, qui indique le procédé correct pour travailler avec les rayons solaires : ÉTIQUETTE PRODUIT LASER DE CLASSE 1 Cette étiquette informe que l'appareil contient un composant laser. ETIQUETTE CONCERNANT Cette étiquette se trouve à l'intérieur de l'unité. (voir illustration ci-contre). Elle indique d'autres dangers concernant l'appareil. L'appareil contient un laser qui émet des rayons excédant la limite des produits de classe 1. L ÉCLAIR AVEC LA POINTE EN FORME DE FLÈCHE à l'intérieur d'un triangle équilatéral informe l'utilisateur de la présence de tension dangereuse non isolée à l'intérieur de l'appareil : elle pourrait être suffisamment élevée pour engendrer le risque de décharges électriques. POINT D'EXCLAMATION à l'intérieur d'un triangle équilatéral, utilisé pour indiquer qu'un élément peut être remplacé uniquement par celui qui est indiqué dans la documentation, afin de ne pas compromettre la sécurité de l'appareil.
34 INSTRUCTIONS DE SÉCURITÉ 1. LISEZ LES INSTRUCTIONS - Il est nécessaire de lire attentivement les instructions de sécurité et de fonctionnement avant d utiliser l'appareil. 2. CONSERVEZ LES INSTRUCTIONS - Les instructions de sécurité et de fonctionnement doivent être conservées pour toutes consultations futures. 3. RESPECTEZ LES AVERTISSEMENTS - Respectez les avertissements et les instructions de fonctionnement de l'appareil. 4. SUIVEZ LES INSTRUCTIONS - Suivez toutes les instructions de fonctionnement. 5. EAU ET HUMIDITÉ - N'utilisez pas l'appareil à proximité de baignoires, lavabos, éviers, lavoirs, piscines ou soussols humides. 6. AÉRATION - L'appareil doit être placé de manière à garantir une bonne aération. Par exemple, évitez de le placer sur des lits, des canapés, des fauteuils ou autres surfaces similaires qui pourraient bloquer les ouvertures d'aération, ou bien dans des lieux qui préviennent la circulation de l'air, comme certaines librairies ou les placards. 7. CHALEUR - L'appareil doit être placé à l'écart de sources de chaleur comme radiateurs, poêles ou tout autre appareil (amplificateurs inclus) qui génère de la chaleur.. 8. ALIMENTATION - Branchez l'appareil sur une source d'alimentation comme indiqué dans les instructions ou sur l'appareil. 9. PROTECTION DES CÂBLES D'ALIMENTATION - Les câbles d'alimentation doivent être étendus de façon à ne pas y marcher dessus et pour éviter qu'ils restent pris dans d'autres objets à proximité. 10. LIGNES ÉLECTRIQUES - L'antenne externe doit être placée à l'écart des lignes électriques. 11. OBJETS ET LIQUIDES - Évitez d'introduire et de faire tomber de corps étrangers, d'objets et de liquides dans l'appareil. 12. AVERTISSEMENT - Si l'afficheur ne fonctionne pas correctement ou que l'appareil ne réponde pas aux commandes, cela peut être dû à une décharge électrostatique. Éteignez et débranchez l'appareil. Rebranchez-le au bout de quelques secondes. 13. DOMMAGES ET ASSISTANCE - L'appareil doit être envoyé dans un centre de service après vente spécialisé lorsque : a. Le câble d alimentation ou la fiche ont été endommagés. b. Du liquide a été renversé sur l'appareil ou des objets ont été insérés à l intérieur.. c. L'appareil a été exposé à la pluie. d. L'appareil est tombé ou endommagé. e. L'appareil ne fonctionne pas correctement. 14. ASSISTANCE- L'utilisateur ne doit intervenir sur l'appareil que selon les indications fournies dans les instructions. Pour toutes les autres interventions d entretien, adressez-vous uniquement à des opérateurs qualifiés. Remarques : a. Des CD sales ou rayés pourraient compromettre la bonne lecture du disque. Nettoyez ou remplacez le CD. b. Si une erreur s'affiche ou que l'appareil ne fonctionne pas correctement, débranchez le câble AC et retirez les batteries. Ensuite, rallumez l'appareil.. AVANT L EMPLOI Remarques sur les CD :. Comme des disques sales, endommagés ou déformés peuvent endommager l'appareil, faites attention à : a. Disques compacts réutilisables. Utilisez uniquement des disques compacts ayant le symbole ci-dessous. b. Utilisez uniquement des disques compacts contenant des signaux audio numériques.
35 POSITION DES COMMANDES AFFICHEUR LCD INDICATEUR D ACCORD SKIP + SKIP - MODE ALBUM SÉLECTEUR FONCTIONS INDICATEUR FM ST. RÉGLAGE DU VOLUME CAPTEUR DE LA TÉLÉCOMMANDE PROGRAM PLAY / PAUSE STOP RECORD OPEN / CLOSE SÉLECTEUR DE BANDE INDICATEUR POWER BOUTON D'ACCORD VOLET CD ENTRÉE CARTE SD ENTRÉE USB ANTENNE FM INTERRUPTEUR GÉNÉRAL CÂBLE D'ALIMENTATION LOGEMENT CASSETTE
36 POSITION DES COMMANDES SÉLECTEUR DE VITESSE BRAS PLATINE CELLULE DE LA PLATINE DU TOURNE-DISQUES MONTAGE COUVERCLE DU PHONOGRAPHE 1. Déplacez la patte de montage comme indiqué dans la figure. 2. Connectez la patte de montage au couvercle du phonographe. ALIMENTATION AC ALIMENTATION Connectez le câble AC à la prise située au dos de l'appareil et branchez la fiche sur une prise secteur. Veillez à ce que la tension de l'appareil corresponde à celle du réseau électrique.
37 TÉLÉCOMMANDE 1. REC 2. BIT RATE 3. USB / SD PROGRAM 6. INFO 7. SKIP + 8. STOP 9. SKIP MUTE 11. RANDOM 12. ALBUM ALBUM PLAY / PAUSE 15. REPEAT 16. INTRO INSTALLATION DES BATTERIES Insérez 2 batteries du type «AAA» dans le logement de la batterie. Assurez-vous que les batteries sont insérées correctement pour ne pas endommager la télécommande. Retirez les batteries lorsque la télécommande n'est pas utilisée pendant longtemps pour éviter toute perte de liquides et tout dommage à l'appareil. Remarques : - Utilisez des batteries du même type. N'insérez pas deux types de batteries différentes dans la télécommande. - Si la distance nécessaire entre la télécommande et l'appareil diminue, les batteries sont faibles. FENÊTRE DU CAPTEUR DU RÉCEPTEUR - Même si la télécommande est utilisée correctement, d'éventuels obstacles entre la télécommande et l'appareil pourraient compromettre le bon fonctionnement. - Si la télécommande est utilisée à proximité d'autres appareils qui émettent des rayons infrarouges ou que d'autres télécommandes à infrarouges soient utilisées à proximité de l'appareil, ce dernier
38 FONCTIONS GÉNÉRALES RADIO 1. Déplacez le «SÉLECTEUR FONCTIONS» sur «RADIO». 2. Sélectionnez la bande souhaitée à l'aide du «SÉLECTEUR DE BANDE». 3. Réglez la fréquence de la radio à l'aide du «BOUTON D'ACCORD». 4. Réglez le volume au niveau souhaité. RÉCEPTION FM / FM-STÉRÉO - Déplacez le «SÉLECTEUR DE BANDE» sur FM pour une réception MONO. - Déplacez le «SÉLECTEUR DE BANDE» sur FM ST. pour une réception FM STÉRÉO. Le voyant correspondant s'allume pour indiquer le mode FM ST. POUR UNE MEILLEURE RÉCEPTION FM - Le récepteur a une antenne à fil FM intégrée dans la partie arrière de l'appareil. Le fil peut être complètement débrouillé et étendu pour améliorer la réception. AM - L'appareil est équipé d'une antenne directionnelle en ferrite. Tournez l'unité pour améliorer la réception. CASSETTES 1. Allumez l'unité en déplaçant la touche «VOLUME» vers la droite et déplacez le «SÉLECTEUR FONCTIONS» sur «TAPE». 2. Insérez une cassette pré-enregistrée dans le logement cassette de manière à ce que la partie surélevée de la bande magnétique se trouve sur le côté opposé à la touche «EJECT». Pour plus d'informations, voir page Assurez-vous que la cassette est complètement insérée, en appuyant contre le mécanisme de celle-ci. La lecture démarre automatiquement. 4. Réglez la touche «VOLUME» au niveau souhaité. 5. Pour interrompre la lecture de la cassette, appuyez à fond sur la touche «EJECT» sur le côté gauche du logement cassette. La cassette sort de son logement.
39 FONCTIONS GÉNÉRALES CD / MP3 Appuyez pour démarrer la lecture d'un disque CD / MP3. Appuyez à nouveau pour interrompre temporairement la lecture. Appuyez à nouveau pour redémarrer la lecture. Appuyez pour passer à la piste suivante ou pour revenir à la piste précédente. Appuyez et gardez la touche enfoncée pendant la lecture pour atteindre le point du morceau souhaité. Appuyez pour interrompre la lecture. LECTURE 1. Déplacez le «SÉLECTEUR FONCTIONS» sur «CD». 2. Appuyez sur la touche «OPEN / CLOSE» pour ouvrir le volet CD et placez un CD, l'étiquette tournée vers le haut, dans le logement CD. 3. Appuyez à nouveau sur la touche «OPEN / CLOSE» pour fermer le volet CD. 4. La recherche démarre avec la lecture du nombre total des pistes. 5. La lecture automatique du disque commence par la première piste. 6. Réglez le volume au niveau souhaité. 7. Appuyez à nouveau sur la touche «PLAY / PAUSE» pour interrompre temporairement la lecture. 8. Appuyez sur la touche «STOP» pour interrompre la lecture. SÉLECTION DU DOSSIER Appuyez sur la touche «ALBUM +» ou «ALBUM -» sur la télécommande pour sélectionner le dossier. (Cette fonction est active si au moins deux répertoires/fichiers se trouvent à l'intérieur du disque).
Περιεχόμενα / Contents
 Aερόθερμo / Fan Heater PTC-906 Περιεχόμενα / Contents GR... Σελίδες 3-8 EN... Pages 9-11 2 GR Ευχαριστούμε που επιλέξατε μια συσκευή της γκάμας θερμαντικών IZZY. Σημαντικές Οδηγίες Ασφαλείας Τα Μέρη της
Quick Installation Guide
 A Installation 1 F H B E C D G 2 www.trust.com/17528/faq Quick Installation Guide C C D Freewave Wireless Audio Set 17528/ 17529 D Installation Configuration Windows XP 4 5 8 Windows 7/ Vista 6 7 9 10
SPEEDO AQUABEAT. Specially Designed for Aquatic Athletes and Active People
 SPEEDO AQUABEAT TM Specially Designed for Aquatic Athletes and Active People 1 2 Decrease Volume Increase Volume Reset EarphonesUSBJack Power Off / Rewind Power On / Fast Forward Goggle clip LED Status
ΟΔΗΓΙΕΣ ΧΡΗΣΗΣ USE INSTRUCTIONS
 ΟΔΗΓΙΕΣ ΧΡΗΣΗΣ USE INSTRUCTIONS ΤΗΛΕΦΩΝΟ ΜΕ ΑΝΑΓΝΩΡΙΣΗ ΚΛΗΣΗΣ /CORDED PHONE WITH CALLER ID ΜΟΝΤΕΛΟ/MODEL: TM09-448 DC48V Παρακαλούμε διαβάστε προσεκτικά όλες τις οδηγίες χρήσης πριν την χρήση της συσκευής
the total number of electrons passing through the lamp.
 1. A 12 V 36 W lamp is lit to normal brightness using a 12 V car battery of negligible internal resistance. The lamp is switched on for one hour (3600 s). For the time of 1 hour, calculate (i) the energy
Εγκατάσταση λογισμικού και αναβάθμιση συσκευής Device software installation and software upgrade
 Για να ελέγξετε το λογισμικό που έχει τώρα η συσκευή κάντε κλικ Menu > Options > Device > About Device Versions. Στο πιο κάτω παράδειγμα η συσκευή έχει έκδοση λογισμικού 6.0.0.546 με πλατφόρμα 6.6.0.207.
CONFIGURAZIONE DELLA CASELLA DI POSTA ELETTRONICA CERTIFICATA (P.E.C.)
") CONFIGURAZIONE DELLA CASELLA DI POSTA ELETTRONICA CERTIFICATA (P.E.C.) Consigliamo di configurare ed utilizzare la casella di posta elettronica certificata tramite il webmail dedicato fornito dal gestore
CONFIGURAZIONE DELLA CASELLA DI POSTA ELETTRONICA CERTIFICATA (P.E.C.) Consigliamo di configurare ed utilizzare la casella di posta elettronica certificata tramite il webmail dedicato fornito dal gestore
Tipologie installative - Installation types Type d installation - Installationstypen Tipos de instalación - Τυπολογίες εγκατάστασης
 AMPADE MOOCROMATICHE VIMAR DIMMERABII A 0 V~ - VIMAR 0 V~ DIMMABE MOOCHROME AMP AMPE MOOCHROME VIMAR VARIATEUR 0 V~ - DIMMERFÄHIGE MOOCHROMATICHE AMPE VO VIMAR MIT 0 V~ ÁMPARA MOOCROMÁTICA VIMAR REGUABE
!Stato di tensione triassiale!stato di tensione piano!cerchio di Mohr
 !Stato di tensione triassiale!stato di tensione piano!cerchio di Mohr Stato di tensione F A = F / A F Traione pura stato di tensione monoassiale F M A M Traione e torsione stato di tensione piano = F /
ΟΔΗΓΙΕΣ ΧΡΗΣΕΩΣ FM RADIO ΜΕ USB & SD CARD READER MODEL: MPR-033. Διαβαστε τις οδηγίες πρίν χρησιμοποιήστε την μονάδα.
 ΟΔΗΓΙΕΣ ΧΡΗΣΕΩΣ FM RADIO ΜΕ USB & SD CARD READER MODEL: MPR-033 Διαβαστε τις οδηγίες πρίν χρησιμοποιήστε την μονάδα. www.lenco.com 7 8 9 10 11 12 13 14 1 2 3 4 5 6 17 15 16 18 Τοποθεσία κουμπιών ελέγχου
ΚΥΠΡΙΑΚΗ ΕΤΑΙΡΕΙΑ ΠΛΗΡΟΦΟΡΙΚΗΣ CYPRUS COMPUTER SOCIETY ΠΑΓΚΥΠΡΙΟΣ ΜΑΘΗΤΙΚΟΣ ΔΙΑΓΩΝΙΣΜΟΣ ΠΛΗΡΟΦΟΡΙΚΗΣ 6/5/2006
 Οδηγίες: Να απαντηθούν όλες οι ερωτήσεις. Ολοι οι αριθμοί που αναφέρονται σε όλα τα ερωτήματα είναι μικρότεροι το 1000 εκτός αν ορίζεται διαφορετικά στη διατύπωση του προβλήματος. Διάρκεια: 3,5 ώρες Καλή
The Simply Typed Lambda Calculus
 Type Inference Instead of writing type annotations, can we use an algorithm to infer what the type annotations should be? That depends on the type system. For simple type systems the answer is yes, and
La Déduction naturelle
 La Déduction naturelle Pierre Lescanne 14 février 2007 13 : 54 Qu est-ce que la déduction naturelle? En déduction naturelle, on raisonne avec des hypothèses. Qu est-ce que la déduction naturelle? En déduction
ULX Wireless System USER GUIDE SUPPLEMENT RENSEIGNEMENT SUPPLÉMENTAIRES INFORMACION ADICIONAL. M1 ( MHz)
") ULX Wireless System USER GUIDE SUPPLEMENT RENSEIGNEMENT SUPPLÉMENTAIRES INFORMACION ADICIONAL M1 (662 698 MHz) 2003, Shure Incorporated 27B8733A (Rev. 4) Printed in U.S.A. SPECIFICATIONS ULX1 Transmitter
ULX Wireless System USER GUIDE SUPPLEMENT RENSEIGNEMENT SUPPLÉMENTAIRES INFORMACION ADICIONAL M1 (662 698 MHz) 2003, Shure Incorporated 27B8733A (Rev. 4) Printed in U.S.A. SPECIFICATIONS ULX1 Transmitter
Modbus basic setup notes for IO-Link AL1xxx Master Block
 n Modbus has four tables/registers where data is stored along with their associated addresses. We will be using the holding registers from address 40001 to 49999 that are R/W 16 bit/word. Two tables that
BFN3000 ΕΠΙΤΡΑΠΕΖΙΟΣ ΑΝΕΜΙΣΤΗΡΑΣ. Owner s manual. Μετάφραση του πρωτοτύπου των οδηγιών χρήσης
 BFN3000 ΕΠΙΤΡΑΠΕΖΙΟΣ ΑΝΕΜΙΣΤΗΡΑΣ Μετάφραση του πρωτοτύπου των οδηγιών χρήσης Owner s manual www.bormanntools.com GR Οδηγίες ασφαλούς λειτουργίας 1. Τα χαρακτηριστικά της παροχής ηλεκτρικού ρεύματος θα
ΟΔΗΓΙΕΣ ΣΥΝΑΡΜΟΛΟΓΗΣΗΣ/ ASSEMBLY INSTRUCTION ΤΟΜΜΥ ΚΡΕΒΑΤΙ/BED
 ΟΔΗΓΙΕΣ ΣΥΝΑΡΜΟΛΟΓΗΣΗΣ/ ASSEMBLY INSTRUCTION ΤΟΜΜΥ ΚΡΕΒΑΤΙ/BED 1. Παρακαλώ πολύ διαβάστε προσεκτικά τις οδηγίες πριν την συναρμολόγηση/ Please read the instructions carefully. 2. Παρακαλώ πολύ όπως ελέγξτε
2 Composition. Invertible Mappings
 Arkansas Tech University MATH 4033: Elementary Modern Algebra Dr. Marcel B. Finan Composition. Invertible Mappings In this section we discuss two procedures for creating new mappings from old ones, namely,
Strain gauge and rosettes
 Strain gauge and rosettes Introduction A strain gauge is a device which is used to measure strain (deformation) on an object subjected to forces. Strain can be measured using various types of devices classified
OUR PRODUCT RANGE. www.rakson.gr
 ΤΑ ΑΛΛΑ ΕΙ Η ΠΡΟΪΟΝΤΑ ΜΑΣ ΜΕΤΑΣΧΗΜΑΤΙΣΤΕΣ ΚΟΥ ΟΥΝΙΩΝ ΚΟΥ ΟΥΝΙΑ ΜΠΟΥΤΟΝ ΚΟΥ ΟΥΝΙΩΝ ΑΥΤΟΜΑΤΟΙ ΚΛΙΜΑΚΟΣΤΑΣΙΟΥ ΚΛΕΙ ΑΡΙΕΣ ΑΝΙΧΝΕΥΤΕΣ ΚΙΝΗΣΗΣ ΣΥΣΤΗΜΑΤΑ ΕΠΙΚΟΙΝΩΝΙΑΣ Θυροτηλεοράσεις Θυροτηλέφωνα Ενδοεπικοινωνίες
Οδηγίες Αγοράς Ηλεκτρονικού Βιβλίου Instructions for Buying an ebook
 Οδηγίες Αγοράς Ηλεκτρονικού Βιβλίου Instructions for Buying an ebook Βήμα 1: Step 1: Βρείτε το βιβλίο που θα θέλατε να αγοράσετε και πατήστε Add to Cart, για να το προσθέσετε στο καλάθι σας. Αυτόματα θα
ΚΥΠΡΙΑΚΗ ΕΤΑΙΡΕΙΑ ΠΛΗΡΟΦΟΡΙΚΗΣ CYPRUS COMPUTER SOCIETY ΠΑΓΚΥΠΡΙΟΣ ΜΑΘΗΤΙΚΟΣ ΔΙΑΓΩΝΙΣΜΟΣ ΠΛΗΡΟΦΟΡΙΚΗΣ 19/5/2007
 Οδηγίες: Να απαντηθούν όλες οι ερωτήσεις. Αν κάπου κάνετε κάποιες υποθέσεις να αναφερθούν στη σχετική ερώτηση. Όλα τα αρχεία που αναφέρονται στα προβλήματα βρίσκονται στον ίδιο φάκελο με το εκτελέσιμο
The challenges of non-stable predicates
 The challenges of non-stable predicates Consider a non-stable predicate Φ encoding, say, a safety property. We want to determine whether Φ holds for our program. The challenges of non-stable predicates
Capacitors - Capacitance, Charge and Potential Difference
 Capacitors - Capacitance, Charge and Potential Difference Capacitors store electric charge. This ability to store electric charge is known as capacitance. A simple capacitor consists of 2 parallel metal
Homework 8 Model Solution Section
 MATH 004 Homework Solution Homework 8 Model Solution Section 14.5 14.6. 14.5. Use the Chain Rule to find dz where z cosx + 4y), x 5t 4, y 1 t. dz dx + dy y sinx + 4y)0t + 4) sinx + 4y) 1t ) 0t + 4t ) sinx
PortSip Softphone. Ελληνικά Ι English 1/20
 PortSip Softphone Ελληνικά Ι English 1/20 1. Περιεχόμενα 2. Εγκατάσταση σε Smartphone & Tablet (Android ή ios)... 1 3. Εγκατάσταση σε ηλεκτρονικό υπολογιστή (Windows ή Mac).... 5 4. Installation in Smartphone
derivation of the Laplacian from rectangular to spherical coordinates
 derivation of the Laplacian from rectangular to spherical coordinates swapnizzle 03-03- :5:43 We begin by recognizing the familiar conversion from rectangular to spherical coordinates (note that φ is used
Right Rear Door. Let's now finish the door hinge saga with the right rear door
 Right Rear Door Let's now finish the door hinge saga with the right rear door You may have been already guessed my steps, so there is not much to describe in detail. Old upper one file:///c /Documents
CHAPTER 25 SOLVING EQUATIONS BY ITERATIVE METHODS
 CHAPTER 5 SOLVING EQUATIONS BY ITERATIVE METHODS EXERCISE 104 Page 8 1. Find the positive root of the equation x + 3x 5 = 0, correct to 3 significant figures, using the method of bisection. Let f(x) =
Instruction Execution Times
 1 C Execution Times InThisAppendix... Introduction DL330 Execution Times DL330P Execution Times DL340 Execution Times C-2 Execution Times Introduction Data Registers This appendix contains several tables
3.4 SUM AND DIFFERENCE FORMULAS. NOTE: cos(α+β) cos α + cos β cos(α-β) cos α -cos β
 cos α + cos β cos(α-β) cos α -cos β") 3.4 SUM AND DIFFERENCE FORMULAS Page Theorem cos(αβ cos α cos β -sin α cos(α-β cos α cos β sin α NOTE: cos(αβ cos α cos β cos(α-β cos α -cos β Proof of cos(α-β cos α cos β sin α Let s use a unit circle
3.4 SUM AND DIFFERENCE FORMULAS Page Theorem cos(αβ cos α cos β -sin α cos(α-β cos α cos β sin α NOTE: cos(αβ cos α cos β cos(α-β cos α -cos β Proof of cos(α-β cos α cos β sin α Let s use a unit circle
VBA ΣΤΟ WORD. 1. Συχνά, όταν ήθελα να δώσω ένα φυλλάδιο εργασίας με ασκήσεις στους μαθητές έκανα το εξής: Version 25-7-2015 ΗΜΙΤΕΛΗΣ!!!!
 VBA ΣΤΟ WORD Version 25-7-2015 ΗΜΙΤΕΛΗΣ!!!! Μου παρουσιάστηκαν δύο θέματα. 1. Συχνά, όταν ήθελα να δώσω ένα φυλλάδιο εργασίας με ασκήσεις στους μαθητές έκανα το εξής: Εγραφα σε ένα αρχείο του Word τις
digital video baby monior user guide
 digital video baby monior user guide IMPORTANT! KEEP FOR FUTURE REFERENCE, 1911 MC731_1911_Digital Baby Monitor User Guide.indd 1 16/04/2015 11:32 Your Video Baby Monitor should be treated with care. The
(1) Describe the process by which mercury atoms become excited in a fluorescent tube (3)
 Describe the process by which mercury atoms become excited in a fluorescent tube (3)") Q1. (a) A fluorescent tube is filled with mercury vapour at low pressure. In order to emit electromagnetic radiation the mercury atoms must first be excited. (i) What is meant by an excited atom? (1) (ii)
Q1. (a) A fluorescent tube is filled with mercury vapour at low pressure. In order to emit electromagnetic radiation the mercury atoms must first be excited. (i) What is meant by an excited atom? (1) (ii)
Εργαστήριο Ανάπτυξης Εφαρμογών Βάσεων Δεδομένων. Εξάμηνο 7 ο
 Εργαστήριο Ανάπτυξης Εφαρμογών Βάσεων Δεδομένων Εξάμηνο 7 ο Procedures and Functions Stored procedures and functions are named blocks of code that enable you to group and organize a series of SQL and PL/SQL
9.09. # 1. Area inside the oval limaçon r = cos θ. To graph, start with θ = 0 so r = 6. Compute dr
 9.9 #. Area inside the oval limaçon r = + cos. To graph, start with = so r =. Compute d = sin. Interesting points are where d vanishes, or at =,,, etc. For these values of we compute r:,,, and the values
ENGLISH. S-Video. Composite
 CMP-USBVG6 ENGLISH 1.) Hardware Introduction 1. USB 2.0 connector 2. Audio input Left / Right 3. Composite Input 4. S-Video Input VHS Player Camera S-Video DVD Player Multiple devices Set-top Box Game
EE512: Error Control Coding
 EE512: Error Control Coding Solution for Assignment on Finite Fields February 16, 2007 1. (a) Addition and Multiplication tables for GF (5) and GF (7) are shown in Tables 1 and 2. + 0 1 2 3 4 0 0 1 2 3
Stato di tensione triassiale Stato di tensione piano Cerchio di Mohr
 Stato di tensione triassiale Stato di tensione iano Cerchio di Mohr Stato di tensione F A = F / A F Traione ura stato di tensione monoassiale F M A M Traione e torsione stato di tensione iano = F / A =
HOMEWORK 4 = G. In order to plot the stress versus the stretch we define a normalized stretch:
 HOMEWORK 4 Problem a For the fast loading case, we want to derive the relationship between P zz and λ z. We know that the nominal stress is expressed as: P zz = ψ λ z where λ z = λ λ z. Therefore, applying
Οδηγός χρήστη. USB Charger UCH20
 Οδηγός χρήστη USB Charger UCH20 Περιεχόμενα Εισαγωγή... 3 Πληροφορίες για το φορτιστή USB Charger...3 Χρήση του φορτιστή USB...4 Φόρτιση της συσκευής σας... 4 Νομικές πληροφορίες...5 Declaration of Conformity...6
Galatia SIL Keyboard Information
 Galatia SIL Keyboard Information Keyboard ssignments The main purpose of the keyboards is to provide a wide range of keying options, so many characters can be entered in multiple ways. If you are typing
Επιτραπέζιος Η/Υ ASUS M12AD and M52AD Εγχειρίδιο χρήστη
 Επιτραπέζιος Η/Υ ASUS M12AD and M52AD Εγχειρίδιο χρήστη M12AD M52AD GK9559 Πρώτη Έκδοση Ιούλιος 2014 Copyright 2014 ASUSTeK Computer Inc. Διατηρούνται όλα τα δικαιώματα. Απαγορεύεται η αναπαραγωγή οποιουδήποτε
[1] P Q. Fig. 3.1
![[1] P Q. Fig. 3.1](/thumbs/79/80362156.jpg "[1] P Q. Fig. 3.1") 1 (a) Define resistance....... [1] (b) The smallest conductor within a computer processing chip can be represented as a rectangular block that is one atom high, four atoms wide and twenty atoms long. One
1 (a) Define resistance....... [1] (b) The smallest conductor within a computer processing chip can be represented as a rectangular block that is one atom high, four atoms wide and twenty atoms long. One
Advanced Subsidiary Unit 1: Understanding and Written Response
 Write your name here Surname Other names Edexcel GE entre Number andidate Number Greek dvanced Subsidiary Unit 1: Understanding and Written Response Thursday 16 May 2013 Morning Time: 2 hours 45 minutes
e VOLUME f SURROUND g MIC LEVEL h USB i MP3 j MIC
 56 57 58 1 2 3 4 5 6 7 11 10 9 8 a STANDBY ON 2 b PLAY PAUSE u STOP Ç PREV. / NEXT > c SOURCE e VOLUME f SURROUND g MIC LEVEL h USB i MP3 j MIC k d EJECT ç 59 60 a 2 b DISC/USB TUNER TV AUX/DI c ZOOM d
Αποτελέσματα έρευνας σε συνδικαλιστές
 From law to practice-praxis Αποτελέσματα έρευνας σε συνδικαλιστές Το πρόγραμμα συγχρηματοδοτείται από την ΕΕ Συγχρηματοδοτείται από την Ευρωπαϊκή Ένωση Γνωρίζετε τι προβλέπει η Οδηγία 2002/14; Sa che cosa
KH2249. ραδιοφώνου Οδηγία χρήσης I Radio Istruzioni per l uso
 KH2249 ραδιοφώνου Οδηγία χρήσης I Radio Istruzioni per l uso Kompernaß GmbH Burgstrasse 21 D 44867 Bochum Deutschland/Germany www.kompernass.com KH 2249 GR/IT v.1.1 08-2006 Index 1. Υποδείξεις ασφαλείας...
Μοντέλα/Models: MFT-16227, MFT-16228
 Εγχειρίδιο χρήσης για επιτραπέζιο ανεμιστήρα Instructions Manual for table fan Μοντέλα/Models: MFT-16227, MFT-16228 Διαβάστε προσεκτικά τις οδηγίες χρήσης και κρατήστε τις για μελλοντική αναφορά Read carefully
Tipologie installative - Installation types Types d installation - Die einbauanweisungen Tipos de instalación - Τυπολογίες εγκατάστασης
 Types d installation Die einbauanweisungen Tipos de instalación Τυπολογίες εγκατάστασης AMPADE MOOCROMATICHE VIMAR DIMMERABII A 0 V~ MOOCHROME DIMMABE AMP VIMAR 0 V~ AMPE MOOCHROME VIMAR DIMMABE 0 V~ EUCHTE
Solar Laptop Charger with 2.5w/12000mah
 WWW..GR ΕΤΑΙΡΙΑ: ΟΙ. ΦΟΡΤΙΣΤΕΣ ΜΑΣ ΓΙΑ ΟΛΑ ΚΑΙ ΟΛΟΥΣ Solar Laptop Charger with 2.5w/12000mah Specification Battery Type: Lithium-ion polymer battery; Battery capacity: 12000mAh/3.7V 3000mAh lithium polymer
Manuale delle istruzioni Οδηγός Χρήσης
 3-285-370-51(1) Digital Video Camera Recorder Manuale delle istruzioni Οδηγός Χρήσης IT GR DCR-DVD510E/DVD910E Ulteriori informazioni su questo prodotto e risposte alle domande più comuni sono reperibili
UDZ Swirl diffuser. Product facts. Quick-selection. Swirl diffuser UDZ. Product code example:
 UDZ Swirl diffuser Swirl diffuser UDZ, which is intended for installation in a ventilation duct, can be used in premises with a large volume, for example factory premises, storage areas, superstores, halls,
Συστήματα Διαχείρισης Βάσεων Δεδομένων
 ΕΛΛΗΝΙΚΗ ΔΗΜΟΚΡΑΤΙΑ ΠΑΝΕΠΙΣΤΗΜΙΟ ΚΡΗΤΗΣ Συστήματα Διαχείρισης Βάσεων Δεδομένων Φροντιστήριο 9: Transactions - part 1 Δημήτρης Πλεξουσάκης Τμήμα Επιστήμης Υπολογιστών Tutorial on Undo, Redo and Undo/Redo
SFH-41 Fan Heater Αερόθερμο
 SFH-41 Fan Heater Αερόθερμο GB GR INSTRUCTION MANUAL ΒΙΒΛΙΟ ΟΔΗΓΙΩΝ GB ENGLISH... 3 GR EΛΛHNIKA... 7 ENGLISH PLEASE READ THESE INSTRUCTIONS CAREFULLY AND RETAIN FOR FUTURE REFER- ENCE SAFETY WARNINGS When
Section 8.3 Trigonometric Equations
 99 Section 8. Trigonometric Equations Objective 1: Solve Equations Involving One Trigonometric Function. In this section and the next, we will exple how to solving equations involving trigonometric functions.
Potential Dividers. 46 minutes. 46 marks. Page 1 of 11
 Potential Dividers 46 minutes 46 marks Page 1 of 11 Q1. In the circuit shown in the figure below, the battery, of negligible internal resistance, has an emf of 30 V. The pd across the lamp is 6.0 V and
ZLW Series. Single-stage Monoblock Centrifugal Pump ZL PUMP GROUP.,LTD
 ZLW Series Single-stage Monoblock Centrifugal Pump ZL PUMP GROUP.,LTD 1 Application Apply as the transportation of liquids in the fields of air condition, heating, sanitary water, water treatment cooling,
Math 6 SL Probability Distributions Practice Test Mark Scheme
 Math 6 SL Probability Distributions Practice Test Mark Scheme. (a) Note: Award A for vertical line to right of mean, A for shading to right of their vertical line. AA N (b) evidence of recognizing symmetry
Presenter SNP6000. Register your product and get support at Εγχειρίδιο χρήσης
 Register your product and get support at www.philips.com/welcome Presenter SNP6000 EL Εγχειρίδιο χρήσης 1 a b c d e 2 3 4 Federal Communication Commission Interference Statement This equipment has been
ΟΔΗΓΙΕΣ ΕΓΚΑΤΑΣTΑΣΗΣ ΓΙΑ ΠΑΤΩΜΑ WPC INSTALLATION GUIDE FOR WPC DECKING
 1/12 ΟΔΗΓΙΕΣ ΕΓΚΑΤΑΣTΑΣΗΣ ΓΙΑ ΠΑΤΩΜΑ WPC INSTALLATION GUIDE FOR WPC DECKING Ανοίγουμε τρύπες Ø8 x 80mm στο σημείο κατασκευής, με τρυπάνι. To προτεινόμενο πλάτος και μήκος μεταξύ των 2 οπών να είναι 30-35εκ.,
ΑΥΤΟΜΑΤΟΠΟΙΗΣΗ ΜΟΝΑΔΑΣ ΘΡΑΥΣΤΗΡΑ ΜΕ ΧΡΗΣΗ P.L.C. AUTOMATION OF A CRUSHER MODULE USING P.L.C.
 ΤΕΧΝΟΛΟΓΙΚΟ ΕΚΠΑΙΔΕΥΤΙΚΟ ΙΔΡΥΜΑ ΑΝ. ΜΑΚΕΔΟΝΙΑΣ ΚΑΙ ΘΡΑΚΗΣ ΣΧΟΛΗ ΤΕΧΝΟΛΟΓΙΚΩΝ ΕΦΑΡΜΟΓΩΝ ΤΜΗΜΑ ΗΛΕΚΤΡΟΛΟΓΩΝ ΜΗΧΑΝΙΚΩΝ Τ.Ε ΠΤΥΧΙΑΚΗ ΕΡΓΑΣΙΑ ΑΥΤΟΜΑΤΟΠΟΙΗΣΗ ΜΟΝΑΔΑΣ ΘΡΑΥΣΤΗΡΑ ΜΕ ΧΡΗΣΗ P.L.C. AUTOMATION OF A
ΟΔΗΓΙΕΣ ΧΡΗΣΗΣ ΕΠΙΤΡΑΠΕΖΙΟΣ ΑΝΕΜΙΣΤΗΡΑΣ
 ΟΔΗΓΙΕΣ ΧΡΗΣΗΣ ΕΠΙΤΡΑΠΕΖΙΟΣ ΑΝΕΜΙΣΤΗΡΑΣ ΜΟΝΤΕΛΟ: UDF-769 ΣΗΜΕΙΩΣΗ: Παρακαλούμε διαβάστε το εγχειρίδιο χρήσης, πριν χρησιμοποιήσετε τη συσκευή. ΣΗΜΑΝΤΙΚΑ ΜΕΤΡΑ ΠΡΟΣΤΑΣΙΑΣ Όταν χρησιμοποιείτε ηλεκτρικές
ANSWERSHEET (TOPIC = DIFFERENTIAL CALCULUS) COLLECTION #2. h 0 h h 0 h h 0 ( ) g k = g 0 + g 1 + g g 2009 =?
 COLLECTION #2. h 0 h h 0 h h 0 ( ) g k = g 0 + g 1 + g g 2009 =?") Teko Classes IITJEE/AIEEE Maths by SUHAAG SIR, Bhopal, Ph (0755) 3 00 000 www.tekoclasses.com ANSWERSHEET (TOPIC DIFFERENTIAL CALCULUS) COLLECTION # Question Type A.Single Correct Type Q. (A) Sol least
Teko Classes IITJEE/AIEEE Maths by SUHAAG SIR, Bhopal, Ph (0755) 3 00 000 www.tekoclasses.com ANSWERSHEET (TOPIC DIFFERENTIAL CALCULUS) COLLECTION # Question Type A.Single Correct Type Q. (A) Sol least
Bbc7000 ΦΟΡΤΙΣΤΗΣ - ΕΚΚΙΝΗΤΗΣ ΜΠΑΤΑΡΙΑΣ. Art Nr: Owner s manual. Μετάφραση του πρωτοτύπου των οδηγιών χρήσης
 Bbc7000 ΦΟΡΤΙΣΤΗΣ - ΕΚΚΙΝΗΤΗΣ ΜΠΑΤΑΡΙΑΣ Μετάφραση του πρωτοτύπου των οδηγιών χρήσης Art Nr: 022213 Owner s manual Διαβάστε προσεχτικά όλες τις οδηγίες χρήσης και ασφάλειας πριν την λειτουργία του μηχανήματος.
RSDW08 & RDDW08 series
 /,, MODEL SELECTION TABLE INPUT ORDER NO. INPUT VOLTAGE (RANGE) NO LOAD INPUT CURRENT FULL LOAD VOLTAGE CURRENT EFFICIENCY (Typ.) CAPACITOR LOAD (MAX.) RSDW08F-03 344mA 3.3V 2000mA 80% 2000μF RSDW08F-05
Physical DB Design. B-Trees Index files can become quite large for large main files Indices on index files are possible.
 B-Trees Index files can become quite large for large main files Indices on index files are possible 3 rd -level index 2 nd -level index 1 st -level index Main file 1 The 1 st -level index consists of pairs
Kompernaß GmbH Burgstrasse 21. Deutschland/Germany.
 KH 2243 Kompernaß GmbH Burgstrasse 21 D 44867 Bochum Deutschland/Germany www.kompernass.com KH 2243 GR/IT v.1.1 08-2006 Index 1. Υποδείξεις ασφαλείας... 4 2. Περιεχόμενο συσκευασίας... 6 3. Χρήση... 6
DCR-DVD150E/DVD450E/ DVD650E/DVD850E
 4-125-250-31(1) Digital Video Camera Recorder Manuale delle istruzioni Οδηγός Χρήσης IT GR DCR-DVD150E/DVD450E/ DVD650E/DVD850E IT/GR Ulteriori informazioni su questo prodotto e risposte alle domande più
User s Manual / Οδηγίες Χρήσης
 User s Manual / Οδηγίες Χρήσης EUROPEAN STANDARDS Your child s safety depends on you. Proper bed rail usage cannot be assured unless you follow these instructions. DO NOT USE YOUR BED RAIL UNTILL YOU READ
Calculating the propagation delay of coaxial cable
 Your source for quality GNSS Networking Solutions and Design Services! Page 1 of 5 Calculating the propagation delay of coaxial cable The delay of a cable or velocity factor is determined by the dielectric
DESIGN OF MACHINERY SOLUTION MANUAL h in h 4 0.
 DESIGN OF MACHINERY SOLUTION MANUAL -7-1! PROBLEM -7 Statement: Design a double-dwell cam to move a follower from to 25 6, dwell for 12, fall 25 and dwell for the remader The total cycle must take 4 sec
FR IT GR ES PT. Notice d utilisation du radio CD-MP3. Manuale d uso radio CD-MP3. Οδηγίες ράδιο CD-MP3. Manual de instrucciones radio CD-MP3
 Ref. / Cod. / Κωδ. 477106 FR IT GR ES PT Notice d utilisation du radio CD-MP3 Manuale d uso radio CD-MP3 Οδηγίες ράδιο CD-MP3 Manual de instrucciones radio CD-MP3 Manual de instruções radio CD-MP3 MET336
LR Series Metal Alloy Low-Resistance Resistor
 Tel : 881745 Fax : 881749 LR Series Metal Alloy LowResistance Resistor This specification is applicable to lead free, halogen free of RoHS directive for metal alloy lowresistance resistor. The product
Approximation of distance between locations on earth given by latitude and longitude
 Approximation of distance between locations on earth given by latitude and longitude Jan Behrens 2012-12-31 In this paper we shall provide a method to approximate distances between two points on earth
AMENDMENTS XM United in diversity XM. European Parliament Draft opinion Giovanni La Via (PE v01-00)
") European Parliament 2014-2019 Committee on the Environment, Public Health and Food Safety 14.12.2016 2016/2166(DEC) AMENDMENTS 1-11 Giovanni La Via (PE592.294v01-00) Discharge 2015: European Environment
European Parliament 2014-2019 Committee on the Environment, Public Health and Food Safety 14.12.2016 2016/2166(DEC) AMENDMENTS 1-11 Giovanni La Via (PE592.294v01-00) Discharge 2015: European Environment
How to register an account with the Hellenic Community of Sheffield.
 How to register an account with the Hellenic Community of Sheffield. (1) EN: Go to address GR: Πηγαίνετε στη διεύθυνση: http://www.helleniccommunityofsheffield.com (2) EN: At the bottom of the page, click
ΚΥΠΡΙΑΚΗ ΕΤΑΙΡΕΙΑ ΠΛΗΡΟΦΟΡΙΚΗΣ CYPRUS COMPUTER SOCIETY ΠΑΓΚΥΠΡΙΟΣ ΜΑΘΗΤΙΚΟΣ ΔΙΑΓΩΝΙΣΜΟΣ ΠΛΗΡΟΦΟΡΙΚΗΣ 11/3/2006
 ΠΑΓΚΥΠΡΙΟΣ ΜΑΘΗΤΙΚΟΣ ΔΙΑΓΩΝΙΣΜΟΣ ΠΛΗΡΟΦΟΡΙΚΗΣ 11/3/26 Οδηγίες: Να απαντηθούν όλες οι ερωτήσεις. Ολοι οι αριθμοί που αναφέρονται σε όλα τα ερωτήματα μικρότεροι το 1 εκτός αν ορίζεται διαφορετικά στη διατύπωση
Main source: "Discrete-time systems and computer control" by Α. ΣΚΟΔΡΑΣ ΨΗΦΙΑΚΟΣ ΕΛΕΓΧΟΣ ΔΙΑΛΕΞΗ 4 ΔΙΑΦΑΝΕΙΑ 1
 Main source: "Discrete-time systems and computer control" by Α. ΣΚΟΔΡΑΣ ΨΗΦΙΑΚΟΣ ΕΛΕΓΧΟΣ ΔΙΑΛΕΞΗ 4 ΔΙΑΦΑΝΕΙΑ 1 A Brief History of Sampling Research 1915 - Edmund Taylor Whittaker (1873-1956) devised a
AKC Spectrum Analyzer User s Manual.
 AKC-1291 Spectrum Analyzer User s Manual u ano un ao Prohibiting to removal the cover e m Keep the power insert clean RF in/output rating oae o n DC Power nt Restore this instrument 1. Introduction 2.
Magnetic Charging Dock DK48
 Οδηγός χρήστη Magnetic Charging Dock DK48 Περιεχόμενα Εισαγωγή...3 Πληροφορίες για τη μαγνητική βάση φόρτισης...3 Χρήση της μαγνητικής βάσης φόρτισης...4 Επιλογή προσάρτησης για το τηλέφωνό σας...4 Φόρτιση
Phys460.nb Solution for the t-dependent Schrodinger s equation How did we find the solution? (not required)
") Phys460.nb 81 ψ n (t) is still the (same) eigenstate of H But for tdependent H. The answer is NO. 5.5.5. Solution for the tdependent Schrodinger s equation If we assume that at time t 0, the electron starts
Phys460.nb 81 ψ n (t) is still the (same) eigenstate of H But for tdependent H. The answer is NO. 5.5.5. Solution for the tdependent Schrodinger s equation If we assume that at time t 0, the electron starts
Surface Mount Multilayer Chip Capacitors for Commodity Solutions
 Surface Mount Multilayer Chip Capacitors for Commodity Solutions Below tables are test procedures and requirements unless specified in detail datasheet. 1) Visual and mechanical 2) Capacitance 3) Q/DF
UNIVERSITY OF CALIFORNIA. EECS 150 Fall ) You are implementing an 4:1 Multiplexer that has the following specifications:
 You are implementing an 4:1 Multiplexer that has the following specifications:") UNIVERSITY OF CALIFORNIA Department of Electrical Engineering and Computer Sciences EECS 150 Fall 2001 Prof. Subramanian Midterm II 1) You are implementing an 4:1 Multiplexer that has the following specifications:
UNIVERSITY OF CALIFORNIA Department of Electrical Engineering and Computer Sciences EECS 150 Fall 2001 Prof. Subramanian Midterm II 1) You are implementing an 4:1 Multiplexer that has the following specifications:
First Sensor Quad APD Data Sheet Part Description QA TO Order #
 Responsivity (/W) First Sensor Quad PD Data Sheet Features Description pplication Pulsed 16 nm laser detection RoHS 211/65/EU Light source positioning Laser alignment ø mm total active area Segmented in
Econ 2110: Fall 2008 Suggested Solutions to Problem Set 8 questions or comments to Dan Fetter 1
 Eon : Fall 8 Suggested Solutions to Problem Set 8 Email questions or omments to Dan Fetter Problem. Let X be a salar with density f(x, θ) (θx + θ) [ x ] with θ. (a) Find the most powerful level α test
(REV:01) RYOBI 48 Volt Lawn Mower Model No. RY14110 Replacement Parts List
 RYOBI 48 Volt Lawn Mower Model No. RY14110 Replacement Parts List") 9800-86 2-0-0 (REV:0) RYOBI 48 Volt Lawn Mower Model No. RY0 Replacement Parts List RYOBI RY0 48 volt lawn mower 3 38 39 44 39 36 34 36 42 38 39 3 4 37 34 3 43 2 32 0 8 9 2 4 33 8 7 6 3 6 7 22 8 20 3 30
9800-86 2-0-0 (REV:0) RYOBI 48 Volt Lawn Mower Model No. RY0 Replacement Parts List RYOBI RY0 48 volt lawn mower 3 38 39 44 39 36 34 36 42 38 39 3 4 37 34 3 43 2 32 0 8 9 2 4 33 8 7 6 3 6 7 22 8 20 3 30
Section 1: Listening and responding. Presenter: Niki Farfara MGTAV VCE Seminar 7 August 2016
 Section 1: Listening and responding Presenter: Niki Farfara MGTAV VCE Seminar 7 August 2016 Section 1: Listening and responding Section 1: Listening and Responding/ Aκουστική εξέταση Στο πρώτο μέρος της
Η ΕΝΕΡΓΕΙΑΚΗ ΣΗΜΑΝΣΗ ΚΑΙ ERP
 Η ΕΝΕΡΓΕΙΑΚΗ ΣΗΜΑΝΣΗ ΚΑΙ ERP 2 1 ΠΛΑΙΣΙΟ ΓΙΑΤΙ ΕΝΕΡΓΕΙΑΚΗ ΣΗΜΑΝΣΗ ΚΑΙ ErP? Αντιμετωπίζοντας την κλιματική αλλαγή, διασφαλίζοντας την ασφάλεια της παροχής ενέργειας2 και την αύξηση της ανταγωνιστικότητα
Solutions to Exercise Sheet 5
 Solutions to Eercise Sheet 5 jacques@ucsd.edu. Let X and Y be random variables with joint pdf f(, y) = 3y( + y) where and y. Determine each of the following probabilities. Solutions. a. P (X ). b. P (X
Practice Exam 2. Conceptual Questions. 1. State a Basic identity and then verify it. (a) Identity: Solution: One identity is csc(θ) = 1
 Identity: Solution: One identity is csc(θ) = 1") Conceptual Questions. State a Basic identity and then verify it. a) Identity: Solution: One identity is cscθ) = sinθ) Practice Exam b) Verification: Solution: Given the point of intersection x, y) of the
Conceptual Questions. State a Basic identity and then verify it. a) Identity: Solution: One identity is cscθ) = sinθ) Practice Exam b) Verification: Solution: Given the point of intersection x, y) of the
ΑΚΑ ΗΜΙΑ ΕΜΠΟΡΙΚΟΥ ΝΑΥΤΙΚΟΥ ΜΑΚΕ ΟΝΙΑΣ ΣΧΟΛΗ ΜΗΧΑΝΙΚΩΝ ΠΤΥΧΙΑΚΗ ΕΡΓΑΣΙΑ ΘΕΜΑ : ΧΗΜΙΚΑ ΠΡΟΣΘΕΤΑ ΠΟΥ ΠΡΟΟΡΙΖΟΝΤΑΙ ΓΙΑ ΤΟ ΝΕΡΟ ΤΟΥ ΑΤΜΟΛΕΒΗΤΑ
 ΑΚΑ ΗΜΙΑ ΕΜΠΟΡΙΚΟΥ ΝΑΥΤΙΚΟΥ ΜΑΚΕ ΟΝΙΑΣ ΣΧΟΛΗ ΜΗΧΑΝΙΚΩΝ ΠΤΥΧΙΑΚΗ ΕΡΓΑΣΙΑ ΘΕΜΑ : ΧΗΜΙΚΑ ΠΡΟΣΘΕΤΑ ΠΟΥ ΠΡΟΟΡΙΖΟΝΤΑΙ ΓΙΑ ΤΟ ΝΕΡΟ ΤΟΥ ΑΤΜΟΛΕΒΗΤΑ ΣΠΟΥ ΑΣΤΗΣ : ΑΓΟΡΑΣΤΟΣ ΧΡΥΣΟΒΑΛΑΝΤΗΣ ΕΠΙΒΛΕΠΟΥΣΑ ΚΑΘΗΓΗΤΡΙΑ :
Δημιουργία Λογαριασμού Διαχείρισης Business Telephony Create a Management Account for Business Telephony
 Δημιουργία Λογαριασμού Διαχείρισης Business Telephony Create a Management Account for Business Telephony Ελληνικά Ι English 1/7 Δημιουργία Λογαριασμού Διαχείρισης Επιχειρηματικής Τηλεφωνίας μέσω της ιστοσελίδας
(REV:01) RYOBI 48 Volt Lawn Mower Model No. RY14110A Replacement Parts List
 RYOBI 48 Volt Lawn Mower Model No. RY14110A Replacement Parts List") 9000-7 9-- (REV:0) RYOBI 4 Volt Lawn Mower Model No. RY0A Replacement Parts List RYOBI RY0A 4 VOLT LAWN MOWER 3 3 39 44 39 3 34 3 42 3 39 3 4 37 34 3 43 2 0 37 2 33 32 3 9 7 22 30 4 7 3 20 9 3 2 2 27 2
9000-7 9-- (REV:0) RYOBI 4 Volt Lawn Mower Model No. RY0A Replacement Parts List RYOBI RY0A 4 VOLT LAWN MOWER 3 3 39 44 39 3 34 3 42 3 39 3 4 37 34 3 43 2 0 37 2 33 32 3 9 7 22 30 4 7 3 20 9 3 2 2 27 2
1000 VDC 1250 VDC 125 VAC 250 VAC J K 125 VAC, 250 VAC
 Metallized Polyester Film Capacitor Type: ECQE(F) Non-inductive construction using metallized Polyester film with flame retardant epoxy resin coating Features Self-healing property Excellent electrical
department listing department name αχχουντσ ϕανε βαλικτ δδσϕηασδδη σδηφγ ασκϕηλκ τεχηνιχαλ αλαν ϕουν διξ τεχηνιχαλ ϕοην µαριανι
 She selects the option. Jenny starts with the al listing. This has employees listed within She drills down through the employee. The inferred ER sttricture relates this to the redcords in the databasee
Ρύθμιση e-mail σε whitelist
 Ρύθμιση e-mail σε whitelist «Δουλεύω Ηλεκτρονικά, Δουλεύω Γρήγορα και με Ασφάλεια - by e-base.gr» Web : www.e-base.gr E-mail : support@e-base.gr Facebook : Like Twitter : @ebasegr Πολλές φορές αντιμετωπίζετε
ΘΕΡΜΑΣΤΡΑ ΧΑΛΑΖΙΑ 2400W ΟΔΗΓΙΕΣ ΧΡΗΣHΣ. Model No: LX-1502H Ref. No:
 ΘΕΡΜΑΣΤΡΑ ΧΑΛΑΖΙΑ 2400W ΟΔΗΓΙΕΣ ΧΡΗΣHΣ Model No: LX-1502H Ref. No: 891-4144 ΠΡΟΣΟΧΗ! - ΟΔΗΓΙΕΣ ΑΣΦΑΛΕΙΑΣ 1. Αυτή η συσκευή έχει σχεδιαστεί ΜΟΝΟ για οικιακή χρήση. Καμία ευθύνη δεν φέρει ο κατασκευαστής
Επιτραπέζιος Η/Υ K30AM / K30AM-J Εγχειρίδιο χρήστη
 Επιτραπέζιος Η/Υ K30AM / K30AM-J Εγχειρίδιο χρήστη GK9380 Ελληνικα Πρώτη Έκδοση Μάιος 2014 Copyright 2014 ASUSTeK Computer Inc. Διατηρούνται όλα τα δικαιώματα. Απαγορεύεται η αναπαραγωγή οποιουδήποτε τμήματος