MOD Cod REV. 0 del 24/05/2011
|
|
|
- Ποσειδώνιος Λαμέρας
- 7 χρόνια πριν
- Προβολές:
Transcript

1 MOD.2732 Cod REV. 0 del 24/05/2011 SERVIZIO CONSUMATORI NUMERO VERDE De Longhi Appliances Srl Divisione Commerciale Ariete Via San Quirico, Campi Bisenzio FI - Italy info@ariete.net Internet:


2 C D S U B E R F X H T Fig. 4 Fig. 5 A V L P Y Q Fig. 6 Fig. 7 I G M N O Fig. 1 Fig. 8 Fig. 9 Fig. 2 Fig. 3 Fig. 10 Fig. 11
3 A PROPOSITO DI QUESTO MANUALE IT Anche se gli apparecchi sono stati realizzati in conformità con le specifi che Normative europee vigenti e sono pertanto protetti in tutte le parti potenzialmente pericolose, leggete con attenzione queste avvertenze e usate l apparecchio solo per l uso cui è stato destinato per evitare infortuni e danni. Tenete a portata di mano questo libretto per future consultazioni. Qualora vogliate cedere questo apparecchio ad altre persone ricordatevi di includere anche queste istruzioni. Le informazioni riportate in questo manuale sono marcate dai seguenti simboli che indicano: USO PREVISTO Pericolo per i bambini Pericolo dovuto a elettricità Pericolo di danni derivanti da altre cause Attenzione - danni materiali Questo apparecchio dovrà essere destinato solo all uso per il quale è stato espressamente concepito e cioè per l aspirazione delle polveri delle superfi ci domestiche. Ogni altro uso è da considerarsi improprio e quindi pericoloso. Il costruttore non può essere considerato responsabile per eventuali danni derivati da usi impropri, erronei ed irragionevoli. AVVERTENZE DI SICUREZZA LEGGERE ATTENTAMENTE LE ISTRUZIONI PRIMA DELL USO. L apparecchio è destinato solo ad uso domestico e non deve essere adibito ad uso commerciale o industriale. Non si assumono responsabilità per uso errato o per impieghi diversi da quelli previsti dal presente libretto. Si consiglia di conservare gli imballi originali, poiché l assistenza gratuita non è prevista per i guasti causati da imballo non adeguato del prodotto al momento della spedizione ad un Centro di Assistenza autorizzato. L apparecchio è conforme alla Direttiva 2006/95/CE e alla Direttiva EMC 2004/108/CE. PERICOLO PER I BAMBINI Questo apparecchio non deve essere utilizzato da persone (compresi i bambini) con capacità fi siche, sensoriali o mentali ridotte; da persone che manchino di esperienza e conoscenza dell apparecchio, a meno che siano attentamente sorvegliate o ben istruite relativamente all utilizzo dell apparecchio stesso da parte di una persona responsabile della loro sicurezza. Assicurarsi che i bambini non giochino con l apparecchio. Gli elementi dell imballaggio non devono essere lasciati alla portata dei bambini in quanto potenziali fonti di pericolo. Allorché si decida di smaltire come rifi uto questo apparecchio, si raccomanda di renderlo inoperante tagliandone il cavo di alimentazione. Si raccomanda inoltre di rendere innocue quelle parti dell apparecchio suscettibili di costituire un pericolo, specialmente per i bambini che potrebbero servirsi dell apparecchio per i propri giochi. 1
4 IT PERICOLO DOVUTO A ELETTRICITÀ Prima di collegare l apparecchio alla rete di alimentazione controllare che la tensione indicata sulla targhetta posta al di sotto della macchina corrisponda a quella della rete locale. Collegare l apparecchio esclusivamente ad una presa di corrente elettrica alternata. L uso di prolunghe elettriche non autorizzate dal fabbricante dell apparecchio può provocare danni e incidenti. Se il cavo di alimentazione è danneggiato, esso deve essere sostituito dal costruttore o dal suo servizio Assistenza Tecnica o comunque da una persona con qualifi ca similare, in modo da prevenire ogni rischio. Non aspirare mai su superfi ci bagnate: può generarsi un cortocircuito! Non aspirare mai liquidi. Non toccare l apparecchio con mani e piedi bagnati o umidi. Non usare l apparecchio a piedi nudi. Togliere la spina dalla presa prima di ogni intervento di pulizia o di manutenzione. NON IMMERGERE L APPARECCHIO IN ACQUA O ALTRI LIQUIDI. Assicurarsi che il cavo non sia in contatto con superfi ci calde o taglienti. Scollegare il cavo di alimentazione dalla presa di corrente dopo ogni uso. In caso di guasti, difetti o sospetto difetto dopo una caduta, staccare subito la spina dalla presa di corrente. LE RIPARAZIONI POSSONO ESSERE EFFETTUATE ESCLUSIVAMENTE DAI CENTRI DI ASSISTENZA AUTORIZZATI. PERICOLO DI DANNI DERIVANTI DA ALTRE CAUSE Non aspirare cenere calda, pezzi grossi di vetro, calcinacci, oggetti appuntiti o taglienti e liquidi. Per evitare surriscaldamenti pericolosi si raccomanda di svolgere in tutta la sua lunghezza il cavo di alimentazione e di staccare la spina dalla rete di alimentazione elettrica quando l apparecchio non è utilizzato. L apparecchio non deve essere usato senza sacchetto, senza fi ltro motore, oppure qualora il sacchetto o il fi ltro siano rotti o danneggiati. Non lasciare esposto l apparecchio ad agenti atmosferici (pioggia, sole, etc.). Non tenere l apparecchio in prossimità di fonti di calore (es. termosifone) Staccare sempre la spina prima di effettuare la pulizia dell apparecchio o il cambio dei fi ltri. ATTENZIONE - DANNI MATERIALI. Non disinserire mai la spina dalla presa di corrente tirando il cavo di alimentazione. Non mettere mai in funzione l apparecchio difettoso Avviare sempre l apparecchio con il regolatore di potenza nella posizione di minimo. Il prodotto non va alimentato attraverso timer esterni o con impianti separati comandati a distanza. Una volta riposto l apparecchio, assicurarsi che non sia a contatto con superfi ci calde e taglienti. CONSERVARE SEMPRE QUESTE ISTRUZIONI. 2
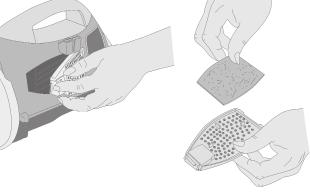
5 DESCRIZIONE DELL APPARECCHIO IT A) Levetta di apertura comparto sacchetto polvere B) Spia sacchetto pieno C) Pulsante riavvolgimento cavo D) Impugnatura per trasporto E) Pulsante accensione On/Off F) Comparto sacchetto polvere G) Sacchetto in carta H) Tubo fl essibile I) Accessorio per fessure con spazzolino L) Tubo telescopico M) Pulsanti di sblocco tubo fl essibile N) Impugnatura O) Controllo aspirazione regolatore di suzione P) Spazzola pavimenti Q) Selettore pavimenti duri/tappeti R) Comparto fi ltro di scarico S) Gancio posteriore attacco tubo telescopico T) Vano per accessorio di aspirazione U) Regolatore potenza di aspirazione V) Gancio inferiore attacco tubo telescopico X) Levetta apertura vano fi ltro Y) Cavo elettrico estraibile ISTRUZIONI PER L USO AL PRIMO UTILIZZO: ASSEMBLAGGIO DELL ASPIRAPOLVERE Inserire il tubo fl essibile nella sede di aspirazione premendolo con cautela fi no al blocco. Per ri-muoverlo è necessario premere contemporaneamente i due pulsanti di sblocco (M) ed estrarlo (FIG. 2). Attenzione! Prima di installare o rimuovere gli accessori, assicurarsi sempre che sia stata disinserita la spina dell aspirapolvere dalla presa. ACCESSORI Tubo telescopico (L) Inserire il tubo telescopico sull impugnatura e installare successivamente l accessorio aspi-ratore per fessure con spazzolino (I). Una volta inserito l accessorio, è possibile estendere il tubo tele-scopico agendo sulla relativa leva a scatto (FIG. 3) fi no alla lunghezza desiderata. Rilasciare la leva per fi ssarne la lunghezza desiderata. Spazzola per pavimenti (P) Adatta alla pulizia sia di zone ampie sia di angoli difficili da raggiungere. Per pulire i tappeti ed i pavimenti duri si consiglia di non utilizzare la spazzola. Per sollevare la spazzola premere la leva interruttore contrassegnata con il simbolo del tappeto. Per una migliore pulizia e conservazione dei pavimenti lisci, come il PVC, il parquet o le mattonelle, è preferibile l uso della spazzola. Per estrarre la spazzola occorre premere la leva selettore (Q) contrassegnata con il simbolo pavimenti lisci. Aspiratore per fessure con spazzolino (I) Adatto per aspirare fra le pieghe dei tessuti, giunture, angoli o nicchie che non possono essere raggiunte dall aspiratore per pavimenti. Questo accessorio può essere applicato anche direttamente sull impugnatura (N). 3
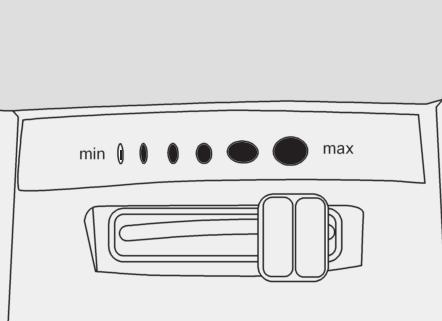
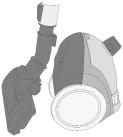
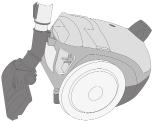
6 IT UTILIZZO DELL APPARECCHIO Attenzione! Prima di usare l aspirapolvere, rimuovere gli oggetti grandi o appuntiti dal pavimento, per evitare ogni possibile danno all aspirapolvere stesso.prima di utilizzare questo apparecchio innanzitutto estrarre il cavo in tutta la sua lunghezza e inserire la spina. Per accendere l apparecchio premere l interruttore On/Off posto sull aspirapolvere (FIG. 4). Importante In qualche caso all accensione è possibile udire un sibilo: non si tratta di un difetto e con l utilizzo si esaurirà. CONTROLLO FLUSSO DI ASPIRAZIONE La fessura dell aria secondaria (O) si trova sull impugnatura e viene utilizzata per regolare la forza d aspirazione (FIG. 5) Maggiore è l apertura della fessura, minore è la forza d aspirazione e viceversa. Per aprire la fessura, è necessario sospingere la leva verso il basso, per chiuderla verso l alto. La regolazione della fessura è funzionale al tipo di superfi cie: Forza minima per tende e materiali delicati. Forza media per cuscini, materassi, tappeti. Forza massima per pavimenti in mattonelle, legno o altro materiale robusto molto sporco. CONTROLLO POTENZA MOTORE E possibile regolare la potenza di aspirazione utilizzando il cursore scorrevole (FIG. 11). Raccomandiamo di utilizzare una potenza minima per i materiali delicati. Selezionare, quindi, una potenza media per materassi, mobili rivestiti in tappezzeria e tappeti. Selezionare una potenza massima per pavimenti in mattonelle, legno o altro materiale robusto. Attenzione! Spegnere immediatamente l aspirapolvere qualora i bocchettoni dell aria, le spazzole o il tubo telescopico risultino occlusi. Prima di accendere nuovamente l aspirapolvere rimuovere ciò che ha causato l occlusione. DOPO AVER USATO L ASPIRAPOLVERE Terminato l utilizzo spegnere l apparecchio premendo il pulsante accensione (E), disinserire la spina dalla presa e riavvolgere il cavo tenendo premuto il pulsante di avvolgimento (C) sull apparecchio. Il cavo si avvolgerà all interno del contenitore. E possibile inoltre utilizzare il gancio posteriore (S) e inferiore (V) per poter inserire il tubo telescoppico e riporre l apparecchio insieme al suo accessorio in maniera da occupare il minimo spazio possibile (FIG. 6). Attenzione! Durante il riavvolgimento, direzionare il cavo con una mano in modo da evitare di ferirsi e fare molta attenzione in presenza di bambini o animali domestici. PULIZIA E MANUTENZIONE Attenzione! Prima di effettuare qualsiasi operazione di pulizia e manutenzione, spegnere l apparecchio e scollegare la spina di alimentazione dalla presa di corrente. SOSTITUZIONE DEL SACCHETTO PER LA POLVERE Quando la spia sacchetto pieno (B) diventa rossa, il sacchetto ha bisogno di essere cambiato. Sollevare il comparto sacchetto spingendo verso l alto l apposito alloggiamento sacchetti(fig. 7). Estrarre il supporto sacchetto (FIG. 8), prestando attenzione a non forzarlo, una volta estratto il supporto, fare scivolare la parte di cartone rigida del sacchetto nelle apposite guide e gettarlo nel bidone della spazzatura. 4
7 IT Mettere un nuovo sacchetto facendolo scivolare con la parte di cartone rigida nelle apposite guide, riporre il supporto nella sede interna. Chiudere il coperchio del comparto polvere. PULIZIA/SOSTITUZIONE DEL FILTRO PRE-MOTORE Il fi ltro pre-motore dovrebbe essere pulito regolarmente e sostituito ogni 6, 9 mesi a seconda dell uso. Rimuovere il supporto del sacchetto (FIG. 8). Rimuovere il fi ltro (FIG.9) e scuoterlo con vigore per pulirlo. Se è molto sporco, lavarlo con acqua tiepida saponata, risciacquarlo bene e farlo asciugare naturalmente. Importante NON farlo asciugare artifi cialmente. Per le sostituzioni fi ltri, contattare un Centro Assistenza. Reinserire il fi ltro nella sua sede assicurandosi che la superfi cie ruvida del fi ltro sia visibile. Infi ne, ricollocare il sacchetto per la polvere e assicurarsi che il comparto fi ltro sia ben a posto prima dell uso. PULIZIA/SOSTITUZIONE DEL FILTRO DI USCITA Il fi ltro di uscita dovrebbe essere pulito regolarmente e sostituito ogni 6, 9 mesi, a seconda dell uso. Rimuovere il coperchio del filtro di scarico agendo sull apposita levetta (FIG. 10). Estrarre il fi ltro sollevandolo e agitarlo vigorosamente per pulirlo. Se il fi ltro è molto sporco lavarlo con acqua tiepida saponata e farlo asciugare naturalmente. Importante NON farlo asciugare artifi cialmente. Per le sostituzioni fi ltri, contattare un Centro Assistenza. Rimettere il fi ltro nella sua sede e chiudere lo sportellino, assicurandosi prima che la superfi cie ruvida del fi ltro sia visibile e che il portafi ltro sia ben a posto prima dell uso. RICERCA GUASTI BLOCCO TERMICO L aspirapolvere è dotato di un dispositivo di blocco termico che lo protegge in caso di surriscaldamento del motore. Se l aspirapolvere si arresta improvvisamente da solo, seguire questa procedura: Spegnere l aspirapolvere e disinserire la spina dalla presa. Cercare l origine del surriscaldamento (tubo di aspirazione intasato, fi ltro sporco, ecc..) Pulire il tubo, svuotare il contenitore della polvere e pulire i filtri se necessario. Attendere per circa minuti affi nché il motore si raffreddi. Dopo minuti, inserire la spina nella presa e accendere l aspirapolvere.l aspirapolvere ora dovrebbe funzionare. Se non funziona ancora, attendere per altri 20 minuti e poi provare di nuovo. Se continua a non funzionare, contattare un Centro Assistenza. 5
8 EN ABOUT THIS MANUAL Even if appliances are made in conformity with specifi c European standards currently in force and therefore, with all potentially hazardous parts protected, you must read these warnings with care and use the appliance only as originally intended by the manufacturer, in order to prevent damage or accidents. Keep this booklet handy for future reference. If you wish to give this appliance to other people, remember to provide them with these instructions. The information in this manual is marked with the following symbols, which mean: Hazard for children. Electrical hazard INTENDED USE Risk of damage from other causes. Important material damage. This appliance has been designed for use in the home only and therefore, it must not be considered as suitable for industrial or professional use. Any other use of the appliance not envisaged by the manufacturer will free this latter of any liability for damage of any kind, arising from improper use of the appliance. Improper use will also render any form of warranty null and void. SAFETY WARNINGS READ THESE INSTRUCTIONS CAREFULLY BEFORE USE. This appliance is for home use only and must not be used for business or industrial purposes. The manufacturer cannot accept any liability for incorrect use or for uses other than as stated in this handbook. We recommend that you keep the original packaging, as free after-sales assistance is not envisaged for problems caused by unsuitable packaging when sending the appliance to an authorised Assistance Centre. The appliance conforms to Directive 2006/95/EC and to Directive EMC 2004/108/EC. HAZARD FOR CHILDREN This appliance must not be used by people (including children) with reduced physical, sensory or mental capabilities, or by people with no experience or familiarity with the appliance itself, unless suitably supervised or well instructed as to appliance use by a person responsible for their safety. Do not allow children to play with the appliance. Packaging must not be left within reach of children as it is a potential source of danger. If you should decide to dispose of this appliance, we recommend that you make it inoperative by cutting the power cord. It is also advisable to make safe those parts of the appliance that might represent a hazard, especially to children, who may try to use the appliance as a plaything. 6
9 EN ELECTRICAL HAZARD Before connecting the appliance to the mains power, make sure that the voltage on the plate underneath the appliance is the same as the mains voltage in the premises. Only connect the appliance to an AC power socket. The use of extension leads not recommended by the manufacturer may cause damage or accidents. If the power cord is damaged, it must be replaced either by the manufacturer or by a Technical Assistance Centre or similarly qualified person, so as to prevent any risk. Never place energised parts in contact with water: danger of short circuits! Never use to clean up liquids. Never touch the appliance with wet hands or feet. Never use the appliance with bare feet. Unplug the appliance from the mains power before carrying out any cleaning or maintenance. NEVER PLACE THE APPLIANCE IN WATER OR OTHER LIQUIDS. Make sure that the power cord is not in contact with hot or sharp surfaces. Unplug the power cord after every use. In case of breakdowns, failures or suspected faults after a fall or being dropped, unplug the appliance from the mains immediately. Never use a faulty appliance. REPAIRS MAY ONLY BE CARRIED OUT BY AN AUTHORISED ASSISTANCE CENTRE. RISK OF DAMAGE DUE TO OTHER CAUSES Do not use to clean up hot ash, large pieces of glass, plaster or cement, sharp or pointed objects or liquids To avoid dangerous overheating, we recommend unwinding the whole length of the power cord and to unplug the appliance when it is not in use. The appliance must not be used without a bag or motor fi lter, or if the bag or fi lter are damaged or broken. Do not leave the appliance exposed to the elements (rain, sunlight, etc.). Do not store the appliance close to sources of heat (e.g. radiator). Always unplug the appliance before cleaning it or changing the filters. IMPORTANT MATERIAL DAMAGE Never unplug the appliance by pulling on the power cord. Never use the appliance if faulty. Always start the appliance with the power set to minimum. Never use external timers or separate, remote controlled devices to power the appliance. When putting away the appliance, make sure that it is not in contact with hot or sharp surfaces. PLEASE KEEP THESE INSTRUCTIONS IN A SAFE PLACE. 7
10 EN DESCRIPTION OF THE APPLIANCE A) Lever to open the dust bag compartment B) Bag full indicator C) Cord rewind button D) Carry handle E) On/Off button F) Dust bag compartment G) Paper bag H) Flexible hose I) Crevice nozzle with brush L) Telescopic tube M) Hose release buttons N) Handgrip O) Suction adjustment control P) Floor brush Q) Hard fl oor/carpet selector R) Exhaust fi lter compartment S) Rear hook for telescopic tube attachment T) Compartment for cleaner attachments U) Suction power adjustment V) Bottom hook for telescopic tube attachment X) Filter compartment opening lever Y) Pull-out power cord INSTRUCTIONS FOR USE USING FOR THE FIRST TIME: VACCUM CLEANER ASSEMBLY Insert the hose into the suction inlet, pressing it gently until it clicks into place. To remove the hose, press both release buttons (M) at the same time and simply pull it out (FIG. 2). Important note! Before fi tting or removing attachments, always make sure that the vacuum cleaner is unplugged from the mains power. ATTACHMENTSI Telescopic tube (L) Insert the telescopic tube into the handgrip and then fi t the crevice nozzle with brush (I). Once an attachment is fi tted, it is possible to extend the tube using the lever (FIG. 3) to the required length. Release the lever to fasten the tube at the required length. Floor brush (P) This is good for large areas and also for those corners that are diffi cult to reach. When cleaning carpets, rugs and hard fl ooring, it is advisable not to use the brush. To raise the brush, press the selector marked with the carpet symbol. For better cleaning and care of smooth fl ooring, such as PVC, parquet or tiles, it is better to use the brush. To extract the brush, press the selector (Q) marked with the smooth fl oor symbol. Crevice nozzle with brush (I) Use to clean between the folds of fabric, joints, corners or hard-to-access areas that cannot be reached with the fl oor attachment. This attachment can also be fi tted directly to the handgrip (N). 8
11 USING THE APPLIANCE EN Important note! Before using the vacuum cleaner, remove any large or sharp objects from the fl oor to avoid causing damage to the appliance. Before use, wind out the cord for its whole length and plug in the appliance. To switch on the appliance, press the On/Off switch on the cleaner (FIG. 4). Important In some cases, it is possible for a whistling sound to be heard when the appliance is switched on: this is not a fault and it will disappear with use. SUCTION FLOW CONTROL The secondary air opening (O) is on the handgrip and it is used to adjust suction strength (FIG. 5). The larger the opening, the less the suction power and vice versa. To open the suction opening, push the lever downwards and upwards to close it. The opening should be adjusted according to surface type: Minimum power for curtains and delicate materials. Medium power for cushions, mattresses and carpets. Maximum power for tiled or wooden fl ooring or other hardy materials with a good deal of dirt. MOTOR POWER CONTROL It is possible to adjust the suction power using the slider (FIG. 11). We recommend using minimum power for delicate materials. Select the medium setting for mattresses, upholstered furniture and carpets or rugs. Select the maximum power setting for tiled or wooden fl ooring or other hardy materials with a good deal of dirt. Important note! Switch off the vacuum cleaner immediately if the air openings, brushes or telescopic tube become clogged or blocked. Remove the blockage before switching on the vacuum cleaner again. AFTER USING THE VACUUM CLEANERT After use, switch off the appliance by holding down the On/Off button (E); unplug the appliance and rewind the power cord by holding down the cord rewind button (C) on the appliance. The cord will be rewound inside the container. It is possible to use the rear (S) and bottom (V) hooks to insert the telescopic tube and store the appliance together with its attachment so as to take up as little room as possible (FIG. 6). Important note! While rewinding the cord, guide it with one hand to as not to hurt yourself and take great care if there are children or pets in the vicinity. CLEANING AND MAINTENANCE Important note! Before carrying out any cleaning or maintenance operation, switch off and unplug the appliance from the mains DUST BAG REPLACEMENT When the bag full indicator (B) turns red, the bag needs changing. Lift out the bag compartment, pushing the bag housing upwards (FIG. 7). Take out the bag support (FIG. 8), taking care not to force it and once the support is out, slide the stiff cardboard part of the bag into out of the guides and throw away the bag. Fit a new bag, sliding the stiff card into the guides, then place the support inside the housing. Close the lid of the compartment. 9
12 EN PRE-MOTOR FILTER CLEANING/REPLACEMENT The pre-motor fi lter needs to be cleaned regularly and replaced every 6-9 months, according to use. Remove the bag support (FIG. 8). Remove the fi lter (FIG.9) and shake it vigorously to clean it. If it is very dirty, wash it with lukewarm soapy water; rinse it well and leave to dry naturally. Important DO NOT dry the fi lter using artifi cial means. To replace the fi lter, contact your Assistance Centre. Refi t the fi lter in its housing, making sure that the rough surface of the fi lter is visible. Then refi t the dust bag and make sure that the fi lter compartment is in place before use. EXHAUST FILTER CLEANING/REPLACEMENT The outlet fi lter needs to be cleaned regularly and replaced every 6-9 months, according to use. Remove the cover of the exhaust fi lter, using the lever (FIG. 10). Lift out the fi lter and shake it vigorously to clean it. If the fi lter is very dirty, wash it with lukewarm soapy water; rinse it well and leave to dry naturally. Important DO NOT dry the fi lter using artifi cial means. To replace the fi lter, contact your Assistance Centre Refi t the fi lter in its housing, making sure that the rough surface of the fi lter is visible and that the fi lter holder is in place correctly before using. TROUBLESHOOTING THERMAL CUT OUT The vacuum cleaner is equipped with a thermal cut-out device to protect it if the motor should overheat. If the vacuum cleaner should suddenly stop on its own, proceed as follows: Switch off and unplug the vacuum cleaner. Look for the cause of the overheating (suction tube clogged, dirty fi lter, etc.). Clean the tube, empty the dust container and clean the fi lters if necessary. Wait about minutes to give the motor time to cool down. After minutes, plug the appliance into the mains power and switch it on. The vacuum cleaner should work now. If it continues not to work, wait a further 20 minutes and then try again. If the appliance still does not work, contact your nearest Assistance Centre. 10
13 A PROPOS DE CE MANUEL FR Bien que si les appareils aient été réalisés conformément aux Normes spécifi ques européennes en vigueur et que tous leurs composants potentiellement dangereux soient par conséquent protégés, il est indispensable de lire attentivement ces instructions et d utiliser l appareil exclusivement pour l usage auquel il a été destiné afi n d éviter tout accident et dommage. Gardez cette notice à portée de la main pour toute future consultation. Si vous décidez de céder cet appareil à d autres personnes, n oubliez pas d inclure aussi ces instructions. Les informations reportées dans ce manuel sont accompagnées des symboles suivants, qui indiquent: Danger pour les enfants Danger dû à la présence d électricité Danger de dommages dérivant d autres causes Attention dommages matériaux USAGE PREVU Cet appareil a été conçu exclusivement pour un usage privé et tout usage industriel ou professionnel sera donc considéré inapproprié. Toute autre utilisation de la machine n est pas prévue par le Fabriquant qui n assume aucune responsabilité face aux éventuels dommages, de quelque nature que ce soit, dérivant d un usage impropre de la machine. L usage impropre détermine en outre l annulation de toute forme de garantie. PRESCRIPTIONS DE SECURITE LIRE ATTENTIVEMENT LES INSTRUCTIONS AVANT L EMPLOI Cet appareil est réservé exclusivement à un usage domestique et il ne doit pas être destiné à des usages commerciaux ou industriels. Nous n assumons aucune responsabilité face à un usage erroné ou à des emplois différents de ceux prévus dans ce manuel. Nous conseillons de conserver les emballages originaux car l assistance gratuite n est pas prévue pour les dommages provoqués par un emballage non approprié du produit au moment de son envoi au centre de service après-vente autorisé. Cet appareil est conforme à la Directive 2006/95/CE et à la Directive EMC 2004/108/CE. DANGER POUR LES ENFANTS Cet appareil ne doit pas être utilisé par des personnes (y compris les enfants) présentant des capacités physiques, sensorielles ou mentales réduites; par des personnes manquant d expérience et de connaissance du produit, à moins qu elles ne soient attentivement surveillées et correctement instruites sur l utilisation de l appareil de la part d une personne responsable de leur sécurité. Vérifi ez que les enfants ne jouent pas avec l appareil. Les éléments de l emballage ne doivent pas être laissés à la portée des enfants car ils représentent une source potentielle de danger. Si vous décidez de vous débarrassez de cet appareil, il est recommandé de le rendre inutilisable en coupant le cordon d alimentation électrique. Il est recommandé d autre part d exclure les parties pouvant représenter un danger, spécialement pour les enfants qui pourraient de servir de l appareil pour leurs jeux. 11
14 FR DANGER DU A LA PRESENCE D ELECTRICITE Avant de brancher l appareil au réseau d alimentation électrique, contrôler que le voltage indiqué sur la plaquette située sous la machine corresponde à celui du réseau local. Brancher l appareil uniquement à une prise de courant électrique alterné. L usage de rallonges électriques non autorisées par le fabriquant de l appareil peut provoquer des dommages et des accidents. Si le cordon électrique est endommagé, il doit être remplacé par le constructeur ou par le service après-vente ou, dans tous les cas, par une personne qualifi ée, de façon à prévenir tout risque de danger. Ne jamais mettre les parties sous tension électrique en contact avec de l eau car cela peut provoquer des courts-circuits! Ne jamais aspirer de liquides. Ne pas toucher l appareil avec les mains et les pieds mouillés ou humides.. Ne pas utiliser l appareil avec les pieds nus. Débrancher la fi che de la prise de courant avant toute intervention de nettoyage ou d entretien de la machine. NE PAS PLONGER L APPAREIL SOUS L EAU OU AUTRES LIQUIDES. Vérifi er que le cordon ne soit pas en contact avec les surfaces chaudes ou coupantes. Débrancher le cordon d alimentation de la prise de courant à la fi n de chaque utilisation. En cas de pannes de fonctionnement, de défauts ou de suspect de dommages après une chute, débrancher immédiatement la fi che de la prise de courant. Ne jamais mettre en marche un appareil défectueux. LES REPARATIONS DOIVENT ETRE EFFECTUEES EXCLUSIVEMENT PAR LES CEN- TRES DE SERVICE APRES-VENTE AUTORISES. DANGER DE DOMMAGES DERIVANT D AUTRES CAUSES Ne pas aspirer la cendre chaude, les gros morceaux de verre, les débris, les objets pointus ou coupants ni les liquides. Pour éviter la surchauffe dangereuse de l appareil, il est recommandé de dérouler le cordon sur toute sa longueur et de débrancher la fi che de la prise de courant quand l appareil n est pas utilisé. L appareil ne doit pas être utilisé sans sac, sans fi ltre moteur ou si le sac ou le fi ltre sont cassés ou endommagés. Ne pas exposer l appareil aux agents atmosphériques (pluie, soleil, etc.). Ne jamais laisser l appareil près des sources de chaleur (ex. radiateurs) Débrancher toujours la fi che avant de nettoyer l appareil ou de remplacer les fi ltres. ATTENTION DOMMAGES MATERIAUX Ne jamais débrancher la fi che de la prise de courant en tirant sur le cordon d alimentation. Ne jamais mettre en marche l appareil s il est défectueux Faire toujours démarrer l appareil avec le régulateur de puissance sur la position de minimum. Le produit ne doit jamais être alimenté à travers des minuteries externes ou avec des installations séparées et commandées à distance. Au moment du rangement de l appareil, vérifi er qu il ne soit pas en contact avec des surfaces chaudes ou coupantes. CONSERVER TOUJOURS CES INSTRUCTIONS. 12
15 DESCRIPTION DE L APPAREIL FR A) Levier d ouverture logement sac à poussière B) Voyant lumineux de trop plein du sac à poussière C) Poussoir d enroulement du cordon D) Manche pour transport E) Poussoir marche-arrêt On/Off F) Logement sac à poussière G) Sac en papier H) Tube fl exible I) Accessoire pour fi ssures avec goupillon L) Tube télescopique M) Poussoirs de déblocage du tube fl exible N) Manche O) Contrôle aspiration régulateur d aspiration P) Brosse sols Q) Sélecteur sols durs/tapis R) Logement fi ltre d évacuation S) Crochet arrière prise tube télescopique T) Logement pour accessoire d aspiration U) Régulateur puissance d aspiration V) Crochet inférieur prise tube télescopique X) Levier ouverture logement fi ltre Y) Cordon électrique amovible MODE D EMPLOI PREMIERE UTILISATION: ASSEMBLAGE DE L ASPIRATEUR Introduire le tube fl exible dans le logement d aspiration en le poussant jusqu à ce qu il se bloque. Pour le retirer, il est nécessaire d appuyer simultanément sur les deux poussoirs de déblocage (M) et de l extraire (FIG. 2). Attention! Avant d installer ou de retirer les accessoires, vérifi er toujours que la fi che de l aspirateur soit débranchée de la prise de courant. ACCESSOIRES Tube télescopique (L) Assembler le tube télescopique sur le manche puis installer l accessoire aspirateur pour fi ssures avec goupillon (I). Après avoir assemblé l accessoire, il est possible de rallonger le tube télescopique en agissant sur le levier à déclic (FIG. 3) jusqu à la longueur désirée. Relâcher le levier pour fi xer la longueur désirée. Brosse pour sols (P) Indiquée pour le nettoyage des zones vastes ainsi que des angles diffi ciles à atteindre. Pour nettoyer les tapis et les sols durs, il est conseillé de ne pas utiliser la brosse. Pour soulever la brosse, appuyer sur le levier interrupteur portant le symbole du tapis. Pour un meilleur nettoyage et une meilleure conservation des sols lisses, tels que le PVC, le parquet ou le carrelage, il est préférable d utiliser la brosse. Pour extraire la brosse, il faut appuyer sur le levier sélecteur (Q) portant le symbole des sols lisses. Aspirateur pour fissures avec goupillon (I) Indiqué pour aspirer entre les plis des tissus et dans les angles ou dans les niches qui peuvent être atteintes par l aspirateur pour sols. Cet accessoire peut être appliqué aussi directement sur le manche (N). 13
16 FR UTILISATION DE L APPAREIL Attention! Avant d utiliser l aspirateur, enlever tous les objets grands ou pointus présents sur le sol pour éviter d endommager l aspirateur. Avant d utiliser cet appareil, extraire avant tout le cordon sur toute sa longueur et brancher la fi che dans la prise de courant. Pour mettre l appareil en marche, appuyer sur l interrupteur On/Off situé sur l aspirateur (FIG. 4). Important Il est possible, dans certains cas, d entendre un siffl ement au moment de la mise en marche de l appareil: il ne s agit pas d un défaut et ce phénomène disparaîtra dans le temps en utilisant l aspirateur. CONTROLE DU FLUX D ASPIRATION La fi ssure de l air secondaire (O) se trouve sur le manche et elle sert à régler la force d aspiration (FIG. 5). Plus elle est ouverte et plus la force d aspiration est réduite et vice versa. Pour ouvrir la fi ssure, il est nécessaire de pousser le levier vers le bas, alors que pour la fermer, il faut le pousser vers le haut. Le réglage de la fi ssure dépend du type de surface à aspirer: Force minimum pour rideaux et matériaux délicats. Force moyenne pour coussins, matelas et tapis. Force maximum pour sols en carrelage, en bois ou autre matériau robuste et très sale. CONTROLE DE LA PUISSANCE DU MOTEUR Il est possible de régler la puissance d aspiration en utilisant le curseur coulissant (FIG. 11). Nous conseillons d utiliser une puissance minimum pour les matériaux délicats, une moyenne pour les matelas, les meubles revêtus de tapisserie et les tapis et une puissance maximum pour sols en carrelage, en bois ou autre matériau robuste.. Attention! Eteindre immédiatement l aspirateur si les bouches d aération de l air, les brosses ou le tube télescopique sont obstrués. Avant de rallumer l appareil, éliminer la cause de l obstruction. APRES AVOIR UTILISE L ASPIRATEUR Une fois l utilisation terminée, éteindre l appareil en appuyant sur le poussoir de marche-arrêt (E), débrancher la fi che de la prise de courant et enrouler le cordon en appuyant sur le poussoir d enroulement (C). Le cordon s enroule à l intérieur du logement. Il est possible en outre d utiliser le crochet arrière (S) et inférieur (V) pour introduire le tube télescopique et ranger l appareil avec son accessoire de façon à occuper le moins de place possible (FIG. 6). Attention! Pendant l enroulement du cordon, accompagner le cordon d une main pour éviter de se blesser et faire très attention en présence d enfants ou d animaux domestiques. NETTOYAGE ET ENTRETIEN Attention! Avant toute opération de nettoyage et d entretien, éteindre l appareil et débrancher la fi che d alimentation de la prise de courant. REMPLACEMENT DU SAC A POUSSIERE Quand le voyant lumineux de trop plein (B) devient rouge, le sac à poussière doit être remplacé. Soulever le compartiment contenant le sac en poussant vers le haut le logement du sac à poussière (FIG. 7). Extraire le support du sac (FIG. 8), en faisant attention à ne pas trop forcer, puis faire glisser la partie en carton rigide le long des glissières pour jeter le sac. 14
17 FR Mettre un sac neuf en faisant glisser sa partie en carton rigide dans les glissières, puis remettre le support dans son siège interne. Refermer le couvercle du compartiment à poussière. NETTOYAGE/SUBSTITUTION DU FILTRE PRE-MOTEUR Le fi ltre pré-moteur devrait être nettoyé régulièrement et remplacé tous les 6/9 mois selon l emploi de l aspirateur. Retirer le support du sac à poussière (FIG. 8). Retirer le fi ltre (FIG. 9) et le secouer énergiquement pour le nettoyer. S il est très sale, le laver avec de l eau tiède savonneuse, le rincer correctement et le laisser sécher naturellement Important NE PAS essuyer le fi ltre artifi ciellement. Pour la substitution des fi ltres, contacter un Centre de Service après-vente. Remettre le fi ltre à sa place en s assurant que la surface rugueuse du fi ltre soit visible. Enfi n, remettre le sac à poussière dans son logement et vérifi er que le fi ltre soit bien en place avant d utiliser l appareil. NETTOYAGE/SUBSTITUTION DU FILTRE D EVACUATION DE L AIR Le fi ltre d évacuation de l air devrait être nettoyé régulièrement et remplacé tous les 6/9 mois, selon l emploi de l aspirateur. Retirer le couvercle du filtre d évacuation en agissant sur le levier (FIG. 10). Extraire le fi ltre en le soulevant et l agiter énergiquement pour le nettoyer. Si le fi ltre est très sale, le laver avec de l eau tiède et savonneuse puis el faire sécher naturellement. Important NE PAS essuyer le fi ltre artifi ciellement. Pour la substitution des fi ltres, contacter un Centre de Service après-vente. Remettre le fi ltre à sa place et refermer le portillon, en vérifi ant que la surface rugueuse du fi ltre soit visible et que le porte-fi ltre soit positionné correctement avant d utiliser l appareil. RECHERCHE DES PANNES DE FONCTIONNEMENT BLOCAGE THERMIQUE L aspirateur est muni d un dispositif de blocage thermique qui le protège en cas de surchauffe du moteur. Si l aspirateur s arrête subitement tout seul, suivre la procédure suivante: Eteindre l aspirateur et débrancher la fi che de la prise de courant. Chercher l origine de la surchauffe (tube d aspiration obstrué, fi ltre sale, etc.) Nettoyer le tube, vider le compartiment à poussière et nettoyer les filtres si nécessaire. Attendre environ minutes que le moteur refroidisse. Après minutes, brancher la fi che dans la prise de courant et allumer l aspirateur. L aspirateur devrait alors fonctionner. S il ne fonctionne pas encore, attendre 20 minutes puis essayer à nouveau. S il ne fonctionne toujours pas, contacter un Centre de Service après-vente. 15
18 DE ZU DIESER ANLEITUNG Obwohl dieses Gerät in Konformität mit einschlägigen europäischen Normen realisiert wurde und daher alle potentiell gefährlichen Teile geschützt sind, sollten diese Hinweise aufmerksam gelesen werden. Um Unfälle und Schäden zu vermeiden, darf das Gerät nur zu dem Zweck verwendet werden,für den es bestimmt ist. Halten Sie diese Anleitung griffbereit, um es bei Bedarf nachschlagen zu können. Sollten Sie dieses Gerät an Dritte weitergeben, vergessen Sie nicht, auch diese Anleitung beizufügen. Die in dieser Anleitung enthaltenen Informationen sind mit Symbolen markiert, die folgende Bedeutung haben: Gefahr für Kinder Gefahr durch elektrischen Strom Gefahr von Schäden durch andere Ursachen Achtung, Sachschäden BESTIMMUNGSGEMÄSSE VERWENDUNG Dieses Gerät ist ausschließlich für den privaten Gebrauch konzipiert und ist daher für industrielle oder professionelle Zwecke nicht geeignet. Jede andere Art der Verwendung ist vom Hersteller nicht vorgesehen, der daher keinerlei Haftung für Schäden jeglicher Art übernimmt, die durch unsachgemäßen Einsatz des Geräts zustande kommen. Unsachgemäße Verwendung führt außerdem zum Verfall jeder Art von Garantieleistung. SICHERHEITSHINWEISE LESEN SIE BITTE AUFMERKSAM DIESE ANLEITUNG, BEVOR SIE DAS GERÄT BENUTZEN. Das Gerät ist ausschließlich der den häuslichen Gebrauch bestimmt und darf nicht zu kommerziellen oder industriellen Zwecken verwendet werden Für falsche Verwendung oder von dem in dieser Anleitung beschriebenen abweichenden Einsatz wird keinerlei Haftung geleistet. Es empfi ehlt sich, die Originalverpackung aufzubewahren, denn für Schäden, die durch unsachgemäße Verpackung beim Versand des Produkts an eine zugelassene Kundendienststelle zustande kommen, kein kostenloser Kundendienst geleistet wird. Dieses Gerät ist konform mit der Richtlinie 2006/95/EG und mit der EMV-Richtlinie 2004/108/EG. GEFAHR FÜR KINDER Dieses Gerät darf nicht von Personen (einschließlich Kindern) benutzt werden, die nicht im vollen Besitz ihrer körperlichen, sensoriellen oder geistigen Fähigkeiten sind oder denen es an Erfahrung und Kenntnis des Geräts mangelt, sofern sie nicht sorgfältig überwacht oder in die Verwendung des Geräts durch eine Person eingewiesen werden, die für ihre Sicherheit verantwortlich ist. Sicher stellen, dass Kinder nicht mit diesem Gerät spielen. Die Verpackungselemente dürfen nicht in Reichweite von Kindern gelassen werden, da sie eine mögliche Gefahrenquelle darstellen. Wenn das Gerät als Abfall entsorgt werden soll, muss es durch Abschneiden des Versorgungskabels betriebsunfähig gemacht werden. Außerdem sollten die Teile des Geräts unschädlich gemacht werden, die eine Gefahr darstellen könnten, speziell wenn Kinder damit spielen. 16
19 DE GEFAHR DURCH ELEKTRISCHEN STROM Bevor das Gerät an das Stromnetz angeschlossen wird, muss überprüft werden, dass die auf dem Typenschild angegebene Spannung mit der des lokalen Stromnetzes übereinstimmt. Das Gerät ausschließlich an eine Wechselstromsteckdose anschließen. Die Verwendung von Verlängerungskabeln, die nicht vom Hersteller des Geräts zugelassen sind, kann zu Schäden und Unfällen führen. Wenn das Versorgungskabel beschädigt ist, muss es vom Hersteller oder dessen Kundendienst bzw. durch ein Person mit vergleichbarer Qualifi kation ausgetauscht werden, um jedem Risiko aus dem Weg zu gehen. Nicht auf nassen Flächen saugen: es besteht die Gefahr eines Kurzschlusses! Keinesfalls Flüssigkeiten aufsaugen. Berühren Sie das Gerät nicht, wenn Sie nasse Hände oder Füße haben. Betreiben Sie das Gerät nicht barfuß. Ziehen Sie vor Reinigungs- oder Instandhaltungsarbeiten immer den Stecker aus der Steckdose. DAS GERÄT KEINESFALLS IN WASSER ODER SONSTIGE FLÜSSIGKEITEN TAUCHEN. Sicherstellen, dass das Gerät nicht mit heißen oder scharfkantigen Flächen in Berührung kommt. Den Stecker nach jedem Gebrauch aus der Steckdose ziehen. Ein defektes Gerät darf nicht in Betrieb gesetzt werden. REPARATUREN DÜRFEN AUSSCHLIESSLICH VON DEN ZUGELASSENEN KUNDEDIENSTSTELLEN AUSGEFÜHRT WERDEN. GEFAHR VON SCHÄDEN DURCH ANDERE URSACHEN Keine heiße Asche, größere Glasscherben, Schutt, spitze oder scharfkantige Gegenstände oder Flüssigkeiten aufsaugen. Um gefährliche Überhitzungen zu vermeiden, sollte das Kabel in seiner gesamten Länge ausgerollt und der Stecker aus der Steckdose gezogen werden, wenn das Gerät nicht gebraucht wird. Das Gerät darf nicht ohne bzw. mit gerissenem oder beschädigtem Staubbeutel oder Motorfi lter betrieben werden. Das Gerät darf keinen Wettereinfl üssen ausgesetzt werden (Regen, Sonne usw. ). Stellen Sie das Gerät nicht in die Nähe von Hitzequellen (z.b. Heizkörper). Ziehen Sie immer den Stecker aus der Steckdose, bevor Sie das Gerät reinigen oder die Filter wechseln. WARNUNG VOR VERBRENNUNGEN. Den Stecker keinesfalls am Kabel aus der Steckdose ziehen. Setzen Sie das Gerät nicht in Betrieb, wenn es defekt ist Beim Einschalten des Geräts muss der Leistungsregler immer auf Minimum stehen. Das Gerät darf nicht über externe Timer oder ferngesteuerte Anlagen gespeist werden. Nach dem Wegräumen des Geräts muss sicher gestellt werden, dass es nicht mit heißen oder scharfkantigen Flächen in Berührung kommt. BEWAHREN SIE DIESE ANLEITUNG AUF. 17
20 DE BESCHREIBUNG DES GERÄTS A) Hebel zum Öffnen des Staubbeutelfachs B) Kontrolllampe für vollen Staubbeutel C) Kabel- Aufrolltaste D) Traggriff E) Ein-/Ausschalttaste F) Staubbeutelfach G) Papierbeutel H) Schlauch I) Schlitzdüse mit Bürste L) Teleskoprohr M) Taste zum Ausrasten des Schlauchs N) Griff O) Saugstärkenregler P) Fußbodenbürste Q) Umschalter glatte Böden/Teppiche R) Fach Ausgangsfi lter S) Rückseitiger Haken für Teleskoprohr T) Fach für Saugaufsätze U) Saugleistungsregler V) Unterseitiger Haken für Teleskoprohr X) Hebel zum Öffnen des Filterfachs Y) Ausziehbares Stromkabel BETRIEBSANLEITUNG ERSTMALIGE VERWENDUNG: ZUSAMMENBAU DES STAUBSAUGERS Die Gummimanschette in die Saugöffnung einführen und vorsichtig drücken, bis sie eingerastet ist. Zum Lösen der Manschette müssen die beiden Entriegelungstasten gleichzeitig gedrückt und die Manschette (M) herausgezogen werden (ABB. 2). Achtung! Bevor Zubehörteile angebracht oder entfernt werden, immer sicher stellen, dass der Stecker des Staubsaugers aus der Steckdose gezogen wurde. ZUBEHÖR Teleskoprohr (L) Das Teleskoprohr in den Griff einstecken und dann die Schlitzdüse mit Bürste (I) anbringen. Nachdem das Zubehörteil angebracht wurde, kann nach Drücken der entsprechenden Rasttaste das Teleskoprohr (ABB: 3) auf die gewünschte Länge ausgezogen werden. Die Rasttaste loslassen, wenn die gewünschte Länge erreicht ist. Fußbodenbürste (P) Eignet sich für die Reinigung sowohl größerer Flächen als auch schwer zu erreichender Ecken Zur Reinigung von Teppichen und glatten Böden ist von der Verwendung der Bürste abzuraten. Zum Einfahren der Bürste, den mit dem Symbol eines Teppichs gekennzeichneten Schalter betätigen. Um eine bessere Reinigung und Instandhaltung glatter Böden wie PVC, Parkett oder Fliesen zu erzielen, empfi ehlt sich die Verwendung der Bürste. Zum Ausrasten der Bürste, den mit dem Symbol für glatte Böden gekennzeichneten Schalter (Q) betätigen. Schlitzdüse mit Bürste (I) Eignet sich für das Saugen in Gewebefalten, Verbindungsstellen, Ecken oder Nischen, die mit der Fußbodenbürste nicht erreichbar sind. Dieses Zubehörteil kann auch direkt am Griff (N) angebracht werden. 18
21 VERWENDUNG DES GERÄTS DE Achtung! Bevor Sie mit dem Saugen beginnen, beseitigen Sie größere oder spitze Gegenstände, um Schäden am Staubsauger zu vermeiden Vor der Verwendung des Geräts muss zunächst das Kabel in seiner gesamten Länge ausgerollt und der Stecker in die Steckdose gesteckt werden. Zum Einschalten des Geräts ist der Ein-/Ausschalter am Staubsauger zu betätigen (ABB. 4). Wichtig In manchen Fällen ist beim Einschalten ein Zischen zu hören: das ist keine Funktionsstörung und gibt sich bei der Verwendung von selbst. EINSTELLUNG DER SAUGSTÄRKE Der Sekundär-Luftschlitz (O) am Griff dient zur Regelung der Saugleistung (ABB. 5) Je weiter dieser Schlitz geöffnet wird, desto geringer wird die Saugleistung und umgekehrt. Zum Öffnen des Schlitzes muss der zugehörige Hebel nach unten, zum Schließen nach oben gedrückt werden. Die Einstellung dieses Schlitzes ist von der Art der abzusaugenden Oberfl äche abhängig: Minimale Saugleistung bei Gardinen und anderen, empfi ndlichen Materialien. Mittlere Saugleistung bei Kissen, Matratzen, Teppichen. Maximale Saugleistung bei Fliesen- und Holzböden oder bei anderen robusten, stark verschmutzten Materialien. EINSTELLUNG DER MOTORLEISTUNG Die Saugstärke kann anhand des Schiebers (ABB. 11) eingestellt werden. Es empfi ehlt sich, bei empfi ndlichem Material eine niedrige Saugstärke einzustellen. Für Matratzen, Polstermöbel und Teppiche empfi ehlt sich eine mittlere Saugstärke. Maximale Saugleistung bei Fliesen- und Holzböden oder bei anderen robusten, stark verschmutzten Materialien einstellen. Achtung! Schalten Sie den Staubsauger sofort aus, wenn die Luftstutzen, die Bürste oder das Teleskoprohr verstopft ist. Bevor der Staubsauger wieder eingeschaltet wird, muss der Gegenstand beseitigt werden, der das Verstopfen bewirkt hat. NACH DEM GEBRAUCH DES STAUBSAUGERS Wenn der Staubsauger nicht mehr gebraucht wird, schalten Sie ihn durch Betätigen des Pedalschalters (E) ab, ziehen Sie den Stecker aus der Dose und rollen Sie das Kabel auf, indem Sie das Pedal (C) am Gerät gedrückt halten. Das Kabel wird dadurch im Inneren des Gehäuses aufgerollt. Darüber hinaus können der rückseitige (S) und der unterseitige Haken zum Verstauen des Teleskoprohrs und zum Wegräumen des Zubehörteils verwendet werden, um so wenig Platz wie möglich in Anspruch zu nehmen (ABB. 6). Achtung! Begleiten Sie das Kabel während des Aufrollens mit einer Hand, um Verletzungen zu vermeiden, und achten Sie besonders auf in der Nähe befi ndliche Kinder oder Haustiere. REINIGUNG UND INSTANDHALTUNG Achtung! Begleiten Sie das Kabel während des Aufrollens mit einer Hand, um Verletzungen zu vermeiden, und achten Sie besonders auf in der Nähe befi ndliche Kinder oder Haustiere. AUSTAUSCH DES STAUBBEUTELS Wenn die Kontrolllampe (B) rot leuchtet muss der Staubbeutel gewechselt werden. Dazu das Beutelfach herausheben und die Beutelaufnahme nach oben drücken (ABB. 7). Den Beutel herausnehmen (ABB. 8), wobei darauf geachtet werden muss, dass er nicht zerrissen wird. Dazu den starren Kartonteil durch die Führungen schieben und den Beutel dann in den Müll werfen. 19
22 DE Den starren Kartonteil des neuen Beutels in die Führungen einschieben und dann den Behälter wieder in seine Aufnahme zurück drücken. Den Deckel des Staubbeutelfachs schließen. REINIGUNG/AUSTAUSCH DES VORFILTERS DES MOTORS Der Vorfi lter des Motors sollte in regelmäßigen Abständen gereinigt und je nach Häufi gkeit des Gebrauchs alle 6 bis 9 Monate gewechselt werden. Die Halterung des Beutels entfernen (ABB. 8). Den Filter (ABB. 9) herausnehmen und kräftig schütteln, um ihn zu reinigen. Wenn der Filter stark verschmutzt ist, kann er mit lauwarmem Seifenwasser gesäubert werden. Dann gründlich nachspülen und an der Luft trocknen lassen. Wichtig NICHT künstlich trocknen. Zum Austausch der Filter setzen Sie sich mit einem Kundendienstzentrum in Verbindung. Den Filter wieder in seine Aufnahme einsetzen und dabei darauf achten, dass die raue Seite des Filters sichtbar ist. Abschließend den Staubbeutel wieder einsetzen und vor dem Gebrauch sicher stellen, dass der Filter richtig angebracht wurde. REINIGUNG/AUSTAUSCH DES AUSGANGSFILTERS Der Ausgangsfi lter sollte in regelmäßigen Abständen gereinigt und je nach Häufi gkeit des Gebrauchs alle 6 bis 9 Monate gewechselt werden. Den Deckel des Ausgangsfilters durch Betätigen des zugehörigen Hebels entfernen (ABB. 10). Den Filter herausnehmen und kräftig schütteln, um ihn zu reinigen. Wenn der Filter stark verschmutzt ist, kann er mit lauwarmem Seifenwasser gesäubert werden. Dann an der Luft trocknen lassen. Wichtig NICHT künstlich trocknen. Zum Austausch der Filter setzen Sie sich mit einem Kundendienstzentrum in Verbindung. Den Filter wieder in seine Aufnahme einsetzen und dabei darauf achten, dass die raue Seite des Filters sichtbar ist. Vor Gebrauch sicher stellen, dass der Filterhalter wieder richtig angebracht wurde. FEHLERSUCHE THERMOSCHUTZSCHALTER Dieser Staubsauger ist mit einem Thermoschalter ausgestattet, der den Motor vor Überhitzung schützt. Wenn der Staubsauger sich plötzlich von selbst abschaltet, gehen Sie wie folgt vor: Den Staubsauger abschalten und den Stecker aus der Steckdose ziehen. Die Ursache des Heißlaufens feststellen (verstopfter Saugschlauch, verschmutzter Filter usw. ) Falls notwendig, den Saugschlauch reinigen, den Staubbehälter entleeren und die Filter säubern. Etwa Minuten abwarten, bis der Motor sich wieder abgekühlt hat. 20
Tipologie installative - Installation types Type d installation - Installationstypen Tipos de instalación - Τυπολογίες εγκατάστασης
 AMPADE MOOCROMATICHE VIMAR DIMMERABII A 0 V~ - VIMAR 0 V~ DIMMABE MOOCHROME AMP AMPE MOOCHROME VIMAR VARIATEUR 0 V~ - DIMMERFÄHIGE MOOCHROMATICHE AMPE VO VIMAR MIT 0 V~ ÁMPARA MOOCROMÁTICA VIMAR REGUABE
Περιεχόμενα / Contents
 Aερόθερμo / Fan Heater PTC-906 Περιεχόμενα / Contents GR... Σελίδες 3-8 EN... Pages 9-11 2 GR Ευχαριστούμε που επιλέξατε μια συσκευή της γκάμας θερμαντικών IZZY. Σημαντικές Οδηγίες Ασφαλείας Τα Μέρη της
Tipologie installative - Installation types Types d installation - Die einbauanweisungen Tipos de instalación - Τυπολογίες εγκατάστασης
 Types d installation Die einbauanweisungen Tipos de instalación Τυπολογίες εγκατάστασης AMPADE MOOCROMATICHE VIMAR DIMMERABII A 0 V~ MOOCHROME DIMMABE AMP VIMAR 0 V~ AMPE MOOCHROME VIMAR DIMMABE 0 V~ EUCHTE
La Déduction naturelle
 La Déduction naturelle Pierre Lescanne 14 février 2007 13 : 54 Qu est-ce que la déduction naturelle? En déduction naturelle, on raisonne avec des hypothèses. Qu est-ce que la déduction naturelle? En déduction
BFN3000 ΕΠΙΤΡΑΠΕΖΙΟΣ ΑΝΕΜΙΣΤΗΡΑΣ. Owner s manual. Μετάφραση του πρωτοτύπου των οδηγιών χρήσης
 BFN3000 ΕΠΙΤΡΑΠΕΖΙΟΣ ΑΝΕΜΙΣΤΗΡΑΣ Μετάφραση του πρωτοτύπου των οδηγιών χρήσης Owner s manual www.bormanntools.com GR Οδηγίες ασφαλούς λειτουργίας 1. Τα χαρακτηριστικά της παροχής ηλεκτρικού ρεύματος θα
English PDFsharp is a.net library for creating and processing PDF documents 'on the fly'. The library is completely written in C# and based
 English PDFsharp is a.net library for creating and processing PDF documents 'on the fly'. The library is completely written in C# and based exclusively on safe, managed code. PDFsharp offers two powerful
IMETEC ECO EXTREME COMPACT
 MI001524 Istruzioni per l uso Operating instructions Mode d emploi Instrucciones para el uso Instruções para o uso Οδηγίες χρήσης IT pagina 1 EN page 9 FR page 17 ES página 25 PT página 33 EL σελίδα 41
User s Manual / Οδηγίες Χρήσης
 User s Manual / Οδηγίες Χρήσης EUROPEAN STANDARDS Your child s safety depends on you. Proper bed rail usage cannot be assured unless you follow these instructions. DO NOT USE YOUR BED RAIL UNTILL YOU READ
INSTRUCTIONS MANUAL ΕΓΧΕΙΡΙΔΙΟ ΛΕΙΤΟΥΡΓΙΑΣ
 Model/Μοντέλο: WKH-1132 INSTRUCTIONS MANUAL ΕΓΧΕΙΡΙΔΙΟ ΛΕΙΤΟΥΡΓΙΑΣ ENGLISH General Safety Instructions Before commissioning this kettle, please read the instruction manual carefully. Please keep the instruction
MARQUE: CALOR REFERENCE: CF 3610CO SO CURLS CODIC:
 MARQUE: CALOR REFERENCE: CF 3610CO SO CURLS CODIC: 4083105 FR EN DE NL IT ES PT EL TR NO SV DA FI AR SO CURLS FA Lire attentivement le mode d emploi ainsi que les consignes de sécurité FR avant toute utilisation.
Istruzioni per l uso Οδηγίες χρήσης RASOIO DEPILATORE. IT pagina 1 ΕΛ σελίδα 12
 Istruzioni per l uso Οδηγίες χρήσης RASOIO DEPILATORE IT pagina 1 ΕΛ σελίδα 12 [A] [B1] [B2] [B3] 4 [E] 1 2 1 3 2 5 [C1] [C2] [D1] 3 4 7 6 [D2] [D3] 5 6 8 9 10 Type E1101 IPX5 IN: 3V Battery Battery Ni-MH
Instruction Execution Times
 1 C Execution Times InThisAppendix... Introduction DL330 Execution Times DL330P Execution Times DL340 Execution Times C-2 Execution Times Introduction Data Registers This appendix contains several tables
Montage - Raccordement Implantation EURO-RELAIS MINI & BOX. Mini & Box
 Montage - Raccordement Implantation EURO-RELAIS MINI & BOX 3 Fiche technique EURO-RELAIS MINI & BOX DESCRIPTIF La borne Euro-Relais MINI est en polyester armé haute résistance totalement neutre à la corrosion
4K HDMI Splitter 1x4. User s Guide / Bedienungsanleitung / Εγχειρίδιο Χρήστη
 4K HDMI Splitter 1x4 User s Guide / Bedienungsanleitung / Εγχειρίδιο Χρήστη INTRODUCTION The EDISION 4K HDMI Splitter 1x4 uses a single HDMI input source, to distribute it to 4 HDMI outputs. The splitter
Right Rear Door. Let's now finish the door hinge saga with the right rear door
 Right Rear Door Let's now finish the door hinge saga with the right rear door You may have been already guessed my steps, so there is not much to describe in detail. Old upper one file:///c /Documents
(Type B) Το προϊόν αυτό δεν είναι κατάλληλο για σκοπούς πρωτογενούς θέρμανσης. ADM AEE
 Το προϊόν αυτό δεν είναι κατάλληλο για σκοπούς πρωτογενούς θέρμανσης. ADM AEE") (Type B) Το προϊόν αυτό δεν είναι κατάλληλο για σκοπούς πρωτογενούς θέρμανσης. ADM AEE 2310 85 30 61 80 00 18 Mklg 01. Rwnc A]SQ,ovb / D OPERATlON FUELING WARNING: uture storage of your heater. Use o NEVE
(Type B) Το προϊόν αυτό δεν είναι κατάλληλο για σκοπούς πρωτογενούς θέρμανσης. ADM AEE 2310 85 30 61 80 00 18 Mklg 01. Rwnc A]SQ,ovb / D OPERATlON FUELING WARNING: uture storage of your heater. Use o NEVE
!Stato di tensione triassiale!stato di tensione piano!cerchio di Mohr
 !Stato di tensione triassiale!stato di tensione piano!cerchio di Mohr Stato di tensione F A = F / A F Traione pura stato di tensione monoassiale F M A M Traione e torsione stato di tensione piano = F /
APPLICAZIONE APPLICATION APPLICATION. Sublime Colours 2,5L (10-12m2/L) Madreperla 2,5L (27m2)
 Madreperla 2,5L (27m2)") MADREPERLA 2,5L Μοντέρνα διακόσμηση με περλε αποχρώσεις, μπορεί να εφαρμοστεί με απλό ρολό, παλετινα και το φινίρισμα το δίνει η εύκαμπτη πλαστική σπάτουλα ή με ψεκασμό (με χρήση πιστολίου). Η τεχνοτροπία
MADREPERLA 2,5L Μοντέρνα διακόσμηση με περλε αποχρώσεις, μπορεί να εφαρμοστεί με απλό ρολό, παλετινα και το φινίρισμα το δίνει η εύκαμπτη πλαστική σπάτουλα ή με ψεκασμό (με χρήση πιστολίου). Η τεχνοτροπία
Capacitors - Capacitance, Charge and Potential Difference
 Capacitors - Capacitance, Charge and Potential Difference Capacitors store electric charge. This ability to store electric charge is known as capacitance. A simple capacitor consists of 2 parallel metal
VC1225E. Vacuum cleaner Ηλεκτρική σκούπα Прахосмукачка GB GR BG INSTRUCTION MANUAL ΒΙΒΛΙΟ ΟΔΗΓΙΩΝ ИНСТРУКЦИИ ЗА ЕКСПЛОАТАЦИЯ
 VC1225E Vacuum cleaner Ηλεκτρική σκούπα Прахосмукачка GB GR BG INSTRUCTION MANUAL ΒΙΒΛΙΟ ΟΔΗΓΙΩΝ ИНСТРУКЦИИ ЗА ЕКСПЛОАТАЦИЯ GB ENGLISH... 3 GR EΛΛHNIKA... 12 BG БЪЛГАРСКИ... 39 ENGLISH Read this manual
Stato di tensione triassiale Stato di tensione piano Cerchio di Mohr
 Stato di tensione triassiale Stato di tensione iano Cerchio di Mohr Stato di tensione F A = F / A F Traione ura stato di tensione monoassiale F M A M Traione e torsione stato di tensione iano = F / A =
Strain gauge and rosettes
 Strain gauge and rosettes Introduction A strain gauge is a device which is used to measure strain (deformation) on an object subjected to forces. Strain can be measured using various types of devices classified
CHAPTER 25 SOLVING EQUATIONS BY ITERATIVE METHODS
 CHAPTER 5 SOLVING EQUATIONS BY ITERATIVE METHODS EXERCISE 104 Page 8 1. Find the positive root of the equation x + 3x 5 = 0, correct to 3 significant figures, using the method of bisection. Let f(x) =
Επιτραπέζιος Η/Υ K30AM / K30AM-J Εγχειρίδιο χρήστη
 Επιτραπέζιος Η/Υ K30AM / K30AM-J Εγχειρίδιο χρήστη GK9380 Ελληνικα Πρώτη Έκδοση Μάιος 2014 Copyright 2014 ASUSTeK Computer Inc. Διατηρούνται όλα τα δικαιώματα. Απαγορεύεται η αναπαραγωγή οποιουδήποτε τμήματος
Οδηγίες Αγοράς Ηλεκτρονικού Βιβλίου Instructions for Buying an ebook
 Οδηγίες Αγοράς Ηλεκτρονικού Βιβλίου Instructions for Buying an ebook Βήμα 1: Step 1: Βρείτε το βιβλίο που θα θέλατε να αγοράσετε και πατήστε Add to Cart, για να το προσθέσετε στο καλάθι σας. Αυτόματα θα
3.4 SUM AND DIFFERENCE FORMULAS. NOTE: cos(α+β) cos α + cos β cos(α-β) cos α -cos β
 cos α + cos β cos(α-β) cos α -cos β") 3.4 SUM AND DIFFERENCE FORMULAS Page Theorem cos(αβ cos α cos β -sin α cos(α-β cos α cos β sin α NOTE: cos(αβ cos α cos β cos(α-β cos α -cos β Proof of cos(α-β cos α cos β sin α Let s use a unit circle
3.4 SUM AND DIFFERENCE FORMULAS Page Theorem cos(αβ cos α cos β -sin α cos(α-β cos α cos β sin α NOTE: cos(αβ cos α cos β cos(α-β cos α -cos β Proof of cos(α-β cos α cos β sin α Let s use a unit circle
Stucco Natural / Stucco Mítiko. Στόκος με βάση τον ασβέστη.
 Stucco Natural / Stucco Mítiko Στόκος με βάση τον ασβέστη. 5Kg Stucco Mítiko + 480ml Esencia 05 Stuco Natural / Stucco Mítiko Στόκος, για εσωτερική χρήση που χαρίζει ένα πολυτελές παλαιωμένο αποτέλεσμα,
Επιτραπέζιος Η/Υ ASUS M12AD and M52AD Εγχειρίδιο χρήστη
 Επιτραπέζιος Η/Υ ASUS M12AD and M52AD Εγχειρίδιο χρήστη M12AD M52AD GK9559 Πρώτη Έκδοση Ιούλιος 2014 Copyright 2014 ASUSTeK Computer Inc. Διατηρούνται όλα τα δικαιώματα. Απαγορεύεται η αναπαραγωγή οποιουδήποτε
Code Breaker. TEACHER s NOTES
 TEACHER s NOTES Time: 50 minutes Learning Outcomes: To relate the genetic code to the assembly of proteins To summarize factors that lead to different types of mutations To distinguish among positive,
Door Hinge replacement (Rear Left Door)
") Door Hinge replacement (Rear Left Door) We will continue the previous article by replacing the hinges of the rear left hand side door. I will use again the same procedure and means I employed during the
Door Hinge replacement (Rear Left Door) We will continue the previous article by replacing the hinges of the rear left hand side door. I will use again the same procedure and means I employed during the
Βασιλική Σαμπάνη 2013. Μαντάμ Μποβαρύ: Αναπαραστάσεις φύλου και σεξουαλικότητας
 Βασιλική Σαμπάνη 2013 Μαντάμ Μποβαρύ: Αναπαραστάσεις φύλου και σεξουαλικότητας 200 Διαγλωσσικές Θεωρήσεις μεταφρασεολογικός η-τόμος Interlingual Perspectives translation e-volume ΜΑΝΤΑΜ ΜΠΟΒΑΡΥ: ΑΝΑΠΑΡΑΣΤΑΣΕΙΣ
ΟΔΗΓΙΕΣ ΣΥΝΑΡΜΟΛΟΓΗΣΗΣ/ ASSEMBLY INSTRUCTION ΤΟΜΜΥ ΚΡΕΒΑΤΙ/BED
 ΟΔΗΓΙΕΣ ΣΥΝΑΡΜΟΛΟΓΗΣΗΣ/ ASSEMBLY INSTRUCTION ΤΟΜΜΥ ΚΡΕΒΑΤΙ/BED 1. Παρακαλώ πολύ διαβάστε προσεκτικά τις οδηγίες πριν την συναρμολόγηση/ Please read the instructions carefully. 2. Παρακαλώ πολύ όπως ελέγξτε
ΟΔΗΓΙΕΣ ΧΡΗΣΗΣ USE INSTRUCTIONS
 ΟΔΗΓΙΕΣ ΧΡΗΣΗΣ USE INSTRUCTIONS ΤΗΛΕΦΩΝΟ ΜΕ ΑΝΑΓΝΩΡΙΣΗ ΚΛΗΣΗΣ /CORDED PHONE WITH CALLER ID ΜΟΝΤΕΛΟ/MODEL: TM09-448 DC48V Παρακαλούμε διαβάστε προσεκτικά όλες τις οδηγίες χρήσης πριν την χρήση της συσκευής
ΕΦΑΡΜΟΓΗ APPLICAZIONE APPLICATION APPLICATION. Sublime Colours 2,5L (10-12m2/L) Esencia 25 ml 100 ml. Damasco 2,5L (6-8m2/L)
 Esencia 25 ml 100 ml. Damasco 2,5L (6-8m2/L)") DAMASCO Διακριτική και κομψή διακόσμηση εμπνευσμένη από τα πολυτελή υφάσματα της αρχαιότητας, για όσους επιθυμούν οι τοίχοι να είναι επενδεδυμένοι με ένα προϊόν που παρέχει μεταξένια και βελούδινη αντανάκλαση.
DAMASCO Διακριτική και κομψή διακόσμηση εμπνευσμένη από τα πολυτελή υφάσματα της αρχαιότητας, για όσους επιθυμούν οι τοίχοι να είναι επενδεδυμένοι με ένα προϊόν που παρέχει μεταξένια και βελούδινη αντανάκλαση.
Downloaded from www.vandenborre.be. RO54xx serie www.rowenta.com 760280-13/12
 RO54xx serie www.rowenta.com 760280-13/12 1 2 14 12 7 6 5 4 9 15a* 13 11 15b* 4 9 5 10b 8 6 7 3 16a 16b 10a 16* 17a* 17b* 18b 18a 19a 19b 21a 18* 19c 21* 22* 23* 19* 21b 24* 25* 20* 26* 27* CONSEILS
derivation of the Laplacian from rectangular to spherical coordinates
 derivation of the Laplacian from rectangular to spherical coordinates swapnizzle 03-03- :5:43 We begin by recognizing the familiar conversion from rectangular to spherical coordinates (note that φ is used
 60 61 62 63 64 65 Ο Δ Η Γ Ι Ε Σ Σ Υ Ν Τ Η Ρ Η Σ Η Σ Τ Ω Ν Κ Ο Υ Φ Ω Μ Α Τ Ω Ν Ι Ν S T R U C T I N O N S C O N C E R N I N G Τ Η Ε C A S E M E N T S M A I N T E N A N C E Ο τακτικός καθαρισμός των βαμμένων
PLUGIN BASIC TS (en) indication, that electrical appliance is switched on
 indication, that electrical appliance is switched on") PLUGIN BASIC TS (en) indication, that electrical appliance is switched on after pressing the ON button, will be the connected appliance permantely switched on. after pressing the button, will be the connected
PLUGIN BASIC TS (en) indication, that electrical appliance is switched on after pressing the ON button, will be the connected appliance permantely switched on. after pressing the button, will be the connected
the total number of electrons passing through the lamp.
 1. A 12 V 36 W lamp is lit to normal brightness using a 12 V car battery of negligible internal resistance. The lamp is switched on for one hour (3600 s). For the time of 1 hour, calculate (i) the energy
QC5015 A D E 1 2 3 4 F M H 5 6 7 1 B G 2 I 8 9 10 1 J K L 2 C 11 1 12 13 2 14 15 16 17 18
 QC5015 A D E 1 2 3 4 M F H 5 1 6 7 B G 2 I J K L 1 8 9 10 2 C 11 1 12 13 2 14 15 16 17 18 Deutsch Einführung Herzlichen Glückwunsch zu Ihrem Kauf und willkommen bei Philips! Um den Support von Philips
ΟΔΗΓΙΕΣ ΧΡΗΣΗΣ USE INSTRUCTIONS
 ΟΔΗΓΙΕΣ ΧΡΗΣΗΣ USE INSTRUCTIONS ΗΛΕΚΤΡΙΚΗ ΣΚΟΥΠΑ/ELECTRIC VACUUM CLEANER ΜΟΝΤΕΛΟ/MODEL: YL6228-S 220-240V~50/60HZ 700W ECO Παρακαλούμε διαβάστε προσεκτικά όλες τις οδηγίες χρήσης πριν την χρήση της συσκευής
3 Lösungen zu Kapitel 3
 3 Lösungen zu Kapitel 3 31 Lösungen der Aufgaben zu Abschnitt 31 311 Lösung Die Abbildung D : { R 4 R 4 R 4 R 4 R, a 1, a 2, a 3, a 4 ) D( a 1, a 2, a 3, a 4 ) definiere eine Determinantenform (auf R 4
ΑΚΑ ΗΜΙΑ ΕΜΠΟΡΙΚΟΥ ΝΑΥΤΙΚΟΥ ΜΑΚΕ ΟΝΙΑΣ ΣΧΟΛΗ ΜΗΧΑΝΙΚΩΝ ΠΤΥΧΙΑΚΗ ΕΡΓΑΣΙΑ ΘΕΜΑ : ΧΗΜΙΚΑ ΠΡΟΣΘΕΤΑ ΠΟΥ ΠΡΟΟΡΙΖΟΝΤΑΙ ΓΙΑ ΤΟ ΝΕΡΟ ΤΟΥ ΑΤΜΟΛΕΒΗΤΑ
 ΑΚΑ ΗΜΙΑ ΕΜΠΟΡΙΚΟΥ ΝΑΥΤΙΚΟΥ ΜΑΚΕ ΟΝΙΑΣ ΣΧΟΛΗ ΜΗΧΑΝΙΚΩΝ ΠΤΥΧΙΑΚΗ ΕΡΓΑΣΙΑ ΘΕΜΑ : ΧΗΜΙΚΑ ΠΡΟΣΘΕΤΑ ΠΟΥ ΠΡΟΟΡΙΖΟΝΤΑΙ ΓΙΑ ΤΟ ΝΕΡΟ ΤΟΥ ΑΤΜΟΛΕΒΗΤΑ ΣΠΟΥ ΑΣΤΗΣ : ΑΓΟΡΑΣΤΟΣ ΧΡΥΣΟΒΑΛΑΝΤΗΣ ΕΠΙΒΛΕΠΟΥΣΑ ΚΑΘΗΓΗΤΡΙΑ :
Deutsch. English. Ελληνικά
 Deutsch Wir freuen uns, dass Sie sich für den AEG UltraOne- Staubsauger entschieden haben. Diese Bedienungsanleitung gilt für alle UltraOne-Modelle. Das bedeutet, dass Ihr Modell bestimmte Zubehörteile
Approximation of distance between locations on earth given by latitude and longitude
 Approximation of distance between locations on earth given by latitude and longitude Jan Behrens 2012-12-31 In this paper we shall provide a method to approximate distances between two points on earth
CITRUS JUICER INSTRUCTIONS
 CITRUS JUICER INSTRUCTIONS Model No.: J85SS Safty warning Intended use The citrus juicer is suitable for extracting juice from citrus fruit(lemons,oranges etc).it is designed for juicing domestic portions
u Do not block the vents of the appliance. u Avoid inhaling dust when emptying the appliance or the dustbag. u Always empty the product outside.
 WBV1450 WBV1405P A 10 B C D E 2 F G 3 ENGLISH (Original instructions) Intended use Your Black & Decker vacuum cleaner has been designed for wet and dry vacuum cleaning purposes. This appliance is intended
Every set of first-order formulas is equivalent to an independent set
 Every set of first-order formulas is equivalent to an independent set May 6, 2008 Abstract A set of first-order formulas, whatever the cardinality of the set of symbols, is equivalent to an independent
TRIGONOMETRIA: ANGOLI ASSOCIATI
 FACOLTÀ DI INGEGNERIA CORSO DI AZZERAMENTO - MATEMATICA ANNO ACCADEMICO 010-011 ESERCIZI DI TRIGONOMETRIA: ANGOLI ASSOCIATI Esercizio 1: Fissata in un piano cartesiano ortogonale xoy una circonferenza
Operating-instruction Manual ΟΔΗΓΙΕΣ ΧΡΗΣΕΩΣ
 Operating-instruction Manual ΟΔΗΓΙΕΣ ΧΡΗΣΕΩΣ 16 3 SPEED PEDESTAL FAN 16 ΑΝΕΜΙΣΤΗΡΑΣ ΟΡΘΟΣΤΑΤΗΣ 3 ΤΑΧΥΤΗΤΩΝ PLEASE READ ALL INSTRUCTIONS CAREFULLYAND KEEP FOR FUTURE USE ΠΑΡΑΚΑΛΩ ΔΙΑΒΑΣΤΕ ΤΙΣ ΟΔΗΓΙΕΣ ΧΡΗΣΗΣ
Οδηγίες Χρήσης BWR5106
 Οδηγίες Χρήσης BWR5106 Περιγραφή εργαλείου Οι αντλίες χειρός είναι ένα εργαλείο με την ικανότητα, πιέζοντας τον λεβιέ πάνω κάτω να πρεσάρει γράσο σε μεγάλη πίεση και με την βοήθεια αυτής να γρασάρει οπού
Εγκατάσταση λογισμικού και αναβάθμιση συσκευής Device software installation and software upgrade
 Για να ελέγξετε το λογισμικό που έχει τώρα η συσκευή κάντε κλικ Menu > Options > Device > About Device Versions. Στο πιο κάτω παράδειγμα η συσκευή έχει έκδοση λογισμικού 6.0.0.546 με πλατφόρμα 6.6.0.207.
902979/02-42/12. Downloaded from www.vandenborre.be
 902979/02-42/12 10 13a 13c 13b 17 8 9 6b 13 7 13d 14 15 11 18a 18* 18b 16 6a 12* 11 14a 1b 14b 3* 2 4 9 1a 5 14a bis 20* 21* 22 24* 26* 25* 27* 23* 19 1 2 1 2 fig. 1 fig. 2 fig. 3a fig. 3b fig. 4 fig.
HOMEWORK 4 = G. In order to plot the stress versus the stretch we define a normalized stretch:
 HOMEWORK 4 Problem a For the fast loading case, we want to derive the relationship between P zz and λ z. We know that the nominal stress is expressed as: P zz = ψ λ z where λ z = λ λ z. Therefore, applying
Τεστ Κατάταξης 1 Grading Test 1
 HELLENIC CULTURE CENTRE - Education, Language and Culture www.hcc.edu.gr, e-mail: Ifigenia@hcc.edu.gr, Tel.: (+30) 210 5238149, Fax: (+30) 210 8836494 Τεστ Κατάταξης 1 Grading Test 1 Οδηγίες Πρέπει να
SPEEDO AQUABEAT. Specially Designed for Aquatic Athletes and Active People
 SPEEDO AQUABEAT TM Specially Designed for Aquatic Athletes and Active People 1 2 Decrease Volume Increase Volume Reset EarphonesUSBJack Power Off / Rewind Power On / Fast Forward Goggle clip LED Status
Finite Field Problems: Solutions
 Finite Field Problems: Solutions 1. Let f = x 2 +1 Z 11 [x] and let F = Z 11 [x]/(f), a field. Let Solution: F =11 2 = 121, so F = 121 1 = 120. The possible orders are the divisors of 120. Solution: The
EE512: Error Control Coding
 EE512: Error Control Coding Solution for Assignment on Finite Fields February 16, 2007 1. (a) Addition and Multiplication tables for GF (5) and GF (7) are shown in Tables 1 and 2. + 0 1 2 3 4 0 0 1 2 3
MATERIALIEN ZUR VORBEREITUNG AUF DIE KLAUSUR INFORMATIK II FÜR VERKEHRSINGENIEURWESEN ANTEIL VON PROF. VOGLER IM WINTERSEMESTER 2011/12
 Fakultät Informatik Institut für Angewandte Informatik, Professur Technische Informationssysteme MATERIALIEN ZUR VORBEREITUNG AUF DIE KLAUSUR INFORMATIK II FÜR VERKEHRSINGENIEURWESEN ANTEIL VON PROF. VOGLER
Quick Installation Guide
 A Installation 1 F H B E C D G 2 www.trust.com/17528/faq Quick Installation Guide C C D Freewave Wireless Audio Set 17528/ 17529 D Installation Configuration Windows XP 4 5 8 Windows 7/ Vista 6 7 9 10
Bedankt voor het downloaden van deze handleiding.
 Over Megakeuze Megakeuze is opgericht in 2010 en is een vergelijkingswebsite op het gebied van consumentenelektronica. Elk product is professioneel gereviewd en beschikt over vele specificaties en duidelijke
2 Composition. Invertible Mappings
 Arkansas Tech University MATH 4033: Elementary Modern Algebra Dr. Marcel B. Finan Composition. Invertible Mappings In this section we discuss two procedures for creating new mappings from old ones, namely,
Advanced Subsidiary Unit 1: Understanding and Written Response
 Write your name here Surname Other names Edexcel GE entre Number andidate Number Greek dvanced Subsidiary Unit 1: Understanding and Written Response Thursday 16 May 2013 Morning Time: 2 hours 45 minutes
Griechisches Staatszertifikat - Deutsch
 ΥΠΟΥΡΓΕΙΟ ΕΘΝΙΚΗΣ ΠΑΙ ΕΙΑΣ ΚΑΙ ΘΡΗΣΚΕΥΜΑΤΩΝ ΚΡΑΤΙΚΟ ΠΙΣΤΟΠΟΙΗΤΙΚΟ ΓΛΩΣΣΟΜΑΘΕΙΑΣ Griechisches Ministerium für Bildung und Religion Griechisches Staatszertifikat - Deutsch Niveau A1 & A2 Entspricht dem Gemeinsamen
RO54xx serie
 RO54xx serie www.rowenta.com 760280-13/12 1 2 14 12 7 6 5 4 9 15a* 13 11 15b* 4 9 5 10b 8 6 7 3 16a 16b 10a 16* 17a* 17b* 18b 18a 19a 19b 21a 18* 19c 21* 22* 23* 19* 21b 24* 25* 20* 26* 27* CONSEILS
ENGLISH 4 ITALIANO 8 ΕΛΛΗΝΙΚΑ 12
 3 2 7 6 5 4 1 ENGLISH 4 ITALIANO 8 ΕΛΛΗΝΙΚΑ 12 10 11 9 8 12 14 13 9 15 16 17 19 18 4 11 11 3 20 2 8 10 2 5 7 6 19 21 22 3 ENGLISH ENGLISH Intended use Your Black & Decker vacuum cleaner has been designed
[1] P Q. Fig. 3.1
![[1] P Q. Fig. 3.1](/thumbs/79/80362156.jpg "[1] P Q. Fig. 3.1") 1 (a) Define resistance....... [1] (b) The smallest conductor within a computer processing chip can be represented as a rectangular block that is one atom high, four atoms wide and twenty atoms long. One
1 (a) Define resistance....... [1] (b) The smallest conductor within a computer processing chip can be represented as a rectangular block that is one atom high, four atoms wide and twenty atoms long. One
Istruzioni per l uso Οδηγίες χρήσης ΑΤΜΟΣΥΣΤΗΜΑ
 Istruzioni per l uso Οδηγίες χρήσης Sistema stirante ΑΤΜΟΣΥΣΤΗΜΑ Indice - Περιεχόμενα IT Descrizione... 4 Descrizione... 4 Pannello comandi... 4 Ferro di tipo professionale... 4 Ferro di tipo domestico...
X815 X715. www.blackanddecker.co.uk
 www.blackanddecker.co.uk X815 X715 English 1. Spray button 2. Steam control dial 3. Steam burst button 4. Temperature control dial 5. Heating light 6. Heel rest 7. Self-clean button 8. Cord storage 9.
Steriliser Stérilisateur Sterilisator Απστειρωτής Ατμού Sterilizator
 Steriliser Stérilisateur Sterilisator Απστειρωτής Ατμού Sterilizator Bedienungsanleitung Instruction Manual Conseil d utilisation Gebruiksaanwijzing Οδηγίες χρήσης Navodilo za uporabo 1 3 1 2 Steriliser
UNIVERSITY OF CAMBRIDGE INTERNATIONAL EXAMINATIONS International General Certificate of Secondary Education
 www.xtremepapers.com UNIVERSITY OF CAMBRIDGE INTERNATIONAL EXAMINATIONS International General Certificate of Secondary Education *6301456813* GREEK 0543/03 Paper 3 Speaking Role Play Card One 1 March 30
Fragen, ob Gebühren anfallen, wenn man in einem bestimmten Land Geld abhebt
 - Allgemeines Μπορώ να κάνω ανάληψη στην [χώρα] χωρίς να πληρώσω προμήθεια; Kann ich in [Land] gebührenfrei Geld abheben? Fragen, ob Gebühren anfallen, wenn man in einem bestimmten Land Geld abhebt Πόσα
Session novembre 2009
 ΥΠΟΥΡΓΕΙΟ ΕΘΝΙΚΗΣ ΠΑΙΔΕΙΑΣ ΚΑΙ ΘΡΗΣΚΕΥΜΑΤΩΝ ΚΡΑΤΙΚΟ ΠΙΣΤΟΠΟΙΗΤΙΚΟ ΓΛΩΣΣΟΜΑΘΕΙΑΣ MINISTÈRE GREC DE L ÉDUCATION NATIONALE ET DES CULTES CERTIFICATION EN LANGUE FRANÇAISE NIVEAU ÉPREUVE B1 sur l échelle proposée
HQ6990, HQ6970, HQ6950, HQ6920 CHARGE
 HQ6990, HQ6970, HQ6950, HQ6920 1 2 3 4 5 6 7 CHARGE 8 9 10 2 1 11 2 12 13 1 14 15 16 1 2 17 18 19 2 20 21 22 1 ENGLISH Introduction Congratulations on your purchase and welcome to Philips! To fully benefit
C.S. 430 Assignment 6, Sample Solutions
 C.S. 430 Assignment 6, Sample Solutions Paul Liu November 15, 2007 Note that these are sample solutions only; in many cases there were many acceptable answers. 1 Reynolds Problem 10.1 1.1 Normal-order
FR EN DE NL IT ES PT EL AR ROWENTA X-TREM POWER. RO54xx series.
 FR EN DE NL IT ES PT EL AR ROWENTA X-TREM POWER RO54xx series www.rowenta.com 1 2 14 12 7 6 5 4 9 13 8 10b 15a* 11 15b* 4 9 5 6 7 3 16a 16b 10a 16* 17a* 17b* a 19a c b 20 21A* 19 21B* 19b 22* a 18 b 23*
Αποτελέσματα έρευνας σε συνδικαλιστές
 From law to practice-praxis Αποτελέσματα έρευνας σε συνδικαλιστές Το πρόγραμμα συγχρηματοδοτείται από την ΕΕ Συγχρηματοδοτείται από την Ευρωπαϊκή Ένωση Γνωρίζετε τι προβλέπει η Οδηγία 2002/14; Sa che cosa
UDZ Swirl diffuser. Product facts. Quick-selection. Swirl diffuser UDZ. Product code example:
 UDZ Swirl diffuser Swirl diffuser UDZ, which is intended for installation in a ventilation duct, can be used in premises with a large volume, for example factory premises, storage areas, superstores, halls,
ENGLISH 4 ITALIANO 8 ΕΛΛΗΝΙΚΑ 13
 3 2 7 6 5 4 1 ENGLISH 4 ITALIANO 8 ΕΛΛΗΝΙΚΑ 13 11 12 10 9 8 13 15 14 10 16 17 18 20 19 4 12 3 12 21 8 2 9 11 2 5 7 6 20 22 23 24 J 3 ENGLISH ENGLISH Intended use Your Black & Decker vacuum cleaner has
Εμπορική αλληλογραφία Ηλεκτρονική Αλληλογραφία
 - Εισαγωγή Sehr geehrter Herr Präsident, Sehr geehrter Herr Präsident, Εξαιρετικά επίσημη επιστολή, ο παραλήπτης έχει ένα ειδικό τίτλο ο οποίος πρέπει να χρησιμοποιηθεί αντί του ονόματος του Sehr geehrter
ΑΓΓΛΙΚΗ ΓΛΩΣΣΑ ΣΕ ΕΙΔΙΚΑ ΘΕΜΑΤΑ ΔΙΕΘΝΩΝ ΣΧΕΣΕΩΝ & ΟΙΚΟΝΟΜΙΑΣ
 ΑΓΓΛΙΚΗ ΓΛΩΣΣΑ ΣΕ ΕΙΔΙΚΑ ΘΕΜΑΤΑ ΔΙΕΘΝΩΝ ΣΧΕΣΕΩΝ & ΟΙΚΟΝΟΜΙΑΣ Ενότητα 1β: Principles of PS Ιφιγένεια Μαχίλη Τμήμα Οικονομικών Επιστημών Άδειες Χρήσης Το παρόν εκπαιδευτικό υλικό υπόκειται σε άδειες χρήσης
S.Barbarino - Esercizi svolti di Campi Elettromagnetici. Esercizi svolti di Antenne - Anno 2004 I V ...
 SBarbarino - Esercizi svolti di Campi Elettromagnetici Esercizi svolti di Antenne - Anno 004 04-1) Esercizio n 1 del 9/1/004 Si abbia un sistema di quattro dipoli hertziani inclinati, disposti uniformemente
ΓΙΑ ΠΕΡΙΣΣΟΤΕΡΕΣ ΠΛΗΡΟΦΟΡΙΕΣ: Οδηγίες Χρήσης / Instructions Manual Ελληνικά (GR) English (EN) Ηλ. Σκούπα Vacuum Cleaner 4lt K1 Dynamic Force
 English (EN) Ηλ. Σκούπα Vacuum Cleaner 4lt K1 Dynamic Force") ΓΙΑ ΠΕΡΙΣΣΟΤΕΡΕΣ ΠΛΗΡΟΦΟΡΙΕΣ: Χ. ΜΠΕΝΡΟΥΜΠΗ & ΥΙΟΣ Α.Ε. Αγ. Θωμά 27, 15124, Μαρούσι-Αθήνα Τηλ. 210 6156400, Fax: 210 6199316 e-mail: benrubi-sda@benrubi.gr FOR FURTHER INFORMATION: H. BENRUBI & FILS S.A.
ΓΙΑ ΠΕΡΙΣΣΟΤΕΡΕΣ ΠΛΗΡΟΦΟΡΙΕΣ: Χ. ΜΠΕΝΡΟΥΜΠΗ & ΥΙΟΣ Α.Ε. Αγ. Θωμά 27, 15124, Μαρούσι-Αθήνα Τηλ. 210 6156400, Fax: 210 6199316 e-mail: benrubi-sda@benrubi.gr FOR FURTHER INFORMATION: H. BENRUBI & FILS S.A.
Μετανάστευση Στέγαση. Στέγαση - Ενοικίαση. Θα ήθελα να ενοικιάσω ένα. Για να δηλώσετε ότι θέλετε να ενοικιάσετε κάτι.
 - Ενοικίαση γαλλικά Je voudrais louer. Για να δηλώσετε ότι θέλετε να ενοικιάσετε κάτι une chambre un appartement un studio une maison individuelle une maison jumelée une maison mitoyenne Combien coûte
ΠΑΝΕΠΙΣΤΗΜΙΟ ΠΑΤΡΩΝ ΤΜΗΜΑ ΗΛΕΚΤΡΟΛΟΓΩΝ ΜΗΧΑΝΙΚΩΝ ΚΑΙ ΤΕΧΝΟΛΟΓΙΑΣ ΥΠΟΛΟΓΙΣΤΩΝ ΤΟΜΕΑΣ ΣΥΣΤΗΜΑΤΩΝ ΗΛΕΚΤΡΙΚΗΣ ΕΝΕΡΓΕΙΑΣ
 ΠΑΝΕΠΙΣΤΗΜΙΟ ΠΑΤΡΩΝ ΤΜΗΜΑ ΗΛΕΚΤΡΟΛΟΓΩΝ ΜΗΧΑΝΙΚΩΝ ΚΑΙ ΤΕΧΝΟΛΟΓΙΑΣ ΥΠΟΛΟΓΙΣΤΩΝ ΤΟΜΕΑΣ ΣΥΣΤΗΜΑΤΩΝ ΗΛΕΚΤΡΙΚΗΣ ΕΝΕΡΓΕΙΑΣ ιπλωµατική Εργασία του φοιτητή του τµήµατος Ηλεκτρολόγων Μηχανικών και Τεχνολογίας Ηλεκτρονικών
The Simply Typed Lambda Calculus
 Type Inference Instead of writing type annotations, can we use an algorithm to infer what the type annotations should be? That depends on the type system. For simple type systems the answer is yes, and
ΓΙΑ ΠΕΡΙΣΣΟΤΕΡΕΣ ΠΛΗΡΟΦΟΡΙΕΣ: Οδηγίες Χρήσης / Instructions Manual Ελληνικά (GR) English (EN) Ηλ. Σκούπα Vacuum Cleaner Compact Power EV-100
 English (EN) Ηλ. Σκούπα Vacuum Cleaner Compact Power EV-100") ΓΙΑ ΠΕΡΙΣΣΟΤΕΡΕΣ ΠΛΗΡΟΦΟΡΙΕΣ: Χ. ΜΠΕΝΡΟΥΜΠΗ & ΥΙΟΣ Α.Ε. Αγ. Θωμά 27, 15124, Μαρούσι-Αθήνα Τηλ. 210 6156400, Fax: 210 6199316 e-mail: benrubi-sda@benrubi.gr FOR FURTHER INFORMATION: H. BENRUBI & FILS S.A.
ΓΙΑ ΠΕΡΙΣΣΟΤΕΡΕΣ ΠΛΗΡΟΦΟΡΙΕΣ: Χ. ΜΠΕΝΡΟΥΜΠΗ & ΥΙΟΣ Α.Ε. Αγ. Θωμά 27, 15124, Μαρούσι-Αθήνα Τηλ. 210 6156400, Fax: 210 6199316 e-mail: benrubi-sda@benrubi.gr FOR FURTHER INFORMATION: H. BENRUBI & FILS S.A.
Modbus basic setup notes for IO-Link AL1xxx Master Block
 n Modbus has four tables/registers where data is stored along with their associated addresses. We will be using the holding registers from address 40001 to 49999 that are R/W 16 bit/word. Two tables that
AMENDMENTS XM United in diversity XM. European Parliament Draft opinion Giovanni La Via (PE v01-00)
") European Parliament 2014-2019 Committee on the Environment, Public Health and Food Safety 14.12.2016 2016/2166(DEC) AMENDMENTS 1-11 Giovanni La Via (PE592.294v01-00) Discharge 2015: European Environment
European Parliament 2014-2019 Committee on the Environment, Public Health and Food Safety 14.12.2016 2016/2166(DEC) AMENDMENTS 1-11 Giovanni La Via (PE592.294v01-00) Discharge 2015: European Environment
«ΨΥΧΙΚΗ ΥΓΕΙΑ ΚΑΙ ΣΕΞΟΥΑΛΙΚΗ» ΠΑΝΕΥΡΩΠΑΪΚΗ ΕΡΕΥΝΑ ΤΗΣ GAMIAN- EUROPE
 «ΨΥΧΙΚΗ ΥΓΕΙΑ ΚΑΙ ΣΕΞΟΥΑΛΙΚΗ» ΠΑΝΕΥΡΩΠΑΪΚΗ ΕΡΕΥΝΑ ΤΗΣ GAMIAN- EUROPE We would like to invite you to participate in GAMIAN- Europe research project. You should only participate if you want to and choosing
Η ΕΝΕΡΓΕΙΑΚΗ ΣΗΜΑΝΣΗ ΚΑΙ ERP
 Η ΕΝΕΡΓΕΙΑΚΗ ΣΗΜΑΝΣΗ ΚΑΙ ERP 2 1 ΠΛΑΙΣΙΟ ΓΙΑΤΙ ΕΝΕΡΓΕΙΑΚΗ ΣΗΜΑΝΣΗ ΚΑΙ ErP? Αντιμετωπίζοντας την κλιματική αλλαγή, διασφαλίζοντας την ασφάλεια της παροχής ενέργειας2 και την αύξηση της ανταγωνιστικότητα
ΚΥΠΡΙΑΚΗ ΕΤΑΙΡΕΙΑ ΠΛΗΡΟΦΟΡΙΚΗΣ CYPRUS COMPUTER SOCIETY ΠΑΓΚΥΠΡΙΟΣ ΜΑΘΗΤΙΚΟΣ ΔΙΑΓΩΝΙΣΜΟΣ ΠΛΗΡΟΦΟΡΙΚΗΣ 6/5/2006
 Οδηγίες: Να απαντηθούν όλες οι ερωτήσεις. Ολοι οι αριθμοί που αναφέρονται σε όλα τα ερωτήματα είναι μικρότεροι το 1000 εκτός αν ορίζεται διαφορετικά στη διατύπωση του προβλήματος. Διάρκεια: 3,5 ώρες Καλή
Hauptseminar Mathematische Logik Pcf Theorie (S2A2) Das Galvin-Hajnal Theorem
 Das Galvin-Hajnal Theorem") Hauptseminar Mathematische Logik Pcf Theorie (S2A2) Das Galvin-Hajnal Theorem Jonas Fiege 21 Juli 2009 1 Theorem 1 (Galvin-Hajnal [1975]) Sei ℵ α eine singuläre, starke Limes-Kardinalzahl mit überabzählbarer
Hauptseminar Mathematische Logik Pcf Theorie (S2A2) Das Galvin-Hajnal Theorem Jonas Fiege 21 Juli 2009 1 Theorem 1 (Galvin-Hajnal [1975]) Sei ℵ α eine singuläre, starke Limes-Kardinalzahl mit überabzählbarer
SFH-41 Fan Heater Αερόθερμο
 SFH-41 Fan Heater Αερόθερμο GB GR INSTRUCTION MANUAL ΒΙΒΛΙΟ ΟΔΗΓΙΩΝ GB ENGLISH... 3 GR EΛΛHNIKA... 7 ENGLISH PLEASE READ THESE INSTRUCTIONS CAREFULLY AND RETAIN FOR FUTURE REFER- ENCE SAFETY WARNINGS When
OUR PRODUCT RANGE. www.rakson.gr
 ΤΑ ΑΛΛΑ ΕΙ Η ΠΡΟΪΟΝΤΑ ΜΑΣ ΜΕΤΑΣΧΗΜΑΤΙΣΤΕΣ ΚΟΥ ΟΥΝΙΩΝ ΚΟΥ ΟΥΝΙΑ ΜΠΟΥΤΟΝ ΚΟΥ ΟΥΝΙΩΝ ΑΥΤΟΜΑΤΟΙ ΚΛΙΜΑΚΟΣΤΑΣΙΟΥ ΚΛΕΙ ΑΡΙΕΣ ΑΝΙΧΝΕΥΤΕΣ ΚΙΝΗΣΗΣ ΣΥΣΤΗΜΑΤΑ ΕΠΙΚΟΙΝΩΝΙΑΣ Θυροτηλεοράσεις Θυροτηλέφωνα Ενδοεπικοινωνίες
(REV:01) RYOBI 48 Volt Lawn Mower Model No. RY14110 Replacement Parts List
 RYOBI 48 Volt Lawn Mower Model No. RY14110 Replacement Parts List") 9800-86 2-0-0 (REV:0) RYOBI 48 Volt Lawn Mower Model No. RY0 Replacement Parts List RYOBI RY0 48 volt lawn mower 3 38 39 44 39 36 34 36 42 38 39 3 4 37 34 3 43 2 32 0 8 9 2 4 33 8 7 6 3 6 7 22 8 20 3 30
9800-86 2-0-0 (REV:0) RYOBI 48 Volt Lawn Mower Model No. RY0 Replacement Parts List RYOBI RY0 48 volt lawn mower 3 38 39 44 39 36 34 36 42 38 39 3 4 37 34 3 43 2 32 0 8 9 2 4 33 8 7 6 3 6 7 22 8 20 3 30
Οδηγίες Χρήσης / Instructions Manual Ελληνικά (GR) English (EN) Ηλ. Σκούπα Vacuum Cleaner AC-1108
 English (EN) Ηλ. Σκούπα Vacuum Cleaner AC-1108") ΓΙΑ ΠΕΡΙΣΣΟΤΕΡΕΣ ΠΛΗΡΟΦΟΡΙΕΣ: FOR FURTHER INFORMATION: Χ. ΜΠΕΝΡΟΥΜΠΗ & ΥΙΟΣ Α.Ε. H. BENRUBI & FILS S.A. Αγ. Θωμά 27, 15124, Μαρούσι-Αθήνα 27 Aghiou Thoma str. GR 15124, Maroussi-Athens Τηλ. 210 6156400,
ΓΙΑ ΠΕΡΙΣΣΟΤΕΡΕΣ ΠΛΗΡΟΦΟΡΙΕΣ: FOR FURTHER INFORMATION: Χ. ΜΠΕΝΡΟΥΜΠΗ & ΥΙΟΣ Α.Ε. H. BENRUBI & FILS S.A. Αγ. Θωμά 27, 15124, Μαρούσι-Αθήνα 27 Aghiou Thoma str. GR 15124, Maroussi-Athens Τηλ. 210 6156400,
VENERE. GR. Οδηγός Χρήσης EN. User Guide
 GR. Οδηγός Χρήσης EN. User Guide ΣΗΜΑΝΤΙΚΟ! ΚΡΑΤΗΣΤΕ ΓΙΑ ΜΕΛΛΟΝΤΙΚΗ ΑΝΑΦΟΡΑ: ΔΙΑΒΑΣΤΕ ΠΡΟΣΕΚΤΙΚΑ Κίνδυνος από φωτιά και άλλες πηγές έντονης θερμότητας, όπως ηλεκτρικές αντιστάσεις, υγραέριο, φωτιά κλπ,